Last Updated: April 17, 2026
Install or upgrade DXL Broker
Determine which type of installation you need to perform: a first time installation in a new environment, or an upgrade to a newer version of Trellix® Data Exchange Layer.
Each type of installation includes a workflow of steps that must be completed in a specific order.
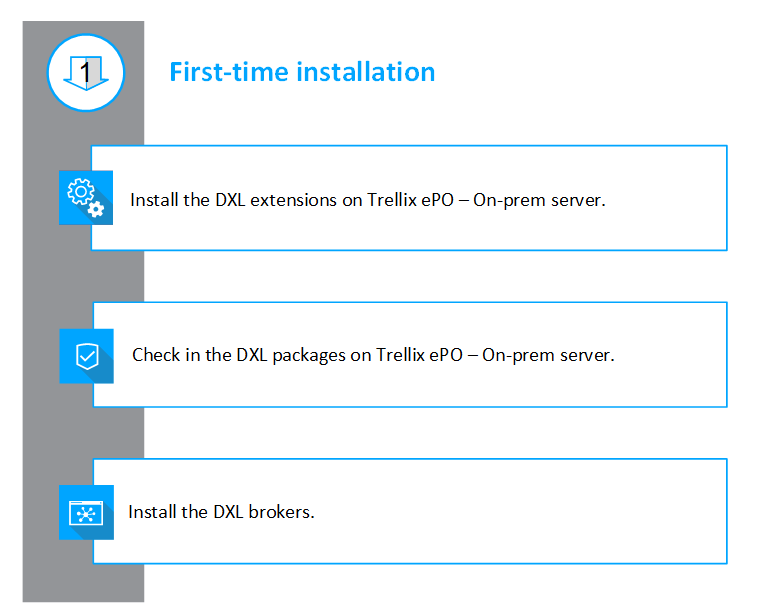
First-time installation workflow
DXL is installed as a ePO - On-prem extension. It includes the ePO - On-prem server files and DXL brokers.
When installing for the first time, you must install components in order shown below.
Upgrade installation workflow
To upgrade an existing installation, you install a new version of the ePO - On-prem extension, server files, and DXL brokers.
Install upgrades to the DXL components in this order:
Upgrade
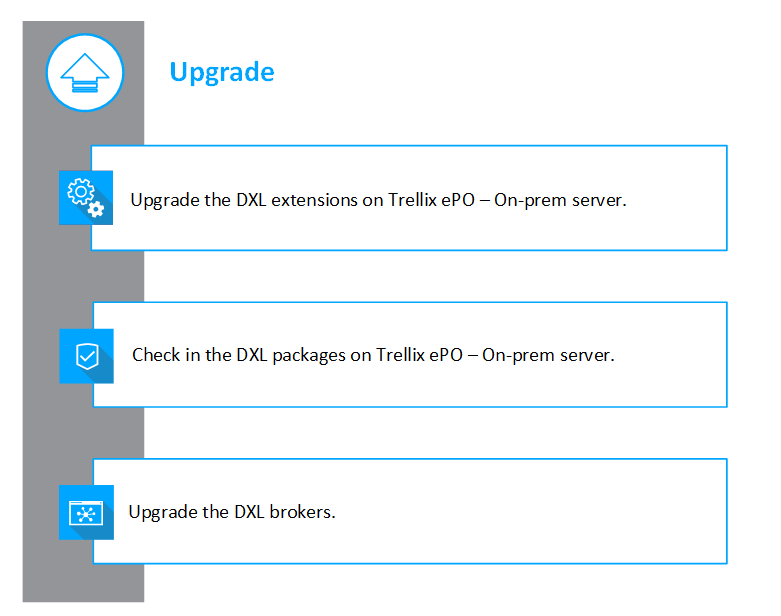
Upgrade the DXL extensions on Trellix ePO – On-prem server.
Check in the DXL packages on Trellix ePO – On-prem server.
Upgrade the DXL brokers.
Things to consider before installing DXL
Before installing DXL, consider the size, the number of locations, and the unique needs of your environment. The number of brokers you install depends on the number of managed endpoints and the geographical locations of those endpoints. The DXL client is automatically installed with Trellix® Agent on each managed endpoint.
At the center of DXL is the DXL broker fabric, or framework. This is the backbone that enables the communication of events and tasks throughout your environment. Each DXL client installed on a managed endpoint connects to a DXL broker, and brokers form the fabric that sends and receives information.
Broker installation example
Consider these questions to ask when planning a DXL installation and determining the number of brokers to install.
How many systems do you manage?
The number of systems you manage determines the number of DXL brokers to install. As a rule, you need one broker per 50,000 managed endpoints, however, it's best to have at least 2 brokers so that you have a primary and a failover broker in the event the primary broker is unavailable.
How many ePO - On-prem servers are in your environment?
If you have multiple ePO - On-prem servers or multiple data centers, two additional brokers are required to make a Root Hub, a hub that provides a communication link between all regions. These Root Hub brokers don't accept DXL client connections and aren't counted in the overall broker scaling for the number of managed endpoints.
Do you have multiple networks?
Are your systems on a single network, or do you have different geographical locations on different networks?
Do you have a DMZ?
If you have managed endpoints that are in a DMZ, you need a broker inside the DMZ that can communicate with the DXL fabric.
Question | Answer |
|---|---|
How many ePO - On-prem servers? | 2 |
How many managed endpoints? | 10,000 endpoints per server |
How many data centers or regions? | 1 region with 2 data centers |
Question | Answer |
|---|---|
Do clients outside the network need access (broker in a DMZ)? | Yes |
Number of brokers to install
Based on the answers to the questions, the number of brokers needed is:
One broker for the first ePO - On-prem server to support its 10,000 managed endpoints.
One broker for the second ePO - On-prem server to support its 10,000 managed endpoints.
Two brokers for a Root Hub to connect the two ePO - On-prem servers. The brokers in this hub can be managed in either data center. The Root Hub doesn't service any clients and only exists for communication between the two data centers, or provides failover if a service is temporarily unavailable.
One broker for inside the DMZ that communicates outside of the DMZ.
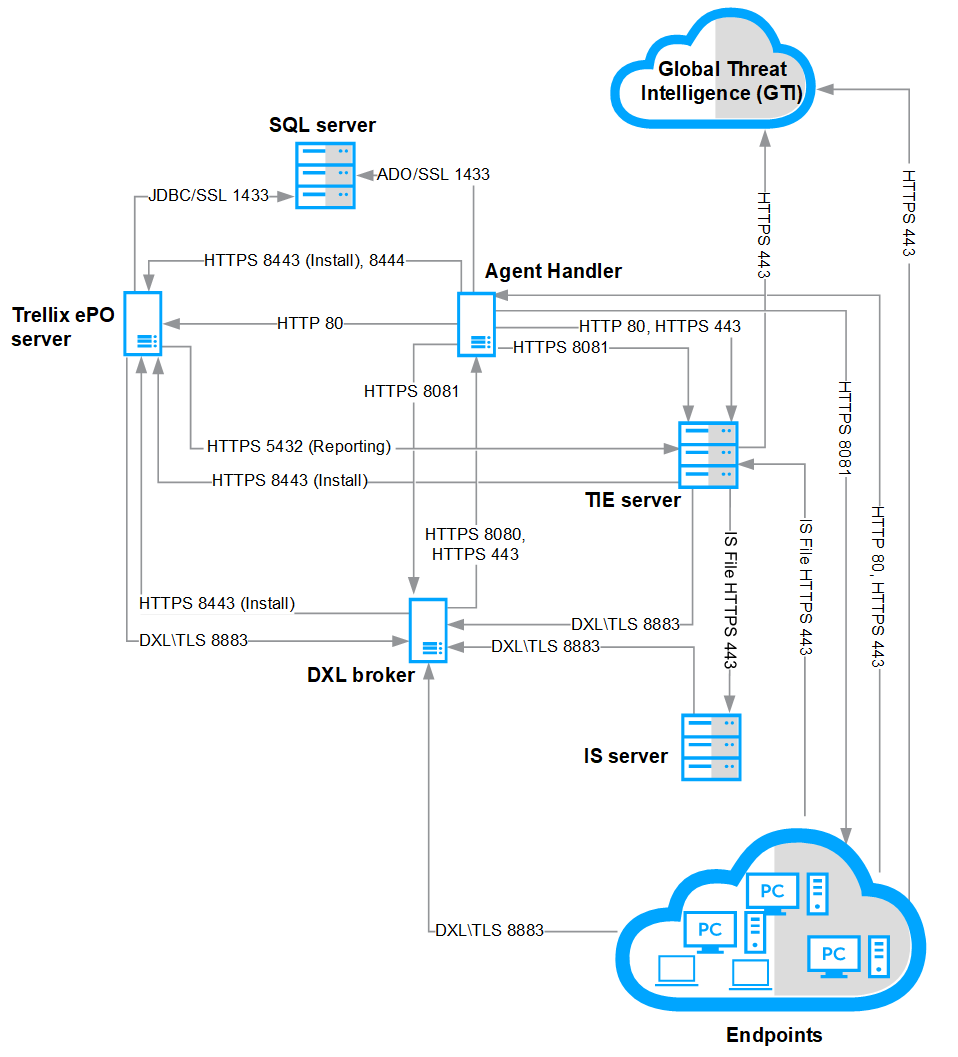
Trellix DXL protocols and ports
The Trellix DXL framework uses network protocols and ports for communication between the Trellix DXL clients and brokers throughout your environment.
Make sure these ports are open and available for use with DXL. Port 8883 is used by default, but you can assign a different port for use with DXL.
Required software and versions
Make sure that your system environment meets all requirements and that you have administrator rights.
DXL broker requirements
Product | Minimum version | Installed on |
|---|---|---|
VMware vSphere for use with MLOS brokers | ESXi 5.1 | Virtual system |
ePO - On-prem |
| Virtual system or a physical system |
Trellix® Agent Extension |
| ePO - On-prem systems with brokers installed running CentOS, Red Hat, and Microsoft Windows |
Trellix Agent |
| Each of the endpoints that you want to manage that are running CentOS, Red Hat, and Microsoft Windows |
DXL operating system requirements
For a list of supported operating systems, see KB90421.
Hypervisor support for DXL
You can install DXL on a hypervisor virtual machine. See KB90421 for a complete list of supported hypervisor software.
Standalone DXL broker requirements
Linux | Microsoft Windows | |
|---|---|---|
Recommended requirements | ||
Processor | 4 cores | 4 cores |
Memory | 8 GB | 12 GB |
Disk space | 25 GB | 20 GB |
Minimum requirements | ||
Processor | 2 cores | 2 cores |
Memory | 4 GB | 8 GB |
Disk space | 20 GB | 20 GB |
Install DXL 6.1.x using ePO - On-prem
Installing DXL extensions and DXL brokers on the ePO - On-prem server enables the communication throughout your environment.
Determine the number of DXL brokers you need.
Review and make sure the ports are available for use with DXL.
Make sure that your system environment meets all requirements.
Download the DXL software from the Software Catalog or Trellix Products website.
Install the DXL extensions on the ePO - On-prem server.
Go to Menu → Software → Extensions and click Install Extension
Install the extensions in this order:
DXL Broker Management
DXL Client
DXL Client Management
Cisco pxGrid extension (if used)
Check in DXL packages to the ePO - On-prem Main Repository.
On the ePO - On-prem console, select Menu → Software → Main Repository.
Check in these DXL packages:
DXL Broker
DXL Platform, only if you are installing the DXL broker using an .iso or .ova file. If you are installing a broker on a Microsoft Windows Server system, or on a system running a supported operating system in Amazon Web Services (AWS), you do not have to check in the DXL Platform package.
Click Next.

Important
Before checking in the DXL Platform, the ePO - On-prem product package upload limit must be increased. See KB90036 for details.
d. Under Branch, select Current to check in the packages, then click Save.
4. Install the DXL broker software on:
Microsoft Windows
Linux
Virtual appliances using .iso or .ova file
systems running on AWS
Verify the DXL installation.
Install DXL broker software
Brokers are installed on virtual appliances or physical systems to send and receive messages between security products that are integrated with the DXL. The network of brokers tracks active clients and dynamically adjusts the message routing as needed.
Brokers can be installed on the same system as the ePO - On-prem Server, SuperAgents, or Agent Handlers. Use one of these broker components to install DXL brokers:
DXL broker package — Used to install on a Linux system, a Microsoft Windows Server system, or on a system running a supported operating system in Amazon Web Services (AWS)
.ova — Used to install on a VMware vSphere appliance
.iso — Used to install on virtual appliances (including VMware vSphere) or on a physical system
Deploying brokers only on systems with specific operating systems
In ePO - On-prem 5.x and Trellix Agent 5.x and later, when deploying a broker using a Product Deployment task, the deployment task does not consider the Target platform (operating system) option on the Product Deployment page. The brokers are installed on all supported systems, regardless of the operating system selection. This occurs on Microsoft Windows systems and Linux systems. There are two workarounds you can use to ensure the brokers are installed only on those systems you want. See KB91361 for details.
Install DXL brokers on Microsoft Windows Server
DXL brokers can be installed on Microsoft Windows Server system using the product deployment task.
In ePO - On-prem, select Menu → Software → Product Deployment, then click New Deployment.
On the New Deployment page:
Enter a name for the deployment.
Select Data Exchange Layer Broker from the Package drop-down list.
Select the endpoints to deploy to.
Configure any other settings, then click Save at the top of the page.
The Product Deployment page opens with your new project added to the list of deployments. Also, a client task is automatically created with the deployment settings.
Navigate to System Tree and select the DXL broker system.
Go to Properties → Wake up Agents and select Force complete policy and task update. It might take a few minutes for the broker properties to be sent to ePO.
Install DXL brokers on a Linux system
You can install the DXL brokers on a managed Linux system using a ePO - On-prem deployment task.
In ePO - On-prem, select Menu → Software → Product Deployment, then click New Deployment.
Complete the new deployment information, then start the deployment.
When the deployment task finishes, configure the broker.
To use a communication port other than the default 8883, update the DXL broker configuration file /opt/McAfee/dxlbroker/conf/dxlbroker.conf. Change the listenPort setting.
# The broker listen port listenPort=port numberUpdate the firewall to allow communication on the broker port with the commands for your platform (replace <listenPort> with the correct port).
Red Hat Enterprise Linux 6.x / CentOS 6.x
iptables -N DXLBROKER iptables -I INPUT -j DXLBROKER iptables -A DXLBROKER -p tcp -m tcp --dport <listenPort> -j ACCEPT service iptables save ip6tables -N DXLBROKER ip6tables -I INPUT -j DXLBROKER ip6tables -A DXLBROKER -p tcp -m tcp --dport <listenPort> -j ACCEPT service ip6tables saveRed Hat Enterprise Linux 7.x / CentOS 7.x
firewall-cmd --zone=public --permanent --add-port=<listenPort>/tcp
firewall-cmd --reloadc. Restart the DXL Broker service.
$> service dxlbroker restart(Optional) For troubleshooting, use the log files for installing and deploying brokers on a Linux system.
/var/log/dxlbroker <version_number> <build_number>.log
/var/log/dxlbroker-uninstall.log
In the ePO - On-prem System Tree, select the broker system and click Wake Up Agents, select Force complete policy and task update, then click OK. It might take a few minutes for the broker properties to be sent to ePO.
Install DXL 6.0.3 or later Broker appliance
You can install DXL brokers appliance on supported hypervisors using the .ova file and .iso file.
Based on your preference, download one of these files from the Software Catalog:
Broker ISO
Broker OVA
Review the supported hypervisors for the DXL broker (KB90421).
Extract the downloaded .iso or .ova .zip file.
Browse to select the DXL .ova or .iso file.
If you're using the .iso file, you can allow the automatic installation of DXL platform. Turn on the system once it is complete.
Install and configure the DXL broker appliance.
Read and accept the license agreement.
Create a root password for the appliance (minimum 8 characters and should not be a dictionary word).
Specify the operational account name and real name, and enter Submit.
Specify the Password for operational account name (minimum 8 characters and should not be a dictionary word) and enter Submit.
The account name is typically something like jsmith and is used to log on to and administer the appliance. The real name is your full name, for example, John Smith.
e. On the Network Selection page, enter ok.
For the version 6.1.2 or later, on the Network Setup page, select the IP version that matches your network environment.
IPv4
IPv6
Both IPv4 and IPv6
f. Select a configuration type, then enter Submit to continue.
DHCP - Selecting DHCP auto-assigns the IP address
Manual IP address — enter the information.
g. Enter the host name and domain name of the computer where you are installing the appliance, then enter Submit.
h. Enter up to 3 Network Time Protocol servers to synchronize the time of the appliance, then enter Submit.
Use the default server listed, or enter the address.
i. Enter the IP address or fully qualified domain name, port, and account information for your ePO - On-prem server, then enter Submit.
Note
The Trellix ePO user account must have administrator rights.
j. In a web browser, navigate to ePO - On-prem and verify that the ePO - On-prem server certificate's Common Name (CN) and fingerprint match the information shown.
Verifying certificates depends on your browser. For most browsers, click the Lock icon in the address bar to view certificate details.
k. Specify the port that DXL Broker uses, then enter Submit.
Use the default port or enter a port number within the range shown.
l. DXL broker reboots automatically. You can close the logon screen when it appears.
Log on to ePO - On-prem as an administrator and verify that a DXL broker is listed in the System Tree.
Click Wake Up Agents, select Force complete policy and task update, then click OK. It might take a few minutes for the broker properties to be sent to the appliance.
Install DXL brokers on a system running in AWS
DXL brokers can be installed on a system that is using any of the supported operating systems running in Amazon Web Services (AWS).
You must establish and maintain a VPN connection between the on-premise infrastructure for the DXL client and the AWS infrastructure for the DXL brokers. This VPN connection must be established full time to maintain connectivity between the brokers and the clients.
See the installation instructions for the specific operating system that you're using in AWS for details about installing brokers on that system.
Verify the DXL installation
After you install and deploy the DXL broker, verify that the installation was successful and that the brokers are connected to the DXL clients on the managed endpoints.
On the System Tree main page, verify that the broker is listed and tagged as DXLBROKER.
If it isn't tagged as DXLBROKER, run the Manage DXL Brokers server task.
In the System Tree, select the DXL broker name, then click the Products tab to verify that the DXL broker and version are listed.
If the DXL broker and version aren't listed, click Wake Up Agents, select Force complete policy and task update, then click OK. It might take a few minutes for the broker properties to be sent to the appliance.
When the installation is successful, the installed brokers are tagged as DXLBROKER and the correct DXL version is displayed in the Products tab. When you click the Trellix shield icon in the Windows taskbar, the Trellix Data Exchange Layer heading displays the broker connection status, and the broker name, address, and port number that the DXL client is connected to.
Install DXL broker (local) on endpoints using ePO - SaaS
You can deploy the DXL local broker on endpoints using ePO - SaaS to allow DXL traffic on your local network. The Advanced Product Deployment page enables you to deploy DXL local broker to endpoints.
Select Menu → Software → Product Deployment, then click Advanced Product Deployment link under Advanced Options.
In the Advanced Product Deployment page, click New Deployment.
Complete the new deployment information, then start the deployment. For more information, see ePO - SaaS Product Guide.
Configure DXL local broker
You can configure DXL local broker on a DXL broker using a local configuration file.
On the DXL local broker, create the brokerstate.policy file.
On Windows — C:\ProgramData\McAfee\dxlbroker\policy\brokerstate.policy
On Linux — /var/McAfee/dxlbroker/policy/brokerstate.policy
Populate the file with the DXL broker state configuration JSON.
Note
For bridging to work properly, an identical copy of this policy file must exist on each broker.
The following is a sample brokerstate.policy containing a fabric having a root hub (rootHub) with broker1 and broker2. A third broker (broker3) is a direct spoke off of the root hub.
{
"hubs": [
{
"id": "rootHub",
"primaryBroker": "broker1",
"secondaryBroker": "broker2",
"name": "Root Hub"
}
],
"brokers": [
{
"id": "broker1",
"hostname": "broker1",
"port": "8883",
"altHostname": "192.168.1.1"
},
{
"id": "broker2",{
"hostname": "broker2",
"port": "8883",
"altHostname": "192.168.1.2"
},
{
"id": "broker3",
"hostname": "broker3",
"port": "8883",
"altHostname": "192.168.1.3",
"parentId": "rootHub"
}
]
}Hub Fields:
id = Unique identifier of a hub.
parentId = (optional) The identifier of the hub or broker to connect (bridge) to. If blank, the hub will not initiate an outgoing bridge connection (only incoming bridge connections are possible).
primaryBroker = (optional) The identifier of a broker that is a member of this hub.
secondaryBroker = (optional) The identifier of a broker that is a member of this hub.
serviceZone = (optional) The service zone name established at this hub. If blank, a service zone will not be established.
Broker Fields:
id = The identifier associated with the broker. This must match the broker identifier (brokerId) in the dxlbroker.conf.defaults file for the corresponding broker.
parentId = (optional) The identifier of the hub or broker for this broker to connect (bridge) to. If blank, the broker will not initiate an outgoing bridge connection (only incoming bridge connections are possible).
hostname = The hostname or IP address of the broker.
Port = The port number of the broker.
altHostname = (optional) An alternate host name or IP address of the broker.
serviceZone = (optional) The name of the service zone that is established at this broker. If not specified, a service zone will not be established at this broker.
3. Restart the DXL local broker service.
Connect DXL client with DXL local broker
You can configure DXL client using policy to connect it with the DXL local broker. DXL client maintains local DXL connection and a DXL connection with the ePO - SaaS DXL fabric.
Log on to ePO - SaaS as an administrator.
Select Menu → Policy → Policy Catalog.
From the Products list, select Trellix DXL Client.
Select a policy and click Edit.
In Broker Connection, select a broker you want to connect with DXL client.

Note
Broker is available on the list only when you deploy it correctly.
Edit the Published Name when you need a different hostname or IP address.
Upgrading to a new software version
Install DXL upgrades when they are available to get the latest features, enhancements, and security protection.
Before upgrading Trellix DXL, if using a Hypervisor virtual machine, create a snapshot of your virtual machine. If using a Linux system, back up your system.
Important
The C:\ProgramData\Package Cache\ folder and files, where the WiX installer stores its bundle and other data, must not be removed from systems running DXL. When upgrading DXL, this bundle is used to uninstall the previous version of DXL as part of the upgrade process. If the bundle isn't there, DXL upgrades will fail. Ensure that system users, administrators, or disk cleanup utilities are not deleting files in this folder to free up disk space.
The tasks for updating DXL are:
Download the DXL software.
Upgrade the DXL extensions on the ePO - On‑prem server.
Check in the DXL packages.
Upgrade the DXL broker software.
Verify the upgrade.
Upgrade the DXL extensions in ePO - On-prem
Install the Trellix DXL extension upgrades on the ePO - On‑prem server.
Make sure that you've downloaded the latest DXL software extension.
The DXL extension version must be the same or newer than the DXL broker version. You can't install an older extension version with a newer broker version.
Select Menu → Software → Extensions.
Click Install Extension and install the extensions in this order:
DXL Broker Management
DXL Client
DXL Client Management
Cisco pxGrid extension (if used)
Upgrading DXL Broker
Based on where you have installed DXL broker, select a method to upgrade your DXL broker.
Where the DXL broker is installed | Upgrade from version | Upgrade to version | Follow these instructions |
|---|---|---|---|
On Managed systems | Any previous version | Latest version | Upgrade DXL brokers on managed systems using Product Deployment task |
On DXL Broker appliances | 5.x.x | 6.0.0 | Upgrade DXL broker appliance using Product Deployment task |
5.x.x | 6.0.3 or later | Upgrade DXL broker by transitioning to a new server | |
6.0.0 | 6.0.3 or later | Upgrade DXL brokers using Product Deployment task | |
6.0.3 or later | Latest version | Upgrade DXL brokers using Product Deployment task | |
On TIE appliances | 5.x.x | 6.0.0 | Upgrade DXL Broker on TIE appliance using Product Deployment task |
5.x.x | 6.0.3 or later | Upgrade DXL broker by upgrading TIE appliance | |
6.0.0 | 6.0.3 or later | Upgrade DXL Broker on TIE appliance using Product Deployment task | |
6.0.3 or later | Latest version | Upgrade DXL Broker on TIE appliance using Product Deployment task |
Upgrade DXL brokers on managed systems using Product Deployment task
You can upgrade DXL brokers that are installed on CentOS, Red Hat, or on Microsoft Windows systems managed by ePO - On-prem.
Make sure that you have checked-in the latest DXL packages to the Main Repository on the ePO - On-prem server.
Tip
In ePO - On‑prem 5.10.0 and Trellix Agent 5.6.0 and later, when deploying a broker using a Product Deployment task, the deployment task does not consider the Target platform (operating system) option on the Product Deployment page. The brokers are installed on all supported systems, regardless of the operating system selection. There are two workarounds you can use to make sure the brokers are installed only on those systems you want. See KB91361 for details.

ePO - On-prem, select Menu → Software → Product Deployment.
Select New Deployment.
Select the Data Exchange Layer Broker package and specify the other details.
Save the task.
The deployment task is created to install DXL broker.
Navigate to System Tree and select the DXL broker system.
Go to Properties → Wake up Agents and select Force complete policy and task update. It might take a few minutes for the broker properties to be sent to the ePO.
For any issues during the installation, see Troubleshooting.
Upgrade DXL appliance using Product Deployment task
Follow these steps to upgrade the DXL brokers that are installed on appliances using .iso or .ova.
Check whether the DXL broker is installed using DXL Broker standalone ISO or ova.
In ePO console, navigate to Menu → System Tree.
Select a DXL broker system that you want to upgrade and go to System Properties tab.
Check the OS OEM Identifier field. If it displays DXL Platform, the DXL broker was installed using ISO/OVA of DXL broker.
Make sure that you have checked-in the latest DXL packages to the Main Repository on the ePO - On-prem server.
🔆 Tip
In ePO - On-prem 5.10.0 and Trellix Agent 5.6.0 and later, when deploying a broker using a Product Deployment task, the deployment task does not consider the Target platform (operating system) option on the Product Deployment page. The brokers are installed on all supported systems, regardless of the operating system selection. There are two workarounds you can use to make sure the brokers are installed only on those systems you want. See KB91361 for details.
ePO - On-prem, select Menu → Software → Product Deployment.
Select New Deployment.
Select the DXL platform package and specify the other details.
Save the task.
The deployment task is created to install DXL platform.
Navigate to System Tree and select the DXL broker system.
Go to Properties → Wake up Agents and select Force complete policy and task update.
It might take a few minutes for the broker properties to be sent to the appliance.
(Mandatory) Verify that DXL platform deployment task is completed successfully and Agent communicates with the ePO server. It might take a few minutes.
Repeat steps 1 and 2.
Create the deployment task for Data Exchange Layer Broker.
Repeat steps 5 and 6.
For any issues during the installation, see Troubleshooting.
Upgrade DXL broker by transitioning to a new server
Follow these steps to upgrade the DXL brokers appliance that is installed using .iso or .ova.
Check whether the DXL broker is installed using DXL Broker appliance ISO or OVA.
In ePO console, navigate to Menu → System Tree.
Select a DXL broker system that you want to upgrade and go to System Properties tab.
Check the OS OEM Identifier field. If it displays DXL Platform, the DXL broker was installed using ISO/OVA of DXL broker.
Important
Use of product deployment task to upgrade from DXL 5.0.X/6.0.0 to the latest version is applicable only if DXL is installed on managed systems with the supported Microsoft Windows or Linux. You cannot use the product deployment task to upgrade from DXL broker appliance 5.x.x/6.0.0 to 6.0.3 or later version. See KB96242.
Perform the fresh installation of DXL broker. You can,
install DXL broker version 6.0.3 or later on the managed systems with the supporting OS (Windows and Linux), or
install DXL broker version 6.0.3 or later on appliance using ISO/OVA.
Verify that the DXL broker is installed.
Tip
DXL Broker 6.0.3 or later can communicate with the existing DXL Broker 6.0.0 or 5.x.x server. It ensures the high availability of DXL Broker fabric before you plan to remove the earlier version of DXL broker server.
Replace the DXL broker server with a new server.
Decommission the DXL broker server on your network.
Upgrade DXL Broker on TIE appliance using Product Deployment task
Follow these steps to upgrade the DXL broker 5.x.x to 6.0.0 that is installed using TIE server appliance .ova or .iso.
Check whether the DXL broker is installed using TIE Server ISO or OVA.
In ePO console, navigate to Menu → System Tree.
Select a DXL broker system that you want to upgrade and go to System Properties tab.
Check the OS OEM Identifier field. If it displays TIE Platform, the DXL broker was installed using ISO/OVA of TIE server.
Make sure that you have checked-in the latest DXL packages to the Main Repository on the ePO - On-prem server.
Tip
In ePO - On-prem 5.10.0 and Trellix Agent 5.6.0 and later, when deploying a broker using a Product Deployment task, the deployment task does not consider the Target platform (operating system) option on the Product Deployment page. The brokers are installed on all supported systems, regardless of the operating system selection. There are two workarounds you can use to make sure the brokers are installed only on those systems you want. See KB91361 for details.
ePO - On-prem, select Menu → Software → Product Deployment.
Select New Deployment.
Select the Data Exchange Layer broker package and specify the other details.
Save the task.
The deployment task is created to install DXL broker.
Navigate to System Tree and select the DXL broker system.
Go to Properties → Wake up Agents and select Force complete policy and task update. It might take a few minutes for the broker properties to be sent to the ePO.
For any issues during the installation, see Troubleshooting.
Upgrade DXL broker by upgrading TIE appliance
TIE server 4.0.0 includes the DXL broker the latest version. In order to upgrade DXL broker from 5.x.x to 6.0.3 or later and DXL 6.0.0 to 6.0.3 or later installed on your TIE server 2.x.x/3.x.x, you need to upgrade TIE.
Check whether the DXL broker is installed using TIE server ISO or OVA.
In ePO console, navigate to Menu → System Tree.
Select a DXL broker system that you want to upgrade and go to System Properties tab.
Check the OS OEM Identifier field. If it displays TIE Platform, the DXL broker was installed using ISO/OVA of TIE server.
Important
Use of product deployment task to upgrade from DXL 5.0.X/6.0.0 to 6.0.3 or later version is applicable only if DXL is installed on managed systems with the supported Microsoft Windows or Linux. You cannot use the product deployment task to upgrade from DXL 5.0.X/6.0.0 to 6.0.3 or later version on TIE appliances.
For more instructions on TIE package and upgrade steps, see TIE installation guide. See KB96242.
Before you decommission DXL broker running on TIE appliance, you must replace with the new DXL broker.
Verify the DXL broker upgrade
After you complete the DXL upgrade, verify that the upgrade was successful.
In the System Tree, select the DXL broker name, then click the Products tab to verify that the DXL broker and version are listed.
If the DXL broker and version aren't listed, click Wake Up Agents, select Force complete policy and task update, then click OK. It might take a few minutes for the broker properties to be sent to the appliance. If the DXLBROKER tag doesn't appear in the System Tree, run the Manage DXL Brokers server task again.
When the upgrade is successful, the installed brokers are tagged as DXLBROKER and the correct DXL version is displayed in the Products tab. When you click the Trellix shield icon in the Windows taskbar, the Trellix Data Exchange Layer heading displays the broker connection status, and the broker name, address, and port number that the DXL client is connected to.
Replace the DXL broker server
Removing the DXL broker server from your environment disrupts the communication with the connected clients. Trellix recommends that you configure a new DXL broker server and ensure it is up and running to avoid the disruption.
For details about product features, usage, and best practices, click ? or Help.
Configure setting on new DXL Broker server from old before you decommission. :
Navigate to Menu → Server Settings → DXL Topology and click Edit.
If the DXL broker server to be replaced is,
in the top-level broker, replace it with the new DXL broker server. For more details, see Configure DXL brokers.
assigned as part of hub, replace it with the new DXL broker server. For more details, see Configure DXL brokers.
part of DMZ environment, replace it with the new DXL broker in DMZ.
part of DXL bridge to connect two ePO servers, reconfigure the bridging of DXL fabrics with new DXL broker.
Service Zone enabled, then enable the same on the new DXL broker server.
has any Broker Extension enabled, then enable the same on the new DXL broker server.
Note
Ensure that DXL broker server to be removed does not have a child broker in hierarchy of DXL Topology.
Important
After editing DXL topology, ensure that hierarchy contains a single DXL broker or a single hub at the top-level.
Update the DXL broker preference in the DXL Client for ePO:
Navigate to Menu → Server Settings → DXL Client for ePO and click Edit.
If ePO client broker preference is set to only communicate with the DXL broker server to be replaced then change it to the new DXL broker server else no change required.
Update the DXL Client policies:
Navigate to Menu → Policy Catalog → Trellix DXL Client .
Review the policy and if DXL client broker preference is set to only communicate with the DXL broker server to be replaced then change it to the new DXL broker server else no change required.
Tip
You can manually refresh the DXL Client policy by executing the remote command https://<ePO_system_IP_address>:8443/remote/dxl.client.updatePolicy in browser.
Troubleshooting the installation
Trellix provides log files and scripts that can help you resolve common issues that might occur during installation.
Troubleshooting DXL Broker upgrade issue on DXL Broker appliances
Perform these steps, when the DXL Broker product version is not updated on the ePO System Tree page even after the DXL Broker product upgrade deployment task was successful:
Log on to DXL broker appliance using the root credentials.
Run this command to restart the DXL broker:
sudo service dxlbroker restartLog on to ePO console and navigate to System Tree.
Select the DXL broker system and go to Properties → Wake up Agents.
Select Retrieve all properties even if they haven't changed since the last time they were collected. If deselected, only retrieve changed properties.
This process would take a few minutes to update broker properties on ePO .
Accessing log files
To troubleshoot installation problems, view the log files. Depending on your operating system, have these files available if you contact Technical Support.
/var/log/dxlbroker-<version_number>-<build_number>.log
/var/log/DXLPlatform-<version_number>-<build_number>-<timestamp>.log
/var/McAfee/dxlbroker/logs/ipe-start.log
/var/McAfee/dxlbroker/logs/ipe.log
C:\ProgramData\McAfee\dxlbroker\logs\dxlbroker.log
C:\ProgramData\McAfee\dxlbroker\logs\ipe.logReconfiguring the installation using scripts
You can use scripts to reconfigure the DXL brokers and Trellix Agent installed using an .ova or .iso file. The scripts are located in
the /home/<username> directory. They must be executed with sudo permissions, for example:
sudo /home/myname/reconfig-dxl.
Script name | Description | Reboot? |
|---|---|---|
change-hostname | Changes the host name of the current DXL broker appliance. It restarts the Trellix Agent and the broker. | Recommended |
change-services | Enables or disables the DXL broker. If the broker was initially disabled during first boot, the script prompts for broker configuration information. This is only applicable for DXL Broker installed using TIE appliance (TIE ISO and OVA) | No |
reconfig-dxl | Reconfigures the DXL port. | No |
reconfig-ma | Reconfigures the Trellix Agent. The agent and DXL broker services are restarted. New keystores are generated when the service starts.
| Recommended |
reconfig-network | Reconfigures the current network interface to switch between DHCP and manual IP configurations. With version 6.1.2, this script also supports changing the network protocol by allowing you to select IPv4, IPv6, or both IPv4 and IPv6. | Needed |
reconfig-ntp | Reconfigures the Network Time Protocol servers. | No |

Uninstall DXL brokers on managed systems
You can uninstall DXL brokers that were installed on a Linux or Microsoft Windows system. You cannot use Product Deployment to uninstall DXL brokers that were installed using an .ova or .iso file. However, you can decommission them.
Select Menu → Software → Product Deployment → New Deployment.
Complete and save the new deployment information for the uninstall.
In the Product Deployment page, from the Action drop-down, select Uninstall. Then start the deployment to uninstall Data Exchange Layer Broker package.
Decommission DXL broker appliance
For details about product features, usage, and best practices, click ? or Help.
Shut down and Decommission DXL broker server.
Remove the DXL Broker system from the System Tree.
Navigate to Menu → System Tree.
Select the removed DXL broker system and go to Actions → Directory Management → Delete, and click OK.