Last Updated: April 17, 2026
Overview
The Trellix Data Exchange Layer framework allows bidirectional communication between endpoints on a network. It connects multiple products and applications, shares data, and orchestrates security tasks using a real-time application framework called the Data Exchange Layer fabric.
DXL receives and sends encrypted messages over the fabric to track activity, risks, and threats and take action in real time. The DXL framework:
Shortens the workflow for finding and responding to threats. The nearly instant information sharing reduces the time it takes to detect, contain, and correct newly identified threats.
Uses OpenDXL to connect products from different vendors with your own applications and tools, reducing integration challenges and complexities. It allows communication between multiple products so they can quickly share the threat data they generate, increasing the value of the applications you deploy.
Key features
DXL provides several key features that enable communication throughout the network.
The DXL broker fabric
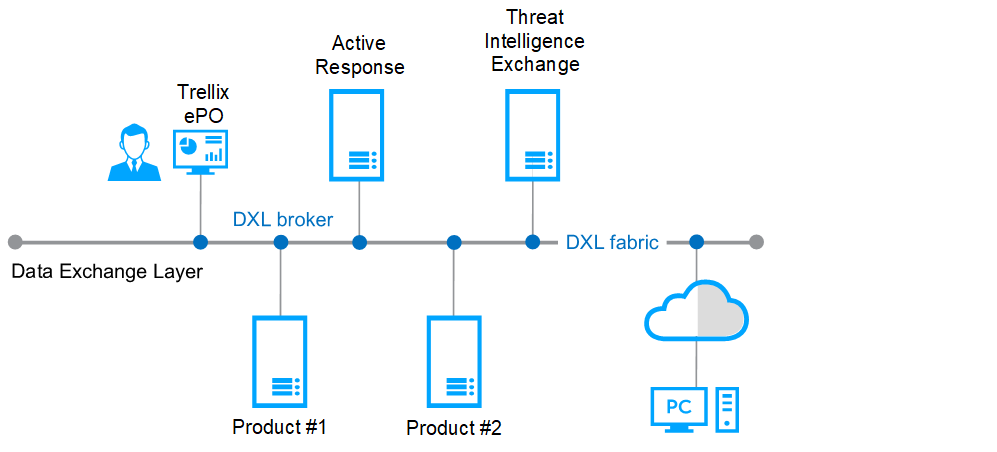
At the center of DXL is the DXL broker fabric, or framework. This is the backbone that enables the communication of events and tasks throughout your environment. Each DXL client installed on managed endpoints connects to a DXL broker, and brokers form the fabric that sends and receives information.
Unlike typical security products where different applications do not communicate with each other, multiple applications and products connect to the DXL broker fabric to immediately share information. When a threat is found and stopped on one managed endpoint, products on the DXL fabric can send that information in real time to all other endpoints on the fabric to stop the threat from spreading.
Reduced time to detect and manage threats
The time it takes to detect, contain, and correct newly identified threats is reduced because the DXL broker fabric constantly shares the latest data and tasks occurring in your environment. Problems are identified and stopped quickly with less intervention from your security team. There is no need to check and update settings in several products as you react to a threat; information and tasks are shared automatically throughout your network.
OpenDXL
OpenDXL is a software development kit (SDK) that allows developers to create or connect applications that use the DXL broker fabric. This allows a secure way to share data and actions across multiple applications from different vendors, as well as applications developed internally. OpenDXL provides one integration process instead of multiple methods that must be managed separately. Just as your Trellix products can connect to a broker on the DXL fabric, other products used in your company can too.
How it works
DXL communicates with services, databases, endpoints, and applications. The DXL client is installed with Trellix® Agent on each managed endpoint, and connects to a DXL broker.
The connected brokers create a fabric, or framework, so that information can be shared immediately with all other services and devices. For example:
If a security administrator stops a threat using Active Response, the threat information is sent in real time via DXL to all connected clients, isolating and stopping it from spreading.
If a security administrator changes the reputation of a file or process using Trellix® Threat Intelligence Exchange (TIE), that change can be applied to a single system, or sent to all connected clients to take effect immediately.
Brokers
DXL brokers are installed on managed systems and route messages between connected clients, effectively allowing the client to connect to the DXL. Examples of connected clients are the Threat Intelligence Exchange module, the Active Response server, or third-party products using OpenDXL. Brokers can be installed on a virtual appliance through an .ova file or any Trellix Agent managed system running supported OS platform such as Microsoft Windows Server, Red Hat or CentOS.
The network of brokers tracks active consumers (clients that use DXL) and dynamically adjusts the message routing as needed. When a client requests a service, or when an update is broadcast, brokers relay these messages to listeners or receivers. Brokers can be organized into hubs and service zones to provide failover protection and message routing preferences.
DXL clients maintain a persistent connection to their brokers regardless of their location. Even if a managed endpoint running the DXL client is behind a NAT (network address translation) boundary, it can receive updated threat information from its broker located outside the NAT.
DXL Fabric
The DXL fabric consists of connected DXL clients and brokers. It enables bidirectional communication, allowing connected security components to share relevant data between endpoint, network, and other security systems. It also allows automated responses, greatly reducing response time and improving containment of threats.
To share information and services across separate fabrics, you can bridge DXL fabrics that are managed by different ePolicy Orchestrator™ - On-prem servers.
Broker hubs
A broker hub is a configuration of one or two brokers that provides failover protection in a multi-broker environment. If a hub has two brokers, both act simultaneously. If one is unavailable, the other continues to function.
Clients
A client is any device that connects to the DXL fabric that is not routing messages (such as a broker). Clients receive and process messages from the brokers. Examples of clients are the Threat Intelligence Exchange module and Active Response.
Service zones
Service zones are groups of brokers that allow you to control how requests are routed on the fabric. You can organize brokers and hubs into service zones to determine how services are used.
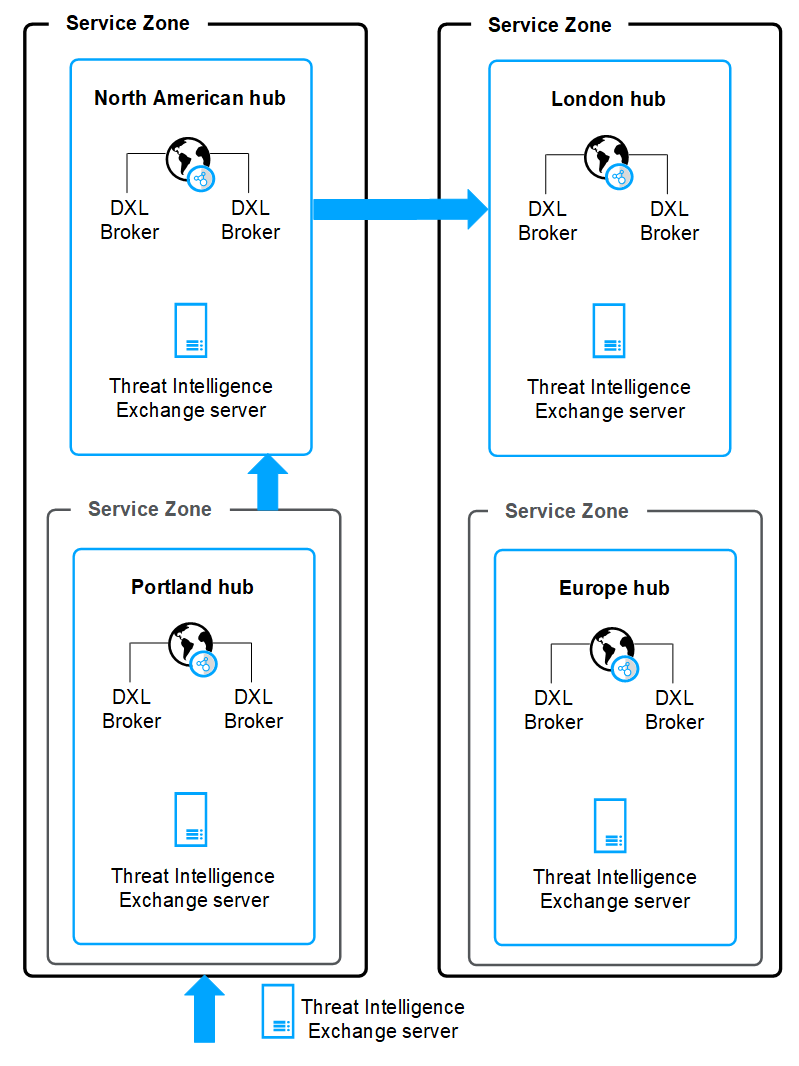
For example, if you have multiple TIE servers and brokers in different geographical locations, you can create service zones that contain brokers and services. Clients connected to a broker in a service zone access services in that zone first. If those services are not available, the broker routes the request to services in other zones. If you don't use service zones, client requests are sent to any service at any location across the fabric.
In the following example, service zones are organized into locations. When the TIE client sends a file or certificate reputation request, it tries to find a TIE server in the Portland service zone first. If a server is not available in that zone, it looks in the North America service zone, because the Portland hub is part of the North America zone. Without specifying service zones, requests might be sent to the Europe or London hub first.
DXL Topics
Topics are like the URLs of DXL. They are where a service publishes its specific methods. When a client connects to DXL, it notifies the broker of the topics it is interested in. This allows for de-coupled topic-based communication where messages are sent to topics, not specific hosts.
DXL Cloud Databus
The DXL Cloud Databus facilitates the connection of on-premise ePO - On-prem servers with Trellix Cloud Bridge, which provides cloud storage and services.
DXL brokers can be configured using the DXL Broker Management Extension to send data via the DXL Cloud Databus to the Cloud Bridge to support products that use this component.
For example, Active Response clients send trace data from managed endpoints via DXL and the DXL Cloud Databus to the Trellix Cloud Bridge. The trace data on the Cloud Bridge is then made available to an on-premise instance of Active Response where an endpoint administrator analyzes the data, identifies issues, and remediates threats.
Organizing and configuring brokers
The Trellix DXL brokers can be organized into hubs and service zones to determine how brokers are accessed.
Brokers are installed on managed systems and communicate messages between security products that are integrated with the DXL fabric. The network of brokers tracks active clients and dynamically adjusts the message routing as needed.
Organizing brokers
Brokers can be organized into hubs that manage how brokers are accessed and provide failover protection in a multi-broker environment. If a hub has two brokers, both act simultaneously. If one is unavailable, the other continues to function. You can create as many hubs as needed. A broker, however, can be assigned to only one hub.
You can also organize brokers and hubs into service zones, which are groups of brokers that allow you to control how requests are routed on the fabric. For example, if you have multiple TIE servers and brokers in different geographical locations, you can create service zones that contain brokers and services. Clients connected to a broker in a service zone access services in that zone first. If those services are not available, the broker routes the request to services in other zones.
Tools for working with brokers
Arrange the brokers in the DXL Topology page to organize them the way you want. On the left side of the page is a list of brokers and hubs. Drag and drop the brokers and hubs to create the topology you need for your environment.
You can add new brokers at any time as needed by deploying them on a managed system. A new broker is automatically added as a child to the top-level broker or hub in the broker topology.
Use the Data Exchange Layer Fabric feature to view the broker topology in your environment. You can quickly see how brokers are connected and managed. You can also see the number of clients that are connected to a specific broker. This can help you determine if you need more brokers in your environment.
Use the DXL Client policy to determine which broker an endpoint connects to, or to restrict specific brokers from an endpoint.
To increase or decrease the number of clients that can connect to a broker, change the Client Connection Limit settings in the Trellix DXL Broker Management policy.
Configure DXL client policies
DXL policy settings are used by the DXL client on managed systems where the policy is assigned. The DXL client is installed and deployed with Trellix Agent.
The policy settings allow you to determine a specific broker or hub that the DXL client connects to. Policies enable you to control which DXL brokers that managed systems connect to. If a direct connection is not available, the DXL client will use the proxy settings as configured in the Trellix Agent policy.
Select Menu → Policy → Policy Catalog.
From the Products list, select Trellix DXL Client.
Click New Policy to create a new policy, or Edit to change or duplicate an existing policy.
If creating or duplicating a new policy, enter a name and a brief description for the new policy, then click OK.
Complete the fields on the Policy Catalog page, then click Save.
Option | Definition |
|---|---|
Self Protection | Prevents users on managed endpoints from changing DXL settings. (Windows only) |
Broker Keepalive Interval | Determines how often the DXL client pings the broker. The default is every 30 minutes. |
Client Log Settings | Enables debug logging for the C++ client. This option is not available for DXL clients managed by other products such as Threat Intelligence Exchange. |
Client Broker Connections | Determines a specific broker or hub that the DXL client connects to. You can specify one broker or hub.
|
After you create a policy, assign it to managed systems to control how the DXL client on those systems communicates with brokers and hubs.
Configure DXL broker management policies
Use the broker management policy to increase or decrease the number of clients that can connect to a broker.
Select Menu → Policy → Policy Catalog.
From the Products list, select Trellix DXL Broker Management.
Click New Policy to create a new policy, or Edit to change or duplicate an existing policy.
If creating a new policy, enter a name and a brief description for the new policy, then click OK.
Complete the fields on the Policy Catalog page, then click Save.
Broker Keepalive Interval — How often a ping occurs between brokers. The default is 1 minute.
Client Connection Limit — The number of clients that can connect to the brokers that use this policy. The default is 50,000 clients.
Configure brokers
If you installed DXL brokers on more than one system, you can create a hierarchy of brokers to provide failover protection if any brokers are unavailable.
Select Menu → Configuration → Server Settings → DXL Topology.
Select Edit to create hubs, service zones, and assign brokers.
The options on the page depend on whether you selected a broker or a hub. Unassigned brokers are listed below the hubs.
Select an item from the Actions menu to create or delete a hub, or to detach a broker from its current hub.
Option definitions if a broker is selected
Option | Definition |
|---|---|
DXL Broker/Hub list | Lists the hubs and brokers. Hubs are logical groups of brokers (not actual hardware). Hubs are associated with one or two brokers. You can add new brokers at any time using the DXL installation wizard. A new broker is automatically added as a child to the top-level broker or hub in the broker topology. |
System Name | The system name where the broker is installed. |
Published System Name | The published system name changes the host name used by all DXL fabric components to connect to the selected broker. Creating a published name allows DXL clients and brokers to connect to each other in a demilitarized zone (DMZ). If a published name is not entered in the field, the System Name is used. |
IP Address | The system's IP address. |
Published IP Address | The published system name changes the IP address used by all DXL fabric components to connect to the selected broker. Creating a published IP address allows DXL clients and brokers to connect to each other in a DMZ. If you don't enter an IP address in this field, the system's IP address is used. |
Port | The port used by the broker. |
Broker UID | The broker's unique identifier. The identifier is automatically assigned and cannot be changed. |
Service Zone | Makes the broker a service zone, which determines how a request is routed to the client. When clients that are connected to this broker request reputation information, the request goes to this broker instead of a broker in a different location. If this broker is unavailable, the request is then routed to a different broker. |
Registered Services | Services available to the broker. Click Details to see information about the supported services. |
Bridged to | Bridging DXL fabrics allows DXL clients to access services that are available on other fabrics. This field shows the brokers that are bridged to the selected broker. Click Details to see information about the bridged brokers. |
Broker Extensions | Broker extensions are additional features that can be enabled on a DXL broker to add new functionality. Other managed products that use DXL brokers create and make these extensions available. The available broker extensions are listed. Select one or more extensions to enable them on the selected broker. |
Actions | Create Hub — Create a hub of one or two brokers. |
DXL Broker/Hub list | Lists the hubs and brokers. Hubs are logical groups of brokers (not actual hardware). Hubs are associated with one or two brokers. |
Hub Name | The hub's name. |
Hub UID | The hub's unique identifier, which is automatically assigned and can't be changed. |
Broker 1, Broker 2 | The brokers assigned to the hub. |
Service Zone | Enables a service zone at the selected hub which includes the entire subtree under this hub. When clients that are connected to this hub or any broker under it request reputation information, the request goes to services registered with the hub or its descendants. If the brokers in the hub and all child brokers are unavailable, the request is routed to services in the next service zone higher in the tree. If there are no other service zones, services across the whole fabric are used. |
Broker 1, Broker 2 Published System Name | The published system name for the brokers, if used. |
Broker 1, Broker 2 Published IP Address | The published IP address for the brokers, if used. |
Broker 1, Broker 2 Extension | Shows the extensions associated with the broker. Broker extensions are additional features that can be enabled on a DXL broker to add new functionality. Other managed products that use DXL brokers create and make these extensions available. |
Broker 1, Broker 2 Details | Shows details about the broker. |
Actions | Create Outgoing Bridge - Remote ePO Hub — If the top-level hub is selected, bridge the local brokers under that hub to a remote hub managed by a different instance of ePO - On‑prem. This allows the bridged brokers to share information. Create Incoming Bridge - Remote ePO Hub — Create an incoming bridge where local brokers on your system are bridged to a remote hub and its brokers. Select a hub in your hierarchy that you want to bridge to the remote hub, then select this option. The hub on your local system does not have to be a top-level hub. |
Import Remote Hub Information | When bridging from a remote hub to your local hub, click this to import the file with the remote hub's broker information. Browse to the remote hub's file to import it. |
Export Local Hub Information | When bridging from your local hub to a remote hub, click this to create a file with information about your local hub's brokers. Make this file available to the remote hub so that it can create an incoming bridge and import it. |
Add brokers
You might want to install more brokers throughout your environment as you add new endpoints and systems. A new broker is automatically added as a child to the top-level broker or hub in the broker topology.
Run the DXL appliance installation, or install the brokers on a Microsoft Windows Server or Linux System.
If adding brokers using the appliance, on the Service Selection page, select DXL Broker and complete the broker installation.
Add brokers to a DMZ
You can install Trellix DXL brokers in a demilitarized zone (DMZ) where publicly accessible servers are not allowed.
For managed endpoints that are in the DMZ to communicate with the DXL fabric, a broker must be established inside the DMZ. DMZ brokers must have their publicly exposed System Name (Published System Name) and publicly exposed IP address (Published IP address) configured on the DXL Topology page. When both the Published System Name and Published IP address have been set, all connections made to these brokers use these values instead of the reported internal values. It is recommended that DMZ brokers not have any children in the topology unless it is intended that they connect through the external Published System Name and external Published IP address.
Additional DXL Client configuration is not needed to use of DMZ brokers. External endpoints are unable to see any internal brokers aside from the DMZ brokers and will connect to the closest available DMZ broker.
The DXL Topology page enables you to create this structure. (To access the DXL Topology page, select Menu → Configuration → Server Settings → DXL Topology.)
Important
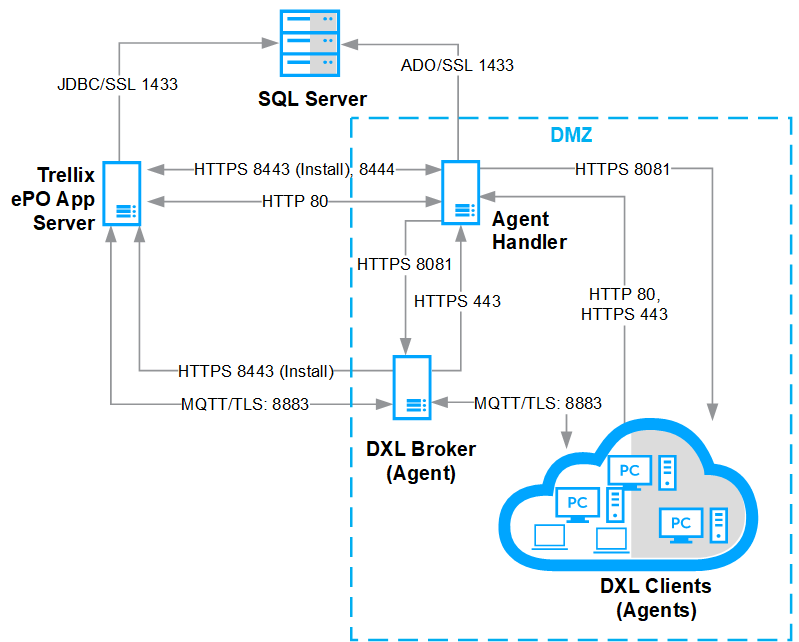
You must have an Agent Handler in the DMZ and your network must be configured to support this. ePO - On-prem communicates with the DXL broker to share configuration, policy, and performance information via the agent on the broker.
This diagram shows the default ports used in a DMZ environment.
The DXL fabric
Quickly see all DXL brokers in your environment. You can see their status, how they are connected, clients they support, and other details.
There are several views to see the broker fabric in different ways:
The current connection status for all brokers
Brokers managed by different instances of ePO - On-prem
Brokers by hub
Brokers by connected clients
For all brokers in the fabric, you can see detailed properties, bridging information, registered services, and more.
View the DXL fabric
View all brokers in your environment and see connection, status, and detailed information.
The DXL fabric page is view-only and requires permissions to access it. To set permissions to access the fabric, use the Trellix DXL Fabric permission set in ePO - On-prem.
Select Menu → Systems → Data Exchange Layer Fabric.
Use the View drop-down list to select how you want the information to be organized.
To resize the items on the page to zoom in our out, use the mouse wheel.
To fit all items on the fabric view on the page, double-click the mouse.
Use the Label drop-down list to select the type of labels that you want to see.
For brokers that are part of a bridged hub, select Display Bridge Direction to display the direction of the bridge connection; whether it's an incoming or outgoing bridge. The arrows point from the outgoing broker to the incoming broker.
Click a broker to see detailed information about it on the Properties, Bridges, Services, and Extensions tabs.
Note
Extensions are additional features that can be enabled on a DXL broker to add functionality from other managed products. The Extensions tab shows details about enabled extensions for the broker.
Bridging Trellix DXL fabrics
Bridging DXL fabrics allows DXL brokers that are managed by different ePO - On-prem servers to communicate with each other to share clients and services.
For example, if you have Threat Intelligence Exchange and at least one DXL broker managed by multiple instances of ePO - On-prem, you can connect the brokers by bridging their fabrics. You can then see the files that are running at all locations and share their reputation information.
To connect DXL broker fabrics, you create incoming and outgoing bridges to and from the brokers that are managed by different ePO - On-prem servers.
Process for bridging DXL fabrics
Bridging DXL fabrics is a multi-step process to ensure that the DXL brokers that are managed by different ePO - On-prem servers can connect and communicate with each other. The bridged systems must export and import each other's broker information.
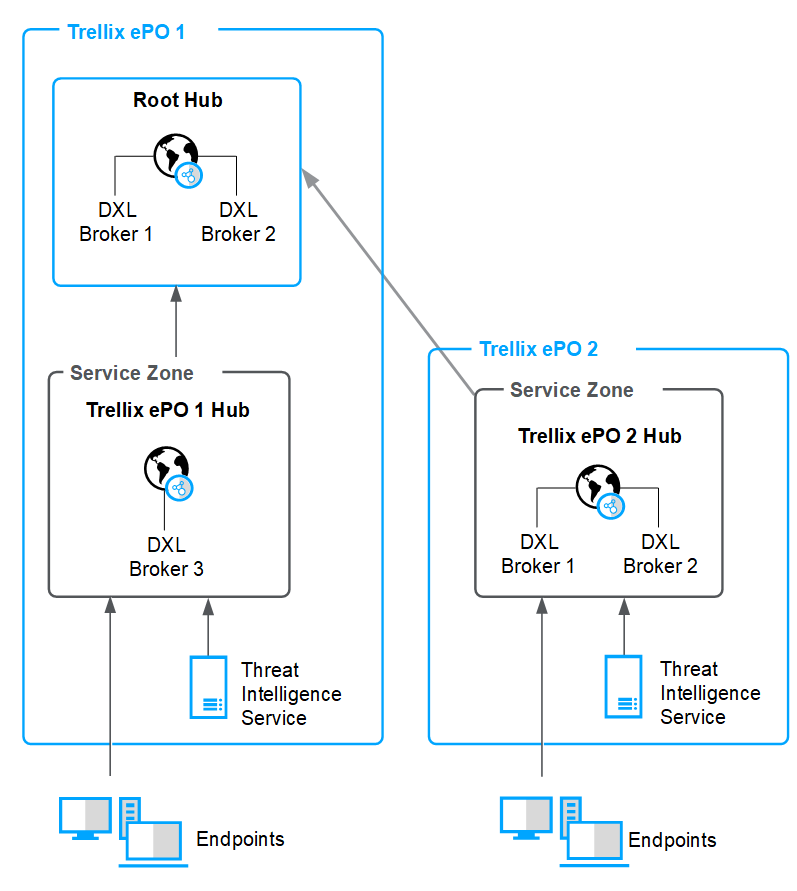
In this example, ePO - On-prem 1 has a top-level hub with two brokers. It also has a broker used by the TIE service, where managed endpoints connect. ePO - On-prem 2 has a hub with two brokers that are used by the TIE service and managed endpoints. To bridge the brokers so that they can share clients and services, you create an incoming bridge on ePO - On-prem 1 and an outgoing bridge on ePO - On-prem 2.
Bridging must be completed at the hub level. You cannot create a bridge from an individual broker.
Create an outgoing bridge to another hub
When you designate a DXL hub as an outgoing bridge, brokers in that hub can connect to the brokers that are managed by a different ePO - On-prem server.
Each ePO - On-prem server can have only one hub that is designated as an outgoing bridged hub. And that hub must be the top-level hub in the DXL topology with at least one broker assigned to it.
Select Menu → Configuration → Server Settings → DXL Topology.
On the DXL Topology page, select Edit.
From the topology tree, select the top-level hub, and from the Actions menu, select Create Outgoing Bridge - Remote ePO Hub.
The hub is highlighted in red (invalid state) until it is bridged with a hub on a remote system.
Click Export Local Hub Information to create a file that contains information about the hub's brokers. Save this file in a location that's available to remote systems.
On the remote ePO - On-prem server where you are bridging to:
From the Actions menu, select Create Incoming Bridge - Remote ePO Hub.
Select a hub to bridge to the outgoing hub, then click Import Remote Hub Information and navigate to the file. This creates an incoming bridge.
Click Export Local Hub Information to create a file containing information about the brokers.
On the local system, click Import Remote Hub Information and navigate to the file created by the remote system.
The local and remote hubs have now exchanged broker certificate authorities and connection information needed to bridge the fabrics and share information via the DXL framework.
Create an incoming bridge from another hub
Designating a hub as an incoming bridge enables brokers that are managed by a remote ePO - On-prem system to connect its brokers to local DXL brokers.
Select Menu → Configuration → Server Settings → DXL Topology.
On the DXL Topology page, click Edit.
From the topology tree, select the top-level hub, and from the Actions menu, select Create Incoming Bridge - Remote ePO Hub to create an empty hub under the top-level hub.
This is a placeholder for the broker topology information that will come from remote ePO - On-prem systems when they are bridged with the local system. The hub is highlighted in red (invalid state) until the information from a remote system is uploaded.
Click Import Remote Hub Information and navigate to the outgoing bridge file created by the remote ePO - On-prem server. This file contains information about its brokers.
Click Export Local Hub Information to create a file that contains information about the brokers in the local hub. The remote system (outgoing bridge) imports this file.
Both hubs now have the broker information necessary to communicate and share information via the DXL fabric.
6. To complete the bridge, run the Send DXL State Event server task on both the incoming and outgoing systems.
Managing certificates used with OpenDXL clients
You can now import a Certificate Signing Request (CSR) to generate a certificate which allows OpenDXL clients to connect to the DXL fabric.
For information about OpenDXL, see the OpenDXL website.
The DXL Certificates (ePO - On-prem Managed) Server Settings page or the OpenDXL Configuration page in ePO - SaaS enable you to do the following:
Import a CSR to generate an OpenDXL client certificate to be managed in ePO - On-prem.
Export a previously generated OpenDXL client certificate.
Revoke a previously generated OpenDXL client certificate, preventing it from being used to communicate on the fabric.
Export a client configuration package with all certificates and configuration files needed to connect an OpenDXL client.
Import a certificate
When using a third-party certificate with DXL clients, you must import a certificate authority, or self-signed certificate, for those clients. The DXL brokers use certificates to recognize and validate clients. After a certificate is created, import it into ePO - On-prem.
Select Menu → Configuration → Server Settings → DXL Certificates.
On the Client Certificates page, click Edit.
Click Import to browse to the certificate, then click OK.
The certificate is added to the Client Certificates list used by DXL.
Create a list of certificates used by DXL
Create a file that lists the certificates used by DXL clients.
You can create a list of the broker certificate authorities (CA) currently in use, or a list of the managed DXL brokers that show broker connection information.
Select Menu → Configuration → Server Settings → DXL Certificates.
On the Client Certificates page, click Edit.
Create a file:
For a list of broker certificate authorities currently in use, click Export All next to Broker Certificates. The file created is
brokercert.crt. It contains all broker certificate authority information in PEM (Privacy-enhanced Electronic Mail) format.For a list of managed brokers, click Export All next to Broker List. The file created is
brokerlist.propertieswith broker information shown in the following format:broker guid=broker guid;port;host name;ipaddress. This list can be passed to a client when connecting to the DXL broker fabric.
Trellix DXL certificate authorization
Python-based DXL clients are identified by their certificates. Client-specific certificates and certificate authorities (CAs) can be used to limit which clients can send and receive messages on particular topics.
A client certificate can also be used to establish a restriction for a single client, whereas a certificate authority can be used to establish a restriction for all clients that are signed by that particular authority.
Examples for using certificate authorization
Restricting which clients can provide DXL services. When providing a service, for example, Threat Intelligence Exchange, a restriction can be added to ensure that only clients that are providing the service are able to receive request messages on the service-related topics. Without this protection, other clients could masquerade as the service.
Restricting which clients can invoke DXL services. You can limit the clients that can send messages on the service-related topics. For example, you can limit the clients that initiate Active Response queries using topic authorization.
Restricting which clients can send event messages. For example, only authorized clients should be able to inform that a TIE reputation has changed by sending a DXL event.
Using OpenDXL to enable certificate authorization
Use the OpenDXL Python Client SDK to authorize third-party certificates. For details about the SDK, see the OpenDXL website.
Managing certificates used with OpenDXL clients in ePO - SaaS
You can now import a Certificate Signing Request (CSR) to generate a certificate which allows OpenDXL clients to connect to the DXL fabric in ePO - SaaS.
For information about OpenDXL, see the OpenDXL website. The OpenDXL Configuration page in ePO - SaaS enable you to do the following:
Import a CSR to generate an OpenDXL client certificate to be managed in ePO - SaaS.
Export a previously generated OpenDXL client certificate.
Revoke a previously generated OpenDXL client certificate, preventing it from being used to communicate on the fabric.
Export a client configuration package with all certificates and configuration files needed to connect an OpenDXL client.
Import a certificate signing request
When connecting an OpenDXL client to ePO - SaaS, you must generate a certificate signing request (CSR) for the client and import it to create the client certificate.
Select Menu → Configuration → OpenDXL Configuration.
Click Import to browse to the certificate, then click OK.
A new certificate is generated from CSR and added to the list of ePO Managed Client Certificates.
Export a client configuration package
You can create a client configuration package to connect the OpenDXL clients with ePO - SaaS.
Select Menu → Configuration → OpenDXL Configuration.
Select a certificate from the list that you want to connect.
Click Export Client Configuration to generate and download the client configuration package.
For information about OpenDXL, see the OpenDXL website.
Migrating certificates in ePO - On-prem
Keep certificates up to date with the latest hash algorithm using the Certificate Manager in ePO - On-prem.
Many organizations are no longer using TLS/SSL certificates signed by an older SHA algorithm. DXL installs the latest hash algorithm certificates. If you have upgraded DXL from an older version that uses older DXL certificates, you can migrate those certificates to the latest hash algorithm.
Note
This an ePO - On-prem platform certificate manager and is not part of certificate management in DXL and OpenDXL.
To migrate certificates to the latest hash algorithm:
All DXL brokers and DXL extensions must be at version 3.1.0 or later. This includes any bridged brokers to multiple ePO - On-prem instances.
The DXL fabric should be in a stable and connected state before migrating certificates. Use the Data Exchange Layer Fabric page to verify that all brokers are connected and communicating. Do not add or delete brokers from the DXL fabric until the migration is complete.
In a bridged environment, migrate the certificates on each instance of ePO - On-prem independently to minimize changes in the environment. Complete the migration on one instance of ePO - On-prem before beginning a migration on a different instance.
Migrate certificates to a newer hash algorithm
Migrate your existing certificates to more secure algorithm certificates or regenerate them to remediate vulnerabilities in your DXL environment.
Use the Certificate Manager in ePO - On-prem to migrate certificates. It allows you to:
Migrate certificates that are signed by an older signing algorithm to the new algorithm such as SHA-1 to SHA256.
Regenerate your certificates when your existing certificates are compromised due to vulnerabilities in your environment.
Migrate or regenerate certificates for managed products that are derived from ePO - On-prem root CA.
Troubleshoot the certificate migration
If you experience issues with the DXL client or brokers, review these issues and solutions.
Note
If you experience issues, check the log file for details. The log files are on the ePO - On-prem server.
The brokers no longer bridge after the migration
The brokers might not have regenerated. Force an agent wake-up in ePO - On-prem with full properties on the broker and wait at least 15 minutes. Check to see if the broker is connected.
The DXL Java client no longer connects after the migration
The brokers might not have regenerated. Force an agent wake-up in ePO - On-prem with full properties on the broker and wait at least 15 minutes. Check to see if the broker is connected.
If the client is still not connected, delete the dxlClient.jks KeyStore file and restart the service containing the DXL client. The location of the KeyStore depends on the service running the client.
The DXL C++ client no longer connects after the migration
The DXL C++ client staggers certificate regeneration over a 24-hour period. If the client disconnects during this process, force a certificate regeneration (available on Windows systems only):
Disable the Self Protection option for the system in the DXL client policy.
Delete the certificate files located in
%PROGRAMDATA%\McAfee\Data_Exchange_Layer(DxlBrokerCertChain.pem,DxlClientCert.pem, andDxlPrivateKey.pem).Restart the DXL Service.
Enable the Self Protection option in the DXL client policy.
ePO - On-prem bridged brokers no longer connect after the migration
In a bridged broker environment, the new certificates for the migrating ePO - On-prem instance might have already been sent to the bridged ePO - On-prem system but not delivered to the individual brokers in the policy. On the remote ePO - On-prem system, force an agent wake-up to deliver the new certificates and wait at least 15 minutes.
If the DXL fabrics are still unable to bridge, re-export the information from the migrating ePO - On-prem system into the remote ePO - On-prem system to deliver the new certificate information. After importing the .zip file into the remote ePO - On-prem system, force an agent wake-up and wait for at least 15 minutes.
The DXL client in ePO - On-prem is no longer connected after the migration
See the log files to verify that the errors are certificate-related. Delete the DXL client KeyStore at \Program Files\McAfee\ePolicy Orchestrator\Server\keystore\dxlClient.keystore. The DXL client will detect this and regenerate the KeyStore.
Using DXL with Cisco Platform Exchange Grid (pxGrid)
DXL includes an extension that enables bridging a DXL broker fabric and Cisco Platform Exchange Grid (pxGrid) infrastructure.
Cisco pxGrid is a fabric that products can integrate with, such as Cisco ISE, just as DXL allows access to ePO - On-prem, Threat Intelligence Exchange, Active Response. DXL-integrated technologies can share system information between Cisco ISE and DXL. For example, system information about malware identified by Trellix technologies on managed endpoints can be shared via DXL to the Cisco pxGrid infrastructure, allowing Cisco ISE to quarantine the affected endpoints.
To configure Cisco pxGrid to work with DXL, follow these tasks. Before starting, make sure the DXL Cisco pxGrid Integration extension is installed.
Provision certificates in Cisco ISE for use with DXL brokers
Using the Cisco ISE web user interface, generate certificates for use with the DXL brokers. See article 000014266 for detailed steps.
Make the Cisco ISE certificates available to DXL
Copy the Cisco ISE certificates to one or more DXL brokers you want to bridge to Cisco pxGrid. See 000014266 for detailed steps.
Configure the Cisco pxGrid settings in DXL
Provide the necessary information for DXL brokers to connect to the Cisco pxGrid fabric.
Select Menu → Configuration → Server Settings → DXL Cisco pxGrid, then click Edit.
Complete the settings on the Edit DXL Cisco pxGrid page.
pxGrid Hostname | Enter the host name or IP address for the pxGrid controllers that the DXL brokers are connecting to. |
Client Name Prefix | This field identifies the name of the client connection from the DXL brokers to the pxGrid fabric in the Cisco ISE console. You can change this name if you like and it is updated in the pxGrid user interface. |
Client Description | This field identifies the description of the client connection from the DXL brokers to the pxGrid fabric in the Cisco ISE console. You can change this description if you like and it is updated in the pxGrid user interface. |
Certificate Password | The password used to create the certificate in Cisco ISE for use with DXL. |
Notifications | Notifications are received via the pxGrid fabric. Select the types of notifications to bridge from the pxGrid fabric to DXL. |
Custom Attribute Forwarding | Enables ePO to automatically send endpoint details to Cisco ISE using Open API or ERS API when it receives PxGrid Session notification. This allows Cisco ISE policies to make quick decisions based on the device data that ePO has already collected from endpoints. |
Configure the DXL brokers to use with Cisco pxGrid
Select which DXL brokers to bridge with the Cisco pxGrid fabric. Perform the following steps for each broker that is used with Cisco pxGrid.
Select Menu → Configuration → Server Settings → DXL Topology, then click Edit.
Select a broker to use with Cisco pxGrid.
Select one or more broker extensions to use. You can have several DXL brokers that query Cisco pxGrid providers, but only one broker should receive notifications to reduce redundancy and to prevent performance issues.
Make approvals in Cisco ISE
Approve the Cisco pxGrid client connecting from a DXL broker in the Cisco pxGrid part of the Cisco ISE interface. See 000014266 for detailed steps.
Set up automatic responses
You can create an automatic response to send a mitigation action to Cisco pxGrid, or to apply an adaptive network control (ANC) endpoint policy when a threat event occurs. ANC policies are created in Cisco ISE.
For example, if you created an automatic response rule with quarantine as the mitigation action for a system, when a threat event occurs, the system the threat event was for is quarantined in Cisco ISE.
Automatic responses are created in ePO - On-prem using the Automatic Responses feature. In the Actions page of the Response Builder, select Execute pxGrid Query and then select the query type, system identifier, and either the action to take or the policy to apply.
Set up server tasks
To create a server task that runs a query and applies or clears an Adaptive Network Control (ANC) policy, follow these steps:
Create a query in Trellix ePO
Log in to the Trellix ePolicy Orchestrator (ePO) console.
Navigate to Query & Reports from the main menu.
Click New Query to create a custom query.
Select the Query Type based on your requirement (For example, non-compliant AMCore content).
Set the output type to Table to ensure proper results.
Save the query with a relevant name.
Create a server task
Navigate to Menu → Automation → Server Tasks.
Click New Task to create a server task.
Enter a Task Name and provide description.
Under Actions, select Run a Query and select the query created in Step 1.
Click Next to configure additional actions.
Configure the pxGrid query as a sub-action
On the Actions page of the Server Task Builder,
Select Execute pxGrid Query as a sub-action.
Specify the query type, system identifier, and the corresponding policy name.
Click Next to proceed to scheduling options.
Schedule and save the task
Select the frequency for running the task. For example, hourly, daily or on-demand.
Review the task summary and click Save to create the server task.
Creating DXL queries
You can create queries in ePO - On-prem to see property information for DXL broker systems and client systems.
Use the Queries and Reports feature in ePO - On-prem to create managed systems queries. You can then select column headings from the DXL Broker Systems and DXL Client Systems categories to include in the query.
DXL automatic responses
Automatic responses are created in ePO - On-prem so that notifications and actions are taken when a condition is met.
You can create an automatic response rule to broadcast a ePO - On-prem Threat Event over DXL as a DXL Event on the topic "/mcafee/event/epo/threat/response". Then, use an OpenDXL Python Client to subscribe to that topic. When the Automatic Response rule is triggered, you receive the ePO - On-prem Threat Event data via DXL.
In the Automatic Responses feature in ePO - On-prem, select the Send DXL Event in the Actions page as the action to be taken when the threat event occurs.
DXL server tasks
Server tasks are configurable actions that run on ePO - On-prem at scheduled times or intervals.
Use the Server Tasks feature in ePO - On-prem to automate repetitive tasks. Each task has actions and can be scheduled to occur at specific intervals.
DXL includes these server tasks.
Server task | Description |
|---|---|
Manage DXL Brokers | Assigns the DXLBROKER tag to all fully configured DXL brokers and updates the DXL broker policies. Use this task if you install a new broker and want to immediately identify it in the DXL fabric. |
Send DXL State Event | Sends the current DXL State Event to the DXL fabric. Use this task when you make changes to bridged brokers to incorporate those changes on the DXL fabric page. |
Send DXL Certificate Revocations | Sends the current list of revoked certificates to the DXL brokers. |
Invoking remote commands over DXL
You can authorize OpenDXL clients to invoke remote commands that are available in ePO - On-prem over DXL. Use this feature if you are developing Python-based clients with OpenDXL or using clients that were developed with OpenDXL.
Invoking remote commands over DXL is useful with automation tasks, whether they are user-driven (orchestrated), or performed without user involvement (automated). All remote commands that are available from the ePO - On-prem core.help command output can be invoked over DXL.
You select a single command or group of commands to associate with a user and authorize that user to invoke the command over ePO - On-prem system tags or OpenDXL certificates. You can authorize one or more users for a single command or several commands. This also adds the authorization on the broker level. When you create an authorization to invoke a command, the DXL Topic Authorization is updated to allow a DXL request to be sent for that command from the client.
If you are using the External Certificate Authority (CA) Provisioning approach to manage your DXL client certificates, you must manually import your client certificates into ePO - On-prem to create a remote command authorization. For more information about importing client certificates into ePO - On-prem, see the Certificate Authority (CA) Import topic in the OpenDXL Python Client SDK documentation.
Example for using remote commands
When you select system → applyTag from the list of remote commands in the Edit DXL Commands list, you see in its description that the system.applyTag command needs 2 parameters: names and tagName. These parameters are needed to invoke the command and must be sent in the DXL request's payload.
For example, creating an authorization to send a DXL request to the topic /mcafee/service/epo/command/{057d4edf-9da6-4ec2-80fe-14adc4f2f625}/remote/system/applyTag enables it to run the command. The request's payload must be a map for the parameters, so a valid payload to apply a tag name "Quarantine" to the 2 systems would be:
{
"names":"system_name1,system_name2",
"tagName":"Quarantine"
}Authorize users to invoke remote commands over DXL
Set up authorization for OpenDXL clients to invoke remote commands that are available in ePO - On-prem over DXL.
Select Menu → Configuration → Server Settings → DXL Commands.
Click Edit, then select a command group or individual command for which you want to create a user authorization.
If you select a command group, the user can invoke all commands within that group. For example, if a certificate is granted authorization at a group level, the certificate can be used to run each of the commands with the group's subtree.
Click Create Authorization.
Select the ePO - On-prem user that will be invoking the command.
Specify on which systems or clients the user can invoke the commands, either by ePO - On-prem server, system tag, or client certificates, then click OK.
Choose as many system tags or certificates as you like, but you must choose at least one system tag or certificate for each user. We recommend creating authorizations for the least privileged user account and the minimal set of client certificates needed to perform the selected remote commands.
Click Save when finished.
Edit or delete a user authorization
You can view, edit, or delete the information associated with a user authorization used to invoke remote commands over DXL.
Select Menu → Server Settings → DXL Commands.
Click Edit.
Select an authorization from the list, then click Actions and click Delete Authorization to delete it, or Edit Authorization to view and edit the authorization information.
Click Save when finished.
Creating custom topics for remote commands
Custom topics enable you to use your own topic mapping to invoke a remote command instead of using the default topic for the command, like creating a shorter alias for a long complex topic.
For example, instead of invoking a remote command to mcafee/service/epo/command/{057d4edf-9da6-4ec2-80fe-14adc4f2f625}/remote/system/applyTag, you could eliminate the GUID and long topic name by naming the topic /mcafee/epo/applyTag while still sending the same payload. You can further customize it by sending a different JSON format in the request instead of using the default mapping.
If you had the output from a system scan and didn't want to change that, you could add an element to specify the tag, and then use JSONPath to parse the system names. The payload would be:
{
"tag": "Quarantine",
"scanReport":
{
"systems":
{
"names": "system_name1,system_name2",
"Detections": "...",
...
}
}
}
In the Add Custom Topic dialog, you would enter /mcafee/epo/applyTag as the Topic name. The command parameters and Payload JSONPath settings would be:
The first Command Parameter is
tagName; Payload JSONPath istagThe second Command Parameter is
names; Payload JSONPath is$.scanReport.systems.names
When you send the request to the topic /mcafee/epo/applyTag, it parses the custom elements into the mapped parameters.
Add a custom topic to a remote command
You can map one or more custom topics to a remote command authorization. You can't map a custom topic to an authorization for a group of commands.
Each of the parameters of the command can be mapped from the JSON payload of the incoming event using JSONPath syntax. For example, an IP address from the incoming JSON payload can be mapped to the appropriate parameter of the tag command.
In the Edit DXL Commands page, select an authorization for a command, then click Actions → Add Custom Topics.
Enter the topic name.
To add a custom JSON format in the request instead of the default mapping, click Enable custom mappings, then enter the command parameter and payload information for the mapping.
Click OK when finished, then click Save.
Edit or delete a custom topic
You can view, edit, or delete the custom topic information associated with a user authorization used to invoke remote commands over DXL.
Select Menu → Server Settings → DXL Commands.
Click Edit.
Select an authorization from the list that has the custom topic you want to edit or delete, then click Actions → Edit Custom Topic.
Select a custom topic to see its details and do one of the following:
Edit the information.
Select Delete Custom Topic to delete it.
Click OK when finished, then click Save.