You can protect sensitive data using the Exact data matching (EDM) feature. Sensitive data or data records you want to protect must be saved in the form of .csv file and used as classifications to match data for any violation.
The feature in Trellix DLP Discover Trellix DLP Discover – SaaS supports exact data matching on File Server repositories.
Trellix DLP Network Prevent – SaaS appliances support scanning emails and web posts with EDM. Trellix DLP Network Monitor – SaaS appliances support scanning emails, web posts, and network traffic with EDM.
Data records are stored in CSV files as rows of data where the cells in each row are related, for example:
First name | Last name | Phone | |
|---|---|---|---|
John | Doe | 871-555-5555 | j.doe@google.com |
When you add an exact data match condition to a classification definition, apply that classification to the uploaded files and create an EDM package. Trellix DLP – SaaS makes the EDM package available for classification and remediation scans.
Upload CSV files with the data records that you want to protect from being leaked.
In ePO - SaaS, select Menu → Data Protection → Classification.
On the Register Documents tab, select Exact Data Fingerprints from the Type drop-down list.
Click Upload file, select a CSV or .zip file to upload, then click OK.
For uploads with more than 100,000 records, click the executable link to open the CSV2Fingerprints.exe utility.
Create or add an exact data match condition.
In ePO - SaaS, select Menu → Data Protection → Classification.
Optional: Create a classification — select Actions → New Classification in the classifications list.
You can also add an EDM condition to an existing classification.
Select Actions → New Content Classification Criteria.
From the Data conditions list, select Exact Data Matching.
Click the choose icon (
 ) next to the Value field.
The Exact Data Fingerprints Match Criteria page appears.
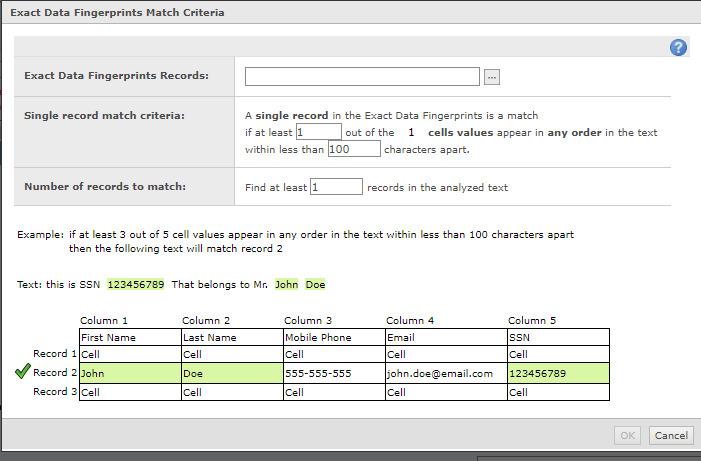
Click the choose icon and select a CSV file from the list of files you uploaded. Fill in the match criteria and number of records to match. Click OK.
Create the package. On the Register Documents tab, select Exact Data Fingerprints from the Type drop-down list, then click Create package.
All uploaded documents are added to the package, and the package is copied to the network evidence share folder.
(For Trellix DLP Discover only) Create a network discovery rule.
In the DLP Policy Manager, open a rule set or create one.
On the Discovery tab, select Actions → New Network Discovery Rule, then select one of the repository types supported by the feature (File Server) .
Select the classification you created in Step 2 and a repository that matches the type selected in Substep b. Fill in the rest of the fields, and click Save.
(For Trellix DLP Discover – SaaS only) Run the scan.
Go to Data Protection → DLP Discover to open the Scan Management page.
Click New scan and enter the required details for the scan.
Select the rule set that includes the rule created in step 4.
Click Save and Apply Policy.