To set up rsyslog servers, perform the following subtasks:
Add the rsyslog servers
Configure the rsyslog servers
On the Web UI, select the Settings tab.
Select Notifications on the side bar.
Click the RSYSLOG tab to display the View and Add Rsyslog Servers area.
Click Add Rsyslog Server.
Enter the name of the rsyslog server to receive the notifications in the Server Name box and click Add Rsyslog Server.
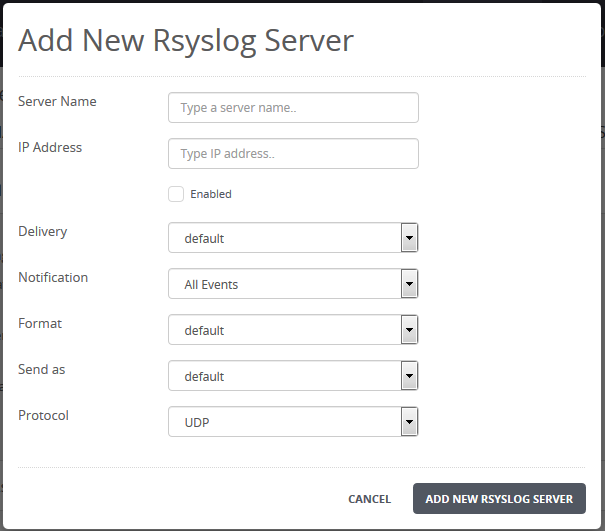
Select the Enabled check box to choose which servers will receive rsyslog notifications. Select the Enable All check box to ensure that all listed servers receive rsyslog notifications.
Enter the IP address of the rsyslog server in the IP Address box.
To apply the rsyslog server listing changes, click Add New Rsyslog Server.
On the Web UI, select the Settings tab.
Select Notifications on the side bar.
Click the RSYSLOG tab to display the View and Add Rsyslog Servers area.
Click the
 icon for the server you want to edit.
Select the delivery frequency in the Delivery drop-down list box:
Default—Use the delivery frequency specified in the Default delivery box in the Rsyslog Settings area.
Per Event—Send a notification each time a malware object is detected.
Select Malware Object or All Events in the Notification drop-down list box to send rsyslog notifications when malware objects are detected.
Select CEF, LEEF, CSV, XML, JSON, or Text as the default format and select which level of detail (only for XML, JSON, or text) is provided in the Format drop-down list box. Select Default to use the format specified in the Default format box in the Rsyslog Settings area.
Normal—This format contains detailed information and abstracts, such as alert type, ID, source IP, malware name, hostname, and alert URL without redundant information
Concise—This format contains basic information, such as alert type, ID, source IP, malware name, hostname, and alert URL.
Extended—This format contains detailed information and abstracts, including data-theft information (if any) and static-analysis details. This format provides all details about files and objects modified during analysis.
Select the severity classification for the rsyslog notification in the Send as box:
Default—Use the value specified in the Default send as field in the Rsyslog Settings area.
Alert—Action must be taken immediately (severity 1).
Critical—Critical conditions (severity 2).
Debug—Debug-level messages (severity 7).
Emergency—Emergency: system is unusable (severity 0).
Error—Error conditions (severity 3).
Informational—Informational messages (severity 6).
Notice—Normal but significant conditions (severity 5).
Warning—Warning conditions (severity 4).
Select UDP or TCP in the Protocol drop-down list box.
To apply the rsyslog server listing changes, click Update.