Last Updated: November 6, 2025
Overview
Trellix Management of Native Encryption (MNE) is a management product that allows ePolicy OrchestratorTM - On-prem administrators to manage Apple FileVault and Microsoft BitLocker. These are products that provide full disk encryption on Macintosh (Mac) and Windows systems.
With MNE you can perform these core functions from a central interface:
Manage Apple FileVault and Microsoft BitLocker
Report encryption status
Import, store, and retrieve recovery keys
Adopting MNE for BitLocker means that you no longer need to license, manage, or maintain Microsoft BitLocker Administration and Monitoring (MBAM) or its associated servers. You can consolidate servers and eliminate the related Microsoft licenses, providing significant cost savings and reduced management overhead.
MNE ensures that you have consistent enforcement of policy and compliance across your encryption technology stack. You can also use the report-only feature of MNE without having to actively manage FileVault or BitLocker. MNE provides comprehensive reports that give you complete visibility of your organization's encryption status. Report queries can also be used as a dashboard monitor that is automatically updated every 5 minutes.
Note: We provide support only for the MNE management solution, and not the underlying FileVault or BitLocker encryption technology. If you encounter any issues with FileVault or BitLocker technology, contact Apple for FileVault support and Microsoft for BitLocker support.
Key features
You can manage FileVault or BitLocker through MNE.
Manage FileVault on any Mac hardware that can run OS X Mojave, High Sierra, and Sierra directly from ePO - On-prem software.
Manage BitLocker on Windows 7, 8, and 10 systems directly from ePO - On-prem software, without the need for a separate Microsoft BitLocker Administration and Monitoring (MBAM) server.
Report compliance in various reports and dashboards.
Configure authentication policy appropriate to FileVault or BitLocker:
Supports user-domain authentication using Trellix Preboot security, TPM, TPM and PIN, TPM and enhanced PIN, password, and network-unlock for BitLocker (Windows systems only)
Supports password for FileVault
Configure BitLocker To Go to manage removable media on BitLocker encrypted client systems.
Support FileVault and BitLocker recovery by using:
Administrative recovery through the ePO - On-prem console
Self-service recovery using Data Protection Self Service Portal
Administrative recovery through the web-based API, allowing simple integration into your Help Desk tools
Rotate recovery keys periodically, or after a recovery workflow occurs in ePO - On-prem or Data Protection Self Service Portal (Windows systems only).
Make sure that on Windows systems, when taking over BitLocker management, only MNE-managed keys remain, to avoid older (insecure) keys being accessible on the system.
Configure network-unlock to permit remote authentication of BitLocker Fixed Volumes on servers (Windows systems only).
Use DEGO for a pre-flight check before activating FileVault (Mac systems only).
Import recovery keys manually. This is required for FileVault. (Mac systems only).
Use MNE in FIPS mode.
Report status on ENSM console (Mac systems only).
How it works
Trellix Native Drive Encryption provides components that are installed on your ePO - On-prem server, and on all Microsoft Windows and Mac computers that you want MNE to manage.
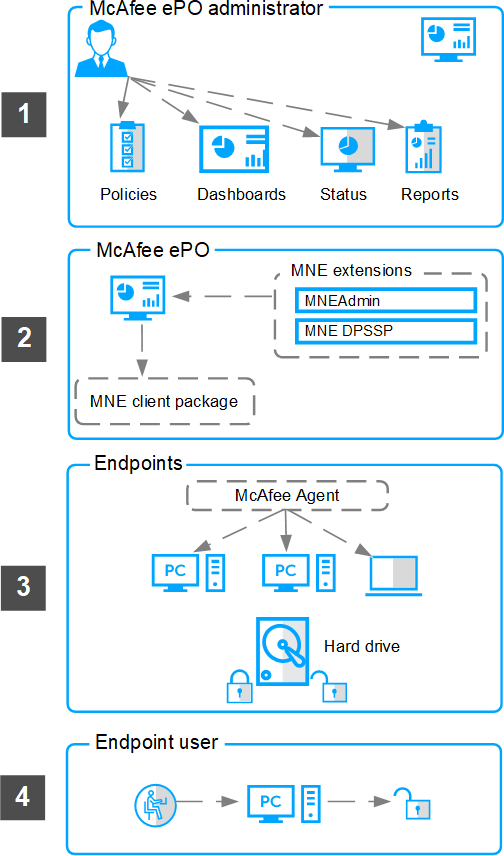
This diagram shows MNE components and workflows that manage and report on encryption status for endpoints using BitLocker or FileVault.
The ePO - On-prem administrator configures ePO - On-prem policies, runs ePO - On-prem queries and reports, and checks the status of ePO - On-prem managed endpoints.
The ePO - On-prem administrator installs the MNE extensions in ePO - On-prem. The MNE software is checked in to ePO - On-prem and the MNE packages are deployed to the client system.
The Trellix Agent package is deployed to the client systems. MNE is installed and activated on the endpoint. Policies are assigned to the client system.
After successful MNE activation, the endpoint is protected by BitLocker, according to the applied authentication policy.
Trusted Platform Module (TPM) provides platform authentication support, without the need for preboot authentication (PBA). All chosen authentication methods other than TPM require the user to authenticate before restarting the endpoint.
Product components
MNE includes two product extensions and a client package:
The MNEAdmin extension is installed on ePO - On-prem. This extension allows you to manage and report on both FileVault and BitLocker on client systems by deploying policy to the client systems.
The optional Data Protection Self Service Portal extension is a separate extension that integrates with MNEAdmin to provide self-recovery capabilities for client users.
The MNE software packages that are checked in to the master repository on the ePO - On-prem server are the actual products that are installed on the client systems, and apply the policy received from the ePO - On-prem server.
Managing policies
You can manage the MNE client systems from ePO - On-prem through a combination of product policies. Assign policies to the required client systems to make sure that systems are managed and function as specified.
Are you configuring policies for the first time?
A policy is a collection of settings that you create in ePO - On-prem and assign to the required MNE client to configure client systems.
When configuring policies for the first time:
Plan product policies for different segments of your System Tree.
Create and assign policies to groups and systems.
Note: To create, edit, and assign policies to systems or groups, see the product documentation for your version of ePO - On-prem.
Product policies
On the Policy Catalog page, the MNE policies appear under the FileVault Product Settings, BitLocker Product Settings, and Security Posture Report Settings categories.
FileVault Product Settings
Settings | Description |
FileVault Management | Manage FileVault — Allows you to manage FileVault and receive reports from the client system.
When you turn on FileVault and enforce this policy on the required client systems, users see a pop-up window on their client systems |
Settings | Description |
requesting that they restart the system. The user must restart the system to enable FileVault to encrypt the system managed by ePO - On-prem, or choose to postpone the restart until a more convenient time.
— The FileVault recovery key is removed from memory when a system goes into a standby mode. This defends against memory-related attacks during various sleep states. Resuming from sleep mode forces a user authentication to bring the key back into memory.
|
Settings | Description |
Note: If users ignore this request, system recovery cannot be achieved as no recovery key can be escrowed to ePO - On-prem; FileVault only releases the current recovery key if authentication is provided.
2.1.0.xxx on the Mac client system, FileVault is enabled only if DEGO tests pass. Note: Make sure that you have already installed EEGO.zip(DEGO extension) before enabling this option. For more information about the DEGO extension, see the Trellix Drive Encryption Product Guide.
Note: On enabling this option, the Password Settings and Client Messaging functions are disabled. Do not manage FileVault — When enforced, MNE does not manage FileVault. |
Settings | Description |
If MNE manages FileVault, or if report-only mode is selected, the client system reports the following information to ePO - On-prem:
| |
Password Settings | Apply password content rules — Allows you to set password settings on OS X, which enforces these password settings on the client system.
|
Settings | Description |
(1-180) — The user must change the password after the specified number of days.
| |
Client Messaging | Display the following message, instead of the default, when enabling FileVault — The user receives this message when FileVault is enabled. If left empty, a default message is provided. Display the following login banner — Enable this option and provide a logon banner after FileVault authentication. Display the following message, instead of the default, when a third party application or user disables FileVault — The user receives this message if FileVault is disabled by anything other than MNE. If left empty, a default message is provided. |
BitLocker Product Settings
Settings | Description |
Show/Hide Advanced | Click to show or hide advanced settings within the policy page. All policy options have suitable defaults if you do not want to define advanced settings. |
BitLocker management |
|
Settings | Description |
Note: Make sure to note that the encryption strength cannot be changed on a previously encrypted client. To change the encryption strength, BitLocker needs to be decrypted, disabled, and then re-enabled by MNE.
Note: This algorithm is supported on Windows 10 version 1511 and above systems only. Older systems fall back to the AES-128 algorithm.
Note: This algorithm is supported on Windows 10 version 1511 and above systems only. Older systems fall back to the AES-256 algorithm.
|
Settings | Description |
If MNE manages BitLocker, or report-only mode is enabled, the client system reports the following information to ePO - On-prem:
Note: BitLocker protection is suspended when the administrator changes the policy to change protector on operating system drive during the switch-over period. Otherwise, if switching authentication method, the endpoint is unprotected until the new authentication method is fully applied.
| |
System authentication |
|
Settings | Description |
security for TPM supported client systems.
Note: It is recommended to enable the hardware test option under BitLocker advanced settings to make sure pre-boot supports enhanced PINs.
Note: It is recommended to enable the hardware test option under BitLocker advanced settings to make sure pre-boot supports enhanced PINs.
— Allows you to use password authentication for client systems that do not support TPM. Note: If the Use Trusted Platform Module (TPM), Also use PIN, and Fall back to Password if no TPM is available (Windows 8 and above) options are all enabled and the current protector is the passphrase protector, then the client system is compliant to the policy.
|
Settings | Description |
that are installed with Windows 8 or above. Note: If you enable this option, Windows 7 systems automatically fall back to using TPM with PIN, as password is not supported for Windows 7 systems.
| |
Authentication Settings | Maximum number of times user can postpone activation (1-10) — Enable this option and enter the maximum number of times from 1 to 10 to postpone activation. Click Show Advanced to access this setting. |
End user messaging | Provide a custom URL for the BitLocker recovery screen in preboot (Windows 10 and above) — Enable this option to enter a custom URL that appears in the preboot screen on Windows 10 systems. The user needs to copy this URL on a webpage of another system for information about retrieving the recovery key. Recovery URL — Enter the URL that appears in the preboot screen. Click Show Advanced to access this setting. |
BitLocker advanced settings | You can choose to enable, disable, or not manage the following options:
|
Settings | Description |
Note: Sensitive data that was previously deleted from the file system might not be protected, as not all sectors are protected.
Note: From Windows 10 Build 18317, software-based encryption is the BitLocker default. See https://bit-tech.net/news/tech/software/microsoft-flips-bitlocker-encryption-default/1/
|
Security Posture Report Settings
Security posture reporting allows you to report the endpoints that meet your required security posture settings for your organization, and those that do not.
The security posture report settings allow you to define the criteria for securing endpoints. This policy has no effect on the management of the endpoint; it simply defines the tests that the endpoints should run to assure its data protection security posture .
Each specific posture test passes unless there is a specific reason for failing. For example, a system without data volumes passes all data volume tests, since there are no data volumes to fail. In other words, this reporting is primarily designed to report failures against specific criteria.
Note: You can view the overall result of security posture reporting tests by navigating through Menu → Systems → System Tree →
Systems tab, selecting the required system, and then clicking Native Encryption → Security posture reporting.
Security Posture Report Settings
Settings | Description |
Security posture reports apply to: |
Note:
If the system doesn't have data volumes, the data volume tests pass each of the posture tests. |
Security posture reporting: |
|

Settings | Description |
selected volume types use at least:
Note: Systems that are activated with higher strength Algorithm AES-256 and Security Posture set to Algorithm AES-128 displays as pass.
Note: Systems that are activated before they are managed by MNE cannot be verified as FIPs compliant. |
Enforce MNE policies on a system
Enable or disable policy enforcement on a client system. Policy enforcement is enabled by default, and is inherited in the System Tree.
For more information about performing this task, see the product documentation for your version of ePO - On-prem.
Log on to the ePO - On-prem server as an administrator.
Click Menu → Systems → System Tree → Systems tab, then under System Tree, select the group where the system belongs. The list of systems belonging to this group appears in the details pane.
Select a system, then click Actions → Agent → Modify Policies on a Single System.
Select Trellix Management of Native Encryption <version>, then click Enforcing next to Enforcement status.
Select Break inheritance and assign the policy and settings below to change the enforcement status.
Next to Enforcement status, select Enforcing, then click Save.
After restarting, the client system communicates with the ePO - On-prem server and pulls down the assigned MNE policies and encrypts the system according to the defined policies. The assigned user can be initialized through the preboot screen after the subsequent restart.
Enforce policies to a group
Enable or disable policy enforcement for a product on a System Tree group. Policy enforcement is enabled by default, and is inherited in the System Tree.
Log on to the ePO - On-prem server as an administrator.
Click Menu → Systems → System Tree → Assigned Policies, then select a group in the System Tree.
From the Product drop-down list, select Trellix Management of Native Encryption <version>, then click Enforcing next to Enforcement Status.
To change the enforcement status, select Break inheritance and assign the policy and settings below.
Next to Enforcement status, select Enforcing.
Select whether to lock policy inheritance so that groups and systems that inherit this policy can't break enforcement, then click Save.
Retain non-MNE authentication protectors on endpoints
You can configure the MNE policy so that the existing non-MNE authentication protectors configured on endpoints are retained.
Log on to ePO - On-prem as an administrator.
Select Policy → Policy Catalog.
From the Products pane, select Management of Native Encryption <version> , then under BitLocker Product Settings, select a policy to edit.
In the System Authentication tab, select Keep existing non-MNE authentication protector.
Click Save.
The selected MNE authentication protectors are ignored for endpoints that have an active non-MNE authentication protector. If none of the MNE authentication protectors are selected and the Keep existing non-MNE authentication protector is selected, then only systems with non-MNE authentication protectors are secured.
Automatic network unlock
Automatic network unlock is a feature ideally suited for protecting servers. It can be used to automatically unlock fixed data volumes while they are on the corporate network and while server rules permit, and prevent unlock when not on the corporate network or when server rules deny access.
To enable network unlock, it's necessary to assign a suitable BitLocker product policy to the system (as described earlier in this guide), and also define access rules as discussed below.
When a Fixed volume is mounted, the MNE client software requests the unlock key from ePO - On-prem. If a suitable access control rule has been provided, ePO - On-prem will release the unlock key to the client, which will unlock the Fixed volume. If no suitable rule can be found, or the rule denies access, no key will be released by ePO - On-prem and the Fixed volume will remain locked.
In this release, network unlock is available on Fixed volumes only. To avoid the need for any user authentication when the system is booted, OS volumes might be left unencrypted, or can be encrypted but with protection disabled.
Access rules can be defined on the Server Settings page. For more information, see the Automatic unlock of fixed volumes for client systems topic. This feature is applicable for endpoints installed with MNE 4.0.0 and above only.
For more information on setting network unlock policies, see the Product policies section.
Automatic unlock of fixed volumes for client systems
The administrator can define a selection of access control rules in the Server Settings page.
Each separate rule applies to a System Tree branch and all its children (via inheritance). Where a rule is explicitly defined for a System Tree branch and its children, it supersedes any rule inherited by that branch, allowing complete flexibility in access rule specification.
By default, no systems in the entire System Tree have network unlock granted. This is expressed by the path \My Organization
having a deny rule applied. This is inherited by the entire System Tree.
Since it is preferable to grant network unlock permission only where needed, ensure that your System Tree is organized so that systems that require network unlock are separated into a separate branch.
Log on to the ePO - On-prem server as an administrator.
Click Menu → Configuration → Server Settings.
On the left pane, select Trellix Management of Native Encryption, and click Edit to open the Edit Trellix Management of Native Encryption page.
Next to Automatic (network) unlock of volumes for system under, click Edit network rule, select whether you want to grant or deny access for systems in this branch by selecting GRANTED or DENIED respectively, then click Apply.
Browse through the System Tree View, select the required system or group, and click OK.
Click Add rule, then click Save.
Preboot authentication
The Trellix preboot authentication feature allows you to add preboot authentication on Windows client systems. You can enable Trellix Preboot under BitLocker Product Settings in MNE System Authentication policies.
Important: Trellix Preboot is supported only on 64-bit UEFI systems.
If you enable Trellix Preboot in ePO - On-prem policies and assign the policies to a BIOS system, MNE applies the next enabled authentication type in the list.
Note: DXL is required if you want to allow new users to be provisioned from Active Directory. If you want new users to be provisioned from Active Directory, make sure that DXL components are installed and set up in your IT infrastructure.
Trellix Preboot BitLocker Recovery. When the Trellix Preboot screen appears, the user can click Exit to BitLocker Recovery if they experience accessibility issues. The BitLocker recovery screen appears. The user must follow the on-screen instructions to complete system recovery.
Register an LDAP server for preboot user assignment
By registering an LDAP server in ePO - On-prem and setting up DXL, you can facilitate user login with Active Directory credentials at preboot. The user is not required to log in first with their Windows credentials.
Before you begin
You must have a registered LDAP (Lightweight Directory Access Protocol) server to enable Active Directory user login at preboot. Task
Select Menu → Configuration → Registered Servers, and click New Server.
From the Server Type menu on the Description page, select LDAP Server, specify a unique name and any details, then click Next.
Select Active Directory from the LDAP server type drop-down list.
Choose if you are specifying a Domain name or a specific server name next to Server name.
Use DNS-style domain names. For example, internaldomain.com and fully qualified domain names or IP addresses for servers.
Next to User name, enter the domain for Active Directory accounts and enter the password in the Password field.
These credentials must be for an admin account on the server. Use the domain\username format on Active Directory servers.
Click Test Connection.
If the connection is successful, Successfully connected to the LDAP server appears.
Click Save.
The LDAP server you created appears in the LDAP servers drop-down list.
Provision a user to use preboot from within Windows
Enable a Windows client to authenticate from preboot using Active Directory credentials.
Make sure Trellix Preboot is enabled in System Authentication policies in ePO - On-prem.
Make sure MNE is deployed to client systems.
Make sure you have registered an LDAP server in ePO - On-prem.
The user turns on the client system and the Trellix preboot logon screen appears.
The user enters their Active Directory user name and password and Windows initiates.
Provision a user to use preboot from Windows logon
Provision an existing Windows user for Trellix preboot authentication.
Make sure Trellix Preboot is enabled in System Authentication policies in ePO - On-prem.
Make sure MNE is deployed to client systems.
When MNE is deployed to the client system, the user might be required to log off and log on again to enable BitLocker disk encryption.
The user logs on to the client system using their Windows credentials and restarts the client system.
The Trellix preboot logon screen appears.
The user enters their domain credentials and clicks Login.
Managing client systems
System management allows you to import system information into ePO - On-prem. This is useful in the process of installing MNE and viewing the list of FileVault or BitLocker users.
Client systems are managed by ePO - On-prem through a combination of product policies. You can identify systems that require the same policy settings, and place them in a system group. This grouping allows you to update the policy settings to all systems in that group at the same time.
Add a system to an existing group
You can import systems from your neighborhood network to groups through ePO. You can also import a network domain or Active Directory container.
Note: The client systems are automatically added to the System Tree in ePO on successful installation of the Trellix Agent for Mac.
For more information about performing this task, see the product documentation for your version of ePO. Task
Log on to the ePolicy Orchestrator server as an administrator.
Click Menu → Systems → System Tree, then click Actions → New Systems.
From How to add systems, select the required option.
Select Push agents and add systems to the current group to enable automatic System Tree sorting. Do this to apply the sorting criteria to these systems.
Complete the following options:
Option | Action |
Agent version | Select the agent version to deploy. |
Installation path | Type the agent installation path or accept the default. |
Credentials for agent installation | Type valid credentials to install the agent: |
Option | Action |
| |
Number of attempts | Type an integer for the specified number of attempts, or use zero for continuous attempts. |
Retry interval | Type the interval in the number of seconds between two attempts. |
Cancel After | Type the number of minutes before stopping the connection. |
Push Agent using | Select the connection used for the deployment:
|
In the Systems to add field, type the NetBIOS name for each system, separated by commas, spaces, or line breaks. Alternatively, click Browse to select the systems.
Click OK.
Move systems between groups
You can move systems from one group to another in the System Tree. You can also move systems from any page that displays a table of systems, including the results of a query.
Note: In addition to the steps below, you can also drag-and-drop systems from the Systems table to any group in the System Tree.
Even if you have a perfectly organized System Tree that mirrors your network hierarchy and uses automated tasks and tools to regularly synchronize your System Tree, you might need to move systems manually between groups. For instance, you might
need to periodically move systems from the Lost&Found group. Task
Log on to the ePolicy Orchestrator server as an administrator.
Click Menu → Systems → System Tree → Systems, then browse and select the systems.
Click Actions → Directory Management → Move Systems.
Select whether to enable or disable, or to not change the System Tree sorting on the selected systems when they are moved.
Select the group where you want to place the systems, then click OK.
System actions
Use system actions to perform actions like recovering MNE and importing the recovery key.
You can perform these tasks by navigating through Menu → Systems → System Tree, select the required system, then click Actions → Management of Native Encryption.
System actions
Option | Description |
Compliance report | You can view the report, system, and native encryption properties for the selected system. |
Import FileVault recovery key | You can manually import the recovery key of the Mac systems to the ePO - On-prem database using the Import FileVault recovery key by Machine Nodepage. For more information, see the Recovering systems section. |
Management of Native Encryption Recovery | You can recover a system, if a user reports accessibility issues to that system. To recover a system, select the required system in the System Tree, then click Actions → Management of Native Encryption → Management of Native Encryption Recoveryto open the recovery key for that system. |
Option | Description |
You must securely pass that recovery key to the user, so that the user can recover the system. For more information about recovering systems, see the Recovering systems section. |
Maintenance mode on BitLocker systems
This feature allows you to temporarily disable pre-boot authentication on BitLocker systems, in order to roll out Windows or software updates that may require a system reboot. To use this feature, the maintenancemode-x.x.x.x.exe file must be copied to the system, and executed with command-line parameters within the roll out scripts.
Maintenance mode disables BitLocker protection, Trellix Preboot, and all subsequent enforcement of MNE policy, until the specified number of reboots have occurred, or maintenance mode is explicitly cleared. Once cleared, system protection is restored to its original state upon next local policy enforcement.
An API version is used to check whether the maintenance mode executable is compatible with the installed version of MNE. To test for compatibility, run the command maintenancemode-x.x.x.x.exe --version and check the output.
Note: To restore BitLocker and Trellix Preboot protection immediately, you can trigger a local policy enforcement from the Trellix Agent by calling CmdAgent.exe, within your script(s). For more information about using command line switches with CmdAgent, see KB52707.
Note: The maintenance mode executable requires Administrator privileges to run.
Examples
For command-line options, run maintenancemode-x.x.x.x.exe --help.
Enter maintenance mode, allowing for 3 reboots before maintenance mode is cleared: maintenancemode-x.x.x.x.exe --number-of-reboots 3
Clear the maintenance mode: maintenancemode-x.x.x.x.exe --clear
Obtain the version of the maintenance mode executable, and API versions: maintenancemode-x.x.x.x.exe --version
Managing MNE reports
MNE queries are configurable objects that retrieve and display data from the database. These queries can be displayed in charts and tables.
Any query results can be exported to a variety of formats, any of which can be downloaded or sent as an attachment to an email message. Most queries can be used as a dashboard monitor.
Privacy and Data Protection Self-Service Portal (DPSSP) reports
Ensure that access to these reports is authorized and appropriately managed. DPSSP reports within ePO - On-prem contain users' login names, system names, IP addresses, and audit data.
Note: This information is not transmitted externally to Trellix or other third-parties.
Queries as dashboard monitors
Most queries can be used as a dashboard monitor (except those using a table to display the initial results). Dashboard monitors are refreshed automatically on a user‑configured interval (five minutes by default).
Exported results
MNE query results can be exported to four different formats. Exported results are historical data and are not refreshed like other monitors when used as dashboard monitors. Like query results and query-based monitors displayed in the console, you can drill down into the HTML exports for more detailed information.
Reports are available in several formats:
CSV — Use the data in a spreadsheet application (for example, Microsoft Excel).
XML — Transform the data for other purposes.
HTML — View the exported results as a web page.
PDF — Print the results.
View the standard MNE reports
You can run and view the standard MNE reports from the Queries & Reports page.
Log on to the ePO - On-prem server as an administrator.
Click Menu → Reporting → Queries & Reports.
On the Groups pane, under the Trellix Groups category, select Management of Native Encryption.
You can view these standard reports:
Query | Description |
Activation Failures | Displays the list of systems that have failed activation. |
Trellix Preboot key request log | Lists all the Trellix Preboot related key request events. |
Report data protection security posture | Displays the results of the data protection security posture check on MNE systems. This report can be used to identify and report those systems that do not meet the definition of a secure system. |
Report native encryption status | Displays the MNE status of the client systems. |
Report overall encryption status | Displays the encryption status of the client systems. Important: Make sure to note that when a volume is locked by BitLocker, the message "Unable to determine status" will be displayed for the system overall encryption status because BitLocker will not release any information for a locked volume. Please note that this is an expected behavior. |
Report policy compliance | Reports the level of policy compliance of MNE systems. This report can be used to identify systems that cannot or have not enforced the ePO - On-prem policy correctly. For example, a system previously encrypted with AES-128 with an AES-256 policy cannot transition to AES-256, so will be out of compliance with the ePO - On-prem policy. |
Query | Description |
Report policy compliance (rollup) | Reports the level of policy compliance of MNE systems (rollup). |
Report product events | Displays the product related events for managing FileVault or BitLocker. |
Report recovery keys | Displays the list of client systems with recovery information. |
Reports users per system | Displays the list of users assigned to a Mac client system, or who have logged on to Windows systems. |
Report systems in maintenance mode | Displays the systems currently in maintenance mode, where BitLocker protection has been disabled. |
Report systems pending key rotation | Displays the systems where key rotation is pending after a recovery has been performed on the system through MNE recovery pages or DPSSP (Data Protection Self-Service Portal). |
Processed requests for automatic network unlock of volumes | Displays a list of all the unlock requests from systems that have network unlock enabled, and the state of the request. |
Report authentication types for MNE systems | Displays a pie chart showing authentication types for MNE systems. |
Report whether systems are waiting for a preboot password to be captured | Displays a pie chart showing which systems are waiting for a preboot password to be captured. |
From the Queries list, select the required query.
Click Actions → Run. The query results appear.
Note: You can also edit or duplicate the query, and view the details.
Click Options → Export Data, make the required selections, then click Export to export the query data.
Click on the .xml link to open the query data or right-click and save the .xml file to the required location.
Click Close.
Create MNE custom queries
You can create queries that retrieve and display the details like disk status, users, and product client events for MNE. With this wizard you can configure which data is retrieved and displayed, and how it is displayed.
For details about product features, usage, and best practices, click ? or Help.
Log on to the ePO - On-prem server as an administrator.
Click Menu → Reporting → Queries & Reports, then click Actions → New.
On the Feature Group pane, select Management of Native Encryption.
On the Result Types page, select the required query type, then click Next.
On the Chart page, from the Display Result As pane, select the type of chart or table to display the primary results of the query, then click Next.
If you select Boolean Pie Chart, you must configure the criteria to include in the query.
On the Columns page, from the Available Columns pane, select the columns to be included in the query, then click Next.
If you had selected Table on the Chart page, the columns you select here are the columns of that table. Otherwise, these are the columns that make up the query details table.
On the Filter page, from the Available Properties pane, select the required properties to narrow the search results, then
click Run. The Unsaved Query page displays the results of the query, which is actionable, so you can take any available actions on items in any tables or drill-down tables.
Selected properties appear in the content pane with operators that can specify criteria used to narrow the data that is returned for that property.
If the query didn’t appear to return the expected results, click Edit Query to go back to the Query Builder and edit the details of this query.
If you don’t need to save the query, click Close.
If this is a query you want to use again, click Save and continue to the next step.
8. On the Save Query page, type a name for the query, add any notes, and select one of the following:
New Group — Type the new group name and select either:
Private (Private Groups)
Public (Shared Groups)
Existing Group — Select the group from the list of Shared Groups.
9. Click Save.
View the standard dashboard
You can view the standard MNE reports from the Dashboards page.
Log on to the ePO - On-prem server as an administrator.
Select Reporting → Dashboards and select MNE Dashboard from the drop-down list.
You can view the MNE dashboard.
Find systems by user name
You can view the Find MNE systems by user name dashboard on the MNE Dashboards page.
The Find MNE systems by user name dashboard allows the administrator to enter a user name that reports all systems associated with that user.
Log on to the ePO - On-prem server as an administrator.
From the Dashboard drop-down list, select MNE Dashboard.
Type the name of the user in the text box and click Go.
The administrator can now view all systems associated with that user.
Create custom MNE dashboard
Dashboards are collections of user-selected and configured monitors that provide current data about your environment. You can create your own dashboards from query results or use ePO default dashboards.
For details about product features, usage, and best practices, click ? or Help.
Log on to the ePO - On-prem server as an administrator.
From the Dashboard Actions drop-down list, select New.
Next to Dashboard Name, type a name for the dashboard.
Next to Dashboard Visibility, select one of these options, as required:
Private — To make the dashboard visible to a specific set of users.
Public — To make the dashboard visible to all the users.
Shared with the following permission set(s) — To make the dashboard visible to the specified permission set(s).
Click OK.
Click Add Monitor, select the MNE query, and drag and drop to the MNE dashboard.
MNE client events
While implementing and enforcing the MNE policies that control how sensitive data is encrypted, you can monitor real‑time client events and generate reports using the MNE client events query.
Event ID | Event Description | Event Type |
35203 | This event is reported in ePO - On-prem when the FileVault activation is failed with an error message OS X recovery partition is not found. | Critical |
35204 | This event is reported in ePO - On-prem when an incompatible product is found like Trellix Drive Encryption. | Informational |
Event ID | Event Description | Event Type |
35205 | This event is reported in ePO - On-prem when FileVault or BitLocker activation is successful. | Informational |
35206 | This event is reported in ePO - On-prem when the restart prompt appears on the client system. | Informational |
35207 | This event is reported in ePO - On-prem when the FileVault or BitLocker activation is failed with an error message Unsupported operating system found. | Critical |
35208 | This event is reported in ePO - On-prem when FileVault activation is failed with an error message EEMac is active. | Informational |
35209 | This event is reported in ePO - On-prem when FileVault or BitLocker is already turned on in the client system. | Informational |
35210 | This event is reported in ePO - On-prem when FileVault activation is failed with an error message Unable to retrieve the recovery key from FileVault. | Error |
35211 | This event is reported in ePO - On-prem when FileVault or BitLocker activation is failed with an error message Unknown exception occurred. | Error |
Event ID | Event Description | Event Type |
35212 | This event is reported in ePO - On-prem when the recovery key is sent to the ePO database successfully. | Informational |
35213 | This event is reported in ePO - On-prem when the user is waiting for system to restart. | Informational |
35214 | This event is reported in ePO - On-prem when MNE is running in Report and Manage mode. | Informational |
35215 | This event is reported in ePO - On-prem when MNE is running in Report only mode. | Informational |
35216 | This event is reported in ePO - On-prem when MNE is disabled. | High |
35217 | This event is reported in ePO - On-prem when OS X login banner is applied. | Informational |
35218 | This event is reported in ePO - On-prem when OS X login banner is removed. | Informational |
35219 | This event is reported in ePO - On-prem when OS X password settings are applied. | Informational |
35220 | This event is reported in ePO - On-prem when OS X password settings are disabled. | Critical |
Event ID | Event Description | Event Type |
35221 | This event is reported in ePO - On-prem when disabling FileVault is failed as the recovery key is invalid, and the user must manually disable FileVault. | Error |
35222 | This event is reported in ePO - On-prem when disabling FileVault is failed as the recovery key is unavailable, and the user must manually disable FileVault. | Error |
35223 | This event is reported in ePO - On-prem when the Mac serial number is not found. | Error |
35224 | This event is reported in ePO - On-prem when the volume information is not available. | Error |
35225 | This event is reported in ePO - On-prem when FileVault user information is sent. | Informational |
35226 | This event is reported in ePO - On-prem when FileVault is disabled by third party application or user. | Critical |
35227 | This event is reported in ePO - On-prem when the encryption is started. | Informational |
35228 | This event is reported in ePO - On-prem when the encryption is completed. | Informational |
Event ID | Event Description | Event Type |
35229 | This event is reported in ePO - On-prem when the decryption is started. | Informational |
35230 | This event is reported in ePO - On-prem when the decryption is completed, and Filevault or BitLocker is disabled. | Informational |
35231 | This event is reported in ePO - On-prem when the restart prompt fails to appear. | Error |
35232 | This event is reported in ePO - On-prem when disabling FileVault or BitLocker fails. | Error |
35233 | This event is reported in ePO - On-prem when a user is removed from FileVault. | Informational |
35234 | This event is reported in ePO - On-prem when a user is failed to be removed from FileVault. | Error |
35235 | This event is reported in ePO - On-prem when the user imports a FileVault recovery key. | Informational |
35236 | This event is reported in ePO - On-prem when the user fails to import a FileVault recovery key since the key is invalid. | Informational |
35238 | This event is reported in ePO -On-prem when the system is not compliant to MNE policy as the local policy changes have been made. | Critical |
Event ID | Event Description | Event Type |
35239 | This event is reported in ePO - On-prem when the BitLocker GPO policy is overriding the MNE policy. | Critical |
35240 | This event is reported in ePO - On-prem when BitLocker fails to activate as TPM is not available, or when changing from password to TPM policy, if TPM is not available, leaving the system in an unprotected state. | Error |
35241 | This event is reported in ePO - On-prem when BitLocker fails to activate as TPM is not available and fails to fall back to password authentication on Windows 7 systems that do not support the password encryption method. | Error |
35242 | This event is reported in ePO - On-prem when BitLocker fails to activate as the password policy is not supported on Windows 7 systems. | Error |
35243 | This event is reported in ePO - On-prem when BitLocker fails to activate as TPMs PIN policy is not supported on Windows 7 systems. | Error |
Event ID | Event Description | Event Type |
35244 | This event is reported in ePO - On-prem when the encryption algorithm strength used to encrypt the disk is weaker than the strength specified in the policy. | Warning |
35245 | This event is reported in ePO - On-prem when the encryption algorithm strength used to encrypt the disk is stronger than the strength specified in the policy. | Warning |
35246 | This event is reported in ePO - On-prem when TPM is not available and the client system has fallen back to password encryption method for authentication. | Informational |
35247 | This event is reported in ePO - On-prem when the client system has more than one user on the system while activating FileVault. | Informational |
35248 | This event is reported in ePO - On-prem when the FileVault users have been successfully excluded from inheriting the password policy. | Informational |
35249 | This event is reported in ePO - On-prem when excluding FileVault users fails from inheriting the password policy. | Error |
Event ID | Event Description | Event Type |
35250 | This event is reported in ePO - On-prem when the recovery key is successfully regenerated on the client system. | Informational |
35251 | This event is reported in ePO - On-prem when the recovery key fails to regenerate on the client system. | Critical |
35252 | This event is reported in ePO - On-prem when BitLocker activation fails as SafeBoot or Trellix Drive Encryption is installed. | Critical |
35253 | This event is reported in ePO - On-prem when FIPS mode activations fails on Windows 8 systems. | Critical |
35254 | This event is reported in ePO - On-prem when password authentication is not supported on Windows 7 systems and falls back to TPM and PIN authentication method. | Informational |
35255 | This event is reported in ePO - On-prem when MNE activation is refused due to failed hardware test. | Critical |
35256 | This event is reported in ePO - On-prem when the hardware test is ignored as FIPS is enabled. | Critical |
Event ID | Event Description | Event Type |
35257 | This event is reported in ePO - On-prem when the key rotation is successful. | Informational |
35258 | This event is reported in ePO - On-prem when key rotation is failed as one or more key(s) failed to rotate. | Major |
35259 | This event is reported in ePO - On-prem when the calculation of compliance to policy is failed. For more information, refer the client logs. | Critical |
35260 | This event is reported in ePO - On-prem when there are no supported BitLocker volumes. For more information, see KB83141. | Major |
35261 | This event is reported in ePO - On-prem when a keyboard is not detected for use in pre-boot environment for tablets/slates and the activation is failed. | Major |
35262 | This event is reported in ePO - On-prem when the non-MNE recovery keys have been removed. | Informational |
35263 | This event is reported in ePO - On-prem when the system fails to remove the non-MNE recovery keys. | Major |
35264 | This event is reported in ePO - | Informational |
Event ID | Event Description | Event Type |
On-prem when key rotation is requested by ePO - On-prem from the client system. | ||
35265 | This event is reported in ePO - On-prem when the maintenance mode has been disabled successfully. | Informational |
35266 | This event is reported in ePO - On-prem when the maintenance mode is currently active. | Informational |
35267 | This event is reported in ePO - On-prem when the maintenance mode is failed to activate. | Major |
35268 | This event is reported in ePO - On-prem when the maintenance mode has ended after the specified number of reboots. | Informational |
35269 | This event is reported in ePO - On-prem when key rotation was only partially successful (some keys failed to rotate). | Informational |
35270 | This event is reported in ePO - On-prem when a fixed volume was successfully unlocked using network unlock. | Informational |
35271 | This event is reported in ePO - On-prem when a fixed volume failed to successfully unlock using network unlock. | Major |
Event ID | Event Description | Event Type |
35272 | This event is reported in ePO - On-prem when a network unlock key request failed to be queued. | Major |
35273 | This event is reported in ePO - On-prem when a network unlock key request timed out. | Major |
35274 | This event is reported in ePO - On-prem when a user successfully changed their password through the MNE user interface. | Informational |
35275 | This event is reported in ePO - On-prem when a user successfully changed their PIN through the MNE user interface. | Informational |
35276 | Activation failed: Hardware encryption is required but not supported. | Informational |
35277 | Hardware encryption is required but drive is already encrypted with software. | Informational |
35278 | Failed to disable FileVault due to empty UUID. | Error |
35279 | Successfully applied password authentication. | Informational |
35280 | Failed to apply password authentication. | Error |
35281 | Successfully applied TPM | Informational |
Event ID | Event Description | Event Type |
authentication. | ||
35282 | Failed to apply TPM authentication. | Error |
35283 | Successfully applied TPM & standard PIN authentication. | Informational |
35284 | Failed to apply TPM & standard PIN authentication. | Error |
35285 | Successfully applied TPM & enhanced PIN authentication. | Informational |
35286 | Failed to apply TPM & enhanced PIN authentication. | Error |
35287 | Successfully applied network unlock authentication. | Informational |
35288 | Failed to apply network unlock authentication. | Error |
35289 | Successfully applied domain user authentication with Trellix Preboot. | Informational |
35290 | Failed to apply domain user authentication with Trellix Preboot. | Error |
35291 | Information | Informational |
35292 | Error | Error |
35293 | Failed to apply any of the | Critical |
Event ID | Event Description | Event Type |
authentication methods specified in the policy. | ||
35294 | Upgrade started for preboot authentication. | Informational |
35295 | Upgrade finished successfully for preboot authentication. | Informational |
35296 | Upgrade failed for preboot authentication. | Error |
35297 | Trellix Preboot compatibility test successful. | Informational |
35298 | Trellix Preboot compatibility test failed. | Error |
35299 | An error occurs while reading Boot Configuration Data. | Error |
40200 | An error occurs while reading or writing UEFI variables. | Error |
Recovering systems
System recovery is a process of recovering a user's system from system crashes, system malfunctions, accessibility issues, and more. If a user reports any such problems, you must provide the recovery key of the system to the user for the user to recover the system using FileVault recovery tools provided by Apple or BitLocker recovery tools provided by Microsoft.
Note: We don't provide support for FileVault or BitLocker recovery tools. If you encounter any problems with this recovery process, we recommend that you contact Apple or Microsoft Support as appropriate.
How is the key escrowed in the ePO - On-prem database?
The recovery key can be escrowed in two ways:
When enabling FileVault or BitLocker on a client system using MNE, MNE obtains the recovery key of the system automatically and sends it to the ePO - On-prem database.
If FileVault has been previously enabled by the user at the point when MNE is installed on the client system, then either:
the system user must enter their FileVault password when prompted in order to grant MNE the right to the recovery key, or
the system user must import their FileVault recovery key on the system, or
the administrator must import the recovery key of the system manually into the ePO - On-prem database in order for the recovery feature to be available for that system.
If none of these actions are taken, recovery will not be possible.
Note: You can obtain the recovery key of a client system only if FileVault or BitLocker is managed by MNE.
How to obtain the serial number of a Mac system?
The serial number of the Mac system can be obtained in two ways:
At the back/side/bottom of your Mac hardware, the serial number of the system is displayed.
When you click the About this Mac option, the serial number of the system is displayed.
Import the recovery key
You might need to manually import the recovery key of a Mac client system to the ePO - On-prem database using the System Tree or Data Protection menu. The client user can also import the recovery key to the ePO - On-prem database from the client system.
These tasks must be performed only if FileVault has been previously enabled by the user.
Note: This is not required for BitLocker systems.
Import the recovery key using System Tree
You must manually import the recovery key of the client system to the ePO - On-prem database using the Import FileVault recovery key by Machine Node page.
For details about product features, usage, and best practices, click ? or Help.
Log on to the ePO - On-prem server as an administrator.
Click Menu → Systems → System Tree → Systems tab, select the required system, then click Actions → Management of Native Encryption → Import FileVault recovery key to open the Import FileVault recovery key by Machine Node page.
In the Enter recovery key field, type the recovery key of the system that you obtained.
Click Ok.
Import the recovery key using the Data Protection menu
You must manually import the recovery key of the client system to the ePO - On-prem database using the Import FileVault recovery key by serial number page.
Task
Log on to the ePO - On-prem server as an administrator.
Click Menu → Data Protection → Import FileVault recovery key to open the Import FileVault recovery key by serial number page.
In the Enter serial number field, type the serial number of the system that you received from the user.
In the Enter recovery key field, type the recovery key of the system that you obtained.
Click Ok.
Import the recovery key from a client system
Client users now have an option of importing the recovery key directly from the client system to the ePO - On-prem database.
Make sure to note that this task must be performed by the client user on the client system.
Make sure that the administrator has enabled the FileVault policy for the client system.
Make sure that the administrator has enabled and enforced the Allows users to import recovery key on client policy on to the client system.
For details about product features, usage, and best practices, click ? or Help.
Open the MNE client interface on the client system.
On the left pane, click Encryption.
Enter the new recovery key.
To generate a new recovery key, enter this command: sudo fdesetup changerecovery -personal.
Click Apply.
After the recovery key is escrowed to the ePO - On-prem database, the last key import time is displayed on the Encryption pane.
The recovery key is successfully escrowed to the ePO - On-prem database.
Import the recovery key using the MNE command-line
Client users now have an option of importing the recovery key directly from the client system, installed with Mavericks operating system or above, to the ePO - On-prem database using the MNE CLI (Command-Line Interface) tool.
Make sure to note that this task must be performed by the client user who has 'sudo' or 'root' privileges on the client system.
Make sure that the administrator has enabled the FileVault policy for the client system.
Make sure that the administrator has enabled and enforced the Allows users to import recovery key on client policy on to the client system.
For details about product features, usage, and best practices, click ? or Help.
Open the Terminal.app on the Mac client system.
Run the command: sudo /usr/local/McAfee/MNE/bin/MNEMacTool -i xxxx-xxxx-xxxx-xxxx-xxxx-xxxx, where xxxx
refers to a valid recovery key for that particular client system.
The recovery key is successfully escrowed to the ePO - On-prem database.
Perform system recovery using ePO - On-prem
If a user reports the system to be recovered, you must provide the recovery key of the system to the user for the user to recover the system using the Apple FileVault or Microsoft BitLocker recovery tools.
Note: Note that FileVault provides a single recovery key per system. BitLocker provides one or more recovery keys per volume. If multiple recovery keys are available for a single volume (which may happen when MNE is installed on a previously encrypted system), then any of the recovery keys can be used to recover the volume.
Provide the recovery key to the user
You must provide the recovery key of the client system that is managed by ePO - On-prem to the user for the user to recover the system using the Apple FileVault or Microsoft BitLocker recovery tools.
For details about product features, usage, and best practices, click ? or Help.
Log on to the ePO - On-prem server as an administrator.
Click Menu → Data Protection → Management of Native Encryption recovery.
Note: You can also access Management of Native Encryption recovery by navigating through Menu → Systems → System Tree → Systems tab, select the required system, then click Actions → Management of Native Encryption recovery.
On the Enter serial number (FileVault) or recovery key ID (BitLocker) page, type the serial number for FileVault systems or recovery key ID for BitLocker systems that you received from the user, then click Next.
Note: This step is not applicable if you access Management of Native Encryption recovery through the System Tree menu, because the serial number or recovery key ID of the system is automatically populated. In this case, multiple keys might be displayed.
The recovery key(s) of the system appears on the Recovery key from serial number/ recovery key ID page.
Provide the recovery key to the user so that the user can recover the system.
For FileVault, the recovery key is always a string. For BitLocker in non-FIPS mode, the recovery key is always a string. For
BitLocker in FIPS mode, the recovery key is always a file that must be downloaded and managed by Cryptographic Officers.
Once the user has received the recovery key, we recommend the user to contact Apple or Microsoft Support for assistance in recovering the client system.
MNE recovery key through scripting
MNE recovery keys can be retrieved from ePO - On-prem using the ePO - On-prem web API by passing the serial number, recovery key ID, or ePO - On-prem leaf node.
How does scripting work?
Scripts using the Web API can be run from any computer that can connect to the ePolicy Orchestrator - On-premises server. For security reasons, they must not be run on the same computer as the ePolicy Orchestrator - On-premises server itself. For more information, see Trellix ePolicy Orchestrator - On-prem Web API Scripting Reference Guide.
The Web API is used primarily for two purposes:
Scripting sequences of tasks
Performing simple tasks without using the user interface
MNE key recovery by serial number or recovery key ID
FileVault or BitLocker recovery keys can be retrieved from ePO - On-prem using the mc.mne.recoverMachine command by passing the serial number of the system for FileVault systems or recovery key ID for BitLocker systems. In both cases, use the serialNumber parameter as shown in the Syntax column. A key ID consists of 32 hexadecimal digits.
Note: This API is not available for systems running in FIPS mode. It displays numeric keys, not binary file keys as are used in FIPS mode.
Command | Syntax | Description |
mc.mne.recoverMachine | mc.mne.recoverMachine(serialN umber='<serial number or recovery key ID>') | Pass the serial number of the client system to retrieve the FileVault recovery key and |
Command | Syntax | Description |
For example:
6789abcdef') | recovery key ID to retrieve the BitLocker recovery key. |
MNE key recovery by ePO - On-prem leaf node
FileVault or BitLocker recovery key can be retrieved from ePO - On-prem using mc.mne.recoverMachine command by passing the ePO - On-prem leaf node ID number.
Command | Syntax | Description |
mc.mne.recoverMachine | mc.mne.recoverMachine(epoLeaf NodeId='<>' For example, mc.mne.recoverMachine(epoLeaf NodeId='10') | Pass the ePO - On-prem leaf node ID to retrieve the FileVault or BitLocker recovery key for the client system. |
Perform system recovery using the Data Protection Self Service Portal
The client user can obtain the recovery key for a client system using the Data Protection Self Service Portal (DPSSP), and perform system recovery using the Apple FileVault or Microsoft BitLocker recovery tools.
The administrator must first install the dpssp.zip extension in ePO - On-prem, make the required DPSSP server settings. An authorized client user can open the DPSSP portal on a system, enter the serial number or recovery key ID for the FileVault or BitLocker system respectively, and obtain the recovery key.
The full DPSSP URL is displayed in Menu → Configuration → Server Settings → DPSSP Settings.
The DPSSP URL will be of the general form https://ePO_IP_address:Port_Number/dpssp/selfRecovery.
Important: The DPSSP URL is displayed on the DPSSP policy page and can be copied into an email or other notification provided to users to identify the URL that can be used for recovery.
If you have previously provided the URL to users based on port 8443, this URL will still work after upgrading to the latest version. However, we recommend that the users are provided with the revised URL using port 8444, as port 8443 is used by other ePO - On-prem services. This is especially important in environments where there are a significant number of client systems that could undertake recovery in response to some common problem affecting multiple systems.
Configure DPSSP server settings on ePO - On-prem
The administrator must configure DPSSP server settings on the client system and enforce the settings on to the required client system to allow the user to obtain the recovery key on the client system using DPSSP.
Make sure that you have installed the dpssp.zip extension on the ePO - On-prem server before performing this task. For details about product features, usage, and best practices, click ? or Help.
Log on to the ePO - On-prem server as an administrator.
Click Menu → Configuration → Server Settings.
On the left pane, select DPSSP Settings and click Edit to open the Edit DPSSP Settings page.
Enable the Self Service Portal option.
Next to ePO user, type the ePO - On-prem user name.
Note: Make sure that the ePO - On-prem user name that you enter has the permission to perform recovery operations in MNE. We recommend creating a specific ePO - On-prem user for DPSSP recoveries, and limiting the permission set privileges to MNE recovery only.
Next to Authentication, AD is selected by default as the Active Directory sever.
Note: Make sure to note that the administrator has selected the registered AD in ePO - On-prem.
Next to Logging, enable the Log authentication attempts and Log user activity options.
Next to Blocking, enable the Enable IP address blocking option, and perform the following operations:
Block IP address after (failed logins) — Type the numeric value to block the IP address after the specified number of unsuccessful logon attempts.
Unblock after (minutes) — Type the numeric value in minutes to unblock the respective IP address after the specified number of minutes.
Note: To instantly unblock an IP address, refer to the How to instantly unblock a user or IP address section.
Next to Blocking, enable the Enable user blocking option, and perform the following operations:
Block user after (failed logins) — Type the numeric value to block the user after the specified number of unsuccessful logon attempts.
Unblock after (minutes) — Type the numeric value in minutes to unblock the respective user after the specified number of minutes.
Note: If you either install the dpssp.zip extension or restart the ePO - On-prem system, you cannot block or unblock users for 10 minutes.
To instantly unblock a user, refer to the How to instantly unblock a user or IP address section.
Next to Session, type the numeric value in minutes to log off the user's session after the specified number of minutes.
Click Save.
Enable the DPSSP permission set for unblocking users or IP addresses
Enabling the DPSSP permission set allows you to remove users or IP addresses from the blocked list in the event of multiple failed logons (in the DPSSP portal) by users or IP addresses leading to being blocked.
To enable the DPSSP permission set for unblocking users or IP addresses, follow these steps: Task
Click Menu → User Management → Permission Sets.
Next to the Data Protection Self Service Portal permission set, click Edit.
Next to the Data Protection Self Service Portal option, select Unblock users or IP addresses.
Click Save.
How to instantly unblock a user or IP address
To instantly unblock a user or IP address after the specified number of unsuccessful logon attempts, follow these steps: Task
Log on to the ePO - On-prem server as an administrator.
Click Menu → Reporting → Queries & Reports.
On the Groups pane, under Trellix Groups category, select Data Protection Self Service Portal.
Select the Blocked users or Blocked IP addresses query, click Actions → Run.
Select the required user or IP address, click Actions → Unblock users or IP addresses.
Click Yes when the system prompts Are you sure? to unblock the selected user or IP address.
Obtain a recovery key on the client system using DPSSP
When DPSSP is used for recovery with systems managed with MNE, the user must open the DPSSP portal, enter the serial number or recovery key ID for the FileVault or BitLocker system respectively, and obtain the recovery key.
Make sure to note that this task must be performed by the client user on the system.
The Data Protection Self-Service Portal (DPSSP) can now be used with both MNE 2.0.0 and later, and Trellix Drive Encryption 7.1 Patch 2 and later. In the event that both MNE and Drive Encryption are installed within the customer environment, the user is required to choose the product for which recovery is being requested.
For details about product features, usage, and best practices, click ? or Help.
In the address bar of a web browser, enter the URL https://<ePO IP address>:8444/dpssp/selfRecovery, then press Enter to open the Data Protection Self Service Portal (DPSSP) page.
Select the required Language, type the domain user name prefixed with domain name, type the password, then click Login.
Note:
If you exceed the specified number of unsuccessful logon attempts as set in ePO - On-prem, your user account will be blocked and you will see the message "Login failed." In that case, you must wait for the specified number of minutes as set in ePO - On-prem to get your account unlocked.
Upon a successful login to DPSSP, if MNE and Drive Encryption are both installed in the environment managed by ePO - On-prem, the user will need to select the appropriate product for which recovery information is required.
Type the serial number or recovery key ID of the FileVault or BitLocker system respectively, then click Get key.
Obtain the Recovery code to recover the system using the Apple FileVault or Microsoft BitLocker recovery tools.
Note: If the entered serial number or recovery key ID is not recognized, the user should check the value entered was correct and then contact the help desk. The help desk can then check the ePO - On-prem User Audit log for more detailed information.
Click Logout.
View the Data Protection Self Service Portal (DPSSP) reports
You can run and view the standard DPSSP reports from the Queries & Reports page. Task
Log on to the ePO - On-prem server as an administrator.
Click Menu → Reporting → Queries & Reports.
On the Groups pane, under the Trellix Groups category, select Data Protection Self Service Portal.
You can view these standard reports:
Query | Description |
Blocked IP addresses | Displays the IP addresses of client systems that are blocked. |
Blocked users | Displays the list of users who are blocked. |
Query | Description |
Number of recoveries per point product in the last 24 hours | Displays the number of recoveries per point product in the last 24 hours. |
Number of recoveries per point product in the last 30 days | Displays the number of recoveries per point product in the last 30 days. |
Number of recoveries per user in the last 24 hours | Displays the number of recoveries per user in the last 24 hours. |
Number of recoveries per user in the last 30 days | Displays the number of recoveries per user in the last 30 days. |
From the Queries list, select the required query.
Click Actions → Run. The query results appear.
Note: You can also edit or duplicate the query, and view the details.
Click Options → Export Data, make the required selections, then click Export to export the query data.
Click on the .xml link to open the query data or right-click and save the .xml file to the required location.
Click Close.
Rotate recovery keys
You can enable rotating the recovery keys when the system recovery is performed through MNE recovery pages and DPSSP. Please note that there may be a delay of up to an hour before the server requests that the client rotates the keys.
For details about product features, usage, and best practices, click ? or Help.
Click Menu → Configuration → Server Settings.
In the Setting Categories pane, click Management of Native Encryption, then click Edit to open the Edit Management of Native Encryption page.
Enable the options as follows:
Recovery is performed through MNE recovery pages — Enable this option to rotate the recovery keys when the recovery is performed through MNE recovery pages.
Recovery is performed through DPSSP — Enable this option to rotate the recovery keys when the recovery is performed through DPSSP.
Note: Key rotation following recovery is not available on OS X systems.
Click Save.