Here are answers to frequently asked questions.
What features are enabled with which license?
Licence | Features enabled |
|---|---|
Application Control |
|
What are these features?
Feature | Description |
|---|---|
app-control | Helps you to define applications that are allowed to run on your system (allow list applications) and applications that are blocked from running on your system (block list applications). |
app-control-dsr | Provides additional information about a file such as file type, size, and version. |
app-control-installer-detect | Checks whether an application being launched is an installer or not in context of App-control feature. If the application is an installer, it works as an Updater if configured so. |
checksum | Calculates and matches the checksum of the file to be executed with the checksum stored in the inventory. |
deny-exec | Prevents execution of any unauthorized EXE files, DLL files, and drivers. |
deny-exec-dlls | Prevents execution of any unauthorized DLL files. |
deny-exec-drivers | Prevents execution of any unauthorized drivers (for example .sys files). |
deny-exec-exes | Prevents execution of any unauthorized EXE files. |
deny-exec-ads | Prevents execution of Advanced Data Streams. |
deny-read | Read-protects critical components. When this feature is applied on the components, the components can't be read. Read protection is listed as deny‑read feature in the features list. Read protection works only when Application Control is running in the Enabled mode. |
deny-write | Write-protects the specified components. When this feature is applied on the components, the components are rendered as read-only thereby protecting your valuable data. This feature is supported only when Application Control is operating in the Enabled mode. |
discover-updaters | Retrieves a list of potential updaters that can be included in the system. |
integrity | Protects the files and registry keys of Application Control from unauthorized tampering. It allows the product code to run even when the components of Application Control are not in the inventory. This makes sure that all components of the product are allowed. Accidental or malicious removal of the components from the allow list is prevented to make sure the product remains usable. |
mon | Allows you to designate a set of files, processes to be monitored for changes. |
mp | Protects the running processes on a system from malicious/hijacking attempt. This feature is supported only on the Windows platform. Unauthorized code injected into a running process is trapped, halted, and logged. In this manner, attempts to gain control of a system through buffer overflow and similar exploits are rendered ineffective and logged. |
mp-casp | Renders useless code that is running from the non‑code area. Code running from the non‑code area is an abnormal event that usually happens due to a buffer overflow being exploited. This technique is available on the 32‑bit Windows platforms. |
mp-nx | The NX feature uses Windows' Data Execution Prevention (DEP) feature to protect processes against exploits that try to execute code from writable memory area (stack/heap). |
mp-vasr-forced-relocation | Forces relocation of those dynamic-link libraries that have opted out of Windows native ASLR feature. Some malware relies on these DLLs to get loaded at the same and known address. By relocating such DLLs, these attacks are prevented. |
ob-logging | Controls if observations are reported. |
pkg-ctrl | Manages the installation and removal of all MSI‑based installers on a protected Windows endpoint. |
pkg-ctrl-bypass | Controls bypassing from the package control feature. When this feature is enabled, pkg-ctrl feature is bypassed and every software installation and removal is allowed. |
pkg-ctrl-allow-uninstall | Controls the removal of software packages. When this feature is enabled, all software removal is allowed. |
popups | Allows the user to get the solidifier events in a pop-up with logs and event viewer. |
Trellix GTI-reputation | Reputation checking with Trellix GTI. |
script-auth | Prevents the execution of supported script files, which are not present in the allow list. Only the allowed script files are allowed to execute on an endpoint. For example, supported script files such as .BAT, .CMD, .VBS (for Windows) are added to the allow list to be allowed to execute on an endpoint. |
self-approval | Application Control prevents any new or unknown applications from running on protected endpoints. When the self-approval feature is enabled and users try to run an unknown or new application on a protected endpoint, they are prompted to approve or deny the application execution. |
script as updater | Provides updater rights to supported script files such as .BAT, .CMD, .VBS (for Windows). |
signing | Allows user to control execution of a binary based on trusted publisher certificates. |
signing-fic | Controls execution of binary based on both checksum and trusted publisher certificates. |
throttle | Controls Throttling policy. If this is not set, neither the events are sent to throttle cache, nor any pull from throttle cache or any type of throttle tracking happens. The installer enables this feature by default in version 6.2.0. This is a common feature for all types of throttling (events/invdiff/observations). Enabling or disabling this feature applies to all 3 types of throttling. |
throttle-ob | Controls throttling of observations. |
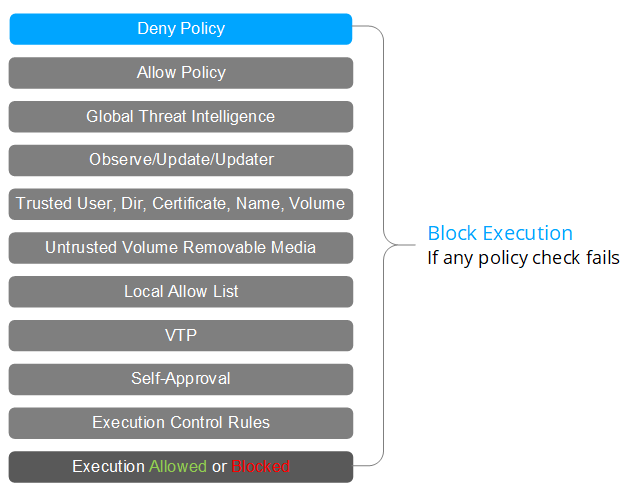
What is the execution decision flow of Application Control?
For more information about execution decision flow of Application Control, see KB85695.
Which one takes precedence in monitoring (file, user, or folder)?
The order of precedence is considered as listed:
User name-based filter
Process name-based filter
File extension-based filter
File name-based filter
Folder/directory-based filters
For example, on Windows, if folder C:\Folder1\Folder2 is included but folder C:\Folder1 is excluded, any change operations performed on a file in folder C:\Folder1\Folder2 will record events because C:\Folder1\Folder2 (longest pathname) has higher precedence over C:\Folder1. Hence, all other folders present under C:\Folder1 are not monitored.
How to handle Memory Leak from scsrvc.exe (User-mode)
Before you start collecting traces, you need to define how long it takes for the Application Control process to consume all available RAM from the Operating System, so you can divide the time and use it to capture 4 traces. Also, enable the advanced debugging for scsrvc.exe in Gflags tool (Global Flags Editor).
Gflags tool is included in Debugging Tools for Microsoft Windows. For more information, see Download Debugging Tools for Windows.
Once the debugging kit is installed, the tool (gflags.exe) is saved in: C:\Program Files (x86)\Windows Kits\10\Debuggers\x64 for Systems running 64 bits Windows or C:\Program Files (x86)\Windows Kits\10\Debuggers\x86 running 32-bits version of Windows.
In addition, you need poolmon.exe which is also part of the debugging tools, and procdump.exe which can be downloaded from Microsoft Sysinternals tool website. For details, click here.
Note
If the debugging package is installed while the product is in Update mode, all tools are solidified. But, if you are copying the tool from another system or downloading while the product is in Enabled Mode, solidify the tools or change the product to Update Mode. Otherwise the execution is denied.
Instructions to start the advance trace for scsrvc.exe:
Open Command Prompt as an administrator and navigate to the path where the tool is saved.
Run the following command:
<tool path>\gflags.exe /i SCSRVC.exe +ust
Verify the Gflags is enabled for scsrv.exe by opening the following registry key: HKEY_LOCAL_MACHINE\SOFTWARE\Microsoft\Windows NT\CurrentVersion\Image File Execution Options\SCSRVC.exe\GlobalFlag = 0x00001000.
Make sure TACC is in the operation mode where the memory leak is exhibited.
Reboot the system for advance logging to start recording.
Scenario for data collection: If scsrvc.exe takes 48 hours to reach 4-GB RAM (all available RAM), you can reduce the trace time, because the 0-GB trace does not have enough info and 4-GB RAM trace might be hard to capture as the system might be in a crash state. So, in case, you remove 8 hours, in total we have 40 workable hours to capture 4 traces.
Every 10 hours, you must capture: poolmon and process dump (procdump) at the same time, using these commands:
Open Command Prompt as an Administrator, and run:
<tool path>\poolmon.exe -b -p -r -n <filename>.log
<tool path>\procdump.exe -ma scsrvc.exe
Repeat this process 4 times.
Once you finish collecting poolmon and process dumps, disable gflags by executing: <tool path>\gflags.exe -i SCSRVC.exe.
Then reboot the system and collect a MER.
How to handle memory Leak from Solidcore Tags (Kernel Mode)
In kernel mode, Solidcore tags name start with: Q*.
This issue is exhibited when these tags don't release allocated memory, which leads to system crash and the only way to recover is by rebooting it.
Before collecting any trace, you need to configure your system to generate full memory dump, and this is due to the nature of the issue, no User-mode processes exhibit high consumption generally.
Following instructions to force a system crash by pressing a combination of keys. For instructions, click here.
When configuring the dump options in Control Panel > System and Security > System. Click Advanced system settings. Under Startup and Recovery, click Settings. Select Complete Memory Dump in Write Debugging Information.
Like the user-mode scenario, you can define a time frame to capture 4 poolmon, and a full memory dump (forced through keyboard) when the system crashes or is unresponsive.
How to manually Purge data from ePO - SaaS?
Application Control collects and store information from all endpoints. This information can be categorized as: events, inventory, and Policy Discovery. Trellix Recommends that after all data is reviewed by the Solidcore Administrator, it needs to be purged to avoid data redundancy and performance degradation on the database caused by the product extension.
From ePO - SaaS, all purging tasks can be created and scheduled from Server Tasks:
On the ePO - SaaS console, select Menu → Automation → Server task.
Click New Task to open the Server Task Builder wizard.
Type the task name, then click Next.
Select Solidcore: Purge from the Actions drop-down list.
Configure choose feature option - Select the reporting feature for which to purge records.
Note
You can expand the choose feature option to find Inventory, Events, and Policy Discovery.
Click Next to open the Schedule page.
Specify schedule details, then click Next to open the Summary page.
Review and verify the details, then click Save.
The following schedule frequencies need to be adapted in compliance with your company auditing and data restore policies:
What we recommend — Purge Events older than 90 days.
Note
Purging the records from Solidcore Events table also purge related records from ePO - SaaS Events Table.
Purge Client Task Log older than 30 days.
Purge alerts older than 90 days.
Inventories are frequently updated and there is no need to remove them, if you need to remove the inventory from 1 particular system.
Content Change Tracking Repository is purged by query only.
Purge Policy Discovery older than 90 days.
Solidification FAQs
What files do we solidify?
PE 32 > EXE, DLL, SYS > all executable files
Scripts > BAT, CMD, 16-bit EXE, VBS
PE 64 > 64-bit executables
How to view scripts that can be solidified?
Run the following command to view scripts:
Sadmin Scripts list
How to determine if something is Solidified (on the allow list)?
Run the following command to list solidified items:
Sadmin ls
If it echoes the path and name, it is solidified.
If not, not solidified.
Run the following command to list unsolidified items:
Sadmin lu
If it echoes the path and name, it is unsolidified.
If not, it is solidified.
Run the following command to get advanced details about a file:
Sadmin ls - lax
What hashes are collected in inventory?
Hashes collected for inventory:
SHA-1
MD5
SHA-256
What is collected in Solidcore inventory file?
Inventory file contains details such as hash, reputation, and location.
Where can you view your client inventory?
On the ePO - SaaS console, select Menu → Application Control → Inventory.
What is the function and specific use cases for each skiplist?
You can add skip rules using the sadmin skiplist add command and specify the needed arguments to skip path components from several features such as monitoring, write protection, file operations and script-auth, allow list, and Application Control.
Monitoring
Skiplist -c
Skiplist -c is used predominately in the Update mode to disable monitoring on files. This can be used to quiet events from showing up in TACC events. Think of a more powerful filter built into operate while in the Update mode.
Use case | This skiplist is used mainly on inventory files to suppress events in Update mode. |
Applying this feature to an endpoint | You can't apply this skiplist through a policy. You must run from a sadmin command or locally from an endpoint.
|
Risk | The risk associated with this process is medium. If a file is no longer monitored, it can't be executed without additional permission configured. |
Write protection
Skiplist -d
Skiplist -d is used to deny write passthrough attribute. This skiplist removes write protection from a file allowing it to be changed by any source.
Use case | This skiplist can be used when you modify a file with a generic updater. You can remove write protection from a file and block a generic process from updating your file. This allows the file to remain solidified but create hash mismatches. Net framework and directories where libraries are frequently upgraded and require execution. |
Applying this feature to an endpoint | This skiplist can be applied through a policy in ePO - SaaSePO - SaaS or a sadmin run command. To apply it as a policy, go to the specified rule group, click filters, and select exclude path from write-protect rules. You must specify a path for the file.
|
Risk | The risk associated with this process is high. There is a chance a malicious file could be placed in a path. |
Skiplist -r
Skiplist -r creates a registry path passthrough attribute. This process allows an application to modify the registry.
Use case | When registry write deny events are triggered by an application, a skiplist -r might be needed to allow the change. |
Applying this feature to an endpoint | This skiplist can't be applied through a policy. You must run from a sadmin command or locally from an endpoint.
|
Risk | The risk associated with this process is high. It should only be used for processes that are known and trusted. It can be exploited if the policy is defined broadly. |
File operations and script-auth
Skiplist -f (think file)
Skiplist -f is used to create file operations passthrough. This rule allows you to create, modify, and delete files regardless of solidification. It will not allow you to overwrite links and rename files.
Use case | This skiplist is used when files are noisy and updated frequently if a filter does not work. |
Applying this feature to an endpoint | This skiplist can be applied through a policy in ePO - SaaS or a sadmin run command. To apply it as a policy, go to the specified rule group, click filters, and select exclude path from file operations rules. You must specify a path for the file.
|
Risk | The risk associated with this process is high. It should be used when a filter is not working. |
Skiplist -i (think folder)
Skiplist -i or ignore passthrough attribute, ignores path, and works similar to a skiplist -f.
Use case | When on a 64-bit platform, this skiplist can be used with 32-bit and earlier processes. A reboot is needed for this rule to work. Another use case is jar files that are modified frequently that do not run without an interpreter. |
Applying this feature to an endpoint | This skiplist can be applied through a policy in ePO - SaaS or a sadmin run command. To apply it as a policy, go to the specified rule group, click filters, and select Ignore path for file operations rules. You must specify a path for the file.
|
Risk | The risk associated with this process is medium as files can now be modified freely. |
Allow list
Skiplist -s
Skiplist -s is a process used to bypass the solidification status of a file. This process also unsolidifies files.
Use case | This skiplist should be used when files or paths do not need solidification. The solidified files and paths are not allowed to execute. |
Applying this feature to an endpoint | This skiplist can be applied through a policy in ePO - SaaS or a sadmin run command. To apply it as a policy, go to the specified rule group, click filters, and select exclude local path and all its files and subdirectories from the allow list. You must specify a path for the file.
|
Risk | The risk associated with this process is low. Once files are unsolidified, they can't be executed. The only risk is if you unsolidify a legitimate application, it is denied execution. |
Application Control
Skiplist -v
Skiplist -v is used to exclude a volume or drive from being allow listed.
Use case | This skiplist is used when a server has multiple drives that do not require solidification. |
Applying this feature to an endpoint | This skiplist can be applied through a policy in ePO - SaaS or a sadmin run command. To apply it as a policy, go to the specified rule group, click filters, and select exclude volume from Application Control protection. You must specify a volume/drive.
|
Risk | The risk associated with this process is low. |
What is an Alternate Data Stream (ADS)?
On the Microsoft NTFS file system, a file consists of multiple data streams. One stream holds the file contents and another contains security information. You can create alternate data streams (ADS) for a file to associate information or other files with the existing file. In effect, alternate data streams allow you to embed information or files in existing files. The ADSs associated with a file do not affect its contents or attributes and are not visible in Windows Explorer. So, for practical purposes, the ADSs associated with a file are hidden. Malicious users can misuse the ADS feature to associate malicious files with other files without the malicious files being detected.
What are the implications of recovering the local CLI access for an endpoint?
To troubleshoot or debug issues, you might need to recover the local CLI access for an endpoint. Recovering the local CLI for an endpoint prevents the enforcement of policies from ePO - SaaS to the endpoint. This implies that when the CLI is recovered for an endpoint, no existing or new policies (created on the ePO - SaaS server) are applied to that endpoint.
What is the significance of the label specified in a policy while configuring updater processes, installers, and users?
The specified labels help you correlate the generated events with the actions performed by the trusted resources. For example, when an event is generated for an action performed by a trusted user, the Workflow ID attribute for the event includes the label specified for the trusted user.
How do I unsolidify a file, directory, or volume?
To unsolidify a file, directory, or volume, run the SC: Run Commands client task with the sadmin unso <resource name> command.
Note
As a best practice, do not unsolidify a system drive or volume.
Do Application Control work in Network Address Translation (NAT) environments?
If the ePO - SaaS server can communicate with the Trellix Agent in a NAT environment, then Application Control works as expected.
How can I trust applications developed for use in my organization?
Sign the applications with a self-generated certificate, then trust the certificate.
Perform one of these actions.
Locate your certificate if you have an existing certificate.
Generate an X.509 certificate pair using a tool, such as
makecert.exe(see this for details).
Export the certificate in PEM (Base-64 encoded X.509 - .CER) format.
Upload the certificate and add it to an Application Control policy as a trusted certificate.
Apply the policy to the endpoints.
Use the certificate to sign and verify in-house applications. This can be done using a tool, such as
SignTool.exe.Note
When working with scripts, convert the script into a self-extracting executable file, then sign the file.
Define the internal certificate as a trusted certificate.
Can I script sadmin commands?
Yes, you can script sadmin commands. While recovering the CLI, you are prompted to enter to password. To achieve this in a script, suffix the sadmin recover command with -z <password>.
How can I resolve discrepancies and inconsistencies in the Solidcore rule groups after upgrading the Solidcore extension? When I access the Rule Groups page, an Internal Server Error is displayed.
Run the Rule Group Sanity Check server task from the ePO - SaaS console to fix the inconsistencies in the rule groups. This server task reports and corrects (if possible) discrepancies and inconsistencies in the Solidcore rule groups and policies.
Select Menu → Automation → Server Tasks.
Click New Task.
The Server Task Builder wizard opens.
Type the task name and click Next.
Select Solidcore: Rule Group Sanity Check from the Actions drop-down list.
Click Next.
Specify the schedule for the task.
Click Next.
The Summary page appears.
Review the task summary and click Save.
Review the logs generated by the server task (on the Server Task Log page) to view the warnings, if any.
How do I manage the predefined rules available with Application Control?
Revisit the predefined rules available with Application Control when you install or upgrade the Solidcore extension. Because the software installed on the endpoints in your enterprise might change (is added or removed), you must revise the rules periodically. Based on the software installed on the endpoints in your setup, revise the rules and remove unwanted or irrelevant rules.
How can I enable or disable selected features on endpoints from the ePO - SaaS console?
Use the Application Control Options (Windows) policy to enable or disable selected features on endpoints from the ePO - SaaS console.
Select Menu → Policy → Policy Catalog.
Select the Solidcore 9.x.x: Application Control product.
Select the Application Control Options (Windows) category.
Click the My Default policy.
Switch to the Features tab.
Select Enforce feature control from ePO.
For more information about these features.
Memory Protection, see Memory-protection techniques.
Package Control, see Package Control.
Select the features to enable or disable.
Save the policy and apply to the relevant endpoints.
After I deploy Application Control, how can I check the status of the memory protection techniques, such as Data Execution Prevention (DEP) and Address Space Layout Randomization (ASLR), provided by the Windows operating system?
Review the status of the techniques for one endpoint |
|
Here are the possible values for DEP and ASLR.
Technique | Possible value | Description |
|---|---|---|
DEP | Enabled (Always On) | DEP is enabled for all processes. |
Disabled (Always Off) | DEP is disabled for all processes. | |
Disabled (With Opt In) | DEP is enabled only for Windows system components and services. | |
Enabled (With Opt Out) | DEP is enabled for all processes. You can choose to remove processes from the DEP technique. | |
Not Supported | DEP technique is not supported on the hardware. | |
ASLR | Enabled | ASLR is enabled for all processes. |
Disabled | ASLR is disabled for all processes. | |
Enabled (Partial) | ASLR is enabled and VASR bypass rules might be present. |
The software is allowing the execution of a banned file. What could be the reason?
When defined rules are applied, the software combines or aggregates the rules defined for a file. When applying the rules, it uses the following order to determine whether the file execution is allowed or blocked. The order in which the methods are listed indicates the precedence the software applies to the method.
|
If none of the above apply for a file, the software blocks the execution of the file.
How can I check the solidification or allow listing status for an endpoint?
Perform these steps to review the solidification or allow listing status for an endpoint.
From the ePO - SaaS console, select Menu | Systems | System Tree.
Select the group associated with the endpoint in the System Tree pane.
The endpoints in the group are listed in the Systems tab.
Click Actions | Choose Columns.
Navigate to the Solidcore Client Properties list and select the Solidification Status property.
Click Save to return to the Systems tab.
Navigate to the row corresponding to an endpoint and review the value listed in the Solidification Status column.
How can I apply multiple policies to one node in the System Tree?
Perform these steps to apply multi-slot policies to a group or specific endpoints.
From the ePO - SaaS console, select Menu | Systems | System Tree.
Perform one of these actions.
Group — Select a group in the System Tree and switch to the Assigned Policies tab.
Endpoint — Select the endpoint on the Systems page, then click Actions → Agent → Modify Policy on a Single System.
Click Edit Assignments for the multi-slot policy where you want to assign multiple policies.
Click New Policy Instance.
Select the policy that you want to assign from the Assigned policy field.
Click Save.
I am trying to fetch the software inventory for an endpoint, but the SC: Pull Inventory client task fails and I receive a message that the inventory cannot be fetched. What is the reason and how can I fetch the inventory successfully?
By default, you can fetch the inventory for an endpoint once in seven days. This value is set as the minimum interval between consecutive inventory runs. But, if needed, you can configure this value for your enterprise. See Configure settings for fetching the inventory.
What is the difference between custom action and taking global actions for a request?
For selected endpoints, to define custom rules to allow, ban, or allow by certificate an application or executable file, use the Create Custom Policy action. You can also define custom rules to allow a network path for selected endpoints. But, to allow, ban, allow by certificate an application or executable file globally (on all endpoints in your enterprise), or to allow a network path globally, take global actions.
I am using the Number of Systems where Throttling Initiated in Last 7 days monitor on the Health Monitoring dashboard. Why is no data visible when I select List events that initiated throttling for a system link?
When you select the List events that initiated throttling for a system link, the Events page lists events that resulted in the generation of the Data Throttled or Data Dropped events. The list includes all events that were generated in the 7-days period before receiving the Data Throttled or Data Dropped events.
In these two scenarios, the Events page does not list any data.
Consecutive Data Throttled and Data Dropped events are received for a system.
Events yet to be received at the ePO - SaaS console. This can occur when the endpoint for which throttling initiated is parsing older data and is yet to send the newer events to the ePO - SaaS server.
Also, the same scenario can occur for policy discovery requests (observations) and inventory updates.
I want to change the value of a configuration parameter for a managed endpoint. I cannot find a policy or method to complete this from the ePO - SaaS console. How can I complete tasks for which no method is available on the ePO - SaaS console?
From the ePO - SaaS console, you can use the SC: Run Commands client task to run any CLI commands remotely on one or more endpoints. The commands can include tasks that can or cannot be completed using ePO - SaaS, such as enable or disable the product, change the value for configuration parameters, or fetch the software inventory.
From the ePO - SaaS console, select Menu | Systems | System Tree.
Perform one of these actions.
To apply the client task to a group, select a group in the System Tree and switch to the Assigned Client Tasks tab.
To apply the client task to an endpoint, select the endpoint on the Systems page, then click Actions → Agent → Modify Tasks on a Single System.
Click Actions → New Client Task Assignment to open the Client Task Assignment Builder page.
Select the Solidcore 9.x.x product, SC: Run Commands task type, then click Create New Task to open the Client Task Catalog page.
Specify the task name and add any information.
Specify the command you want to run on the endpoints.
For example, to change the value of configuration parameters, specify the
sadmin config set <ParameterName>=<ParameterValue>command.(Optional) Specify the option to receive the result of the command by clicking Requires Response.
The command output is available on the Menu → Automation → Solidcore Client Task Log page.
Click Save.
How can I lock down or recover the local CLI for managed endpoints?
By default, the local CLI is locked down for ePO - SaaS-managed endpoints. But, you can recover the CLI for one or more endpoints, if needed.
Important
When you recover the CLI, any changes to configuration, policies, tasks pushed from the ePO - SaaS server are not enforced on the endpoint. So, the CLI status must be set to Restrict to enforce any changes to the endpoint.
From the ePO - SaaS console, select Menu | Systems | System Tree.
Perform one of these actions.
To apply the client task to a group, select a group in the System Tree and switch to the Assigned Client Tasks tab.
To apply the client task to an endpoint, select the endpoint on the Systems page, then click Actions → Agent → Modify Tasks on a Single System.
Click Actions → New Client Task Assignment to open the Client Task Assignment Builder page.
Select the Solidcore 9.x.x product, SC: Change Local CLI Access task type, then click Create New Task to open the Client Task Catalog page.
Change CLI status to Restrict or Allow.
Click Save.
How can I view the reputation for a specific file on an endpoint?
To view the reputation for a specific file on an endpoint, fetch the file reputation from a source (Trellix GTI, or Intelligent Sandbox), as applicable. But, make sure that the reputation setting is enabled in Application Control (Options)policy applied to the endpoint. For more information about how to enable reputation settings, see Configure reputation settings.
Use the SC: Run Commands client task to run this command on the endpoint.
sadmin getreputation [ -v | -b ] -f <filename> -m <md5> -h <sha-1> -s <reputation-source>
You must specify MD5 and SHA-1 value for a file to fetch its reputation. But, if you also specify the file name with its MD5 and SHA-1 value, the file name is considered for fetching the reputation.
This table lists the supported arguments and their description.
Argument | Description |
|---|---|
-v | Specify this argument to display all sources and the file reputation stored in them. |
-b | Specify this argument to bypass the internal cache for stored file reputation and fetches the reputation from the specified source. |
-f | Specify the file name for which you want to fetch the reputation. |
-m | Specify the MD5 value of the file for which you want to fetch the reputation. |
-h | Specify the SHA-1 value of the file for which you want to fetch the reputation. |
-s | Include the source to fetch the file reputation from. |
How can I recover the CLI for an endpoint if the CLI is disabled after multiple incorrect password attempts?
If the CLI is disabled after multiple incorrect password attempts, there are two methods to recover the CLI:
To immediately recover the CLI, the administrator can send the SC: Change Local CLI Access client task from the ePO - SaaS console.
To recover the CLI from the endpoint, enter the correct CLI recover password on the CLI after the disable time period lapses.
When the CLI is recovered, the Recovered Local CLI event is sent to the ePO - SaaS console to notify the administrator.
When using Application Control, which features and workflow support SHA-1 and SHA-256?
We have added support for file SHA-256 values (for the Windows platform). This table lists how existing features and workflows use SHA-1 and SHA-256 values.
Feature | Capability | SHA-1 | SHA-256 |
|---|---|---|---|
Executable files | Define allow or ban rules for executable files (in policy or rule group) | Yes | Yes |
Updater Processes | Define allow or ban rules for updater processes (in policy or rule group) | Yes | Yes |
Installers | Define allow or ban rules for installer (in policy or rule group) | Yes | Yes |
Certificates | Add rules for trusted certificates (in policy or rule group) | Yes | Yes |
View certificate details about Solidore pages | Yes | No | |
Policy discovery | Add rules to process requests | Yes | Yes |
Group requests for display on Policy Discovery page | Yes | No | |
Inventory | Add rules for inventory items | Yes | Yes |
Group items for display on Inventory pages | Yes | No | |
Solidcore events | Review event information and file details | Yes | Yes |
Rule groups | Add rules to a rule group to associate with a policy | Yes | Yes |
Reputation-based rules | Add rules to allow or ban files based on their reputation | Yes | No |
Scan a Software Repository server task | Scan a repository to add installers and certificates to ePO - SaaS | Yes | Yes |
Trellix GTI reputation | Determine file reputation and classification | Yes | No |
Except when stated, all other Application Control workflows are based on file SHA-1 values. In other words, the linking between events (on Solidcore Events page), file details (on Inventory pages), and requests (Policy Discovery page) are based on the file's SHA-1 values.
I recently fetched inventory for an endpoint and need to fetch inventory for it again. How can I do this?
For Application Control, the minimum interval between consecutive inventory runs (when the inventory information is fetched from the endpoints) is set to seven days. This is the default value and implies that for an endpoint you can pull inventory once a week. But, if needed, you can configure this value for your enterprise. See Configure settings for fetching the inventory.
One of these happen when you fetch inventory for an endpoint:
If inventory for the endpoint was fetched in the last seven days, inventory updates are fetched.
If inventory for the endpoint was not fetched in the last seven days, complete inventory details are fetched.
I received the Unable to Recover Inventory event for an endpoint. What can I do?
The Inventory Corrupted event is generated for an endpoint if the internal inventory for the endpoint is corrupt. Application Control maintains inventory backup for the endpoint and recovers the inventory for the endpoint from the backup copy.
If the inventory is recovered successfully from the backup copy, the Recovered Inventory event is generated.
If for some reason, the inventory can't be recovered from the backup copy, the Unable to Recover Inventory event is generated. To rectify, execute the SC: Run Commands client task with the sadmin so command.