You can save the backup file three ways:
To a local destination on the appliance
To a remote server (this first creates a local backup and then transfers it to the remote server)
To a USB device connected to your local machine
Note
Use the
media usb mountcommand to mount the USB device to the attached appliance. If the USB device is mounted, use themedia usb ejectcommand to unmount the USB device. For details about how to mount or unmount a USB device, see Mounting or unmounting a USB device using the CLI .
The appliance must have sufficient space to save one backup. You cannot proceed with a backup operation if there is not enough space on the requested backup destination. For information about estimating the amount of space, see Estimating the space needed for the backup file .
Caution
Stop all running scans before you back up the database.
Note
The appliance is fully functional while the backup operation is in process.
Admin access
Backing up the database using the Web UI
Use the Backup and Restore page to back up the database.
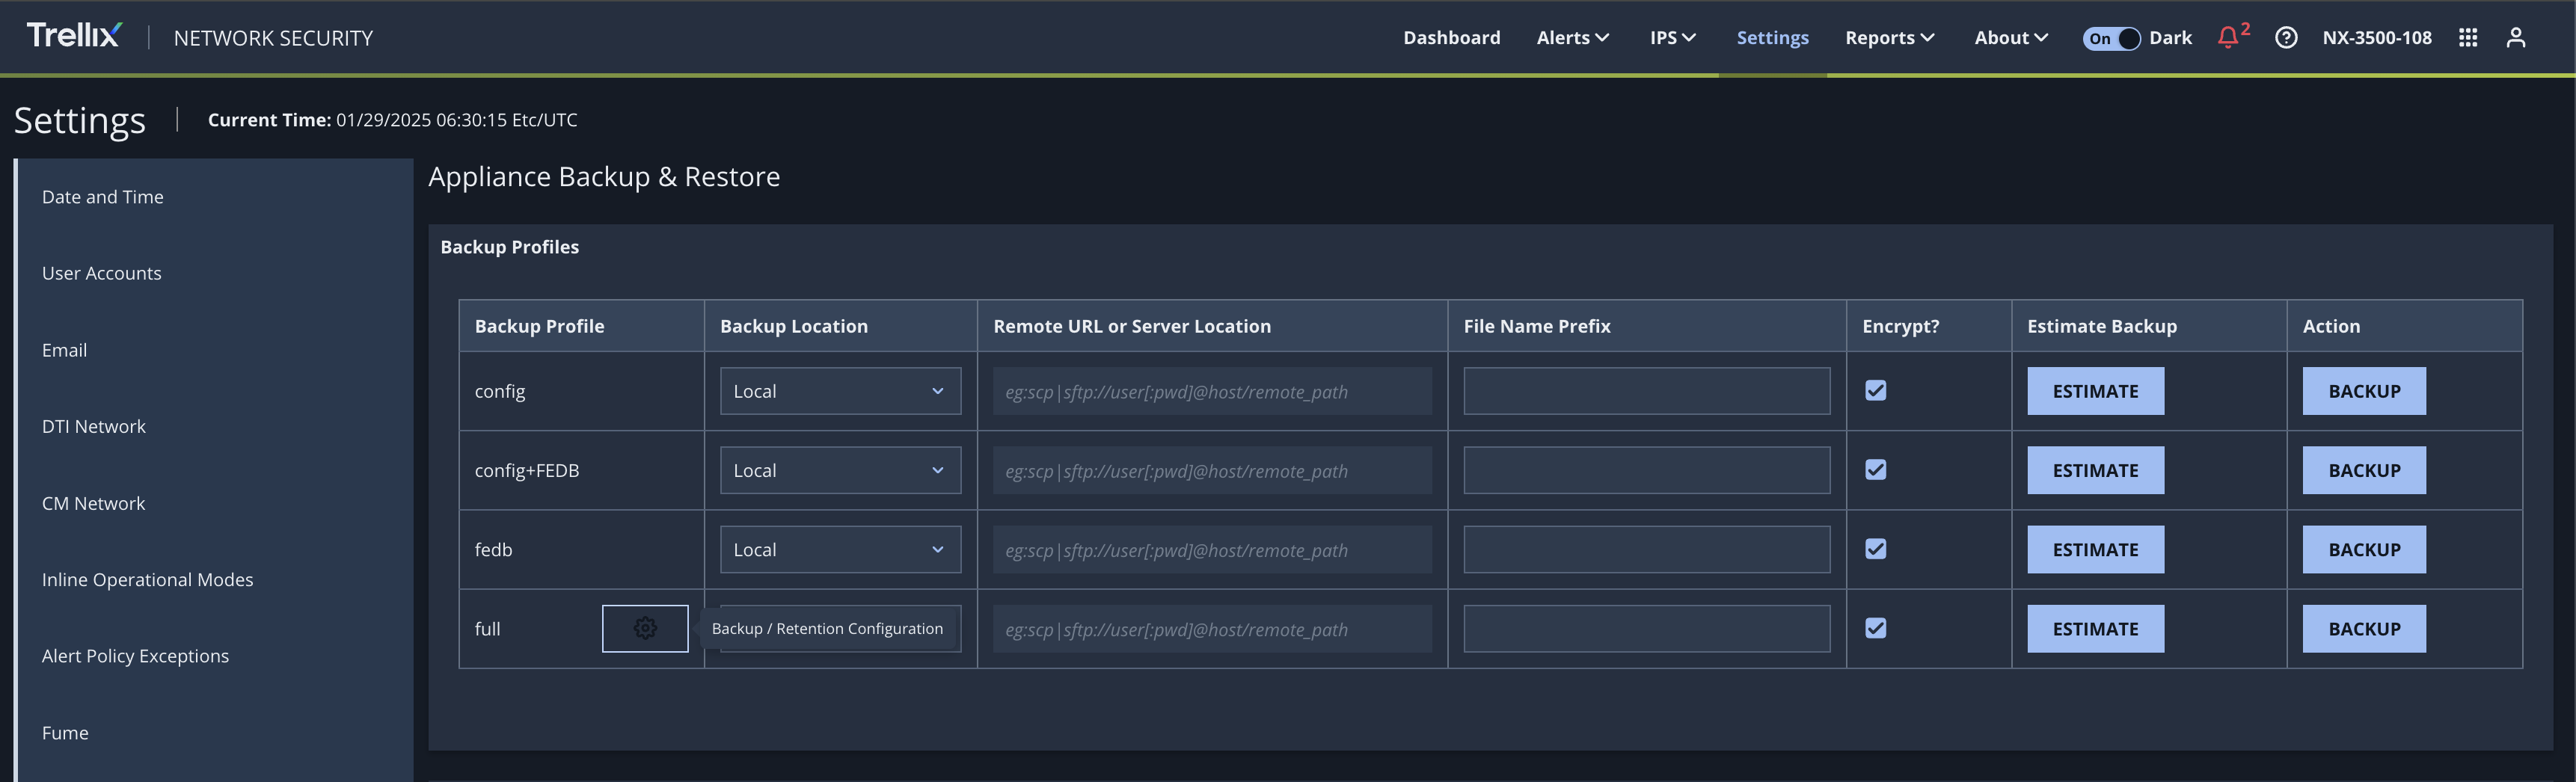
Click the Settings tab.
Click Appliance Backup & Restore on the sidebar.
Locate the backup profile, then select the backup location from the drop-down list.
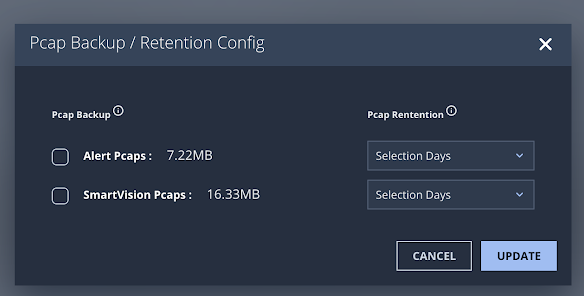
For full backups, you can configure the backup options for pcap artifacts. Click the settings button beside the full backup. A pop-up window will appear. Select the pcaps you want to backup. Also select the retention period for the pcap artifacts. The artifacts will be retained for the selected period before being cleaned up.
Local—Saves the backup file to a local destination on the appliance.
Important
When the number of backup files on your appliance reaches the backup file limit set for your appliance, you need to delete old backups to continue performing local backups.
USB—Saves the backup file to a USB device connected to your local machine.
Remote—Saves the backup file to a remote server. This first creates a local backup and then transfers it to the remote server.
Note
See Database backup and restore introduction for a description of each backup profile.
If you selected Remote Server, enter the location of the remote backup file in the Remote URL or Server Location column:
scp://<username>:<password>@<hostname>/<directory>
where
<username>and<password>are remote server admin credentials,<hostname>is the remote server, and<directory>is the directory in which to save the backup file.Enter a custom prefix for the backup file name in the File Name Prefix column.
You can use the prefix to sort the list of the backup files.
(Optional) Clear the Encrypt checkbox to disable public and private key encryption for the backup operation. Each backup file is signed by default using the public and private key pairs. By default, encryption is always included in the backup.
Note
Encryption delays the backup operation. Backups are encrypted only using static keys.
Click Backup in the Action column.
A progress bar indicates the status of the backup operation.
Note
To cancel a database backup that is in progress, click the red X in the progress bar.
Backing up the database using the CLI
Use the commands in this section to back up the database.
Go to CLI configuration mode.
hostname > enable hostname # configure terminal
Enable or disable backup for packet capture artifacts.
hostname (config) # ntap pcap backup enable hostname (config) # no smartvision ebc backup enable hostname (config) # bottracker ebc backup enable
You can also use the following CLIs to know the backup configuration status for the pcap artifacts.
show smartvision configshow ntap configshow bottracker ebc backup config
Use the following CLIs to know the size of the respective PCAP directories.
show ntap ebc pcap-sizeshow smartvision ebc pcap-sizeshow bottracker ebc pcap-size
Use the following CLIs to clean up packet capture directories:
ntap pcap cleanupsmartvision ebc cleanupbottracker ebc cleanup
To back up a profile to a specified location:
hostname (config) # backup profile <profile> to <backup location> [prefix <prefix>]
Parameters
profile
Specifies the type of profile for backup.
config: To set the profile for the configuration database.
fedb: To set the profile for the Network Security appliance database.
config+fedb: To set the profile for both the configuration database and theNetwork Security appliance database.
full: To set the profile for the configuration database, Network Security appliance database, and detected data (malware, alerts, reports, and so on).
backup location
Specifies the location for the backup file.
local: To save the backup file to a local destination on the appliance.
Important
When the number of backup files on your appliance reaches the backup file limit set for your appliance, you need to delete old backups to continue performing local backups.
The following command automatically deletes the oldest local backup file (when the backup files limit is crossed) and then backs up the appliance:
backup profile <profile> to local auto-delete-old. For details, see CLI Command Reference.For details on specifying a limit to the number of backup files, see Limiting the number of backup files on your appliance .
usb: To save the backup file to a USB drive on your local machine.
url: To save the backup file on a remote server:
where
<url>specifies remote server admin credentials (<username>and<password>), the remote server (<hostname>), and the directory in which to save the backup file (<directory>) in the following format:scp://<username>[:<password>]@<hostname>/<directory>
Note
If you do not specify the remote host administrator password in the
backup profilecommand (where the password would be visible as clear text), the CLI prompts for the password and obfuscates the keyboard input as you type it.A remote backup first creates a local backup and then transfers it to the remote server.
prefix
Specifies a custom prefix for the backup file name.
(Optional) Monitor the progress of the backup operation.
To disable progress tracking for the backup operation:
hostname (config) # backup profile <profile> to <backup location> progress no-track
To enable progress tracking for the backup operation:
hostname (config) # backup profile <profile> to <backup location> progress track
By default, progress tracking is enabled.
(Optional) Disable public and private key encryption for the backup operation:
hostname (config) # backup profile <profile> to <backup location> no-encryption
The following example backs up the appliance database to a local destination on the appliance without encryption:
hostname (config) # backup profile fedb to local no-encryption
Note
Encryption is enabled by default. Encryption delays the backup operation. Backups are encrypted only using static keys.
Note
To cancel a backup that is in progress, enter the
backup cancelcommand. When you cancel the backup operation that is in progress, the system finishes the current step before canceling the entire operation.
Examples
Note
The following examples are from a Intelligent Virtual Execution - Server appliance, but they are representative of NX appliances as well.
The following example backs up the configuration database, detected data, and artifacts to a local destination on the appliance:
hostname (config) # backup profile full to local Step 1 of 5: Performing Sanity checks 100.0% [##################################################################] Step 2 of 5: Backing up config db 100.0% [#################################################################] Step 3 of 5: Backing up fedb 100.0% [#################################################################] Step 4 of 5: Backing up Artifacts 100.0% [#################################################################] Step 5 of 5: Generating Backup package 100.0% [#################################################################]
The following example backs up the configuration database, detected data, and artifacts to a remote destination:
hostname (config) # backup profile full to scp://remoteAdmin3@vx-2/vx-2-bkp Password (if required): ******** Step 1 of 4: Performing Sanity checks 100.0% [##################################################################] Step 2 of 4: Backing up config db 100.0% [##################################################################] Step 3 of 4: Generating backup package 100.0% [##################################################################] Step 4 of 4: Transferring backup to remote loc 100.0% [##################################################################]