The NDR CLI raid-wipe menu allows you to securely erase the NDR appliance RAID device used for PX traffic metadata. You can remove the data from each file system you want to clear. The table below provides a description for each file system and the type of data removed. Completely wipe (erase) the NDR RAID device used for PX traffic metadata.
Partition Type | Description | Data Removed |
|---|---|---|
NPSTORE | This file system stores all PCAP data and artifacts from bulk PCAP downloads. | Download PCAP, stored PCAP, and bulk download artifacts |
Elastic | This file system stores all Elasticsearch data. | All Elasticsearch data. |
CMA | This file system stores all unprocessed metadata. | Unprocessed metadata |
Prerequisites
Admin access
Cleaning your RAID device
To configure a RAID device clean operation:
Log in to the NDR as npadmin using the NDR IP address or FQDN. For example:
$ ssh npadmin@10.1.0.1or
$ ssh npadmin@exampleFQDNEnter privileged mode:
npadmin@ia> enableEnter the npadmin password. The password can be 5 to 24 characters long.
[sudo] password for npadmin: <password>Enter configuration mode:
npadmin@ia# configure systemEnter the raid-wipe menu:
npadmin@hostname(config)# raid-wipe
You will see the following:
Wipe
Securely removed collected data
1. File partitions to shred/wipe: No partition selected.
2. Verbose Mode: False
3. Shred iteration:
4. Zero Drives:
A. Apply the shred of filesystem.
C. Cancel the shred.
Enter the option from above to execute:
Enter 1 to select the partition you want to clean:
You will see the followingWipeSecurely removed collected dataNPSTORE:2. ELASTIC:3. CMA:Press
Enterto go back to the main menu.Enter the number for the file system you want to include in the SHRED:Select the number (1,2 or 3) for the file system you want to shred. You can include a single file system or multiple file systems in the shred.
Select option 2 to enable Verbose mode:
Select option 3 to enter the number of shred iterations. You can select up to 9 iterations. The default is 1.
Enter the number of iterations for sherd [1-9]:Select option 4 to enable zero drives. This will zero out each and every sector and byte in the drive after shredding.
Select option A to include the file system in the shred.
Note
A file system shred results in a permanent loss of all data in each file system included in the RAID device wipe. You cannot retrieve the file system data after it is deleted.
You will see the following warning:
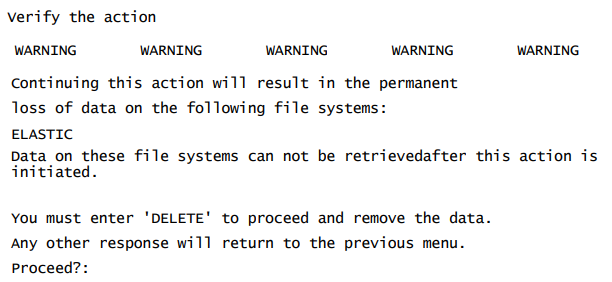
Type
DELETEto confirm file system shred.Press
Enterto go back to the raid-wipe menu.