Initial setup and configuration of threat intelligence feeds are performed from the CLI of the NDR Console. To configure:
Connect to Mandiant Threat Intelligence
This procedure establishes the connection to the Mandiant Threat Intelligence platform and sets the connection mode for the appliance.
Log into the NDR CLI using a terminal window or SSH client:
Using the SSH protocol, log into the appliance with management interface's IP address or hostname.
$ ssh npadmin@<NDR-ip-or-fqdn>Enter the password when prompted. The
hostname > promptis displayed after you have logged in.
Enter privileged mode on the NDR CLI.
npadmin@hostname> enable
Enter the
npadminpassword, when prompted. The password can be 5 to 24 characters long.[sudo] password for npadmin: <password>
Enter configuration mode.
npadmin@hostname# configure system
The prompt changes to
npadmin@hostname(config)#on the terminal indicating that the configuration mode is enabled.Type
Rat the terminal and pressEnterto configure the Run Mode for the appliance.The following options appears:
(0) Data Node Full Mode: Select this for a standalone appliance or the Director node in a cluster.
(1) Data Node Index Only Mode: Select this for data nodes in a cluster.
Choose the appropriate mode for your appliance.
Type
Kto configure API Key and secret key. A status message is displayed if the key is valid and functional.Follow the subsequent prompts to complete the connection setup.
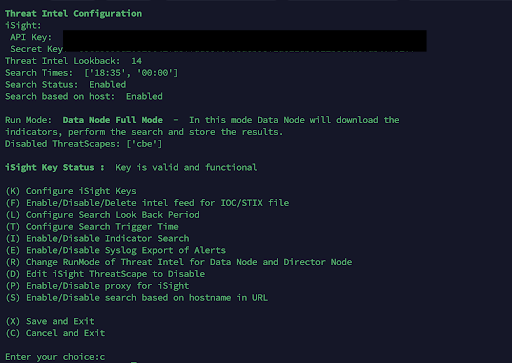
(F) Enable/Disable/Delete intel feed for IOC/STIX file | Enable/disable/add/delete custom feeds. |
(L) Configure Search Look Back Period | Number of days the retroactive search looks back for matching IOCs with metadata |
(T) Configure Search Trigger Time | 1 or 2 searches cab be schedule in a day with 8 hours difference between searches |
(I) Enable/Disable Indicator Search | Enable scheduled retroactive search/es to match indicators. |
(E) Enable/Disable Syslog Export of Alerts | Generated alerts can be exported to syslog using this option. You can add multiple syslog servers |
(R) Change RunMode of Threat Intel for Data Node and Director Node | Run mode needs to be appropriately set. |
(P) Enable/Disable proxy for iSight | Set proxy in air gapped networks |
(S) Enable/Disable search based on hostname in URL | Enable this option to match hostnames in the URL with available indicators |
Configuring custom intel feeds
The NDR also supports the integration of custom threat intelligence feeds in Structured Threat Information Expression (STIX) or OpenIOC formats. The system will parse these files for MD5, URL, IP, JA3, and JA3S hash values.
Create a custom intel feed name
From the threatintel menu, add new FeedName, enter a descriptive name for your custom feed and and upload feed via API.
Use the following API to create a new feed name:
curl -k -u npadmin:<password> -X POST https://NDRC_IP:443/threatintelservice/v1/feedname/<feedname>
Use the following API to upload file containing Indicators to the feed created in step 1
curl -k -u npadmin:<password> https://NDRC_IP:443/threatintelservice/v1/uploadfile -F "feedname=<feedname>" -F uploadfile=@test.ioc
Enable or disable a custom intel feed
Use the following API to enable/disable the feed.
curl -k -u npadmin:<password> -X POST https://NDRC_IP:443/threatintelservice/v1/feedname/test/true
[OR] From the the threatintel menu, type
F.Enter the number corresponding to the feed you wish to modify.
Select (T) Toggle FeedName's status to change its state from enabled to disabled, or vice versa.
Press
Enterto confirm the change.Press
Xto go back to the previous page.
Delete a custom intel feed
From the the threatintel menu, type
F.Enter the number corresponding to the feed you wish to delete.
Select (D) Delete FeedName to the system.
Confirm the deletion by entering
ywhen prompted.