Before you begin
Make sure that you have set up the NDR appliance and configured one or more required client profiles on it using the NDR CLI. For more information, refer to the topic Creating a client profile using the CLI.
Log into the NDR CLI using a terminal window or SSH client:
Using the SSH protocol, log into the appliance with management interface's IP address or hostname.
$ ssh npadmin@<NDR IP address>Enter the password when prompted. The
hostname > promptis displayed after you have logged in.
Enter privileged mode on the NDR CLI.
npadmin@hostname> enable
Enter the
npadminpassword, when prompted. The password can be 5 to 24 characters long.[sudo] password for npadmin: <password>
Enter configuration mode.
npadmin@hostname# configure system
The prompt changes to
npadmin@hostname(config)#on the terminal indicating that configuration mode is enabled. You can now proceed with the Client Profile configuration task.Type
client-groupat the terminal and pressEnter.The Client Group configuration options are displayed in the Group(s). page
Note
You can configure up to 10 client groups on an appliance using its CLI.
To add a new client group, type
Ain theEnter your choice fieldand pressEnter. Add new group page is displayed with the configuration options.Type
1and pressEnterto create a name for the client group. Enter the name of the group in theEnter group name fieldand pressEnter. The name given will now reflect in theNamesection.Type
2and press Enter to assign a client profile to the client group being configured. The Profile(s) page is displayed with the list of client profiles configured. To specify a client profile, type the numeric value assigned to the profile and pressEnter. The client profile name will now reflect in theProfilefield under theAdd new grouppage. Or, EnterCand then pressEnterto go back to the previous Add new group page menu.On Add new group page menu, type
3and pressEnterto set up the polling interval in minutes. This polling interval duration is used by both the Manager and Sensors to retrieve the configuration and filter parameters from the client profile assigned and apply the configuration or any changes made in the configuration to the alert data and flow data before exporting it to the NDR appliance, when it is integrated.Provide the Polling interval value in minutes. You can enter any number between 30 to 1440. Once set, the value assigned will reflect in the Add group name page menu.
Note
The default polling interval is set to 30 minutes.
Type
4and pressEnterto enable the flow whitelist(count). Flow Whitelist page displays the flow whitelist parameters that are part of a particular flow. When these flows are added to whitelist, NDR will ignore these flows and will not generate alerts for these flows.Type
5and pressEnterto enable the metadata engine(s). Configure detection engines page displays the metadata engines. The metadata engines are disabled by default and showsNto reflect the disabled status. You can choose to enable any detection engine as per your investigation requirement.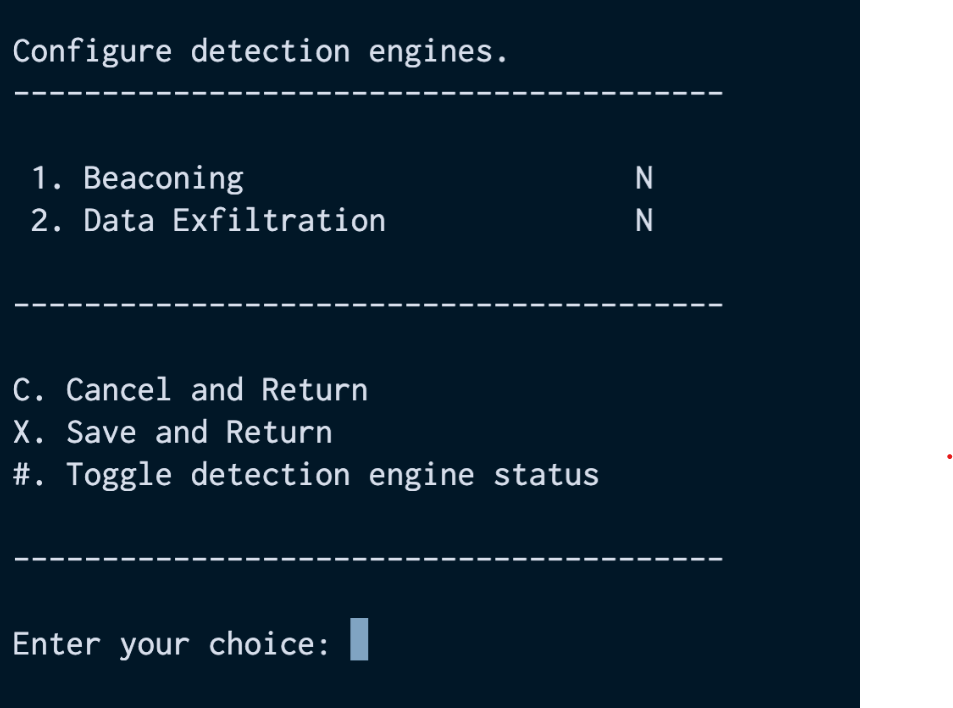
To enable a specific detection engine:
Type the numeric value assigned to that engine and press
Enter. The status of the engine changes toYto reflect the enabled mode. For example, from the engine configuration page, you need to type3and pressEnterto enable Data Exfiltration Engine that allows you to monitor alerts generated by this engine on the NDR Web UI and identify any data extraction patterns or possible malicious data exfiltration attack over your network. Repeat the same procedure for any other detection engine you want to enable.To save and return to the Add new group page menu, type
Xand pressEnter. Or, typeCand pressEnterto abort the changes made and return to the Add new group page menu. The names of the metadata engine(s) enabled reflect in the Add group name page menu.
Type
6and pressEnterto enable the home network. Type the CDR format of the home network for which NDR appliance will not generate alerts for the configured home network.Type
Xand pressEnterto save the changes and finish the client group configuration task. A message confirming the addition of the group is displayed. PressEnterto go back exit the Add new group page menu. In case you do not want to proceed with the client group configuration changes, typeCand pressEnter. This will cancel all the configurations made for the group and redirects back to the Group(s) page.The Group(s) page is displayed with the configured client group in the list.
Type
7and press Enter to add the PX host(s). The PX Host(s) page is displayed. To add a PX host to the Client Group, type A and pressEnter. Specify a PX host by typing the numeric value assigned to the host's IP address and pressEnter. You are directed to the PX Host(s) page which now reflects PX host IP address chosen by you.Enter the numeric value assigned to the client group configured in the
Enter your choicefield and PressEnter.The group-specific details is displayed on the terminal. Note down the authentication hash token of 32 bytes and the client group name. This token will be required while configuring L7metadata export and alerts export on different devices such as NDR sensor, IPS manager, EX, AX, and CMS.