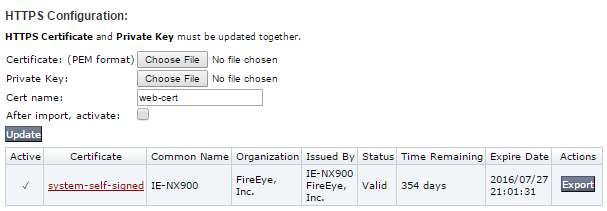
Use the HTTPS Configuration section of the Certificate Management page to do the following:
Import the public and private keys for an HTTPS certificate.
Activate the certificate.
Export the public key.
Note
The VX Series appliance has a CLI, but does not have a Web UI. The recommended method for this configuration on a VX Series appliance is through the managing Central Management System appliance Web UI.
This example if from an Network Security appliance, but it is representative of other appliances as well.
Importing an HTTPS certificate
Important
You must select both the public and private key before you click Update to add the certificate to the certificate database.
Log into the Central Management System Web UI.
Click the Settings tab.
Click the Appliance Settings subtab.
Use the Groups drop-down list to select a VX Series appliance or MVX cluster group.
By default, all appliances in the group are selected, and the page shows the settings for the first appliance in the group only.
(Optional) Use the Appliance drop-down list to select a specific VX Series appliance. The "Showing" field shows the name of the selected appliance.
If you want the changes you make to the current appliance to be automatically applied to all other appliances in the group, select the Write changes to group checkbox.
Click Certificates/Keys in the sidebar.
Select the certificate public key:
Click Choose File in the Certificate field.
In the dialog box that opens, navigate to the certificate
.pemfile in your local file system.
Select the private key:
Click Choose File in the Private Key field.
In the dialog box that opens, navigate to the private key
.pemfile in your local file system.
(Optional) Enter a certificate name in the Cert name field.
Important
The certificate name must be changed to web-cert before you can activate it.
If you want to activate the certificate, select the After import, activate checkbox.
Note
The certificate can be activated later, if you prefer. For details, see Activating named certificates.
Click Update.
Exporting an HTTPS certificate
Note
Because private keys are sensitive, you can export only the public key.
Click the Settings tab on all appliances except the HX Series. On the HX Series, select Appliance Settings from the Admin menu.
Click Certificates/Keys in the sidebar.
Click Export in the Actions column for the HTTPS certificate.
Verify that the
.crtfile was downloaded to your local file system.