The management interface is the port through which the virtual appliance is managed and administered. It is also the port through which integration of the Central Management System appliance and a managed appliance is managed. With the single-port address type, the management interface is also the port through which a managed appliance requests and downloads software updates from the DTI network.
Initial settings need to be configured to set up the management interface, and to allow access to the network, change the default administrator password, and so on.
You can use the set_keys.ps1 PowerShell script provided in the deployment package .zip file to supply some initial settings for the appliance, including the activation code, a new password for the "admin" user, and initial CLI commands to configure the appliance. You can then log into the CLI of the virtual appliance and use the configuration wizard to complete the setup.
If you do not use the PowerShell script, you can use the virtual appliance console in Hyper-V Manager to type the activation code and commands that allow the admin to log in to the CLI or Web UI to configure the appliance. You can fully configure the appliance from the console, but it might be inconvenient because you cannot paste into the console.
Using the set_keys.ps1 PowerShell script
Trellix recommends that you use the set_keys.ps1 PowerShell script to do at least the following:
Enter the activation code for your virtual appliance. The activation code contains many characters. You cannot paste into the console, and it is easy to make a typing error.
Reset the password for the "admin" user if password authentication will be used to log into the CLI or Web UI over the network. The password must be changed to a password of at least eight characters.
You can also use this script to provide commands for configuration settings that the system will apply during the initial boot. This can be convenient if you have a large number of virtual appliances to deploy, because you can create base sets of commands and then customize them for each deployment.
set_keys.ps1 PowerShell script:Navigate to the directory where you extracted the deployment package
.zipfile.Locate the
set_keys.ps1file and open it in a text editor.Note
Alternatively, you can enter values when you run the script in the PowerShell ISE or PowerShell session described later in this procedure.
Change settings in the file by specifying your values within the quotation marks. The settings you can change are all located between the comments
MODIFY THESE AS NEEDEDandDON'T MODIFY ANYTHING BELOW. Do not change any other settings in the file.
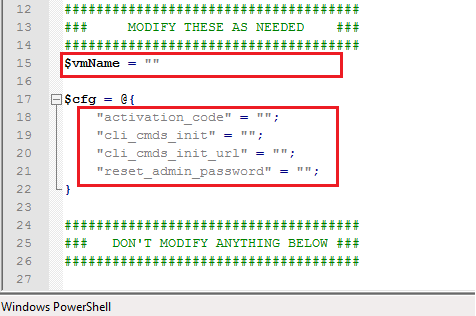
The settings are described in the following table.
Field
Description
vmNameThe name of the virtual machine name you deployed. The name is displayed in the Virtual Machines section of Hyper-V Manager.
activation_codeThe code you received in a secure email from Trellix that gives the virtual appliance its identity and access credentials.
cli_cmds_initA set of commands that at a minimum allow the appliance to connect to your network. Type the commands in plain-text format and then paste the string into this field.
Consider using this field for network connectivity only, because the size of the string could become unwieldy.
cli_cmds_init_urlA URL that points to a file on your network (for example,
http://acme.com/operations/2500V_config.txt). To use this field, create a text file that contains CLI commands in plain-text format that configure additional settings, and store the file on an HTTP server in your network.The virtual appliance needs network connectivity (which the commands in the
cli_cmds_initfield can establish) to access the file referenced in the URL.reset_admin_passwordA password of at least eight characters. The initial admin password must be reset to allow the admin user to log into the CLI or Web UI over the network, unless both of the following are true:
The CLI commands being executed set an SSH authorized key for the admin user, which allows the admin to log in remotely without a password.
You disable password logins using the
username admin disable passwordcommand.
Save the file.
Do one of the following:
Open an administrator Windows PowerShell ISE session, select File > Open, and then navigate to and select set_keys.ps1.
Open an administrator Windows PowerShell session, navigate to the directory where you extracted the deployment package, and then run the
set_keys.ps1script.
Enter values in response to the prompts, or press Enter to leave a field blank.
Note
You will not be prompted for values you already provided in the
set_keys.ps1file.
Using the console
Trellix recommends that you use the set_keys.ps1 PowerShell script to provide initial configuration settings, because you cannot copy and paste into the Hyper-V Manager console. However, if you do not use this script, and if the license update feature is not enabled, Trellix recommends that you accept the evaluation licenses during the initial configuration, because typing the keys is tedious and prone to error. After the activation code is entered and the admin user has access to the appliance Web UI or CLI , you can copy and paste the license keys.
Open Hyper-V Manager.
Right-click the row for the virtual appliance and select Connect. The virtual appliance console opens.
At the login prompt, enter admin.
Do one of the following:
If you configured a password in the
set_keys.ps1file or script, enter that password.Otherwise, enter the default password (
admin). When prompted to change the password, go to CLI configuration mode and create another password:hostname > en hostname # configure terminal hostname (config) # username admin password <new password>
The system will log you out. Log in using the new password.
Accept the license agreement. The configuration jump-start wizard starts.
Answer the wizard questions as described below.
Network Security wizard steps
The following table describes the questions the configuration wizard prompts you to answer. As noted in the table, the wizard skips some steps based on your answers to previous steps.
Note
Press Ctrl+C to exit the configuration wizard. After the management interface is configured, an administrator can use the configuration jump-start CLI command to run the wizard again.
Step | Response |
|---|---|
Hostname? | Enter the hostname for the appliance. |
Admin password? | (Optional) Enter a new administrator password. |
Confirm admin password? | Re-enter the new administrator password. |
Enable remote access for 'admin' user? | Enter yes to enable the administrator to log in to the appliance remotely. Enter no to disable remote access. |
Enable IPv4 for the management interface (ether1) | Enter yes to enable the IPv4 protocol. If you enter no, IPv4 setup is skipped and you are redirected to the IPv6 configuration, where you can enable or configure IPv6 instead. |
Use DHCP on ether1 interface? | Enter no to manually configure your IP address and network settings. |
Use zeroconf on ether1 interface? | Enter yes to use zero-configuration (zeroconf) networking. Enter no to specify a static IP address and network mask. (If you specify yes, the next step is skipped.) NOTE: Do not use zeroconf on the primary interface. |
Primary IPv4 address and masklen? | Enter the IPv4 address for the management interface in A.B.C.D format and enter the network mask (for example, 1.1.1.2 /24). |
Default gateway? | Enter the gateway IP address for the management interface. |
Primary DNS server? | Enter the IP address of the DNS server. |
Include HOMENET private IP range | Enter yes to configure the following homenet IP range for Snort rules. For further configuration, use the CLI homenet command or Web UI.
HOMENET is a default variable in the Snort rules (snort.conf) supported by the standard libpcap library where you can specify IP addresses that are to be protected. The Network Security appliance allows the configuration of the HOME_NET variable the CLI and WebUI. |
Include HOMENET private IPv6 range | Enter yes to configure the following homenet IP range for Snort rules. For further configuration, use the CLI homenet command or Web UI.
HOMENET is a default variable in the Snort rules (snort.conf) supported by the standard libpcap library where you can specify IP addresses that are to be protected. The Network Security appliance allows the configuration of the HOME_NET variable the CLI and WebUI. |
Enable IPv6 on management interface (ether1) | Enable IPv6 on management interface (ether1) NoteEnable Incident Response or Compromise Assessment features are not supported when IPv6 is selected as yes. |
Enable IPv6 autoconfig (SLAAC) on ether1 interface? | Enter yes to enable configuration. Enter no to disable configuration. The default setting is no. |
Enable DHCPv6 on ether1 interface? | Enter yes to enable configuration. Enter no to disable configuration. The default setting is no. |
Primary IPv6 address and masklen (connection may be lost upon change)? | Enter the IPv6 address in X:X:X:X:X:X:X:X format and the prefix length. Example: 2001:db8::1/64. |
IPv6 Default gateway | Enter the gateway IPv6 address for the management interface. |
Primary DNS server? | Enter the IPv6 address in X:X:X:X:X:X:X:X format. Example: 2001:db8::1. |
IPv6 Primary DNS server | Enter the IPv6 address of the DNS server. |
Domain name? | Enter the domain for the management interface (for example, it.acme.com). |
Enable Incident Response or Compromise Assessment? | Enter no. These features are not supported in virtual NX deployments. |
Enable fenet service? | Enter yes to enable access to the DTI network. |
Enable fenet license update service? | Enter yes to enable the licensing service to automatically download your licenses from the DTI network and install them. (If licenses are downloaded and installed successfully, the wizard skips the step that prompts for the product license key and the step that prompts for the security-content updates key.) |
Sync appliance time with fenet? | Enter yes to synchronize the appliance time with the DTI server time. If you enabled the licensing service, synchronization prevents a feature from being temporarily unlicensed due to a time gap. The wizard makes three attempts to perform this step before it gives up and moves to the next step. |
Update licenses from fenet? | Enter yes to download and install your licenses. The wizard makes three attempts to perform this step before it gives up and moves to the next step. |
Enable NTP? | Enter yes to enable automatic time synchronization with one or more Network Time Protocol (NTP) servers. Enter no to manually set the time and date on the appliance. (This step is skipped if you entered yes in the "Sync appliance time with fenet?" step.) If you enter no, specify the time and date in subsequent steps. |
Set date(<yyyy>/<mm>/<dd>)? | Enter the appliance date in Greenwich Mean Time (GMT) (UTC+0). |
Set time (<hh>:<mm>:<ss>)? | Enter the appliance time in Greenwich Mean Time (GMT) (UTC+0). (This step and the next step are skipped if you entered yes in the "Sync appliance time with fenet?" or "Enable NTP?" step.) |
Submission: Configure Interface? | Press Enter to accept ether1 as the interface through which sensors and brokers communicate. Otherwise, enter the name of the other interface. (If you accept ether1, the next three steps are skipped.) |
Submission: Interface? | Enter the name of the other interface. NoteTo keep management and data traffic separate, Trellix recommends that you use another management interface, such as ether2, and not a monitoring interface. |
Submission: Use DHCP on <name> interface? | Enter yes to use Dynamic Host Configuration Protocol (DHCP) to configure the submission interface IP address and other network parameters. Enter no to manually configure the IP address and network settings. (If you enter yes, the static IP addressing steps are skipped.) |
Submission: IP address and masklen? | Enter the IP address for the submission interface in A.B.C.D format and enter the network mask (for example, 10.1.1.1 /24). |
Submission: Default IPv4 gateway? | Enter the gateway IP address for the submission interface. |
Product license key? | Enter the product license key you obtained from Trellix, or press Enter to install a 15-day evaluation license. (This step and the next step are skipped if you entered yes in the "Enable fenet license update service?" step and if licenses were successfully installed as a result.) |
Security-content updates key? | Enter the security-content license key you obtained from Trellix, or press Enter to skip this step and install the license later. |
Send a request to be managed by CMS | Enter yes to add Network Security to Central Management System. |
CMS Address | Enter Central Management System IPv4 or IPv6 address. |
CMS Server username | Enter the Central Management System server username. (Example: admin) |
CMS Server password | Enter the admin password for Central Management System server. |
CMS Port? | Enter the port number for the Central Management System appliance |
Appliance Reachable to CMS? | Enter yes/no. |
Authetication type | Choose the required authentication type.
|