System Information Reporter (SIR) integrates with Trellix Agent 5.8.4 or later and is enabled via a policy which can be created in the SIR ePO Extension for use in On-Prem ePolicy Orchestrator (ePO) 5.10 (or later) to provide a flexible, policy-driven method for querying system properties, environment variables, registry key values, and other installed software on your managed nodes.
For example, your managed nodes may have common names or conflicting IP addresses. This complicates the task of managing them from a single server. SIR reports properties from such nodes and allows you to identify and group them based on the query results. SIR is a free Operational Technology Product which can can be used to assist the Administrator by delivering the reports on the following properties:
Installed software
Running Processes
Operating system
Hardware configuration
Network configuration
Security configuration
Windows Patch level
File properties search
Folder Structure search
Registry detail retrieval
Identify installed products with vulnerabilities
In addition to supporting regulatory and organizational compliance, this can be very useful to troubleshoot problems and assist in configuring software.
With the introduction of SIR v1.0.6, SIR can assemble a .zip file, which can be retrieved to ePO using Trellix Agent. The payload to be included in the file is defined via a SIR File Retrieval Task, and can retrieve almost any file or folder on the Endpoint File System.
SIR can also set registry keys (including many Trellix protected registry keys) and restore the entire registry. Extreme caution should be used when using this functionality. Setting registry keys incorrectly or restoring a registry to an inappropriate point can make a system unusable. But this can be useful for remotely configuring certain software.
System Information Reporter currently only supports the English language.
System Information Reporter features
Centralized management — Allows you to enforce System Information Reporter policies on managed nodes using ePolicy Orchestrator management software.
Query system properties — Allows you to query the managed nodes to collect:
System properties such as versions, patches, and hotfixes
Custom environment variable value
Registry key values
File search support — Allows you to query the managed nodes to search for files and file details.
Registry key modification support — Allows you to query the managed nodes to create, edit, or delete registry keys.
Back up and restore registry keys — Creates a backup of registry keys before modifying and restores registry backup file using Set Registry policy.
Retrieve files for analysis - Allows the ePO Administrator to review any unprotected file on a Windows Endpoint.
System requirements
System Information Reporter managed nodes prerequisites:
Item | Requirements |
|---|---|
Operating Systems | Microsoft Windows 7 SP1 or higher |
Trellix Agent (TA) | 5.8.6 |
ePolicy Orchestrator (ePO) | Any version higher than 5.10 |
Software Compatibility
System Information Reporter is compatible with all versions of Trellix endpoint products including all versions of Endpoint Security (ENS) and Trellix Application and Change Control (TACC) subject to the system requirements mentioned above. System Information Reporter cannot be used with ePO SaaS. System Information Reporter requires the installation of the System Information Reporter Extension in On-Prem ePO.
About this guide
This guide provides detailed instructions for installing and managing System Information Reporter using ePolicy Orchestrator software version 5.10. To use this guide effectively, you must be familiar with ePolicy Orchestrator 5.10. For more information, see ePolicy Orchestrator product documentation.
Target Audience
This guide is intended for ePolicy Orchestrator administrators.
Installing & Uninstalling System Information Reporter
Installing the System Information Reporter ePO Extension using ePolicy Orchestrator
You can install the System Information Reporter extension on the ePolicy Orchestrator server using the Configuration tab. The extension file is in .ZIP format.
Method
Create a temporary folder on your local drive.
Download the SIR_ePOExtension.zip archive and save it to the temporary directory.
Log on to the ePolicy Orchestrator server as an administrator.
Click Menu | Extensions | Install Extension. The Install Extension dialog box appears.
Click Browse to locate the extension file SIR_ePOExtension.zip, then click OK. The Install Extension page appears with the extension name and version details.
Click OK.
System Information Reporter client in Trellix Agent
SIR 1.0.6 is now available with Trellix Agent (TA) 5.8.6. It is not possible to check in a separate package and install SIR with any other version of TA. SIR is available in all 3 Trellix Agent packages for Windows (Trellix Agent for OT, Trellix Agent for Windows and Trellix Agent with Embedded Credentials). SIR can be installed using the following methods. All future releases of SIR will be in Trellix Agent and all future releases of Trellix Agent will contain SIR.
Overview
The 3 Trellix Agent packages for use on Windows Operating Systems each contain System Information Reporter. Each can be used to install and uninstall SIR. Trellix Agent for OT will install SIR automatically whereas the other packages need a command line parameter passed to FramePkg.exe or FrmInst.exe to action the install of SIR. From the SIR perspective, this is the only difference between the packages.
Installing SIR using Trellix Agent for OT by deploying from ePO
From ePO, using a Client Task or Product Deployment Task, deploy Trellix Agent for OT to your target Windows Endpoint either as an upgrade of TA or as a fresh install of TA. Please see the TA Product Guide for how to install Trellix Agent.
TA will install TA and install SIR. If a previous version of TA is installed, this will be upgraded. If a previous version of SIR is installed, this will be uninstalled and SIR will be installed.
Installing SIR using Trellix Agent by deploying from ePO (not the OT package)
From ePO, using a Client Task or Product Deployment Task, deploy Trellix Agent to your target Windows Endpoint either as an upgrade of TA or as a fresh install of TA. Please see the TA Product Guide for how to install Trellix Agent. Include /installsir in the Command Line parameter option in the task.
TA will install TA and install SIR. If a previous version of TA is installed, this will be upgraded. If a previous version of SIR is installed, this will be uninstalled and SIR will be installed. If TA is the same as the version deployed, then only SIR will be installed.
Installing SIR using FramePkg.exe derived from Trellix Agent for OT
Generate a FramePkg.exe by using the “Add new systems” functionality in ePO using the branch on which the Trellix Agent for OT has been placed. Please see the TA Product Guide for how to create a FramePkg.exe.
Transfer the created FramePkg.exe to the target endpoint. Double click on FramePkg.exe.
TA will install TA and install SIR. If a previous version of TA is installed, this will be upgraded. If a previous version of SIR is installed, this will be uninstalled and SIR will be installed.
If you wish to use the command line to execute FramePkg.exe to install TA, then please see the TA Product Guide for the relevant command line parameters. SIR will be installed automatically using this method.
Installing SIR using FramePkg.exe derived from Trellix Agent for Windows
Generate a FramePkg.exe by using the “Add new systems” functionality in ePO using the branch on which the Trellix Agent for OT has been placed. Please see the TA Product Guide for how to create a FramePkg.exe.
Transfer the created FramePkg.exe to the target endpoint. It is not possible to install SIR by double clicking on FramePkg.exe. Command line parameters must be used.
The command line parameters will need to include /installsir alongside the other parameters, which must include /install=agent.
TA will install TA and install SIR. If a previous version of TA is installed, this will be upgraded. If a previous version of SIR is installed, this will be uninstalled and SIR will be installed. If the same version of TA is already installed, then the parameter /forceinstall must be supplied and then TA will be reinstalled and SIR will be installed.
Installing SIR using Smart Installer derived from Trellix Agent for OT
Generate a Smart Installer URL by using the “Add new systems” functionality in ePO using the branch on which the Trellix Agent for OT has been placed. Please see the TA Product Guide for how to create a Smart Installer URL.
Copy the generated URL into the address bar in a browser on the target endpoint and hit Enter.
When the Smart Installer has been downloaded, click Install in the dialog box.
Uninstalling System Information Reporter
Uninstalling on the Endpoint
Open an Administrator Command Prompt and navigate to: C:\Program Files\McAfee\Agent\x86
Execute the following command: FrmInst.exe /uninstallsir
SIR will be uninstalled.
Note: SIR is present in the Windows | Settings | Installed Apps, but using Uninstall will not permanently uninstall SIR. If this method is used, TA will reinstall SIR after a short time.
Uninstalling using an ePO Task
From ePO, using a Client INSTALL Task or Product Deployment INSTALL Task, deploy Trellix Agent 5.8.6 to your target Windows Endpoint. Include /uninstallsir in the Command Line parameter option in the task.
Wake up Agents and wait a few minutes.
TA will uninstall SIR immediately, if the machines are online or at the next ASCI.
Removing the System Information Reporter ePO Extension
Use this task to remove the product extension from the ePolicy Orchestrator server.
Method
Log on to the ePolicy Orchestrator server as an administrator.
Click Configuration | Extensions.
Select the System Information Reporter extension file, then click Remove.
Select Force removal, bypassing any checks or errors, then click OK.
Logs for SIR client
SIR will create, install and uninstall logs in %SYSTEMROOT%\Temp\McAfeeLogs.
Execution logs are stored in %PROGRAMDATA%\McAfee\System Information Reporter\logs
Configure System Information Reporter Policy
Setting policies using ePolicy Orchestrator
A policy is a collection of settings that you create, configure, then enforce. Policies ensure that the managed security software products are configured and perform accordingly. Once SIR has been installed on an endpoint and the SIR ePO Extension is installed, SIR clients will always send at least a minimum set of properties at each ASCI.
The ePolicy Orchestrator allows you to configure System Information Reporter policies from a central location.
System Information Repeater supports two types of policies:
Collect Data - This policy can be configured to:
Collect system properties such as versions, patches, and hotfixes of the software installed
Collect custom environment variable and registry key values
Search for files on managed nodes
Search folder structure on managed nodes
Care must be exercised when deciding to use SIR. Unless intermittent Property Collection has been configured, SIR sends properties at each ASCI. If the number of properties is large and/or the number of machines is large, this can cause significant load on the ePO Database. Intermittent Property Collection should be configured so that an organisation-wide Agent Wakeup Call, which triggers a property collection from all affected machines, will not overwhelm the ePO Database.
Set Registry | Registry General
Set Registry - This policy can be configured to:
Create, modify, or delete registry keys
Create backup of registry keys before modifying or deleting
Restoring registry keys
Extreme caution should be exercised when setting a registry value or using Registry Restore. Incorrect use of this feature may have severe consequences for the endpoint or its software.
Creating a Collect Data | General policy
You can create, edit, delete or assign a policy to a specific system(s) or group in the system tree.
Log on to the ePolicy Orchestrator server as an administrator.
Click Menu | Policy Catalog. The Policy Catalog page appears.
Select Product as System Information Reporter | General.
Click New Policy. The Create a new policy dialog box appears.
Select the policy you want to duplicate from the Create a policy based on this existing policy drop-down list, type a name then click OK. The new policy wizard for System Information Reporter appears.
Edit the policy settings on each tab as required and click Save. For information on configuring the policy pages, see Configuring Collect Data | General policy.
Configuring Collect Data | General policy
Use these tasks to configure Collect Data policy.
Configuring General tab (Collect Data | General policy)
Use this task to configure the General tab on the Collect Data policy wizard.
On the General tab:
Select the system properties you want to collect from the managed nodes.
Select Select/Deselect all to select or deselect all the system properties in the list.
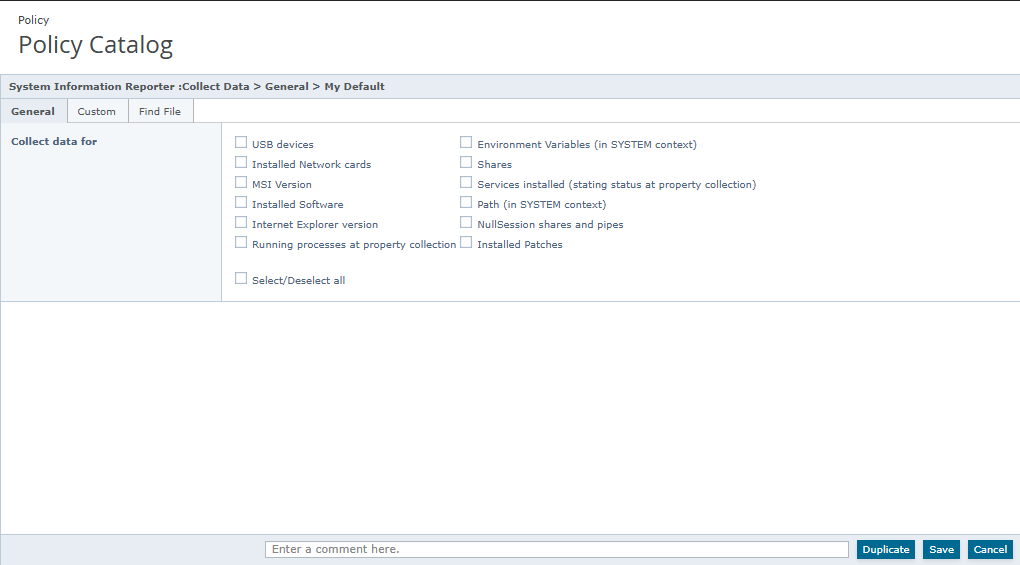
Click Save.
On the Custom tab:
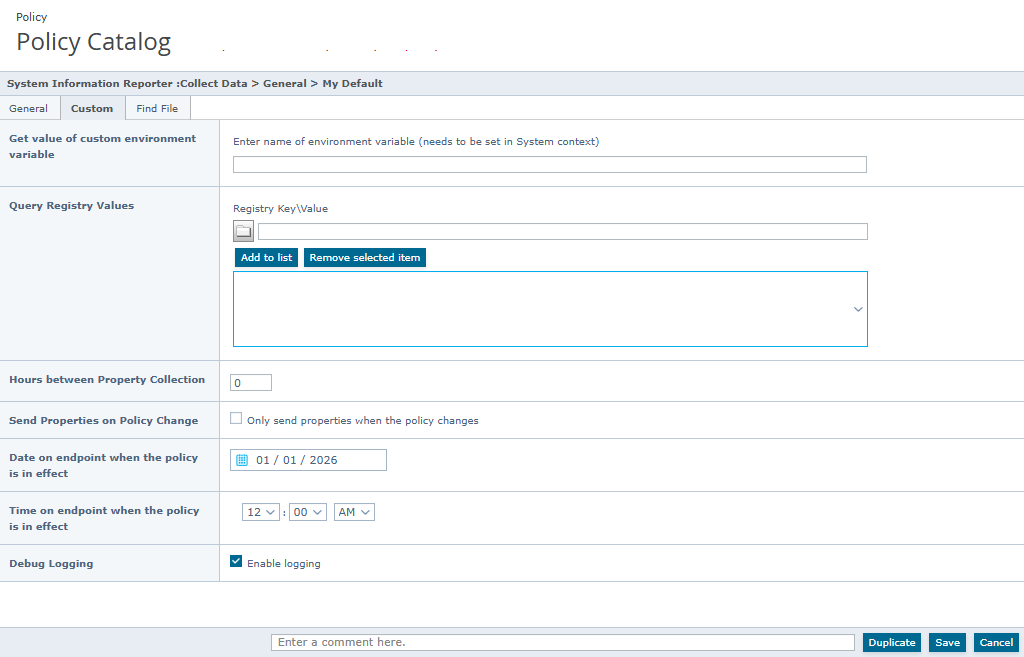
Type the custom environment variable or the registry key for which you want to collect value.
To enable intermittent Property Collection set the “Hours between Property Collection” to a desired frequency. If the value 168 is used, then SIR will send updated properties from the endpoint once per week on the first ASCI after the timing event has triggered. This feature also respects the other “timing” options and will send when the other criteria are met. Earlier versions of SIR used the number of ASCIs between property collections, but this is deprecated and no longer supported.
To enable a single Property Collection, check the “Send Properties only on Policy Change” and save the policy. The “Save” button is always enabled and any “Save”, of an otherwise unchanged policy, will be deemed a policy change for this functionality. This feature also respects the other “timing” options and will send when the other criteria are met. The default is for SIR to only send properties when the policy changes.
To enable the property collection policy at some point in the future, set the Date Time options for a time (calculated on the endpoint) at which this is convenient. This setting enables the policy at that Date / Time and respects the other timing properties also. Combinations of these timing options give the ePO Administrator much greater control of the SIR Property Collection capabilities in his environment and should contribute to reducing the load on the ePO Database, if infrequent reporting options are chosen.
Select Enable logging to create SIRService.log file on the nodes on which policy is enforced, in %PROGRAMDATA%\McAfee\System Information Reporter\logs.
Click Save.
The log file contains the policy enforcement status and the details of action taken by the policy on the managed nodes. It also contains sensitive registry information, so should only be enabled for troubleshooting.
NOTE: When the SIRService.log file size exceeds 5 MB, it is backed up in the SIRService_1.log file. The current policy enforcement status and the details of action taken by the policy are logged in SIRService.log. The same process is repeated for subsequent logging.
Configuring Find File tab (Collect Data | General policy)
Use this task to configure the Find File tab on the Collect Data policy wizard.
Method
[IMAGE PLACEHOLDER: Screenshot of the Policy Catalog showing the Collect Data > General > Find File tab. The image displays sections titled "Find a file" and "Folder Structure Discovery" with input fields, "Add to list" and "Remove selected item" buttons, a large multi-line input box, and a "Search Depth" numeric field.]
On the Find File tab “Find a File” option, select the mounted drive or folder from the drop-down list and type the name of the file you want to search for on the managed nodes. See the example below.
NOTE: Use wildcard characters for searching files with common names or extensions.
For example, [PROGRAMFILES]\McAfee\ePolicy Orchestrator\*.exe This search results in a list of all .exe files in the ePolicy Orchestrator directory. In addition to finding a file this function will determine the version (if available) and SHA-256 hash of the file. This file hashing operation is conducted at each ASCII, so if the number or size of files is large, this may cause a performance degradation at that moment.
On the “Folder Structure Discovery” option select the mounted drive from the drop-down list and type the path to the folder you want investigated. There is a “Search Depth” option which has a maximum value of 10. This will allow you to discover the folder structure up to 10 sub-folders down. This box allows for a multi-line input and numerous structures can be investigated. There is a 5000 folder limit on each “Discovery”. All “Discoveries” have the same search depth limit.
Click Save.
System Information Reporter User Guide
11
Creating Set Registry | Registry General policy
Use this task to create a Set Registry policy.
Method
Log on to the ePolicy Orchestrator server as an administrator.
Click Systems | Policy Catalog. The Policy Catalog page appears.
Select Product as System Information Reporter: and Registry General.
Click New Policy. The Create a new policy dialog box appears.
Select the policy you want to duplicate from the Create a policy based on this existing policy drop-down list, type a name then click OK.
Edit the policy settings on each tab as required and click Save. For information on configuring the policy pages, see Configuring Set Registry policy.
Configuring Set Registry | Registry General policy
Use these tasks to configure Set Registry policy.
Configuring Set Registry tab (Set Registry | Registry General policy)
Use this task to configure Set Registry tab on Set Registry policy wizard.
System Information Reporter creates a back up of registry keys at %PROGRAMDATA%\McAfee\System Information Reporter\RegistryBackup\ before enforcing the policy. You can recover the damage caused due to modification of the registry keys by restoring the registry backup file using Set Registry policy. Access to the path requires folder ownership, which must be set via the Security Tab in Windows Explorer.
System Information Reporter supports 20 backups. After 20 back ups the oldest back up is purged.
Method
On the Set Registry tab, type a name for the registry backup.
NOTE: You cannot modify, delete, or create registry keys without specifying registry backup name.
Type a meaningful name for the policy, so that you can easily identify what it does.
For example, to create a policy that deletes the agent pipe key, type the name as Delete agent pipe key.
NOTE: This field name is optional.
Select a registry key and type the value.
Select a registry value type from the drop-down list and type its data. For example, HKEY_LOCAL_MACHINE\SOFTWARE\McAfee\Agent\lpc
NOTE: The data type is mandatory but the data value is optional and must not be preceded by a backslash (\).
Set the required action.
Extreme caution should be exercised when setting a registry value. Incorrect use of this feature may have severe consequences for the endpoint or its software.
System Information Reporter User Guide
Policy
Policy Catalog
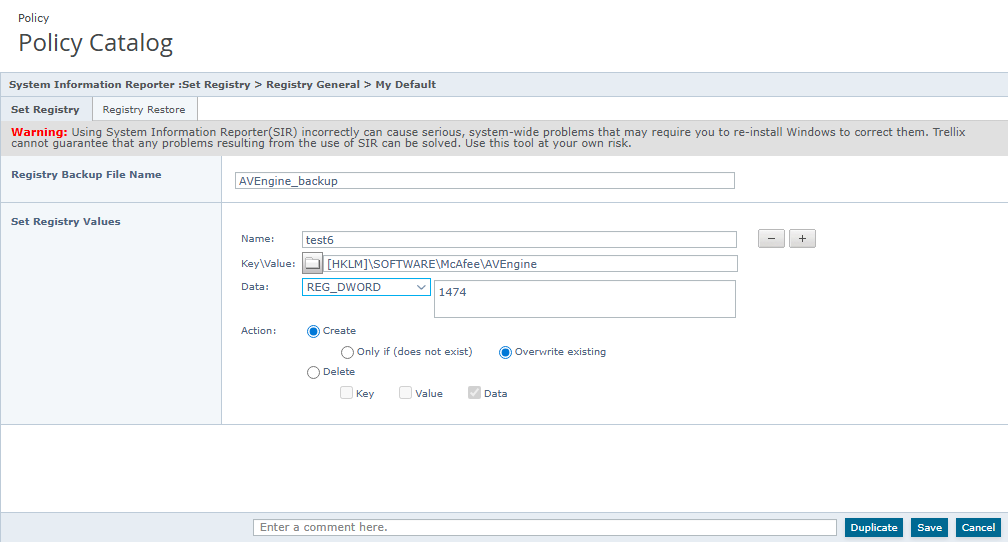 \SOFTWARE\McAfee\AVEngine, data type REG_DWORD with value 1474, action radio buttons (Create, Only if (does not exist), Overwrite existing, Delete), checkboxes for Key/Value/Data, and bottom Duplicate/Save/Cancel buttons.]
6. Click Save.
Configuring Registry Restore tab (Set Registry | Registry General policy)
Use this task to configure the Registry Restore tab on the Set Registry policy wizard.
Before you begin
Create and configure a Set Registry policy, then enforce it on required managed node(s).
Method
For option definitions, click ? in the interface.
Locate the required Set Registry policy on the Policy Catalog page, then click Edit next to it.
On the Registry Restore tab, select the name of the backup file you created in the Set Registry policy.
System Information Reporter User Guide
13
Policy
Policy Catalog
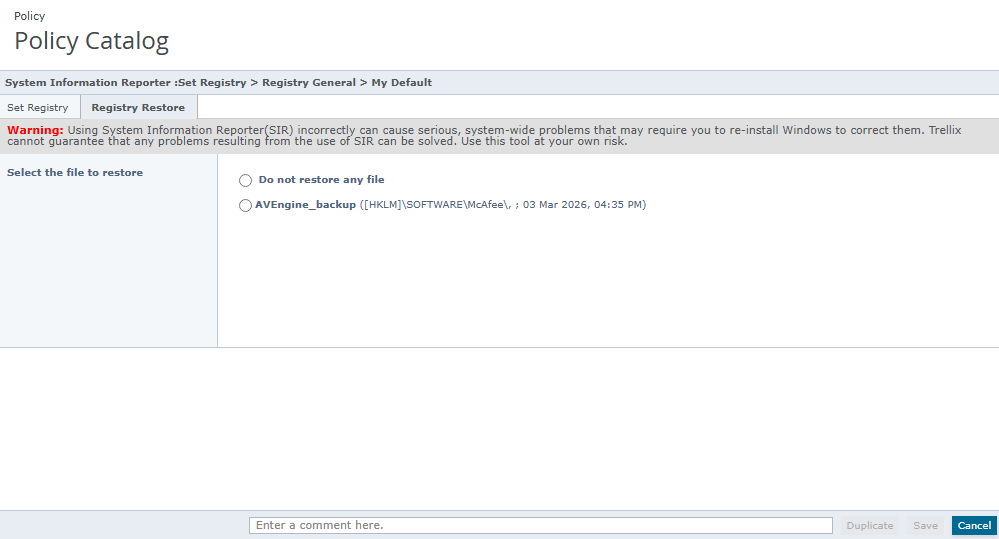
Warning: Using System Information Reporter(SIR) incorrectly can cause serious, system-wide problems that may require you to re-install Windows to correct them. Trellix cannot guarantee that any problems resulting from the use of SIR can be solved. Use this tool at your own risk.
Select the file to restore
Do not restore any file
AVEngine_backup ([HKLM]\SOFTWARE\McAfee\ ; 03 Mar 2026, 04:35 PM)
3. Click Save.
Extreme caution should be exercised when using Registry Restore. Incorrect use of this feature may have severe consequences for the endpoint or its software.
Assigning a policy to managed nodes
Use this method to assign a policy to managed nodes within a group. You can assign policies before or after a product is deployed.
Method
Click Menu | System Tree | then select the desired systems within a group.
Click Actions | Agent | Set Policy & Inheritance. The Assign Policy for <n> system(s) page appears.
Select the Product as System Information Reporter, Category as Registry General, and the desired Policy from the drop-down list, then click Save.
Enforcing policies
Use this task to enable or disable policy enforcement on a system tree group. Policy enforcement is enabled by default, and is inherited in the system tree. Disabling policy enforcement does not prevent Property Collection. Care should be taken to ensure that unnecessary properties are not collected and consideration should be given to increasing the time interval between ACSIs.
Method
Click Menu | System Tree | Assigned Policies, then select the required group in the System Tree Reporting.
Select the Product as System Information Reporter 1.0, then click Enforcing next to Enforcement Status. The Enforcement page appears.
To change the enforcement status, select Break inheritance and assign the policy and settings below.
Select Enforcing or Not enforcing as required.
System Information Reporter User Guide
NOTE: The default Enforcement Status is Enforcing. Select Not enforcing to disable the policy updates at agent-server communication. Contrary to what might be expected, the policy that is present on the client will send properties at each ASCI and an empty policy should be chosen, if new properties are not to be sent. An empty policy will delete the properties reported in ePO.
Select to lock or unlock the policy inheritance. Locking policy inheritance prevents any nodes that inherit this policy from having another one assigned in its place.
Click Save.
Securing registry keys
Registry keys must be modified correctly to prevent any damage to managed nodes. You might have to reinstall the associated software, if you damage the registry key.
System Information Reporter creates a back up of registry entries before modifying. You can recover the damage caused by modification of the registry keys by restoring the registry backup file using Set Registry policy.
ePolicy Orchestrator allows you to secure the managed nodes by restricting permission to unauthorized users.
NOTE: Only the ePolicy Orchestrator administrator with appropriate permission sets can use System Information Reporter. Trellix will not address any issues that arise from the misuse of System Information Reporter.
Permission Sets in ePolicy Orchestrator
A permission set is a group of permissions that can be granted to users or Active Directory (AD) groups by assigning it to those users’ accounts. One or more permission sets can be assigned to users who are not global administrators (global administrators have all permissions to all products and features).
User accounts and their associated permission sets in ePolicy Orchestrator define the tasks that the users can perform. This allows you to restrict specific users or groups from misusing the System Information Reporter features.
Creating permission sets for user accounts
Use this task to create a permission set. Only global administrators can create permission sets.
Method
Click Menu | User Management | Permission Sets | New Permission Set. The New Permission Set page appears.
Type a name for the permission set and select the users to which the set is assigned.
Click Save.
Select the new permission set from the Permission Sets list on the left pane. Its details appear to the right pane.
Scroll down on the right pane and click Edit next to System Information Reporter. The Edit Permission Set page appears.
Select the appropriate permission, then click Save.
File Retrieval
Overview
Trellix Agent 5.8.6 supports the retrieval of a file to ePO. System Information Reporter 1.0.6 makes use of this feature by allowing the ePO Administrator to retrieve any file (or selection of files) on an endpoint and make it available for Trellix Agent to retrieve the file to ePO. System Information Reporter has a task that can be configured to achieve this. The maximum size file that can be retrieved to ePO is 200MB.
Creating a task to retrieve a file
Navigate to the Client Task Catalog in ePO and click on System Information Reporter
Click New Task and click OK in the New Task Dialog. (There is only 1 type of task)
Give the task a name and a useful description.
Enter the file(s) or folder(s) to be retrieved in the Retrieval Path Text box. Multiple lines are allowed.
If folders have been selected, Check the Include subfolders Checkbox.
Click Save.
Trigger the task on the endpoints via an Agent Wakeup call or wait for the next ASCI.
When SIR has finished preparing the file for TA to retrieve, it will send a Threat Event to ePO, with the outcome of the task. Even if there is an error creating the file, some file should have been created with details of what happened. This can still be retrieved by TA.
Example
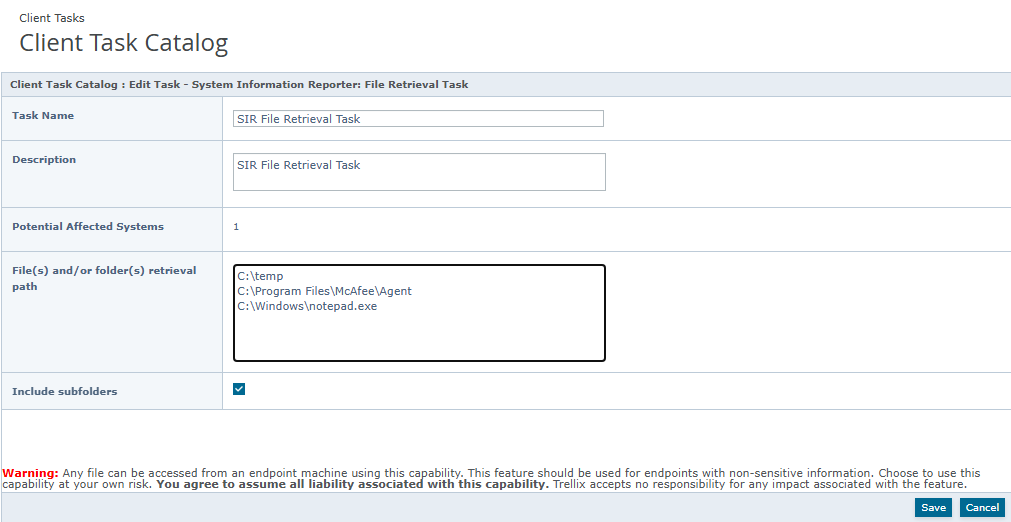
Warning: Any file can be accessed from an endpoint machine using this capability. This feature should be used for endpoints with non-sensitive information. Choose to use this capability at your own risk. You agree to assume all liability associated with this capability. Trellix accepts no responsibility for any impact associated with the feature.
The Task can be assigned to any machine or machines using the usual Task assignment options. Even though this task can be assigned to many machines, a Trellix Agent File Retrieval task can only be pushed to one machine at a time. SIR should be able to collect any unprotected file or folder for retrieval to ePO.
Warning: Any file can be accessed from an endpoint machine using this capability. This feature should be used for endpoints with non-sensitive information. Choose to use this capability at your own risk. You agree to assume all liability associated with this capability. Trellix accepts no responsibility for any impact associated with the feature.
Reporting
ePolicy Orchestrator 5.10 ships with its own querying and reporting capabilities. These are highly customizable, flexible and easy to use. Included is the Query Builder wizard, which creates and runs queries that result in user-configured data in user-configured charts and tables.
Reports are pre-defined queries which query the ePolicy Orchestrator database and generate a graphical output. An ePO Admin can create, edit and manage queries through ePolicy Orchestrator. SIR queries can be found in Menu| Queries & Reports| New Query| Others from the Feature Group and scroll down until he sees the SIR options. From there, he can customise the query and generate reports.
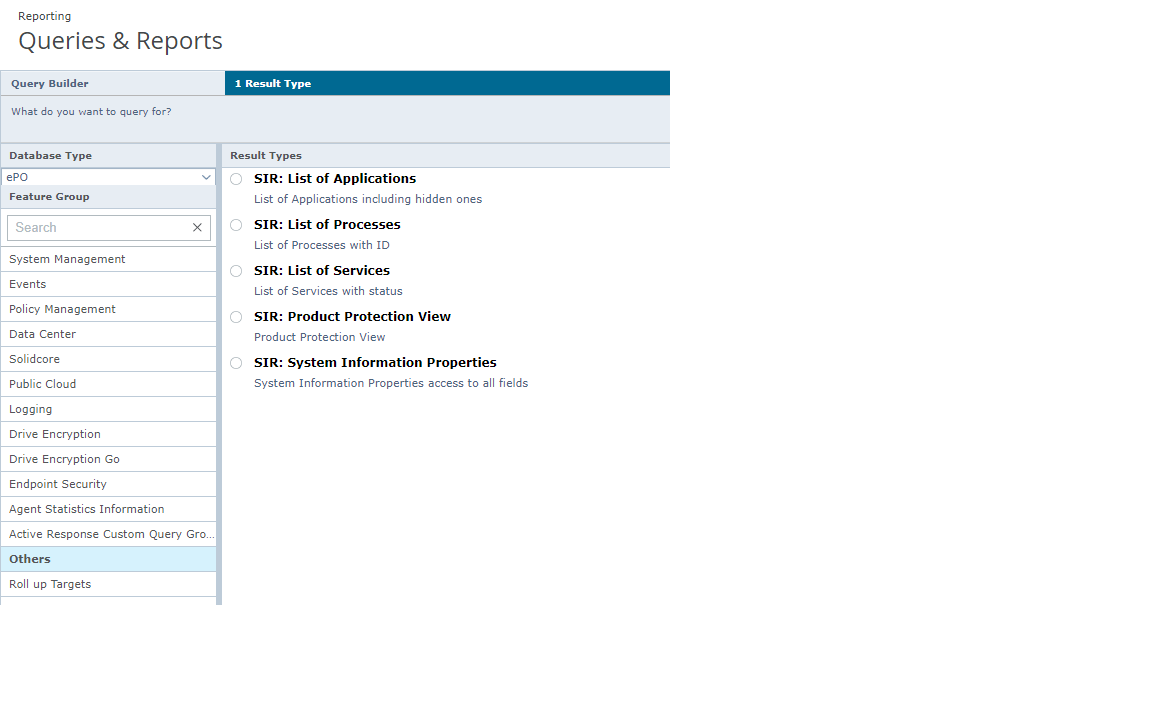
System Information Reporter supports the following reports:
List of Applications — Report contains a list of applications installed on managed nodes, including hidden applications.
List of Processes — Report contains a list of processes running on managed nodes with their IDs.
List of Services — Report contains a list of services on managed nodes along with their status.
Product Protection View — Report contains the properties of managed products such as, patches, and hotfixes installed on the managed nodes.
System Information Properties — Report contains system properties such as USB devices, network cards, internet explorer version, and other software installed on the managed nodes.
NOTE: For instructions on creating, editing or deleting queries, see ePolicy Orchestrator 5.10 Product guide.
SIR Query Example
In the ePO Queries and Reports option, click New Query.
In the Result Type tab select the “Systems” Radio button Result Type and click Next.
In the Chart Tab, Select a Table in the Chart Type options on the left.
Use the Agent GUID for sorting and click Next.
Scroll down the Available Columns until the SIR: System Information Reporter Properties dropdown appears
In the Columns tab, Click each of the options: Computername, Sectionname, Settingname & Value and click Next.
In the Filter Tab, scroll down to the SIR: System Information Reporter Properties dropdown in the Available Properties and click both Settingname & Value
Change both “comparison” options to Contains and enter “Trellix Agent” in the Sectionname field and enter “5.8.6” in the Value field.
Click Run and see that all machines with Trellix Agent 5.8.6 will report 2 results in the query.
NOTE: These results can be actioned and Tags can be applied or removed from these systems.
Data Collection Timing
Once an SIR policy is saved, that policy will be pushed to the endpoint at the next Agent Communication. Data will not be retrieved until the next Send Properties Event and Set Registry changes will not be made until the next policy enforcement. So after changing a policy 2 ASCIs are required before the data appears in the System Properties..
With the release of SIR 1.0.5, the ePO Administrator has additional options to configure the timing of Data Collection. Consideration should be given to deciding how frequently systems should report their properties as each Property Collection introduces load on ePO and if the organisation is large, this might be an unnecessary burden on the system.
SIR Properties
SIR Properties for a single endpoint can be viewed in ePO by selecting the system in the System Tree, clicking on the Products Tab, clicking on SIR Product. At this point, the Product Properties for SIR are displayed and the ePO Admin can scroll through these to view them.
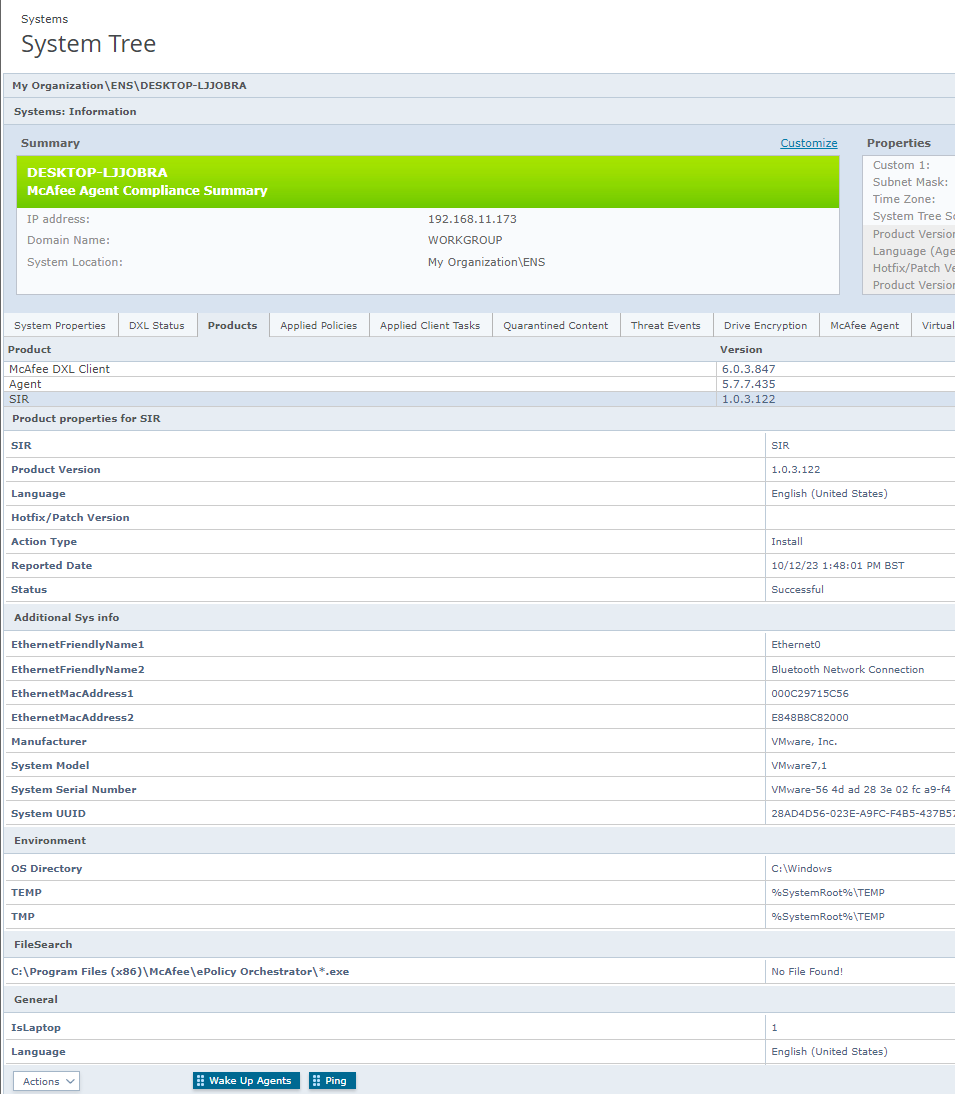
Product | Version |
|---|---|
McAfee DXL Client | 6.0.3.847 |
Agent | 5.7.7.435 |
SIR | 1.0.3.122 |
Product properties for SIR
SIR | SIR |
Product Version | 1.0.3.122 |
Language | English (United States) |
Action Type | Install |
Reported Date | 10/12/23 1:48:01 PM BST |
Status | Successful |
Additional Sys info | |
EthernetFriendlyName1 | Ethernet0 |
EthernetFriendlyName2 | Bluetooth Network Connection |
EthernetMacAddress1 | 000C29715C56 |
EthernetMacAddress2 | E848BBC82000 |
Manufacturer | VMware, Inc. |
System Model | VMware7,1 |
System Serial Number | VMware-56 4d ad 28 3e 02 fc a9-f4 |
System UUID | 28AD4D56-023E-A9FC-F4B5-437B5... |
OS Directory | C:\Windows |
TEMP | %SystemRoot%\TEMP |
TMP | %SystemRoot%\TEMP |
FileSearch | C:\Program Files (x86)\McAfee\ePolicy Orchestrator\*.exe — No File Found! |
General - IsLaptop | 1 |
General - Language | English (United States) |
Overview of SIR Extension
General tab (SIR policy pages)
Use this page to collect system information from managed nodes.
Option definitions
Option | Definition |
|---|---|
Collect data for |
|
Select/Deselect All | Selects or deselects all the system information in the list for querying. |
Custom Tab (SIR policy pages)
Use this page to query the custom environment variables and registry keys.
Option definitions
System Information Reporter User Guide
Find File tab (SIR policy pages)
Use this page to search files on managed nodes.
Option | Definition |
|---|---|
Get value of custom environment variable | Collects the specified custom environment variable value. NOTE: You can query one environment variable in a policy. |
Query Registry Values | Collects the specified registry key(s) value and data. |
Add to list | Adds the specified registry key(s) to the list. |
Remove selected item | Removes the selected registry key(s) from the list. |
ASCIs between | Reduce the frequency of Property Collection, to lower the number of DB updates required. Setting this value to: 10, will report properties every 10th ASCI, after the 10th ASCI. |
Send Properties on | This will only send properties once, after a policy is saved, subject to other timing considerations in the policy |
Date on endpoint | Start date for enabling the Property Collection policy. To used in conjunction with “Time On endpoint when the policy is in effect” |
Time on endpoint | Start time for enabling the Property Collection policy. To used in conjunction with “Date On endpoint when the policy is in effect” |
Enable logging | Creates SIRService.log file on the nodes on which the policy is enforced. This log file is created in %PROGRAMDATA%\McAfee\System Information Reporter\SIRService.log and contains action details specified in the policy. |
Find a file option definitions
Option | Definition |
|---|---|
Find a file | Searches for files on managed nodes. For folder names and location, see the Folder name definitions table. NOTE: Use wildcard characters for searching files with common names or file extensions. For example, [Program Files Directory]\McAfee\ePolicy Orchestrator\*.exe This search results in a list of all .exe files in the Program Files directory. |
Add to list | Adds the specified file(s) to the search list. |
Remove selected item | Removes the specified file(s) from the search list. Use Ctrl key to select more than one file in the list |
Folder name definitions
Folder Name | Definition |
|---|---|
System Drive System Root Program Files Directory Program Files Common Directory | Specifies the C:\ drive. [SYSTEMDRIVE] Specifies the C:\Windows directory. [SYSTEMROOT] Specifies the 32 bit C:\Program Files directory. [PROGRAMFILES] Specifies the 32 bit C:\Program Files\Common Files directory. [COMMONPROGRAMFILES] |
Set Registry tab (SIR policy pages)
Use this page to create, modify, or delete the registry keys on managed nodes.
Option definitions
Option | Definition |
|---|---|
Registry Backup File Name | Specifies a name for the registry backup. |
Name | Specifies a meaningful name for the policy. For example, to create a policy that deletes the Trellix Agent Ipc pipe key, type the name as Delete Trellix Agent Ipc pipe key. NOTE: This field is optional. |
Key/Value | Specifies the registry key and its value to be created or deleted. NOTE: The registry value is optional and must not be preceded by a backslash (\). |
Data | Specifies the type of the registry value and its data. For more information on registry value types, see Registry value type definitions table. |
Action | Specifies the actions you can perform on the registry keys:
|
Registry value type definitions
Registry Value Type | Definition |
|---|---|
REG_DWORD | A four bytes long decimal data. |
REG_SZ | A fixed-length string. |
REG_MULTI_SZ | A multiple string. This value contains multiple lines. |
REG_BINARY | A variable length binary data represented in hexadecimal format. |
REG_EXPAND_SZ | A variable length data string. This data type includes variables that are resolved when a program or service uses the data. |
Registry Restore tab (SIR policy pages)
Use this page to restore registry back up.
Option definitions
Folder Name | Definition |
|---|---|
Select the file to restore |
|
Enable/Disable Debug Logging
If this policy is enabled, then SIR creates SIRService.log file on the nodes on which the policy is enforced. This log file is created in %ProgramData%\McAfee\System Information Reporter\SIRService.log and contains action details specified in the policy.
Important Considerations
Setting registry keys and registry values incorrectly can cause severe problems for an endpoint. In extreme cases certain registry changes can make a machine unable to boot and “Restore” functionality could have a similar effect, if the Registry is updated between taking the backup and the restore operation. This feature should be used with extreme caution.
Properties are sent at every ASCI, which results in a Database update for each endpoint at each ASCI. If an Administrator does not want the Database to be updated with SIR data at each ASCI, the Administrator should use the options for modifying the frequency and timing of property collection.
SIR properties may seem duplicated if the correct details are not selected when choosing Selected Columns in the System Tree or in Reports & Queries. For instance Software Version alone will seem as if many entries are duplicated. Such a selection should be accompanied by the Software Name, to make sense of the selection.