Last Updated: September 17, 2023
Client command line interface
You can access the Trellix MOVE AntiVirus (Multi-Platform) client command line interface (CLI) on the managed virtual machine to perform basic maintenance tasks.
The CLI is a series of commands that you can issue to the mvadm utility. Each command has arguments and parameters that can be added to the command to change its behavior. This reference lists each command in mvadm, and all argument variations.
Access the CLI
During installation, a shortcut to the Multi-platform command line interface (CLI) is added to the Windows Start menu.
From the Start menu, select Programs → McAfee → MOVE AV Client Command Prompt.
NOTE
Make sure you run this command as an administrator.
At this command prompt, you can type commands to perform administration tasks on the VM.
config
Display and edit the configuration settings that are applied to the current installation.
mvadm config set NAME=VALUE
mvadm config showArguments | Description |
|---|---|
| Sets the value of the configuration argument NAME to VALUE. |
| Lists the configuration settings. |
Parameter | Value | Description |
| 0 (off) or 1 (on). Default = 0. | Enables or disables scanning of files residing on a network path. |
| A positive integer value. Default = 0 (no timeout). | Sets the connection timeout in milliseconds. |
| An integer between 0 (no notifications) and 14 (all notifications). Default = 14. | Determines where threat events are sent. The total combines the values for Windows Event Viewer log (2), ePO - On-prem Threat Event Log (4), and Trellix system tray pop-up menu (8). |
| An integer between 0 (no self-protection) and 7 representing a binary value. Default = 7 (all self-protections). | Determines the active self-protections. The total combines the values for file (1), registry (2), and services (4). |
| A positive integer value. Default = 4. | Limits the number of log files allowed before they are overwritten. |
| An integer greater than 1024. Default = 2048. | Limits the size (in KB) of an individual log file. |
| A positive integer value. Default to 40. | Limits the size (in MB) of files where scan results are cached. Files up to this size are transferred completely to the SVM for scanning. |
| 0 (off) or 1 (on). Default = 1. | Enables or disables quarantine services. |
| A valid file path. Default = C:\Quarantine. | Determines where quarantined files are stored. Cannot be a mapped network drive or UNC file path. |
| A positive integer. Default = 28. | Determines the number of days quarantined files are stored before being deleted. Submitting a 0 turns off quarantined file deletion. |
| 0 (off) or 1 (on). Default = 0. | Indicates protection status on the VM. This value cannot be changed through the config command. |
| 0 (off) or 1 (on). Default = 0. | Enables or disables the on-access scan on the VM. On the next policy enforcement, the settings are changed based on the configurations in the on-access scan policy in ePO - On-prem. |
| 0 (off) or 1 (on). Default = 0. | Enables or disables the on-demand scan on the VM. On the next policy enforcement, the settings are changed based on the configurations in the on-demand scan policy in ePO - On-prem. |
| 0 (specific extensions) or 1 (all files). Default = 1. | Determines whether to scan all files or only specific extensions. |
| 0 (specific extensions) or 1 (all files). Default = 1. | Determines whether to scan all files or only specific extensions for the on-demand scan. |
| An integer between 0 (no operations scanned) and 7 representing a binary value. Default = 7 (all operations scanned). | Determines which operations trigger scanning. The total combines the values for Read (1), Write (2), and Backup (4). |
| A positive integer. Default = 45000. | Limits the time (in milliseconds) allowed for file scans after which the file can be accessed. |
| A positive integer. Default = 45000. | Limits the time (in milliseconds) allowed for an on-demand scan after which the file can be accessed. |
| An IPv4 address or FQDN. No default. | Specifies the IPv4 address or FQDN of the primary SVM used by the VM. |
| An IPv4 address or FQDN. No default. | Specifies the IPv4 address or FQDN of the secondary SVM used by the VM. |
| Between 1024 and 65535. Default = 9053. | Specifies the port used to communicate with the primary SVM. |
| Between 1024 and 65535. Default = 9053. | Specifies the port used to communicate with the secondary SVM. |
| 0 (delete) or 1 (deny access). Default = 0. | Determines the primary action taken when a threat is detected. |
| 0 (delete) or 1 (deny access). Default = 1. | Determines the secondary action taken when a threat is detected. |
| 0 (delete) or 1 (deny access). Default = 0. | Determines the primary action taken when a threat is detected during on-demand scan. |
| 0 (delete) or 1 (deny access). Default = 1. | Determines the secondary action taken when a threat is detected during on-demand scan. |
| An IPv4 address or FQDN. No default. | Specifies the IPv4 address or FQDN of the SVM Manager. |
| Between 1024 and 65535. Default = 8080. | Specifies the port used to communicate with SVM Manager. |
ftypes
Display and edit the list of file extensions to be sent for scanning.
mvadm ftypes add oas <extn>
mvadm ftypes remove oas <extn>
mvadm ftypes list oas
mvadm ftypes add oas exe pdf zip
mvadm ftypes add ods exe pdf zipThe ftypes command does not support wildcards, and extensions must be an exact match. For example, issuing an mvadm ftypes add doc command does not cause .DOCX files to be scanned.
Arguments | Description |
|---|---|
| Adds the files with extension for anti-virus scanning. |
| Removes the files with extension from the list of files to be included for scanning. |
| Lists the file extensions to be included for on-access scanning. |
| Adds the files with extensions exe, pdf, and zip to be included for on-access scanning. |
| Adds the files with extensions exe, pdf, and zip to be included for on-demand scanning. |
help
Display usage information for the mvadm utility.
mvadm help
mvadm help commandArguments | Description |
|---|---|
| Lists the summary description for the Trellix MOVE AntiVirus client CLI commands. |
| Lists the detailed Help for the provided command. |
loglevel
View and edit the log level of the Trellix MOVE AntiVirus client.
mvadm loglevelmvadm loglevel enable {MODULE_NAME | ALL} {TYPES... | ALL}mvadm loglevel disable {MODULE_NAME | ALL} {TYPES... | ALL}Arguments | Description |
|---|---|
default | Lists the current log level of each module that is part of the Trellix MOVE AntiVirus client. Use this form to get a full list of modules for use with other forms of the loglevel command. |
enable {MODULE_NAME | ALL} {TYPES... | ALL} | Sets the log level for module MODULE_NAME or all modules to the specified log level types or to all types. |
disable {MODULE_NAME | ALL} {TYPES... | ALL} | Clears the specified log level types or all types for module MODULE_NAME or for all modules. |
These are the supported log level types:
Error
Warning
System
Info
Detail
Fnentry
Fnexit
On-demand scan loglevel
View and edit the log level of the Trellix MOVE AntiVirus ODS clients.
ODSLOG
The ods.log(ods<n>.log) file is created on client and installed at: mvadm loglevel enable/disable <module_name> ODSLOG.
Arguments | Description |
|---|---|
| Enable ODSLOG loglevel on client for all modules. |
| Disable ODSLOG loglevel on client for all modules. |
List of files:
Table 1. Trellix MOVE AntiVirus Client
File name | Location | Description |
|---|---|---|
| <Install Directory> | Trellix MOVE AntiVirus Client log, rolled over logs will be named similarly (ods1.log,ods2.log, etc.) Stores results of ODS/TODS on system. |
Table 2. Trellix MOVE AntiVirus SVM Manager
File name | Location | Description |
|---|---|---|
| /lib/systemd/system/ | Control script for regulating SVA Manager process. File available from Trellix MOVE AntiVirus Multi-platform 4.9.0 onwards. |
pp
Specify trusted processes. All files acted on by a trusted process are excluded from scans.
Process passthru rule supports these path formats:
Just the process name, for example:
xyz.exePartial path, for example:
abc\xyz.exeComplete path, for example:
C:\abc\xyz.exeWindows path, for example:
%windir%\abc\xyz.exe
Note these points while using the pp command to specify trusted processes:
If
%abc%does not resolve, delete it from the list.This format is only valid from ePO - On-prem.
This resolves the path concerning the system user.
mvadm pp list oas
mvadm pp list ods
mvadm pp add oas <process path>
mvadm pp remove oas <process path>
mvadm pp set <process path>
mvadm pp add oas <file path>Arguments | Description |
|---|---|
| Displays a list of all trusted processes for on-access scanning. |
| Displays a list of all trusted processes for on-demand scanning. |
| Adds the specified process (or processes) as a trusted process. For example: All files acted on by the |
| Removes the specified process (or processes) as a trusted process. |
| Removes all existing trusted processes and adds the specified process (or processes) as trusted processes. |
| Adds the specified file path as a trusted file path for an on-access scan. For example: All file paths acted on by the |
exp
Specify path exclusion. All paths acted on by a trusted process are excluded from on-access scan.
mvadm exp add oas <file path>
mvadm exp list oasArguments | Description |
|---|---|
| Excludes the specified file path from the trusted file path during on-access scan. For example: 3 | 11 — Scans the specified directory only. 3 | 15 — Scans the specified directory and subdirectories. All file paths acted on by the |
| Lists excluded file paths from on-access scan. |
q
Change the quarantine behavior for Trellix MOVE AntiVirus (Multi-Platform).
mvadm q list
mvadm q restore <detected as>
mvadm q remove <detected as>
Arguments | Description |
|---|---|
| Lists the currently quarantined files and their detection type. |
| Restores all .VIR files from the currently configured quarantine folder with the specified <detected as> category. |
| Deletes all .VIR files from the currently configured quarantine folder with the specified <detected as> category. |
status
Display the current state of the Trellix MOVE AntiVirus client in terms of operational mode (enabled or disabled) and its Trellix MOVE AntiVirus Multi-Platform SVM details.
mvadm status
Arguments | Description |
|---|---|
| Lists the current Trellix MOVE AntiVirus client status. |
| Displays the current status of the on-access scan. |
| Displays the current status of the on-demand scan. |
| Lists all file types to be scanned for on-demand scanning. |
Example 1. Example
If TODS/Schedule ODS is running on client then mvadm status display progress.
C:\Windows\system32\mvadm status
Scan Configuration: Enabled
On Access Scan: Enabled
On Demand Scan: Enabled
On Demand Scan State: Progress
Driver Status: Driver is loaded
Primary Server: xxx.xxx.xxx.xxx:9053 [Active]
Secondary Server: NONE:9053 [Not Configured]
SVA Manager: NONE:8080 [Not Configured]
Protection Status: EnabledIf TODS/Schedule is not running on client:
C:\Windows\system32\mvadm status
Scan Configuration: EnabledOn Access Scan: Enabled
On Demand Scan: Enabled
On Demand Scan State: Not Running
Driver Status: Driver is loaded
Primary Server: xxx.xxx.xxx.xxx:9053 [Active]
Secondary Server: NONE:9053 [Not Configured]
SVA Manager: NONE:8080 [Not Configured]
Protection Status: EnabledIf TODS/Scheduled ODS is running on client:
C:\Windows\system32\mvadm status
Scan Configuration: Enabled
On Access Scan: Enabled
On Demand Scan: Enabled
On Demand Scan State: Running[3.98 % : Finished]
Driver Status: Driver is loaded
Primary Server: xxx.xxx.xxx.xxx:9053 [Active]
Secondary Server: NONE:9053 [Not Configured]
SVA Manager: NONE:8080 [Not Configured]
Protection Status: EnabledOn-demand scan stats
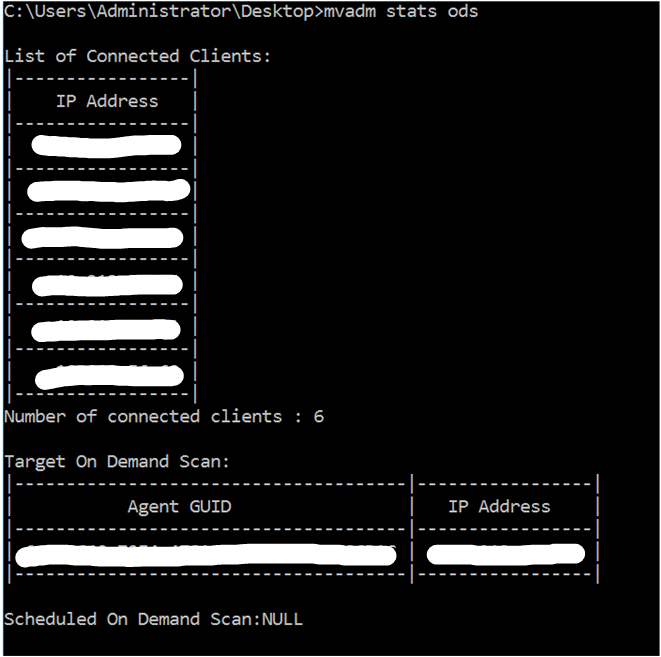
Display the information related to On-demand scan on SVM.
mvadm stats odsArguments | Description |
|---|---|
| IP address list of connected Trellix MOVE AntiVirus Multi-platform clients . |
| Number of connected Trellix MOVE AntiVirus Multi-platform clients. |
| Trellix MOVE AntiVirus Multi-platform client GUID and IP address of system currently running TODS. |
| Trellix MOVE AntiVirus Multi-platform client GUID and IP address of system currently running Scheduled on demand. |
Example 2. Example
The output of the mvadm stats ods command from one SVM where 6 clients are connected and on one of client TODS is running:
version
Display the version of the Trellix MOVE AntiVirus client installed on the VM.
mvadm versionArguments | Description |
|---|---|
default | Displays the version of the Trellix MOVE AntiVirus client installed on the VM. This is useful for verifying that an upgrade operation is complete, or checking if an upgrade is needed. |
Cert
View, add, or remove certificates from the Certificate policy.
Arguments | Description |
|---|---|
mvadm cert | View the existing certificates added to the Certificate policy. |
mvadm cert add <certificate name> | Add certificate to the Certificate policy. |
mvadm cert remove <certificate name> | Remove certificate from the Certificate policy. |
Scanning folders
Run on-demand scan on a specific folder.
Arguments | Description |
Example: To run the on-demand scan on | Start on-demand scan on the path specified. |
Password-protected CLI
Set password protection through the client policy to prevent users from changing the anti-virus settings, or disabling the anti-virus protection.
After setting the password, type the password to execute any of these commands on the mvadm command line of the clients.
configfiletypesprocpassthruloglevel
Set password for client CLI
Specify the password on the ePO - On-prem server to prevent users from changing the anti-virus settings, or disabling the anti-virus protection on the client.
You installed the Trellix MOVE AntiVirus extension on the ePO - On-prem server.
For details about product features, usage, and best practices, click ? or Help.
Log on to ePO - On-prem as an administrator
Select Menu → Policy → Policy Catalog, then select MOVE AntiVirus Common 4.6.0 from the Product list.
From the Category list, select Options.
Click the name of an editable policy.
Select Enable Self-Protection for MOVE CLI, then type and confirm the password.
Click Save to modify the policy.
Results
You can now verify that the commands on the client system are password-protected.