Last Updated: December 16, 2025
Overview
The Multi-platform deployment removes the need to install an antivirus application on every VM, and it is the original agent-based deployment option.
The Multi-platform deployment option offloads all scanning to a dedicated VM — an SVM — that runs Trellix Endpoint Security (ENS) Threat Prevention software. Guest VMs are no longer required to run antivirus software locally, which improves performance for antivirus scanning, and increases VM density per hypervisor.
The Multi-platform deployment option:
Uses ePO - On-prem to manage the Trellix MOVE AntiVirus configuration on the client systems, SVM, and SVM Manager.
Uses the Trellix Agent for policy and event handling.
Uses ePO - On-prem for reports on viruses that are discovered on the VMs.
Uses Trellix® Threat Intelligence Exchange (TIE) and Trellix Intelligent Sandbox technologies to perform in-depth analysis of suspect files (using local, global, and enterprise-level caches), define threat reputation and take the required actions.
First-time installation workflow (Multi-platform)
To install and configure the Trellix MOVE for Multi-Platform environment, see the first-time installation high-level workflow diagram shown below:
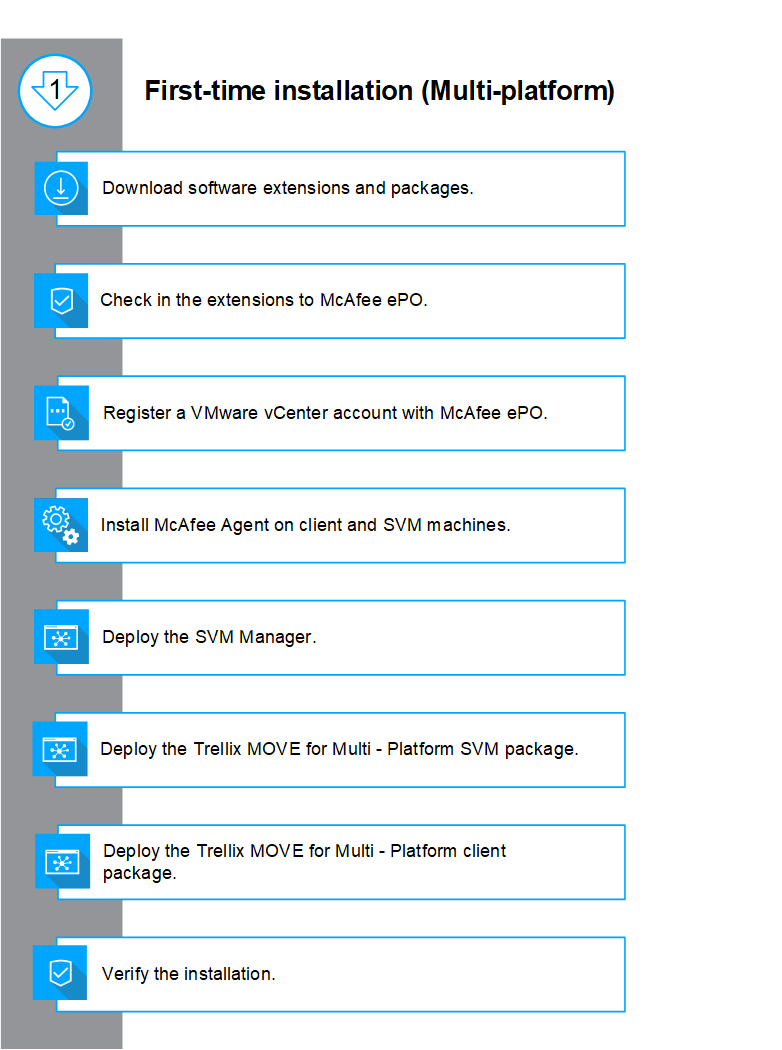
First-time installation (Multi-platform) workflow diagram
Upgrade installation workflow (Multi-platform)
To upgrade the Trellix MOVE for Multi-Platform software and remain updated with the new features, see the Upgrade (Multi-platform) workflow diagram shown below:
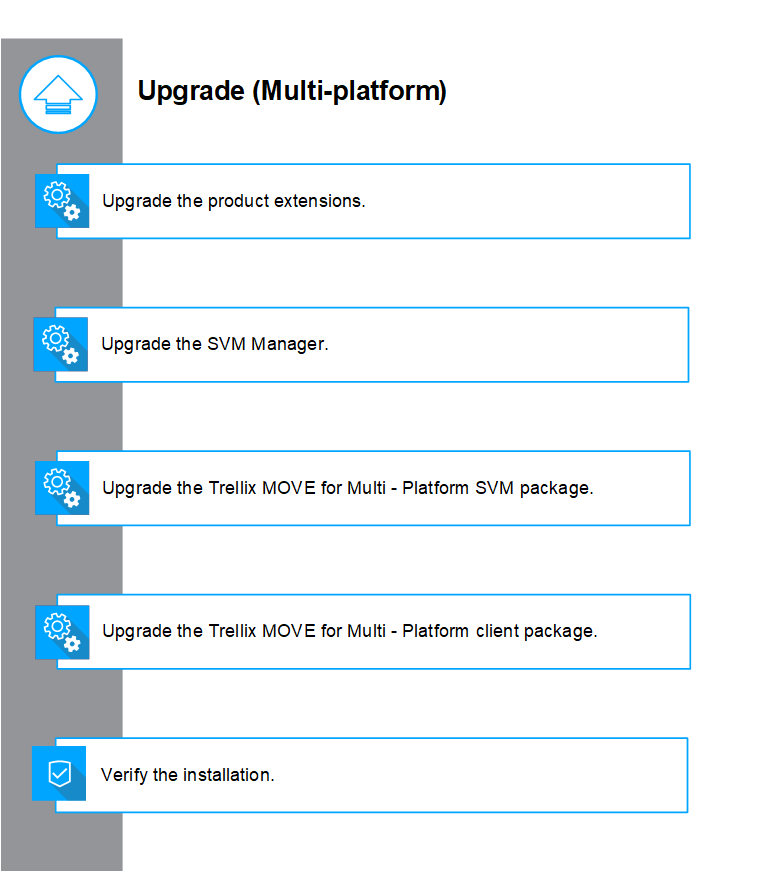
Upgrade (Multi-platform) workflow diagram
System and hardware requirements
Make sure that each of your guest VMs is running a supported version of Microsoft Windows and confirms to these requirements
Hypervisor requirements
All hypervisors are supported, but only those listed were tested.
VMware ESXi 6.0 or later
Citrix XenServer 6.0 or later
Microsoft 2012 R2 Hyper-V or later
Nutanix AHV 20170830.395 or later
SVM requirements
The SVM requires a dedicated virtual machine with Endpoint Security Threat Prevention November 2021 update or above installed.
Note: You need to first deploy Trellix Agent, followed by Trellix ENS software and then MOVE SVM package.
The virtual machine must meet these requirements:
Operating system |
|
|---|---|
CPU | CPU 4 vCPU, 2 GHz or higher |
Note: Make sure that the Windows security updates are up to date.
Memory | 6-GB RAM or higher |
Allotted space for MOVE AntiVirus deployment | 8 GB or higher |
IP address requirements | Static IP address (required for configuring policies with IP address) |
Note:
Trellix MOVE AntiVirus requires Microsoft Visual C++ 2019 Runtime and it is bundled with SVM package.
SVM Manager requirements
Important
It is recommended to keep SVM on the same host where most of the clients are located, it improves the performance of the SVM.
CPU | 2 vCPU |
Memory | 2-GB RAM or higher |
Hard disk space for SVM Manager deployment | 16 GB or higher |
Note:
SVM Manager is shipped as an OVF package (Linux, Ubuntu 20.04 (64-bit)) and comes preinstalled with the required software.
Client system requirements
The Trellix MOVE AntiVirus client software requires a Trellix Agent for one of these operating Trellix MOVE AntiVirus systems:
Note
Trellix MOVE AntiVirus (Multi-platform) requires Microsoft Visual C++ 2019 Runtime and it is bundled with client package.
Supported Operating Systems |
|---|
Windows 8.1 (32-bit and 64-bit) |
Windows 10 (32-bit and 64-bit) |
Windows Server 2008 R2 SP1 |
Windows Server 2012 R2 |
Windows Server 2016 |
Windows Server 2019 |
Windows 11 |
Windows Server 2022 |
Supported Trellix management platform and software
You must have specific versions of Trellix management platform and software installed.
Software | Versions |
|---|---|
ePO - On-prem For details, see TePO - On-prem Installation Guide. | 5.10.0 Update 11 or later |
vSphere Connector Extension | 5.4.x or later |
Trellix Agent | 5.7.4 or later |
Endpoint Security Threat Prevention | ENS 10.7.0 November 2021 Update or later |
Trellix Endpoint Security (ENS) for Linux Threat Prevention | 10.7.1 |
Trellix® Threat Intelligence Exchange (TIE) | 3.0 or later |
Trellix Intelligent Sandbox | 3.6.1, 3.6.2, 3.8.0, or 4.0.0 |
Virtual Intelligent Sandbox (vATD) | 3.10 |
Trellix® Data Exchange Layer | 6.0.0 or later |
| |
Ports for Multi-platform deployment
Following are the ports that are open and not reserved for other purposes:
System connections | Default ports |
|---|---|
ePO - On-prem to vCenter communication | TCP 443 |
Communication between Trellix Agent and ePO - On-prem | TCP 8081 |
Communication between SVA Manager and the SVM | TCP 8443 |
Communication between SVA Manager and the client | TCP 8080 |
Communication between the client and the SVM | TCP 9053 |
GTI lookup - DNS | TCP 53 |
Note
If required, you can customize the default ports.
Installation prerequisites
Begin the installation once the environment meets the specified requirements.
Components | Requirements |
|---|---|
All systems where you want to install the product |
|
Managed systems only | Required Trellix Agent or software installed and communicating with the ePO - On-prem server. |
ePO - On-prem server | Supported management platform is installed. |
Pre-installation tasks
You can check-in the software and extensions on ePO - On-prem server in either ways:
Manually download software extensions and packages and check-in to ePO - On-prem server
Check-in the extensions and packages to ePO - On-prem using ePO - On-prem Software Catalog
Note
In the ePO - On-prem version 5.10.0 and above, the term Software Manager is identified as Software Catalog.
Download software extensions and packages
If not using Software Catalog, you can download these software extensions and product packages from the Trellix download site (https://www.trellix.com/en-us/downloads) and check in them to ePO - On-prem server.
The software package consists of Trellix MOVE AntiVirus extensions.
MDCC_5.3.x.xx.zip
VSPHEREDCEXTN_5.4.x.xx.zip
DC__GS__4000_4.10.x.xx.zip
DC__AM__4000_4.10.x.xx.zip
MOVEAVLIC400_4.10.x.xx.zip
Note
Make sure that you download the required extensions and packages from the Trellix download site.
Check in the extensions and packages to ePO - On-prem manually
The Trellix MOVE for Multi-Platform extensions and Trellix ENS extensions must be installed on the ePO - On-prem server before you can manage Trellix MOVE for Multi-Platform on your virtual machines.
Make sure that the extension files are in an accessible location on the network.
Trellix ENS is only licensed for the SVM, not for other Windows systems in your environment.
(Optional) Install the Trellix ENS for Linux Threat Prevention extension to manage the Trellix ENS for Linux Threat Prevention policy on the SVM Manager. Trellix ENS for Linux Threat Prevention is only licensed for the SVM Manager, not for other Linux systems in your environment.
Note
Install the extensions Trellix Data Center Control, vSphere Connector Extension, and Trellix MOVE AntiVirus specific extensions (MOVE AntiVirus, MOVE AntiVirus Common) on the ePO - On-prem server manually. It also checks in the Trellix MOVE AntiVirus SVM and Client packages to the Main Repository.
Log on to ePO - On-prem as an administrator.
To check in the packages, select Menu → Software → Main Repository → Check In Package.
For File path, browse and select the individual packages as mentioned below, then click OK
Package description | Package name |
|---|---|
Trellix ENS Multi-platform client package |
|
4. If you are using individual extensions instead of meta package, check in the extension and packages individually:
Select Menu → Software → Extensions → Install Extension.
The Install Extension page opens.Browse and select the extension files in the same order as mentioned below, then click Open → OK:
Extension description | Extension name |
|---|---|
Trellix MOVE AntiVirus extension |
|
Trellix ENS |
|
c. Review the extension details and click OK.
d. To check in the packages, select Menu → Software → Main Repository → Check In Package.
e. For File path, browse and select the individual packages as mentioned below, then click OK:
Package description | Package name |
|---|---|
Trellix MOVE for Multi-Platform package |
|
Trellix ENS Multi-platform client package |
|
Check in the extensions and packages to ePO - On-prem from Software Catalog
If you have Software Catalog, you can check in the software extensions and packages to the Main Repository without downloading them.
Log on to ePO - On-prem as an administrator.
Select Menu → Software, then click Software Catalog.
From Software (by Label) → Endpoint Security, select these extensions, then click Check In.
Product | Component |
|---|---|
Trellix MOVE AntiVirus 4.10.x | This main extension includes these extensions:
|
All extensions and packages are checked in to the Main Repository from the Software Catalog.
Note
You must download other Trellix MOVE Multi-Platform packages from the Trellix download site (http://www.trellix.com/us/downloads/).
Register a VMware vCenter account with ePO - On-prem
To use Trellix MOVE for Multi-Platform to manage the security of the virtual machines in your data center, you must first add your VMware vCenter to the ePO - On-prem server.
Make sure that:
You have configured your VMware vCenter server that manages the ESXi servers, which host the guest VMs.
You have installed the Trellix MOVE for Multi-Platform software extension on the ePO - On-prem server.
Log on to ePO - Onprem as an administrator.
Select Menu → Configuration → Registered Cloud Accounts.
From the bottom-left click Actions → Add Cloud Account to open the Add Cloud Account dialog box.
From the Choose Cloud Provider drop-down list, select VMware vSphere and click OK.
On the vCenter Account Details page, configure these options.
Note
You must have a vCenter Server user account with administrator rights to use the autoscale feature.
Option | Description |
|---|---|
Account Name | A name for the VMware vCenter account in ePO - On-prem. Account names can include characters a–z, A–Z, 0–9, and [_.-], without space. |
Server Address | (Required) IP address or the host name of the available VMware vCenter. |
vCenter Username | (Required) User name of the available VMware vCenter account. |
vCenter Password | (Required) Password of the available VMware vCenter account. |
Sync Interval (In Minutes) | Specify the interval for running the next vCenter discovery (default value is 5 minutes). |
Port | The port number required to establish the connection with the available VMware vCenter (default port is 443). |
Tag | The administrator specifies this to identify the VMs. Tag name can include characters a–z, A–Z, 0–9, and [_.-], with space. |
Click Test Connection to validate VMware vCenter account details and verify the connection to the VMware vCenter, then click Next → Finish.
When prompted to confirm, click OK to register the vCenter account and wait for vCenter sync to complete.
This action registers the VMware vCenter and imports all discovered virtual machines, which are unmanaged, into the System Tree. The instances are imported with the same organization as the VMware vCenter.
Note
The virtual machines that are already added and managed by ePO - On-prem are retained with the existing policy settings, but the virtualization properties for these systems are added.
Set up a general configuration for deployment
Before deploying Trellix MOVE AntiVirus SVM Manager, configure settings on the ePO - On-prem server, so that they are retrieved and used for every Trellix MOVE AntiVirus SVM Manager deployment.
Make sure that you have registered a VMware vCenter account with the ePO - On-prem.
Log on to ePO - On-prem as an administrator.
Select Menu → Automation → MOVE AntiVirus Deployment.
In the Configuration tab, click General under General list.
The General Configuration page opens.
Enter and confirm the password for ePO - On-prem Credentials section.
ePO - On-prem credentials
Options | Description |
|---|---|
Password | Type the password of the ePO - On-prem console that the administrator has currently logged on |
Confirm Password | Confirm the password |
5. Enter and confirm password for SVM (Agentless) and SVM Manager (Multi-Platform) Configuration section.
Note
The SVM (Agentless) and SVM Manager (Multi-Platform) Configuration section shows a default password.
Caution
The password you enter is set to the SVM Manager and you can't update it once it is deployed. This password is not applicable to the SVM Manager, which is already deployed.
If required, change the password.
SVM (Agentless) and SVM Manager (Multi-platform) Configuration
Option | Description |
|---|---|
Hostname Prefix (Agentless only) | Type a unique prefix that is added to the host name of the Trellix MOVE AntiVirus SVM Manager. The prefix can include characters a–z, A–Z, 0–9, and [-], without space |
Password | Type a password to be used as the Trellix MOVE AntiVirus SVM Manager password during deployment.
|
Confirm Password | Confirm the password |
Note
The password configured for SVM (Agentless) and SVM Manager (Multi-platform) Configuration is assigned to SVM Manager which is deployed from SVM Manager Configuration page.
Click Save to store these configurations, so that you can use them for every Trellix MOVE AntiVirus SVM Manager deployment.
SVM assignment made easy
An SVM can generally be assigned to 150–300 endpoints, depending on the load of the endpoints.
Assigning policies to the SVM manually is a time-consuming task. The SVM Manager creates assignments based on IP address and tags where a range of endpoints are automatically assigned to a group of SVMs.
SVM autoscaling
The virtual environments are dynamic with the number of instances depending on time of the day and day of the week.
Provisioning your SVMs to accommodate this variation manually is not a scalable solution. You might end up running more SVMs than you require to accommodate peak load. Or, you might end up running fewer SVMs, resulting in endpoints not being protected.
The security administrator can define the number of backup SVMs that are ready to protect your client systems. Calculate the number of ready SVMs required for the maximum number of clients that need protection at any time of the day. The standby SVMs are automatically deployed based on the backup SVM value. For example, if you specify the backup SVM as 4, two standby SVMs are deployed automatically. The SVMs automatically scale up and down depending on the number of endpoints connected.
The SVM deployment automatically transitions between three modes:
Standby — Standby SVMs are created and are ready to transition to the backup SVM mode. The standby SVMs are automatically deployed based on the backup SVM value. These SVMs are turned off.
Ready — Backup SVMs that are ready for protecting your client systems. You need to calculate the number of ready SVMs required for the maximum number of clients that would need protection at any time of the day. These SVMs are turned on, but not protecting the client systems.
Running — These SVMs are currently protecting the client systems.
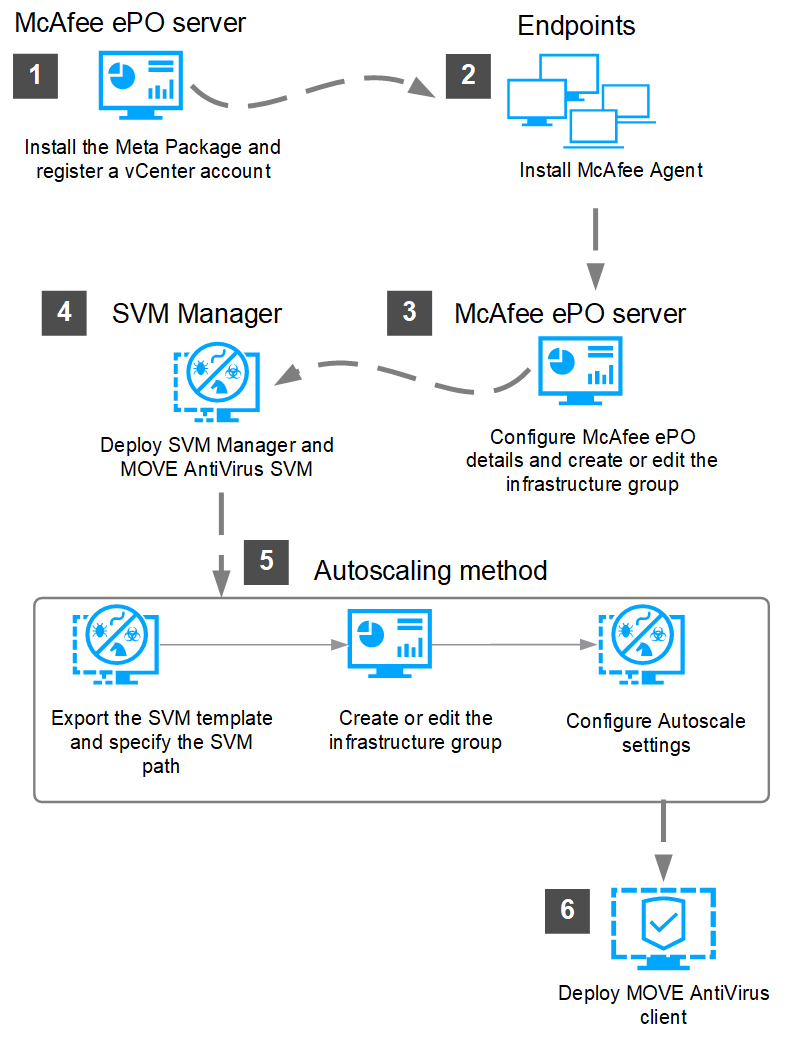
Multi-platform deployment process using Trellix MOVE AntiVirus autoscaling with SVM Manager
Using Trellix MOVE AntiVirus SVM autoscaling, the overall Trellix MOVE AntiVirus SVM deployment of the Multi-Platform option consists of the following tasks.
Install the extensions on ePO - On-prem and register a VMware vCenter account with ePO - On-prem
Install Trellix Agent on the endpoints
Configure ePO - On-prem details for deployment and create or edit the infrastructure group on ePO - On-prem
Deploy SVM Manager
Deploy Trellix MOVE AntiVirus SVM
Assign the SVM Manager to SVM
Configure assignment rules in SVM Manager Settings policy
Export the SVM template and specify the Trellix MOVE AntiVirus SVM path in ePO - On-prem.
Note
This is required only when you are using autoscaling method.
a. Create or edit the infrastructure group on ePO - On-prem
b. Configure the SVM Autoscale Settings in SVM Manager Settings policy and assign it to SVM Manager
6. Deploy the Trellix MOVE AntiVirus Client using ePO - On-prem
The SVM ready pool is now created based on the number of backup SVMs specified. The backup SVMs that you specified in ePO - On-prem are deployed automatically.
A Trellix MOVE AntiVirus SVM can generally be assigned to 150–300 endpoints, depending on the load of the endpoints. The security administrator can define the number of backup SVMs that are ready to protect your client systems. Calculate the number of ready SVMs required for the maximum number of clients that need protection at any time of the day.
The standby SVMs are automatically deployed based on the backup SVM value. For example, if you specify the backup SVM as 4, 2 standby SVMs are deployed automatically. The SVMs automatically scale up and down depending on the number of endpoints connected.
When a Trellix MOVE AntiVirus client system starts communicating with the SVM Manager, one SVM from the ready pool moves to the running pool and protects the client system. The transition from the ready pool to running pool occurs when no running SVMs exist or all running SVMs have reached their client limit. The ready pool is again replaced with one Trellix MOVE AntiVirus SVM from the standby pool.
One Trellix MOVE AntiVirus SVM is automatically deployed to the standby pool to retain the number of standby SVMs, which is specified in ePO - On-prem.
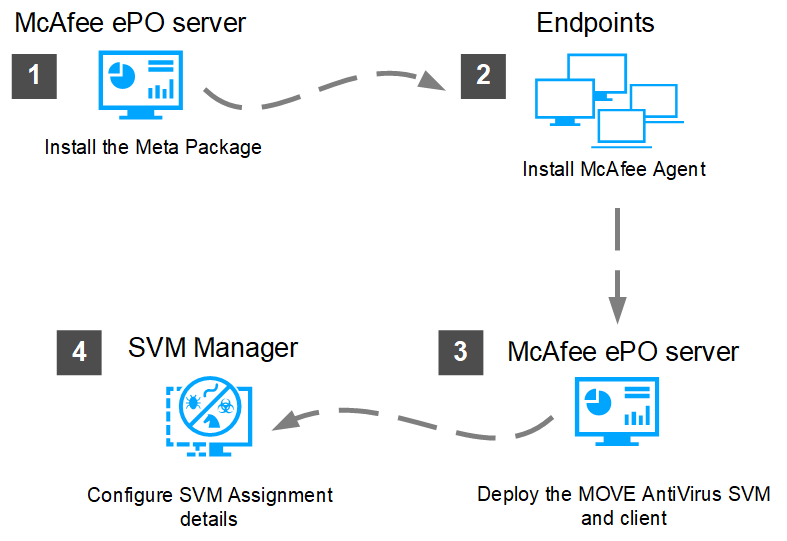
Configure Multi-platform product without SVM Manager
The overall Trellix MOVE AntiVirus Multi-platform SVM deployment consists of the following tasks.
Install the extensions on ePO - On-prem
Install Trellix Agent on the endpoints
Deploy the Trellix MOVE AntiVirus SVM
Deploy the Trellix MOVE AntiVirus client
Configure the Trellix MOVE AntiVirus SVM details in the Options policy
Note
Configuring the Multi-platform product without SVM Manager is recommended only if you are planning to have one SVM.
Create or edit an infrastructure group in ePO - On-prem for SVM Manager deployment
After registering your vCenter account, your default group is added to the MOVE AntiVirus Deployment wizard when you access the Infrastructure Details option under General. You can edit the details of the default infrastructure group, as needed.
You installed the Trellix MOVE AntiVirus Meta Package extension on the ePO - On-prem server.
You registered your VMware vCenter account with ePO - On-prem.
You can deploy the SVM Manager to any infrastructure group using ePO - On-prem. With the Infrastructure Details option, you can create or edit a hypervisor-based or cluster-based infrastructure group. You can then customize and select the infrastructure group for SVM Manager deployment.
You can include individual infrastructure groups for SVM Manager deployment.
Log on to ePO - On-prem as an administrator.
Select Menu → Automation → MOVE AntiVirus Deployment.
On the Configuration tab, click Infrastructure Details.
Edit the default infrastructure group options, as needed.
Option | Description |
|---|---|
Group Name | The name of the infrastructure group.
|
Cloud Account Name | The name of the registered vCenter account. |
ESXi / Cluster | The IP address or name of the hypervisor or the cluster selected as part of the infrastructure group.
|
IP Pool Name | The name of the DHCP or IP Pool used in the infrastructure group. By default, DHCP is selected.
|
Provisioning Type | The provisioning type as Thin or Thick. |
Network Name | The name of the management network used by the group. |
Datastore Name | The name of the datastore used by the infrastructure group. By default, the datastore with the most free space is selected. |
Action |
|
5. (Optional) Click Actions → Create and configure properties for the custom infrastructure group. You don't need to configure the custom group options when the default group is available.
Option | Description |
|---|---|
Group Name | Type a name for the infrastructure group. |
Infrastructure Type | Select whether you want to create a group based on your hypervisor or cluster.
|
Select Host / Select Cluster | Select the IP address of your host or cluster. |
Hostname Prefix | Type a unique prefix that is added to the host name of the hypervisor or cluster. The prefix can include characters a–z, A–Z, 0–9, and [-], without space. |
IP Pool | Configure the IP Pool as Static or DHCP. |
AD Server | Select the registered Active Directory server, so that the deployed SVM is automatically added to the selected domain. |
Provisioning Type | Select the provisioning type as Thin or Thick. |
Network Name | Select the required management network. |
Datastore Name | Select the configured datastore for the infrastructure. |
6. Click Save to store the infrastructure group details.
Check in the SVM Manager OVF package using ePO - On-prem
Check in the SVM Manager OVF package to the ePO - On-prem server, so that ePO - On-prem can deploy it to your hypervisor.
Make sure that:
You have installed the Trellix MOVE AntiVirus extension on the ePO - On-prem server.
You have registered a VMware vCenter account with ePO - On-prem.
You have set up a general configuration for deployment.
You must add Global_GCC_Code_Signing.cer, Global_Code_Signing.cer, and GlobalSign.cer to the vCenter certificate store. These certificates are available in Global_Certificate.zip package.
Add certs as Trusted root certificates in vCenter.
To add a certificate, logon to vCenter → Administration → Certificates → Certificate Managment → Add as Trusted Root Certificate.
Log on to ePO - On-prem as an administrator.
Select Menu → Automation → MOVE AntiVirus Deployment.
On the Configuration tab, click SVM Manager Configuration to open the SVM Manager OVF Details page with these SVM Manager options.
Options | Description |
|---|---|
SVM Manager OVF Name | Name of the SVM Manager OVF package checked in to the ePO - On-prem server. |
SVM Manager OVF Version | Version of the SVM Manager OVF package checked in to the ePO - On-prem server. |
Action | Delete — To remove a checked in SVM Manager OVF. |
Click Actions → Add SVM Manager to open the Check-in SVM Manager OVF (zip) File page.
Under SVM Manager OVF Check-in, configure these options:
Select SVM Manager OVF (zip) file to check-in — Browse to and select the SVM Manager OVF package (MOVE-AV-MP_SVM_Manager_OVF_ 4.9.0.195.zip).
Specify the location of Trellix ePO - On-prem system — Specify the SVM Manager OVF package location on the ePO - On-prem server (for example, C:\SVM Manager). The package is taken from this location during deployment to the hypervisor.
Click OK to check in the package.
Note
Make sure you create a new virtual machine using MOVE-AV-MP_SVM_Manager_OVF_4.10.1.168 package as the SVA Manager OVF upgrade from the MOVE AntiVirus Deployment page is not supported. In the Option Policy, replace the existing SVA Manager IP with the newly created SVA Manager IP once ePO - On-prem is connected and the previous SVA Manager IP can be deleted from the vCenter.
The SVM Manager OVF package appears in the specified folder on the ePO - On-prem server. Also, the SVM Manager details appear on the SVM Manager OVF Details page.
To deploy SVM Manager in a VMware vCenter environment, see
Deploy SVM Manger from Trellix MOVE AntiVirus deployment page
Using the ePO - On-prem console, deploy the SVM Manager to your hypervisors, so that it automatically assigns the SVM to a group of clients.
Note
You need to have the vendor specific tool for conversion installed on your systems to deploy SVM Manager on Citrix Xenserver and Microsoft Hyper-V environments.
Make sure that:
You have installed the Trellix MOVE AntiVirus extension on the ePO - On-prem server.
You have registered your VMware vCenter account with ePO - On-prem.
Your VMware vCenter account is synced successfully.
You have configured your ePO - On-prem details about the General page under Menu → Automation → MOVE AntiVirus Deployment → Configuration.
You configured your Infrastructure Group.
You have checked in the SVM Manager OVF package to the ePO - On-prem server.
Log on to ePO - On-prem as an administrator.
Select Menu → Automation → MOVE AntiVirus Deployment.
The default password for the SVM Manager svaadmin account is Svaadmin$1
You can change the password from the SVM Manager (Multi-Platform) Configuration option under Menu → Automation → MOVE AntiVirus Deployment → Configuration → General.
On the Configuration tab, click SVM Manager Configuration to open the SVM Manager OVF Details page.
Under Deployment Configuration, configure these options.
Infrastructure Group — Select the Default Group or an infrastructure group you created. The SVM Manager is deployed on this infrastructure group.
Checked-in OVF — Select the SVM Manager OVF package that is checked in to the ePO - On-prem server.
SVM Manager Settings policy — Select the SVM Manager Settings policy, so that it is assigned to the SVM Manager.
Click Deploy SVM Manager to open the Confirm SVM Manager Deployment dialog box.
Click OK to deploy the SVM Manager.
On a successful deployment, an SVM-Manager VM is created on the configured infrastructure group. Now, the SVM Manager service can communicate with ePO - On-prem through the Trellix Agent. Also, the selected SVM Manager Settings policy is applied to the SVM Manager.
Check the SVM Manager deployment status
After deploying the SVM Manager, you can view the deployment details on the Deployment Status tab under MOVE AntiVirus Deployment wizard on the ePO - On-prem server.
You installed the Trellix MOVE AntiVirus extension on the ePO - On-prem server.
You initiated the SVM Manager deployment using ePO - On-prem.
Log on to ePO - On-prem as an administrator.
Select Menu → Automation → MOVE AntiVirus Deployment.
On the Deployment Status tab, view the SVM Manager deployment details.
Click any SVM Manager deployment job to view these Task Status Details.
Deployment status
Item | Description |
|---|---|
Hypervisors/Hostname | Specifies the name of the hypervisor. |
vCenter Name/IP address | Specifies the name of the VMware vCenter account that is registered with ePO - On-prem. |
Deployment Type | Displays the SVM Manager deployment type as Deploy SVM Manager. |
Status | Specifies the deployment status such as Started, In Progress, Completed, and Failed. |
Start Time | Indicates the date and time when the SVM Manager deployment started. |
End Time | Indicates the date and time when the SVM Manager deployment ended. |
Task status
Item | Description |
|---|---|
Node Type | Specifies whether the node is an SVM Manager or a hypervisor, SVM, or a VM. |
Task Type | Specifies the set of internal tasks in a deployment job. The task list for one job is displayed in sequence with Start Time, End Time, and Failure Reasons, if applicable. |
Node Name | Displays the SVM Manager name, or hypervisor name, SVM, or the guest VM name. |
Status | Specifies the task status: Started, In Progress, Completed, Skipped, and Failed. |
Failure Reason | Specifies the reason for the failure of the task. |
Start Time | Indicates the date and time when the task started. |
End Time | Indicates the date and time when the task ended. |
Task type and status details
These are the task types that specify the internal tasks of a deployment job. The task list for one job is displayed in sequence with Start Time, End Time, and Failure Reasons, if applicable.
During SVM Manager deployment
Task type | Description |
|---|---|
Deploying SVM Manager | Indicates that the SVM Manager deployment is in progress. |
Powering on SVM Manager | Specifies that the SVM Manager is turned on. |
Task type | Description |
|---|---|
Registering SVM Manager with McAfee ePO | Registers the SVM Manager with ePO - On-prem. |
Assigning SVM Manager Settings policy to the SVM Manager node | Assigns the SVM Manager Settings policy to the SVM Manager node. |
During rollback
Task type | Description |
|---|---|
Rollback: Returning Static IP to IP Pool | (If Static IP Pool is used) Rolls back the static IP to IP Pool, which was assigned to the deployed SVM Manager. |
Rollback: Powering off SVM Manager | Rolls back the Powering on SVM Manager task. |
Rollback: Remove SVM Manager | Rolls back the Deploying SVM Manager task. |
SVM Manager in Hyper-V environment
To deploy the SVM Manager on Hyper-V, you must convert the .vmdk file, part of SVM Manager appliance, into a .vhd file.
Note
You need to have the vendor specific tool for conversion installed on your systems to deploy SVM Manager on Citrix Xenserver and Microsoft Hyper-V environments.
Make sure the MOVE-AV-MP_SVM_Manager_OVF_4.10.x.x.zip file is in accessible location.
Unzip the MOVE-AV-MP_SVM_Manager_OVF_4.10.x.x.zip file.
Using the Microsoft Virtual Machine Converter software, convert the .vmdk file into a .vhd file.
Attach the .vhd file as a hard disk to a new VM in Hyper-V.
Setup SVM Manager on vCenter environment manually
You must set up and configure the SVM Manager before deploying the SVM and assigning it to a group of clients. You can use this method for all type of hypervisors.
You must have administrator rights to perform this task.
The SVM Manager OVF package is in an accessible location on the network.
Open the VMware vSphere client, then click File → Deploy OVF Template.
Browse to and select the SVM Manager OVF package (MOVE-AV-MP_SVM_Manager_Pkg.4.10.x.x.zip) on your computer, then click Next to start the installation wizard.
Complete the steps in the wizard, accepting the default values or entering different values as needed.
When finished, select Power On to turn on the virtual machine and open a Console window to configure the SVM Manager appliance.
At the prompt, log on with these credentials:
User name:
svaadminPassword:
svaadmin
6. Configure the VM appliance with these details:
Time zone
Network — DHCP or Static
(Recommended: select a Static IP address for SVM Manager)DNS servers
IP Address or Hostname of the ePO - On-prem server
Note
It is recommended to use ePO - On-prem IP, even if the hostname resolves from new SVA-manager box.
ePO - On-prem credentials
Check for the correct format of the user name, for example: domain\\user name.
7. Verify that these communication ports are open and reachable on the SVM Manager:
8080 — For communication between SVM Manager and the client
8081 — For communication between Trellix Agent and ePO - On-prem
8443 — For communication between SVM Manager and the SVM
Tip
Best practice: By default, these ports are already opened through the firewall installed on the appliance. However, verify that the firewall settings in your environment are configured to allow communication on these ports.
8. Use this command to manually run the configuration script: sudo /home/svaadmin/.sva-config.
Now, the SVM Manager service can communicate with ePO - On-prem through the Trellix Agent. You must now set the required policies in ePO - On-prem.
Create a SVM deployment client task
Create an SVM deployment client task, so that you can assign that task to virtual machines.
Make sure that:
You have installed the Trellix MOVE AntiVirus extension on the ePO - On-prem server.
The Trellix Agent and Trellix ENS 10.x.x are installed on the target virtual system.
Note
Make sure that you check for AMCore Content (DAT) update before deploying the SVM.
Log on to ePO - On-prem as an administrator.
Select Menu → Policy → Client Task Catalog.
Select Product Deployment in the Client Task Types menu, then select Actions → New Task.
Select Product Deployment from the list, then click OK to open the Client Task Builder wizard.
Type a name for the task you are creating, and add any descriptive information in the Description field.
Make sure that Windows is the only target platform selected.
For Products and components:
For SVM, select Trellix MOVE AV [Multi-Platform] SVM 4.10.x.x from the drop-down list.
Set the action to Install, set the language to Language Neutral, and set the branch to Current.
Leave the Command line setting blank.
8. Review the task settings, then click Save.
The task is added to the list of client tasks for the selected client task type.
Assign an SVM deployment client task
After creating the SVM deployment client task, you must assign that task to virtual machines.
The Trellix Agent must already be deployed to target virtual systems.
Log on to ePO - On-prem as an administrator.
Select Menu → Policy → Client Task Assignments, then click the Assigned Client Tasks tab.
Click Actions → New Client Task Assignment.
Configure these settings, then click Next.
Product — Trellix Agent
Task Type — Product Deployment
Task Name — The name of the task you used when you created the client task
On the Schedule tab, specify the schedule for running the client task, then click Next.
Examine the settings on the Summary tab, then click Save to assign the task.
The Trellix MOVE AntiVirus SVM is deployed to systems in the selected group in the System Tree.
Assign the SVM Manager to an SVM
Configure the SVM Manager details in Trellix MOVE AntiVirus Options policy and assign it to the SVMs, so that the SVM Manager and SVMs can communicate to each other.
Make sure that:
You have installed the Trellix MOVE AntiVirus extension on the ePO - On-prem server.
You have deployed the Trellix MOVE AntiVirus SVM Manager.
You have deployed the Trellix MOVE AntiVirus SVM package to the target virtual systems.
Log on to ePO - On-prem as an administrator.
Click Menu → Policy → Policy Catalog, select MOVE AntiVirus 4.10.x from the Product drop-down list, then select Options
Click New Policy or click the name of an existing policy to edit it.
Type a name for the new policy (for example, MOVE AV SVM Manager Policy), then click OK.
Under SVM Assignment on the policy settings page, select Assign SVM using SVM Manager and configure the SVM Manager details, then click Save.
Enter the SVM Manager IP address or FQDN (domain name)
Enter the SVM Manager Port. Default is 8080.
Assign the configured policy to your SVMs.
The SVM Manager and the SVMs communicate, so that the clients can request the SVM Manager when they require an SVM. SVM Manager serves them an SVM based on the filtering rules created in the SVM Manager Settings policy.
Add or edit an SVM Manager assignment rule using IP address
Using their IP address range, assign a set of endpoints to a selected SVM or multiple SVMs, so that those endpoints are protected by the SVM Manager assignment rule.
Make sure that:
You have installed the Trellix MOVE AntiVirus extension on the ePO - On‑prem server.
You have deployed the SVM Manager.
You have deployed the Trellix MOVE AntiVirus SVM package to the target virtual systems.
Things to remember:
You can define different rules to overwrite the autoscale settings. After defining the generic SVM autoscale requirements in SVM Autoscale Settings, you can also define rule-based autoscale settings.
Rule-based autoscale settings can overwrite the regular SVM Autoscale Settings.
You can separate IP addresses or ranges with a comma (,) or a new line.
Log on to ePO - On‑prem as an administrator.
Select Menu → Policy → Policy Catalog, select MOVE AntiVirus 4.10.x from the Product drop-down list, then select SVM Manager Settings from the Category drop-down list.
Click New Policy or click the name of an existing policy to edit it.
Type a name for the new policy (for example, MOVE AV SVM Manager Policy), then click OK.
On the Assignment Rules tab on the Policy Settings page, click Add to open the Add/Edit SVM IP Assignment Rule dialog box and configure these settings as needed.
For this option... | Do this... |
|---|---|
Rule name | Type a unique user-friendly name that can help you identify the rule. |
Client IP Addresses | Type the IP address or a range of IP addresses of the endpoints, so that these endpoints can be protected by the SVM, which is specified in the SVM IP Address option. |
SVM IP Addresses | Type the IP address of the SVM, so that this SVM can protect the endpoints, which are specified in the Client IP Address option. |
If you are using the autoscale SVM feature, configure these settings.
For this option... | Do this... |
|---|---|
Select and add to infrastructure groups | Select the Default Group or an infrastructure group you created using the Menu → Automation → MOVE AntiVirus Deployment → Configuration → Infrastructure Details option, so that SVM deployment can be done to a specific infrastructure group in your organization. |
Customize SVM Settings | This is the SVM assignment rule specific to autoscale settings. Each rule can be assigned for individual SVM deployment settings. You can define different rules, which overwrite the common autoscale settings defined under SVM Autoscale Settings.
|
For this option... | Do this... |
|---|---|
required for the maximum number of clients that need protection at any time of the day. The standby SVMs are automatically deployed based on the backup SVM value. For example, if you specify the backup SVM as 4, two standby SVMs are deployed automatically. The Trellix MOVE AntiVirus SVMs automatically scale up and down depending on the number of endpoints connected. | |
Alarms | Threshold for number of connected endpoints (per SVM) — Specify the SVM capacity threshold level. A warning appears when the number of connected endpoints is more than this level. |
Note
The Assign SVM if no rule is defined for the above client option is used to assign the SVM to endpoints, which are not defined in any of the rules. By default, this option is enabled.
(Optional) Select Enable to get SVM preference from the same subnetto assign an SVM from the same subnet. For details, see SVM preference.
Click OK to save your changes.
Add or edit an SVM Manager assignment rule using ePO - On-prem tag
Assign a set of endpoints to a selected SVM using their tag group, so that they are protected by the SVM Manager assignment rule.
Make sure that:
You have installed the Trellix MOVE AntiVirus extension on the ePO - On-prem server.
You have deployed the SVM Manager.
You have deployed the Trellix MOVE AntiVirus SVM package to the target virtual systems.
Things to remember:
You can define different rules to overwrite the autoscale settings. After defining the generic SVM autoscale requirements in SVM Autoscale Settings, you can also define rule-based autoscale settings
Rule-based autoscale settings overwrite the regular SVM Autoscale Settings.
Separate tag names with a comma (,)
Tag-based assignment rules take priority over IP-based assignment rules
Log on to ePO - On-prem as an administrator
Select Menu → Policy → Policy Catalog, select MOVE AntiVirus 4.10.x from the Product drop-down list, then select SVM Manager Settings from the Category drop-down list
Click New Policy or click the name of an existing policy to edit it
Type a name for the new policy (for example, MOVE AV SVM Manager Policy), then click OK
In the Tag Assignment Rules tab on the Policy Settings page, click Add to open the Add/Edit SVM Tag Assignment Rule dialog box and configure these settings as needed
For this option... | Do this... |
|---|---|
Rule name | Type a unique user-friendly name that can help you identify the rule |
Select and add to client tags | Select the ePO - On‑prem tag names of the endpoints, so that these endpoints can be protected by the SVM, which is specified in the Select and add to SVM tags option |
Select and add to SVM tags | Select the ePO - On‑prem tag name of the SVM, so that this SVM can protect the endpoints, which are specified in the Select and add to client tags option |
If you are using the autoscale SVM feature, configure these settings.
For this option... | Do this... |
|---|---|
Select and add to infrastructure groups | Select the Default Group or an infrastructure group you created using the Menu → Automation → MOVE AntiVirus Deployment → Configuration → Infrastructure Details option, so that SVM deployment can be done to a specific infrastructure group in your organization |
Customize SVM settings | This is the SVM assignment rule specific to autoscale settings. Each rule can be assigned for individual SVM deployment settings. You can define different rules, which overwrite the common autoscale settings defined under SVM Autoscale Settings.
|
Alarms | Threshold for number of connected endpoints (per SVM) — Specify the SVM capacity threshold level. A warning appears when the number of connected endpoints is more than this level |
Note
The Assign SVM if no rule is defined for the above client option is used to assign the SVM to endpoints, which are not defined in any of the rules. By default, this option is enabled.
(Optional) Select Enable to get SVM preference from the same subnet to assign an SVM from the same subnet. For details, see SVM preference
Click OK to save your changes
SVM preference
Selecting the Enable to get SVM preference from the same subnet option, you can assign an SVM to the clients from the same subnet when clients migrate from one hypervisor to another. You must define tag or IP-based rules specifying the SVM's IP address or tag of respective hypervisor/subnet.
For example, consider a scenario where:
SVM-1, SVM-2, and SVM-3 are in ESXi-1, ESXi-2, and ESXi-3 servers respectively
You have a client that keeps migrating from one hypervisor to another
You want to protect the client by an SVM that belongs to the same subnet
With these assumptions, selecting the Enable to get SVM preference from the same subnet option, when the client migrates from one hypervisor to another, it is protected from an SVM that belongs to the same subnet.
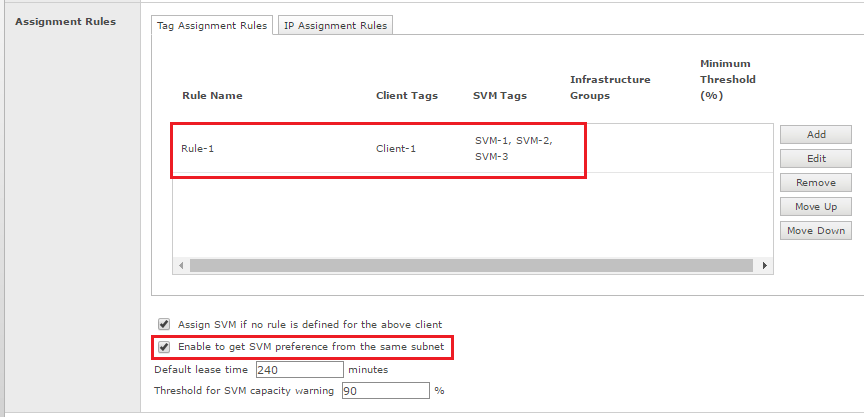
Default rule vs custom rules (tag-based or IP-based)
After registering your vCenter account, your default infrastructure group is added to the MOVE AntiVirus Deployment wizard when you access the Infrastructure Details option under Multi-Platform.
When you enable the autoscale SVM feature based on the specified SVMs value under Customize SVM Settings, a default SVM pool is created, then Ready and Standby SVMs are deployed to the default infrastructure group for the default SVM assignment rule.
When you create SVM assignment rules (tag-based or IP-based), you can specify the number of backup SVMs for the rule, then new SVMs are deployed to the selected infrastructure group. The infrastructure group can be default group or user-defined group.
The clients that are not under a tag-based or IP-based rule are protected by the default SVM pool corresponding to the default SVM assignment rule.
If you bring up the client system that is not part of the SVM assignment rules (tag-based or IP-based), the client system is protected by the SVM pool that is created for the default SVM assignment rule.
If you bring up the client system that is part of the SVM assignment rules (tag-based or IP-based), the client system is protected by the SVM pool that is created for the custom SVM assignment rule.
Creating more rules consumes more computing resources for deploying SVMs. For example, if you create 10 SVM assignment rules (tag-based or IP-based) specifying backup SVMs as 2, then 2 Ready and 1 Standby SVMs are deployed for each rule.
How autoscale SVM works
A default infrastructure group is added to the MOVE AntiVirus Deployment wizard when you access the Infrastructure Details option under Multi-Platform.
When you enable the autoscale SVM feature, based on the specified SVM's value under Customize SVM Settings, a default SVM pool is created then Ready and Standby SVMs are deployed to the default infrastructure group for the default SVM assignment rule (The SVM assignment rule is created by default for the clients that are not part of user-defined SVM assignment rules. The default SVM assignment rule does not appear on the ePO - On-prem page).
For user-defined SVM assignment rule, the number of backup SVMs can be specified on the Add/Edit SVM Tag Assignment Rule or Add/Edit SVM IP Assignment Rule dialog box under Customize SVM Settings.
Example 1
Consider a scenario where:
The number of clients — X
The number of Ready SVMs specified in ePO - On-prem — Y
The number of Standby SVMs — Z
Depending on the value Y, the time it takes to start protecting the X number of clients varies. If the value of Y is less (considering each SVM protects 250 clients), then for the first time, it takes more time to protect the X clients because that number of required SVMs must be deployed. But eventually all X clients are protected.
You can also bring all these X clients to the Trellix MOVE AntiVirus environment in different batches. For example, if you have 10000 clients in your environment, you can bring them in 2 batches (5000 clients in each batch), so that there is no gap in protecting the clients by SVMs.
Example 2
Consider a scenario where:
The total number of client systems — 15000
The number of static client systems (All time turned on) — 6000
The number of dynamic clients (Keep turned on and off when needed) — 9000
These 9000 clients are part of 3 SVM assignment rules (a default, one tag-based, and one IP-based rule) — 3000 client systems per each rule
The number of client systems with a tag-based SVM assignment rule — 3000
The number of client systems with an IP-based SVM assignment rule — 3000
The number of client systems with a default SVM assignment rule — 9000 (3000 dynamic and 6000 static)
These 9000 dynamic client systems need immediate protection when they are up and running. These 9000 dynamic client systems can be protected by using the autoscale SVM feature.
You configured the number of Ready SVMs as 4 and the number of Standby SVMs as 2 for each SVM assignment rule (default, tag-based, and IP-based) to protect these 9000 dynamic client systems.
With these 4 Ready and 2 Standby SVMs, dynamic and static client systems must be protected.
Protecting dynamic client systems
During the peak time, say 9000 client systems are up and running, then first 3000 clients (1000 clients per each rule) are protected immediately [As the 12 Ready SVMs (4 Ready SVMs of each rule) would immediately transition to Running state and protect the first 3000 clients]. But for next 6000 dynamic clients, the new Ready SVMs need to be deployed and they keep transitioning from Standby → Ready → Running state depending on the client load. It takes some time to protect these 6000 dynamic client systems. So to keep protecting the total 9000 dynamic clients, 36 Running SVMs (12 SVMs per each rule) are required.
When clients systems are turned off, the corresponding Running SVMs are transitioned to Standby state so that the computing resources are saved.
Protecting static client systems
These 6000 static clients are protected by the respective SVM pool that is created for the corresponding SVM assignment rule (default, tag-based, and IP-based).
To protect 6000 static client systems, 24 Running SVMs (6000/250 = 24 Running SVMs) are required.
These initial 24 Running SVMs creation takes some time, as this is an initial setup and fresh Ready and Standby SVMs need to be deployed. The transition from Standby → Ready → Running happens in phase by phase manner. But eventually all X clients are protected.
To protect 12,000 static clients at once, you can also bring all these 12,000 clients to the Trellix MOVE AntiVirus environment in different batches, for example, you can bring them in 12 batches (1000 clients per batch) so that there is no gap in protecting the clients by SVMs.
Configuring an SVM OVF template for autoscaling
An SVM OVF template is a primary image of a virtual machine that can be used to create and deploy many SVMs.
When you export an SVM, you create a copy of the entire virtual machine, including its settings, installed software, and other configuration settings. Exporting the SVM saves time when you are deploying many SVMs. You can create and configure a single SVM, then deploy it multiple times, rather than creating and configuring each SVM individually.
When you deploy an SVM from OVF template, the resulting SVM is independent of the original SVM or template. Changes to the original SVM or template are not reflected in the deployed SVM, and changes to the deployed SVM are not reflected in the original SVM or template.
Note
Exporting an SVM OVF template is required only when you are using autoscaling method.
You can configure an SVM OVF template using one of these options:
Export an existing SVM or create and export from a VM — You can export a template from an SVM system or can create an SVM and export it to make a primary image of the SVM, from which you can deploy many SVMs.
Specify the SVM OVF location available on the McAfee ePO system — You can export an SVM OVF template using the export utility, then copy the exported SVM OVF template to the ePO - On-prem server. Then specify the location of the SVM OVF template that is available on the ePO - On-prem server, so that Trellix MOVE AntiVirus can deploy SVMs, as needed.
Export an SVM OVF template
Using the Export an existing SVM or create and export from a VM option, you can export a template from an SVM system or can create an SVM and export it to make a primary image of the SVM, from which you can deploy many SVMs. create an SVM system, then export it to make a primary image of an SVM, from which you can deploy many SVMs. When you use this option, Trellix MOVE AntiVirus installs Trellix ENS and the SVM package (if they are not installed) on the VM, then exports it to the ePO - On-prem server.
Make sure that:
You have installed the Trellix MOVE AntiVirus 4.10.x extensions on the ePO - On-prem server.
Your VMware vCenter account is synced successfully.
(If you are creating and exporting from a VM) You have a VM with one of these Plain Vanilla Windows Server platforms: 2008 R2 SP1 (64-bit), 2012 R2 (64-bit), 2016, or 2019.
(If you are exporting from an existing SVM) Make sure that the SVM package is upgraded to the latest version of 4.10.x.
The latest VMware Tools are installed on the VM.
The VM is managed by ePO - On-prem.
The VM has no snapshots.
The VM has only one hard disk.
The VM is turned on.
(If your environment includes more than one domain) Make sure that the VM is not part of any domain, so that the exported SVM template is a generic one and can be deployed to any domain.
Do not configure the SVM Manager IP details under SVM Manager Assignment in Options policy until you create and export the SVM template.
Note
To use autoscale SVM feature, the minimum supported Trellix ENS version is 10.7.0 or later.
Log on to ePO - On-prem as an administrator.
Select Menu → Automation → MOVE AntiVirus Deployment.
On the Configuration tab, under Multi-Platform, click SVM Configuration to open the SVM OVF Details page with these SVM OVF details and actions.
Options | Description |
|---|---|
SVM OVF Name | Name of the Trellix MOVE AntiVirus SVM OVF template checked in to ePO - On-prem. |
SVM OVF Version | Version of the Trellix MOVE AntiVirus SVM OVF template checked in to ePO - On-prem. |
SVM OVF Use Cozunt | Specifies the number of SVMs that are deployed for SVM autoscaling |
Action | Delete — To remove an existing Trellix MOVE AntiVirus SVM OVF when it is not deployed to any hypervisor. You can delete the SVM OVF only when the SVM OVF Use Count is 0. |
4. Click Actions → Add SVM to open the Configure SVM OVF page.
5. Under Configure SVM OVF template, select Export an existing SVM or create and export from a VM and configure these options.
Options | Description |
|---|---|
Registered Cloud Account | Select a VMware vCenter account where the VM is present |
VM Name | Type the name of the VM |
Username | Type the user name of the VM |
Password | Type the password of the VM |
Confirm Password | Retype the password |
SVM Location on McAfee ePO | Specify the location on the ePO - On-prem server. This location is used to store the exported SVM OVF template |
SVM OVF Version | Type a version for the SVM OVF template, for example, 4.10.x |
Options | Description |
|---|---|
SVM OVF Name | Type a name for the SVM OVF template, for example, ESVM 4.10.x |
Description | (Optional) Type details about the SVM OVF template, to help identify the SVM OVF template |
Click Export to open the Export SVM OVF Confirmation dialog box.
Click OK to create an SVM system and export it to make an SVM OVF template.
The SVM OVF template files (**.ovf and **.vmdk) are created on the ePO - On-prem server. Also, the exported SVM OVF template details are available on the SVM OVF Repository page under MOVE AntiVirus Deployment → Configuration → Multi-Platform → SVM Configuration.
Check the SVM export status
After exporting an SVM, you can view the export details on the Deployment Status tab under MOVE AntiVirus Deployment wizard on the ePO - On-prem server.
Make sure that you initiate an SVM export using ePO - On-prem.
Log on to ePO - On-prem as an administrator.
Select Menu → Automation → MOVE AntiVirus Deployment.
On the Deployment Status tab, view the SVM export details.
Click any Export SVM OVF template job to view these Task Status Details.
Deployment status
Item | Description |
|---|---|
Hypervisors/Hostname | Specifies the host name of the SVM |
vCenter Name/IP address | Specifies the name of the VMware vCenter account that is registered with ePO - On-prem |
Deployment Type | Displays the deployment type as Export SVM OVF |
Item | Description |
|---|---|
template | |
Status | Specifies the deployment status such as Started, In Progress, Completed, and Failed |
Start Time | Indicates the date and time when the SVM export job started |
End Time | Indicates the date and time when the SVM export job ended |
Task status
Item | Description |
|---|---|
Node Type | Specifies whether the node is an SVM or endpoint |
Task Type | Specifies the set of internal tasks in an SVM export job. The task list for one job is displayed in sequence with Start Time, End Time, and Failure Reasons, if applicable |
Node Name | Displays the name of the VM |
Status | Specifies the task status: Started, In Progress, Completed, Skipped, and Failed |
Failure Reason | Specifies the reason for the failure of the task |
Start Time | Indicates the date and time when the task started |
End Time | Indicates the date and time when the task ended |
Create or edit an infrastructure group in ePO - On-prem for SVM autoscaling
After registering your vCenter account, your default group is added to the MOVE AntiVirus Deployment wizard when you access the Infrastructure Details option under Multi-Platform. You can edit the details of the default infrastructure group, as needed.
You registered your VMware vCenter account with ePO - On-prem.
You can deploy the SVM to any infrastructure group by configuring the SVM Manager and autoscale settings in ePO - On-prem. By default, an infrastructure group is added to the MOVE AntiVirus Deployment wizard when you access the Infrastructure Details option under Multi-Platform.
Using the Infrastructure Details option, you can create a hypervisor-based or cluster-based infrastructure group. You can then customize and select the infrastructure group for SVM deployment.
You can customize the SVM Manager Settings policy for creating and assigning IP-based or tag-based assignment rules for SVM deployment. You can select and include individual infrastructure groups for SVM deployment.
Log on to ePO - On-prem as an administrator.
Select Menu → Automation → MOVE AntiVirus Deployment.
On the Configuration tab, click Infrastructure Details to open the Infrastructure Details page with the default infrastructure group details.
Option | Description |
|---|---|
Group Name | Specifies the name of the infrastructure group.
|
Cloud Account Name | Specifies the account name of the registered vCenter account. |
ESXi/Cluster | Specifies the IP address or name of the hypervisor or the cluster selected as part of the infrastructure group. |
Option | Description |
|---|---|
| |
IP Pool Name | Specifies the name of the DHCP or IP Pool used in the infrastructure group. By default, DHCP is selected.
|
Provisioning | Specifies the provisioning type as Thin or Thick. |
Network Name | Specifies the name of the management network used by the group. |
Datastore Name | Specifies the name of the datastore used by the infrastructure group. By default, the datastore with the most free space is selected. |
Action |
|
4. Click Actions → Create and configure these properties for the custom infrastructure group details. You don't need to configure the custom group details when the default group is available.
Option | Description |
|---|---|
Group Name | Type a name for the infrastructure group. |
Infrastructure Type | Select whether you want to create a group based your hypervisor or cluster.
|
Select Host (Cluster) | Select the IP address of your host or cluster. |
Hostname Prefix | Type a unique prefix that is added to the host name of the hypervisor or cluster. The prefix can include characters a–z, A–Z, 0–9, and [-], without space. |
IP Pool | Configure the IP Pool as Static or DHCP. |
AD Server | Select the registered Active Directory server, so that the deployed SVM is automatically added to the selected domain. |
Provisioning Type | Select the provisioning type as Thin or Thick. |
Network Name | Select the required management network. |
Datastore Name | Select the configured datastore for the infrastructure. |
5. Click Save to store the infrastructure details.
Enable and configure SVM autoscale settings
Create and assign a policy that specifies which SVM an infrastructure group uses.
Make sure that:
You define the autoscale settings for the Trellix MOVE AntiVirus SVM so that its deployment starts automatically, depending on the number of clients connecting to it for protection.
You installed the Trellix MOVE AntiVirus extension on the ePO - On-prem server
You configured your ePO - On-prem details about the General page under Automation → MOVE AntiVirus Deployment → Configuration
You deployed the SVM Manager
You exported an SVM OVF template
(If you exported an SVM OVF using export utility tool) You specified the Trellix MOVE AntiVirus SVM OVF template path in ePO - On-prem
You configured the SVM Manager IP details under SVM Manager Assignment in Options policy
You can track the status of the SVM deployment on the Deployment Status page on the ePO - On-prem server.
Note
You can deploy only one SVM manager if you enable the autoscaling feature.
Log on to ePO - On-prem as an administrator.
Select Menu → Policy → Policy Catalog, select MOVE AntiVirus 4.10.x from the Product drop-down list, then select SVM Manager Settings from the Category drop-down list.
Click New Policy or click the name of an existing policy to edit it.
Type a name for the new policy (for example, MOVE AV Server Policy), then click OK.
Under SVM Manager Configuration, configure these settings as needed, then click Save.
SVM Port — Specify the port for the SVM to communicate to SVM Manager. Default is 8443.
Client Port — Specify the port for the client system to communicate to SVM Manager. Default is 8080.
From SVM Autoscale Settings, select Enable auto scaling of SVMs.
Important
Enabling the Enable auto scaling of SVMs option deletes all manually deployed SVMs after the new SVMs are deployed. The new SVMs are ready to protect the client systems. Disabling the Enable auto scaling of SVMs option deletes all ready and standby SVMs, but the running SVMs continue to protect the client systems.
7. Under SVM Autoscale Settings, configure these options:
Number of backup SVMs — Type the number of ready SVMs required to protect your client systems.
Calculate the number of ready SVMs required for the maximum number of clients that need protection at any time of the day. The standby SVMs are automatically deployed based on the backup SVM value. For example, if you specify the backup SVM as 4, 2 standby SVMs are deployed automatically.
Important
The ready SVMs are not protecting your clients, but running SVMs are. The backup SVMs are the ready SVMs, which enable faster protection for new client systems that might be added during peak hours or during a cloud burst.
Note
When the SVM reaches minimum threshold for the number of connected endpoints, the running SVMs move to the standby SVM pool.
8. Click Show Advanced and configure the Assignment Rules options as needed, then click Save.
Autoscale SVM details
When you define the autoscale SVM settings, the SVM deployment starts automatically depending on the number of clients connecting to the Trellix MOVE AntiVirus SVM for protection.
You can view the SVM deployment mode, its status, and the purging details on the Autoscale SVM Details page.
Option | Description |
|---|---|
Preset | You can select an option to filter and display the |
1 | Multi-platform
Option | Description |
|---|---|
deployed SVM modes:
| |
Hostname | Host name of the deployed Trellix MOVE AntiVirus SVM. |
Assignment Rule | Specifies the name of assignment rule, which assigns a set of endpoints to a selected SVM or multiple SVMs, so that those clients are protected by the SVM Manager assignment rule. |
Infrastructure Group | Specifies whether it is a hypervisor-based or cluster-based infrastructure group. |
Version | Specifies the version of the SVM. |
SVM Mode | Specifies the mode of the deployed SVM:
|
Option | Description |
|---|---|
SVM Status | Specifies whether the SVMs are running. |
Action |
|
Deploy the Trellix MOVE AntiVirus client
Deploy the client package to virtual machines using ePO - On-prem, so that ePO - On-prem can manage the Trellix MOVE AntiVirus configuration on client systems.
Make sure that:
The Trellix Agent must already be deployed to target virtual systems.
You installed the Trellix MOVE AntiVirus extension on the ePO - On-prem server
Make sure that your VMware vCenter account is synced successfully.
You deployed the SVM Manager using ePO - On-prem.
(If you are using autoscale SVM) You exported an SVM OVF template and configured SVM autoscale settings.
(If you are not using autoscale SVM) You deployed the Trellix MOVE AntiVirus SVM package to target virtual systems.
Make sure that the SVMs are communicating with the SVM Manager and are ready to protect new clients.
Make sure that your virtual machines are turned on where you want to deploy Trellix MOVE AntiVirus client.
Log on to ePO - On-prem as an administrator.
Select Menu → Systems → System Tree.
In the System Tree, select the virtual machines where you want to deploy the client package.
From Actions, select MOVE → Deploy Client [Multi-Platform] to open the Client Deployment Configuration page.
Under Client Configuration for Client Package, select Trellix MOVE AV [Multi-Platform] Client 4.10.x..
You can view all SVM Assignment Rules, if the selected client systems are part of the assignment rules.
Click Proceed to open the Deployment Confirmation dialog box.
A message shows the number of systems that are compatible and non-compatible for the client deployment.
Review the message, then click OK to deploy the client package to the compatible client systems.
A deployment task is created for all selected systems. Go to Deployment Status tab under the MOVE AntiVirus Deployment wizard to view the Passed or Failed tasks with their details.
If you click Cancel, the deployment task is created only for the non-compatible client systems, and the failure reasons can be viewed on the Deployment Status tab under the MOVE AntiVirus Deployment wizard.
Note
Reboot the system after installing Trellix MOVE client software.
For compatible client systems, the SVM Manager IP address is updated in the respective Options policy, then the SVM Manager assigns an SVM for the clients to protect them.
Note
When the Trellix MOVE AntiVirus client is present, disable Trellix ENS Threat Protection. Deploying two AntiVirus solutions on the same system results in performance impact.
Check the Trellix MOVE AntiVirus client deployment status
After deploying Trellix MOVE AntiVirus client, you can view the deployment details on the Deployment Status tab under MOVE AntiVirus Deployment wizard on the ePO - On-prem server.
Make sure that:
You have installed the Trellix MOVE AntiVirus package extension on the ePO - On-prem server.
You have initiated the Trellix MOVE AntiVirus client deployment using ePO - On-prem.
Log on to ePO - On-prem as an administrator.
Select Menu → Automation → MOVE AntiVirus Deployment.
On the Deployment Status tab, you can view the Trellix MOVE AntiVirus client deployment details.
Click any of the Deploy client and enable protection jobs to view these Task Status Details.
Job status
Item | Description |
|---|---|
Start Time | Indicates the date and time when the Trellix MOVE AntiVirus client deployment started |
End Time | Indicates the date and time when the Trellix MOVE AntiVirus client deployment ended |
Deployment Type | Displays the Trellix MOVE AntiVirus client deployment type as Deploy client and enable protection |
Status | Specifies the deployment status such as Started, In Progress, Completed, and Failed |
vCenter Name/IP address | Specifies the IP address of the Trellix MOVE AntiVirus client system |
Hypervisors/Hostname | Specifies the host name of the Trellix MOVE AntiVirus client system |
"Task status details" \ Guest Tab
Item | Description |
|---|---|
Node Type | Specifies the node type as Endpoint |
Task Type | Specifies the set of internal tasks that happen in a deployment job. The task list for one job is displayed in sequence with Start Time, End Time, and Failure Reasons, if applicable |
Node Name | Displays the host name of the Trellix MOVE AntiVirus client system. |
Status | Specifies the task status such as Started, In Progress, Completed, Skipped, and Failed |
Item | Description |
|---|---|
Failure Reason | Specifies the reason for the failure of the task |
Start Time | Indicates the date and time when the task started |
End Time | Indicates the date and time when the task ended |
During Trellix MOVE AntiVirus client deployment
Task type | Description |
|---|---|
Updating Options policy | Updates the IP address of the SVM Manager in the respective Options policies that are assigned to the clients. |
Deploying client | Indicates that the Trellix MOVE AntiVirus client deployment is in progress. |
Connecting to SVM Manager | Specifies that the Trellix MOVE AntiVirus client is communicating to the SVM Manager. |
Assigning SVM to endpoint | Assigns the Trellix MOVE AntiVirus SVM to the client system. |
Connecting to SVM | Specifies that the client is communicating to the Trellix MOVE AntiVirus SVM. |
Testing EICAR | Tests EICAR on the Trellix MOVE AntiVirus client system on which the Trellix MOVE AntiVirus client deployment is successful. |
Deploy client in a Virtual Desktop Infrastructure environment
When operating in a Virtual Desktop Infrastructure (VDI) environment, follow these steps to create a primary image of a client system and clone the virtual machines.
1 | Multi-platform
Make sure that:
The Trellix Agent is installed on the primary image.
The Trellix MOVE AntiVirus client is in the Main Repository.
Deploy the Trellix MOVE AntiVirus client to the primary image.
Configure and apply Trellix MOVE AntiVirus policies to the primary image.
Run the targeted on-demand scan on the primary image to build up the cache.
Building up the cache on the primary image improves the performance of the VDI when you clone the virtual machines.
In the primary image, delete the registry key AgentGUID from the location determined by your Windows operating system.
32-bit —
HKEY_LOCAL_MACHINE\SOFTWARE\Network Associates\ePolicy Orchestrator\Agent(32-bit)64-bit —
HKEY_LOCAL_MACHINE\SOFTWARE\Wow6432Node\Network Associates\ePolicy Orchestrator\Agent(64-bit)
In the primary image, under
HKEY_LOCAL_MACHINE\SYSTEM\CurrentControlSet\Services\mvagtdrv\Parameters, delete the data for ServerAddress1, ServerAddress2, and ODSUniqueId.Shut down the primary image and clone the virtual machines from the primary image.
When cloned virtual machines are turned on, new agent GUID values are automatically generated. The virtual machines are now managed by the ePO - On-prem server.
Deploy the Trellix MOVE AntiVirus Multi-Platform client 4.10 with Trellix Endpoint Security (ENS) Threat Prevention
Deploy the client package to virtual machines using ePO - On-prem, so that ePO - On-prem can manage the Trellix MOVE AntiVirus configuration on client systems. The co-existence of Trellix MOVE AntiVirus and Trellix Endpoint Security (ENS) Threat Prevention is a replacement for MOVE + HIPS configuration because of the HIPS EOL announcement.
Make sure that:
The Trellix Agent must already be deployed to target virtual systems.
You installed the Trellix MOVE AntiVirus extension on the Trellix ePO - On-prem server.
Make sure that your VMware vCenter account is synced successfully.
You deployed the SVM Manager using Trellix ePO - On-prem.
(If you are using autoscale SVM) You exported an SVM OVF template and configured SVM autoscale settings.
Trellix MOVE AntiVirus 4.10.x Installation Guide 59
1 | Multi-platform
(If you are not using autoscale SVM) You deployed the Trellix MOVE AntiVirus SVM package to target virtual systems.
Make sure that the SVMs are communicating with the SVM Manager and are ready to protect new clients.
Make sure that your virtual machines are turned on where you want to deploy Trellix MOVE AntiVirus client.
The client machine has ENS 10.7.0 installed with June 2021 Update or later.
Log on to ePO - On-prem as an administrator.
Select Menu → Systems → System Tree.
In the System Tree, select the virtual machines where you want to deploy the client package.
From Actions, select Agent → Run Client Task Now to open the Run Client Task Now page.
In the Run Client Task Now:
For Product, select Trellix Agent.
For Task Type, select Product Deployment.
For Task Name, select Create New Task.
Check if Target Platforms is Windows only.
For Products and components, select Trellix Move AV [Multi-Platform] Client 4.10.x or later Trellix MOVE AntiVirus client version and in the Command Line, enter KEEPENS=1 .
In the bottom right corner, click Run Task Now.
You can see the status of the installation in the Running Client Task Status page.
Reboot the system after installing Trellix MOVE client software.
If you see the Status as Completed on the Running Client Task Status page, the MOVE AntiVirus installation on your client machine is finished.
Note
This solution is only for MOVE + Trellix ENS exploit prevention function only. All other Trellix Endpoint Security (ENS) Threat Prevention functions such as: On Access scan, On Demand Scan and Access Protection aren’t supported.
Create policies and settings on ePO - On-prem
Policies and setting need to be created and configured for Trellix MOVE AntiVirus 4.10.x.x. This can be done under the Policy Catalog in ePO - On-prem. The Multi Platform client assigned with the created policies and settings will be protected based on the set configuration.
Create an On Access Scan policy
After you deploy the Trellix MOVE M-Platform to the clients from the ePO - On-prem server, you need to create an On Access Scan policy. This policy is used to Enable/Disable On Access Scan, Enable/Disable Deferred Scan, File types to Scan, Path Exclusion, Process Exclusion, and Publisher Exclusion.
Log on to ePO - On-prem as an administrator.
Select Menu → Policy → Policy Catalog.
Select MOVE AntiVirus 4.10.x from the Product drop-down list, then click New Policy.
The Create a new policy dialog box appears on the screen.
In the Create a new policy, select On Access Scan from the Category drop-down list.
Select My Default from the Create a policy based on this existing policy drop-down list.
Enter the name of your policy in Policy Name.
Click OK to save the policy.
The new On Access Scan policy page appears on the screen with all the parameters and their values. As per your requirements, edit the values of the parameters and click Save otherwise click Cancel.
Create an On-Demand scan policy
After you deploy the MOVE Multi Platform AntiVirus to the clients from the ePO - On-prem server, you need to create an On-Demand Scan policy. Use this policy to enable or disable On Access Scan, Deferred Scan, File types to Scan, and Path Exclusion.
Log on to ePO - On-prem as an administrator.
Select Menu → Policy → PolicyCatalog.
Select MOVE AntiVirus 4.10.x from the Product drop-down list, then click New Policy.
The Create a new policy dialog box appears on the screen.
In Create a new policy, select On Demand Scan from the Category drop down list.
Select My Default from the Create a policy based on this existing policy drop down list
Enter the name of your policy in Policy Name.
Click OK to save the policy
The new On Demand Scan policy page appears on the screen with all the parameters and their values. As per your requirements, edit the values of the parameters and click Save otherwise click Cancel.
Create an On-Demand scan task on individual folder
After you deploy the Trellix MOVE AntiVirus Multi Platform to the clients from the ePO - On-prem server, you can run on-demand scan at individual folder level.
Log on to the ePO - On-prem server as an administrator.
Select Menu → Policy → Client Task Catalog.
From Client Task Types, select MOVE AntiVirus 4.10.x → Targeted On-Demand Scan [Multi-Platform].
Click the name of an existing client task or click New Task, then confirm the task type.
Configure the Task Name and Description on each tab. Also provide Folder Path (Optional), then click Save
Configure Task Name and Description on each tab, then click Save.
Note
Specify the path in Folder Path (Optional) to run on-demand scan on individual folders.
Click Assign, specify the servers where you want to assign the task, then click OK.
Click Schedule to schedule the task.
Create an Options policy
After you deploy the MOVE Multi Platform AntiVirus to the clients from the ePO - On-prem server, you need to create an Options policy. Using this policy, you can assign SVM manager or SVM to Multi-Platform clients.
Log on to ePO - On-prem as an administrator.
Select Menu → Policy → PolicyCatalog.
Select MOVE AntiVirus 4.10.x from the Product drop-down list, then click New Policy.
In Create a new policy, select Options from the Category drop-down list.
Select My Default from the Create a policy based on this existing policy drop-down list.
Enter the name of your policy in Policy Name.
Click OK to save the policy
The new Options policy page appears on the screen with all the parameters and their values.
On the policy settings page, click Show Advanced to see all the settings
Under SVM Assignment (Multi-Platform only) on the policy settings page:
Click on Assign SVM using SVM Manager and provide the IP address/host name and the port (If SVM Manager need to be assigned) OR
Click on Assign SVM manually and provide the IP address/host name and the port for SVM-1 and SVM-2 (If SVM need to be assigned instead of SVM Manager)
Click Save to save the new settings to your Options policy
As per your requirements, edit the values of the parameters and click Save otherwise click Cancel.
Create SVM settings policy
After you deploy the MOVE Multi Platform AntiVirus to the clients from the ePO - On-prem server, you need to create a policy for SVM settings policy. Using this policy, you can configure the ODS scheduler, Scanning options and other options.
Log on to ePO - On-prem as an administrator.
Select Menu → Policy → PolicyCatalog.
Select MOVE AntiVirus 4.10.x from the Product drop-down list, then click New Policy.
The Create a new policy dialog box appears on the screen.
In Create a new policy, select SVM Settings from the Category drop-down list.
Select My Default from the Create a policy based on this existing policy drop-down list
Enter the name of your policy in Policy Name.
Click OK to save the policy
The new SVM Settings policy page appears on the screen with all the parameters and their values.
As per your requirements, edit the values of the parameters and click Save otherwise click Cancel.
Create a Certificates policy
After you deploy the Trellix MOVE for Multi-Platform AntiVirus to the clients from the ePO - On-prem server, you need to create a Certificate policy. Using this policy, you can add the trusted certificates.
The Certificates policy option allows you to add certificates in the policy. Once you add the certificate, all files that are signed by the listed certificates are excluded from on-access and on-demand scanning.
Log on to ePO - On-prem as an administrator.
Select Menu → Policy → PolicyCatalog.
Select MOVE AntiVirus 4.10.x from the Product drop-down list, navigate to Certificates (Multi-Platform only) policy.
In Create a new policy, select SVM Manager Settings from the Category drop-down list.
Select My Default and edit the My Default policy.
As per your requirements, edit the values of the parameters and click Save otherwise click Cancel.
Create a Shared Cloud Solutions policy
After you deploy the Trellix MOVE for Multi-Platform AntiVirus to the clients from the ePO - On-prem server, you can create a Shared Cloud Solutions policy. Using this policy, you can configure Threat Intelligence Exchange and Intelligent Sandbox settings.
Log on to ePO - On-prem as an administrator.
Select Menu → Policy → PolicyCatalog.
Select MOVE AntiVirus 4.10.x from the Product drop-down list, then click New Policy.
The Create a new policy dialog box appears on the screen.
In Create a new policy, select Shared Cloud Solutions from the Category drop-down list.
Select My Default from the Create a policy based on this existing policy drop-down list
Enter the name of your policy in Policy Name.
Click OK to save the policy
The new Shared Cloud Solutions policy page appears on the screen with all the parameters and their values.
As per your requirements, edit the values of the parameters and click Save otherwise click Cancel.
Create a SVM Manager settings policy
After you deploy the Trellix MOVE for Multi-Platform AntiVirus to the clients from the ePO - On-prem server, you need to create a policy for SVM Manager settings policy. Using this policy, you can configure the ODS scheduler, Scanning options and other options.
Log on to ePO - On-prem as an administrator.
Select Menu → Policy → PolicyCatalog.
Select MOVE AntiVirus 4.10.x from the Product drop-down list, then click New Policy.
The Create a new policy dialog box appears on the screen.
In Create a new policy, select SVM Manager Settings from the Category drop-down list.
Select My Default from the Create a policy based on this existing policy drop-down list
Enter the name of your policy in Policy Name.
Click OK to save the policy
The new SVM Manager Settings policy page appears on the screen with all the parameters and their values.
As per your requirements, edit the values of the parameters and click Save otherwise click Cancel.
Upgrade from Trellix MOVE AntiVirus 4.9.x
If a supported version of Trellix MOVE AntiVirus is installed in your environment, you can upgrade to the latest version of Trellix MOVE AntiVirus 4.10.x.
The latest version of Trellix MOVE AntiVirus 4.10.x upgrade these components:
Trellix MOVE AntiVirus extensions.
Trellix MOVE AntiVirus SVM Manager.
Trellix MOVE AntiVirus SVM.
Trellix MOVE AntiVirus Client.
Upgrade the extension
Version 4.10.x of the Trellix MOVE AntiVirus extension upgrades the 4.9.x extension on the ePO - On-prem server.
Make sure the extension file in an accessible location on the network.
All policies created in version 4.9.x exist after you upgrade to version 4.10.x.
Log on to ePO - On-prem as an administrator.
Select Menu → Software → Extensions.
Click Install Extension.
Browse to and select the extension file, then click OK.
After a confirmation message, click OK.
Upgrade the SVM Manager
In-place upgrade from previous version of 4.10.x to latest version of 4.10.x is supported, the latest version of 4.10.x of the SVM Manager upgrades over the previous version of 4.10.x SVM Manager on your hypervisor. Once the latest version of 4.10.x SVM Manager is up and running, the previous version of 4.10.x SVM Manager is turned off.
Make sure that:
The VMware vCenter account is synced successfully.
You have configured the Infrastructure Group. For details, see Create or edit an infrastructure group in ePO - On-prem for SVM Manager deployment.
The SVM Manager package (MOVE-AV-MP_SVM_Manager_Pkg.4.10.1.168.zip) is in an accessible location on the network.
You have not removed the existing SVM Manager IP address in respective options policy.
Note
The MOVE SVM Manager upgrade from older versions to 4.10.x using Debian package is not supported.
Log on to ePO - On-prem as an administrator.
Select Menu → Systems → System Tree.
In the System Tree, select the virtual machines where you want to deploy the SVM Manager package.
Click Actions → Agent → Run Client Task Now to open the Run Client Task Now page.
Perform these tasks to run the client task:
In the Product drop-down list, select Trellix Agent.
In the Task Type, select Product Deployment.
In the Task Name, click Create New Task to create the new task.
The Run Client Task Now window opens on the screen.
Perform these steps to create a task in the Run Client Task Now window:
From the Target Platforms checkboxes, select Linux only.
In the Products and components dropdown list, select Trellix MOVE AV [Multi-Platform] SVM Manager 4.10.x.xx.
Click Run Task Now to deploy the SVM Manager.
You can see the status of the installation in the Running Client Task Status page. If you see the Status as Completed on the Running Client Task Status page, the Trellix MOVE AntiVirus SVM Manager 4.10.x upgraded on your virtual machine.
Create an SVM deployment client task for upgrade
Create an SVM deployment client task, so that you can assign that task to SVMs.
Make sure that:
The Trellix MOVE AntiVirusextensions upgrade are successful.
The SVM Manager upgrade is successful.
Log on to ePO - On-prem as an administrator.
Select Menu → Policy → Client Task Catalog.
Select Product Deployment in the Client Task Types menu, then select Actions → New Task.
Select Product Deployment from the list, then click OK to open the Client Task Builder wizard.
Type a name for the task you are creating, and add any descriptive information in the Description field.
Make sure that Windows is the only target platform selected.
For Products and components:
For SVM, select Trellix MOVE AV [Multi-Platform] SVM 4.10.x from the drop-down list.
Set the action to Install, set the language to Language Neutral, and set the branch to Current.
Leave the Command line setting blank.
Review the task settings, then click Save.
The task is added to the list of client tasks for the selected client task type.
Assign an SVM deployment client task for upgrade
After creating the SVM deployment client task, you must assign that task to the SVMs.
Make sure that the Trellix Agent and Trellix ENS is already deployed to target virtual systems.
Log on to ePO - On-prem as an administrator.
Select Menu → Policy → Client Task Assignments, then click the Assigned Client Tasks tab.
Click Actions → New Client Task Assignment.
Configure these settings, then click Next.
Product — Trellix Agent
Task Type — Product Deployment
Task Name — The name of the task you used when you created the client task
On the Schedule tab, specify the schedule for running the client task, then click Next.
Examine the settings on the Summary tab, then click Save to assign the task.
The Trellix MOVE AntiVirus SVM is deployed to systems in the selected group in the System Tree.
Upgrade the SVM with ePO - On-prem (with autoscale SVM)
You must export an SVM OVF template with 4.10.x SVM installed on it, so that your primary image of the SVM has latest version.
Make sure that your SVM Manager upgrade is successful.
You exported your latest SVM OVF template and checked in to the ePO - On-prem server and the SVM OVF details appear on the SVM Configuration page under MOVE AntiVirus Deploymentwizard. For details, see Configuring an SVM OVF template for autoscaling.
You configured your Infrastructure Group. For details, see Create or edit an infrastructure group in ePO - On-prem for SVM autoscaling.
Log on to ePO - On-prem as an administrator.
Select Menu → Policy → Policy Catalog, then select Trellix MOVE AntiVirus 4.10.x from the Product list.
From the Category list, select SVM Manager Settings.
Click the name of the policy that you are currently using for SVM autoscaling.
From SVM Autoscale Settings, deselect Enable auto scaling of SVMs.
Note
Disabling this option disappears all running, ready, and standby SVMs from the Autoscale SVM Details page under MOVE AntiVirus Deployment wizard. Also, delete all ready and standby SVMs, but the running SVMs continue to protect the client systems.
Select Menu → Systems → System Tree.
Identify the VM or SVM that you used to export SVM OVF template, then delete it.
From SVM Autoscale Settings, again select Enable auto scaling of SVMs.
1 | Multi-platform
The new ready and standby SVMs are deployed. Once the new ready and standby SVMs are up, the existing running SVMs are deleted.
Upgrade the Trellix MOVE AntiVirus client
Version 4.10.x of the Trellix MOVE AntiVirus client upgrades the 4.9.x clients.
Make sure that:
The VMware vCenter account is synced successfully.
The client systems are turned on where you want to deploy Trellix MOVE AntiVirus client.
The SVM Manager upgrade is successful.
The SVM upgrade is successful.
Note
You can also upgrade clients by creating an upgrade client task and assigning that task to virtual machines.
Log on to ePO - On-prem as an administrator.
Select Menu → Systems → System Tree.
In the System Tree, select the virtual machines where you want to deploy the client package.
From Actions, select MOVE → Deploy Client [Multi-Platform] to open the Client Deployment Configuration page.
Under Client Configuration for Client Package, select Trellix MOVE AV [Multi-Platform] Client 4.10.x.
You can view all SVM Assignment Rules, if the selected client systems are part of the assignment rules.
Click Proceed to open the Deployment Confirmation dialog box.
A message shows the number of systems that are compatible and non-compatible for the client deployment.
Review the message, then click OK to deploy the client package to the compatible client systems.
A deployment task is created for all selected systems. Go to Deployment Status tab under the MOVE AntiVirus Deployment wizard to view the Passed or Failed tasks with their details.
If you click Cancel, the deployment task is created only for the non-compatible client systems, and the failure reasons can be viewed on the Deployment Status tab under the MOVE AntiVirus Deployment wizard.
Note
After upgrading the Trellix MOVE AntiVirus software, reboot the system.
For the compatible client systems, if the SVM Manager IP address is updated in the respective Options policy, then the SVM Manager assigns an SVM for the clients to protect them.
Job status
Item | Description |
|---|---|
Start Time | Indicates the date and time when the Trellix MOVE AntiVirus client deployment started |
End Time | Indicates the date and time when the Trellix MOVE AntiVirus client deployment ended |
Deployment Type | Displays the Trellix MOVE AntiVirus client deployment type as Deploy client and enable protection |
Status | Specifies the deployment status such as Started, In Progress, Completed, and Failed |
vCenter Name/IP address | Specifies the IP address of the Trellix MOVE AntiVirus client system |
Hypervisors/Hostname | Specifies the host name of the Trellix MOVE AntiVirus client system |
Task status details
Item | Description |
|---|---|
Node Type | Specifies the node type as Endpoint |
Task Type | Specifies the set of internal tasks that happen in a deployment job. The task list for one job is displayed in sequence with Start Time, End Time, and Failure Reasons, if applicable |
Item | Description |
|---|---|
Node Name | Displays the host name of the Trellix MOVE AntiVirus client system. |
Status | Specifies the task status such as Started, In Progress, Completed, Skipped, and Failed |
Failure Reason | Specifies the reason for the failure of the task |
Start Time | Indicates the date and time when the task started |
End Time | Indicates the date and time when the task ended |
During Trellix MOVE AntiVirus client deployment
Task type | Description |
|---|---|
Updating Options policy | Updates the IP address of the SVM Manager in the respective Options policies that are assigned to the clients. |
Deploying client | Indicates that the Trellix MOVE AntiVirus client deployment is in progress. |
Connecting to SVM Manager | Specifies that the Trellix MOVE AntiVirus client is communicating to the SVM Manager. |
Assigning SVM to endpoint | Assigns the Trellix MOVE AntiVirus SVM to the client system. |
Connecting to SVM | Specifies that the client is communicating to the Trellix MOVE AntiVirus SVM. |
Testing EICAR | Tests EICAR on the Trellix MOVE AntiVirus client system on which the Trellix MOVE AntiVirus client deployment is successful. |
Upgrade persistent virtual machines
Upgrading persistent virtual machines provides nearly seamless virus protection, but requires the overhead of duplicate SVMs during the upgrade process.
We recommend this method for environments made up primarily of persistent virtual machines, where the clients require support from the SVM during the client migration process.
Log on to ePO - On-prem as an administrator.
Check in and install the Trellix MOVE AntiVirus 4.10.x extension in ePO - On-prem.
Create a new virtual server and install Trellix ENS 10.7.x or later on that server.
Install SVM version 4.10.x on the virtual server.
Create a new Trellix MOVE AntiVirus 4.10.x policy that references the SVM you created, and assign it to the virtual machines being upgraded.
Create a ePO - On-prem client task to upgrade the Trellix MOVE AntiVirus clients to version 4.10.x.
As the upgrade task is executed on virtual machines, the VMs begin to use the 4.10.x SVM for file scanning.
After all clients are upgraded to version 4.10.x, shut down the older versions of the SVM.
Note
After upgrading the Trellix MOVE AntiVirus software, reboot the system.
Upgrade non-persistent virtual machines
Upgrading non-persistent virtual machines does not require creating additional SVMs, although it might result in a window of time when virtual machines are unprotected.
We recommend that you perform this upgrade during scheduled downtime.
Log on to ePO - On-prem as an administrator.
Install the Trellix MOVE AntiVirus 4.10.x client package and Trellix MOVE AntiVirus 4.10.x SVM packages and upgrade the extensions in ePO - On-prem.
Create a new 4.10.x client policy definition that references existing SVM systems.
From the ePO - On-prem console, upgrade all SVMs to version 4.10.x.
Caution
Virtual machines serviced by upgraded SVMs do not have anti-virus protection until after this task is completed.
Change the primary image by deploying version 4.10.x of the Trellix MOVE AntiVirus client from ePO - On-prem, or by manually upgrading the client directly on the primary image.
Note
After upgrading the Trellix MOVE AntiVirus software, reboot the system.
Upgrade the Trellix MOVE AntiVirus client with Trellix ENS on ePO - On-prem
Version 4.10.x of the Trellix MOVE AntiVirus client upgrades the 4.9.x clients which have MOVE + Trellix Endpoint Security (ENS) Threat Prevention combination using ePO - On-prem.
Make sure that:
The client systems are turned on where you want to deploy Trellix MOVE AntiVirus client.
The client machine has Trellix ENS 10.7.0 and MOVE 4.9.x installed.
Note
You can also upgrade clients by creating an upgrade client task and assigning that task to virtual machines.
Log on to ePO - On-prem as an administrator.
Select Menu → Systems → System Tree.
In the System Tree, select the virtual machines where you want to deploy the client package.
From Actions, select Agent → Run Client Task Now to open the Run Client Task Now page.
In the Run Client Task Now:
For Product, select Trellix Agent.
For Task Type, select Product Deployment.
For Task Name, select Create New Task.
Check if Target Platforms is Windows only.
For Products and components, select Trellix Move AV [Multi-Platform] Client 4.10.x or later Trellix MOVE AntiVirus client version and in the Command Line, enter KEEPENS=1.
In the bottom right corner, click Run Task Now.
You can see the status of the installation in the Running Client Task Status page.
6. Reboot the system after installing Trellix MOVE client software.
If you see the Status as Completed on the Running Client Task Status page, the Trellix MOVE AntiVirus upgrade on your client machine is finished.
Update the standby SVMs (Autoscale SVMs)
When the latest SVM OVF template is configured in ePO - On-prem, you can deploy it from ePO - On-prem to all standby SVMs. This is only true for standby SVMs, not for ready and running SVMs.
Make sure that you have created your latest SVM OVF template.
When you click Update Standby SVMs, the existing standby SVMs are purged and new standby SVMs are deployed.
When you define the autoscale settings, the Trellix MOVE AntiVirus SVM deployment starts automatically depending on the number of clients connecting to the Trellix MOVE AntiVirus SVM for protection. You can view SVM deployment mode, its status, and the purging details about the Autoscale SVM Details page.
Log on to ePO - On-prem as an administrator.
Select Menu → Automation → MOVE AntiVirus Deployment.
On the Configuration tab, click Autoscale SVM Details to open the Autoscale SVM Details page with the autoscale SVM deployment details.
Click Actions → Update Standby SVMs.
This action removes the existing standby SVMs and deploys the new standby SVMs with the latest SVM OVF template.
Generate certificates for Trellix MOVE AntiVirus
If there is a connectivity issue with the SVM Manager, you must generate the certificates for Trellix MOVE AntiVirus, so that the SVM and SVM Manager communicate and authenticate each other properly.
Make sure that:
Trellix MOVE AntiVirus uses secure https protocol for communication between Trellix MOVE AntiVirus SVM and SVM Manager. For secure https protocol, you must generate the Trellix MOVE AntiVirus certificates when the ePO - On-prem certificate is changed, so that the change is reflected in the Trellix MOVE AntiVirus policies.
You have installed the Trellix MOVE AntiVirus extension on the ePO - On-prem server.
You have deployed the SVM Manager.
You have deployed the Trellix MOVE AntiVirus SVM package to the target virtual systems.
You have deployed the Trellix MOVE AntiVirus client package to client systems.
You have configured your ePO - On-prem details about the General page under Automation → MOVE AntiVirus Deployment → Configuration.
Log on to ePO - On-prem as an administrator.
Select Menu → Automation → Server Tasks to open Server Tasks page.
Select MOVE AntiVirus : Generate Certificates query and click Run to generate the Trellix MOVE AntiVirus certificates.
Select Menu → Systems → System Tree.
In the System Tree, select the group containing the virtual machines where you want to apply the Trellix MOVE AntiVirus 4.10.x policies.
To apply the policy immediately, send an agent wake-up call to the client system.
Log on to the client system as an administrator.
Run an EICAR test.
Verify that the SVM sends threat details as threat events to ePO - On-prem.
Trellix MOVE AntiVirus certificates are generated successfully and Trellix MOVE AntiVirus SVM and SVM Manager are communicating properly.
Integrating TIE and Intelligent Sandbox
TIE provides context-aware adaptive security for your virtual environment. It quickly analyzes files and content from the SVM in your environment and makes informed security decisions.
These decisions are based on a file's security reputation and your own criteria set in the Shared Cloud Solutions policy of Trellix MOVE AntiVirus.
The Multi-platform deployment, with TIE and Intelligent Sandbox integration, becomes a multi-layered solution that involves various techniques to scan and detect the malware. It includes:
Pattern matching
Global reputation
Program emulation
Static analysis
Dynamic analysis
All these layers are seamlessly integrated and provide a single point of control for easy configuration and management.
TIE and Intelligent Sandbox integration process
The overall TIE and Intelligent Sandbox integration process of the Multi-platform consists of the following tasks.
Install the TIE server appliance.
Deploy the Data Exchange Layer client to Trellix MOVE AntiVirus SVM.
Verify the TIE server installation.
Create a new registered server in ePO - On-prem.
Enable TIE and Intelligent Sandbox protection for Trellix MOVE AntiVirus.
Verify the TIE server integration.
Verify the Intelligent Sandbox integration.
Deploy the Trellix DXL client to Trellix MOVE AntiVirus SVM
You must deploy the DXL client to all your Trellix MOVE AntiVirus SVMs for TIE integration.
Log on to ePO - On-prem as an administrator.
Select Menu → Software → Product Deployment, then click New Deployment.
Complete the new deployment information, then start the deployment.
Verify that the DXL Connection Status on ePO - On-prem is Connected.
Important - Restart the Trellix MOVE AntiVirus SVM service if you deploy the DXL Client after deploying the Trellix MOVE AntiVirus SVM.
For details about deploying software from ePO - On-prem, see the product documentation for your version of ePO - On-prem.
Verify the TIE server installation
After installing the Threat Intelligence Exchange and Trellix DXL components, verify the installation.
Make sure that you have installed the TIE server appliance. For installing and setting-up TIE, see the installation guide for your version of TIE.
Log on to ePO - On‑prem as an administrator.
In the System Tree, click the TIE server name, then click Products. Verify that the following components are listed with the corresponding version for the installation process.
DXL Broker
DXL Client
Threat Intelligence Exchange Server
In the System Tree, verify that the TIESERVER and DXLBROKER tags were applied to the system.
Select Menu → Configuration → Server Settings, click DXL ePO Client, then verify that the Connection State is Connected.
In the System Tree, select the TIE server, then from the Actions menu, select DXL | Lookup in DXL.
Verify that the Connection State is Connected.
Log on to the Trellix MOVE AntiVirus SVM system.
From the system tray, click
 and select About to open the Trellix About window.
Under McAfee Data Exchange Layer, verify that the DXL Connected Status is Connected.
The DXL broker and DXL client communication is now up and running. From ePO - On‑prem, you can select Menu → Systems Section → TIE Reputations to verify that you can search for files and certificates. It might take some time for reputation information to update the database.
Create a new registered server
To view TIE information in ePO - On‑prem reports and dashboards, create a new registered server in ePO - On‑prem.
Log on to ePO - On‑prem as an administrator.
Select Menu → Configuration → Registered Servers, then click New Server.
In the Server type drop-down list, select Database Server.
Enter a Name, for example, TIE Server, then click Next.
On the Details page:
Select Make this the default database for the selected database type.
This option is automatically selected when you create the first registered server. If you have more than one TIE database, select this option only for the database that you want as the default.
In the Database Vendor field, select TieServerPostgres.
In the Host name or IP address field, enter the IP address of the TIE server.
Leave the Database server instance and Database server port fields blank (if they appear).
For the Database name, enter tie.
In the User name and password fields, enter the read-only postgress user name and password that you specified on the PosgresSQL page during the server installation.
Click Test Connection.
Click Save.
ePO - On-prem communicates with the server and retrieves data for the reports and dashboards.
Enable TIE and Intelligent Sandbox protection for Trellix MOVE AntiVirus
Files and certificates have threat reputations based on their content and properties. The Shared Cloud Solutions policy determines whether files and certificates are blocked or allowed on systems in your environment based on reputation levels.
Make sure that:
You have installed TIE and Intelligent Sandbox to integrate them with Trellix MOVE AntiVirus.
You have installed the Trellix MOVE AntiVirus extension on the ePO - On-prem server.
File and certificate reputation is determined when a file tries to run on a managed system. For details about how to install and set up the TIE requirements, see the product documentation for your version of TIE.
Log on to ePO - On-prem as an administrator.
Select Menu → Policy → Policy Catalog, select MOVE AntiVirus 4.10.x from the Product drop-down list, then select Shared Cloud Solutions from the Category drop-down list.
From Enable TIE, select Enabled to determine file and certificate reputation when a Portable Executable (PE) file is accessed on a managed endpoint.
PE file includes these formats: .cpl, .exe, .dll, .ocx, .sys, .scr, .drv, .efi, .fon
From TIE Non-PE Lookup, select Enabled to determine file and certificate reputation when a non-PE file is accessed on a
managed endpoint.
Note
To enable TIE Non-PE Lookup, make sure that you selected Enable TIE option.
5. Under Threat Intelligence Exchange (TIE), configure these reputation settings for files and certificates.
Select this... | To do this... |
|---|---|
Known malicious | Perform scan action for Known malicious, Most likely malicious, Might be malicious, Unknown, Might be trusted, and Most likely trusted files based on threat detection response specified in On Access Scan or On Demand Scan policies |
Most likely malicious |
|
Might be malicious |
|
Unknown | Perform threat detection response actions specified in On Access Scan or On Demand Scan policies |
Select this... | To do this... |
|---|---|
specified in On Access Scan or On Demand Scan policies for files Known malicious, Most likely malicious, and Might be malicious based on their TIE reputation score
| |
Might be trusted |
|
Most likely trusted |
|
Based on the file TIE reputation score, the SVM performs threat detection responses specified in the On Access Scan or On Demand Scan policies for files the TIE reputation score is higher than the threshold defined in OAS/ODS policy. The SVM performs the scan action for selected files based on the threat detection response specified in OAS/ODS policies.
From Advanced Threat Defense (ATD), select Submit files to ATD at and below to send files with these reputation scores to Intelligent Sandbox for further analysis.
Most likely malicious
Unknown
Most likely trusted
For example, if the file hash is not found in the TIE server, the TIE server queries Trellix GTI for the file hash reputation. Trellix GTI sends the information that is available, for example "unknown reputation." The TIE server stores that information and sends the same to SVM.
If Submit files to ATD at and below is enabled and the file is determined as an Intelligent Sandbox candidate by TIE server, SVM sends the file to Intelligent Sandbox through the TIE server for analyzing.
Verify the TIE server integration
Verify the TIE integration before configuring and using the scan policies to detect malware.
Make sure that you have installed the TIE server and configured Threat Intelligence Exchange (TIE) option under the Shared Cloud Solutions policy on the ePO - On‑prem server.
Log on to the Trellix MOVE AntiVirus client system as an administrator.
Run an EICAR test.
Log on to ePO - On‑prem as an administrator.
Select Menu → Reporting → Threat Event Log.
Under Threat Type, verify that Virus detected using TIE appears.
Verify the Intelligent Sandbox integration
Verify the Intelligent Sandbox integration before configuring and using the scan policies to detect malware.
Make sure that you have installed Intelligent Sandbox and configured the Advanced Threat Defense (ATD) option under the Shared Cloud Solutions policy on the ePO - On‑prem server.
Log on to the Trellix MOVE AntiVirus SVM.
Run this command:
mvadm statsVerify that Total ATD candidates and Total ATD successful submissions values appear.
[IMAGE PLACEHOLDER: Screenshot of a Windows command prompt window titled "Administrator: C:\Windows\System32\cmd.exe" showing McAfee/MOVE AV Server statistics with a red rectangle highlighting "Total ATD candidates" and "Total ATD successful submissions".]
Log on to ePO - On-prem as an administrator.
Select Menu → Systems → TIE Reputations.
From the File Search tab, under ATD Reputation, verify the Intelligent Sandbox reputation details for the files those were submitted to Intelligent Sandbox.
Uninstall the client and SVM
Log on to ePO - On-prem as an administrator.
Select Menu → Policy → Client Task Catalog.
In the left column under Trellix Agent , select Product Deployment.
Click Actions → New Task, select Product Deployment, then click OK.
Type the name of the task, like Uninstall MOVE AV client on VM client, and an optional description.
Make sure that Windows is the only target platform selected.
For Products and components, select the following, then click Next.
Select Trellix MOVE AV [Multi-Platform] client 4.10.x or Trellix MOVE AV [Multi-Platform] SVM 4.10.x from the first drop-down list.
Set the action to Remove, set the language to Language Neutral, and set the branch to Current.
Leave the Command Line setting blank.
8. Select the remaining options according to your environment's best practices, then click Save.
The newly created task appears in the Client Task Catalog.
Assign the uninstallation task to virtual systems
The uninstallation task for the client and Trellix MOVE AntiVirus SVM must be assigned to virtual systems to take effect.
Make sure that the Trellix MOVE AntiVirus client and SVM are added to the Main Repository and your virtual systems are added to the System Tree.
Log on to ePO - On-prem as an administrator.
Select a group in the System Tree.
Select Menu → Policy → Client Task Assignments, then click the Assigned Client Tasks tab.
Click Actions → New Client Task Assignment.
Configure these settings, then click Next.
Product — Trellix Agent
Task Type — Product Deployment
Task Name — The name of the task you created earlier
On the Schedule tab next to Schedule type, select Run Immediately from the drop-down list, set the options as appropriate, then click Next.
Examine the settings displayed on the Summary tab, then click Save to assign the task.
The Trellix MOVE AntiVirus client is removed from every system in the selected group in the System Tree.
Remove the client or SVM package from ePO - On-prem
Log on to ePO - On-prem as an administrator.
Select Menu → Software → Main Repository.
Select MOVE AV [Multi-Platform] client 4.10.x or MOVE AV [Multi-Platform] SVM 4.10.x, then click Delete.
Remove the SVM Manager
Log on to ePO - On-prem as an administrator.
Select Menu → Automation → MOVE AntiVirus Deployment.
On the Configuration tab, click SVM Manager Configuration to open the SVM Manager OVF Details page.
Under Deployment Configuration, click Delete SVM Manager.
Note
The Delete SVM Manager button is enabled only when the latest version of 4.10.x of SVM Manager is checked in to the ePO - On-prem server
You can check the deletion status on the Deployment Status tab under MOVE AntiVirus Deployment wizard on the ePO - On-prem server.
Uninstall the extensions
Uninstall the Trellix MOVE AntiVirus extensions from ePO - On-prem.
Log on to ePO - On-prem as an administrator.
Select Menu → Software → Extensions.
From the Extensions tab under McAfee group, select Data Center Security.
Click Remove next to each extension in this order.
MOVE AntiVirus
MOVE AntiVirus Common
vSphere Connector Extension
MDCC
Installation overview
The agentless solution integrates with VMware NSX Data Center. It addresses the challenges of protecting your VMware virtual machines and keeping it free of malware without a Trellix footprint on the client. The agentless deployment provides virus protection for virtual machines on the ESXi hypervisor.
First-time installation workflow (Agentless)
To install and configure the Trellix MOVE Agentless environment, refer the first-time installation high-level workflow diagram shown below:
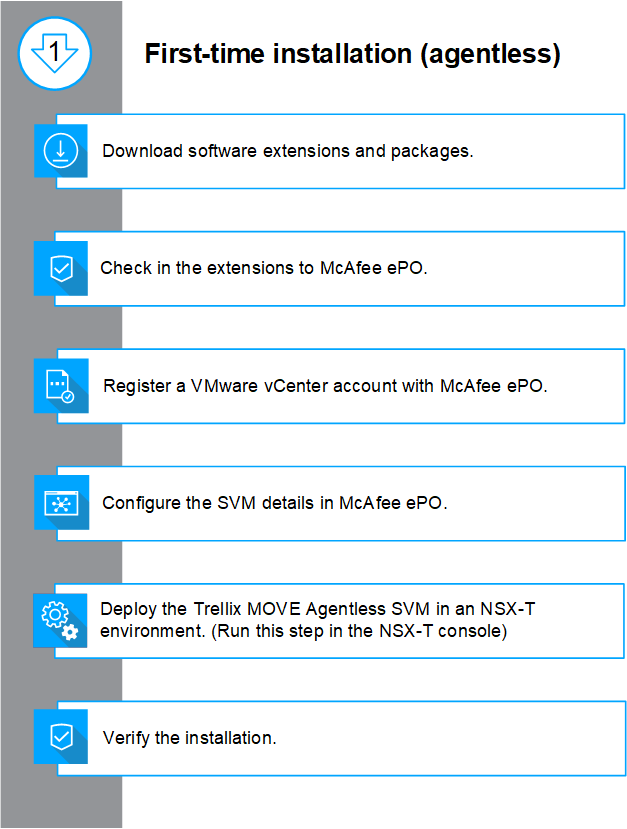
Supported Trellix management platform and software
The Trellix Agent and Trellix Endpoint Security (ENS) for Linux Threat Prevention are preinstalled in SVM Open Virtualization Format (OVF). If required you can update to current version according to Point Product Compatibility Testing (PPCT). You must have specific versions of Trellix management platform and software installed as shown below:
Software | Version (Agentless) |
|---|---|
ePO - On-prem | 5.10.0 Service Pack 1, Service Pack 1 Update 2, Service Pack 1 Update 3. |
vSphere Connector Extension | 5.4.2 |
Trellix Agent | 5.8.1 |
Trellix Endpoint Security (ENS) for Linux Threat Prevention | 10.7.17 |
SVM OVF requirements (Agentless)
You must use the virtual machine we provide for Agentless SVM. This system is a dedicated virtual appliance with Trellix ENS for Linux Threat Prevention installed, which protects the SVM and Trellix Agent, to communicate with the ePO - On‑prem.
The OVF is a secure image, so it doesn't require any more hardening.
The hardware and software specifications of the SVM OVF are:
CPU | 4 vCPU, 1.6 GHz or higher |
Memory | 4‑GB RAM or higher |
Hard disk space for SVM deployment | 32 GB or higher |
Operating system | Linux, Ubuntu 20.04 (64-bit) |
Software (pre-installed) | Trellix Agent |
Note
The supported hypervisor is of VMware only.
Supported operating systems
Make sure that the guest virtual machine has a supported version of windows installed. The following windows operating systems are supported for the NSX Guest Introspection:
Windows supported operating system (Agentless) |
|---|
Windows 10 and Windows 11 |
Windows Server 2016 |
Windows Server 2019 |
Windows Server 2022 |
Windows 2012 R2 |
Make sure that the guest virtual machine has a following supported version of Linux installed:
Linux supported operating system (Agentless) |
|---|
Centos 7.5 - 7.6 |
RHEL 8.0 - 8.3 |
Ubuntu 18.04 |
Supported VMware management platform and software
You must install a supported version of VMware software.
ePO - On-prem | VMware NSX Manager | VMware vSphere |
|---|---|---|
5.10.0 Service Pack 1, Service Pack 1 Update 2 ,Service Pack 1 | 4.0, 4.1.2.3, 4.1.2.4 | 7.0, 8.0 |
For a complete list of supported Trellix MOVE AntiVirus environment, see Trellix article 74865 and for vSphere Connector Extension see Trellix article 96090.
For information about the Guest VM operating systems that are supported for NSX Data Center Manager, see VMware NSX Data Center Installation Guide.
Note
One ePO - On-prem supports only one NSX Datacenter. We support multiple vCenter through this managed NSX Datacenter.
Permissions required for SVM deployment
The VMware vCenter account credentials specified in the Registered Cloud Account page of ePO - On-prem for discovering the virtual instances must have these permissions.
Preparing the ESX host
This is the first step in deploying the SVM. In this phase, a kernel driver is loaded onto the ESX host, and a separate vSwitch is configured to facilitate internal connectivity for the SVM.
Configuration location | Permission description |
|---|---|
Host → Configuration → Change Settings | Permissions required to query modules on ESX. |
Host → Configuration → Network Configuration | Permissions required to add details such as new virtual switch, port group, virtual NIC. |
Host → Configuration → Advanced Settings | Permissions required to set up networking for filter communication on ESX. |
Host → Configuration → Query Patch | Permissions required to install Filter Driver. |
Configuration location | Permission description |
|---|---|
Host → Configuration → Security profile and firewall | Permissions to reconfigure outgoing firewall connections to allow retrieval of Filter Driver package from DSM. |
Global → Licenses | To check which licenses are installed, so that you can add or remove licenses. |
Sessions → Validate session | To verify the session validity. |
Note
Make the MTU byte to 1600 and add 2 minimum NIC adapters.
Deploying the Virtual Appliance
This is the second step in SVM deployment, during which the virtual appliance itself is deployed from an OVF file.
Configuration location | Permission description |
|---|---|
vApp → Import | Permissions to deploy SVM from OVF file. |
Datastore → Allocate Space | Permissions required to allocate space for SVM on datastore. |
Network → Assign Network | Permissions to assign SVM to networks. |
Virtual Machine → Change Configuration → Add new disk | Permissions to add disks to SVM. |
Virtual Machine → Interaction → Power On | Permissions to turn on SVM. |
Virtual Machine → Interaction → Power Off | Permissions to turn off SVM. |
Virtual Machine → Change Configuration → Rename | Permissions to rename a virtual machine or change the associated notes of a virtual machine. |
Activating the Virtual Machine
In this step, the SVM is activated.
Configuration location | Permission description |
|---|---|
Virtual Machine → Change Configuration → Advanced | Permissions to reconfigure virtual machine for dvfilter |
Enabling vShield Driver
This step involves enabling vShield driver on endpoints.
Configuration location | Permission description |
|---|---|
Virtual Machine → Interaction → Install VMware Tools | To mount and unmount the VMware Tools CD installer as a CD for the guest operating system. |
Virtual Machine → Guest Operations → Guest Operation Program Execution | For execution of virtual machine operation programs. |
Virtual Machine → Guest Operations → Guest Operation Modifications | For changes of virtual machine operation. |
Remove Operations
In this step, the SVM is removed.
Configuration location | Permission description |
|---|---|
Virtual Machine → Edit Inventory → Remove | To delete a virtual machine and to remove its underlying files from disk. Note: To have permission to perform this operation, you must have this privilege assigned to both the object and its parent object. |
Adding vCenter in NSX Compute Manager
This step involves adding vCenter as compute manager in NSX
Configuration location | Permission description |
|---|---|
Extensions → Register extension | To register the extension |
Extensions → Unregister extension | To unregister the extension |
Extensions → Update extension | To update the extension |
Setting up ESX Agent
This step involves setting up ESX Agent.
Configuration location | Permission description |
|---|---|
ESX Agent Manager → Config | To configure the ESX Agent Manager |
ESX Agent Manager → Modify | To modify the ESX Agent Manager |
ESX Agent Manager → View | To view the ESX Agent Manager |
2 | Multi-platform
Ports for Agentless deployment
Following are the ports that are open and not reserved for other purposes:
System connections | Default ports |
|---|---|
ePO to vCenter communication | TCP 443 |
NSX to ePO communication | TCP 8443 |
ePO to NSX communication | TCP 443 |
SVM(MA) to ePO communication | TCP 80 and 8443 |
ePO to SVM (MA) communication | TCP 8081 |
SVM to MOVE Quarantine Share | TCP 445 |
GTI lookup - DNS | TCP 53 |
Note
If required, you can customize the default ports.
Register vCenter with NSX Data Center Manager Console
Follow the NSX configuration guide available in the following link for the NSX version you are using: https://docs.vmware.com/en/VMware-NSX/index.html
NSX Data Center Manager has a virtual appliance console. The vCenter registration and operational processes are carried out on this console from MOVE 4.10.x.
Make sure that:
You have a vCenter user account with administrative access to synchronize NSX Manager with the vCenter.
If your vCenter password has non-ASCII characters, change it before synchronizing the NSX Manager with the vCenter.
Log on to the NSX manager console using the IP address, for example: https://<NSX-Manager-IP>
In the NSX Data Center Manager homepage, click System.
On the left pane, click Fabric → Compute Managers.
Click +Add Compute Managers and add Name, FQDN or IP address, Username, and Password. Use the default option for other fields.
Note
If you are opting FQDN option, provide same domain name in FQDN or IP address in the New Compute Manager dialog box and in Server Address in the Registered Cloud Accounts page in the ePO - On-prem. The domain names are case-sensitive.
After filling in all the details, click Add to complete the Compute Manager setup.
Verify that the vCenter Registration Status is Registered, and its Connection is UP.
Configure a Transport Zone with NSX Manager console
A transport zone is a container that defines the potential reach of transport nodes. Transport nodes are hypervisor hosts and NSX Edges. The Transport Zone creation on the NSX Manager Console is given below for MOVE Agentless integration with NSX.
Log on to the NSX manager console using the IP address, for example:
https://<NSX-Manager-IP>Navigate to System → Fabric → Transport Zones.
Click +Add Zone to create a transport zone.
In New Transport Zone, enter a name for the transport zone and optionally a description.
Select the traffic type as Overlay or VLAN.
After you add the transport zone, go to the Transport Zones page, and view the newly added transport zone.
Configure a Host with NSX Manager
Log on to the NSX manager console using the IP address, for example:
https://<NSX-Manager-IP>In the NSX Data Center Manager homepage, click System.
On the left pane, click Fabric → Hosts.
Click Transport Node Profiles.
Go to Cluster, select Host and click Configure NSX and Configure Host details and Prepare Host.
Check for NSX Configuration status as Success.
Select the Cluster → Configure NSX and apply a Transport Node profile to the selected cluster and sub-cluster.
NSX will be installed with the deployment configuration defined in Transport Node profile.
Check for status as Prepared.
Download and install software extensions
You can download these extensions and packages either from:
The ePO - On-premserver, Software Catalog. For more information see, Check in the software extensions and download packages from Software Catalog in the ePO - On-prem.
The Trellix download site. Check in the extensions to ePO - On-prem.
Note
Make sure to download the required extensions and packages from the Trellix download site.
Log on to ePO - On-prem as an administrator.
Check in the extension and packages individually:
Select Menu → Software → Extensions → Install Extension.
The Install Extension page opens.
Browse and select the extension files in the same order as mentioned below, and then click Open → OK:
Extension description
Extension name
Trellix MOVE AntiVirus Agentless extension
MDCC_5.3.x.xx.zip
VSPHEREDCEXTN_5.4.x.xx.zip
DC__GS__4000_4.10.x.xx.zip
DC__AM__4000_4.10.x.xx.zip
MOVEAVLIC400_4.10.x.xx.zip
Agentless SVM OVF package. For more information see, Check in the Trellix MOVE AntiVirus SVM package to ePO - On-prem.
MOVE-AV-AL_SVM_OVF_4.10.X.zip
Review the extension details and click OK.
To check in the packages, select Menu → Software → Software Catalog → Check In Package.
For File path, browse and select the individual packages as mentioned below, and then click OK:
Package description | Package name |
|---|---|
Trellix MOVE AntiVirus Agentless package | MOVE-AV-AL_SVM_OVF_4.10.X.XX.zip |
Note
MOVE AL 4.10.x extension supports version 4.10.x or above and is incompatible with version 4.9.x or lower policies. MOVE AL 4.10.2 extension and above supports NSX version 4.x.x.x.
Check in the software extensions and download packages from Software Catalog in the ePO - On-prem
If you have Software Catalog, you can check in the software extensions from there.
Make sure to download the required packages from the software catalog.
Note
In the ePO - On-prem version 5.10.0 and above, the term Software Manager is identified as Software Catalog.
Log on to ePO - On-prem as an administrator.
Select Menu → Software, then click Software Catalog.
In the Product Categories pane, enter Move in the search bar.
Select the version of the Trellix MOVE AntiVirus 4.x and click Check In.
Register a VMware vCenter account with ePO - On-prem (Agentless)
To use Trellix MOVE AntiVirus to manage the security of the virtual machines in your data center, you must first add your VMware vCenter to the ePO - On-prem server.
Make sure that:
You have configured your VMware vCenter server that manages the ESXi servers, which host the guest VMs.
You have registered the VMware vCenter Server with VMware NSX Manager. In case of multiple VMware vCenter servers, register each vCenter appropriately. Environment each of your vCenter Servers are registered with a single VMware NSX Manager.
You have installed the Trellix MOVE AntiVirus software extension on the ePO - On-prem server.
Log on to ePO - On-prem as an administrator.
Select Menu → Configuration → Registered Cloud Accounts.
From the bottom-left click Actions → Add Cloud Account to open the Add Cloud Account dialog box.
From the Choose Cloud Provider drop-down list, select VMware vSphere and click OK.
On the vCenter Account Details page, configure these options.
Note
You must have a vCenter Server user account with administrator rights to use the autoscale feature.
Option | Description |
|---|---|
Account Name | A name for the VMware vCenter account in ePO - On-prem. Account names can include characters a–z, A–Z, 0–9, and [_.-], without space. |
Server Address | (Required) IP address or the host name of the available VMware vCenter. |
vCenter Username | (Required) User name of the available VMware vCenter account. |
vCenter Password | (Required) Password of the available VMware vCenter account. |
Sync Interval (In Minutes) | Specify the interval for running the next vCenter discovery (default value is 5 minutes). |
Port | The port number required to establish the connection with the available VMware vCenter (default port is 443). |
Tag | The administrator specifies this to identify the VMs. Tag name can include characters a–z, A–Z, 0–9, and [_.-], with space. |
Click Test Connection to validate VMware vCenter account details and verify the connection to the VMware vCenter, then click Next → Finish.
When prompted to confirm, click OK to register the vCenter account and wait for vCenter sync to complete.
This action registers the VMware vCenter and imports all discovered virtual machines, which are unmanaged, into the System Tree. The instances are imported with the same organization as the VMware vCenter.
Note
The virtual machines that are already added and managed by ePO - On-prem are retained with the existing policy settings, but the virtualization properties for these systems are added.

Set up a general configuration for deployment (Agentless)
Before deploying Trellix MOVE AntiVirus SVM, configure settings on the ePO - On-prem server, so that they are retrieved and used for every Trellix MOVE AntiVirus SVM deployment.
Make sure that you have registered a VMware vCenter account with the ePO - On-prem.
Log on to ePO - On-prem as an administrator.
Select Menu → Automation → MOVE AntiVirus Deployment.
In the Configuration tab, click General under General list.
The General Configuration page opens.
Enter and confirm the password for ePO - On-prem Credentials section.
ePO - On-prem credentials
Options | Description |
|---|---|
Password | Type the password of the ePO - On-prem console that the administrator has currently logged on |
Confirm Password | Confirm the password |
5. Enter and confirm password for SVM (Agentless) and SVM Manager (Multi-Platform) Configuration section.
Note
The SVM (Agentless) and SVM Manager (Multi-Platform) Configuration section shows a default password.
Caution
The password you enter is set to the SVM and you can't update it once the SVM is deployed. This password is not applicable to the SVM, which is already deployed.
If required, change the password.
SVM (Agentless) and SVM Manager (Multi-platform) Configuration
Option | Description |
|---|---|
Hostname Prefix (Agentless only) | Type a unique prefix that is added to the host name of the Trellix MOVE AntiVirus SVM. The prefix can include characters a–z, A–Z, 0–9, and [-], without space |
Password | Type a password to be used as the Trellix MOVE AntiVirus SVM password during deployment.
|
Confirm Password | Confirm the password |
6. Click Save to store these configurations, so that you can use them for every Trellix MOVE AntiVirus SVM deployment.
Validate your NSX Data Center Manager using ePO - On-prem
The vSphere Connector extension automatically detects once vCenter sync is successful in RCA page and then it shows the details of your NSX Manager accounts in the ePO - On-prem. You must now register these NSX Manager servers with ePO - On-prem.
Make sure that you have set up a common configuration for ePO - On-prem and SVA.
Using this configuration available on the ePO - On-prem, you can edit the details and validate the credentials of your NSX Manager.
Log on to ePO - On-prem as an administrator.
Select Menu → Automation → MOVE AntiVirus Deployment.
In the Configuration tab, click NSX Manager under Agentless.
The NSX Manager: Registration page displays these options:
Option | Description |
|---|---|
vCenter Account | Displays the name of the registered vCenter account |
NSX Manager Name | Displays the name of your NSX Manager |
Configuration Status | Specifies whether the NSX Manager is configured |
Action | Edit — Click to edit and validate the credentials and other details of the NSX Manager accounts, which are automatically detected and sent to ePO - On-prem |
4. Click Edit under Action to open the Edit NSX Manager Details dialog box and edit these NSX Manager account options.
Note
Make sure that your NSX Manager account and its details are ready.
Option | Description |
|---|---|
vCenter Account | Specifies the name of the registered vCenter account
|
NSX Manager Name | Specifies the name of the available NSX Manager
|
NSX Manager Address | Specifies the IP address or the host name of the available NSX Manager
|
NSX Manager Port | Specifies the port number of NSX Manager |
NSX Manager Username | Specifies the user name of the available NSX Manager |
NSX Manager Password | Specifies the password of the available NSX Manager |
Click Validate Credentials to verify the credentials of the NSX Manager and verify that the connection to the NSX Manager works.
Click Save to store the NSX Manager account details.
Note
MOVE AntiVirus can only register with a single VMware NSX manager. In a multiple VMware vCenter environment, each VMware vCenter must be configured to share the same NSX manager.
Check in the Trellix MOVE AntiVirus SVM package to ePO - On-prem
Check in the Trellix MOVE AntiVirus SVM package to ePO - On-prem, so that it is available with VMware NSX Manager to deploy it to the cluster. You can view and delete the Trellix MOVE AntiVirus SVM package using ePO - On-prem.
vCenter account synchronization is successful after upgrading the Trellix MOVE AntiVirus extension.
Make sure that you have installed the Trellix MOVE AntiVirus extension on the ePO - On-prem server.
Important
For a successful check-in, do not change the file name of the Trellix MOVE AntiVirus SVM package.
Log on to ePO - On-prem as an administrator.
Select Menu → Automation → MOVE AntiVirus Deployment.
On the Configuration tab under Agentless, click SVM Repository to open the SVM OVF Details page with these Trellix MOVE AntiVirus SVM OVF options:
Options | Description |
|---|---|
SVM OVF Name | Name of the Trellix MOVE AntiVirus SVM package checked in to ePO - On-prem. |
SVM OVF Version | Version of the Trellix MOVE AntiVirus SVM package checked in to ePO - On-prem. |
SVM OVF Use Count | Specifies the number of hypervisors that are using this Trellix MOVE AntiVirus SVM. |
Action | • Delete — To remove an existing Trellix MOVE AntiVirus SVM when it is not registered with any NSX Manager. |
Click Actions → Add SVM to open the Check-in SVM OVF (zip) file page.
Click Choose File to select the Trellix MOVE AntiVirus SVM package, then click Open → OK.
Note
You can check in up to three versions of Trellix MOVE AntiVirus SVM starting from 4.x.x.
The package to ePO - On-prem is checked in.
6. (Optional) On the Configuration tab under Agentless, click Server Settings to enable NSX Unprotected Tag.
Upgrade the Trellix MOVE AntiVirus service using ePO - On-prem
Upgrade NSX Manager to the required Version. For more information, see docs.vmware.com.
Upgrade the Trellix MOVE AntiVirus service by going to ePO - On-prem after a Successful upgrade of NSX version.
The details of the registered vCenter, SVM OVF Version, and NSX Manager are automatically retrieved and displayed on the ePO - On-prem server. But you must register the Trellix MOVE AntiVirus service with the vCenter account. This registration permits the deployment of the service to the ESXi servers.
Log on to ePO - On-prem as an administrator.
Select Menu → Automation → MOVE AntiVirus Deployment.
On the Service tab, click NSX Manager to open the MOVE Service Registration page with these options.
Option | Description |
|---|---|
NSX Manager Name | Displays the name of the registered NSX Manager. |
NSX Manager Address | Displays the IP address of your NSX Manager. |
vCenter Account | Displays the name of the vCenter account that is registered with NSX Manager and ePO - On-prem. |
Registered SVM Version | Displays the version of the Trellix MOVE AntiVirus SVM package checked in to ePO - On-prem. |
Service Registration Status | Displays registration status values Registered, Not Registered, and Registration Failed. |
Actions |
|
Click Register under Actions to open the MOVE Service Registration dialog box.
Select the latest Trellix MOVE AntiVirus SVM and click OK.
The Trellix MOVE AntiVirus service is now registered with the vCenter account that is registered with your NSX Manager.
On the NSX Data Center console, verify that the Trellix MOVE AntiVirus service is now available under System → Service Deployments → Catalog.
Deploy the Trellix MOVE AntiVirus SVM
To provide Trellix MOVE AntiVirus (Agentless) protection to the virtual machines on your ESXi servers, you must install the Trellix MOVE AntiVirus service (Trellix MOVE AntiVirus SVM) on your ESXi servers.
Make sure that:
The host, where you are deploying the SVM using NSX Manager, is part of a cluster.
The virtual machines have the latest VMware Tools installed and have the Guest Introspection Thin Agent enabled for both Windows and Linux VMs.
You have appropriate permission to perform the SVM deployment using ePO - On-prem. You can enable this permission by
navigating through Menu → Users → Permission Sets → MOVE AV [Agentless] SVM Deployment → Edit.
Deploy the Trellix MOVE AntiVirus services on a set of clusters. Manage service deployments here by adding new services or deleting existing ones.
This deployment automatically provides virus protection for virtual machines on a new hypervisor from the moment the hypervisor is added to the clusters. When a new cluster is added, deploy the Trellix MOVE AntiVirus SVM again.
Log on to the NSX Data Center manager as an administrator.
In the NSX Data Center manager console, navigate to System and then in the left pane, click Service Deployment.
Select Partner service from the drop-down list and then click Deploy Service.
To configure the service deployment:
Enter the name under Service Deployment Name.
Select your desired Compute Manager, Cluster, and Data Store.
Click Edit Details.
A Networks dialog box appears on your screen.
Choose your Management NIC and their Network, Network Type as per your environment and click Save.
In the NSX Data Center manager, select System → Service Deployment, click Save. The service deployment starts and after successful Service deployment SVA is installed vCenter.
Service Status | ID | Description |
|---|---|---|
UNKNOWN | 3 | Specifies that the Trellix MOVE AntiVirus service status is unknown |
UP | N/A | Not applicable |
DOWN | 1 | Specifies that the Trellix MOVE AntiVirus service is stopped |
The Trellix MOVE AntiVirus service is now deployed to the cluster when the Installation Status is Successful and the Service Status is UP.
On-access scan policy export to NSX
After you register the Trellix MOVE AntiVirus service on the ePO - On-prem server, the On Access Scan policies for Trellix MOVE AntiVirus are exported from ePO - On-prem to NSX in real time.
The exported policies are available in NSX console under Security → Endpoint Protection Rules → Service Profiles with a Service Profile Name, Service Profile Description, Vendor Template, Vendor Template Key, Tags and Status.
Important
Only the On Access Scan policies are exported from ePO - On-prem to NSX Manager. If you need to assign the On Demand Scan policies, assign them manually on ePO - On-prem.
When you create a new or duplicate On Access Scan policy in ePO - On-prem, it is immediately exported to Service Profiles in NSX Manager. This real-time policy export helps the VMware NSX administrator understand the different sets of policies created and changed by the administrator.
Note
Once an On Access Scan policy is exported to NSX Manager, changes to an On Access Scan policy names in ePO - On-prem will not update in NSX Manager. You must manually update the name changes in the NSX Manager.
If you want to delete an On Access Scan policy from ePO - On-prem, the best practice is to delete the same policy from the NSX Manager.
Tip
Best practice: Verify the security policy in NSX before deleting any On Access Scan policy from ePO - On-prem.
You can't delete the exported On Access Scan policy in NSX Manager when it is included in any NSX security policy. You must remove all configurations referring to this policy before deleting it.
Configure the security group and security policy in NSX Manager
You must create the security policy and apply it to the security group of VMs that you want to protect.
The security policies for Trellix MOVE AntiVirus are automatically exported from ePO - On-prem after you register the Trellix MOVE AntiVirus service on ePO - On-prem. This configuration is a one-time initial activity for a vCenter. But you must repeat this configuration when a new datacenter is added.
Create an NSX service profile
Create an NSX service profile with Trellix MOVE AntiVirus (Agentless).
Make sure that:
The Trellix MOVE AntiVirus service is registered with ePO - On-prem.
You deploy the Trellix MOVE AntiVirus SVM.
Log on to the NSX manager console as an administrator.
Select Security → Endpoint Protection → Endpoint Protection Rules, then click the Security Profiles tab.
In the Service Profiles page, click Add Service Profile.
Complete the details of the service profile:
In the Service Profile Name, enter the name of the service profile.
In the Service Profile Description, enter a description for the profile (optional).
In the Vendor Template, select the policy configured in the ePO - On-prem.
Click Save. The status of the Service Profile changes to Success on successful configuration.
Note
Select My Default policy or any duplicate policy you have created.
You have created your NSX service profile for the Trellix MOVE AntiVirus (Agentless).
Create an NSX security policy and rule
Create an NSX security policy with Trellix MOVE AntiVirus (Agentless).
Make sure that:
The Trellix MOVE AntiVirus service is registered with ePO - On-prem.
You deploy the Trellix MOVE AntiVirus SVM.
Log on to the NSX manager console as an administrator.
Select Security → Endpoint Protection → Endpoint Protection Rules, then click the Rules tab.
In the Rules page, click +Add Policy.
The policy gets listed in the list of available policies.
In the list of policies, click the desired policy and click +Add Rule.
In the new rule, rename the rule name and click the Edit icon under the Groups column.
The Set Groups dialog box appears on the screen.
Select a group in the list and click Apply.
The selected group appears in the list.
Click the Edit icon under the Service Profiles column.
The Set Service Profile dialog box appears on the screen.
Select a service profile in the list and click Save.
The selected service profile appears in the list.
Click Publish to change the status from Uninitialized to Success.
You have created your NSX security policy for deploying Trellix MOVE AntiVirus (Agentless).
Create an NSX Security Group
Select the required Clusters or Virtual Machines from the available vCenter and configure them as a security group. This configuration allows you to assign the security policy to the group and protect its VMs.
Make sure that:
VMware vSphere is installed and added to the cluster.
The Trellix MOVE AntiVirus service is registered with NSX Data Center Manager using ePO - On-prem.
You deploy the Trellix MOVE AntiVirus SVM
Log on to the NSX manager console as an administrator.
Select Security → Endpoint Protection → Endpoint Protection Rules, then click the Rules tab.
In the list of policies, click the desired policy and click +Add Rule.
In the new rule, rename the rule name and click the Edit icon under the Groups column.
The Set Groups dialog box appears on the screen.
In the Set Groups dialog box, click +Add Group.
Enter the name in the Group Name field.
Click Set Members under the Compute Members column.
The Select Members dialog box appears on the screen.
Under Membership Criteria, click +Add Criteria to add multiple criteria. Maximum number of allowed criteria are five.
In the Criteria row, select the desired values from the dropdown lists and enter the field values, then click Apply.
Click Save and click View Members to check the effective list of virtual machines in the group.
Your security group is added and contains the virtual machines to be protected from the selected cluster.
Verify the SVM deployment on ePO - On-prem
To verify the Managed State of the deployed SVM.
Make sure that:
The Trellix MOVE AntiVirus service is registered with ePO - On-prem.
You deploy the Trellix MOVE AntiVirus SVM.
The Installation Status appear as Succeeded and Service Status as Up in NSX console.
Log on to ePO - On-prem as an administrator.
Select Menu → System Tree → Systems.
Under Managed State column, verify the SVM state as Managed.
Note
The SVM name is in the format of <NSX Manager Name>-<Hostname prefix>-host-xx.
Create Policies and Settings on ePO - On-prem
If you want to support multi vCenter environment with Trellix MOVE AntiVirus (Agentless), then you need to create individual policy and settings to each multi vCenter environment. The policy catalog on the ePO - On-prem of the Trellix MOVE AntiVirus contains the policies and settings required for each vCenter.
Create a On Access Scan policy
After you register the Trellix MOVE AntiVirus on the ePO - On-prem server, you need to create a On Access Scan policy each for every vCenter that you want to protect with Trellix MOVE AntiVirus.
Log on to ePO - On-prem as an administrator.
Select Menu → Policy → Policy Catalog.
Select MOVE AntiVirus 4.x.x from the Product drop-down list, then click New Policy.
The Create a new policy dialog box appears on the screen.
In the Create a new policy, select On Access Scan from the Category drop-down list.
Select My Default from the Create a policy based on this existing policy drop-down list.
Enter the name of your policy in Policy Name.
Click OK to save the policy.
The new On Access Scan policy page appears on the screen with all parameters and their values.
According to your requirements, edit the values of the parameters and click Save otherwise click Cancel.
Create an On Demand Scan policy
After you register the Trellix MOVE AntiVirus on the ePO - On-prem server, you need to create a On Demand Scan policy each for every vCenter that you want to protect with Trellix MOVE AntiVirus.
Log on to ePO - On-prem as an administrator.
Select Menu → Policy → Policy Catalog.
Select MOVE AntiVirus 4.x.x from the Product drop-down list, then click New Policy.
The Create a new policy dialog box appears on the screen.
In the Create a new policy, select On Demand Scan from the Category dropdown list.
Select My Default from the Create a policy based on this existing policy dropdown list.
Enter the name of your policy in Policy Name.
Click OK to save the policy.
The new On Demand Scan policy page appears on the screen with all the parameters and their values.
As per your requirements, edit the values of the parameters and click Save otherwise click Cancel.
Create a SVM Settings policy
After you register the Trellix MOVE AntiVirus on the ePO - On-prem server, you need to create a SVM Settings policy each for every vCenter that you want to protect with Trellix MOVE AntiVirus.
Log on to ePO - On-prem as an administrator.
Select Menu → Policy → Policy Catalog.
Select MOVE AntiVirus 4.x.x from the Product drop-down list, then click New Policy.
The Create a new policy dialog box appears on the screen.
In the Create a new policy, select SVM Settings from the Category drop-down list.
Select My Default from the Create a policy based on this existing policy drop-down list.
Enter the name of your policy in Policy Name.
Click OK to save the policy.
The new On Access Scan policy page appears on the screen with all the parameters and their values.
Under SVM Configuration → Agentless on the policy settings page, configure these settings as needed, then click Save.
Hypervisor/vCenter Server — Enter the valid IP address of either the hypervisor that the SVM resides on or the vCenter server (vCenter details are recommended to provide here).
Protocol — Select https or http, depending on the protocol the server uses to receive client requests.
vCenter/ESXi Port — Specify the port number of the SVM. The default port is 443.
Username — Enter the user name credentials to connect with the server.
Note
The user account requires at least read access to the vCenter server or the ESXi host. Domain-based credentials are supported only when the vCenter server or the ESXi host has been configured to support domain-based authentication.
Password — Enter the password associated with the user.
Note
After you save and reopen the SVM Settings policy, the vCenter Password field appears blank. Though it appears blank, the password is encrypted and saved in the policy settings. Confirm the password to test connection settings.
Confirm password — confirm the password.
SVM Time Zone — Select your local time zone from the drop-down list.
NTP Servers(s) — Select Use Default servers or Use following Servers. If Use following Servers is selected, enter the NTP server details.
Click Test connection settings to test the connection to the hypervisor/vCenter Server and then click Save to save the new settings to your SVM Settings policy.
Create a Options policy
After you register the Trellix MOVE AntiVirus on the ePO - On-prem server, you need to create a Options policy each for every vCenter that you want to protect with Trellix MOVE AntiVirus.
Log on to ePO - On-prem as an administrator.
Select Menu → Policy → Policy Catalog.
Select MOVE AntiVirus 4.x.x from the Product drop-down list, then click New Policy.
The Create a new policy dialog box appears on the screen.
In the Create a new policy, select Options from the Category dropdown list.
Select My Default from the Create a policy based on this existing policy dropdown list.
Enter the name of your policy in Policy Name.
Click OK to save the policy.
The new Options policy page appears on the screen with all the parameters and their values.
On the policy settings page, click Show Advanced to see all the settings.
Under Quarantine Manager → Agentless only on the policy settings page:
Enter the network share under Quarantine network share.
Enter the network domain and username under Network domain and username.
Enter the network domain password under Network Password and Confirm Password.
Click Save to save the new settings to your Options policy.
Create a SVM Manager settings policy
After you deploy the Trellix MOVE for Multi-Platform AntiVirus to the clients from the ePO - On-prem server, you need to create a policy for SVM Manager settings policy. Using this policy, you can configure the ODS scheduler, Scanning options and other options.
Log on to ePO - On-prem as an administrator.
Select Menu → Policy → PolicyCatalog.
Select MOVE AntiVirus 4.10.x from the Product drop-down list, then click New Policy.
The Create a new policy dialog box appears on the screen.
In Create a new policy, select SVM Manager Settings from the Category drop-down list.
Select My Default from the Create a policy based on this existing policy drop-down list
Enter the name of your policy in Policy Name.
Click OK to save the policy
The new SVM Manager Settings policy page appears on the screen with all the parameters and their values.
As per your requirements, edit the values of the parameters and click Save otherwise click Cancel.
Create a Shared Cloud Solutions policy
After you deploy the Trellix MOVE for Multi-Platform AntiVirus to the clients from the ePO - On-prem server, you can create a Shared Cloud Solutions policy. Using this policy, you can configure Threat Intelligence Exchange and Intelligent Sandbox settings.
Log on to ePO - On-prem as an administrator.
Select Menu → Policy → PolicyCatalog.
Select MOVE AntiVirus 4.10.x from the Product drop-down list, then click New Policy.
The Create a new policy dialog box appears on the screen.
In Create a new policy, select Shared Cloud Solutions from the Category drop-down list.
Select My Default from the Create a policy based on this existing policy drop-down list
Enter the name of your policy in Policy Name.
Click OK to save the policy
The new Shared Cloud Solutions policy page appears on the screen with all the parameters and their values.
As per your requirements, edit the values of the parameters and click Save otherwise click Cancel.
Group SVM and client systems under vSphere
The Trellix MOVE AntiVirus service deployment to the client systems and their status are visible in their respective vCenter. In multiple vCenters scenarios, after deploying the virtual machines with Trellix MOVE AntiVirus Agentless, each client system and SVM is shown under their respective vCenter.
The vCenter dashboard shows the Trellix MOVE AntiVirus Agentless deployment and functional status. When you register all your VMware vSphere accounts under Registered Cloud Accounts, the same systems and SVMs must appear under their respective groups in the ePO under System Tree > My Organization > vSphere.
Lost and Found
For example, if you manage two vCenter accounts, those two accounts reflect as groups under vSphere. There are some scenarios where the systems and SVMs might not appear under their respective groups and their SVM might appear in the Lost and Found section.
Verify the SVA and Client System are grouped properly
The SVA and client system must present in the same group in the ePO - On-prem which are named after the vCenters. The sync process must be verified between VMware vSphere vCenters and ePO - On-prem.
Make sure that multiple VMware vCenter servers that manage the ESXi servers, which host the guest VMs are configured properly.
Make sure that all vCenter Servers are configured on the NSX Manager Console.
Make sure that the VMware vCenter account with the ePO - On-prem under Registered Cloud Account.
'Make sure the SVM deployment is completed successfully from the NSX console
Log on to ePO - On-prem as an administrator.
Navigate to System Tree and expand My Organization → vSphere.
The account groups appear with their respective client systems and SVAs.
Select each account and check whether SVA and client system IP addresses match with your respective vSphere vCenter client system and SVA IP addresses.
If the account groups systems and SVAs are not grouped properly as expected, then delete all the client systems and SVAs from the vSphere and Lost and Found groups. After that make sure to delete the Group.
Delete the groups and systems
In some scenarios, the groups under My Organization → vSphere don't have the SVAs and Client systems are not organized as per vSphere vCenters. You must delete all the groups and systems that are grouped under different accounts and Lost and Found.
Make sure that multiple VMware vCenter servers that manage the ESXi servers, which host the guest VMs are configured properly.
For details about product features, usage, and best practices, click ? or Help.
Log on to ePO - On-prem as an administrator.
Navigate to System Tree and expand My Organization > vSphere.
The account groups appear with their respective client systems and SVAs.
Select each account, under Systems tab, select the checkbox to select all the systems.
Select Delete under Actions → Directory Management on the Wake Up Agents toolbar.
The Delete dialog box appears on the screen.
Click Ok on the Delete dialog box.
All the systems are deleted under the group with a message
Deleted Systemsat the bottom right corner.Repeat the above two steps to delete all the systems under each group and Lost and Found.
Under System Tree, select each group account and click System Tree Actions → Delete Group.
The Delete Group dialog box appears on the screen.
Click Ok on the Delete Group dialog box.
The group is deleted with a message
Group deleted successfullyat the bottom right corner.
Make sure that all the systems and groups are deleted, even delete the systems under Lost and Found. Now sync your vSphere accounts on the Registered Cloud Accounts page.
Sync all vSphere accounts in ePO - On-prem
After cleaning up the group accounts and systems associated to each configured vSphere account, check the vSphere accounts registered under Registered Cloud Accounts.
Make sure that the VMware vCenter account with the ePO - On-prem under Registered Cloud Account.
For details about product features, usage, and best practices, click ? or Help.
Log on to ePO - On-prem as an administrator.
Select Menu → Configuration → Registered Cloud Account
In the list of VMware vSphere accounts, under Actions, click Sync for every account.
This syncs the VMware vSphere accounts and groups these as accounts with their SVAs and Client Systems.
Assign On-access scan, On-demand scan, options, and svm settings to the Groups in System Tree
The vCenters are created as a group account with their corresponding SVAs and client systems. The assigned policies are the default policies assigned to the group and their systems for the deployed Trellix MOVE AntiVirus software.
Make sure to provide the NSX manager details for only one vCenter account in the ePO - On-prem and registered it to the NSX Manager. This validates your NSX Data Center Manager for all vCenters.
Make sure to deploy the Trellix MOVE AntiVirus SVM on all vCenters from NSX manager console.
The newly created policies specifically for the vSphere groups are applied as follows:
Log on to ePO - On-prem as an administrator.
Navigate to System Tree → My Organization → vSphere, select a vSphere account and, click the Assigned Policies tab.
Select the latest version of MOVE AntiVirus from the Product drop-down list.
All default policies assigned to the vCenter appear in this list.
For each policy, click Edit Assignment under Actions.
The policy assignment page appears for the selected policy.
Under Assignment page, edit the options as:
Choose Inherit from as Break inheritance and assign the policy and settings below.
Select your policy from the Assigned Policy drop-down list.
Choose Lock policy inheritance as Unlocked.
Click Save and click OK in the dialog box to save your changes.
Now the client systems under each vSphere account are assigned with created policies.
Repeat the same for assigning the created policies for On Access Scan, On Demand Scan, SVM settings and Options.
Configure the vCenter details in SVM Settings policy in ePO - On-prem
You must specify these details under SVM Configuration in the Trellix MOVE AntiVirus SVM Settings policy in ePO - On-prem.
Note
If you failed to provide the vCenter details:
The IP address for the threat events generated for client will not appear.
The Security tags will not work.
The Agentless Anti-Malware Protection Status for the clients will not appear.
Log on to ePO - On-prem as an administrator.
Select Menu → Policy → Policy Catalog.
Select MOVE AntiVirus 4.x.x from the Product drop-down list, then select SVM Settings from the Category drop-down list.
Click Edit SVM Setting policy .
Under SVM Configuration, configure these settings as needed, then click Save.
Hypervisor/vCenter Server — Enter the valid IP address of either the hypervisor that the SVM resides on or the vCenter server (vCenter details are recommended to provide here).
Protocol — Select https or http, depending on the protocol the server uses to receive client requests.
vCenter/ESXi Port — Specify the port number of the SVM. The default port is 443.
Username — Enter the user name credentials to connect with the server.
Note
The user account requires at least read access to the vCenter server or the ESXi host. Domain-based credentials are supported only when the vCenter server or the ESXi host has been configured to support domain-based authentication.
Password — Enter the password associated with the user.
Note
After you save and reopen the SVM Settings policy, the vCenter Password field appears blank. Though it appears blank, the password is encrypted and saved in the policy settings. Confirm the password to test connection settings.
Confirm password — confirm the password.
SVM Time Zone — Select your local time zone from the drop-down list.
NTP Servers(s) — Select Use Default servers or Use following Servers. If Use following Servers is selected, enter the NTP server details.
6. Click Test connection settings to test the connection to the hypervisor/vCenter Server and then click Save.
Perform wake-up agent and Antimalware test (EICAR)
Once the SVM appears as Managed in Trellix System Tree, perform wake up agent on the SVM and antimalware test (EICAR) on clients.
Make sure that:
You deploy the Trellix MOVE AntiVirus SVM.
You apply the NSX security policy to the NSX security group.
The policy reflection of On Access policy from NSX to ePO - On-prem.
SVM appears as Managed in ePO - On-prem System Tree.
Note
As the Trellix software is not installed in the Agentless, the client appears as unmanaged in the ePO - On-prem System Tree.
Policy enforcement based on time configured at ePO - On-prem.
In the ePO - On-prem, click Menu → Automation → MOVE AntiVirus Deployment → Configuration → Agentless → Server Settings.
The Server Settings page opens.
The default Policy Enforcement Interval (Minutes) is 60 minutes. This reflects that all policy changes in every 60 minutes automatically to SVM.
Click Run for Run Policy Collection to reflect any policy changes immediately to SVM.
The Server Settings page opens.
Once the policy collection is completed successfully, perform a Wake-up Agent on SVM.
In the ePO - On-prem, click System Tree and select the managed SVMs.
From the Actions drop-down list, click Agent → Wake up Agents → Wake Up Trellix Agent.
The Wake Up Trellix Agent page opens.
Select Options and Force policy update, then click OK.
You can view the status on the Server Task Log.
Once the Wake-up Agent is completed successfully, test the antimalware (EICAR) on client.
Log on to any client which is part of cluster where SVM is deployed.
Download the test eicar file from
eicar.org.Once the malware is detected in client, it denies the access as the quarantine details are not configured by default in ePO - On-prem.
To delete the malware when it detects, configure the quarantine details.
Click Menu → Policy → Policy Catalog → Options → My Default → Edit → Quarantine Manager → (Agentless only).
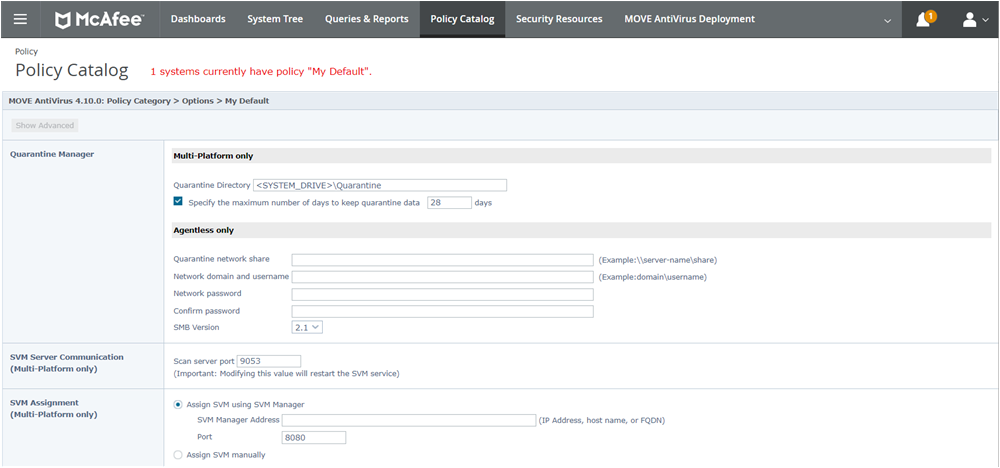
(Optional) If you don't want to configure the quarantine details for Agentless, you can choose to delete the malware when it detects.
Log on to ePO - On-prem as an administrator.
Click Menu → Policy → Policy Catalog → On Access Scan → My Default → Edit → Actions.
To disable the quarantine for Agentless, and to delete the malware when it detects, select Delete files automatically from the Threat detection primary response drop-down list.
Enable NSX tagging through ePO - On-prem
Using ePO - On-prem, you can create On Access Scan and On Demand Scan policies with the configurations needed for high security.
Make sure that:
You have registered the Trellix MOVE AntiVirus service with ePO - On-prem.
You have specified your vCenter details under SVM Configuration in the Trellix MOVE AntiVirus SVM Settings policy in ePO - On-prem.
On-prem.
Registering the Trellix MOVE AntiVirus service exports all On Access Scan policies of Trellix MOVE AntiVirus from ePO - On-prem to NSX. When a new On Access Scan policy is created or duplicated, all updates are immediately exported to NSX. These policies are included in the NSX Service Profiles.
Log on to ePO - On-prem as an administrator.
Select Menu → Automation → MOVE AntiVirus Deployment.
On the Configuration tab under Agentless, click Server Settings → Edit.
The Edit Server Settings page opens.
Select these tagging options under NSX Tagging and click Save.
NSX Virus Found Tag — In the ePO - On-prem for the On Access Scan policy, if the primary action is configured to deny access to files and when malware is detected and deleted on a client system, the client system is tagged with ANTI_VIRUS.VirusFound.threat=high.
When the file is deleted on a next successful on-demand scan, the tag is removed.
On the NSX manager console, under Inventory → Tags, the VM systems with this tag gets added under the scope name ANTI_VIRUS.VirusFound.threat=high.
NSX Unprotected Tag — In the NSX Manager console, the system is tagged with this tag when the system is unprotected or the OAS scan is disabled.
On the NSX manager console, under Inventory → Tags, the VM systems with this tag gets added under the scope name MCAFEE.MOVE.unprotected=yes.
Upgrade Trellix MOVE AntiVirus (Agentless)
Make sure that you have installed or upgraded the supported products from Trellix and VMware. For more information, see RN 4.10.2
Upgrade extension and SVA OVF
Log on to ePO - On-prem as an administrator.
Check in the extension and packages individually:
Select Menu → Software → Extensions → Install Extension.
Select Menu → Automation → MOVE AntiVirus Deployment → SVM Repository.
On the Configuration tab under Agentless, click SVM Repository to open the SVM OVF Details page with these Trellix MOVE AntiVirus SVM OVF.
Click Actions → Add SVM to open the Check-in SVM OVF (zip) file page.
Click Choose File to select the Trellix MOVE AntiVirus SVM package, then click Open → OK.
Select Menu → Automation → MOVE AntiVirus Deployment → Service and click Upgrade in the actions column.
Upgrade the Trellix Move Antivirus SVM
Log on to the NSX Data Center manager as an administrator.
In the NSX Data Center manager console, navigate to System and then in the left pane, click Service Deployment.
Under Deploy Service, select menu and choose from the options to deploy a different appliance.
A new SVA is installed in the vCenter after the successful upgrade.
Note
Earlier SVA versions are removed from the vCenter after the new version is installed.
Configure security group and security policy in NSX Manager
Log on to the NSX Manager console as an administrator.
Select Security → Endpoint Protection → Endpoint Protection Rules → Configure service profile and policy
Note
When a duplicate policy is observed in the Vendor Template after an upgrade, select the bottom policy in Endpoint Protection Rules → Service profiles.
Upgrade NSX Manager
Upgrade NSX Manager to 4.x.x.x. For more information, see docs.VMware.com
Uninstall Trellix MOVE AntiVirus (Agentless)
The process of removing Trellix MOVE AntiVirus (Agentless) consists of removing the Trellix MOVE AntiVirus service from the clusters and removing the configurations and extensions from ePO - On-prem.
Uninstall the Trellix MOVE AntiVirus 4.x.x in an NSX environment
A full uninstallation involves removing these components: Trellix MOVE AntiVirus SVM, Trellix MOVE AntiVirus service, NSX Manager details, and the Trellix MOVE AntiVirus extension.
Remove the policies and service profile from NSX console
You can remove the policies and service profile from NSX console using the VMware NSX console.
Log on to VMware NSX console.
Select Security → Endpoint Protection Rules.
Select Rules → Policies and delete the selected policy.
Select Service Profiles, select the Service Profile and delete the service profile.
Remove Trellix MOVE AntiVirus SVM from the cluster
Using the NSX console, you can remove the Trellix MOVE AntiVirus service, which is deployed to one or more clusters.
Log on to NSX console as an administrator.
Click System → Service Deployments → Deployment.
Click the Available Actions icon and click Delete or Force Delete.
The Delete Service Deployment window opens.
Click Delete to delete the service deployment.
Unregister the Trellix MOVE AntiVirus service with NSX Manager from ePO - On-prem
Select the registered VMware NSX Manager and unregister it from the ePO - On-prem server.
Log on to ePO - On-prem as an administrator.
Select Menu → Automation → MOVE AntiVirus Deployment → Service → NSX Manager. This action lists all NSX Managers registered in ePO - On-prem.
From the Actions column on the MOVE Service Registration page, click Unregister for the registered NSX Manager. A
confirmation dialog box appears.
Click OK to confirm.
Uninstall the extension
Uninstall the Trellix MOVE AntiVirus extensions from ePO - On-prem.
Log on to ePO - On-prem as an administrator.
Select Menu → Software → Extensions.
From the Extensions tab under McAfee group, select Data Center Security.
Click Remove next to each extension in this order.
MOVE AntiVirus License
MOVE AntiVirus
MOVE AntiVirus Common
vSphere Connector Extension
MDCC