Last Updated: August 29, 2024
Overview
Trellix Management for Optimized Virtual Environments AntiVirus (Trellix MOVE AntiVirus) is an anti-virus solution for virtual environments. It provides protection and optimal performance for your organization without having to install an anti-virus application on every virtual machine.
Trellix MOVE AntiVirus detects threats and then protects your environment based on settings that you configure.
You can configure the software as a standalone product, or use Trellix ePolicy Orchestrator - On-premises to configure, manage, and enforce your policies. After the configuration, you can use queries and dashboards to track activity and detections.
The software includes two deployment options, Multi-platform and Agentless. Both options provide consistent protection and can be managed and reported through Trellix ePO - On-prem.
Key features
Trellix MOVE AntiVirus features enable you to secure and protect your enterprise systems without compromising on performance. The key features are listed below.
Note:
Each feature that is listed below is available either in both Multi-platform and Agentless deployment or only one. You can know about the availability of the feature by checking the column Multi-platform and Agentless in the table below.
Feature | Description | Multi-platform | Agentless |
|---|---|---|---|
Centralized management | Trellix MOVE AntiVirus integrates fully into Trellix ePO - On‑prem for automated security reporting, monitoring, deployment, and policy administration. | Yes | Yes |
Data Center visibility | vSphere Connector, part of the Data Center Security suite, provides a complete view into virtual datacenters and imports key properties like servers, hypervisors, and VMs through Trellix ePO - On‑prem. | Yes | Yes |
On-access scanning | Examine files as they are accessed, providing continuous, real-time detection of threats. | Yes | Yes |
On-demand scanning | Examine all files on VMs to find potential threats any time or on a schedule. | Yes | Yes |
Targeted on-demand scanning | Optimize file scanning for files where the previous scanning is timed out for reasons such as large file size, file structure, and file composition. | Yes | Yes |
SVM Manager | Automatically assign the SVM to Multi-platform clients for simplified administrative management, monitoring the health of SVMs, and load-balancing of SVMs. | Yes | No |
SVM autoscaling | The SVMs automatically scale up and down depending on the number of endpoints connected. Define the number of backup SVMs that are ready to protect your client systems. Calculate the number of ready SVMs required for the maximum number of clients that need protection at any time of the day. The standby SVMs are automatically deployed based on the backup SVM value. | Yes | No |
Scan diagnostics | Run the scan diagnostic tool to easily find frequently scanned files, extensions, and VMs, then use the results to exclude them from being scanned, improving performance. | Yes | Yes |
RAM disk for scanning | RAM disk is used by the OSS for file scanning and it significantly reduces the disk I/O on the offline scan server. By default, RAM disk is enabled in the Trellix ePO - On-prem server. RAM disk is created by the OSS and it improves the OSS performance by enhancing the scan time. | Yes | No |
Global Threat Intelligence | Determine a file's reputation risk score with seamless integration of TIE, Trellix ePO - On-prem, and Trellix MOVE AntiVirus. | Yes | No |
Trellix Intelligent Sandbox integration | Protect your client systems and network against malware and Advanced Persistent Threats (APTs) with the multi-level threat detection capabilities of Intelligent Sandbox. | Yes | No |
Working
Trellix MOVE AntiVirus detects, resolves, and logs information about detected threats. The software is installed on Trellix MOVE AntiVirus Security Virtual Machine (SVM) to perform these tasks.
The software includes two deployment options, Multi-platform and Agentless. Both options provide consistent protection and are managed and reported on by Trellix ePO - On-prem.
Multi-platform
Multi-platform is an agent-based deployment option that offloads all scanning to a dedicated Security Virtual Machine (SVM) that runs the Trellix® Endpoint Security software. Guest VMs are no longer required to run anti-virus software locally, which improves the performance for anti-virus scanning, and increases VM density per hypervisor.
Note
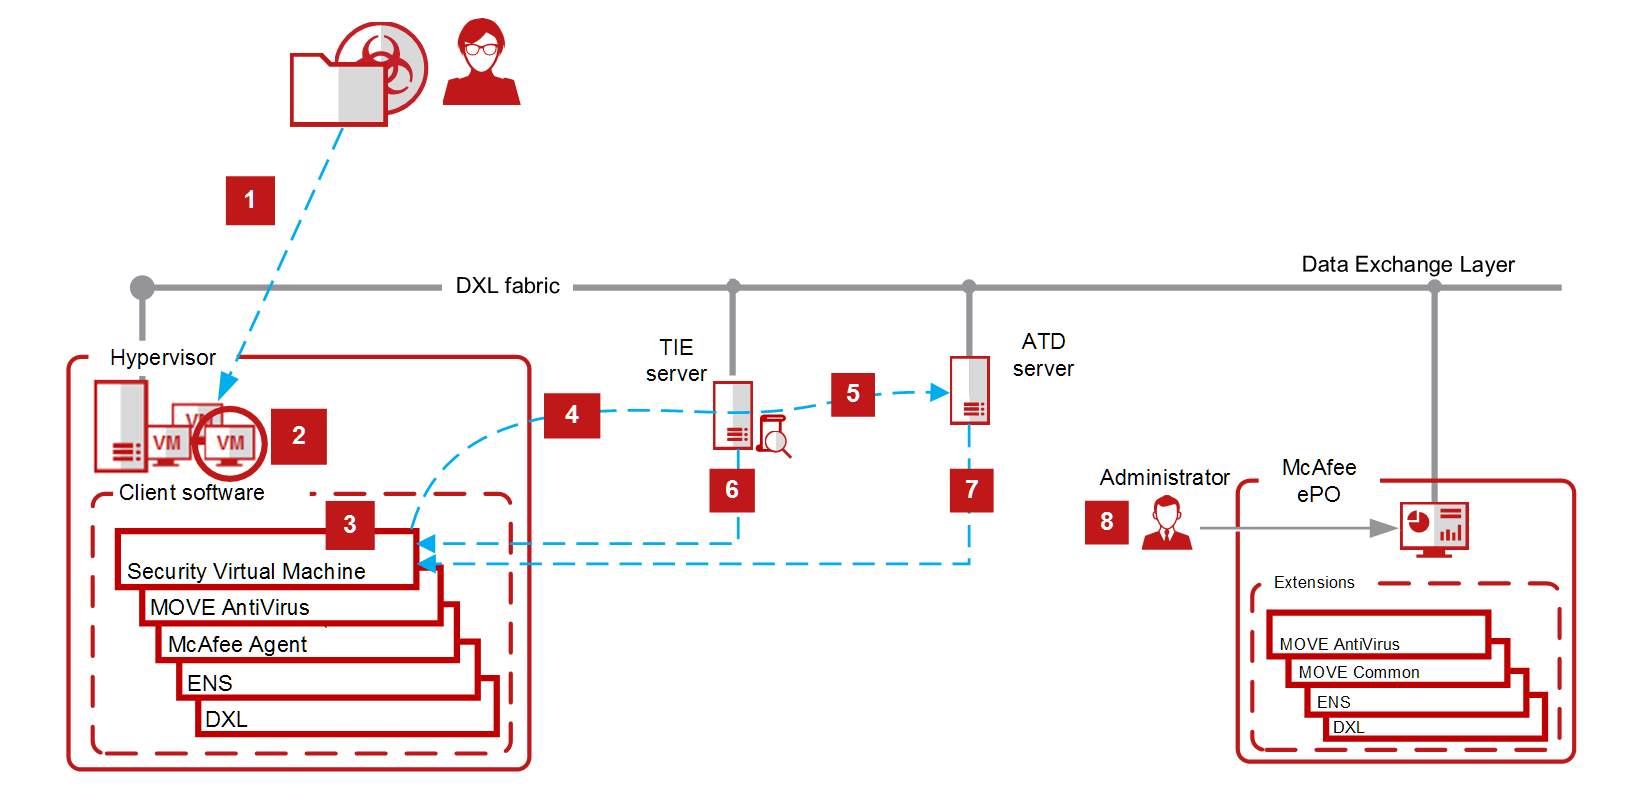
In the workflow mentioned below, the assumption is that Trellix Threat Intelligence Exchange and Trellix Intelligent Sandbox are enabled.
The file enters the network, where Trellix MOVE AntiVirus is installed.
Trellix MOVE AntiVirus client looks for the file reputation in the local cache of the VM.
When the search provides no results, then the file is provided to the Security Virtual Machine (SVM) to check the file reputation in the global cache.
If the search in local and global cache provides no results, then the file is provided to the Threat Intelligence Exchange for inspection, which internally requests the Global Threat Intelligence for the file reputation.
If the file's reputation is not available in Global Threat Intelligence, then the file is sent to Intelligent Sandbox for scan.
As the scan by Intelligent Sandbox is a time-consuming process, the file is also sent to the AMCore engine for scanning.
Intelligent Sandbox sends the results to the SVM after completion of the scan.
Note
If Threat Intelligence Exchange and Intelligent Sandbox are not enabled, then the file is sent for scanning after step 3 and therefore, steps 4, 5, 6, and 7 are not relevant.
If the file is malicious, then you can check the Threat Event Log in Trellix ePO - On‑prem to see the results.
Agentless
This deployment method integrates with VMware NSX-T Manager. It protects your virtual environment from malware without a Trellix Agent for easy deployment and setup. This deployment provides virus protection for VMs on the hypervisor.
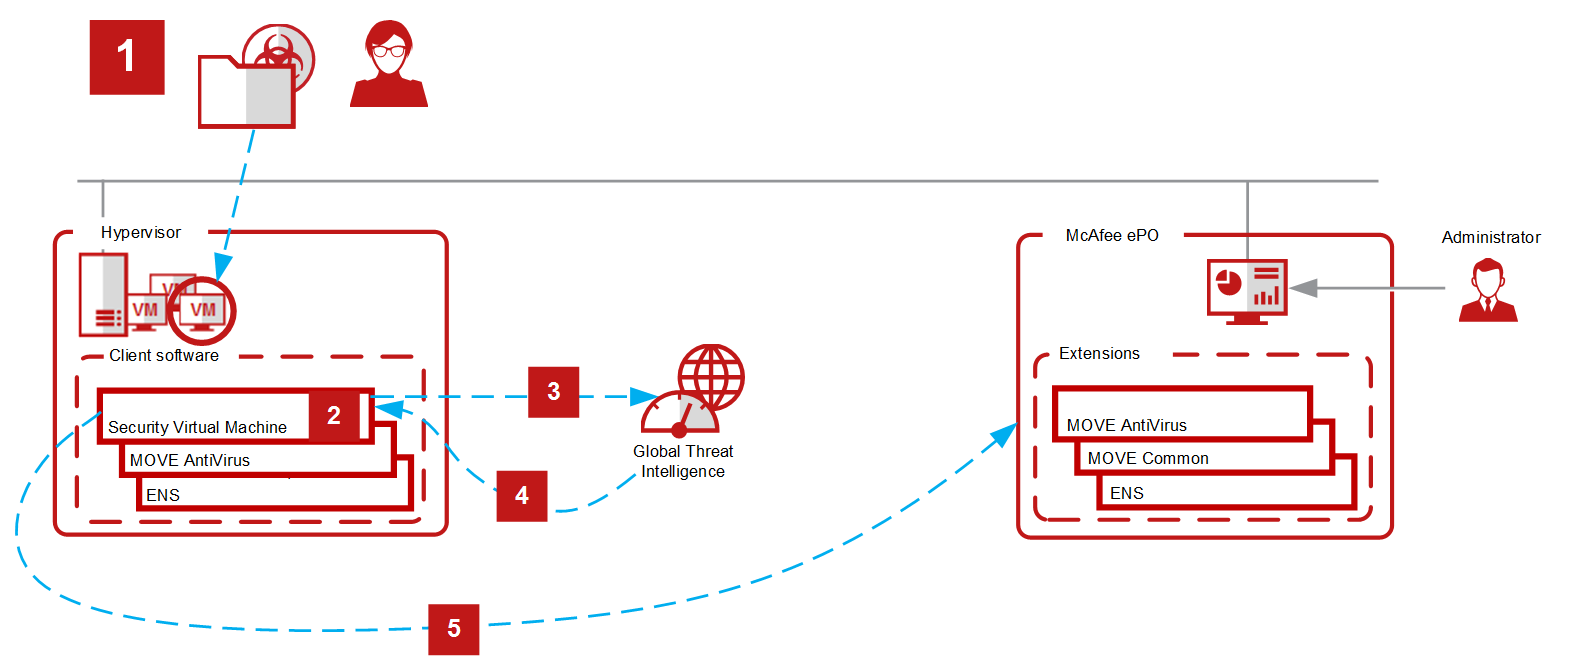
The virus enters the network and tries to infect a VM, where Trellix MOVE AntiVirus is installed.
The Security Virtual Machine (SVM) is notified about the new file in the network through the third-party agents. After receiving the file information, the SVM initiates the search for the same file in the global cache.
When the search in global cache provides no results, then the SVM requests Trellix GTI for the file's reputation.
If the file's reputation is not available in Trellix GTI, then the SVM initiates a file scan.
If the file is malicious, then you can check the Threat Event Log in Trellix ePO - On-prem to see the results.
Configuring Trellix MOVE AntiVirus
Configure Trellix MOVE AntiVirus settings to prevent malware access, keep your protection up to date, and scan for malware on client systems.
Trellix MOVE AntiVirus provides two types of file scanning, on-access and on-demand. You can customize the scan settings based on your demands and requirements.
Multi-platform components
Each component performs specific functions to keep your environment protected.
ePolicy Orchestrator - On-premises — A management platform that communicates with the Trellix Agent, manages the Multi-platform configuration, and provides reports on malware discovered in your virtual environment.
Hypervisor — A virtual operating platform that allows multiple operating systems to run concurrently on a hosted system and manages the execution of the guest operating system.
Trellix Agent — A client-side component that communicates with Trellix ePO - On-prem, applies policies to each VM, and deploys the Trellix MOVE AntiVirus client.
Trellix MOVE AntiVirus client — The client software that allows VMs to work with the Security Virtual Machine (SVM) for file scanning and malware detection. Enforces actions on the client when a threat is detected.
Trellix MOVE AntiVirus SVM — The Security Virtual Machine VM that provides offloaded scanning support for VMs, minimizing the performance impact on virtual desktops.
SVM Manager — A load balancing component that automatically assigns SVM to Multi-platform clients based on configurable parameters like scan server load, Trellix ePO - On-prem tags, and IP address ranges.
Trellix MOVE AntiVirus Meta Package extension — The product extension that provides policies and controls for configuring and managing the self-protection for the product's command line interface. You can enable events and logging details of the Trellix MOVE AntiVirus client through Trellix ePO - On-prem. It provides policies and controls for configuring and managing components such as SVM Manager, SVM Settings, on-access and on-demand scanning, and shared cloud solutions. It provides the configurations required for managing the Trellix MOVE AntiVirus SVM through Trellix ePO - On-prem.
Trellix ENS — Anti-virus software that enables anti-virus scanning for the SVM virtual machine and communicates with the Trellix GTI servers.
vSphere Connector — A Data Center Connector that helps you discover and import your virtual infrastructure using Trellix ePO - On-prem. You can also view the virtualization properties and protection status of your virtual machines, and manage them.
Agentless components
Each component performs specific functions to keep your environment protected.
ePolicy Orchestrator - On-premises — A management platform that allows you to configure policies to manage Agentless configuration and provides reports on malware discovered in your virtual environment.
Security Virtual Machine (SVM) — The Trellix MOVE AntiVirus service package that provides anti-virus protection for VMs and communicates with the loadable kernel module on the hypervisor, Trellix ePO - On-prem, and the Trellix GTI servers. The SVM is the only system directly managed by Trellix ePO - On-prem. Endpoint Security for Linux Threat Prevention, Trellix Agent, and Trellix MOVE AntiVirus (Agentless) are pre-installed.
File Quarantine — Remote quarantine system, where quarantined files are stored on an administrator-specified network share.
Trellix GTI (Global Threat Intelligence) — A comprehensive, real-time, cloud-based threat intelligence service that classifies suspicious files that are found on the file system. When the real-time malware defense detects a suspicious program, it sends a DNS request for analysis to a central database server hosted by Trellix Advanced Research Center.
VMware vCenter — Console that manages the ESXi servers, which host the guest VMs that require protection.
Hypervisor (ESXi) — A virtual operating platform that allows multiple operating systems to run concurrently on a hosted system and manages the execution of the guest operating systems. ESXi is an embedded hypervisor for servers that runs directly on server hardware without requiring an extra underlying operating system.
VMware NSX-T Manager — Console that allows you to configure, provision, and automate the protection on the endpoints in a datacenter.
Virtual Machines (VMs) — Completely isolated guest operating system installations in a normal host operating system that support both virtual desktops and virtual servers.
Importance of creating a security strategy
Protecting your virtual systems from malware requires a well-planned strategy: define threat prevention and detection, response to threats, and ongoing analysis and tuning.
Prevent — Avoiding threats
Define your security requirements to make sure that your data sources are protected. Then, develop an effective scan strategy to stop intrusions before they gain access to your environment.
Configure these features to prevent intrusions:
Self-Protection — (Multi-platform only) One of the first things that malware tries to do during an attack is to disable your system security software. Configure Self-Protection for Trellix MOVE AntiVirus (Multi-platform) to prevent Trellix MOVE AntiVirus service, files, and registries from being stopped or changed.
Common scan options — Enable Trellix MOVE AntiVirus and configure options that apply to all scans, including:
(Multi-platform) Quarantine location and the number of days to keep quarantined items before automatically deleting them
(Agentless) Quarantine network share where the quarantined files are stored
Scan Diagnostics client task — Run the scan diagnostic tool or use Trellix ePO - On-prem to calculate and display frequently scanned files, extensions, processes, and VMs. You can use the results to exclude the items from being scanned.
Detect — Finding threats
Develop an effective strategy to detect intrusions when they occur. Configure these features to detect threats:
On-Access Scan — Scan for threats as files are read from or written to disk.
On-Demand Scan — Run immediate and scheduled scans, including scanning for malware-related registry entries that weren't previously cleaned.
Targeted On-Demand Scan — Select a system or a group of systems from the System Tree where to initiate the on-demand scan.
Respond — Handling threats
Use product log files, automatic actions, and other notification features to determine the best way to handle detections.
Actions — Configure what happens in response to a detection.
Alerts — Specify how Trellix MOVE AntiVirus notifies you when detections occur, including alerting options and logging.
Tune — Monitoring, analyzing, and fine-tuning your protection
Monitor and analyze your configuration to improve system and network performance, and enhance virus protection, if needed. Use these tools and features:
Queries, dashboards, and server tasks (Trellix ePO - On-prem) — Monitor scanning activity and detections.
Log files — View a history of detected items. Analyzing this information might reveal that you must enhance your protection or change the configuration to improve system performance.
Scan policies — Analyze log files or queries and change policies to increase performance or virus protection, if needed. For
example, you can improve performance by configuring exclusions, high- and low-risk process scanning, and disabling scan on write.
Scan Diagnostics reports — Run and view these scan diagnostic queries:
Top 10 Scanned File Extensions for each SVM
Top 10 Scanned Files for each SVM
Top 10 Scanned Virtual Machines for each SVM
(Multi-platform only) Top 10 Scanned Processes for each SVM
Trellix ePO - On-prem features leveraged by Trellix MOVE AntiVirus
Trellix MOVE AntiVirus leverages these features in the Trellix ePO - On-prem environment.
Trellix ePO - On-prem feature | Trellix MOVE AntiVirus |
|---|---|
Policies | Adds predefined policies to the Policy Catalog. |
Client tasks | Adds predefined client tasks to the Client Task Catalog. |
Dashboards and monitors | Adds predefined dashboards and monitors. |
Permission sets | Adds a Trellix MOVE AntiVirus permission group to each permission set. |
Queries and reports | Adds:
|
Server tasks | Adds predefined server tasks to the Server Tasks list in Automation. |
Threat Event Log | Adds Trellix MOVE AntiVirus events that you can filter and view. |
About the Trellix ePO - On-prem system tree
The System Tree is a graphical representation of how your managed network is organized.
Trellix ePO - On-prem enables you to automate and customize system organization. The structure that you put in place affects how security policies are inherited and enforced throughout your environment.
You can perform these Trellix MOVE AntiVirus functions from the System Tree.
Function | Category | Description |
|---|---|---|
Policies | MOVE AntiVirus Common 4.10.x → Options | Includes policy setting to prevent Trellix MOVE AntiVirus service, files, and registries from being stopped or modified. You can also specify the settings required for events and logging for Multi-platform. |
MOVE AntiVirus 4.10.x → Options | Configures settings that apply to both on-access and on-demand scans. | |
MOVE AntiVirus 4.10.x → On Access Scan | When a threat is detected, the on-access scanner responds based on the configurations in this policy. | |
MOVE AntiVirus 4.10.x → On Demand Scan | When a threat is detected, the scanner responds based on the configurations in this policy. | |
MOVE AntiVirus 4.10.x → Shared Cloud Solutions (Multi-platform only) | The Shared Cloud Solutions policy determines whether files and certificates are blocked or allowed on your systems based on reputation levels. | |
MOVE AntiVirus 4.10.x → SVM Manager Settings (Multi-platform only) | Create and assign a policy that specifies which SVM a virtual infrastructure group uses. You can define the SVM auto scale settings, so that the SVM deployment starts automatically depending on the number of clients connecting to the SVM for protection. | |
MOVE AntiVirus 4.10.x → SVM Settings | Specifies the scanning settings and performance configurations for the SVM. | |
Client Tasks (Multi-platform) | Restore from Quarantine | Performs actions on quarantined items. For example, you can restore a quarantined item after downloading a later version of the DAT that contains information that cleans the threat. |
Targeted On-Demand Scan | Optimizes file scanning for files where the previous scan timed out for reasons such as large file size, file structure, and file composition. | |
Scan Diagnostics | Run the scan diagnostic task to easily find frequently scanned files, extensions, and VMs, then use the results to exclude these items from being scanned. | |
Check SVM Assignment | Checks whether an SVM is assigned to the client system to protect it. |
Using client tasks with Trellix MOVE AntiVirus
Use client tasks to automate system management in your Trellix ePO - On‑prem environment. For example, you can configure a client task to deploy product updates, run a diagnostic scan, or run an on‑demand scan.
Depending on your permissions, you can use predefined client tasks as is, edit them, or create custom client tasks.
Trellix MOVE AntiVirus adds these predefined client tasks to the Client Task Catalog.
Function | Category | Description |
|---|---|---|
Client Tasks (Multi-platform) | Restore from Quarantine | Performs actions on quarantined items. For example, you can restore an item after downloading a later version of the DAT that contains information that cleans the threat. |
Targeted On-Demand Scan | Optimizes file scanning for files where the previous scanning is timed out for reasons such as large file size, file structure, and file composition. | |
Scan Diagnostics | Run the scan diagnostic task to easily find frequently scanned files, processes, extensions, and VMs, then use these results to exclude them from being scanned. A good set of exclusions improves the performance of the virtual infrastructure. | |
Check SVM Assignment | Checks whether an SVM is assigned to the client system to protect it. | |
Check SVM Connectivity | Checks the connectivity status between an SVM and the client system. | |
Check SVM Manager Connectivity | Checks the connectivity status between the SVM Manager and the client system. | |
Perform EICAR Test | Performs an EICAR test on the client system. | |
Client Tasks (Agentless) | Scan Diagnostics | Run the scan diagnostic task to easily find frequently scanned files, extensions, and VMs, then use the results to exclude these items from being scanned. |
For information about creating and using client tasks and the Client Task Catalog, see the Trellix ePO - On-prem documentation.
Using policies in Trellix ePO - On-prem
Policies enable you to configure managed products and apply the configuration to systems in your network, all from the Trellix ePO - On-prem console.
Policies are collections of settings that you create, configure, and apply, then enforce. Most policy settings correspond to settings that you configure for the Trellix MOVE AntiVirus client systems. Other policy settings are the primary interface for configuring and deploying the Trellix MOVE AntiVirus SVM and its components.
Trellix MOVE AntiVirus adds these categories to the Policy Catalog.
Trellix MOVE AntiVirus categories
Category | Description |
|---|---|
Options | Configures the Quarantine Manager options that apply to both on-access scanner and on-demand scanner. Also, specifies the SVM assignment details for Multi-platform. |
On Access Scan | Examines files on the computer as the user accesses them, and provides continuous, real-time detection of threats. |
On Demand Scan | Configures the on-demand scan settings for the preconfigured scans that run on the SVM. |
Share Cloud Solutions (Multi-platform only) | Enables you to specify that files and certificates with specific reputations are allowed to perform certain scan actions, as specified by scan rules. |
SVM Manager Settings (Multi-platform only) | Configures the SVM Manager and autoscale settings required for SVM deployment and management. |
SVM Settings | Specifies settings that apply to SVM configuration, scanning options, on-demand scan configurations required for SVM, and scan performance. |
Trellix MOVE AntiVirus Common categories
Category | Description |
|---|---|
Options | Allows you to configure the settings to defend files, services, and registry keys on virtual machines and to log events and alerts. |
In each category, these predefined policies are available:
Trellix MOVE AntiVirus predefined policies
Policy | Description |
|---|---|
McAfee Default | Defines the default policy that takes effect if no other policy is applied. You can duplicate this policy, but you can't delete or modify it. |
My Default | Specifies predefined settings for the category. |
You can use predefined policies as is, edit the My Default policies, or create custom policies.
For information about creating and using policies and the Policy Catalog, see the Trellix ePO - On‑prem documentation.
Create a policy
Policies allow you to describe threat scanning behavior for specific virtual machines.
Before you begin:
You installed the Trellix MOVE AntiVirus extension on the Trellix ePO - On-prem server.
By default, policies created in Trellix ePO - On-prem are not assigned to any groups or systems. When you create a policy, you add a custom policy to the Policy Catalog. You can create policies before or after a product is deployed.
Task
Log on to Trellix ePO - On-prem as an administrator.
Select Menu → Policy → Policy Catalog, then select MOVE AntiVirus 4.10.x or MOVE AntiVirus Common 4.10.x from the Product drop-down list.
Click New Policy.
On the Create a new policy dialog box, configure the options, as required, then click OK.
Click the new policy that is created, then configure the policy options, as required.
Click Save.
In the Assigned Policy list, select the policy you created.
Click Save.
To apply the policy immediately, send wake-up agent call.
You installed the Trellix MOVE AntiVirus extension on the Trellix ePO - On-prem server.
The policies are not modified on client systems until the next agent-server communication that includes a Collect and Send Properties operation. This can be initiated from the agent on the client, or by sending wake-up agent call from Trellix ePO - On-prem.
Policy assignment (Agentless)
VM-based scan configuration is enabled by default. The Trellix ePO - On-prem administrator can enforce unique scan policies with exclusion to different groups, resource pool, or specific virtual machines protected by Trellix MOVE AntiVirus SVM on a hypervisor, even when Trellix Agent is not deployed to the client systems.
The on-access and on-demand scan policies can be applied to SVMs or to a specific virtual machine, or group. With VM-based scan configuration enabled by default, all VMs are protected by the on-access and on-demand scan policies, which are assigned to VM or group.
The on-access and on-demand scan policies can be assigned to the system using system-based assignment or rule-based assignment in Trellix ePO - On-prem.
Enable or disable policy collector
You can enable the Policy Collector to update the target SVMs with the latest on-access and on-demand scan policies.
Follow the steps below to enable or disable Policy Collector:
Login to Trellix ePO - On-prem.
Go to MOVE AntiVirus Deployment page.
In the Configuration tab, expand Agentless and then select Server Settings.
Select Edit.
Enable or disable Policy Collector.
Note
The Policy Collector dialog box appears.
Select Yes.
Select Save.
You have enabled or disabled Policy Collector successfully.
Update SVMs with scan policies
You can run the policy collector to update the target SVMs with the latest on-access and on-demand scan policies. The policies and updates are enforced to SVM in the default policy collection interval, which is 60 minutes.
Tip
Best practice: Specify the policy collection interval for your environment, as needed.
Select Menu → Automation → MOVE AntiVirus Deployment → Configuration → Server Settings.
Click Run next to Run policy collector.
The Policy collection completed successfully message appears when policies are successfully collected.
Send wake-up agent call to the target SVMs.
Important
You can change the policy enforcement interval by navigating to Menu → Automation → MOVE AntiVirus Deployment → Configuration → Server Settings → Edit. You can also view the task log for policy collection (MOVE AntiVirus:Policy collection task) by navigating to Menu → Automation → Server Task Log. The policy collection task log is updated in the default policy collection interval, which is 60 minutes.
Assign an on-access scan policy to a group in Trellix ePO - On-prem
You can assign an on-access scan policy to a group in Trellix ePO - On-prem. This is applicable only for NSX-T environment.
Log on to Trellix ePO - On-prem as an administrator.
In the System Tree, select the group containing the virtual machines where you want to apply the policy.
Assign the policy to the group. For more information, see Assign a policy topic.
Log on to the NSX-T console as an administrator.
Click Security → Endpoint Protection Rules → Rules → Add policy.
Apply the same security policy to the NSX security group and wait for the policy reflection.
Note
Make sure that the same set of client VMs are part of Trellix ePO - On‑prem group and NSX security group.
Run the policy collector in Trellix ePO - On‑prem.
Send wake‑up agent call to the SVMs, which these client VMs are protected with.
Configuring policies
You can configure the Trellix MOVE AntiVirus client and SVM behavior with policy settings.
Policies for client | Policies for SVM |
|---|---|
|
|
Configuring permissions sets
A permission set is a group of access rights granted to a user account for specific features of a product. Permission sets only grant permissions — they never remove a permission.
All permissions to all products and features are assigned automatically to global administrators. Other users must have permission assigned manually. Global administrators can assign existing permission sets when creating or editing user accounts and when creating or editing permission sets.
For more information about permission sets, see the product documentation for your version of Trellix ePO - On‑prem.
Trellix MOVE AntiVirus permission set
The Trellix MOVE AntiVirus software adds sections to the permission sets including the MOVE AntiVirus SVM Manager role.
Global administrators must grant permissions to users for the MOVE AntiVirus Common, MOVE AntiVirus Deployment, MOVE AntiVirus General, and MOVE AntiVirus Policy Permission sections, because no permissions are granted by default.
Permission section | Permission set | Description |
|---|---|---|
MOVE AntiVirus Common | View policy and task settings | User can view the policy and task settings that are available in the MOVE AntiVirus Common extension in Trellix ePO - On-prem. |
View and change policy and task settings | User can view and edit the policy and task settings that are available in the MOVE AntiVirus Common extension in Trellix ePO - On-prem. | |
MOVE AntiVirus Deployment | View/Edit Deployment MOVE AntiVirus Configuration | User can view and edit the MOVE AntiVirus Deployment configuration details in Trellix ePO - On-prem. |
MOVE AntiVirus General | Run System Tag Info Command | This permission is used by the SVM Manager to fetch the system tag information, which is configured and assigned to the client systems. |
MOVE AntiVirus Policy Permission | View policy and task settings | User can view the policy and tasks settings that are available in the MOVE AntiVirus extension in Trellix ePO - On-prem. |
View and change policy and task settings | User can view and edit the policy and tasks settings that are available in the MOVE AntiVirus extension in Trellix ePO - On-prem. |
Other required permissions
The global administrator must give Trellix ePO - On-prem permissions to handle other areas that work with Trellix MOVE AntiVirus including queries, dashboards, and the Threat Event Log.
For these features... | These permissions sets are required |
Dashboards | Dashboards, Queries and Reports |
Queries | Queries and Reports |
Policies | System Tree access, Policy Assignment Rules |
Events on virtual machines | Systems, System Tree access, Threat Event Log |
Using permission sets
A permission set specifies all permissions that apply to one object and controls users' level of access to features.
Trellix MOVE AntiVirus adds a permission group MOVE AntiVirus SVM Manager to each permission set.
Permission groups define the access rights to the features. Trellix ePO - On-prem grants all permissions for all products and features to global administrators. Administrators then assign user roles to existing permission sets or create permission sets.
Feature | Required permissions |
Automatic responses | Automatic Responses, Event Notifications, plus any feature-specific permissions depending on the feature used (such as System Tree or queries). |
Client tasks |
|
Dashboards and monitors | Dashboards |
Policies | Trellix MOVE AntiVirus Policy |
Queries | Queries and Reports |
Server tasks | Server tasks |
System Tree | Systems, System Tree access |
Threat Event Log | Systems, System Tree access, Threat Event Log |
Configure permission sets
Update the read/write permissions assigned to the user roles defined for your Trellix ePO - On-prem environment.
Log on to Trellix ePO - On-prem as an administrator.
Select Menu → User Management → Permission Sets.
Select a user role from the Permission Sets list.
Next to any Trellix MOVE AntiVirus permission, click Edit.
Select the permission level, as needed.
Click Save.
Configuring Trellix MOVE AntiVirus settings
Configure settings that apply to all components and features of Trellix MOVE AntiVirus in the MOVE AntiVirus Common 4.10.x and MOVE AntiVirus 4.10.x extensions.
Protect Trellix MOVE AntiVirus resources (Multi-platform)
One of the first things that a malware tries to do during an attack is to disable your system security software. Configure Self-Protection in the Options policy under MOVE AntiVirus Common 4.10.x to prevent Trellix MOVE AntiVirus services, files, and registries from being stopped or modified.
Log on to Trellix ePO - On-prem as an administrator.
Select Menu → Policy → Policy Catalog, then select MOVE AntiVirus Common 4.10.x from the Product list.
From the Category list, select Options.
Click the name of an editable policy.
Under Self-Protection, enable these options.
Options
Description
Enable Self-Protection
To prevent Trellix MOVE AntiVirus services and files, registries from being stopped or modified.
Enable Self-Protection for MOVE CLI
To protect the command-line utility from being accessed by unauthorized users.
Click Save.
Configure logging settings (Multi-platform)
Configure Trellix MOVE AntiVirus logging in the Options policy under MOVE AntiVirus Common 4.10.x to retrieve the software deployment and configuration details.
Log on to Trellix ePO - On-prem as an administrator.
Select Menu → Policy → Policy Catalog, then select MOVE AntiVirus Common 4.10.x from the Product list.
From the Category list, select Options.
Click the name of an editable policy.
Configure these settings on the page.
Options | Actions |
|---|---|
Events |
|
Logging |
|
6. Click Save.
Configuring exclusions
Trellix MOVE AntiVirus enables you to fine-tune your protection by specifying items to exclude from scanning.
For example, you might need to exclude some file types to prevent a scanner from locking a file used by a database or server. A locked file can cause the database or server to fail or generate errors.
For this scan type... | Specify items to exclude | Where to configure | Use wildcards? |
|---|---|---|---|
On-access scan | Files, file types, folders, and process exclusions | On Access Scan policy | Yes |
On-demand scan | Files, file types, and folders | On Demand Scan policy | Yes |
Every item in exclusion lists is mutually exclusive. Each exclusion is evaluated separately from the others in the list.
Note
To exclude a folder on Windows systems, append a backslash (\) character to the path. To exclude a folder on Linux systems, append a forward slash (/) character to the path.
Path exclusions
The Trellix MOVE AntiVirus product allows you to fine-tune the list of file types scanned including individual files, folders, and disks. You might need these exclusions because the scanners might scan and lock a file when that file is being used by a database or server. This might cause the database or server to fail or generate errors.
Note
When specifying the path exclusions, wildcards are supported.
(Windows system) All folder exclusion must append a backslash (\). For example, C:\temp\test\
If you do not append a backslash (\) for the specified path, the file test is excluded.
(Linux system) All folder exclusion must append a forward slash (/). For example, /temp/test/
If you do not append a forward slash (/) for the specified path, the file test is excluded.
Process exclusions (Multi-platform)
The Trellix MOVE AntiVirus product allows you to fine-tune the list of process types scanned including processes. You might need these exclusions because the scanners might scan and lock a process when that process is being used by a database or server. This might cause the database or server to fail or generate errors.
Note
When specifying the process exclusions, wildcards are not supported.
Wildcards in exclusions
You can use wildcards to represent characters in exclusions for files, folders, and detection names.
Valid wildcards
Wildcard character | Name | Represents |
|---|---|---|
? | Question mark | Single character This wildcard applies only if the number of characters matches the length of the file or folder name. For example: The exclusion W?? excludes WWW, but doesn't exclude WW or WWWW. (Windows) This wildcard matches one character. For example: ?:\ABC matches C:\ABC and D:\ABC (Linux) This wildcard matches one character. For example: /?DEF/ matches /CDEF/ |
* | Asterisk | Multiple characters, except backslash (\). (Windows) This wildcard matches zero or more characters. For example: C:\ABC\*\XYZ matches C:\ABC\DEF\XYZ and C:\ABC\XYZ |
** | Double asterisk | Zero or more of any characters, including backslash (\). (Windows system) This wildcard matches zero or more characters. For example: C:\ABC\**\XYZ matches C:\ABC\DEF\XYZ and C:\ABC\XYZ |
(Windows) Wildcards can appear in front of a backslash (\) in a path. For example, C:\ABC\*\XYZ matches C:\ABC\DEF\XYZ.
(Linux) Wildcards can appear in front of a forward slash (/) in a path. For example, ?DEF matches /CDEF.
Root-level exclusions (Multi-platform)
Trellix MOVE AntiVirus requires an absolute path for root-level exclusions. This means that you can't use leading \ or ?:\ wildcard characters to match drive names at the root level.
Instead, you can use leading **\ wildcard characters in root-level exclusions to match drives and subfolders.
For example, **\test\ matches the following:
C:\test\
D:\test\
C:\temp\test\
D:\foo\test\
Root-level exclusions (Agentless)
For Windows systems
Trellix MOVE AntiVirus requires an absolute path for root-level exclusions. You can use leading ?:\ wildcard characters in root-level exclusions to match drives and subfolders.
For example, ?:\test\ matches the following:
C:\test\
D:\test\
System variables (Multi-platform)
These are the Windows system variables that are supported for Multi-platform.
System variable | Path |
|---|---|
%ALLUSERSPROFILE% | C:\ProgramData |
%CommonProgramFiles% | C:\Program Files\Common Files |
%CommonProgramFiles(x86)% | C:\Program Files (x86)\Common Files (only in 64-bit version) |
%CommonProgramW6432% | C:\Program Files\Common Files (only in 64-bit version) |
%ProgramData% | %SystemDrive%\ProgramData |
%ProgramFiles% | %SystemDrive%\Program Files |
%ProgramFiles(x86)% | %SystemDrive%\Program Files (x86) (only in 64-bit version) |
%ProgramW6432% | %SystemDrive%\Program Files (only in 64-bit version) |
%PUBLIC% | %SystemDrive%\Users\Public |
%SystemDrive% | C:\ |
%SystemRoot% | %SystemDrive%\Windows |
%windir% | %SystemDrive%\Windows |
Import path exclusions from Trellix ENS Threat Prevention scan policies
If you are using Endpoint Security Threat Prevention in your environment, you can import the list of path exclusions that are defined in the on-access scan and on-demand scan policies of Endpoint Security Threat Prevention to Trellix MOVE AntiVirus scan policies.
You installed the Trellix MOVE AntiVirus extension on the Trellix ePO - On-prem server.
You installed the Endpoint Security Threat Prevention extension on the Trellix ePO - On-prem server.
You have path exclusions list ready in the on-access scan and on-demand scan policies of Endpoint Security Threat Prevention.
Log on to Trellix ePO - On-prem as an administrator.
Select Menu → Policy → Policy Catalog, then select Endpoint Security Threat Prevention from the Product list.
From the Category list, select On Access Scan or On Demand Scan.
Note:
From the on-demand scan policy, you can import only the exclusions that are defined on the Full Scan tab.
Next to the name of the policy where you want to import path exclusions, click Export.
Next to the Download file, right-click the policy name and select Save link as...
From the Save As window, browse to the location and click Save to save the xml file.
Select Menu → Policy → Policy Catalog, then select MOVE AntiVirus 4.10.x from the Product list.
From the Category list, select On Access Scan or On Demand Scan.
Click the name of an editable policy.
From Path Exclusions under the Exclusions option, click Import... to open the Import Exclusion Path dialog box.
Under Select the file to add exclusion path, click Choose File, then browse to the location, and select the xml file that is download from Endpoint Security Threat Prevention.
Note
If you want to clear the existing exclusions, select Clear existing exclusions.
Click OK to import the exclusions list.
You can now see that the path exclusions are imported.
Click Save to save the changes in the policy.
Configure client load per SVM (Multi-platform)
Depending on your environment, you can configure the load type for each SVM, which specifies the workload and activities on clients. Configure the client load for each SVM in the SVM Settings policy.
The available options are:
Low (Higher number of clients) — Less file activity on clients per SVM. When clients have less file activity, SVM can handle more clients. Default number of clients is 300.
Medium (Moderate number of clients) — Medium file activity on clients per SVM. Default number of clients is 250.
High (Fewer number of clients) — More file activity on clients per SVM. When clients have more file activity, SVM can handle fewer clients. Default number of clients is 150.
Custom — Customize workload and activities for your clients.
Tip
We recommend 250. Increasing this value might cause performance issues or scan delays, or both.
Alerts for number of client connections and scan time
You can configure alerts for the number of client connections and scan time per SVM. Configure the Alert me option for each SVM in the SVM Settings policy.
The available options are:
When number of client connections to the SVM reaches____% — Specify the SVM capacity level (in percentage) for number of client connections. A warning appears when the number of connected clients is greater than this level. Default value is 90.
When average scan time on the SVM exceeds____seconds — Specify the SVM's average scan time (in seconds). A warning appears when the average scan time on the SVM exceeds this level. Default value is 10 seconds.
Types of scans
Scanning files for threats when the user accesses them protects against intrusions when they occur. Periodically scanning areas of your system that are most susceptible to infection ensures complete protection.
Trellix MOVE AntiVirus provides two types of scans: on-access scans and on-demand scans.
On-access scan — Configure on-access scans to run on managed endpoints. When you access files, folders, and programs, the on-access scanner checks the operation and scans the item, based on criteria defined by the administrator. On-access scanning provides continuous and real-time detection of threats.
To configure and schedule on-access scans, use the on-access scan policy settings.
On-demand scan — Configure and schedule on-demand scans to run on managed endpoints. This scan type examines all files or files in a specific folder on virtual machines for potential threats during the time specified. On-demand scans supplement the continuous protection of on-access scanning. You can also schedule regular scans at times that do not interfere with your work.
To configure and schedule on-demand scans, use these client task settings:
Targeted On Demand Scan — Allows you to select a system or a group of systems from the System Tree to initiate the on-demand scan.
Policy-based On-Demand Scan — Schedules the predefined on-demand scans. Configure the behavior of these scans in the policy settings for on-demand scan.
The Options policy includes settings that apply to all scan types.
Trellix GTI working
If you enable Trellix GTI for the on-access or on-demand scanner, the scanner uses heuristics to check for suspicious files.
The scanner submits fingerprints of samples, or hashes, to a central database server hosted by Trellix Advanced Research Center to determine if they are malware. By submitting hashes, detection might be made available sooner than when Trellix Advanced Research Center publishes the next DAT release.
You can configure the sensitivity level that Trellix GTI uses when it determines if a detected sample is malware. The higher the sensitivity level, the higher the number of malware detections. However, allowing more detections can result in more false positives. The Trellix GTI sensitivity level is set to Medium by default. Configure the sensitivity level for each scanner in the SVM Settings policy.
Enable or disable Trellix GTI
Follow the steps to enable or disable Trellix GTI and to specify the GTI timeout value.
Log on to Trellix ePO - On-prem.
Go to Policy Catalog.
Select MOVE AntiVirus 4.10.0 as the Product and SVM Settings as the Category.
Select a policy.
Select Show Advanced.
Select Enable GTI and specify the GTI timeout value in seconds.
The GTI timeout value ranges from 1 to 10 seconds.
Select Save.
Note
You can specify the GTI timeout value only for MOVE AntiVirus Agentless.
You have now enabled or disabled Trellix GTI and specified the GTI timeout value.
Configure common scan settings
To specify settings that apply to both on-access and on-demand scans, configure the MOVE AntiVirus 4.10.x → Options policy settings.
The common scan settings in the policy apply to all scans:
Quarantine Manager (Multi-platform) — Specifies the quarantine location and the number of days to keep quarantined items before automatically deleting them.
Quarantine network share (Agentless) — Specifies the specified network share where the quarantined files are stored. Make sure that you have write permission to the shared folder.
Trellix MOVE AntiVirus supports only Windows share path for quarantine network share.
SVM Server Communication (Multi-platform) — Specifies the scan server port for communicating with the client system.
SVM Assignment (Multi-platform)
Assign SVM using SVM Manager — Specifies the IP address of the SVM manager for assigning the SVM using SVM Manager.
Assign SVM manually — Specifies the IP address of the SVM to assign the SVM manually.
Log on to Trellix ePO - On-prem as an administrator.
Select Menu → Policy → Policy Catalog, then select MOVE AntiVirus 4.10.x from the Product list.
From the Category list, select Options.
Click the name of an editable policy.
Configure settings on the page, as required, then click Save.
On-access scanning
The on-access scanner examines files on the computer as the user accesses them, and provides continuous, real-time detection of threats.
On-access scanning (Multi-platform)
The on-access scanner integrates with the system at the lowest levels (file system filter driver) and scans files where they first enter the system.
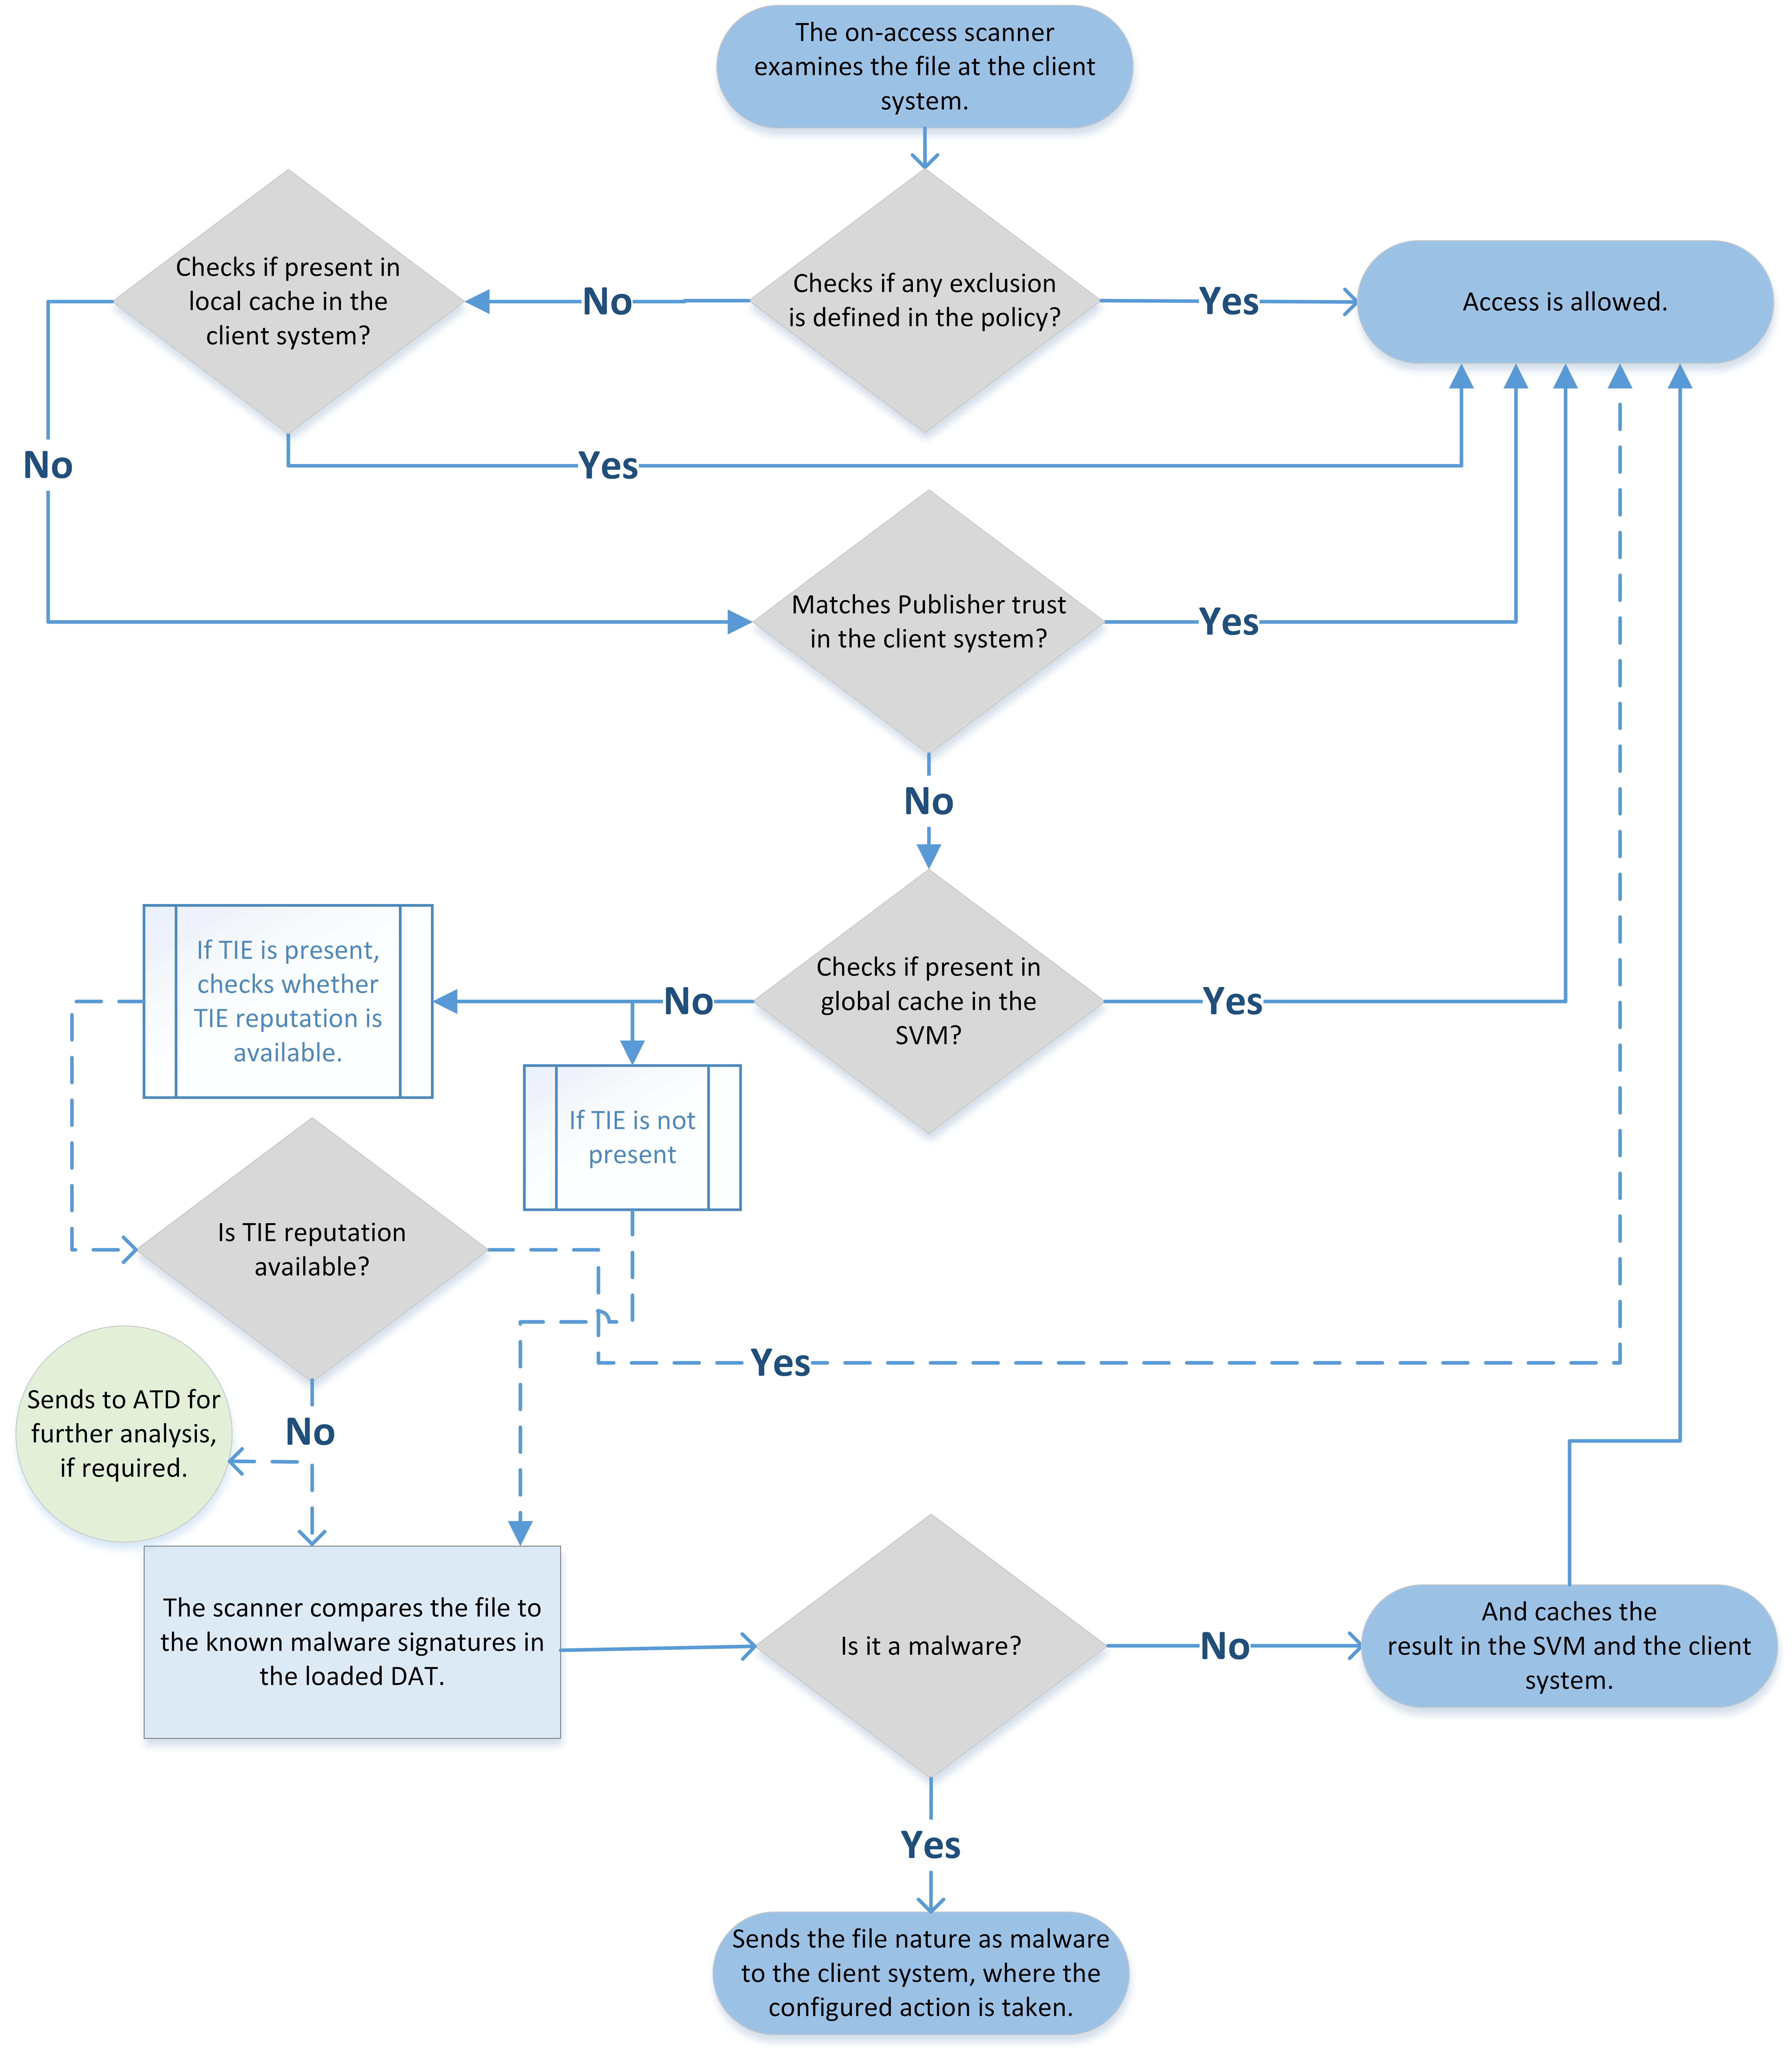
The on-access scanner delivers notifications to the System Service interface when detections occur.
When an attempt is made to access or modify a file, the scanner intercepts the operation and takes these actions.
Examines the file at the client system.
Checks if any exclusion is defined in the policy. If any exclusion is defined for the file, the access is allowed.
If an exclusion is not defined, the scanner checks whether the file is present in local cache in the client system. If it is present, access is allowed.
If the file is not present in local cache, the scanner checks for publisher trust in the client system. If it matches, the access is allowed.
If the publisher trust does not match, the scanner checks for the file in global cache in the SVM. If the file is present, the access is allowed.
If the file is not present in global cache, the scanner compares the information in the file to the known malware signatures in the currently loaded DAT files.
If the file is clean, the result is cached and the read, write, or rename operation is granted. Trellix MOVE AntiVirus caches the result in the SVM and client system.
If the file contains a threat, the scanner sends the file nature as malware to the client systems, where the configured action is taken.
On-access scanning with TIE and Intelligent Sandbox enabled
On-access scanner goes through the steps 1 through 4 of How on-access scanning works.
If the publisher trust does not match:
The client looks for the reputation in global cache in the SVM. If the reputation is available, the access is allowed based on the Shared Cloud Solutions policy assigned to the system.
If the reputation is not available in global cache in the SVM, the client sends the file hashes to the SVM for TIE lookup.
The SVM checks the reputation cache for the file hash. If the file hash is found, the SVM gets the reputation data from the SVM cache and sends the reputation to the client and the action is taken.
(SVM is connected to TIE) If the file hash is not found in the SVM cache and TIE server does not have the reputation:
(Intelligent Sandbox is present) If the policy on the endpoint determines that the file must be sent to Intelligent Sandbox, the server sends the file for further analysis. To send the file to Intelligent Sandbox, these requirements must be met:
Advanced Threat Defense (ATD) option is configured in the Shared Cloud Solutions policy on the Trellix ePO - On-prem server.
Size of the file is less than 10 MB
The TIE server returns the file hash's reputation to the SVM once the data is received from Intelligent Sandbox after analyzing the file.
Trellix MOVE AntiVirus takes action based on the Shared Cloud Solutions policy assigned to the system that is running the file.
The SVM sends threat details as threat events to Trellix ePO - On-prem.
Changing when files are scanned
You can change the client policy to determine which files are scanned for threats and when.
By default, files are scanned when they are read from or written to disk, or when opened for backup. The Trellix Agent program files and the User Profile Manager process are excluded from scans.
When files are written to disk, the on-access scanner examines these files:
Incoming files written to the local drive.
Files (new, changed, or files copied or moved from one drive to another) created on the local drive or a mapped network drive (if enabled with Multi-platform).
When files are read from disk, the scanner examines these files:
Outgoing files read from the local drive or mapped network drives (if enabled with Multi-platform).
Files trying to execute a process on the local drive.
Files opened on the local drive.
Caution
Depending on your environment, selecting On network drives can degrade network performance.
On-access scanning (Agentless)
The on-access scanner integrates with the system at the lowest levels (file system filter driver) and scans files where they first enter the system.
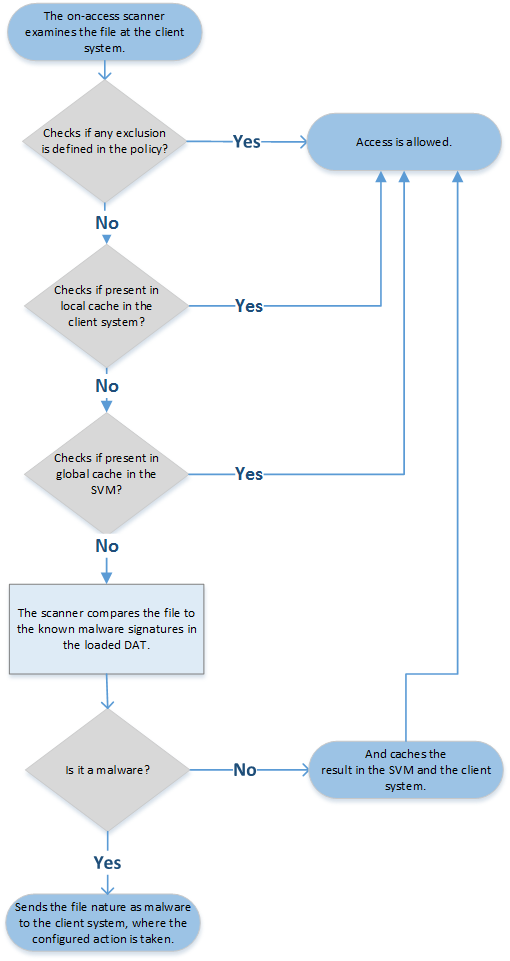
The on-access scanner delivers notifications to the System Service interface when detections occur.
When an attempt is made to access or modify a file, the scanner intercepts the operation and takes these actions.
Examines the file at the client system.
Checks if any exclusion is defined in the policy. If any exclusion is defined for the file, the access is allowed.
If an exclusion is not defined, the scanner checks whether the file is present in local cache in the client system. If it is present, access is allowed.
The scanner checks for the file in global cache in the SVM. If the file is present, the access is allowed.
If the file is not present in global cache, the scanner compares the information in the file to the known malware signatures in the currently loaded DAT files.
If the file is clean, the result is cached and the read, write, or rename operation is granted. Trellix MOVE AntiVirus caches the result in the SVM as part of global cache and client system as part of local cache.
If the file contains a threat, the scanner sends the file nature as malware to the client systems, where the configured action is taken.
Changing when files are scanned
You can change the client policy to determine which files are scanned for threats and when.
By default, files are scanned when they are read from or written to disk, or when opened for backup. The Trellix Agent program files and the User Profile Manager process are excluded from scans.
When files are written to disk, the on-access scanner examines these files:
Incoming files written to the local drive.
Files (new, changed, or files copied or moved from one drive to another) created on the local drive.
When files are read from disk, the scanner examines these files:
Outgoing files read from the local drive.
Files trying to execute a process on the local drive.
Files opened on the local drive.
Configure on-access scan policy settings
These settings enable and configure on-access scanning, which includes specifying messages to send when a threat is detected and different settings based on process type.
Log on to Trellix ePO - On-prem as an administrator.
Select Menu → Policy → Policy Catalog, then select MOVE AntiVirus 4.10.x from the Products list.
Select On-Access Scan.
Click Edit for the name of an editable policy.
Policy Catalog page opens.
Click Show Advanced.
Select Enable On-Access Scan to enable the on-access scanner and modify options.
Configure these settings:
Options | Actions |
|---|---|
On-access Scan | Under Scan, select any combination of:
The supported file systems for Linux client system are ext2, ext3, ext4, btrfs, cifs, vfat, ISO9660, xfs, and nfs. |
File types to scan |
|
Exclusions | Path ExclusionsAdd them to the Path Exclusions list. The Trellix MOVE AntiVirus product allows you to fine-tune the list of file types scanned including individual files, folders, and disks. You might need these exclusions because the scanners might scan and lock a file when that file is being used by a database or server. This might cause the database or server to fail or generate errors. When specifying the exclusions:
|
Using the Import option, you can browse to and select the exclusion rule file and add path exclusions. You can import exclusions from an on-access scan policy of Trellix ENS that has exclusions defined in it. You can refer to Import path exclusions from Endpoint Security Threat Prevention scan policies for more information.
Process Exclusions (Multi-Platform only)Add them to the Process Exclusions list. The Trellix MOVE AntiVirus product allows you to fine-tune the list of process types scanned including processes. You might need these exclusions because the scanners might scan and lock a process when that process is being used by a database or server. This might cause the database or server to fail or generate errors.
Publisher Exclusions (Multi-Platform only)You can choose to trust the authenticated and signed files from different publishers, so that the scanning performance improves by optimized use of resources at the SVM by sending fewer files for scanning from the endpoints. Here are the portable executable extensions that are excluded with this option: .cpl, .exe, .dll, .ocx, .sys, .scr, .drv, .efi, .fon
|
For the Actions options, configure Threat detection primary response. Make sure that you select a primary action and a secondary action.
Available primary actions:
Delete files automatically and quarantine — Once the threat is detected, it deletes and quarantines the threat to the specified location.
Note
(Agentless only) If no quarantine policy is configured, the Delete files automatically and quarantine action does not occur even if it is configured as the primary action.
Delete files automatically — Once the threat is detected, it deletes the threat.
Deny access to files — Prevents the user from accessing the file.
Available secondary action:
Deny access to files — Prevents the user from accessing the file.
Click Save to store the policy.
On-demand scanning
The on-demand scanner examines the client systems for potential threats at regular intervals or at convenient times.
Use on-demand scans to supplement the continuous protection of the on-access scanner, such as to scan latent and inactive processes. You can also schedule regular scans at times that do not interfere with your work.
On-demand scans (Multi-platform)
The on-demand scanner searches files, folders, and registry for any malware that might have infected the computer.
You decide when and how often the on-demand scans occur. You can scan at a scheduled time or at startup.
The on-demand scanner intercepts the operation and takes these actions:
Examines the file at the client system.
Checks if any exclusion is defined in the policy. If any exclusion is defined for the file, the access is allowed.
If an exclusion is not defined, the scanner checks whether the file is present in local cache in the client system. If it is present, access is allowed.
If the file is not present in local cache, the scanner checks for publisher trust in the client system. If it matches, the access
is allowed.
If the publisher trust does not match, the scanner checks for the file in global cache in the SVM. If the file is present, the access is allowed.
If the file is not present in global cache, the scanner compares the information in the file to the known malware signatures in the currently loaded DAT files.
If the file is clean, the result is cached and the read, write, or rename operation is granted. Trellix MOVE AntiVirus caches the result in the SVM and the client system.
If the file contains a threat, the scanner sends the file nature as malware to the client systems, where the configured action is taken.
For example, if the action is configured to Delete files automatically and quarantine (the default setting), the scanner:
Deletes items that are detected as threats and saves copies in a non-executable format to the Quarantine folder.
Records the results in the activity log.
Notifies the user that it detected a threat in the file, and includes the item name and the action taken.
If the file doesn't meet the scanning requirements, the scanner doesn't check it. The scanner continues until all data is scanned.
The on-demand scan detection list is cleared when the next on-demand scan starts.
On-demand scanner goes through the steps 1 through 4 of How on-demand scanning works.
If the publisher trust does not match:
The client looks for the reputation in global cache in the SVM. If the reputation is available, the access is allowed based on the Shared Cloud Solutions policy assigned to the system.
If the reputation is not available in global cache in the SVM, the client sends the file hashes to the SVM for TIE lookup.
The SVM checks the reputation cache for the file hash. If the file hash is found, the SVM gets the reputation data from the SVM cache and sends the reputation to the client and the action is taken.
(SVM is connected to TIE) If the file hash is not found in the SVM cache and TIE server does not have the reputation:
(Intelligent Sandbox is present) If the policy on the endpoint determines that the file must be sent to Intelligent Sandbox, the server sends the file for further analysis. To send the file to Intelligent Sandbox, these requirements must be met:
Advanced Threat Defense (ATD) option is configured in the Shared Cloud Solutions policy on the Trellix ePO - On-prem server.
Size of the file is less than 10 MB
The TIE server returns the file hash's reputation to the SVM once the data is received from Intelligent Sandbox after analyzing the file.
Trellix MOVE AntiVirus takes action based on the Shared Cloud Solutions policy assigned to the system that is running the file.
The SVM sends threat details as threat events to Trellix ePO - On-prem.
Optimizing the scanning performance on systems
To minimize the impact that on-demand scans have on a system, specify performance options when configuring these scans.
ODS Summary feature is helpful in tracking ODS happening on the Trellix MOVE AntiVirus Multi-platform environment.
You can track ODS details from Client, SVM, and Trellix ePO - On-prem (Queries and Reports). For more information see, Trellix ePO - On-prem features leveraged by Trellix MOVE AntiVirus .
The ODS summaries on the clients are:
MP Clients: Information
Parameters | Description |
|---|---|
ODS State | The state (started, in progress or stopped) of scan. |
ODS start time | The time when the scan started. |
ODS End time | The time when the scan stopped. |
No. of Files Trusted by Publisher Check | The number of files passed during the certificate entry scan. |
No. of Local Cache Hit | The number of files got missed during the scan. |
No. of SVM Cache Hit | The number of files got missed during the scan from SVM side. |
No. of Files Excluded by Path | The number of files excluded during the scan. |
No of clean files found in SVM Scanning | The number of files found clean from SVM scan. |
No. of Scan Timeout | The number of files got timed out during the configured time scan. |
No. of Files Infected | The number of detected files found during the scan. |
SVM IP Address | The IP address. |
ODS Termination Reason | Reason for ODS fail. |
AMCore Engine Version | The AMCore engine version. |
AMCore Content Version | The AMCore content version. |
View ODS stats on Client/SVM side
Client side
Shows the scan status (Running/Not Running) in percentage.
Run mvadm status command to view ODS current state (Running/Not Running). If ODS is running, this command shows the completion status in percentage.
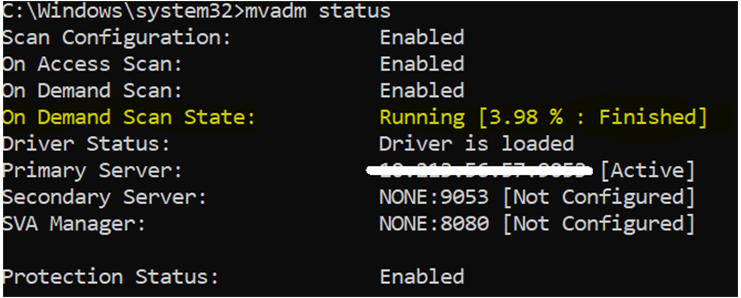
Driver Status: Driver is loaded; Primary Server: (masked address) [Active]; Secondary Server: NONE:9053 [Not Configured]; SVA Manager: NONE:8080 [Not Configured]; Protection Status: Enabled]
SVM side
Shows the list of connected clients, total number of connected clients, clients running TODS and ODS.
Run mvadm stats ods command to get list of connected clients, clients running ODS, and clients running TODS.
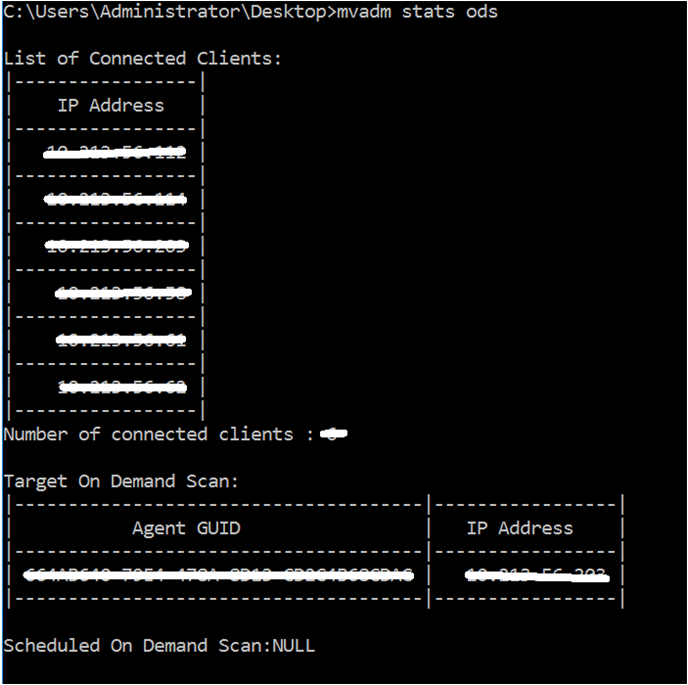
Note
If scheduled ODS is running on clients, it displays the output in same format as TODS else NULL.
On-demand scans logging
A new log level ODSLOG is defined on client side to get the detailed logging when ODS is running. It creates separate empty log file ods.log on starting the service.
The detail logging information is available only if you enable loglevel == ODSLOG in command prompt, else only ODS summary is displayed on the Trellix ePO - On-prem. The ODS related logging summary is part of ods.log file.
Define separate log level on client side (ODSLOG):
When ODS/TODS starts on MOVE client side, log ODS related logging in separate file (ods.log).
Print ODS summary in case ODS starts, end, stop in ods.log file.
Keep log rotation and configurable file size same as existing
mvagent.logfile.
On-demand scans (Agentless)
The on-demand scanner searches files, folders, and registry for any malware that might have infected the computer.
You decide when and how often the on-demand scans occur. You can scan at a scheduled time or at startup.
The on-demand scanner intercepts the operation and takes these actions:
Examines the file at the client system.
Checks if any exclusion is defined in the policy. If any exclusion is defined for the file, the access is allowed.
If an exclusion is not defined, the scanner checks whether the file is present in local cache in the client system. If it is present, access is allowed.
The scanner checks for the file in global cache in the SVM. If the file is present, the access is allowed.
If the file is not present in global cache, the scanner compares the information in the file to the known malware signatures in the currently loaded DAT files.
If the file is clean, the result is cached and the read, write, or rename operation is granted. Trellix MOVE AntiVirus caches the result in the SVM as part of global cache and the client system as part of local cache.
If the file contains a threat, the scanner sends the file nature as malware to the client systems, where the configured action is taken.
For example, if the action is configured to Delete files automatically and quarantine (the default setting), the scanner:
Deletes items that are detected as threats and saves copies in a non-executable format to the Quarantine folder.
Records the results in the activity log.
If the file doesn't meet the scanning requirements, the scanner doesn't check it. The scanner continues until all data is scanned.
The on-demand scan detection list is cleared when the next on-demand scan starts.
Optimizing the scanning performance on systems
To minimize the impact that on-demand scans have on a system, specify performance options when configuring these scans.
Enable and configure on-demand scans
You can modify the on-demand scan policy to enable system on-demand scans, and to determine the schedule and frequency of scans.
You installed the Trellix MOVE AntiVirus extension on the Trellix ePO - On-prem server.
By default, on-demand scans are not enabled. Other scan settings (for example, exclusions) are inherited from the client scan policy.
Log on to Trellix ePO - On-prem as an administrator.
Select Menu → Policy → Policy Catalog, then select MOVE AntiVirus 4.10.x from the Products list.
Select On Demand Scan.
Click Edit for the name of an editable policy.
Policy Catalog page opens.
Click Show Advanced.
Configure these settings:
Options | Actions |
|---|---|
On-demand Scan |
|
File Types to Scan |
For more information about how to use wildcards when creating exclusions in VirusScan Enterprise or Trellix MOVE AntiVirus, see Trellix KnowledgeBase article KB54812. |
Path Exclusions | Add them to the Path Exclusions list. Excluding scan items — The Trellix MOVE AntiVirus product allows you to fine-tune the list of file types scanned including individual files, folders, and disks. You might need these exclusions because the scanners might scan and lock a file when that file is being used by a database or server. This might cause the database or server to fail or generate errors. When specifying the exclusions:
Using the Import option, you can browse to and select the exclusion rule file and add path exclusions.
|
7. Click Save to store the policy.
On-demand scan events and log details
Trellix MOVE AntiVirus generates alerts for on-demand scans. You can view the ODS statuses and event logs on Trellix ePO - On-prem and client systems.
The log files for on-demand and on-access scans are available in the installation directory.
Under loglevel, an ODS module is introduced that allows the Trellix MOVE AntiVirus to record the logs. To enable ODS logging, run the command: mvadm loglevel enable ODS ALL.
In the client log file, you can search for terms like ODS: start scan and ODS: scan complete to find the status on-demand scan.
(Multi-platform only) You can also view the ODS status from the local system's Windows Event Log on the client system. (Event: On-Demand Scan Started on winvistax64mp.moveauto.com using engine version 5600.1067 and dat version 7203.0000)
Trellix MOVE AntiVirus generates alerts for on-demand scans. These alerts can be displayed in any of these locations:
The local system's Windows Event Log
The Trellix ePO - On-prem Threat Event Log
The local system as a Trellix notification area pop-up menu
Server on-demand scan events (Multi-platform)
Event ID | Event message |
|---|---|
36984 | On-demand scan started. |
36985 | On-demand scan completed. |
36986 | On-demand scan terminated. Scan time limit reached. |
36987 | On-demand scan terminated. Scan disabled in policy. |
36988 | On-demand scan terminated. Exceeded maximum number of concurrent scans. |
36989 | High on-demand scan terminated. Scan failure on client. |
36990 | High on-demand scan terminated. Unexpected termination. |
37009 | Threat detected. |
37014 | On-demand scan events summary report. |
Server on-demand scan events (Agentless)
Event ID | Event message |
|---|---|
37055 | On-demand scan started. |
37056 | On-demand scan completed. |
37057 | On-demand scan found malware. |
37058 | On-demand scan failed to start. |
37059 | On-demand scan terminated. Scan time limit reached. |
37060 | On-demand scan terminated. Scan target powered off. |
37061 | On-demand scan terminated. Scan disabled in policy. |
37062 | On-demand scan resumed. |
37076 | Malware detected and successfully deleted. |
Targeted on-demand scans
The targeted on-demand scan feature allows the administrator to select a system or a group of systems where to initiate the on-demand scan.
When the admin initiates the targeted on-demand scan on the client system, Trellix Agent schedules the client task on the client system. The SVM picks the client task, then runs the scan on the client system, depending on the slot availability for the scan. Trellix Agent monitor shows the status such as TODSTask becomes active, TODSTask is successful, and TODSTask is finished, but this is not the actual on-demand scan status. You can view the on-demand scan status and event logs on Trellix ePO - On-prem and client systems.
The SVM runs the specified maximum concurrent targeted on-demand scans per SVM defined by the administrator. When the SVM has reached the maximum number of targeted on-demand scans, the recently initiated on-demand scan runs later when the targeted on-demand scan slot is available.
Example 1
Consider a scenario where:
Restrict number of on-demand scans to____per SVM is set as 2
Restrict number of targeted on-demand scans to____per SVM is set as 2
No on-demand scan is running currently
Two targeted on-demand scans are running currently
With these assumptions, if you configure one more targeted on-demand scan, the newly scheduled targeted on-demand scan starts when one of the existing targeted on-demand scans finishes.
Example 2
Consider a scenario where:
Restrict number of on-demand scans to____per SVM is set as 2
Restrict number of targeted on-demand scans to____per SVM is set as 2
One or two on-demand scans are running currently
Two targeted on-demand scans are running currently
With these assumptions, if you configure one more targeted on-demand scan, the newly scheduled targeted on-demand scan starts when one of the existing targeted on-demand scans finishes.
Configure targeted on-demand scans
Change the SVM Settings policy to enable on-demand scanning, and to set the concurrent scan value as needed.
You installed the Trellix MOVE AntiVirus extension on the Trellix ePO - On-prem server.
By default, on-demand scans are disabled. Other scan settings (for example, exclusions) are inherited from the client on-demand scan policy.
Log on to Trellix ePO - On-prem as an administrator.
Select Menu → Policy → Policy Catalog, then from the Product list select MOVE AntiVirus 4.10.0.
From the Category list, select SVM Settings.
Click the name of an editable policy.
Under Concurrent on-demand scans, configure these settings, then click Save.
To do this... | Do this... |
|---|---|
Restrict number of targeted on-demand scans to____per SVM | Enter the appropriate value for your environment.
|
Create and run targeted on-demand scan
Select a system or a group of systems from the System Tree and initiate the targeted on-demand scan.
You installed the Trellix MOVE AntiVirus extension on the Trellix ePO - On-prem server.
You enabled the Enable on-demand scan option in the On Demand Scan policy.
You configured Restrict number of targeted on-demand scans to____per SVM in the SVM Settings policy.
A new ODS does not start if an ODS is currently running on the targeted system.
Log on to the Trellix ePO - On-prem server as an administrator.
Select Menu → Systems → System Tree.
Select the VMs you want to run the targeted on-demand scan.
Click Actions → MOVE → Targeted ODS.
Note
(For Agentless) If any target VM is turned off, Trellix ePO - On-prem sends the task once the VM is turned on, then SVM initiates the scan.
On the Schedule page, schedule the task, then click Next.
On the Summary page, review the task details and click Save to run the on-demand scan.
Create and run targeted on-demand scan client task (Multi-platform)
Select a system or a group of systems from the System Tree and assign a client task to initiate the targeted on-demand scan.
You installed the Trellix MOVE AntiVirus extension on the Trellix ePO - On-prem server.
You enabled the Enable on-demand scan option in the On Demand Scan policy.
You configured Restrict number of targeted on-demand scans to____per SVM in the SVM Settings policy.
A new on-demand scan does not start if the on-demand scan is already running on the targeted system.
Log on to the Trellix ePO - On-prem server as an administrator.
Select Menu → Policy → Client Task Catalog.
From Client Task Types, select MOVE AntiVirus 4.10.x → Targeted On-Demand Scan [Multi-Platform].
Click the name of an existing client task or click New Task, then confirm the task type.
Configure the Task Name and Description on each tab. Also provide Folder Path (Optional), then click Save.
Click Assign, specify the servers where you want to assign the task, then click OK.
Click Schedule to schedule the task.
Configure deferred scan settings (Multi-platform)
The deferred scan feature optimizes file scanning for files where the previous scan timed out because of large file size, file structure, or file composition.
You installed the Trellix MOVE AntiVirus extension on the Trellix ePO - On-prem server.
When the previous on-access scan timed out, scanning for a file starts again with an increased or new timeout, depending on the file size. You can configure this timeout value and the file size using the Trellix ePO - On-prem server.
For an on-demand scan, the scanning for a file starts according to the timeout based on file size value specified in the deferred scan policy.
Log on to Trellix ePO - On-prem as an administrator.
Select Menu → Policy → Policy Catalog, select MOVE AntiVirus 4.10.x from the Product drop-down list, then select On-Access Scan or On-Demand Scan from the Category drop-down list.
Click New Policy or click the name of an existing policy to edit it.
Type a name for the new policy (for example, MOVE AV Scan Policy), then click OK.
Under Deferred Scan (Multi-Platform only), select Enable on-access deferred scan or Enable on-demand deferred scan and configure these file size ranges and scan timeout values, then click Save.
File size range | Scan timeout |
|---|---|
> 40 MB and ≤200 MB | 480 seconds |
> 200 MB and ≤4096 MB | 900 seconds |
> 4096 MB and greater | 1800 seconds |
Client notifications for deferred scans
If the deferred scanning is incomplete after reaching the maximum timeout, access to the file is allowed.
These client notifications appear to the user on the client system for successful on-access scanning or scan timeouts:
Deferred scan completed for file <C:\Test\file name>. File is safe to access.
Deferred scan is in progress for file <C:\Test\file name>. (A thread in svchost.exe process took 45 seconds for scanning. Hence, access denied.)
Deferred scan is timed out for file <C:\Test\file name>. Hence, access allowed.
Deferred scan failed for file <C:\Test\file name> due to some internal error. Hence, access denied.
Deferred scan failed for file <C:\Test\file name>. Hence, access denied.
Access Denied: Deferred scan is in progress for file <C:\Test\file name>.
Deferred scan completed for file <C:\Test\file name>. File is not accessible.
Deferred scan completed for file <C:\Test\file name>. File is deleted.
Note
The client notifications do not appear for on-demand scan.
Identify frequently scanned items from Trellix ePO - On-prem (Agentless)
Select an SVM or a group of SVMs from the System Tree and assign a client task to calculate and display frequently scanned files, extensions, and VMs. You can include these results in the path exclusion policies to exclude them from being scanned.
You installed the Trellix MOVE AntiVirus extension on the Trellix ePO - On-prem server.
Log on to Trellix ePO - On‑prem as an administrator.
Select Menu → Policy → Client Task Catalog.
From Client Task Types, select MOVE AntiVirus 4.10.x → Scan Diagnostics [Agentless].
Click the name of an existing client task or click New Task and confirm the task type.
Configure these settings on each tab, then click Save.
Task Name — Specifies a unique name for the task.
Description — Specifies a description about the task.
Diagnosis Time — Specifies a description about the task.
Click Assign, specify the SVM where you want to assign the task, then click OK.
Click Schedule to schedule the task.
At the end of specified minutes, the Trellix ePO - On‑prem completes the analysis and displays the results. The default allowed time limit is 10 minutes.
Select Menu → Reporting → Queries & Reports, then select MOVE AntiVirus 4.10.x [Agentless] under Trellix Groups to view and run these scan diagnostic queries:
MOVE AntiVirus: Top 10 Scanned File Extensions for each SVM — Lists the top 10 file extensions scanned by the SVM.
MOVE AntiVirus: Top 10 Scanned Files for each SVM — Lists the top 10 files scanned by the SVM.
MOVE AntiVirus: Top 10 Scanned Virtual Machines for each SVM — Lists the top 10 virtual machines that are sending maximum scan and checksum requests.
Identify frequently scanned items from command line (Agentless)
Use the scan diagnostic command-line tool to calculate and display frequently scanned files, extensions, and VMs, on a system running the Agentless software. You can include these results in the path exclusion policies to exclude them from being scanned.
Make sure that the user is a root user, or has sudo permissions.
The name of the VM is resolved only when the vCenter is successfully registered in the SVM Settings policy using Trellix ePO - On‑prem. Otherwise, only the VM ID appears.
Access the command line interface (CLI) of the SVM to create and display this report.
This diagnostic tool captures these details:
Top 10 file scan requests.
Top 10 file extensions.
Top 10 virtual machines that are sending scan and checksum requests.
To identify the frequently scanned files, run the command:
>cd /opt/McAfee/move/bin>sudo ./scan_diagnostic or sudo /opt/McAfee/move/bin/scan_diagnostic.
These parameters are available:
Option | Definition |
|---|---|
| Shows how to use the command and its options. |
| Specifies the time period, in seconds, set for calculating the frequently scanned files. For example, 60 seconds. |
| Specifies the number of entries to be captured and displayed in the result. |
| Specifies the output folder path. The default path is /opt/McAfee/move/log. |
At the end of specified minutes, the tool completes the analysis and displays the results. The default allowed time limit is 1 minute.
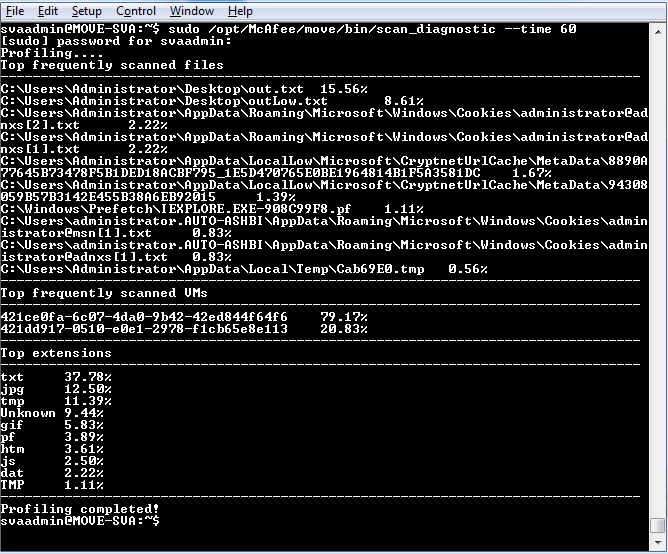
2. (Optional) Change the time limit by editing the svaconfig.xml file located at /opt/McAfee/move/etc/.
Note
To stop the scan diagnostic tool while it is collecting the data, use the Ctrl+C keys.
Identify frequently scanned items from Trellix ePO - On-prem (Multi-platform)
Select one or a group of SVMs from the System Tree and assign a client task to calculate and display frequently scanned files, extensions, processes, and VMs. You can include these results in the path exclusion policies to exclude them from being scanned.
You installed the Trellix MOVE AntiVirus extension on the Trellix ePO - On-prem server.
Log on to Trellix ePO - On-prem as an administrator.
Select Menu → Policy → Client Task Catalog.
From MOVE AntiVirus 4.10.x under Client Task Types, select Scan Diagnostics [Multi-Platform].
Click the name of an existing client task or click New Task, then confirm the task type.
Configure these settings on each tab, then click Save.
Task Name — Specifies a unique user-friendly name for the task.
Description — Specifies some user-friendly description about the task.
Diagnosis Time — Specifies the time period, in minutes, set for calculating the frequently scanned files. for example 1-10 minutes.
Click Assign, select one SVM or a group of SVMs where you want to assign the task, then click OK.
Click Schedule to schedule the task.
At the end of specified minutes, the Trellix ePO - On-prem server completes the analysis and displays the results. The default allowed time limit is 10 minutes.
Select Menu → Reporting → Queries & Reports and select MOVE AntiVirus 4.10.x [Multi-Platform] under Trellix Groups to view and run these scan diagnostic queries:
MOVE AntiVirus: Top 10 Scanned File Extensions for each SVM — Lists the top 10 file extensions scanned by the SVM.
MOVE AntiVirus: Top 10 Scanned Files for each SVM — Lists the top 10 files scanned by the SVM.
MOVE AntiVirus: Top 10 Scanned Processes for each SVM — Lists the top 10 processes scanned by the SVM.
MOVE AntiVirus: Top 10 Scanned Virtual Machines for each SVM — Lists the top 10 virtual machines that are sending maximum scan and checksum requests.
Note
This data is rolled over every 7 days.
Identify frequently scanned items from command line (Multi-platform)
The scan diagnostic tool calculates and displays frequently scanned processes, files, extensions, and VMs. You can include these files in the path and process exclusion policies. These specified files are excluded from scans when they are written by a trusted process.
You must have administrator permissions to perform this task.
Access the SVM command line interface (CLI) on the SVM virtual machine to create and display this report.
This diagnostic tool captures these details:
Top 10 file scan requests
Top 10 file extensions
Top 10 processes
Top 10 virtual machines that are sending maximum scan and checksum requests.
Open the SVM CLI: click Start → Programs → McAfee → MOVE AV Server command prompt.
Note
This command prompt has administrator rights.
At this command prompt, you can type commands that activate the mvadm utility to perform administration tasks on the SVM.
To calculate the frequently scanned files, run this command:
move_diagnose /T: <Time Window> /O: < Output File>Option | Definition |
|---|---|
T | The time period, in minutes, set for calculating the frequently scanned files. For example, 3 minutes. |
0 | Full path of the output file for storing the results. |
At the end of specified minutes, the tool completes the analysis and displays the results. The default allowed time limit is 10 minutes.
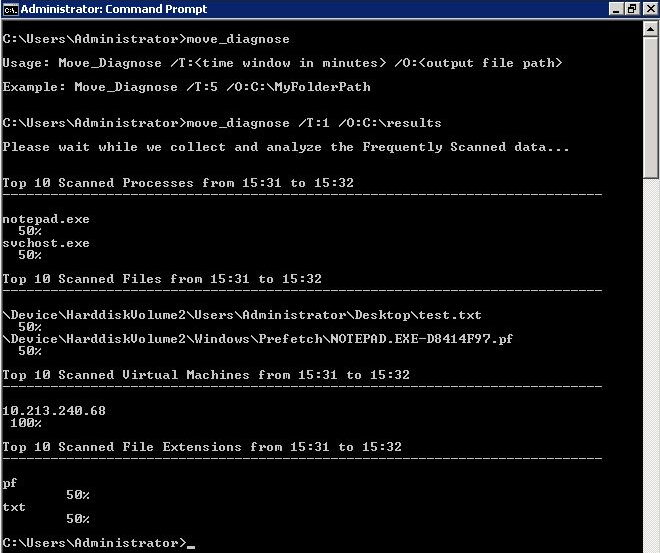
3. (Optional) Change the time limit by configuring the registry settings in HKLM\System\CurrentControlSet\services\mvserver\Parameters\diagnostic\FrequentlyScanMaxTimeOutWindow.
Managing Trellix MOVE AntiVirus
Manage Trellix MOVE AntiVirus by responding to threat detections, managing quarantined items, and periodically analyzing your protection.
Keeping your protection up to date
Trellix MOVE AntiVirus depends on the engine and information in the content files to identify and act on threats. Every day, Trellix Advanced Research Center releases new content files to address new threats.
To update systems managed by Trellix ePO - On-prem, use the Main Repository. The Main Repository on the Trellix ePO - On-prem server maintains the latest versions of the engine and content files.
For Agentless SVM, AutoUpdate for DAT files is disabled. Use Trellix ePO - On-prem to create a client task and update to the latest versions of the engine and DAT files.
Responding to detections
When a threat occurs, the Trellix MOVE AntiVirus configuration determines the threat detection method and response.
If Trellix MOVE AntiVirus is configured to Delete files automatically and quarantine (the default setting), the scanner deletes items that are detected as threats and saves copies in a non-executable format to the Quarantine folder. If the file can't be deleted, the scanner denies access to the file.
Unwanted program detection
The on-access and on-demand scanners detect unwanted programs using policy settings that you configured and DAT files.
When a detection occurs, the scanner that detected the unwanted program applies the action that you configured for that scanner.
Review the information in the log file, then decide whether to take any of these additional actions:
Fine-tune the settings for the scanner to make your scans more efficient.
Exclude unwanted program and files from detection.
If a legitimate program was detected (false positive), configure it as an exclusion.
On-access scan detections
When a threat is detected, the on-access scanner responds according to the settings in the On-Access Scan policy.
Review the information in the activity log to decide whether to take more actions:
Fine-tune the settings for scan to make your scans more efficient.
For example, exclude legitimate files and delete known threats from the quarantine.
Configure the scanner to:
Delete files automatically and quarantine — Deletes and quarantines the item that contains the threat.
Delete files automatically — Deletes the item that contains the threat.
Deny access to files — Prevents the user from accessing files with detected threats.
Configure the scanner to display a message to users when a threat is detected.
On-demand scan detections
When an on-demand detection occurs, the scanner response depends on the type of on-demand scan.
For targeted on-demand scans, the scanner uses Targeted On-Demand Scan client task settings. For policy-based on-demand scans, the scanner uses On-Demand Scan policy settings.
Review the information in the log file to decide whether to take more actions:
Fine-tune the settings for the scan to make your scans more efficient.
For example, exclude legitimate files and delete known threats from the quarantine.
Configure the scanner to prompt for action.
Configure the scanner to:
Delete files automatically and quarantine — Deletes and quarantines the item that contains the threat.
Delete files automatically — Deletes the item that contains the threat.
Notify only — Notifies when accessed an item that contains the threat.
Quarantined items
Trellix MOVE AntiVirus deletes items that are detected as threats and saves copies in a non-executable format to the Quarantine folder.
You can restore a quarantined item.
Configure the settings for quarantine
Configure Quarantine Manager settings in the Options policy, including the location of quarantined items and how long to keep them.
Log on to Trellix ePO - On-prem as an administrator.
Select Menu → Policy → Policy Catalog, then select MOVE AntiVirus 4.10.x from the Product list.
From the Category list, select Options.
Click the name of an editable policy.
Configure the Quarantine Manager settings, then click Save.
For | Option | Description |
|---|---|---|
Multi-platform | Quarantine Directory | Specify where quarantined items are stored by changing the quarantine directory. Note: Mapped network drives and UNC network path names are not supported. |
Agentless | Quarantine network share | Quarantined files are stored on the specified network share. The share is mounted as CIFS, so the remote share must support this protocol. Read and write permissions are required. Trellix MOVE AntiVirus supports only Windows share path for quarantine network share. Linux share path is not supported for quarantine network share. Enter the IP address or FQDN so that it can be resolved by the SVM. How this is entered depends on the environment and how the SVM is configured. |
Network domain name | The domain used to access the specified share. | |
Network user name | The user name used to access the specified share. | |
Network password | The password used to access the specified share. | |
SMB Versions | Select the required SMB version to access the specified share (Default is 2.1). |
Restore quarantined items (Multi-platform)
Trellix MOVE AntiVirus deletes any items that are detected as threats, converts a copy of the item to a non-executable format, and saves it in the Quarantine folder.
You installed the Trellix MOVE AntiVirus extension on the Trellix ePO - On-prem server.
You can restore a quarantined item.
Log on to the Trellix ePO - On-prem server as an administrator.
Select Menu → Policy → Client Task Catalog.
From Client Task Types, select MOVE AntiVirus 4.10.x → Restore from Quarantine (Multi-Platform).
Click the name of an existing client task or click New Task, then confirm the task type.
Configure these settings on each tab, then click Save.
Tab | Description |
|---|---|
Task Name | Specifies a unique name for the task. |
Description | Specifies a description about the task. |
Detection name | Specifies the exact detection name of the item to restore from quarantine. You can find the Threat Name under Menu → Reporting → Threat Event Log. If TIE is disabled, the detection name of the item might be Artemis!EB51D377817C, RDN/Generic.dx!dqq If TIE is enabled, the detection name of the item might be TIE!4414f6c4303c2ce9a23261a880b3ee6b3ef4f37 8. The detection name of the item is prefixed with TIE! and suffixed with the SHA-1 reputation value of the item. |
6. Click Assign, specify the servers where you want to assign the task, then click OK.
7. Click Schedule to schedule the task.
Note
You can also use the mvadm command on the client system to restore the quarantined items:
mvadm q restore <Detection_Name>
Quarantined items (Agentless)
Trellix MOVE AntiVirus (Agentless) implements a remote quarantine system, where quarantined files are stored on an administrator-specified network share.
The quarantine network share is mounted on the SVM during policy enforcement at /mnt/quarantine using the Common Internet File System (CIFS) protocol. If mounting fails, the Quarantine Mount Failed event is generated and mounting is tried at the next policy enforcement.
A file is quarantined when:
The Quarantine network share configuration, which is present in the Options policy, is mounted.
A detection occurs.
Delete files automatically and quarantine is the primary action. Quarantined files are automatically deleted after 28 days.
Note
If no quarantine policy is configured, the Delete files automatically and quarantine action does not occur even if it is configured as the primary action in the scan policies.
Set permissions for quarantined folder
Setting permission for the quarantine folder allows you to specify who has access to the share.
Create the following:
Quarantine folder
Domain User Account — The account used by the SVM to quarantine files.
Domain Local Security Group — This group has access to the Restore Tool.
Right-click the quarantine folder, then select Properties.
Select the Sharing tab, then click Advanced Sharing
In the Advanced Sharing dialog box, select Share this folder.
Click Permissions, select the default user name Everyone, click Remove, then click Apply.
Click Add to select an object type.
Note
You can give permission only to administrators who need access to the quarantine folder.
In Select Users or Groups, enter your Domain User account in the object names dialog box, then click OK.
Select the user name you created earlier, select Full Control, then click OK.
Click Add to select an object type.
In Select Users or Groups, enter your Domain Local Security Group in the object names dialog box, then click OK.
With this group selected, select Full Control, then click OK.
Tagging in an NSX-T environment (Agentless)
When malware is detected on a VM where you configured NSX tagging, the affected VM is tagged with the NSX tag (ANTI_VIRUS.VirusFound.threat=high).
In the On Access Scan policy, if the primary action is configured to Delete files automatically or Delete files automatically
and quarantine, and when malware is detected and deleted on a client system, the NSX tagging and untagging happens at the same time. The malware detection details can be viewed in Trellix ePO - On-prem Orion logs.
In the On Access Scan policy, if the primary action is configured to Deny access to files and when malware is detected and deleted on a client system, the client system is tagged with ANTI_VIRUS.VirusFound.threat=high. The tag is removed on the next successful completion of an on-demand scan.
In the On Access Scan policy, if the primary action is configured to Delete files automatically and quarantine and the quarantine details are not configured, and when malware is detected and deleted on the client system, the client system is tagged with the NSX tag ANTI_VIRUS.VirusFound.threat=high. The tag is removed on the next successful completion of an on-demand scan.
When you run on-demand scan and malware is detected on a VM, the NSX tag is removed for the VM only if the primary action is configured to Delete files automatically or Delete files automatically and quarantine.
Self-protection (Multi-platform)
The self-protection feature defends files, services, and registry keys on virtual machines. Use the Trellix ENS access protection rules for protecting the components of the SVM.
Trellix MOVE AntiVirus Client
The self-protection feature prevents malicious attacks on Trellix MOVE AntiVirus (Multi-platform) client components. This keeps your virus protection active and stable.
Protection type | Protection effects |
|---|---|
File protection | Files inside the installed directory and driver file (mvagtdrv.sys) are protected from being deleted or renamed. |
Registry protection | These registry keys, all subkeys, and all values under them are protected.
|
Service stop protection | The mvagtsvc service cannot be stopped. |
The IntegrityEnabled configuration parameter controls the self-protection feature. By default, the parameter is set to 0x7, and all components of the feature are enabled.
The configuration parameter accepts values from 0–7, which is a decimal representation of a 3-bit binary value.
Decimal value | Binary value | Definition |
|---|---|---|
0 | 000 | Protection disabled |
1 | 001 | File protection |
2 | 010 | Registry protection |
3 | 011 | File and registry protection |
4 | 100 | Service protection |
5 | 101 | Service and file protection |
6 | 110 | Service and registry protection |
7 | 111 | Service, registry, and file protection |
For example, to enable file and registry protection, set the parameter to 3 (0b011) with this command:
mvadm config set IntegrityEnabled=3To enable file and service stop protection, but not registry protection, set the parameter to 5 (0b101) with this command:
mvadm config set IntegrityEnabled=5To disable the self-protection feature, set the parameter to 0 with this command:
mvadm config set IntegrityEnabled=0mvadm config set IntegrityEnabled=0When Service stop protection is enabled (by setting the highest bit to 1), the mvagtsvc service does not accept stop commands. File protection and registry protection require the agent driver be loaded, but service stop protection does not.
Trellix MOVE AntiVirus SVM
If you want to protect the components of the SVM, then you can use the Access Protection rules in Trellix ENS. Check the list of components below:
mvserver.exeC:\Program Files (x86)\McAfee\MOVE AV Server\**HKEY_LOCAL_MACHINE\SYSTEM\CurrentControlSet\Services\mvserverHKEY_LOCAL_MACHINE\SYSTEM\CurrentControlSet\Services\mvserver\ParametersHKEY_LOCAL_MACHINE\SYSTEM\CurrentControlSet\Services\mvserver\Parameters\ODS
Events, responses, and Trellix MOVE AntiVirus
Configure Automatic Responses to respond to threat events.
The Threat Event Log is a log file of all threat events that Trellix ePO - On-prem receives from managed systems.
In Trellix ePO - On-prem, you can define which events are forwarded to the Trellix ePO - On-prem server. To display the complete list of events in Trellix ePO - On-prem, select Menu → Configuration → Server Setting, select Event Filtering, then click Edit.
Set up a Purge Threat Event Log server task to purge the Threat Event Log periodically.
For information about Automatic Responses and working with the Threat Event Log, see the Trellix ePO - On-prem documentation.
Analyzing your protection
The ongoing process of analyzing your system protection enables you to improve the protection and performance of your system.
Analyzing your protection helps you determine:
Which threats you are facing
What malware was used in the attack
Where the threats are coming from
Where and when the attacks occurred
How often threats are found
Which systems are being targeted
How the attack affected the system
Protection analysis is also helps you:
Create reports for IT and managers.
Capture information used to create scripts and queries.
Dashboards and queries
Use Trellix ePO - On-prem queries to view events, run default queries, and create reports.
View events in the Threat Event Log.
Run default queries that show important client information.
Create reports using data sent by the Trellix Agent to the Trellix ePO - On-prem database.
For information about how to run a query or report, see the product documentation for your version of Trellix ePO - On-prem.
Queries are questions that you ask Trellix ePO - On-prem, which returns answers as charts and tables. You can export or download queries, combine them into reports, and use most queries as dashboard monitors.
Reports enable you to package one or more queries into a single PDF document, for access outside of Trellix ePO - On-prem.
To create reports, your assigned permission set must include the ability to create and edit reports. You can restrict access to reports using groups and permission sets exactly as you restrict access to queries. Reports and queries can use the same groups, and because reports primarily consist of queries, this allows for consistent access control.
VMs running Agentless do not have the Trellix Agent installed. Only the SVM appears in the Trellix ePO - On-prem console, which means you don't see each VM. vShield Manager provides a report that validates the protection status of each VM.
Integrating TIE and Intelligent Sandbox
TIE provides context-aware adaptive security for your virtual environment. It quickly analyzes files and content from the SVM in your environment and makes informed security decisions.
These decisions are based on a file's security reputation and your own criteria set in the Shared Cloud Solutions policy of Trellix MOVE AntiVirus.
The Multi-platform deployment, with TIE and Intelligent Sandbox integration, becomes a multi-layered solution that involves various techniques to scan and detect the malware. It includes:
Pattern matching
Global reputation
Program emulation
Static analysis
Dynamic analysis
All these layers are seamlessly integrated and provide a single point of control for easy configuration and management.
Threat Intelligence Exchange
Threat Intelligence Exchange uses the Trellix Data Exchange Layer framework to share file and threat information instantly across the entire network.
In the past, you sent an unknown file or certificate to Trellix for analysis, then updated the file information throughout your network later. Threat Intelligence Exchange enables file reputation to be controlled at a local level, your virtual environment. You decide which files can run and which are blocked, and the Trellix DXL shares the information immediately throughout your environment.
Threat Intelligence Exchange components
Threat Intelligence Exchange includes these components.
A server that stores information about file and certificate reputations, then passes that information to other systems.
Trellix DXL brokers that allow bidirectional communication between managed systems on a network.
These components are installed as Trellix ePO - On-prem extensions and add several new features and reports:
TIE server extension
Trellix DXL broker management
Trellix DXL client for Trellix ePO - On-prem
Trellix DXL client management
Intelligent Sandbox
If Intelligent Sandbox is present, the following process occurs.
When a file is sent for TIE reputation and TIE determines that it is an Intelligent Sandbox candidate. Then the file is submitted to Intelligent Sandbox for further analysis through TIE from SVM based on the settings in Shared Cloud Solutions policy under Trellix MOVE AntiVirus.
Intelligent Sandbox analyses file and sends file reputation results to the TIE server using the Trellix DXL. The TIE server also updates the database and sends the updated reputation information to the SVM.
The Intelligent Sandbox solution primarily consists of the Intelligent Sandbox Appliance and the pre-installed software. The Intelligent Sandbox Appliance is available in two models. The standard model is the ATD-3000. The high-end model is the ATD-6000.
For installing and setting up Intelligent Sandbox, see the installation guide for your version of Intelligent Sandbox.
Intelligent Sandbox components
Intelligent Sandbox integrates its native capabilities with Trellix MOVE AntiVirus to provide a multilayered defense mechanism against malware.
These features and components of Intelligent Sandbox integrate with Trellix MOVE AntiVirus for better malware detection:
A local block list to quickly detect known malware.
Trellix GTI for cloud lookups to detect malware that has already been identified by organizations throughout the globe.
Embedded McAfee Gateway Anti-Malware Engine in for emulation capability.
Embedded McAfee Anti-Malware Engine embedded in for signature-based detection.
A virtual sandbox environment for dynamic file analysis.
Scenarios for using Threat Intelligence Exchange
Immediately block a file — Threat Intelligence Exchange alerts the network administrator of an unknown file in the environment. Instead of sending the file information to Trellix for analysis, Trellix MOVE AntiVirus blocks the file immediately. The administrator can then use Threat Intelligence Exchange to learn whether the file is a threat and how many systems ran the file.
Allow a custom file to run — A company routinely uses a file whose default reputation is suspicious or malicious, for example a custom file created for the company. This file can override the reputation of a file on TIE server so that it is allowed to run in the environment.
Import known reputations — A company has several files that are trusted and used regularly, and other files that are not allowed. Because the reputations are already known and set, the administrator can import a list of files and their reputations directly into the Threat Intelligence Exchange database. Those reputations are used immediately with no further action needed.
See additional information about a file — Threat Intelligence Exchange notifies the network administrator of an unknown file. The administrator can see several details about the file, such as the file's parent process, company, hash information, and the systems that ran the file. The administrator can also see more detailed information about the file with VirusTotal, a free online service for scanning viruses, malware, and URLs.
Determine a file or certificate's reputation
File and certificate reputation is determined when a file tries to run on a managed system.
These steps occur in determining a file or certificate's reputation.
A user or system tries to run a file.
Trellix MOVE AntiVirus compares and inspects the file with local cache and can't determine its validity and reputation.
The client looks for the reputation in global cache in the SVM and can't find the reputation, then sends the file hashes to the SVM for TIE lookup based on the Shared Cloud Solutions policy assigned to the system.
The SVM checks the reputation cache for the file hash. If the file hash is found, the SVM gets the reputation data from the SVM cache and sends the reputation to the client and action is taken.
If the file hash is not found in the SVM cache and TIE server does not have the reputation:
(Intelligent Sandbox is present) If the policy on the endpoint determines that the file has to be sent to Intelligent Sandbox, the TIE server sends the file for further analysis. To send the file to Intelligent Sandbox, these requirements must meet:
Advanced Threat Defense (ATD) option is configured in the Shared Cloud Solutions policy on the Trellix ePO - On‑prem server.
Size of the file is less than 10 MB.
The TIE server returns the file hash's reputation to the SVM once the data is received from Intelligent Sandbox after analyzing the file.
Trellix MOVE AntiVirus responds based on the Shared Cloud Solutions policy assigned to the system that is running the file.
The SVM sends threat details as threat events to Trellix ePO - On‑prem.
Determine a reputation with TIE 2.0.0
When the SVM sends a signed file for certificate lookup and this certificate has a file that has administrator overridden file reputation, the file hash is sent for file reputation lookup again. Then the overridden file reputation is considered for the file, ignoring certificate reputation value.
For example, let us consider a scenario where:
The file has a certificate value as Known trusted
The file reputation of any files associated with the same certificate is overridden by the administrator to Known malicious
With these assumptions, when an SVM sends a file for TIE lookup, TIE notifies that it has a file reputation overridden for the certificate. Then the SVM sends for file reputation again and responds based on the file reputation.
Monitoring activity in your environment
An important step in a protection strategy is using tools to monitor the malware events that occur on your systems.
Monitoring activity with Trellix ePO - On-prem
Use Trellix ePO - On-prem to monitor activity on your managed systems and determine what to do when issues occur.
Dashboards are collections of monitors that track activity in your Trellix ePO - On-prem environment.
Trellix MOVE AntiVirus provides predefined dashboards and monitors. Depending on your permissions, you can use them as is, modify them to add or remove monitors, or create custom dashboards.
Trellix MOVE AntiVirus dashboard
The Trellix MOVE AntiVirus dashboard is added to your Trellix ePO - On-prem server when you install the software.
The dashboard displays a collection of monitors based on the results of the default Trellix MOVE AntiVirus software queries.
The default monitors that appear on the Trellix MOVE AntiVirus dashboard are:
SVM Load: Number of Connected Endpoints — Displays the number of managed endpoints with load category of the SVM.
Capacity Full — Indicates that the SVM limit is reached when the number of endpoints is equal to what can be assigned.
Capacity Above Threshold — Appears when capacity of an SVM is more than its threshold value.
Capacity Below Threshold — Appears when capacity of an SVM is less than its threshold value.
SVM with Higher Average Scan Time in last 7 days — Specifies the top 10 SVMs, which have reached average scan time threshold and they are in this state for the longest time in the past 7 days.
See the chapter on dashboards in the Trellix ePO - On-prem Product Guide for information about managing dashboards.
Check visibility and health details of the SVM
You can view and check the product properties of Trellix MOVE AntiVirus and the product component SVM using Trellix ePO - On-prem.
Log on to Trellix ePO - On-prem as an administrator.
Select Menu → Systems → System Tree → Systems tab.
Click an SVM system to open the System Information page.
Click Product tab and select the product as MOVE AntiVirus.
You can now see the product properties, which can be used to determine the health details of the SVM.
Check predefined queries
Run the predefined queries to generate reports based on Trellix MOVE AntiVirus components.
Log on to Trellix ePO - On-prem as an administrator.
Select Menu → Reporting → Queries & Reports.
From the McAfee Groups pane, select MOVE AntiVirus 4.10.x to display the queries for the selected group.
From the Queries list, select a query, then click Run.
On the query results page, click any item in the results to drill down further.
Click Close when finished.
Predefined Multi-platform queries
The Trellix MOVE AntiVirus (Multi-platform) deployment option adds several queries to your Trellix ePO - On-prem environment.
Multi-platform queries
Query | Description |
|---|---|
Client Protection Status | Displays the status of all Trellix MOVE AntiVirus clients managed by the server. |
Clients connected with a given SVM and SVM Manager | Displays the data of the clients and the associated SVMs and SVM Manager. |
Clients connected with a given SVM | Displays the details of the client and the SVM that is assigned to it. |
DAT version | Displays the DAT version of all Trellix MOVE AntiVirus clients that are managed by the server. |
Query | Description |
|---|---|
Summary of Threats Detected in the Last 24 Hours | Displays threats detected in the last 24 hours. |
Threats Detected in the Last 24 Hours | Displays the number of threats detected in the last 24 hours by hour. |
Top 10 Computers with the Most Detections | Displays the top 10 computers with the most threat detections in the last three months. |
Top 10 Detected Threats | Displays the top 10 detected threats in the last three months. |
Top 10 Users with the Most Detections | Displays the top 10 users with the most threat detections in the last three months. |
TIE/ATD Metrics for each MP SVM | Lists all TIE or Intelligent Sandbox related metrics such as Total File reputation requests to TIE, Total Certificate reputation requests to TIE, and Total number of Intelligent Sandbox candidates for each Trellix MOVE AntiVirus SVM. |
Client queries and events
Query | Description |
|---|---|
MP Connectivity Details | Displays the connectivity status details between an SVM and SVM manager, and a client and SVM Manager such as Success, Failed, and Unassigned.
|
ODS Client queries and events
Query | Description |
|---|---|
MOVE AntiVirus: MOVE MP ODS Summary | Displays a summary of On-Demand scan for all the clients. The query categorizes all the clients based on the ODS states. Possible ODS states are:
|
SVM queries and events
Query | Description |
|---|---|
SVM Load: Number of Connected Endpoints | Categorizes the SVMs into Capacity full, Capacity Above Threshold, and Capacity Below Threshold based on the number of connected endpoints. |
SVM with Higher Average Scan Time in last 7 days | Specifies the top 10 SVMs, which have reached the average scan time threshold and are in this state for the longest time in the past 7 days. |
SVM with SVM Manager details | Lists all SVMs with SVM Manager details. |
SVM: Average Scan Time Events | Lists the SVM Average Scan Time, SVM Average Scan Time Threshold, and SVM Average Scan Time Sampling Interval details. This report is generated from SVM average Scan Time Threshold hit and SVM Average Scan Time Threshold Restored events. The average scan time threshold for each SVM can be modified in the Alert me in the SVM Settings policy. |
SVM Capacity Events | Lists the SVM Capacity Full, SVM Capacity Restored, and SVM Capacity Threshold hit details. This report is generated from SVM Capacity Threshold hit, SVM Capacity Full, and SVM Capacity Threshold Restored events. |
Query | Description |
|---|---|
event. The threshold limit of client connections for each SVM can be modified in the Alert me option in the SVM Settings policy. | |
Top 10 Scanned File Extensions for each SVM | Lists the top 10 file extensions scanned by the SVM. |
Top 10 Scanned Files for each SVM | Lists the top 10 files scanned by the SVM. |
Top 10 Scanned Processes for each SVM | Lists the top 10 processes scanned by the SVM. |
Top 10 Scanned Virtual Machines for each SVM | Lists the top 10 virtual machines that are sending maximum scan and checksum requests. |
MP Error Codes Data | Displays the error code details that occurred while managing Trellix MOVE AntiVirus |
SVM Manager queries and events
Query | Description |
|---|---|
SVM Assignment Failed | Specifies the details and reasons of SVM assignment by the SVM Manager. This event is reported on the Trellix ePO - On-prem server.
|
SVM Capacity Events | Specifies the maximum number of endpoints with the number of endpoints connected. These events are reported on the Trellix ePO - On-prem server. |
Query | Description |
|---|---|
| |
SVM Registration Events | Displays the SVM registration events raised by the SVM Manager. These events are reported on the Trellix ePO - On-prem server.
|
SVM_MANAGER_STARTED | This event is reported when the SVM Manager starts. |
SVM_MANAGER_STOPPED | This event is reported when the SVM Manager stops. |
You can add these queries to dashboards to more efficiently track your environment by displaying several queries at once.
The queries are constantly refreshed, or you can run them at a specified frequency. You can add them to reports that are run on specific schedules and export them as PDF files or email messages.
Note
The Trellix ePO - On-prem Threat Event Log contains information about detections, scan failure, and on-demand scan events.
SVM Manager information
A shell script, msmclient.sh, is available with SVM Manager and is used to retrieve the SVM details. The script is available at /opt/ McAfee/movesvamanger.
For these commands to work and retrieve the results, the SVM Manager application must be running.
Run these commands with root rights from the /opt/McAfee/movesvamanager directory:
sudo ./msmclient.sh osscount— Displays the number of SVMs attached to the SVM Manager.sudo ./msmclient.sh ossinfo— Displays some basic information about the SVMs attached to the SVM Manager.sudo ./msmclient.sh ossdetails— Displays some advanced information about the SVM: current SVM load, SVM GUID, and last heartbeat time.
Predefined Agentless queries
You can use predefined queries as is, or create queries from events and properties stored in the Trellix ePO - On-prem database.
To create custom queries, your assigned permission set must include the ability to create and edit private queries.
The Agentless deployment option provides these predefined queries:
Query | Definition |
|---|---|
Clients connected with a given SVM (AL) | Displays the data of Agentless clients and the associated SVMs. |
DAT Version | Specifies the DAT version available on the VMs. This query is available only when the vSphere Connector is installed. |
Detection Response Summary | Displays the number of threats on which an action such as Modify, Access denied, or Deleted is taken versus the number of threats on which no action was taken, in the last three months. |
Licensing Information | Displays the number of VMs that are being managed |
Query | Definition |
|---|---|
by the licensed SVM. This report is generated from MOVE AntiVirus: Compute licensing information server task. | |
On-Demand Scan Events Summary | Displays a summary of the on-demand scan events for the last 3 months. |
Service Events Summary | Displays a summary of the service events for the last 3 months. |
Summary of Threats Detected in the Last 24 Hours | Displays a summary of the threats detected in the last 24 hours. |
Summary of Threats Detected in the Last 7 Days | Displays a summary of the threats detected in the last 7 days. |
Threat Count by Severity | Specifies the slice count, which is the number of Agentless events. Slice indicates different event severities for the last months. |
Threat Names Detected per Week | Displays the name and number of different threats detected every week for the last 3 months. |
Threats Detected in the Last 24 Hours | Specifies the number of threats detected in the last 24 hours. |
Threats detected in the Last 7 Days | Specifies the number of threats detected in the last 7 days. |
Threats Detected Over the Previous 2 Quarters | Specifies the number of threats detected for the last 2 quarters. |
Threats Detected per Week | Displays the number of threats detected every week for the last 3 months. |
Query | Definition |
|---|---|
Top 10 Detected Threats | Displays the top 10 threats detected in the last 3 months. |
Top 10 Scanned File Extensions for each SVM | Lists the top 10 file extensions scanned by the SVM. |
Top 10 Scanned Files for each SVM | Lists the top 10 files scanned by the SVM. |
Top 10 Scanned Virtual Machines for each SVM | Lists the top 10 virtual machines that are sending maximum scan and checksum requests. |
Top 10 Threats per Threat Category | Displays the top 10 threats in a threat category for the last three months. The threats are grouped by threat category and threat name. |
Top 10 Virtual Machines with the Most Detections | Displays the top 10 virtual machines with the most threat detections in the last 3 months. |
Unwanted Programs Detected in the Last 24 Hours | Displays the number of potentially unwanted program events for the last 24 hours. |
Unwanted Programs Detected in the Last 7 Days | Displays the number of potentially unwanted program events for the last 7 days. |
Virtual Machines with Threats Detected per Week | Displays the number of virtual machines detected with threats per week for the last 3 months. |
MOVE AntiVirus - generate certificates (Multi-platform)
If there is a connectivity issue with the SVM Manager, you must generate the certificates for Trellix MOVE AntiVirus, so that the Trellix MOVE AntiVirusSVM and SVM Manager communicate and authenticate each other properly. For details, see the Trellix MOVE AntiVirus 4.10.x Installation Guide
MOVE AntiVirus - compute licensing information (Agentless)
From Menu → Automation → Server Tasks, you can run MOVE AntiVirus: Compute licensing information server task to list the number of VMs being managed by the licensed SVM. You can find the output of this server task from MOVE AntiVirus: Licensing information Queries & Reports.
Troubleshooting
Use this information to resolve problems while running Trellix MOVE AntiVirus and using its deployment modes.
Best practices for using Trellix MOVE AntiVirus
Here are some best practices for deploying and managing the Trellix MOVE AntiVirus product.
Best practices for Multi-platform
Here are some best practices for deploying and managing the Trellix MOVE AntiVirus product (Multi-platform).
Best practices for creating multiple client systems using primary image
To create multiple client systems in your environment, create a primary image of a VM where client is installed on it and reconfigured the settings, as needed. So that you do not need to repeat these actions on every client system that you create.
Deploy the Trellix MOVE AntiVirus client to the managed VM, which you want to make a primary image.
In Trellix ePO - On-prem, add required exclusions for both on-access scan and on-demand scan policies and apply them to the primary image.
Path exclusions
Process exclusions
Publisher exclusions
Run the on-demand scan or Targeted on-demand scan on the primary image to build up the cache.
Building up the cache on the primary image improves the performance of the VM when you clone the virtual machines.
In the primary image, under
HKEY_LOCAL_MACHINE\SYSTEM\CurrentControlSet\Services\mvagtdrv\Parameters, delete the registry key for ODSUniqueId and ServerAddress1.In the primary image, under
HKEY_LOCAL_MACHINE\SOFTWARE\McAfee\Agent\FirewallRules\Identifier, delete the agent registry key GUID.Shut down the primary image and clone the virtual machines from the primary image.
When cloned virtual machines are turned on, new agent GUID values are automatically generated. The virtual machines are now managed by the Trellix ePO - On-prem server.
Note
It is recommended to update AMCore Content Package (V3 DAT) on daily basis during non peak hours.
It is recommended to keep SVM on the same host where most of the clients are located, it improves the performance of the SVM.
Best practices for Agentless
Here are some best practices for deploying and managing the Trellix MOVE AntiVirus product (Agentless).
Best practices for VDI environment
While provisioning many VMs, the VDI might stop responding due to lack of client cache. The flushing of client cache while loading and unloading the filter driver is a VMware limitation.
When there is a significant workload running on the client systems, you might notice issues like the VM getting hung during its boot, latency during file scanning, and many. To prevent such issues, it is recommended to upgrade the SVM configuration with this configuration:
Memory | 4-GB RAM or higher |
CPU | 4 vCPU |
Maximum worker threads | 512 (You can log on to the SVM and change this number)
|
Error codes
Here are steps to troubleshoot some of the errors that you might see while deploying and managing the Trellix MOVE AntiVirus product. You might see these errors on the Trellix ePO - On-prem pages or in the log files.
Product area - Trellix MOVE AntiVirus extension
You might see these errors on the Trellix ePO - On-prem pages or in the log files while deploying and managing the Trellix MOVE AntiVirus product using Trellix MOVE AntiVirus extension.
MOVE_ERROR_30001
Error string: [MOVE_ERROR_30001] Critical error. Downloading Trellix ePO - On-prem init files failed. |
Log: Orion.log on the Trellix ePO - On-prem system |
Cause: For Static IP Pool The provided IP Pool details might be wrong. For DHCP The DNS might not ping FQDN or host name of the Trellix ePO - On-prem server. |
Workaround: For Static IP Pool
For DHCP
|
MOVE_ERROR_30002
Error string: [MOVE_ERROR_30002] Compatibility checking failed |
Log: Orion.log on the Trellix ePO - On-prem system |
Cause: MOVEAICompatMatrix.xml might not be compatible with the versions of vCener, ESXi, vShield Manager, vShield Endpoint, and VM Tools. |
Workaround: This error can be ignored because it does not impact while deploying and managing the Trellix MOVE AntiVirus product.
MOVE_ERROR_30003
Error string: [MOVE_ERROR_30003] For some VM's either VM Tools is not running or VMs are not part of the AD, hence, vShield driver installation fails on them. |
Log: Orion.log on the Trellix ePO - On-prem system |
Cause: VM Tools are not running on some of the VMs or the VMs are not part of the Active Directory server. |
Workaround:
|
MOVE_ERROR_30004
Error string: [MOVE_ERROR_30004] All VMs in the Hypervisor are not part of the AD, vShield driver installation fails on them. |
Log: Orion.log on the Trellix ePO - On-prem system |
Cause: The VMs are not part of the Active Directory server. |
Workaround:
|
MOVE_ERROR_30005
Error string: [MOVE_ERROR_30005] VM Tools in some VMs are not running, vShield driver installation might fail on them. |
Log: Orion.log on the Trellix ePO - On-prem system |
Cause: VMware Tools are not running on some of the VMs. |
Workaround:
|
MOVE_ERROR_30007
Error string: [MOVE_ERROR_30007] Rest API call failed with exception. |
Log: Orion.log on the Trellix ePO - On-prem system |
Cause: For NSX environment: NSX Manager details are not configured properly in Trellix ePO - On-prem. |
Workaround: For NSX environment
|
MOVE_ERROR_30008
Error string: [MOVE_ERROR_30008] Getting vsm heartbeat details: <APPLIANCE_URL> failed using : <CLIENT_DETAILS> |
Log: Orion.log on the Trellix ePO - On-prem system |
Cause: The vShield Manager might not be running. |
Workaround: |
MOVE_ERROR_30009
Error string: [MOVE_ERROR_30009] Error occurred while executing service setup task. Continuing with next setup |
Log: Orion.log on the Trellix ePO - On-prem system |
Cause: VMs might not be synchronized properly from the vCenter account in Trellix ePO - On-prem. |
Workaround: |
MOVE_ERROR_30010
Error string: [MOVE_ERROR_30010] NSX-T Manager is already registered with different Trellix ePO - On-prem. |
Log: Orion.log on the Trellix ePO - On-prem system |
Cause: NSX-T Manager is registered with another Trellix ePO - On-prem. |
Workaround:
|
MOVE_ERROR_30011
Error string: [MOVE_ERROR_30011] Error occurred while communicating with NSX-T Manager. |
Log: |
Cause: NSX-T certificate details are not valid. |
Workaround:
|
MOVE_ERROR_30012
Error string: [MOVE_ERROR_30012] MOVE Service can't be unregistered or upgraded because it is used in NSX-T Manager Security Policy. |
Log: |
Cause: The Security Policy is being used in NSX-T Manager. |
Workaround:
|
MOVE_ERROR_30013
Error string: [MOVE_ERROR_30013] MOVE Service can't be unregistered because it is deployed on clusters. |
Log: |
Cause: SVM is deployed on one or more clusters. |
Workaround:
|
Product area - Trellix MOVE AntiVirus client (Multi-platform)
You might see these errors on the Queries & Reports (MOVE AntiVirus: Error Code Details or MOVE AntiVirus: Multi-Platform Connectivity Status) in Trellix ePO - On-prem or in the log files.
Error code: 12002
Error reason string: | Client communication with SVM Manager failed |
Log: | mvagent.log on the client |
Cause: | Client communication with SVM Manager has timed out. |
Workaround: |
|
Error code: 12002
Log: | Queries & Reports (MP Connectivity Details) on Trellix ePO - On-prem |
Cause: | Client communication with SVM Manager has timed out. |
Workaround: |
|
Error code: 12029
Error reason string: Client communication with SVM Manager failed |
Log: mvagent.log on the client |
Cause: The attempt to connect client to SVM Manager is failed. |
Workaround:
|
Error code: 12029
Log: Queries & Reports (MP Connectivity Details) on Trellix ePO - On-prem |
Cause: The attempt to connect client to SVM Manager is failed. |
Workaround:
|
Error code: 4001
Log: Queries & Reports (MP Connectivity Details) on Trellix ePO - On-prem |
Cause: SVM is not available with SVM Manager to assign it to the client. |
Workaround:
|
Product area - Trellix MOVE AntiVirus SVM (Multi-platform)
You might see these errors on the Queries & Reports (MOVE AntiVirus: Error Code Details or MOVE AntiVirus: Multi-Platform Connectivity Status) in Trellix ePO - On-prem or in the log files.
Error code: 15
Error string: | Failed to send request to the TIE server |
Log: | mvserver.log on the SVM |
Cause: | McAfee DXL client and DXL broker might not be compatible. |
Workaround: | Verify that the McAfee DXL client and DXL broker version is compatible. |
Error code: 16
Error string: | Failed to send request to the TIE server |
Log: | mvserver.log on the SVM |
Cause: | McAfee DXL client service might be stopped / MOVE service might not be recognized the McAfee DXL client. |
Workaround: |
Log on to the Trellix MOVE AntiVirus SVM system.
Open Task Manager and verify that the McAfee DXL client service appears.
From system tray, click
 and select About... to open Trellix About... window.
Under McAfee Data Exchange Layer, verify that the DXL Connected Status is Connected.
Restart the MOVE service.
Error code: 201
Error string: Failed to send request to the TIE server |
Log: mvserver.log on the SVM |
Cause: DXL fabric might not be connected. |
Workaround:
|
Error code: 202
Error string: Failed to send request to the TIE server |
Log: mvserver.log on the SVM |
Cause: DXL fabric might be trying to connect continuously. |
Workaround:
|

Error code: 11
Error string: Failed to send request to the TIE server |
Log: mvserver.log on the SVM |
Cause: TIE server might not be running. |
Workaround:
|
Error code: 1
Error string: | SVM is shutting down |
Log: | Queries & Reports (MP Connectivity Details) on Trellix ePO - On‑prem. |
Cause: | MOVE AV Server service might not be running or SVM might not be functional. |
Workaround: |
|
Error code: 2
Error string: | SVM is max client threshold reached |
Log: | Queries & Reports (MP Connectivity Details) on Trellix ePO - On‑prem. |
Cause: | The number of clients connected to the SVM is more than its threshold value. |
Workaround: |
|
Error code: 3
Error string: | VM to client heartbeat break |
Log: Queries & Reports (MP Connectivity Details) on Trellix ePO - On-prem. |
Cause: SVM might be turned off or SVM might be over loaded or SVM and client version is not compatible. |
Workaround:
|
Error code: 4
Error string: Client to SVM connection failed |
Log: Queries & Reports (MP Connectivity Details) on Trellix ePO - On-prem. |
Cause: SVM might be turned on or MOVE AV Server service might not be running. |
Workaround:
|
Error code: 12002
Error string: SVM Registration with SVM Manager failed |
Log: mvserver.log on SVM and Queries & Reports (MP Error Code Details) on Trellix ePO - On-prem. |
Cause: SVM Registration with SVM Manager request has timed out. |
Workaround:
|
3. Verify that the Options policy is assigned to the SVM.
Error code: 12002
Error string: | Failed to submit file to Intelligent Sandbox server |
Log: | Queries & Reports (MP Error Code Details) on Trellix ePO - On-prem. |
Cause: | Intelligent Sandbox might not be integrated properly. |
Workaround: |
|
Error code: 12002
Error string: | Unable to register OSS with broker with err: -1, get last error: 12002 |
Log: |
|
Cause: | On the SVM system, proxy setting might not be configured correctly for the IP address used for communication between SVM and SVM Manager. |
Method 1: |
Log on to the Trellix MOVE AntiVirus SVM system.
Run this command to confirm proxy setting is used by the SVM:
netsh winhttp show proxyChange the proxy setting to use the correct IP address that is used for communication between the SVM and SVM Manager.
Method 2:
Log on to the Trellix MOVE AntiVirus SVM system.
Run this command to confirm proxy setting is used by the SVM:
netsh winhttp show proxyIf multiple NICs are used by the SVM, perform these actions:
Disable the NICs that are not used for communication between the SVM and SVM Manager.
Run this command to reset the proxy setting:
netsh winhttp reset proxy
Error code: 12029
Error string: | Failed to submit file to Intelligent Sandbox server |
Log: | Queries & Reports (MP Error Code Details) on Trellix ePO - On-prem. |
Cause: | Intelligent Sandbox might not be integrated properly. |
Workaround: |
|
Error code: 12029
Error string: SVM Registration with SVM Manager failed |
Log: mvserver.log on the SVM and Queries & Reports (MP Error Code Details) on Trellix ePO - On-prem. |
Cause: The attempt to connect SVM to SVM Manager is failed. |
Workaround:
|
Product area - Trellix MOVE AntiVirus SVM (Agentless)
You might see these errors on the Trellix MOVE AntiVirus SVM log files while deploying and managing the Trellix MOVE AntiVirus SVM (Agentless).
MOVE_ERROR_20001
Error string: [MOVE_ERROR_20001] Failed to create quarantine mount event |
Log: mvsvc.log on the SVM |
Cause: Quarantine details might not be configured properly. |
Workaround:
|
MOVE_ERROR_20002
Error string: [MOVE_ERROR_20002] Mounting <name of the network mount> failed, error(<system error code>): <system error message> |
Log: |
Cause: Quarantine details might not be configured properly. |
Workaround:
|
MOVE_ERROR_20004
Error string: | [MOVE_ERROR_20004] Detected malware <name of the malware>, quarantine failed hence file is not deleted, file has been DENIED ACCESS, VMID: <ID of the VM> filename: <name of the file> |
Log: |
|
Cause: | Quarantine details might not be configured properly. |
Workaround: |
|
MOVE_ERROR_20005
prem.
|
MOVE_ERROR_20006
Error string: [MOVE_ERROR_20006] hyper_register unable to contact the hypervisor due to timeout <name of the exception> Please verify the hypervisor information supplied in the SVA policy onTrellix ePO - On-prem and retry |
Log: mvsvc.log on the SVM |
Cause: vCenter or hypervisor details might not be configured properly. |
Workaround:
|
Frequently asked questions
Here are answers to some of the most frequently asked questions relating to the security implications of running Trellix MOVE AntiVirus and using its deployment modes.
How can I convert the SVM Manager format to Microsoft Hyper-V format?
Convert the .vmdk file format to .vhd file to deploy the SVM Manager to Microsoft Hyper-V. Attach the converted file as a hard disk to create a new virtual machine.
Download and install Microsoft Virtual Machine Converter 3.0 (MVMC 3.0).
Note
The SVM Manager can only be converted using the Microsoft Virtual Machine Converter 3.0 command-line Windows PowerShell scripts.
Click Start → All Programs → Accessories, right-click Windows PowerShell, then click Run as administrator.
In the PowerShell console, run this command:
Import-Module "C:\Program Files\Microsoft Virtual Machine Converter\MvmcCmdlet.psd1"For .vhdx format image, run this command:
ConvertTo-VirtualHardDisk -SourceLiteralPath "C:\VMDKs\SVM_Manager_3.x-disk1.vmdk"For .vhd format image, run this command:
ConvertTo-VirtualHardDisk -SourceLiteralPath "C:\VMDKs\SVM_Manager_3.x-disk1.vmdk" -DestinationLiteralPath "C:\VHDs" -VhdType FixedHardDisk -VhdFormat VhdAfter you convert the file format to .vhd or .vhdx, mount the disk image to the Microsoft Server 2012 R2 Hyper-V system:
On the Server 2012 R2 Hyper-V Manager, click New → Virtual Machine, then click Next.
Specify these VM details in the wizard, then click Next.
Option
Definition
VM Name
Specify the VM name of the instance.
Memory Size
Set the memory size of the VM.
Network Interface
Specify the details about the network interface associated to the instance.
Select Use an existing virtual hard disk, specify the path to the .vhdx or .vhd file, then click Next.
Click Finish, then turn on the SVM manager.
How do I enable core dumps for SVM Manager on it's appliance?
Run the command ulimit -c unlimited on the terminal.
The Trellix MOVE AntiVirus detection pop-up message does not appear on the Windows desktop. How do I fix this?
Method 1:
Enable the Trellix Agent policy option, Show the Trellix system tray icon (Windows only), to display Trellix MOVE AntiVirus detection pop-up message on the Windows desktop.
Log on to Trellix ePO - On-prem as an administrator.
Select Menu → Policy → Policy Catalog.
From the Product drop-down list, select McAfee Agent.
From the Category drop-down list, select General.
Click New Policy.
On the New Policy page, configure the policy settings, then click OK.
Open the newly created policy.
Enable Show the McAfee system tray icon (Windows only) from General Options on the General tab.
Click Save, then apply the policy to the clients.
Method 2 (Multi-platform only):
If you need the Multi-platform Threat Event pop-up alerts through the Remote Desktop Protocol (RDP) session, run UPDATERUI.EXE manually.
Perform these steps inside your remote session.
Click Start → Run.
Run this command:
"C:\Program Files\McAfee\Common Framework\CmdAgent.exe" /s
Note
The Trellix Agent icon now appears in the toolbar, and the on-access scan Statistics can be viewed in the remote session.
How can I create an on-demand scan task for a vSphere VM with Agentless?
Have the required Trellix MOVE AntiVirus extensions in Trellix ePO - On-prem and create a Registered Cloud Account for vSphere.
Click System Tree. You see the vSphere group that was previously added and all client computers under that vSphere group entry.
Select an unmanaged computer where you want to trigger the on-demand scan:
Click Actions → Agent → Modify Policies on a Single System.
From the Product drop-down list, select MOVE AntiVirus 4.10.x.
From the Category drop-down list, select On Demand Scan.
Click New Policy.
On the New Policy page, configure the policy settings, then click OK.
Open the newly created policy, select Enable on-demand scan, then click Save.
Select the SVM that is managing that client VM and issue wake-up agent call.
The on-demand scan starts at the next available slot.
The Policy Collector task collects the unmanaged system policies and adds them to the SVM policy for the next policy enforcement.
What can I do if I see the warning message "Failed to get process info of (system)", which is recorded in the Multi-platform client mvagent.log?
This is expected behavior. This informational message can be ignored.
In some environments, you might see these warning messages in the mvagent.log, which is the scan log generated by the Trellix MOVE AntiVirus (Multi-platform) client on protected systems:
WARNING: utl_rt.c: 109: Process info is NULL for proc handle 0x4
WARNING: fsh_winnt.c: 216: Failed to get for process info of (System)
Note
The message does not upload as an event to Trellix ePO - On-prem.
How can I manually check the DAT version installed on the Trellix MOVE AntiVirus SVM in an Agentless environment?
Check which DAT version is installed on the Trellix MOVE AntiVirus SVM using the Linux command line interface (CLI).
Method 1:
Log on to the Trellix MOVE AntiVirus SVM.
At the command prompt, run this command:
sudoWhen prompted, provide valid credentials.
Run this command to display the SVM details:
/opt/McAfee/ens/tp/bin/mfetpcli --v
For example:
Trellix Endpoint Security (ENS) for LinuxThreat Prevention
Version: 10.7.7.24
License: Full
DAT Version: 4860.0
DAT Date : 24-01-2022
Engine Version: 6300.9389
Exploit Prevention Content Version: 10.7.0.00079
Method 2:
Log on to the Trellix MOVE AntiVirus SVM.
At the command prompt, run this command:
sudo /opt/McAfee/move/bin/sva-config -vWhen prompted, provide valid credentials.
Note
The required details appear in the command window.
How can I fix any filesystem error that appears after deploying Agentless?
Download a new copy of the Agentless OVF template from the product download site.
Deploy the Agentless OVF template. For details, see Agentless installation and configuration in the Trellix MOVE AntiVirus 4.10.x Installation Guide.
What do I do if Agentless SVM shows as unmanaged when registering with the Trellix ePO - On-prem server?
Make sure that the copy of the Agentless OVF package is from a known good source, preferably the Trellix download site, then do a fresh deployment.
Perform these steps only if the SVM shows as Unmanaged in the Trellix ePO - On-prem System Tree.
Delete the system from Trellix ePO - On-prem.
When prompted, do not choose to remove the Trellix Agent.
For the existing SVM, from the local command line interface, run the registration script with this command:
sudo /opt/McAfee/move/bin/sva-configWhen prompted, click Yes to unregister with the vShield Manager.
Complete the procedure to unregister the product.
Turn off the SVM and delete it from the disk.
Continue with the new deployment.
Agentless configuration fails and displays failed status on the Trellix ePO - On-prem for the vCenter account. How do I fix this?
There are two causes for the status to show Configuration Failed:
If the vShield Manager is not registered with vCenter under Registered Cloud Accounts, then the vCenter appears as Not Configured on the Trellix ePO - On-prem console under Trellix MOVE AntiVirus (Agentless).
If the vShield Manager was first successfully registered with vCenter, but later removed from the Registered Cloud Accounts, it might not synchronize the vCenter account successfully, resulting in Not Configured being displayed on the Trellix ePO - On-prem console under Trellix MOVE AntiVirus (Agentless).
Register or re-register the vCenter account under Registered Cloud Accounts.
Log on to Trellix ePO - On-prem as an administrator.
Select Menu → configuration → Registered Cloud Accounts to open the Registered Cloud Account page.
Select the vCenter Account and click Delete.
Restart the ePolicy Orchestrator - On-premises Event Parser Service.
Select Menu → Registered Cloud Accounts, and confirm that the specific vCenter account is now deleted.
On the Registered Cloud Account page, click Actions, then select Add Cloud Account.
Type the vCenter Account Details on the Registered Cloud Accounts page, then click Test Connection.
If Test Connection is successful, click Next, then accept the certificate.
Click Finish, then click OK.
Check the configuration status of the vCenter Account, and now it shows as Configured.
The Trellix ePO - On-prem server now creates a task that synchronizes the vCenter according to the above configuration.
How do I keep disabled Windows Defender on Windows 10 system after installing Multi-platform?
Open the command prompt as an administrator.
Run these commands one after the other:
mvadm config set IntegrityEnabled=0sc stop mvgatsvcsc start mvgatsvcmvadm config set IntegrityEnabled=7
Close the command prompt window.
How do I avoid loss of network connectivity on virtual machines that use VMXNet3 NICs when deploying Agentless through Trellix ePO - On-prem?
Method 1:
Make sure that the version of VMware Tools installed on the virtual machine is the exact same build as the VMware Tools version supplied by the host. When the script is invoked and the builds match, only the needed Guest Introspection (vShield components) are installed.
Method 2:
Make sure that the virtual machines also have their e1000 NICs installed, to maintain network functionality when the script is invoked remotely.
How do I delete the IP pool when an IP address is already in use?
Run this SQL query to remove the IP Pool details from the Trellix ePO - On-prem database:
DELETE FROM [DC_AL_CONFIG_IPPOOL] WHERE IPPOOL_NAME='<POOL_NAME>'What do I do when the error "Critical error. Downloading Trellix ePO - On-prem init files failed" appears when deploying SVM through Trellix ePO - On-prem using an IP Pool?
When you deploy the SVM through Trellix ePO - On-prem using an IP Pool on the VMware ESX host, you might see these errors in the SVM console session:
ERROR [MOVEAL:pool-1-thread-1] svm.SvmEpoRegistrationTaskImpl - Trellix ePO - On-prem Registration failed for SVM with VM name and for the Hypervisor: HyperVisor_Name
ERROR [MOVEAL:pool-1-thread-1] svm.SvmEpoRegistrationTaskImpl - Reason being: Critical error. Downloading Trellix ePO - On-prem init files failed.
When you see these errors, make sure that the prefix length is correct for the IP Pool according to the characteristics of the destination network.
What is the error return code description for Trellix MOVE AntiVirus (Agentless) SVM registration with the vShield Manager?
When Trellix MOVE AntiVirus (Agentless) SVM registration fails, vShield Manager provides a Return Code error.
Return Code | Definition |
200 | OK operation successful. |
201 | Created: Entity successfully altered. |
400 | Bad Request: Internal error codes. See the Error Schema for more details. |
401 | Unauthorized: Incorrect user name or password. |
600 | Unrecognized vendor ID. |
601 | Vendor is already registered. |
602 | Unrecognized altitude. |
603 | Solution is already registered. |
604 | Invalid IPv4 address. |
605 | Invalid port. |
606 | Port out of range. |
607 | Unrecognized Managed Object Reference ID (MOID). |
608 | Location information is already set. |
609 | Location not set. |
610 | Insufficient rights. |
612 | Solutions still registered. |
613 | Solution location information still set. |
614 | Solution still activated. |
615 | Solution not activated. |
616 | Solution is already activated. |
617 | IP: Port already in use. |
618 | Bad solution ID. |
619 | vShield Endpoint is not licensed. |
620 | Internal error. |
I am using Trellix MOVE AntiVirus (Agentless) in an NSX-T environment. Where do I find the original name of the host name where the infection occurred instead of IP of Trellix MOVE AntiVirus SVM?
The Threat Event Log displays the host name of the system where the infection occurred.
Note
Make sure that you configured SVM Configuration details and tested connection settings in the SVM Settings policy on the Trellix ePO - On-prem server.
Log on to Trellix ePO - On-prem as an administrator.
Select Menu → Reporting → Threat Event Log.
I am using Trellix MOVE AntiVirus (Agentless) in an NSX-T environment. For some reason, Trellix MOVE AntiVirus SVM is doing nothing. How do I redeploy the Trellix MOVE AntiVirus SVM?
Navigate to the NSX-T console.
Navigate to System → Service deployment.
Select the service deployment and delete it.
After successful deletion, deploy the service again.
What do I do when error "Internal error on the server" appears when trying to delete a Registered Cloud Account?
This error occurs if you select Delete Tags, and one or more systems that do not belong to that cloud account erroneously have the same tag assigned.
Method 1:
From the Delete Account dialog box, deselect Delete Tags, and then click OK to delete the registered cloud account.
Method 2:
Identify one or more systems that do not belong to the registered cloud account but have the same tag assigned.
Remove the tag from the systems you identified.
Delete the registered cloud account.
I exported SVM Settings policy from one Trellix ePO - On-prem (source) to another Trellix ePO - On-prem (destination). The imported policy still has old Trellix ePO - On-prem (source) credentials. How do I fix this?
To update Trellix ePO - On-prem password in the imported SVM Settings policy, you must again configure the Trellix ePO - On-prem details about the Trellix ePO - On-prem server.
Log on to Trellix ePO - On-prem (destination) as an administrator.
Select Menu → Automation → MOVE AntiVirus Deployment.
On the Configuration tab, click General and enter and confirm the password of the Trellix ePO - On-prem.