(This topic is applicable to DLP-CSA-B and DLP-CSA-A.) To run the DLP Capture feature on the Trellix DLP 6600 appliance, connect the Trellix DLP 6600 appliance to the Trellix DLP Capture Storage Array after installing the RAID backup unit.
Caution
If the appliance is turned on, shut down the appliance before removing the power cords. Make sure you unplug the power cords and the network cables from the appliance before you open the appliance cover.
Before you handle the RAID controller and other hardware components, make sure that you fasten the Electrostatic Discharge (ESD) wrist strap to ground yourself to the chassis.
Unpack the Trellix DLP Capture Storage Array package and verify that you received all parts listed in the contents sheet.
Install the RAID controller inside Trellix DLP 6600 appliance
(This topic is applicable to DLP-CSA-B and DLP-CSA-A.) The preinstalled hard disk drives in the Trellix DLP Capture Storage Array are converted to a RAID volume when connected to the provided RAID controller. Install the controller inside the Trellix DLP 6600 appliance before connecting the appliance to Trellix DLP Capture Storage Array.
Fasten the disposable ESD wrist strap provided in the accessory kit to ground yourself before touching the RAID controller. Perform all installation at an ESD-safe workstation.
Open the appliance top cover, based on the type of the chassis. Opening the top cover requires breaking the tamper label. Once, the appliance setup is complete, replace the tamper label with a spare tamper label included in Trellix DLP Capture Storage Array accessory kit.
Look for the screw heads on the appliance top cover and unscrew them to open the appliance cover. There are four screws, one screw at the back and three screws at the front, which are concealed by anti-tamper labels.
Caution
Use the Phillips #2 screwdriver. Using an incorrect-sized screwdriver damages the screw heads and the appliance cover.
The top cover of the appliance is held in place by two thumbscrews. Unscrew the thumbscrews to open the appliance top cover; this is a tool-less installation. You don't have to unscrew the screw covered by a tamper label.
Remove the PCIe riser card attached to the motherboard of the appliance.
Use the PCIe riser card that is farthest from the power supplies, as the PCIe riser card nearest to the power supplies is connected to a NIC card.
Remove the screw retaining the PCIe riser card blanking plate.
Install the RAID controller bus connecter into the PCIe slot.
Fix the bracket screw to secure the RAID controller.
Callout
Description
1
Align the RAID controller with the PCIe slot.
2
Press the RAID controller to fit into the PCIe slot.
3
Use the bracket screw to secure the RAID controller.
.png)
Install the RAID backup unit inside Trellix DLP 6600 appliance
(This topic is applicable to DLP-CSA-B and DLP-CSA-A.) The super capacitor (RAID backup unit) protects the RAID cache in the event of a power outage. Install the super capacitors in the double tier enclosure and connect it to the RAID controller.
Install the RAID backup unit:
Disconnect the RAID backup adapter cable connected to the default RAID module in the appliance.
Install the RAID backup unit (super capacitor).
Callout
Description
1
Slide to release the enclosed single tier RAID backup.
2
Lift the latch to release the RAID backup unit from the single tier enclosure. Fix the existing super capacitor back into the provided double tier enclosure and then place the provided backup unit on top of the first backup unit.
3
Feed both Cable 1 and Cable 2 out of the enclosure.
4
Slide to insert the double tier enclosure, latched with both the RAID backup units.
.png)
Connect the cables.
Callout
Description
1
While using Set B, connect Cable 2 to the built-in RAID module in DLP 6600 appliance, and connect Cable 1 to the RAID controller card that manages the JBOD. Whereas while using Set A, you can use Cable 1 and Cable 2 interchangeably.
2
The super capacitor cable is connected to the connecter on the RAID controller, by default.
.png)
Fit the PCIe riser card back, fitted with the RAID controller into the appliance.
Note
Make sure that the PCIe riser card is fully seated into the card edge connecter on the motherboard.
Route the cable from the RAID controller toward the front of the fans and beside the chassis wall. Tuck in the cable firmly between the side of the plastic cover and the chassis. For bundling the cable, use the tie wraps included in the accessory kit box. Place the bundle beside Fan 1 to minimize the air flow restriction.
While using Set B, connect Cable 2 to the built-in RAID module in DLP 6600 appliance. Whereas while using Set A, you can use Cable 1 and Cable 2 interchangeably.
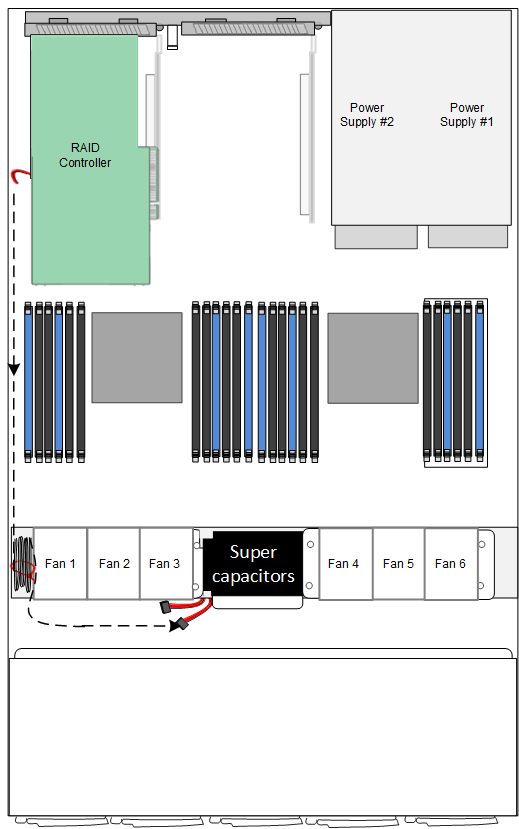
Close the appliance cover. Replace the tamper label with the spare tamper label to cover the screw heads. Install the appliance in a rack.
Connect the Trellix DLP Capture Storage Array to the Trellix DLP 6600 appliance
(This topic is applicable to DLP-CSA-B and DLP-CSA-A.) By connecting the Trellix DLP Capture Storage Array to the Trellix DLP 6600 appliance, you can use the DLP Capture feature.
Install the storage array in a rack.
Caution
Don't connect the power sources as both the appliance and Trellix DLP Capture Storage Array are set to on by default when the power sources are connected. Also, don't turn on the Trellix DLP Capture Storage Array until the appliance is set up. Apply the power only when the hardware installation is complete.
Locate the provided mini-SAS cable.
Connect one end of the mini-SAS cable to the RAID controller port at the back panel of the appliance and the other end to the Trellix DLP Capture Storage Array port.
Trellix DLP Capture Storage Array (DLP-CSA-B) connected to Trellix DLP 6600 appliance.png "GUID-118D1D59-627F-48AE-9FB2-E104FC3A14D5-low.png") Trellix DLP Capture Storage Array (DLP-CSA-A) connected to Trellix DLP 6600 appliance
Trellix DLP Capture Storage Array (DLP-CSA-A) connected to Trellix DLP 6600 appliance.png "GUID-AB55FDBD-3E23-4D86-A0EB-73ED89D9F861-low.png")
Connect the console serial port to the DLP 6600 appliance USB port using the assembled 3.5 mm jack cable — DB9 connecter — USB adapter and plug in the USB connecter to connect to the appliance.
Connect the power supply cables of the appliance and Trellix DLP Capture Storage Array to its respective power supply source.
Both the appliance and the storage array have dual hot-swap power supplies and automatically turn on when connected to the power supply.
The Trellix DLP Capture Storage Array is not recognized until the appliance software is reinstalled. Reinstall the appliance software when you connect a capture storage disk to an existing appliance.
Log on to the appliance as administrator.
From the appliance console menu, select Reboot to restart the system.
When you reboot the appliance, you get to see a GRUB menu.
Select Trellix DLP Network Prevent Internal Installation Image (Password required).
Follow the on-screen instructions to reimage the appliance.