Custom Indicators of Compromise (IOC) detection rules monitor your environment for specific threats. By defining rules tailored to your organization's threat landscape, you can proactively detect and respond to suspicious activity using EDRF.
Caution
When configuring custom IOC rules, use conditions and criteria relevant to your specific use case. Broad or generic rules might increase the number of alerts in the IOC Detection Rules dashboard.
Create a custom IOC detection rule
Log in to the Trellix EDR.
Go to Menu → IOC Detection Rules.
Click Create Rule.
Enter a rule Name and Description.
Configure the rule scope:
Server ID: Select the target server.
Category: The Custom category is selected by default.
Operating System: Select one or more target operating systems.
Define the detection conditions for the rule. A rule can have up to 30 conditions, with each condition containing multiple criteria.
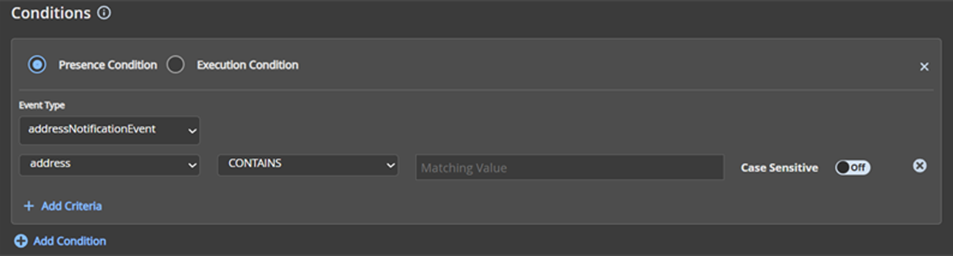
Click Add Condition.
Choose a Condition Type:
Presence condition: Use to detect threats that currently exist on your endpoints, such as known malware, suspicious files, or specific file hashes.
Execution condition: Use to detect threats that have been executed on your endpoints, such as process creation, file creation or modification, or code execution.
Build the condition by adding criteria:
Select an Event Type (see the Event Type reference table for a full list). Event types are predefined based on the selected operating system.
You can select only one Event Type per condition. To use a different Event Type, add a new condition. If you change the operating system while adding a condition, the application discards all previously added conditions and Event Types.
Click Add Criteria. For each criterion, select an Event Type Attribute (see the Event Type Attributes reference table for a full list), choose an Operator (see Operator reference table for full list), and enter a matching value.
Note
Ensure that the matching value is a valid data type for the selected event. If you enter an invalid data type, the condition is not created.
(Optional) Toggle Case Sensitive matching.
To create another condition that triggers the same rule, click Add Condition and repeat the steps from 1 - 5.
Important
Conditions and criteria use different logical operations:
Conditions use OR logic. The rule triggers if any one of its conditions is met.
Criteria within a single condition use AND logic. A condition is met only when all of its criteria are satisfied.
Click Save. The new rule appears on the IOC Detection Rules dashboard.
Manage IOC Detection Rules
Use the IOC Detection Rules dashboard to manage all custom and system-generated rules.
View and Filter Rules
Use the quick filters (Server ID, OS, Category) or column-level filters to find specific rules.
Click any rule in the list to see its configuration in the right-side panel.
Edit, Clone, Delete, Import, or Export a Single Rule
Click the settings icon at the end of a rule's row.
Select an action:
Edit: Modify the rule’s configuration.
Clone: Create a duplicate of the rule.
Delete: Remove the rule.
Export: Export the single rule to a CSV or XLSX file.
Delete multiple rules
Select the checkboxes for the rules to delete (you can select up to 50).
From the Actions drop-down menu, select Delete.
Note
You can't delete system-generated rules that are marked as mandated in the Category column.
Import rules
Click Import Rule.
Select the Server ID and Operating System(s).
Upload a JSON or Rule file (max 1 MB).
Click Import.
Export Multiple Rules
Click the Export button to download all rules in the current filtered view as a CSV or XLSX file.