Endpoint Security AMSI Module User Guide Release 2.1.0
Last Updated: September 17, 2023

Contents
Module Overview .................................................... 4
Supported Platforms .................................................... 4
Installing the AMSI Module .................................................... 5
Installing the AMSI Server Module .................................................... 5
Installing the AMSI Agent Module .................................................... 5
Uninstalling the AMSI Module .................................................... 7
Uninstalling the AMSI Module Completely .................................................... 7
Uninstalling the AMSI Agent Module .................................................... 7
Configuring the AMSI Module .................................................... 8
Enabling the AMSI Module .................................................... 8
Enabling the AMSI Server Module .................................................... 8
Enabling the AMSI Agent Module .................................................... 8
Verifying Installation .................................................... 9
Disabling the AMSI Module ................................................... 10
Disabling the AMSI Server Module ................................................... 10
Disabling the AMSI Agent Module ................................................... 10
Configuring the AMSI Server Module ................................................... 11
Logging Settings ................................................... 11
Alert Settings ................................................... 12
Configuring the AMSI Agent Module ................................................... 12
Verifying AMSI Detection ................................................... 12
Configuring YARA Rule Updates ................................................... 13
Configuring Policy Exclusions ................................................... 13
Changing the Size of the Agent Database ................................................... 15
Configuring Detection Settings ............................................................... 16
Managing Disk Space Use ................................................................. 17
Policy Recommendations for Windows Servers with High Workload Systems ........................ 19
Configuration API ................................................................. 19
Get AMSI Configuration ............................................................. 19
Update AMSI Configuration .......................................................... 20
Single Artifact Acquisition by Scan ID .............................................. 21
Multiple Artifact Acquisition ........................................................ 22
Command-Line Sample Template for Acquiring Artifacts ................................. 22
Alerts .......................................................... 24
Alert Details ................................................................. 24
Troubleshooting ......................................................... 26
1 | Module Overview
Module Overview
The AMSI Module for FireEye Endpoint Security monitors, detects, and blocks suspicious scripts using the AMSI interface and generates alerts when malicious scripts are found.
The module compares scripts to YARA rules downloaded from the FireEye DTI. If any script matches a rule, the module sends the script objects for an additional FireEye Endpoint Security scan. An event with detection metadata is then sent to the Endpoint Security controller, and an alert is generated and displayed in the Alerts page.
The module is installed and enabled on host sets using the AMSI policy.
Supported Platforms
This release of the AMSI Module 2.1.0 is supported on Endpoint Security with Endpoint Agent running on Windows 10 and Windows Server 2016 or later. The Module is supported only on the Windows platform.
Note
Installing the AMSI Module 2.1.0 on Endpoint Security 5.0.3 or earlier, or with Endpoint Agent 31.x.x or earlier, is not supported.
Windows 8, Windows Server 2012, macOS, and Linux platforms are not supported.
2 | Module Overview
Installing the AMSI Module
You can install the AMSI Module using the Endpoint Security Web UI or download the CMS package from the FireEye Market.
Installing the AMSI Server Module
Select one of the following options to install the module:
- To install the AMSI Module using the Endpoint Security Web UI:
- Log in to the Endpoint Security Web UI as an administrator.
- From the Modules menu, select Endpoint Module Administration.
- Click the Available Modules tab and locate AMSI in the Module list.
- In the Actions column, click the gear icon, and click Install.
- Click Install on the dialog box.
- To download the module installer CMS package, go to the FireEye Market, then upload the module CMS file to your Endpoint Security Web UI. The module is disabled by default. When the module is installed successfully, it appears on the Modules menu tab.
For more information about installing the server module, see the "Installing or Uninstalling Modules" section in the Endpoint Security Server User Guide.
Installing the AMSI Agent Module
- Log in to the Endpoint Security Web UI as an administrator.
- From the Admin menu, select Policies to access the Policies page.
- On the Policies page, in the Actions column, click the gear icon for the appropriate policy assigned to the host that you want to deploy AMSI to, and select Edit Policy.
- On the Edit Policy page, click Categories, and select AMSI. Click Apply.
- Click Save.
These steps inform the endpoints on the local systems to download the agent module and install it during a configuration update. To enable the module, see Configuring the AMSI Module.
After installation, the AMSI Module creates an instance of FireEye xagt.exe with AMSI in its command line. This is a container for the AMSI agent and related components.
Endpoint Security AMSI Module User Guide Release 2.1.0
2 | Module Overview
application to interact with agent services. The process runs under the system account like any other agent instance.
AMSI Module registers FeAmsiProvider.dll as a FireEye AMSI provider with Windows OS. The FireEye AmsiProxy.dll library is loaded into PowerShell with other runtime libraries and scripting processes that support AMSI.
6
Endpoint Security AMSI Module User Guide Release 2.1.0
3 | Module Overview
Uninstalling the AMSI Module
Uninstalling the AMSI Module removes AMSI policy settings from all policies, removes the server module from the management server, and removes the agent modules from endpoints on host systems. You do not need to disable AMSI before you uninstall it. You can also remove the agent module from a host set without removing the module from the server.
Uninstalling the AMSI Module Completely
To uninstall the AMSI Module using the Endpoint Security Web UI, complete the following steps:
Log in to the Endpoint Security Web UI as an administrator.
From the Modules menu, select Endpoint Module Administration.
Click the Installed Modules tab and locate AMSI in the Module list.
On the Modules page, locate the AMSI module and click the Actions icon.
Select Uninstall and click Uninstall in the confirmation window.
A message at the top of the page tells you that module uninstallation succeeded.
Uninstalling the AMSI Agent Module
Log in to the Endpoint Security Web UI as an administrator.
From the Admin menu, select Policies to access the Policies page.
On the Policies page, in the Action column, click the gear icon for the policy that you want to remove the AMSI from, and select Edit Policy.
On the Edit Policy page, click Categories.
Clear the AMSI checkbox and click Apply.
Click Save.
Endpoint Security AMSI Module User Guide Release 2.1.07
4 | Module Overview
Configuring the AMSI Module
The AMSI Module consists of a server module and an agent module. The agent module is installed and enabled on agents using the AMSI policy. If you disable the server module, this will automatically disable the agent module for all policies.
Enabling the AMSI Module
Before you enable the AMSI Module, ensure that you understand the concepts of host sets and assigning a policy. For more information, see the Endpoint Security Server User Guide.
Enabling the AMSI Server Module
Log in to the Endpoint Security Web UI.
From the Modules menu, select Endpoint Module Administration.
On the Modules page, click Installed Modules.
Locate the AMSI module in the list.
In the Actions column, click the gear icon, and select Enable.
To configure AMSI server settings, see Configuring the AMSI Server Module.
Note
Enabling the server module does not automatically enable the AMSI on the agents. You can also view and update the AMSI configuration using the API.
Enabling the AMSI Agent Module
To enable AMSI on a host set, complete the following steps:
Log in to the Endpoint Security Web UI as an administrator.
From the Admin tab, select Policies.
On the Policies page, click the appropriate policy.
Select AMSI in the Configurations list.
8
Endpoint Security AMSI Module User Guide Release 2.1.0
4 | Module Overview
5. In the AMSI details panel, move the AMSI toggle to On, and click Save.
The AMSI Module will be enabled the next time the configuration is updated on the agent.
Verifying Installation
After you install and enable the AMSI Module, check for the existence of module files under C:\ProgramData\FireEye\xagt\exts\amsi\sandbox and C:\ProgramData\FireEye\xagt\exts\plugin\amsi.
The working status of the plug-in can be verified on the Endpoint Security server using the API /hx/api/v3/hosts/<agent_id>/sysinfo call to review the system information (SysInfo) received from the endpoint agent. You should see the following fields in the SysInfo JSON data.
"AmsiStatus":"running",
"Amsi": {
"version":"1.2.0",
"plugin-supported":"true",
"provider-registered":"true",
"intel-version":"464-lb.101",
"rules-version":"2021.01.20",
"intel-timestamp":"2021-02-17T19:04:16Z",
"intel-received-timestamp":"2021-03-02T16:00:48Z",
…
}Field Name | Description |
|---|---|
plugin-supported | AMSI is only supported on Windows 10 or Windows Server 2016 and above. When this is set to "false", the OS does not support the AMSI feature. |
provider-registered | Indicates whether the FireEye AMSI Module is registered with Windows OS. |
Intel-version | Intel version as seen in the Security Endpoint controller. |
Rules-version | AMSI rules version found in a subpackage in the Intel package. |
Intel-timestamp | Intel timestamp seen in the Security Endpoint controller. |
Endpoint Security AMSI Module User Guide Release 2.1.09
4 | Module Overview
|
Field Name |
Description |
|---|---|
| Intel-received-timestamp |
Intel timestamp when the endpoint receives AMSI rules. |
The AMSI agent module creates log files in c:\Windows\Temp. Depending on the scenario, the following files are created:
amsi_install.logamsi_uninstall.logamsi_preupgrade.logamsi_upgrade.log
Check agent logs for additional messages related to the plug-in installation.
The log file for the server module installation is stored on the server in /var/log/supervisor/amsi-server_<version>_<unique_id>.log.
Disabling the AMSI Module
Disabling the server module automatically disables AMSI in all existing policies.
Disabling the AMSI Server Module
Log in to the Endpoint Security Web UI as an administrator.
From the Modules tab, select Endpoint Module Administration.
On the Modules page, click Installed Modules.
Locate the AMSI module in the list.
In the Actions column, click the gear icon, and select Disable.
Disabling the AMSI Agent Module
Log in to the Endpoint Security Web UI as an administrator.
4 | Module Overview
-
From the Admin menu, select Policies.
-
On the Policies page, locate the appropriate policy for the agent on which you want to disable AMSI.
-
In the Actions column, click the gear icon and click Edit Policy.
-
In the Edit Policy page, in the Configurations panel, click AMSI.
-
In the details panel, move the Enable AMSI on the host toggle to Off.
-
On the Edit Policy page, click Save.
Configuring the AMSI Server Module
-
Log in to the Endpoint Security Web UI as an administrator.
-
From the Modules menu, select Endpoint Module Administration to access the Modules page.
-
On the Installed Modules page, locate the AMSI Module.
-
In the Actions column, click the gear icon, and select Configure.
-
The AMSI Settings page opens.
Logging Settings
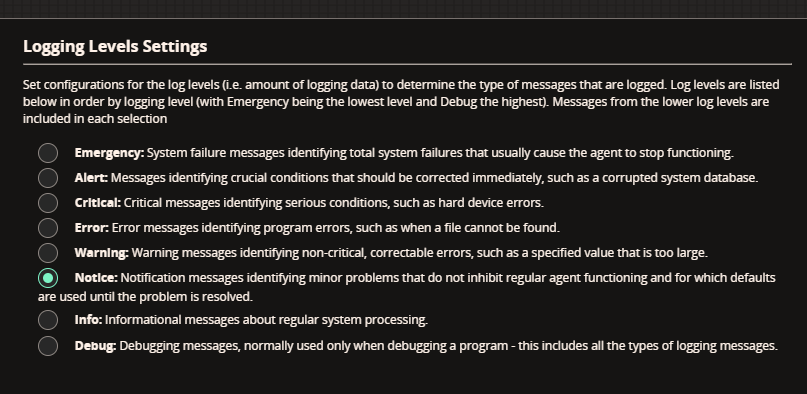
In the Logging Settings page, you can control what level of messages are logged, from emergency system failures to debugging messages. Emergency is the highest level and it includes all lower levels.
Endpoint Security AMSI Module User Guide Release 2.1.0
11
4 | Module Overview
Alert Settings
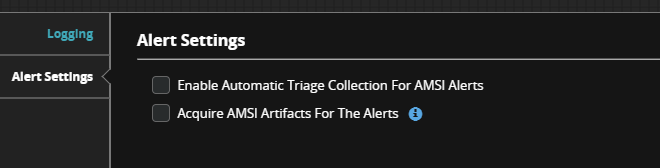
In the Alert Settings section, you can select Enable Automatic Triage Collection for AMSI Alerts. This option uses the standard auto-triage collection method and provides useful insights into the environment.
To collect AMSI artifacts, you can select Acquire AMSI Artifacts for the Alerts. This option ensures that the AMSI Module obtains scan requests from various sources and displays the results of the scan requests in the Acquisitions page providing metadata of the scan request and the payload.
Configuring the AMSI Agent Module
For the AMSI to function on the agent, you must enable the agent on the policy. See Enabling the AMSI Agent Module.
12
Endpoint Security AMSI Module User Guide Release 2.1.0
4 | Module Overview
Verifying AMSI Detection
To verify AMSI Module detection, execute the following sample script using PowerShell.
iex([System.Text.Encoding]::UTF8.GetString([Convert]::FromBase64String('JHJlc3AgPSBjbnZva2UtV2ViUmVxdWVzdHMgICk=')))If the AMSI Module is enabled and the content is updated, you will receive the following AMSI alert Suspicious Base64 Decoding using PowerShell.
Configuring YARA Rule Updates
The AMSI Module uses YARA rules to detect suspicious script execution. These rules are released as part of the FireEye DTI content package and downloaded to the Endpoint Security controller at regular intervals. You can control how often endpoints poll for and download the latest content in the Rule Updates section. The default update setting is one hour.
To configure rule updates:
- Log in to the Endpoint Security Web UI.
- From the Admin menu, select Policies.
- On the Policies page, select the policy you want.
- On the Edit Policy page, in the Categories panel select AMSI.
- On the AMSI details panel, in the Rule Updates section, select the duration you want in the Hours, Minutes, and Seconds fields.
- Click Save.

In this release, you cannot modify the downloaded content or create new custom rules.
Each YARA rule is a simple JSON-format text file. In this release, each rule is approximately 1 KB. Several hundred rules may be released to the DTI for an initial release. Updates may vary in size.
Endpoint Security AMSI Module User Guide Release 2.1.0
13
4 | Module Overview
Configuring Policy Exclusions
To improve performance and avoid generating false positive alerts, add the script or application to the exclusion list.
To configure exclusions:
Log in to the Endpoint Security Web UI.
From the Admin menu, select Polices.
On the Policies page, select the policy you want.
On the Edit Policy page, in the Configurations section, select the AMSI tab.
On the AMSI details panel, in the Policy Exclusion section, enter the appropriate values to complete the exclusion.
In the Parameter Name field, select the appropriate endpoint.
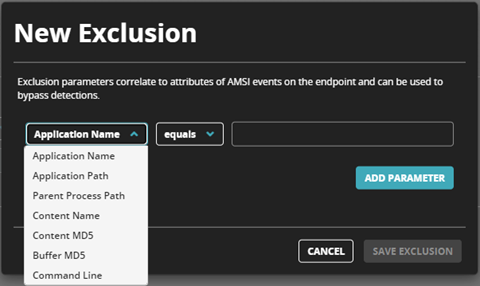
In the Match Criteria field, select the appropriate operator.
In the Parameter Value field, enter the value.
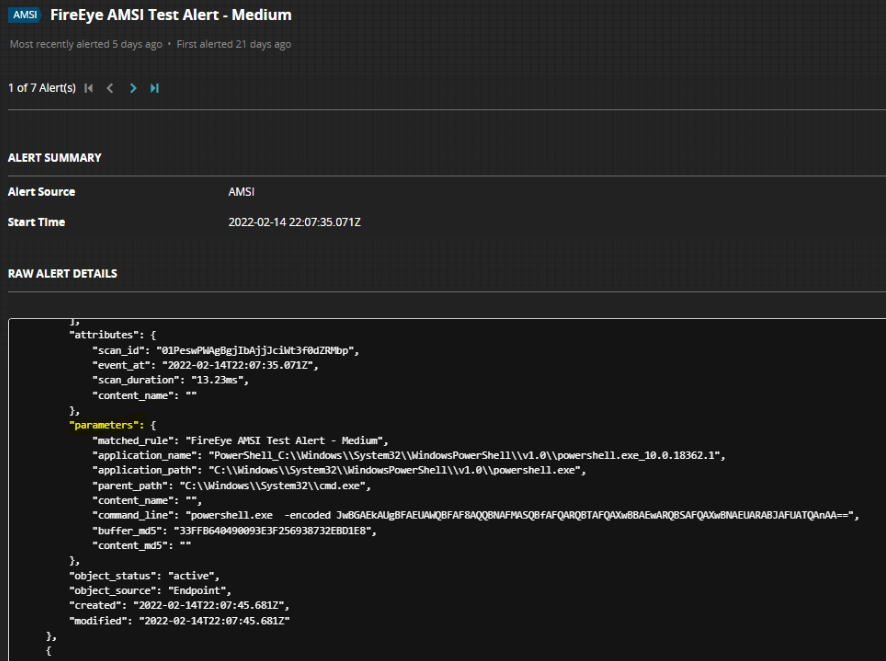
To find the parameter value, click the Alerts tab, select an AMSI alert from the grid, and click Alert Summary. For more information, see Alert Details.
4 | Module Overview
9. Click Save Exclusion.
Note
DTI intel updates may add exclusions to disable detections that generate excessive false positive alerts.
Changing the Size of the Agent Database
The AMSI Module stores scanned data in an encrypted SQLite database on the endpoint, which it scans at regular intervals. By default, the database size is 100 MB. A smaller database saves space, but it will have less historical data for AMSI audits. For more information, see Managing Disk Space Use.
To change the database size to suit your environment:
- Log in to the Endpoint Security Web UI.
- From the Admin menu, select Policies.
- On the Policies page, select the policy you want.
- On the Edit Policy page, click the AMSI tab.
- In the AMSI details panel, in the Agent Database section, in the Maximum Database Size field, enter the size you want.
On servers or systems that have a high workload, FireEye recommends that you enable the Discard Clean Scans option. This reduces disk input/output (IO) operations and database space usage. However, AMSI audits will include only detected and blocked artifacts.
Endpoint Security AMSI Module User Guide Release 2.1.015
4 | Module Overview

Configuring Detection Settings
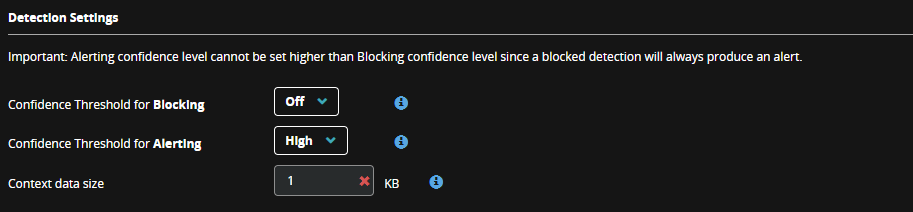
The AMSI Module generates alerts or blocks execution when any script matches a rule. You can control the number of alerts generated by using the Confidence Threshold for Alerting section in Policies. The confidence threshold allows you to suppress alerts based on a triggered rule’s confidence level. For example, a High level setting only alerts on rules with a high confidence level, and a Low level setting alerts on every rule. The alert includes an extract of the suspicious script for quick analysis. Use the Context data size option to control the size of the sample script.
When blocking is enabled, the execution of scripts is blocked when a detection matches the selected confidence level or higher. By default, blocking is disabled, alerting is High, and the default data size is 1 KB.
Note
To prevent AMSI blocking a known allowed script, add it to the exclusions rules in policy.
To configure Alerts:
Log in to the Endpoint Security Web UI.
From the Admin menu, select Policies.
On the Policies page, select the policy you want.
On the Edit Policy page, in the Configurations section, select the AMSI tab.
On the AMSI details panel, in the Detection Settings section, select settings for confidence level, blocking, and data size.
Click Save.
16
Endpoint Security AMSI Module User Guide Release 2.1.0
4 | Module Overview
Note
Confidence levels are decided by the FireEye research team and applied to each rule. The confidence levels are tuned based on the observations from internal testing and feedback from the field.
Managing Disk Space Use
The AMSI Module provides advanced settings to tune the performance and disk input/output (IO) operations. Default values address most scenarios. If you modify the settings, make sure that you validate the outcome.
Note
If your system has a high AMSI workload that uses large buffers for scanning operations, the AMSI Module database size may exceed the configured value. Workload is defined as the number of AMSI requests per minute and the average payload size of each request. The database may grow if there are few requests with large payloads, or many requests with small payloads.
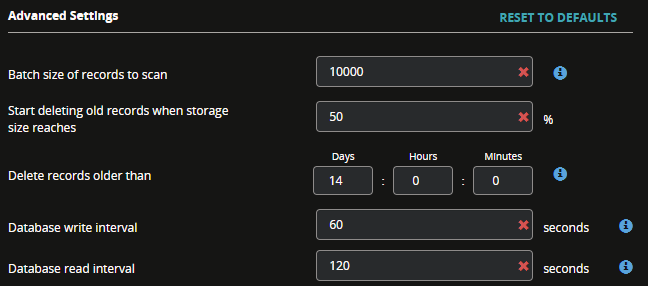
Use the following guidelines to monitor your usage and then adjust the settings relative to your findings.
Advanced Settings in Policy | Description | Default Values | Recommendation |
|---|---|---|---|
Batch size of records to scan | The number of records to scan during a scan | 10 KB | Increase this value until you get a satisfactory |
Endpoint Security AMSI Module User Guide Release 2.1.0 17
4 | Module Overview
| Advanced Settings in Policy | Description | Default Values | Recommendation |
|---|---|---|---|
|
cycle. The AMSI Module stores the records in a database and scans at configured intervals to control the disk IO operations. Increasing the batch size of records to scan, may temporarily increase the memory usage allocated to the AMSI process on your system. |
result. | ||
| Delete records older than |
The length of time to keep records. |
14 days |
Reduce this to an hour or less until you get a satisfactory result. |
| Database write interval |
How often the database writes data to the disk. Keep this value lower than the read interval. |
15 seconds. Minimum value is 5 seconds. |
Set the write interval to half the read interval value and reduce the value until you get a satisfactory result. |
| Database read interval |
How often the database scans the records. When the scan is complete, the database size is checked against the policy. If the database size needs to be reduced, records will be deleted to bring it within the configured limits. |
30 seconds |
Reduce this to 10 seconds and increase until you get a satisfactory result. A low value can lead to a temporary increase in CPU consumption. |
4 | Module Overview
Important
Database size management involves the creation of a journal file before the database size is reduced. This journal file is normal database behavior and can double the size of the database temporarily. It is not a reason to change the database settings.
Policy Recommendations for Windows Servers with High Workload Systems
To enable audits, the AMSI Module stores scan requests in a database. If your AMSI workload is high, the database may grow rapidly. To ensure optimum performance in this environment, follow these recommendations:
-
Add exclusion parameters. For more information. See Configuring Policy Exclusions.
-
To avoid writing all clean scans to the database, enable the Discard Clean Scans option. For more information, see Changing the Size of the Agent Database.
-
To avoid repeated vacuuming of the database, high CPU usage, and high disk IO operations, increase the database size. For more information, see Changing the Size of the Agent Database.
-
Reduce the time that records are kept by changing the Delete records older than setting. For more information, see Advanced Settings.
Configuration API
The configuration API is available through the configuration endpoint of the Endpoint Security Server REST API. For more information about how to interact with the Endpoint Security Server API, refer to the Endpoint Security REST API Guide.
Get AMSI Configuration
Use the following API request to get the current configuration tree for the AMSI Module.
Request
|
HTTP Verb |
Path |
Parameters |
|---|---|---|
|
GET |
hx/api/services/config/tree |
?node_name=/config/amsi |
Endpoint Security AMSI Module User Guide Release 2.1.0 19
4 | Module Overview
Response
|
Key |
Notes |
|---|---|
|
Data |
List of configuration properties. Each property has the following attributes:
|
Configuration Options
|
Property |
Path |
Data Type |
|---|---|---|
|
Logging Level |
/config/amsi/logging/level |
Type: string Default: notice Values: Emergency, Alert, Critical, Error, Warning, Info, Debug |
Update AMSI Configuration
Use the following API request to update the AMSI Module server configuration settings.
Request
|
HTTP Verb |
Path |
Parameters |
|---|---|---|
|
PUT |
hx/api/services/config/tree |
?node_name=/config/amsi |
Request Headers
4 | Module Overview
| Header Property | Value |
|---|---|
| Content-Type | application/json |
| X-FeApi-Token | {{ random token string }} |
The request body contains a JSON object with a data property containing an array of JSON objects for each configuration setting to update. The following example updates the logging level setting to info:
Request Body
{
"data": [
{
"default_value": "notice",
"name": "/config/amsi/logging/level",
"type": "string",
"value": "info"
}
]
}
Single Artifact Acquisition by Scan ID
To acquire a single artifact, you need a scan ID. You can find the scan ID in the AMSI scan request, in the AMSI alerts attributes field.
The following JSON example obtains a single artifact by Scan ID.
Request Body
{
"commands": [
{
"name": "amsibuffer",
"parameters": [
{
"name": "scanID",
"value": "p2Z740dC2dFo603LKTEk2TRcSLAYLf2o"
}
]
}
]
}
4 | Module Overview
Multiple Artifact Acquisition
To obtain multiple artifacts over a time range, use the following time range-based JSON example.
Request Body
{
"commands":
[{
"name": "amsibuffer",
"parameters":
[{
"name": "intervalStart",
"value": "<Date
time in Zulu format (e.g.2019-09-16T19:00:000Z)>"
},
{
"name": "intervalStop",
"value": "<Date
time in Zulu format>"
}
]
}
]
}
Command-Line Sample Template for Acquiring Artifacts
curl -X POST "https://<ip address>:3000/hx/api/v3/hosts/<Host_ID>/live" \
-H "Accept: application/json" \
-H "X-FeApi-Token: <API_Token>" \
-H "Content-Type: application/json" \
-d '{"name":"<Audit_name>","script":{"b64":"<Base64_encoded
22
Endpoint Security AMSI Module User Guide Release 2.1.0
4 | Module Overview
job_script">}}'For more information on using the Endpoint Security API, refer to the Endpoint Security API Guide.
Endpoint Security AMSI Module User Guide Release 2.1.0
23
5 | Module Overview
Alerts
Alerts from the AMSI Module are displayed on the Alerts page of the Endpoint Security Web UI with the AMSI alert type. When you click the alert, the Hosts page display the details of the alert.
Alert Details
When you select a single AMSI alert on the Alerts page, the details of the alert are shown on the Hosts page of the Endpoint Security Web UI.
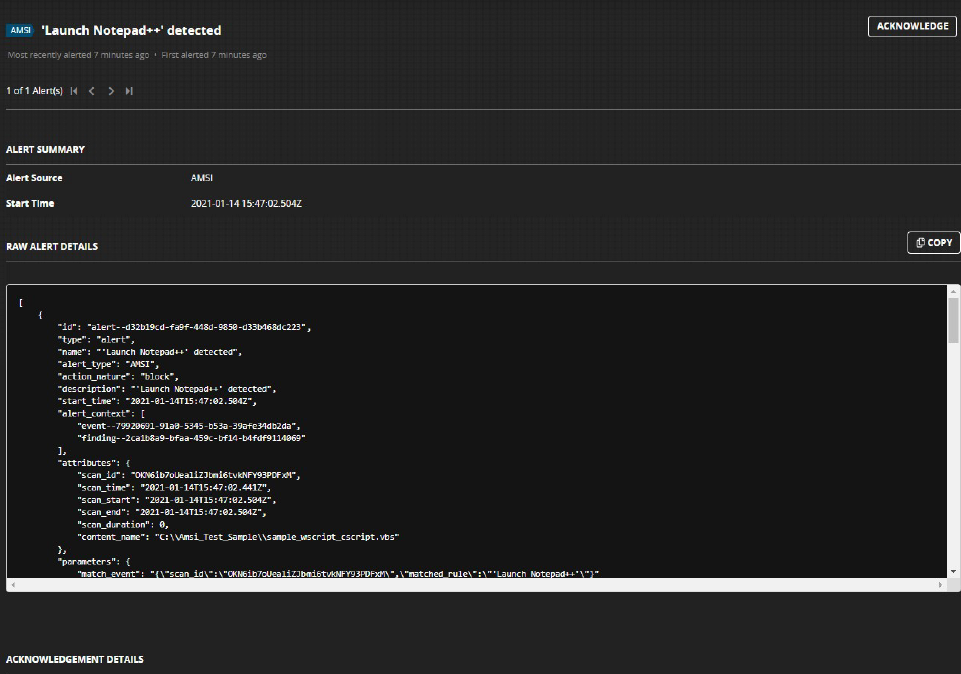
The Endpoint Security server provides a raw view of the alert details in JSON format. Most of the information available in the AMSI home page is reformatted to generalize the alerts data coming from various modules. The following table shows notable alert fields that the AMSI Module generates.
|
Alert Fields |
Description |
|---|---|
|
Event_at |
Time when the script was executed. |
|
Content_name |
The script name if the file is on the disk. This field can also be used to indicate when a DotNet assembly is dynamically loaded. |
24Endpoint Security AMSI Module User Guide Release 2.1.0
5 | Module Overview
|
Alert Fields |
Description |
|---|---|
|
matched_rule |
Contains the rule name and additional metadata, such as MetaData and MatchedStrings, that help analyze the detection. |
|
Intel_version |
Version of the intel package that includes the AMSI rules. |
|
Rules_version |
AMSI rules package version. |
|
Amsi_data |
Suspicious data scanned by AMSI. |
|
Arguments |
Command-line arguments passed to the source process. |
|
Attributes |
Scan metadata. |
|
Account_name |
User account that the scripting engine targeted. |
Endpoint Security AMSI Module User Guide Release 2.1.025
Troubleshooting
The AMSI Module does not block the script execution.
The block action may not work if the block setting in not correctly configured in policy with the appropriate confidence threshold level. For more information, see Configuring Policy Exclusions.
The AMSI module cannot detect a script execution that occurred before the AMSI Module has been initialized and running.
Note
The AMSI Module relies on security content to detect malicious activities. Make sure that the AMSI Module is initialized and the content has been successfully downloaded. This information is available in the agentInfo audit in the sysInfo data.

The FireEye AMSI provider does not load in PowerShell, or any of the supported scripting engines.
This may occur when the FireEye Endpoint Security is installed side-by-side with other competing security solutions. Try to configure the other security products to trust or exclude FireEye binaries so that they can co-exist.
The AMSI Module does not generate multiple alerts if I run a PowerShell script file on disk in a loop.
Most scripting engines implement performance optimization techniques to avoid scanning script contents repeatedly. In the case of PowerShell, the AMSI Module only scans the content once unless the script file on the disk is modified, or a new instance of PowerShell is invoked,
Several AMSI providers are registered, but some scripts are scanned by only one provider.
When multiple AMSI providers are registered, the Microsoft AMSI framework decides which provider scans the script first. If an AMSI provider determines that a script is malicious, other providers may not get an opportunity to scan it.
The AMSI Module database has grown beyond the defined limit in policy and filled the disk.
There is no combination of settings that will maintain the database size in all environments. For more information, see Managing Disk Space Use and Policy Recommendations for Windows Servers with High Workload Systems.
COPYRIGHT
Copyright © 2026 Musarubra US LLC.
Trellix and FireEye are the trademarks or registered trademarks of Musarubra US LLC, FireEye Security Holdings US LLC, and their affiliates in the US and /or other countries. Other names and brands are the property of these companies or may be claimed as the property of others.