Protecting your networks with Trellix Rogue System Detection
Unprotected systems, known as rogue systems, are often the weak spot of any security strategy, creating entry points that viruses and other potentially harmful programs can use to access your network.
Trellix® Rogue System Detection provides near real-time discovery of rogue systems by using Rogue System Sensors installed throughout your network. These sensors use various passive and active network discovery techniques to detect systems connected to the network.
When a sensor detects a system on the network, it sends a message to Trellix® ePolicy Orchestrator - On-prem ). Trellix ePO - On-prem then checks whether the detected system has an active Trellix® Agent installed. If the detected system is unknown to the server, Trellix RSD provides information to Trellix ePO - On-prem to allow you to take remediation steps, which include alerting administrators and automatically deploying a Trellix Agent to the system.
Benefits of Trellix RSD
Asset management, including Trellix RSD, is an important part of overall organization security.
Security software often focuses on assets that are known and permitted within the network environment, but is not designed to detect and control rogue systems that are connected to the network. Rogue devices are not part of the management framework, which means they are not part of any standards, policies, security controls, or patch updates.
Rogue systems can include devices that we often overlook, and include things as varied as systems that employees bring from home, Voice over IP devices, printers, test systems, and even manufacturing equipment.
Rogue systems pose a unique threat to organizations, present vulnerabilities, and can allow sensitive data to be exposed or stolen. Conficker is an example of a severe attack that infected many organizations after unprotected laptops gained access to the corporate network.
Managing rogue assets
These examples show the challenge of managing rogue assets:
Unmanaged assets are often insufficiently patched and protected, and vulnerable to attack. These systems can harbor undetected malware. Not only is the asset compromised, but the asset can attack and damage other systems in the network.
Contractor and visitor systems that connect to an organization’s network often do not meet established security policies. Unprotected systems or systems with an undetermined protection level that join the network can create compliance issues. Attackers can also use the legitimate data and access rights provided to these systems to extract sensitive information or to distribute malware.
Rogue systems detected on the network can indicate physical malicious activity within the corporate network, and can create unprotected wireless access points that bypass firewalls. Without actively monitoring the network for rogue systems, there is no way that an administrator can determine the number of unmanaged systems on the network. The greater the number of unmanaged systems there are, the greater the risk to the network.
4Trellix Rogue System Detection 5.0.7 Product Guide
Trellix recommendations
Trellix recommends three stages to achieve identification and then appropriately mitigate rogue assets on the network:
Identify all assets on the network — Identify all devices on the network and gain full visibility. Trellix RSD 5.x replaces the old sensor with a more advanced sensor. The new sensor improves upon previous releases with:
Detection of additional rogue devices
Faster detection of rogue devices
Improved accuracy for rogue device attributes (such as OS detection)
Report assets back to Trellix RSD — Compare the results to existing managed assets and a rule set created for determining the true status of a system. Trellix RSD allows administrators to create and apply rules, ignore known managed systems, and filter unmanaged devices that are of no threat by adding them to the Exceptions List.
Exceptions are systems that don’t need a Trellix Agent and from which you no longer want to receive detection information. Common examples include voice over IP telephones and switches. At the same time, you can identify unmanageable non-corporate devices, such as personal cell phones.
You can also add systems to the Rogue Sensor Blacklist. These are often systems that are adversely affected if a sensor is installed on them.
Convert a rogue system to a managed client — Once you have a list of rogue devices, Trellix RSD allows you to execute a series of actions on the results. These are systems that you don't want on your network, and the solution can be to generate a simple alert to inform the administrator that these rogue systems are present and to take appropriate action.
For unmanaged corporate resources, the administrator can choose to make it a managed system or add it to the Exceptions List. While automation saves time and reduces the scope for errors, manual administration is necessary when testing and commissioning a solution or changing policies.
Automatic Responses
Use the Automatic Responses feature of Trellix ePolicy Orchestrator - On-prem to handle rogue systems:
A rule configured to push out the Trellix Agent using domain administrator credentials converts an unmanaged system to a managed system.
Preconfigured systems placement rules can determine where to place the rogue device in the System Tree and trigger execution of the correct policies and installation tasks. These rules can turn an unmanaged system into a fully managed, protected, and compliant system. Administrators can use this method to deploy protection to entire networks with minimal effort.
See the Trellix ePolicy Orchestrator - On-prem Product Guide for more information about Automatic Responses.
Rogue systems and your network
Rogue systems access your network, but are not managed by Trellix ePO - On-prem. Even in a managed network environment, some systems might not have an active Trellix Agent on them.
Any device on your network with a network interface card (NIC) also appears as a rogue system. On systems with multiple NICs, each resulting interface is identified as a separate system. When these interfaces are detected, they appear as multiple rogue systems. You can specify the steps Trellix ePO - On-prem takes when multiple interfaces are detected in the same way that you specify remediation steps for other detected rogue systems.
Trellix RSD interface and system definitions
For Trellix RSD, each of these terms has a unique meaning. Do not use them interchangeably.
Interface — Trellix RSD binds to an interface. Systems can have multiple interfaces because they have multiple NIC cards, or because they connected to multiple subnets and the same NIC is given multiple IP addresses.
System — In Trellix RSD, a system has a specific DNS Name and OS Platform, which appears in the Detected Systems Details.
Note
Each system can have multiple interfaces in the Detected System Interfaces list.
Trellix RSD states
Trellix RSD uses different states to categorize systems, sensors, and subnets, making it easier to monitor and manage your network.
These states determine the following:
Overall system status
Rogue System Sensor status
Subnet status
The Detected Systems page displays information about each of these states through corresponding status monitors. This page also displays the 25 subnets with the most rogue system interfaces in the Top 25 Subnets list and the adjacent Detected System Interfaces by Subnet table.
The Top 25 Subnets list and Detected System Interfaces by Subnet table are linked together. The list on the left, Top 25 Subnets, is the top 25 most rogue-infested subnets. It is a not a complete list because you can have many more subnets with rogue systems. In the list, you can click Ignore to ignore a subnet. This action doesn't delete the subnet, but means that I know I can get detections on this subnet, but I don't want to see them.
Tip
Trellix recommends that you do not choose to ignore subnets. If you ignore subnets, you have decided that a subnet can have rogue systems connected.
The Detected System Interfaces by Subnet table allows you to monitor and take actions on the detected interfaces. For example, you can:
Monitor the Last Detected Time to determine when the system NIC was last detected on the Trellix managed network. A system whose interface has not been detected for a long time might have been disconnected from the network.
Click the system row to display the Detected Systems Details page and see all interfaces associated with this system.
Select a system and click Actions to add the system interface to the Exceptions List, add the system to the System Tree, deploy agents, and more.
How rogue systems are detected
To configure and manage Trellix RSD, it is important to understand which components are used and how the rogue systems are detected.
Trellix Agent
The ideal ePolicy Orchestrator managed network has a Trellix Agent installed on all systems in the network. Using the Trellix Agent, those systems actively communicate their status back to the Trellix ePO - On-prem server regularly. To eliminate rogue systems, when systems are added to the ePolicy Orchestrator managed network, make sure that they have the Trellix Agent installed:
As part of the image installed on the system before connection
Automatically when synchronized with Active Directory
As an automatic response associated to an ePolicy Orchestrator System Tree
Manually by the administrator from the System Tree
Trellix RSD components
Trellix RSD uses the following to discover and report rogue systems:
Trellix RSD extension — Installed on the Trellix ePO - On-prem server
Trellix RSD server settings — Configured as part of the advanced server settings
Rogue System Sensors — Configured as policy and server settings
Automatic Responses — Automatically adds the Trellix Agent to the rogue system or notifies the administrator of the rogue system
Trellix Rogue System Detection 5.0.7 Product Guide7
 Note
Note
Optionally, you can configure a Rogue System group in the System Tree. This group is a place to move the rogue systems to until the Trellix Agent is deployed and the system can be moved to an appropriate group.
Rogue System Sensors
Rogue System Sensors detect rogue systems on the local subnets they are installed on.
Sensors can be installed on the subnet:
Using all systems in a subnet — Configure the Rogue System Sensor election feature to determine which sensors are active and which are passive
Deploying to specific systems — Use a System Tree action or a client task to deploy the sensor to selected systems
Trellix RSD active sensors are configured on subnets depending on, for example:
Type of systems on the subnet — If the subnet is a server farm with mission-critical systems, you can install the sensor on a system with the least traffic and the least downtime.
Note
Mission-critical systems can also be blacklisted to ensure that they are not used as active sensors.
Size of the managed network — If the managed network is small, you can configure the Trellix ePO - On-prem server to determine which sensors are active.
Type of traffic on the subnet — If the subnet is a broadcast network managed with a DHCP server that has an IP address configured on the subnet, then the DHCP server is an acceptable place to install the active sensor.
Note
If the DHCP server can't support the sensor, you can install sensors on all systems and configure them to elect which system or systems are active during a specific time. You can also install the sensors on specific systems and let the Trellix ePO - On-prem server determine which ones are active.
Types of Trellix RSD
It is important to understand that Trellix RSD server and sensor configuration varies depending on the type of systems and subnets being listened to and how they appear on the Detected Systems page.
Here is a look at the four most common types of rogue systems that appear on the Detected Systems page.
1 | Protecting your networks with Trellix Rogue System Detection
Trellix RSD examples
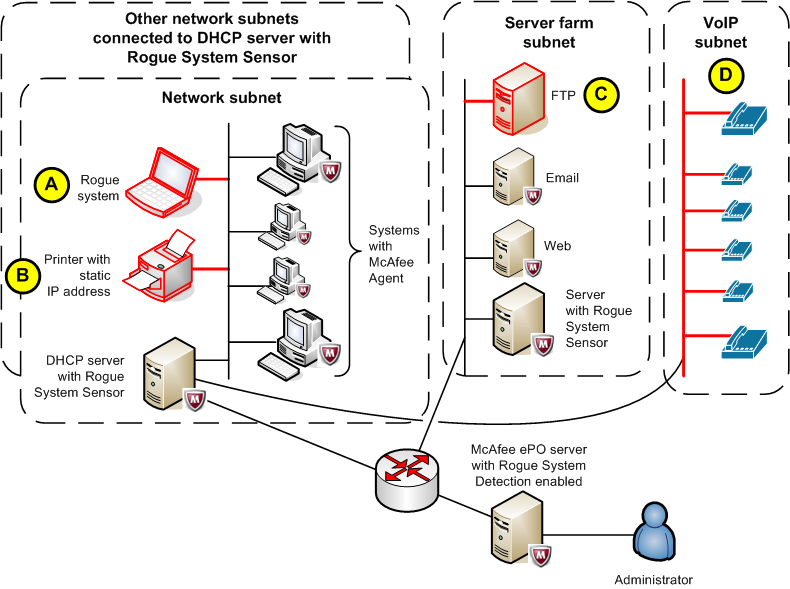
The four most common rogue system detections are:
A | Broadcast network rogue system detections — These are DHCP-enabled systems that are missing the Trellix Agent. These systems are the most common rogue systems. |
B | Rogue systems whose operating systems don't support Trellix Agent installation — For example, printers and mainframe computers. |
C | Static IP address rogue systems' detections — These are mission-critical servers connected to a subnet with a static IP address. |
D | Subnets where all systems' operating systems don't support Trellix Agent installation — For example, Voice Over Internet Protocol and mainframe computer subnets. |
Detect DHCP network rogue systems
DHCP networks are the simplest networks to configure for Trellix RSD. You can install the Trellix Agent automatically on the rogue system or install the agent manually as a System Tree action.
This process probably accounts for most of the rogue systems detected on your subnets managed by ePolicy Orchestrator.
Here is a look at a simple broadcast network subnet and the steps that occur when a rogue system connects to the subnet.
Trellix RSD on a broadcast network
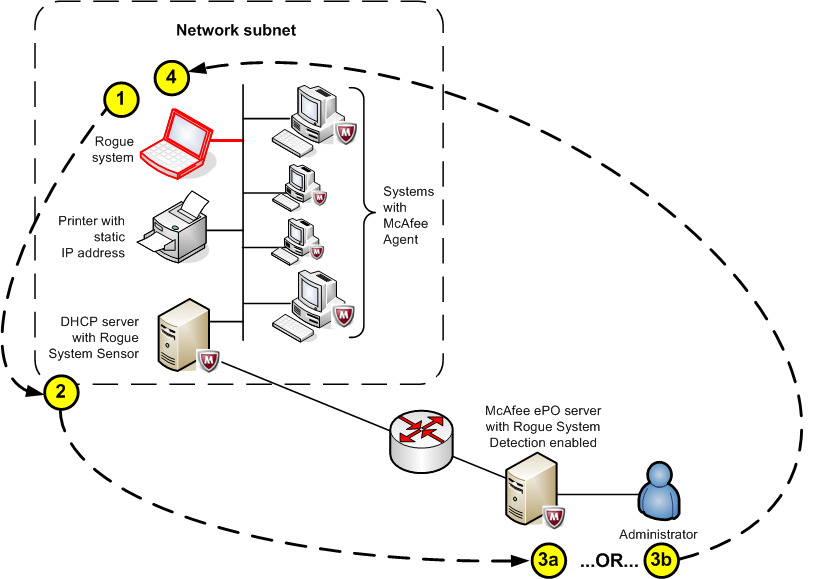
When a DHCP-enabled rogue system connects to a broadcast network:
The DHCP-enabled system connects to the network and sends a DHCP request for an IP address to the DHCP server.
If a sensor installed on the DHCP server or on another system in the relevant subnet detects the DHCP request, it automatically sends the connection event, OS fingerprints, and more to the Trellix ePO - On-prem server.
Note
If the DHCP server can't support the sensor, you can install sensors on all systems and configure them to elect which sensors are active during a specific time. You can also install the sensors on specific systems and let the Trellix ePO - On-prem server determine which ones are active.
When the Trellix ePO - On-prem server receives the event and determines the interface is a rogue system, you can either:
Use an Automatic Response to install the Trellix Agent on the rogue system.
Use an Automatic Response to move the system to a special folder in the System Tree then manually install the Trellix Agent using an action.
One of the following occurs:
If the Trellix Agent is installed successfully on the rogue system, it's listed as a managed system and left in the Rogue systems folder of the System Tree. The administrator can move the system to its correct System Tree folder later.
If the Trellix Agent installation fails, the system is left as a rogue system. You can configure an automatic response to notify the administrator to manually disconnect the system from the network. You can also add it as an exception and allow it to remain connected to the network.
The Overall System Status is updated in the Detected Systems page.
Detect systems that can't host the Trellix Agent
Some rogue systems on your managed network are systems whose operating systems don't support installation of the Trellix Agent. These systems can be added to the network as exceptions because their operating systems aren't likely to pose a security threat to the managed network.
Examples of unmanageable systems are printers and mainframe computers.
Here is a look at a simple broadcast network and what happens when a rogue system that can't support Trellix Agent installation. In this example, a printer connects to the managed subnet.
Trellix RSD exception example
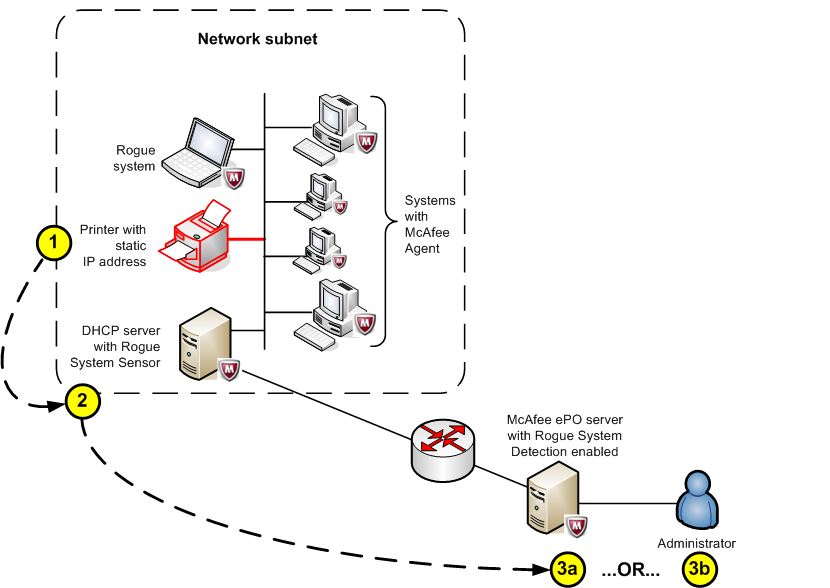
When the rogue system that can't support Trellix Agent installation connects to a managed broadcast network:
The printer with a static IP address connects to the network and sends a broadcast to all systems on the local subnet.
The Rogue System Sensor installed on the DHCP server or on another system in the relevant subnet detects the broadcast and sends a connection event to the Trellix ePO - On-prem server.
Trellix Rogue System Detection 5.0.7 Product Guide 11
1 | Protecting your networks with Trellix Rogue System Detection
Note
If the DHCP server cannot support the sensor, you can install sensors on all systems and configure the systems to elect which system or systems are active during a specific time, or install the sensors on specific systems and let the Trellix ePO - On-prem server determine which are active.
When the Trellix ePO - On-prem server receives the event and determines the interface is a rogue system, you can either:
Use an automatic response to move the system to the Exceptions List.
Use an automatic response to notify the administrator, who can then manually move the system to the exceptions list.
Detect static IP address systems
Static IP addresses are typically used for high performance servers that must always have the same IP address to ensure connectivity. To find these rogue systems, install a Rogue System Sensor on one or more systems on the subnet.
Here is what happens when a rogue system with a static IP address connects to the subnet.
Trellix RSD on a static IP address network
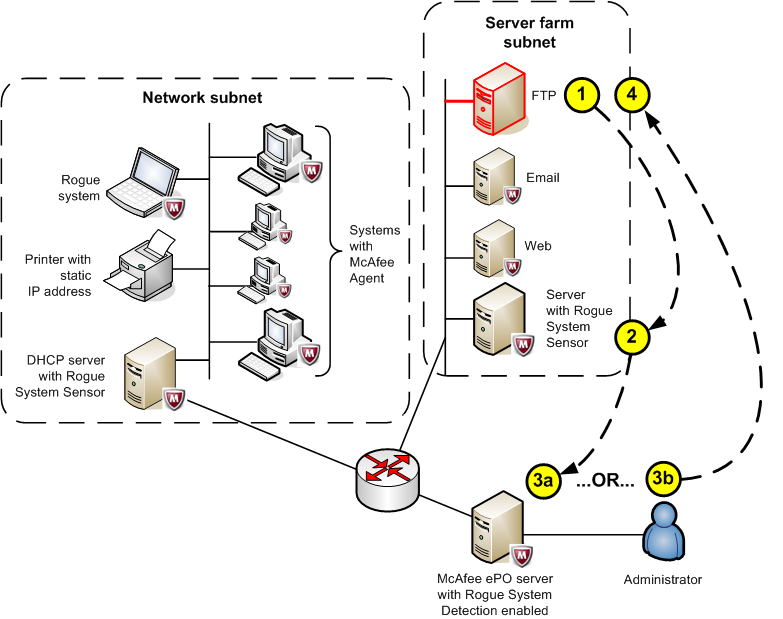
When a rogue system with a static IP address connects to the subnet:
Note
In the figure, the rogue system is the FTP server and the Rogue System Sensor is installed on another server.
The rogue system connects to the network and sends a broadcast to all systems on the subnet.
The server, configured as the Rogue System Sensor, receives the broadcast and sends a connection event to the Trellix ePO - On-prem server.
When the Trellix ePO - On-prem server receives the event and determines the interface is a rogue system, you can either:
Use an automatic response to install the Trellix Agent on the rogue system using a specific IP address range filter.
Use an automatic response to notify the administrator, who can then manually deploy the Trellix Agent to the system with a static IP address.
One of the following occurs, then the Overall System Status is updated in the Detected Systems page of the Trellix ePO - On-prem server.
If the Trellix Agent is installed successfully on the rogue system, the system is listed as managed and left in the Rogue systems folder of the System Tree. This action allows the administrator to move the system into its correct System Tree folder later.
If the Trellix Agent installation fails, the system is left as a rogue system and you can configure an automatic response to notify the administrator. The automatic response suggests manually disconnecting the system from the network, or adding it as an exception and allowing it to remain connected to the network.
Detect a subnet of systems that can’t host agents
Some subnets and individual systems on your managed network don't allow you to install the Trellix Agent. The individual systems might have proprietary operating systems, such as printers, mainframe computers, or Voice over IP telephones.
Also, the subnets these individual systems connect to appear as uncovered subnets with multiple rogue systems in the Subnet Status monitor on the Detected Systems page.
Here is what happens when a subnet with many Voice over IP phones, whose operating systems don't support installation of the Trellix Agent, connect to an ePolicy Orchestrator managed network.
Subnet with special Voice over IP phone systems
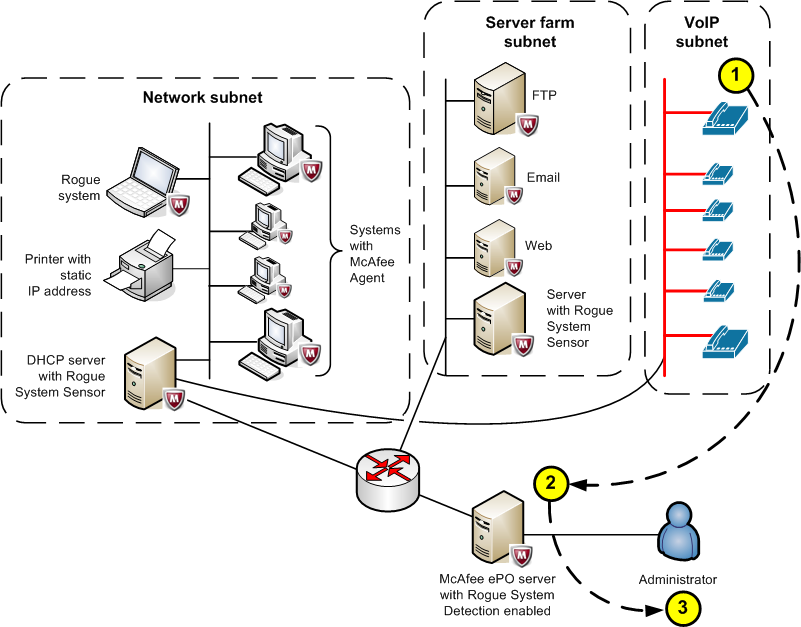
When a subnet of Voice over IP phones connects to the ePolicy Orchestrator managed network:
The uncovered subnet with rogue systems connects to the ePolicy Orchestrator managed network and many broadcasts are sent to the Rogue System Sensor and forwarded to the Trellix ePO - On-prem server.
The subnet appears in the Detected Systems dialog as:
A covered subnet in the Subnet Status monitor
An increase in the number of rogue systems in the Overall System Status monitor
If an automatic response is configured, the administrator receives a notification that many rogue systems have connected to the managed network.
The administrator can configure either:
The sensor to not scan a specific list of system MAC addresses or the Organizationally Unique Identifiers (OUIs) of the voice over IP phones, as in this example
A policy not to listen on interfaces whose IP addresses are in a specified range
How the Rogue System Sensor works
Rogue System Sensors detect devices that are connected to your network, then gather information about the devices and forward it to the Trellix ePO - On-prem server.
Passive listening to layer-2 traffic
To detect systems on the network, the sensor uses WinPCap, a packet capture library.
It captures layer-2 broadcast packets sent by systems that are connected to the same network broadcast segment. It also listens passively to all layer-2 traffic for other network protocols, such as ARP and DHCP.
Note
The sensor doesn't determine whether the system is a rogue system. It detects systems connected to the network and reports these detections back to the Trellix ePO - On-prem server, which determines whether the system is rogue based on user-configured settings.
Systems that host sensors
Install sensors on systems that are likely to remain on and permanently connected to the network, such as servers. If you don't have a server running in a given broadcast segment, install sensors on several workstations to ensure that at least one sensor is always connected to the network.
Tip
To guarantee that your Trellix RSD coverage is complete, you must install at least one sensor on each broadcast segment of your network. Installing more than one sensor on a broadcast segment doesn't create issues around duplicate messages because the server filters any duplicates. But, additional active sensors on each subnet result in traffic sent from each sensor to the server. Although maintaining as many as 10 sensors in a broadcast segment typically does not cause bandwidth issues, we recommend that you do not maintain more sensors on a broadcast segment than needed to guarantee coverage.
DHCP servers
If you use DHCP servers in your network, you can install sensors on them. Sensors installed on DHCP servers provide full visibility for covered subnets, which are subnets where the DHCP servers assign IP addresses to endpoints directly or through relay agents. Using sensors on DHCP servers can reduce the number of sensors you must install and manage on your network to ensure coverage. But, it does not eliminate the need to install sensors to network segments that are not directly covered by the DHCP servers.
Installing sensors on DHCP servers can improve coverage of your network. But, it is still needed to install sensors on broadcast segments that use static IP address.
Rogue System Sensor status
Rogue System Sensor status measures how many of the sensors installed on your network are actively reporting to the Trellix ePO - On-prem server, and is displayed in terms of health.
The software determines health by calculating the ratio of active sensors to missing sensors on your network.
Sensor states are:
Active — Active sensors report information about their broadcast segment to the Trellix ePO - On-prem server at regular intervals over a fixed time. You configure both the reporting period and the active period. All sensors on a subnet use a voting algorithm to determine which sensor is active and which are passive. The next sensor voted active on the subnet takes over communicating with the Trellix ePO - On-prem server.
Note
You can use the ePolicy Orchestrator Server Settings to configure multiple active sensors on a subnet.
Missing — Missing sensors have not communicated with the Trellix ePO - On-prem server in a user-configured time. These missing sensors can be on a system that has been turned off or removed from the network.
Passive — Passive sensors check in with the Trellix ePO - On-prem server, but don't report information about detected systems. They wait until they are voted active by the voting algorithm to communicate the state of the broadcast segment to the Trellix ePO - On-prem server.
1 | Protecting your networks with Trellix Rogue System Detection
Rogue System Sensor election
You can determine the active Rogue System Sensors on a subnet using either the Trellix ePO - On-prem server or by allowing the sensors in the subnets to elect which sensors are active or passive.
Using the Trellix ePO - On-prem server to set active sensors
Use the Trellix ePO - On-prem server to deploy Rogue System Sensors on a subnet from the System Tree and configure the sensor numbers and communication using the sever settings.
For example, you can use:
A manual process of installing sensors on specific systems
Client tasks to install sensors
The drawbacks to these methods include:
Deploying the sensors individually from the Trellix ePO - On-prem server can be time consuming.
Determine beforehand which systems to configure as Rogue System Sensors and manage them and make sure that they are always online or have redundant sensors.
Systems added to the subnets after the initial configuration are not eligible to be active sensors.
These methods don't scale well for large managed networks.
Allowing Rogue System Sensor elections to set active sensors
Configuring Trellix RSD to use the local sensor election feature allows Rogue System Sensors in the local subnets to elect the active sensors in the group. This reduces sensor traffic back to the Trellix ePO - On-prem server. It also allows you to automatically deploy a Rogue System Sensor to all nodes on your subnets.
Advantages of this configuration include:
You can install the Rogue System Sensor on every system and not worry about selecting individual active sensors.
If a system running as the active Rogue System Sensor is shut down or removed from the network, another system takes over automatically after a configured time.
It eliminates some of Rogue System Sensor traffic through the Trellix ePO - On-prem server.
 Caution
Be careful when you install Rogue System Sensors on many nodes on many subnets and configure the policy to Use Local Sensor Election, then later change the policy to Use ePO server to determine active sensors. The previously installed sensors can overwhelm the Trellix ePO - On-prem server when they ask to become active.
1 | Protecting your networks with Trellix Rogue System Detection
How Rogue System Sensor elections work
Use the policy settings for Trellix RSD on the Communications tab to configure local sensor election.
The local sensor election feature works like this:
A Rogue System Sensor is deployed to every node on the subnet.
An active sensor election starts if the number of active sensors communicating to the network subnet group is less than the number of configured active sensors, or the configured time between active sensor elections has passed.
Each sensor in the subnet uses an election algorithm using GUIDs to determine which sensors are active.
The sensor checks if its own GUID is one of the active sensors. If it is, it sends out a message telling the other sensors it is now an active sensor. If not, it becomes passive and waits for the next election cycle.
Managing Trellix RSD sensors
Manage your sensors so that they can discover and manage rogue systems on your networks.
Edit sensor descriptions
Editing Rogue System Sensor descriptions makes them easier to find and their function easier to understand on the Rogue System Sensors page.
Task
To open the Rogue System Sensor Details page, click Menu → Systems Section → Detected Systems, click any sensor category in the Rogue System Sensor Status monitor, then click any sensor.
Select the system whose description you want to edit, click Actions → Rogue Sensor → Edit Description.
Type the description, then click OK.
Tip
You can also open the page by clicking Menu → Systems Section → Detected Systems, then clicking any sensor category in the Rogue System Sensor Status monitor.
Results
The new description appears in the Rogue System Sensor Status monitor.
Rogue Sensor Blacklist
The Rogue Sensor Blacklist is the list of managed systems where you don't want sensors installed. These can include systems that would be adversely affected if you install sensors on them, or systems you have otherwise determined should not host sensors.
For example:
Servers where peak performance of core services is essential, such as database servers or servers in the DMZ (demilitarized zone)
Systems that might spend significant time outside your network, such as laptops
The Rogue Sensor Blacklist is different than the Exceptions list. The systems on the Exceptions list can’t have an agent on them, or are systems that you do not want to categorize as rogue systems, such as printers.
Add systems to the Rogue Sensor Blacklist
To prevent Trellix RSD sensors from being installed on selected managed systems, you can add the systems to the Rogue Sensor Blacklist.
Task
Click Menu → Systems Section → System Tree → Systems and select the detected systems you want to add to the Rogue Sensor Blacklist.
Select Actions → Rogue Sensor → Add to Sensor Blacklist.
Click Yes to confirm the change.
💡 Tip
To confirm that the systems are moved to the Rogue Sensor Blacklist, click Menu → Systems Section → Detected Systems, then from the Rogue System Sensor Status monitor, click View Blacklist.
Results
The selected systems are moved to the Rogue Sensor Blacklist and the software does not install sensors on the systems.
Remove systems from the Rogue Sensor Blacklist
Trellix RSD prevents sensors from being installed on systems that are included in the blacklist. If you want to install a sensor on a system that has been blacklisted, remove the system from the list.
Task
Click Menu → Systems Section → Detected Systems.
In the Rogue System Sensor Status monitor, click View Blacklist.
Select the system you want to remove from the Rogue System Blacklist page.
Select Actions → Rogue Sensor → Remove from Blacklist, then click OK when prompted.
Results
The system is removed from the Rogue System Blacklist.
Edit Rogue System Sensor settings
Determine how sensors interact with each other and the ePolicy Orchestrator server.
Sensor settings are user-configured and specify:
The amount of time that sensors are active
The maximum number of sensors active on each subnet
How long the server waits to hear from a sensor before categorizing it as missing
Task
Click Menu → Configuration → Server Settings, then in the Settings Categories list, select Rogue System Sensor and click Edit.
Edit the Sensor Timeout field to set the maximum amount of time the server waits for a sensor to call in before specifying it as missing.
Edit the Sensors per Subnet field to set the maximum number of sensors active on each subnet, or select All sensors active.
Edit the Sensor Scanning section to specify systems you do not want to scan. This setting is useful for saving resources and lessening network traffic.
Add a list of Sensor Scanning MAC addresses and OUIs that the sensors do not actively probe, regardless of the configured policy.
For version 5.x sensors, you can add a list of IP addresses or subnet masks that sensors do not scan actively. These systems are not scanned regardless of the policy settings for the sensor.
Edit the Active Period field to set the maximum amount of time that passes before the server tells a sensor to become passive, or allows a new sensor to become active.
The Server Settings Revision ID field specifies the revision number of the setting. The ID is incremented every time the Server Settings are saved.
Click Save.
Note
The Active Period setting doesn't set the communication times for the active and inactive sensors. Communication time is configured using communication policy settings for Trellix RSD.

Note
This section applies only to version 5.x sensors.
Results
The new Server Settings take effect after the next agent-server communication interval.
2 | Protecting your networks with Trellix Rogue System Detection
Change the sensor-to-server port number
You can change the port that the Rogue System Sensor uses to communicate with Trellix ePO - On-prem.
Note
The port number specified on the Server Settings page can be changed only during installation of ePolicy Orchestrator. If you changed this port number during installation, change it in the Trellix RSD policy settings to allow sensors to communicate with the server.
Task
Click Menu → Policy → Policy Catalog, then from the Product drop-down list, select Rogue System Detection x.x.x, and from the Category drop-down list, select General. All created policies for Trellix RSD appear in the details pane.
Locate the policy, then click its name.
On the General tab, change the Sensor-to-Server Communication Port to the new port number, then click Save.
Results
The Rogue System Sensor uses the specified port to communicate with Trellix ePO - On-prem.
Trellix Rogue System Detection 5.0.7 Product Guide21
3 | Protecting your networks with Trellix Rogue System Detection
Managing rogue systems
Once you deploy your sensors, Trellix Rogue System Detection allows you to manage and act on detected rogue systems.
Manage alien agents and multiple Trellix ePO - On-prem servers
If you have an ePolicy Orchestrator managed network with multiple Trellix ePO - On-prem servers, some rogue systems might appear, if configured, as alien agents on the local Detected Systems Details page. To fix this add all Trellix ePO - On-prem servers to the Server Settings for the Detected System Compliance setting categories.
Configure your Trellix ePO - On-prem server to recognize systems managed by other Trellix ePO - On-prem servers.
If you don't configure your server to recognize the other Trellix ePO - On-prem servers in your network, rogue systems might appear as alien agents, and systems managed by another Trellix ePO - On-prem server might be incorrectly listed as rogue.
You can use the Query Agent action to revise the status of mislabeled systems.
Task
Click Menu → Configuration → Server Settings, then from the Settings Categories list select Detected System Compliance. The existing Detected System Compliance settings appear in the right pane.
Click Edit. The Edit Detected System Compliance settings appear in the dialog box for editing.
In the Other ePO Servers field of ePO Servers settings, type names of the other Trellix ePO - On-prem servers in your environment, then click Save.
To add multiple Trellix ePO - On-prem server names, separate them with a comma, whitespace, or on separate lines. For example:
eP01,eP02
eP01 eP02
eP01
ePo2For the Query Agent action to work correctly, click Menu → Policy → Policy Catalog, click Trellix Agent from the product list, and select a General category policy. Make these changes:
Click the General tab and disable Accept connections only from the ePO server.
Click the Logging tab and click Enable Agent Activity Log.
(Optional) Change the Alternative Trellix Agent ports found at Menu → Configuration → Server Settings, from Setting Categories select Detected System Matching and enter the alternate ports to check for a Trellix Agent.
Run the Query Agent action on all alien agents. This action can be performed manually or by using a server task or automatic response.
Tip
You can confirm the change by clicking Menu → Systems Section → Detected Systems.
Results
The alien system appears as a managed system with an ePO Server Name that's different than the local Trellix ePO - On-prem server. The previous alien system is no longer in the list of detected systems.
Deploy agent manually from the Detected Systems page
You can manually deploy the Trellix Agent to a rogue system using actions in the Detected Systems page.
Task
Select the rogue system where you want to deploy the Trellix Agent:
Click the interface in the Detected System Interfaces by Subnet table.
Click Rogue in the Overall System Status monitor. The rogue systems appear on the Detected Systems page.
Select the system.
Click Actions → Detected Systems → Deploy Agent and the Deploy Trellix Agent page appears.
Configure the options in the Agent Deployment Settings page, then click OK.
Results
The Trellix Agent is deployed to the rogue system and it is changed to a managed state.
Use Automatic Responses to manage rogue systems
Trellix RSD Automatic Responses offer you powerful tools to automatically perform actions on detected rogue systems and notify the administrator.
You can configure Automatic Responses so that ePolicy Orchestrator responds automatically to the Trellix RSD events. An automatic response can contain one or more actions. For example, if you configure a response to deploy the Trellix Agent to newly detected systems, it can send an email to administrators to follow up on the agent installation.
Move rogue systems to a System Tree folder
Use Trellix RSD Automatic Responses to automatically move detected rogue systems to a folder you create in the System Tree and send an email to the administrator notifying them that rogue system has been found.
23
Before you begin
You must have already created a System Tree folder to receive the detected systems, and specified an email server for use with your ePolicy Orchestrator server.
Task
Click Menu → Automation → Automatic Responses, then click Actions | New Response or Edit next to an existing rule.
In the Response Builder dialog box that appears, click the Description tab, type appropriate information in Name and Description, and select a Language.
In Events, click the following in the lists:
Event group, click Detected System Events.
Event type, click System Detection.
In Status, click Enabled, then click Next.
On the Actions tab, configure two actions.
Select Add to System Tree from the actions list and configure the following:
In System Tree Location, click Browse and select the folder where you want the detected system moved. For example, "Rogue system detections."
Optionally, you can click Tag and Sort Systems, to make systems easier to find, and Duplicate System Names to show duplicate entries.
Select Send Email from the actions list and configure the following:
In Importance, click a value from the list.
In Subject, type a string, or select variables from the Insert variable lists and click Insert.
In Body, type a string, or select variables from the Insert variable lists and click Insert.
Click Next, review the Summary page, and click Save.
Results
After you have configured these processes, Trellix RSD is configured.
Convert a rogue system to a managed client
Use Automatic Responses to install the Trellix Agent on a rogue system and convert it from an unmanaged client to a managed client.
Create a query to look for rogue systems, then create a server task to deploy the agent.
3 | Protecting your networks with Trellix Rogue System Detection
Task
Create a query:
Click Menu → Reporting → Queries and Reports.
Click Actions → New. The Query Builder appears.
On the Result Type page, under Feature Group, select Detected Systems. Under Result Types, do the same. Then click Next.
On the Chart page, under Display Results As, select Table. Click Next.
On the Columns page, ensure that these entries are listed as displayed columns, then click Next:
Computer Name
DNS Name
Last Detected IP Address
On the Filter page, under Available Properties, make sure the following properties are set, then click Run.
Comparison = Equals
Value = True
Click Save, provide a descriptive name and notes, then click Save.
Create a server task:
Click Menu → Automation → Server Tasks.
Click Actions → New Task, provide a descriptive name and notes, then click Next.
From the Actions drop-down list, select Run Query.
In the Query field, browse to the query you created and click OK.
Select the language in which to display the results.
From the Sub-Actions list, select Deploy Trellix Agent, then click OK.
Configure the Trellix Agent deployment, provide the necessary installation credentials for installation, then click Next.
Schedule the task, then click Next.
Verify the configuration of the task, then click Save.
Results
At every scheduled run, the client task installs the Trellix Agent on detected rogue systems.
Ping a detected system
Ping a detected system to confirm that you can reach it over the network.
Task
Click Menu → Systems Section → System Tree.
Trellix Rogue System Detection 5.0.7 Product Guide25
3 | Protecting your networks with Trellix Rogue System Detection
Tip
You can also view systems from the Detected Systems Status page by clicking Menu → Systems Section → Detected Systems, then clicking any category in the Overall System Status monitor.
Select the system you want to ping.
Note
You can ping only one system at a time.
Click Actions → Detected Systems, then click Ping.
You can also click Actions → Directory Management, then click Ping.
Results
The result is displayed on the Actions bar in the notification panel at the bottom right corner of the Trellix ePO - On-prem console window.
Add detected systems to the System Tree
Add detected systems to the System Tree from the Detected Systems pages to better organize your network.
Task
To open the Detected Systems page, click Menu → Systems Section → Detected Systems.
You can also view systems from the Detected Systems Status page by clicking Menu → Systems Section → Detected Systems, then click any category in the Overall System Status monitor.
Select the detected systems that you want to add to the System Tree.
Click Actions → Detected Systems → Add to System Tree.
Click Browse to open the Select System Tree Group dialog box, then navigate to the location where you want to add the selected systems.
Specify one of these options:
Tag and Sort Systems — Applies tags and sorts systems immediately after adding the systems to the System Tree.
Duplicate System Names — Allows duplicate entries to be added to the System Tree.
Edit system comments
System comments can be useful for noting important "human readable" information to a detected system entry.
Task
To open the Detected Systems page, click Menu → Systems Section → Detected Systems, and then click any detected system category in the Overall System Status monitor.
Tip
You can also view systems from the Detected Systems Status page by clicking Menu → Systems Section → Detected Systems. Next, click any detected system category in the Overall System Status monitor, and then click any system.
Select the system whose comment you want to edit, then click Actions → Detected Systems → Edit Comment.
Type your comments, then click OK.
How detected systems are matched and merged
When a system connects to your network, Trellix RSD automatically checks the Trellix ePO - On-prem database to determine whether the incoming system is new or corresponds to a previously detected system.
Automatic matching of detected systems is necessary to prevent previously detected systems from being identified as new systems on your network.
By default, systems are first matched against an agent’s GUID. If this GUID doesn't exist, the Trellix ePO - On-prem database uses attributes specified in the Rogue System Matching server settings. You can specify which attributes the database uses for matching, based on which attributes are unique in your environment.
If a system on your network has multiple NICs, each system interface can result in separate interface detections. To eliminate duplicate systems use the Detected System Matching Server setting to match multiple interfaces to an existing detected system. You can also configure your server settings to automatically match detected systems with multiple NICs.
Matching detected systems
If the system has been previously detected, Trellix RSD automatically matches it to the existing record in the Trellix ePO - On-prem database. When a detected system is not matched automatically, you can manually merge the system with an existing detected system.
When the Trellix ePO - On‑prem server can't automatically match detected systems, you can merge them manually using Merge systems.
For example, the Trellix ePO - On‑prem server might not be able to match a detected system interface generated by a system with multiple NICs based on the specified matching attributes.
Edit Detected System Matching
Edit the matching settings for Trellix RSD. The matching settings are user-configured.
Matching settings have these important functions:
They define the properties that determine how newly detected interfaces are matched with existing systems.
They specify static IP address ranges for matching.
They specify which ports to check for a Trellix Agent.
Task
Click Menu → Configuration → Server Settings, then in the Settings Categories list select Detected System Matching and click Edit.
Use the Matching Detected Systems table to define the properties that determine when to match detected systems.
Use the Matching Managed Systems table to define the properties that determine when a newly detected interface belongs to an existing managed system.
In Static IP Ranges for Matching, type the static IP address ranges to use when matching on static IP addresses.
In Alternative Trellix Agent Ports, specify any alternate ports you want to use when querying detected systems to check for a Trellix Agent.
Click Save.
Merge Detected Systems
Edit the matching settings for Trellix RSD. The matching settings are user-configured.
Click Menu Systems Section Detected Systems, then from Overall System Status monitor, select Rogue. The rogue systems appear in the display.
Select the systems that you want to merge.
Click Actions, then select Detected Systems Merge Systems.
Click Merge.
When the merge warning message appears, click OK.
Results
The selected systems are merged.
Remove systems from the Detected Systems list
You can remove a system from the Detected Systems list when you know that it is no longer in service.
Once a system is removed, it doesn't appear in the Detected Systems list until the next time the system is detected.
Task
Click Menu → Systems Section → Detected Systems.
In the Overall System Status monitor, click any detected system category, then click the system you want to remove.
Click Actions → Detected Systems → Delete, then click OK when prompted.
Results
The system is removed from the Detected Systems list.
Query detected system agents
Query agents installed on detected systems to determine whether a Trellix Agent is installed. You can also view links to details about the system and the Trellix Agent, if available.
Task
Click Menu → Systems Section → Detected Systems.
Select the systems whose agents you want to query.
Click Actions → Query Agent. The Query Trellix Agent Results page opens.
Tip
View systems on the Detected Systems Status page by clicking Menu → Systems Section → Detected Systems, then clicking any category in the Overall System Status monitor.
Tip
You can also query systems by clicking Actions → Detected Systems → Query Agent
Add systems to the Exceptions list
Exceptions are systems that don’t need a Trellix Agent and no longer need to send their detection information.
Identify these systems and mark them as exceptions to prevent them from being categorized as rogue systems.
Candidates for exceptions include routers, printers, mainframe computers, and voice over IP telephones.
Important
Mark a system as an exception only when it does not represent a vulnerability in your environment.
Task
Click Menu → Systems Section → Detected Systems.
From the Overall System Status monitor pane, click any detected system category.
From the Detected Systems Details page, click any system.
Click Actions → Detected Systems → Add to Exceptions to view the Add to Exceptions dialog box.
Select one of the following options to configure the exception category:
Option | Definition |
|---|---|
No Category | Displayed without a category entry |
New Category | Displayed with the new category name you type |
Select Category | Displayed with the category selected from the list |
6. Click OK.
Remove systems from the Exceptions list
You can remove a detected system from the Exceptions list if you want to start receiving detection information about it, or if you know that the system is no longer connected to your network.
Task
Click Menu → Systems Section → Detected Systems.
In the Overall System Status monitor, click the Exceptions category, then select the system you want to remove.
Select Actions → Detected Systems → Remove from Exceptions, then click OK when prompted.
Export or import Exceptions list
You can export information from the Exceptions list or import information into the Exceptions list.
Both the export and import data processes modify MAC address data stored in the Trellix RSD Exceptions list.
Task
Click Menu → Systems Section → Detected Systems and click Import/Export Exceptions from the Overall System Status monitor. The Import/Export Exceptions dialog box appears.
Do one of the following:
On the Export Exceptions tab, click the link, then save the file.
Note
Files are exported in the comma-separated value format. The file name for your Exceptions list is predefined as RSDExportedExceptions.csv. You can change the name of the file when you download it to your local system.
Click Import Exceptions tab and choose the method that you want to use to import, specify the systems or file, then click Import Exceptions.
Note
When importing systems, only MAC addresses are recognized. MAC addresses can be separated by whitespace, commas, or semicolons. The MAC address can include colons, but they are not required.
Managing subnets
Trellix RSD allows you to work with subnets and act to protect them.
View detected subnets and their details
You can view detected subnet details from any page that displays detected subnets.
Task
Click Menu → Systems Section → Detected Systems.
In the Subnet Status monitor, click any category, such as Covered, to view the list of detected subnets it contains. The Detected Subnets page appears and displays the subnets in that category.
Click any detected subnet to view its details. The Detected Subnet Details page appears.
Add subnets
Many organizations use subnets to classify systems and devices. For example, you might have all your printers on a single subnet. You can add subnets to Trellix RSD to help you better manage rogue systems.
Task
Click Menu → Systems Section → Detected Systems, then in the Subnet Status monitor, click Add Subnet. The Add Subnets page appears.
Choose the method you want to use to add subnets, specify the subnets you want to add, then click Import.
Results
The Detected Systems page displays the 25 subnets with the most rogue system interfaces in the Top 25 Subnets list and the adjacent Detected System Interfaces by Subnet table.
Delete subnets
You can delete subnets from Trellix RSD if, for example, the subnet consists of devices you don't want to see, like printers.
Tip
Trellix recommends that you do not choose to delete subnets. If you delete subnets, you have decided that a subnet can have rogue systems connected.
Task
Click Menu → Systems Section → Detected Systems, then click any category in the Subnet Status monitor. The Detected Subnets page appears.
Tip
You can also view subnets from the Detected Subnets Details page. Click Menu → Systems Section → Detected Systems, click any category in the Subnet Status monitor, and then click any subnet.
Select the subnets that you want to delete, click Actions, then select Detected Systems → Delete.
In the Delete confirmation pane, click Yes.
Results
The subnet is no longer associated with detected systems.
Ignore subnets
You can ignore subnets that you don't want to receive information about from Trellix RSD.
Ignoring a subnet deletes all detected interfaces associated with that subnet. All further detections on that subnet are also ignored. To view the list of ignored subnets, click the Ignored link in the Subnet Status monitor. This link appears only when there are subnets being ignored.
Tip
Trellix recommends that you do not choose to ignore subnets. If you ignore subnets, you have decided that a subnet can have rogue systems connected.
Task
To open the Detected Subnets page, click Menu → Systems Section → Detected Systems, then click any category in the Subnet Status monitor.
To ignore subnets from the Detected Subnets Details page:
Click Menu → Systems Section → Detected Systems, any category in the Subnet Status monitor, then any subnet.
Click Menu → Systems Section → Detected Systems
Select the subnets that you want to ignore, click Actions, then select Detected Systems → Ignore.
In the Ignore dialog box, click OK.
When ignoring a subnet on the Detected Systems page in the Top 25 Subnets list, a dialog box opens. Click OK.
Results
The software ignores the selected subnets and does not provide information about rogue systems on them.
Include subnets
Include subnets that Trellix RSD has previously ignored.
Perform this task by querying ignored subnets, or include subnets from the Ignored Subnets page.
Task
Click Menu → Reporting → Queries & Reports, and query for any ignored subnets.
On the Unsaved Queries page, click Include.
In the Include dialog box, click OK.
Results
The software no longer ignores rogue systems on the selected subnets.
Rename subnets
You can rename subnets from the default IP address to make them easier to find or understand their use.
Task
To open the Detected Subnets page, click Menu → Systems Section → Detected Systems, then click any subnet category in the Subnet Status monitor.

Tip
You can also rename subnets from the Detected Subnets Details page by clicking Menu → Systems Section → Detected Systems, clicking any subnet category in the Subnet Status monitor, and then clicking any subnet.
Select the subnet that you want to rename, then click Actions and select Detected Systems → Rename.
In the Rename dialog box, type the new name for the subnet, then click OK.
Results
The Subnet Status monitor identifies the subnet by name instead of IP address.
Rogue System Detection dashboards
Rogue System Detection provides expanded Trellix ePO - On‑prem reporting capabilities with these dashboards and monitors.
Overall system status
The Overall System Status monitor shows the condition of your system as a percentage of compliant systems.
Systems' states are separated into these categories:
Exceptions
Inactive
Managed
Rogue
The percentage of compliant systems is the ratio of systems in the Managed and Exceptions categories to systems in the Rogue and Inactive categories.
Exceptions
Exceptions are systems that don’t need a Trellix Agent, such as routers, printers, or systems from which you no longer want to receive detection information. Identify these systems and mark them as exceptions to prevent them from being categorized as rogue systems. Mark a system as an exception only when it doesn't represent a vulnerability in your environment.
Inactive
Inactive systems are listed in the Trellix ePO - On‑prem database, but have not been detected by a detection source in a specified time, which exceeds the period specified in the Rogue category. Most likely these are systems that are shut down or disconnected from the network, for example, a laptop or retired system. The default time period for marking systems as inactive is 45 days.
Managed
Managed systems have an active Trellix Agent that has communicated with the Trellix ePO - On‑prem server in a specified time. We recommend that you manage your systems to ensure security.
Note
Systems on your network with an installed active agent are displayed in this list, even before you deploy sensors to the subnets that contain these systems. When the agent reports to the Trellix ePO - On-prem database, the system is automatically listed in the Managed category.

Rogue
Rogue systems are systems that are not managed by your Trellix ePO - On-prem server. There are three rogue states:
Alien agent — These systems have a Trellix Agent that is not in the local Trellix ePO - On-prem database, or any database associated with additional Trellix ePO - On-prem servers you have registered with the local server.
Inactive agent — These systems have a Trellix Agent in the Trellix ePO - On-prem database that has not communicated in a specified time.
Rogue — These systems don’t have a Trellix Agent.
Systems in any of these three rogue states are categorized as Rogue systems.
Subnet status
Subnet status displays how many detected subnets on your network are covered, or have a Rogue System Sensor monitoring the subnet. The software determines coverage by calculating the ratio of covered subnets to uncovered subnets on your network.
Subnet states are categorized into these groups:
Contains Rogues
Covered
Uncovered
Tip
To fall into one of these categories, subnets must be known by the Trellix ePO - On-prem server or be detected by a sensor. Once a subnet has been detected, you can mark it Ignore to prevent receiving further reporting about its status.

Contains Rogues
Subnets that contain rogue systems are listed in the Contains Rogues category to make it easier to take action on them.
Covered
Covered subnets have installed sensors that actively report information about detected systems to the Trellix ePO - On-prem server. This category also includes the systems listed in the Contains Rogues category. For example, the Covered subnets category contains subnets A, B, and C. Subnet B contains rogues, while A and C don't. All three are listed in the Covered category; only subnet B is listed in the Contains Rogues category.
Uncovered
Uncovered subnets don’t have any active sensors on them. Subnets that are uncovered do not report information about detected systems to the Trellix ePO - On-prem server. However, there might be managed systems on this subnet that are being reported on through other means, such as agent-server communication.
Top 25 Subnets
The Top 25 Subnets list shows the 25 subnets that contain the most rogue system interfaces on your network. The list shows the subnets by name or IP addresses.
When a top 25 subnet is selected, the rogue system interfaces it contains are displayed in the adjacent Rogue System Interfaces by Subnet table. You can drill down in the table to view more detailed information about the subnets and the systems in them.
Default Trellix RSD queries
Trellix RSD provides default queries that you can use to retrieve specific information from your network.
These queries can be modified or duplicated in the same manner as other queries in Trellix ePO - On-prem. You can also create custom queries, display query results in dashboard monitors, and add the monitors to the Dashboards section in Trellix ePO - On-prem.
Note
Non-administrators cannot use queries to see rogue systems in groups that they don't have viewing rights for. Thus, if a non-administrator creates a Table query with the Managed Systems and Tags column selected, the query does not return any data. A similar query configured as a Chart type works as expected because it doesn't show the same detail as a Table query.
Trellix RSD query definitions
Option | Definition |
|---|---|
Active Sensor Response (Last 24 Hours) | Returns the details of active sensors installed on your network in the last 24 hours, in pie chart format. |
Passive Sensor Response (Last 24 Hours) | Returns the details of passive sensors installed on your network in the last 24 hours, in pie chart format. |
Rogue Systems, By Domain (Last 7 Days) | Returns the details of systems detected on your network as rogue systems in the last seven days, grouped by domain, in table format. |
Rogue Systems, By OS (Last 7 Days) | Returns the details of systems detected on your network as rogue systems in the last seven days, grouped by operating system, in pie chart format. |
Rogue Systems, By OUI (Last 7 Days) | Returns the details of systems detected on your network as rogue systems in the last seven days, grouped by organizationally unique identifier, in pie chart format. |
Subnet Coverage | Returns the details of detected subnets on your network, in pie chart format. |