SIEM Collector overview
Overview
The Trellix SIEM Collector is a host-based utility that sends events to a Trellix Enterprise Security Manager - Event Receiver. It can be configured to send events from local or remote Windows computers.
Key features
Free add-on to Trellix Enterprise Security Manager
Microsoft Windows events, log tailing, Custom SQL and SQL C2 Auditing data collection and forwarding
Supports WEF forwarded Windows events
Can be configured and deployed through Trellix ePolicy Orchestrator - On-prem
Small footprint, high volume
SIEM Collector system requirements
The SIEM Collector runs on both 32-bit and 64-bit architecture. This section gives the supported operating systems and database.
Supported Windows versions
SIEM Collector has been tested and is supported on current version of these operating systems:
Windows Server 2019
Windows Server 2016
Windows Server 2012 R2
Windows Server Core
Windows 10
Windows 8.1
Supported databases
SIEM Collector supports these database/driver combinations:
Database | Driver |
|---|---|
Microsoft SQL Server | Microsoft* ODBC Driver for SQL Server |
Oracle | Oracle Instant Client (Max version supported 11.2). |
Compatibility
This version of the SIEM Collector maintains compatibility with version 11 of the SIEM Collector extension for Trellix ePO - On-prem. No newer extension is needed.
Limitations
The SIEM Collector has not been localized. Only an English interface is available.
The Log Tail client can only collect files having a UTF-8 encoding.
Dependencies
SIEM Collector 11.x does not require a .net 3.5 framework, instead relying on the Microsoft* Visual C++ framework. Microsoft* Visual C++ runtimes are much lighter weight than .net installations and are generally Windows version agnostic. Several versions of the runtimes can also coexist on a single computer without difficulty. If the installation script detects that you do not have the appropriate runtime, it installs it for you.
Install SIEM Collector using setup.exe
Install SIEM Collector on a Microsoft Windows host computer using setup.exe file.
Before you begin
If you are connecting to an MSSQL or Oracle database, make sure the corresponding driver is installed.
Download the installation executable file from the Trellix download site.
Task
Run the installation executable file.
Enter the IP address and EEF port of the Trellix Enterprise Security Manager - Event Receiver that will receive events.
If you enable SSL encryption, make sure it is enabled on the datasource.
Click Next (The Progress dialog box opens) → Finish.
Results
The Trellix SIEM Collector is installed.
Install SIEM Collector remotely
Install SIEM Collector on a remote computer using a third-party application and the SIEM Collector installation script.
Task
From the command prompt on the local computer, enter msiexec /i WindowsAgentInstaller.msi /quiet with the following parameters.
Parameter | Description |
|---|---|
HOSTIPADDRESS | (Required) The IP address of the host computer where you are installing SIEM Collector. |
INSTALLLOCATON | (Required) The path to the directory where you want to install the SIEM Collector files. |
IPADDRESS | (Required) The IP address of the Trellix Enterprise |
Security Manager - Event Receiver. | |
PORT | (Required) The EEF port of the receiver. |
USESSL | (Optional) If the data source on the receiver requires SSL, set to true. |
CONFIGFILE | (Optional) The path to a configuration file that defines the installation parameters. Used in a silent install. |
UPDATE_FOR_EPO | (Optional) True or False. Set to True if Trellix ePO - On-prem manages SIEM Collector. |
Example installation command
msiexec /i WindowsAgentInstaller.msi /quiet HOSTIPADDRESS="1.2.3.4" IPADDRESS="1.2.3.5" INSTALLLOCATION="C:\Program Files (x86)" PORT="8081" USESSL="true" CONFIGFILE="c:\temp\config.txt"Install the SIEM Collector extension with Trellix ePO - On-prem
Use Trellix ePolicy Orchestrator - On-prem to install the SIEM Collector.
Before you begin
Download the installation file from the Trellix download site.
Download a copy of SIEM Collector extension to your Trellix ePolicy Orchestrator - On-prem workstation.
Deploy an ePolicy Orchestrator version 5.3.x with Trellix Agent version 5.0.4 and above.
Task
In Trellix ePO - On-prem, select Menu → Software → Extensions.
Click Install Extension.
Browse to select the SIEMCollectorExtension.zip file, then click OK.
Verify the information about the Install Extension page, then click OK.
Verify that the product name appears in the Extensions list.
Note
If the product name is not listed or you encounter errors during installation, review the Orion.log file in the <Trellix ePO install dir>\Server\Logs directory to analyze the cause.
Install the SIEM Collector installation script with Trellix ePO - On-prem
Before you begin
Download the installation file from the Trellix download site.
Download a copy of SIEM Collector installation script to your Trellix ePolicy Orchestrator - On-prem workstation.
Task
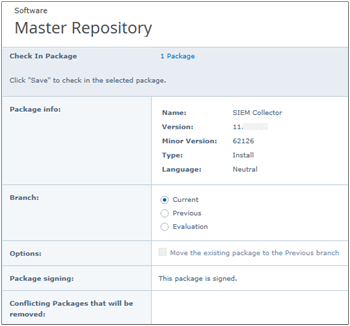
In Trellix ePO - On-prem, select Menu → Software → Master Repository
The Master Repository page opens.
Click Check In Package.
Click Browse for File path to select the SIEMCollectorInstaller.zip file, then click Next.
Click Save.
Verify the product name appears in the Master Repository list.
Configure Policy Catalog in Trellix ePO - On-prem
Task
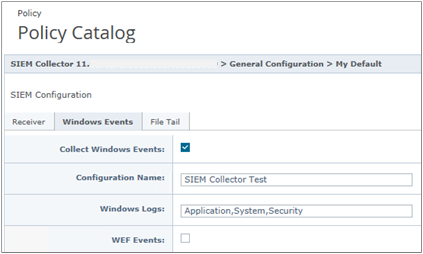
Click Policy Catalog from the menu bar.
The Policy Catalog page opens.
Select SIEM Collector 11.xx.xxxx.xxxx from the Products list.
Click General Configuration → My Default.
The Policy Details page opens.
Click Edit.
The Policy Catalog page opens.
Enter the IP address for the Receiver.
Select the Windows Events tab.
Select Collect Windows Events.
Enter a Configuration Name.
Deploy SIEM Collector in Trellix ePO - On‑prem
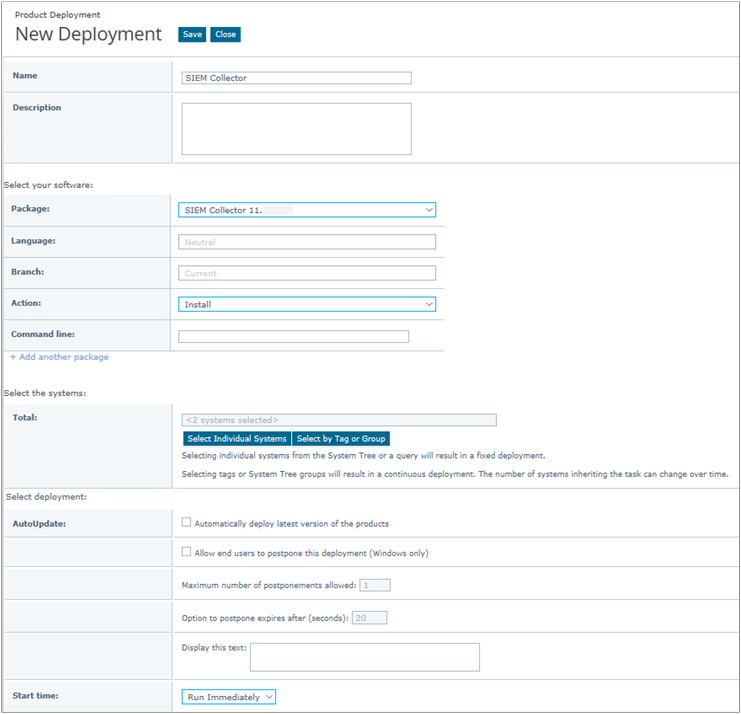
In Trellix ePO - On‑prem, select Menu → Software → Product Deployment → New Deployment.
Enter a Name for the deployment.
Click Package and select a SIEM Collector version.
Select Select Individual Systems or Select by Tag or Group for Select the systems.
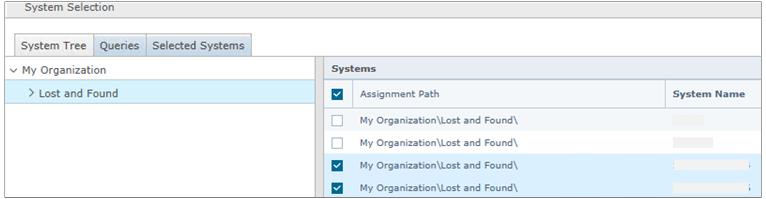
The System Selection dialog box opens.
Expand My Organization on the left menu and select Lost and Found.
Note
Select Windows systems only because Linux is not currently supported in 11.x version.
Click OK.
Click Start time and select Run Immediately.
Click Save.
Status: Pending - deployment in progress
Status: Failed - perform Run Task Now. For details, see Deploy SIEM Collector Installer to endpoints using Trellix ePO - On-prem.
Status: Complete - deployment is successful
Deploy SIEM Collector Installer to endpoints using Trellix ePO - On-prem
Task
In Trellix ePO - On-prem, select Menu → Software → Product Deployment.
Select System Actions.
Select each system check-box.
Note
The Run Client Task Now options is not available if the Select all checkbox is used to select systems.
In the bottom left, select Actions → Agent → Run Client Task Now.
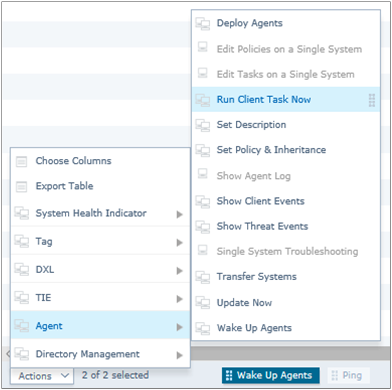
The Run Client Task Now page opens.
Set the following:
Select Trellix Agent under Products.
Select Product Deployment under Task type.
Select SIEM Collector under Task Name.
In the bottom right, click Run Task Now.
Note
Wait for a minute to complete the task.
When the status is Complete, click Close.
Check SIEM Collector installation on Trellix ePO - On-prem
Task
Open the Microsoft Windows File Explorer and navigate to:
C:\Program Files\Trellix\Windows Event Collector for 32-bit systems.
C:\Program Files(x86)\Trellix\Windows Event Collector for 64-bit systems.
Open config.xml file in a text editor and verify that the file contains the Receiver IP Address specified in the ePO Policy Catalog configuration.
Click ConfigTool.
The Trellix SIEM Collector Management Utility window opens.
In the Receiver Configuration pane, verify the Receiver IP Address as specified in the ePO Policy Catalog configuration.
In the left pane, navigate to SIEM Collector → EPO → <host name> and verify the config name specified in the ePO Policy Catalog configuration.
Open Task Manager and verify that the Collection Service (32 bit) → Trellix SIEM Collector is running.
On the System Tray, click Trellix Agent Status Monitor.
The Trellix Agent Status Monitor window opens.
Verify that the Enforcing Policies for SIEMCOLL1000 is present.
Change policy configuration in Trellix ePO - On-prem
Task
Click Policy Catalog.
In the Products pane, select the SIEM Collector product.
Under General Configuration, select My Default.
Click Edit.
Edit the Configuration Name and/or Receiver IP Address, and click Save.
Click System Tree from the menu bar.
Select the endpoint and click Actions → Agent → Wake Up Agents.
Select Force complete policy and task update then click OK.
Wait for a few minutes.
The update is applied to the endpoint.
Verify the installation. For details, see Check SIEM Collector installation on Trellix ePO - On-prem.
Configure a connection between a Trellix Enterprise Security Manager - Event Receiver and SIEM Collector
Set up a receiver to communicate with SIEM Collector.
Before you begin
Enabling encryption with SSL between the SIEM Collector and the Trellix ESM requires both devices to have it enabled. In order to use encryption with host IDs, it must be set up with one 'bridging' client that uses an IP address. This opens the firewall for the connection and allows the receiver to connect with an encrypted connection.
Task
Open the SIEM Collector configuration utility.
Select the receiver and verify the Trellix Enterprise Security Manager - Event Receiver IP address and chosen EEF port.
If you need to change the default settings, change them in Trellix ESM.
From the dashboard, select the receiver in the navigation tree.
Click
 .
.In Receiver Properties, select Receiver Configuration.
Select Interface.
Set the EEF port (Receiver Configuration → Interface → Communication). This value must be the same port configured on the receiver. The default is 8082.
(Optional) Set the network adapter (Receiver Configuration → Interface → Network → Interfaces).
If you enable SSL (encrypted), make sure each data source is configured to Use encryption.
Set up SIEM Collector hosts
Set up groups to help manage hosts that send events to SIEM Collector.
Task
From the SIEM Collector Management Utility, select the SIEM Collector in the navigation tree.
Click the Add icon.
In the Host Group Configuration pane, set the following values:
Name | Type a name to differentiate this group from other groups. |
Group Credential | Credentials can be set at the Groups level and inherited by all child hosts in the group. Individual nodes can be changed to not use the group's credentials. Credentials are only validated when the group has enabled clients. |
Logging Level | This setting is inherited by the group's host and clients. Individual hosts can be changed to not use the host group's settings. |
Select the host group and click the Add icon.
Enter the DNS name or IP address of the host you are collecting events from.
If you want the host's logging level to differ from the Trellix Enterprise Security Manager - Event Receiver, set the host Logging Level.
Configure SIEM Collector Custom SQL clients
Set up custom SQL clients to collect events from a remote database.
Before you begin
Enter the database credentials.
Task
From the Host Configuration window, select Custom SQL from the Clients drop-down list.
Click Add Client.
The SQL Client page opens.
Enter your user credentials.
Configure the settings for the client.
Name | The name of the client. |
Host ID | An ID that corresponds to a host ID associated with a data source on the Trellix Enterprise Security Manager - Event Receiver. |
Forwarding Method | Determines if the events are sent as syslog over |
EEF or field mapped as EEF. | |
Select a database | The databases available to collect from. |
Select a Table/view | The tables available in the selected database. |
Select columns to collect from.
If you use EEF as the forwarding method, map the database columns to EEF fields. Message is the only required EEF field and must be mapped to a column in the selected table.
Select a column to use as a bookmark.
Note
A bookmark is a primary index field. The field must be unique, so use a primary key column. When you sort your database table by this, the results will only be appended to it.
If the user credentials for an MSSQL or Oracle database are different from the user credentials for the computer that hosts the database, set the credentials.
In the Credential section of the Host Configuration page, click the edit icon.
Select a database type.
Select a security type. Windows Integrated Security uses the Windows credentials for the host computer. Database Security uses the database credentials configured in the Credential section.
Set the port.
Note
Windows Integrated Security authentication is currently available only for SQL Server connections.
Configure SIEM Collector generic log tail clients
Set up generic log tail clients to forward events to the SIEM Collector.
From the Host Configuration window, select Generic Log Tail from the Clients drop-down list.
Click Add Client.
The Generic Log Tail Client page opens.Configure the settings for the client.
Name | Required. The name of the client. |
Host ID | An ID that corresponds to a host ID associated with a data source on the Trellix Enterprise Security Manager - Event Receiver. |
Directory | Required. The directory that the client pulls log files from. Enter a path manually or user the browser to locate the directory. |
File Name | Required. The name of the file that the client reads. Type a specific file name or use wildcards (for example, "*.log" or "*"). |
Tail Mode | Determines whether the client starts reading the log from the top of the file or start from the bottom with new events as they are written to the file. Default is to send only new events. |
Multi Line Events | Indicates if the events in the log file span multiple lines. Selecting this field requires setting a delimiter or specifying the maximum lines per event. |
Delimiter | Determines what the client uses as the delimiter between events (for example, "Linux" would split the events when the word "Linux" is found, and "(?:\d{1,2}\/){2}\d{4}" would split the events every time a date in the format MM/DD/YYYY is found). Leaving this field blank defaults to delimiting on new lines. |
Delimiter is a RegEx | Select if the value in the Delimiter field is a regular expression. |
Max Lines Per Event | The maximum number of lines a multi-line event can span. |
Configure SIEM Collector SQL Server C2 audit log clients
Set up SQL Server C2 audit log clients to send events to SIEM Collector.
Task
From the Host Configuration window, select SQL Server C2 audit logs from the Clients drop-down list.
Click Add Client.
The SQL C2 Audit Client page opens.Configure the settings for the client.
Name | Required. The name of the client. |
Host ID | An ID that corresponds to a host ID associated with a data source on the Trellix Enterprise Security Manager - Event Receiver. |
Directory | Required. The directory that the client pulls log files from. Enter a path manually or user the browser to locate the directory. |
Log Name | Required. The name of the file that the client reads. Type can be a full file name or use wildcards (for example, *.trc). |
Archived Log Directory | If a value is entered, the log files are moved to this directory after being read. |
Configure SIEM Collector Windows events clients
Set up Windows events clients to send events to SIEM Collector.
Task
From the Host Configuration window, select Windows events from the Clients drop-down list.
Click Add Client.
The Windows Event Client page opens.Configure the settings for the client.
Name | Required. The name of the client. |
Host ID | An ID that corresponds to a host ID associated with a data source on the Trellix Enterprise Security Manager - Event Receiver. |
Windows Logs | Required. Select one or more Windows logs from the drop-down list. |
WEF Events | Indicates that the events are forwarded from a remote computer and changes the From location to the host name of the computer that generated the event. If deselected, all events show up on the Trellix Enterprise Security Manager - Event Receiver showing a From location with the IP address of the computer that sent the events to the Trellix Enterprise Security Manager - Event Receiver. Usually, this is used with the Forwarded Events log. |
Configure SIEM Collector Windows EVT files clients
Set up Windows EVT files clients to send events to SIEM Collector.
From the Host Configuration window, select Windows EVT files from the Clients drop-down list.
Click Add Client.
The Windows EVT Client page opens.
Configure the settings for the client.
Settings | Description |
Name | Required. The name of the client. |
Host ID | An ID that corresponds to a host ID associated with a data source on the Trellix Enterprise Security Manager - Event Receiver. |
Settings | Description |
|---|---|
Directory | Required. The directory that the client pulls log files from. Type a path or use the browser. |
Log File | Required. The file that the client reads. Type a file name or use wildcards (for example, "*.evt" or "*"). |
Wait Time | The minimum time to wait between reading log files. |
Delete Log File | Delete files after reading them. |
Circular/Active File | Indicates if the log files are currently being written to by another application or process. |
SIEM Collector data source settings
Key settings for data sources that send events to SIEM Collector.
Data Source | Setting | Value |
|---|---|---|
Custom SQL - EEF/EEF | Data Source Vendor | Generic |
Data Source Model | ESM Event Format (EEF) | |
Data Retrieval | EEF (Default) | |
Custom SQL - ASP/EEF | Data Source Vendor | Generic |
Data Source Model | Advanced Syslog Parser | |
Data Retrieval | EEF | |
Generic log tail | Data Source Vendor | Generic |
Data Source Model | Advanced Syslog Parser |
Data Source | Setting | Value |
|---|---|---|
| Data Retrieval | EEF |
SQL Server C2 audit logs | Data Source Vendor | Microsoft |
| Data Source Model | MSSQL Server C2 Audit |
| Data Retrieval | EEF |
Windows events | Data Source Vendor | Microsoft |
| Data Source Model | Windows Event Log - WMI |
| Data Retrieval | EEF |
Windows EVT files | Data Source Vendor | Microsoft |
| Data Source Model | Windows Event Log - WMI |
| Data Retrieval | EEF |
Install Oracle OCI for SIEM Collector
Install Oracle Instant Client.
Task
Download the Windows 32-bit instantclient-basic-nt-11.2.zip file from the Oracle website.
On your computer, create a directory named c:\Oracle.
Copy the downloaded file to the new directory and unzip it.
A new folder is created: c:\Oracle\instant_client_11_2.
Add the new folder to the Windows system variables System Properties → Environment Variables → System variables.
Add a new variable OCI_LIB32 with value c:\Oracle\instant_client_11_2.
Edit the variable Path to include c:\Oracle\instant_client_11_2.
Restart the SIEM Collector service.
Troubleshoot SIEM Collector issues
If you get an error message, use these tips to help resolve the issue.
This client cannot be enabled as its parent host is disabled.
Enable the parent group.
Enable the parent host.
This host cannot be enabled as its parent host group is disabled.
Enable the parent group.
If a silent install isn't installing anything.
Run the installer with verbose logging to find the error.
msiexec /package TrellixSIEMCollectorInstaller_x86.msi /lv* msi.log ...Note
A log file (msi.log) is generated in the directory from which the installer was executed. A full path for the log file can also be used (e.g., c:\temp\msi.log).
Receiver's Data Source is not getting any events.
Check the receiver configuration.
Trellix SIEM Collector msi requires elevated privileges to install on Microsoft Windows 7 and MicrosoftWindows 2008 with UAT enabled
Copy installer to target system.
Select Start.
In Search programs and files text field, enter
cmd.Right click on
cmd.exe.Select Run as administrator.
Navigate to the
TrellixSIEMCollectorInstaller_x86_x.xx.xxxxx.xx.msi.Run the installer.
Trellix SIEM Collector is unable to reopen an active connection in a disabled status
Set AutoDisconnect interval to a larger variable.
Configure the AutoDisconnect time by running the following command from a command prompt:
net config server /autodisconnect:<time_before_autodisconnect>SpecifyRestart the system.
Navigate to the PC with the user account under which the collector is running.