The ether1 interface on the Email Security — Server AWS instance is the only interface that is created by default. You can create multiple network interfaces (ether2, ether3, and so on) and attach them to your Email Security — Server AWS instance.
The following table shows the default Email Security — Server interfaces and their purpose.
Email Security — Server Interface | Purpose |
|---|---|
ether1 | Management interface |
pether3 | Network monitoring interface |
Creating network interfaces
This section describes how to create a network interface for your Email Security — Server instance.
Open the Amazon EC2 console.
In the left pane, select Network & Security > Network Interfaces.
Click Create Network Interface.
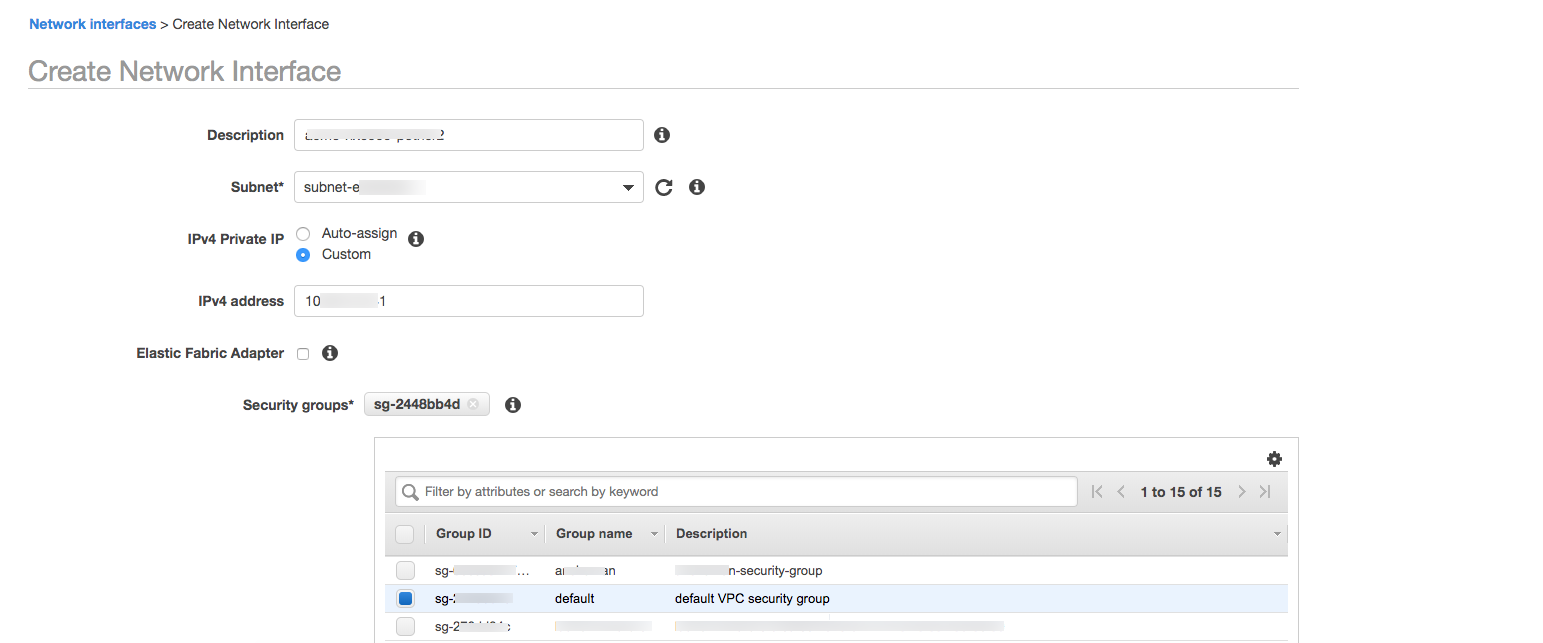
Enter information that uniquely identifies the interface in the Description field.
Select the subnet for the interface in the Subnet drop-down list.
Important
Each interface must be in a separate subnet.
Select Custom to manually configure a static IPv4 address.
Enter the custom static IPv4 address in the IPv4 address field.
Complete the Elastic Fabric Adapter and Security groups fields as directed by your AWS administrator.
Click Create.
Repeat this procedure for each network interface.
Continue to Attaching Network Interfaces.
Attaching network interfaces
This section describes how to attach a network interface to your Email Security — Server instance.
Open the EC2 console.
Select Instances > Instances in the left pane.
Right-click the instance and then select Networking > Attach Network Interface. The Attach Network Interface dialog box opens.
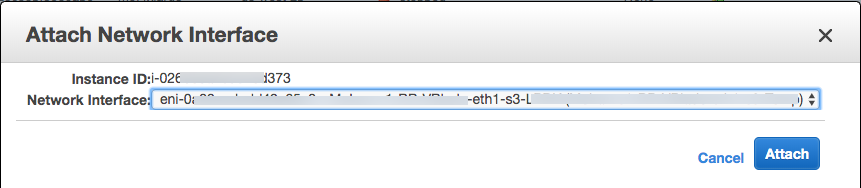
Select the interface with the lowest number in the Network Interface drop-down list (for example, ether2) and then click Attach.
Repeat the previous step for each network interface.
Important
Attach the interfaces in numeric order. For example, attach pether3 before pether4.
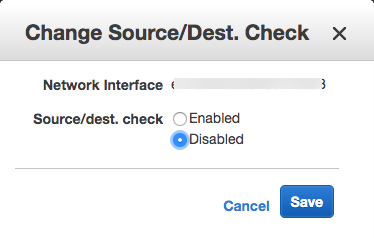
Disable source and destination checks on each monitor interface.
Select the interface.
Right-click and select Change Source/Dest. Check. The Source/Dest. Check dialog box opens.
Select Disabled and then click Save.
Stop the instance:
Select Instances in the navigation pane.
Select the instance, right-click, and then select Instance State > Stop.
Restart the instance:
Select the instance, right-click, and then select Instance State > Start.
Important
Do not perform this step if you plan to perform the following optional procedure (Configuring the Activation Code and Initial Admin Password).
Configuring the interface for email analysis
Enable the interface:
hostname (config) # no interface <interface name> shutdown
Ignore the error that may be displayed; it doesn't hinder the operation.
Set the IP address for the interface manually:
hostname (config) # <interface name> ip address <ip address>/<mask>
(Optional) Enable other interfaces in a similar manner.
Configure the interface for email analysis:
hostname (config) # email-analysis interface <interface_name>
(Optional) If the Destination MTA is not on the same subnet as the newly configured interface, you need to add a static route to reach the destination MTA (next-hop) IP for the solution to work.
In this example, the default gateway (172.16.1.1) will be on ether1, but a different gateway will be on pether3 for SMTP traffic. As shown below, a static IP route is configured for the next-hop MTA (10.2.74.131) to use a different gateway (10.2.75.254).
hostname (config) # interface ether1 ip address 172.16.216.60 /12 hostname (config) # interface pether3 ip address 10.2.75.13 /24 hostname (config) # ip default-gateway 172.16.1.1 hostname (config) # ip route 10.2.74.130 255.255.255.255 10.2.75.254 hostname (config) # ip route 10.2.74.131 255.255.255.255 10.2.75.254
Configuring advanced URL defense
To set up Advanced URL Defense on the interface to separate the live traffic:
hostname (config) # analysis live live-interface <interfaceName>
Configure the IP address of the live analysis data interface. Make sure to use the IP address of the new interface that was configured for email analysis.
hostname (config) # analysis live external ip <ipaddress> <mask>
Check the live analysis configuration:
hostname (config) # analysis live check-connection