Getting started
This document covers the following information:
Accessing the portal
The DTI update portal can be accessed at the following URL: https://portal-dti.fireeye.com.
Prerequisites
You must have a user account to log in.
Procedure. To log in to the DTI update portal:
In your browser, go to the DTI update portal https://portal-dti.fireeye.com).
Log in to the portal with your user credentials.
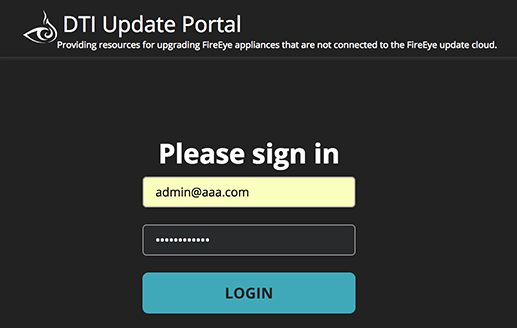
After successful login, you are directed to the DTI Update Portal home page.
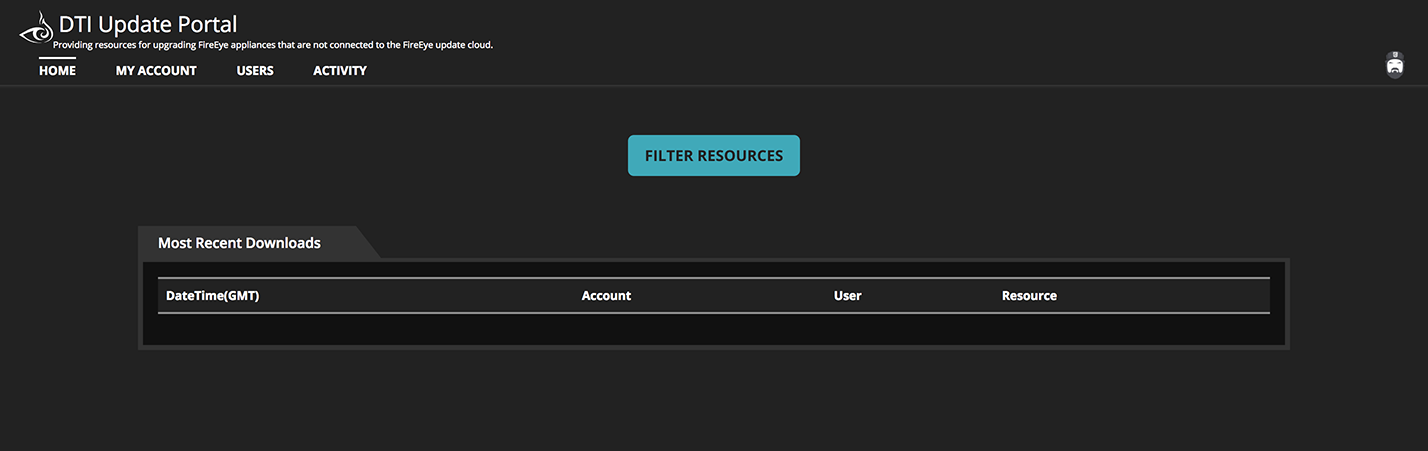
Managing user accounts
All users of the DTI update portal must have a user account. As an administrator of the DTI update portal, you can create and deactivate user accounts for your portal.
User account roles
The DTI update portal supports the following two roles:
User—Users can log in to the DTI update portal, download content, and manage appliances and keys.
Admin—Administrators have the same access as other users, but can also add and deactivate users on the system.
User account password requirements
Passwords must be 8 – 30 characters long and must include the following:
At least one numeric digit
At least one lowercase letter
At least one uppercase letter
At least one of the following symbols: - + _ ! @ # $ % ^ & * . , ?
Prerequisites
Admin access
Creating a user account
Create DTI update portal user accounts using the portal's New User page.
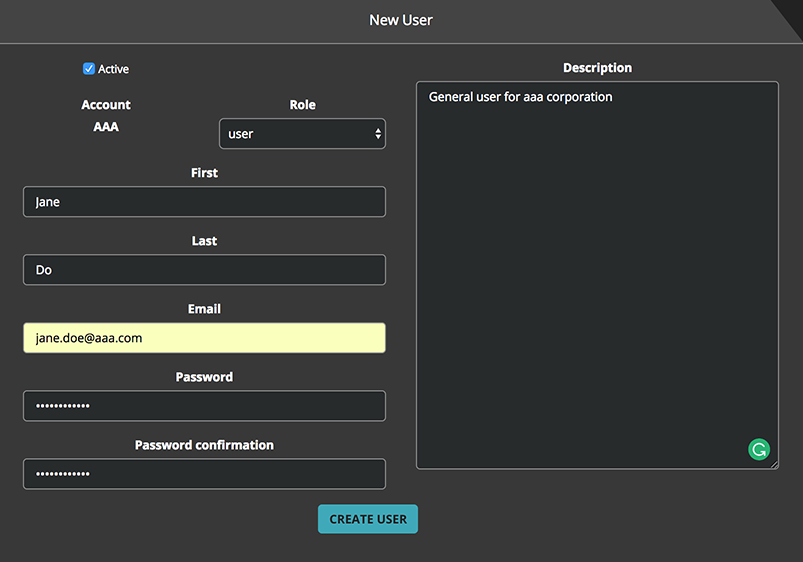
Procedure. To create a DTI update portal user account:
Log in to the DTI update portal as an administrator. See Accessing the Portal.
On the home page, click Users. The user list page is displayed.
Click New User. The New User page displays.
Select the company for the new user account in the Account drop-down menu.
Select the role for the new user account in the Role drop-down menu.
Enter the identifying information for the account: the user's first and last names and email address.
Create and confirm the initial password for the account. Rules for passwords are described in User Account Password Requirements.
Optionally, enter a description for the user account.
Click Create User.
Searching for a user account
You can search for an existing DTI update portal user account.
Procedure. To search for a DTI update portal user account:
Log in to the portal as an administrator. See Accessing the portal.
On the home page, click Users. The user list page is displayed.
3. In the search box at the top of the user list page, enter a string for the search and click Search. The string is not case-sensitive.

The string you enter is matched against the user names, email addresses, and company names in the user list. The results display all of the user accounts that matched the string.
You can refine the filtered list by adding to your search string.
To reset the user list to show all users, clear the search box.
Editing a user account
You can edit DTI update portal user accounts after they have been created.
Procedure. To edit a DTI update portal user account:
Log in to the DTI update portal as an administrator. See Accessing the portal.
On the home page, click Users. The user list page is displayed.
Locate the user in the user list. Click Previous, Next, or one of the listed page numbers to see different pages of the user list.
You can search for a user in the list. See Searching for a user account.
Click the Edit button associated with the user. The Edit User page displays.
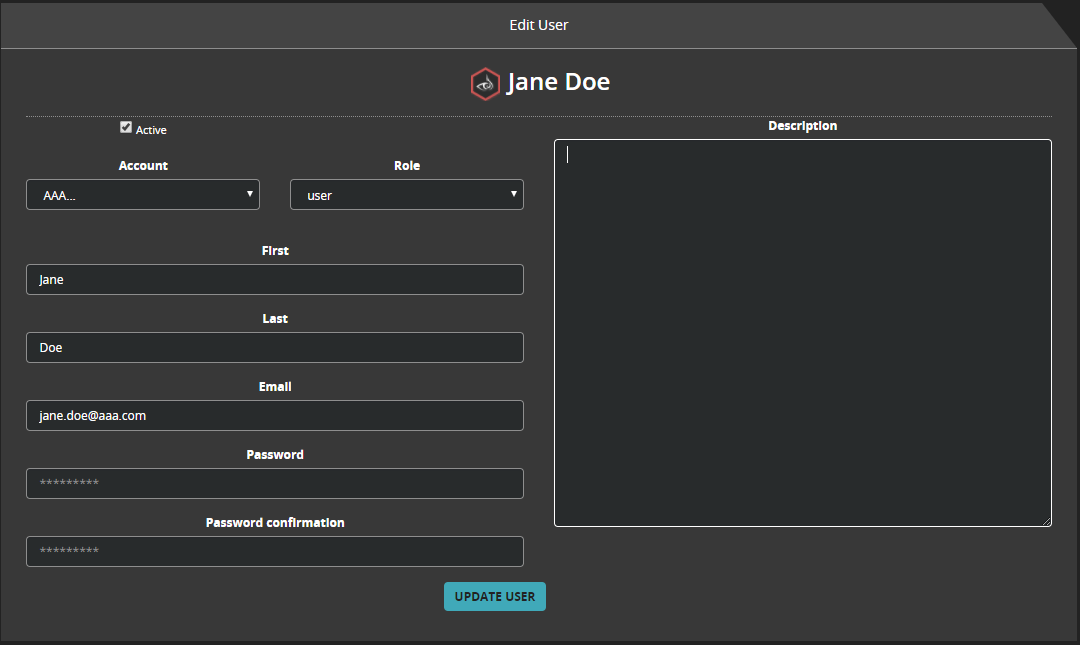
Change the account, role, first name, last name, email address, password or description of the user account, as needed.
Click Update User.
The user account is updated.
Deactivating a user account
The following is used to deactivate a user account on the DTI update portal:
Procedure. To deactivate a DTI update portal user account:
Log in to the DTI update portal as an administrator. See Accessing the portal.
On the home page, click Users. The user list page is displayed.
Locate the user in the user list. Click Previous, Next, or one of the listed page numbers to see different pages of the user list.
You can search for a user in the list. See Searching for a user account.
Click the Edit button associated with the user. The Edit User page displays.
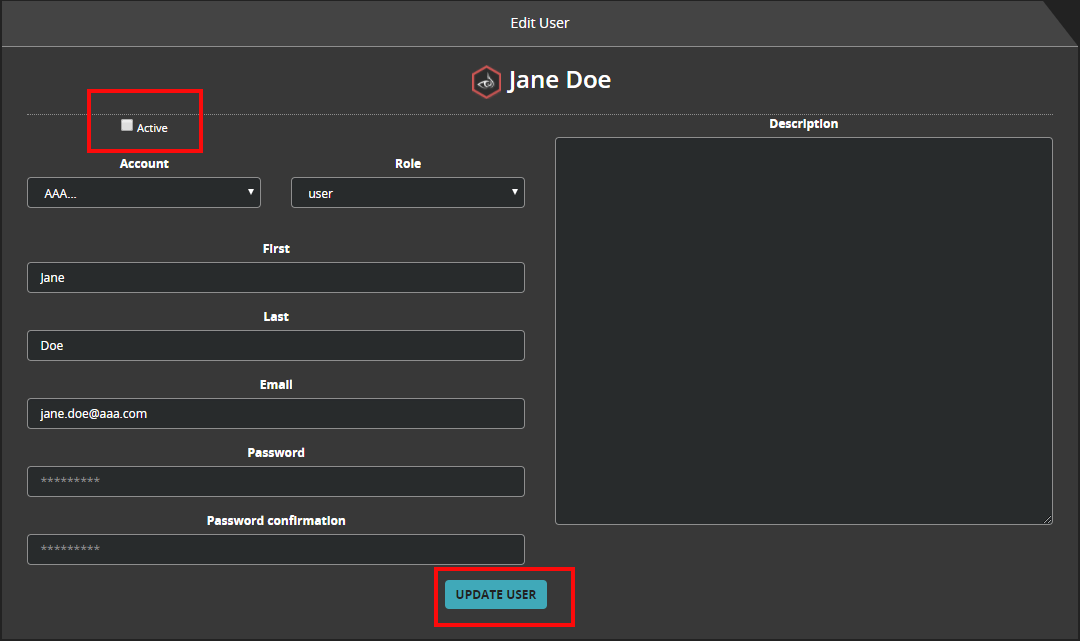
Clear the Active checkbox.
Click Update User.
The user account is deactivated. It still appears in the user list, but is listed as inactive.
Updating content
You can download various content resource files using the DTI update portal Web UI and API.
The content resource files available for download for newer versions of appliance software differ from the content resource files available for legacy versions of appliance software. Both are described here. To determine which type of content resource files your appliance needs, see Content resource files.
To learn more about updating the security content of an Endpoint Security server without the use of a Central Management appliance, see the community article on this topic.
This section covers the following information:
Limitations and usage guidelines
You can use the DTI update portal to upgrade an offline appliance to release 7.5.0 or greater. The update takes effect after you reboot the appliance.
To upgrade an offline appliance from a Central Management appliance, the Central Management appliance must be running the 7.7.0 release or greater.
After upgrading an offline Central Management appliance to a new major release (such as from 7.8.1 to 7.9.0), download the new metadata files for the managed appliances.
Content resource files
This section describes the content resource files available for download from the DTI update portal to newer versions of Trellix appliance software.
Guest images
Guest images are packaged as bundles. Each bundle includes multiple files that must all be installed on the appliance. You can search for guest-image packages by product type and release.
Depending on your appliance hardware architecture, you will need to download either the AMD architecture package or the Intel architecture package.

Caution
You must select and download the correct guest image bundle and install all of its files on your appliance.
Endpoint Security (HX) appliances do not support guest images.
Guest image files come in the following combinations:
Full version or patch version
The full version is referred to as the Guest Image Profile. This version includes the complete guest image software for the version to be installed.
The patch version is referred to as the Guest Image Profile Patch. Patch versions are delta packages that can be downloaded and applied to the currently installed guest image version.
The full version can be installed on any appliance requiring a guest image. You do not need to ensure you have the correct base guest image on the appliance before you install the full version. The patch version is smaller than the full version because it only includes the differences between the source and the target guest image versions.
AMD architecture or Intel architecture
Choose the correct guest image file type for your appliance's hardware architecture. Currently the following appliance versions require the Intel architecture package:
1500, 2500, 2550, 3500, 4500, 5500, 6500, 7500, 8500, 10550
All other appliance versions use the AMD architecture package.
The architecture type can be identified by the profile section of the file name. The Intel package ends with an "m" within the profile section.
Guest image profiles
A guest image profile is an offline guest image package that can be downloaded and installed on any appliance (freshly remanufactured or older). You must download and install all of the files from the same guest image bundle version.
AMD Package:
<PROFILE_NAME>.<PROFILE_VERSION>.img win7-sp1.17.0208.imgIntel Package:
<PROFILE_NAME>m.<PROFILE_VERSION>.img win7-sp1m.17.0208.img
Guest image profile patches
Guest image profile patches are delta packages that can be downloaded and applied to the currently installed guest image version.
AMD package:
<PROFILE_NAME>.img.<CURRENT_GI_VERSION>.<NEW_PROFILE_VERSION>.diff winxp-sp3.img.15.1218.16.0901.diffIntel package:
<PROFILE_NAME>m.img.<CURRENT_GI_VERSION>.<NEW_PROFILE_VERSION>.diff winxp-sp3m.img.15.1218.16.0901.diff
Caution
For NX, EX, AX & CMS appliances, a user of the portal will see:
winxp-sp3m-delta-16.0901-17.0800.imgdownloaded from the Web UI, but thewinxp-sp3m.img.16.0909.17.0800.diffpackage will be present at the FENET server.
Guest image manifest config package
The guest image manifest config package is a small package that includes metadata required to install an .img or .diff package on an appliance. This manifest is also required when an .img or .diff package is hosted on a Central Management appliance.
Legacy content resource files
This section describes the content resource files available for download from the DTI update portal to legacy versions of appliance software.
Femeta
Trellix metadata provides compatibility and other information used when you install the software image. You can search for femeta files by product type and release numbers.
femeta_<PROD>.xml
 Important
Trellix recommends that you update
femetametadata file prior to installing any other update.The
femetametadata file for Endpoint Security (HX) is calledfemeta_HX.ensigfor all versions of HX.
Security content
The security content package is required to update detection rules for Trellix appliances. You can search for security content files based on the product type and release numbers. The latest content package can be downloaded based on the content channel as well. The content package file is named as:
sc-stable_<VERSION>.ensig
Important
The latest
femetametadata must be installed prior to updating or hosting an offline CMS content package.
 Caution
When renaming the OLP security content file the file name must begin with "sc-" and must not have any spaces in the name.
You must ensure that the security content acceptance level is stable. To configure the security acceptance level, use the
fenet security-content acceptance-level stablecommand. For further information, refer to the CLI Command Reference.
System image
System images are used to upgrade the base OS to a newer version. The system image resource type can be downloaded as:
image-<product-name>_<product-release>.ensigImportant
Before installing a newer system image, Trellix highly recommends that you first download and install the latest femeta metadata and security content package.
Virtual appliances
A virtual appliance (OVA) image is required to boot a virtual appliance. The virtual appliance images can be filtered by product name and release. When available, virtual appliance images are supported primarily for major releases only. You may need to download the major release image for a virtual appliance and then upgrade it to a more recent version, if one is available. The virtual appliance models are .zip files and can be downloaded as:
image-<PRODUCT_NAME>_fireeye<MODEL_NAME>_<MAJOR_RELEASE>.zipFor example: image-wmps_fireeyenx2500v_7.9.0.zip
Guest images
Guest images are packaged as bundles. Each bundle includes multiple files that must all be installed on the appliance. You can search for guest-image packages by product type and release.
Note
Offline packages (those with a .ensig extension) are no longer supported. GI bundles (those with a .img extension) based on core version 17.0108, such as 17.0208 and 17.0308 are still supported. You can still upgrade guest images even though you previously installed using offline packages.
Depending on your appliance hardware architecture, you will need to download either the AMD architecture package or the Intel architecture package.
Caution
You must select and download the correct guest image bundle and install all of its files on your appliance.
Endpoint Security (HX) appliances do not support guest images.
Guest image files come in the following combinations:
Full version or patch version
The full version is referred to as the Guest Image Profile. This version includes the complete guest image software for the version to be installed.
The patch version is referred to as the Guest Image Profile Patch. Patch versions are delta packages that can be downloaded and applied to the currently installed guest image version.
The full version can be installed on any appliance requiring a guest image. You do not need to ensure you have the correct base guest image on the appliance before you install the full version. The patch version is smaller than the full version because it only includes the differences between the source and the target guest image versions.
AMD architecture or Intel architecture
Choose the correct guest image file type for your appliance's hardware architecture. Currently the following appliance versions require the Intel architecture package:
1500, 2500, 2550, 3500, 4500, 5500, 6500, 7500, 8500, 10550
All other appliance versions use the AMD architecture package.
The architecture type can be identified by the profile section of the file name. The Intel package ends with an "m" within the profile section.
Guest image profiles
A guest image profile is an offline guest image package that can be downloaded and installed on any appliance (freshly remanufactured or older). You must download and install all of the files from the same guest image bundle version.
Ensig package (oldformat):
vxe_<GI_BUNDLE_VERSION>_<PROFILE_NAME>.ensigvxe_15.0202_osx-10.9.ensigAMD Img package (newformat):
<PROFILE_NAME>.<PROFILE_VERSION>.imgwin7-sp1.16.0901.img
INTEL Img package (newformat):
<PROFILE_NAME>m.<PROFILE_VERSION>.imgwin7-sp1m.16.0901.img
Guest image profile patches
Guest image profile patches are delta packages that can be downloaded and applied to the currently installed guest image version.
AMD img patch:
<PROFILE_NAME>.img.<CURRENT_GI_VERSION>.<NEW_PROFILE_VERSION>.diffwinxp-sp3.img.16.1115.17.0800.diffINTEL img patch:
<PROFILE_NAME>m.img.<CURRENT_GI_VERSION>.<NEW_PROFILE_VERSION>.diffwinxp-sp3m.img.16.1115.17.0800.diff
For NX, EX, AX and CMS appliances, if you are using of the DTI offline portal you will see winxp-sp3.img.16.0909.17.0800.diff.
Guest image manifest config package
The guest image manifest config package is a small package that includes metadata required to install an .img or .diff package on an appliance. This manifest is also required when an .img or .diff package is hosted on a Central Management appliance.
Downloading content from the DTI update portal
To locate content in the DTI update portal, it must be filtered by product name and release. This narrows the content selection.
Procedure. To locate and download content resource files from the DTI update portal:
Log in to the portal. See Accessing the portal.
On the home page, click Filter Resources. The Filter Resources page displays.
As you specify a filter field on this page, additional filter fields appear. Specify as many filter fields as you need.
Select a product in the Select Product drop-down menu.
Select a version of the selected product in the Select Release drop-down menu.
Optionally, select a resource type for that version of the product in the Select Resource (Optional) drop-down menu.
Click Filter. A list of resource types for that product version appears. For information about the resource types available, see Content resource files.

In the displayed resource list, expand the row for a listed resource by clicking on the expand icon
 .
.Click one of two download buttons:
Click Download from CDN to download the content from a content delivery network (such as Akamai’s). Depending on your network configuration, this option is usually faster.
Click Download from DTI to download the content directly from Trellix servers.
The files will be downloaded to your Downloads folder.
Follow the instructions in the next section, Transferring content to offline appliances.
Transferring content to offline appliances
Transfer Trellix content from the DTI update portal to your offline appliances in one of the following ways:
Transferring content files locally
This procedure describes how to upload a local content file that was obtained from the DTI update portal.
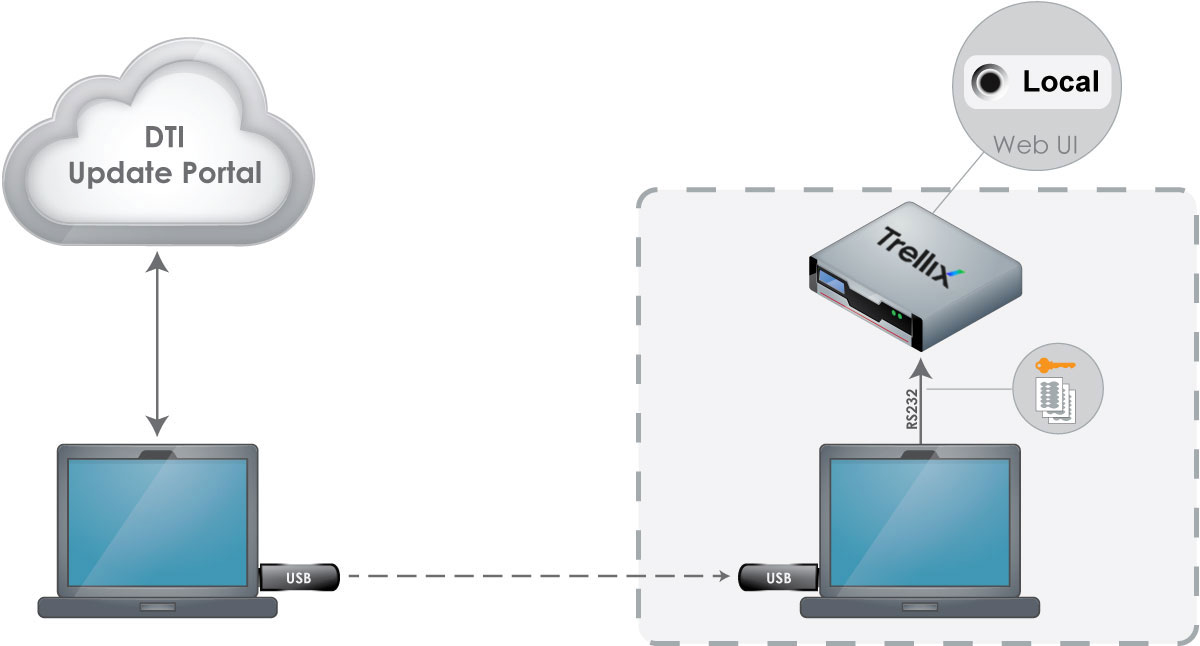
Procedure. To transfer content files locally:
Bring the computer or removable storage device with the downloaded content inside your network.
Directly connect the laptop to your Trellix appliance using a serial port connection, or insert the removable storage device into a directly connected, networked laptop.
Log in to the Web UI on the appliance.
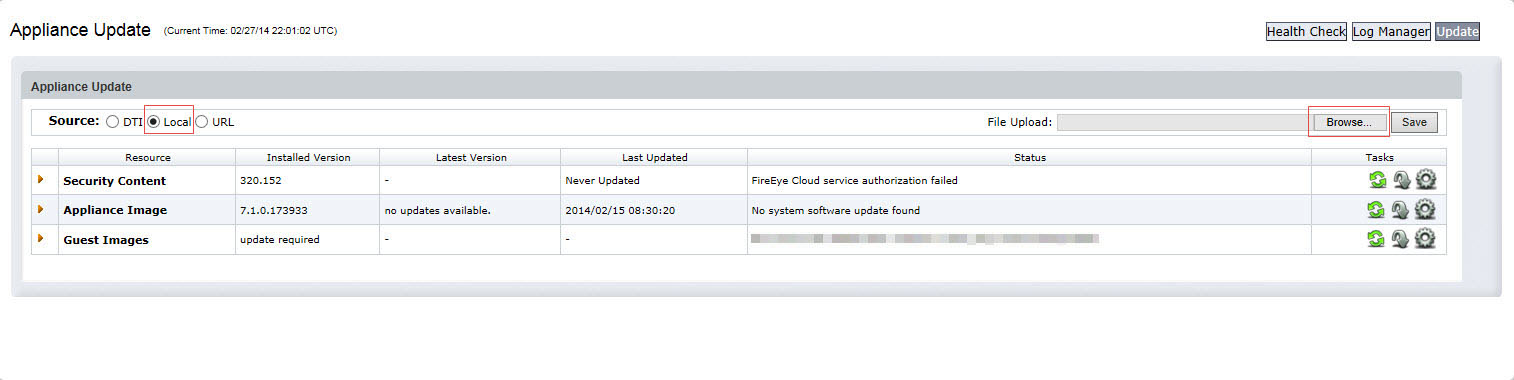
Go to the Appliance Update page (select About > Update) in the appliance Web UI.
Select the Local option, as described in the documentation for the appliance you are updating.
Click Browse to locate the appliance files you downloaded.
Note
For offline guest image updates, downloads are more efficient if Source is set to URL, not Local.
The selection of the Local or URL source option on the Appliance Update page persists across all appliance reboots.
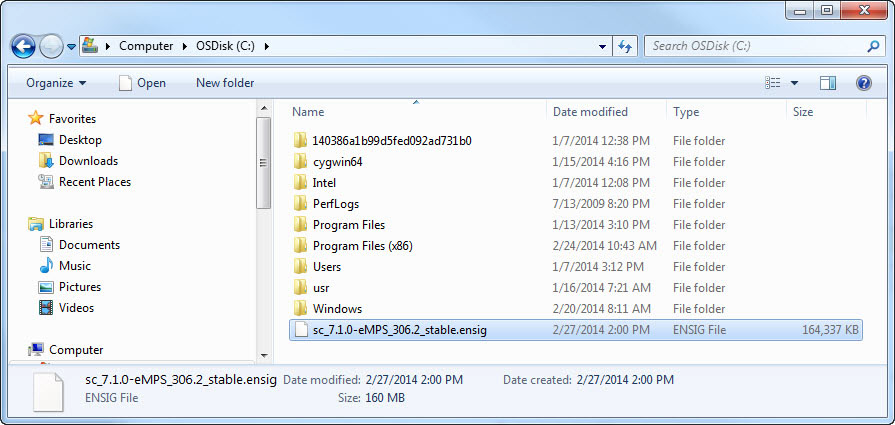
Select the content file you want to transfer and install, and then click Open.
On the Appliance Update page, click Save.
The content file is saved on the appliance.
Repeat these steps for every content file you need to transfer.
Transferring content files using a URL on a local site
This procedure describes how to upload a local content file that was obtained from the DTI update portal and hosted on a local computer or removable storage device identified by a URL.
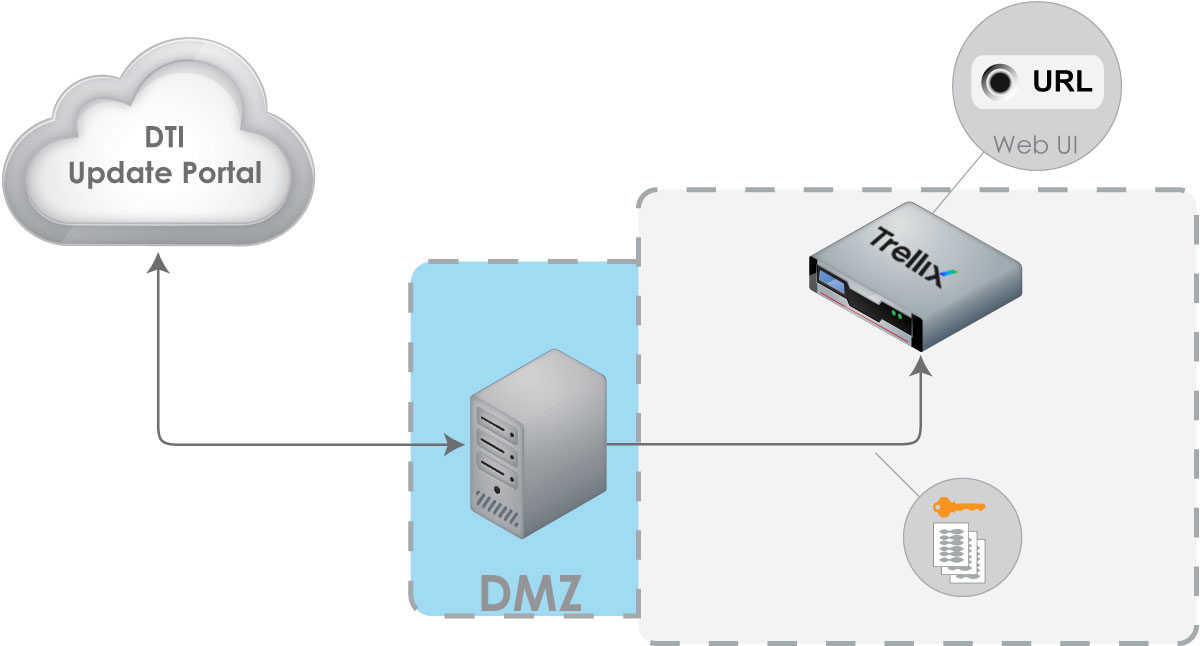
Procedure. To transfer content files from a local computer or removable storage device identified by a URL:
Log in to the Web UI on the appliance.
Go to the Appliance Update page (select About > Update) on the Web UI.
Select the URL option, as described in the documentation for the appliance you are updating.
Note
Use URL for the source of guest image downloads only during offline updates. URL is not relevant if you are performing DTI source downloads.
The selection of the Local or URL source option in the Appliance Update page persists across all appliance reboots.
In the File URL box on the Appliance Update page, specify the URL where the downloaded appliance files can be found.
On the Appliance Update page, click Save.
The file is saved on the appliance.
Repeat these steps for every file you need to transfer.
Transferring content files using SCP
Procedure. To transfer content files using SCP:
Save the update package from the DTI update portal on a UNIX-like system accessible to the Trellix appliance.
Run the
scp <package> <appliance_address>:/data/updatescommand. For example:
# scp femeta.ensig 192.168.1.100:/data/updatesThe file is saved on the appliance.
Note
For offline guest image updates, downloads are more efficient if Source is set to URL, not Local.
3. Repeat these steps for every file you need to transfer.
Installing content files on an offline appliance
Procedure. To install content files on your appliance:
Log on to your Trellix appliance as an administrator.
Go to the Appliance Update page (select About > Update) in the appliance Web UI.
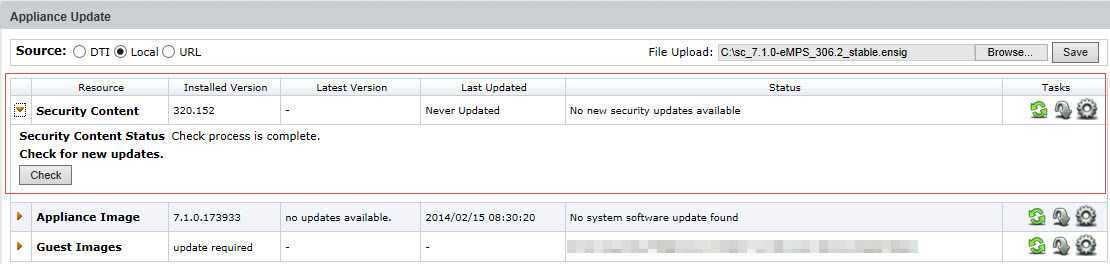
Click the orange arrow next to the resource that you want to update to show details. The Status area displays information about the last check or last update action.
Appliance Update table:
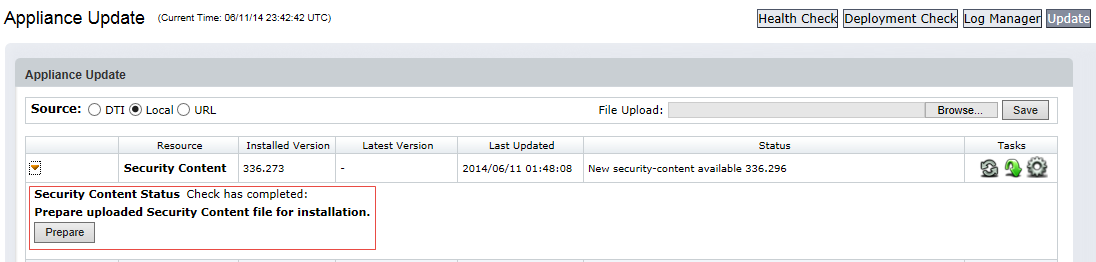
Click the Check button or the Check For Update icon in the Tasks column of the Appliance Update table to perform the software check. If there is an update, the Check button changes into Prepare. If there is no update, a message is displayed that no new updates are available.
Click Prepare to prepare the file for installation.
Appliance Update (status view):
To install the downloaded software on the appliance, click the Install button or the Install icon (gear icon) in the Tasks column.
There is no status bar to show the progress of the installation. You can use CLI commands to monitor the status of the installation. For example, enter
show guest-images downloadto check if the new guest images are installed or entershow fenet image statusto check if the new system image is installed.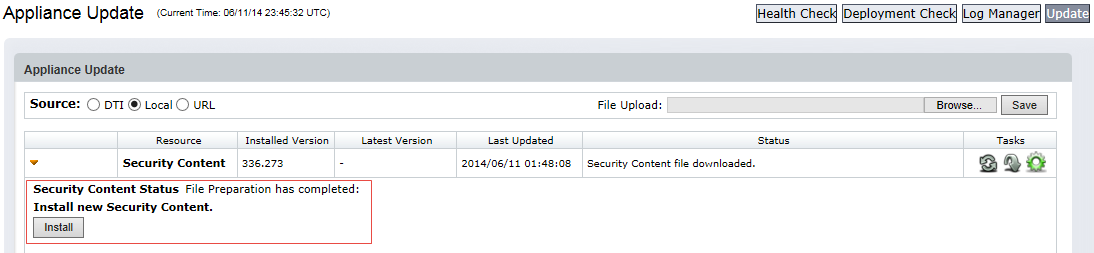
When the installation is finished, you see an "Updates installed successfully" message. The status changes to "Updates installed successfully," and the installed version number changes
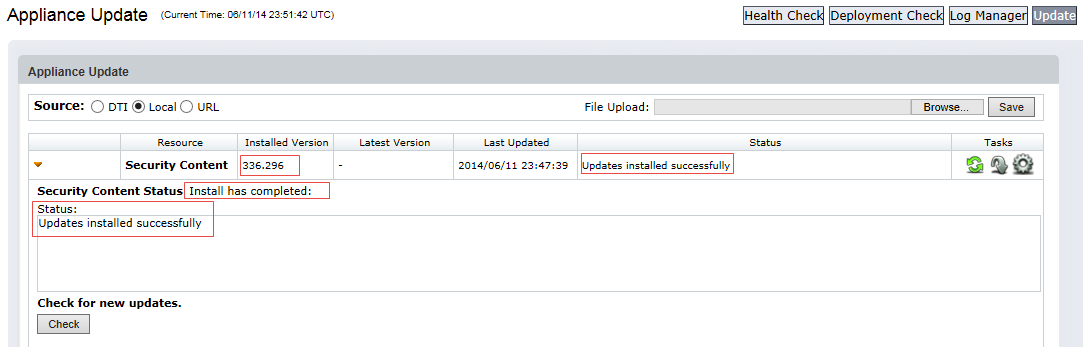
Repeat these steps for every content file you want to install.
Updating Endpoint Agent images
To update the Trellix Endpoint Agent image on an Endpoint Security (HX) appliance, use the Endpoint Security (HX) appliance CLI and the DTI update portal.
Task Summary
Place the Endpoint Security (HX) appliance in an offline operational mode.
Obtain the following files from the DTI update portal. Use product name EP_AGENT when you filter the list:
femeta_HX_AGENT.ensig
image-hx_agent-win-<version>
image-hx_agent-osx-<version>
image-hx_agent-linux-<version>
Determine the content ID of the Trellix Endpoint Agent image you need.
Retrieve and install the Endpoint Agent.
Use the agent image to upgrade your endpoint agents. See the Endpoint Security Agent (HX) Administration Guide for more information.
Prerequisites
Secure Copy (SCP) client software on your local machine.
Administrator credentials for the Endpoint Security (HX) appliance.
Administrator credentials for the DTI update portal. If you do not already have administrator credentials, contact your Trellix sales representative.
Procedure. To update the Trellix Endpoint Agent image on an Endpoint Security (HX) appliance using the CLI:
Place the Endpoint Security (HX) appliance in an offline update state:
Using the CLI, log in to the Endpoint Security (HX) appliance as an administrator.
Enable CLI configuration mode on the Endpoint Security (HX) appliance:
host > enable host # configure terminalPlace the appliance in an offline state:
host (config) # fenet op-mode local
Using your local system, copy the metafiles to the Endpoint Security (HX) appliance.
Log into the DTI update portal.
Filter the portal content using product name EP_AGENT to locate the metafile.
Download the following four metafiles from the portal to your local machine.
femeta_HX_AGENT.ensigimage-hx_agent-win-<version>image-hx_agent-osx-<version>image-hx_agent-linux-<version>
d. Use Secure Copy (SCP) to copy the file to the /data/updates directory on the appliance. For details, see Transferring content files using SCP in this document.
3. On the Endpoint Security (HX) appliance, determine the content ID of the Trellix Endpoint Agent image you need.
a. Retrieve the list of Endpoint Agent images that are available for download.
host (config) # fenet hx-agent metadata refreshb. View the supported operating system, version, and content ID associated with each available Endpoint Agent image.
host (config) # show fenet hx-agent image available command.c. Find the content ID of the image you need.
4. Download the femeta_HX_AGENT-<version>.img (where <version> is the version number of the agent image) from the portal to your machine. Use Secure Copy (SCP) to copy the file to the /data/updates directory on the appliance.
host (config) # fenet hx-agent image fetch content-id <contentID>
host (config) # fenet hx-agent image apply content-id <contentID>5. After the agent software image is applied to the Endpoint Security (HX) appliance, it can be installed or upgraded on the host endpoints provisioned to the appliance. See the Endpoint Security Agent (HX) Deployment Guide and the Endpoint Security Agent (HX) Administration Guide.