This procedure describes how to change the access privileges granted to a user account in your IAM organization. To add or remove privileges, you add or remove the roles assigned directly to the user account. User accounts can be assigned roles for more than one product type, and they typically are. A user can be assigned multiple roles for accessing the Trellix Web UI or Helix Web UI. For access to Trellix appliances, a user is typically assigned a role for each product type in the IAM organization.
Changes to a user's role assignments are made product by product. First you select a product type, then you change the user's role assignments for that product.
Important
When you delete a user local account from your IAM organization, Trellix IAM implicitly removes instances of that account from any groups to which the user might be assigned. Removing a user from a user group―whether done explicitly or implicitly―might reduce the access privileges of the users that remain in those groups.
To change a user's role assignments, use the Edit User view of the Users page and the Roles tab of the Assign Access for Product dialog box.
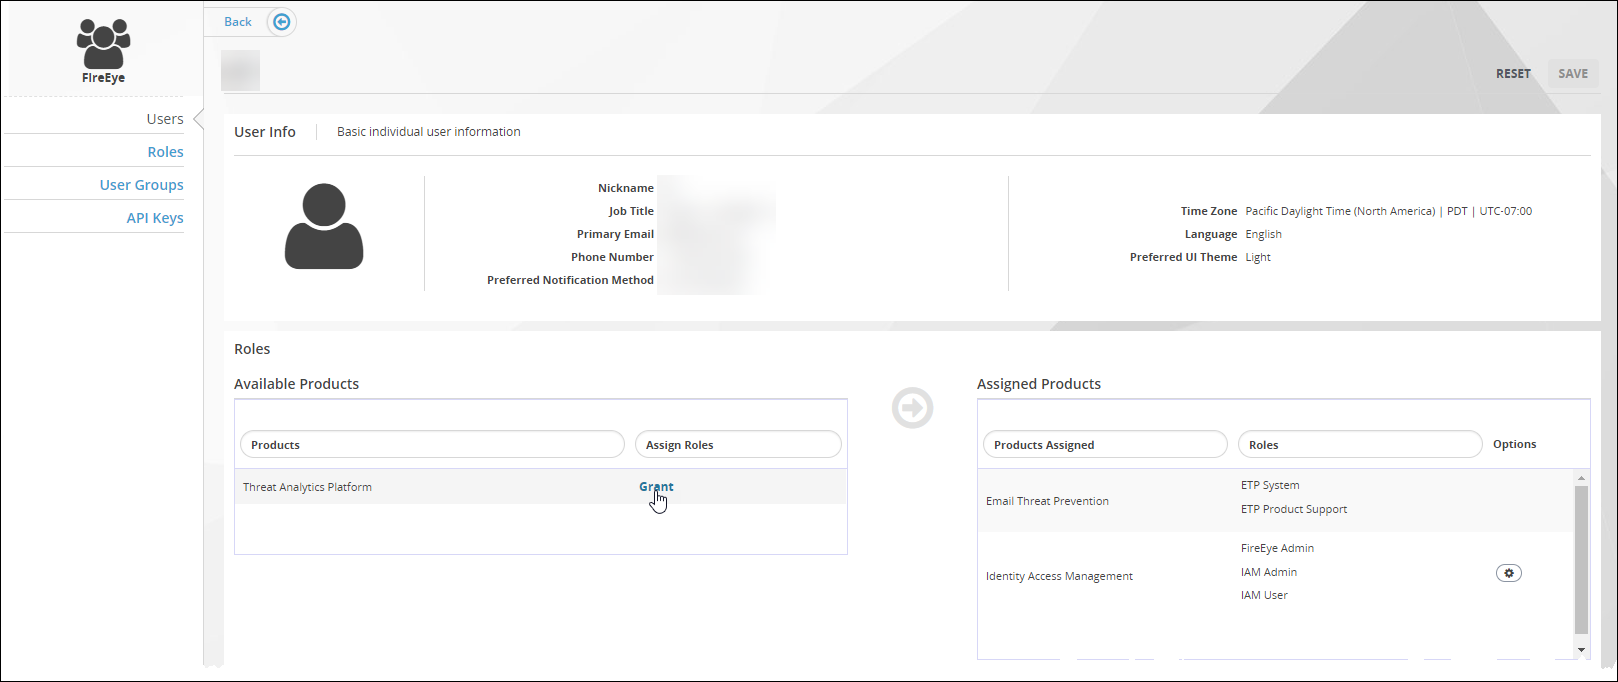
From the Add User view or the Edit User view, there are two ways to open the Assign Access for Product dialog box for a product type:
While creating a new user account―Go to the Available Roles list and click Grant for the product type.
While editing an existing user account―Go to the Assigned Roles list, click the Options icon for the product type, and select Configure.
IAM Admin access to the Trellix IAM Web UI.
To remove all roles for a specific product:
Log in to the IAM Web UI.
Select Organization Settings > Users.
The Users page lists all IAM user accounts known to your IAM organization.
The Internal User panel lists user accounts that are defined in your organization. The External Users panel lists user accounts that are defined in other organizations but which the organization administration has added and assigned roles.
Click the user account you want to edit and click Edit.
The Available Products panel on the left side of the page lists product types that currently have no roles assigned to the user.
The Assigned Products panel on the right side of the page lists the product types that currently have roles assigned to the user. The Roles column shows the roles the user is assigned for each product in this list.
In the Assigned products list, find the product type whose roles you want removed.
Click the Options icon and select Remove.
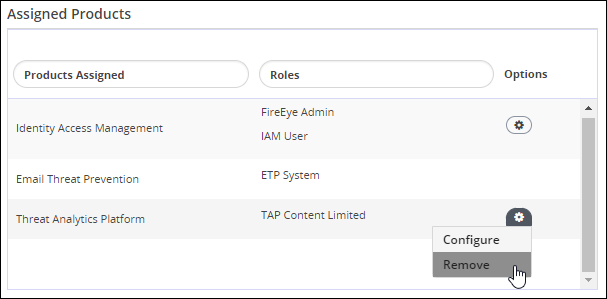
Click Save.
To change more role assignments for the user, go back to step 3.
To assign or remove individual roles:
Log in to the IAM Web UI.
Select Organization Settings > Users.
The Users page lists all IAM user accounts known to your IAM organization.
The Internal Users panel lists user accounts that are defined your organization. The External Users panel lists user accounts that are defined in other organizations but which the organization administrator has added and assigned roles.
Click the name of the user account you want to edit and click Edit.
The Available Products panel on the left side of the page lists product types that currently have no roles assigned to the user.
The Assigned Products panel on the right side of the page lists the product types that currently have roles assigned to the user. The Roles column shows the roles the user is assigned for each product in this list.
Open the Assign Access for Product dialog box for the product type for which you want to assign or remove a role.
If you want to assign a role for a product type that currently has no roles assigned to the user, click Grant in the Assign Roles column for that product.
If you want to assign or remove a role for a product type that currently has roles assigned to the user, click the Options icon and select Configure.
The Assign Access for Product dialog box opens for the selected product type.
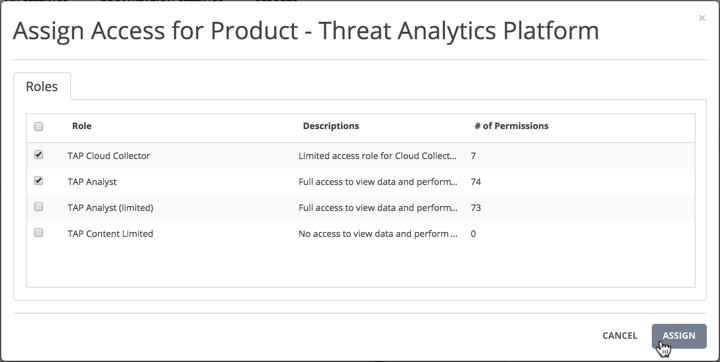
Select or clear the checkbox for each role you want to assign or remove from the user account.
Click Assign.
To change more role assignments for the user account, repeat steps 9 through 11.
Click Save.