This section describes how to install a virtual File Protect appliance using Microsoft Hyper-V Manager.
Important
This procedure uses Microsoft Hyper-V version 10.0.14393.0. The navigation instructions and user interface may vary based on your version of this product.
Note
This procedure covers the required settings for a Trellix virtual appliance. You can accept the default values for the other settings, or specify values that are appropriate for your setup.
Download the File Protect Hyper-V deployment
.zipfile from the Trellix DTI network to a Hyper-V server and extract the files within it. The.zipfile name isimage-fmps-fireeyefx2500v.After the files are extracted, verify that the
image-fmps-fireeyefx2500v-hypervfolder contains theVirtual Hard DisksandVirtual Machinesfolders. If it does not, contact Trellix Technical Support.The folder also contains a readme file with brief installation information.
In Hyper-V Manager, select Action > Import Virtual Machine. The Import Virtual Machine wizard opens.
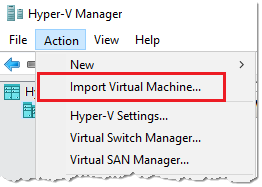
Complete the wizard screens as described in the following table.
Screen
Action
Before You Begin
Click Next.
Locate Folder
Browse to and select the folder to which you extracted the
.zipfile in the first step. You only need to select the top-level folder. Click Next.Select Virtual Machine
Select the virtual machine model associated with the
.zipfile. Click Next.Choose Import Type
Select Copy the virtual machine (create a new unique ID). Click Next.
Choose Folders for Virtual Machine Files
Click Next to accept the default settings.
Choose Folders to Store Virtual Hard Disks
Select the top-level folder into which you extracted the
.zipfile. This folder includes the Virtual Hard Disks folder. Click Next.Connect Network
Select the virtual switch to use for your virtual appliance. Click Next.
Connect Network
(Optional) Select a second virtual switch to use for your virtual appliance. Click Next.
Completing Import Wizard
Verify the information. If you are satisfied, click Finish to import the virtual appliance. If you need to make changes, click Previous.
(Optional) Right-click the virtual appliance in the Virtual Machines section of Hyper-V Manager, select Rename, and enter a new name for the virtual appliance.
Right-click the virtual appliance, select Settings, and then verify that the virtual appliance settings meet the specifications listed in Microsoft Hyper-V requirements.
The virtual appliance is turned off by default after it is imported. To turn it on, right-click the virtual appliance and select Start.
To open the virtual appliance console, right-click the virtual appliance and select Connect.