If the license update feature is not enabled, you need to install license keys manually. Licenses need to be installed when an evaluation license expires or when a license expires or no longer meets your needs. In addition, replacement licenses need to be installed after a Return Material Authorization (RMA).
You can obtain your license keys from the Assets tab in the Trellix Customer Support Portal or by sending an email that includes the MAC address of your appliance to licensing@trellix.com.
There are two ways to manually install licenses, described in the following topics:
Installing licenses using the Web UI
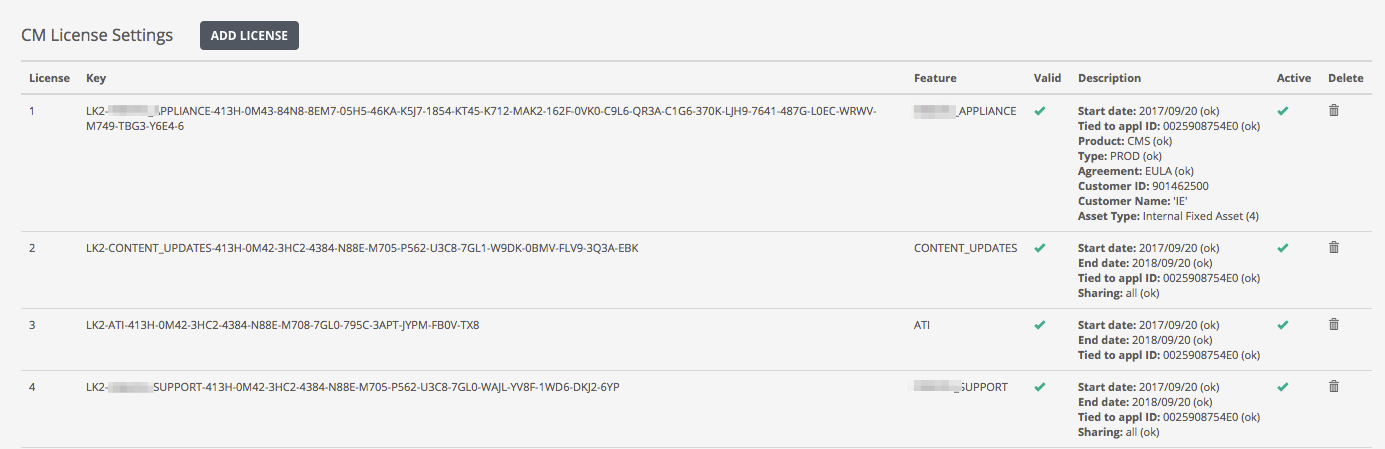
Use the Appliance License Settings page to install licenses on the Network Security appliance.
.png)
Note
Clicking the Enable VPN link in the Description column for an MD_ACCESS license allows you to connect the appliance to Managed Defense over the Internet using a secure SSL VPN connection. For details, see the Managed Defense Quick Start Guide.
Prerequisites
Admin or Operator access.
The appliance does not already have the type of license key you are installing.
To install license keys using the Web UI:
Click the Settings tab.
Click Appliance Licenses on the sidebar.
Paste the license key you obtained from Trellix in the License Key box.
Click Add.
The page refreshes to show the license key in the table. If the key is valid, the Valid column shows a check mark and additional information is displayed about the license.
Removing licenses using the Web UI
Use the Appliance License Settings page to remove licenses.
Note
The Intelligent Virtual Execution - Server appliance has a CLI and a Web UI. The recommended method for this configuration on a Intelligent Virtual Execution - Server appliance is through the Central Management System Web UI.
Prerequisites
Admin or Operator access
To remove license keys:
Click the Settings tab.
Click Appliance Licenses on the sidebar.
Click the icon in the Delete column in the row for the license you want to remove.
Click Yes in the confirmation message that appears.
Installing licenses using the CLI
Use the CLI commands in this topic to install licenses on the NX appliance.
Prerequisites
Admin or Operator access
To install licenses:
Go to CLI configuration mode:
hostname > enable hostname # configure terminalInstall each license:
hostname (config) # license install <key1> <key2> <key3>Note
You can enter the license keys sequentially separated by spaces as shown above, or enter
license installand then press Enter to be prompted to enter the license keys one at a time.Verify the licenses:
hostname (config) # show licenses License 1: LK2-FIREEYE_APPLIANCE-0000-0000-0000-0000-0000-0000-0000-0000-0000 Feature: FIREEYE_APPLIANCE Description: FireEye Appliance Valid: yes Start date: 2016/11/21 (ok) Tied to Appl ID: 000000000000 (ok) Product: eMPS (ok) Type: PROD (ok) Agreement: EULA (ok) Active: yes ... License 2: LK2-CONTENT_UPDATES-0000-0000-0000-0000-0000-0000-0000-0000-0000 Feature: CONTENT_UPDATES Description: Content updates Valid: yes Start date: 2016/11/21 (ok) End date: 2017/11/21 (ok) Tied to Appl ID: 000000000000 (ok) Sharing: all (ok) Active: yes License 3: LK2-FIREEYE_SUPPORT-0000-0000-0000-0000-0000-0000-0000-0000-0000 Feature: FIREEYE_SUPPORT Description: FireEye Support Valid: yes Start date: 2016/11/21 (ok) End date: 2017/11/21 (ok) Tied to Appl ID: 000000000000 (ok) Sharing: all (ok) Active: yes ...Save your changes:
hostname (config) # write memory
Removing licenses using the CLI
Use the CLI commands in this topic to remove licenses.
Prerequisites
Admin or Operator access
To remove licenses:
Go to CLI configuration mode:
hostname > enable hostname # configure terminalList the installed licenses:
hostname (config) # show licenses License 1: LK2-FIREEYE_APPLIANCE-0000-0000-0000-0000-0000-0000-0000 Feature: FIREEYE_APPLIANCE Description: FireEye Appliance Valid: yes Start date: 2016/11/01 (ok) Tied to appl ID: 000000000000 (ok) Product: MPS (ok) Type: PROD (ok) Agreement: EULA (ok) Op Mode: inline (ok) Active: yes ... License 2: LK2-CONTENT_UPDATES-0000-0000-0000-0000-0000-0000-0000 Feature: CONTENT_UPDATES Description: Content updates Valid: yes Start date: 2016/11/01 (ok) End date: 2017/11/01 (ok) Tied to appl ID: 000000000000 (ok) Sharing: all (ok) Active: yes License 3: LK2-FIREEYE_SUPPORT-0000-0000-0000-0000-0000-0000-0000 Feature: FIREEYE_SUPPORT Description: FireEye Support Valid: yes Start date: 2016/11/01 (ok) End date: 2017/11/01 (ok) Tied to appl ID: 000000000000 (ok) Sharing: all (ok) Active: yesSpecify the license ID to remove an individual license. For example, is the license ID for the Support license shown in the previous example.
hostname (config) # license delete 3Save your changes.
hostname (config) # write memory
Note
The
show licensescommand output in this procedure shows the basic licenses installed on a Network Security appliance. The output is similar for Network Security appliances.