Overview
The series allows you to automate certain actions and integrate with existing frameworks, applications, and architectures. The API uses the Representational State Transfer (REST) architecture. The overview covers key conventions used throughout the API guide and an example workflow using the RESTful API.
Introduction
 Note
Note
Generating master and client certificates is covered in the PX Series User Guide.
Series searches begin by searching the internal connection storage. After identifying connections that match the filter criteria, the Series appliance makes references and extracts packets for each connection. This data is all available using the RESTful API.
Each connection can have one or more packets. The packet list request returns a list of packets holding high-level data. To get more detailed data per individual packet, use the packet detail request.
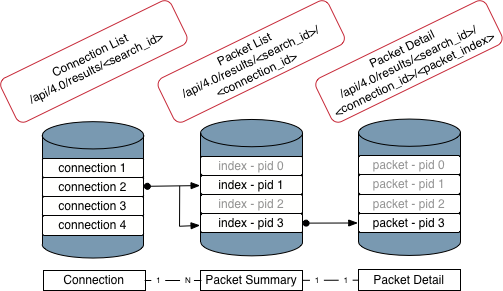
An overview of the search workflow is detailed on the following pages.
Overview of search workflow
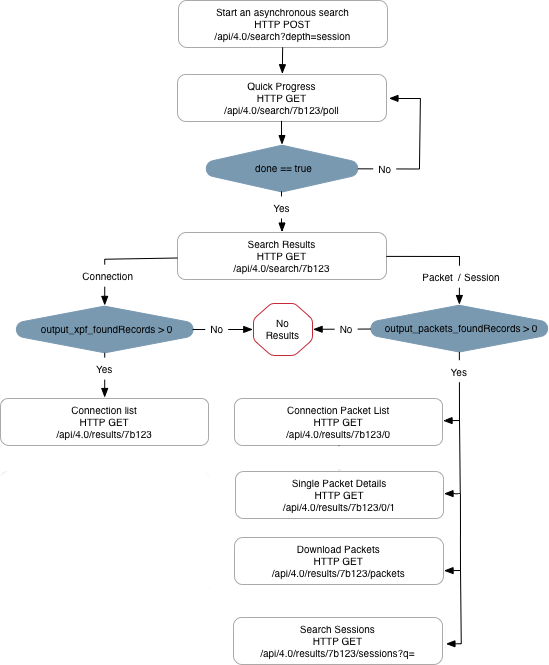
The Series API search workflow is described in the following steps:
Launch an advanced search. See Advanced Search Request. For example, to find all TCP activity for a specific workstation with an IP address of xxx.xxx.xxx.xxx, enter the following:
curl -k --user cpx:hammerhead "stime=20131101.000100&window=3000&ip_list=xxx.xxx.xxx.xxx&depth=session" https://xxx.xxx.xxx.xxx/api/4.0/search
The Series API returns a search_id, for example, 7b123. To monitor the status of a search with a search_id of 7b123, use the search summary request. See Search Summary Request. For example:
curl -k --user cpx:hammerhead https://xxx.xxx.xxx.xxx/api/4.0/search/7b123/poll
When the search is done ("done":true), use the status of advanced search request to see if the data was found. See Status of Advanced Search Request. For example:
curl -k --user cpx:hammerhead https://xxx.xxx.xxx.xxx/api/4.0/search/7b123
If the search found connections and packets (output_xpf_foundRecords > 0 && output_packet_foundRecords > 0), use the connection summary request to retrieve connection or packet data or session analysis data. See Connection Summary Request. For example:
curl -k --user cpx:hammerhead https://xxx.xxx.xxx.xxx/api/4.0/results/7b123
After the connections are retrieved, you can retrieve the packets for a connection. See Packet List Request. For example, you can use the following request for the first connection:
curl -k --user cpx:hammerhead https://xxx.xxx.xxx.xxx/api/4.0/results/7b123/0
After you have a list of packets, use the pindex from one of the packets (3) to view that packetʼs details. See Single Packet Detail Request. For example:
curl -k --user cpx:hammerhead https://xxx.xxx.xxx.xxx/api/4.0/results/7b123/0/3
If the search found sessions, use the session information request to retrieve session analysis data. See Session Information Request. For example:
curl -k --user cpx:hammerhead https://xxx.xxx.xxx.xxx/api/4.0/results/7b123/sessions
To download your packets, use the download packets request. See Download Packets Request. For example:
curl -k --user cpx:hammerhead -o output.pcap https://xxx.xxx.xxx.xxx/api/4.0/results/7b123/packets
Authentication
To authenticate your API requests, include the user name and password for your Series appliance in the header. For example:
--user cpx:hammerhead
If the request is successful, a cookie is returned in the header that can be used to authenticate future requests.
Conventions
 Note
Note
All parameters used in the API are case sensitive.
Use Coordinated Universal Time (UTC) for start time (stime), end time (etime), and so on. Dates can be represented as follows:
yyyymmdd.hhmmss
For example: etime=20131101.000100 = 1 Nov 2013 12:01:00 GMT
second epoch
For example: 1458237457 = Thu, 17 Mar 2016 17:57:37 GMT
nanosecond epoch
For example: 1458237498377 = Thu, 17 Mar 2016 17:58:18 GMT
now
For example: etime=now
0.hhmmss, where 0 represents today
For example: stime=0.000100 = 12:01:00 GMT today
Unless otherwise stated, the Series API displays the unit of time for searches in seconds.
PX RESTful API endpoints
Search
The Series appliance uses a patent-pending tiered search architecture that enables fast searches for network connections and packets over long time periods. You can perform two types of searches:
Filtered packet searches using a list of IP addresses or XPF fields
Detailed searches based on numerous filters
 Note
Note
Search performance is affected based on capture rates and other searches going on at the same time.
Historical search data are available for a maximum of 48 hours unless they are stored. This time might decrease when the
/flow/tmp filesystem is more than 90% full.
Use the search endpoints to create, cancel, or list searches:
GET https://<PX_IP_address>/api/4.0/search/stream
POST https://<PX_IP_address>/api/4.0/search
POST https://<PX_IP_address>/api/4.0/searchinsearch
POST https://<PX_IP_address>/api/4.0/search/upload
GET https://<PX_IP_address>/api/4.0/search/history
GET https://<PX_IP_address>/api/4.0/search/<search_id>/poll
GET https://<PX_IP_address>/api/4.0/search/<search_id>
POST https://<PX_IP_address>/api/4.0/search/<search_id>/session-analysis
DELETE https://<PX_IP_address>/api/4.0/search/<search_id>
GET https://<PX_IP_address>/api/4.0/queue
GET https://<PX_IP_address>/api/4.0/user/searches
POST https://<PX_IP_address>/api/4.0/user/searches
PUT https://<PX_IP_address>/api/4.0/user/searchesa
DELETE https://<PX_IP_address>/api/4.0/user/searches
Packet search request
To search captured data and output a binary stream of packets that can be saved as a file, send the following request:
GET https://<PX_IP_address>/api/4.0/search/stream
Required header:
--user <username>:<password>
This search is performed when this API endpoint is called.
Options
PX_IP_address—IP address of the Series appliance running the Series API.
username—The user name for your Series appliance.
password—The password for your Series appliance.
Query parameters
stime—Date and time from which the search should start. See Conventions for the format.
etime—Date and time at which the search should end. See Conventions for the format.
window—The window of time before and after the specified start time that should be searched. If stime is used as a parameter, the window parameter is divided by two and subtracted from the stime to make a new start time. The window parameter is added to the original stime to make an etime. If stime is not specified, stime defaults to the current time. If etime and window are not specified, etime defaults to stime + 1 second.
xpf—Filter that supports BPF as defined at http://www.tcpdump.org/manpages/pcap-filter.7.html. It is also used with PX-specific connection attributes, see Connection metadata properties. Sample formatting is host xxx.xxx.xxx.xxx && packetdeltacountin>25. If the xpf parameter is not provided, packets between the start and end time range are returned. If the limit parameter is provided, the limit refers to the number of packets to return and not the number of flow records.
limit—The maximum number of connections returned. The default connection limit for asynchronous searches is 100.
strict—If this parameter is set to true, the search ignores extra VLANs and multiprotocol label switching (MPLS) unless you specify them in the xpf parameter. The default value is false.
ip_list—Comma-separated list of IP addresses to be used as a filter. This parameter is useful for sporadic traffic over a long period of time.
pgrep—A string. Each packet that matches the xpf parameter is searched by a regex engine for this string.
Example
GET https://xxx.xxx.xxx.xxx/api/4.0/search/stream
Required header:
--user cpx:hammerhead
Packet search response
HTTP/1.1 [Response Code] [Response Message] Date: [Date]
Content-Type: [Content Type]
Content-Disposition: [Content Disposition]
""
Response fields
Response Code—A standard HTTP response code.
Response Message—A standard HTTP response message.
Date—Standard HTML date format.
Content Type—The response format.
Content Disposition—Name of downloaded file.
Example
HTTP/1.1 200 OK
Date: Wed, 16 Mar 2016 16:07:08 GMT
Content-Type: application/octet-stream; charset=UTF-8
Content-Disposition: attachment; filename = "download_2016160707.pcap"
M>▒▒▒%
cURL code sample: Packet search
The code sample was run with cURL 7.57.0.
curl -k --user cpx:hammerhead "https://xxx.xxx.xxx.xxx/api/4.0/search/ stream?stime=20110901.015959&etime=20110901.030000&xpf=tcp"
This cURL sample includes the following options:
-k—This option explicitly allows cURL to perform insecure SSL connections and transfers, which allows you to test your SSL connection without installing a CA certificate.
--user cpx:hammerhead—Replace cpx with the user name for your Series appliance. Replace hammerhead with the password for your Series appliance.
https://xxx.xxx.xxx.xxx/api/4.0/search/ stream?stime=20110901.015959&etime=20110901.030000&xpf=tcp—The search request URL. Replace xxx.xxx.xxx.xxx with the IP address of your Series appliance. Replace 20110901.015959 with the start time of the range that you want searched. Replace 20110901.030000 with the end time of the range that you want searched. Replace tcp with the appropriate filter.
 Note
Note
Enclose the URL in double quotation marks if it includes special characters such as [, ], {, }, ?, &, and *.
Results
This example searches captured data for a specified time range. The output is a PCAP/binary file.
Advanced search request
To initiate an advanced search and generate a search ID that can be used to poll, send the following request:
POST https://<PX_IP_address>/api/4.0/search
Required header:
--user <username>:<password>
To retrieve results, see Download packets request.
For details and a visual representation of this process, see Overview of search workflow.
Options
PX_IP_address—IP address of the Series appliance running the Series API.
username—The user name for your Series appliance.
password—The password for your Series appliance.
Query parameters
stime—Date and time from which the search should start. See Conventions for the format.
etime—Date and time at which the search should end. See Conventions for the format.
window—The window of time before and after the specified start time that should be searched. If stime is used as a parameter, the window parameter is divided by two and subtracted from the stime to make a new start time. The window parameter is added to the original stime to make an etime. If stime is not specified, stime defaults to the current time. If etime and window are not specified, etime defaults to stime + 1 second.
xpf—Filter to reduce the results set; it supports BPF as defined at http://www.tcpdump.org/manpages/pcap-filter.7.html. It is also used with PX-specific connection attributes, see Connection Metadata Properties. Sample formatting is host
127.0.0.1 && packetdeltacountin>25.
flowID—Filter to search for events tagged with a flowID. Provide "flowID = <id>" in the xpf field when submitting a search. Support for != is also available.
limit—The maximum number of connections returned. The default URL encoding limit for asynchronous searches is 100.
ruleset—The ruleset to use in the search. The ruleset can be local or uploaded (see examples below. If uploading a new ruleset, you can use the skipVerify option to skip validation of the uploaded ruleset (in the event of invalid signatures). Optional.
strict—If this parameter is set to true, the search ignores extra VLANs and MPLS unless you specify them in the xpf
parameter. The default value is false.
ip_list—A comma-separated list of IP addresses to be used as a pre-filter on connections. Specifically useful for sporadic traffic over a long period of time.
depth—This search parameter controls what data is processed during a search. There are three types of a searches: connection, packet, and session. The default value is connection. Because a session-depth search includes a packet-depth search and a connection-depth search, session searches take more time than connection or packet searches. A packet-depth search includes a connection-depth search, so packet searches take longer than connection searches. To use less time, execute a connection or packet search instead of a session search and then review the data that was returned.
connection: To search connections only, set depth=connection. The “connection” value searches the ultrafast connection index to find information about traffic the Series appliance recorded. These connection records contain address, port, and protocol information, and TCP flags, if appropriate.
packet: To search packets only, set depth=packet.
session: To initiate session analysis, set depth=session. As the third main search phase, “session” pulls packets from the PCAP storage and analyzes them in the session analysis engine. Session searches allow you to analyze packets of interest.
 Note
Note
Session analysis is a processor-intensive and memory-intensive operation. The higher the connection limit, the longer this request will take. If there are more than 250 connections, session analysis is not recommended.
Examples
POST https://xxx.xxx.xxx.xxx/api/4.0/search?stime=20110901.015959&etime=&xpf=tcp&depth=packet
POST https://xxx.xxx.xxx.xxx/api/4.0/search -d "limit=100&strict=False&xpf=flowID = 123&depth=connection&stime=1519742735&etime=1519743035"
New search using an existing ruleset:
POST https://xxx.xxx.xxx.xxx/api/4.0/search -d "ruleset=myruleset&depth=session&stime=1537904410&etime=1537904710"
New search using a new ruleset:
https://xxx.xxx.xxx.xxx/api/4.0/search -F "depth=session" -F "stime=1537904410" -F "etime=1537904710" -F "ruleset=@myruleset.tgz"
Required header:
--user cpx:hammerhead
Advanced search response
HTTP/1.1 [Response Code] [Response Message]
{
"hash_field": "SEARCH_bdcae5adcef44e5b7f52c8bb8e6833de", "params": {
"etime": "2018-09-25T19:45:10Z",
"stime": "2018-09-25T19:40:10Z",
"ruleset": "myruleset"
},
"search_id": "bdcae5adcef44e5b7f52c8bb8e6833de", "search_type": "all",
"status": "-2"
}
Response fields
Response Code—A standard HTML response code.
Response Message—A standard HTML response message.
stime—Start time of search.
etime—End time of search.
Hash Field—Hash key for the status of this search.
Search Type—Type of search.
XPF—Filter that supports BPF as defined at http://www.tcpdump.org/manpages/pcap-filter.7.html. It is also used with PX-specific connection attributes, see Connection metadata properties. Sample formatting is host 127.0.0.1 && packetdeltacountin>25.
Search ID—The unique search identifier. search_id is the key to summary, detail, store, and so on. This return value connects to many other functions as an input parameter.
Search Type—Type of search requested: stream or all.
Status—Status of search. For example, –2 means that the search is queued.
Example
HTTP/1.1 200 OK
Date: Fri, 11 Mar 2016 22:33:49 GMT
Content-Type: text/html; charset=UTF-8
{
"hash_field": "SEARCH_578df457cb1049a18ae5f014e6dc5d5c", "params": {
"limit": 100, "search_type": "all", "xpf": "tcp"
},
"search_id": "578df457cb1049a18ae5f014e6dc5d5c", "search_type": "all",
"status": "-2"
}
cURL code sample: Advanced search
The code sample was run with cURL 7.57.0.
curl -k --user cpx:hammerhead
"stime=20150901.015959&etime=20150901.030000&xpf=tcp&depth=packet" https://xxx.xxx.xxx.xxx/api/4.0/search
This cURL sample includes the following options:
-k—This option explicitly allows cURL to perform insecure SSL connections and transfers, which allows you to test your SSL connection without installing a CA certificate.
--user cpx:hammerhead—Replace cpx with the user name for your Series appliance. Replace hammerhead with the password for your Series appliance.
"stime=20110901.015959&etime=&xpf=tcp&depth=packet"—This option specifies the time range that will be searched, TCP-only results, and a packet-depth search.
https://xxx.xxx.xxx.xxx/api/4.0/search—The search request URL. Replace xxx.xxx.xxx.xxx with the IP address of your Series appliance.
Results
This example executes a packet-depth search within a specified time range and returns only TCP results. The output is in JSON.
Search within a search request
To search within the results of an existing search, send the following request:
POST https://<PX_IP_address>/api/4.0/searchinsearch
Required header:
--user <username>:<password>
Options
PX_IP_address—IP address of the Series appliance running the PX Series API.
username—The user name for your Series appliance.
password—The password for your Series appliance.
Query parameters
source_id—Required. The universally unique identifier of the search that you want to search within. The source search must either be a packet-depth search or a session-depth search.
stime—The date and time for the start of the search. This value must be the same as the stime of the source search.
etime—Date and time for the end of the search. This value must be the etime of the source search.
window—The window of time before and after the specified start time that should be searched. If stime is used as a parameter, the window parameter is divided by two and subtracted from the stime to make a new start time. The window parameter is added to the original stime to make an etime. If stime is not specified, stime defaults to the current time. If etime and window are not specified, etime defaults to stime + 1 second.
xpf—Filter to reduce the results set. The filter supports BPF as defined at http://www.tcpdump.org/manpages/pcap-filter.7.html. It is also used with PX-specific connection attributes; see Connection Metadata Properties. Sample formatting is host 127.0.0.1 && packetdeltacountin>25.
limit—The maximum number of connections returned. The default connection limit for asynchronous searches is 100.
strict—This value is ignored.
ip_list—This value is ignored.
depth—This field must be set to packet.
Example
POST https://xxx.xxx.xxx.xxx/api/4.0/ searchinsearch?stime=20110901.015959&etime=&xpf=tcp&depth=packet&source_id=301571c6fbbb43167411e85f45911460
Required header:
--user cpx:hammerhead
Search within a search response
HTTP/1.1 [Response Code] [Response Message] Date: [Date]
Content-Type: [Content Type] hash_field: [Hash Field] input_create_time: [Input Create Time] input_depth: [Input Depth]
input_etime_nanoseconds: [Input End Time in Nanoseconds] input_etime_second: [Input End Time in Seconds] input_hash_field: [Input Hash Field]
input_limit: [Input Limit] input_score: [Input Score] input_search_id: [Input Search ID] input_search_type: [Input Search Type] input_source: [Input Source]
input_stime_nanoseconds: [Input Start Time in Nanoseconds] input_stime_second: [Input Start Time in Seconds] input_strict: [Input Strictness]
input_user: [Input User] input_xpf: [Input XPF] output_bpf: [Output BPF] output_status: [Output Status] search_id: [Search ID]
status: [Status]
Response fields
Response Code—A standard HTML response code.
Response Message—A standard HTML response message.
Date—Standard HTML date format.
Content Type—The response format.
Hash Field—Hash key for the status of this search.
Input Create Time—Time at which the search was submitted.
Input Depth—Search depth. A search can be at the connection, packet, or session depth.
Input End Time in Nanoseconds—The nanoseconds portion of the end time of the search time range.
Input End Time in Seconds—The seconds portion of the end time of the search time range.
Input Hash Field—Hash key for the status of this search.
Input Limit—Requested maximum number of connection records to find.
Input Score—Time when the search was created.
Input Search ID—Generated search ID that uniquely identifies this search.
Input Search Type—Type of search requested: stream or all.
Input Source—The universally unique identifier of the search that you are searching within.
Input Start Time in Nanoseconds—The nanoseconds portion of the start time of the search time range.
Input Start Time in Seconds—The seconds portion of the start time of the search time range.
Input Strictness—If this field is set to true, no variations on the input are tried.
Input User—User who made the search request.
Input XPF—Filter provided by the end user.
Output BPF—Generated XPF after input_xpf is processed by the PX XPF processing engine.
Output Status—Status of the search. For example, –2 means that the search is queued.
Search ID—The unique search identifier of the search within a search.
Status—Status of search. For example, –2 means that the search is queued.
Example
HTTP/1.1 200 OK
Date: Fri, 31 Mar 2017 20:50:52 GMT
Content-Type: application/json; charset=utf-8
{
"hash_field": "SEARCH_d6e6c3cc4fc543356da6fd4e0df27d18", "input_create_time": "1490993452",
"input_depth": "packet", "input_etime_nanoseconds": "0",
"input_etime_second": "1490020140",
"input_hash_field": "SEARCH_d6e6c3cc4fc543356da6fd4e0df27d18", "input_limit": "0",
"input_score": "1490993452",
"input_search_id": "d6e6c3cc4fc543356da6fd4e0df27d18",
"input_search_type": "all",
"input_source": "92e32b18ef8646ed5b7caa15f438129d", "input_stime_nanoseconds": "0",
"input_stime_second": "1490018940", "input_strict": "false", "input_user": "cpx",
"input_xpf": "layer7Classification = 7", "output_bpf": "ether[148:4] = 7", "output_status": "-2",
"search_id": "d6e6c3cc4fc543356da6fd4e0df27d18", "status": "-2"
}
cURL code sample: Search within a search
The code sample was run with cURL 7.57.0.
curl -k --user cpx:hammerhead https://xxx.xxx.xxx.xxx/api/4.0/searchinsearch --data 'xpf=layer7Classification+%3D+7&stime=20161026.155315&etime=20161026.202822&limit=0&depth=packet&ip_list=&source_id=7b
This cURL sample includes the following options:
-k—This option explicitly allows cURL to perform insecure SSL connections and transfers, which allows you to test your SSL connection without installing a CA certificate.
--user cpx:hammerhead—Replace cpx with the user name for your PX Series appliance. Replace hammerhead with the password for your PX Series appliance.
https://xxx.xxx.xxx.xxx/api/4.0/searchinsearch—The search request URL. Replace xxx.xxx.xxx.xxx with the IP address of your PX Series appliance.
--data 'xpf=layer7Classification+%3D+7&stime=20161026.155315&etime=20161026.202822&limit=0&depth=packet&ip_list=&source_id option specifies what to search for within an existing search.
Results
This example returns a subset of results from an existing search. The output is in JSON.
Upload PCAP request
To upload a packet capture (PCAP) file, send the following request:
POST https://<PX_IP_address>/api/4.0/search/upload
Required and optional headers:
--user <username>:<password>
-H "Content-Type: multipart/form-data" uploadfile: <upload_file>
storename: <store_name>
Options
PX_IP_address—IP address of the Series appliance running the Series API.
username—The user name for your Series appliance.
password—The password for your Series appliance.
upload_file—Name and location of the packet capture file.
store_name—Optional. Name for the uploaded packet capture file. If this parameter is omitted, a search universally unique identifier is generated and used.
Example
POST https://xxx.xxx.xxx.xxx/api/4.0/search/upload
Required and optional headers:
--user cpx:hammerhead
-H "Content-Type: multipart/form-data"
-F "uploadfile=@/home/test.pcap"
-F "storename=storeTest3"
Upload PCAP response
input_create_time: [Input Create Time] input_depth: [Input Depth] input_hash_field: [Input Hash Field] input_score: [Input Score] input_search_id: [Input Search Identifier] input_search_type: [Input Search Type] input_user: [Input User]
output_depth: [Output Depth] output_index_end: [Packet Index End Time]
output_index_foundRecords: [Packet Index Found Records] output_index_limitPercent: [Packet Index Limit Percent Complete] output_index_message: [Packet Index Status Message] output_index_packetPercent: [Packet Index Percent Complete] output_index_start: [Packet Index Start]
output_index_status: [Packet Index Status] output_lastUpdate: [Last Update] output_message: [Output Status Message]
output_packet_elapsed: [Packet Retrieval Elapsed Time]
output_packet_end: [Packet Retrieval End Time] output_packet_foundRecords: [Packet Retrieval Found Records] output_packet_message: [Packet Retrieval Status Message] output_packet_packetPercent: [Packet Retrieval Percent Complete] output_packet_processedBytes: [Packet Retrieval Packet Size] output_packet_start: [Packet Retrieval Start] output_packet_status: [Packet Retrieval Status] output_session_message: [Session Analysis Status Message] output_session_packetPercent: [Session Analysis Percent Complete] output_session_status: [Session Analysis Status]
output_status: [Output Status] output_xpf_end: [Connection Index End Time]
output_xpf_foundRecords: [Connection Index Found Records] output_xpf_limitPercent: [Connection Index Percent Complete] output_xpf_message: [Connection Index Status Message] output_xpf_packetCount: [Connection Index Packet Count] output_xpf_start: [Connection Index Start] output_xpf_status: [Connection Index Status]
target_depth: [Target Depth]
Response fields
Input Create Time—Time at which the search was submitted.
Input Depth—Search depth. A search can be at the connection, packet, or session depth.
Input Hash Field—Hash key for the status of this search.
Input Score—Time when the search was created.
Input Search Identifier—Generated search ID that uniquely identifies this search.
Input Search Type—Type of search requested: stream or all.
Input User—User who made the search request.
Output Depth—Search depth. A search can be at the connection, packet, or session depth.
Packet Index End Time—End time of this phase in epoch time.
Packet Index Found Records—Number of records found.
Packet Index Limit Percent Complete—Percentage complete of all potential packets found.
Packet Index Status Message—Current status message for this phase.
Packet Index Percent Complete—Percentage complete, based on captured packet times.
Packet Index Start—Start time of this phase in epoch time.
Packet Index Status—Status of this phase. Valid values are skipped, done, working, idle, and error.
Last Update—Time when the search was last updated.
Output Status Message—Status of the search.
Packet Retrieval Elapsed—Total elapsed time of this phase.
Packet Retrieval End Time—End time of this phase in epoch time.
Packet Retrieval Found Records—Number of records found.
Packet Retrieval Status Message—Current status message for this phase.
Packet Retrieval Percent Complete—Percentage complete of all potential packets found.
Packet Retrieval Packet Size—Size of the packets processed.
Packet Retrieval Start—Start time of this phase in epoch time.
Packet Retrieval Status—Status of this phase. Valid values are skipped, done, working, idle, and error.
Session Analysis Status Message—Current status message for this phase.
Session Analysis Percent Complete—Percentage complete of all potential packets found.
Session Analysis Status—Status of this phase. Valid values are skipped, done, working, idle, and error.
Output Status—Status of the search. Valid values are skipped, done, working, idle, and error.
Connection Index End Time—End time of this phase in epoch time.
Connection Index Found Records—Number of records found.
Connection Index Percent Complete—Percentage complete, based on input_limit.
Connection Index Status Message—Percentage complete, based on captured packet times.
Connection Index Packet Count—Number of packets to be found, based on connection records.
Connection Index Start—Start time of this phase in epoch time.
Connection Index Status—Status of this phase. Valid values are skipped, done, working, idle, and error.
Target Depth—Search depth. A search can be at the connection, packet, or session depth.
Example
HTTP/1.1 200 OK
Date: Fri, 11 Mar 2016 22:33:49 GMT
Content-Type: text/html; charset=UTF-8
{
"input_create_time":"1468417915",
"input_depth":"connection", "input_hash_field":"SEARCH_8767f52de62446766c29a5132d76f400", "input_score":"1468417915", "input_search_id":"8767f52de62446766c29a5132d76f400", "input_search_type":"upload",
"input_user":"cpx", "output_depth":"connection", "output_index_end":"1468417936", "output_index_foundRecords":"0", "output_index_limitPercent":"100", "output_index_message":"Search complete", "output_index_packetPercent":"100", "output_index_start":"1468417936", "output_index_status":"done", "output_lastUpdate":"1468417936", "output_message":"Search complete", "output_packet_elapsed":"0.000", "output_packet_end":"0", "output_packet_foundRecords":"0", "output_packet_message":"skipped", "output_packet_packetPercent":"0", "output_packet_processedBytes":"0", "output_packet_start":"0", "output_packet_status":"skipped", "output_session_message":"skipped", "output_session_packetPercent":"0", "output_session_status":"skipped", "output_status":"done", "output_xpf_end":"1468417936", "output_xpf_foundRecords":"0", "output_xpf_limitPercent":"100", "output_xpf_message":"Search complete", "output_xpf_packetPercent":"100", "output_xpf_start":"1468417936", "output_xpf_status":"done", "target_depth":"connection"
}
cURL code sample: Upload PCAP
The code sample was run with cURL 7.57.0.
curl -k --user cpx:hammerhead -X POST -H "Content-Type: multipart/form-data" -F "uploadfile=@/home/test.pcap"
-F "storename=storeTest3" https://xxx.xxx.xxx.xxx/api/4.0/search/upload
This cURL sample includes the following options:
-k—This option explicitly allows cURL to perform insecure SSL connections and transfers, which allows you to test your SSL connection without installing a CA certificate.
--user cpx:hammerhead—Replace cpx with the user name for your Series appliance. Replace hammerhead with the password for your Series appliance.
-X POST—This option specifies using the POST method.
-H "Content-Type: multipart/form-data"—This option allows you to submit files using HTTP.
-F "uploadfile=@/home/test.pcap"—This option specifies the name and location of the packet capture file to upload.
-F "storename=storeTest3"—This option specifies the name to save the uploaded packet capture file as.
https://xxx.xxx.xxx.xxx/api/4.0/search/upload—The search request URL. Replace xxx.xxx.xxx.xxx with the IP address of your Series appliance.
Results
This example uploads a PCAP file and saves it with the specified file name. The output is in JSON.
Historical searches request
To list all searches during the past 48 hours and their status, send the following request:
GET https://<PX_IP_address>/api/4.0/search/history
Required header:
--user <username>:<password>
Options
PX_IP_address—IP address of the Series appliance running the Series API.
username—The user name for your Series appliance.
password—The password for your Series appliance.
Example
GET https://xxx.xxx.xxx.xxx/api/4.0/search/history
Required header:
--user cpx:hammerhead
Historical searches response
HTTP/1.1 [Response Code] [Response Message]
Date: [Date]
Content-Type: [Content Type] current_time: [Current Time] message: [Message]
input_create_time: [Input Create Time] input_depth: [Input Depth]
input_etime_nanoseconds: [Input End Time in Nanoseconds] input_etime_second: [Input End Time in Seconds] input_hash_field: [Input Hash Field]
input_limit: [Input Limit] input_score: [Input Score]
input_search_id: [Input Search Identifier] input_search_type: [Input Search Type] input_stime_nanoseconds: [Input Start Time in Nanoseconds] input_stime_second: [Input Start Time in Seconds] input_strict: [Input Strictness]
input_time_format: [Input Time Format] input_user: [Input User] output_elapsed: [Output Elapsed Time]
output_firstFlowEpoch: [Output First Flow Epoch] output_firstIndexEpoch: [Output First Index Epoch] output_firstPacketEpoch: [Output First Packet Epoch] output_index_elapsed: [Packet Index Elapsed Time] output_index_end: [Packet Index End Time] output_index_foundRecords: [Packet Index Found Records] output_index_message: [Packet Index Status Message] output_index_packetPercent: [Packet Index Percent Complete] output_index_rangePercent: [Packet Index Range Percent] output_index_searchedFiles: [Packet Index Searched Files] output_index_start: [Packet Index Start] output_index_status: [Packet Index Status] output_lastUpdate: [Last Update]
output_message: [Output Status Message] output_packet_elapsed: [Packet Retrieval Elapsed Time] output_packet_end: [Packet Retrieval End Time] output_packet_foundRecords: [Packet Retrieval Found Records] output_packet_message: [Packet Retrieval Status Message]
output_packet_packetPercent: [Packet Retrieval Percent Complete] output_packet_processedBytes: [Packet Retrieval Packet Size] output_packet_start: [Packet Retrieval Start] output_packet_status: [Packet Retrieval Status] output_searchEnd: [Search End]
output_searchStart: [Search Start] output_session_elapsed: [Session Analysis Elapsed Time] output_session_end: [Session Analysis End Time] output_session_message: [Session Analysis Status Message]
output_session_packetPercent: [Session Analysis Percent Complete] output_session_processedBytes: [Session Analysis Packet Size] output_session_processedRecords: [Session Analysis Processed Records] output_session_start: [Session Analysis Start]
output_session_status: [Session Analysis Status] output_status: [Output Status] output_streamCount: [Stream Count]
output_xpf_elapsed: [Connection Index Elapsed Time] output_xpf_end: [Connection Index End Time] output_xpf_extentSecond: [Connection Index Second] output_xpf_firstSecond: [Connection Index First Connection] output_xpf_foundRecords: [Connection Index Found Records] output_xpf_lastSecond: [Connection Index Last Connection] output_xpf_limitPercent: [Connection Index Percent Complete] output_xpf_message: [Connection Index Status Message] output_xpf_packetCount: [Connection Index Packet Count] output_xpf_rangePercent: [Connection Index Range Percent] output_xpf_searchedBytes: [Connection Index Searched Bytes]
output_xpf_start: [Connection Index Start] output_xpf_status: [Connection Index Status] target_depth: [Target Depth]
status: [Status]
Response fields
Response Code—A standard HTML response code.
Response Message—A standard HTML response message.
Date—Standard HTML date format.
Content Type—The response format.
Current Time—Time when response is returned.
Message—Summary of results.
Input Create Time—Time at which the search was submitted.
Input Depth—Search depth. A search can be at the connection, packet, or session depth.
Input End Time in Nanoseconds—The nanoseconds portion of the end time of the search time range.
Input End Time in Seconds—The seconds portion of the end time of the search time range.
Input Hash Field—Hash key for the status of this search.
Input Limit—Requested maximum number of connection records to find.
Input Score—Time when the search was created.
Input Search Identifier—Generated search ID that uniquely identifies this search.
Input Search Type—Type of search requested: stream or all.
Input Start Time in Nanoseconds—The nanoseconds portion of the start time of the search time range.
Input Start Time in Seconds—The seconds portion of the start time of the search range.
Input Strictness—If this field is set to true, no variations on the input are tried.
Input Time Format—Time format for input. A value of 1 indicates that the pcap time stamp is in microseconds; a value of 0 indicates that the pcap time stamp is in nanoseconds.
Input User—User who made the search request.
Output Elapsed Time—Total elapsed time for all phases.
Output First Flow Epoch—Time of the first flow recorded on the appliance.
Output First Index Epoch—Time of the oldest connection packet index recorded on the appliance.
Output First Packet Epoch—Time of the oldest packet stored on the appliance.
Packet Index Elapsed Time—Total elapsed time of this phase.
Packet Index End Time—End time of this phase in epoch time.
Packet Index Found Records—Number of records found.
Packet Index Status Message—Current status message for this phase.
Packet Index Percent Complete—Percentage complete of all potential packets found.
Packet Index Range Percent—Percentage complete, based on captured packet times.
Packet Index Searched Files—Number of files touched.
Packet Index Start—Start time of this phase in epoch time.
Packet Index Status—Status of this phase. Valid values are skipped, done, working, idle, and error.
Last Update—Time when the search was last updated.
Output Status Message—Status of the search.
Packet Retrieval Elapsed—Total elapsed time of this phase.
Packet Retrieval End Time—End time of this phase in epoch time.
Packet Retrieval Found Records—Number of records found.
Packet Retrieval Status Message—Current status message for this phase.
Packet Retrieval Percent Complete—Percentage complete of all potential packets found.
Packet Retrieval Packet Size—Size of the packets processed.
Packet Retrieval Start—Start time of this phase in epoch time.
Packet Retrieval Status—Status of this phase. Valid values are skipped, done, working, idle, and error.
Search End—Last record searched.
Search Start—First record searched.
Session Analysis Elapsed Time—Total elapsed time of this phase.
Session Analysis End Time—End time of this phase in epoch time.
Session Analysis Status Message—Current status message for this phase.
Session Analysis Percent Complete—Percentage complete of all potential packets found.
Session Analysis Packet Size—Size of the packets processed.
Session Analysis Processed Records—Number of packets processed.
Session Analysis Start—Start time of this phase in epoch time.
Session Analysis Status—Status of this phase. Valid values are skipped, done, working, idle, and error.
Output Status—Status of the search. Valid values are skipped, done, working, idle, and error.
Stream Count—Number of nPulse streams.
Connection Index Elapsed Time—Total elapsed time of this phase.
Connection Index End Time—End time of this phase in epoch time.
Connection Index Second—The last second of the last flow that the search examined.
Connection Index First Connection—Epoch of the first connection found.
Connection Index Found Records—Number of records found.
Connection Index Last Connection—Current status message for this phase.
Connection Index Percent Complete—Percentage complete, based on input_limit.
Connection Index Status Message—Percentage complete, based on captured packet times.
Connection Index Packet Count—Number of packets to be found, based on connection records.
Connection Index Range Percent—Percentage complete, based on captured packet times.
Connection Index Searched Bytes—Size of searched packets.
Connection Index Start—Start time of this phase in epoch time.
Connection Index Status—Status of this phase. Valid values are skipped, done, working, idle, and error.
Target Depth—Search depth. A search can be at the connection, packet, or session depth.
Status—A standard HTTP response message.
Example
HTTP/1.1 200 OK
Date: Fri, 19 Feb 2016 23:52:23 GMT
Content-Type: text/html; charset=UTF-8
{
"current_time": 1455925943, "message": "Found 1 searches.", "searches": [
{
"input_create_time": "1455054118", "input_depth": "connection", "input_etime_nanoseconds": "0",
"input_etime_second": "1455053885",
"input_hash_field": "SEARCH_6e693e264d5045f184c710a650435f76", "input_limit": "100",
"input_score": "1455054118.29",
"input_search_id": "6e693e264d5045f184c710a650435f76", "input_search_type": "all",
"input_stime_nanoseconds": "0",
"input_stime_second": "1455050285", "input_strict": "False", "input_time_format": "0", "input_user": "cpx", "output_elapsed": "0.447",
"output_firstFlowEpoch": "1455051483",
"output_firstIndexEpoch": "1455051483",
"output_firstPacketEpoch": "1455051609",
"output_index_elapsed": "0.138",
"output_index_end": "1455054118",
"output_index_foundRecords": "61345", "output_index_message": "Search complete", "output_index_packetPercent": "100",
"output_index_rangePercent": "100",
"output_index_searchedFiles": "345",
"output_index_start": "1455054118", "output_index_status": "done", "output_lastUpdate": "1455054117", "output_message": "Search complete", "output_packet_elapsed": "0.000",
"output_packet_end": "0",
"output_packet_foundRecords": "0", "output_packet_message": "skipped", "output_packet_packetPercent": "0",
"output_packet_processedBytes": "0",
"output_packet_start": "0", "output_packet_status": "skipped", "output_searchEnd": "1455054118",
"output_searchStart": "1455054118",
"output_session_elapsed": "0",
"output_session_end": "0", "output_session_message": "skipped", "output_session_packetPercent": "0", "output_session_processedBytes": "NA", "output_session_processedRecords": "NA", "output_session_start": "0", "output_session_status": "skipped", "output_status": "done", "output_streamCount": "1",
"output_xpf_elapsed": "0.016",
"output_xpf_end": "1455054118",
"output_xpf_extentSecond": "140257907072051",
"output_xpf_firstSecond": "140256452018176",
"output_xpf_foundRecords": "100",
"output_xpf_lastSecond": "140257907071710",
"output_xpf_limitPercent": "100",
"output_xpf_message": "Search complete", "output_xpf_packetCount": "61345",
"output_xpf_rangePercent": "100",
"output_xpf_searchedBytes": "0",
"output_xpf_start": "1455054118", "output_xpf_status": "done", "target_depth": "connection"
}
],
"status": "ok"
}
cURL code sample: Historical searches
The code sample was run with cURL 7.57.0.
curl -k --user cpx:hammerhead https://xxx.xxx.xxx.xxx/api/4.0/search/history
This cURL sample includes the following options:
-k—This option explicitly allows cURL to perform insecure SSL connections and transfers, which allows you to test your SSL connection without installing a CA certificate.
--user cpx:hammerhead—Replace cpx with the user name for your Series appliance. Replace hammerhead with the password for your Series appliance.
https://xxx.xxx.xxx.xxx/api/4.0/events/search/history—The search request URL. Replace xxx.xxx.xxx.xxx with the IP address of your Series appliance.
Results
This example lists all searches during the past 48 hours and their status. The output is in JSON.
Search summary request
To provide a concise summary of an advanced search, send the following request:
GET https://<PX_IP_address>/api/4.0/search/<search_id>/poll
Required header:
--user <username>:<password>
Options
PX_IP_address—IP address of the Series appliance running the Series API.
username—The user name for your Series appliance.
password—The password for your Series appliance.
search_id—The unique search identifier.
Example
GET https://xxx.xxx.xxx.xxx/api/4.0/search/7b123/poll
Required header:
--user cpx:hammerhead
Search summary response
HTTP/1.1 [Response Code] [Response Message] Date: [Date]
Content-Type: [Content Type] done: [Done]
queued: [Queued]
connection: [Connection Status] packet: [Packet Status] session: [Session Status]
Response fields
Response Code—A standard HTML response code.
Response Message—A standard HTML response message.
Date—Standard HTML date format.
Content Type—The response format.
Done—Whether the search is complete. Valid values are True and False.
Queued—Whether the search is queued. Valid values are True and False.
Connection Status—Status of the connection search. Valid values are skipped, done, working, idle, and error.
Packet Status—Status of the packet search. Valid values are skipped, done, working, idle, and error.
Session Status—Status of the session search. Valid values are skipped, done, working, idle, and error.
Example
HTTP/1.1 200 OK
Date: Sat, 20 Feb 2016 00:51:37 GMT
Content-Type: text/html; charset=UTF-8
{
"done": true, "queued": true, "status": {
"connection": "done", "packet": "skipped", "session": "skipped"
}
}
cURL code sample: Search summary
The code sample was run with cURL 7.57.0.
curl -k --user cpx:hammerhead https://xxx.xxx.xxx.xxx/api/4.0/search/7b123/poll
This cURL sample includes the following options:
-k—This option explicitly allows cURL to perform insecure SSL connections and transfers, which allows you to test your SSL connection without installing a CA certificate.
--user cpx:hammerhead—Replace cpx with the user name for your PX Series appliance. Replace hammerhead with the password for your PX Series appliance.
https://xxx.xxx.xxx.xxx/api/4.0/search/7b123/poll—The search request URL. Replace xxx.xxx.xxx.xxx with the IP address of your PX Series appliance. Replace 7b123 with the search ID of interest.
Results
This example provides a concise summary of the specified search. The output is in JSON.
Status of advanced search request
To provide the status of an advanced search, send the following request:
GET https://<PX_IP_address>/api/4.0/search/<search_id>
Required header:
--user <username>:<password>
Options
PX_IP_address—IP address of the Series appliance running the Series API.
username—The user name for your Series appliance.
password—The password for your Series appliance.
search_id—The unique search identifier.
Example
GET https://xxx.xxx.xxx.xxx/api/4.0/search/7b123
Required header:
--user cpx:hammerhead
Status of advanced search response
HTTP/1.1 [Response Code] [Response Message] Date: [Date]
Content-Type: [Content Type] input_create_time: [Input Create Time] input_depth: [Input Depth]
input_etime_nanoseconds: [Input End Time in Nanoseconds] input_etime_second: [Input End Time in Seconds] input_hash_field: [Input Hash Field]
input_score: [Input Score] input_limit: [Input Limit] input_ruleset: [Ruleset] input_search_id: [Input Search ID] input_search_type: [Input Search Type]
input_stime_nanoseconds: [Input Start Time in Nanoseconds] input_stime_second: [Input Start Time in Seconds] input_strict: [Input Strictness]
input_time_format: [Input Time Format] input_user: [Input User] output_elapsed: [Output Elapsed Time]
output_firstFlowEpoch: [Output First Flow Epoch] output_firstIndexEpoch: [Output First Index Epoch] output_firstPacketEpoch: [Output First Packet Epoch]
output_index_elapsed: [Packet Index Elapsed Time] output_index_end: [Packet Index End Time] output_index_foundRecords: [Packet Index Found Records] output_index_message: [Packet Index Status Message] output_index_packetPercent: [Packet Index Percent Complete] output_index_rangePercent: [Packet Index Range Percent] output_index_searchedFiles: [Packet Index Searched Files] output_index_start: [Packet Index Start] output_index_status: [Packet Index Status] output_lastUpdate: [Last Update]
output_message: [Output Status Message] output_packet_elapsed”: [Packet Retrieval Elapsed Time] output_packet_end: [Packet Retrieval End Time] output_packet_foundRecords: [Packet Retrieval Found Records] output_packet_message: [Packet Retrieval Status Message]
output_packet_packetPercent: [Packet Retrieval Percent Complete] output_packet_processedBytes: [Packet Retrieval Packet Size] output_packet_start: [Packet Retrieval Start] output_packet_status: [Packet Retrieval Status] output_searchEnd: [Search End]
output_searchStart: [Search Start] output_session_elapsed: [Session Analysis Elapsed Time] output_session_end: [Session Analysis End Time] output_session_message: [Session Analysis Status Message]
output_session_packetPercent: [Session Analysis Percent Complete] output_session_processedBytes: [Session Analysis Packet Size] output_session_processedRecords: [Session Analysis Processed Record] output_session_start: [Session Analysis Start] output_session_status: [Session Analysis Status]
output_status: [Output Status] output_streamCount: [Stream Count]
output_xpf_elapsed: [Connection Index Elapsed Time] output_xpf_end: [Connection Index End Time] output_xpf_extentSecond: [Connection Index Second] output_xpf_firstSecond: [Connection Index First Connection] output_xpf_foundRecords: [Connection Index Found Records] output_xpf_lastSecond: [Connection Index Last Connection] output_xpf_limitPercent: [Connection Index Percent Complete] output_xpf_message: [Connection Index Status Message] output_xpf_packetCount: [Connection Index Packet Count] output_xpf_rangePercent: [Connection Index Range Percent] output_xpf_searchedBytes: [Connection Index Searched Bytes] output_xpf_start: [Connection Index Start] output_xpf_status: [Connection Index Status]
target_depth: [Target Depth]
Response fields
Response Code—A standard HTML response code.
Response Message—A standard HTML response message.
Date—Standard HTML date format.
Content Type—The response format.
Input Create Time—Time at which the search was submitted.
Input Depth—Search depth. A search can be at the connection, packet, or session depth.
Input End Time in Nanoseconds—The nanoseconds portion of the end time of the search time range.
Input End Time in Seconds—The seconds portion of the end time of the search time range.
Input Hash Field—Hash key for the status of this search.
Input Score—Time when the search was created.
Input Limit—Requested maximum number of connection records to find.
Input Ruleset—Indicates (by ruleset name) which rulesets were used in the search.
Input Search ID—Generated search ID that uniquely identifies this search.
Input Search Type—Type of search requested: stream or all.
Input Start Time in Nanoseconds—The nanoseconds portion of the start time of the search time range.
Input Start Time in Seconds—The seconds portion of the start time of the search range.
Input Strictness—If this field is set to true, no variations on the input are tried.
Input Time Format—Time format for input. A value of 1 indicates that the pcap time stamp is in microseconds; a value of 0 indicates that the pcap time stamp is in nanoseconds.
Input User—User who made the search request.
Output Elapsed Time—Total elapsed time for all phases.
Output First Flow Epoch—Time of the first flow recorded on the appliance.
Output First Index Epoch—Time of the oldest connection packet index recorded on the appliance.
Output First Packet Epoch—Time of the oldest packet stored on the appliance.
Packet Index Elapsed Time—Total elapsed time of this phase.
Packet Index End Time—End time of this phase in epoch time.
Packet Index Found Records—Number of records found.
Packet Index Status Message—Current status message for this phase.
Packet Index Percent Complete—Percentage complete of all potential packets found.
Packet Index Range Percent—Percentage complete, based on captured packet times.
Packet Index Searched Files—Number of files touched.
Packet Index Start—Start time of this phase in epoch time.
Packet Index Status—Status of this phase. Valid values are skipped, done, working, idle, and error.
Last Update—Time when the search was last updated.
Output Status Message—Status of the search.
Packet Retrieval Elapsed—Total elapsed time of this phase.
Packet Retrieval End Time—End time of this phase in epoch time.
Packet Retrieval Found Records—Number of records found.
Packet Retrieval Status Message—Current status message for this phase.
Packet Retrieval Percent Complete—Percentage complete of all potential packets found.
Packet Retrieval Packet Size—Size of the packets processed.
Packet Retrieval Start—Start time of this phase in epoch time.
Packet Retrieval Status—Status of this phase. Valid values are skipped, done, working, idle, and error.
Search End—Last record searched.
Search Start—First record searched.
Session Analysis Elapsed Time—Total elapsed time of this phase.
Session Analysis End Time—End time of this phase in epoch time.
Session Analysis Status Message—Current status message for this phase.
Session Analysis Percent Complete—Percentage complete, of all potential packets found.
Session Analysis Packet Size—Size of the packets processed.
Session Analysis Processed Records—Number of packets processed.
Session Analysis Start—Start time of this phase in epoch time.
Session Analysis Status—Status of this phase. Valid values are skipped, done, working, idle, and error.
Output Status—Status of the search. Valid values are skipped, done, working, idle, and error.
Stream Count—Number of nPulse streams.
Connection Index Elapsed Time—Total elapsed time of this phase.
Connection Index End Time—End time of this phase in epoch time.
Connection Index Second—The last second of the last flow that the search examined.
Connection Index First Connection—Epoch time of the first connection found.
Connection Index Found Records—Number of records found.
Connection Index Last Connection—Current status message for this phase.
Connection Index Percent Complete—Percentage complete, based on input_limit.
Connection Index Status Message—Percentage complete, based on captured packet times.
Connection Index Packet Count—Number of packets to be found, based on connection records.
Connection Index Range Percent—Percentage complete, based on captured packet times.
Connection Index Searched Bytes—Size of searched packets.
Connection Index Start—Start time of this phase in epoch time.
Connection Index Status—Status of this phase. Valid values are skipped, done, working, idle, and error.
Target Depth—Search depth. A search can be at the connection, packet, or session depth.
Example
HTTP/1.1 200 OK
Date: Thu, 10 Mar 2016 00:06:51 GMT
Content-Type: text/html; charset=UTF-8
{
"input_create_time": "1455054118", "input_depth": "connection", "input_etime_nanoseconds": "0",
"input_etime_second": "1455053885",
"input_hash_field": "SEARCH_6e693e264d5045f184c710a650435f76", "input_limit": "100",
"input_score": "1455054118.29",
"input_search_id": "6e693e264d5045f184c710a650435f76", "input_search_type": "all",
"input_stime_nanoseconds": "0",
"input_stime_second": "1455050285", "input_strict": "False", "input_time_format": "0", "input_user": "cpx", "output_elapsed": "0.447",
"output_firstFlowEpoch": "1455051483",
"output_firstIndexEpoch": "1455051483",
"output_firstPacketEpoch": "1455051609",
"output_index_elapsed": "0.138",
"output_index_end": "1455054118",
"output_index_foundRecords": "61345", "output_index_message": "Search complete", "output_index_packetPercent": "100",
"output_index_rangePercent": "100",
"output_index_searchedFiles": "345",
"output_index_start": "1455054118", "output_index_status": "done", "output_lastUpdate": "1455054117", "output_message": "Search complete", "output_packet_elapsed": "0.000",
"output_packet_end": "0",
"output_packet_foundRecords": "0", "output_packet_message": "skipped", "output_packet_packetPercent": "0",
"output_packet_processedBytes": "0",
"output_packet_start": "0", "output_packet_status": "skipped", "output_searchEnd": "1455054118",
"output_searchStart": "1455054118",
"output_session_elapsed": "0",
"output_session_end": "0", "output_session_message": "skipped", "output_session_packetPercent": "0", "output_session_processedBytes": "NA", "output_session_processedRecords": "NA", "output_session_start": "0", "output_session_status": "skipped", "output_status": "done", "output_streamCount": "1",
"output_xpf_elapsed": "0.016",
"output_xpf_end": "1455054118",
"output_xpf_extentSecond": "140257907072051",
"output_xpf_firstSecond": "140256452018176",
"output_xpf_foundRecords": "100",
"output_xpf_lastSecond": "140257907071710",
"output_xpf_limitPercent": "100", "output_xpf_message": "Search complete", "output_xpf_packetCount": "61345",
"output_xpf_rangePercent": "100",
"output_xpf_searchedBytes": "0",
"output_xpf_start": "1455054118", "output_xpf_status": "done", "target_depth": "connection"
}
cURL code sample: Status of advanced search
The code sample was run with cURL 7.57.0.
curl -k --user cpx:hammerhead https://xxx.xxx.xxx.xxx/api/4.0/search/7b123
This cURL sample includes the following options:
-k—This option explicitly allows cURL to perform insecure SSL connections and transfers, which allows you to test your SSL connection without installing a CA certificate.
--user cpx:hammerhead—Replace cpx with the user name for your PX Series appliance. Replace hammerhead with the password for your Series appliance.
https://xxx.xxx.xxx.xxx/api/4.0/search/7b123—The search request URL. Replace xxx.xxx.xxx.xxx with the IP address
of your Series appliance. Replace 7b123 with the search ID of interest.
Results
This example returns the status of the specified search. The output is in JSON.
Session analysis using existing ruleset request
To invoke session analysis on the specified search, send the following request:
POST https://<PX_IP_address>/api/4.0/search/<search_id>/session-analysis
Required header:
--user <username>:<password>
To retrieve results, see Download packets request.
For details and a visual representation of this process, see Overview of search workflow.
Options
PX_IP_address—IP address of the Series appliance running the Series API.
username—The user name for your Series appliance.
password—The password for your Series appliance.
search_id—The UUID of the search to analyze.
Query parameters
ruleset—The ruleset to use in the search. The ruleset can be local or uploaded (see examples below. If uploading a new ruleset, you can use the skipVerify option to skip validation of the uploaded ruleset (in the event of invalid signatures). Optional.
Examples
Session analysis using an existing ruleset:
POST https://xxx.xxx.xxx.xxx/api/4.0/search/00e5156128e74fc54b3bd07a5eac214f/session-analysis -d "ruleset=myruleset&depth=session&stime=1537904410&etime=1537904710"
Session analysis using a new ruleset:
https://xxx.xxx.xxx.xxx/api/4.0/search/00e5156128e74fc54b3bd07a5eac214f/session-analysis -F "ruleset=@myruleset.tgz"
Required header:
--user cpx:hammerhead
Session analysis using existing ruleset response
HTTP/1.1 [Response Code] [Response Message]
Response fields
Response Code—A standard HTML response code.
Response Message—A standard HTML response message.
stime—Start time of search.
etime—End time of search.
Hash Field—Hash key for the status of this search.
Search Type—Type of search.
XPF—Filter that supports BPF as defined at http://www.tcpdump.org/manpages/pcap-filter.7.html. It is also used with
-specific connection attributes, see Connection metadata properties. Sample formatting is host 127.0.0.1 && packetdeltacountin>25.
Search ID—The unique search identifier. search_id is the key to summary, detail, store, and so on. This return value connects to many other functions as an input parameter.
Search Type—Type of search requested: stream or all.
Status—Status of search. For example, –2 means that the search is queued.
Example
HTTP/1.1 200 OK
cURL code sample: Session analysis using existing ruleset
The code sample was run with cURL 7.57.0.
curl -k --user cpx:hammerhead
"stime=20150901.015959&etime=20150901.030000&xpf=tcp&depth=packet" https://xxx.xxx.xxx.xxx/api/4.0/search/ 00e5156128e74fc54b3bd07a5eac214f/session-analysis
This cURL sample includes the following options:
-k—This option explicitly allows cURL to perform insecure SSL connections and transfers, which allows you to test your SSL connection without installing a CA certificate.
--user cpx:hammerhead—Replace cpx with the user name for your PX Series appliance. Replace hammerhead with the password for your Series appliance.
"stime=20110901.015959&etime=&xpf=tcp&depth=packet"—This option specifies the time range that will be searched, TCP-only results, and a packet-depth search.
https://xxx.xxx.xxx.xxx/api/4.0/search/00e5156128e74fc54b3bd07a5eac214f/session-analysis—The search request URL. Replace xxx.xxx.xxx.xxx with the IP address of your PX Series appliance., and 00e5156128e74fc54b3bd07a5eac214f with the search UUID.
Results
This example executes session analysis on the specified search.
Cancel searches request
To cancel an active and queued search, send the following request:
DELETE https://<PX_IP_address>/api/4.0/search/<search_id>
Required header:
--user <username>:<password>
 Note
Note
You can only cancel searches you initiated. An admin-level user can cancel any search.
Options
PX_IP_address—IP address of the Series appliance running the Series API.
username—The user name for your Series appliance.
password—The password for your Series appliance.
search_id—The unique search identifier.
Example
DELETE https://xxx.xxx.xxx.xxx/api/4.0/search/7b123
Required header:
--user cpx:hammerhead
Cancel searches response
HTTP/1.1 [Response Code] [Response Message] Date: [Date]
Content-Type: [Content Type] message: [Message]
status: [Status]
Response fields
Response Code—A standard HTML response code.
Response Message—A standard HTML response message.
Date—Standard HTML date format.
Content Type—The response format.
Message—Error message.
Status—A standard HTTP response message.
Example
HTTP/1.1 200 OK
Date: Wed, 16 Mar 2016 17:14:42 GMT
Content-Type: text/html; charset=UTF-8
{
"message": "Abort request is set for search id: b948090d35c54ca19d3570c9194e7863", "status": "ok"
}
cURL code sample: Cancel searches
The code sample was run with cURL 7.57.0.
curl -k --user cpx:hammerhead -X DELETE https://xxx.xxx.xxx.xxx/api/4.0/search/7b123
This cURL sample includes the following options:
-k—This option explicitly allows cURL to perform insecure SSL connections and transfers, which allows you to test your SSL connection without installing a CA certificate.
--user cpx:hammerhead—Replace cpx with the user name for your Series appliance. Replace hammerhead with the password for your Series appliance.
-X DELETE—This option changes the HTTP method to DELETE.
https://xxx.xxx.xxx.xxx/api/4.0/events/searchid/7b123—The search request URL. Replace xxx.xxx.xxx.xxx with the IP address of your Series appliance. Replace 7b123 with the search ID of interest.
Results
This example cancels the specified search. The output is in JSON.
List queued searches request
To display the contents of the advanced search queue, send the following request:
GET https://<PX_IP_address>/api/4.0/queue
Required header:
--user <username>:<password>
Options
PX_IP_address—IP address of the Series appliance running the Series API.
username—The user name for your Series appliance.
password—The password for your Series appliance.
Example
GET https://xxx.xxx.xxx.xxx/api/4.0/queue
Required header:
--user cpx:hammerhead
List queued searches response
input_user: [Input User] input_limit: [Input Limit]
input_etime_second: [Input End Time in Seconds] input_hash_field: [Input Hash Field] input_create_time: [Input Create Time] input_packet_analyze: [Input Packet Analysis]
input_etime_nanoseconds: [Input End Time in Nanoseconds] input_stime_nanoseconds: [Input Start Time in Nanoseconds] input_search_type: [Input Search Type]
input_search_id: [Input Search ID] output_bpf: [Output BPF]
input_stime_second: [Input Start Time in Seconds] input_xpf: [Input XPF]
output_status": [Output Status]
Response fields
Input User—User who made the search request.
Input Limit—Requested maximum number of connection records to find.
Input End Time in Seconds—The seconds portion of the end time of the search time range.
Input Hash Field—Hash key for the status of this search.
Input Create Time—Time at which the search was submitted.
Input Packet Analysis—Time to analyze input packets.
Input End Time in Nanoseconds—The nanoseconds portion of the end time of the search time range.
Input Start Time in Nanoseconds—The nanoseconds portion of the start time of the search time range.
Input Search Type—Type of search requested: stream or all.
Input Search ID—Generated search ID that uniquely identifies this search.
Output BPF—Generated XPF after input_xpf is processed by the PX XPF processing engine.
Input Start Time in Seconds—The seconds portion of the start time of the search range.
Input XPF—Filter provided by the end user.
Output Status—Status of the search. For example, –2 means that the search is queued.
Example
{
"queue": [
{
"input_user": "cpx", "input_limit": "100",
"input_etime_second": "1384442788",
"input_hash_field": "SEARCH_47ba048f10274cbc956fbf937c457b62", "input_create_time": "1384442788",
"input_packet_analyze": "0",
"input_etime_nanoseconds": "0",
"input_stime_nanoseconds": "0", "input_search_type": "all",
"input_search_id": "47ba048f10274cbc956fbf937c457", "output_bpf": "port 80",
"input_stime_second": "1293840000",
"input_xpf": "port 80",
"output_status": "-2"
}
]
}
cURL code sample: List queued searches
The code sample was run with cURL 7.57.0.
curl -k --user cpx:hammerhead https://xxx.xxx.xxx.xxx/api/4.0/queue
This cURL sample includes the following options:
-k—This option explicitly allows cURL to perform insecure SSL connections and transfers, which allows you to test your SSL
connection without installing a CA certificate.
--user cpx:hammerhead—Replace cpx with the user name for your PX Series appliance. Replace hammerhead with the password for your Series appliance.
https://xxx.xxx.xxx.xxx/api/4.0/queue—The search request URL. Replace xxx.xxx.xxx.xxx with the IP address of your Series appliance.
Results
This example displays the contents of the advanced search queue. The output is in JSON.
List saved search definitions request
To list all search definitions that a user has created, send the following request:
GET https://<PX_IP_address>/api/4.0/user/searches
Required header:
--user <username>:<password>
The output is Base64 encoded to avoid recursive escaping of JSON strings. The output contains search-related fields, such as
limit, xpf, etime, and stime.
Options
PX_IP_address—IP address of the Series appliance running the Series API.
username—The user name for your Series appliance.
password—The password for your Series appliance.
Example
GET https://xxx.xxx.xxx.xxx/api/4.0/user/searches
Required header:
--user cpx:hammerhead
List saved search definitions response
HTTP/1.1 [Response Code] [Response Message] Date: [Date]
Content-Type: [Content Type] searches: [Search Definitions] status: [Status]
Response fields
Response Code—A standard HTML response code.
Response Message—A standard HTML response message.
Date—Standard HTML date format.
Content Type—The response format.
Search Definitions—List of search definitions.
Status—A standard HTTP response message.
Example
HTTP/1.1 200 OK
Date: Wed, 09 Mar 2016 23:46:02 GMT
Content-Type: text/html; charset=UTF-8
{
[
“eyJsYWJlbCI6InNhZGRyIiwiY3VzdG9tIjoic3R pbWUlM0EyMDE yMDIwOS4xNjA4NTUlMjBldGlt ZSUzQTIwMTIwMjA5LjE2MTIwNiUyMHNhZGRy J TNBOTYuMjI3LjE1NC4yMCUyMGxpbWl0JT NBNTAwJTIwbGFiZ WwlM0FzYWRkciJ9”,
“eyJsYWJlbCI6IlZhbGlkc2VhcmNoZGF5IiwiY3Vzd G9tIjoic3RpbWUlM0EyMDEyMDIxMC4yMDQ3MTY lMjBsaW1pdCUzQTUwMCUyMGxhYmVsJTNBVmFsaWRz ZWFyY2hkYXkifQ==”,“eyJsYWJlbCI6InRlc3Q iLCJjdXN0b20iOiJzdGltZSUzQTIw MTIwMjE0LjIzNTAz NCUyMGV0aW1lJTNBMjAxMjAyMTQuMjM1NDAwJTIwb
GltaXQlM0E1MDAlMjBsYWJlbCUzQXRlc3QifQ==”
],
“status” : “ok”
}
cURL code sample: List saved search definitions
The code sample was run with cURL 7.57.0.
curl -k --user cpx:hammerhead https://xxx.xxx.xxx.xxx/api/4.0/user/searches
This cURL sample includes the following options:
-k—This option explicitly allows cURL to perform insecure SSL connections and transfers, which allows you to test your SSL connection without installing a CA certificate.
--user cpx:hammerhead—Replace cpx with the user name for your PX Series appliance. Replace hammerhead with the password for your Series appliance.
https://xxx.xxx.xxx.xxx/api/4.0/user/searches—The search request URL. Replace xxx.xxx.xxx.xxx with the IP address of your Series appliance.
Results
This example lists all search definitions for a user. The output is in Base64-encoded JSON.
Create saved search definitions request
To create a search definition, send the following request:
POST https://<PX_IP_address>/api/4.0/user/searches
Required header:
--user <username>:<password>
Options
PX_IP_address—IP address of the Series appliance running the Series API.
username—The user name for your Series appliance.
password—The password for your Series appliance.
Query Parameters
stime—Date and time from which the search should start. See Conventions for the format.
etime—Date and time at which the search should end. See Conventions for the format.
label—The name of the component.
window—The window of time before and after the specified start time that should be searched. If stime is used as a parameter, the window parameter is divided by two and subtracted from the stime to make a new start time. The window parameter is added to the original stime to make an etime. If stime is not specified, stime defaults to the current time. If etime and window are not specified, etime defaults to stime + 1 second.
xpf—Filter to reduce the results set; it supports BPF as defined at http://www.tcpdump.org/manpages/pcap-filter.7.html. It is also used with PX-specific connection attributes, see Connection metadata properties. Sample formatting is host
127.0.0.1 && packetdeltacountin>25.
limit—The maximum number of connections returned. The default connection limit for asynchronous searches is 100.
strict—If this parameter is set to true, the search ignores extra VLANs and MPLS unless you specify them in the xpf
parameter. The default value is false.
ip_list—A comma-separated list of IP addresses to be used as a pre-filter on connections. This parameter is useful for sporadic traffic over a long period of time.
depth—This search parameter controls what data is processed during a search. There are three types of a searches: connection, packet, and session. The default value is connection. Because a session-depth search includes a packet-depth search and a connection-depth search, session searches take more time than connection or packet searches. A packet-depth search includes a connection-depth search, so packet searches take longer than connection searches. To use less time, execute a connection or packet search instead of a session search and then review the data that was returned.
connection: To search connections only, set depth=connection. The "connection" value searches the ultrafast connection index to find information about traffic the Series appliance recorded. These connection records contain address, port, and protocol information, and TCP flags, if appropriate.
packet: To search packets and connections only, set depth=packet.
session: To initiate session analysis, set depth=session. A session search pulls packets from the PCAP storage and analyzes them in the session analysis engine. Session searches allow you to analyze packets of interest.
 Note
Note
Session analysis is a processor-intensive and memory-intensive operation. The higher the connection limit, the longer this request will take. If there are more than 250 connections, session analysis is not recommended.
Example
POST https://xxx.xxx.xxx.xxx/api/4.0/user/ searches?which=mine&searchstring=%7B%22xpf%22%3A%22%22%2C%22stime%22%3A%2220170330.155009%22%2C%22etime%22%3A%2220170330
Required header:
--user cpx:hammerhead
Create saved search definitions response
HTTP/1.1 [Response Code] [Response Message] Date: [Date]
Content-Type: [Content Type] searches: [Searches]
status: [Status]
Response fields
Response Code—A standard HTML response code.
Response Message—A standard HTML response message.
Date—Standard HTML date format.
Content Type—The response format.
Searches—A list of saved search definitions in Base64.
Status—A standard HTTP response message.
Example
HTTP/1.1 200 OK
Date: Fri, 31 Mar 2017 21:49:36 GMT
Content-Type: application/json; charset=utf-8
{
"searches": [ "eyJ4cGYiOiIiLCJzdGltZSI6IjIwMTcwMzMwLjE1NTAwOSIsImV0aW
1lIjoiMjAxNzAzMzAuMTU1NTA5IiwibGltaXQiOiIxMDAiLCJkZXB0aCI6ImNvbm5lY3Rpb24iLCJpcF9saXN0IjoiIiwic291cmNlX2lkIjoiIiwid2lu
],
"status": "ok"
}
cURL code sample: Create saved search definitions
The code sample was run with cURL 7.57.0.
curl -k --user cpx:hammerhead "https://xxx.xxx.xxx.xxx/api/4.0/user/ searches?which=mine&searchstring=%7B%22xpf%22%3A%22%22%2C%22stime%22%3A%2220170330.155009%22%2C%22etime%22%3A%22201703
-X POST
This cURL sample includes the following options:
-k—This option explicitly allows cURL to perform insecure SSL connections and transfers, which allows you to test your SSL
connection without installing a CA certificate.
--user cpx:hammerhead—Replace cpx with the user name for your Series appliance. Replace hammerhead with the password for your Series appliance.
"https://xxx.xxx.xxx.xxx/api/4.0/user/ searches?which=mine&searchstring=%7B%22xpf%22%3A%22%22%2C%22stime%22%3A%2220170330.155009%22%2C%22etime%22%3A%22201 search request URL. Replace xxx.xxx.xxx.xxx with the IP address of your PX Series appliance.
-X POST—This option specifies using the POST method.
Results
This example creates the specified search definition. The output is in JSON.
Update saved search definitions request
To update a search definition, send the following request:
PUT https://<PX_IP_address>/api/4.0/user/searches
Required header:
--user <username>:<password>
Options
PX_IP_address—IP address of the Series appliance running the Series API.
username—The user name for your Series appliance.
password—The password for your Series appliance.
Query parameters
stime—Date and time from which the search should start. See Conventions for the format.
etime—Date and time at which the search should end. See Conventions for the format.
label—The name of the component.
window—The window of time before and after the specified start time that should be searched. If stime is used as a parameter, the window parameter is divided by two and subtracted from the stime to make a new start time. The window
parameter is added to the original stime to make an etime. If stime is not specified, stime defaults to the current time. If
etime and window are not specified, etime defaults to stime + 1 second.
xpf—Filter to reduce the results set; it supports BPF as defined at http://www.tcpdump.org/manpages/pcap-filter.7.html. It is also used with PX-specific connection attributes, see Connection metadata properties. Sample formatting is host
127.0.0.1 && packetdeltacountin>25.
limit—The maximum number of connections returned. The default connection limit for asynchronous searches is 100.
strict—If this parameter is set to true, the search ignores extra VLANs and MPLS unless you specify them in the xpf
parameter. The default value is false.
ip_list—A comma-separated list of IP addresses to be used as a pre-filter on connections. Specifically useful for sporadic traffic over a long period of time.
depth—This search parameter controls what data is processed during a search. There are three types of a searches: connection, packet, and session. The default value is connection. Because a session-depth search includes a packet-depth search and a connection-depth search, session searches take more time than connection or packet searches. A packet-depth search includes a connection-depth search, so packet searches take longer than connection searches. To use less time, execute a connection or packet search instead of a session search and then review the data that was returned.
connection: To search connections only, set depth=connection. The "connection" value searches the ultrafast connection index to find information about traffic the Series appliance recorded. These connection records contain address, port, and protocol information, and TCP flags, if appropriate.
packet: To search packets only, set depth=packet.
session: To initiate session analysis, set depth=session. As the third main search phase, “session” pulls packets from the PCAP storage and analyzes them in the session analysis engine. Session searches allow you to analyze packets of interest.
 Note
Note
Session analysis is a processor-intensive and memory-intensive operation. The higher the connection limit, the longer this request will take. If there are more than 250 connections, session analysis is not recommended.
Example
PUT https://xxx.xxx.xxx.xxx/api/4.0/user/ searches?which=mine&searchstring=%7B%22xpf%22%3A%22%22%2C%22stime%22%3A%2220160330.155009%22%2C%22etime%22%3A%2220160330
Required header:
--user cpx:hammerhead
Update saved search definitions response
HTTP/1.1 [Response Code] [Response Message] Date: [Date]
Content-Type: [Content Type] searches: [Searches]
status: [Status]
Response fields
Response Code—A standard HTML response code.
Response Message—A standard HTML response message.
Date—Standard HTML date format.
Content Type—The response format.
Searches—A list of saved search definitions in Base64.
Status—A standard HTTP response message.
Example
HTTP/1.1 200 OK
Date: Fri, 31 Mar 2017 21:51:03 GMT
Content-Type: application/json; charset=utf-8
{
"searches": [ "eyJ4cGYiOiIiLCJzdGltZSI6IjIwMTcwMzMwLjE1NTAwOSIsI
mV0aW1lIjoiMjAxNzAzMzAuMTU1NTA5IiwibGltaXQiOiIxMDAiLCJkZXB0aCI6ImNvbm5lY3Rpb24iLCJpcF9saXN0IjoiIiwic291cmNlX2lkIjoiIiw "eyJ4cGYiOiIiLCJzdGltZSI6IjIwMTYwMzMwLjE1NTAwOSIsI
mV0aW1lIjoiMjAxNjAzMzAuMTU1NTA5IiwibGltaXQiOiIxMDAiLCJkZXB0aCI6ImNvbm5lY3Rpb24iLCJpcF9saXN0IjoiIiwic291cmNlX2lkIjoiIiw
],
"status": "ok"
}
cURL code sample: Update saved search definitions
The code sample was run with cURL 7.57.0.
curl -k --user cpx:hammerhead "https://xxx.xxx.xxx.xxx/api/4.0/user/ searches?which=mine&searchstring=%7B%22xpf%22%3A%22%22%2C%22stime%22%3A%2220160330.155009%22%2C%22etime%22%3A%2220160330
-X PUT
This cURL sample includes the following options:
-k—This option explicitly allows cURL to perform insecure SSL connections and transfers, which allows you to test your SSL connection without installing a CA certificate.
--user cpx:hammerhead—Replace cpx with the user name for your Series appliance. Replace hammerhead with the password for your Series appliance.
"https://xxx.xxx.xxx.xxx/api/4.0/user/ searches?which=mine&searchstring=%7B%22xpf%22%3A%22%22%2C%22stime%22%3A%2220160330.155009%22%2C%22etime%22%3A%22201 search request URL. Replace xxx.xxx.xxx.xxx with the IP address of your Series appliance.
-X PUT—This option specifies using the PUT method.
Results
This example updates the specified search definition. The output is in JSON.
Delete saved search definitions request
To delete a search definition, send the following request:
DELETE https://<PX_IP_address>/api/4.0/user/searches
Required header:
--user <username>:<password>
Options
PX_IP_address—IP address of the Series appliance running the Series API.
username—The user name for your Series appliance.
password—The password for your Series appliance.
Query parameters
stime—Date and time from which the search should start. See Conventions for the format.
etime—Date and time at which the search should end. See Conventions for the format.
label—The name of the component.
window—The window of time before and after the specified start time that should be searched. If stime is used as a
parameter, the window parameter is divided by two and subtracted from the stime to make a new start time. The window parameter is added to the original stime to make an etime. If stime is not specified, stime defaults to the current time. If etime and window are not specified, etime defaults to stime + 1 second.
xpf—Filter to reduce the results set; it supports BPF as defined at http://www.tcpdump.org/manpages/pcap-filter.7.html. It is also used with -specific connection attributes, see Connection metadata properties. Sample formatting is host 127.0.0.1 && packetdeltacountin>25.
limit—The maximum number of connections returned. The default connection limit for asynchronous searches is 100.
strict—If this parameter is set to true, the search ignores extra VLANs and MPLS unless you specify them in the xpf
parameter. The default value is false.
ip_list—A comma-separated list of IP addresses to be used as a pre-filter on connections. Specifically useful for sporadic traffic over a long period of time.
depth—This search parameter controls what data is processed during a search. There are three types of a searches: connection, packet, and session. The default value is connection. Because a session-depth search includes a packet-depth search and a connection-depth search, session searches take more time than connection or packet searches. A packet-depth search includes a connection-depth search, so packet searches take longer than connection searches. To use less time, execute a connection or packet search instead of a session search and then review the data that was returned.
connection: To search connections only, set depth=connection. The "connection" value searches the ultrafast connection index to find information about traffic the Series appliance recorded. These connection records contain address, port, and protocol information, and TCP flags, if appropriate.
packet: To search packets only, set depth=packet.
session: To initiate session analysis, set depth=session. As the third main search phase, “session” pulls packets from the PCAP storage and analyzes them in the session analysis engine. Session searches allow you to analyze packets of interest.
 Note
Note
Session analysis is a processor-intensive and memory-intensive operation. The higher the connection limit, the longer this request will take. If there are more than 250 connections, session analysis is not recommended.
Example
DELETE https://xxx.xxx.xxx.xxx/api/4.0/user/ searches?which=mine&searchstring=%7B%22xpf%22%3A%22%22%2C%22stime%22%3A%2220160330.155009%22%2C%22etime%22%3A%22201603
Required header:
--user cpx:hammerhead
Delete saved search definitions response
HTTP/1.1 [Response Code] [Response Message] Date: [Date]
Content-Type: [Content Type]
Response fields
Response Code—A standard HTML response code.
Response Message—A standard HTML response message.
Date—Standard HTML date format.
Content Type—The response format.
Example
HTTP/1.1 200 OK
Date: Fri, 31 Mar 2017 21:52:04 GMT
Content-Type: text/plain; charset=utf-8
cURL code sample: Delete saved search definitions
The code sample was run with cURL 7.57.0.
curl -k --user cpx:hammerhead "https://xxx.xxx.xxx.xxx/api/4.0/user/ searches?which=mine&searchstring=%7B%22xpf%22%3A%22%22%2C%22stime%22%3A%2220160330.155009%22%2C%22etime%22%3A%22201603
-X DELETE
This cURL sample includes the following options:
-k—This option explicitly allows cURL to perform insecure SSL connections and transfers, which allows you to test your SSL connection without installing a CA certificate.
--user cpx:hammerhead—Replace cpx with the user name for your Series appliance. Replace hammerhead with the password for your Series appliance.
"https://xxx.xxx.xxx.xxx/api/4.0/user/ searches?which=mine&searchstring=%7B%22xpf%22%3A%22%22%2C%22stime%22%3A%2220160330.155009%22%2C%22etime%22%3A%22201 search request URL. Replace xxx.xxx.xxx.xxx with the IP address of your PX Series appliance.
-X DELETE—This option specifies using the DELETE method.
Results
This example deletes the specified search definition. The output is in JSON.
Component configuration
Use the component configuration endpoints to find which components can be configured and then change their values or restore the default values:
GET https://<PX_IP_address>/api/4.0/config
GET https://<PX_IP_address>/api/4.0/config/<component>
POST https://<PX_IP_address>/api/4.0/config/acm
POST https://<PX_IP_address>/api/4.0/config/auth
POST https://<PX_IP_address>/api/4.0/config/px-capture
POST https://<PX_IP_address>/api/4.0/config/exfil
Configure IA export request
POST https://<PX_IP_address>/api/4.0/config/ia
POST https://<PX_IP_address>/api/4.0/config/ipmi
POST https://<PX_IP_address>/api/4.0/config/iptables
POST https://<PX_IP_address>/api/4.0/config/isight-rule-loader
POST https://<PX_IP_address>/api/4.0/config/net
POST https://<PX_IP_address>/api/4.0/config/ntp
POST https://<PX_IP_address>/api/4.0/config/px-eve-route
POST https://<PX_IP_address>/api/4.0/config/snmp
POST https://<PX_IP_address>/api/4.0/config/syslog
DELETE https://<PX_IP_address>/api/4.0/config/<component>
GET https://<PX_IP_address>/api/4.0/config/<component>/status
List components request
To list the components that can be configured, send the following request:
GET https://<PX_IP_address>/api/4.0/config
Required header:
--user <username>:<password>
Options
PX_IP_address—IP address of the Series appliance running the Series API.
username—The user name for your Series appliance.
password—The password for your Series appliance.
Example
GET https://xxx.xxx.xxx.xxx/api/4.0/config
Required header:
--user cpx:hammerhead
List components response
HTTP/1.1 [Response Code] [Response Message] Date: [Date]
Content-Type: [Content Type] [component1, component2, component3,...]
Response fields
Response Code—A standard HTML response code.
Response Message—A standard HTML response message.
Date—Standard HTML date format.
component—Any component that can be configured.
Example
HTTP/1.1 200 OK
Date: Tue, 7 May 2019 21:26:15 GMT
Content-Type: application/json; charset=utf-8 [
"2fa",
"acm",
"auth", "backups", "disk",
"dti",
"exfil",
"export",
"ipmi", "iptables",
"isight-rule-loader", "net",
"ntp", "packetfilters", "px-aggregator", "px-capture",
"px-eve-route",
"px-purge",
"snmp", "suricata", "sysdump", "syslog",
"tap-filter",
"traps", "users"
]
cURL code sample: List components
The code sample was run with cURL 7.57.0.
curl -k --user npadmin:hammerhead
-g "https://<host>/api/4.0/config"
This cURL sample includes the following options:
-k—This option explicitly allows cURL to perform insecure SSL connections and transfers, which allows you to test your SSL connection without installing a CA certificate.
--user npadmin:hammerhead—Replace npadmin with the user name for your Series appliance. Replace hammerhead with the password for your Series appliance.
-g—This option allows URLs that contain {}[].
"https://<host>/api/4.0/config"—The component configuration request URL. Replace <host> with the IP address of your Series appliance.
Results
This example returns a list of components that can be configured. The output is in JSON.
List component details request
To get details about a specific component, send the following request:
GET https://<PX_IP_address>/api/4.0/config/<component>
Required header:
--user <username>:<password>
Options
PX_IP_address—IP address of the Series appliance running the Series API.
username—The user name for your Series appliance.
password—The password for your Series appliance.
component—Part of the Series appliance. See List components request for supported components.
Example
GET https://xxx.xxx.xxx.xxx/api/4.0/config/ntp
Required header:
--user cpx:hammerhead
List component details response
HTTP/1.1 [Response Code] [Response Message] Date: [Date]
Content-Type: [Content Type] description: [Description] fields: [Fields]
label: [Label] values: [Values]
Response fields
Response Code—A standard HTML response code.
Response Message—A standard HTML response message.
Date—Standard HTML date format.
Content Type—The response format.
Description—A description of the component.
Fields—Fields list different options for each component.
Label—The name of the component.
Values—Values for various fields.
Example
HTTP/1.1 200 OK
Date: Thu, 26 Jan 2017 23:20:07 GMT
Content-Type: application/json; charset=utf-8
{
"description": "NTP config to list NTP servers on the network", "fields": {
"servers": {
"description": "Address of NTP Servers", "label": "Servers",
"type": "address"
}
},
"label": "NTP", "values": {
"servers": [
"iad-ntp1.eng.fireeye.com"
]
}
}
cURL code sample: List component details
The code sample was run with cURL 7.57.0.
curl -k --user cpx:hammerhead https://xxx.xxx.xxx.xxx/api/4.0/config/ntp
This cURL sample includes the following options:
-k—This option explicitly allows cURL to perform insecure SSL connections and transfers, which allows you to test your SSL connection without installing a CA certificate.
--user cpx:hammerhead—Replace cpx with the user name for your Series appliance. Replace hammerhead with the password for your Series appliance.
https://xxx.xxx.xxx.xxx/api/4.0/config/ntp—The component configuration request URL. Replace xxx.xxx.xxx.xxx
with the IP address of your Series appliance. Replace ntp with the component of interest.
Results
This example returns the details for the specified component. The output is in JSON.
Configure ACM request
To configure the Access Control Manager (ACM), send one of the following requests:
POST https://<PX_IP_address>/api/4.0/config/acm
PUT https://<PX_IP_address>/api/4.0/config/acm
 Note
Note
To use this request, you must belong to the sudo group.
You cannot update the ACM while it is being synchronized or if a system upgrade, backup, or restore is in progress.
Required header:
--user <username>:<password>
Request body:
{
inactiveTimeout: INT, maxSessionAge: INT
}
Options
PX_IP_address—IP address of the Series appliance running the Series API.
username—The user name for your Series appliance.
password—The password for your Series appliance.
Parameters
inactiveTimeout—The number of seconds before the session becomes inactive. The value is an integer, and the range is 60 to 3600.
maxSessionAge—The maximum number of seconds before a session terminates. The value is an integer, and the range is 600 to 2592000.
Example
POST https://xxx.xxx.xxx.xxx/api/4.0/config/acm
Required header:
--user npadmin:hammerhead
Request body:
{
"values": { "inactiveTimeout": [
700
],
"maxSessionAge": [ 80000
]
}
}
Configure ACM response
HTTP/1.1 [Response Code] [Response Message] Date: [Date]
Content-Type: [Content Type] description: [Description} fields: [Fields]
label: [Label]
inactiveTimeout: [Inactive Timeout] maxSessionAge: [Maximum Session Age]
Response fields
Response Code—A standard HTML response code.
Response Message—A standard HTML response message.
Date—Standard HTML date format.
Content Type—The response format.
Description—A description of ACM.
Fields—ACM options.
Label—The name of the component.
Inactive Timeout—The number of seconds before the session becomes inactive.
Maximum Session Age—The maximum number of seconds before a session terminates.
Example
HTTP/1.1 200 OK
Date: Fri, 27 Jan 2017 21:50:28 GMT
Content-Type: application/json; charset=utf-8
{
"description": "ACM manages http access to back-end services", "fields": {
"inactiveTimeout": { "default": [
600
],
"description": "Time before session becomes inactive", "label": "Inactive Timeout",
"maxCount": 1,
"maxValue": 3600,
"minCount": 1,
"minValue": 60, "type": "int"
},
"maxSessionAge": { "default": [
86400
],
"description": "Maximum age of a session before it terminates", "label": "Maximum Session Age",
"maxCount": 1,
"maxValue": 2592000,
"minCount": 1,
"minValue": 600, "type": "int"
}
},
"label": "ACM", "values": {
"inactiveTimeout": [ 700
],
"maxSessionAge": [ 80000
]
}
}
cURL code sample: Configure ACM
The code sample was run with cURL 7.57.0.
curl --user npadmin:hammerhead https://xxx.xxx.xxx.xxx/api/4.0/config/acm -k -X PUT --data-binary '{"values":
{"inactiveTimeout": [700],"maxSessionAge": [80000]}}'
This cURL sample includes the following options:
--user npadmin:hammerhead—Replace npadmin with the user name for your Series appliance. Replace hammerhead with the password for your PX Series appliance.
https://xxx.xxx.xxx.xxx/api/4.0/config/acm—The component configuration request URL. Replace xxx.xxx.xxx.xxx
with the IP address of your Series appliance.
-k—This option explicitly allows cURL to perform insecure SSL connections and transfers, which allows you to test your SSL connection without installing a CA certificate.
-X PUT—This option specifies using the PUT method.
--data-binary '{"values": {"inactiveTimeout": [700],"maxSessionAge": [80000]}}'—This option specifies the changes to make to ACM.
Results
This example updates the ACM configuration. The output is in JSON.
Configure authentication request
To configure user authentication, send one of the following requests:
POST https://<PX_IP_address>/api/4.0/config/auth
PUT https://<PX_IP_address>/api/4.0/config/auth
 Note
Note
To use this request, you must belong to the sudo group.
You cannot update authentication while it is being synchronized or if a system upgrade, backup, or restore is in progress.
Required header:
--user <username>:<password>
Request body:
{
ldapbase: 'TEXT', ldapbinddn: 'TEXT', ldapbindpw: 'TEXT', ldaphost: 'TEXT', ldapsudo: 'TEXT', ldapuiapi: 'TEXT',
radiussecret: 'TEXT', radiusserver: 'TEXT', tacacssecret: 'TEXT', tacacsserver: 'TEXT', type: 'TEXT'
}
Options
PX_IP_address—IP address of the Series appliance running the Series API.
username—The user name for your Series appliance.
password—The password for your Series appliance.
Parameters
ldapbase—The default base distinguished name (DN) to use when performing lightweight directory access protocol (LDAP) operations. The base must be specified as a DN in LDAP format. If type is ldap or active-directory, this field can be empty or have one value.
ldapbinddn—The default bind DN to use when performing LDAP operations. The bind DN must be specified as a DN in LDAP format. This field can be empty or have one value. If type is ldap or active-directory and this field is set, ldapbindpw must also be set.
ldapbindpw—The password used when binding to the LDAP server. This field can be empty or have one value. If type is
ldap or active-directory and this field is set, ldapbinddn must also be set.
ldaphost—The names of LDAP servers to which the LDAP library connects. Each server consists of an address and optional port number. If type is ldap or active-directory, this field must have at least one name.
ldapsudo—The name of an LDAP or AD group. Membership in this group is required for sudo access on the Series appliance.
ldapuiapi—The name of an LDAP or AD group. Membership in this group is required for uiapi access on the Series appliance.
radiussecret—The RADIUS shared secret that accompanies each RADIUS server. If type is radius, this field is required.
radiusserver—The names of RADIUS servers to which the RADIUS library connects. Each server consists of an address and optional port number. If type is radius, this field must have at least one name.
tacacssecret—The TACACS+ shared secret that accompanies each TACACS+ server. If type is tacacs, this field is required.
tacacsserver—The names of TACACS+ servers to which the TACACS+ library connects. Each server consists of an address and optional port number. If type is tacacs, this field must have at least one name.
type—The authentication type. Valid values are pam, ldap, tacacs, radius, or active-directory.
Example
POST https://xxx.xxx.xxx.xxx/api/4.0/config/auth
Required header:
--user npadmin:hammerhead
Request body:
{
"values": {
"ldapbase": [
"ou=IT staff,o=\"Example, Inc\",c=US"
],
"ldapbinddn": [
"ldapsearch -h 1.2.3.4 -D dc=example,dc=com [query]"
],
"ldapbindpw": [ "9H47nWdE5U"
],
"ldaphost": [
{
"address": [ "ldap1.server.com"
],
"port": [ 389
]
},
{
"address": [ "ldap2.server.com"
]
}
],
"radiussecret": [],
"radiusserver": [],
"tacacssecret": [],
"tacacsserver": [], "type": [
"ldap"
]
}
}
Configure authentication response
HTTP/1.1 [Response Code] [Response Message] Date: [Date]
Content-Type: [Content Type] description: [Description]
fields: [Fields] label: [Label] ldapbase: [LDAP Base]
ldapbindn: [LDAP Bind DN] ldapbindpw: [LDAP Bind Password] ldaphost: [LDAP Host] radiussecret: [RADIUS Secret] radiusserver: [RADIUS Server] tacacssecret: [TACACS Secret] tacacsserver: [TACACS Server] type: [Type]
Response fields
Response Code—A standard HTML response code.
Response Message—A standard HTML response message.
Date—Standard HTML date format.
Content Type—The response format.
Description—A description of authentication.
Fields—Fields list authentication options.
Label—The name of the component.
LDAP Base—The default base DN to use when performing LDAP operations.
LDAP Bind DN—The default bind DN to use when performing LDAP operations.
LDAP Bind Password—The password used when binding to the LDAP server.
LDAP Host—The names of LDAP servers to which the LDAP library connects.
RADIUS Secret—The RADIUS shared secret that accompanies each RADIUS server.
RADIUS Server—The names of RADIUS servers to which the RADIUS library connects.
TACACS Secret—The TACACS+ shared secret that accompanies each TACACS+ server.
TACACS Server—The names of TACACS+ servers to which the TACACS+ library connects.
Type—The authentication type.
Example
HTTP/1.1 200 OK
Date: Mon, 06 Feb 2017 19:14:13 GMT
Content-Type: application/json; charset=utf-8
{
"description": "Auth config to select and configure authentication", "fields": {
"ldapbase": {
"description": "LDAP base DN", "label": "LDAP base DN", "maxCount": 1,
"maxValue": 255,
"minCount": 0,
"minValue": 1,
"type": "string"
},
"ldapbinddn": {
"description": "LDAP Bind DN", "label": "LDAP Bind DN", "maxCount": 1,
"maxValue": 255,
"minCount": 0,
"minValue": 1,
"type": "string"
},
"ldapbindpw": {
"description": "LDAP Bind PW", "label": "LDAP Bind PW", "maxCount": 1,
"maxValue": 255,
"minCount": 0,
"minValue": 1,
"type": "string"
},
"ldaphost": {
"description": "LDAP Servers", "fields": {
"address": {
"description": "LDAP server Address", "label": "Address",
"maxCount": 1,
"minCount": 1,
"type": "address"
},
"port": {
"description": "LDAP server port (optional)", "label": "Port",
"maxCount": 1,
"maxValue": 65535,
"minCount": 0,
"minValue": 0,
"type": "int"
}
},
"label": "LDAP host",
"type": "object"
},
"radiussecret": {
"description": "Radius Secret", "label": "Radius Secret", "maxCount": 1,
"maxValue": 255,
"minCount": 0,
"minValue": 1,
"type": "string"
},
"radiusserver": {
"description": "Radius Servers", "fields": {
"address": {
"description": "Radius server address", "label": "Address",
"maxCount": 1,
"minCount": 1,
"type": "address"
},
"port": {
"description": "Radius server port (optional)", "label": "Port",
"maxCount": 1,
"maxValue": 65535,
"minCount": 0,
"minValue": 0,
"type": "int"
}
},
"label": "Radius Server", "maxCount": 20,
"minCount": 0,
"type": "object"
},
"tacacssecret": {
"description": "TACACS+ Secret", "label": "TACACS+ Secret", "maxCount": 1,
"maxValue": 255,
"minCount": 0,
"minValue": 1,
"type": "string"
},
"tacacsserver": {
"description": "TACACS+ Servers", "fields": {
"address": {
"description": "TACACS+ server address", "label": "Address",
"maxCount": 1,
"minCount": 1,
"type": "address"
},
"port": {
"description": "TACACS+ server port (optional)", "label": "Port",
"maxCount": 1,
"maxValue": 65535,
"minCount": 0,
"minValue": 0,
"type": "int"
}
},
"label": "TACACS+ Server", "maxCount": 20,
"minCount": 0,
"type": "object"
},
"type": {
"default": [ "pam"
],
"description": "Type of authentication to use", "enums": [
"pam",
"ldap",
"tacacs",
"radius",
"active-directory"
],
"label": "Authentication Type", "maxCount": 1,
"minCount": 1,
"type": "enum"
}
},
"label": "Authentication", "values": {
"ldapbase": [
"ou=IT staff,o=\"Example, Inc\",c=US"
],
"ldapbinddn": [
"ldapsearch -h 1.2.3.4 -D dc=example,dc=com [query]"
],
"ldapbindpw": [ "9H47nWdE5U"
],
"ldaphost": [
{
"address": [ "ldap1.server.com"
],
"port": [ 389
]
},
{
"address": [ "ldap2.server.com"
]
}
],
"radiussecret": [],
"radiusserver": [],
"tacacssecret": [],
"tacacsserver": [], "type": [
"ldap"
]
}
}
cURL code sample: Configure authentication
The code sample was run with cURL 7.57.0.
curl --user npadmin:hammerhead https://xxx.xxx.xxx.xxx/api/4.0/config/auth
-k -X PUT --data-binary '{"values": {"ldapbase": ["ou=IT staff,o=\"Example, Inc\",c=US"],"ldapbinddn": ["ldapsearch -h 1.2.3.4 -D dc=example,dc=com [query]"],"ldapbindpw": ["9H47nWdE5U"],"ldaphost": [{"address": ["ldap1.server.com"],"port": [389]},{"address": ["ldap2.server.com"]}],"radiussecret": [],"radiusserver": [],"tacacssecret": [],"tacacsserver": [],"type": ["ldap"]}}'
This cURL sample includes the following options:
--user npadmin:hammerhead—Replace npadmin with the user name for your Series appliance. Replace hammerhead with the password for your PX Series appliance.
https://xxx.xxx.xxx.xxx/api/4.0/config/auth—The component configuration request URL. Replace xxx.xxx.xxx.xxx
with the IP address of your Series appliance.
-k—This option explicitly allows cURL to perform insecure SSL connections and transfers, which allows you to test your SSL connection without installing a CA certificate.
-X PUT—This option specifies using the PUT method.
--data-binary '{"values": {"ldapbase": ["ou=IT staff,o=\"Example, Inc\",c=US"],"ldapbinddn": ["ldapsearch
-h 1.2.3.4 -D dc=example,dc=com [query]"],"ldapbindpw": ["9H47nWdE5U"],"ldaphost": [{"address":
["ldap1.server.com"],"port": [389]},{"address": ["ldap2.server.com"]}],"radiussecret": [],"radiusserver": [],"tacacssecret": [],"tacacsserver": [],"type": ["ldap"]}}'—This option specifies the changes to make to authentication.
Results
This example updates the values for user authentication. The output is in JSON.
Configure capture request
To configure px-capture, send one of the following requests:
POST https://<PX_IP_address>/api/4.0/config/px-capture
PUT https://<PX_IP_address>/api/4.0/config/px-capture
 Note
Note
To use this request, you must belong to the sudo group.
You cannot update capture while it is being synchronized or if a system upgrade, backup, or restore is in progress.
Required header:
--user <username>:<password>
Request body:
{
captureFormat: 'TEXT', captureStream0: BOOLEAN,
captureStream1: BOOLEAN, captureStream2: BOOLEAN, captureStream3: BOOLEAN, classification: BOOLEAN, enableToggleStreams: BOOLEAN, tunnelDecoding: BOOLEAN
}
Options
PX_IP_address—IP address of the Series appliance running the Series API.
username—The user name for your Series appliance.
password—The password for your Series appliance.
Parameters
captureFormat—The time format for packet capture data. Valid values are "nanosecond (nsec)" and "microsecond (usec)".
captureStream0—If enableToggleStreams is set to true, this parameter determines whether stream 0 is enabled. Valid values are true and false.
captureStream1—If enableToggleStreams is set to true, this parameter determines whether stream 1 is enabled. Valid values are true and false.
captureStream2—If enableToggleStreams is set to true, this parameter determines whether stream 2 is enabled. Valid values are true and false.
captureStream3—If enableToggleStreams is set to true, this parameter determines whether stream 3 is enabled. Valid values are true and false.
classification—This parameter determines whether the classifier is enabled. Valid values are true and false.
enableToggleStreams—This parameter determines whether individual streams can be enabled and disabled. Valid values are true and false.
tunnelDecoding—This parameter determines whether flow records are generated for the innermost or outermost layer of data for generic routing encapsulation (GRE) tunnel data. Valid values are true and false.
Example
POST https://xxx.xxx.xxx.xxx/api/4.0/config/px-capture
Required header:
--user npadmin:hammerhead
Request body:
{
"values": { "captureFormat": [
"microsecond (usec)"
],
"captureStream0": [ true
],
"captureStream1": [ true
],
"captureStream2": [ false
],
"captureStream3": [ false
],
"classification": [ true
],
"enableToggleStreams": [ true
],
"tunnelDecoding": [ true
]
}
}
Configure capture response
HTTP/1.1 [Response Code] [Response Message] Date: [Date]
Content-Type: [Content Type] description: [Description} fields: [Fields]
label: [Label]
captureFormat: [Capture Format] captureStream0: [Capture Stream 0] captureStream1: [Capture Stream 1] captureStream2: [Capture Stream 2] captureStream3: [Capture Stream 3] classification: [Classification] enableToggleStreams: [Toggle Streams] tunnelDecoding: [Tunnel Decoding]
Response fields
Response Code—A standard HTML response code.
Response Message—A standard HTML response message.
Date—Standard HTML date format.
Content Type—The response format.
Description—A description of px-capture.
Fields—Fields list px-capture options.
Label—The name of the component.
Capture Format—The time format for packet capture data.
Capture Stream 0—If Toggle Streams is set to true, this parameter determines whether stream 0 is enabled.
Capture Stream 1—If Toggle Streams is set to true, this parameter determines whether stream 1 is enabled.
Capture Stream 2—If Toggle Streams is set to true, this parameter determines stream 2 is enabled.
Capture Stream 3—If Toggle Streams is set to true, this parameter determines whether stream 3 is enabled.
Classification—This parameter determines whether the classifier is enabled.
Toggle Streams—This parameter determines whether individual streams can be enabled and disabled.
Tunnel Decoding—This parameter determines whether flow records are generated for the innermost or outermost layer of data for GRE tunnel data.
Example
HTTP/1.1 200 OK
Date: Mon, 06 Feb 2017 22:42:46 GMT
Content-Type: application/json; charset=utf-8
{
"description": "Configure PX-Capture", "fields": {
"captureFormat": { "default": [
"nanosecond (nsec)"
],
"description": "Time format for captured data", "enums": [
"nanosecond (nsec)", "microsecond (usec)"
],
"label": "Capture Format", "maxCount": 1,
"minCount": 1,
"type": "enum"
},
"captureStream0": { "default": [
true
],
"description": "Toggle capture stream 0", "falseLabel": "Disabled",
"label": "Capture Stream 0", "maxCount": 1,
"minCount": 1, "trueLabel": "Enabled", "type": "bool"
},
"captureStream1": { "default": [
true
],
"description": "Toggle capture stream 1", "falseLabel": "Disabled",
"label": "Capture Stream 1", "maxCount": 1,
"minCount": 1, "trueLabel": "Enabled", "type": "bool"
},
"captureStream2": { "default": [
true
],
"description": "Toggle capture stream 2", "falseLabel": "Disabled",
"label": "Capture Stream 2", "maxCount": 1,
"minCount": 1, "trueLabel": "Enabled", "type": "bool"
},
"captureStream3": { "default": [
true
],
"description": "Toggle capture stream 3", "falseLabel": "Disabled",
"label": "Capture Stream 3", "maxCount": 1,
"minCount": 1, "trueLabel": "Enabled", "type": "bool"
},
"classification": { "default": [
true
],
"description": "Toggle classification", "falseLabel": "Disabled",
"label": "Classification", "maxCount": 1,
"minCount": 1, "trueLabel": "Enabled",
"type": "bool"
},
"tunnelDecoding": { "default": [
false
],
"description": "Toggle tunnel decoding", "falseLabel": "Disabled",
"label": "Tunnel Decoding", "maxCount": 1,
"minCount": 1, "trueLabel": "Enabled", "type": "bool"
}
},
"label": "Capture", "values": {
"captureFormat": [ "microsecond (usec)"
],
"captureStream0": [ true
],
"captureStream1": [ true
],
"captureStream2": [ false
],
"captureStream3": [ false
],
"classification": [ true
],
"enableToggleStreams": [ true
],
"tunnelDecoding": [ true
]
}
}
cURL code sample: Configure capture
The code sample was run with cURL 7.57.0.
curl --user npadmin:hammerhead https://xxx.xxx.xxx.xxx/api/4.0/config/px-capture -k -X POST
--data-binary '{"values": {"captureFormat": ["microsecond (usec)"],"captureStream0": [true], "captureStream1": [true], "captureStream2": [false], "captureStream3": [false], "classification": [true], "enableToggleStreams": [true],"tunnelDecoding": [true]}}'
This cURL sample includes the following options:
--user npadmin:hammerhead—Replace npadmin with the user name for your Series appliance. Replace hammerhead with the password for your Series appliance.
https://xxx.xxx.xxx.xxx/api/4.0/config/px-capture—The component configuration request URL. Replace
xxx.xxx.xxx.xxx with the IP address of your Series appliance.
-k—This option explicitly allows cURL to perform insecure SSL connections and transfers, which allows you to test your SSL connection without installing a CA certificate.
-X POST—This option specifies using the POST method.
--data-binary '{"values": {"captureFormat": ["microsecond (usec)"],"captureStream0": [true], "captureStream1": [true], "captureStream2": [false], "captureStream3": [false], "classification": [true], "enableToggleStreams": [true],"tunnelDecoding": [true]}}'—This option specifies the changes to make to PX capture.
Results
This example updates the values for px-capture. The output is in JSON.
Configure data exfiltration detection request
You can write Suricata rules using the HOME_NET variable to detect data exfiltration if you define your internal network. To define IP addresses as internal addresses, send one of the following requests:
POST https://<PX_IP_address>/api/4.0/config/exfil
PUT https://<PX_IP_address>/api/4.0/config/exfil
 Note
Note
To use this request, you must belong to the sudo group.
You cannot update data exfiltration detection while it is being synchronized or if a system upgrade, backup, or restore is in progress.
Required header:
--user <username>:<password>
Request body:
{
enabled: Boolean, homeNet: 'IP_address'
}
Options
PX_IP_address—IP address of the Series appliance running the Series API.
username—The user name for your Series appliance.
password—The password for your Series appliance.
Parameters
enabled—Whether the date exfiltration detection is active. When enabled is set to true, you can configure the HOME_NET variable for Suricata rule sets. Valid values are true and false.
homeNet—Optional. A list of IP address for the home network in classless inter-domain routing (CIDR) notation.
Example
POST https://xxx.xxx.xxx.xxx/api/4.0/config/exfil
Required header:
--user npadmin:hammerhead
Request body:
{
"values": {
"enabled": [ true
],
"homeNet": [ "192.168.0.0/16",
"10.0.0.0/8",
"172.16.0.0/12"
]
}
}
Configure data exfiltration detection response
HTTP/1.1 [Response Code] [Response Message] Date: [Date]
Content-Type: [Content Type] description: [Description} fields: [Fields]
label: [Label]
enabled: [Enabled] homeNet: [Home Net]
Response fields
Response Code—A standard HTML response code.
Response Message—A standard HTML response message.
Date—Standard HTML date format.
Content Type—The response format.
Description—A description of data exfiltration detection.
Fields—Fields list data exfiltration detection options.
Label—The name of the component.
Enabled—Whether the data exfiltration detection service is active.
Home Net—A list of IP address for the home network in CIDR notation.
Example
HTTP/1.1 200 OK
Date: Wed, 22 Mar 2017 17:58:38 GMT
Content-Type: application/json; charset=utf-8
{
"description": "Configure Exfil Detection", "fields": {
"enabled": {
"default": [ false
],
"description": "Enable/Disable Exfil Detection Service", "falseLabel": "Disabled",
"label": "Exfil Detection", "maxCount": 1,
"minCount": 1, "trueLabel": "Enabled", "type": "bool"
},
"homeNet": {
"default": [ "192.168.0.0/16",
"10.0.0.0/8",
"172.16.0.0/12"
],
"description": "Home network addresses in CIDR notation", "label": "Home network addresses",
"minCount": 0,
"type": "cidr"
}
},
"label": "Exfil", "values": {
"enabled": [ true
],
"homeNet": [ "192.168.0.0/16",
"10.0.0.0/8",
"172.16.0.0/12"
]
}
}
cURL code sample: Configure data exfiltration detection
The code sample was run with cURL 7.57.0.
curl --user npadmin:hammerhead https://xxx.xxx.xxx.xxx/api/4.0/config/exfil
-k -X POST
--data-binary '{"values": {"enabled": [true],"homeNet": ["192.168.0.0/16","10.0.0.0/8","172.16.0.0/12"]}}'
This cURL sample includes the following options:
--user npadmin:hammerhead—Replace npadmin with the user name for your Series appliance. Replace hammerhead with the password for your Series appliance.
https://xxx.xxx.xxx.xxx/api/4.0/config/exfil—The component configuration request URL. Replace xxx.xxx.xxx.xxx
with the IP address of your Series appliance.
-k—This option explicitly allows cURL to perform insecure SSL connections and transfers, which allows you to test your SSL connection without installing a CA certificate.
-X POST—This option specifies using the POST method.
--data-binary '{"values": {"enabled": [true],"homeNet": ["192.168.0.0/16","10.0.0.0/8","172.16.0.0/ 12"]}}'—This option specifies the changes to make to data exfiltration detection.
Results
This example enables data exfiltration detection and defines which IP addresses are internal addresses. The output is in JSON.
Configure IPMI request
To configure the Intelligent Platform Management Interface (IPMI), send one of the following requests:
POST https://<PX_IP_address>/api/4.0/config/ipmi
PUT https://<PX_IP_address>/api/4.0/config/ipmi
 Note
Note
To use this request, you must belong to the sudo group.
You cannot update IPMI while it is being synchronized or if a system upgrade, backup, or restore is in progress.
Required header:
--user <username>:<password>
Request body:
{
dhcp: Boolean ip: 'ipv4' gateway: 'ipv4' netmask: 'ipv4'
}
Options
PX_IP_address—IP address of the Series appliance running the Series API.
username—The user name for your Series appliance.
password—The password for your Series appliance.
Parameters
description—A description of the component.
fields—Fields list different options for each component. Fields cannot be changed.
label—The name of the component.
dhcp—If dhcp is set to true, the ip, gateway, and netmask fields are set automatically. Valid values are true and false.
ip—IPMI IPv4 address. When dhcp is set to false, this parameter is required. When dhcp is set to true, this parameter is optional.
gateway—IPMI IPv4 gateway address. When dhcp is set to false, this parameter is required. When dhcp is set to true, this parameter is optional.
netmask—IPMI IPv4 netmask. When dhcp is set to false, this parameter is required. When dhcp is set to true, this parameter is optional.
Example
POST https://xxx.xxx.xxx.xxx/api/4.0/config/ipmi
Required header:
--user npadmin:hammerhead
Request body:
{
"values": {
"dhcp": [ false
],
"ip": [ "xxx.xxx.xxx.xxx"
],
"gateway": [ "xxx.xxx.xxx.xxx"
],
"netmask": [ "xxx.xxx.xxx.xxx"
]
}
}
Configure IPMI response
HTTP/1.1 [Response Code] [Response Message] Date: [Date]
Content-Type: [Content Type] description: [Description] fields: [Fields]
label: [Label] dhcp: [DHCP] ip: [IP]
gateway: [Gateway] netmask: [Netmask]
Response fields
Response Code—A standard HTML response code.
Response Message—A standard HTML response message.
Date—Standard HTML date format.
Content Type—The response format.
Description—A description of the component.
Fields—Fields list different options for each component.
Label—The name of the component.
DHCP—If dhcp is set to true, the ip, gateway, and netmask fields are set automatically.
IP—IPMI IP address.
Gateway—IPMI gateway address.
Netmask—IPMI netmask.
Example
HTTP/1.1 200 OK
Date: Tue, 07 Feb 2017 16:53:20 GMT
Content-Type: application/json; charset=utf-8
{
"description": "IPMI configuration", "fields": {
"dhcp": {
"default": [ false
],
"description": "Enable DHCP - Selecting true will ignore the other fields.", "label": "Enable DHCP",
"maxCount": 1,
"minCount": 1,
"type": "bool"
},
"gateway": {
"default": [
"0.0.0.0"
],
"description": "Must be an IPv4 address.", "label": "Gateway Address",
"maxCount": 1,
"minCount": 0,
"type": "ipv4"
},
"ip": {
"default": [
"0.0.0.0"
],
"description": "Must be an IPv4 address.", "label": "IP Address",
"maxCount": 1,
"minCount": 0,
"type": "ipv4"
},
"netmask": {
"default": [
"0.0.0.0"
],
"description": "Must be an IPv4 netmask.", "label": "Netmask",
"maxCount": 1,
"minCount": 0,
"type": "ipv4"
}
},
"label": "IPMI", "values": {
"dhcp": [s true
],
"gateway": [ "xxx.xxx.xxx.xxx"
],
"ip": [ "xxx.xxx.xxx.xxx"
],
"netmask": [ "xxx.xxx.xxx.xxx"
]
}
}
cURL code sample: Configure IPMI
The code sample was run with cURL 7.57.0.
curl --user npadmin:hammerhead https://xxx.xxx.xxx.xxx/api/4.0/config/ipmi
-k -X POST --data-binary '{"values": {"dhcp": [true],"gateway": ["xxx.xxx.xxx.xxx"],"ip": ["xxx.xxx.xxx.xxx"],"netmask": ["xxx.xxx.xxx.xxx"]}}'
This cURL sample includes the following options:
--user npadmin:hammerhead—Replace npadmin with the user name for your Series appliance. Replace hammerhead with the password for your Series appliance.
https://xxx.xxx.xxx.xxx/api/4.0/config/ipmi—The component configuration request URL. Replace xxx.xxx.xxx.xxx
with the IP address of your Series appliance.
-k—This option explicitly allows cURL to perform insecure SSL connections and transfers, which allows you to test your SSL connection without installing a CA certificate.
-X POST—This option specifies using the POST method.
--data-binary '{"values": {"dhcp": [true],"gateway": ["xxx.xxx.xxx.xxx"],"ip": ["xxx.xxx.xxx.xxx"],"netmask": ["xxx.xxx.xxx.xxx"]}}'—This option specifies the changes to make to IPMI.
Results
This example updates the values for IPMI. The output is in JSON.
Configure IPTables request
To configure IPTables and IP6Tables to manage the Series appliance's firewall, send one of the following requests:
POST https://<PX_IP_address>/api/4.0/config/iptables
PUT https://<PX_IP_address>/api/4.0/config/iptables
 Note
Note
To use this request, you must belong to the sudo group.
You cannot update IPTables or IP6Tables while they are being synchronized or if a system upgrade, backup, or restore is in progress.
Required header:
--user <username>:<password>
Request body:
{
nagios: Boolean, nagiosport: int, openvpn: Boolean, openvpnport: int, puppet: Boolean, puppetport: int, snmp: Boolean, snmpport: int}
Options
PX_IP_address—IP address of the Series appliance running the Series API.
username—The user name for your Series appliance.
password—The password for your Series appliance.
Parameters
nagios—Determines whether Nagios is enabled. Valid values are true and false.
nagiosport—Nagios port.
openvpn—Determines whether OpenVPN is enabled. Valid values are true and false.
openvpnport—OpenVPN port.
puppet—Determines whether Puppet is enabled. Valid values are true and false.
puppetport—Puppet port.
snmp—Determines whether SNMP is enabled.. Valid values are true and false.
snmpport—SNMP port.
Example
POST https://xxx.xxx.xxx.xxx/api/4.0/config/iptables
Required header:
--user npadmin:hammerhead
Request body:
{
"values": {
"nagios": [ true
],
"nagiosport": [ 5666
],
"openvpn": [ true
],
"openvpnport": [ 1194
],
"puppet": [ false
],
"puppetport": [ 8139
],
"snmp": [ true
],
"snmpport": [ 161
]
}
}
Configure IPTables response
HTTP/1.1 [Response Code] [Response Message] Date: [Date]
Content-Type: [Content Type] description: [Description] fields: [Fields]
label: [Label] nagios: [Nagios]
nagiosport: [Nagios Port] openvpn: [OpenVPN] openvpnport: [OpenVPN] puppet: [Puppet] puppetport: [PuppetPort] snmp: [SNMP]
snmpport: [SNMP Port]
Response fields
Response Code—A standard HTML response code.
Response Message—A standard HTML response message.
Date—Standard HTML date format.
Content Type—The response format.
Description—A description of the component.
Fields—Fields list different options for each component.
Label—The name of the component.
Nagios—Whether Nagios is enabled.
Nagios Port—The port that Nagios is using.
OpenVPN—Whether OpenVPN is enabled.
OpenVPN Port—The port that OpenVPN is using.
Puppet—Whether Puppet is enabled.
Puppet Port—The port that Puppet is using.
SNMP—Whether SNMP is enabled.
SNMP Port—The port that SNMP is using.
Example
HTTP/1.1 200 OK
Date: Tue, 07 Feb 2017 17:54:27 GMT
Content-Type: application/json; charset=utf-8
{
"description": "IP Tables configuration", "fields": {
"nagios": {
"default": [ false
],
"description": "Enable/disable Nagios", "falseLabel": "Disabled",
"label": "Nagios", "maxCount": 1,
"minCount": 1, "trueLabel": "Enabled", "type": "bool"
},
"nagiosport": { "default": [
5666
],
"description": "Nagios port", "label": "Nagios Port", "maxCount": 1,
"maxValue": 65535,
"minCount": 0,
"minValue": 1,
"type": "int"
},
"openvpn": {
"default": [ false
],
"description": "Enable/disable OpenVPN", "falseLabel": "Disabled",
"label": "OpenVPN", "maxCount": 1,
"minCount": 1, "trueLabel": "Enabled", "type": "bool"
},
"openvpnport": { "default": [
1194
],
"description": "OpenVPN Port", "label": "OpenVPN Port", "maxCount": 1,
"maxValue": 65535,
"minCount": 0,
"minValue": 1,
"type": "int"
},
"puppet": {
"default": [ false
],
"description": "Enable/disable Puppet", "falseLabel": "Disabled",
"label": "Puppet", "maxCount": 1,
"minCount": 1, "trueLabel": "Enabled", "type": "bool"
},
"puppetport": { "default": [
8139
],
"description": "Puppet Port", "label": "Puppet Port", "maxCount": 1,
"maxValue": 65535,
"minCount": 0,
"minValue": 1,
"type": "int"
},
"snmp": {
"default": [ false
],
"description": "Enable/disable SNMP", "falseLabel": "Disabled",
"label": "SNMP", "maxCount": 1,
"minCount": 1, "trueLabel": "Enabled", "type": "bool"
},
"snmpport": {
"default": [ 161
],
"description": "SNMP Port", "label": "SNMP Port", "maxCount": 1,
"maxValue": 65535,
"minCount": 0,
"minValue": 1,
"type": "int"
}
},
"label": "IP Tables", "values": {
"nagios": [ true
],
"nagiosport": [ 5666
],
"openvpn": [ true
],
"openvpnport": [ 1194
],
"puppet": [ false
],
"puppetport": [ 8139
],
"snmp": [ true
],
"snmpport": [ 161
]
}
}
cURL code sample: Configure IPTables
The code sample was run with cURL 7.57.0.
curl --user npadmin:hammerhead https://xxx.xxx.xxx.xxx/api/4.0/config/iptables -k -X POST --data-binary '{"values": {"nagios": [true],"nagiosport": [5666],"openvpn": [true],"openvpnport": [1194],"puppet": [false],"puppetport": [8139],"snmp": [true],"snmpport": [161]}}'
This cURL sample includes the following options:
--user npadmin:hammerhead—Replace npadmin with the user name for your Series appliance. Replace hammerhead with the password for your PX Series appliance.
https://xxx.xxx.xxx.xxx/api/4.0/config/iptables—The component configuration request URL. Replace
xxx.xxx.xxx.xxx with the IP address of your Series appliance.
-k—This option explicitly allows cURL to perform insecure SSL connections and transfers, which allows you to test your SSL connection without installing a CA certificate.
-X POST—This option specifies using the POST method.
--data-binary '{"values": {"nagios": [true],"nagiosport": [5666],"openvpn": [true],"openvpnport": [1194],"puppet": [false],"puppetport": [8139],"snmp": [true],"snmpport": [161]}}'—This option specifies the changes to make to IPTables and IP6Tables.
Results
This example updates the values for IPTables and IP6Tables. The output is in JSON.
Configure iSight rule loader request
To configure the iSIGHT rule loader, send one of the following requests:
POST https://<PX_IP_address>/api/4.0/config/isight-rule-loader
PUT https://<PX_IP_address>/api/4.0/config/isight-rule-loader
 Note
Note
To use this request, you must belong to the sudo group.
You cannot update iSight rule loader while it is being synchronized or if a system upgrade, backup, or restore is in progress.
Required header:
--user <username>:<password>
Request body:
{
enabled: BOOLEAN, retentionSpan: INT, secretKey: 'TEXT', userKey: 'TEXT'
}
Options
PX_IP_address—IP address of the Series appliance running the Series API.
username—The user name for your Series appliance.
password—The password for your Series appliance.
Parameters
enabled—Determines whether the iSight rule loader is enabled. Valid values are true and false.
retentionSpan—The number of days to retain rule sets.
secretKey—iSIGHT subscriber secret key.
userKey—iSIGHT subscriber API key.
Example
POST https://xxx.xxx.xxx.xxx/api/4.0/config/isight-rule-loader
Required header:
--user npadmin:hammerhead
Request body:
{
"values": {
"enabled": [ false
],
"retentionSpan": [ 30
],
"secretKey": [ "abcdefghijk"
],
"userKey": [ "lmnopqrstuvw"
]
}
}
Configure iSight rule loader response
HTTP/1.1 [Response Code] [Response Message] Date: [Date]
Content-Type: [Content Type] description: [Description] fields: [Fields]
label: [Label] enabled: [Enabled]
retentionSpan: [Retention Span] secretKey: [Secret Key] userKey: [User Key]
Response fields
Response Code—A standard HTML response code.
Response Message—A standard HTML response message.
Date—Standard HTML date format.
Content Type—The response format.
Description—A description of the component.
Fields—Fields list different options for each component.
Label—The name of the component.
Enabled—Whether the iSight rule loader is enabled.
Retention Span—The number of days to retain rule sets.
Secret Key—iSIGHT subscriber secret key.
User Key—iSIGHT subscriber API key.
Example
HTTP/1.1 200 OK
Date: Tue, 07 Feb 2017 18:59:06 GMT
Content-Type: application/json; charset=utf-8
{
"description": "Configuration for loading and retention of iSIGHT rules", "fields": {
"enabled": {
"default": [
false
],
"description": "Enable/disable rule loader", "falseLabel": "Disabled",
"label": "Rule loader", "maxCount": 1,
"minCount": 1, "trueLabel": "Enabled", "type": "bool"
},
"retentionSpan": { "default": [
15
],
"description": "Number of days to retain rulesets", "label": "Retention (Days)",
"maxCount": 1,
"maxValue": 90,
"minCount": 1,
"minValue": 1,
"type": "int"
},
"secretKey": {
"default": [ ""
],
"description": "iSIGHT Subscriber Secret Key", "label": "Secret Key",
"maxCount": 1,
"minCount": 1,
"type": "string"
},
"userKey": {
"default": [ ""
],
"description": "iSIGHT Subscriber API Key", "label": "API Key",
"maxCount": 1,
"minCount": 1,
"type": "string"
}
},
"label": "PX iSIGHT Rule Loader", "values": {
"enabled": [
false
],
"retentionSpan": [ 30
],
"secretKey": [
"abcdefghijk"
],
"userKey": [
"lmnopqrstuvw"
]
}
}
cURL code sample: Configure iSight rule loader
The code sample was run with cURL 7.57.0.
curl --user npadmin:hammerhead https://xxx.xxx.xxx.xxx/api/4.0/config/isight-rule-loader -k -X POST --data-binary '{"values": {"enabled": [false],"retentionSpan": [30],"secretKey": ["abcdefghijk"],"userKey": ["lmnopqrstuvw"]}}'
This cURL sample includes the following options:
--user npadmin:hammerhead—Replace npadmin with the user name for your Series appliance. Replace hammerhead with the password for your Series appliance.
https://xxx.xxx.xxx.xxx/api/4.0/config/isight-rule-loader—The component configuration request URL. Replace
xxx.xxx.xxx.xxx with the IP address of your Series appliance.
-k—This option explicitly allows cURL to perform insecure SSL connections and transfers, which allows you to test your SSL connection without installing a CA certificate.
-X POST—This option specifies using the POST method.
--data-binary '{"values": {"enabled": [false],"retentionSpan": [30],"secretKey": ["abcdefghijk"],"userKey": ["lmnopqrstuvw"]}}'—This option specifies the changes to the iSight rule loader.
Results
This example updates the values for the iSight rule loader. The output is in JSON.
Configure network request
To update the network configuration, send one of the following requests:
POST https://<PX_IP_address>/api/4.0/config/net
PUT https://<PX_IP_address>/api/4.0/config/net
 Note
Note
To use this request, you must belong to the sudo group.
You cannot update the network configuration while it is being synchronized or if a system upgrade, backup, or restore is in progress.
Required header:
--user <username>:<password>
Request body:
{
enabled: BOOLEAN, ipv4: 'IP address', ipv6: 'IP address', label: 'TEXT', netmaskv4: 'netmask', netmaskv6: 'netmask', dns: 'IP address', domains: 'TEXT', fqdn: 'TEXT',
gateway4: 'IP address', gateway6: 'IP address', hostname: 'TEXT'
}
Options
PX_IP_address—IP address of the Series appliance running the Series API.
username—The user name for your Series appliance.
password—The password for your Series appliance.
Parameters
 Note
Note
The devices field describes two network devices. There are always two devices listed.
enabled—Whether the device is enabled. Valid values are true and false.
ipv4—IPv4 address of the device.
ipv6—IPv6 address of the device.
label—The label for the device. Do not change this value.
netmaskv4—IPv4 netmask of the device.
netmaskv6—IPv6 netmask of the device.
dns—List of IPv4 or IPv6 addresses of DNS servers. Maximum: 3 addresses.
domains—List of search domains.
fqdn—Fully qualified domain name of the Series appliance.
gateway4—IPv4 network gateway address of the Series appliance.
gateway6—IPv6 network gateway address of the Series appliance.
hostname—Hostname of the Series appliance.
Example
POST https://xxx.xxx.xxx.xxx/api/4.0/config/net
Required header:
--user npadmin:hammerhead
Request body:
{
"values": {
"devices": [
{
"enabled": [
false
],
"ipv4": [
"xxx.xxx.xxx.xxx"
],
"ipv6": [], "label": [ "eth0"
],
"netmaskv4": [
"xxx.xxx.xxx.xxx"
],
"netmaskv6": []
},
{
"enabled": [
false
],
"ipv4": [],
"ipv6": [], "label": [
"eth1"
],
"netmaskv4": [],
"netmaskv6": []
}
],
"dns": [
"xxx.xxx.xxx.xxx"
],
"domains": [ "eng.fireeye.com"
],
"fqdn": [
"belmont.eng.fireeye.com"
],
"gateway4": [
"xxx.xxx.xxx.xxx"
],
"gateway6": [], "hostname": [
"belmont"
]
}
}
Configure network response
HTTP/1.1 [Response Code] [Response Message] Date: [Date]
Content-Type: [Content Type] description: [Description] fields: [Fields]
label: [Label] enabled: [Enabled] ipv4: [IPv4]
ipv6: [IPv6] label: [Label]
netmaskv4: [IPv4 Netmask] netmaskv6: [IPv6 Netmask] dns: [DNS]
domains: [Domains]
fqdn: [FQDN]
gateway4: [IPv4 Gateway] gateway6: [IPv6 Gateway] hostname: [Hostname]
Response fields
Response Code—A standard HTML response code.
Response Message—A standard HTML response message.
Date—Standard HTML date format.
Content Type—The response format.
Description—A description of the component.
Fields—Fields list different options for each component.
Label—The name of the component.
Enabled—Whether the device is enabled.
IPv4—IPv4 address of the device.
IPv6—IPv6 address of the device.
Label—The label for the device.
IPv4 Netmask—IPv4 netmask of the device.
IPv6 Netmask—IPv6 netmask of the device.
DNS—List of IPv4 or IPv6 addresses of DNS servers.
Domains—List of search domains.
FQDN—Fully qualified domain name of the Series appliance.
IPv4 Gateway—IPv4 network gateway address of the Series appliance.
IPv6 Gateway—IPv6 network gateway address of the Series appliance.
Hostname—Hostname of the Series appliance.
Example
HTTP/1.1 200 OK
Date: Tue, 07 Feb 2017 22:41:52 GMT
Content-Type: application/json; charset=utf-8
{
"description": "Network config to hosts, hostname and network interfaces", "fields": {
"devices": {
"description": "Configuration for Network Devices", "fields": {
"enabled": {
"default": [
false
],
"description": "Is device enabled?", "label": "Enabled",
"maxCount": 1,
"minCount": 1,
"type": "bool"
},
"ipv4": {
"description": "IPv4 Address", "label": "IPv4 Address", "maxCount": 1,
"minCount": 0,
"type": "ipv4"
},
"ipv6": {
"description": "IPv6 Address", "label": "IPv6 Address", "maxCount": 1,
"minCount": 0,
"type": "ipv6"
},
"label": {
"description": "Device label - do not change", "label": "Label",
"maxCount": 1,
"maxValue": 256,
"minCount": 1,
"minValue": 1,
"type": "string"
},
"netmaskv4": {
"description": "IPv4 Netmask", "label": "IPv4 Netmask", "maxCount": 1,
"minCount": 0,
"type": "ipv4"
},
"netmaskv6": {
"description": "IPv6 Netmask", "label": "IPv6 Netmask", "maxCount": 1,
"maxValue": 128,
"minCount": 0,
"minValue": 0,
"type": "int"
}
},
"label": "Network Devices", "maxCount": 2,
"minCount": 2,
"type": "object"
},
"dns": {
"description": "Addresses of DNS Servers", "label": "DNS Addresses",
"minCount": 0,
"type": "ip"
},
"domains": {
"description": "Network domains", "label": "Domains",
"maxCount": 6,
"minCount": 0, "type": "hostname"
},
"fqdn": {
"description": "Fully Qualified Domain Name", "label": "FQDN",
"maxCount": 1,
"minCount": 0, "type": "hostname"
},
"gateway4": {
"description": "IPv4 network gateway address", "label": "IPv4 Gateway",
"maxCount": 1,
"minCount": 0,
"type": "ipv4"
},
"gateway6": {
"description": "IPv6 network gateway address", "label": "IPv6 Gateway",
"maxCount": 1,
"minCount": 0,
"type": "ipv6"
},
"hostname": {
"description": "Network hostname", "label": "Hostname",
"maxCount": 1,
"minCount": 1, "type": "hostname"
}
},
"label": "Network config", "values": {
"devices": [
{
"enabled": [
false
],
"ipv4": [
"xxx.xxx.xxx.xxx"
],
"ipv6": [], "label": [
"eth0"
],
"netmaskv4": [
"xxx.xxx.xxx.xxx"
],
"netmaskv6": []
},
{
"enabled": [
false
],
"ipv4": [],
"ipv6": [], "label": [ "eth1"
],
"netmaskv4": [],
"netmaskv6": []
}
],
"dns": [
"xxx.xxx.xxx.xxx"
],
"domains": [
"eng.fireeye.com"
],
"fqdn": [
"belmont.eng.fireeye.com"
],
"gateway4": [
"xxx.xxx.xxx.xxx"
],
"gateway6": [], "hostname": [
"belmont"
]
}
}
cURL code sample: Configure network
The code sample was run with cURL 7.57.0.
curl --user npadmin:hammerhead https://xxx.xxx.xxx.xxx/api/4.0/config/net -k -X POST --data-binary '{"values":
{"devices": [{"enabled": [false],"ipv4": ["xxx.xxx.xxx.xxx"],"ipv6": [],"label": ["eth0"],"netmaskv4":
["xxx.xxx.xxx.xxx"],"netmaskv6": []},{"enabled": [false],"ipv4": [],"ipv6": [],"label": [ "eth1"], "netmaskv4":
[],"netmaskv6": []}],"dns": ["xxx.xxx.xxx.xxx"],"domains": ["eng.fireeye.com"],"fqdn":
["belmont.eng.fireeye.com"],"gateway4": ["xxx.xxx.xxx.xxx"], "gateway6": [],"hostname": ["belmont"]}}'
This cURL sample includes the following options:
--user npadmin:hammerhead—Replace npadmin with the user name for your Series appliance. Replace hammerhead with the password for your Series appliance.
https://xxx.xxx.xxx.xxx/api/4.0/config/net—The component configuration request URL. Replace xxx.xxx.xxx.xxx
with the IP address of your Series appliance.
-k—This option explicitly allows cURL to perform insecure SSL connections and transfers, which allows you to test your SSL
connection without installing a CA certificate.
-X POST—This option specifies using the POST method.
--data-binary '{"values": {"devices": [{"enabled": [false],"ipv4": ["xxx.xxx.xxx.xxx"],"ipv6": [],"label":
["eth0"],"netmaskv4": ["xxx.xxx.xxx.xxx"],"netmaskv6": []},{"enabled": [false],"ipv4": [],"ipv6":
[],"label": [ "eth1"], "netmaskv4": [],"netmaskv6": []}],"dns": ["xxx.xxx.xxx.xxx"],"domains":
["eng.fireeye.com"],"fqdn": ["belmont.eng.fireeye.com"],"gateway4": ["xxx.xxx.xxx.xxx"], "gateway6": [],"hostname": ["belmont"]}}'—This option specifies the changes to make to the network configuration.
Results
This example updates the values for the network configuration. The output is in JSON.
Configure NTP request
To update the list of Network Time Protocol (NTP) servers, send one of the following requests:
POST https://<PX_IP_address>/api/4.0/config/ntp
PUT https://<PX_IP_address>/api/4.0/config/ntp
 Note
Note
To use this request, you must belong to the sudo group.
You cannot update the NTP server list while it is being synchronized or if a system upgrade, backup, or restore is in progress.
Required header:
--user <username>:<password>
Request body:
{
servers: 'TEXT'
}
Options
PX_IP_address—IP address of the Series appliance running the Series API.
username—The user name for your Series appliance.
password—The password for your Series appliance.
Parameters
servers—A list of addresses for NTP servers. The value can be omitted. Any number of servers can be listed.
Example
POST https://xxx.xxx.xxx.xxx/api/4.0/config/ntp
Required header:
--user npadmin:hammerhead
Request body:
{
"values": {
"servers": [
"ntp.1.server", "ntp.2.server"
]
}
}
Configure NTP response
HTTP/1.1 [Response Code] [Response Message] Date: [Date]
Content-Type: [Content Type] description: [Description] fields: [Fields]
label: [Label] servers: [Servers]
Response fields
Response Code—A standard HTML response code.
Response Message—A standard HTML response message.
Date—Standard HTML date format.
Content Type—The response format.
Description—A description of the component.
Fields—Fields list different options for each component.
Label—The name of the component.
Servers—A list of addresses for NTP servers.
Example
HTTP/1.1 200 OK
Date: Tue, 07 Feb 2017 23:55:49 GMT
Content-Type: application/json; charset=utf-8
{
"description": "NTP config to list NTP servers on the network", "fields": {
"servers": {
"description": "Address of NTP Servers", "label": "Servers",
"type": "address"
}
},
"label": "NTP", "values": {
"servers": [
"ntp.1.server", "ntp.2.server"
]
}
}
cURL code sample: Configure NTP
The code sample was run with cURL 7.57.0.
curl --user npadmin:hammerhead https://xxx.xxx.xxx.xxx/api/4.0/config/ntp -k
-X POST
--data-binary '{"values": {"servers": ["ntp.1.server","ntp.2.server"]}}'
This cURL sample includes the following options:
--user npadmin:hammerhead—Replace npadmin with the user name for your Series appliance. Replace hammerhead with the password for your Series appliance.
https://xxx.xxx.xxx.xxx/api/4.0/config/ntp—The component configuration request URL. Replace xxx.xxx.xxx.xxx
with the IP address of your Series appliance.
-k—This option explicitly allows cURL to perform insecure SSL connections and transfers, which allows you to test your SSL connection without installing a CA certificate.
-X POST—This option specifies using the POST method.
--data-binary '{"values": {"servers": ["ntp.1.server","ntp.2.server"]}}'—This option specifies the changes to make to the NTP server list.
Results
This example updates the values for the NTP server list. The output is in JSON.
Configure PX-Eve-Route request
To configure -Eve-Route for sharing data from the Series appliance to the IA Series appliance, send one of the following requests:
POST https://<PX_IP_address>/api/4.0/config/px-eve-route
PUT https://<PX_IP_address>/api/4.0/config/px-eve-route
 Note
Note
To use this request, you must belong to the sudo group.
You cannot update -Eve-Route while it is being synchronized or if a system upgrade, backup, or restore is in progress.
Required header:
--user <username>:<password>
Request body:
{
address: 'TEXT', eventTypes: BOOLEAN, dstIP: '<ip address>', dstPort: INT, filterType: ENUM, protocol: INT,
srcIP: '<ip address>', srcPort: INT,
type: 'TEXT', pivotPort: 'TEXT'
}
Options
PX_IP_address—IP address of the Series appliance running the Series API.
username—The user name for your Series appliance.
password—The password for your Series appliance.
Parameters
address—ZMQ socket address.
eventTypes—Whether data for each listed protocol is enabled. Valid values are true and false.
dstIP—Destination IP address.
dstPort—Destination port number.
filterType—Inclusive/exclusive filter. The value can be 0-255.
protocol—Protocol. The value can be 0-255.
srcIP—Source IP address.
srcPort—Source port number.
type—Valid values are inclusive and exclusive.
pivotPort—Pivot port.
Example
POST https://xxx.xxx.xxx.xxx/api/4.0/config/px-eve-route
Required header:
--user npadmin:hammerhead
Request body:
{
"values": {
"output": [
{
"address": [ "ipc:///var/run/flow/test.zmq"
],
"eventTypes": [
{
"alert": [ true
],
"dhcp": [ false
],
"dns": [
false
],
"file": [ false
],
"fileinfo": [ false
],
"ftp": [ true
],
"http": [ true
],
"imap": [ false
],
"irc": [ false
],
"pop3": [ false
],
"pxflow": [ false
],
"rdp": [ false
],
"smb": [ false
],
"smb2": [ false
],
"smtp": [ false
],
"ssh": [ false
],
"tls": [ false
]
}
],
"filters": [
{
"filterType": [ "inclusive"
],
"type": [ "inclusive"
],
"srcIP": [ "xxx.xxx.xxx.xxx"
],
"dstIP": [ "xxx.xxx.xxx.xxx"
],
"srcPort": [ 80
],
"dstPort": [
22
],
"protocol": [ 6
]
}
]
}
],
"pivotPort": [ "eth0"
]
}
}
Configure PX-Eve-Route response
HTTP/1.1 [Response Code] [Response Message] Date: [Date]
Content-Type: [Content Type] description: [Description} fields: [Fields]
label: [Label] address: [Address]
eventTypes: [Event Types] dstIP: [Destination IP] dstPort: [Destination Port] filterType: [Filter Type] protocol: [Protocol] srcIP:[Source IP]
srcPort: [Source Port] type: [Type]
pivotPort: [Pivot Port]
Response fields
Response Code—A standard HTML response code.
Response Message—A standard HTML response message.
Date—Standard HTML date format.
Content Type—The response format.
Description—A description of the component.
Fields—Fields list different options for each component.
Label—The name of the component.
Address—ZMQ socket address.
Event Types—Whether data for each listed protocol is enabled. Valid values are true and false.
Destination IP—Destination IP address.
Destination Port—Destination port number.
Filter Type—Valid values are inclusive and exclusive.
Protocol—Protocol. The value can be 0-255.
Source IP—Source IP address.
Source Port—Source port number.
Type—Valid values are inclusive and exclusive.
Pivot Port—Pivot port.
Example
HTTP/1.1 200 OK
Date: Wed, 08 Feb 2017 22:01:14 GMT
Content-Type: application/json; charset=utf-8
{
"description": "PX Eve Route is responsible for sharing data from PX to IA", "fields": {
"output": {
"description": "Data output from PX Eve Route", "fields": {
"address": {
"description": "ZMQ Socket Address", "label": "Address",
"maxCount": 1,
"maxValue": 320,
"minCount": 1,
"minValue": 0,
"type": "string"
},
"eventTypes": {
"description": "Enable/Disable Protocol Metadata", "fields": {
"alert": {
"default": [
false
],
"label": "Alert", "maxCount": 1,
"minCount": 1,
"type": "bool"
},
"dhcp": {
"default": [
false
],
"label": "DHCP",
"maxCount": 1,
"minCount": 1,
"type": "bool"
},
"dns": {
"default": [
false
],
"label": "DNS", "maxCount": 1,
"minCount": 1,
"type": "bool"
},
"file": {
"default": [
false
],
"label": "File", "maxCount": 1,
"minCount": 1,
"type": "bool"
},
"fileinfo": {
"default": [
false
],
"label": "File Info", "maxCount": 1,
"minCount": 1,
"type": "bool"
},
"ftp": {
"default": [
false
],
"label": "FTP", "maxCount": 1,
"minCount": 1,
"type": "bool"
},
"http": {
"default": [
false
],
"label": "HTTP", "maxCount": 1,
"minCount": 1,
"type": "bool"
},
"imap": {
"default": [
false
],
"label": "IMAP", "maxCount": 1,
"minCount": 1,
"type": "bool"
},
"irc": {
"default": [
false
],
"label": "IRC", "maxCount": 1,
"minCount": 1,
"type": "bool"
},
"pop3": {
"default": [
false
],
"label": "POP3", "maxCount": 1,
"minCount": 1,
"type": "bool"
},
"pxflow": {
"default": [
false
],
"label": "PX Flow", "maxCount": 1,
"minCount": 1,
"type": "bool"
},
"rdp": {
"default": [
false
],
"label": "RDP", "maxCount": 1,
"minCount": 1,
"type": "bool"
},
"smb": {
"default": [
false
],
"label": "SMB", "maxCount": 1,
"minCount": 1,
"type": "bool"
},
"smb2": {
"default": [
false
],
"label": "SMB2", "maxCount": 1,
"minCount": 1,
"type": "bool"
},
"smtp": {
"default": [
false
],
"label": "SMTP", "maxCount": 1,
"minCount": 1,
"type": "bool"
},
"ssh": {
"default": [
false
],
"label": "SSH", "maxCount": 1,
"minCount": 1,
"type": "bool"
},
"tls": {
"default": [
false
],
"label": "TLS", "maxCount": 1,
"minCount": 1,
"type": "bool"
}
},
"label": "Protocol Metadata Selection", "maxCount": 1,
"minCount": 1,
"type": "object"
},
"filters": {
"description": "Five Tuple filters applied to records to determine inclusion/exclusion.", "fields": {
"dstIP": {
"description": "Destination IP Address", "label": "Destination IP Address", "maxCount": 1,
"maxValue": 45,
"minCount": 0,
"minValue": 0,
"type": "ip"
},
"dstPort": {
"description": "Destination Port", "label": "Destination Port", "maxCount": 1,
"maxValue": 65535,
"minCount": 0,
"minValue": 0,
"type": "int"
},
"filterType": {
"description": "Inclusive/Exclusive Filter", "enums": [
"inclusive", "exclusive"
],
"label": "Inclusive/Exclusive", "maxCount": 1,
"maxValue": 255,
"minCount": 1,
"minValue": 0,
"type": "enum"
},
"protocol": {
"description": "Protocol", "label": "Protocol", "maxCount": 1,
"maxValue": 255,
"minCount": 0,
"minValue": 0,
"type": "int"
},
"srcIP": {
"description": "Source IP Address", "label": "SourceIP Address", "maxCount": 1,
"maxValue": 45,
"minCount": 0,
"minValue": 0,
"type": "ip"
},
"srcPort": {
"description": "Source Port", "label": "Source Port", "maxCount": 1,
"maxValue": 65535,
"minCount": 0,
"minValue": 0,
"type": "int"
},
"vlan": {
"description": "VLAN ID", "label": "VLAN ID",
"maxCount": 1,
"maxValue": 4095,
"minCount": 0,
"minValue": 1,
"type": "int"
}
},
"label": "Filters", "maxCount": 32,
"minCount": 0,
"type": "object"
}
},
"label": "Output Sinks", "maxCount": 30,
"minCount": 0,
"type": "object"
},
"pivotPort": {
"default": [ "eth0"
],
"description": "Device used to trace the origin of the data", "label": "PivotPort",
"maxCount": 1,
"maxValue": 9999,
"minCount": 1,
"minValue": 1,
"type": "string"
}
},
"label": "px-eve-route", "values": {
"output": [
{
"address": [ "ipc:///var/run/flow/test.zmq"
],
"eventTypes": [
{
"alert": [
true
],
"dhcp": [
false
],
"dns": [
false
],
"file": [
false
],
"fileinfo": [ false
],
"ftp": [
true
],
"http": [
true
],
"imap": [
false
],
"irc": [
false
],
"pop3": [
false
],
"pxflow": [
false
],
"rdp": [
false
],
"smb": [
false
],
"smb2": [
false
],
"smtp": [
false
],
"ssh": [
false
],
"tls": [
false
]
}
],
"filters": [
{
"dstIP": [
"xxx.xxx.xxx.xxx"
],
"dstPort": [ 22
],
"filterType": [
"inclusive"
],
"protocol": [ 6
],
"srcIP": [
"xxx.xxx.xxx.xxx"
],
"srcPort": [
80
],
"type": [
"inclusive"
]
}
]
}
],
"pivotPort": [ "eth0"
]
}
}
cURL code sample: Configure PX-Eve-Route
The code sample was run with cURL 7.57.0.
curl --user npadmin:hammerhead https://xxx.xxx.xxx.xxx/api/4.0/config/px-eve-route -k -X POST --data-binary '{"values": {"output": [{"address": ["ipc:///var/run/flow/test.zmq"],"eventTypes": [{"alert": [true],"dhcp":
[false],"dns": [false],"file": [false],"fileinfo": [false],"ftp": [true],"http": [true],"imap": [false],"irc":
[false],"pop3": [false],"pxflow": [false],"rdp": [false],"smb": [false],"smb2": [false],"smtp": [false ],"ssh":
[false],"tls": [false]}],"filters": [{"filterType": ["inclusive"],"type": ["inclusive"],"srcIP":
["xxx.xxx.xxx.xxx"],"dstIP": ["xxx.xxx.xxx.xxx"],"srcPort": [80],"dstPort": [22],"protocol": [6]}]}],"pivotPort": ["eth0"]}}'
This cURL sample includes the following options:
--user npadmin:hammerhead—Replace npadmin with the user name for your Series appliance. Replace hammerhead with the password for your Series appliance.
https://xxx.xxx.xxx.xxx/api/4.0/config/px-eve-route—The component configuration request URL. Replace
xxx.xxx.xxx.xxx with the IP address of your Series appliance.
-k—This option explicitly allows cURL to perform insecure SSL connections and transfers, which allows you to test your SSL connection without installing a CA certificate.
-X POST—This option specifies using the POST method.
--data-binary '{"values": {"output": [{"address": ["ipc:///var/run/flow/test.zmq"],"eventTypes": [{"alert":
[true],"dhcp": [false],"dns": [false],"file": [false],"fileinfo": [false],"ftp": [true],"http":
[true],"imap": [false],"irc": [false],"pop3": [false],"pxflow": [false],"rdp": [false],"smb":
[false],"smb2": [false],"smtp": [false ],"ssh": [false],"tls": [false]}],"filters": [{"filterType":
["inclusive"],"type": ["inclusive"],"srcIP": ["xxx.xxx.xxx.xxx"],"dstIP": ["xxx.xxx.xxx.xxx"],"srcPort": [80],"dstPort": [22],"protocol": [6]}]}],"pivotPort": ["eth0"]}}'—This option specifies the changes to make to
-Eve-Route.
Results
This example updates the values for -Eve-Route. The output is in JSON.
Configure SNMP request
To update the SNMP configuration, send one of the following requests:
POST https://<PX_IP_address>/api/4.0/config/snmp
PUT https://<PX_IP_address>/api/4.0/config/snmp
 Note
Note
To use this request, you must belong to the sudo group.
You cannot update the SNMP configuration while it is being synchronized or if a system upgrade, backup, or restore is in progress.
Required header:
--user <username>:<password>
Request body:
{
port: INT, rocommunity: 'TEXT', syscontact: 'TEXT', sysloc: 'TEXT', sysname: 'TEXT', trapcommunity: 'TEXT', trapsenabled: BOOLEAN, address: 'IP address', port: INT
}
Options
PX_IP_address—IP address of the Series appliance running the Series API.
username—The user name for your Series appliance.
password—The password for your Series appliance.
Parameters
port—Required. Port number for SNMP.
rocommunity—Optional. Read-only community group. The default value is "public".
syscontact—Optional. The name of the person to contact for this managed node and how to get in contact. The default value is "None".
sysloc—Optional. The physical location of this managed node. The default value is "None".
sysname—Optional. A name assigned to this managed node, usually the nodeʼs fully qualified domain name. The default value is "None".
trapcommunity—Community value for trap reporting.
trapsenabled—Whether the traps are enabled. Valid values are true and false.
address—An address for reporting traps. There can be multiple addresses.
port—Optional. The port number for the corresponding address.
Example
POST https://xxx.xxx.xxx.xxx/api/4.0/config/snmp
Required header:
--user npadmin:hammerhead
Request body:
{
"values": {
"port": [ 161
],
"rocommunity": [ "public"
],
"syscontact": [ "None"
],
"sysloc": [ "None"
],
"sysname": [ "None"
],
"trapcommunity": [
"public"
],
"trapsenabled": [ false
],
"traptargets": [
{
"address": [ "xxx.xxx.xxx.xxx"
],
"port": [ 1220
]
},
{
"address": [ "xxx.xxx.xxx.xxx"
],
"port": [ 1644
]
}
]
}
}
Configure SNMP response
HTTP/1.1 [Response Code] [Response Message] Date: [Date]
Content-Type: [Content Type] description: [Description} fields: [Fields]
label: [Label] port: [Port]
rocommunity: [Community] syscontact: [Contact] sysloc: [Location] sysname: [Name]
trapcommunity: [Trap Community] trapsenabled: [Traps Enabled] address: [Trap Address]
port: [Trap Port]
Response fields
Response Code—A standard HTML response code.
Response Message—A standard HTML response message.
Date—Standard HTML date format.
Content Type—The response format.
Description—A description of the component.
Fields—Fields list different options for each component.
Label—The name of the component.
Values—Values for various fields.
Port—Port number for SNMP.
Community—Read-only community group.
Contact—The name of the person to contact for this managed node and how to get in contact.
Location—The physical location of this managed node.
Name—A name assigned to this managed node, usually the nodeʼs fully qualified domain name.
Trap Community—Community value for trap reporting.
Traps Enabled—Whether the traps are enabled.
Trap Address—An address for reporting traps.
Trap Port—The port number for the corresponding address.
Example
HTTP/1.1 200 OK
Date: Fri, 10 Feb 2017 00:11:53 GMT
Content-Type: application/json; charset=utf-8
{
"description": "SNMP configuration", "fields": {
"port": {
"default": [ 161
],
"description": "IPtables SNMP port", "label": "Port",
"maxCount": 1,
"maxValue": 65535,
"minCount": 1,
"minValue": 1,
"type": "int"
},
"rocommunity": { "default": [
"public"
],
"description": "Read-only community", "label": "Read-Only Community", "maxCount": 1,
"maxValue": 256,
"minCount": 0,
"minValue": 1,
"type": "string"
},
"syscontact": { "default": [
"None"
],
"description": "System contact", "label": "System Contact", "maxCount": 1,
"maxValue": 256,
"minCount": 0,
"minValue": 1,
"type": "string"
},
"sysloc": {
"default": [
"None"
],
"description": "System location", "label": "System Location", "maxCount": 1,
"maxValue": 256,
"minCount": 0,
"minValue": 1,
"type": "string"
},
"sysname": {
"default": [
"None"
],
"description": "System name", "label": "System Name", "maxCount": 1,
"maxValue": 256,
"minCount": 0,
"minValue": 1,
"type": "string"
},
"trapcommunity": {
"description": "Community for Trap reporting", "label": "Trap Community",
"maxCount": 1,
"maxValue": 256,
"minCount": 0,
"minValue": 0,
"type": "string"
},
"trapsenabled": { "default": [
false
],
"description": "Enable/disable traps", "falseLabel": "Disabled",
"label": "Traps", "maxCount": 1,
"minCount": 1, "trueLabel": "Enabled", "type": "bool"
},
"traptargets": {
"description": "Targets for reporting traps",
"fields": {
"address": {
"description": "Address of target", "label": "Address",
"maxCount": 1,
"minCount": 1,
"type": "address"
},
"port": {
"description": "Port of target (optional)", "label": "Port",
"maxCount": 1,
"maxValue": 65535,
"minCount": 0,
"minValue": 0,
"type": "int"
}
},
"label": "Trap Targets", "minCount": 0,
"type": "object"
}
},
"label": "SNMP", "values": {
"port": [ 161
],
"rocommunity": [ "public"
],
"syscontact": [ "None"
],
"sysloc": [ "None"
],
"sysname": [ "None"
],
"trapcommunity": [ "public"
],
"trapsenabled": [ false
],
"traptargets": [
{
"address": [
"xxx.xxx.xxx.xxx"
],
"port": [
1220
]
},
{
"address": [
"xxx.xxx.xxx.xxx"
],
"port": [
1644
]
}
]
}
}
cURL code sample: Configure SNMP
The code sample was run with cURL 7.57.0.
curl --user npadmin:hammerhead https:///xxx.xxx.xxx.xxx/api/4.0/config/snmp -k -X POST --data-binary '{"values": {"port": [161],"rocommunity": ["public"],"syscontact": ["None"],"sysloc": ["None"],"sysname": ["None"],"trapcommunity": ["public"],"trapsenabled": [false],"traptargets": [{"address":
["xxx.xxx.xxx.xxx"],"port": [1220]},{"address": ["xxx.xxx.xxx.xxx"],"port": [1644]}]}}'
This cURL sample includes the following options:
--user npadmin:hammerhead—Replace npadmin with the user name for your Series appliance. Replace hammerhead with the password for your PX Series appliance.
https://xxx.xxx.xxx.xxx/api/4.0/config/snmp—The component configuration request URL. Replace xxx.xxx.xxx.xxx
with the IP address of your Series appliance.
-k—This option explicitly allows cURL to perform insecure SSL connections and transfers, which allows you to test your SSL connection without installing a CA certificate.
-X POST—This option specifies using the POST method.
--data-binary '{"values": {"port": [161],"rocommunity": ["public"],"syscontact": ["None"],"sysloc":
["None"],"sysname": ["None"],"trapcommunity": ["public"],"trapsenabled": [false],"traptargets": [{"address": ["xxx.xxx.xxx.xxx"],"port": [1220]},{"address": ["xxx.xxx.xxx.xxx"],"port": [1644]}]}}'—This option specifies the changes to make to the SNMP configuration.
Results
This example updates the values for the SNMP configuration. The output is in JSON.
Restore default component configuration request
To restores the default values for a specific component, send the following request:
DELETE https://<PX_IP_address>/api/4.0/config/<component>
 Note
Note
To use this request, you must belong to the sudo group.
Required header:
--user <username>:<password>
Options
PX_IP_address—IP address of the Series appliance running the Series API.
username—The user name for your Series appliance.
password—The password for your Series appliance.
component—Part of the Series appliance.
Example
DELETE https://xxx.xxx.xxx.xxx/api/4.0/config/ntp
Required header:
--user npadmin:hammerhead
Restore default component configuration response
HTTP/1.1 [Response Code] [Response Message] Date: [Date]
Content-Type: [Content Type] description: [Description] fields: [Fields]
label: [Label] values: [Values]
Response fields
Response Code—A standard HTML response code.
Response Message—A standard HTML response message.
Date—Standard HTML date format.
Content Type—The response format.
Description—A description of the component.
Fields—Fields list different options for each component.
Label—The name of the component.
Values—Values for various fields.
Example
HTTP/1.1 200 OK
Date: Fri, 27 Jan 2017 22:00:43 GMT
Content-Type: application/json; charset=utf-8
{
"description": "NTP config to list NTP servers on the network", "fields": {
"servers": {
"description": "Address of NTP Servers", "label": "Servers",
"type": "address"
}
},
"label": "NTP", "values": {
"servers": []
}
}
cURL code sample: Restore default component configuration
The code sample was run with cURL 7.57.0.
curl -k --user npadmin:hammerhead https://xxx.xxx.xxx.xxx/api/4.0/config/ntp -X DELETE
This cURL sample includes the following options:
-k—This option explicitly allows cURL to perform insecure SSL connections and transfers, which allows you to test your SSL connection without installing a CA certificate.
--user npadmin:hammerhead—Replace npadmin with the user name for your Series appliance. Replace hammerhead with the password for your Series appliance.
https://xxx.xxx.xxx.xxx/api/4.0/config/ntp—The component configuration request URL. Replace xxx.xxx.xxx.xxx
with the IP address of your Series appliance. Replace ntp with the component of interest.
Results
This example restores the default values for the specified component. The output is in JSON.
Synchronization state request
To check if the configuration of Series components has been synchronized, send the following request:
GET https://<PX_IP_address>/api/4.0/config/<component>/status
Required header:
--user <username>:<password>
Options
PX_IP_address—IP address of the Series appliance running the Series API.
username—The user name for your Series appliance.
password—The password for your Series appliance.
component—Part of the Series appliance.
Example
GET https://xxx.xxx.xxx.xxx/api/4.0/config/acm/status
Required header:
--user cpx:hammerhead
Synchronization state response
HTTP/1.1 [Response Code] [Response Message] Date: [Date]
Content-Type: [Content Type] status: [Status]
Response fields
Response Code—A standard HTML response code.
Response Message—A standard HTML response message.
Date—Standard HTML date format.
Content Type—The response format.
Status—Status of synchronization.
Example
HTTP/1.1 200 OK
Date: Wed, 16 Mar 2016 18:27:09 GMT
Content-Type: text/html; charset=UTF-8
{
"status": "synced",
}
cURL code sample: Synchronization state
The code sample was run with cURL 7.57.0.
curl -k --user cpx:hammerhead https://xxx.xxx.xxx.xxx/api/4.0/config/acm/status
This cURL sample includes the following options:
-k—This option explicitly allows cURL to perform insecure SSL connections and transfers, which allows you to test your SSL connection without installing a CA certificate.
--user cpx:hammerhead—Replace cpx with the user name for your Series appliance. Replace hammerhead with the password for your Series appliance.
https://xxx.xxx.xxx.xxx/api/4.0/config/acm/status—The component configuration request URL. Replace
xxx.xxx.xxx.xxx with the IP address of your Series appliance. Replace acm with the component of interest.
Results
This example returns whether the configuration of Series components has been synchronized The output is in JSON.
Event-based capture
Event-based capture (EBC) uses defined rules to capture data around a specific event in network traffic. For example, you can use EBC to capture all packets for a blacklisted host address. When a rule matches an event in the network traffic, the Series appliance automatically creates a search on the data surrounding the event. Packets retrieved from event-based search are managed and stored differently than the other packets.
Use the EBC endpoints to retrieve EBC events:
GET https://<PX_IP_address>/api/4.0/events/stored
GET https://<PX_IP_address>/api/4.0/events/searchhistory
GET https://<PX_IP_address>/api/4.0/events/stored/<Search UUID>
GET https://<PX_IP_address>/api/4.0/events/searchid/<EVENT UUID>
View stored EBC events request
To retrieve stored EBC event information, send the following request:
GET https://<PX_IP_address>/api/4.0/events/stored
Required header:
--user <username>:<password>
You can retrieve events from a specified time period, events that occurred before or after a specified time, or the newest or oldest events.
Options
PX_IP_address—IP address of the Series appliance running the Series API.
username—The user name for your Series appliance.
password—The password for your Series appliance.
component—Part of the Series appliance.
stime—The start of the search period, expressed as a floating-point epoch time stamp. See Conventions for the format. Use this parameter with etime to specify a complete time range.
etime—The end of the search period, expressed as a floating-point epoch time stamp. See Conventions for the format. Use
this parameter with stime to specify a complete time range.
direction—Possible values are start, end, older, or newer. Use start or end to retrieve the oldest or newest events based on the specified start or end time. Use older or newer with the time parameter to retrieve events that occurred before or after a specified time stamp.
time—The reference time used when direction is set to older or newer. The time is expressed as a floating-point epoch time stamp.
count—Number of events to return in the result set. The maximum is 100.
Parameters are required in one of the following combinations:
Time range—Use stime and etime. direction and time carry no meaning in this usage.
For example: stime=20150304.000000&etime=20150304.000001
Older events—Use a direction of older and the time parameter. stime and etime carry no meaning in this usage.
For example: time=20150304.000000&direction=older
Newer events—Use a direction of newer and the time parameter. stime and etime carry no meaning in this usage.
For example: time=20150304.000000&direction=newer
Newest events—Use a direction of start. stime, etime, and time carry no meaning in this usage.
For example: direction=start
Oldest events—Use a direction of end. stime, etime, and time carry no meaning in this usage.
For example: direction=end
Example
GET https://xxx.xxx.xxx.xxx/api/4.0/events/stored?stime=20150304.000000&etime=20150304.000001
Required header:
--user cpx:hammerhead
View stored EBC events response
message: [Message] newer: [Newer] older: [Older]
parameters: [Parameters] status: [Status]
ebc: [EBC User] faas: [FaaS User]
input_create_time: [Input Create Time] input_depth: [Input Depth]
@timestamp: [Input Time Stamp] appType: [Application Type]
destinationIPv4Address: [Destination IPv4 Address] destinationTransportPort: [Destination Port] npulseStreamId: [nPulse Stream ID] observationTimeMicroseconds: [Observation Time] protocolIdentifier: [Protocol]
ruleClass: [Rule Class]
ruleGID: [Rule Group Identifier] ruleMessage: [Rule Message] rulePayload: [Rule Payload] rulePriority: [Rule Priority] ruleRev: [Rule Revision]
ruleSID: [Rule Signature Identifier] sourceIPv4Address: [Source IPv4 Address] sourceTransportPort: [Source Port]
input_etime_nanoseconds: [Input End Time in Nanoseconds] input_etime_second: [Input End Time in Seconds] input_hash_field: [Input Hash Field]
input_limit: [Input Limit] input_score: [Input Score] input_search_id: [Input Search ID] input_search_type: [Input Search Type]
input_stime_nanoseconds: [Input Start Time in Nanoseconds] input_stime_second: [Input Start Time in Seconds] input_user: [Input User]
input_window: [Input Window] input_xpf: [Input XPF] output_bpf: [Output BPF]
output_elapsed: [Output Elapsed Time] output_elastic_elapsed": [Text Maintenance Elapsed Time] output_elastic_end: [Text Maintenance End Time] output_elastic_message: [Text Maintenance Status Message] output_elastic_start: [Text Maintenance Start Time] output_elastic_status: [Text Maintenance Status] output_firstFlowEpoch: [Output First Flow Epoch] output_firstIndexEpoch: [Output First Index Epoch] output_firstPacketEpoch: [Output First Packet Epoch] output_index_elapsed: [Packet Index Elapsed Time] output_index_end: [Packet Index End Time] output_index_foundRecords: [Packet Index Found Records] output_index_message: [Packet Index Status Message] output_index_packetPercent:[Packet Index Percent Complete] output_index_rangePercent: [Packet Index Range Percent] output_index_searchedFiles: [Packet Index Searched Files] output_index_start: [Packet Index Start] output_index_status: [Packet Index Status] output_lastUpdate: [Last Update]
output_message: [Output Status Message] output_packet_elapsed: [Packet Retrieval Elapsed Time] output_packet_end: [Packet Retrieval End Time] output_packet_foundRecords: [Packet Retrieval Found Records] output_packet_message: [Packet Retrieval Status Message]
output_packet_packetPercent: [Packet Retrieval Percent Complete] output_packet_processedBytes: [Packet Retrieval Packet Size] output_packet_start: [Packet Retrieval Start] output_packet_status: [Packet Retrieval Status] output_searchEnd: [Search End]
output_searchStart: [Search Start] output_status: [Output Status] output_streamCount: [Stream Count]
output_xpf_elapsed: [Connection Index Elapsed Time] output_xpf_end: [Connection Index End Time] output_xpf_extentSecond: [Connection Index Second] output_xpf_firstSecond: [Connection Index First Connection] output_xpf_foundRecords: [Connection Index Found Records] output_xpf_lastSecond: [Connection Index Last Connection] output_xpf_limitPercent: [Connection Index Percent Complete] output_xpf_message: [Connection Index Status Message] output_xpf_packetCount: [Connection Index Packet Count] output_xpf_rangePercent: [Connection Index Range Percent] output_xpf_searchedBytes: [Connection Index Searched Bytes] output_xpf_start: [Connection Index Start] output_xpf_status: [Connection Index Status]
store_name: [Store Name]
Response fields
Message—Summary of results
Newer—Newest event in search.
Older—Oldest event in search.
Parameters—Query parameters and their settings. See Query parameters.
Status—A standard HTTP response message.
EBC User—Uses event-based capture.
FaaS User—Has a FaaS account.
Input Create Time—Time at which the search was submitted.
Input Depth—Search depth. A search can be at the connection, packet, or session depth.
Input Time Stamp—Time when command was entered.
Application Type—Well-known port number of the protocol found for this event. For example, http=80, tls=443, and smtp=25.
Destination IPv4 Address—Destination IPv4 address.
Destination Port—Destination port.
nPulse Stream ID—nPulse stream identifier.
Observation Time—Time in microseconds.
Protocol—Protocol identifier.
Rule Class—Rule class.
Rule Group Identifier—User-defined group identifier that can be used to group rules.
Rule Message—Rule message.
Rule Payload—Encoded rule.
Rule Priority—User-defined rule priority.
Rule Revision—Rule revision.
Rule Signature Identifier—User-defined signature identifier that can be used to uniquely identify a rule within a set of rules.
Source IPv4 Address—Source IPv4 address.
Source Port—Source port.
Input End Time in Nanoseconds—The nanoseconds portion of the end time of the search time range.
Input End Time in Seconds—The seconds portion of the end time of the search time range.
Input Hash Field—Hash key for the status of this search.
Input Limit—Requested maximum number of connection records to find.
Input Score—Time when the search was created.
Input Search ID—Generated search identifier that uniquely identifies this search.
Input Search Type—Type of search requested: stream or all.
Input Start Time in Nanoseconds—The nanoseconds portion of the start time of the search time range.
Input Start Time in Seconds—The seconds portion of the start time of the search range.
Input User—User who made the search request.
Input Window—The window of time before and after the specified start time that should be searched. If stime is used as a parameter, the window parameter is divided by two and subtracted from the stime to make a new start time. The window parameter is added to the original stime to make an etime. If stime is not specified, stime defaults to the current time. If etime and window are not specified, etime defaults to stime + 1 second.
Input XPF—Filter provided by the end user.
Output BPF—Generated XPF after input_xpf is processed by the XPF processing engine.
Output Elapsed Time—Total elapsed time for all phases.
Text Maintenance Elapsed Time—Total elapsed time of this phase.
Text Maintenance End Time—End time of this phase in epoch time.
Text Maintenance Status Message—Current status message for this phase.
Text Maintenance Start Time—Start time of this phase in epoch time.
Text Maintenance Status—Status of this phase. Valid values are skipped, done, working, idle, and error.
Output First Flow Epoch—Time of the first flow recorded on the appliance.
Output First Index Epoch—Time of the oldest connection packet index recorded on the appliance.
Output First Packet Epoch—Time of the oldest packet stored on the appliance.
Packet Index Elapsed Time—Total elapsed time of this phase.
Packet Index End Time—End time of this phase in epoch time.
Packet Index Found Records—Number of records found.
Packet Index Status Message—Current status message for this phase.
Packet Index Percent Complete—Percentage complete, of all potential packets found.
Packet Index Range Percent—Percentage complete, based on captured packet times.
Packet Index Searched Files—Number of files touched.
Packet Index Start—Start time of this phase in epoch time.
Packet Index Status—Status of this phase. Valid values are skipped, done, working, idle, and error.
Last Update—Time when the search was last updated.
Output Status Message—Status of the search.
Packet Retrieval Elapsed Time—Total elapsed time of this phase.
Packet Retrieval End Time—End time of this phase in epoch time.
Packet Retrieval Found Records—Number of records found.
Packet Retrieval Status Message—Current status message for this phase.
Packet Retrieval Percent Complete—Percentage complete, of all potential packets found.
Packet Retrieval Packet Size—Size of the packets processed.
Packet Retrieval Start—Start time of this phase in epoch time.
Packet Retrieval Status—Valid values are skipped, done, working, idle, and error.
Search End—Last record searched.
Search Start—First record searched.
Output Status—Status of the search. Valid values are skipped, done, working, idle, and error.
Stream Count—Number of nPulse streams.
Connection Index Elapsed Time—Total elapsed time of this phase.
Connection Index End Time—End time of this phase in epoch time.
Connection Index Second—The last second of the last flow that the search examined.
Connection Index First Connection—Epoch of the first connection found.
Connection Index Found Records—Number of records found.
Connection Index Last Connection—Current status message for this phase.
Connection Index Percent Complete—Percentage complete, based on input_limit.
Connection Index Status Message—Percentage complete, based on captured packet times.
Connection Index Packet Count—Number of packets to be found, based on connection records.
Connection Index Range Percent—Percentage complete, based on captured packet times.
Connection Index Searched Bytes—Size of searched packets.
Connection Index Start—Start time of this phase in epoch time.
Connection Index Status—Status of this phase. Valid values are skipped, done, working, idle, and error.
Store Name—Name that search is stored as.
Example
{
"message": "Found 1 EBC stored searches.", "newer": 1425481651.99,
"older": 1425481332.21,
"parameters": { "count": 25
},
"status": "ok", "storedEvents" : [
{
"ebc": "true",
"faas": "true", "input_create_time": "1425481647", "input_depth": "packet",
"input_ebc": [
{
"@timestamp": "2015-03-04T14:58:00.000001Z",
"appType": 4,
"destinationIPv4Address": "xxx.xxx.xxx.xxx", "destinationTransportPort": 44840,
"npulseStreamId": 3750560618,
"observationTimeMicroseconds": "2015-03-04T14:58:00.000001Z", "protocolIdentifier": 17,
"ruleClass": "Potentially Bad Traffic", "ruleGID": 1,
"ruleMessage": "ET POLICY Unusual number of DNS No Such Name Responses", "rulePayload": "Li4uLi4uLi4uLi4uLmZpbmRlcjEtcmVhZG5ld3MuYXN0cmF3ZWIuY29tLnJ "rulePriority": 2,
"ruleRev": 5,
"ruleSID": 2003195,
"sourceIPv4Address": "xxx.xxx.xxx.xxx", "sourceTransportPort": 53
}
]
"input_etime_nanoseconds": "36",
"input_etime_second": "1425481347",
"input_hash_field": "SEARCH_02cc1f1adc4c41ee8beacdb8c9eb2bdb", "input_limit": "1",
"input_score": "1425481647.39",
"input_search_id": "02cc1f1adc4c41ee8beacdb8c9eb2bdb", "input_search_type": "all",
"input_stime_nanoseconds": "23",
"input_stime_second": "1425480738", "input_user": "eventbasedcapture", "input_window": "0",
"input_xpf": "host xxx.xxx.xxx.xxx and host xxx.xxx.xxx.xxx", "output_bpf": "host xxx.xxx.xxx.xxx and host xxx.xxx.xxx.xxx", "output_elapsed": "0.359",
"output_elastic_elapsed": "0.000",
"output_elastic_end": "0", "output_elastic_message": "skipped", "output_elastic_start": "0", "output_elastic_status": "skipped", "output_firstFlowEpoch": "1424895839",
"output_firstIndexEpoch": "1424895839",
"output_firstPacketEpoch": "1425275100",
"output_index_elapsed": "0.235",
"output_index_end": "1425481647",
"output_index_foundRecords": "60", "output_index_message": "Index search complete", "output_index_packetPercent": "100",
"output_index_rangePercent": "100",
"output_index_searchedFiles": "310",
"output_index_start": "1425481647", "output_index_status": "done", "output_lastUpdate": "1425481647", "output_message": "Search complete", "output_packet_elapsed": "1.026",
"output_packet_end": "1425481647",
"output_packet_foundRecords": "60", "output_packet_message": "Packet search complete", "output_packet_packetPercent": "100",
"output_packet_processedBytes": "7860",
"output_packet_start": "1425481647", "output_packet_status": "done", "output_searchEnd": "1425481647",
"output_searchStart": "1425481647", "output_status": "done",
"output_streamCount": "4",
"output_xpf_elapsed": "0.031",
"output_xpf_end": "1425481647",
"output_xpf_extentSecond": "1425481347",
"output_xpf_firstSecond": "139884215344462",
"output_xpf_foundRecords": "1",
"output_xpf_lastSecond": "1425481038",
"output_xpf_limitPercent": "100", "output_xpf_message": "XPF search complete", "output_xpf_packetCount": "60",
"output_xpf_rangePercent": "100",
"output_xpf_searchedBytes": "0",
"output_xpf_start": "1425481647", "output_xpf_status": "done",
"store_name": "EBC_9c42499d-6b5b-45f9-9b09-a2068ed6c2aa"
}
]
}
cURL code sample: View stored EBC events
The code sample was run with cURL 7.57.0.
curl -k –-user cpx:hammerhead https://xxx.xxx.xxx.xxx/api/4.0/events/stored "count=25&direction=older&time=1425481332.21"
This cURL sample includes the following options:
-k—This option explicitly allows cURL to perform insecure SSL connections and transfers, which allows you to test your SSL connection without installing a CA certificate.
--user cpx:hammerhead—Replace cpx with the user name for your Series appliance. Replace hammerhead with the password for your Series appliance.
https://xxx.xxx.xxx.xxx/api/4.0/events/stored—The EBC request URL. Replace xxx.xxx.xxx.xxx with the IP address of your Series appliance.
"count=25&direction=older&time=1425481332.21"—This option specifies that 25 events that are older than the specified time will be returned.
Results
This example returns the stored EBC event information for 25 events that are older than the specified time. The output is in JSON.
View EBC search history request
To retrieve a list of the 200 most recent EBC searches and the status, send the following request:
GET https://<PX_IP_address>/api/4.0/events/searchhistory
Required header:
--user <username>:<password>
Options
PX_IP_address—IP address of the Series appliance running the Series API.
username—The user name for your Series appliance.
password—The password for your Series appliance.
Example
GET https://xxx.xxx.xxx.xxx/api/4.0/events/searchhistory
Required header:
--user cpx:hammerhead
View EBC search history response
ebc: [EBC User] faas: [FaaS User]
input_create_time: [Input Create Time] input_depth: [Input Depth]
@timestamp: [Input Time Stamp] action: [Action]
duplicateCount: [Duplicate Count] ruleClass: [Rule Class]
ruleGID: [Rule Group Identifier] ruleMessage: [Rule Message] rulePriority: [Rule Priority] ruleRev: [Rule Revision]
ruleSID: [Rule Signature Identifier] destinationIPv4Address: [Destination IPv4 Address] destinationTransportPort: [Destination Port]
ebc: [EBC Type] ebcDepth: [EBC Depth] ebcTiming: [EBC Timing]
protocolIdentifier: [Protocol Identifier] protocolIdentifierName: [Protocol Name] pxuuid: [PX UUID]
sourceIPv4Address: [Source IPv4 Address sourceTransportPort: [Source Port] input_etime_nanoseconds: [Input End Time in Nanoseconds] input_etime_second: [Input End Time in Seconds]
input_hash_field: [Input Hash Field] input_limit: [Input Limit] input_score: [Input Score]
input_search_id: [Input Search Identifier] input_search_type: [Input Search Type] input_stime_nanoseconds: [Input Start Time in Nanoseconds] input_stime_second: [Input Start Time in Seconds] input_time_format: [Input Time Format]
input_user: [Input User] input_window: [Input Window] input_xpf: [Input XPF] output_bpf: [Output BPF] output_depth: [Output Depth]
output_elapsed: [Output Elapsed Time] output_firstFlowEpoch: [Output First Flow Epoch] output_firstIndexEpoch: [Output First Index Epoch] output_firstPacketEpoch: [Output First Packet Epoch] output_index_elapsed: [Packet Index Elapsed Time] output_index_end: [Packet Index End Time] output_index_foundRecords: [Packet Index Found Records] output_index_message: [Packet Index Status Message] output_index_packetPercent: [Packet Index Percent Complete] output_index_rangePercent: [Packet Index Range Percent] output_index_searchedFiles: [Packet Index Searched Files] output_index_start: [Packet Index Start] output_index_status: [Packet Index Status] output_lastUpdate: [Last Update]
output_message: [Output Status Message] output_packet_elapsed: [Packet Retrieval Elapsed Time] output_packet_end: [Packet Retrieval End Time] output_packet_foundRecords: [Packet Retrieval Found Records] output_packet_message: [Packet Retrieval Status Message]
output_packet_packetPercent: [Packet Retrieval Percent Complete] output_packet_processedBytes: [Packet Retrieval Packet Size] output_packet_start: [Packet Retrieval Start] output_packet_status: [Packet Retrieval Status] output_searchEnd: [Search End]
output_searchStart: [Search Start] output_session_message: [Session Analysis Status Message]
output_session_packetPercent: [Session Analysis Percent Complete] output_session_status: [Session Analysis Status]
output_status: [Output Status] output_streamCount: [Stream Count]
output_xpf_elapsed: [Connection Index Elapsed Time] output_xpf_end: [Connection Index End Time] output_xpf_extentSecond: [Connection Index Second] output_xpf_firstSecond: [Connection Index First Connection] output_xpf_foundRecords: [Connection Index Found Records] output_xpf_lastSecond: [Connection Index Last Connection] output_xpf_limitPercent: [Connection Index Percent Complete] output_xpf_message: [Connection Index Status Message] output_xpf_packetCount: [Connection Index Packet Count] output_xpf_rangePercent: [Connection Index Range Percent] output_xpf_searchedBytes: [Connection Index Searched Bytes] output_xpf_start: [Connection Index Start] output_xpf_status: [Connection Index Status]
store_name: [Store Name] status: [Status]
Response fields
EBC User—Uses event-based capture.
FaaS User—Has a FaaS account.
Input Create Time—Time at which the search was submitted.
Input Depth—Search depth. A search can be at the connection, packet, or session depth.
Input Time Stamp—Time when command was entered.
Action—The action performed by the engine when a signature matches the alert. A value of allowed means that the engine will send an alert for the packet and continued scanning the flow.
Duplicate Count—Number of duplicates of this alert in the flow associated with this alert.
Rule Class—Defined by the user in the rule configuration.
Rule Group Identifier—User-defined group identifier that can be used to group rules.
Rule Message—Defined by the user in the rule configuration.
Rule Priority—User-defined rule priority.
Rule Revision—Rule revision.
Rule Signature Identifier—User-defined signature identifier that can be used to uniquely identify a rule within a set of rules.
Destination IPv4 Address—Destination IPv4 address.
Destination Port—Destination port.
EBC Type—The EBC action to take. A value of pcap indicates that a pcap should be stored for the flow associated with this alert.
EBC Depth—Capture depth. The depth can be connection, packet, or session. An empty string indicates that the default packet depth is used.
EBC Timing—The delay in seconds before the EBC search and store for this alert occur. A value of -1 is the default and indicates that the EBC search and store for this alert occur when the end of the flow is detected or in 10 minutes, whichever is sooner.
Protocol Identifier—Number that identifies which protocol is being used.
Protocol Name—Name of the protocol being used.
PX UUID—Universally unique identifier for this specific alert.
Source IPv4 Address—Source IPv4 address.
Source Port—Source port.
Input End Time in Nanoseconds—The nanoseconds portion of the end time of the search time range.
Input End Time in Seconds—The seconds portion of the end time of the search time range.
Input Hash Field—Hash key for the status of this search.
Input Limit—Requested maximum number of connection records to find.
Input Score—Time when the search was created.
Input Search Identifier—Generated search identifier that uniquely identifies this search.
Input Search Type—Type of search requested: stream or all.
Input Start Time in Nanoseconds—The nanoseconds portion of the start time of the search time range.
Input Start Time in Seconds—The seconds portion of the start time of the search range.
Input Time Format—Time format for input. A value of 1 indicates that the pcap time stamp is in microseconds; a value of 0 indicates that the pcap time stamp is in nanoseconds.
Input User—User who made the search request.
Input Window—The window of time before and after the specified start time that should be searched. If stime is used as a parameter, the window parameter is divided by two and subtracted from the stime to make a new start time. The window parameter is added to the original stime to make an etime. If stime is not specified, stime defaults to the current time. If etime and window are not specified, etime defaults to stime + 1 second.
Input XPF—Filter provided by the end user.
Output BPF—Generated XPF after input_xpf is processed by the XPF processing engine.
Output Depth—Search depth. A search can be at the connection, packet, or session depth.
Output Elapsed Time—Total elapsed time for all phases.
Output First Flow Epoch—Time of the first flow recorded on the appliance.
Output First Index Epoch—Time of the oldest connection packet index recorded on the appliance.
Output First Packet Epoch—Time of the oldest packet stored on the appliance.
Packet Index Elapsed Time—Total elapsed time of this phase.
Packet Index End Time—End time of this phase in epoch time.
Packet Index Found Records—Number of records found.
Packet Index Status Message—Current status message for this phase.
Packet Index Percent Complete—Percentage complete, of all potential packets found.
Packet Index Range Percent—Percentage complete, based on captured packet times.
Packet Index Searched Files—Number of files touched.
Packet Index Start—Start time of this phase in epoch time.
Packet Index Status—Status of this phase. Valid values are skipped, done, working, idle, and error.
Last Update—Time when the search was last updated.
Output Status Message—Status of the search.
Packet Retrieval Elapsed Time—Total elapsed time of this phase.
Packet Retrieval End Time—End time of this phase in epoch time.
Packet Retrieval Found Records—Number of records found.
Packet Retrieval Status Message—Current status message for this phase.
Packet Retrieval Percent Complete—Percentage complete, of all potential packets found.
Packet Retrieval Packet Size—Size of the packets processed.
Packet Retrieval Start—Start time of this phase in epoch time.
Packet Retrieval Status—Status of this phase. Valid values are skipped, done, working, idle, and error.
Search End—Last record searched.
Search Start—First record searched.
Session Analysis Status Message—Current status message for this phase.
Session Analysis Percent Complete—Percentage complete, of all potential packets found.
Session Analysis Status—Status of this phase. Valid values are skipped, done, working, idle, and error.
Output Status—Status of the search. Valid values are skipped, done, working, idle, and error.
Stream Count—Number of nPulse streams.
Connection Index Elapsed Time—Total elapsed time of this phase.
Connection Index End Time—End time of this phase in epoch time.
Connection Index Second—The last second of the last flow that the search examined.
Connection Index First Connection—Epoch of the first connection found.
Connection Index Found Records—Number of records found.
Connection Index Last Connection—Current status message for this phase.
Connection Index Percent Complete—Percentage complete, based on input_limit.
Connection Index Status Message—Percentage complete, based on captured packet times.
Connection Index Packet Count—Number of packets to be found, based on connection records.
Connection Index Range Percent—Percentage complete, based on captured packet times.
Connection Index Searched Bytes—Size of searched packets.
Connection Index Start—Start time of this phase in epoch time.
Connection Index Status—Status of this phase. Valid values are skipped, done, working, idle, and error.
Store Name—Name that search is stored as.
Status—A standard HTTP response message.
Example
{
"ebc": "true",
"faas": "true", "input_create_time": "1459173598", "input_depth": "packet", "input_ebc": [
{
"@timestamp": "2016-03-28T13:44:57.000001Z",
"alert": {
"action": "allowed", "duplicateCount": 0, "ruleClass": "", "ruleGID": 1,
"ruleMessage": "GET Method Found in HTTP Traffic From Client to Server", "rulePriority": 1,
"ruleRev": "0",
"ruleSID": 10000003
},
"destinationIPv4Address": "xxx.xxx.xxx.xxx", "destinationTransportPort": 80,
"ebc": "pcap",
"ebcDepth": "",
"ebcTiming": -1,
"protocolIdentifier": 6, "protocolIdentifierName": "TCP",
"pxuuid": "41270c8f-2074-4f3d-b58e-d6ae21c3fffa",
"sourceIPv4Address": "xxx.xxx.xxx.xxx", "sourceTransportPort": 42438
}
],
"input_etime_nanoseconds": "5",
"input_etime_second": "1459173298",
"input_hash_field": "SEARCH_8c9ffe11ea3f4e9eb306568b98fef545", "input_limit": "1",
"input_score": "1459173598.73",
"input_search_id": "8c9ffe11ea3f4e9eb306568b98fef545", "input_search_type": "all",
"input_stime_nanoseconds": "5",
"input_stime_second": "1459172396",
"input_time_format": "0", "input_user": "eventbasedcapture", "input_window": "1",
"input_xpf": "proto 6 and host xxx.xxx.xxx.xxx and port 42438 and host xxx.xxx.xxx.xxx and port 80", "output_bpf": "proto 6 and host xxx.xxx.xxx.xxx and port 42438 and host xxx.xxx.xxx.xxx and port 80", "output_depth": "packet",
"output_elapsed": "52.815",
"output_firstFlowEpoch": "1458614340",
"output_firstIndexEpoch": "0",
"output_firstPacketEpoch": "0",
"output_index_elapsed": "51.338",
"output_index_end": "1459173650",
"output_index_foundRecords": "0", "output_index_message": "Search complete", "output_index_packetPercent": "100",
"output_index_rangePercent": "100",
"output_index_searchedFiles": "0",
"output_index_start": "1459173598", "output_index_status": "done", "output_lastUpdate": "1459173651", "output_message": "Search complete", "output_packet_elapsed": "52.726",
"output_packet_end": "1459173650",
"output_packet_foundRecords": "0", "output_packet_message": "Search complete", "output_packet_packetPercent": "100",
"output_packet_processedBytes": "0",
"output_packet_start": "1459173598", "output_packet_status": "done", "output_searchEnd": "1459173651",
"output_searchStart": "1459173598", "output_session_message": "skipped", "output_session_packetPercent": "0", "output_session_status": "skipped", "output_status": "done", "output_streamCount": "4",
"output_xpf_elapsed": "51.337",
"output_xpf_end": "1459173650",
"output_xpf_extentSecond": "140024523784192",
"output_xpf_firstSecond": "140024523784192",
"output_xpf_foundRecords": "0",
"output_xpf_lastSecond": "140024523784192",
"output_xpf_limitPercent": "0", "output_xpf_message": "Search complete", "output_xpf_packetCount": "0",
"output_xpf_rangePercent": "0",
"output_xpf_searchedBytes": "0",
"output_xpf_start": "1459173598", "output_xpf_status": "done",
"store_name": "EBC_8c9ffe11ea3f4e9eb306568b98fef545", "target_depth": "packet"
}
cURL code sample: View EBC search history
The code sample was run with cURL 7.57.0.
curl -k –-user cpx:hammerhead https://xxx.xxx.xxx.xxx/api/4.0/events/searchhistory
This cURL sample includes the following options:
-k—This option explicitly allows cURL to perform insecure SSL connections and transfers, which allows you to test your SSL connection without installing a CA certificate.
--user cpx:hammerhead—Replace cpx with the user name for your Series appliance. Replace hammerhead with the password for your Series appliance.
https://xxx.xxx.xxx.xxx/api/4.0/events/searchhistory—The EBC request URL. Replace xxx.xxx.xxx.xxx with the IP address of your Series appliance.
Results
This example returns a list of the 200 most recent EBC searches and the status. The output is in JSON.
View search details for a stored EBC event request
To view search details for a specific EBC event, send the following request:
GET https://<PX_IP_address>/api/4.0/events/stored/<search_id>
Required header:
--user <username>:<password>
Options
PX_IP_address—IP address of the Series appliance running the Series API.
username—The user name for your Series appliance.
password—The password for your Series appliance.
search_id—The unique search identifier.
Example
GET https://xxx.xxx.xxx.xxx/api/4.0/events/stored/7b123
Required header:
--user cpx:hammerhead
View search details for a stored EBC event response
HTTP/1.1 [Response Code] [Response Message] Date: [Date]
Content-Type: [Content Type] input_abort: [Input Abort] input_aborted_by: [Input Aborted By] input_create_time: [Input Create Time] input_depth: [Input Depth]
input_etime_nanoseconds: [Input End Time in Nanoseconds] input_etime_second: [Input End Time in Seconds] input_hash_field: [Input Hash Field]
input_limit: [Input Limit] input_score: [Input Score] input_search_id: [Input Search ID] input_search_type: [Input Search Type]
input_stime_nanoseconds: [Input Start Time in Nanoseconds] input_stime_second: [Input Start Time in Seconds] input_time_format: [Input Time Format]
input_user: [Input User] output_depth: [Output Depth] output_elapsed: [Output Elapsed Time]
output_firstFlowEpoch: [Output First Flow Epoch] output_firstIndexEpoch: [Output First Index Epoch] output_firstPacketEpoch: [Output First Packet Epoch] output_index_elapsed: [Packet Index Elapsed Time] output_index_end: [Packet Index End Time] output_index_foundRecords: [Packet Index Found Records] output_index_message: [Packet Index Status Message] output_index_packetPercent: [Packet Index Percent Complete] output_index_rangePercent: [Packet Index Range Percent] output_index_searchedFiles: [Packet Index Searched Files] output_index_start: [Packet Index Start] output_index_status: [Packet Index Status] output_lastUpdate: [Last Update]
output_message: [Output Status Message] output_packet_elapsed: [Packet Retrieval Elapsed Time] output_packet_end: [Packet Retrieval End Time] output_packet_foundRecords: [Packet Retrieval Found Records] output_packet_message: [Packet Retrieval Status Message]
output_packet_packetPercent: [Packet Retrieval Percent Complete] output_packet_processedBytes: [Packet Retrieval Packet Size] output_packet_start: [Packet Retrieval Start] output_packet_status: [Packet Retrieval Status] output_searchEnd: [Search End]
output_searchStart: [Search Start] output_session_elapsed: [Session Analysis Elapsed Time] output_session_end: [Session Analysis End Time]
output_session_message: [Session Analysis Status Message] output_session_packetPercent: [Session Analysis Percent Complete] output_session_start: [Session Analysis Start] output_session_status: [Session Analysis Status]
output_status: [Output Status] output_streamCount: [Stream Count]
output_xpf_elapsed: [Connection Index Elapsed Time] output_xpf_end: [Connection Index End Time] output_xpf_extentSecond: [Connection Index Second] output_xpf_firstSecond: [Connection Index First Connection] output_xpf_foundRecords: [Connection Index Found Records] output_xpf_lastSecond: [Connection Index Last Connection] output_xpf_limitPercent: [Connection Index Percent Complete] output_xpf_message: [Connection Index Status Message] output_xpf_packetCount: [Connection Index Packet Count] output_xpf_rangePercent: [Connection Index Range Percent] output_xpf_searchedBytes: [Connection Index Searched Bytes] output_xpf_start: [Connection Index Start] output_xpf_status: [Connection Index Status]
target_depth: [Target Depth]
Response fields
Response Code—A standard HTML response code.
Response Message—A standard HTML response message.
Date—Standard HTML date format.
Content Type—The response format.
Input Abort—How many searches were canceled.
Input Aborted By—User who canceled the search.
Input Create Time—Time at which the search was submitted.
Input Depth—Search depth. A search can be at the connection, packet, or session depth.
Input End Time in Nanoseconds—The nanoseconds portion of the end time of the search time range.
Input End Time in Seconds—The seconds portion of the end time of the search time range.
Input Hash Field—Hash key for the status of this search.
Input Limit—Requested maximum number of connection records to find.
Input Score—Time when the search was created.
Input Search ID—Generated search identifier that uniquely identifies this search.
Input Search Type—Type of search requested: stream or all.
Input Start Time in Nanoseconds—The nanoseconds portion of the start time of the search time range.
Input Start Time in Seconds—The seconds portion of the start time of the search range.
Input Time Format—Time format for input. A value of 1 indicates that the pcap time stamp is in microseconds; a value of 0 indicates that the pcap time stamp is in nanoseconds.
Input User—User who made the search request.
Output Depth—Search depth. A search can be at the connection, packet, or session depth.
Output Elapsed Time—Total elapsed time for all phases.
Output First Flow Epoch—Time of the first flow recorded on the appliance.
Output First Index Epoch—Time of the oldest connection packet index recorded on the appliance.
Output First Packet Epoch—Time of the oldest packet stored on the appliance.
Packet Index Elapsed Time—Total elapsed time of this phase.
Packet Index End Time—End time of this phase in epoch time.
Packet Index Found Records—Number of records found.
Packet Index Status Message—Current status message for this phase.
Packet Index Percent Complete—Percentage complete, of all potential packets found.
Packet Index Range Percent—Percentage complete, based on captured packet times.
Packet Index Searched Files—Number of files touched.
Packet Index Start—Start time of this phase in epoch time.
Packet Index Status—Status of this phase. Valid values are skipped, done, working, idle, and error.
Last Update—Time when the search was last updated.
Output Status Message—Status of the search.
Packet Retrieval Elapsed Time—Total elapsed time of this phase.
Packet Retrieval End Time—End time of this phase in epoch time.
Packet Retrieval Found Records—Number of records found.
Packet Retrieval Status Message—Current status message for this phase.
Packet Retrieval Percent Complete—Percentage complete, of all potential packets found.
Packet Retrieval Packet Size—Size of the packets processed.
Packet Retrieval Start—Start time of this phase in epoch time.
Packet Retrieval Status—Valid values are skipped, done, working, idle, and error.
Search End—Last record searched.
Search Start—First record searched.
Session Analysis Elapsed Time—Total elapsed time of this phase.
Session Analysis End Time—End time of this phase in epoch time.
Session Analysis Status Message—Current status message for this phase.
Session Analysis Percent Complete—Percentage complete, of all potential packets found.
Session Analysis Start—Start time of this phase in epoch time.
Session Analysis Status—Status of this phase. Valid values are skipped, done, working, idle, and error.
Output Status—Status of the search. Valid values are skipped, done, working, idle, and error.
Stream Count—Number of nPulse streams.
Connection Index Elapsed Time—Total elapsed time of this phase.
Connection Index End Time—End time of this phase in epoch time.
Connection Index Second—The last second of the last flow that the search examined.
Connection Index First Connection—Epoch of the first connection found.
Connection Index Found Records—Number of records found.
Connection Index Last Connection—Current status message for this phase.
Connection Index Percent Complete—Percentage complete, based on input_limit.
Connection Index Status Message—Percentage complete, based on captured packet times.
Connection Index Packet Count—Number of packets to be found, based on connection records.
Connection Index Range Percent—Percentage complete, based on captured packet times.
Connection Index Searched Bytes—Size of searched packets.
Connection Index Start—Start time of this phase in epoch time.
Connection Index Status—Status of this phase. Valid values are skipped, done, working, idle, and error.
Target Depth—Search depth. A search can be at the connection, packet, or session depth.
Example
HTTP/1.1 200 OK
Date: Wed, 16 Mar 2016 18:27:09 GMT
Content-Type: text/html; charset=UTF-8
{
"input_abort": "1", "input_aborted_by": "cpx", "input_create_time": "1458147967", "input_depth": "session", "input_etime_nanoseconds": "0",
"input_etime_second": "1441076400",
"input_hash_field": "SEARCH_b948090d35c54ca19d3570c9194e7863", "input_limit": "100",
"input_score": "1458147967.97",
"input_search_id": "b948090d35c54ca19d3570c9194e7863", "input_search_type": "all",
"input_stime_nanoseconds": "0",
"input_stime_second": "1251770399",
"input_time_format": "0", "input_user": "cpx", "output_depth": "session", "output_elapsed": "45.737",
"output_firstFlowEpoch": "1455051483",
"output_firstIndexEpoch": "1455051483",
"output_firstPacketEpoch": "1455051609",
"output_index_elapsed": "0.001",
"output_index_end": "1458147967",
"output_index_foundRecords": "0", "output_index_message": "Search complete", "output_index_packetPercent": "100",
"output_index_rangePercent": "100",
"output_index_searchedFiles": "0",
"output_index_start": "1458147967", "output_index_status": "done", "output_lastUpdate": "1458148013", "output_message": "Search complete", "output_packet_elapsed": "0.489",
"output_packet_end": "1458147967",
"output_packet_foundRecords": "0", "output_packet_message": "Search complete", "output_packet_packetPercent": "100",
"output_packet_processedBytes": "0",
"output_packet_start": "1458147967", "output_packet_status": "done", "output_searchEnd": "1458148013",
"output_searchStart": "1458147967",
"output_session_elapsed": "46.000",
"output_session_end": "1458148013", "output_session_message": "Search complete", "output_session_packetPercent": "100",
"output_session_start": "1458147967", "output_session_status": "done", "output_status": "done", "output_streamCount": "1",
"output_xpf_elapsed": "0.001",
"output_xpf_end": "1458147967",
"output_xpf_extentSecond": "140389596004352",
"output_xpf_firstSecond": "0",
"output_xpf_foundRecords": "0",
"output_xpf_lastSecond": "140389596004352",
"output_xpf_limitPercent": "0", "output_xpf_message": "Search complete", "output_xpf_packetCount": "0",
"output_xpf_rangePercent": "0",
"output_xpf_searchedBytes": "0",
"output_xpf_start": "1458147967", "output_xpf_status": "done", "target_depth": "session"
}
cURL code sample: View search details for a stored EBC event
The code sample was run with cURL 7.57.0.
curl -k --user cpx:hammerhead https://xxx.xxx.xxx.xxx/api/4.0/events/stored/7b123
This cURL sample includes the following options:
-k—This option explicitly allows cURL to perform insecure SSL connections and transfers, which allows you to test your SSL connection without installing a CA certificate.
--user cpx:hammerhead—Replace cpx with the user name for your Series appliance. Replace hammerhead with the password for your Series appliance.
https://xxx.xxx.xxx.xxx/api/4.0/events/stored/7b123—The EBC request URL. Replace xxx.xxx.xxx.xxx with the IP address of your Series appliance. Replace 7b123 with the search ID of interest.
Results
This example returns the search details for the specified EBC event. The output is in JSON.
Retrieve search ID for EBC event UUID request
To retrieve the search ID that was created that contains the given event UUID, send the following request:
GET https://<PX_IP_address>/api/4.0/events/searchid/<event_UUID>
Required header:
--user <username>:<password>
Options
PX_IP_address—IP address of the Series appliance running the Series API.
username—The user name for your Series appliance.
password—The password for your Series appliance.
event_UUID—The event UUID.
Example
GET https://xxx.xxx.xxx.xxx/api/4.0/events/searchid/7b123
Required header:
--user cpx:hammerhead
Retrieve search ID for EBC event UUID response
 Note
Note
This mapping is only available after the search is complete, and the packets are stored.
eventUUID: [Event UUID] searchID: [Search ID] status: [Status] message: [Message]
Response fields
Event UUID—The event UUID.
Search ID—The unique identifier of the search.
Status—A standard HTTP response message.
Message—Error message.
Example
{
"params" : { "eventUUID" : "70687a74-48ab-4cf3-be58-983be3b85080" }, "searchID" : "22b6af77db4f4756a0b7177f72325d1f",
"status" : "ok",
"message" : <message if failed>,
}
cURL code sample: Retrieve search ID for EBC event
The code sample was run with cURL 7.57.0.
curl -k--user cpx:hammerhead https://xxx.xxx.xxx.xxx/api/4.0/events/searchid/7b123
This cURL sample includes the following options:
-k—This option explicitly allows cURL to perform insecure SSL connections and transfers, which allows you to test your SSL connection without installing a CA certificate.
--user cpx:hammerhead—Replace cpx with the user name for your Series appliance. Replace hammerhead with the password for your Series appliance.
https://xxx.xxx.xxx.xxx/api/4.0/events/searchid/7b123—The EBC request URL. Replace xxx.xxx.xxx.xxx with the IP address of your Series appliance. Replace 7b123 with the event UUID of interest.
Results
This example returns the search ID for a specified EBC event. The output is in JSON.
IA export
The following IA export endpoints are available:
GET https://<PX_IP_address>/api/4.0/config/export/ia
GET https://<PX_IP_address>/api/4.0/config/export/ia/outputs
GET https://<PX_IP_address>/api/4.0/config/export/ia/outputs/flow
GET https://<PX_IP_address>/api/4.0/config/export/ia/outputs/flow/filters
GET https://<PX_IP_address>/api/4.0/config/export/ia/outputs/flow/filters/<filter_name>
POST https://<PX_IP_address>/api/4.0/config/export/ia/outputs/flow/filters
PUT https://<PX_IP_address>/api/4.0/config/export/ia/outputs/flow/filters/<filter-name>
DELETE https://<PX_IP_address>/api/4.0/config/export/ia/outputs/flow/filters/<filter-name>
DELETE https://<PX_IP_address>/api/4.0/config/export/ia/outputs/flow/filters
GET https://<PX_IP_address>/api/4.0/config/export/ia/outputs/event
GET https://<PX_IP_address>/api/4.0/config/export/ia/outputs/event/filters
GET https://<PX_IP_address>/api/4.0/config/export/ia/outputs/event/filters/<filter_name>
POST https://<PX_IP_address>/api/4.0/config/export/ia/outputs/event/filters
PUT https://<PX_IP_address>/api/4.0/config/export/ia/outputs/event/filters/<filter_name>
DELETE https://<PX_IP_address>/api/4.0/config/export/ia/outputs/event/filters/<filter-name>
DELETE https://<PX_IP_address>/api/4.0/config/export/ia/outputs/event/filters
List IA export configuration request
To list the full configuration for IA export, send the following request:
GET https://<PX_IP_address>/api/4.0/config/export/ia
Required header:
--user <username>:<password>
Options
PX_IP_address—IP address of the Series appliance running the Series API.
username—Administrator username.
password—Administrator password.
Example
GET https://xxx.xxx.xxx.xxx/api/4.0/config/export/ia
Required header:
--user npadmin:hammerhead
List IA export configuration response
HTTP/1.1 [Response Code] [Response Message] Date: [Date]
Content-Type: [Content Type]
Response fields
Response Code—A standard HTML response code.
Response Message—A standard HTML response message.
Date—Standard HTML date format.
Content Type—The response format.
Description—A description of the IA export.
Example
HTTP/1.1 200 OK
Date: Tue, 07 Feb 2017 00:17:49 GMT
Content-Type: application/json; charset=utf-8
{
"flow": { "eventTypes": [
"X",
"x"
],
"filters": [
{
"eventTypes": [ "x"
],
"filter": "destinationTransportPort = 53"
}
]
},
"event": { "eventTypes": [
"A",
"B", "C"
],
"filters": [
{
"eventTypes": [ "C"
],
"filter": "sourceIPv4Address = 192.168.0.1"
}
]
},
"connectedIAs": [
{
"name": "ia33-249", "eventTypes": [
"filters": []
{
"A",
"B", "C"
],
},
"name": "ia-u19", "eventTypes": [
"E",
"a", "B"
],
"filters": []
},
{
"name": "ia-33-243", "eventTypes": [
"A",
"P", "D"
],
"filters": []
}
]
}
cURL code sample: List IA export configuration
The code sample was run with cURL 7.57.0.
curl -k --user npadmin:hammerhead https://xxx.xxx.xxx.xxx/api/4.0/config/export/ia -X GET
This cURL sample includes the following options:
--user npadmin:hammerhead—Replace npadmin with your user name. Replace hammerhead with your password.
-k—This option explicitly allows cURL to perform insecure SSL connections and transfers, which allows you to test your SSL connection without installing a CA certificate.
https://xxx.xxx.xxx.xxx/api/4.0/config/export/ia—The IA export configuration request URL. Replace
xxx.xxx.xxx.xxx with the IP address of your Series appliance.
-X GET—This option specifies using the GET method.
Results
This example lists the configuration for IA export. The output is in JSON.
List IA export event types—Request
To list all the event types that can be exported to the IA appliance, send the following request:
GET https://<PX_IP_address>/api/4.0/config/export/eventtypes
Required header:
--user <username>:<password>
Options
PX_IP_address—IP address of the Series appliance running the Series API.
username—Administrator username.
password—Administrator password.
Example
GET https://xxx.xxx.xxx.xxx/api/4.0/config/export/eventtypes
Required header:
--user npadmin:hammerhead
List IA export event types—response
HTTP/1.1 [Response Code] [Response Message] Date: [Date]
Content-Type: [Content Type]
Response fields
Response Code—A standard HTML response code.
Response Message—A standard HTML response message.
Date—Standard HTML date format.
Content Type—The response format.
Name—Event type.
Description—Description of an event type.
Example
HTTP/1.1 200 OK
Date: Tue, 07 Feb 2017 00:17:49 GMT
Content-Type: application/json; charset=utf-8 [
{
"name": "Alert",
"description": "Suricata generated alerts from rules"
},
{
"name": "DHCP",
"description": "Dynamic Host Configuration Protocol"
},
{
"name": "DNS",
"description": "Domain Name System"
},
{
"name": "DNP3",
"description": "Distributed Network Protocol 3"
},
{
"name": "File",
"description": "File information"
},
{
"name": "FileInfo",
"description": "Embedded File metadata"
},
{
"name": "FTP",
"description": "File Transfer Protocol"
},
{
"name": "FTP_DATA",
"description": "File Transfer Protocol Data"
},
{
"name": "HTTP",
"description": "Hypertext Transfer Protocol"
},
{
"name": "IKEv2",
"description": "Internet Key Exchange v2"
},
{
"name": "IMAP",
"description": "Interet Message Access Protocol"
},
{
"name": "IRC",
"description": "Internet Relay Chat"
},
{
"name": "KRB5",
"description": "Kerberos V5"
},
{
"name": "NFS",
"description": "Network File System"
},
{
"name": "POP3",
"description": "Post Office Protocol version 3"
},
{
"name": "pxflow",
"description": "PX generated flow records"
},
{
"name": "pxflowdnsaggr",
"description": "DNS PX generated flow records, aggregated by source IP"
},
{
"name": "RADIUS",
"description": "Remote Authentication Dial-In User Service"
},
{
"name": "RDP",
"description": "Remote Desktop Protocol"
},
{
"name": "RTSP",
"description": "Real Time Sharing Protocol"
},
{
"name": "SIP",
"description": "Session Initiation Protocol"
},
{
"name": "SMB",
"description": "Server Message Block"
},
{
"name": "SMTP",
"description": "Simple Mail Transfer Protocol"
},
{
"name": "SNMP",
"description": "Simple Network Management Protocol"
},
{
"name": "SSH",
"description": "Secure Shell"
},
{
"name": "TACPLUS",
"description": "Cisco Terminal Access Controller Access-Control System Plus"
},
{
"name": "TFTP",
"description": "Trivial File Transfer Protocol"
},
{
"name": "TLS",
"description": "Transport Layer Security"
}
]
cURL code sample: List IA export event types
The code sample was run with cURL 7.57.0.
curl -k --user npadmin:hammerhead https://xxx.xxx.xxx.xxx/api/4.0/config/export/eventtypes -X GET
This cURL sample includes the following options:
--user npadmin:hammerhead—Replace npadmin with the user name for your Series appliance. Replace hammerhead with the password for your Series appliance.
https://xxx.xxx.xxx.xxx/api/4.0/config/export/eventtypes—The IA export event types request URL. Replace
xxx.xxx.xxx.xxx with the IP address of your Series appliance.
-k—This option explicitly allows cURL to perform insecure SSL connections and transfers, which allows you to test your SSL connection without installing a CA certificate.
-X GET—This option specifies using the GET method.
Results
This example lists all the event types for IA export. The output is in JSON.
Create IA export output—Request
To create an export directory on your appliance for exporting events to a particular appliance and to configure metadata of supported protocols to be written to the export directory along with filters, send the following request:
POST https://<PX_IP_address>/api/4.0/config/export/ia/outputs
Required header:
--user <username>:<password>
Options
PX_IP_address—IP address of the appliance running the API.
username—Administrator username.
password—Administrator password.
Required body:
{
"name": "iahostname1",
"eventTypes": ["HTTP", "DNS", "SMTP"],
"filters": [
{
"name": "port 80", "eventTypes": [ "HTTP"
],
"filter": "destinationTransportPort = 80 OR sourceTransportPort = 80"
}
]
}
Parameters
name—Hostname of an IA appliance that you wish to pair with your appliance and export metadata.
eventTypes (optional)—The event types that you wish to export to the specified IA appliance.
filters (optional)—The filters applied to the exported metadata.
Example
POST https://xxx.xxx.xxx.xxx/api/4.0/config/export/ia/outputs
Required header:
--user npadmin:hammerhead
Create IA export output response
HTTP/1.1 [Response Code] [Response Message] Date: [Date]
Content-Type: [Content Type]
Response fields
Response Code—A standard HTML response code.
Response Message—A standard HTML response message.
Date—Standard HTML date format.
Content Type—The response format.
Description—A description of the IA export.
Example
HTTP/1.1 200 OK
Date: Tue, 07 Feb 2017 00:17:49 GMT
Content-Type: application/json; charset=utf-8
{
"eventTypes": ["HTTP", "DNS", "SMTP"],
"filters": [
{
"name": "port 80", "eventTypes": [ "HTTP"
],
"filter": "destinationTransportPort = 80 OR sourceTransportPort = 80"
}
]
}
cURL code sample: Create IA export output
The code sample was run with cURL 7.57.0.
curl --user npadmin:hammerhead https://xxx.xxx.xxx.xxx/api/4.0/config/export/ia/outputs -k -X POST -d '{"name": "hostname1","eventTypes": ["HTTP"], "filter": "destinationTransportPort = 80 OR sourceTransportPort = 80"}'
This cURL sample includes the following options:
--user npadmin:hammerhead—Replace npadmin with your user name. Replace hammerhead with your password.
https://xxx.xxx.xxx.xxx/api/4.0/config/export/ia/outputs—Request URL. Replace xxx.xxx.xxx.xxx with the IP address of your Series appliance.
-k—This option explicitly allows cURL to perform insecure SSL connections and transfers, which allows you to test your SSL connection without installing a CA certificate.
-X POST —This option specifies using the POST method.
-d '{"name": "hostname1","eventTypes": ["HTTP"], "filter": "destinationTransportPort = 80 OR sourceTransportPort = 80"}'—Replace hostname1 with the hostname of an IA appliance that you wish to pair with your appliance and export the metadata to the specified IA appliance. Replace HTTP with the event types that you wish to export. Replace destinationTransportPort = 80 OR sourceTransportPort = 80 with the filter that you wish to apply to the metadata export.
Results
This example pairs an appliance with your appliance and exports metadata for the specified event types (with filters) to the export directory hostname1.
To create an export directory on your appliance for exporting events to a particular appliance and to configure metadata of
supported protocols to be written to the export directory along with filters, send the following request:
Update IA export output—Request
To update the event types or filters for an IA export, send the following request:
Put https://<PX_IP_address>/api/4.0/config/export/ia/outputs/<output_name>
Required header:
--user <username>:<password>
Options
PX_IP_address—IP address of the Series appliance running the Series API.
username—Administrator username.
password—Administrator password.
Required body:
{
"eventTypes": ["HTTP"] "filters": [
{
"name": "port 80", "eventTypes": [
"HTTP"],
"filter": "destinationTransportPort = 80 OR sourceTransportPort = 80"
}
]
}
Parameters
output_name—IA-export directory of an IA export that you wish to update.
eventTypes (optional)—The event types that you wish to export to the specified IA appliance.
filters (optional)—The filters applied to the exported metadata.
Example
Put https://<PX_IP_address>/api/4.0/config/export/ia/outputs/<OUTPUT_NAME>
Required header:
--user npadmin:hammerhead
Update IA export—Response
HTTP/1.1 [Response Code] [Response Message] Date: [Date]
Content-Type: [Content Type]
Response fields
Response Code—A standard HTML response code.
Response Message—A standard HTML response message.
Date—Standard HTML date format.
Content Type—The response format.
Description—A description of the IA export.
Example
HTTP/1.1 200 OK
Date: Tue, 07 Feb 2017 00:17:49 GMT
Content-Type: application/json; charset=utf-8
{
"eventTypes": ["HTTP"], "filters": [
{
"name": "port 80", "eventTypes": [ "HTTP"
],
"filter": "destinationTransportPort = 80 OR sourceTransportPort = 80"
}
]
}
cURL code sample: Update IA export output
The code sample was run with cURL 7.57.0.
curl --user npadmin:hammerhead https://xxx.xxx.xxx.xxx/api/4.0/config/export/ia/outputs/iahostname1 -k -X PUT -d '{"eventTypes": ["HTTP"]}'
This cURL sample includes the following options:
--user npadmin:hammerhead—Replace npadmin with your user name. Replace hammerhead with your password.
https://xxx.xxx.xxx.xxx/api/4.0/config/export/ia/outputs/iahostname1—Request URL. Replace xxx.xxx.xxx.xxx with the IP address of your Series appliance. Replace iahostname1 with the IA directory name of an IA export that you wish to update.
-k—This option explicitly allows cURL to perform insecure SSL connections and transfers, which allows you to test your SSL connection without installing a CA certificate.
-X PUT—This option specifies using the PUT method.
-d '{"eventTypes": ["HTTP"]}'—Replace HTTP with the event types that you wish to export.
Results
This example updates the event types or filters for the specified IA export.
List IA export directories request
To list all the IA export directories of your appliance, send the following request:
GET https://<PX_IP_address>/api/4.0/config/export/ia/outputs
Required header:
--user <username>:<password>
Options
PX_IP_address—IP address of the appliance running the API.
username—Administrator username.
password—Administrator password.
Example
GET https://xxx.xxx.xxx.xxx/api/4.0/config/export/ia/outputs
Required header:
--user npadmin:hammerhead
List IA export directories response
HTTP/1.1 [Response Code] [Response Message] Date: [Date]
Content-Type: [Content Type]
Response fields
Response Code—A standard HTML response code.
Response Message—A standard HTML response message.
Date—Standard HTML date format.
Content Type—The response format.
Description—A description of the IA export.
Example
HTTP/1.1 200 OK
Date: Tue, 07 Feb 2017 00:17:49 GMT
Content-Type: application/json; charset=utf-8
[
"flow",
"event", "iahostname1", "iahostname2"
]
cURL code sample: List IA export directories
The code sample was run with cURL 7.57.0.
curl --user npadmin:hammerhead https://xxx.xxx.xxx.xxx/api/4.0/config/export/ia/outputs -k -X GET
This cURL sample includes the following options:
--user npadmin:hammerhead—Replace npadmin with your user name. Replace hammerhead with your password.
https://xxx.xxx.xxx.xxx/api/4.0/config/export/ia/outputs—Request URL. Replace xxx.xxx.xxx.xxx with the IP address of your appliance.
-k—This option explicitly allows cURL to perform insecure SSL connections and transfers, which allows you to test your SSL connection without installing a CA certificate.
-X GET—This option specifies using the GET method.
Results
This example lists the IA directories for metadata export. The output is in JSON.
List IA flow directory configuration request
To list the flow directory configuration for IA, send the following request: GET https://<PX_IP_address>/api/4.0/config/export/ia/outputs/flow Required header:
--user <username>:<password>
Options
PX_IP_address—IP address of the appliance running the Series API.
username—The user name for your appliance.
password—The password for your appliance.
Example
GET https://xxx.xxx.xxx.xxx/api/4.0/config/export/ia/outputs/flow
Required header:
--user npadmin:hammerhead
List IA flow directory configuration response
HTTP/1.1 [Response Code] [Response Message] Date: [Date]
Content-Type: [Content Type]
Response fields
Response Code—A standard HTML response code.
Response Message—A standard HTML response message.
Date—Standard HTML date format.
Content-ype—The response format.
eventTypes—Only "X" and "x" are valid event types. These are the only event types that correspond to flow-related data.
filters—Filter query.
Example
The top level eventTypes represents all of the metadata event types that will be written to this directory assuming no filters. Filters allow the user to "trim" the metadata that is written. They are associated with a set of event types. If the event type of the metadata record does not match, the filter will not be applied and the record will be written. A filter may have multiple event types (shown below). An event type may have multiple filters (also shown below). For example, the configuration below will filter all flow records that have a destination port of 53. It will also filter out all flow records and aggregated DNS flow records that have a source IPv4 address of 192.168.10.155.
HTTP/1.1 200 OK
Date: Tue, 06 Feb 2018 00:17:39 GMT
Content-Type: application/json; charset=utf-8
{
"eventTypes" : [ "X",
"x"
],
"filters": [
{
"name": "dns-traffic" "eventTypes" : [
"x"
],
"filter": "destinationTransportPort = 53"
},
{
"name" : "bobs-annoying-app" "eventTypes": [
"x", "X"
],
"filters": "sourceIPv4Address = 192.168.10.155"
}
]
}
cURL code sample: List IA flow directory configuration
The code sample was run with cURL 7.57.0.
curl --user npadmin:hammerhead https://xxx.xxx.xxx.xxx/api/4.0/config/export/ia/outputs/flow -k -X GET
This cURL sample includes the following options:
--user npadmin:hammerhead—Replace npadmin with the user name for your Series appliance. Replace hammerhead with the password for your appliance.
https://xxx.xxx.xxx.xxx/api/4.0/config/export/ia/outputs/flow—The component configuration request URL. Replace xxx.xxx.xxx.xxx with the IP address of your appliance.
-k—This option explicitly allows cURL to perform insecure SSL connections and transfers, which allows you to test your SSL connection without installing a CA certificate.
-X GET—This option specifies using the GET method.
Results
This example lists the flow directory configuration for IA export. The output is in JSON.
List all flow filters request
To list all flow filters for IA, send the following request:
GET https://<PX_IP_address>/api/4.0/config/export/ia/outputs/flow/filters
Required header:
--user <username>:<password>
Options
PX_IP_address—IP address of the Series appliance running the Series API.
username—The user name for your Series appliance.
password—The password for your Series appliance.
Example
GET https://xxx.xxx.xxx.xxx/api/4.0/config/export/ia/outputs/flow/filters
Required header:
--user npadmin:hammerhead
Lsit all flow filters response
The response is a list of filter names.
HTTP/1.1 [Response Code] [Response Message] Date: [Date]
Content-Type: [Content Type]
[
"filter1", "filter2"
]
Response fields
Response Code—A standard HTML response code.
Response Message—A standard HTML response message.
Date—Standard HTML date format.
Content-ype—The response format.
Example
HTTP/1.1 200 OK
Date: Tue, 06 Feb 2018 05:12:09 GMT
Content-Type: application/json; charset=utf-8 [
"dis-traffic", "bobs-annoying-app"
]
cURL code sample: List all flow filters
The code sample was run with cURL 7.57.0.
curl --user npadmin:hammerhead https://xxx.xxx.xxx.xxx/api/4.0/config/export/ia/outputs/flow/filters -k -X GET
This cURL sample includes the following options:
--user npadmin:hammerhead—Replace npadmin with the user name for your Series appliance. Replace hammerhead with the password for your Series appliance.
https://xxx.xxx.xxx.xxx/api/4.0/config/export/ia/outputs/flow/filters—The filter request URL. Replace
xxx.xxx.xxx.xxx with the IP address of your Series appliance.
-k—This option explicitly allows cURL to perform insecure SSL connections and transfers, which allows you to test your SSL connection without installing a CA certificate.
-X GET—This option specifies using the GET method.
Results
This example lists all flow filters. The output is in JSON.
List a flow filter by name request
To create a new flow filter for IA, send the following request:
GET https://<PX_IP_address>/api/4.0/config/export/ia/outputs/flow/filters/<filter_name>
Required header:
--user <username>:<password>
Options
PX_IP_address—IP address of the Series appliance running the Series API.
username—The user name for your Series appliance.
password—The password for your Series appliance.
filter_name—(string) The name of the filter to return.
Example
GET https://xxx.xxx.xx.xxx/api/4.0/config/export/ia/outputs/flow/filters/myfilter
Required header:
--user npadmin:hammerhead
List a flow filter by name response
The response is a list of filter names.
HTTP/1.1 [Response Code] [Response Message] Date: [Date]
Content-Type: [Content Type]
{
"name" : "string" "eventTypes": [
"x", "X"
],
"filters": "string"
}
Response fields
Response Code—A standard HTML response code.
Response Message—A standard HTML response message.
Date—Standard HTML date format.
Content-ype—The response format.
Example
HTTP/1.1 200 OK
Date: Tue, 06 Feb 2018 05:12:09 GMT
Content-Type: application/json; charset=utf-8
{
"name" : "bobs-annoying-app" "eventTypes": [
"x", "X"
],
"filters": "sourceIPv4Address = 192.168.10.155"
}
cURL code sample: List a flow filter by name
The code sample was run with cURL 7.57.0.
curl --user npadmin:hammerhead https://xxx.xxx.xxx.xxx/api/4.0/config/export/ia/outputs/flow/filters/myfilter -k
-X GET
This cURL sample includes the following options:
--user npadmin:hammerhead—Replace npadmin with the user name for your PX Series appliance. Replace hammerhead with the password for your Series appliance.
https://xxx.xxx.xxx.xxx/api/4.0/config/export/ia/outputs/flow/filters/myfilter—The filter request URL. Replace
xxx.xxx.xxx.xxx with the IP address of your Series appliance, and myfilter with the name of the filter to list.
-k—This option explicitly allows cURL to perform insecure SSL connections and transfers, which allows you to test your SSL connection without installing a CA certificate.
-X GET—This option specifies using the GET method.
Results
This example lists the flow filter named myfilter. The output is in JSON.
Add a flow filter request
To create a new flow filter for IA, send the following request:
POST https://<PX_IP_address>/api/4.0/config/export/ia/outputs/flow/filters
 Note
Note
To use this request, you must belong to the sudo group.
Required header:
--user <username>:<password>
Options
PX_IP_address—IP address of the Series appliance running the Series API.
username—The user name for your Series appliance.
password—The password for your Series appliance.
Request body:
{
"name": "string", "eventTypes": [
"x"
],
"filter": "string"
}
Example
POST https://xxx.xxx.xxx.xxx/api/4.0/config/export/ia/outputs/flow/filters
Required header:
--user npadmin:hammerhead
Request body:
{
"name": "mynewfilter", "eventTypes": [
"x"
],
"filter": "sourceIPv4Address = 10.10.10.1 AND destinationTransportPort = 80"
}
Add a flow filter response
The response is a JSON object detailing the filter. In a successful request the object you sent will be returned back to you.
HTTP/1.1 [Response Code] [Response Message] Date: [Date]
Content-Type: [Content Type]
{
"name": "string", "eventTypes": [
"x"
],
"filter": "string"
}
Response fields
Response Code—A standard HTML response code.
Response Message—A standard HTML response message.
Date—Standard HTML date format.
Content-ype—The response format.
eventTypes—Only "X" and "x" are valid event types. These are the only event types that correspond to flow-related data.
filter—String detailing the filter.
Example
Filters allow the user to "trim" the metadata that is written. They are associated with a set of event types. If the event type of the metadata record does not match, the filter will not be applied and the record will be written. A filter may have multiple event types, and an event type may have multiple filters. For example, the configuration below will filter all flow records that have a destination port of 80. It will also filter out all flow records and aggregated DNS flow records that have a source IPv4 address of 10.10.10.1.
HTTP/1.1 200 OK
Date: Tue, 06 Feb 2018 05:12:09 GMT
Content-Type: application/json; charset=utf-8
{
"name": "mynewfilter", "eventTypes": [
"x"
],
"filter": "sourceIPv4Address = 10.10.10.1 AND destinationTransportPort = 80"
}
cURL code sample: Add a flow filter
The code sample was run with cURL 7.57.0.
curl --user npadmin:hammerhead https://xxx.xxx.xxx.xxx/api/4.0/config/export/ia/outputs/flow/filters -k -X POST
-d ' { "name": "mynewfilter", "eventTypes": [ "x" ], "filter": "sourceIPv4Address = 10.10.10.1 AND destinationTransportPort = 80" }'
This cURL sample includes the following options:
--user npadmin:hammerhead—Replace npadmin with the user name for your Series appliance. Replace hammerhead with the password for your Series appliance.
https://xxx.xxx.xxx.xxx/api/4.0/config/export/ia/outputs/flow/filters—The filter request URL. Replace
xxx.xxx.xxx.xxx with the IP address of your Series appliance.
-k—This option explicitly allows cURL to perform insecure SSL connections and transfers, which allows you to test your SSL connection without installing a CA certificate.
-X POST—This option specifies using the POST method.
-d '{ "name": "mynewfilter", "eventTypes": [ "x" ], "filter": "sourceIPv4Address = 10.10.10.1 AND destinationTransportPort = 80" }'—Specifies the name, event type, and filter parameters of the new flow filter.
Results
This example creates a flow filter. The output is in JSON.
Update a flow filter request
To update an existing flow filter for IA, send the following request:
PUT https://<PX_IP_address>/api/4.0/config/export/ia/outputs/flow/filters/<filter-name>
 Note
Note
To use this request, you must belong to the sudo group.
Required header:
--user <username>:<password>
Options
PX_IP_address—IP address of the Series appliance running the Series API.
username—The user name for your Series appliance.
password—The password for your Series appliance.
filter-name—The name of the filter to update.
Request body:
{
"name": "string",
"eventTypes": [ "x"
],
"filter": "string"
}
Example
PUT https://xxx.xxx.xxx.xxx/api/4.0/config/export/ia/outputs/flow/filters/my-old-filter
Required header:
--user npadmin:hammerhead
Request body:
{
"name": "mynewfilter", "eventTypes": [
"x"
],
"filter": "sourceIPv4Address = 10.10.10.1 AND destinationTransportPort = 80"
}
Update a flow filter response
The response is a JSON object detailing the filter. In a successful request the object you sent will be returned back to you.
HTTP/1.1 [Response Code] [Response Message] Date: [Date]
Content-Type: [Content Type]
{
"name": "string", "eventTypes": [
"x"
],
"filter": "string"
}
Response fields
Response Code—A standard HTML response code.
Response Message—A standard HTML response message.
Date—Standard HTML date format.
Content-type—The response format.
eventTypes—Only "X" and "x" are valid event types. These are the only event types that correspond to flow-related data.
filter—String detailing the filter.
Example
HTTP/1.1 200 OK
Date: Tue, 06 Feb 2018 05:12:09 GMT
Content-Type: application/json; charset=utf-8
{
"eventTypes": [ "X"
]
"filter": "flow.sortedHashValue = 2048"
}
cURL code sample: Update a flow filter
The code sample was run with cURL 7.57.0.
curl --user npadmin:hammerhead https://xxx.xxx.xxx.xxx/api/4.0/config/export/ia/outputs/flow/filters -k -X PUT
-d '{ "eventTypes": [ "X" ] "filter": "flow.sortedHashValue = 2048" }'
This cURL sample includes the following options:
--user npadmin:hammerhead—Replace npadmin with the user name for your PX Series appliance. Replace hammerhead with the password for your Series appliance.
https://xxx.xxx.xxx.xxx/api/4.0/config/export/ia/outputs/flow/filters—The filter request URL. Replace
xxx.xxx.xxx.xxx with the IP address of your Series appliance.
-k—This option explicitly allows cURL to perform insecure SSL connections and transfers, which allows you to test your SSL connection without installing a CA certificate.
-X PUT—This option specifies using the PUT method.
-d '{ "eventTypes": [ "X" ] "filter": "flow.sortedHashValue = 2048" }'
Results
This example updates a flow filter. The output is in JSON.
Delete a flow filter request
To delete a flow filter for IA, send the following request:
DELETE https://<PX_IP_address>/api/4.0/config/export/ia/outputs/flow/filters/<filter-name>
 Note
Note
To use this request, you must belong to the sudo group.
Required header:
--user <username>:<password>
Options
PX_IP_address—IP address of the Series appliance running the Series API.
username—The user name for your Series appliance.
password—The password for your Series appliance.
filter-name—The name of the filter to delete.
Example
DELETE https://xxx.xxx.xxx.xxx/api/4.0/config/export/ia/outputs/flow/filters/my-filter
Required header:
--user npadmin:hammerhead
Delete a flow filter response
The response is a JSON object detailing the filter. In a successful request the object you sent will be returned back to you.
HTTP/1.1 [Response Code] [Response Message] Date: [Date]
Content-Type: [Content Type]
Response fields
Response Code—A standard HTML response code indicating success or failure
Response Message—A standard HTML response message.
Date—Standard HTML date format.
Content-type—The response format.
Example
HTTP/1.1 200 OK
Date: Tue, 06 Feb 2018 05:12:09 GMT
Content-Type: application/json; charset=utf-8
cURL code sample: Delete a flow filter
The code sample was run with cURL 7.57.0.
curl --user npadmin:hammerhead https://xxx.xxx.xxx.xxx/api/4.0/config/export/ia/outputs/flow/filters/my-filter
-k -X DELETE
This cURL sample includes the following options:
--user npadmin:hammerhead—Replace npadmin with the user name for your Series appliance. Replace hammerhead with the password for your Series appliance.
https://xxx.xxx.xxx.xxx/api/4.0/config/export/ia/outputs/flow/filters/my-filter—The filter request URL. Replace
xxx.xxx.xxx.xxx with the IP address of your Series appliance.
-k—This option explicitly allows cURL to perform insecure SSL connections and transfers, which allows you to test your SSL connection without installing a CA certificate.
-X DELETE—This option specifies using the DELETE method.
Results
This example deletes the specified flow filter.
Delete all flow filters request
To delete a flow filter for IA, send the following request:
DELETE https://<PX_IP_address>/api/4.0/config/export/ia/outputs/flow/filters
 Note
Note
To use this request, you must belong to the sudo group.
Required header:
--user <username>:<password>
Options
PX_IP_address—IP address of the Series appliance running the Series API.
username—The user name for your Series appliance.
password—The password for your Series appliance.
Example
DELETE https://xxx.xxx.xxx.xxx/api/4.0/config/export/ia/outputs/flow/filters
Required header:
--user npadmin:hammerhead
Delete all flow filters response
The response is a JSON object detailing the filter. In a successful request the object you sent will be returned back to you.
HTTP/1.1 [Response Code] [Response Message] Date: [Date]
Content-Type: [Content Type]
Response fields
Response Code—A standard HTML response code indicating success or failure
Response Message—A standard HTML response message.
Date—Standard HTML date format.
Content-type—The response format.
Example
HTTP/1.1 200 OK
Date: Tue, 06 Feb 2018 05:12:09 GMT
Content-Type: application/json; charset=utf-8
cURL code sample: Delete all flow filters
The code sample was run with cURL 7.57.0.
curl --user npadmin:hammerhead https://xxx.xxx.xxx.xxx/api/4.0/config/export/ia/outputs/flow/filters -k -X DELETE
This cURL sample includes the following options:
--user npadmin:hammerhead—Replace npadmin with the user name for your Series appliance. Replace hammerhead with the password for your Series appliance.
https://xxx.xxx.xxx.xxx/api/4.0/config/export/ia/outputs/flow/filters—The filter request URL. Replace
xxx.xxx.xxx.xxx with the IP address of your Series appliance.
-k—This option explicitly allows cURL to perform insecure SSL connections and transfers, which allows you to test your SSL connection without installing a CA certificate.
-X DELETE—This option specifies using the DELETE method.
Results
This example deletes all flow filters.
List IA event directory configuration request
To list the current event directory configuration for IA export, send the following request:
GET https://<PX_IP_address>/api/4.0/config/export/ia/outputs/event
Required header:
--user <username>:<password>
Options
PX_IP_address—IP address of the Series appliance running the Series API.
username—The user name for your Series appliance.
password—The password for your Series appliance.
Example
GET https://xxx.xxx.xxx.xxx/api/4.0/config/export/ia/outputs/event
Required header:
--user npadmin:hammerhead
List IA event directory configuration response
The top level eventTypes represents all of the metadata event types that will be written to this directory assuming no filters. Filters allow the user to "trim" the metadata that is written. They are associated with a set of event types. If the event type of the metadata record does not match, the filter will not be applied and the record will be written. As with flow, a filter may have multiple event types that it should be applied to, and an event type may have multiple filters.
HTTP/1.1 [Response Code] [Response Message] Date: [Date]
Content-Type: [Content Type]
{
"eventTypes" : [ "B",
"2", "A"
],
"filters": [
{
"name": "string", "eventTypes" : [
"A"
],
"filter": "string"
}
]
}
Response fields
Response Code—A standard HTML response code.
Response Message—A standard HTML response message.
Date—Standard HTML date format.
Content Type—The response format.
eventTypes—The event types the filter applies to.
filters—The filters to apply.
Example
The example below shows how to access nested JSON keys using "." notation.
HTTP/1.1 200 OK
Date: Tue, 06 Feb 2018 00:13:11 GMT
Content-Type: application/json; charset=utf-8
{
"eventTypes" : [ "B",
"2", "A"
],
"filters": [
{
"name": "test-alert", "eventTypes" : [
"A"
],
"filter": "alert.message = \"Hello, world\""
}
]
}
The filter will apply if a JSON object looks as follows: Match:
{
"alert": {
"message": "Hello, world"
}
}
No match:
{
"message": "Hello, world"
}
cURL code sample: List IA event directory configuration
The code sample was run with cURL 7.57.0.
curl --user npadmin:hammerhead https://xxx.xxx.xxx.xxx/api/4.0/config/export/ia/outputs/event -k -X GET'
This cURL sample includes the following options:
--user npadmin:hammerhead—Replace npadmin with the user name for your Series appliance. Replace hammerhead with the password for your Series appliance.
https://xxx.xxx.xxx.xxx/api/4.0/config/export/ia/outputs/event—The component configuration request URL. Replace xxx.xxx.xxx.xxx with the IP address of your Series appliance.
-k—This option explicitly allows cURL to perform insecure SSL connections and transfers, which allows you to test your SSL connection without installing a CA certificate.
-X GET—This option specifies using the GET method.
Results
This example lists the event directory configuration. The output is in JSON.
List all event filters request
To list all event filters for IA, send the following request:
GET https://<PX_IP_address>/api/4.0/config/export/ia/outputs/event/filters
Required header:
--user <username>:<password>
Options
PX_IP_address—IP address of the Series appliance running the Series API.
username—The user name for your Series appliance.
password—The password for your Series appliance.
Example
GET https://xxx.xxx.xxx.xxx/api/4.0/config/export/ia/outputs/event/filters
Required header:
--user npadmin:hammerhead
List all event filters response
The response is a list of filter names.
HTTP/1.1 [Response Code] [Response Message] Date: [Date]
Content-Type: [Content Type]
[
"string"
]
Response fields
Response Code—A standard HTML response code.
Response Message—A standard HTML response message.
Date—Standard HTML date format.
Content-type—The response format.
Example
HTTP/1.1 200 OK
Date: Tue, 06 Feb 2018 05:12:09 GMT
Content-Type: application/json; charset=utf-8
[
"test-alert"
]
cURL code sample: List all event filters
The code sample was run with cURL 7.57.0.
curl --user npadmin:hammerhead https://xxx.xxx.xxx.xxx/api/4.0/config/export/ia/outputs/event/filters -k -X GET
This cURL sample includes the following options:
--user npadmin:hammerhead—Replace npadmin with the user name for your Series appliance. Replace hammerhead with the password for your Series appliance.
https://xxx.xxx.xxx.xxx/api/4.0/config/export/ia/outputs/event/filters—The filter request URL. Replace
xxx.xxx.xxx.xxx with the IP address of your Series appliance.
-k—This option explicitly allows cURL to perform insecure SSL connections and transfers, which allows you to test your SSL connection without installing a CA certificate.
-X GET—This option specifies using the GET method.
Results
This example lists all event filters. The output is in JSON.
List an event filter by name request
To list a specific event filter for IA, send the following request:
GET https://<PX_IP_address>/api/4.0/config/export/ia/outputs/event/filters/<filter_name>
Required header:
--user <username>:<password>
Options
PX_IP_address—IP address of the Series appliance running the Series API.
username—The user name for your Series appliance.
password—The password for your Series appliance.
filter_name—The name of the event filter.
Example
GET https://xxx.xxx.xxx.xxx/api/4.0/config/export/ia/outputs/event/filters/test-alert
Required header:
--user npadmin:hammerhead
List an event filter by name response
HTTP/1.1 [Response Code] [Response Message] Date: [Date]
Content-Type: [Content Type]
{
"name" : "<string>" "eventTypes": [
"A"
],
"filters": "<string>"
}
Response fields
Response Code—A standard HTML response code.
Response Message—A standard HTML response message.
Date—Standard HTML date format.
Content-ype—The response format.
Example
HTTP/1.1 200 OK
Date: Tue, 06 Feb 2018 05:12:13 GMT
Content-Type: application/json; charset=utf-8
{
"name" : "test-alert" "eventTypes": [
"A"
],
"filters": "alert.message = \"Hello, world\""
}
cURL code sample: List an event filter by name
The code sample was run with cURL 7.57.0.
curl --user npadmin:hammerhead https://xxx.xxx.xxx.xxx/api/4.0/config/export/ia/outputs/event/filters/test-alert
-k -X GET
This cURL sample includes the following options:
--user npadmin:hammerhead—Replace npadmin with the user name for your Series appliance. Replace hammerhead with the password for your Series appliance.
https://xxx.xxx.xxx.xxx/api/4.0/config/export/ia/outputs/event/filters/test-alert—The filter request URL. Replace xxx.xxx.xxx.xxx with the IP address of your Series appliance, and test-alert with the name of your filter.
-k—This option explicitly allows cURL to perform insecure SSL connections and transfers, which allows you to test your SSL connection without installing a CA certificate.
-X GET—This option specifies using the GET method.
Results
This example lists the event filter named test-alert. The output is in JSON.
Add an event filter request
To create a new event filter for IA, send the following request:
POST https://<PX_IP_address>/api/4.0/config/export/ia/outputs/event/filters
 Note
Note
To use this request, you must belong to the sudo group.
Required header:
--user <username>:<password>
Options
PX_IP_address—IP address of the Series appliance running the Series API.
username—The user name for your Series appliance.
password—The password for your Series appliance.
Request body:
{
"name": "string", "eventTypes": [
"x"
],
"filter": "string"
}
Example
POST https://xxx.xxx.xxx.xxx/api/4.0/config/export/ia/outputs/event/filters
Required header:
--user npadmin:hammerhead
Request body:
{
"name": "<string>", "eventTypes": [
"<string>"
],
"filter": "<string>"
}
Add an event filter response
The response is a JSON object detailing the filter. In a successful request the object you sent will be returned back to you.
HTTP/1.1 [Response Code] [Response Message] Date: [Date]
Content-Type: [Content Type]
{
"name": "mynewfilter", "eventTypes": [
"B",
"A",
"2"
],
"filter": "sourceIPv4Address = 10.10.10.1 AND destinationTransportPort = 80"
}
Response fields
Response Code—A standard HTML response code.
Response Message—A standard HTML response message.
Date—Standard HTML date format.
Content-type—The response format.
eventTypes—The event types that correspond to event-related data.
filter—String detailing the filter.
Example
HTTP/1.1 200 OK
Date: Tue, 06 Feb 2018 05:12:09 GMT
Content-Type: application/json; charset=utf-8
{
"name": "mynewfilter", "eventTypes": [
"B",
"A", "2"
],
"filter": "sourceIPv4Address = 10.10.10.1 AND destinationTransportPort = 80"
}
cURL code sample: Add an event filter
The code sample was run with cURL 7.57.0.
curl --user npadmin:hammerhead https://xxx.xxx.xxx.xxx/api/4.0/config/export/ia/outputs/event/filters -k -X POST
-d '{"name": "mynewfilter","eventTypes": ["B","A","2"], "filter": "sourceIPv4Address = 10.10.10.1 AND destinationTransportPort = 80"}'
This cURL sample includes the following options:
--user npadmin:hammerhead—Replace npadmin with the user name for your Series appliance. Replace hammerhead with the password for your Series appliance.
https://xxx.xxx.xxx.xxx/api/4.0/config/export/ia/outputs/event/filters—The filter request URL. Replace
xxx.xxx.xxx.xxx with the IP address of your Series appliance.
-k—This option explicitly allows cURL to perform insecure SSL connections and transfers, which allows you to test your SSL connection without installing a CA certificate.
-X POST—This option specifies using the POST method.
-d '{"name": "mynewfilter","eventTypes": ["B","A","2"], "filter": "sourceIPv4Address = 10.10.10.1 AND destinationTransportPort = 80"}'—Specifies the name, event type, and filter parameters of the new event filter.
Results
This example creates an event filter. The output is in JSON.
Update an event filter request
To update an event filter for IA, send the following request:
PUT https://<PX_IP_address>/api/4.0/config/export/ia/outputs/event/filters/<filter_name>
 Note
Note
To use this request, you must belong to the sudo group.
Required header:
--user <username>:<password>
Options
PX_IP_address—IP address of the Series appliance running the Series API.
username—The user name for your Series appliance.
password—The password for your Series appliance.
filter_name—The name of the event filter.
Request body:
{
"eventTypes": [
"<string>"
]
"filter": "<string>"
}
Example
PUT https://xxx.xxx.xxx.xxx/api/4.0/config/export/ia/outputs/event/filters/test-alert
Required header:
--user npadmin:hammerhead
Request body to update filter:
{
"filter": "alert.class = \"malware\""
}
Request body to update eventTypes:
{
"eventTypes" : [ "2"
]
}
Request body to update eventTypes and filter:
{
"eventTypes": [ "2"
]
"filter": "alert.class = \"malware\""
}
Update an event filter response
The response is a JSON object detailing the filter. In a successful request the object you sent will be returned back to you.
HTTP/1.1 [Response Code] [Response Message] Date: [Date]
Content-Type: [Content Type]
{
"name" : "<string>" "eventTypes": [
"A"
],
"filters": "<string>"
}
Response fields
Response Code—A standard HTML response code.
Response Message—A standard HTML response message.
Date—Standard HTML date format.
Content-type—The response format.
eventTypes—The event types that correspond to event-related data.
filter—String detailing the filter.
Example
HTTP/1.1 200 OK
Date: Tue, 06 Feb 2018 05:12:09 GMT
Content-Type: application/json; charset=utf-8
{
"name" : "test-alert" "eventTypes": [
"A"
],
"filters": "alert.class = \"malware\""
}
cURL code sample: Update an event filter
The code sample was run with cURL 7.57.0.
curl --user npadmin:hammerhead https://xxx.xxx.xxx.xxx/api/4.0/config/export/ia/outputs/event/filters/test-alert
-k -X PUT -d '{"eventTypes": [ "2" ] "filter": "alert.class = \"malware\""}'
This cURL sample includes the following options:
--user npadmin:hammerhead—Replace npadmin with the user name for your Series appliance. Replace hammerhead with the password for your Series appliance.
https://xxx.xxx.xxx.xxx/api/4.0/config/export/ia/outputs/event/filters/test-alert—The filter request URL. Replace xxx.xxx.xxx.xxx with the IP address of your Series appliance.
-k—This option explicitly allows cURL to perform insecure SSL connections and transfers, which allows you to test your SSL connection without installing a CA certificate.
-X PUT—This option specifies using the PUT method.
-d '{"eventTypes": [ "2" ] "filter": "alert.class = \"malware\""}'—Specifies the new event type and filter parameters of the event filter.
Results
This example updates an event filter. The output is in JSON.
Delete an event filter request
To delete an event filter for IA, send the following request:
DELETE https://<PX_IP_address>/api/4.0/config/export/ia/outputs/event/filters/<filter-name>
 Note
Note
To use this request, you must belong to the sudo group.
Required header:
--user <username>:<password>
Options
PX_IP_address—IP address of the Series appliance running the Series API.
username—The user name for your Series appliance.
password—The password for your Series appliance.
filter-name—The name of the filter to delete.
Example
DELETE https://xxx.xxx.xxx.xxx/api/4.0/config/export/ia/outputs/event/filters/my-filter
Required header:
--user npadmin:hammerhead
Delete an event filter response
The response is a JSON object detailing the filter. In a successful request the object you sent will be returned back to you.
HTTP/1.1 [Response Code] [Response Message] Date: [Date]
Content-Type: [Content Type]
Response fields
Response Code—A standard HTML response code indicating success or failure
Response Message—A standard HTML response message.
Date—Standard HTML date format.
Content-type—The response format.
Example
HTTP/1.1 200 OK
Date: Tue, 06 Feb 2018 05:12:09 GMT
Content-Type: application/json; charset=utf-8
cURL code sample: Delete an event filter
The code sample was run with cURL 7.57.0.
curl --user npadmin:hammerhead https://xxx.xxx.xxx.xxx/api/4.0/config/export/ia/outputs/event/filters/my-filter
-k -X DELETE
This cURL sample includes the following options:
--user npadmin:hammerhead—Replace npadmin with the user name for your Series appliance. Replace hammerhead with the password for your Series appliance.
https://xxx.xxx.xxx.xxx/api/4.0/config/export/ia/outputs/event/filters/my-filter—The filter request URL. Replace xxx.xxx.xxx.xxx with the IP address of your Series appliance.
-k—This option explicitly allows cURL to perform insecure SSL connections and transfers, which allows you to test your SSL connection without installing a CA certificate.
-X DELETE—This option specifies using the DELETE method.
Results
This example deletes the specified event filter.
Delete all event filters request
To delete an event filter for IA, send the following request:
DELETE https://<PX_IP_address>/api/4.0/config/export/ia/outputs/event/filters
 Note
Note
To use this request, you must belong to the sudo group.
Required header:
--user <username>:<password>
Options
PX_IP_address—IP address of the Series appliance running the Series API.
username—The user name for your Series appliance.
password—The password for your Series appliance.
Example
DELETE https://xxx.xxx.xxx.xxx/api/4.0/config/export/ia/outputs/event/filters
Required header:
--user npadmin:hammerhead
Delete all event filters response
The response is a JSON object detailing the filter. In a successful request the object you sent will be returned back to you.
HTTP/1.1 [Response Code] [Response Message] Date: [Date]
Content-Type: [Content Type]
Response fields
Response Code—A standard HTML response code indicating success or failure
Response Message—A standard HTML response message.
Date—Standard HTML date format.
Content-type—The response format.
Example
HTTP/1.1 200 OK
Date: Tue, 06 Feb 2018 05:12:09 GMT
Content-Type: application/json; charset=utf-8
cURL code sample: Delete all event filters
The code sample was run with cURL 7.57.0.
curl --user npadmin:hammerhead https://xxx.xxx.xxx.xxx/api/4.0/config/export/ia/outputs/event/filters -k -X DELETE
This cURL sample includes the following options:
--user npadmin:hammerhead—Replace npadmin with the user name for your Series appliance. Replace hammerhead with the password for your Series appliance.
https://xxx.xxx.xxx.xxx/api/4.0/config/export/ia/outputs/event/filters—The filter request URL. Replace
xxx.xxx.xxx.xxx with the IP address of your Series appliance.
-k—This option explicitly allows cURL to perform insecure SSL connections and transfers, which allows you to test your SSL connection without installing a CA certificate.
-X DELETE—This option specifies using the DELETE method.
Results
This example deletes all event filters.
Use the results endpoints to examine, store, and unstore search results:
GET https://<PX_IP_address>/api/4.0/results/<search_id>
GET https://<PX_IP_address>/api/4.0/results/<search_id>/sessionsdl/connectionSummary.json
GET https://<PX_IP_address>/api/4.0/results/<search_id>/sessionsdl/files/file.<file_id>
GET https://<PX_IP_address>/api/4.0/results/<search_id>/<connection_index>
GET https://<PX_IP_address>/api/4.0/results/<search_id>/<connection_index>/<packet_index>
GET https://<PX_IP_address>/api/4.0/results/<search_id>/sessions
POST https://<PX_IP_address>/api/4.0/search/<search_id>/<newname>
POST https://<PX_IP_address>/api/4.0/search/<search_id>/<search_id>
GET https://<PX_IP_address>/api/4.0/search/stored
GET https://<PX_IP_address>/api/4.0/results/<search_id>/packets
GET https://<PX_IP_address>/api/4.0/results/<search_id>/packets
Connection list request
To get a connection list after the search is complete, send the following request:
GET https://<PX_IP_address>/api/4.0/results/<search_id>
Required header:
--user <username>:<password>
Options
PX_IP_address—IP address of the Series appliance running the Series API.
username—The user name for your Series appliance.
password—The password for your Series appliance.
search_id—The unique search identifier.
Query parameters
r_index—Specifies which connection to start with in the response. The first index is zero. For example, r_index=5 specifies that the results are shown from the fifth index (4).
r_count—Number of connection records to be returned, used in pagination.
xpf—Filter to reduce the results set; it supports BPF as defined at http://www.tcpdump.org/manpages/pcap-filter.7.html. It is also used with PX-specific connection attributes, see Connection metadata properties. Sample formatting is host
127.0.0.1 && packetdeltacountin>25.
Example
GET https://xxx.xxx.xxx.xxx/api/4.0/results/7b123?r_index=0&r_count=250
Required header:
--user cpx:hammerhead
Connection list response
stime: [Start Time] etime: [End Time]
ethsaddr: [Ethernet Start Address] ethdaddr: [Ethernet Destination Address] saddr4: [Source IPv4 Address]
daddr4: [Destination IPv4 Address] saddr6: [Source IPv6 Address] daddr6: [Destination IPv6 Address] version: [Version]
saddr: [Source Address] daddr: [Destination Address] proto: [Protocol]
sport: [Source Port] dport: [Destination Port]
sportdisplay: [Source Port Display] dportdisplay: [Destination Port Display] vlan: [VLAN]
stream: [Stream]
classification: [Classification] spackets: [Source Packets] dpackets: [Destination Packets] sflags: [Source Flags]
dflags: [Destination Flags] flags: [Flags]
index: [Index]
Response fields
Start Time—Date and time from which the search started. The format is a floating-point epoch time stamp.
End Time—Date and time at which the search ended. The format is a floating-point epoch time stamp.
Ethernet Start Address—Ethernet start address.
Ethernet Destination Address—Ethernet destination address.
Source IPv4 Address—Source IPv4 address.
Destination IPv4 Address—Destination IPv4 address.
Source IPv6 Address—Source IPv6 address.
Destination IPv6 Address—Destination IPv6 address.
Version—Version.
Source Address—Source IPv4 or IPv6 address, depending on which one was used.
Destination Address—Destination IPv4 or IPv6 address, depending on which one was used.
Protocol—The transport layer protocol of the connection.
Source Port—Source port.
Destination Port—Destination port.
Source Port Display—Source port display.
Destination Port Display—Destination port display.
VLAN—Number of virtual LANs.
Stream—Number of nPulse streams.
Classification—Application data classification.
Source Packets—Number of source packets.
Destination Packets—Number of destination packets.
Source Flags—Number of source warnings.
Destination Flags—Number of destination warnings.
Flags—Total number of warnings.
Index—Zero-based index of first connection from search result.
Example
[
{
"stime": "1455051483.829782000",
"etime": "1455051483.829782000",
"ethsaddr": "7e:ae:46:66:ed:0f",
"ethdaddr": "01:00:5e:00:00:01",
"saddr4": xxx.xxx.xxx.xxx",
"daddr4": xxx.xxx.xxx.xxx",
"saddr6": "",
"daddr6": "", "version": 4,
"saddr": "xxx.xxx.xxx.xxx",
"daddr": "xxx.xxx.xxx.xxx", "proto": 2,
"sport": "",
"dport": "",
"sportdisplay": "",
"dportdisplay": "",
"vlan": "", "stream": 0,
"classification": "IGMP", "spackets": 1,
"dpackets": 0,
"sflags": 0,
"dflags": 0,
"flags": 0,
"index": 0
},
{
"stime": "1455051483.829789000",
"etime": "1455051483.829789000",
"ethsaddr": "7e:ae:46:66:ed:0f",
"ethdaddr": "33:33:00:00:00:01",
"saddr4": "",
"daddr4": "",
"saddr6": "fe80::7cae:46ff:fe66:ed0f", "daddr6": "ff02::1",
"version": 6,
"saddr": "fe80::7cae:46ff:fe66:ed0f",
"daddr": "ff02::1", "proto": 0, "sport": "",
"dport": "",
"sportdisplay": "",
"dportdisplay": "",
"vlan": "", "stream": 0,
"classification": "ICMPV6", "spackets": 1,
"dpackets": 0,
"sflags": 0,
"dflags": 0,
"flags": 0,
"index": 1
}
]
cURL code sample: Connection list
The code sample was run with cURL 7.57.0.
curl -k --user cpx:hammerhead https://xxx.xxx.xxx.xxx/api/4.0/results/7b123?r_index=0&r_count=250&xpf=port+80
This cURL sample includes the following options:
-k—This option explicitly allows cURL to perform insecure SSL connections and transfers, which allows you to test your SSL connection without installing a CA certificate.
--user cpx:hammerhead—Replace cpx with the user name for your Series appliance. Replace hammerhead with the password for your Series appliance.
https://xxx.xxx.xxx.xxx/api/4.0/results/7b123?r_index=0&r_ count=250&xpf=port+80—The results request URL. Replace xxx.xxx.xxx.xxx with the IP address of your Series appliance. Replace 7b123 with the search ID of interest.
 Note
Note
Enclose the URL in double quotation marks if it includes special characters such as [, ], {, }, ?, &, and *.
Results
This example returns the first 250 connection records for the specified search after it is complete. The output is in JSON.
Connection summary request
To get a connection summary for a completed search, send the following request:
GET https://<PX_IP_address>/api/4.0/results/<search_id>/sessionsdl/connectionSummary.json
Required header:
--user <username>:<password>
Options
PX_IP_address—IP address of the Series appliance running the Series API.
username—The user name for your Series appliance.
password—The password for your Series appliance.
search_id—The unique search identifier.
Example
GET https://xxx.xxx.xxx.xxx/api/4.0/results/7b123/sessionsdl/connectionSummary.json
Required header:
--user cpx:hammerhead
Connection summary response
HTTP/1.1 [Response Code] [Response Message] Date: [Date]
Content-Type: [Content Type] xpf: [XPF]
index: [Index]
packet: [Packet Status] session: [Session Status] count: [Count]
addr: [Address] srcCount: [Source Count]
dstCount: [Destination Count] srcPackets: [Source Packets] dstPackets: [Destination Packets] srcOctets: [Source Octets] dstOctets: [Destination Octets] port: [Port]
proto: [Protocol] packets: [Packets] octets: [Octets]
Response fields
Response Code—A standard HTML response code.
Response Message—A standard HTML response message.
Date—Standard HTML date format.
Content Type—The response format.
XPF—Filter that supports BPF as defined at http://www.tcpdump.org/manpages/pcap-filter.7.html. It is also used with PX-specific connection attributes; see Connection metadata properties. Sample formatting is host 127.0.0.1 && packetdeltacountin>25.
Index—Zero-based index of first connection from search result.
Packet Status—Status of the packet search. Valid values are skipped, done, working, idle, and error.
Session Status—Status of the session search. Valid values are skipped, done, working, idle, and error.
Count—Number of records.
Address—IP address.
Source Count—Number of source records.
Destination Count—Number of destination records.
Source Packets—Number of source packets.
Destination Packets—Number of destination packets.
Source Octets—Size of source records.
Destination Octets—Size of destination records.
Protocol—The transport layer protocol of the connection.
Packets—The number of packets.
Octets—The size of packets.
Example
HTTP/1.1 200 OK
Date: Thu, 30 Mar 2017 20:48:31 GMT
Content-Type: application/json; charset=utf-8
{
"Processes": { "xpf":"done",
"index":"done",
"packet":"skipped", "session":"skipped"
},
"IPaddr": {
"count": 2,
"records": [
{
"addr": "24.203.30.73",
"srcCount": 1,
"dstCount": 0,
"srcPackets": 28,
"dstPackets": 39,
"srcOctets": 5636,
"dstOctets": 49473
},
{
"addr": "64.18.84.36",
"srcCount": 0,
"dstCount": 1,
"srcPackets": 0,
"dstPackets": 28,
"srcOctets": 0,
"dstOctets": 5636
}
]
},
"Port": {
"count": 2,
"records": [
{
"port": 51959,
"srcCount": 1,
"dstCount": 0,
"srcPackets": 28,
"dstPackets": 39,
"srcOctets": 5636,
"dstOctets": 49473
},
{
"port": 80,
"srcCount": 0,
"dstCount": 1,
"srcPackets": 0,
"dstPackets": 28,
"srcOctets": 0,
"dstOctets": 5636
}
]
},
"Proto":
{
"count": 1,
"records": [
{
"proto": 6,
"count": 1,
"packets": 67,
"octets": 55109
}
]
},
"Class": {
"count": 1,
"records": [
{
"class": "0x0800", "count": 1,
"packets": 67,
"octets": 55109
}
]
},
"AppId": {
"count": 1,
"records": [
{
"appid": 7, "appname": "HTTP", "count": 1,
"packets": 67,
"octets": 55109
}
]
}
}
cURL code sample: Connection summary
The code sample was run with cURL 7.57.0.
curl -k --user cpx:hammerhead https://xxx.xxx.xxx.xxx/api/4.0/results/7b123/sessionsdl/connectionSummary.json
This cURL sample includes the following options:
-k—This option explicitly allows cURL to perform insecure SSL connections and transfers, which allows you to test your SSL connection without installing a CA certificate.
--user cpx:hammerhead—Replace cpx with the user name for your Series appliance. Replace hammerhead with the password for your Series appliance.
https://xxx.xxx.xxx.xxx/api/4.0/results/7b123/sessionsdl/connectionSummary.json—The results request URL. Replace xxx.xxx.xxx.xxx with the IP address of your Series appliance. Replace 7b123 with the search ID of interest.
 Note
Note
Enclose the URL in double quotation marks if it includes special characters such as [, ], {, }, ?, &, and *.
Results
This example returns connection summary for the specified completed search. The output is in JSON.
Download file request
To download a file found during session analysis, send the following request:
GET https://<PX_IP_address>/api/4.0/results/<search_id>/sessionsdl/files/file.<file_id>
Required header:
--user <username>:<password>
Options
PX_IP_address—IP address of the Series appliance running the Series API.
username—The user name for your Series appliance.
password—The password for your Series appliance.
search_id—The unique search identifier.
file_id—The number identifying a file found during session analysis.
Example
GET https://xxx.xxx.xxx.xxx/api/4.0/results/7b123/sessionsdl/file.1
Required header:
--user cpx:hammerhead
Download file response
HTTP/1.1 [Response Code] [Response Message] Date: [Date]
Content-Type: [Content Type] ""
Response fields
Response Code—A standard HTML response code.
Response Message—A standard HTML response message.
Date—Standard HTML date format.
Content Type—The response format.
Example
HTTP/1.1 200 OK
Date: Fri, 31 Mar 2017 16:02:41 GMT
Content-Type: application/zip; charset=utf-8
<<zip file contents>>
cURL code sample: Download file
The code sample was run with cURL 7.57.0.
curl -k --user cpx:hammerhead https:///xxx.xxx.xxx.xxx/api/4.0/results/7b123/sessionsdl/files/file.1
This cURL sample includes the following options:
-k—This option explicitly allows cURL to perform insecure SSL connections and transfers, which allows you to test your SSL connection without installing a CA certificate.
--user cpx:hammerhead—Replace cpx with the user name for your Series appliance. Replace hammerhead with the password for your Series appliance.
https://xxx.xxx.xxx.xxx/api/4.0/results/7b123/sessionsdl/files/file.1—The results request URL. Replace xxx.xxx.xxx.xxx with the IP address of your Series appliance. Replace 7b123 with the search ID of interest. Replace 1 with the file identifier of interest.
 Note
Note
Enclose the URL in double quotation marks if it includes special characters such as [, ], {, }, ?, &, and *.
Results
This example downloads the specified file in .zip format.
Packet list request
To get a packet list for a connection, send the following request:
GET https://<PX_IP_address>/api/4.0/results/<search_id>/<connection_index>
Required header:
--user <username>:<password>
Options
PX_IP_address—IP address of the Series appliance running the Series API.
username—The user name for your Series appliance.
password—The password for your Series appliance.
search_id—The unique search identifier.
connection_index—The index number of the connection.
Query Parameters
r_index—Zero-based index of first packet from search result.
r_count—The number of packets to be returned; used in pagination.
Example
GET https://xxx.xxx.xxx.xxx/api/4.0/results/7b123/3?r_index=5&r_count=30
Required header:
--user cpx:hammerhead
Packet list response
index: [Index] stime: [Start Time] etime: [End Time]
saddr: [Source Address] sport: [Source Port]
daddr: [Destination Address] dport: [Destination Port] version: [Version]
proto: [Protocol] vlan: [VLAN] stream: [Stream] flags: [Flags]
pindex: [Packet Index]
Response fields
Index—Zero-based index of first connection from search result.
Start Time—Date and time from which the search started. The format is a floating-point epoch time stamp.
End Time—Date and time at which the search ended. The format is a floating-point epoch time stamp.
Source Address—Source IP address.
Source Port—Source port.
Destination Address—Destination IP address.
Destination Port—Destination port.
Version—Version.
Protocol—The transport layer protocol of the connection.
VLAN—Number of virtual LANs.
Stream—nPulse stream number.
Flags—Number of warnings.
Packet Index—Zero-based index of first packet from search result.
Example
[
{
“index”: 0,
“stime”: “1374591610.000578540”,
“etime”: “1374591610.580978060”,
“saddr”: “xxx.xxx.xxx.xxx”, “sport”: 42342,
“daddr”: “xxx.xxx.xxx.xxx”, “dport”: 80,
“version”: 4,
“proto”: 6,
“vlan”: 0,
“stream”: 3,
“flags”: 17,
“pindex”: “104”,
}
{
“index”: 1,
“stime”: “1374591610.000580978”,
“etime”: “1374591610.580978060”,
“saddr”: “xxx.xxx.xxx.xxx”, “sport”: 80,
“daddr”: “xxx.xxx.xxx.xxx”, “dport”: 42342,
“version”: 4,
“proto”: 6,
“vlan”: 0,
“stream”: 3,
“flags”: 17,
“pindex”: “105”,
}
]
cURL code sample: Packet list
The code sample was run with cURL 7.57.0.
curl -k --user cpx:hammerhead "r_index=0&r_count=100" https://xxx.xxx.xxx.xxx/api/4.0/results/7b123/3
This cURL sample includes the following options:
-k—This option explicitly allows cURL to perform insecure SSL connections and transfers, which allows you to test your SSL connection without installing a CA certificate.
--user cpx:hammerhead—Replace cpx with the user name for your Series appliance. Replace hammerhead with the password for your Series appliance.
"r_index=0&r_count=100"—This option specifies which packet to start with and how many packets are returned.
https://xxx.xxx.xxx.xxx/api/4.0/results/7b123/3—The results request URL. Replace xxx.xxx.xxx.xxx with the IP address of your Series appliance. Replace 7b123 with the search ID of interest. Replace 3 with the connection record index
of interest.
Results
This example returns a packet list for a specified connection. The output is in JSON.
Single packet detail request
To get the XML/PDML/Wireshark information for an individual packet, send the following request:
GET https://<PX_IP_address>/api/4.0/results/<search_id>/<connection_index>/<packet_index>
Required header:
--user <username>:<password>
For more details on Wireshark XML, visit https://anonsvn.wireshark.org/wireshark/trunk/doc/README.xml-output
Options
PX_IP_address—IP address of the Series appliance running the Series API.
username—The user name for your Series appliance.
password—The password for your Series appliance.
search_id—The unique search identifier.
connection_index—The index number of the connection.
packet_index—The index number of the packet. The first packet in a connection has an index of 1.
Example
GET https://xxx.xxx.xxx.xxx/api/4.0/results/7b123/3/104
Required header:
--user cpx:hammerhead
Single packet detail response
xml version: [XML Version] pdml version: [PDML Version] creator: [PDML Creator] proto name: [Protocol Name] pos: [Position]
showname: [Display Name] size: [Size]
field name: [Field Name] show: [Visibility] value: [Field Value]
unmaskedvalue: [Unmasked Value]
Response fields
XML Version—Version of XML.
PDML Version—Version of PDML
PDML Creator—Who created this version of PDML.
Protocol Name—Name of protocol.
Position—Starting position of the protocol.
Display Name—User-entered name.
Size—Size of data.
Field Name—Field name.
Visibility—How the packet data is displayed.
Field Value—Value.
Unmasked Value—Value without mask.
Example
<?xml version="1.0"?>
<pdml version="0" creator="wireshark/1.2.11">
<packet>
<proto name="geninfo" pos="0" showname="General information" size="64">
<field name="num" pos="0" show="1" showname="Number" value="1" size="64"/>
<field name="len" pos="0" show="64" showname="Frame Length" value="40" size="64"/>
<field name="caplen" pos="0" show="64" showname="Captured Length" value="40" size="64"/> <field name="timestamp" pos="0" show="Sep 1, 2011 11:41:27.051327000" showname="Captured Time" value="1314891687.051327000" size="64"/> </proto>
<proto name="frame" showname="Frame 1 (64 bytes on wire, 64 bytes captured)" size="64" pos="0">
<field name="frame.time" showname="Arrival Time: Sep 1, 2011 11:41:27.051327000" size="0" pos="0" show="Sep 1, 2011 11:41:27.051327000"/>
<field name="frame.time_delta" showname="Time delta from previous captured frame: 0.000000000 seconds" size="0" pos="0" show="0.000000000"/>
<field name="frame.time_delta_displayed" showname="Time delta from previous displayed frame: 0.000000000 seconds" size="0" pos="0" show="0.000000000"/>
<field name="frame.time_relative" showname="Time since reference or first frame: 0.000000000 seconds" size="0" pos="0" show="0.000000000"/>
<field name="frame.number" showname="Frame Number: 1" size="0" pos="0" show="1"/>
<field name="frame.len" showname="Frame Length: 64 bytes" size="0" pos="0" show="64"/>
<field name="frame.cap_len" showname="Capture Length: 64 bytes" size="0" pos="0" show="64"/> <field name="frame.marked" showname="Frame is marked: False" size="0" pos="0" show="0"/> <field name="frame.protocols" showname="Protocols in frame: eth:vlan:ip:tcp" size="0" pos="0" show="eth:vlan:ip:tcp"/> </proto>
<proto name="eth" showname="Ethernet II, Src: 00:05:01:aa:2c:00 (00:05:01:aa:2c:00), Dst: 00:05:00:da:80:00 (00:05:00:da:80:00)" size="14" pos="0">
<field name="eth.dst" showname="Destination: 00:05:00:da:80:00 (00:05:00:da:80:00)" size="6" pos="0" show="00:05:00:da:80:00" value="000500da8000">
<field name="eth.addr" showname="Address: 00:05:00:da:80:00 (00:05:00:da:80:00)" size="6" pos="0" show="00:05:00:da:80:00" value="000500da8000"/>
<field name="eth.ig" showname=".... ...0 .... .... .... .... = IG bit: Individual address (unicast)" size="3" pos="0" show="0" value="0" unmaskedvalue="000500"/>
<field name="eth.lg" showname=".... ..0. .... .... .... .... = LG bit: Globally unique address (factory default)" size="3" pos="0" show="0" value="0" unmaskedvalue="000500"/>
</field>
<field name="eth.src" showname="Source: 00:05:01:aa:2c:00 (00:05:01:aa:2c:00)" size="6" pos="6" show="00:05:01:aa:2c:00" value="000501aa2c00">
<field name="eth.addr" showname="Address: 00:05:01:aa:2c:00 (00:05:01:aa:2c:00)" size="6" pos="6" show="00:05:01:aa:2c:00" value="000501aa2c00"/>
<field name="eth.ig" showname=".... ...0 .... .... .... .... = IG bit: Individual address (unicast)" size="3" pos="6" show="0" value="0" unmaskedvalue="000501"/>
<field name="eth.lg" showname=".... ..0. .... .... .... .... = LG bit: Globally unique address (factory default)" size="3" pos="6" show="0" value="0" unmaskedvalue="000501"/> </field>
<field name="eth.type" showname="Type: 802.1Q Virtual LAN (0x8100)" size="2" pos="12" show="0x8100" value="8100"/>
<proto name="vlan" showname="802.1Q Virtual LAN, PRI: 0, CFI: 0, ID: 205" size="4" pos="14">
<field name="vlan.priority" showname="000. .... .... .... = Priority: 0" size="2" pos="14" show="0" value="0" unmaskedvalue="00cd"/>
<field name="vlan.cfi" showname="...0 .... .... .... = CFI: 0" size="2" pos="14" show="0" value="0" unmaskedvalue="00cd"/>
<field name="vlan.id" showname=".... 0000 1100 1101 = ID: 205" size="2" pos="14" show="205" value="CD" unmaskedvalue="00cd"/>
<field name="vlan.etype" showname="Type: IP (0x0800)" size="2" pos="16" show="0x0800" value="0800"/>
<field name="vlan.trailer" showname="Trailer: 000000000000" size="6" pos="58" show="00:00:00:00:00:00" value="000000000000"/> </proto>
<proto name="ip" showname="Internet Protocol, Src: xxx.xxx.xxx.xxx (xxx.xxx.xxx.xxx), Dst: xxx.xxx.xxx.xxx (xxx.xxx.xxx.xxx)" size="20" pos="18">
<field name="ip.version" showname="Version: 4" size="1" pos="18" show="4" value="45"/>
<field name="ip.hdr_len" showname="Header length: 20 bytes" size="1" pos="18" show="20" value="45"/>
<field name="ip.dsfield" showname="Differentiated Services Field: 0x00 (DSCP 0x00: Default; ECN: 0x00)" size="1" pos="19" show="0" value="00">
<field name="ip.dsfield.dscp" showname="0000 00.. = Differentiated Services Codepoint: Default (0x00)" size="1" pos="19" show="0x00" value="0" unmaskedvalue="00"/>
<field name="ip.dsfield.ect" showname=".... ..0. = ECN-Capable Transport (ECT): 0" size="1" pos="19" show="0" value="0" unmaskedvalue="00"/>
<field name="ip.dsfield.ce" showname=".... ...0 = ECN-CE: 0" size="1" pos="19" show="0" value="0" unmaskedvalue="00"/>
</field>
<field name="ip.len" showname="Total Length: 40" size="2" pos="20" show="40" value="0028"/> <field name="ip.id" showname="Identification: 0x3d91 (15761)" size="2" pos="22" show="0x3d91" value="3d91"/>
<field name="ip.flags" showname="Flags: 0x02 (Don't Fragment)" size="1" pos="24" show="0x02" value="40">
<field name="ip.flags.rb" showname="0.. = Reserved bit: Not Set" size="1" pos="24" show="0" value="0" unmaskedvalue="40"/>
<field name="ip.flags.df" showname=".1. = Don't fragment: Set" size="1" pos="24" show="1" value="1" unmaskedvalue="40"/>
<field name="ip.flags.mf" showname="..0 = More fragments: Not Set" size="1" pos="24" show="0" value="0" unmaskedvalue="40"/> </field>
<field name="ip.frag_offset" showname="Fragment offset: 0" size="2" pos="24" show="0" val- ue="4000"/>
<field name="ip.ttl" showname="Time to live: 121" size="1" pos="26" show="121" value="79"/>
<field name="ip.proto" showname="Protocol: TCP (0x06)" size="1" pos="27" show="0x06" val- ue="06"/>
<field name="ip.checksum" showname="Header checksum: 0x1b00 [correct]" size="2" pos="28" show="0x1b00" value="1b00">
<field name="ip.checksum_good" showname="Good: True" size="2" pos="28" show="1" val- ue="1b00"/>
<field name="ip.checksum_bad" showname="Bad : False" size="2" pos="28" show="0" value="1b00"/>
</field>
<field name="ip.src" showname="Source: xxx.xxx.xxx.xxx (xxx.xxx.xxx.xxx)" size="4" pos="30" show="xxx.xxx.xxx.xxx" val- ue="900ea1a2"/>
<field name="ip.addr" showname="Source or Destination Address: xxx.xxx.xxx.xxx (xxx.xxx.xxx.xxx)" hide="yes" size="4" pos="30" show="xxx.xxx.xxx.xxx" value="900ea1a2"/>
<field name="ip.src_host" showname="Source Host: xxx.xxx.xxx.xxx" hide="yes" size="4" pos="30" show="xxx.xxx.xxx.xxx" value="900ea1a2"/>
<field name="ip.host" showname="Source or Destination Host: xxx.xxx.xxx.xxx" hide="yes" size="4" pos="30" show="xxx.xxx.xxx.xxx" value="900ea1a2"/>
<field name="ip.dst" showname="Destination: xxx.xxx.xxx.xxx (xxx.xxx.xxx.xxx)" size="4" pos="34" show="xxx.xxx.xxx.xxx" value="c769b024"/>
<field name="ip.addr" showname="Source or Destination Address: xxx.xxx.xxx.xxx (xxx.xxx.xxx.xxx)" hide="yes" size="4" pos="34" show="xxx.xxx.xxx.xxx" value="c769b024"/>
<field name="ip.dst_host" showname="Destination Host: xxx.xxx.xxx.xxx" hide="yes" size="4" pos="34" show="xxx.xxx.xxx.xxx" value="c769b024"/>
<field name="ip.host" showname="Source or Destination Host: xxx.xxx.xxx.xxx" hide="yes" size="4" pos="34" show="xxx.xxx.xxx.xxx" value="c769b024"/>
</proto>
<proto name="tcp" showname="Transmission Control Protocol, Src Port: 3949 (3949), Dst Port: 8292 (8292), Seq: 1, Ack: 1, Len: 0" size="20" pos="38">
<field name="tcp.srcport" showname="Source port: 3949 (3949)" size="2" pos="38" show="3949" value="0f6d"/>
<field name="tcp.dstport" showname="Destination port: 8292 (8292)" size="2" pos="40" show="8292" value="2064"/>
<field name="tcp.port" showname="Source or Destination Port: 3949" hide="yes" size="2" pos="38" show="3949" value="0f6d"/>
<field name="tcp.port" showname="Source or Destination Port: 8292" hide="yes" size="2" pos="40" show="8292" value="2064"/>
<field name="tcp.stream" showname="Stream index: 0" size="0" pos="38" show="0"/>
<field name="tcp.len" showname="TCP Segment Len: 0" hide="yes" size="1" pos="50" show="0" value="50"/>
<field name="tcp.seq" showname="Sequence number: 1 (relative sequence number)" size="4" pos="42" show="1" value="15d8d59f"/>
<field name="tcp.ack" showname="Acknowledgement number: 1 (relative ack number)" size="4" pos="46" show="1" value="c85702d9"/>
<field name="tcp.hdr_len" showname="Header length: 20 bytes" size="1" pos="50" show="20" value="50"/>
<field name="tcp.flags" showname="Flags: 0x10 (ACK)" size="1" pos="51" show="0x10" val- ue="10">
<field name="tcp.flags.cwr" showname="0... .... = Congestion Window Reduced (CWR): Not set" size="1" pos="51" show="0" value="0" unmaskedvalue="10"/>
<field name="tcp.flags.ecn" showname=".0.. .... = ECN-Echo: Not set" size="1" pos="51" show="0" value="0" unmaskedvalue="10"/>
<field name="tcp.flags.urg" showname="..0. .... = Urgent: Not set" size="1" pos="51" show="0" value="0" unmaskedvalue="10"/>
<field name="tcp.flags.ack" showname="...1 .... = Acknowledgement: Set" size="1" pos="51" show="1" value="1" unmaskedvalue="10"/>
<field name="tcp.flags.push" showname=".... 0... = Push: Not set" size="1" pos="51" show="0" value="0" unmaskedvalue="10"/>
<field name="tcp.flags.reset" showname=".... .0.. = Reset: Not set" size="1" pos="51" show="0" value="0" unmaskedvalue="10"/>
<field name="tcp.flags.syn" showname=".... ..0. = Syn: Not set" size="1" pos="51" show="0" value="0" unmaskedvalue="10"/>
<field name="tcp.flags.fin" showname=".... ...0 = Fin: Not set" size="1" pos="51" show="0" value="0" unmaskedvalue="10"/> </field>
<field name="tcp.window_size" showname="Window size: 32147" size="2" pos="52" show="32147" value="7d93"/>
<field name="tcp.checksum" showname="Checksum: 0xa288 [validation disabled]" size="2" pos="54" show="0xa288"
value="a288">
<field name="tcp.checksum_good" showname="Good Checksum: False" size="2" pos="54" show="0" value="a288"/>
<field name="tcp.checksum_bad" showname="Bad Checksum: False" size="2" pos="54" show="0" value="a288"/>
</field> </proto> </packet>
</pdml>
cURL code sample: Single packet detail
The code sample was run with cURL 7.57.0.
curl -k --user cpx:hammerhead https://xxx.xxx.xxx.xxx/api/4.0/results/7b123/3/104
This cURL sample includes the following options:
-k—This option explicitly allows cURL to perform insecure SSL connections and transfers, which allows you to test your SSL connection without installing a CA certificate.
--user cpx:hammerhead—Replace cpx with the user name for your Series appliance. Replace hammerhead with the password for your Series appliance.
https://xxx.xxx.xxx.xxx/api/4.0/results/7b123/3/104—The results request URL. Replace xxx.xxx.xxx.xxx with the IP address of your Series appliance. Replace 7b123 with the search ID of interest. Replace 3 with the connection index of interest. Replace 104 with the packet index of interest.
Results
This example returns the XML/PDML/Wireshark information for a specified packet. The output is in XML/PDML.
Session information request
To search the data extracted during the session analysis phase, send the following request:
GET https://<PX_IP_address>/api/4.0/results/<search_id>/sessions
Required header:
--user <username>:<password>
Use the search summary request to check the status of the search. The search summary response must have "done":true
before you can use the session information request.
Options
PX_IP_address—IP address of the Series appliance running the Series API.
username—The user name for your Series appliance.
password—The password for your Series appliance.
search_id—The unique search identifier.
Query parameters
offset—Specifies which packet to start with in the response. The first index is zero. This parameter is used in pagination. For example, to return results 11–100, specify count=90&offset=11.
count—Number of results to be returned. If this parameter is not specified, the default number of results is 250. For example, count=100.
type—Type of event to return. Valid values are dns, fileinfo, http, tls, and unknown. For example, type=dns. The following table lists additional parameters you can specify for each type.
type | Additional Parameters |
dns |
|
fileinfo |
|
type | Additional Parameters |
For example, type=fileinfo&md5=78ed1e688b3d902a8240f7031a 30a356. | |
http |
|
tls |
For example, type=tls&version="TLS 1.2". |
type | Additional Parameters |
unknown |
For example, type=unknown&name=ssh. |
Example
GET "https://xxx.xxx.xxx.xxx/api/4.0/results/7b123/sessions?type%3A%22http%22&r_index=0&r_count=250"
Required header:
--user cpx:hammerhead
Session information response
typecount: [Type Count] proto: [Protocol]
src_ip: [Source IP Address] src_port: [Source Port]
dest_ip: [Destination IP Address] dest_port: [Destination Port] hostname: [Hostname]
url: [URL]
httpuseragent: [HTTP User Agent] httpmethod: [HTTP Method] protocol: [HTTP Protocol] status: [HTTP Status]
md5: [MD5]
size: [File Size] name: [Name]
timestamp: [Time Stamp] flow_id: [Flow ID] pcap_cnt: [pcap Count] event_type: [Event Type] tx_id: [Transmit ID]
http_user_agent: [HTTP User Agent] http_content_type: [HTTP Content Type] http_method: [HTTP Method]
length: [Length] filename: [File Name] magic: [Magic]
state: [State] store: [Stored] file_id: [File ID] redirect: [Redirect]
http_refer: [HTTP Referer] filtercount: [Filter Count]
Response fields
Type Count—The number of events of each type.
Protocol—Protocol.
Source IP Address—Source IP address.
Source Port—Source port.
Destination IP Address—Destination IP address.
Destination Port—Destination port.
Hostname—Source hostname.
URL—Full HTTP URL
HTTP User Agent—The HTTP user agent originating the request.
HTTP Method—The HTTP method used in the event.
HTTP Protocol—The HTTP protocol used in the event.
HTTP Status—A standard HTTP response code.
MD5—MD5 hash of the file that caused this event.
File Size—Size of the file that caused this event.
Name—Name of the file that caused this event.
Time Stamp—Time of the event.
Flow ID—Flow identifier.
pcap Count—Number of packets captured.
Event Type—Type of event. Valid values are dns, fileinfo, http, tls, and unknown.
Transmit ID—Transmit identifier.
HTTP Content Type—HTTP content encoding originating the request.
Length—Size of the file that caused this event.
File Name—Name of the file that caused this event.
Magic—Information about the fileʼs type as determined by the file command on Linux.
State—Success or failure of reassembled file transfer. Valid values are “CLOSED”, “TRUNCATED”, “ERROR”, or “UNKNOWN”. “CLOSED” indicates successful reassembly.
Stored—TRUE if reassembled file was saved in the filesystem.
File ID—File identifier.
Redirect—File that was redirected to.
HTTP Referer—HTTP referer field from an HTTP transaction.
Filter Count—Total number of events.
Example
{
"typecount": [
{
"count": 464,
"term": "http"
},
{
"count": 59, "term": "fileinfo"
},
],
"http": {
"tuple": {
"proto": [
{
"count": 464,
"term": "TCP"
}
],
"src_ip": [
{
"count": 464,
"term": "xxx.xxx.xxx.xxx"
}
],
"src_port": [
{
"count": 1,
"term": "4937"
},
{
"count": 317,
"term": "4216"
},
],
"dest_ip": [
{
"count": 1,
"term": "xxx.xxx.xxx.xxx"
},
{
"count": 391,
"term": "xxx.xxx.xxx.xxx"
},
],
"dest_port": [
{
"count": 464,
"term": "80"
}
]
},
"hostname": [
{
"count": 1,
"term": "abcdef.com"
},
{
"count": 317, "term": "ghijk.com"
},
],
"url": [
{
"count": 1,
"term":
search&aType=3"
},
{
"count": 391,
"term": "\/images\/index.php"
}
],
"httpuseragent": [
{
"count": 464,
"term": "Mozilla\/4.0 (compatible; MSIE 6.0; Windows NT 5.1; SV1; InfoPath.1)"
}
],
"httpmethod": [
{
"count": 464,
"term": "GET"
}
],
"protocol": [
{
"count": 464, "term": "HTTP\/1.0"
}
],
"status": [
{
"count": 66,
"term": "200"
},
{
"count": 396,
}
]
},
"dns": {
"tuple": {
}
},
"fileinfo": {
"tuple": {
"proto": [
{
"count": 59,
"term": "TCP"
}
],
"src_ip": [
{
"count": 1,
"term": "xxx.xxx.xxx.xxx"
},
{
"count": 1,
"term": "xxx.xxx.xxx.xxx"
}
],
"src_port": [
{
"count": 59,
"term": "80"
}
],
"dest_ip": [
{
"count": 59,
"term": "xxx.xxx.xxx.xxx"
}
],
"dest_port": [
{
"count": 1,
"term": "4937"
},
{
"count": 1,
"term": "4934"
}
]
},
"md5": [
{
"count": 2,
"term": "ad4b0f606e0f8465bc4c4c170b37e1a3"
},
{
"count": 1,
"term": "72bb9648a67295ed5777d364c3c290d7"
}
],
"size": [
{
"count": 2,
},
{
"count": 1,
"term": "7593"
}
]
},
"tls": {
"tuple": {
}
},
"ssh": {
"tuple": {
}
},
"unknown": {
"tuple": {
},
"name": [
{
"count": 1,
"term": "stats"
}
]
},
"filterdata": [
{
"timestamp": "2015-12-09T11:26:18.638727-0500",
"flow_id": 28860384,
"pcap_cnt": 430, "event_type": "http", "src_ip": "xxx.xxx.xxx.xxx", "src_port": 4937,
"dest_ip": "xxx.xxx.xxx.xxx", "dest_port": 80,
"proto": "TCP", "tx_id": 0,
"http": {
"hostname": "crux.abcdef.com", "url":
search&aType=3",
"http_user_agent": "Mozilla\/4.0 (compatible; MSIE 6.0; Windows NT 5.1; SV1; InfoPath.1)", "http_content_type": "image\/gif",
"http_method": "GET", "protocol": "HTTP\/1.0", "status": 200,
"length": 43
}
},
{
"timestamp": "2015-12-09T11:26:19.931286-0500",
"flow_id": 28860384, "event_type": "fileinfo", "src_ip": "xxx.xxx.xxx.xxx" "src_port": 80,
"dest_ip": "xxx.xxx.xxx.xxx", "dest_port": 4937,
"proto": "TCP",
"http": {
"hostname": "crux.fghijklm.com", "url":
search&aType=3",
"http_user_agent": "Mozilla\/4.0 (compatible; MSIE 6.0; Windows NT 5.1; SV1; InfoPath.1)", "http_content_type": "image\/gif",
"http_method": "GET", "protocol": "HTTP\/1.0", "status": 200,
"length": 43
},
"fileinfo": {
"filename": "\/index.gif",
"magic": "GIF image data, version 89a, 1 x 1", "state": "CLOSED",
"md5": "ad4b0f606e0f8465bc4c4c170b37e1a3", "stored": true,
"file_id": 2,
"size": 43,
"tx_id": 0
}
],
"filtercount": 524
}
cURL code sample: Session information
The code sample was run with cURL 7.57.0.
curl -k --user cpx:hammerhead "https://xxx.xxx.xxx.xxx/api/4.0/results/7b123/ sessions?type%3A%22http%22&r_index=0&r_count=250"
This cURL sample includes the following options:
-k—This option explicitly allows cURL to perform insecure SSL connections and transfers, which allows you to test your SSL connection without installing a CA certificate.
--user cpx:hammerhead—Replace cpx with the user name for your Series appliance. Replace hammerhead with the password for your Series appliance.
https://xxx.xxx.xxx.xxx/api/4.0/results/7b123/sessions?type%3A%22http%22&r_index=0&r_count=250—The results request URL. Replace xxx.xxx.xxx.xxx with the IP address of your Series appliance. Replace 7b123 with the search ID of interest. Replace 3 with the connection index of interest. Replace type with the field you want to find. Replace http with the value that you want to find. Replace 0 with the first packet that you want to search. Replace 250 with the number of packets that you want returned.
 Note
Note
Enclose the URL in double quotation marks if it includes special characters such as [, ], {, }, ?, &, and *.
Results
This example searches the first 250 packets from the specified search results for type:"http". The output is in JSON.
Store search results request
To store search results by assigning a new name to the search, send the following request:
POST https://<PX_IP_address>/api/4.0/search/<search_id>/<new_name>
Required header:
--user <username>:<password>
Options
PX_IP_address—IP address of the Series appliance running the Series API.
username—The user name for your Series appliance.
password—The password for your Series appliance.
search_id—The unique search identifier.
new_name—The new identifier for this search.
Example
POST https://xxx.xxx.xxx.xxx/api/4.0/search/7b123/malware_example
Required header:
--user cpx:hammerhead
Store search results response
HTTP/1.1 [Response Code] [Response Message] Date: [Date]
Content-Type: [Content Type] status: [Status]
message: [Message] cmd: [Command]
uuid: [UUID] name: [Name]
Response fields
Response Code—A standard HTML response code.
Response Message—A standard HTML response message.
Date—Standard HTML date format.
Content Type—The response format.
Status—A standard HTTP response message.
Message—The system response.
Command—The command being executed.
UUID—The unique search identifier.
Name—The new identifier for the search.
Example
HTTP/1.1 200 OK
Date: Thu, 10 Mar 2016 21:47:18 GMT
Content-Type: text/html; charset=UTF-8
{
"status": "ok", "message": "Success", "cmd": "store",
"uuid": "6e693e264d5045f184c710a650435f76",
"name": "malware_example"
}
cURL code sample: Store search results
The code sample was run with cURL 7.57.0.
curl -k --user cpx:hammerhead -X POST https://xxx.xxx.xxx.xxx/api/4.0/search/7b123/malware_example
This cURL sample includes the following options:
-k—This option explicitly allows cURL to perform insecure SSL connections and transfers, which allows you to test your SSL
connection without installing a CA certificate.
--user cpx:hammerhead—Replace cpx with the user name for your Series appliance. Replace hammerhead with the password for your Series appliance.
-X POST—This option changes the HTTP method to POST.
https://xxx.xxx.xxx.xxx/api/4.0/search/7b123/malware_example—The results request URL. Replace xxx.xxx.xxx.xxx with the IP address of your Series appliance. Replace 7b123 with the search ID of interest. Replace malware_example with a new name for the saved search results.
Results
This example stores the search results with specified file name. The output is in JSON.
Remove stored search results request
To remove stored search results and place the data back in the normal purge cycle, send the following request:
POST https://<PX_IP_address>/api/4.0/search/<search_id>/<search_id>
Required header:
--user <username>:<password>
Options
PX_IP_address—IP address of the Series appliance running the Series API.
username—The user name for your Series appliance.
password—The password for your Series appliance.
search_id—The unique search identifier.
Example
POST https://xxx.xxx.xxx.xxx/api/4.0/results/7b123/7b123
Required header:
--user cpx:hammerhead
Remove stored search results response
uuid: [UUID] cmd: [Command] name: [Name] status: [Status]
message: [Message]
Response fields
UUID—The unique search identifier.
Command—The command being executed.
Name—The unique search identifier.
Status—A standard HTTP response message.
Message—The system response.
Example
{
“uuid”: “7b123”,
“cmd”:”unstore”,
“name”:”7b123”,
“status”:”ok”, “message”:”Success”
}
cURL code sample: Remove stored search results
The code sample was run with cURL 7.57.0.
curl -k --user cpx:hammerhead -X POST https://xxx.xxx.xxx.xxx/api/4.0/search/7b123/7b123
This cURL sample includes the following options:
-k—This option explicitly allows cURL to perform insecure SSL connections and transfers, which allows you to test your SSL connection without installing a CA certificate.
--user cpx:hammerhead—Replace cpx with the user name for your Series appliance. Replace hammerhead with the password for your Series appliance.
-X POST—This option changes the HTTP method to POST.
https://xxx.xxx.xxx.xxx/api/4.0/search/7b123/7b123—The results request URL. Replace xxx.xxx.xxx.xxx with the IP address of your Series appliance. Replace 7b123 with the search ID of interest.
Results
This example removes the specified stored search results and places the data back in the normal purge cycle. The output is in JSON.
List stored search results request
To list search summaries for searches that have been stored, send the following request:
GET https://<PX_IP_address>/api/4.0/search/stored
Required header:
--user <username>:<password>
Options
PX_IP_address—IP address of the Series appliance running the Series API.
username—The user name for your Series appliance.
password—The password for your Series appliance.
Example
GET https://xxx.xxx.xxx.xxx/api/4.0/search/stored
Required header:
--user cpx:hammerhead
List stored search results response
HTTP/1.1 [Response Code] [Response Message] Date: [Date]
Content-Type: [Content Type] message: [Message]
input_create_time: [Input Create Time] input_depth: [Input Depth]
input_etime_nanoseconds: [Input End Time in Nanoseconds] input_etime_second: [Input End Time in Seconds] input_hash_field: [Input Hash Field]
input_limit: [Input Limit] input_score: [Input Score] input_search_id: [Input Search ID] input_search_type: [Input Search Type]
input_stime_nanoseconds: [Input Start Time in Nanoseconds] input_stime_second: [Input Start Time in Seconds] input_strict: [Input Strictness]
input_time_format: [Input Time Format] input_user: [Input User] output_elapsed: [Output Elapsed Time]
output_firstFlowEpoch: [Output First Flow Epoch] output_firstIndexEpoch: [Output First Index Epoch] output_firstPacketEpoch: [Output First Packet Epoch] output_index_elapsed: [Packet Index Elapsed Time] output_index_end: [Packet Index End Time] output_index_foundRecords: [Packet Index Found Records] output_index_message: [Packet Index Status Message] output_index_packetPercent:[Packet Index Percent Complete] output_index_rangePercent: [Packet Index Range Percent] output_index_searchedFiles: [Packet Index Searched Files] output_index_start: [Packet Index Start] output_index_status: [Packet Index Status] output_lastUpdate: [Last Update]
output_message: [Output Status Message] output_packet_elapsed: [Packet Retrieval Elapsed Time] output_packet_end: [Packet Retrieval End Time] output_packet_foundRecords: [Packet Retrieval Found Records] output_packet_message: [Packet Retrieval Status Message]
output_packet_packetPercent: [Packet Retrieval Percent Complete] output_packet_processedBytes: [Packet Retrieval Packet Size] output_packet_start: [Packet Retrieval Start] output_packet_status: [Packet Retrieval Status] output_searchEnd: [Search End]
output_searchStart: [Search Start] output_session_elapsed: [Session Analysis Elapsed Time] output_session_end: [Session Analysis End Time] output_session_message: [Session Analysis Status Message]
output_session_packetPercent: [Session Analysis Percent Complete] output_session_processedBytes: [Session Analysis Packet Size] output_session_processedRecords: [Session Analysis Processed Records] output_session_start: [Session Analysis Start]
output_session_status: [Session Analysis Status] output_status: [Output Status] output_streamCount: [Stream Count]
output_xpf_elapsed: [Connection Index Elapsed Time] output_xpf_end: [Connection Index End Time] output_xpf_extentSecond: [Connection Index Second] output_xpf_firstSecond: [Connection Index First Connection] output_xpf_foundRecords: [Connection Index Found Records] output_xpf_lastSecond: [Connection Index Last Connection] output_xpf_limitPercent: [Connection Index Percent Complete] output_xpf_message: [Connection Index Status Message] output_xpf_packetCount: [Connection Index Packet Count] output_xpf_rangePercent: [Connection Index Range Percent] output_xpf_searchedBytes: [Connection Index Searched Bytes] output_xpf_start: [Connection Index Start] output_xpf_status: [Connection Index Status]
store_name: [Store Name] target_depth: [Target Depth]
Response fields
Response Code—A standard HTML response code.
Response Message—A standard HTML response message.
Date—Standard HTML date format.
Content Type—The response format.
Message—Summary of results
Input Create Time—Time at which the search was submitted.
Input Depth—Search depth. A search can be at the connection, packet, or session depth.
Input End Time in Nanoseconds—The nanoseconds portion of the end time of the search time range.
Input End Time in Seconds—The seconds portion of the end time of the search time range.
Input Hash Field—Hash key for the status of this search.
Input Limit—Requested maximum number of connection records to find.
Input Score—Time when the search was created.
Input Search ID—Generated search identifier that uniquely identifies this search.
Input Search Type—Type of search requested: stream or all.
Input Start Time in Nanoseconds—The nanoseconds portion of the start time of the search time range.
Input Start Time in Seconds—The seconds portion of the start time of the search range.
Input Strictness—If this field is set to true, no variations on the input are tried.
Input Time Format—Time format for input. A value of 1 indicates that the pcap time stamp is in microseconds; a value of 0 indicates that the pcap time stamp is in nanoseconds.
Input User—User who made the search request.
Output Elapsed Time—Total elapsed time for all phases.
Output First Flow Epoch—Time of the first flow recorded on the appliance.
Output First Index Epoch—Time of the oldest connection packet index recorded on the appliance.
Output First Packet Epoch—Time of the oldest packet stored on the appliance.
Packet Index Elapsed Time—Total elapsed time of this phase.
Packet Index End Time—End time of this phase in epoch time.
Packet Index Found Records—Number of records found.
Packet Index Status Message—Current status message for this phase.
Packet Index Percent Complete—Percentage complete, of all potential packets found.
Packet Index Range Percent—Percentage complete, based on captured packet times.
Packet Index Searched Files—Number of files touched.
Packet Index Start—Start time of this phase in epoch time.
Packet Index Status—Status of this phase. Valid values are skipped, done, working, idle, and error.
Last Update—Time when the search was last updated.
Output Status Message—Status of the search.
Packet Retrieval Elapsed Time—Total elapsed time of this phase.
Packet Retrieval End Time—End time of this phase in epoch time.
Packet Retrieval Found Records—Number of records found.
Packet Retrieval Status Message—Current status message for this phase.
Packet Retrieval Percent Complete—Percentage complete, of all potential packets found.
Packet Retrieval Packet Size—Size of the packets processed.
Packet Retrieval Start—Start time of this phase in epoch time.
Packet Retrieval Status—Valid values are skipped, done, working, idle, and error.
Search End—Last record searched.
Search Start—First record searched.
Session Analysis Elapsed Time—Total elapsed time of this phase.
Session Analysis End Time—End time of this phase in epoch time.
Session Analysis Status Message—Current status message for this phase.
Session Analysis Percent Complete—Percentage complete, of all potential packets found.
Session Analysis Packet Size—Size of the packets processed.
Session Analysis Processed Records—Number of packets processed.
Session Analysis Start—Start time of this phase in epoch time.
Session Analysis Status—Status of this phase. Valid values are skipped, done, working, idle, and error.
Output Status—Status of the search. Valid values are skipped, done, working, idle, and error.
Stream Count—Number of nPulse streams.
Connection Index Elapsed Time—Total elapsed time of this phase.
Connection Index End Time—End time of this phase in epoch time.
Connection Index Second—The last second of the last flow that the search examined.
Connection Index First Connection—Epoch of the first connection found.
Connection Index Found Records—Number of records found.
Connection Index Last Connection—Current status message for this phase.
Connection Index Percent Complete—Percentage complete, based on input_limit.
Connection Index Status Message—Percentage complete, based on captured packet times.
Connection Index Packet Count—Number of packets to be found, based on connection records.
Connection Index Range Percent—Percentage complete, based on captured packet times.
Connection Index Searched Bytes—Size of searched packets.
Connection Index Start—Start time of this phase in epoch time.
Connection Index Status—Status of this phase. Valid values are skipped, done, working, idle, and error.
Store Name—Name that search is stored as.
Target Depth—Search depth. A search can be at the connection, packet, or session depth.
Example
HTTP/1.1 200 OK
Date: Thu, 10 Mar 2016 22:00:34 GMT
Content-Type: text/html; charset=UTF-8
{
"message": "Found 1 searches.",
"searches": [
{
"input_create_time": "1455054118", "input_depth": "connection", "input_etime_nanoseconds": "0",
"input_etime_second": "1455053885",
"input_hash_field": "SEARCH_6e693e264d5045f184c710a650435f76", "input_limit": "100",
"input_score": "1455054118.29",
"input_search_id": "6e693e264d5045f184c710a650435f76", "input_search_type": "all",
"input_stime_nanoseconds": "0",
"input_stime_second": "1455050285", "input_strict": "False", "input_time_format": "0", "input_user": "cpx", "output_elapsed": "0.447",
"output_firstFlowEpoch": "1455051483",
"output_firstIndexEpoch": "1455051483",
"output_firstPacketEpoch": "1455051609",
"output_index_elapsed": "0.138",
"output_index_end": "1455054118",
"output_index_foundRecords": "61345", "output_index_message": "Search complete", "output_index_packetPercent": "100",
"output_index_rangePercent": "100",
"output_index_searchedFiles": "345",
"output_index_start": "1455054118", "output_index_status": "done", "output_lastUpdate": "1455054117", "output_message": "Search complete", "output_packet_elapsed": "0.000",
"output_packet_end": "0",
"output_packet_foundRecords": "0", "output_packet_message": "skipped", "output_packet_packetPercent": "0",
"output_packet_processedBytes": "0",
"output_packet_start": "0", "output_packet_status": "skipped", "output_searchEnd": "1455054118",
"output_searchStart": "1455054118",
"output_session_elapsed": "0",
"output_session_end": "0", "output_session_message": "skipped", "output_session_packetPercent": "0", "output_session_processedBytes": "NA", "output_session_processedRecords": "NA", "output_session_start": "0", "output_session_status": "skipped", "output_status": "done", "output_streamCount": "1",
"output_xpf_elapsed": "0.016",
"output_xpf_end": "1455054118",
"output_xpf_extentSecond": "140257907072051",
"output_xpf_firstSecond": "140256452018176",
"output_xpf_foundRecords": "100",
"output_xpf_lastSecond": "140257907071710",
"output_xpf_limitPercent": "100", "output_xpf_message": "Search complete", "output_xpf_packetCount": "61345",
"output_xpf_rangePercent": "100",
"output_xpf_searchedBytes": "0",
"output_xpf_start": "1455054118", "output_xpf_status": "done",
"store_name": "malware_example", "target_depth": "connection"
}
],
"status": "ok"
}
cURL code sample: List stored search results
The code sample was run with cURL 7.57.0.
curl -k --user cpx:hammerhead https://xxx.xxx.xxx.xxx/api/4.0/search/stored
This cURL sample includes the following options:
-k—This option explicitly allows cURL to perform insecure SSL connections and transfers, which allows you to test your SSL connection without installing a CA certificate.
--user cpx:hammerhead—Replace cpx with the user name for your Series appliance. Replace hammerhead with the password for your Series appliance.
https://xxx.xxx.xxx.xxx/api/4.0/search/stored—The results request URL. Replace xxx.xxx.xxx.xxx with the IP address of your Series appliance.
Results
This example lists search summaries for searches that have been stored. The output is in JSON.
Analyze connections request
To increase the depth of a previously run connection search and to perform a session analysis, send the following request:
GET https://<PX_IP_address>/api/4.0/results/<search_id>/packets
Required header:
--user <username>:<password>
Data pulled from the search is not automatically saved. For details on storing search results, see Store search results request. Data that was purged will not be analyzed.
 Important
If the current search is already at the session level, this request will trigger a download of pcap files. For more information, see Download packets request.
Options
PX_IP_address—IP address of the Series appliance running the Series API.
username—The user name for your Series appliance.
password—The password for your Series appliance.
search_id—The unique search identifier.
Example
GET https://xxx.xxx.xxx.xxx/api/4.0/results/7b123/packets
Required header:
--user cpx:hammerhead
Analyze connections response
HTTP/1.1 [Response Code] [Response Message] Date: [Date]
Content-Type: [Content Type] status: [Status]
message: [Message]
Response fields
Response Code—A standard HTML response code.
Response Message—A standard HTML response message.
Date—Standard HTML date format.
Content Type—The response format.
Status—A standard HTTP response message.
Message—System response.
Example
HTTP/1.1 200 OK
Date: Thu, 10 Mar 2016 23:07:51 GMT
Content-Type: application/json; charset=UTF-8
{
“status”: “ok”,
“message”: “Session analysis has begun.”
}
cURL code sample: Analyze connections
The code sample was run with cURL 7.57.0.
curl -k --user cpx:hammerhead https://xxx.xxx.xxx.xxx/api/4.0/results/7b123/packets
This cURL sample includes the following options:
-k—This option explicitly allows cURL to perform insecure SSL connections and transfers, which allows you to test your SSL connection without installing a CA certificate.
--user cpx:hammerhead—Replace cpx with the user name for your Series appliance. Replace hammerhead with the password for your Series appliance.
https://xxx.xxx.xxx.xxx/api/4.0/results/7b123/packets—The results request URL. Replace xxx.xxx.xxx.xxx with the IP address of your Series appliance. Replace 7b123 with the search ID of interest.
Results
This example increases the depth of a previously run connection search and performs a session analysis on the specified search. The output is in JSON.
Download packets request
To download packets in pcap format, send the following request:
GET https://<PX_IP_address>/api/4.0/results/<search_id>/packets
Required header:
--user <username>:<password>
Data that was purged from storage will not be downloaded.
Options
PX_IP_address—IP address of the Series appliance running the Series API.
username—The user name for your Series appliance.
password—The password for your Series appliance.
search_id—The unique search identifier.
Query parameters
pcapdownload—When this parameter is set to true, the API will send packets for download instead of a session analysis. This parameter is useful for downloading pcap data from a packet-depth search without triggering session analysis.
Example
GET https://xxx.xxx.xxx.xxx/api/4.0/results/7b123/packets
Required header:
--user cpx:hammerhead
Download packets response
HTTP/1.1 [Response Code] [Response Message] Date: [Date]
Content-Type: [Content Type] ""
Response fields
Response Code—A standard HTTP response code.
Response Message—A standard HTTP response message.
Date—Standard HTML date format.
Content Type—The response format.
Example
HTTP/1.1 200 OK
Date: Thu, 10 Mar 2016 23:16:33 GMT
Content-Type: application/octet-stream; charset=UTF-8
M<▒▒▒%
cURL code sample: Download packets
The code sample was run with cURL 7.57.0.
curl -k --user cpx:hammerhead https://xxx.xxx.xxx.xxx/api/4.0/results/7b123/packets
This cURL sample includes the following options:
-k—This option explicitly allows cURL to perform insecure SSL connections and transfers, which allows you to test your SSL connection without installing a CA certificate.
--user cpx:hammerhead—Replace cpx with the user name for your Series appliance. Replace hammerhead with the password for your Series appliance.
https://xxx.xxx.xxx.xxx/api/4.0/results/7b123/packets—The results request URL. Replace xxx.xxx.xxx.xxx with the IP address of your Series appliance. Replace 7b123 with the search ID of interest.
Results
This example downloads packets in pcap format for the specified search. The output is in pcap nanosecond format, which is compatible with Wireshark or any other analysis tool.
Statistics
Use the statistics endpoints to get information about the overall system or to focus on a specific aspect:
GET https://<PX_IP_address>/api/4.0/stats/active
GET https://<PX_IP_address>/api/4.0/stats/info
GET https://<PX_IP_address>/api/4.0/stats/vital
GET https://<PX_IP_address>/api/4.0/stats/capture
GET https://<PX_IP_address>/api/4.0/stats/system
GET https://<PX_IP_address>/api/4.0/stats/disk
GET https://<PX_IP_address>/api/4.0/stats/timezone
GET https://<PX_IP_address>/api/4.0/stats/loadavg
GET https://<PX_IP_address>/api/4.0/stats/cpu
GET https://<PX_IP_address>/api/4.0/stats/mem
GET https://<PX_IP_address>/api/4.0/stats/temp
GET https://<PX_IP_address>/api/4.0/stats/flow
GET https://<PX_IP_address>/api/4.0/stats/capstats
GET https://<PX_IP_address>/api/4.0/stats/layer1
GET https://<PX_IP_address>/api/4.0/stats/layer2
GET https://<PX_IP_address>/api/4.0/stats/layer3
GET https://<PX_IP_address>/api/4.0/stats/layer4
GET https://<PX_IP_address>/api/4.0/stats/interfaces
GET https://<PX_IP_address>/api/4.0/stats/interfaces/<interface>
GET https://<PX_IP_address>/api/4.0/stats/interfaces/<interface>/streams
GET https://<PX_IP_address>/api/4.0/stats/interfaces/<interface>/channels
Search engine status request
To list advanced searches and any system calls, send the following request:
GET https://<PX_IP_address>/api/4.0/stats/active
Required header:
--user <username>:<password>
Examples of system calls are packet search, connection summary, packet list, and single packet detail requests. Only active searches are listed.
Options
PX_IP_address—IP address of the Series appliance running the Series API.
username—The user name for your Series appliance.
password—The password for your Series appliance.
Query parameters
stime—Date and time from which the search engine status should start. See Conventions for the format.
etime—Date and time at which the search engine status should end. See Conventions for the format.
Example
GET https://xxx.xxx.xxx.xxx/api/4.0/stats/active?stime=20151230.013059&etime=now
Required header:
--user cpx:hammerhead
Search engine status response
HTTP/1.1 [Response Code] [Response Message] Date: [Date]
Content-Type: [Content Type] thread: [Thread] output_status: [Output Status] input_user: [Input User]
input_create_time: [Input Create Time] input_service_id: [Input Service ID] input_search_type: [Input Search Type] cancelable: [Cancelable] output_elapsed: [Output Elapsed Time]
output_xpf_status: [Connection Index Status] output_index_status: [Packet Index Status] output_packet_status: [Packet Retrieval Status]
Response fields
Response Code—A standard HTML response code.
Response Message—A standard HTML response message.
Date—Standard HTML date format.
Content Type—The response format.
Thread—Number of threads.
Output Status—Status of the search. Valid values are skipped, done, working, idle, and error.
Input User—User who made the search request.
Input Create Time—Time at which the search was submitted.
Input Search ID—Generated search ID that uniquely identifies this search.
Input Search Type—Type of search requested: stream or all.
Cancelable—Whether the search or service can be canceled.
Output Elapsed Time—Total elapsed time for all phases.
Connection Index Status—Status of this search phase. Valid values are skipped, done, working, idle, and error.
Packet Index Status—Status of this search phase. Valid values are skipped, done, working, idle, and error.
Packet Retrieval Status—Status of this search phase. Valid values are skipped, done, working, idle, and error.
Example
{
“service”: [
{
“thread”:”0”, “output_status”:”working”, “input_user”:””, “input_create_time”:”0”,
“input_service_id”:”tmp_R94HP98RYLDNTJPQY07VW”, “input_search_type”:”active”,
“cancelable”:”0”, “output_elapsed”:”0.000”
}
],
“search”: [
{
“thread”:”2”, “output_status”:”working”, “input_user”:”cpx”, “input_create_time”:”1383842997”, “input_search_id”:”7b123”, “input_search_type”:”all”, “cancelable”:”1”, “output_elapsed”:”2.000”, “output_xpf_status”:”working”, “output_index_status”:”working”, “output_packet_status”:”skipped”,
}
]
}
cURL code sample: Search engine status
The code sample was run with cURL 7.57.0.
curl -k --user cpx:hammerhead https://xxx.xxx.xxx.xxx/api/4.0/stats/active
This cURL sample includes the following options:
-k—This option explicitly allows cURL to perform insecure SSL connections and transfers, which allows you to test your SSL connection without installing a CA certificate.
--user cpx:hammerhead—Replace cpx with the user name for your Series appliance. Replace hammerhead with the password for your Series appliance.
https://xxx.xxx.xxx.xxx/api/4.0/stats/active—The statistics request URL. Replace xxx.xxx.xxx.xxx with the IP address of your Series appliance.
Results
This example returns a list of advanced searches and any service calls being issued against the system. The output is in JSON.
Informational statistics request
To get general information about the Series appliance, send the following request:
GET https://<PX_IP_address>/api/4.0/stats/info
Required header:
--user <username>:<password>
Options
PX_IP_address—IP address of the Series appliance running the Series API.
username—The user name for your Series appliance.
password—The password for your Series appliance.
Example
GET https://xxx.xxx.xxx.xxx/api/4.0/stats/info
Required header:
--user cpx:hammerhead
Informational statistics response
HTTP/1.1 [Response Code] [Response Message] Date: [Date]
Content-Type: [Content Type]
lastflow: [Last Flow] firstpacket: [First Packet] status: [Status]
firstflow: [First Flow]
Response fields
Response Code—A standard HTML response code.
Response Message—A standard HTML response message.
Date—Standard HTML date format.
Content Type—The response format.
Last Flow—The last second of the last flow examined.
First Packet—Time stamp of the first packet index in storage.
Status—Status of physical device.
First Flow—Time of the first flow recorded on the appliance.
Example
HTTP/1.1 200 OK
Date: Wed, 16 Mar 2016 23:24:01 GMT
Content-Type: application/json; charset=utf-8
{
"lastflow": "", "firstpacket": "1483967100", "status": "ok",
"firstflow": "1483733400"
}
cURL code sample: Informational statistics
The code sample was run with cURL 7.57.0.
curl -k --user cpx:hammerhead https://xxx.xxx.xxx.xxx/api/4.0/stats/info
This cURL sample includes the following options:
-k—This option explicitly allows cURL to perform insecure SSL connections and transfers, which allows you to test your SSL connection without installing a CA certificate.
--user cpx:hammerhead—Replace cpx with the user name for your Series appliance. Replace hammerhead with the password for your Series appliance.
https://xxx.xxx.xxx.xxx/api/4.0/stats/info—The statistics request URL. Replace xxx.xxx.xxx.xxx with the IP address of your Series appliance.
Results
This example returns general information about the Series appliance. The output is in JSON.
Vital statistics request
To get the most pertinent details about the Series appliance, send the following request:
GET https://<PX_IP_address>/api/4.0/stats/vital
Required header:
--user <username>:<password>
Options
PX_IP_address—IP address of the Series appliance running the Series API.
username—The user name for your Series appliance.
password—The password for your Series appliance.
Query Parameters
stime—Date and time from which the vital statistics should start. See Conventions for the format.
etime—Date and time at which the vital statistics should end. See Conventions for the format.
Example
GET https://xxx.xxx.xxx.xxx/api/4.0/stats/vital?stime=epoch&etime=19900801.015959
Required header:
--user cpx:hammerhead
Vital statistics response
HTTP/1.1 [Response Code] [Response Message] Date: [Date]
Content-Type: [Content Type] first_connection: [First Connection] msepoch: [Epoch in Microseconds] links: [Links]
first_index: [First Index] epoch: [Epoch]
started: [PPS Started] skew: [PPS Skew]
sync: [PPS Synchronization] ended: [PPS Ended]
toggle: [PPS Toggle] version: [PPS Version] link: [PPS Link]
date: [PPS Date] notrunning: [Not Running]
first_packet: [First Packet]
Response fields
Response Code—A standard HTML response code.
Response Message—A standard HTML response message.
Date—Standard HTML date format.
Content Type—The response format.
First Connection—Time stamp of the first connection in storage.
Epoch in Microseconds—Microseconds since epoch (UTC) on the Series appliance.
Links—Which ports show a link. A link is indicated by 1.
First Index—Time stamp of the first packet index in storage.
Epoch—Seconds since epoch (UTC) on the Series appliance.
PPS Started—This value will be blank; PPS is no longer reported.
PPS Skew—This value will be blank; PPS is no longer reported.
PPS Synchronization—This value will be blank; PPS is no longer reported.
PPS Ended—This value will be blank; PPS is no longer reported.
PPS Toggle—This value will be blank; PPS is no longer reported.
PPS Version—This value will be blank; PPS is no longer reported.
PPS Link—This value will be blank; PPS is no longer reported.
PPS Date—This value will be blank; PPS is no longer reported.
Not Running—List of critical Series services that should be running but are not.
First Packet—Time stamp of the first packet in storage.
Example
HTTP/1.1 200 OK
Date: Wed, 16 Mar 2016 23:24:01 GMT
Content-Type: application/json; charset=utf-8
{
"first_connection":1455051480, "msepoch":1458170641540,
"links":[
1,
0,
0,
0
],
"first_index":1455051480, "epoch":1458170641,
"pps":{
"started":"",
"skew":"",
"sync":"",
"ended":"",
"toggle":"",
"version":"",
"link":"",
"date":""
},
"notrunning":[
"px-analysis", "px-eve-route"
],
"first_packet":1455051600
}
cURL code sample: Vital statistics
The code sample was run with cURL 7.57.0.
curl -k --user cpx:hammerhead https://xxx.xxx.xxx.xxx/api/4.0/stats/vital
This cURL sample includes the following options:
-k—This option explicitly allows cURL to perform insecure SSL connections and transfers, which allows you to test your SSL connection without installing a CA certificate.
--user cpx:hammerhead—Replace cpx with the user name for your Series appliance. Replace hammerhead with the password for your Series appliance.
https://xxx.xxx.xxx.xxx/api/4.0/stats/vital—The statistics request URL. Replace xxx.xxx.xxx.xxx with the IP address of your Series appliance.
Results
This example returns the most pertinent details about the Series appliance. The output is in JSON.
Capture statistics request
To retrieve the most recent data point for each stream of network data for the Series appliance, send the following request:
GET https://<PX_IP_address>/api/4.0/stats/capture
Required header:
--user <username>:<password>
Options
PX_IP_address—IP address of the Series appliance running the Series API.
username—The user name for your Series appliance.
password—The password for your Series appliance.
Query parameters
stime—Date and time from which the capture statistics should start. See Conventions for the format.
etime—Date and time at which the capture statistics should end. See Conventions for the format.
Example
GET https://xxx.xxx.xxx.xxx/api/4.0/stats/capture?stime=epoch&etime=19710301.015959
Required header:
--user cpx:hammerhead
Capture statistics response
HTTP/1.1 [Response Code] [Response Message] Date: [Date]
Content-Type: [Content Type] Mfps: [Mfps]
Mbps: [Mbps]
disk-filtered-octets: [Octets] disk-filtered-packets: [Packets] frames: [Frames]
octets: [Octets]
suricata-drop-octets: [Octets] suricata-drop-packets: [Packets] suricata-export-octets: [Octets] suricata-export-packets: [Packets] suricata-filtered-octets: [Octets] suricata-filtered-packets: [Packets]
Response fields
Response Code—A standard HTML response code.
Response Message—A standard HTML response message.
Date—Standard HTML date format.
Content Type—The response format.
suricata-export-octets—Number of octets sent to metadata pipeline.
suricata-export-packets—Number of packets sent to metadata pipeline.
suricata-drop-octets—Number of octets dropped on metadata pipeline.
suricata-drop-packets—Number of packets dropped on metadata pipeline.
suricata-filtered-octets—Number of octets not sent to metadata pipeline due to a filter rule.
suricata-filtered-packets—Number of packets not sent to metadata pipeline due to a filter rule.
octets—The size of packets.
frames—Number of frames.
Mfps—Traffic rate in millions of frames per second.
Mbps—Traffic rate in megabits per second.
Example
HTTP/1.1 200 OK
Date: Fri, 11 Mar 2016 22:33:49 GMT
Content-Type: text/html; charset=UTF-8
{
"streams": [
{
"suricata-export-octets": 1958169662274,
"suricata-export-packets": 2553527610,
"suricata-drop-octets": 567204400,
"suricata-drop-packets": 621662,
"suricata-filtered-octets": 0,
"suricata-filtered-packets": 0,
"octets": 1958736866674,
"frames": 2554149272,
"mfps": 0.008007,
"mbps": 50.760014
},
{
"suricata-export-octets": 1665554706140,
"suricata-export-packets": 2258422450,
"suricata-drop-octets": 9675435478,
"suricata-drop-packets": 10645450,
"suricata-filtered-octets": 0,
"suricata-filtered-packets": 0,
"octets": 1675230141618,
"frames": 2269067900,
"mfps": 0.005395,
"mbps": 30.199156
},
{
"suricata-export-octets": 1623754393469,
"suricata-export-packets": 2239539195,
"suricata-drop-octets": 540669897,
"suricata-drop-packets": 582888,
"suricata-filtered-octets": 0,
"suricata-filtered-packets": 0,
"octets": 1624295063366,
"frames": 2240122083,
"mfps": 0.006913,
"mbps": 41.150513
},
{
"suricata-export-octets": 1204315963724,
"suricata-export-packets": 1739699750,
"suricata-drop-octets": 155863200,
"suricata-drop-packets": 171002,
"suricata-filtered-octets": 0,
"suricata-filtered-packets": 0,
"octets": 1204471826924,
"frames": 1739870752,
"mfps": 0.004829,
"mbps": 26.796675
}
]
}
cURL code sample: Capture statistics
The code sample was run with cURL 7.57.0.
curl -k --user cpx:hammerhead https://xxx.xxx.xxx.xxx/api/4.0/stats/capture
This cURL sample includes the following options:
-k—This option explicitly allows cURL to perform insecure SSL connections and transfers, which allows you to test your SSL connection without installing a CA certificate.
--user cpx:hammerhead—Replace cpx with the user name for your Series appliance. Replace hammerhead with the password for your Series appliance.
https://xxx.xxx.xxx.xxx/api/4.0/stats/capture—The statistics request URL. Replace xxx.xxx.xxx.xxx with the IP address of your Series appliance.
Results
This example returns the most recent data point for each stream of network data. The output is in JSON.
System statistics request
To retrieve information regarding the current Series appliance, including disk usage, memory usage, system load, and the capture interfaces, send the following request:
GET https://<PX_IP_address>/api/4.0/stats/system
Required header:
--user <username>:<password>
Each message has an object for CPU, memory, load, capture ports, and file system
Options
PX_IP_address—IP address of the Series appliance running the Series API.
username—The user name for your Series appliance.
password—The password for your Series appliance.
Query parameters
stime—Date and time from which the system statistics should start. See Conventions for the format.
etime—Date and time at which the system statistics should end. See Conventions for the format.
Example
GET https://xxx.xxx.xxx.xxx/api/4.0/stats/system?stime=20100101.015959&etime=20100201.015900
Required header:
--user cpx:hammerhead
System statistics response
HTTP/1.1 [Response Code] [Response Message] Date: [Date]
Content-Type: [Content Type] min1: [1 Minute]
min5: [5 Minutes]
min15: [15 Minutes] burst: [Burst]
sfp: [SFP] epoch: [Epoch] link: [Link] octets: [Octets] frames: [Frames] drops: [Drops]
started: [PPS Started] skew: [PPS Skew]
sync: [PPS Synchronization] ended: [PPS Ended]
toggle: [PPS Toggle]
version: [PPS Version] link:[PPS Link]
date: [PPS Date]
channelvalues: [Channel Values] total: [Total Memory]
cache: [Cache Memory] used: [Used Memory] free: [Free Memory]
blocksAvailable: [Blocks Available] hwm: [High-Water Mark]
sizeGB: [Size GB] utilization: [Utilization] inodesFree: [Inodes Free] blockSize: [Block Size] inodesTotal: [Total Inodes] lastUpdated: [Last Updated] blocksTotal: [Total Blocks]
inodesAvailable: [Inodes Available] blocksFree: [Blocks Free] fragmentSize: [Fragment Size]
root: [Root Directory]
Response fields
Response Code—A standard HTML response code.
Response Message—A standard HTML response message.
Date—Standard HTML date format.
Content Type—The response format.
1 Minute—The average system load over 1 minute.
5 Minutes—The average system load over 5 minutes.
15 Minutes—The average system load over 15 minutes.
Burst—Data rate delta in bursts per second.
SFP—Number of small form-factor pluggable (SFP) adapters.
Epoch—Epoch time stamp.
Link—The number of links.
Octets—Number of octets.
Frames—Number of frames.
Drops—Number of dropped packets.
PPS Started—This value will be blank; pulse-per-second status (PPS) is no longer reported.
PPS Skew—This value will be blank; PPS is no longer reported.
PPS Synchronization—This value will be blank; PPS is no longer reported.
PPS Ended—This value will be blank; PPS is no longer reported.
PPS Toggle—This value will be blank; PPS is no longer reported.
PPS Version—This value will be blank; PPS is no longer reported.
PPS Link—This value will be blank; PPS is no longer reported.
PPS Date—This value will be blank; PPS is no longer reported.
Channel Values—The number of channels.
Total Memory—Total system memory in megabytes.
Cache Memory—How much memory is in the cache in megabytes.
Used Memory—How much of the system memory is used in megabytes.
Free Memory—How much of the system memory is free in megabytes.
Blocks Available—Number of blocks are available.
High-Water Mark—The maximum allowed size of the disk before the purge process will start removing files. For example, if this field is set to 0.9, the purge process starts when the filesystem is 90-percent full.
Size GB—Size in GB.
Utilization—The percentage of space that is currently being used.
Inodes Free—How many inodes are free.
Block Size—Size of each block.
Total Inodes—Total number of inodes.
Last Updated—When the last update occurred.
Total Blocks—Total number of blocks.
Inodes Available—How many inodes are available.
Blocks Free—How many blocks are free.
Fragment Size—Size of each fragment.
Root Directory—Directory root at which the filesystem is mounted.
Example
HTTP/1.1 200 OK
Date: Fri, 26 Jul 2019 12:42:39 GMT
Content-Type: application/json; charset=utf-8
{
"systat": {
"load": {
"min1": "2.78",
"min5": "2.85",
"min15": "2.84"
},
"channels": [
{
"device": "napatech", "broadcastPackets": "0", "missedBufPackets": "", "missedHWPackets": "0",
"multicastPackets": "0",
"receivedOctets": "0",
"receivedPackets": "0",
"epoch": "1564180559"
}
],
"pps": { "started": "",
"skew": "",
"sync": "",
"ended": "",
"toggle": "",
"version": "",
"link": "",
"date": ""
},
"channelvalues": [ 0,
0,
0,
0
],
"memory": {
"total": "131996564",
"cache": "735320",
"used": "49123176",
"free": "82873388"
},
"filesystem": { "tmp": {
"blocksAvailable": "126870515", "hwm": "",
"sizeGB": "484.00964736938477",
"utilization": "0.008",
"inodesFree": "253884408",
"blockSize": "4096",
"inodesTotal": "253884416",
"lastUpdated": "1564180552",
"blocksTotal": "126880225",
"inodesAvailable": "253884408",
"blocksFree": "126870515",
"fragmentSize": "4096", "root": "/data/px/search"
},
"capture": {
"blocksAvailable": "5858387144", "hwm": "",
"sizeGB": "22348.005859375",
"utilization": "0",
"inodesFree": "2343566902",
"blockSize": "4096",
"inodesTotal": "2343566912",
"lastUpdated": "1564180553",
"blocksTotal": "5858395648",
"inodesAvailable": "2343566902",
"blocksFree": "5858387144",
"fragmentSize": "4096", "root": "/data/px/capture"
},
"flow": {
"blocksAvailable": "195192649", "hwm": "",
"sizeGB": "744.6323280334473",
"utilization": "0.004",
"inodesFree": "390592509",
"blockSize": "4096",
"inodesTotal": "390592512",
"lastUpdated": "1564180553",
"blocksTotal": "195200897",
"inodesAvailable": "390592509",
"blocksFree": "195192649",
"fragmentSize": "4096", "root": "/data/px/flow"
},
"index": {
"blocksAvailable": "585594442", "hwm": "",
"sizeGB": "2233.8969802856445",
"utilization": "0.001",
"inodesFree": "234355453",
"blockSize": "4096",
"inodesTotal": "234355456",
"lastUpdated": "1564180552",
"blocksTotal": "585602690",
"inodesAvailable": "234355453",
"blocksFree": "585594442",
"fragmentSize": "4096", "root": "/data/px/index"
},
"buffer": {
"blocksAvailable": "9746794", "hwm": "",
"sizeGB": "37.227909088134766",
"utilization": "0.126",
"inodesFree": "19527462",
"blockSize": "4096",
"inodesTotal": "19527680",
"lastUpdated": "1564180552",
"blocksTotal": "9759073",
"inodesAvailable": "19527462",
"blocksFree": "9746794",
"fragmentSize": "4096", "root": "/data/px/buffer"
},
"event": {
"blocksAvailable": "9750825", "hwm": "",
"sizeGB": "37.227909088134766",
"utilization": "0.085",
"inodesFree": "19527677",
"blockSize": "4096",
"inodesTotal": "19527680",
"lastUpdated": "1564180552",
"blocksTotal": "9759073",
"inodesAvailable": "19527677",
"blocksFree": "9750825",
"fragmentSize": "4096", "root": "/data/px/event"
}
}
}
}
cURL code sample: System statistics
The code sample was run with cURL 7.57.0.
curl -k --user cpx:hammerhead https://xxx.xxx.xxx.xxx/api/4.0/stats/system
This cURL sample includes the following options:
-k—This option explicitly allows cURL to perform insecure SSL connections and transfers, which allows you to test your SSL connection without installing a CA certificate.
--user cpx:hammerhead—Replace cpx with the user name for your Series appliance. Replace hammerhead with the password for your Series appliance.
https://xxx.xxx.xxx.xxx/api/4.0/stats/system—The statistics request URL. Replace xxx.xxx.xxx.xxx with the IP address of your Series appliance.
Results
This example returns information regarding the current Series appliance. The output is in JSON.
RAID status request
To provide a list of all RAID controllers and the associated disks, including status, serial number, and location, send the following request:
GET https://<PX_IP_address>/api/4.0/stats/disk
Required header:
--user <username>:<password>
This output is dynamic based on the number of RAID controllers and the number of disks in each controller.
Options
PX_IP_address—IP address of the Series appliance running the Series API.
username—The user name for your Series appliance.
password—The password for your Series appliance.
Example
GET https://xxx.xxx.xxx.xxx/api/4.0/stats/disk
Required header:
--user cpx:hammerhead
RAID status response
HTTP/1.1 [Response Code] [Response Message] Date: [Date]
Content-Type: [Content Type] Controller: [Controller] isOptimal: [Optimal]
model: [Model]
serialNumber: [Serial Number] slotNumber: [Slot Number] tempCelcius: [Temperature] defunctCount: [Defunct Count]
logicalDeviceCount: [Logical Device Count] logicalFailedCount: [Logical Devices Failed] logicalDegradedCount: [Logical Devices Degraded] versionBIOS: [BIOS Version]
versionFirmware: [Firmware Version] versionDriver: [Driver Version] versionBootFlash: [Boot Flash Version] logicalDeviceNumber: [Logical Device Number] name: [Logical Device Name]
blockSize: [Block Size]
RaidLevel: [Logical Device RAID Level] uid: [Logical Device UID]
size: [Logical Device Size]
stripeSize: [Logical Device Stripe Size] segmentCount: [Logical Device Segment Count] deviceNumber: [Physical Device Number] status: [Physical Device Status]
channelNumberT: [Physical Device Channel Number Target] channelNumberL: [Physical Device Channel Number LUN] location: [Physical Device Location]
vendor: [Physical Device Vendor]
model: [Physical Device Model]
serialNumber: [Physical Device Serial Number] size: [Physical Device Size]
hotspare: [Hot Spare]
Response fields
Response Code—A standard HTML response code.
Response Message—A standard HTML response message.
Date—Standard HTML date format.
Content Type—The response format.
Controller—Number of RAID controllers.
Optimal—RAID status, for example, optimal or degraded. A value of 1 indicates the RAID is in an optimal state.
Model—Controller model number.
Serial Number—Controller serial number.
Slot Number—Physical PCI slot in which the controller is seated.
Temperature—Temperature in degrees Celsius.
Defunct Count—Number of defunct disks.
Logical Device Count—Number of logical devices.
Logical Devices Failed—Number of failed logical devices.
Logical Devices Degraded—Number of degraded logical devices.
BIOS Version—BIOS version.
Firmware Version—Firmware version.
Driver Version—Driver version.
Boot Flash Version—Boot Flash version.
Logical Device Number—Logical device identifier.
Logical Device Name—Name of logical device.
Block Size—Size of blocks.
Logical Device RAID Level—RAID level.
Logical Device UID—A unique identifier of the connection.
Logical Device Size—Size of logical device.
Logical Device Stripe Size—Stripe size.
Logical Device Segment Count—Number of segments.
Physical Device Number—Physical device identifier.
Physical Device Status—Status of physical device.
Physical Device Channel Number Target—Enclosure number where the physical device is.
Physical Device Channel Number LUN—Slot number where the physical device is.
Physical Device Location—Location of physical device.
Physical Device Vendor—Manufacturer of physical device.
Physical Device Model—Physical device model.
Physical Device Serial Number—Physical device serial number.
Physical Device Size—Size of physical device.
Hot Spare—Whether backup RAID is available.
Example
HTTP/1.1 200 OK
Date: Fri, 11 Mar 2016 00:50:32 GMT
Content-Type: application/json; charset=utf-8
[
{
"Controller": 1,
"isOptimal": 1,
"model": "Adaptec ASR7805", "serialNumber": "3A011300BCD", "slotNumber": 4,
"tempCelcius": 48,
"defunctCount": 0,
"logicalDeviceCount": 1,
"logicalFailedCount": 0,
"logicalDegradedCount": 0,
"versionBIOS": "7.5-0 (32033)",
"versionFirmware": "7.5-0 (32033)",
"versionDriver": "1.2-1 (40708)",
"versionBootFlash": "7.5-0 (32033)", "logicalDevices": [
{
"logicalDeviceNumber": 0, "name": "CAPTURE",
"blockSize": 512,
"RaidLevel": 6,
"isOptimal": 1, "uid": "579F0726", "size": 11438070,
"stripeSize": 256,
"segmentCount": 3, "physicalDevices": [
{
"deviceNumber": 1, "status": "Online", "blockSize": 512,
"channelNumberT": 0,
"channelNumberL": 1,
"location": "Enclosure 0, Slot 1", "vendor": "SEAGATE",
"model": "ST6000NM0034",
"versionFirmware": "E001", "serialNumber": "Z4D01NG40000S436FTT3", "size": 5723166
},
{
"deviceNumber": 2, "status": "Online", "blockSize": 512,
"channelNumberT": 0,
"channelNumberL": 2,
"location": "Enclosure 0, Slot 2", "vendor": "SEAGATE",
"model": "ST6000NM0034",
"versionFirmware": "E001", "serialNumber": "Z4D045CZ0000S432D2R1", "size": 5723166
},
{
"deviceNumber": 3, "status": "Online", "blockSize": 512,
"channelNumberT": 0,
"channelNumberL": 3,
"location": "Enclosure 0, Slot 3", "vendor": "SEAGATE",
"model": "ST6000NM0034",
"versionFirmware": "E001", "serialNumber": "Z4D04PCM0000S4439Q7F", "size": 5723166
}
]
}
],
"hotspare": [
]
}
]
cURL code sample: RAID status
The code sample was run with cURL 7.57.0.
curl -k --user cpx:hammerhead https://xxx.xxx.xxx.xxx/api/4.0/stats/disk
This cURL sample includes the following options:
-k—This option explicitly allows cURL to perform insecure SSL connections and transfers, which allows you to test your SSL connection without installing a CA certificate.
--user cpx:hammerhead—Replace cpx with the user name for your Series appliance. Replace hammerhead with the password for your Series appliance.
https://xxx.xxx.xxx.xxx/api/4.0/stats/disk—The statistics request URL. Replace xxx.xxx.xxx.xxx with the IP address of your Series appliance.
Results
This example returns a list of all RAID controllers, the associated disks, and their status and location. The output is in JSON.
Time zone statistics request
To get information about the time zone setting of the Series appliance, send the following request:
GET https://<PX_IP_address>/api/4.0/stats/timezone
Required header:
--user <username>:<password>
Options
PX_IP_address—IP address of the Series appliance running the Series API.
username—The user name for your Series appliance.
password—The password for your Series appliance.
Example
GET https://xxx.xxx.xxx.xxx/api/4.0/stats/timezone
Required header:
--user cpx:hammerhead
Time zone statistics response
HTTP/1.1 [Response Code] [Response Message] Date: [Date]
Content-Type: [Content Type]
utc: [UTC]
Response fields
Response Code—A standard HTML response code.
Response Message—A standard HTML response message.
Date—Standard HTML date format.
Content Type—The response format.
UTC—Seconds since epoch (UTC) on the Series appliance.
Example
HTTP/1.1 200 OK
Date: Wed, 16 Mar 2016 23:24:01 GMT
Content-Type: application/json; charset=utf-8
{
"utc": -300
}
cURL code sample: Time zone statistics
The code sample was run with cURL 7.57.0.
curl -k --user cpx:hammerhead https://xxx.xxx.xxx.xxx/api/4.0/stats/timezone
This cURL sample includes the following options:
-k—This option explicitly allows cURL to perform insecure SSL connections and transfers, which allows you to test your SSL connection without installing a CA certificate.
--user cpx:hammerhead—Replace cpx with the user name for your Series appliance. Replace hammerhead with the password for your Series appliance.
https://xxx.xxx.xxx.xxx/api/4.0/stats/timezone—The statistics request URL. Replace xxx.xxx.xxx.xxx with the IP address of your Series appliance.
Results
This example returns information about the time zone setting of the Series appliance. The output is in JSON.
Load average values request
To display the system load in 1-minute, 5-minute, and 15-minute averages, send the following request:
GET https://<PX_IP_address>/api/4.0/stats/loadavg
Required header:
--user <username>:<password>
Statistics are collected at a default interval that depends on the stime value. See the following table.
stime | Interval |
No stime specified | 10 seconds |
Less than 1 hour | 10 seconds |
More than 1 hour and less than 3 days | 2 minutes |
More than 3 days and less than 3 weeks | 10 minutes |
More than 3 weeks and less than 3 months | 1 hour |
More than 3 months and less than 2 years | 1 day |
More than 2 years | Not applicable; data is not kept for more than 2 years. |
Options
PX_IP_address—IP address of the Series appliance running the Series API.
username—The user name for your Series appliance.
password—The password for your Series appliance.
Query parameters
stime—Date and time from which the load average values should start. See Conventions for the format.
etime—Date and time at which the load average values should end. See Conventions for the format.
Example
GET https://xxx.xxx.xxx.xxx/api/4.0/stats/loadavg?stime=20140130.015959&etime=20140215.010059
Required header:
--user cpx:hammerhead
Load average values response
HTTP/1.1 [Response Code] [Response Message] Date: [Date]
Content-Type: [Content Type] name: [Statistics Type] type: [Load Average Period] values: [Values]
columns: [Columns] error: [Error]
Response fields
Response Code—A standard HTML response code.
Response Message—A standard HTML response message.
Date—Standard HTML date format.
Content Type—The response format.
Statistics Type—For the load average values request, the type is loadavg.
Load Average Period—The response provides the average system load over 1 minute, 5 minutes, and 15 minutes.
Values—The response provides times and the load average value for each time.
Columns—The response provides two columns, time and mean.
Error—Error message if an error occurs.
Example
HTTP/1.1 200 OK
Date: Mon, 14 Mar 2016 15:46:40 GMT
Content-Type: application/json; charset=utf-8
{
"results": [
{
"series": [
{
"name": "loadavg", "tags": {
"type": "min1"
},
"values": [ [
1452094794,
3.03
], [
1452094784,
3.04
]
]
"columns":[
"time", "mean"
]
},
{
"name": "loadavg", "tags": {
"type": "min15"
},
"values": [ [
1452094794,
5.78
], [
1452094784,
5.81
]
]
"columns": [
"time", "mean"
],
},
{
"name": "loadavg", "tags": {
"type": "min5"
},
"values": [ [
1452094794,
5.02
], [
1452094784,
5.08
]
],
"columns":[
"time", "mean"
]
}
],
"error":""
}
]
}
cURL code sample: Load average values
The code sample was run with cURL 7.57.0.
curl -k --user cpx:hammerhead https://xxx.xxx.xxx.xxx/api/4.0/stats/loadavg
This cURL sample includes the following options:
-k—This option explicitly allows cURL to perform insecure SSL connections and transfers, which allows you to test your SSL connection without installing a CA certificate.
--user cpx:hammerhead—Replace cpx with the user name for your Series appliance. Replace hammerhead with the password for your Series appliance.
https://xxx.xxx.xxx.xxx/api/4.0/stats/loadavg—The statistics request URL. Replace xxx.xxx.xxx.xxx with the IP address of your Series appliance.
Results
This example returns the system load in 1-minute, 5-minute, and 15-minute averages. The output is in JSON.
CPU statistics request
To retrieve information about the CPU of the PX Series appliance, send the following request:
GET https://<PX_IP_address>/api/4.0/stats/cpu
Required header:
--user <username>:<password>
Statistics are collected at a default interval that depends on the stime value. See the following table.
stime | Interval |
No stime specified | 10 seconds |
Less than 1 hour | 10 seconds |
More than 1 hour and less than 3 days | 2 minutes |
More than 3 days and less than 3 weeks | 10 minutes |
More than 3 weeks and less than 3 months | 1 hour |
More than 3 months and less than 2 years | 1 day |
More than 2 years | Not applicable; data is not kept for more than 2 years. |
Options
PX_IP_address—IP address of the Series appliance running the Series API.
username—The user name for your Series appliance.
password—The password for your Series appliance.
Query parameters
stime—Date and time from which the CPU statistics should start. See Conventions for the format.
etime—Date and time at which the CPU statistics should end. See Conventions for the format.
Example
GET https://xxx.xxx.xxx.xxx/api/4.0/stats/cpu?stime=20150701.015959&etime=0.015959
Required header:
--user cpx:hammerhead
CPU statistics response
HTTP/1.1 [Response Code] [Response Message] Date: [Date]
Content-Type: [Content Type] name: [Statistics Type] type: [CPU Statistics Type] values: [Values]
columns: [Columns] error: [Error]
Response fields
Response Code—A standard HTML response code.
Response Message—A standard HTML response message.
Date—Standard HTML date format.
Content Type—The response format.
Statistics Type—For the CPU statistics request, the type is cpustats.
CPU Statistics Type—The type of CPU statistics being measured. The following statistics are gathered:
idle—How much time the CPU is idle.
iowait—How much time the CPU is waiting on input/output processes.
irq—How much time the CPU is stopped because of interrupt requests.
nice—Percentage of CPU usage that occurred while executing at the user level with nice priority.
softirq—How much time the CPU is stopped because of software interrupts.
system—How much of the system is being used.
Values—The response provides times and the value for each time.
Columns—The response provides two columns, time and non_negative_derivative.
Error—Error message if an error occurs.
Example
HTTP/1.1 200 OK
Date: Mon, 14 Mar 2016 15:47:29 GMT
Content-Type: application/json; charset=utf-8
{
"results": [
{
"series": [
{
"name": "cpustats", "tags": {
"type": "idle"
},
"values": [ [
1452094794,
364830323
], [
1452094784,
364820625
]
],
"columns": [
"time", "non_negative_derivative"
]
},
{
"name": "cpustats", "tags": {
"type": "iowait"
},
"values": [ [
1452094794,
675014662
], [
1452094784,
675014622
]
],
"columns": [
"time", "non_negative_derivative"
]
},
{
"name": "cpustats", "tags": {
"type": "irq"
},
"values": [ [
1452094794,
4009
], [
1452094784,
4009
]
],
"columns": [
"time", "non_negative_derivative"
]
},
{
"name": "cpustats", "tags": {
"type": "nice"
},
"values": [ [
1452094794,
9823012
], [
1452094784,
9823005
]
],
"columns": [
"time", "non_negative_derivative"
]
},
{
"name": "cpustats", "tags": {
"type": "softirq"
},
"values": [ [
1452094794,
666890
], [
1452094784,
666889
]
],
"columns": [
"time", "non_negative_derivative"
]
},
{
"name": "cpustats", "tags": {
"type": "system"
},
"values": [ [
1452094794,
99408899
], [
1452094784,
99408076
]
],
"columns": [
"time", "non_negative_derivative"
]
},
{
"name": "cpustats", "tags": {
"type": "user"
},
"values": [ [
1452094794,
58264297
], [
1452094784,
58263172
]
],
"columns": [
"time", "non_negative_derivative"
]
}
],
"error":""
}
]
}
cURL code sample: CPU statistics
The code sample was run with cURL 7.57.0.
curl -k --user cpx:hammerhead https://xxx.xxx.xxx.xxx/api/4.0/stats/cpu
This cURL sample includes the following options:
-k—This option explicitly allows cURL to perform insecure SSL connections and transfers, which allows you to test your SSL connection without installing a CA certificate.
--user cpx:hammerhead—Replace cpx with the user name for your Series appliance. Replace hammerhead with the password for your Series appliance.
https://xxx.xxx.xxx.xxx/api/4.0/stats/cpu—The statistics request URL. Replace xxx.xxx.xxx.xxx with the IP address of your Series appliance.
Results
This example returns information about the CPU. The output is in JSON.
Memory statistics request
To retrieve information about the system memory consumption of the Series appliance, send the following request:
GET https://<PX_IP_address>/api/4.0/stats/mem
Required header:
--user <username>:<password>
Statistics are collected at a default interval that depends on the stime value. See the following table.
stime | Interval |
No stime specified | 10 seconds |
Less than 1 hour | 10 seconds |
More than 1 hour and less than 3 days | 2 minutes |
More than 3 days and less than 3 weeks | 10 minutes |
More than 3 weeks and less than 3 months | 1 hour |
More than 3 months and less than 2 years | 1 day |
More than 2 years | Not applicable; data is not kept for more than 2 years. |
Options
PX_IP_address—IP address of the Series appliance running the Series API.
username—The user name for your Series appliance.
password—The password for your Series appliance.
Query parameters
stime—Date and time from which the memory statistics should start. See Conventions for the format.
etime—Date and time at which the memory statistics should end. See Conventions for the format.
Example
GET https://xxx.xxx.xxx.xxx/api/4.0/stats/mem?stime=epoch&etime=19750824.015930
Required header:
--user cpx:hammerhead
Memory statistics response
HTTP/1.1 [Response Code] [Response Message] Date: [Date]
Content-Type: [Content Type] name: [Statistics Type]
type: [Memory Statistics Type] values: [Values]
columns: [Columns] error: [Error]
Response fields
Response Code—A standard HTML response code.
Response Message—A standard HTML response message.
Date—Standard HTML date format.
Content Type—The response format.
Statistics Type—For the memory statistics request, the type is memstats.
Memory Statistics Type—The type of memory statistics being measured. The following statistics are gathered:
buffers—How much buffered memory is consumed.
cached—How much cached memory is consumed.
hugepagestotal—How many huge pages are configured on the Series appliance.
hugepagesused—How many huge pages are consumed on the system.
mapped—How much memory has been mapped.
memfree—How much unused memory is available on the system.
memtotal—How much memory is installed in the Series appliance.
shmem—How much symmetric hierarchical memory access is available.
swapfree—How much swap space is available on the system.
swaptotal—How much swap space is installed in the Series appliance.
vmtotal—How much virtual memory is configured in the Series appliance.
vmused—How much virtual memory is as consumed on the system.
Values—The response provides times and the value for each time.
Columns—The response provides two columns, time and mean.
Error—Error message if an error occurs.
Example
HTTP/1.1 200 OK
Date: Mon, 14 Mar 2016 15:49:21 GMT
Content-Type: application/json; charset=utf-8
{
"results": [
{
"series": [
{
"name": "memstats", "tags": {
"type": "buffers"
},
"values": [ [
1452094794,
73448
], [
1452094784,
73416
]
]
"columns": [
"time", "mean"
],
},
{
"name": "memstats", "tags": {
"type": "cached"
},
"values": [ [
1452094794,
20294208
], [
1452094784,
20294032
]
]
"columns": [
"time", "mean"
],
},
{
"name": "memstats", "tags": {
"type": "hugepagestotal"
},
"values": [ [
1452094794,
0
], [
1452094784,
0
]
]
"columns": [
"time", "mean"
],
},
{
"name": "memstats", "tags": {
"type": "hugepagesused"
},
"values": [ [
1452094794,
0
], [
1452094784,
0
]
]
"columns": [
"time", "mean"
],
},
{
"name": "memstats", "tags": {
"type": "mapped"
},
"values": [ [
1452094794,
339300
], [
1452094784,
339276
]
]
"columns": [
"time", "mean"
],
},
{
"name": "memstats", "tags": {
"type": "memfree"
},
"values": [ [
1452094794,
14084988
], [
1452094784,
32538932
]
]
"columns": [
"time", "mean"
],
},
{
"name": "memstats", "tags": {
"type": "memtotal"
},
"values": [ [
1452094794,
66082220
], [
1452094784,
66082220
]
]
"columns": [
"time", "mean"
],
},
{
"name": "memstats", "tags": {
"type": "shmem"
},
"values": [ [
1452094794,
24612
], [
1452094784,
24612
]
]
"columns": [
"time", "mean"
],
},
{
"name": "memstats", "tags": {
"type": "swapfree"
},
"values": [ [
1452094794,
6380540
], [
1452094784,
6380540
]
]
"columns": [
"time", "mean"
],
},
{
"name": "memstats", "tags": {
"type": "swaptotal"
},
"values": [ [
1452094794,
6380540
], [
1452094784,
6380540
]
]
"columns": [
"time", "mean"
],
},
{
"name": "memstats", "tags": {
"type": "vmtotal"
},
"values": [ [
1452094794,
34359738367
], [
1452094784,
34359738367
]
]
"columns": [
"time", "mean"
],
},
{
"name": "memstats", "tags": {
"type": "vmused"
},
"values": [ [
1452094794,
385784
], [
1452094784,
385784
]
]
"columns": [
"time", "mean"
]
}
],
"error": ""
}
]
}
cURL code sample: Memory statistics
The code sample was run with cURL 7.57.0.
curl -k --user cpx:hammerhead https://xxx.xxx.xxx.xxx/api/4.0/stats/mem
This cURL sample includes the following options:
-k—This option explicitly allows cURL to perform insecure SSL connections and transfers, which allows you to test your SSL connection without installing a CA certificate.
--user cpx:hammerhead—Replace cpx with the user name for your Series appliance. Replace hammerhead with the password for your Series appliance.
https://xxx.xxx.xxx.xxx/api/4.0/stats/mem—The statistics request URL. Replace xxx.xxx.xxx.xxx with the IP address of your Series appliance.
Results
This example returns information about the system memory consumption. The output is in JSON.
Temperature statistics request
To retrieve information about the temperature of the Series appliance, send the following request:
GET https://<PX_IP_address>/api/4.0/stats/temp
Required header:
--user <username>:<password>
Statistics are collected at a default interval that depends on the stime value. See the following table.
stime | Interval |
No stime specified | 10 seconds |
Less than 1 hour | 10 seconds |
More than 1 hour and less than 3 days | 2 minutes |
More than 3 days and less than 3 weeks | 10 minutes |
More than 3 weeks and less than 3 months | 1 hour |
More than 3 months and less than 2 years | 1 day |
More than 2 years | Not applicable; data is not kept for more than 2 years. |
Options
PX_IP_address—IP address of the Series appliance running the Series API.
username—The user name for your Series appliance.
password—The password for your Series appliance.
Query parameters
stime—Date and time from which the temperature statistics should start. See Conventions for the format.
etime—Date and time at which the temperature statistics should end. See Conventions for the format.
Example
GET https://xxx.xxx.xxx.xxx/api/4.0/stats/temp?stime=epoch&etime=19750824.015930
Required header:
--user cpx:hammerhead
Temperature statistics response
HTTP/1.1 [Response Code] [Response Message] Date: [Date]
Content-Type: [Content Type]
name: [Statistics Type] tags: [Tags]
values: [Values] columns: [Columns] error: [Error]
Response fields
Response Code—A standard HTML response code.
Response Message—A standard HTML response message.
Date—Standard HTML date format.
Content Type—The response format.
Statistics Type—For the temperature request, the type is Layer1.
Tags—The type of temperature statistics collected.
Values—The response provides times and the value for each time.
Columns—The response provides two columns, time and mean.
Error—Error message if an error occurs.
Example
HTTP/1.1 200 OK
Date: Mon, 14 Mar 2016 15:49:21 GMT
Content-Type: application/json; charset=utf-8
{
"results": [
{
"series": [
{
"name": "Layer1", "tags": null,
"values": [ [
1.48415467e+09,
null
], [
1.48415466e+09,
null
],
... [
1.48415108e+09,
73.5
], [
1.48415107e+09,
73.5
]
],
"columns": [
"time", "mean"
]
}
],
"error": ""
}
]
}
cURL code sample: Temperature statistics
The code sample was run with cURL 7.57.0.
curl -k --user cpx:hammerhead https://xxx.xxx.xxx.xxx/api/4.0/stats/temp
This cURL sample includes the following options:
-k—This option explicitly allows cURL to perform insecure SSL connections and transfers, which allows you to test your SSL connection without installing a CA certificate.
--user cpx:hammerhead—Replace cpx with the user name for your Series appliance. Replace hammerhead with the password for your Series appliance.
https://xxx.xxx.xxx.xxx/api/4.0/stats/temp—The statistics request URL. Replace xxx.xxx.xxx.xxx with the IP address of your Series appliance.
Results
This example returns information about the temperature of the Series appliance. The output is in JSON.
Flow statistics request
To retrieve information about the active, dropped, and exported flow records for the Series appliance, send the following request:
GET https://<PX_IP_address>/api/4.0/stats/flow
Required header:
--user <username>:<password>
Statistics are collected at a default interval that depends on the stime value. See the following table.
stime | Interval |
No stime specified | 10 seconds |
Less than 1 hour | 10 seconds |
stime | Interval |
More than 1 hour and less than 3 days | 2 minutes |
More than 3 days and less than 3 weeks | 10 minutes |
More than 3 weeks and less than 3 months | 1 hour |
More than 3 months and less than 2 years | 1 day |
More than 2 years | Not applicable; data is not kept for more than 2 years. |
Options
PX_IP_address—IP address of the Series appliance running the Series API.
username—The user name for your Series appliance.
password—The password for your Series appliance.
Query parameters
stime—Date and time from which the flow statistics should start. See Conventions for the format.
etime—Date and time at which the flow statistics should end. See Conventions for the format.
Example
GET https://xxx.xxx.xxx.xxx/api/4.0/stats/flow?stime=20141109.015959&etime=now
Required header:
--user cpx:hammerhead
Flow statistics response
HTTP/1.1 [Response Code] [Response Message] Date: [Date]
Content-Type: [Content Type] name: [Statistics Type] type: [Flow Statistics Type] values: [Values]
columns: [Columns] error: [Error]
Response fields
Response Code—A standard HTML response code.
Response Message—A standard HTML response message.
Date—Standard HTML date format.
Content Type—The response format.
Statistics Type—For the load average values request, the type is flows.
Flow Statistics Type—The type of flow statistics being measured. Valid values are active, dropped, and exported.
Values—The response provides times and the value for each time.
Columns—The response provides two columns, time and mean or time and non_negative_derivative.
Error—Error message if an error occurs.
Example
HTTP/1.1 200 OK
Date: Fri, 18 Mar 2016 16:35:02 GMT
Content-Type: application/json; charset=utf-8
{
"results": [
{
"series": [
{
"name": "Flows", "tags": {
"type": "active"
},
"values": [ [
1452094664,
45490
], [
1452094654,
45907
], [
1452094644,
49528
], [
1452094634,
48923
], [
1452094624,
48089
], [
1452094614,
47594
]
]
"columns": [
"time", "mean"
],
},
{
"name": "Flows", "tags": {
"type": "dropped"
},
"values": [ [
1452094664,
0
], [
1452094654,
0
], [
1452094644,
0
], [
1452094634,
0
], [
1452094624,
0
], [
1452094614,
0
]
]
"columns": [
"time", "non_negative_derivative"
],
},
{
"name": "Flows", "tags": {
"type": "exported"
},
"values": [ [
1452094664,
23649696
], [
1452094654,
23646358
], [
1452094644,
23638950
], [
1452094634,
23635707
], [
1452094624,
23632705
], [
1452094614,
23629777
]
]
"columns": [
"time", "non_negative_derivative"
]
}
],
"error": ""
}
]
}
cURL code sample: Flow statistics
The code sample was run with cURL 7.57.0.
curl -k --user cpx:hammerhead https://xxx.xxx.xxx.xxx/api/4.0/stats/flow
This cURL sample includes the following options:
-k—This option explicitly allows cURL to perform insecure SSL connections and transfers, which allows you to test your SSL connection without installing a CA certificate.
--user cpx:hammerhead—Replace cpx with the user name for your Series appliance. Replace hammerhead with the password for your Series appliance.
https://xxx.xxx.xxx.xxx/api/4.0/stats/flow—The statistics request URL. Replace xxx.xxx.xxx.xxx with the IP address
of your Series appliance.
Results
This example returns information about the active, dropped, and exported flow records. The output is in JSON.
Capture statistics over time request
To retrieve information over a time range for each stream of network data for the Series appliance, send the following request:
GET https://<PX_IP_address>/api/4.0/stats/capstats
Required header:
--user <username>:<password>
Statistics are collected at a default interval that depends on the stime value. See the following table.
stime | Interval |
No stime specified | 10 seconds |
Less than 1 hour | 10 seconds |
More than 1 hour and less than 3 days | 2 minutes |
More than 3 days and less than 3 weeks | 10 minutes |
More than 3 weeks and less than 3 months | 1 hour |
More than 3 months and less than 2 years | 1 day |
More than 2 years | Not applicable; data is not kept for more than 2 years. |
Options
PX_IP_address—IP address of the Series appliance running the Series API.
username—The user name for your Series appliance.
password—The password for your Series appliance.
Query parameters
stime—Date and time from which the capture statistics should start. See Conventions for the format.
etime—Date and time at which the capture statistics should end. See Conventions for the format.
Example
GET https://xxx.xxx.xxx.xxx/api/4.0/stats/capstats?stime=1522788360&etime=1522788460
Required header:
--user cpx:hammerhead
Capture statistics over time response
HTTP/1.1 [Response Code] [Response Message] Date: [Date]
Content-Type: [Content Type] name: [Statistics Type] stream: [Stream]
type: [Capture Statistics Over Time Type] values: [Values]
columns: [Columns] error: [Error]
Response fields
Response Code—A standard HTML response code.
Response Message—A standard HTML response message.
Date—Standard HTML date format.
Content Type—The response format.
Statistics Type—For the capture statistics over time request, the type is Streams.
Stream—Which stream is being examined.
Capture Statistics Over Time Type—The type of capture statistics over time being measured. The following statistics are gathered:
Mfps—Traffic rate in millions of frames per second.
Mbps—Traffic rate in megabits per second.
disk-filtered-octets—Number of octets not written to disk due to a filter rule.
disk-filtered-packets—Number of packets not written to disk due to a filter rule.
frames—Number of frames.
octets—The size of packets.
suricata-drop-octets—Number of octets dropped on metadata pipeline.
suricata-drop-packets—Number of packets dropped on metadata pipeline.
suricata-export-octets—Number of octets sent to metadata pipeline.
suricata-export-packets—Number of packets sent to metadata pipeline.
suricata-filtered-octets—Number of octets not sent to metadata pipeline due to a filter rule.
suricata-filtered-packets—Number of packets not sent to metadata pipeline due to a filter rule.
Values—The response provides times and the value for each time.
Columns—The response provides two columns, time and mean.
Error—Error message if an error occurs.
Example
HTTP/1.1 200 OK
Date: Thu, 3 Apr 2018 09:39:42 GMT
Content-Type: application/json; charset=utf-8
{
"results": [
{
"series": [
{
"name": "Streams", "tags": {
"stream": "0",
"type": "Mbps"
},
"values": [ [
1522788460,
null
], [
1522788450,
32.849503
], [
1522788440,
51.35078
], [
1522788430,
50.766144
]
],
"columns": [
"time", "mean"
]
},
{
"name": "Streams", "tags": {
"stream": "0",
"type": "Mfps"
},
"values": [ [
1522788460,
null
], [
1522788450,
0.00593
], [
1522788440,
0.008147
], [
1522788430,
0.007938
]
],
"columns": [
"time", "mean"
]
},
{
"name": "Streams", "tags": {
"stream": "0",
"type": "disk-filtered-octets"
},
"values": [ [
1522788460,
null
], [
1522788450,
0
],
[
1522788440,
0
], [
1522788430,
0
]
],
"columns": [
"time", "mean"
]
},
{
"name": "Streams", "tags": {
"stream": "0",
"type": "disk-filtered-packets"
},
"values": [ [
1522788460,
null
], [
1522788450,
0
], [
1522788440,
0
], [
1522788430,
0
],
],
"columns": [
"time", "mean"
]
},
{
"name": "Streams", "tags": {
"stream": "0",
"type": "frames"
},
"values": [ [
1522788460,
null
], [
1522788450,
2582075262
], [
1522788440,
2582015960
], [
1522788430,
2581934489
]
],
"columns": [
"time", "mean"
]
},
{
"name": "Streams", "tags": {
"stream": "0",
"type": "octets"
},
"values": [ [
1522788460,
null
], [
1522788450,
1980151385902
], [
1522788440,
1980110324025
], [
1522788430,
1980046135551
]
],
"columns": [
"time", "mean"
]
},
{
"name": "Streams", "tags": {
"stream": "0",
"type": "suricata-drop-octets"
},
"values": [ [
1522788460,
null
], [
1522788450,
576515903
], [
1522788440,
576492493
], [
1522788430,
576492493
]
],
"columns": [
"time", "mean"
]
},
{
"name": "Streams", "tags": {
"stream": "0",
"type": "suricata-drop-packets"
},
"values": [ [
1522788460,
null
], [
1522788450,
633052
], [
1522788440,
633027
], [
1522788430,
633027
]
],
"columns": [
"time", "mean"
]
},
{
"name": "Streams", "tags": {
"stream": "0",
"type": "suricata-export-octets"
},
"values": [ [
1522788460,
null
], [
1522788450,
1979574869999
], [
1522788440,
1979533831532
], [
1522788430,
1979469643058
]
],
"columns": [
"time", "mean"
]
},
{
"name": "Streams", "tags": {
"stream": "0",
"type": "suricata-export-packets"
},
"values": [ [
1522788460,
null
], [
1522788450,
2581442210
], [
1522788440,
2581382933
], [
1522788430,
2581301462
]
],
"columns": [
"time", "mean"
]
},
{
"name": "Streams", "tags": {
"stream": "0",
"type": "suricata-filtered-octets"
},
"values": [ [
1522788460,
null
], [
1522788450,
0
], [
1522788440,
0
], [
1522788430,
0
]
],
"columns": [
"time", "mean"
]
},
{
"name": "Streams", "tags": {
"stream": "0",
"type": "suricata-filtered-packets"
},
"values": [ [
1522788460,
null
], [
1522788450,
0
], [
1522788440,
0
], [
1522788430,
0
]
],
"columns": [
"time", "mean"
]
},
{
"name": "Streams", "tags": {
"stream": "1",
"type": "Mbps"
},
"values": [
[ ... ]
}
],
"error": ""
}
]
}
cURL code sample: Capture statistics over time
The code sample was run with cURL 7.57.0.
curl -k --user cpx:hammerhead https://xxx.xxx.xxx.xxx/api/4.0/stats/capstats
This cURL sample includes the following options:
-k—This option explicitly allows cURL to perform insecure SSL connections and transfers, which allows you to test your SSL connection without installing a CA certificate.
--user cpx:hammerhead—Replace cpx with the user name for your Series appliance. Replace hammerhead with the password for your Series appliance.
https://xxx.xxx.xxx.xxx/api/4.0/stats/capstats—The statistics request URL. Replace xxx.xxx.xxx.xxx with the IP address of your Series appliance.
Results
This example returns information over a time range for each stream of network data for the Series appliance. The output is in JSON.
Layer 1 statistics request
To retrieve information about layer 1, the physical interface of the Series appliance, send the following request:
GET https://<PX_IP_address>/api/4.0/stats/layer1
Required header:
--user <username>:<password>
Statistics are collected at a default interval that depends on the stime value. See the following table.
stime | Interval |
No stime specified | 10 seconds |
Less than 1 hour | 10 seconds |
More than 1 hour and less than 3 days | 2 minutes |
More than 3 days and less than 3 weeks | 10 minutes |
More than 3 weeks and less than 3 months | 1 hour |
More than 3 months and less than 2 years | 1 day |
More than 2 years | Not applicable; data is not kept for more than 2 years. |
Options
PX_IP_address—IP address of the Series appliance running the Series API.
username—The user name for your Series appliance.
password—The password for your Series appliance.
Query parameters
stime—Date and time from which the layer 1 statistics should start. See Conventions for the format.
etime—Date and time at which the layer 1 statistics should end. See Conventions for the format.
Example
GET https://xxx.xxx.xxx.xxx/api/4.0/stats/layer1?stime=20140201.015959&etime=20150601.015959
Required header:
--user cpx:hammerhead
Layer 1 statistics response
HTTP/1.1 [Response Code] [Response Message] Date: [Date]
Content-Type: [Content Type] name: [Name]
adapter: [Adapter] channel: [Channel] type: [Type] values: [Values] columns: [Columns] error: [Error]
Response fields
Response Code—A standard HTML response code.
Response Message—A standard HTML response message.
Date—Standard HTML date format.
Content Type—The response format.
Name—Type of statistics being reported. For the layer-1 statistics request, the type is Layer1.
Adapter—The adapter number.
Channel—The channel number.
Type—The following types of layer-1 statistics are collected:
broadcastPkts—Number of broadcast packets.
collisions—Number of collisions.
dropEvents—Number of events that were dropped.
drops—Number of frames that were dropped.
errors—Number of errors.
fragments—Number of fragments.
frames—Number of frames.
jabbers—Number of packets transmitted that exceed the maximum transmission unit.
link—Number of ports with links.
multicastPkts—Number of multicast packets.
octets—The size of packets.
oversizePkts—Number of oversized packets.
pkts1024to1518Octets—Number of packets from 1024 to 1518 octets.
pkts128to255Octets—Number of packets from 128 to 255 octets.
pkts1519to2047Octets—Number of packets from 1519 to 2047 octets.
pkts2048to4097Octets—Number of packets from 2048 to 4097 octets.
pkts256to511Octets—Number of packets from 256 to 511 octets.
pkts4096to8191Octets—Number of packets from 4096 to 8191 octets.
pkts512to1023Octets—Number of packets from 512 to 1023 octets.
pkts640octets—Number of packets of 640 octets.
pkts65to127Octets—Number of packets from 65 to 127 octets.
pkts8192toMaxOctets—Number of packets from 8192 octets to the maximum size.
pktsDedup—Number of unique packets.
pktsHardSlic—Number of sliced packets.
pktsMpls—Number of MPLS packets.
pktsVlan—Number of VLAN packets.
pktsVlanMpls—Number of MPSL and VLAN packets.
undersizePkts—Number of undersized packets.
unicastPkts—Number of unicast packets.
sfp—Number of small form-factor pluggable (SFP) adapters that are present in the card.
Values—The response provides times and the value for each time.
Columns—The response provides two columns, time and non_negative_derivative.
Error—Error message if an error occurs.
Example
HTTP/1.1 200 OK
Date: Thu, 17 Mar 2016 20:34:05 GMT
Content-Type: application/json; charset=utf-8
{
"results": [
{
"series": [
{
"name": "Layer1", "tags": {
"adapter": "0",
"channel": "0",
"type": "broadcastPkts"
},
"values": [ [
1452095222,
126
], [
1452095212,
126
]
]
"columns": [
"time", "non_negative_derivative"
],
},
{
"name": "Layer1", "tags": {
"adapter": "0",
"channel": "0", "type": "collisions"
},
"values": [ [
1452094667,
0
], [
1452094657,
0
]
]
"columns": [
"time", "non_negative_derivative"
],
},
{
"name": "Layer1", "tags": {
"adapter": "0",
"channel": "0", "type": "dropEvents"
},
"values": [ [
1452095222,
181836
], [
1452095212,
181836
], [
1452095102,
181704
]
]
"columns": [
"time", "non_negative_derivative"
],
},
{
"name": "Layer1", "tags": {
"adapter": "0",
"channel": "1",
"type": "drops"
},
"values": [ [
1452094667,
0
], [
1452094657,
0
]
]
"columns": [
"time", "non_negative_derivative"
],
},
{
"name": "Layer1", "tags": {
"adapter": "0",
"channel": "2",
"type": "errors"
},
"values": [ [
1452094667,
146101
], [
1452094657,
146101
]
]
"columns": [
"time", "non_negative_derivative"
],
},
{
"name": "Layer1", "tags": {
"adapter": "0",
"channel": "2", "type": "fragments"
},
"values": [ [
1452094667,
144763
]
]
"columns": [
"time", "non_negative_derivative"
],
},
{
"name": "Layer1", "tags": {
"adapter": "0",
"channel": "2",
"type": "frames"
},
"values": [ [
1452094667,
2043005904
], [
1452094657,
2042699392
]
]
"columns": [
"time", "non_negative_derivative"
],
},
{
"name": "Layer1",
"tags": {
"adapter": "0",
"channel": "2",
"type": "jabbers"
},
"values": [ [
1452094667,
1
], [
1452094657,
1
]
]
"columns": [
"time", "non_negative_derivative"
],
},
{
"name": "Layer1", "tags": {
"adapter": "0",
"channel": "2",
"type": "link"
},
"values": [ [
1452094667,
90954
], [
1452094657,
90947
]
]
"columns": [
"time", "non_negative_derivative"
],
},
{
"name": "Layer1", "tags": {
"adapter": "0",
"channel": "2",
"type": "multicastPkts"
},
"values": [ [
1452094667,
1692455282582
], [
1452094657,
1692201558966
]
]
"columns": [
"time", "non_negative_derivative"
],
},
{
"name": "Layer1", "tags": {
"adapter": "0",
"channel": "2",
"type": "octets"
},
"values": [ [
1452094667,
43804225
], [
1452094657,
43797272
]
]
"columns": [
"time", "non_negative_derivative"
],
},
{
"name": "Layer1", "tags": {
"adapter": "0",
"channel": "2", "type": "oversizePkts"
},
"values": [ [
1452094667,
9108751
], [
1452094657,
9106619
]
]
"columns": [
"time", "non_negative_derivative"
],
},
{
"name": "Layer1", "tags": {
"adapter": "0",
"channel": "2",
"type": "pkts1024to1518Octets"
},
"values": [ [
1452094667,
1071274597
], [
1452094657,
1071114206
]
]
"columns": [
"time", "non_negative_derivative"
],
},
{
"name": "Layer1", "tags": {
"adapter": "0",
"channel": "2",
"type": "pkts128to255Octets"
},
"values": [ [
1452094667,
448089555
], [
1452094657,
448024910
]
]
"columns": [
"time", "non_negative_derivative"
],
},
{
"name": "Layer1", "tags": {
"adapter": "0",
"channel": "2",
"type": "pkts1519to2047Octets"
},
"values": [ [
1452094667,
470728776
], [
1452094657,
470656385
]
]
"columns": [
"time", "non_negative_derivative"
],
},
{
"name": "Layer1", "tags": {
"adapter": "0",
"channel": "2",
"type": "pkts2048to4095Octets"
},
"values": [ [
1452094667,
2042768849
], [
1452094657,
2042462344
]
]
"columns": [
"time", "non_negative_derivative"
],
},
{
"name": "Layer1", "tags": {
"adapter": "0",
"channel": "2",
"type": "pkts256to511Octets"
},
"values": [ [
1452094667,
2042768849
], [
1452094657,
2042462344
]
]
"columns": [
"time", "non_negative_derivative"
],
},
{
"name": "Layer1", "tags": {
"adapter": "0",
"channel": "2",
"type": "pkts4096to8191Octets"
},
"values": [ [
1452094667,
2042768849
], [
1452094657,
2042462344
]
]
"columns": [
"time", "non_negative_derivative"
],
},
{
"name": "Layer1", "tags": {
"adapter": "0",
"channel": "2",
"type": "pkts512to1023Octets"
},
"values": [ [
1452094667,
2042768849
], [
1452094657,
2042462344
]
]
"columns": [
"time", "non_negative_derivative"
],
},
{
"name": "Layer1", "tags": {
"adapter": "0",
"channel": "2",
"type": "pkts640octets"
},
"values": [ [
1452094667,
2042768849
], [
1452094657,
2042462344
]
]
"columns": [
"time", "non_negative_derivative"
],
},
{
"name": "Layer1", "tags": {
"adapter": "0",
"channel": "2",
"type": "pkts65to127Octets"
},
"values": [ [
1452094667,
2042768849
], [
1452094657,
2042462344
]
]
"columns": [
"time", "non_negative_derivative"
],
},
{
"name": "Layer1", "tags": {
"adapter": "0",
"channel": "2",
"type": "pkts8192toMaxOctets"
},
"values": [ [
1452094667,
2042768849
], [
1452094657,
2042462344
]
]
"columns": [
"time", "non_negative_derivative"
],
},
{
"name": "Layer1", "tags": {
"adapter": "0",
"channel": "2", "type": "pktsDedup"
},
"values": [ [
1452094667,
2042768849
], [
1452094657,
2042462344
]
]
"columns": [
"time", "non_negative_derivative"
],
},
{
"name": "Layer1", "tags": {
"adapter": "0",
"channel": "2", "type": "pktsHardSlic"
},
"values": [ [
1452094667,
2042768849
], [
1452094657,
2042462344
]
]
"columns": [
"time", "non_negative_derivative"
],
},
{
"name": "Layer1", "tags": {
"adapter": "0",
"channel": "2", "type": "pktsMpls"
},
"values": [ [
1452094667,
2042768849
],
[
1452094657,
2042462344
]
]
"columns": [
"time", "non_negative_derivative"
],
},
{
"name": "Layer1", "tags": {
"adapter": "0",
"channel": "2", "type": "pktsVlan"
},
"values": [ [
1452094667,
2042768849
], [
1452094657,
2042462344
]
]
"columns": [
"time", "non_negative_derivative"
],
},
{
"name": "Layer1", "tags": {
"adapter": "0",
"channel": "2", "type": "pktsVlanMpls"
},
"values": [ [
1452094667,
2042768849
], [
1452094657,
2042462344
]
]
"columns": [
"time", "non_negative_derivative"
],
},
{
"name": "Layer1", "tags": {
"adapter": "0",
"channel": "2",
"type": "undersizePkts"
},
"values": [ [
1452094667,
2042768849
], [
1452094657,
2042462344
]
]
"columns": [
"time", "non_negative_derivative"
],
},
{
"name": "Layer1", "tags": {
"adapter": "0",
"channel": "2", "type": "unicastPkts"
},
"values": [ [
1452094667,
2042768849
], [
1452094657,
2042462344
]
]
"columns": [
"time", "non_negative_derivative"
],
},
{
"name": "Layer1", "tags": {
"adapter": "0",
"channel": "2",
"type": "sfp"
},
"values": [ [
1452094667,
2042768849
], [
1452094657,
2042462344
]
]
"columns": [
"time", "non_negative_derivative"
]
}
],
"error": ""
}
]
}
cURL code sample: Layer 1 statistics
The code sample was run with cURL 7.57.0.
curl -k --user cpx:hammerhead https://xxx.xxx.xxx.xxx/api/4.0/stats/layer1
This cURL sample includes the following options:
-k—This option explicitly allows cURL to perform insecure SSL connections and transfers, which allows you to test your SSL connection without installing a CA certificate.
--user cpx:hammerhead—Replace cpx with the user name for your Series appliance. Replace hammerhead with the password for your Series appliance.
https://xxx.xxx.xxx.xxx/api/4.0/stats/layer1—The statistics request URL. Replace xxx.xxx.xxx.xxx with the IP address of your Series appliance.
Results
This example returns information about layer 1. The output is in JSON.
Layer 2 statistics request
To retrieve information about layer 2 of the Series appliance, send the following request:
GET https://<PX_IP_address>/api/4.0/stats/layer2
Required header:
--user <username>:<password>
Statistics are collected at a default interval that depends on the stime value. See the following table.
stime | Interval |
No stime specified | 10 seconds |
Less than 1 hour | 10 seconds |
More than 1 hour and less than 3 days | 2 minutes |
stime | Interval |
More than 3 days and less than 3 weeks | 10 minutes |
More than 3 weeks and less than 3 months | 1 hour |
More than 3 months and less than 2 years | 1 day |
More than 2 years | Not applicable; data is not kept for more than 2 years. |
Options
PX_IP_address—The IP address of the Series appliance running the Series API.
username—The user name for your Series appliance.
password—The password for your Series appliance.
Query parameters
stime—Date and time from which the layer 2 statistics should start. See Conventions for the format.
etime—Date and time at which the layer 2 statistics should end. See Conventions for the format.
Example
GET https://xxx.xxx.xxx.xxx/api/4.0/stats/layer2?stime=19691006.015959&etime=epoch
Required header:
--user cpx:hammerhead
Layer 2 statistics response
HTTP/1.1 [Response Code] [Response Message] Date: [Date]
Content-Type: [Content Type] name: [Name]
type: [Type] values: [Values] columns: [Columns] error: [Error]
Response fields
Response Code—A standard HTML response code.
Response Message—A standard HTML response message.
Date—Standard HTML date format.
Content Type—The response format.
Name—Type of statistics being reported. For the layer-2 statistics request, the type is EtherTypes.
Type—The following types of layer-2 statistics are collected:
arp—Number of frames per second with the ARP type set.
ipv4—Number of frames per second with the IPv4 type set.
ipv6—Number of frames per second with the IPv6 type set.
llc—Number of frames per second with the logical link control (LLC) type set.
lldp—Number of frames per second with the link layer discovery protocol (LLDP) type set.
malformed—Number of malformed frames.
metro—Number of frames per second with the metro type set.
mpls—Number of frames per second with the MPLS type set.
multicast—Number of frames per second with Ethernet multicast addresses. These are Ethernet frames with a value of 1 in the least-significant bit of the first octet of the destination address.
other—Number of frames per second for the other type sets not listed in this section.
qinq—Number of frames per second with the Q-in-Q VLAN type set.
raw—Number of frames per second with the raw type set.
snap—Number of frames per second with the subnetwork access protocol (SNAP) type set.
total—Total number of frames.
vlan—Number of frames per second with the VLAN 802.1Q type set.
vlan3—Number of frames per second with the VLAN3 type set.
Values—The response provides times and the value for each time.
Columns—The response provides two columns, time and non_negative_derivative.
Error—Error message if an error occurs.
Example
HTTP/1.1 200 OK
Date: Fri, 18 Mar 2016 16:23:17 GMT
Content-Type: application/json; charset=utf-8
{
"results": [
{
"series": [
{
"name": "EtherTypes", "tags": {
"type": "arp"
},
"values": [ [
1452095222,
126
], [
1452095212,
126
]
]
"columns": [
"time", "non_negative_derivative"
],
},
{
"name": "EtherTypes", "tags": {
"type": "ipv4"
},
"values": [ [
1452094667,
0
], [
1452094657,
0
]
]
"columns": [
"time", "non_negative_derivative"
],
},
{
"name": "EtherTypes", "tags": {
"type": "ipv6"
},
"values": [ [
1452095222,
181836
], [
1452095212,
181836
]
]
"columns": [
"time", "non_negative_derivative"
],
},
{
"name": "EtherTypes", "tags": {
"type": "llc"
},
"values": [ [
1452094667,
0
], [
1452094657,
0
]
]
"columns": [
"time", "non_negative_derivative"
],
},
{
"name": "EtherTypes", "tags": {
"type": "lldp"
},
"values": [ [
1452094667,
146101
], [
1452094657,
146101
]
]
"columns": [
"time", "non_negative_derivative"
],
},
{
"name": "EtherTypes",
"tags": {
"type": "malformed"
},
"values": [ [
1452094667,
144763
]
]
"columns": [
"time", "non_negative_derivative"
],
},
{
"name": "EtherTypes", "tags":
"type": "metro"
},
"values": [ [
1452094667,
2043005904
], [
1452094657,
2042699392
]
]
"columns": [
"time", "non_negative_derivative"
],
},
{
"name": "EtherTypes", "tags": {
"type": "mpls"
},
"values": [ [
1452094667,
1
], [
1452094657,
1
]
]
"columns": [
"time", "non_negative_derivative"
],
},
{
"name": "EtherTypes", "tags": {
"type": "multicast"
},
"values": [ [
1452094667,
90954
],
[
1452094657,
90947
]
]
"columns": [
"time", "non_negative_derivative"
],
},
{
"name": "EtherTypes", "tags": {
"type": "other"
},
"values": [ [
1452094667,
1692455282582
], [
1452094657,
1692201558966
]
]
"columns": [
"time", "non_negative_derivative"
],
},
{
"name": "EtherTypes", "tags": {
"type": "qinq"
},
"values": [ [
1452094667,
43804225
], [
1452094657,
43797272
]
]
"columns": [
"time", "non_negative_derivative"
],
},
{
"name": "EtherTypes", "tags": {
"type": "raw"
},
"values": [ [
1452094667,
9108751
], [
1452094657,
9106619
]
]
"columns": [
"time", "non_negative_derivative"
],
},
{
"name": "EtherTypes", "tags": {
"type": "snap"
},
"values": [ [
1452094667,
1071274597
], [
1452094657,
1071114206
]
]
"columns": [
"time", "non_negative_derivative"
],
},
{
"name": "EtherTypes", "tags": {
"type": "total"
},
"values": [ [
1452094667,
448089555
], [
1452094657,
448024910
]
]
"columns": [
"time", "non_negative_derivative"
],
},
{
"name": "EtherTypes", "tags": {
"type": "vlan"
},
"values": [ [
1452094667,
470728776
]
]
"columns": [
"time", "non_negative_derivative"
],
},
{
"name": "EtherTypes",
"tags": {
"type": "vlan3"
},
"values": [ [
1452094667,
2042768849
]
]
"columns": [
"time", "non_negative_derivative"
],
}
],
"error": ""
}
]
}
cURL code sample: Layer 2 statistics
The code sample was run with cURL 7.57.0.
curl -k --user cpx:hammerhead https://xxx.xxx.xxx.xxx/api/4.0/stats/layer2
This cURL sample includes the following options:
-k—This option explicitly allows cURL to perform insecure SSL connections and transfers, which allows you to test your SSL connection without installing a CA certificate.
--user cpx:hammerhead—Replace cpx with the user name for your Series appliance. Replace hammerhead with the password for your Series appliance.
https://xxx.xxx.xxx.xxx/api/4.0/stats/layer2—The statistics request URL. Replace xxx.xxx.xxx.xxx with the IP address of your Series appliance.
Results
This example returns information about layer 2 of the Series appliance. The output is in JSON.
Layer 3 statistics request
To retrieve information about the packet type at layer 3 for all received traffic for the Series appliance, send the following request:
GET https://<PX_IP_address>/api/4.0/stats/layer3
Required header:
--user <username>:<password>
Statistics are collected at a default interval that depends on the stime value. See the following table.
stime | Interval |
No stime specified | 10 seconds |
Less than 1 hour | 10 seconds |
More than 1 hour and less than 3 days | 2 minutes |
More than 3 days and less than 3 weeks | 10 minutes |
More than 3 weeks and less than 3 months | 1 hour |
More than 3 months and less than 2 years | 1 day |
More than 2 years | Not applicable; data is not kept for more than 2 years. |
Options
PX_IP_address—The IP address of the Series appliance running the Series API.
username—The user name for your Series appliance.
password—The password for your Series appliance.
Query parameters
stime—Date and time from which the layer 3 statistics should start. See Conventions for the format.
etime—Date and time at which the layer 3 statistics should end. See Conventions for the format.
Example
GET https://xxx.xxx.xxx.xxx/api/4.0/stats/layer3?stime=20160101.027959&etime=now
Required header:
--user cpx:hammerhead
Layer 3 statistics response
HTTP/1.1 [Response Code] [Response Message] Date: [Date]
Content-Type: [Content Type] name: [Name]
type: [Type] values: [Values] columns: [Columns] error: [Error]
Response fields
Response Code—A standard HTML response code.
Response Message—A standard HTML response message.
Date—Standard HTML date format.
Content Type—The response format.
Name—Type of statistics being reported. For the layer-3 statistics request, the type is Layer3.
Type—The following types of layer-3 statistics are collected:
fragments-active—Number of active fragments.
fragments-completed—Number of completed fragments.
fragments-discarded—Number of discarded fragments.
ipv4—Number of IPv4 packets per second.
ipv6—Number of IPv6 packets per second.
other—Malformed packets per second. Shows all packets received with checksum errors per second.
tcp-resets—Number of all TCP packets with the reset flag set.
total—Number of packets per second.
Values—The response provides times and the value for each time.
Columns—The response provides two columns, time and non_negative_derivative.
Error—Error message if an error occurs.
Example
HTTP/1.1 200 OK
Date: Fri, 18 Mar 2016 16:23:17 GMT
Content-Type: application/json; charset=utf-8
{
"results": [
{
"series": [
{
"name": "Layer3", "tags": {
"type": "fragments-active"
},
"values": [ [
1452095222,
126
], [
1452095212,
126
]
]
"columns": [
"time", "non_negative_derivative"
],
},
{
"name": "Layer3", "tags": {
"type": "fragments-completed"
},
"values": [ [
1452094667,
0
], [
1452094657,
0
]
]
"columns": [
"time", "non_negative_derivative"
],
},
{
"name": "Layer3", "tags": {
"type": "fragments-discarded"
},
"values": [ [
1452095222,
181836
], [
1452095212,
181836
]
]
"columns": [
"time", "non_negative_derivative"
],
},
{
"name": "Layer3", "tags": {
"type": "ipv4"
},
"values": [ [
1452094667,
0
], [
1452094657,
0
]
]
"columns": [
"time", "non_negative_derivative"
],
},
{
"name": "Layer3", "tags": {
"type": "ipv6"
},
"values": [ [
1452094667,
146101
], [
1452094657,
146101
]
]
"columns": [
"time", "non_negative_derivative"
],
},
{
"name": "Layer3", "tags": {
"type": "other"
},
"values": [ [
1452094667,
144763
]
]
"columns": [
"time", "non_negative_derivative"
],
},
{
"name": "Layer3", "tags":
"type": "tcp-resets"
},
"values": [ [
1452094667,
2043005904
], [
1452094657,
2042699392
]
]
"columns": [
"time", "non_negative_derivative"
],
},
{
"name": "Layer3", "tags": {
"type": "total"
},
"values": [ [
1452094667,
1
], [
1452094657,
1
]
]
"columns": [
"time", "non_negative_derivative"
],
},
],
"error": ""
}
]
}
cURL code sample: Layer 3 statistics
The code sample was run with cURL 7.57.0.
curl -k --user cpx:hammerhead https://xxx.xxx.xxx.xxx/api/4.0/stats/layer3
This cURL sample includes the following options:
-k—This option explicitly allows cURL to perform insecure SSL connections and transfers, which allows you to test your SSL connection without installing a CA certificate.
--user cpx:hammerhead—Replace cpx with the user name for your Series appliance. Replace hammerhead with the password for your Series appliance.
https://xxx.xxx.xxx.xxx/api/4.0/stats/layer3—The statistics request URL. Replace xxx.xxx.xxx.xxx with the IP address of your Series appliance.
Results
This example returns information about the packet type at layer 3 for all received traffic. The output is in JSON.
Layer 4 statistics request
To retrieve information about the packet type at layer 4 for all received traffic for the Series appliance, send the following request:
GET https://<PX_IP_address>/api/4.0/stats/layer4
Required header:
--user <username>:<password>
Statistics are collected at a default interval that depends on the stime value. See the following table.
stime | Interval |
No stime specified | 10 seconds |
Less than 1 hour | 10 seconds |
More than 1 hour and less than 3 days | 2 minutes |
More than 3 days and less than 3 weeks | 10 minutes |
More than 3 weeks and less than 3 months | 1 hour |
stime | Interval |
More than 3 months and less than 2 years | 1 day |
More than 2 years | Not applicable; data is not kept for more than 2 years. |
Options
PX_IP_address—IP address of the Series appliance running the Series API.
username—The user name for your Series appliance.
password—The password for your Series appliance.
Query parameters
stime—Date and time from which the layer 4 statistics should start. See Conventions for the format.
etime—Date and time at which the layer 4 statistics should end. See Conventions for the format.
Example
GET https://xxx.xxx.xxx.xxx/api/4.0/stats/layer4?stime=20151020.015959&etime=0.052330
Required header:
--user cpx:hammerhead
Layer 4 statistics response
HTTP/1.1 [Response Code] [Response Message] Date: [Date]
Content-Type: [Content Type] name: [Name]
type: [Type] values: [Values] columns: [Columns] error: [Error]
Response fields
Response Code—A standard HTML response code.
Response Message—A standard HTML response message.
Date—Standard HTML date format.
Content Type—The response format.
Name—Type of statistics being reported. For the layer-4 statistics request, the type is Layer4.
Type—The types of layer-4 statistics that are collected.
Values—The response provides times and the value for each time.
Columns—The response provides two columns, time and non-negative_derivative.
Error—Error message if an error occurs.
Example
HTTP/1.1 200 OK
Date: Fri, 18 Mar 2016 16:23:17 GMT
Content-Type: application/json; charset=utf-8
{
"results": [
{
"series": [
{
"name": "Layer4", "tags": {
"type": "0-hop"
},
"values": [ [
1452095222,
126
], [
1452095212,
126
]
]
"columns": [
"time", "non_negative_derivative"
],
},
{
"name": "Layer4", "tags": {
"type": "3pc"
},
"values": [ [
1452094667,
0
], [
1452094657,
0
]
]
"columns": [
"time", "non_negative_derivative"
],
},
{
"name": "Layer4", "tags": {
"type": "AX.24"
},
"values": [ [
1452095222,
181836
], [
1452095212,
181836
]
]
"columns": [
"time", "non_negative_derivative"
],
},
{
"name": "Layer4", "tags": {
"type": "a\/n"
},
"values": [ [
1452094667,
0
], [
1452094657,
0
]
]
"columns": [
"time", "non_negative_derivative"
],
},
{
"name": "Layer4", "tags": {
"type": "ah"
},
"values": [ [
1452094667,
146101
], [
1452094657,
146101
]
]
"columns": [
"time", "non_negative_derivative"
],
},
{
"name": "Layer4", "tags": {
"type": "argus"
},
"values": [ [
1452094667,
144763
]
]
"columns": [
"time", "non_negative_derivative"
],
},
{
"name": "Layer4", "tags":
"type": "aris"
},
"values": [ [
1452094667,
2043005904
], [
1452094657,
2042699392
]
]
"columns": [
"time", "non_negative_derivative"
],
},
{
"name": "Layer4", "tags": {
"type": "bna"
},
"values": [ [
1452094667,
1
], [
1452094657,
1
]
]
"columns": [
"time", "non_negative_derivative"
],
.
.
.
},
],
"error": ""
}
]
}
cURL code sample: Layer 4 statistics
The code sample was run with cURL 7.57.0.
curl -k --user cpx:hammerhead https://xxx.xxx.xxx.xxx/api/4.0/stats/layer4
This cURL sample includes the following options:
-k—This option explicitly allows cURL to perform insecure SSL connections and transfers, which allows you to test your SSL connection without installing a CA certificate.
--user cpx:hammerhead—Replace cpx with the user name for your Series appliance. Replace hammerhead with the password for your Series appliance.
https://xxx.xxx.xxx.xxx/api/4.0/stats/layer4—The statistics request URL. Replace xxx.xxx.xxx.xxx with the IP address of your Series appliance.
Results
This example returns information about the packet type at layer 4 for all received traffic. The output is in JSON.
Interface statistics request
To retrieve interfaces statistics for the current PX Series appliance, send the following request:
GET https://<PX_IP_address>/api/4.0/stats/interfaces
Required header:
--user <username>:<password>
Options
PX_IP_address—IP address of the Series appliance running the Series API.
username—The user name for your Series appliance.
password—The password for your Series appliance.
Example
GET https://xxx.xxx.xxx.xxx/api/4.0/stats/interfaces
Required header:
--user cpx:hammerhead
Interface statistics response
HTTP/1.1 [Response Code] [Response Message] Date: [Date]
Content-Type: [Content Type] [
{
"interfaceName": "string", "channels": [
{
"channel": int, "receivedOctets": int, "receivedPackets": int, "multicastPackets": int, "missedHwPackets": int, "broadcastPackets": int, "mbps": int
},
. . .
],
"streams": [
{
"stream": int, "slicedOctets": int, "slicedPackets": int, "receivedOctets": int, "receivedPackets": int, "sentOctets": int, "sentPackets": int, "droppedPackets": int, "droppedOctets": int, "missedBufPackets": int,
"mbps": speed
},
. . .
]
}
]
Response fields
Response Code—A standard HTML response code.
Response Message—A standard HTML response message.
Date—Standard HTML date format.
Content Type—The response format.
interfaceName—Name of interface.
channel—The hardware channel to which the statistics pertain. Generally, this maps to a specific port (such asSFP) on the capture card.
receivedOctets—The software stream to which the statistics pertain. Generally, there will be four streams for Napatech capture cards, and one stream per Silicom/Intel capture card.
multicastPackets—The number of multicast packets received. These packets are also included in a channel's receivedPackets statistic.
missedHwPackets—The number of packets that the capture device had to drop at the wire due to back pressure. This represents packets that the Series appliance did not capture.
broadcastPackets—The number of broadcast packets received. These packets are also included in a channel's receivedPackets statistic.
mbps—The captured traffic rate, in megabits per second.
stream—The software stream to which the statistics pertain. Generally, there will be four streams for Napatech capture cards, and one stream per Silicom/Intel capture card.
slicedOctets—The number of bytes that were truncated because the packet was too large.
slicedPackets—The number of packets that were truncated (over 9,000 bytes) because the packet was too large.
receivedOctets—For channels, this is the number of bytes received from the capture device. For streams, this is the number of bytes received by the software.
receivedPackets—For channels, this is the number of packets received from the capture device. For streams, this is the number of packets received by the software.
sentOctets—The number of bytes sent to the packet acquisition pipeline. This should be equal to the number of bytes received minus the number of bytes dropped.
sentPackets—The number of packets sent to the packet acquisition pipeline. This should be equal to the number of packets received minus the number of packets dropped.
droppedPackets—The number of packets dropped by the packet acquisition software due to to the appliance being overloaded.
droppedOctets—The number of bytes dropped by the packet acquisition software due to to the appliance being overloaded.
missedBufPackets—The number of packets the the capture device could not copy into memory due to back pressure. This represents packets that the Series appliance did not capture.
Example
HTTP/1.1 200 OK
Date: Wed, 6 Jun 2018 22:41:55 GMT
Content-Type: application/json; charset=utf-8
[
{
"interfaceName": "netmap:ether2", "channels": [
{
"channel": 0,
"receivedOctets": 0,
"receivedPackets": 0,
"multicastPackets": 0,
"missedHwPackets": 0,
"broadcastPackets": 0,
"mbps": 0
},
{
"channel": 1,
"receivedOctets": 0,
"receivedPackets": 0,
"multicastPackets": 0,
"missedHwPackets": 0,
"broadcastPackets": 0,
"mbps": 0
}
],
"streams": [
{
"stream": 0,
"slicedOctets": 0,
"slicedPackets": 0,
"receivedOctets": 37623,
"receivedPackets": 25667,
"sentOctets": 847,
"sentPackets": 245,
"droppedPackets": 0,
"droppedOctets": 0,
"missedBufPackets": 0,
"mbps": 15
},
{
"stream": 1,
"slicedOctets": 0,
"slicedPackets": 0,
"receivedOctets": 0,
"receivedPackets": 0,
"sentOctets": 0,
"sentPackets": 0,
"droppedPackets": 0,
"droppedOctets": 0,
"missedBufPackets": 0,
"mbps": 0
},
{
"stream": 2,
"slicedOctets": 0,
"slicedPackets": 0,
"receivedOctets": 0,
"receivedPackets": 0,
"sentOctets": 0,
"sentPackets": 0,
"droppedPackets": 0,
"droppedOctets": 0,
"missedBufPackets": 0,
"mbps": 0
},
. . .
]
}
]
cURL code sample: Interface statistics
The code sample was run with cURL 7.57.0.
curl -k --user cpx:hammerhead https://xxx.xxx.xxx.xxx/api/4.0/stats/interfaces
This cURL sample includes the following options:
-k—This option explicitly allows cURL to perform insecure SSL connections and transfers, which allows you to test your SSL connection without installing a CA certificate.
--user cpx:hammerhead—Replace cpx with the user name for your Series appliance. Replace hammerhead with the password for your Series appliance.
https://xxx.xxx.xxx.xxx/api/4.0/stats/interfaces—The statistics request URL. Replace xxx.xxx.xxx.xxx with the IP address of your Series appliance.
Results
This example returns interface statistics for the current Series appliance. The output is in JSON.
Interface statistics by name request
To retrieve interfaces statistics for a specific interface, send the following request:
GET https://<PX_IP_address>/api/4.0/stats/interfaces/<interface>
Required header:
--user <username>:<password>
Options
PX_IP_address—IP address of the Series appliance running the Series API.
username—The user name for your Series appliance.
password—The password for your Series appliance.
interface—(string) The name of the interface.
Example
GET https://xxx.xxx.xxx.xxx/api/4.0/stats/interfaces/netmap
Required header:
--user cpx:hammerhead
Interface statistics by name response
HTTP/1.1 [Response Code] [Response Message] Date: [Date]
Content-Type: [Content Type]
{
"interfaceName": "string", "channels": [
{
"channel": int,
"receivedOctets": int, "receivedPackets": int, "multicastPackets": int, "missedHwPackets": int, "broadcastPackets": int, "mbps": speed
},
. . .
],
"streams": [
{
"stream": int, "slicedOctets": int, "slicedPackets": int, "receivedOctets": int, "receivedPackets": int, "sentOctets": int, "sentPackets": int, "droppedPackets": int, "droppedOctets": int, "missedBufPackets": int, "mbps": speed
},
. . .
]
}
Response fields
Response Code—A standard HTML response code.
Response Message—A standard HTML response message.
Date—Standard HTML date format.
Content Type—The response format.
interfaceName—Name of interface.
channel—The hardware channel to which the statistics pertain. Generally, this maps to a specific port (such asSFP) on the capture card.
receivedOctets—The software stream to which the statistics pertain. Generally, there will be four streams for Napatech capture cards, and one stream per Silicom/Intel capture card.
receivedPackets—
multicastPackets—The number of multicast packets received. These packets are also included in a channel's receivedPackets statistic.
missedHwPackets—The number of packets that the capture device had to drop at the wire due to back pressure. This represents packets that the did not capture.
broadcastPackets—The number of broadcast packets received. These packets are also included in a channel's receivedPackets statistic.
mbps—The captured traffic rate, in megabits per second.
stream—The software stream to which the statistics pertain. Generally, there will be four streams for Napatech capture cards, and one stream per Silicom/Intel capture card.
slicedOctets—The number of bytes that were truncated because the packet was too large.
slicedPackets—The number of packets that were truncated (over 9,000 bytes) because the packet was too large.
receivedOctets—For channels, this is the number of bytes received from the capture device. For streams, this is the number of bytes received by the software.
receivedPackets—For channels, this is the number of packets received from the capture device. For streams, this is the number of packets received by the software.
sentOctets—The number of bytes sent to the packet acquisition pipeline. This should be equal to the number of bytes received minus the number of bytes dropped.
sentPackets—The number of packets sent to the packet acquisition pipeline. This should be equal to the number of packets received minus the number of packets dropped.
droppedPackets—The number of packets dropped by the packet acquisition software due to back pressure.
droppedOctets—The number of bytes dropped by the packet acquisition software due to back pressure.
missedBufPackets—The number of packets the the capture device could not copy into memory due to back pressure. This represents packets that the did not capture.
Example
HTTP/1.1 200 OK
Date: Wed, 6 Jun 2018 22:42:41 GMT
Content-Type: application/json; charset=utf-8
{
"interfaceName": "napatech:ether2", "channels": [
{
"channel": 0,
"receivedOctets": 100546833121,
"receivedPackets": 137701950,
"multicastPackets": 8,
"missedHwPackets": 0,
"broadcastPackets": 11045,
"mbps": 9.535215759277344
}
],
"streams": [
{
"stream": 0,
"slicedOctets": 0,
"slicedPackets": 0,
"receivedOctets": 99227919530,
"receivedPackets": 135870577,
"sentOctets": 98807431792,
"sentPackets": 135277638,
"droppedPackets": 592939,
"droppedOctets": 420487738,
"missedBufPackets": 0,
"mbps": 9.536094665527344
}
]
}
cURL code sample: Interface statistics by name
The code sample was run with cURL 7.57.0.
curl -k --user cpx:hammerhead https://xxx.xxx.xxx.xxx/api/4.0/stats/interfaces/pinetree
This cURL sample includes the following options:
-k—This option explicitly allows cURL to perform insecure SSL connections and transfers, which allows you to test your SSL connection without installing a CA certificate.
--user cpx:hammerhead—Replace cpx with the user name for your Series appliance. Replace hammerhead with the password for your Series appliance.
https://xxx.xxx.xxx.xxx/api/4.0/stats/interfaces/pinetree—The statistics request URL. Replace xxx.xxx.xxx.xxx
with the IP address of your Series appliance, and pinetree with the name of your interface.
Results
This example returns interface statistics for the specified interface. The output is in JSON.
Stream statistics for interface request
To retrieve stream statistics for a specific interface, send the following request:
GET https://<PX_IP_address>/api/4.0/stats/interfaces/<interface>/streams
Required header:
--user <username>:<password>
Options
PX_IP_address—IP address of the Series appliance running the Series API.
username—The user name for your Series appliance.
password—The password for your Series appliance.
interface—(string) The name of the interface.
Example
GET https://xxx.xxx.xxx.xxx/api/4.0/stats/interfaces/pinetree/streams
Required header:
--user cpx:hammerhead
Stream statistics for interface response
HTTP/1.1 [Response Code] [Response Message] Date: [Date]
Content-Type: [Content Type] [
{
"stream": int, "slicedOctets": int, "slicedPackets": int, "receivedOctets": int, "receivedPackets": int, "sentOctets": int, "sentPackets": int, "droppedPackets": int, "droppedOctets": int, "missedBufPackets": int, "mbps": speed
}
Response fields
Response Code—A standard HTML response code.
Response Message—A standard HTML response message.
Date—Standard HTML date format.
Content Type—The response format.
other fields—See Interface statistics request
Example
HTTP/1.1 200 OK
Date: Wed, 6 Jun 2018 22:43:56 GMT
Content-Type: application/json; charset=utf-8 [
{
"stream": 0,
"slicedOctets": 0,
"slicedPackets": 0,
"receivedOctets": 26985031288922,
"receivedPackets": 36757651350,
"sentOctets": 26985031288922,
"sentPackets": 36757651350,
"droppedPackets": 0,
"droppedOctets": 0,
"missedBufPackets": 0,
"mbps": 141.95724716186524
}
]
cURL code sample: Stream statistics for interface
The code sample was run with cURL 7.57.0.
curl -k --user cpx:hammerhead https://xxx.xxx.xxx.xxx/api/4.0/stats/interfaces/pinetre/streams
This cURL sample includes the following options:
-k—This option explicitly allows cURL to perform insecure SSL connections and transfers, which allows you to test your SSL connection without installing a CA certificate.
--user cpx:hammerhead—Replace cpx with the user name for your Series appliance. Replace hammerhead with the password for your Series appliance.
https://xxx.xxx.xxx.xxx/api/4.0/stats/interfaces/pinetree/streams—The statistics request URL. Replace
xxx.xxx.xxx.xxx with the IP address of your Series appliance, and pinetree with the name of your interface.
Results
This example returns stream statistics for the specified interface. The output is in JSON.
Channel statistics for interface request
To retrieve channel statistics for a specific interface, send the following request:
GET https://<PX_IP_address>/api/4.0/stats/interfaces/<interface>/channels
Required header:
--user <username>:<password>
Options
PX_IP_address—IP address of the Series appliance running the Series API.
username—The user name for your Series appliance.
password—The password for your Series appliance.
interface—(string) The name of the interface.
Example
GET https://xxx.xxx.xxx.xxx/api/4.0/stats/interfaces/pinetree/channels
Required header:
--user cpx:hammerhead
Channel statistics for interface response
HTTP/1.1 [Response Code] [Response Message] Date: [Date]
Content-Type: [Content Type] [
{
"channel": int, "receivedOctets": int, "receivedPackets": int, "multicastPackets": int, "missedHwPackets": int, "broadcastPackets": int, "mbps": speed
},
. . .
]
Response fields
Response Code—A standard HTML response code.
Response Message—A standard HTML response message.
Date—Standard HTML date format.
Content Type—The response format.
other fields—See Interface statistics request
interfaceName—Name of interface.
Example
HTTP/1.1 200 OK
Date: Wed, 6 Jun 2018 22:42:41 GMT
Content-Type: application/json; charset=utf-8
{
"interfaceName": "pinetree", "channels": [
{
"channel": 0,
"receivedOctets": 0,
"receivedPackets": 0,
"multicastPackets": 0,
"missedHwPackets": 0,
"broadcastPackets": 0,
"mbps": 0
},
{
"channel": 1,
"receivedOctets": 0,
"receivedPackets": 0,
"multicastPackets": 0,
"missedHwPackets": 0,
"broadcastPackets": 0,
"mbps": 0
}
],
"streams": [
{
"stream": 0,
"slicedOctets": 0,
"slicedPackets": 0,
"receivedOctets": 37623,
"receivedPackets": 25667,
"sentOctets": 847,
"sentPackets": 245,
"droppedPackets": 0,
"droppedOctets": 0,
"missedBufPackets": 0,
"mbps": 15
},
{
"stream": 1,
"slicedOctets": 0,
"slicedPackets": 0,
"receivedOctets": 0,
"receivedPackets": 0,
"sentOctets": 0,
"sentPackets": 0,
"droppedPackets": 0,
"droppedOctets": 0,
"missedBufPackets": 0,
"mbps": 0
},
{
"stream": 2,
"slicedOctets": 0,
"slicedPackets": 0,
"receivedOctets": 0,
"receivedPackets": 0,
"sentOctets": 0,
"sentPackets": 0,
"droppedPackets": 0,
"droppedOctets": 0,
"missedBufPackets": 0,
"mbps": 0
},
. . .
]
}
cURL code sample: Channel statistics for interface
The code sample was run with cURL 7.57.0.
curl -k --user cpx:hammerhead https://xxx.xxx.xxx.xxx/api/4.0/stats/interfaces/pinetree/channels
This cURL sample includes the following options:
-k—This option explicitly allows cURL to perform insecure SSL connections and transfers, which allows you to test your SSL connection without installing a CA certificate.
--user cpx:hammerhead—Replace cpx with the user name for your Series appliance. Replace hammerhead with the password for your Series appliance.
https://xxx.xxx.xxx.xxx/api/4.0/stats/interfaces/pinetree/channels—The statistics request URL. Replace
xxx.xxx.xxx.xxx with the IP address of your Series appliance, and pinetree with the name of your interface.
Results
This example returns channel statistics for the specified interface. The output is in JSON.
Suricata
The Series appliance provides configuration options for Suricata. These endpoints allow an authorized user to:
Enable and disable Suricata processing
Enable and disable Event-based capture processing
Set networks for HOME_NET
Enable or disable individual protocol parsers
Since changes to the Suricata configuration require restarting Suricata, they are managed in bulk by using a meta file. The process for modifying values is to:
Use the GET method to download the current configuration settings in JSON format.
Modify the settings in the value section of the JSON object. Only the 'value' section is required for modifications. Other sections can be either removed or left in place, whichever is most convenient.
Use the PUT method to upload the modified settings.
Use the following endpoints configure Suricata:
GET https://<PX_IP_address>/api/4.0/config/suricata
POST https://<PX_IP_address>/api/4.0/config/suricata
POST https://<PX_IP_address>/api/4.0/config/exfil
GET https://<PX_IP_address>/api/4.0/eventlogs
Get Suricata configuration request
To retrieve the Suricata configuration, send the following request:
GET https://<PX_IP_address>/api/4.0/config/suricata
The configuration is stored in a meta file. When getting the configuration, specify the name of the meta file on the command line.
Required header:
--user <username>:<password>
Options
PX_IP_address—IP address of the Series appliance running the Series API.
username—The user name for your Series appliance.
password—The password for your Series appliance.
Example
GET https://xxx.xxx.xxx.xxx/api/4.0/config/suricata
Required header:
--user npadmin:hammerhead
Get Suricata configuration response
HTTP/1.1 [Response Code] [Response Message] Date: [Date]
Content-Type: [Content Type] description: [Description} fields: [Fields]
label: [Label]
homeNet: [Home Network]
Response fields
Response Code—A standard HTML response code.
Response Message—A standard HTML response message.
Date—Standard HTML date format.
Content Type—The response format.
Description—A description of the component.
Fields—Fields list different options for each component.
Label—The name of the component.
Home Network—A list of addresses in CIDR notation used in the HOME_NET configuration value of Suricata.
Example
HTTP/1.1 200 OK
Date: Fri, 10 Mar 2018 01:52:58 GMT
Content-Type: application/json; charset=utf-8
{
"description": "Configure Suricata", "fields": {
"suricata": {
"default": [ true
],
"description": "Enable/disable Suricata", "falseLabel": "Disabled",
"index": 1,
"label": "Suricata", "maxCount": 1,
"minCount": 1, "trueLabel": "Enabled", "type": "bool"
},
"ebc": {
"default": [ true
],
"description": "Enable/disable EBC", "falseLabel": "Disabled",
"index": 2, "label": "EBC", "maxCount": 1,
"minCount": 1, "trueLabel": "Enabled", "type": "bool"
},
"homeNet": {
"default": [ "192.168.0.0/16",
"10.0.0.0/8",
"172.16.0.0/12"
],
"description": "HOME_NET addresses in CIDR notation", "index": 3,
"label": "HOME_NET addresses", "minCount": 0,
"type": "cidr"
},
"protocols": {
"description": "Manage protocols", "fields": {
"tacplus": {
"default": [ "no"
],
"description": "Manage TACACS+ protocol", "enums": ["yes", "no", "detection-only"], "index": 1,
"label": "tacplus", "maxCount": 1,
"minCount": 1,
"type": "enum"
},
"dhcp": {
"default": [ "no"
],
"description": "Manage DHCP protocol", "enums": ["yes", "no", "detection-only"], "index": 2,
"label": "dhcp", "maxCount": 1,
"minCount": 1,
"type": "enum"
},
"sip": {
"default": [ "no"
],
"description": "Manage SIP protocol", "enums": ["yes", "no", "detection-only"], "index": 3,
"label": "sip", "maxCount": 1,
"minCount": 1,
"type": "enum"
},
"rtsp": {
"default": [ "no"
],
"description": "Manage RTSP protocol", "enums": ["yes", "no", "detection-only"], "index": 4,
"label": "rtsp", "maxCount": 1,
"minCount": 1,
"type": "enum"
},
"krb5": {
"default": [ "no"
],
"description": "Manage KRB5 protocol", "enums": ["yes", "no", "detection-only"], "index": 5,
"label": "krb5", "maxCount": 1,
"minCount": 1,
"type": "enum"
},
"radius": {
"default": [ "no"
],
"description": "Manage RADIUS protocol", "enums": ["yes", "no", "detection-only"], "index": 6,
"label": "radius", "maxCount": 1,
"minCount": 1,
"type": "enum"
},
"tls": {
"default": [ "yes"
],
"description": "Manage TLS protocol", "enums": ["yes", "no", "detection-only"], "index": 7,
"label": "tls", "maxCount": 1,
"minCount": 1,
"type": "enum"
},
"dcerpc": {
"default": [ "no"
],
"description": "Manage DCERPC protocol", "enums": ["yes", "no", "detection-only"], "index": 8,
"label": "dcerpc", "maxCount": 1,
"minCount": 1,
"type": "enum"
},
"ftp": {
"default": [ "no"
],
"description": "Manage FTP protocol", "enums": ["yes", "no", "detection-only"], "index": 9,
"label": "ftp", "maxCount": 1,
"minCount": 1,
"type": "enum"
},
"ftpData": {
"default": [ "no"
],
"description": "Manage FTP-data protocol", "enums": ["yes", "no", "detection-only"], "index": 10,
"label": "ftp-data", "maxCount": 1,
"minCount": 1,
"type": "enum"
},
"rdp": {
"default": [ "no"
],
"description": "Manage RDP protocol", "enums": ["yes", "no", "detection-only"], "index": 11,
"label": "rdp", "maxCount": 1,
"minCount": 1,
"type": "enum"
},
"ssh": {
"default": [ "yes"
],
"description": "Manage SSH protocol", "enums": ["yes", "no", "detection-only"], "index": 12,
"label": "ssh", "maxCount": 1,
"minCount": 1,
"type": "enum"
},
"smtp": {
"default": [ "yes"
],
"description": "Manage SMTP protocol", "enums": ["yes", "no", "detection-only"], "index": 13,
"label": "smtp", "maxCount": 1,
"minCount": 1,
"type": "enum"
},
"imap": {
"default": [ "yes"
],
"description": "Manage IMAP protocol", "enums": ["yes", "no", "detection-only"], "index": 14,
"label": "imap", "maxCount": 1,
"minCount": 1,
"type": "enum"
},
"pop3": {
"default": [ "yes"
],
"description": "Manage POP3 protocol", "enums": ["yes", "no", "detection-only"], "index": 15,
"label": "pop3", "maxCount": 1,
"minCount": 1,
"type": "enum"
},
"msn": {
"default": [ "detection-only"
],
"description": "Manage MSN protocol", "enums": ["yes", "no", "detection-only"], "index": 16,
"label": "msn", "maxCount": 1,
"minCount": 1,
"type": "enum"
},
"smb": {
"default": [ "no"
],
"description": "Manage SMB protocol", "enums": ["yes", "no", "detection-only"], "index": 17,
"label": "smb", "maxCount": 1,
"minCount": 1,
"type": "enum"
},
"smb2": {
"default": [ "no"
],
"description": "Manage SMB2 protocol", "enums": ["yes", "no", "detection-only"], "index": 18,
"label": "smb2", "maxCount": 1,
"minCount": 1,
"type": "enum"
},
"dns": {
"default": [ "yes"
],
"description": "Manage DNS protocol", "enums": ["yes", "no", "detection-only"], "index": 19,
"label": "dns", "maxCount": 1,
"minCount": 1,
"type": "enum"
},
"irc": {
"default": [ "no"
],
"description": "Manage IRC protocol", "enums": ["yes", "no", "detection-only"], "index": 20,
"label": "irc", "maxCount": 1,
"minCount": 1,
"type": "enum"
},
"http": {
"default": [ "yes"
],
"description": "Manage HTTP protocol", "enums": ["yes", "no", "detection-only"], "index": 21,
"label": "http", "maxCount": 1,
"minCount": 1,
"type": "enum"
},
"modbus": {
"default": [ "no"
],
"description": "Manage Modbus protocol", "enums": ["yes", "no", "detection-only"], "index": 22,
"label": "modbus", "maxCount": 1,
"minCount": 1,
"type": "enum"
},
"dnp3": {
"default": [ "no"
],
"description": "Manage DNP3 protocol", "enums": ["yes", "no", "detection-only"], "index": 23,
"label": "dnp3", "maxCount": 1,
"minCount": 1,
"type": "enum"
},
"enip": {
"default": [ "no"
],
"description": "Manage ENIP protocol", "enums": ["yes", "no", "detection-only"], "index": 24,
"label": "enip", "maxCount": 1,
"minCount": 1,
"type": "enum"
}
},
"index": 4,
"label": "Protocols", "type": "object", "minCount": 1,
"maxCount": 1
}
},
"label": "Suricata", "values": {
"suricata": [ true
],
"ebc": [ true
],
"homeNet": [ "192.168.0.0/16",
"10.0.0.0/8",
"172.16.0.0/12"
],
"protocols": [
{
"tacplus": [ "no"
],
"dhcp": [ "no"
],
"sip": [ "no"
],
"rtsp": [ "no"
],
"krb5": [ "no"
],
"radius": [
"no"
],
"tls": [ "yes"
],
"dcerpc": [ "no"
],
"ftp": [ "no"
],
"ftpData": [ "no"
],
"rdp": [ "no"
],
"ssh": [ "yes"
],
"smtp": [ "yes"
],
"imap": [ "yes"
],
"pop3": [ "yes"
],
"msn": [ "detection-only"
],
"smb": [ "no"
],
"smb2": [ "no"
],
"dns": [ "yes"
],
"irc": [ "no"
],
"http": [ "yes"
],
"modbus": [ "no"
],
"dnp3": [ "no"
],
"enip": [ "no"
]
}
]
}
}
cURL code sample: Get Suricata configuration
The code sample was run with cURL 7.57.0.
curl --user npadmin:hammerhead https://xxx.xxx.xxx.xxx/api/4.0/config/suricata -k -X GET -o suricata.meta
This cURL sample includes the following options:
--user npadmin:hammerhead—Replace npadmin with the user name for your Series appliance. Replace hammerhead with the password for your Series appliance.
https://xxx.xxx.xxx.xxx/api/4.0/config/suricata—The component configuration request URL. Replace
xxx.xxx.xxx.xxx with the IP address of your Series appliance.
-k—This option explicitly allows cURL to perform insecure SSL connections and transfers, which allows you to test your SSL connection without installing a CA certificate.
-X GET—This option specifies using the GET method.
-o suricata.meta—This option specifies the name of the Suricata meta file.
Results
This example lists the Suricata configuration. The output is in JSON.
Configure Suricata request
To update the Suricata configuration, send the following request:
PUT https://<PX_IP_address>/api/4.0/config/suricata
 Note
Note
To use this request, you must belong to the sudo group.
You cannot update the Suricata configuration while it is being synchronized or if a system upgrade, backup, or restore is in progress.
Required header:
--user <username>:<password>
Request body:
{
"values": {
"suricata": [ true
],
"ebc": [ true
],
"homeNet": [
"10.0.0.0/8"
],
"protocols": [
{
"tacplus": [ "yes"
],
. . .
}
]
}
}
Options
PX_IP_address—IP address of the Series appliance running the Series API.
username—The user name for your Series appliance.
password—The password for your Series appliance.
Parameters
values—A description of the component.
protocols—Settings for protocols.
Example
PUT https://xxx.xxx.xxx.xxx/api/4.0/config/suricata
Required header:
--user npadmin:hammerhead
Request body:
{
"values": {
"suricata": [
true
],
"ebc": [ true
],
"homeNet": [
"10.0.0.0/8"
],
"protocols": [
{
"tacplus": [ "yes"
],
"dhcp": [ "detection-only"
],
"sip": [ "no"
],
"rtsp": [ "no"
],
"krb5": [ "no"
],
"radius": [ "no"
],
"tls": [ "yes"
],
"dcerpc": [ "no"
],
"ftp": [ "no"
],
"ftpData": [ "no"
],
"rdp": [ "no"
],
"ssh": [ "yes"
],
"smtp": [ "yes"
],
"imap": [ "yes"
],
"pop3": [ "yes"
],
"msn": [ "detection-only"
],
"smb": [ "no"
],
"smb2": [ "no"
],
"dns": [ "yes"
],
"irc": [ "no"
],
"http": [ "yes"
],
"modbus": [ "no"
],
"dnp3": [ "no"
],
"enip": [ "no"
]
}
]
}
}
Configure Suricata response
HTTP/1.1 [Response Code] [Response Message] Date: [Date]
Content-Type: [Content Type] description: [Description}
Response fields
Response Code—A standard HTML response code.
Response Message—A standard HTML response message.
Date—Standard HTML date format.
Content Type—The response format.
Description—A description of the component.
Example
HTTP/1.1 200 OK
Date: Mon, 09 Apr 2018 01:21:58 GMT
Content-Type: application/json; charset=utf-8
{
"description": "Configure Suricata", "fields": {
"suricata": {
"default": [ true
],
"description": "Enable/disable Suricata", "falseLabel": "Disabled",
"index": 1,
"label": "Suricata", "maxCount": 1,
"minCount": 1, "trueLabel": "Enabled", "type": "bool"
},
"ebc": {
"default": [ true
],
"description": "Enable/disable EBC", "falseLabel": "Disabled",
"index": 2, "label": "EBC", "maxCount": 1,
"minCount": 1, "trueLabel": "Enabled", "type": "bool"
},
"homeNet": {
"default": [ "192.168.0.0/16",
"10.0.0.0/8",
"172.16.0.0/12"
],
"description": "HOME_NET addresses in CIDR notation", "index": 3,
"label": "HOME_NET addresses", "minCount": 0,
"type": "cidr"
},
"protocols": {
"description": "Manage protocols", "fields": {
"tacplus": {
"default": [ "no"
],
"description": "Manage TACACS+ protocol", "enums": ["yes", "no", "detection-only"], "index": 1,
"label": "tacplus", "maxCount": 1,
"minCount": 1,
"type": "enum"
},
"dhcp": {
"default": [ "no"
],
"description": "Manage DHCP protocol", "enums": ["yes", "no", "detection-only"], "index": 2,
"label": "dhcp", "maxCount": 1,
"minCount": 1,
"type": "enum"
},
"sip": {
"default": [ "no"
],
"description": "Manage SIP protocol", "enums": ["yes", "no", "detection-only"], "index": 3,
"label": "sip", "maxCount": 1,
"minCount": 1,
"type": "enum"
},
.
.
.
.
"dnp3": {
"default": [ "no"
],
"description": "Manage DNP3 protocol", "enums": ["yes", "no", "detection-only"], "index": 23,
"label": "dnp3", "maxCount": 1,
"minCount": 1,
"type": "enum"
},
"enip": {
"default": [ "no"
],
"description": "Manage ENIP protocol", "enums": ["yes", "no", "detection-only"], "index": 24,
"label": "enip", "maxCount": 1,
"minCount": 1,
"type": "enum"
}
},
"index": 4,
"label": "Protocols", "type": "object", "minCount": 1,
"maxCount": 1
}
},
"label": "Suricata", "values": {
"suricata": [ true
],
"ebc": [ true
],
"homeNet": [
"10.0.0.0/8"
],
"protocols": [
{
"tacplus": [ "yes"
],
"dhcp": [ "detection-only"
],
"sip": [ "no"
],
"rtsp": [ "no"
],
"krb5": [ "no"
],
"radius": [ "no"
],
.
.
.
}
]
}
}
cURL code sample: Configure Suricata
The code sample was run with cURL 7.57.0.
curl --user npadmin:hammerhead https://xxx.xxx.xxx.xxx/api/4.0/config/suricata -k -X PUT
-d @suricata.meta
This cURL sample includes the following options:
--user npadmin:hammerhead—Replace npadmin with the user name for your Series appliance. Replace hammerhead with the password for your Series appliance.
https://xxx.xxx.xxx.xxx/api/4.0/config/suricata—The component configuration request URL. Replace
xxx.xxx.xxx.xxx with the IP address of your Series appliance.
-k—This option explicitly allows cURL to perform insecure SSL connections and transfers, which allows you to test your SSL connection without installing a CA certificate.
-X PUT—This option specifies using the PUT method.
-d @suricata.meta—This option specifies the meta file to update.
Results
This example updates the values for the Suricata configuration. The output is in JSON.
Configure data exfiltration detection request
You can write Suricata rules using the HOME_NET variable to detect data exfiltration if you define your internal network. To define IP addresses as internal addresses, send one of the following requests:
POST https://<PX_IP_address>/api/4.0/config/exfil
PUT https://<PX_IP_address>/api/4.0/config/exfil
 Note
Note
To use this request, you must belong to the sudo group.
 Note
Note
You cannot update data exfiltration detection while it is being synchronized or if a system upgrade, backup, or restore is in progress.
Required header:
--user <username>:<password>
Request body:
{
enabled: Boolean, homeNet: 'IP_address'
}
Options
PX_IP_address—IP address of the Series appliance running the Series API.
username—The user name for your Series appliance.
password—The password for your Series appliance.
Parameters
enabled—Whether the date exfiltration detection is active. When enabled is set to true, you can configure the HOME_NET variable for Suricata rule sets. Valid values are true and false.
homeNet—Optional. A list of IP address for the home network in classless inter-domain routing (CIDR) notation.
Example
POST https://xxx.xxx.xxx.xxx/api/4.0/config/exfil
Required header:
--user npadmin:hammerhead
Request body:
{
"values": {
"enabled": [ true
],
"homeNet": [ "192.168.0.0/16",
"10.0.0.0/8",
"172.16.0.0/12"
]
}
}
Configure data exfiltration detection response
HTTP/1.1 [Response Code] [Response Message] Date: [Date]
Content-Type: [Content Type] description: [Description} fields: [Fields]
label: [Label] enabled: [Enabled] homeNet: [Home Net]
Response fields
Response Code—A standard HTML response code.
Response Message—A standard HTML response message.
Date—Standard HTML date format.
Content Type—The response format.
Description—A description of data exfiltration detection.
Fields—Fields list data exfiltration detection options.
Label—The name of the component.
Enabled—Whether the data exfiltration detection service is active.
Home Net—A list of IP address for the home network in CIDR notation.
Example
HTTP/1.1 200 OK
Date: Wed, 22 Mar 2017 17:58:38 GMT
Content-Type: application/json; charset=utf-8
{
"description": "Configure Exfil Detection", "fields": {
"enabled": {
"default": [ false
],
"description": "Enable/Disable Exfil Detection Service", "falseLabel": "Disabled",
"label": "Exfil Detection", "maxCount": 1,
"minCount": 1, "trueLabel": "Enabled", "type": "bool"
},
"homeNet": {
"default": [ "192.168.0.0/16",
"10.0.0.0/8",
"172.16.0.0/12"
],
"description": "Home network addresses in CIDR notation", "label": "Home network addresses",
"minCount": 0,
"type": "cidr"
}
},
"label": "Exfil", "values": {
"enabled": [ true
],
"homeNet": [ "192.168.0.0/16",
"10.0.0.0/8",
"172.16.0.0/12"
]
}
}
cURL code sample: Configure data exfiltration detection
The code sample was run with cURL 7.57.0.
curl --user npadmin:hammerhead https://xxx.xxx.xxx.xxx/api/4.0/config/exfil
-k -X POST
--data-binary '{"values": {"enabled": [true],"homeNet": ["192.168.0.0/16","10.0.0.0/8","172.16.0.0/12"]}}'
This cURL sample includes the following options:
--user npadmin:hammerhead—Replace npadmin with the user name for your Series appliance. Replace hammerhead with the password for your Series appliance.
https://xxx.xxx.xxx.xxx/api/4.0/config/exfil—The component configuration request URL. Replace xxx.xxx.xxx.xxx
with the IP address of your Series appliance.
-k—This option explicitly allows cURL to perform insecure SSL connections and transfers, which allows you to test your SSL connection without installing a CA certificate.
-X POST—This option specifies using the POST method.
--data-binary '{"values": {"enabled": [true],"homeNet": ["192.168.0.0/16","10.0.0.0/8","172.16.0.0/ 12"]}}'—This option specifies the changes to make to data exfiltration detection.
Results
This example enables data exfiltration detection and defines which IP addresses are internal addresses. The output is in JSON.
Local event logging request
To retrieve Suricata local event logs containing layer-7 event information, send the following request:
GET https://<PX_IP_address>/api/4.0/eventlogs
Required header:
--user <username>:<password>
 Note
Note
Depending on the amount of data on the system, this endpoint could return a lot of information. recommends querying more frequently for smaller time ranges rather than less frequently with larger time ranges.
Options
PX_IP_address—IP address of the Series appliance running the Series API.
username—The user name for your Series appliance.
password—The password for your Series appliance.
Query parameters
stime—Date and time from which the search should start. See Conventions for the format. (REQUIRED)
etime—Date and time at which the search should end. See Conventions for the format. (REQUIRED)
Example
GET https://xxx.xxx.xxx.xxx/api/4.0/eventlogs?stime=20150304.000000&etime=20150304.000001
Required header:
--user cpx:hammerhead
Local event logging response
The response varies depending on the type of event.
Response fields
The response fields vary depending on the type of event.
Example
The response varies depending on the type of event.
cURL code sample: Local event logging
The code sample was run with cURL 7.57.0.
curl -k --user cpx:hammerhead "stime=20150304.000000&etime=20150304.000001" https://xxx.xxx.xxx.xxx/api/4.0/ eventlogs
This cURL sample includes the following options:
-k—This option explicitly allows cURL to perform insecure SSL connections and transfers, which allows you to test your SSL connection without installing a CA certificate.
--user cpx:hammerhead—Replace cpx with the user name for your Series appliance. Replace hammerhead with the password for your Series appliance.
"stime=20150304.000000&etime=20150304.000001"—This option specifies the range of time.
https://xxx.xxx.xxx.xxx/api/4.0/eventlogs—The local event logging request URL. Replace xxx.xxx.xxx.xxx with the IP address of your Series appliance.
Results
This example returns the Suricata local event logs for the specified time range. The output is a stream of JSON objects.
File extraction
The appliance can now selectively extract files from live traffic in real time using Suricata. The extracted files saved to the Packet Capture appliance can then be submitted to configured third-party tools such as VirusTotal and ReversingLabs for further analysis. To configure real-time file extraction using Suricata, see the "Configuring real-time file extraction" topic in the .
Use the following endpoints to do the following: Enable file extraction, check the file-extraction status, create a target, list targets, and to retrieve information of a specific target.
PUT https://<PX_IP_address>/api/4.0/config/export/fileexport
GET https://<PX_IP_address>/api/4.0/config/export/fileexport
POST https://<PX_IP_address>/api/4.0/config/export/fileexport/targets
GET https://<PX_IP_address>:8666>/api/4.0/config/export/fileexport/targets
GET https://<PX_IP_address>:8666/api/4.0/config/export/fileexport/targets/<target_name>
Configure file extraction—Request
You can enable or disable the real-time file extraction feature using the following request:
PUT https://<PX_IP_address>/api/4.0/config/export/fileexport
 Note
Note
To use this request, you must belong to the sudo group.
Required header:
--user <username>:<password>
Request body:
{
"enabled": Boolean
}
Options
PX_IP_address—IP address of the Series appliance running the Series API.
username—Administrator user name.
password—Administrator password.
Parameters
enabled—The file extraction status. Valid values are true and false. When enabled is set to true, the file extraction is activated. When enabled is set to false, the file extraction is deactivated.
Example
PUT http://xxx.xxx.xxx.xxx:/api/4.0/config/export/fileexport
Required header:
--user npadmin:hammerhead
Request body:
{
"enabled": true
}
Configure file extraction—Response
HTTP/1.1 [Response Code] [Response Message] Date: [Date]
Content-Type: [Content Type]
Response fields
Response Code—A standard HTML response code.
Response Message—A standard HTML response message.
Date—Standard HTML date format.
Content Type—The response format.
Example
HTTP/1.1 200 OK
Date: Wed, 22 Mar 2017 17:58:38 GMT
Content-Type: application/json; charset=utf-8
{
"File carving configs updated successfully"
}
cURL code sample: Configure file extraction
This code sample was run on a remote host.
curl -k --user npadmin:hammerhead -H "Content-Type: application/json" --request PUT --data '{"enabled": true}' https://xxx.xxx.xxx.xxx/api/4.0/config/export/fileexport
This cURL sample includes the following options:
-k—This option explicitly allows cURL to perform insecure SSL connections and transfers, which allows you to test your SSL connection without installing a CA certificate.
--user npadmin:hammerhead—Replace npadmin with the administrator user name. Replace hammerhead with the administrator password.
-H "Content-Type: application/json"— This option specifies the content type of input data passed as a header.
--request PUT—This option specifies using the PUT method.
--data {"enabled": true}—This option specifies the configuration changes for file extraction. In this case, the file extraction is enabled.
https://xxx.xxx.xxx.xxx:<port>/api/4.0/config/export/fileexport—Request URL. Replace xxx.xxx.xxx.xxx with the IP address of your Series appliance.
The following is an example of the CURL code executed in PX shell:
curl -H "X-Username: npadmin" -H "X-Role: wheel" -H "Content-Type: application/json"
--request PUT --data '{"enabled": true}' http://localhost:8666/api/4.0/config/export/fileexport
Results
This example enables file extraction. The output is in JSON.
File-extraction status—Request
To retrieve the file-extraction configuration status, send the following request:
GET https://<PX_IP_address>/api/4.0/config/export/fileexport
Required header:
--user <username>:<password>
Options
PX_IP_address—IP address of the Series appliance running the Series API.
username—Administrator username.
password—Administrator password.
Example
GET https://xxx.xxx.xxx.xxx/api/4.0/config/export/fileexport
Required header:
--user npadmin:hammerhead
File-extraction status—Response
HTTP/1.1 [Response Code] [Response Message] Date: [Date]
Content-Type: [Content Type] Enabled: [Boolean]
Response fields
Response Code—A standard HTML response code.
Response Message—A standard HTML response message.
Date—Standard HTML date format.
Content Type—The response format.
Enabled—Configuration status of the file extraction feature. True: File extraction is enabled. False: File extraction is disabled.
Example
HTTP/1.1 200 OK
Date: Fri, 10 Mar 2018 01:52:58 GMT
Content-Type: application/json; charset=utf-8
{
"enabled": false
}
cURL code sample: Get file-extraction status
The following code sample was run on a remote host:
- curl -k -u npadmin:hammerhead https://xxx.xxx.xxx.xxx/api/4.0/config/export/fileexport
This cURL sample includes the following options:
-k—This option explicitly allows cURL to perform insecure SSL connections and transfers, which allows you to test your SSL connection without installing a CA certificate.
--u npadmin:hammerhead—Replace npadmin with the administrator user name. Replace hammerhead with the administrator password.
https://xxx.xxx.xxx.xxx/api/4.0/config/export/fileexport—Request URL. Replace xxx.xxx.xxx.xxx with the IP address of your Series appliance.
The following is an example of the CURL code executed in PX shell:
curl -H "X-Username: npadmin" -H "X-Role: wheel" http://localhost:8666/api/4.0/config/export/fileexport
Results
This example displays the file-extraction configuration status. The output is in JSON.
Create target for file export—Request
When file extraction is enabled, you can export the extracted files to a target created on third-party detection and analysis tools such as VirusTotal and ReversingLabs for further analysis. To create a target and configure file export to the target, send the following request:
POST https://<PX_IP_address>/api/4.0/config/export/fileexport/targets
Required header:
--user <username>:<password>
Required body:
{
"name": "string", "enabled": boolean, "host": "string", "port": int, "verify_https": boolean, "scheme":"string", "endpoint":"string", "timeout": int, "target_type": "string", "api_token": "string"
}
Options
PX_IP_address—IP address of the Series appliance running the Series API.
username—Administrator user name.
password—Administrator password.
Parameters
name—Name of the target.
enabled—Status of the file export. If set to true, the file export to the target is enabled. If set to false, the export to the target is disabled.
host—Hostname or IP address of the target.
port—The port over which the communication happens.
verify_https—To enable or disable SSL certificates while exporting files to target.
scheme—The scheme used to send the request. Possible values are HTTP and HTTPS.
endpoint—The location in the target where the files are saved.
timeout—The period after which the connection drops for the export request.
target_type—The platform to which the files are exported. Currently appliance supports two platforms—VirusTotal and ReversingLabs.
api_token— API authentication token generated in the platforms where the target is being created.
Required header:
--user cpx:hammerhead
Required body:
{
"name": "virustotal-1", "enabled": true,
"host": "www.virustotal.com", "port":443,
"verify_https": true, "scheme":"https", "endpoint":"/api/v3/files", "timeout": 10,
"target_type": "virus-total", "api_token": " xxxx"
}
Create target for file export—Response
HTTP/1.1 [Response Code] [Response Message] Date: [Date]
Content-Type: [Content Type]
]
Response fields
Response Code—A standard HTML response code.
Response Message—A standard HTML response message.
Date—Standard HTML date format.
Content Type—The response format.
Example
HTTP/1.1 200 OK
Date: Fri, 31 Mar 2017 21:49:36 GMT
Content-Type: application/json; charset=utf-8
{
"Target added successfully"
}
cURL code sample: Create target
The following code sample was run on a remote host:
- curl -k -u npadmin::hammerhead -H "X-Role: wheel" -H "Content-Type: application/json"
--request POST --data '{"name": "virustotal-1", "enabled": true, "host": "www.virustotal.com", "port":443, "verify_https": true,
"scheme":"https", "endpoint":"/api/v3/files", "timeout": 10, "target_type": "virus-total", "api_token": " xxxx"}'
https://xxx.xxx.xxx.xxx/api/4.0/config/export/fileexport/targets
This cURL sample includes the following options:
-k—This option explicitly allows cURL to perform insecure SSL connections and transfers, which allows you to test your SSL connection without installing a CA certificate.
--user npadmin:hammerhead—Replace npadmin with the administrator user name. Replace hammerhead with the administrator password.
H "X-Role: wheel"—This option specifies the user role passed as a header. Replace "wheel" with your administrator-user role.
-H "Content-Type: application/json"— This option specifies the content type of input data passed as a header.
--request POST—This option specifies using the POST method.
--data '{"name": "virustotal-1", "enabled": true, "host": "www.virustotal.com", "port":443, "verify_https": true, "scheme":"https", "endpoint":"/api/v3/files", "timeout": 10, "target_type": "virus-total", "api_token": " xxxx"}'— This option specifies the details of the target that is created, whether the files extracted are exported to the target, and other details of the file export. See the parameters section for information on each parameter.
https://xxx.xxx.xxx.xxx/api/4.0/config/export/fileexport/target—Request URL. Replace xxx.xxx.xxx.xxx with the IP address of your Series appliance.
The following is an example of the CURL code executed in PX shell:
curl -H "X-Username: npadmin" -H "X-Role: wheel" -H "Content-Type:
application/json" --request POST --data '{"name": "virustotal-1", "enabled": true, "host": "www.virustotal.com", "port":443, "verify_https": true, "scheme":"https",
"endpoint":"/api/v3/files",
"timeout": 10, "target_type": "virus-total", "api_token": "xxxxxxxxxxxxxxxxxx"}' http://localhost:8666/api/4.0/config/export/fileexport/targets
Results
This example creates a target and enables the file export to the configured target. The output is in JSON.
Target status—Request
To retrieve information of a specific target configured on any supported third-party platform to which the files (extracted when the file extraction feature is enabled) are exported, send the following request:
GET https://<PX_IP_address>:8666/api/4.0/config/export/fileexport/targets/<target_name>
Required header:
--user <username>:<password>
Options
PX_IP_address—IP address of the Series appliance running the Series API.
username—Administrator username.
password—Administrator password.
Example
GET https://xxx.xxx.xxx.xxx:8666/api/4.0/config/export/fileexport/targets/virustotal-1
Required header:
--user npadmin:hammerhead
Target status—Response
HTTP/1.1 [Response Code] [Response Message] Date: [Date]
Content-Type: [Content Type]
{
"name": "string",
"scheme":"string",
"host": "string", "endpoint":"string", "port":int, "timeout": int, "enabled": boolean,
"verify_https": boolean, "target_type": "string",
"api_token": "string"
}
Response fields
Response Code—A standard HTML response code.
Response Message—A standard HTML response message.
Date—Standard HTML date format.
Content Type—The response format.
name—Name of the target.
scheme—The scheme used to send the request.
host—Hostname or IP address of the target.
endpoint—The location in the target where the files are saved.
port—The port of the target over which the communication happens.
timeout—The period after which the connection drops for the export request.
enabled—Status of file export to the target. If it is true, the file export to the target is enabled. If it is false, the export to the target is disabled.
verify_https—To enable or disable SSL certificates while exporting files to target.
target_type—The third-party platform on which the target is created.
api_token —The API authentication token generated in the third-party platform where the target is created.
Example
HTTP/1.1 200 OK
Date: Fri, 10 Mar 2018 01:52:58 GMT
Content-Type: application/json; charset=utf-8
{
"name": "virustotal-1",
"scheme": "https",
"host": "www.virustotal.com", "endpoint": "/api/v3/files", "port": 443,
"timeout": 10, "enabled": true, "verify_https": true,
"target_type": "virus-total",
"api_token": " 8cf8fcd2c2f7235e544cae89b896965753f0c3a194f86bfd1721915d87350275"
}
cURL code sample: Get target status
The code sample was run with cURL 7.57.0.
curl -k --user npadmin:hammerhead https://xxx.xxx.xxx.xxx:8666/api/4.0/config/export/fileexport/targets/ virustotal-1 -X GET
This cURL sample includes the following options:
-k—This option explicitly allows cURL to perform insecure SSL connections and transfers, which allows you to test your SSL connection without installing a CA certificate.
--user npadmin:hammerhead—Replace npadmin with the administrator user name. Replace hammerhead with the administrator password.
https://xxx.xxx.xxx.xxx:8666/api/4.0/config/export/fileexport/targets/virustotal-1—Request URL. Replace xxx.xxx.xxx.xxx with the IP address of your Series appliance. Replace virustotal-1 with the target whose details you need.
-X GET—This option specifies using the GET method.
Results
This example displays the details of the specified target. The output is in JSON.
List targets—Request
To retrieve the targets configured on third-party platforms to which the files are exported for further analysis, send the following request:
GET https://<PX_IP_address>:8666>/api/4.0/config/export/fileexport/targets
Required header:
--user <username>:<password>
Options
PX_IP_address—IP address of the Series appliance running the Series API.
username—Administrator username.
password—Administrator password.
Example
GET https://xxx.xxx.xxx.xxx:8666/api/4.0/config/export/fileexport/targets
Required header:
--user npadmin:hammerhead
List targets—Response
HTTP/1.1 [Response Code] [Response Message] Date: [Date]
Content-Type: [Content Type]
{
"name": "string", "enabled": boolean,
"host": "string", "port":int, "verify_https": boolean, "scheme":"string", "endpoint":"string", "timeout": int, "target_type": "string", "api_token": "string"
}
Response fields
Response Code—A standard HTML response code.
Response Message—A standard HTML response message.
Date—Standard HTML date format.
Content Type—The response format.
name—Name of the target.
scheme—The scheme used to send the request.
host—Hostname or IP address of the target.
endpoint—The location in the target where the files are saved.
port—The port over which the communication happens.
timeout—The period after which the connection drops for the export request.
enabled—Status of the file export to a configured target. True: Export is enabled; False: Export is disabled.
verify_https—To enable or disable SSL certificates while exporting files to target.
target_type—The third-party solution on which the target is created. Currently the appliance supports two platforms—VirusTotal and ReversingLabs.
api_token —The API authentication token generated in the third-party tool where the target is created.
Example
HTTP/1.1 200 OK
Date: Fri, 10 Mar 2018 01:52:58 GMT
Content-Type: application/json; charset=utf-8
{
"name": "virustotal-1",
"scheme": "https",
"host": "www.virustotal.com", "endpoint": "/api/v3/files", "port": 443,
"timeout": 10, "enabled": true, "verify_https": true,
"target_type": "virus-total",
"api_token": " 8cf8fcd2c2f7235e544cae89b896965753f0c3a194f86bfd1721915d87350275"
}
cURL code sample: List targets
The code sample was run with cURL 7.57.0.
curl -k --user npadmin:hammerhead https://xxx.xxx.xxx.xxx:8666/api/4.0/config/export/fileexport/targets -X GET
This cURL sample includes the following options:
-k—This option explicitly allows cURL to perform insecure SSL connections and transfers, which allows you to test your SSL connection without installing a CA certificate.
--user npadmin:hammerhead—Replace npadmin with the administrator user name. Replace hammerhead with the administrator password.
https://xxx.xxx.xxx.xxx:8666/api/4.0/config/export/fileexport/targets—Request URL. Replace xxx.xxx.xxx.xxx
with the IP address of your Series appliance.
-X GET—This option specifies using the GET method.
Results
This example displays the targets configured on the platforms such as VirusTotal and ReversingLabs to which the files are exported for further analysis. The output is in JSON.
Netflow
The Series appliance provides a JSON object filter query language in 5.0 that is being added to all forms of metadata export to control what metadata is sent off the box. This section details the API to configure this export for the Netflow metadata export.
Export configuration has two levels; one for outputs, and one for output filters. This allows you to split outputs and filters into manageable queries and also assign meaningful names to the filters for management.
Use the following endpoints to configure Netflow:
GET https://<PX_IP_address>/api/4.0/export/netflow
PUT https://<PX_IP_address>/api/4.0/export/netflow
GET https://<PX_IP_address>/api/4.0/export/netflow/outputs
GET https://<PX_IP_address>/api/4.0/export/netflow/outputs/<output>
POST https://<PX_IP_address>/api/4.0/export/netflow/outputs/<output>/filters
PUT https://<PX_IP_address>/api/4.0/export/netflow/outputs/<output>
DELETE https://<PX_IP_address>/api/4.0/export/netflow/outputs/<output>
GET https://<PX_IP_address>/api/4.0/export/netflow/outputs/<output>/filters
GET https://<PX_IP_address>/api/4.0/export/netflow/outputs/<output>/filters/<filter>
POST https://<PX_IP_address>/api/4.0/export/netflow/outputs/<output>/filters
DELETE https://<PX_IP_address>/api/4.0/export/netflow/outputs/<output>/filters/<filter>
Netflow export configuration request
To retrieve the Netflow configuration, send the following request:
GET https://<PX_IP_address>/api/4.0/config/export/netflow
Required header:
--user <username>:<password>
Options
PX_IP_address—IP address of the Series appliance running the Series API.
username—The user name for your Series appliance.
password—The password for your Series appliance.
Example
GET https://xxx.xxx.xxx.xxx/api/4.0/config/export/netflow
Required header:
--user npadmin:hammerhead
Netflow export configuration response
HTTP/1.1 [Response Code] [Response Message] Date: [Date]
Content-Type: [Content Type]
{
"outputs": [
{ <output1 config>},
{ <output2 config>}
]
}
Response fields
Response Code—A standard HTML response code.
Response Message—A standard HTML response message.
Date—Standard HTML date format.
Content Type—The response format.
outputs—Output configurations.
Example
HTTP/1.1 200 OK
Date: Fri, 10 Mar 2018 01:52:58 GMT
Content-Type: application/json; charset=utf-8
{
"outputs": [
{ <output1 config>},
{ <output2 config>}
]
}
cURL code sample: Netflow export configuration
The code sample was run with cURL 7.57.0.
curl --user npadmin:hammerhead https://xxx.xxx.xxx.xxx/api/4.0/config/export/netflow -k -X GET
This cURL sample includes the following options:
--user npadmin:hammerhead—Replace npadmin with the user name for your Series appliance. Replace hammerhead with the password for your Series appliance.
https://xxx.xxx.xxx.xxx/api/4.0/config/export/netflow—The Netflow request URL. Replace xxx.xxx.xxx.xxx with the IP address of your Series appliance.
-k—This option explicitly allows cURL to perform insecure SSL connections and transfers, which allows you to test your SSL connection without installing a CA certificate.
-X GET—This option specifies using the GET method.
Results
This example lists the Netflow export configuration. The output is in JSON.
Configure Netflow export request
To update the Netflow export configuration, send the following request:
PUT https://<PX_IP_address>/api/4.0/export/netflow
 Note
Note
To use this request, you must belong to the sudo group.
You cannot update the Netflow configuration while it is being synchronized or if a system upgrade, backup, or restore is in progress.
Required header:
--user <username>:<password>
Request body:
{
"outputs": [
{<output1 config>},
{<output2 config>}
]
}
Options
PX_IP_address—IP address of the Series appliance running the Series API.
username—The user name for your Series appliance.
password—The password for your Series appliance.
Parameters
outputs—The output configuration.
Example
PUT https://xxx.xxx.xxx.xxx/api/4.0/export/netflow
Required header:
--user npadmin:hammerhead
Request body:
{
"outputs": [
{<output1 config>},
{<output2 config>}
]
}
Configure Netflow export response
HTTP/1.1 [Response Code] [Response Message] Date: [Date]
Content-Type: [Content Type] outputs: [outputs}
Response fields
Response Code—A standard HTML response code.
Response Message—A standard HTML response message.
Date—Standard HTML date format.
Content Type—The response format.
Outputs—The updated output configuration.
Example
HTTP/1.1 200 OK
Date: Mon, 09 Apr 2018 01:21:58 GMT
Content-Type: application/json; charset=utf-8
{
"outputs": [
{<output1 config>},
{<output2 config>}
]
}
cURL code sample: Configure Netflow export
The code sample was run with cURL 7.57.0.
curl --user npadmin:hammerhead https://xxx.xxx.xxx.xxx/api/4.0/export/netflow -k -X PUT
-d '{"outputs": [{ <output1 config>},{ <output2 config>}]}'
This cURL sample includes the following options:
--user npadmin:hammerhead—Replace npadmin with the user name for your Series appliance. Replace hammerhead with the password for your Series appliance.
https://xxx.xxx.xxx.xxx/api/4.0/export/netflow—The Netflow configuration request URL. Replace xxx.xxx.xxx.xxx
with the IP address of your Series appliance.
-k—This option explicitly allows cURL to perform insecure SSL connections and transfers, which allows you to test your SSL connection without installing a CA certificate.
-X PUT—This option specifies using the PUT method.
-d '{"outputs": [{ <output1 config>},{ <output2 config>}]}'—This option specifies the updated configuration.
Results
This example updates the Netflow export configuration. The output is in JSON.
Netflow outputs request
To retrieve Netflow outputs, send the following request:
GET https://<PX_IP_address>/api/4.0/export/netflow/outputs
Required header:
--user <username>:<password>
Options
PX_IP_address—IP address of the Series appliance running the Series API.
username—The user name for your Series appliance.
password—The password for your Series appliance.
Example
GET https://xxx.xxx.xxx.xxx/api/4.0/export/netflow/outputs
Required header:
--user npadmin:hammerhead
Netflow outputs response
HTTP/1.1 [Response Code] [Response Message] Date: [Date]
Content-Type: [Content Type] [
"<output1>", "<output2>", "<outputN>"
]
Response fields
Response Code—A standard HTML response code.
Response Message—A standard HTML response message.
Date—Standard HTML date format.
Content Type—The response format.
outputs—Output configurations.
Example
HTTP/1.1 200 OK
Date: Fri, 10 Mar 2018 01:52:58 GMT
Content-Type: application/json; charset=utf-8 [
"<output1>", "<output2>", "<outputN>"
]
cURL code sample: Netflow outputs
The code sample was run with cURL 7.57.0.
curl --user npadmin:hammerhead https://xxx.xxx.xxx.xxx/api/4.0/export/netflow/outputs -k -X GET
This cURL sample includes the following options:
--user npadmin:hammerhead—Replace npadmin with the user name for your Series appliance. Replace hammerhead with the password for your Series appliance.
https://xxx.xxx.xxx.xxx/api/4.0/export/netflow/outputs—The Netflow request URL. Replace xxx.xxx.xxx.xxx with the IP address of your Series appliance.
-k—This option explicitly allows cURL to perform insecure SSL connections and transfers, which allows you to test your SSL connection without installing a CA certificate.
-X GET—This option specifies using the GET method.
Results
This example lists Netflow outputs. The output is in JSON.
Netflow output details request
To retrieve details of a specific Netflow output, send the following request:
GET https://<PX_IP_address>/api/4.0/export/netflow/outputs/<output>
Required header:
--user <username>:<password>
Options
PX_IP_address—IP address of the Series appliance running the Series API.
username—The user name for your Series appliance.
password—The password for your Series appliance.
output—The output name.
Example
GET https://xxx.xxx.xxx.xxx/api/4.0/export/netflow/outputs/myexport
Required header:
--user npadmin:hammerhead
Netflow output details response
HTTP/1.1 [Response Code] [Response Message] Date: [Date]
Content-Type: [Content Type]
{
"name": "myexport", "address": "192.168.10.1",
"port": 666, "protocol": "v5",
"transport": "udp", "filters": [
{
"eventTypes": [ "xyz"
],
"filter": "destinationTransportPort = 55", "name": "willter"
}
]
}
Response fields
Response Code—A standard HTML response code.
Response Message—A standard HTML response message.
Date—Standard HTML date format.
Content Type—The response format.
Example
HTTP/1.1 200 OK
Date: Fri, 10 Mar 2018 01:52:58 GMT
Content-Type: application/json; charset=utf-8
{
"name": "<string>", "address": "<IP_address>", "port": int,
"protocol": "<string>", "transport": "<string>", "filters": [
{
"eventTypes": [ "<string>"
],
"filter": "<string>", "name": "<string>"
}
]
}
cURL code sample: Netflow output details
The code sample was run with cURL 7.57.0.
curl --user npadmin:hammerhead https://xxx.xxx.xxx.xxx/api/4.0/export/netflow/outputs/myexport -k -X GET
This cURL sample includes the following options:
--user npadmin:hammerhead—Replace npadmin with the user name for your Series appliance. Replace hammerhead with the password for your Series appliance.
https://xxx.xxx.xxx.xxx/api/4.0/export/netflow/outputs/myexport—The Netflow request URL. Replace
xxx.xxx.xxx.xxx with the IP address of your Series appliance.
-k—This option explicitly allows cURL to perform insecure SSL connections and transfers, which allows you to test your SSL connection without installing a CA certificate.
-X GET—This option specifies using the GET method.
Results
This example lists Netflow output details for myexport. The output is in JSON.
Netflow output filters request
To retrieve filters for a specific Netflow output, send the following request:
POST https://<PX_IP_address>/api/4.0/export/netflow/outputs/<output>/filters
 Note
Note
To use this request, you must belong to the sudo group.
You cannot update the Netflow configuration while it is being synchronized or if a system upgrade, backup, or restore is in progress.
Required header:
--user <username>:<password>
Options
PX_IP_address—IP address of the Series appliance running the Series API.
username—The user name for your Series appliance.
password—The password for your Series appliance.
output—The name of the output.
Example
GET https://xxx.xxx.xxx.xxx/api/4.0/export/netflow/outputs/my_output/filters
Required header:
--user npadmin:hammerhead
Netflow output filters response
HTTP/1.1 [Response Code] [Response Message] Date: [Date]
Content-Type: [Content Type] outputs: [outputs}
Response fields
Response Code—A standard HTML response code.
Response Message—A standard HTML response message.
Date—Standard HTML date format.
Content Type—The response format.
Outputs—The updated output configuration.
Example
HTTP/1.1 200 OK
Date: Mon, 09 Apr 2018 01:21:18 GMT
Content-Type: application/json; charset=utf-8
[
"<filter1>", "<filter2>"
]
cURL code sample: Netflow output filters
The code sample was run with cURL 7.57.0.
curl --user npadmin:hammerhead https://xxx.xxx.xxx.xxx/api/4.0/export/netflow/outputs/my_output/filters -k -X GET
This cURL sample includes the following options:
--user npadmin:hammerhead—Replace npadmin with the user name for your Series appliance. Replace hammerhead with the password for your Series appliance.
https://xxx.xxx.xxx.xxx/api/4.0/export/netflow/outputs/my_output/filters—The Netflow output request URL. Replace xxx.xxx.xxx.xxx with the IP address of your Series appliance.
-k—This option explicitly allows cURL to perform insecure SSL connections and transfers, which allows you to test your SSL connection without installing a CA certificate.
-X GET—This option specifies using the GET method.
Results
This example returns the filters for the specified Netflow output. The output is in JSON.
Update Netflow output request
To update a specific Netflow output, send the following request:
PUT https://<PX_IP_address>/api/4.0/export/netflow/outputs/<output>
 Note
Note
To use this request, you must belong to the sudo group.
You cannot update the Netflow configuration while it is being synchronized or if a system upgrade, backup, or restore is in progress.
Required header:
--user <username>:<password>
Request body:
{
"address": "<IP_address>", "port": int,
"protocol": "<string>", "transport": "<string>", "filters": [
<filter1>
]
}
Options
PX_IP_address—IP address of the Series appliance running the Series API.
username—The user name for your Series appliance.
password—The password for your Series appliance.
output—The output configuration.
Example
PUT https://xxx.xxx.xxx.xxx/api/4.0/export/netflow
Required header:
--user npadmin:hammerhead
Request body:
{
"address": "192.168.10.1",
"port": 666, "protocol": "v5",
"transport": "udp", "filters": [
<filter1>
]
}
Update Netflow output response
In a successful request you will get the object you sent returned back to you.
HTTP/1.1 [Response Code] [Response Message] Date: [Date]
Content-Type: [Content Type]
{
"address": "<IP_address>", "port": int,
"protocol": "<string>", "transport": "<string>", "filters": [
<filter1>
]
}
Response fields
Response Code—A standard HTML response code.
Response Message—A standard HTML response message.
Date—Standard HTML date format.
Content Type—The response format.
Outputs—The updated output configuration.
Example
HTTP/1.1 200 OK
Date: Mon, 09 Apr 2018 01:21:58 GMT
Content-Type: application/json; charset=utf-8
{
"address": "192.168.10.1",
"port": 666, "protocol": "v5",
"transport": "udp", "filters": [
<filter1>
]
}
cURL code sample: Update Netflow output
The code sample was run with cURL 7.57.0.
curl --user npadmin:hammerhead https://xxx.xxx.xxx.xxx/api/4.0/export/netflow -k -X PUT -d '{"address": "192.168.10.1", "port": 666, "protocol": "v5", "transport": "udp", "filters": [<filter1>]}'
This cURL sample includes the following options:
--user npadmin:hammerhead—Replace npadmin with the user name for your Series appliance. Replace hammerhead with the password for your Series appliance.
https://xxx.xxx.xxx.xxx/api/4.0/export/netflow—The output configuration request URL. Replace xxx.xxx.xxx.xxx
with the IP address of your Series appliance.
-k—This option explicitly allows cURL to perform insecure SSL connections and transfers, which allows you to test your SSL connection without installing a CA certificate.
-X PUT—This option specifies using the PUT method.
-d '{"address": "192.168.10.1", "port": 666, "protocol": "v5", "transport": "udp", "filters": [<filter1>]}'—This option specifies the updated output.
Results
This example updates the specified Netflow output. The output is in JSON.
Delete Netflow output request
To delete a specific Netflow output, send the following request:
DELETE https://<PX_IP_address>/api/4.0/export/netflow/outputs/<output>
 Note
Note
To use this request, you must belong to the sudo group.
Required header:
--user <username>:<password>
Options
PX_IP_address—IP address of the Series appliance running the Series API.
username—The user name for your Series appliance.
password—The password for your Series appliance.
output—The output name.
Example
DELETE https://xxx.xxx.xxx.xxx/api/4.0/export/netflow/outputs/myexport
Required header:
--user npadmin:hammerhead
Delete Netflow output response
HTTP/1.1 [Response Code] [Response Message] Date: [Date]
Response fields
Response Code—A standard HTML response code.
Response Message—A standard HTML response message.
Date—Standard HTML date format.
Example
HTTP/1.1 204 No content
Date: Fri, 10 Mar 2018 01:52:12 GMT
cURL code sample: Delete Netflow output
The code sample was run with cURL 7.57.0.
curl --user npadmin:hammerhead https://xxx.xxx.xxx.xxx/api/4.0/export/netflow/outputs/myexport -k -X DELETE
This cURL sample includes the following options:
--user npadmin:hammerhead—Replace npadmin with the user name for your Series appliance. Replace hammerhead with the password for your Series appliance.
https://xxx.xxx.xxx.xxx/api/4.0/export/netflow/outputs/myexport—The Netflow request URL. Replace
xxx.xxx.xxx.xxx with the IP address of your Series appliance.
-k—This option explicitly allows cURL to perform insecure SSL connections and transfers, which allows you to test your SSL connection without installing a CA certificate.
-X DELETE—This option specifies using the DELETE method.
Results
This example deletes Netflow output myexport.
Netflow output filters request
To retrieve filters for a specific Netflow output, send the following request:
GET https://<PX_IP_address>/api/4.0/export/netflow/outputs/<output>/filters
Required header:
--user <username>:<password>
Options
PX_IP_address—IP address of the Series appliance running the Series API.
username—The user name for your Series appliance.
password—The password for your Series appliance.
output—The output name.
Example
GET https://xxx.xxx.xxx.xxx/api/4.0/export/netflow/outputs/my_output/filters
Required header:
--user npadmin:hammerhead
Netflow output filters response
HTTP/1.1 [Response Code] [Response Message]
Date: [Date]
Content-Type: [Content Type]
[
"<filter1>", "<filter2>"
]
Response fields
Response Code—A standard HTML response code.
Response Message—A standard HTML response message.
Date—Standard HTML date format.
Content Type—The response format.
outputs—Output configurations.
Example
HTTP/1.1 200 OK
Date: Fri, 10 Mar 2018 01:52:58 GMT
Content-Type: application/json; charset=utf-8
[
"<filter1>", "<filter2>"
]
cURL code sample: Netflow output filters
The code sample was run with cURL 7.57.0.
curl --user npadmin:hammerhead https://xxx.xxx.xxx.xxx/api/4.0/export/netflow/outputs/my_output/filters -k -X GET
This cURL sample includes the following options:
--user npadmin:hammerhead—Replace npadmin with the user name for your Series appliance. Replace hammerhead with the password for your Series appliance.
https://xxx.xxx.xxx.xxx/api/4.0/export/netflow/outputs/my_output/filters—The Netflow request URL. Replace
xxx.xxx.xxx.xxx with the IP address of your Series appliance.
-k—This option explicitly allows cURL to perform insecure SSL connections and transfers, which allows you to test your SSL
connection without installing a CA certificate.
-X GET—This option specifies using the GET method.
Results
This example lists filters for the specified Netflow output. The output is in JSON.
Netflow output filter details request
To retrieve filter details for a specific Netflow output filter, send the following request:
GET https://<PX_IP_address>/api/4.0/export/netflow/outputs/<output>/filters/<filter>
Required header:
--user <username>:<password>
Options
PX_IP_address—IP address of the Series appliance running the Series API.
username—The user name for your Series appliance.
password—The password for your Series appliance.
output—The output name.
filter—The filter name.
Example
GET https://xxx.xxx.xxx.xxx/api/4.0/export/netflow/outputs/my_output/filters/my_filter
Required header:
--user npadmin:hammerhead
Netflow output filter details response
HTTP/1.1 [Response Code] [Response Message] Date: [Date]
Content-Type: [Content Type]
{
"name": "<string>", "filter": "<string>", "eventTypes": [
"x"
]
}
Response fields
Response Code—A standard HTML response code.
Response Message—A standard HTML response message.
Date—Standard HTML date format.
Content Type—The response format.
name—Filter name.
filter—Filter specification.
evenTypes—Event types affected by the filter.
Example
HTTP/1.1 200 OK
Date: Fri, 10 Mar 2018 01:52:58 GMT
Content-Type: application/json; charset=utf-8
{
"name": "myfilter",
"filter": "sourceIPv4Address = \"10.10.10.10\" AND protocolIdentifier = 12", "eventTypes": [
"x",
"A",
"D", "L"
]
}
cURL code sample: Netflow output filter details
The code sample was run with cURL 7.57.0.
curl --user npadmin:hammerhead https://xxx.xxx.xxx.xxx/api/4.0/export/netflow/outputs/my_output/filters/ my_filter -k -X GET
This cURL sample includes the following options:
--user npadmin:hammerhead—Replace npadmin with the user name for your Series appliance. Replace hammerhead with the password for your Series appliance.
https://xxx.xxx.xxx.xxx/api/4.0/export/netflow/outputs/my_output/filters/my_filter—The Netflow filter request URL. Replace xxx.xxx.xxx.xxx with the IP address of your Series appliance.
-k—This option explicitly allows cURL to perform insecure SSL connections and transfers, which allows you to test your SSL connection without installing a CA certificate.
-X GET—This option specifies using the GET method.
Results
This example lists details of a specific filter for the specified Netflow output. The output is in JSON.
Add Netflow output filters request
To create a new filter for a specific Netflow output, send the following request:
POST https://<PX_IP_address>/api/4.0/export/netflow/outputs/<output>/filters
 Note
Note
To use this request, you must belong to the sudo group.
You cannot update the Netflow configuration while it is being synchronized or if a system upgrade, backup, or restore is in progress.
Required header:
--user <username>:<password>
Options
PX_IP_address—IP address of the Series appliance running the Series API.
username—The user name for your Series appliance.
password—The password for your Series appliance.
output—The output name.
Request body:
{
"name": "<string>", "filter": "<string>", "eventTypes": [
"x"
]
}
Example
POST https://xxx.xxx.xxx.xxx/api/4.0/export/netflow/outputs/my_output/filters
Required header:
--user npadmin:hammerhead
Request body:
{
"name": "myfilter",
"filter": "sourceIPv4Address = \"10.10.10.10\" AND protocolIdentifier = 12",
"eventTypes": [ "x",
"A",
"D", "L"
]
}
Add Netflow output filters response
HTTP/1.1 [Response Code] [Response Message] Date: [Date]
Content-Type: [Content Type]
{
"name": "<string>", "filter": "<string>", "eventTypes": [
"x"
]
}
Response fields
Response Code—A standard HTML response code.
Response Message—A standard HTML response message.
Date—Standard HTML date format.
Content Type—The response format.
name—The name of the filter.
filter—The filter specification.
eventTypes—The event types the filter applies to.
Example
HTTP/1.1 200 OK
Date: Mon, 09 Apr 2018 01:21:19 GMT
Content-Type: application/json; charset=utf-8
{
"name": "myfilter",
"filter": "sourceIPv4Address = \"10.10.10.10\" AND protocolIdentifier = 12", "eventTypes": [
"x",
"A",
"D", "L"
]
}
cURL code sample: Add Netflow output filters
The code sample was run with cURL 7.57.0.
curl --user npadmin:hammerhead https://xxx.xxx.xxx.xxx/api/4.0/export/netflow/outputs/my_output/filters -k -X POST -d '{"name": "myfilter", "filter": "sourceIPv4Address = \"10.10.10.10\" AND protocolIdentifier = 12", "eventTypes": ["x", "A", "D", "L"]}'
This cURL sample includes the following options:
--user npadmin:hammerhead—Replace npadmin with the user name for your Series appliance. Replace hammerhead with the password for your Series appliance.
https://xxx.xxx.xxx.xxx/api/4.0/export/netflow/outputs/my_output/filters—The Netflow output filter request URL. Replace xxx.xxx.xxx.xxx with the IP address of your Series appliance.
-k—This option explicitly allows cURL to perform insecure SSL connections and transfers, which allows you to test your SSL connection without installing a CA certificate.
-X POST—This option specifies using the POST method.
-d '{"name": "myfilter", "filter": "sourceIPv4Address = \"10.10.10.10\" AND protocolIdentifier = 12", "eventTypes": ["x", "A", "D", "L"]}'—Specifies the new output filter.
Results
This example creates a new filter for the specified Netflow output. The output is in JSON.
Delete Netflow output filter request
To remove a specific Netflow output filter, send the following request:
DELETE https://<PX_IP_address>/api/4.0/export/netflow/outputs/<output>/filters/<filter>
 Note
Note
To use this request, you must belong to the sudo group.
Required header:
--user <username>:<password>
Options
PX_IP_address—IP address of the Series appliance running the Series API.
username—The user name for your Series appliance.
password—The password for your Series appliance.
output—The output name.
filter—The filter name.
Example
DELETE https://xxx.xxx.xxx.xxx/api/4.0/export/netflow/outputs/my_output/filters/my_filter
Required header:
--user npadmin:hammerhead
Delete Netflow output filter response
HTTP/1.1 [Response Code] [Response Message] Date: [Date]
Response fields
Response Code—A standard HTML response code.
Response Message—A standard HTML response message.
Date—Standard HTML date format.
Example
HTTP/1.1 204 No content
Date: Fri, 10 Mar 2018 01:52:11 GMT
cURL code sample: Delete Netflow output filter
The code sample was run with cURL 7.57.0.
curl --user npadmin:hammerhead https://xxx.xxx.xxx.xxx/api/4.0/export/netflow/outputs/my_output/filters/ my_filter -k -X DELETE
This cURL sample includes the following options:
--user npadmin:hammerhead—Replace npadmin with the user name for your Series appliance. Replace hammerhead with the password for your Series appliance.
https://xxx.xxx.xxx.xxx/api/4.0/export/netflow/outputs/my_output/filters/my_filter—The Netflow request URL. Replace xxx.xxx.xxx.xxx with the IP address of your Series appliance, my_output with your output name, and my_filter with your filter name..
-k—This option explicitly allows cURL to perform insecure SSL connections and transfers, which allows you to test your SSL connection without installing a CA certificate.
-X DELETE—This option specifies using the DELETE method.
Results
This example removes the specified Netflow output filter.
DTI
Use the following endpoints for DTI proxy, interval, enabled, and timeout configuration:
GET https://<PX_IP_address>/api/4.0/config/dti
PUT https://<PX_IP_address>/api/4.0/config/dti
GET https://<PX_IP_address>/api/4.0/config/dti/proxy
PUT https://<PX_IP_address>/api/4.0/config/dti/proxy
DELETE https://<PX_IP_address>/api/4.0/config/dti/proxy
GET https://<PX_IP_address>/api/4.0/config/dti/interval
PUT https://<PX_IP_address>/api/4.0/config/dti/interval
GET https://<PX_IP_address>/api/4.0/config/dti/enabled
PUT https://<PX_IP_address>/api/4.0/config/dti/enabled
GET https://<PX_IP_address>/api/4.0/config/dti/timeout
PUT https://<PX_IP_address>/api/4.0/config/dti/timeout
PUT https://<PX_IP_address>/api/4.0/config/dti/activation
DTI configuration request
To retrieve the DTI configuration, send the following request:
GET https://<PX_IP_address>/api/4.0/config/dti
 Note
Note
To use this request, you must belong to the sudo group.
Required header:
--user <username>:<password>
Options
PX_IP_address—IP address of the Series appliance running the Series API.
username—The user name for your Series appliance.
password—The password for your Series appliance.
Example
GET https://xxx.xxx.xxx.xxx/api/4.0/config/dti
Required header:
--user npadmin:hammerhead
DTI configuration response
 Note
Note
The password field is not included in the response for security reasons.
HTTP/1.1 [Response Code] [Response Message] Date: [Date]
Content-Type: [Content Type]
{
"enabled": Boolean, "interval": int, "address": "address", "port": int, "timeout": seconds, "username": "name", "proxy": {
"enable": Boolean, "address": "address", "port": int, "username": "name",
"password": "",
"type": "type"
}
}
Response fields
Response Code—A standard HTML response code.
Response Message—A standard HTML response message.
Date—Standard HTML date format.
Content Type—The response format.
Example
HTTP/1.1 200 OK
Date: Tue, 07 May 2019 09:48:39 GMT
Content-Type: application/json; charset=utf-8
{
"enabled": false, "interval": 3,
"address": "cloud.fireeye.com", "port": 0,
"timeout": 600, "username": "engtest", "proxy": {
"enable": false, "address": "", "port": 0, "username": "",
"password": "",
"type": "none"
}
}
cURL code sample: DTI configuration
The code sample was run with cURL 7.57.0.
curl --user npadmin:hammerhead https://xxx.xxx.xxx.xxx/api/4.0/config/dti -k -X GET
This cURL sample includes the following options:
--user npadmin:hammerhead—Replace npadmin with the user name for your Series appliance. Replace hammerhead with the password for your Series appliance.
https://xxx.xxx.xxx.xxx/api/4.0/config/dti—The DTI configuration request URL. Replace xxx.xxx.xxx.xxx with the IP address of your Series appliance.
-k—This option explicitly allows cURL to perform insecure SSL connections and transfers, which allows you to test your SSL connection without installing a CA certificate.
-X GET—This option specifies using the GET method.
Results
This example gets the DTI configuration. The output is in JSON.
Update DTI Configuration Request
To update the DTI configuration, send the following request:
PUT https://<PX_IP_address>/api/4.0/config/dti
 Note
Note
To use this request, you must belong to the sudo group.
Required header:
--user <username>:<password>
Request body:
{
"enabled": Boolean, "interval": int, "address": "address", "port": int, "timeout": seconds, "username": "string", "password": "string", "proxy": {
"enable": Boolean, "address": "address", "port": int, "username": "string", "password": "string", "type": "string"
}
}
 Note
Note
The password field is optional. If omitted, the current password is left unchanged. If supplied, the current password is overwritten with the submitted password.
Options
PX_IP_address—IP address of the PX Series appliance running the PX Series API.
username—The user name for your PX Series appliance.
password—The password for your PX Series appliance.
Example
PUT https://xxx.xxx.xxx.xxx/api/4.0/config/dti
Required header:
--user npadmin:hammerhead
Request body:
{
"enabled": true, "interval": 2,
"address": "static-cloud.fireeye.com", "port": 443,
"timeout": 200,
"username": "fev-39tpena2674wj", "password": "7u0sbfjwh2b0i", "proxy": {
"enable": false, "address": "", "port": 0, "username": "",
"password": "",
"type": "none"
}
}
Update DTI Configuration Response
HTTP/1.1 [Response Code] [Response Message] Date: [Date]
Content-Type: [Content Type]
Response Fields
Response Code—A standard HTML response code.
Response Message—A standard HTML response message.
Date—Standard HTML date format.
Content Type—The response format.
Example
HTTP/1.1 200 OK
Date: Wed, 08 May 2019 01:21:58 GMT
Content-Type: application/json; charset=utf-8
cURL Code Sample: Update DTI Configuration
The code sample was run with cURL 7.57.0.
curl --user npadmin:hammerhead https://xxx.xxx.xxx.xxx/api/4.0/config/dti -k -X PUT -d @example.json
This cURL sample includes the following options:
--user npadmin:hammerhead—Replace npadmin with the user name for your PX Series appliance. Replace hammerhead with the password for your PX Series appliance.
https://xxx.xxx.xxx.xxx/api/4.0/config/dti—The DTI configuration request URL. Replace xxx.xxx.xxx.xxx with the IP address of your PX Series appliance.
-k—This option explicitly allows cURL to perform insecure SSL connections and transfers, which allows you to test your SSL connection without installing a CA certificate.
-X PUT—This option specifies using the PUT method.
-d @example.json—This option specifies the JSON file containing the request body.
Results
This example updates the DTI configuration.
DTI Proxy Configuration Request
To retrieve the DTI proxy configuration, send the following request:
GET https://<PX_IP_address>/api/4.0/config/dti/proxy
 Note
Note
To use this request, you must belong to the sudo group.
Required header:
--user <username>:<password>
Options
PX_IP_address—IP address of the PX Series appliance running the PX Series API.
username—The user name for your PX Series appliance.
password—The password for your PX Series appliance.
Example
GET https://xxx.xxx.xxx.xxx/api/4.0/config/dti
Required header:
--user npadmin:hammerhead
DTI Proxy Configuration Response
 Note
Note
The password field is not included in the response for security reasons.
HTTP/1.1 [Response Code] [Response Message] Date: [Date]
Content-Type: [Content Type]
{
"enable": false, "address": "", "port": 0, "username": "",
"password": "",
"type": "none"
}
Response Fields
Response Code—A standard HTML response code.
Response Message—A standard HTML response message.
Date—Standard HTML date format.
Content Type—The response format.
Example
HTTP/1.1 200 OK
Date: Tue, 07 May 2019 19:12:39 GMT
Content-Type: application/json; charset=utf-8
{
"enable": false, "address": "", "port": 0,
"username": "",
"password": "",
"type": "none"
}
cURL Code Sample: DTI Proxy Configuration
The code sample was run with cURL 7.57.0.
curl --user npadmin:hammerhead https://xxx.xxx.xxx.xxx/api/4.0/config/dti/proxy -k -X GET
This cURL sample includes the following options:
--user npadmin:hammerhead—Replace npadmin with the user name for your PX Series appliance. Replace hammerhead with the password for your PX Series appliance.
https://xxx.xxx.xxx.xxx/api/4.0/config/dti/proxy—The DTI configuration request URL. Replace xxx.xxx.xxx.xxx with the IP address of your PX Series appliance.
-k—This option explicitly allows cURL to perform insecure SSL connections and transfers, which allows you to test your SSL connection without installing a CA certificate.
-X GET—This option specifies using the GET method.
Results
This example gets the DTI proxy configuration. The output is in JSON.
Update DTI proxy configuration request
To update the DTI proxy configuration, send the following request:
PUT https://<PX_IP_address>/api/4.0/config/dti/proxy
 Note
Note
To use this request, you must belong to the sudo group.
Required header:
--user <username>:<password>
Request body:
{
"enable": Boolean, "address": "address", "port": int, "username": "string", "password": "string", "type": "string"
}
Options
PX_IP_address—IP address of the Series appliance running the Series API.
username—The user name for your Series appliance.
password—The password for your Series appliance.
Example
PUT https://xxx.xxx.xxx.xxx/api/4.0/config/dti/proxy
Required header:
--user npadmin:hammerhead
Request body:
{
"enable": true, "address": "10.10.10.10",
"port": 8080, "username": "foo",
"password": "bar",
"type": "basic"
}
Update DTI proxy configuration response
HTTP/1.1 [Response Code] [Response Message] Date: [Date]
Content-Type: [Content Type]
Response fields
Response Code—A standard HTML response code.
Response Message—A standard HTML response message.
Date—Standard HTML date format.
Content Type—The response format.
Example
HTTP/1.1 200 OK
Date: Wed, 08 May 2019 08:22:56 GMT
Content-Type: application/json; charset=utf-8
cURL code sample: Update DTI proxy configuration
The code sample was run with cURL 7.57.0.
curl --user npadmin:hammerhead https://xxx.xxx.xxx.xxx/api/4.0/config/dti/proxy -k -X PUT -d @example.json
This cURL sample includes the following options:
--user npadmin:hammerhead—Replace npadmin with the user name for your Series appliance. Replace hammerhead with the password for your Series appliance.
https://xxx.xxx.xxx.xxx/api/4.0/config/dti/proxy—The DTI configuration request URL. Replace xxx.xxx.xxx.xxx with the IP address of your Series appliance.
-k—This option explicitly allows cURL to perform insecure SSL connections and transfers, which allows you to test your SSL connection without installing a CA certificate.
-X PUT—This option specifies using the PUT method.
-d @example.json—This option specifies the JSON file containing the request body.
Results
This example updates the DTI proxy configuration.
Reset DTI proxy configuration request
To reset the DTI proxy configuration, send the following request:
DELETE https://<PX_IP_address>/api/4.0/config/dti/proxy
 Note
Note
To use this request, you must belong to the sudo group.
Required header:
--user <username>:<password>
Options
PX_IP_address—IP address of the Series appliance running the Series API.
username—The user name for your Series appliance.
password—The password for your Series appliance.
Example
DELETE https://xxx.xxx.xxx.xxx/api/4.0/config/dti/proxy
Required header:
--user npadmin:hammerhead
Reset DTI proxy configuration response
HTTP/1.1 [Response Code] [Response Message] Date: [Date]
Content-Type: [Content Type]
Response fields
Response Code—A standard HTML response code.
Response Message—A standard HTML response message.
Date—Standard HTML date format.
Content Type—The response format.
Example
HTTP/1.1 200 OK
Date: Tue, 07 May 2019 15:48:29 GMT
Content-Type: application/json; charset=utf-8
cURL code sample: Reset DTI proxy configuration
The code sample was run with cURL 7.57.0.
curl --user npadmin:hammerhead https://xxx.xxx.xxx.xxx/api/4.0/config/dti/proxy -k -X DELETE
This cURL sample includes the following options:
--user npadmin:hammerhead—Replace npadmin with the user name for your Series appliance. Replace hammerhead with the password for your Series appliance.
https://xxx.xxx.xxx.xxx/api/4.0/config/dti/proxy—The DTI configuration request URL. Replace xxx.xxx.xxx.xxx with the IP address of your Series appliance.
-k—This option explicitly allows cURL to perform insecure SSL connections and transfers, which allows you to test your SSL connection without installing a CA certificate.
-X DELETE—This option specifies using the DELETE method.
Results
This example resets the DTI proxy configuration.
DTI interval configuration request
To retrieve the DTI interval configuration, send the following request:
GET https://<PX_IP_address>/api/4.0/config/dti/interval
 Note
Note
To use this request, you must belong to the sudo group.
Required header:
--user <username>:<password>
Options
PX_IP_address—IP address of the Series appliance running the Series API.
username—The user name for your Series appliance.
password—The password for your Series appliance.
Example
GET https://xxx.xxx.xxx.xxx/api/4.0/config/dti/interval
Required header:
--user npadmin:hammerhead
DTI interval configuration response
HTTP/1.1 [Response Code] [Response Message] Date: [Date]
Content-Type: [Content Type]
{
"interval": int
}
Response fields
Response Code—A standard HTML response code.
Response Message—A standard HTML response message.
Date—Standard HTML date format.
Content Type—The response format.
Example
HTTP/1.1 200 OK
Date: Tue, 07 May 2019 02:48:19 GMT
Content-Type: application/json; charset=utf-8
{
"interval": 3
}
cURL code sample: DTI interval configuration
The code sample was run with cURL 7.57.0.
curl --user npadmin:hammerhead https://xxx.xxx.xxx.xxx/api/4.0/config/dti/interval -k -X GET
This cURL sample includes the following options:
--user npadmin:hammerhead—Replace npadmin with the user name for your Series appliance. Replace hammerhead with the password for your Series appliance.
https://xxx.xxx.xxx.xxx/api/4.0/config/dti/interval—The DTI configuration request URL. Replace xxx.xxx.xxx.xxx
with the IP address of your Series appliance.
-k—This option explicitly allows cURL to perform insecure SSL connections and transfers, which allows you to test your SSL connection without installing a CA certificate.
-X GET—This option specifies using the GET method.
Results
This example gets the DTI Interval configuration. The output is in JSON.
Update DTI interval configuration request
To update the DTI interval configuration, send the following request:
PUT https://<PX_IP_address>/api/4.0/config/dti/interval
 Note
Note
To use this request, you must belong to the sudo group.
Required header:
--user <username>:<password>
Request body:
{
"interval": int
}
Options
PX_IP_address—IP address of the Series appliance running the Series API.
username—The user name for your Series appliance.
password—The password for your Series appliance.
Example
PUT https://xxx.xxx.xxx.xxx/api/4.0/config/dti/interval
Required header:
--user npadmin:hammerhead
Request body:
{
"interval": 2
}
Update DTI interval configuration response
HTTP/1.1 [Response Code] [Response Message] Date: [Date]
Content-Type: [Content Type]
Response fields
Response Code—A standard HTML response code.
Response Message—A standard HTML response message.
Date—Standard HTML date format.
Content Type—The response format.
Example
HTTP/1.1 200 OK
Date: Wed, 08 May 2019 01:31:48 GMT
Content-Type: application/json; charset=utf-8
cURL code sample: Update DTI interval configuration
The code sample was run with cURL 7.57.0.
curl --user npadmin:hammerhead https://xxx.xxx.xxx.xxx/api/4.0/config/dti/interval -k -X PUT -d @example.json
This cURL sample includes the following options:
--user npadmin:hammerhead—Replace npadmin with the user name for your Series appliance. Replace hammerhead with the password for your Series appliance.
https://xxx.xxx.xxx.xxx/api/4.0/config/dti/interval—The DTI configuration request URL. Replace xxx.xxx.xxx.xxx
with the IP address of your Series appliance.
-k—This option explicitly allows cURL to perform insecure SSL connections and transfers, which allows you to test your SSL connection without installing a CA certificate.
-X PUT—This option specifies using the PUT method.
-d @example.json—This option specifies the JSON file containing the request body.
Results
This example updates the DTI interval configuration.
DTI enabled configuration request
To determine if telemetry uploads are enabled, send the following request:
GET https://<PX_IP_address>/api/4.0/config/dti/enabled
 Note
Note
To use this request, you must belong to the sudo group.
Required header:
--user <username>:<password>
Options
PX_IP_address—IP address of the Series appliance running the Series API.
username—The user name for your Series appliance.
password—The password for your Series appliance.
Example
GET https://xxx.xxx.xxx.xxx/api/4.0/config/dti/enabled
Required header:
--user npadmin:hammerhead
DTI enabled configuration response
HTTP/1.1 [Response Code] [Response Message] Date: [Date]
Content-Type: [Content Type]
{
"enabled": Boolean
}
Response fields
Response Code—A standard HTML response code.
Response Message—A standard HTML response message.
Date—Standard HTML date format.
Content Type—The response format.
Example
HTTP/1.1 200 OK
Date: Tue, 07 May 2019 03:01:19 GMT
Content-Type: application/json; charset=utf-8
{
"enabled": false
}
cURL code sample: DTI enabled configuration
The code sample was run with cURL 7.57.0.
curl --user npadmin:hammerhead https://xxx.xxx.xxx.xxx/api/4.0/config/dti/enabled -k -X GET
This cURL sample includes the following options:
--user npadmin:hammerhead—Replace npadmin with the user name for your Series appliance. Replace hammerhead with the password for your Series appliance.
https://xxx.xxx.xxx.xxx/api/4.0/config/dti/enabled—The DTI configuration request URL. Replace xxx.xxx.xxx.xxx
with the IP address of your Series appliance.
-k—This option explicitly allows cURL to perform insecure SSL connections and transfers, which allows you to test your SSL connection without installing a CA certificate.
-X GET—This option specifies using the GET method.
Results
This example gets the DTI enabled status. The output is in JSON.
Update DTI enabled configuration request
To update the DTI enabled setting, send the following request:
PUT https://<PX_IP_address>/api/4.0/config/dti/enabled
 Note
Note
To use this request, you must belong to the sudo group.
Required header:
--user <username>:<password>
Request body:
{
"enabled": Boolean
}
Options
PX_IP_address—IP address of the Series appliance running the Series API.
username—The user name for your Series appliance.
password—The password for your Series appliance.
Example
PUT https://xxx.xxx.xxx.xxx/api/4.0/config/dti/enabled
Required header:
--user npadmin:hammerhead
Request body:
{
"enabled": false
}
Update DTI enabled configuration response
HTTP/1.1 [Response Code] [Response Message] Date: [Date]
Content-Type: [Content Type]
Response fields
Response Code—A standard HTML response code.
Response Message—A standard HTML response message.
Date—Standard HTML date format.
Content Type—The response format.
Example
HTTP/1.1 200 OK
Date: Wed, 08 May 2019 01:31:48 GMT
Content-Type: application/json; charset=utf-8
cURL code sample: Update DTI enabled configuration
The code sample was run with cURL 7.57.0.
curl --user npadmin:hammerhead https://xxx.xxx.xxx.xxx/api/4.0/config/dti/enabled -k -X PUT -d @example.json
This cURL sample includes the following options:
--user npadmin:hammerhead—Replace npadmin with the user name for your Series appliance. Replace hammerhead with the password for your Series appliance.
https://xxx.xxx.xxx.xxx/api/4.0/config/dti/enabled—The DTI configuration request URL. Replace xxx.xxx.xxx.xxx
with the IP address of your Series appliance.
-k—This option explicitly allows cURL to perform insecure SSL connections and transfers, which allows you to test your SSL connection without installing a CA certificate.
-X PUT—This option specifies using the PUT method.
-d @example.json—This option specifies the JSON file containing the request body.
Results
This example updates the DTI enabled setting.
DTI timeout configuration request
To retrieve the DTI timeout configuration, send the following request:
GET https://<PX_IP_address>/api/4.0/config/dti/timeout
 Note
Note
To use this request, you must belong to the sudo group.
Required header:
--user <username>:<password>
Options
PX_IP_address—IP address of the Series appliance running the Series API.
username—The user name for your Series appliance.
password—The password for your Series appliance.
Example
GET https://xxx.xxx.xxx.xxx/api/4.0/config/dti/timeout
Required header:
--user npadmin:hammerhead
DTI timeout configuration response
HTTP/1.1 [Response Code] [Response Message] Date: [Date]
Content-Type: [Content Type]
{
"timeout": int
}
Response fields
Response Code—A standard HTML response code.
Response Message—A standard HTML response message.
Date—Standard HTML date format.
Content Type—The response format.
Example
HTTP/1.1 200 OK
Date: Tue, 07 May 2019 02:48:19 GMT
Content-Type: application/json; charset=utf-8
{
"timeout": 300
}
cURL code sample: DTI timeout configuration
The code sample was run with cURL 7.57.0.
curl --user npadmin:hammerhead https://xxx.xxx.xxx.xxx/api/4.0/config/dti/timeout -k -X GET
This cURL sample includes the following options:
--user npadmin:hammerhead—Replace npadmin with the user name for your Series appliance. Replace hammerhead with the password for your Series appliance.
https://xxx.xxx.xxx.xxx/api/4.0/config/dti/timeout—The DTI configuration request URL. Replace xxx.xxx.xxx.xxx
with the IP address of your Series appliance.
-k—This option explicitly allows cURL to perform insecure SSL connections and transfers, which allows you to test your SSL connection without installing a CA certificate.
-X GET—This option specifies using the GET method.
Results
This example gets the DTI timeout configuration. The output is in JSON.
Update DTI timeout configuration request
To update the DTI timeout configuration, send the following request:
PUT https://<PX_IP_address>/api/4.0/config/dti/timeout
 Note
Note
To use this request, you must belong to the sudo group.
Required header:
--user <username>:<password>
Request body:
{
"timeout": int
}
Options
PX_IP_address—IP address of the Series appliance running the Series API.
username—The user name for your Series appliance.
password—The password for your Series appliance.
Example
PUT https://xxx.xxx.xxx.xxx/api/4.0/config/dti/timeout
Required header:
--user npadmin:hammerhead
Request body:
{
"timeout": 2
}
Update DTI timeout configuration response
HTTP/1.1 [Response Code] [Response Message] Date: [Date]
Content-Type: [Content Type]
Response fields
Response Code—A standard HTML response code.
Response Message—A standard HTML response message.
Date—Standard HTML date format.
Content Type—The response format.
Example
HTTP/1.1 200 OK
Date: Wed, 08 May 2019 06:31:52 GMT
Content-Type: application/json; charset=utf-8
cURL code sample: Update DTI timeout configuration
The code sample was run with cURL 7.57.0.
curl --user npadmin:hammerhead https://xxx.xxx.xxx.xxx/api/4.0/config/dti/timeout-k -X PUT -d @example.json
This cURL sample includes the following options:
--user npadmin:hammerhead—Replace npadmin with the user name for your Series appliance. Replace hammerhead with the password for your Series appliance.
https://xxx.xxx.xxx.xxx/api/4.0/config/dti/timeout—The DTI configuration request URL. Replace xxx.xxx.xxx.xxx
with the IP address of your Series appliance.
-k—This option explicitly allows cURL to perform insecure SSL connections and transfers, which allows you to test your SSL connection without installing a CA certificate.
-X PUT—This option specifies using the PUT method.
-d @example.json—This option specifies the JSON file containing the request body.
Results
This example updates the DTI timeout configuration.
Apply DTI activation code request
To apply an activation code to the DTI configuration, send the following request:
PUT https://<PX_IP_address>/api/4.0/config/dti/activation
A valid activation code will include a DTI username, DTI password, and appliance ID.
If applying the code fails, the failure is described in the message. If the activation code is valid and successfully applied, the credentials are used to try to contact the configured DTI Service. The success of the attempt is included in the message. Failure to contact the DTI service could be for many reasons such as a network connectivity problem or a service outage. It does not necessarily indicate a problem with the applied credentials.
 Note
Note
To use this request, you must belong to the sudo group.
Required header:
--user <username>:<password>
Request body:
{
"code": "string"
}
Options
PX_IP_address—IP address of the Series appliance running the Series API.
username—The user name for your Series appliance.
password—The password for your Series appliance.
Example
PUT https://xxx.xxx.xxx.xxx/api/4.0/config/dti/activation
Required header:
--user npadmin:hammerhead
Request body:
{
"code": "AC2-NQHL-076T-M060-SDFS-GM4G-F5F9-U243-4FAF-1TUN-KCMM-AWF8-7DNR-SF2F-5U52-0HDN"
}
Apply DTI activation code response
HTTP/1.1 [Response Code] [Response Message] Date: [Date]
Content-Type: [Content Type]
{
"status": "status", "message": "message"
}
Response fields
Response Code—A standard HTML response code.
Response Message—A standard HTML response message.
Date—Standard HTML date format.
Content Type—The response format.
Example
HTTP/1.1 200 OK
Date: Wed, 08 May 2019 02:11:48 GMT
Content-Type: application/json; charset=utf-8
{
"status": "succeeded",
"message": "successfully contacted DTI server"
}
cURL code sample: Apply DTI activation code
The code sample was run with cURL 7.57.0.
curl --user npadmin:hammerhead https://xxx.xxx.xxx.xxx/api/4.0/config/dti/activation -k -X PUT -d @example.json
This cURL sample includes the following options:
--user npadmin:hammerhead—Replace npadmin with the user name for your Series appliance. Replace hammerhead with the password for your Series appliance.
https://xxx.xxx.xxx.xxx/api/4.0/config/dti/activation—The DTI configuration request URL. Replace
xxx.xxx.xxx.xxx with the IP address of your Series appliance.
-k—This option explicitly allows cURL to perform insecure SSL connections and transfers, which allows you to test your SSL connection without installing a CA certificate.
-X PUT—This option specifies using the PUT method.
-d @example.json—This option specifies the JSON file containing the request body.
Results
This example applies the activation code to the DTI configuration.
System information and configuration
Use the system endpoints to configure and provide information about the system:
GET https://<PX_IP_address>/api/4.0/version
GET https://<PX_IP_address>/api/4.0/system
PUT https://<PX_IP_address>/api/4.0/system
GET https://<PX_IP_address>/api/4.0/system/timezone
PUT https://<PX_IP_address>/api/4.0/system/timezone
GET https://<PX_IP_address>/api/4.0/system/px-id
PUT https://<PX_IP_address>/api/4.0/system/px-id
GET https://<PX_IP_address>/api/4.0/system/px-name
PUT https://<PX_IP_address>/api/4.0/system/px-name
POST https://<PX_IP_address>/api/4.0/system/reboot
GET https://<PX_IP_address>/api/4.0/system/serial-number
GET https://<PX_IP_address>/api/4.0/system/active-users
GET https://<PX_IP_address>/api/4.0/system/ssd-info
System version information request
To retrieve series appliance version information, send the following request:
GET https://<PX_IP_address>/api/4.0/version
Required header:
--user <username>:<password>
Options
PX_IP_address—IP address of the Series appliance running the Series API.
username—The user name for your Series appliance.
password—The password for your Series appliance.
Example
GET https://xxx.xxx.xxx.xxx/api/4.0/version
Required header:
--user cpx:hammerhead
System version information response
HTTP/1.1 [Response Code] [Response Message] Date: [Date]
Content-Type: [Content Type]
name: [Name] version: [Version]
Response fields
Response Code—A standard HTTP response code.
Response Message—A standard HTTP response message.
Date—Standard HTML date format.
Content Type—The response format.
Name—The name of the service.
Version—The version of the service.
Example
HTTP/1.1 200 OK
Date: Fri, 11 Mar 2016 01:10:16 GMT
Content-Type: text/html; charset=UTF-8
{
"about": [
{
"name": "System",
"version": "4.5.0.564"
},
{
"name": "NPMonitor",
"version": "4.4.0"
},
{
"name": "PX Purge",
"version": "4.4.0"
},
{
"name": "PX Stat Collect", "version": "4.4.0"
},
{
"name": "PX Eve Route", "version": "4.5.0"
},
{
"name": "NPSNMP",
"version": "4.4.0"
},
{
"name": "ACM",
"version": "4.5.0"
},
{
"name": "PX Search",
"version": "4.5.0"
},
{
"name": "PX Flow2Eve", "version": "4.4.0"
},
{
"name": "PX API",
"version": "4.5.0"
},
{
"name": "PXMOM",
"version": "4.5.0"
},
{
"name": "PX Capture",
"version": "4.5.0"
},
{
"name": "PX Collect",
"version": "4.5.0"
},
{
"name": "PX OS",
"version": "4.4.0"
},
{
"name": "ASAP",
"version": "4.5.0"
}
]
}
cURL code sample: System version information
The code sample was run with cURL 7.57.0.
curl -k --user cpx:hammerhead https://xxx.xxx.xxx.xxx/api/4.0/version
This cURL sample includes the following options:
-k—This option explicitly allows cURL to perform insecure SSL connections and transfers, which allows you to test your SSL connection without installing a CA certificate.
--user cpx:hammerhead—Replace cpx with the user name for your Series appliance. Replace hammerhead with the password for your Series appliance.
https://xxx.xxx.xxx.xxx/api/4.0/version—The system information request URL. Replace xxx.xxx.xxx.xxx with the IP address of your Series appliance.
Results
This example returns Series appliance version information. The output is in JSON.
System configuration request
To get the current system configuration, send the following request:
GET https://<PX_IP_address>/api/4.0/system
 Note
Note
This endpoint is available to all authenticated users.
The active-users field will not be shown to users who are not in the sudo group
Required header:
--user <username>:<password>
Options
PX_IP_address—IP address of the Series appliance running the Series API.
username—The user name for your Series appliance.
password—The password for your Series appliance.
Example
GET https://xxx.xxx.xxx.xxx/api/4.0/system
Required header:
--user npadmin:hammerhead
System configuration response
HTTP/1.1 [Response Code] [Response Message] Date: [Date]
Content-Type: [Content Type]
{
"serial-number": "int",
"px-id": "string",
"px-name": "string", "processor-count: int, "current-time": "string", "timezone": "string", "active-users": [
{
"user": "user_id",
"tty": "string", "from": "ip_address", "login": "hh:mm", "idle": "idle_time"
}
]
}
Response fields
Response Code—A standard HTML response code.
Response Message—A standard HTML response message.
Date—Standard HTML date format.
Content Type—The response format.
Example
HTTP/1.1 200 OK
Date: Wed, 06 Jun 2018 01:23:54 GMT
Content-Type: application/json; charset=utf-8
{
"serial-number": "276953073002", "px-id": "092oskj02fqj2sa",
"px-name": "PX0123", "processor-count: 4,
"current-time": "2018-04-26T15:49:45Z",
"timezone": "America/New_York", "active-users": [
{
"user": "npadmin",
"tty": "pts/0",
"from": "10.61.75.110"
}
]
}
cURL code sample: System configuration
The code sample was run with cURL 7.57.0.
curl --user npadmin:hammerhead https://xxx.xxx.xxx.xxx/api/4.0/system -k -X GET
This cURL sample includes the following options:
--user npadmin:hammerhead—Replace npadmin with the user name for your Series appliance. Replace hammerhead with the password for your Series appliance.
https://xxx.xxx.xxx.xxx/api/4.0/system—The system request URL. Replace xxx.xxx.xxx.xxx with the IP address of your Series appliance.
-k—This option explicitly allows cURL to perform insecure SSL connections and transfers, which allows you to test your SSL connection without installing a CA certificate.
-X GET—This option specifies using the GET method.
Results
This example returns the current system configuration. The output is in JSON.
Update system configuration request
To update the current system configuration, send the following request:
PUT https://<PX_IP_address>/api/4.0/system
 Note
Note
This endpoint is restricted to sudo users.
Required header:
--user <username>:<password>
Request JSON:
{
"serial-number": "serial-number", "px-id": "PX-ID",
"px-name": "PX-name", "timezone": "timezone"
}
Options
PX_IP_address—IP address of the Series appliance running the Series API.
username—The user name for your Series appliance.
password—The password for your Series appliance.
Example
PUT https://xxx.xxx.xxx.xxx/api/4.0/system
Required header:
--user npadmin:hammerhead
Example request JSON:
{
"serial-number": "276953073002",
"px-id": "239081029",
"px-name": "PX999", "timezone": "America/New_York"
}
Update system configuration response
HTTP/1.1 [Response Code] [Response Message] Date: [Date]
Content-Type: [Content Type]
{
"px-id": "PX-ID",
"px-name": "PX-name", "processor-count: int, "current-time": "timestamp", "timezone": "timezone", "active-users": [
{
"user": "user",
"tty": "tty", "from": "IP_address"
}
]
}
Response fields
Response Code—A standard HTML response code.
Response Message—A standard HTML response message.
Date—Standard HTML date format.
Content Type—The response format.
Example
HTTP/1.1 200 OK
Date: Wed, 07 Jun 2018 01:24:08 GMT
Content-Type: application/json; charset=utf-8
{
"px-id": "239081029",
"px-name": "PX999", "processor-count: 4,
"current-time": "2018-04-26T15:49:45Z",
"timezone": "America/New_York", "active-users": [
{
"user": "npadmin",
"tty": "pts/0",
"from": "10.61.75.110"
}
]
}
cURL code sample: Update system configuration
The code sample was run with cURL 7.57.0.
curl --user npadmin:hammerhead https://xxx.xxx.xxx.xxx/api/4.0/system -k -X PUT -d @example.json
This cURL sample includes the following options:
--user npadmin:hammerhead—Replace npadmin with the user name for your Series appliance. Replace hammerhead with the password for your Series appliance.
https://xxx.xxx.xxx.xxx/api/4.0/system—The system request URL. Replace xxx.xxx.xxx.xxx with the IP address of your Series appliance.
-k—This option explicitly allows cURL to perform insecure SSL connections and transfers, which allows you to test your SSL connection without installing a CA certificate.
-X PUT—This option specifies using the PUT method.
-d @example.json—File containing updates to configuration.
Results
This example updates the current system configuration. The output is in JSON.
System timezone request
To get the current system timezone, send the following request:
GET https://<PX_IP_address>/api/4.0/system/timezone
 Note
Note
This endpoint is available to all authenticated users.
Required header:
--user <username>:<password>
Options
PX_IP_address—IP address of the Series appliance running the Series API.
username—The user name for your Series appliance.
password—The password for your Series appliance.
Example
GET https://xxx.xxx.xxx.xxx/api/4.0/system/timezone
Required header:
--user npadmin:hammerhead
System timezone response
HTTP/1.1 [Response Code] [Response Message] Date: [Date]
Content-Type: [Content Type]
{
"current-time": "timestamp", "timezone": "timezone"
}
Response fields
Response Code—A standard HTML response code.
Response Message—A standard HTML response message.
Date—Standard HTML date format.
Content Type—The response format.
Example
HTTP/1.1 200 OK
Date: Wed, 07 Jun 2018 01:23:54 GMT
Content-Type: application/json; charset=utf-8
{
"current-time": "2018-04-26T15:49:45Z",
"timezone": "America/New_York"
}
cURL code sample: System timezone
The code sample was run with cURL 7.57.0.
curl --user npadmin:hammerhead https://xxx.xxx.xxx.xxx/api/4.0/system/timezone -k -X GET
This cURL sample includes the following options:
--user npadmin:hammerhead—Replace npadmin with the user name for your Series appliance. Replace hammerhead with the password for your Series appliance.
https://xxx.xxx.xxx.xxx/api/4.0/system/timezone—The system request URL. Replace xxx.xxx.xxx.xxx with the IP address of your Series appliance.
-k—This option explicitly allows cURL to perform insecure SSL connections and transfers, which allows you to test your SSL connection without installing a CA certificate.
-X GET—This option specifies using the GET method.
Results
This example returns the current system timezone. The output is in JSON.
Update system timezone request
To update the current system timezone, send the following request:
PUT https://<PX_IP_address>/api/4.0/system/timezone
 Note
Note
This endpoint is restricted to sudo users.
Required header:
--user <username>:<password>
Request JSON:
{
"timezone": "timezone"
}
Options
PX_IP_address—IP address of the Series appliance running the Series API.
username—The user name for your Series appliance.
password—The password for your Series appliance.
Example
PUT https://xxx.xxx.xxx.xxx/api/4.0/system/timezone
Required header:
--user npadmin:hammerhead
Example request JSON:
{
"timezone": "America/New_York"
}
Update system timezone response
HTTP/1.1 [Response Code] [Response Message] Date: [Date]
Content-Type: [Content Type]
{
"timezone": "timezone"
}
Response fields
Response Code—A standard HTML response code.
Response Message—A standard HTML response message.
Date—Standard HTML date format.
Content Type—The response format.
Example
HTTP/1.1 200 OK
Date: Wed, 07 Jun 2018 01:24:08 GMT
Content-Type: application/json; charset=utf-8
{
"timezone": "America/New_York"
}
cURL code sample: Update system timezone
The code sample was run with cURL 7.57.0.
curl --user npadmin:hammerhead https://xxx.xxx.xxx.xxx/api/4.0/system/timezone -k -X PUT -d @example.json
This cURL sample includes the following options:
--user npadmin:hammerhead—Replace npadmin with the user name for your Series appliance. Replace hammerhead with the password for your Series appliance.
https://xxx.xxx.xxx.xxx/api/4.0/system/timezone—The system request URL. Replace xxx.xxx.xxx.xxx with the IP address of your Series appliance.
-k—This option explicitly allows cURL to perform insecure SSL connections and transfers, which allows you to test your SSL connection without installing a CA certificate.
-X PUT—This option specifies using the PUT method.
-d @example.json—File containing update to timezone.
Results
This example updates the current system timezone. The output is in JSON.
System PX ID request
To get the ID of the system, send the following request:
GET https://<PX_IP_address>/api/4.0/system/px-id
 Note
Note
This endpoint is available to all authenticated users.
Required header:
--user <username>:<password>
Options
PX_IP_address—IP address of the Series appliance running the Series API.
username—The user name for your Series appliance.
password—The password for your Series appliance.
Example
GET https://xxx.xxx.xxx.xxx/api/4.0/system/px-id
Required header:
--user npadmin:hammerhead
System PX ID response
HTTP/1.1 [Response Code] [Response Message] Date: [Date]
Content-Type: [Content Type]
{
"px-id": "px-id"
}
Response fields
Response Code—A standard HTML response code.
Response Message—A standard HTML response message.
Date—Standard HTML date format.
Content Type—The response format.
Example
HTTP/1.1 200 OK
Date: Wed, 07 Jun 2018 01:23:54 GMT
Content-Type: application/json; charset=utf-8
{
"px-id": "8306720923841"
}
cURL code sample: System PX ID
The code sample was run with cURL 7.57.0.
curl --user npadmin:hammerhead https://xxx.xxx.xxx.xxx/api/4.0/system/px-id -k -X GET
This cURL sample includes the following options:
--user npadmin:hammerhead—Replace npadmin with the user name for your Series appliance. Replace hammerhead with the password for your Series appliance.
https://xxx.xxx.xxx.xxx/api/4.0/system/px-id—The system request URL. Replace xxx.xxx.xxx.xxx with the IP address of your Series appliance.
-k—This option explicitly allows cURL to perform insecure SSL connections and transfers, which allows you to test your SSL connection without installing a CA certificate.
-X GET—This option specifies using the GET method.
Results
This example returns the ID of the system. The output is in JSON.
Update system PX ID request
To update the system ID, send the following request:
PUT https://<PX_IP_address>/api/4.0/system/px-id
By configuring the px-id and px-name, you also modify the event records coming from Suricata. The event records will contain the configured values for the name and ID.
 Note
Note
This endpoint is restricted to sudo users.
Required header:
--user <username>:<password>
Request JSON:
{
"px-id": "px-id"
}
Options
PX_IP_address—IP address of the Series appliance running the Series API.
username—The user name for your Series appliance.
password—The password for your Series appliance.
Example
PUT https://xxx.xxx.xxx.xxx/api/4.0/system/px-id
Required header:
--user npadmin:hammerhead
Example request JSON:
{
"px-id": "856064307828"
}
Update system PX ID response
HTTP/1.1 [Response Code] [Response Message] Date: [Date]
Content-Type: [Content Type]
{
"px-id": "px-id"
}
Response fields
Response Code—A standard HTML response code.
Response Message—A standard HTML response message.
Date—Standard HTML date format.
Content Type—The response format.
Example
HTTP/1.1 200 OK
Date: Wed, 07 Jun 2018 01:24:08 GMT
Content-Type: application/json; charset=utf-8
{
"px-id": "856064307828"
}
cURL code sample: Update system PX ID
The code sample was run with cURL 7.57.0.
curl --user npadmin:hammerhead https://xxx.xxx.xxx.xxx/api/4.0/system/px-id -k -X PUT -d @example.json
This cURL sample includes the following options:
--user npadmin:hammerhead—Replace npadmin with the user name for your Series appliance. Replace hammerhead with the password for your Series appliance.
https://xxx.xxx.xxx.xxx/api/4.0/system/px-id—The system request URL. Replace xxx.xxx.xxx.xxx with the IP address of your Series appliance.
-k—This option explicitly allows cURL to perform insecure SSL connections and transfers, which allows you to test your SSL connection without installing a CA certificate.
-X PUT—This option specifies using the PUT method.
-d @example.json—File containing the new PX ID.
Results
This example updates the system ID. The output is in JSON.
System PX name request
To get the name of the system, send the following request:
GET https://<PX_IP_address>/api/4.0/system/px-name
 Note
Note
This endpoint is available to all authenticated users.
Required header:
--user <username>:<password>
Options
PX_IP_address—IP address of the Series appliance running the Series API.
username—The user name for your Series appliance.
password—The password for your Series appliance.
Example
GET https://xxx.xxx.xxx.xxx/api/4.0/system/px-name
Required header:
--user npadmin:hammerhead
System PX name response
HTTP/1.1 [Response Code] [Response Message] Date: [Date]
Content-Type: [Content Type]
{
"px-name": "px-name"
}
Response fields
Response Code—A standard HTML response code.
Response Message—A standard HTML response message.
Date—Standard HTML date format.
Content Type—The response format.
Example
HTTP/1.1 200 OK
Date: Wed, 07 Jun 2018 01:23:54 GMT
Content-Type: application/json; charset=utf-8
{
"px-name": "PX007"
}
cURL code sample: System PX name
The code sample was run with cURL 7.57.0.
curl --user npadmin:hammerhead https://xxx.xxx.xxx.xxx/api/4.0/system/px-name -k -X GET
This cURL sample includes the following options:
--user npadmin:hammerhead—Replace npadmin with the user name for your Series appliance. Replace hammerhead with the password for your Series appliance.
https://xxx.xxx.xxx.xxx/api/4.0/system/px-name—The system request URL. Replace xxx.xxx.xxx.xxx with the IP address of your Series appliance.
-k—This option explicitly allows cURL to perform insecure SSL connections and transfers, which allows you to test your SSL connection without installing a CA certificate.
-X GET—This option specifies using the GET method.
Results
This example returns the name of the system. The output is in JSON.
Update system name request
To update the system -name, send the following request:
PUT https://<PX_IP_address>/api/4.0/system/px-name
By configuring the px-id and px-name, you also modify the event records coming from Suricata. The event records will contain the configured values for the -name and ID.
 Note
Note
This endpoint is restricted to sudo users.
Required header:
--user <username>:<password>
Request JSON:
{
"px-name": "px-name"
}
Options
PX_IP_address—IP address of the Series appliance running the Series API.
username—The user name for your Series appliance.
password—The password for your Series appliance.
Example
PUT https://xxx.xxx.xxx.xxx/api/4.0/system/px-name
Required header:
--user npadmin:hammerhead
Example request JSON:
{
"px-name": "PX008"
}
Update system PX name response
HTTP/1.1 [Response Code] [Response Message] Date: [Date]
Content-Type: [Content Type]
{
"px-name": "px-name"
}
Response fields
Response Code—A standard HTML response code.
Response Message—A standard HTML response message.
Date—Standard HTML date format.
Content Type—The response format.
Example
HTTP/1.1 200 OK
Date: Wed, 07 Jun 2018 01:24:08 GMT
Content-Type: application/json; charset=utf-8
{
"px-name": "PX008"
}
cURL code sample: Update system PX name
The code sample was run with cURL 7.57.0.
curl --user npadmin:hammerhead https://xxx.xxx.xxx.xxx/api/4.0/system/px-name -k -X PUT -d @example.json
This cURL sample includes the following options:
--user npadmin:hammerhead—Replace npadmin with the user name for your Series appliance. Replace hammerhead with the password for your Series appliance.
https://xxx.xxx.xxx.xxx/api/4.0/system/px-name—The system request URL. Replace xxx.xxx.xxx.xxx with the IP address of your Series appliance.
-k—This option explicitly allows cURL to perform insecure SSL connections and transfers, which allows you to test your SSL connection without installing a CA certificate.
-X PUT—This option specifies using the PUT method.
-d @example.json—File containing the new -name.
Results
This example updates the system -name. The output is in JSON.
Reboot system request
To reboot the Series appliance, send the following request:
POST https://<PX_IP_address>/api/4.0/system/reboot
 Note
Note
This endpoint is restricted to sudo users.
Required header:
--user <username>:<password>
Options
PX_IP_address—IP address of the Series appliance running the Series API.
username—The user name for your Series appliance.
password—The password for your Series appliance.
Example
POST https://xxx.xxx.xxx.xxx/api/4.0/system/reboot
Required header:
--user npadmin:hammerhead
Reboot system response
HTTP/1.1 [Response Code] [Response Message] Date: [Date]
Response fields
Response Code—A standard HTML response code.
Response Message—A standard HTML response message.
Date—Standard HTML date format.
Example
HTTP/1.1 200 OK
Date: Wed, 07 Jun 2018 01:25:58 GMT
Content-Type: application/json; charset=utf-8
cURL code sample: Reboot system
The code sample was run with cURL 7.57.0.
curl --user npadmin:hammerhead https://xxx.xxx.xxx.xxx/api/4.0/system/reboot -k -X POST
This cURL sample includes the following options:
--user npadmin:hammerhead—Replace npadmin with the user name for your Series appliance. Replace hammerhead with the password for your Series appliance.
https://xxx.xxx.xxx.xxx/api/4.0/system/reboot—The system request URL. Replace xxx.xxx.xxx.xxx with the IP address of your Series appliance.
-k—This option explicitly allows cURL to perform insecure SSL connections and transfers, which allows you to test your SSL connection without installing a CA certificate.
-X POST—This option specifies using the POST method.
Results
This example reboots the system.
System serial number request
To get the system serial number, send the following request:
GET https://<PX_IP_address>/api/4.0/system/serial-number
 Note
Note
This endpoint is available to all authenticated users.
Required header:
--user <username>:<password>
Options
PX_IP_address—IP address of the Series appliance running the Series API.
username—The user name for your Series appliance.
password—The password for your Series appliance.
Example
GET https://xxx.xxx.xxx.xxx/api/4.0/system/serial-number
Required header:
--user npadmin:hammerhead
System serial number response
HTTP/1.1 [Response Code] [Response Message] Date: [Date]
Content-Type: [Content Type]
{
"serial-number": "serial-number"
}
Response fields
Response Code—A standard HTML response code.
Response Message—A standard HTML response message.
Date—Standard HTML date format.
Content Type—The response format.
Example
HTTP/1.1 200 OK
Date: Wed, 07 Jun 2018 01:23:54 GMT
Content-Type: application/json; charset=utf-8
{
"serial-number": "276953073002"
}
cURL code sample: Serial number
The code sample was run with cURL 7.57.0.
curl --user npadmin:hammerhead https://xxx.xxx.xxx.xxx/api/4.0/system/serial-number -k -X GET
This cURL sample includes the following options:
--user npadmin:hammerhead—Replace npadmin with the user name for your Series appliance. Replace hammerhead with the password for your Series appliance.
https://xxx.xxx.xxx.xxx/api/4.0/system/serial-number—The serial number request URL. Replace xxx.xxx.xxx.xxx
with the IP address of your Series appliance.
-k—This option explicitly allows cURL to perform insecure SSL connections and transfers, which allows you to test your SSL connection without installing a CA certificate.
-X GET—This option specifies using the GET method.
Results
This example returns the system serial number. The output is in JSON.
System active users request
To get details of users currently logged in, send the following request:
GET https://<PX_IP_address>/api/4.0/system/active-users
 Note
Note
This endpoint is restricted to sudo users.
Required header:
--user <username>:<password>
Options
PX_IP_address—IP address of the Series appliance running the Series API.
username—The user name for your Series appliance.
password—The password for your Series appliance.
Example
GET https://xxx.xxx.xxx.xxx/api/4.0/system/active-users
Required header:
--user npadmin:hammerhead
System active users response
HTTP/1.1 [Response Code] [Response Message] Date: [Date]
Content-Type: [Content Type]
[
{
"user": "username",
"tty": "tty", "from": "ip_address"
}
]
Response fields
Response Code—A standard HTML response code.
Response Message—A standard HTML response message.
Date—Standard HTML date format.
Content Type—The response format.
Example
HTTP/1.1 200 OK
Date: Wed, 07 Jun 2018 01:25:34 GMT
Content-Type: application/json; charset=utf-8
[
{
"user": "npadmin",
"tty": "pts/0",
"from": "10.10.10.10"
},
{
"user": "joe",
"tty": "pts/1",
"from": "10.10.10.11"
}
]
cURL code sample: System active users
The code sample was run with cURL 7.57.0.
curl --user npadmin:hammerhead https://xxx.xxx.xxx.xxx/api/4.0/system/active-users -k -X GET
This cURL sample includes the following options:
--user npadmin:hammerhead—Replace npadmin with the user name for your Series appliance. Replace hammerhead with the password for your Series appliance.
https://xxx.xxx.xxx.xxx/api/4.0/system/active-users—The system request URL. Replace xxx.xxx.xxx.xxx with the IP address of your Series appliance.
-k—This option explicitly allows cURL to perform insecure SSL connections and transfers, which allows you to test your SSL connection without installing a CA certificate.
-X GET—This option specifies using the GET method.
Results
This example returns details of current active users. The output is in JSON.
System SSD information—Request
To retrieve smart attributes of your appliance's solid-state drives (SSD), send the following request:
GET https://<PX_IP_address>/api/4.0/system/ssd-info
Required header:
--user <username>:<password>
Options
PX_IP_address—IP address of the appliance running the API.
username—Administrator username.
password—Administrator password.
Example
GET https://xxx.xxx.xxx.xxx/api/4.0/system/ssd-info
Required header:
--user cpx:hammerhead
System SSD information—Response
HTTP/1.1 [Response Code] [Response Message] Date: [Date]
Content-Type: [Content Type]
Response fields
Response Code—A standard HTTP response code.
Response Message—A standard HTTP response message.
Date—Standard HTML date format.
Content Type—The response format.
Example
HTTP/1.1 200 OK
Date: Fri, 11 Mar 2016 01:10:16 GMT
Content-Type: application/json; charset=UTF-8
{
"smartAttributeDetails": [
{
"id": 1,
"name": "Raw_Read_Error_Rate", "value": 100,
"worst_value": 100,
"raw_value": 0,
"threshold": 62, "type": "Pre-fail"
},
{
"id": 2,
"name": "Throughput_Performance", "value": 100,
"worst_value": 100,
"raw_value": 0,
"threshold": 40, "type": "Pre-fail"
},
{
"id": 3,
"name": "Spin_Up_Time", "value": 134,
"worst_value": 134,
"raw_value": 2,
"threshold": 33, "type": "Pre-fail"
},
{
"id": 4,
"name": "Start_Stop_Count", "value": 100,
"worst_value": 100,
"raw_value": 732,
"threshold": 0, "type": "Old_age"
},
{
"id": 5,
"name": "Reallocated_Sector_Ct", "value": 100,
"worst_value": 100,
"raw_value": 0,
"threshold": 5, "type": "Pre-fail"
},
{
"id": 7,
"name": "Seek_Error_Rate", "value": 100,
"worst_value": 100,
"raw_value": 0,
"threshold": 67, "type": "Pre-fail"
},
{
"id": 8,
"name": "Seek_Time_Performance", "value": 100,
"worst_value": 100,
"raw_value": 0,
"threshold": 40, "type": "Pre-fail"
},
{
"id": 9,
"name": "Power_On_Hours", "value": 1,
"worst_value": 1,
"raw_value": 54594,
"threshold": 0, "type": "Old_age"
},
{
"id": 10,
"name": "Spin_Retry_Count", "value": 100,
"worst_value": 100,
"raw_value": 0,
"threshold": 60, "type": "Pre-fail"
},
{
"id": 12,
"name": "Power_Cycle_Count", "value": 100,
"worst_value": 100,
"raw_value": 136,
"threshold": 0, "type": "Old_age"
},
{
"id": 191,
"name": "G-Sense_Error_Rate", "value": 100,
"worst_value": 100,
"raw_value": 0,
"threshold": 0, "type": "Old_age"
},
{
"id": 192,
"name": "Power-Off_Retract_Count", "value": 100,
"worst_value": 100,
"raw_value": 21,
"threshold": 0, "type": "Old_age"
},
{
"id": 193,
"name": "Load_Cycle_Count", "value": 1,
"worst_value": 1,
"raw_value": 5559046,
"threshold": 0, "type": "Old_age"
},
{
"id": 194,
"name": "Temperature_Celsius", "value": 152,
"worst_value": 152,
"raw_value": 36,
"threshold": 0, "type": "Old_age"
},
{
"id": 196,
"name": "Reallocated_Event_Count", "value": 100,
"worst_value": 100,
"raw_value": 9,
"threshold": 0, "type": "Old_age"
},
{
"id": 197,
"name": "Current_Pending_Sector", "value": 100,
"worst_value": 100,
"raw_value": 0,
"threshold": 0, "type": "Old_age"
},
{
"id": 198,
"name": "Offline_Uncorrectable", "value": 100,
"worst_value": 100,
"raw_value": 0,
"threshold": 0, "type": "Old_age"
},
{
"id": 199,
"name": "UDMA_CRC_Error_Count", "value": 200,
"worst_value": 200,
"raw_value": 0,
"threshold": 0, "type": "Old_age"
},
{
"id": 223,
"name": "Load_Retry_Count", "value": 100,
"worst_value": 100,
"raw_value": 0,
"threshold": 0, "type": "Old_age"
}
]
}
cURL code sample: System SSD information
curl -k --user cpx:hammerhead https://xxx.xxx.xxx.xxx/api/4.0/system/ssd-info -X GET
This cURL sample includes the following options:
-k—This option explicitly allows cURL to perform insecure SSL connections and transfers, which allows you to test your SSL connection without installing a CA certificate.
--user cpx:hammerhead—Replace cpx with the user name of the administrator for your Series appliance. Replace
hammerhead with the corresponding administrator password for your appliance.
https://xxx.xxx.xxx.xxx/api/4.0/system/ssd-info—The system's SSD information request URL. Replace
xxx.xxx.xxx.xxx with the IP address of your appliance.
-X GET—This option specifies using the GET method.
Results
This example returns smart attributes of your appliance's SSDs. The output is in JSON.
File system request
To get the information of the files systems of your appliance, send the following request:
GET https://<PX_IP_address>/api/4.0/system/filesystem
 Note
Note
This endpoint is available to all authenticated users.
Required header:
--user <username>:<password>
Query parameter:
filter—This is an optional parameter that indicates the particular file system mounted on a directory for which the info is needed. Multiple file systems can be passed within the filter separated by a comma. The passed filter will filter the output of the API where the "mounted on" parameter of the "df -h" command will represent the filter.
If the filter is not passed in the request, all the file systems are returned. If no matching file system is passed in the filter, an empty response will be returned.
Options
PX_IP_address—IP address of the Series appliance running the Series API.
username—Administrator user name.
password—Administrator password.
GET https://xxx.xxx.xxx.xxx/api/4.0/system/filesystem
Required header:
--user npadmin:hammerhead
File system response
HTTP/1.1 [Response Code] [Response Message] Date: [Date]
Content-Type: [Content Type]
[
{
"fileSystem": "[File System Name]", "totalSize": "[Total Size]",
"used": "[Used Memory]", "available": "[Available Memory]", "usedPercent": "[Percentage Used]", "mountedOn": "[Directory]"
}
]
Response fields
Response Code—A standard HTML response code.
Response Message—A standard HTML response message.
Date—Standard HTML date format.
Content Type—The response format.
File System Name—File system type.
Total Size—Total disk space of the file system.
Used Memory—Used disk space of the file system.
Available Memory—Disk space available in the file system.
Percentage Used—Percentage of disk space used.
Directory—Directory on which the file system is mounted.
HTTP/1.1 200 OK
Date: Wed, 07 Jun 2018 01:23:54 GMT
Content-Type: application/json; charset=utf-8
[
{
"fileSystem": "devtmpfs", "totalSize": "16G",
"used": "0",
"available": "16G",
"usedPercent": "0%", "mountedOn": "/dev"
},
{
"fileSystem": "tmpfs", "totalSize": "16G",
"used": "0",
"available": "16G",
"usedPercent": "0%", "mountedOn": "/sys/fs/cgroup"
}
]
cURL code sample: File system
The code sample was run with cURL 7.57.0.
curl -H --user npadmin:hammerhead -k https://xxx.xxx.xxx.xxx/api/4.0/system/filesystem?filter=/yyy,/zzz
This cURL sample includes the following options:
--user npadmin:hammerhead—Replace npadmin with the administrator user name. Replace hammerhead with the administrator password.
https://xxx.xxx.xxx.xxx/api/4.0/system/filesystem—The system request URL. Replace xxx.xxx.xxx.xxx with the IP address of your Series appliance.
-k—This option explicitly allows cURL to perform insecure SSL connections and transfers, which allows you to test your SSL connection without installing a CA certificate.
filter=/yyy,/zzz—This option lists the file systems mounted on the specified directories. Replace yyy and zzz with the directories to list the file systems mounted on it.
Example
curl -H --user npadmin:hammerhead -k https://xxx.xxx.xxx.xxx/api/4.0/system/filesystem?filter=/var,/home
[
{
"fileSystem": "/dev/sda6", "totalSize": "6.7G",
"used": "1.2G",
"available": "5.2G", "usedPercent": "18%", "mountedOn": "/var"
},
{
"fileSystem": "/dev/sda7", "totalSize": "7.6G",
"used": "3.7G",
"available": "3.5G", "usedPercent": "52%", "mountedOn": "/home"
}
]
Results
This example returns the file systems of your appliance. The output is in JSON.
License
The PX Series appliance comes pre-installed with a system license. However, you might have to install a new license if an older one expires.
To check whether the pre-installed system license is still valid, use the License details request. To request a new system license, use the Request license request to generate a license request string, which you must send to Support. After Support sends you the license key, you must upload it to the PX appliance using the Apply license request.
Use the license endpoints to check if your system license is valid, request a new license, and apply the new license:
GET https://<PX_IP_address>/api/4.0/license
GET https://<PX_IP_address>/api/4.0/license/request
POST https://<PX_IP_address>/api/4.0/license
GET https://<PX_IP_address>/api/4.0/licenses
POST https://<PX_IP_address>/api/4.0/licenses
DELETE https://<PX_IP_address>/api/4.0/licenses
GET https://<PX_IP_address>/api/4.0/licenses/<feature>
DELETE https://<PX_IP_address>/api/4.0/licenses/<feature>
License details request
To check whether the pre-installed system license is still valid, send the following request:
GET https://<PX_IP_address>/api/4.0/license
Required header:
--user <username>:<password>
Options
PX_IP_address—IP address of the Series appliance running the Series API.
username—The user name for your Series appliance.
password—The password for your Series appliance.
Example
GET https://xxx.xxx.xxx.xxx/api/4.0/license
Required header:
--user cpx:hammerhead
License details response
HTTP/1.1 [Response Code] [Response Message] Date: [Date]
Content-Type: [Content Type]
{
"issueEpoch": "epoch_time", "issueDate": "date", "expireEpoch": "epoch_time", "expireDate": "date", "versionMajor": "version", "optionList": "products", "hash": "hash",
"status": "status"
}
Response fields
Response Code—A standard HTTP response code.
Response Message—A standard HTTP response message.
Date—Standard HTML date format.
Content Type—The response format.
issueEpoch—Issue date in epoch time format.
issueDate—Date of the software installation.
expireEpoch—Expiration date in epoch time format.
expireDate—Date when the system license expires.
versionMajor—Software version installed on the Series appliance.
optionList—A list of products that are licensed.
hash—A hash value of the license number.
status—The status of the license (valid or expired).
Example
HTTP/1.1 200 OK
Date: Mon, 6 May 2019 19:09:39 GMT
Content-Type: text/plain; charset=utf-8
{
"issueEpoch": "1555423203",
"issueDate": "Tue 16 Apr 2019 14:00:03",
"expireEpoch": "1641996003",
"expireDate": "Wed 12 Jan 2022 14:00:03",
"versionMajor": "4", "optionList": "PX,CAP,SES,L7X",
"hash": "5D6DB97F2058151C1E173E24C130C0B5AFB71198D13E39E6ABC1A09557DFA5",
"status": "valid"
}
cURL code sample: License details
The code sample was run with cURL 7.57.0.
curl -k --user cpx:hammerhead https://xxx.xxx.xxx.xxx/api/4.0/license
This cURL sample includes the following options:
-k—This option explicitly allows cURL to perform insecure SSL connections and transfers, which allows you to test your SSL connection without installing a CA certificate.
--user cpx:hammerhead—Replace cpx with the user name for your Series appliance. Replace hammerhead with the password for your Series appliance.
https://xxx.xxx.xxx.xxx/api/4.0/license—The license request URL. Replace xxx.xxx.xxx.xxx with the IP address of your Series appliance.
Results
This example returns license information for your Series appliance. The output is in JSON.
Request license request
To request a new system license for a Series appliance, send the following request:
GET https://<PX_IP_address>/api/4.0/license/request
Required header:
--user <username>:<password>
Request body:
{
customer: 'TEXT'
}
The response is a license request string, which you must send to Support. Support will send you the license key. To upload the license key, use the Apply license request.
Options
PX_IP_address—IP address of the Series appliance running the Series API.
username—The user name for your Series appliance.
password—The password for your Series appliance.
Parameter
customer—The name of the customer who needs a Series license.
Example
GET https://xxx.xxx.xxx.xxx/api/4.0/license/request
Required header:
--user cpx:hammerhead
Request body:
{
"customer=John Doe"
}
Request license response
HTTP/1.1 [Response Code] [Response Message] Date: [Date]
Content-Type: [Content Type]
status: [Status]
licenseRequest: [License Request]
Response fields
Response Code—A standard HTTP response code.
Response Message—A standard HTTP response message.
Date—Standard HTML date format.
Content Type—The response format.
Status—Status of the license request.
License Request—License request string.
Example
HTTP/1.1 100 Continue
HTTP/1.1 200 OK
Date: Mon, 30 Jan 2017 21:59:03 GMT
Content-Type: application/json; charset=utf-8
{
"status": "ok",
"licenseRequest": "fLfUoPDjkRA1zh4e1oPhJ8BFz4x/3SWsf3bYeFeQ0lxD1Ou4B/4hiwhr/x/1i0ITPOwx5nqy..."
}
cURL code sample: Request license
The code sample was run with cURL 7.57.0.
curl https://xxx.xxx.xxx.xxx/api/4.0/license/request --user "cpx:hammerhead" -X GET -F "customer=John Doe" -k
This cURL sample includes the following options:
https://xxx.xxx.xxx.xxx/api/4.0/license/request—The license request URL. Replace xxx.xxx.xxx.xxx with the IP address of your Series appliance.
--user cpx:hammerhead—Replace cpx with the user name for your Series appliance. Replace hammerhead with the password for your Series appliance.
-X GET—This option specifies using the GET method.
-F "customer=John Doe"—This option specifies the name of the customer who needs a new license.
-k—This option explicitly allows cURL to perform insecure SSL connections and transfers, which allows you to test your SSL
connection without installing a CA certificate.
Results
This example returns a license request string, which you must send to Support. Support will send you the license key. To upload the license key, use the Apply license request.
Apply license request
To get a license key, you must use the Request license request to generate a license request string, which you must send to Support. Support will send you the license key.
To upload the license key to a PX Series appliance, send the following request:
POST https://<PX_IP_address>/api/4.0/license
 Note
Note
To use this request, you must belong to the sudo group.
Required header:
--user <username>:<password>
Request body:
{
license: 'TEXT'
}
Options
PX_IP_address—IP address of the Series appliance running the Series API.
username—The user name for your Series appliance.
password—The password for your Series appliance.
Parameter
license—A new, valid Series license.
Example
POST https://xxx.xxx.xxx.xxx/api/4.0/license
Required header:
--user npadmin:hammerhead
Request body:
{
"license=xxxxxxxxxxxxxxxxxxxxxxxxxxxxxxxxxxxxxxxxxxxxxxxx"
}
Apply license response
HTTP/1.1 [Response Code] [Response Message] Date: [Date]
Content-Type: [Content Type]
status: [Status] message: [Message]
Response fields
Response Code—A standard HTTP response code.
Response Message—A standard HTTP response message.
Date—Standard HTML date format.
Content Type—The response format.
Status—The status of the request, either ok or failed.
Message—The result of the request, either License successfully applied. Services will be restarted or Invalid license.
Example
HTTP/1.1 200 OK
Date: Fri, 03 Mar 2017 22:04:35 GMT
Content-Type: text/html; charset=UTF-8
{
"status": "ok",
"message": "License successfully applied. Services will be restarted"
}
cURL code sample: Apply license
The code sample was run with cURL 7.57.0.
curl https://10.41.131.151/api/4.0/license
--data "{ \"license\": \"xxxxxxxxxxxxxxxxxxxxxxxxxxxxxxxxxxxxxxxxxxxxxxxx\" }"
-X POST --user "npadmin:hammerhead" -k
This cURL sample includes the following options:
https://xxx.xxx.xxx.xxx/api/4.0/license—The license request URL. Replace xxx.xxx.xxx.xxx with the IP address of your Series appliance.
--data "{ \"license\": \"xxxxxxxxxxxxxxxxxxxxxxxxxxxxxxxxxxxxxxxxxxxxxxxx\" }"—This option specifies the license key.
-X POST—This option specifies using the POST method.
--user npadmin:hammerhead—Replace npadmin with the user name for your Series appliance. Replace hammerhead with the password for your Series appliance.
-k—This option explicitly allows cURL to perform insecure SSL connections and transfers, which allows you to test your SSL connection without installing a CA certificate.
Results
This example uploads a license key to a Series appliance. The output is in JSON.
List installed licenses request
To get all licenses installed on the Series appliance, send the following request:
GET https://<PX_IP_address>/api/4.0/licenses
Required header:
--user <username>:<password>
Options
PX_IP_address—IP address of the Series appliance running the Series API.
username—The user name for your Series appliance.
password—The password for your Series appliance.
Example
GET https://xxx.xxx.xxx.xxx/api/4.0/licenses
Required header:
--user cpx:hammerhead
List installed licenses response
HTTP/1.1 [Response Code] [Response Message] Date: [Date]
Content-Type: [Content Type]
status: [Status]
licenseRequest: [License Request]
Response fields
Response Code—A standard HTTP response code.
Response Message—A standard HTTP response message.
Date—Standard HTML date format.
Content Type—The response format.
Status—Status of the license request.
License Request—License request string.
Example
HTTP/1.1 100 Continue
HTTP/1.1 200 OK
Date: Tue, 07 May 2019 21:59:03 GMT
Content-Type: application/json; charset=utf-8 [{
"license": "LK2-FIREEYE_SUPPORT-413H-HA42-3HK8-6A6J-18QX-D438-4N85-KMAC-5R40-L2Q5-7GL1-1XGH-RLXU-QC1J-8TJE-D6R",
"license_type": 2, "well_formed": true, "feature": "FIREEYE_SUPPORT",
"hash_type": "hmac_sha256_96", "hash_ok": true,
"valid": true, "revoked": false, "options":
[
{
"option_name": "start_date", "option_value": "2019/03/07"
},
{
"option_name": "end_date", "option_value": "2019/05/08"
},
{
"option_name": "time_order_constant", "option_value": "605316045"
},
{
"option_name": "tied_primary_mac", "option_value": "00:25:90:59:D5:4C"
},
{
"option_name": "tied_product", "option_value": "PX"
},
{
"option_name": "tied_scshare", "option_value": "all"
}
]
},
...
]
cURL code sample: List installed licenses
The code sample was run with cURL 7.57.0.
curl https://xxx.xxx.xxx.xxx/api/4.0/licenses --user "cpx:hammerhead" -X GET -k
This cURL sample includes the following options:
https://xxx.xxx.xxx.xxx/api/4.0/licenses—The license request URL. Replace xxx.xxx.xxx.xxx with the IP address of your Series appliance.
--user cpx:hammerhead—Replace cpx with the user name for your Series appliance. Replace hammerhead with the password for your Series appliance.
-X GET—This option specifies using the GET method.
-k—This option explicitly allows cURL to perform insecure SSL connections and transfers, which allows you to test your SSL connection without installing a CA certificate.
Results
This example returns all licenses installed on the Series appliance.
Add new feature licenses request
To update the x509 configuration with new licenses, send the following request:
POST https://<PX_IP_address>/api/4.0/licenses
 Note
Note
To use this request, you must belong to the sudo group.
Required header:
--user <username>:<password>
Request body:
[
"license1", "license2"
]
Options
PX_IP_address—IP address of the Series appliance running the Series API.
username—The user name for your Series appliance.
password—The password for your Series appliance.
Parameter
licenseN—A new, valid Series license.
Example
POST https://xxx.xxx.xxx.xxx/api/4.0/licenses
Required header:
--user npadmin:hammerhead
Request body:
{
"xxxxxxxxxxxxxxxxxxxxxxxxxxxxxxxxxxxxxxxxxxxxxxxx"
}
Add new feature licenses response
HTTP/1.1 [Response Code] [Response Message] Date: [Date]
Content-Type: [Content Type]
Response fields
Response Code—A standard HTTP response code.
Response Message—A standard HTTP response message.
Date—Standard HTML date format.
Content Type—The response format.
Example
HTTP/1.1 200 OK
Date: Tue, 07 May 2019 22:04:35 GMT
Content-Type: text/html; charset=UTF-8
cURL code sample: Add new feature licenses
The code sample was run with cURL 7.57.0.
curl https://xxx.xxx.xxx.xx/api/4.0/licenses
--data '[""xxxxxxxxxxxxxxxxxxxxxxxxxxxxxxxxxxxxxxxxxxxxxxxx", "xxxxxxxxxxxxxxxxxxxxxxxxxx"]'
-X POST --user "npadmin:hammerhead" -k
This cURL sample includes the following options:
https://xxx.xxx.xxx.xxx/api/4.0/licenses—The license request URL. Replace xxx.xxx.xxx.xxx with the IP address of your Series appliance.
--data '["xxxxxxxxxxxxxxxxxxxxxxxxxxxxxxxxxxxxxxxxxxxxxxxx", "xxxxxxxxxxxxxxxxxxxxxxxxxx" ]'—This option specifies the license keys.
-X POST—This option specifies using the POST method.
--user npadmin:hammerhead—Replace npadmin with the user name for your Series appliance. Replace hammerhead with the password for your Series appliance.
-k—This option explicitly allows cURL to perform insecure SSL connections and transfers, which allows you to test your SSL connection without installing a CA certificate.
Results
This example adds the specified licenses to the Series appliance.
Delete all feature licenses request
To delete all feature licenses key from a Series appliance, send the following request:
DELETE https://<PX_IP_address>/api/4.0/licenses
 Note
Note
To use this request, you must belong to the sudo group.
Required header:
--user <username>:<password>
Options
PX_IP_address—IP address of the Series appliance running the Series API.
username—The user name for your Series appliance.
password—The password for your Series appliance.
Example
DELETE https://xxx.xxx.xxx.xxx/api/4.0/licenses
Required header:
--user npadmin:hammerhead
Delete all feature licenses response
HTTP/1.1 [Response Code] [Response Message] Date: [Date]
Content-Type: [Content Type]
Response fields
Response Code—A standard HTTP response code.
Response Message—A standard HTTP response message.
Date—Standard HTML date format.
Content Type—The response format.
Example
HTTP/1.1 200 OK
Date: Tue, 07 May 2019 22:04:35 GMT
Content-Type: text/html; charset=UTF-8
cURL code sample: Delete all feature licenses
The code sample was run with cURL 7.57.0.
curl https://xxx.xxx.xxx.xx/api/4.0/licenses -X DELETE --user "npadmin:hammerhead" -k
This cURL sample includes the following options:
https://xxx.xxx.xxx.xxx/api/4.0/licenses—The license request URL. Replace xxx.xxx.xxx.xxx with the IP address of your Series appliance.
-X DELETE—This option specifies using the DELETE method.
--user npadmin:hammerhead—Replace npadmin with the user name for your Series appliance. Replace hammerhead with the password for your Series appliance.
-k—This option explicitly allows cURL to perform insecure SSL connections and transfers, which allows you to test your SSL connection without installing a CA certificate.
Results
This example deletes all licenses from the Series appliance.
List a feature license request
To get the details of the specified feature license, send the following request:
GET https://<PX_IP_address>/api/4.0/licenses/<feature>
Required header:
--user <username>:<password>
Options
PX_IP_address—IP address of the Series appliance running the Series API.
username—The user name for your Series appliance.
password—The password for your Series appliance.
feature—The Series feature.
Example
GET https://xxx.xxx.xxx.xxx/api/4.0/licenses/fireeye_support
Required header:
--user cpx:hammerhead
List a feature license response
HTTP/1.1 [Response Code] [Response Message] Date: [Date]
Content-Type: [Content Type]
{
"license": "string", "license_type": int, "well_formed": Boolean, "feature": "feature_name", "hash_type": "hash_type", "hash_ok": Boolean, "valid": Boolean, "revoked": Boolean, "options": [
{
"option_name": "name", "option_value": "value"
},
...
}
Response fields
Response Code—A standard HTTP response code.
Response Message—A standard HTTP response message.
Date—Standard HTML date format.
Content Type—The response format.
Example
HTTP/1.1 200 OK
Date: Tue, 07 May 2019 21:59:03 GMT
Content-Type: application/json; charset=utf-8
{
"license": "LK2-FIREEYE_SUPPORT-413H-HA42-3HK8-6A6J-18QX-D438-4N85-KMAC-5R40-L2Q5-P562-U3C8-RLXU-QC1J-8TJE-
D6R",
"license_type": 2, "well_formed": true, "feature": "FIREEYE_SUPPORT",
"hash_type": "hmac_sha256_96", "hash_ok": true,
"valid": true, "revoked": false, "options": [
{
"option_name": "start_date", "option_value": "2019/03/07"
},
{
"option_name": "end_date", "option_value": "2019/05/08"
},
{
"option_name": "time_order_constant", "option_value": "605316045"
},
{
"option_name": "tied_primary_mac", "option_value": "00:25:90:59:D5:4C"
},
{
"option_name": "tied_product", "option_value": "PX"
},
{
"option_name": "tied_scshare", "option_value": "all"
}
]
}
cURL code sample: List a feature license
The code sample was run with cURL 7.57.0.
curl https://xxx.xxx.xxx.xxx/api/4.0/licenses/fireeye_support --user "cpx:hammerhead" -X GET -k
This cURL sample includes the following options:
https://xxx.xxx.xxx.xxx/api/4.0/licenses/fireeye_support—The license request URL. Replace xxx.xxx.xxx.xxx with the IP address of your Series appliance, and fireeye_support with the name of the feature.
--user cpx:hammerhead—Replace cpx with the user name for your Series appliance. Replace hammerhead with the password for your Series appliance.
-X GET—This option specifies using the GET method.
-k—This option explicitly allows cURL to perform insecure SSL connections and transfers, which allows you to test your SSL connection without installing a CA certificate.
Results
This example returns details of the feature license of the specified feature.
Delete a feature license request
To delete a specific feature licenses from a Series appliance, send the following request:
DELETE https://<PX_IP_address>/api/4.0/licenses/<feature>
 Note
Note
To use this request, you must belong to the sudo group.
Required header:
--user <username>:<password>
Options
PX_IP_address—IP address of the Series appliance running the Series API.
username—The user name for your Series appliance.
password—The password for your Series appliance.
feature—The Series feature.
Example
DELETE https://xxx.xxx.xxx.xxx/api/4.0/licenses/fireeye_support
Required header:
--user npadmin:hammerhead
Delete a feature license response
HTTP/1.1 [Response Code] [Response Message] Date: [Date]
Content-Type: [Content Type]
Response fields
Response Code—A standard HTTP response code.
Response Message—A standard HTTP response message.
Date—Standard HTML date format.
Content Type—The response format.
Example
HTTP/1.1 200 OK
Date: Tue, 07 May 2019 22:04:35 GMT
Content-Type: text/html; charset=UTF-8
cURL code sample: Delete a feature license
The code sample was run with cURL 7.57.0.
curl https://xxx.xxx.xxx.xx/api/4.0/licenses/fireeye_support -X DELETE --user "npadmin:hammerhead" -k
This cURL sample includes the following options:
https://xxx.xxx.xxx.xxx/api/4.0/licenses/fireeye_support—The license request URL. Replace xxx.xxx.xxx.xxx with the IP address of your Series appliance, and fireeye_support with the feature.
-X DELETE—This option specifies using the DELETE method.
--user npadmin:hammerhead—Replace npadmin with the user name for your Series appliance. Replace hammerhead with the password for your Series appliance.
-k—This option explicitly allows cURL to perform insecure SSL connections and transfers, which allows you to test your SSL connection without installing a CA certificate.
Results
This example deletes the specified feature license from the Series appliance.
X.509
This suite of endpoints allows configuration of the series appliance in order to use X.509 certificates to authenticate users using the Web UI and API endpoints. You can configure X.509, authorization, Client CA (certificate authority), OCSP (Online Certificate Status Protocol), and CRLs (Certificate Revocation Lists).
OCSP is used to get the revocation status of an X.509 digital certificate.
A CRL is a list of digital certificates that should no longer be trusted because they have been revoked by the CA before their expiration date.
The following endpoints are available:
X.509 configuration request
To list the X.509 configuration, send the following request:
GET https://<PX_IP_address>/api/4.0/config/2fa/x509
 Note
Note
To use this request, you must belong to the sudo group.
Required header:
--user <username>:<password>
Options
PX_IP_address—IP address of the Series appliance running the Series API.
username—The user name for your Series appliance.
password—The password for your Series appliance.
Example
GET https://xxx.xxx.xxx.xxx/api/4.0/config/2fa/x509
Required header:
--user cpx:hammerhead
X.509 configuration response
HTTP/1.1 [Response Code] [Response Message] Date: [Date]
Content-Type: [Content Type]
{
"ocsp": {
"verification-url": "URL"
},
"crl": {
"retrieval-interval": int, "enable-retrieval": Boolean, "retrieval-url": "URL"
},
"authorization": {
"encryption-type": "encryption", "host": "URL",
"port": port,
"base-dn": "string",
"bind-dn": "string",
"bind-pw": "string",
"uiapi-mapping-field": "example-field", "sudo-mapping-field": "example-field", "username-mapping-field": "example-field",
"username-schema-attribute": "example-attribute"
},
"audit-logging-field": "logging-field", "state": "state"
}
Response fields
Response Code—A standard HTTP response code.
Response Message—A standard HTTP response message.
Date—Standard HTML date format.
Content Type—The response format.
Example
HTTP/1.1 200 OK
Date: Wed, 14 May 2019 09:22:08 GMT
Content-Type: application/json; charset=utf-8
{
"ocsp": {
"verification-url": "www.google.com"
},
"crl": {
"retrieval-interval": 3, "enable-retrieval": true,
"retrieval-url": "www.google.com"
},
"authorization": { "encryption-type": "ssl", "host": "www.mydomain.com", "port": 80,
"base-dn": "example",
"bind-dn": "example",
"bind-pw": "example",
"uiapi-mapping-field": "example-field", "sudo-mapping-field": "example-field", "username-mapping-field": "example-field",
"username-schema-attribute": "example-attribute"
},
"audit-logging-field": "logging-field", "state": "disabled"
}
cURL code sample: X.509 configuration
The code sample was run with cURL 7.57.0.
curl -k --user cpx:hammerhead https://xxx.xxx.xxx.xxx/api/4.0/config/2fa/x509
This cURL sample includes the following options:
-k—This option explicitly allows cURL to perform insecure SSL connections and transfers, which allows you to test your SSL connection without installing a CA certificate.
--user cpx:hammerhead—Replace cpx with the user name for your Series appliance. Replace hammerhead with the password for your Series appliance.
https://xxx.xxx.xxx.xxx/api/4.0/config/2fa/x509—The X.509 request URL. Replace xxx.xxx.xxx.xxx with the IP address of your Series appliance.
Results
This example returns the X.509 configuration. The output is in JSON.
Update X.509 configuration request
To update the X.509 configuration, send the following request:
PUT https://<PX_IP_address>/api/4.0/config/2fa/x509
You can provide the new JSON configuration, CRL file, CA file, or any combination of them.
 Note
Note
To use this request, you must belong to the sudo group.
Required header:
--user <username>:<password>
Options
PX_IP_address—IP address of the Series appliance running the Series API.
username—The user name for your Series appliance.
password—The password for your Series appliance.
Request body:
{
"ocsp": {
"verification-url": "www.google.com"
},
"crl": {
"retrieval-interval": 20, "enable-retrieval": true,
"retrieval-url": "www.google.com"
},
"authorization": { "encryption-type": "ssl", "host": "www.mydomain.com", "port": 443,
"base-dn": "example",
"bind-dn": "example",
"bind-pw": "example",
"uiapi-mapping-field": "example-field", "sudo-mapping-field": "example-field", "username-mapping-field": "example-field",
"username-schema-attribute": "example-attribute"
},
"audit-logging-field": "CN-Username", "state": "required"
}
Example
PUT https://xxx.xxx.xxx.xxx/api/4.0/config/2fa/x509
Required header:
--user npadmin:hammerhead
Example request body:
{
"ocsp": {
"verification-url": "www.google.com"
},
"crl": {
"retrieval-interval": 20, "enable-retrieval": true,
"retrieval-url": "www.google.com"
},
"authorization": { "encryption-type": "ssl", "host": "www.mydomain.com", "port": 443,
"base-dn": "example",
"bind-dn": "example",
"bind-pw": "example",
"uiapi-mapping-field": "example-field", "sudo-mapping-field": "example-field", "username-mapping-field": "example-field",
"username-schema-attribute": "example-attribute"
},
"audit-logging-field": "CN-Username", "state": "required"
}
Update X.509 configuration response
HTTP/1.1 [Response Code] [Response Message] Date: [Date]
Response fields
Response Code—A standard HTML response code.
Response Message—A standard HTML response message.
Date—Standard HTML date format.
Example
HTTP/1.1 200 OK
Date: Tue, 14 May 2019 15:13:29 GMT
cURL code sample: Update X.509 configuration
The code sample was run with cURL 7.57.0.
curl -k -u npadmin:hammerhead https://<ip>/api/4.0/config/2fa/x509 -X PUT -F 'config=<json data>' -F ca=@file.crt -F crt=@file.crl
This cURL sample includes the following options:
--user npadmin:hammerhead—Replace npadmin with the user name for your Series appliance. Replace hammerhead with the password for your Series appliance.
https://xxx.xxx.xxx.xxx/api/4.0/config/2fa/x509—The X.509 request URL. Replace xxx.xxx.xxx.xxx with the IP address of your Series appliance.
-k—This option explicitly allows cURL to perform insecure SSL connections and transfers, which allows you to test your SSL
connection without installing a CA certificate.
-X PUT—This option specifies using the PUT method.
-F 'config=<json data>'—Specifies the JSON configuration.
-F ca=@file.crt—Specifies the CA file.
-F crt=@file.crl—Specifies the CRL file.
Results
This example updates the X.509 configuration.
X.509 feature state request
To get the X.509 feature state, send the following request:
GET https://<PX_IP_address>/api/4.0/config/2fa/x509/state
 Note
Note
To use this request, you must belong to the sudo group.
Required header:
--user <username>:<password>
Options
PX_IP_address—IP address of the Series appliance running the Series API.
username—The user name for your Series appliance.
password—The password for your Series appliance.
Example
GET https://xxx.xxx.xxx.xxx/api/4.0/config/2fa/x509/state
Required header:
--user cpx:hammerhead
X.509 feature state response
HTTP/1.1 [Response Code] [Response Message] Date: [Date]
Content-Type: [Content Type]
{
"state": "state"
}
Response fields
Response Code—A standard HTTP response code.
Response Message—A standard HTTP response message.
Date—Standard HTML date format.
Content Type—The response format.
state—Feature state.
Example
HTTP/1.1 200 OK
Date: Wed, 14 May 2019 09:22:16 GMT
Content-Type: application/json; charset=utf-8
{
"state": "disabled"
}
cURL code sample: X.509 feature state
The code sample was run with cURL 7.57.0.
curl -k --user cpx:hammerhead https://xxx.xxx.xxx.xxx/api/4.0/config/2fa/x509/state
This cURL sample includes the following options:
-k—This option explicitly allows cURL to perform insecure SSL connections and transfers, which allows you to test your SSL connection without installing a CA certificate.
--user cpx:hammerhead—Replace cpx with the user name for your Series appliance. Replace hammerhead with the password
for your Series appliance.
https://xxx.xxx.xxx.xxx/api/4.0/config/2fa/x509/state—The X.509 request URL. Replace xxx.xxx.xxx.xxx with the IP address of your Series appliance.
Results
This example returns the X.509 feature state. The output is in JSON.
Update X.509 feature state request
To change the X.509 feature state, send the following request:
PUT https://<PX_IP_address>/api/4.0/config/2fa/x509/state
 Note
Note
To use this request, you must belong to the sudo group.
Required header:
--user <username>:<password>
Options
PX_IP_address—IP address of the Series appliance running the Series API.
username—The user name for your Series appliance.
password—The password for your Series appliance.
exporter—The name of the exporter.
Request body:
{
"state": state
}
Example
PUT https://xxx.xxx.xxx.xxx/api/4.0/config/2fa/x509/state
Required header:
--user npadmin:hammerhead
Example request body:
{
"state": "required"
}
Update X.509 feature state response
HTTP/1.1 [Response Code] [Response Message] Date: [Date]
Content-Type: [Content Type]
Response fields
Response Code—A standard HTML response code.
Response Message—A standard HTML response message.
Date—Standard HTML date format.
Content-type—The response format.
Example
HTTP/1.1 200 OK
Date: Tue, 06 Feb 2018 06:32:41 GMT
Content-Type: application/json; charset=utf-8
cURL code sample: Update X.509 feature state
The code sample was run with cURL 7.57.0.
curl --user npadmin:hammerhead https://xxx.xxx.xxx.xxx/api/4.0/config/2fa/x509/state -k -X PUT -d @example.json
This cURL sample includes the following options:
--user npadmin:hammerhead—Replace npadmin with the user name for your Series appliance. Replace hammerhead with the password for your Series appliance.
https://xxx.xxx.xxx.xxx/api/4.0/config/2fa/x509/state—The X.509 request URL. Replace xxx.xxx.xxx.xxx with the IP
address of your Series appliance.
-k—This option explicitly allows cURL to perform insecure SSL connections and transfers, which allows you to test your SSL connection without installing a CA certificate.
-X PUT—This option specifies using the PUT method.
-d @example.json—Specifies the file containing the updated feature state.
Results
This example changes the X.509 feature state.
X.509 authorization configuration request
To list the X.509 authorization configuration, send the following request:
GET https://<PX_IP_address>/api/4.0/config/2fa/x509/authorization
 Note
Note
To use this request, you must belong to the sudo group.
Required header:
--user <username>:<password>
Options
PX_IP_address—IP address of the Series appliance running the Series API.
username—The user name for your Series appliance.
password—The password for your Series appliance.
Example
GET https://xxx.xxx.xxx.xxx/api/4.0/config/2fa/x509/authorization
Required header:
--user cpx:hammerhead
X.509 authorization configuration response
HTTP/1.1 [Response Code] [Response Message] Date: [Date]
Content-Type: [Content Type]
{
"encryption-type": "encryption", "host": "URL",
"port": port,
"base-dn": "string",
"bind-dn": "string",
"bind-pw": "string",
"uiapi-mapping-field": "example-field", "sudo-mapping-field": "example-field", "username-mapping-field": "example-field",
"username-schema-attribute": "example-attribute"
}
Response fields
Response Code—A standard HTTP response code.
Response Message—A standard HTTP response message.
Date—Standard HTML date format.
Content Type—The response format.
Example
HTTP/1.1 200 OK
Date: Wed, 14 May 2019 09:25:08 GMT
Content-Type: application/json; charset=utf-8
{
"encryption-type": "ssl", "host": "www.mydomain.com", "port": 80,
"base-dn": "example",
"bind-dn": "example",
"bind-pw": "example",
"uiapi-mapping-field": "example-field", "sudo-mapping-field": "example-field", "username-mapping-field": "example-field",
"username-schema-attribute": "example-attribute"
}
cURL code sample: X.509 authorization configuration
The code sample was run with cURL 7.57.0.
curl -k --user cpx:hammerhead https://xxx.xxx.xxx.xxx/api/4.0/config/2fa/x509/authorization
This cURL sample includes the following options:
-k—This option explicitly allows cURL to perform insecure SSL connections and transfers, which allows you to test your SSL connection without installing a CA certificate.
--user cpx:hammerhead—Replace cpx with the user name for your Series appliance. Replace hammerhead with the password for your Series appliance.
https://xxx.xxx.xxx.xxx/api/4.0/config/2fa/x509/authorization—The X.509 request URL. Replace xxx.xxx.xxx.xxx
with the IP address of your Series appliance.
Results
This example returns the X.509 authorization configuration. The output is in JSON.
Update X.509 authorization configuration request
To update the X.509 authorization configuration, send the following request:
PUT https://<PX_IP_address>/api/4.0/config/2fa/x509/authorization
 Note
Note
To use this request, you must belong to the sudo group.
Required header:
--user <username>:<password>
Options
PX_IP_address—IP address of the Series appliance running the Series API.
username—The user name for your Series appliance.
password—The password for your Series appliance.
Example
PUT https://xxx.xxx.xxx.xxx/api/4.0/config/2fa/x509/authorization
Required header:
--user cpx:hammerhead
Update X.509 authorization configuration response
HTTP/1.1 [Response Code] [Response Message] Date: [Date]
Content-Type: [Content Type]
{
"encryption-type": "encryption", "host": "URL",
"port": port,
"base-dn": "string",
"bind-dn": "string",
"bind-pw": "string",
"uiapi-mapping-field": "example-field", "sudo-mapping-field": "example-field", "username-mapping-field": "example-field",
"username-schema-attribute": "example-attribute"
}
Response fields
Response Code—A standard HTTP response code.
Response Message—A standard HTTP response message.
Date—Standard HTML date format.
Content Type—The response format.
Example
HTTP/1.1 200 OK
Date: Wed, 14 May 2019 09:25:38 GMT
Content-Type: application/json; charset=utf-8
{
"encryption-type": "ssl", "host": "www.mydomain.com", "port": 80,
"base-dn": "example",
"bind-dn": "example",
"bind-pw": "example",
"uiapi-mapping-field": "example-field", "sudo-mapping-field": "example-field", "username-mapping-field": "example-field",
"username-schema-attribute": "example-attribute"
}
cURL code sample: Update X.509 authorization configuration
The code sample was run with cURL 7.57.0.
curl -k --user cpx:hammerhead -X PUT https://xxx.xxx.xxx.xxx/api/4.0/config/2fa/x509/authorization
This cURL sample includes the following options:
-k—This option explicitly allows cURL to perform insecure SSL connections and transfers, which allows you to test your SSL connection without installing a CA certificate.
-X PUT—This option specifies using the PUT method.
--user cpx:hammerhead—Replace cpx with the user name for your Series appliance. Replace hammerhead with the password for your Series appliance.
https://xxx.xxx.xxx.xxx/api/4.0/config/2fa/x509/authorization—The X.509 request URL. Replace xxx.xxx.xxx.xxx
with the IP address of your Series appliance.
Results
This example updates the X.509 authorization configuration.
X.509 OSCP configuration request
To list the X.509 OSCP configuration, send the following request:
GET https://<PX_IP_address>/api/4.0/config/2fa/x509/oscp
 Note
Note
To use this request, you must belong to the sudo group.
Required header:
--user <username>:<password>
Options
PX_IP_address—IP address of the Series appliance running the Series API.
username—The user name for your Series appliance.
password—The password for your Series appliance.
Example
GET https://xxx.xxx.xxx.xxx/api/4.0/config/2fa/x509/oscp
Required header:
--user cpx:hammerhead
X.509 OSCP configuration response
HTTP/1.1 [Response Code] [Response Message] Date: [Date]
Content-Type: [Content Type]
{
"verification-url": "URL"
}
Response fields
Response Code—A standard HTTP response code.
Response Message—A standard HTTP response message.
Date—Standard HTML date format.
Content Type—The response format.
Example
HTTP/1.1 200 OK
Date: Wed, 14 May 2019 13:12:08 GMT
Content-Type: application/json; charset=utf-8
{
"verification-url": "www.google.com"
}
cURL code sample: X.509 OSCP configuration
The code sample was run with cURL 7.57.0.
curl -k --user cpx:hammerhead https://xxx.xxx.xxx.xxx/api/4.0/config/2fa/x509/oscp
This cURL sample includes the following options:
-k—This option explicitly allows cURL to perform insecure SSL connections and transfers, which allows you to test your SSL connection without installing a CA certificate.
--user cpx:hammerhead—Replace cpx with the user name for your Series appliance. Replace hammerhead with the password for your Series appliance.
https://xxx.xxx.xxx.xxx/api/4.0/config/2fa/x509/oscp—The X.509 request URL. Replace xxx.xxx.xxx.xxx with the IP address of your Series appliance.
Results
This example returns the X.509 OSCP configuration. The output is in JSON.
Update X.509 OSCP configuration request
To change the X.509 OSCP configuration, send the following request:
PUT https://<PX_IP_address>/api/4.0/config/2fa/x509/oscp
 Note
Note
To use this request, you must belong to the sudo group.
Required header:
--user <username>:<password>
Options
PX_IP_address—IP address of the Series appliance running the Series API.
username—The user name for your Series appliance.
password—The password for your Series appliance.
Request body:
{
"verification-url": "URL"
}
Example
PUT https://xxx.xxx.xxx.xxx/api/4.0/config/2fa/x509/oscp
Required header:
--user cpx:hammerhead
Example request body:
{
"verification-url": "www.example.com"
}
Update X.509 OSCP configuration response
HTTP/1.1 [Response Code] [Response Message] Date: [Date]
Content-Type: [Content Type]
Response fields
Response Code—A standard HTTP response code.
Response Message—A standard HTTP response message.
Date—Standard HTML date format.
Content Type—The response format.
Example
HTTP/1.1 200 OK
Date: Wed, 14 May 2019 13:12:08 GMT
Content-Type: application/json; charset=utf-8
cURL code sample: Update X.509 OSCP configuration
The code sample was run with cURL 7.57.0.
curl -k --user cpx:hammerhead -X PUT https://xxx.xxx.xxx.xxx/api/4.0/config/2fa/x509/oscp
This cURL sample includes the following options:
-k—This option explicitly allows cURL to perform insecure SSL connections and transfers, which allows you to test your SSL connection without installing a CA certificate.
--user cpx:hammerhead—Replace cpx with the user name for your Series appliance. Replace hammerhead with the password for your Series appliance.
-X PUT—This option specifies using the PUT method.
https://xxx.xxx.xxx.xxx/api/4.0/config/2fa/x509/oscp—The X.509 request URL. Replace xxx.xxx.xxx.xxx with the IP address of your Series appliance.
Results
This example updates the X.509 OSCP configuration.
Client CA certificate request
To download the client CA certificate, send the following request:
GET https://<PX_IP_address>/api/4.0/config/2fa/x509/ca
 Note
Note
To use this request, you must belong to the sudo group.
Required header:
--user <username>:<password>
Options
PX_IP_address—IP address of the Series appliance running the Series API.
username—The user name for your Series appliance.
password—The password for your Series appliance.
Example
GET https://xxx.xxx.xxx.xxx/api/4.0/config/2fa/x509/ca
Required header:
--user cpx:hammerhead
Client CA certificate response
HTTP/1.1 [Response Code] [Response Message] Date: [Date]
Content-Type: [Content Type]
Response fields
Response Code—A standard HTTP response code.
Response Message—A standard HTTP response message.
Date—Standard HTML date format.
Content Type—The response format.
Example
HTTP/1.1 200 OK
Date: Wed, 14 May 2019 09:25:18 GMT
Content-Type: application/json; charset=utf-8 [file.crt]
cURL code sample: Client CA certificate
curl -k --user cpx:hammerhead https://xxx.xxx.xxx.xxx/api/4.0/config/2fa/x509/ca
This cURL sample includes the following options:
-k—This option explicitly allows cURL to perform insecure SSL connections and transfers, which allows you to test your SSL connection without installing a CA certificate.
--user cpx:hammerhead—Replace cpx with the user name for your Series appliance. Replace hammerhead with the password for your Series appliance.
https://xxx.xxx.xxx.xxx/api/4.0/config/2fa/x509/ca—The request URL. Replace xxx.xxx.xxx.xxx with the IP address of your Series appliance.
Results
This example downloads the CA certificate.
Delete client CA certificate request
To delete the client CA certificate, send the following request:
DELETE https://<PX_IP_address>/api/4.0/config/2fa/x509/ca
 Note
Note
To use this request, you must belong to the sudo group.
Required header:
--user <username>:<password>
Options
PX_IP_address—IP address of the Series appliance running the Series API.
username—The user name for your Series appliance.
password—The password for your Series appliance.
Example
DELETE https://xxx.xxx.xxx.xxx/api/4.0/config/2fa/x509/ca
Required header:
--user cpx:hammerhead
Delete client CA certificate response
HTTP/1.1 [Response Code] [Response Message] Date: [Date]
Content-Type: [Content Type]
Response fields
Response Code—A standard HTTP response code.
Response Message—A standard HTTP response message.
Date—Standard HTML date format.
Content Type—The response format.
Example
HTTP/1.1 200 OK
Date: Wed, 14 May 2019 09:25:19 GMT
Content-Type: application/json; charset=utf-8
cURL code sample: Delete client CA certificate
curl -k --user cpx:hammerhead -X DELETE https://xxx.xxx.xxx.xxx/api/4.0/config/2fa/x509/ca
This cURL sample includes the following options:
-k—This option explicitly allows cURL to perform insecure SSL connections and transfers, which allows you to test your SSL connection without installing a CA certificate.
--user cpx:hammerhead—Replace cpx with the user name for your Series appliance. Replace hammerhead with the password for your Series appliance.
-X DELETE—This option specifies using the DELETE method.
https://xxx.xxx.xxx.xxx/api/4.0/config/2fa/x509/ca—The request URL. Replace xxx.xxx.xxx.xxx with the IP address of your Series appliance.
Results
This example deletes the CA certificate.
Upload client CA certificate request
To upload a new client CA certificate, send the following request:
POST https://<PX_IP_address>/api/4.0/config/2fa/x509/ca
This endpoint will overwrite any CA certificate that already exists. The uploaded file may be a certificate chain to allow chaining.
 Note
Note
To use this request, you must belong to the sudo group.
Required header:
--user <username>:<password>
Options
PX_IP_address—IP address of the Series appliance running the Series API.
username—The user name for your Series appliance.
password—The password for your Series appliance.
Example
POST https://xxx.xxx.xxx.xxx/api/4.0/config/2fa/x509/ca
Required header:
--user cpx:hammerhead
Upload client CA certificate response
HTTP/1.1 [Response Code] [Response Message] Date: [Date]
Content-Type: [Content Type]
Response fields
Response Code—A standard HTTP response code.
Response Message—A standard HTTP response message.
Date—Standard HTML date format.
Example
HTTP/1.1 200 OK
Date: Wed, 14 May 2019 09:35:08 GMT
[file.crt]
cURL code sample: Upload client CA certificate
curl -k --user cpx:hammerhead https://xxx.xxx.xxx.xxx/api/4.0/config/2fa/x509/ca -F ca=@cert.crt
This cURL sample includes the following options:
-k—This option explicitly allows cURL to perform insecure SSL connections and transfers, which allows you to test your SSL connection without installing a CA certificate.
--user cpx:hammerhead—Replace cpx with the user name for your Series appliance. Replace hammerhead with the password for your Series appliance.
-X POST—This option specifies using the POST method.
https://xxx.xxx.xxx.xxx/api/4.0/config/2fa/x509/ca—The request URL. Replace xxx.xxx.xxx.xxx with the IP address of your Series appliance.
-F ca=@cert.crt—Specifies the CA certificate.
Results
This example uploads a CA certificate.
X.509 CRL configuration request
To list the X.509 CRL configuration, send the following request:
GET https://<PX_IP_address>/api/4.0/config/2fa/x509/crl
 Note
Note
To use this request, you must belong to the sudo group.
Required header:
--user <username>:<password>
Options
PX_IP_address—IP address of the Series appliance running the Series API.
username—The user name for your Series appliance.
password—The password for your Series appliance.
Example
GET https://xxx.xxx.xxx.xxx/api/4.0/config/2fa/x509/crl
Required header:
--user cpx:hammerhead
X.509 CRL configuration response
HTTP/1.1 [Response Code] [Response Message] Date: [Date]
Content-Type: [Content Type]
{
"retrieval-interval": int, "enable-retrieval": Boolean, "retrieval-url": "URL"
}
Response fields
Response Code—A standard HTTP response code.
Response Message—A standard HTTP response message.
Date—Standard HTML date format.
Content Type—The response format.
Example
HTTP/1.1 200 OK
Date: Wed, 14 May 2019 14:09:08 GMT
Content-Type: application/json; charset=utf-8
{
"retrieval-interval": 3, "enable-retrieval": true,
"retrieval-url": "www.google.com"
}
cURL code sample: X.509 CRL configuration
The code sample was run with cURL 7.57.0.
curl -k --user cpx:hammerhead https://xxx.xxx.xxx.xxx/api/4.0/config/2fa/x509/crl
This cURL sample includes the following options:
-k—This option explicitly allows cURL to perform insecure SSL connections and transfers, which allows you to test your SSL connection without installing a CA certificate.
--user cpx:hammerhead—Replace cpx with the user name for your Series appliance. Replace hammerhead with the password for your Series appliance.
https://xxx.xxx.xxx.xxx/api/4.0/config/2fa/x509/crl—The X.509 request URL. Replace xxx.xxx.xxx.xxx with the IP address of your Series appliance.
Results
This example returns the X.509 CRL configuration. The output is in JSON.
Update X.509 CRL configuration request
To update the X.509 CRL configuration, send the following request:
PUT https://<PX_IP_address>/api/4.0/config/2fa/x509/crl
You can provide the new JSON configuration, CRL file, or both.
 Note
Note
To use this request, you must belong to the sudo group.
Required header:
--user <username>:<password>
Options
PX_IP_address—IP address of the Series appliance running the Series API.
username—The user name for your Series appliance.
password—The password for your Series appliance.
Request body:
{
"retrieval-interval": 20, "enable-retrieval": true,
"retrieval-url": "www.google.com"
}
Example
PUT https://xxx.xxx.xxx.xxx/api/4.0/config/2fa/x509/crl
Required header:
--user npadmin:hammerhead
Example request body:
{
"retrieval-interval": 20, "enable-retrieval": true,
"retrieval-url": "www.google.com"
}
Update X.509 CRL configuration response
HTTP/1.1 [Response Code] [Response Message] Date: [Date]
Response fields
Response Code—A standard HTML response code.
Response Message—A standard HTML response message.
Date—Standard HTML date format.
Example
HTTP/1.1 200 OK
Date: Tue, 14 May 2019 15:13:29 GMT
cURL code sample: Update X.509 CRL configuration
The code sample was run with cURL 7.57.0.
curl -k -u npadmin:hammerhead https://<ip>/api/4.0/config/2fa/x509/crl -X PUT -F 'config=<json data>' -F crt=@file.crl
This cURL sample includes the following options:
--user npadmin:hammerhead—Replace npadmin with the user name for your Series appliance. Replace hammerhead with the password for your Series appliance.
https://xxx.xxx.xxx.xxx/api/4.0/config/2fa/x509/crl—The X.509 request URL. Replace xxx.xxx.xxx.xxx with the IP address of your Series appliance.
-k—This option explicitly allows cURL to perform insecure SSL connections and transfers, which allows you to test your SSL connection without installing a CA certificate.
-X PUT—This option specifies using the PUT method.
-F 'config=<json data>'—Specifies the JSON configuration.
-F crt=@file.crl—Specifies the CRL file.
Results
This example updates the X.509 CRL configuration.
X.509 CRL certificate request
To download the X.509 CRL certificate, send the following request:
GET https://<PX_IP_address>/api/4.0/config/2fa/x509/crl/file
 Note
Note
To use this request, you must belong to the sudo group.
Required header:
--user <username>:<password>
Options
PX_IP_address—IP address of the Series appliance running the Series API.
username—The user name for your Series appliance.
password—The password for your Series appliance.
Example
GET https://xxx.xxx.xxx.xxx/api/4.0/config/2fa/x509/crl/file
Required header:
--user cpx:hammerhead
X.509 CRL certificate response
HTTP/1.1 [Response Code] [Response Message] Date: [Date]
[file.crl]
Response fields
Response Code—A standard HTTP response code.
Response Message—A standard HTTP response message.
Date—Standard HTML date format.
Example
HTTP/1.1 200 OK
Date: Wed, 14 May 2019 14:09:08 GMT
[file.crl]
cURL code sample: X.509 CRL certificate
The code sample was run with cURL 7.57.0.
curl -k --user cpx:hammerhead https://xxx.xxx.xxx.xxx/api/4.0/config/2fa/x509/crl/file
This cURL sample includes the following options:
-k—This option explicitly allows cURL to perform insecure SSL connections and transfers, which allows you to test your SSL connection without installing a CA certificate.
--user cpx:hammerhead—Replace cpx with the user name for your Series appliance. Replace hammerhead with the password for your Series appliance.
https://xxx.xxx.xxx.xxx/api/4.0/config/2fa/x509/crl/file—The X.509 request URL. Replace xxx.xxx.xxx.xxx with the IP address of your Series appliance.
Results
This example downloads the X.509 CRL certificate.
Delete CRL certificate request
To delete the CRL certificate, send the following request:
DELETE https://<PX_IP_address>/api/4.0/config/2fa/x509/crl/file
 Note
Note
To use this request, you must belong to the sudo group.
Required header:
--user <username>:<password>
Options
PX_IP_address—IP address of the Series appliance running the Series API.
username—The user name for your Series appliance.
password—The password for your Series appliance.
Example
DELETE https://xxx.xxx.xxx.xxx/api/4.0/config/2fa/x509/crl/file
Required header:
--user cpx:hammerhead
Delete CRL certificate response
HTTP/1.1 [Response Code] [Response Message] Date: [Date]
Content-Type: [Content Type]
Response fields
Response Code—A standard HTTP response code.
Response Message—A standard HTTP response message.
Date—Standard HTML date format.
Content Type—The response format.
Example
HTTP/1.1 200 OK
Date: Wed, 14 May 2019 09:25:19 GMT
Content-Type: application/json; charset=utf-8
cURL code sample: Delete CRL certificate
curl -k --user cpx:hammerhead -X DELETE https://xxx.xxx.xxx.xxx/api/4.0/config/2fa/x509/crl/file
This cURL sample includes the following options:
-k—This option explicitly allows cURL to perform insecure SSL connections and transfers, which allows you to test your SSL connection without installing a CA certificate.
--user cpx:hammerhead—Replace cpx with the user name for your Series appliance. Replace hammerhead with the password for your Series appliance.
-X DELETE—This option specifies using the DELETE method.
https://xxx.xxx.xxx.xxx/api/4.0/config/2fa/x509/crl/file—The request URL. Replace xxx.xxx.xxx.xxx with the IP address of your Series appliance.
Results
This example deletes the CRL certificate.
Upload CRL certificate request
To upload a new CRL certificate, send the following request:
POST https://<PX_IP_address>/api/4.0/config/2fa/x509/crl/file
This endpoint will overwrite any CRL certificate that already exists.
 Note
Note
To use this request, you must belong to the sudo group.
Required header:
--user <username>:<password>
Options
PX_IP_address—IP address of the Series appliance running the Series API.
username—The user name for your Series appliance.
password—The password for your Series appliance.
Example
POST https://xxx.xxx.xxx.xxx/api/4.0/config/2fa/x509/crl/file
Required header:
--user cpx:hammerhead
Upload CRL certificate response
HTTP/1.1 [Response Code] [Response Message] Date: [Date]
Response fields
Response Code—A standard HTTP response code.
Response Message—A standard HTTP response message.
Date—Standard HTML date format.
Example
HTTP/1.1 200 OK
Date: Wed, 14 May 2019 09:35:08 GMT
cURL code sample: Upload CRL certificate
curl -k --user cpx:hammerhead -X POST https://xxx.xxx.xxx.xxx/api/4.0/config/2fa/x509/crl/file -F crl=@certs.crl
This cURL sample includes the following options:
-k—This option explicitly allows cURL to perform insecure SSL connections and transfers, which allows you to test your SSL connection without installing a CA certificate.
--user cpx:hammerhead—Replace cpx with the user name for your Series appliance. Replace hammerhead with the password for your Series appliance.
-X POST—This option specifies using the POST method.
https://xxx.xxx.xxx.xxx/api/4.0/config/2fa/x509/crl/file—The request URL. Replace xxx.xxx.xxx.xxx with the IP address of your Series appliance.
-F crl=@certs.crl—Specifies the CRL certificate.
Results
This example uploads a CRL certificate.
Refresh CRL certificate request
To refresh the CRL certificate with a new file from the configured URL, send the following request:
POST https://<PX_IP_address>/api/4.0/config/2fa/x509/crl/file/refresh
This endpoint will overwrite any CRL certificate that was manually uploaded.
 Note
Note
To use this request, you must belong to the sudo group.
Required header:
--user <username>:<password>
Options
PX_IP_address—IP address of the Series appliance running the Series API.
username—The user name for your Series appliance.
password—The password for your Series appliance.
Example
POST https://xxx.xxx.xxx.xxx/api/4.0/config/2fa/x509/crl/file/refresh
Required header:
--user cpx:hammerhead
Refresh CRL certificate response
HTTP/1.1 [Response Code] [Response Message] Date: [Date]
Response fields
Response Code—A standard HTTP response code.
Response Message—A standard HTTP response message.
Date—Standard HTML date format.
Example
HTTP/1.1 200 OK
Date: Wed, 14 May 2019 09:49:08 GMT
cURL code sample: Refresh CRL certificate
curl -k --user cpx:hammerhead -X POST https://xxx.xxx.xxx.xxx/api/4.0/config/2fa/x509/crl/file/refresh
This cURL sample includes the following options:
-k—This option explicitly allows cURL to perform insecure SSL connections and transfers, which allows you to test your SSL connection without installing a CA certificate.
--user cpx:hammerhead—Replace cpx with the user name for your Series appliance. Replace hammerhead with the password for your Series appliance.
-X POST—This option specifies using the POST method.
https://xxx.xxx.xxx.xxx/api/4.0/config/2fa/x509/crl/file/refresh—The request URL. Replace xxx.xxx.xxx.xxx
with the IP address of your Series appliance.
Results
This example refreshes the current CRL certificate.
Users
The users endpoints allow you to add, remove, list, and update user accounts:
GET https://<PX_IP_address>/api/4.0/config/users
POST https://<PX_IP_address>/api/4.0/config/users
GET https://<PX_IP_address>/api/4.0/config/users/<username>
PUT https://<PX_IP_address>/api/4.0/config/users/<username>
DELETE https://<PX_IP_address>/api/4.0/config/users/<username>
GET https://<PX_IP_address>/api/4.0/ui/profile/<username>
List users request
To list all appliance users, send the following request:
GET https://<PX_IP_address>/api/4.0/config/users
Required header:
--user <username>:<password>
Options
PX_IP_address—IP address of the Series appliance running the Series API.
username—The user name for your Series appliance.
password—The password for your Series appliance.
Example
GET https://xxx.xxx.xxx.xxx/api/4.0/config/users
Required header:
--user cpx:hammerhead
List users response
HTTP/1.1 [Response Code] [Response Message] Date: [Date]
Content-Type: [Content Type]
username: [User Name] name: [Full Name] groups: [Groups]
Response fields
Response Code—A standard HTTP response code.
Response Message—A standard HTTP response message.
Date—Standard HTML date format.
Content Type—The response format.
User Name—The user name for a Series appliance.
Full Name—The full name of a user.
Groups—Groups of Series appliance users.
Example
HTTP/1.1 200 OK
Date: Tue, 24 Jan 2017 18:57:04 GMT
Content-Type: application/json; charset=utf-8
[
{
"username": "jdoe",
"name": "Jane Doe", "groups": [
"jdoe",
"sudo",
"klish", "uiapi"
]
},
{
"username": "jsmith", "name": "Jim Smith", "groups": [
"jsmith", "uiapi"
]
},
{
"username": "msmith", "name": "Mary Smith", "groups": [
"msmith", "uiapi"
]
}
]
cURL code sample: List users
The code sample was run with cURL 7.57.0.
curl -k --user cpx:hammerhead https://xxx.xxx.xxx.xxx/api/4.0/config/users
This cURL sample includes the following options:
-k—This option explicitly allows cURL to perform insecure SSL connections and transfers, which allows you to test your SSL connection without installing a CA certificate.
--user cpx:hammerhead—Replace cpx with the user name for your Series appliance. Replace hammerhead with the password for your Series appliance.
https://xxx.xxx.xxx.xxx/api/4.0/config/users—The users request URL. Replace xxx.xxx.xxx.xxx with the IP address of your Series appliance.
Results
This example returns a list of all Series appliance users. The output is in JSON.
New user request
To add a user to the appliance, send the following request:
POST https://<PX_IP_address>/api/4.0/config/users
 Note
Note
To use this request, you must belong to the sudo group.
Required header:
--user <username>:<password>
Request body:
{
user: 'TEXT',
name: 'TEXT',
group: 'TEXT', password: 'TEXT' remote: true|false
}
Options
PX_IP_address—IP address of the Series appliance running the Series API.
username—The user name of the administrator for your Series appliance.
password—The password for your Series appliance.
Parameters
user—The user name for a Series appliance. The user may be a remote user.
name—The full name of the new user.
group—A group of Series appliance users that will include the new user. Valid values are uiapi, klish, and sudo. You can
specify multiple groups.
password—The password for the new user. Do not supply a password if the user is remote.
remote—Boolean. True if user is a remote user.
Example
POST https://xxx.xxx.xxx.xxx/api/4.0/config/users
Required header:
--user npadmin:hammerhead
Request body:
{
user: jdoe, name: Jane Doe, group: sudo,
password: abcdef12345
}
New user response
HTTP/1.1 [Response Code] [Response Message] Date: [Date]
Content-Type: [Content Type]
username: [User Name] name: [Full Name] groups: [Groups]
Response fields
Response Code—A standard HTTP response code.
Response Message—A standard HTTP response message.
Date—Standard HTML date format.
Content Type—The response format.
User Name—The user name for a Series appliance.
Full Name—The full name that corresponds to the user name.
Groups—Groups of Series appliance users that include the new user.
Example
HTTP/1.1 100 Continue
HTTP/1.1 200 OK
Date: Tue, 24 Jan 2017 18:38:24 GMT
Content-Type: application/json; charset=utf-8
{
"username": "jdoe",
"name": "Jane Doe", "groups": [
"jdoe", "sudo"
]
}
cURL code sample: New user
The code sample was run with cURL 7.57.0.
curl -k --user npadmin:hammerhead https://xxx.xxx.xxx.xxx/api/4.0/config/users -X POST -F user=jsmith
-F "name=Jim Smith" -F group=uiapi -F password=a8Cb2cdH2eJ7f@ -F remote=false
 Note
Note
The code sample for creating a dummy user is:
curl -k --user npadmin:hammerhead https://xxx.xxx.xxx.xxx/api/4.0/config/users -X POST -F "user=dummy1" -F "name=Dummy One" -F "group=uiapi" -F "remote=true"
This cURL sample includes the following options:
-k—This option explicitly allows cURL to perform insecure SSL connections and transfers, which allows you to test your SSL connection without installing a CA certificate.
--user npadmin:hammerhead—Replace npadmin with the user name of the administrator for your Series appliance. Replace
hammerhead with the password for your Series appliance.
https://xxx.xxx.xxx.xxx/api/4.0/config/users—The users request URL. Replace xxx.xxx.xxx.xxx with the IP address of your Series appliance.
-X POST—This option specifies using the POST method.
-F user=jsmith—This option specifies the user name of the new user.
-F "name=Jim Smith"—This option specifies the full name of the new user.
-F group=uiapi—This option specifies a group that will include the new user.
-F password=a8Cb2cdH2eJ7f@—This option specifies the password for the new user.
-F remote=false—This option specifies a local user.
Results
This example adds a user to the Series appliance. The output is in JSON.
User details request
To get details about a specific Series appliance user, send the following request:
GET https://<PX_IP_address>/api/4.0/config/users/<username>
Required header:
--user <username>:<password>
Options
PX_IP_address—IP address of the Series appliance running the Series API.
username—The user name for your Series appliance.
password—The password for your Series appliance.
Example
GET https://xxx.xxx.xxx.xxx/api/4.0/config/users/jdoe
Required header:
--user cpx:hammerhead
User details response
HTTP/1.1 [Response Code] [Response Message] Date: [Date]
Content-Type: [Content Type]
username: [User Name] name: [Full Name] groups: [Groups]
Response fields
Response Code—A standard HTTP response code.
Response Message—A standard HTTP response message.
Date—Standard HTML date format.
Content Type—The response format.
User Name—The user name for a Series appliance.
Full Name—The full name of a user.
Groups—Groups of Series appliance users that include the specified user.
Example
HTTP/1.1 200 OK
Date: Tue, 24 Jan 2017 18:58:06 GMT
Content-Type: application/json; charset=utf-8
{
"username": "jdoe",
"name": "Jane Doe", "groups": [
"jdoe",
"sudo",
"klish", "uiapi"
]
}
cURL code sample: User details
The code sample was run with cURL 7.57.0.
curl -k --user cpx:hammerhead https://xxx.xxx.xxx.xxx/api/4.0/config/users/jdoe
This cURL sample includes the following options:
-k—This option explicitly allows cURL to perform insecure SSL connections and transfers, which allows you to test your SSL connection without installing a CA certificate.
--user cpx:hammerhead—Replace cpx with the user name for your Series appliance. Replace hammerhead with the password for your Series appliance.
https://xxx.xxx.xxx.xxx/api/4.0/config/users/jdoe—The users request URL. Replace xxx.xxx.xxx.xxx with the IP address of your Series appliance. Replace jdoe with the user name of the user of interest.
Results
This example returns details about the specified Series appliance user. The output is in JSON.
Update a user request
To update a user of the appliance, send the following request:
PUT https://<PX_IP_address>/api/4.0/config/users/<username>
 Note
Note
To use this request, you must belong to the sudo group.
Required header:
--user <username>:<password>
Request body:
{
name: 'TEXT', group: 'TEXT'
}
Options
PX_IP_address—IP address of the appliance running the Series API.
username—The user name of the administrator for your appliance.
password—The password for your appliance.
Parameters
name—Optional. The full name of the user.
group—Optional. A group of appliance users to add the user to. Valid values are uiapi, klish, and sudo. You can specify multiple groups.
Example
PUT https://xxx.xxx.xxx.xxx/api/4.0/config/users/jsmith
Required header:
--user npadmin:hammerhead
Request body:
{
name: Jane Doe, group: sudo
}
Update a user response
HTTP/1.1 [Response Code] [Response Message] Date: [Date]
Content-Type: [Content Type]
username: [User Name] name: [Full Name] groups: [Groups]
Response fields
Response Code—A standard HTTP response code.
Response Message—A standard HTTP response message.
Date—Standard HTML date format.
Content Type—The response format.
User Name—The user name for a appliance.
Full Name—The full name of a user.
Groups—Groups of appliance users that include the new user.
Example
HTTP/1.1 100 Continue
HTTP/1.1 200 OK
Date: Tue, 24 Jan 2017 21:29:13 GMT
Content-Type: application/json; charset=utf-8
{
"username": "jdoe",
"name": "Jane Doe", "groups": [
"jdoe", "sudo"
]
}
cURL code sample: Update a user
The code sample was run with cURL 7.57.0.
curl https://xxx.xxx.xxx.xxx/api/4.0/config/users/jsmith -k -X PUT
-F "name=John Smith" -F group=sudo --user npadmin:hammerhead
This cURL sample includes the following options:
https://xxx.xxx.xxx.xxx/api/4.0/config/users/jsmith—The users request URL. Replace xxx.xxx.xxx.xxx with the IP address of your Series appliance. Replace jsmith with the user name of the user to update.
-k—This option explicitly allows cURL to perform insecure SSL connections and transfers, which allows you to test your SSL connection without installing a CA certificate.
-X PUT—This option specifies using the PUT method.
-F "name=John Smith"—This option specifies the full name of the user.
-F group=sudo—This option specifies a group to add the user to.
--user npadmin:hammerhead—Replace npadmin with the user name of the administrator for your Series appliance. Replace
hammerhead with the password for your Series appliance.
Results
This example updates the full name of a user and adds the user to a group. The output is in JSON.
Remove a user request
To remove a appliance user, send the following request:
DELETE https://<PX_IP_address>/api/4.0/config/users/<username>
 Note
Note
To use this request, you must belong to the sudo group.
Required header:
--user <username>:<password>
Options
PX_IP_address—IP address of the appliance running the Series API.
username—The user name of the administrator for your appliance.
password—The password for your appliance.
Example
DELETE https://xxx.xxx.xxx.xxx/api/4.0/config/users/jsmith
Required header:
--user npadmin:hammerhead
Remove a user response
HTTP/1.1 [Response Code] [Response Message] Date: [Date]
Content-Type: [Content Type]
status: [Status] message: [Message]
Response fields
Response Code—A standard HTTP response code.
Response Message—A standard HTTP response message.
Date—Standard HTML date format.
Content Type—The response format.
Status—The status of the request.
Message—The result of the request.
Example
HTTP/1.1 200 OK
Date: Tue, 24 Jan 2017 21:30:31 GMT
Content-Type: application/json; charset=utf-8
{
"status": "OK",
"message": "Succesfully deleted jsmith"
}
cURL code sample: Remove a user
The code sample was run with cURL 7.57.0.
curl -k --user npadmin:hammerhead https:///xxx.xxx.xxx.xxx/api/4.0/config/users/msmith -X DELETE
This cURL sample includes the following options:
-k—This option explicitly allows cURL to perform insecure SSL connections and transfers, which allows you to test your SSL connection without installing a CA certificate.
--user npadmin:hammerhead—Replace npadmin with the user name of the administrator for your Series appliance. Replace
hammerhead with the password for your Series appliance.
https://xxx.xxx.xxx.xxx/api/4.0/config/users/msmith—The users request URL. Replace xxx.xxx.xxx.xxx with the IP address of your Series appliance. Replace msmith with the user name of the user to remove.
-X DELETE—This option specifies using the DELETE method.
Results
This example removes the specified Series appliance user. The output is in JSON.
User profile request
To retrieve your user profile, send the following request:
GET https://<PX_IP_address>/api/4.0/ui/profile/<username>
 Note
Note
You can request the profile only of the user you have used for authentication unless you are an administrator.
Required header:
--user <username>:<password>
Options
PX_IP_address—IP address of the appliance running the Series API.
username—The user name for your appliance.
password—The password for your appliance.
Example
GET https://xxx.xxx.xxx.xxx/api/4.0/ui/profile/cpx
Required header:
--user cpx:hammerhead
User profile response
HTTP/1.1 [Response Code] [Response Message] Date: [Date]
Content-Type: [Content Type]
dateformat: [Date Format] timeformat: [Time Format] theme: [Theme]
layout: [Layout]
logouttimeout: [Timeout Minutes] displaytime: [Display Time]
Response fields
Response Code—A standard HTTP response code.
Response Message—A standard HTTP response message.
Date—Standard HTML date format.
Content Type—The response format.
Date Format—Date format for input.
Time Format—Time format for input.
Theme—Theme color for the Web UI.
Layout—Not applicable.
Timeout Minutes—Number of minutes before the connection is terminated.
Display Time—Seconds since epoch (UTC) on the appliance.
Example
HTTP/1.1 200 OK
Date: Wed, 25 Jan 2017 19:37:57 GMT
Content-Type: application/json; charset=utf-8
{
"dateformat": "MM/DD/YYYY", "timeformat": "HH:mm:ss",
"theme": "light",
"layout": "", "logouttimeout": 15,
"displaytime": -240
}
cURL code sample: User profile
The code sample was run with cURL 7.57.0.
curl -k --user cpx:hammerhead https://xxx.xxx.xxx.xxx/api/4.0/ui/profile/cpx
This cURL sample includes the following options:
-k—This option explicitly allows cURL to perform insecure SSL connections and transfers, which allows you to test your SSL connection without installing a CA certificate.
--user cpx:hammerhead—Replace cpx with the user name for your appliance. Replace hammerhead with the password for your Series appliance.
https://xxx.xxx.xxx.xxx/api/4.0/ui/profile/cpx—The users request URL. Replace xxx.xxx.xxx.xxx with the IP address of your appliance. Replace cpx with the user name for your appliance.
Results
This example returns your user profile. The output is in JSON.
Backup and restore
 Note
Note
This feature is not designed for RMA scenarios.
The backup and restore endpoints allow you to back up the system configuration before patches and upgrades and restore an earlier version if needed:
GET https://<PX_IP_address>/api/4.0/config/backups
GET https://<PX_IP_address>/api/4.0/config/backups/generate
GET https://<PX_IP_address>/api/4.0/config/backups/<id>
POST https://<PX_IP_address>/api/4.0/config/backups
DELETE https://<PX_IP_address>/api/4.0/config/backups/<id>
GET https://<PX_IP_address>/api/4.0/config/backups/<id>/restore
List backup files request
To list all backup files, send the following request:
GET https://<PX_IP_address>/api/4.0/config/backups
Required header:
--user <username>:<password>
Options
PX_IP_address—IP address of the Series appliance running the Series API.
username—The user name for your Series appliance.
password—The password for your Series appliance.
Example
GET https://xxx.xxx.xxx.xxx/api/4.0/config/backups
Required header:
--user cpx:hammerhead
List backup files response
HTTP/1.1 [Response Code] [Response Message] Date: [Date]
Content-Type: [Content Type]
backupID: [Backup ID] filename: [Backup File Name]
filepath: [Backup File Path] createTime: [Create Time]
Response fields
Response Code—A standard HTTP response code.
Response Message—A standard HTTP response message.
Date—Standard HTML date format.
Content Type—The response format.
Backup ID—Backup identifier.
Backup File Name—Name of the backup file.
Backup File Path—Location of the backup file.
Create Time—Time when the backup file was created.
Example
HTTP/1.1 200 OK
Date: Wed, 25 Jan 2017 22:35:34 GMT
Content-Type: application/json; charset=utf-8
[
{
"backupID": "1489990230",
"filename": "1489990230.tar.gz",
"filepath": "/data/backup/ROOT1/1489990230.tar.gz", "createTime": "2017-03-20 02:10:30 -0400 EDT"
},
{
"backupID": "1490010808",
"filename": "1490010808.tar.gz",
"filepath": "/data/backup/ROOT1/1490010808.tar.gz", "createTime": "2017-03-20 07:53:28 -0400 EDT"
},
]
cURL code sample: List backup files
The code sample was run with cURL 7.57.0.
curl -k --user cpx:hammerhead https://xxx.xxx.xxx.xxx/api/4.0/config/backups
This cURL sample includes the following options:
-k—This option explicitly allows cURL to perform insecure SSL connections and transfers, which allows you to test your SSL connection without installing a CA certificate.
--user cpx:hammerhead—Replace cpx with the user name for your Series appliance. Replace hammerhead with the password for your Series appliance.
https://xxx.xxx.xxx.xxx/api/4.0/config/backups—The backup and restore request URL. Replace xxx.xxx.xxx.xxx with the IP address of your Series appliance.
Results
This example returns a list of all backup files. The output is in JSON.
Create a backup file request
To back up the system configuration of a Series appliance, send the following request:
GET https://<PX_IP_address>/api/4.0/config/backups/generate
 Note
Note
To use this request, you must belong to the sudo group.
Required header:
--user <username>:<password>
Options
PX_IP_address—IP address of the Series appliance running the Series API.
username—The user name for your Series appliance.
password—The password for your Series appliance.
Example
GET https://xxx.xxx.xxx.xxx/api/4.0/config/backups/generate
Required header:
--user npadmin:hammerhead
Create a backup file response
HTTP/1.1 [Response Code] [Response Message] Date: [Date]
Content-Type: [Content Type]
backupID: [Backup ID] filename: [Backup File Name] filepath: [Backup File Path]
Response fields
Response Code—A standard HTTP response code.
Response Message—A standard HTTP response message.
Date—Standard HTML date format.
Content Type—The response format.
Backup ID—Backup identifier.
Backup File Name—Name of the backup file.
Backup File Path—Location of the backup file.
Example
HTTP/1.1 200 OK
Date: Wed, 25 Jan 2017 22:34:50 GMT
Content-Type: application/json; charset=utf-8
{
"backupID": "a00cef8e", "filename": "a00cef8e.tar.gz",
"filepath": "/data/backup/ROOT1/a00cef8e.tar.gz"
}
cURL code sample: Create a backup
The code sample was run with cURL 7.57.0.
curl -k --user npadmin:hammerhead https://xxx.xxx.xxx.xxx/api/4.0/config/backups/generate
This cURL sample includes the following options:
-k—This option explicitly allows cURL to perform insecure SSL connections and transfers, which allows you to test your SSL connection without installing a CA certificate.
--user npadmin:hammerhead—Replace npadmin with the user name for your Series appliance. Replace hammerhead with the password for your Series appliance.
https://xxx.xxx.xxx.xxx/api/4.0/config/backups/generate—The backup request URL. Replace xxx.xxx.xxx.xxx with the IP address of your Series appliance.
Results
This example backs up the system configuration of a Series appliance. The output is in JSON.
Download a backup file request
To download a backup file to your local machine, send the following request:
GET https://<PX_IP_address>/api/4.0/config/backups/<id>
 Note
Note
To use this request, you must belong to the sudo group.
Required header:
--user <username>:<password>
Options
PX_IP_address—IP address of the Series appliance running the Series API.
id—Backup identifier.
username—The user name for your Series appliance.
password—The password for your Series appliance.
Example
GET https://xxx.xxx.xxx.xxx/api/4.0/config/backups/368728c4
Required header:
--user npadmin:hammerhead
Download a backup file response
% Total: [Total Percentage]
% Received: [Percentage Received]
% Xferd: [Percentage Transferred] Average Dload: [Download Speed] Speed Upload: [Upload Speed]
Time Total: [Total Time] Time Spent: [Time Spent] Time Left: [Time Left]
Current Speed: [Current Speed]
Response fields
Total Percentage—How much of the file was downloaded.
Percentage Received—How much of the file was received.
Percentage Transferred—How much of the file was transferred.
Download Speed—Average download speed.
Upload Speed—Average upload speed.
Total Time—Time required for downloading the file.
Time Spent—How much time has been spent downloading the file.
Time Left—How much time it will take to finish downloading the file.
Current Speed—Current download speed.
Example
% Total % Received % Xferd Average Speed Time Time Time Current
Dload Upload Total Spent Left Speed
100 74 100 74 0 0 149 0
--:--:-- --:--:-- --:--:-- 188
cURL code sample: Download a backup file
The code sample was run with cURL 7.57.0.
curl -k --user npadmin:hammerhead https://xxx.xxx.xxx.xxx/api/4.0/config/backups/<backupID> -o 1586875291.tar.gz
This cURL sample includes the following options:
-k—This option explicitly allows cURL to perform insecure SSL connections and transfers, which allows you to test your SSL connection without installing a CA certificate.
--user npadmin:hammerhead—Replace npadmin with the user name for your Series appliance. Replace hammerhead with the password for your Series appliance.
https://xxx.xxx.xxx.xxx/api/4.0/config/backups/368728c4—The backup and restore request URL. Replace
xxx.xxx.xxx.xxx with the IP address of your Series appliance. Replace 368728c4 with the backup identifier of interest.
> 368728c4.tar.gz—This option specifies the file name for the downloaded backup file.
Results
This example downloads the specified backup file to your local machine.
Upload a backup file request
To upload an existing backup file from your local machine to a Series appliance, send the following request:
POST https://<PX_IP_address>/api/4.0/config/backups
 Note
Note
To use this request, you must belong to the sudo group.
Required header:
--user <username>:<password>
Request body:
{
filename: 'TEXT'
}
Options
PX_IP_address—IP address of the Series appliance running the Series API.
username—The user name for your Series appliance.
password—The password for your Series appliance.
Parameter
filename—Name of an existing backup file.
Example
POST https://xxx.xxx.xxx.xxx/api/4.0/config/backups
Required header:
--user npadmin:hammerhead
Request body:
{
filename: 'a00cef8e.tar.gz'
}
Upload a backup file response
HTTP/1.1 [Response Code] [Response Message] Date: [Date]
Content-Type: [Content Type]
backupID: [Backup ID] filename: [Backup File Name] filepath: [Backup File Path]
Response fields
Response Code—A standard HTTP response code.
Response Message—A standard HTTP response message.
Date—Standard HTML date format.
Content Type—The response format.
Backup ID—Backup identifier.
Backup File Name—Name of the backup file.
Backup File Path—Location of the backup file name.
Example
HTTP/1.1 200 OK
Date: Wed, 01 Mar 2017 23:11:49 GMT
Content-Type: application/json; charset=utf-8
{
"backupID": "645f0117", "filename": "645f0117.tar.gz",
"filepath": "/data/backup/ROOT1/645f0117.tar.gz"
}
cURL code sample: Upload a backup file
The code sample was run with cURL 7.57.0.
curl -k --user npadmin:hammerhead https://xxx.xxx.xxx.xxx/api/4.0/config/backups -X POST
--data-binary @a00cef8e.tar.gz
This cURL sample includes the following options:
-k—This option explicitly allows cURL to perform insecure SSL connections and transfers, which allows you to test your SSL connection without installing a CA certificate.
--user npadmin:hammerhead—Replace npadmin with the user name for your Series appliance. Replace hammerhead with the password for your Series appliance.
https://xxx.xxx.xxx.xxx/api/4.0/config/backups—The backup and restore request URL. Replace xxx.xxx.xxx.xxx with the IP address of your Series appliance.
-X POST—This option specifies using the POST method.
--data-binary "@a00cef8e.tar.gz"—This option specifies which backup file to upload.
Results
This example uploads an existing backup file from your local machine to a Series appliance. The output is in JSON.
Delete a backup file request
To delete a backup file, send the following request:
DELETE https://<PX_IP_address>/api/4.0/config/backups/<id>
 Note
Note
To use this request, you must belong to the sudo group.
Required header:
--user <username>:<password>
Options
PX_IP_address—IP address of the Series appliance running the Series API.
id—Backup identifier.
username—The user name for your Series appliance.
password—The password for your Series appliance.
Example
DELETE https://xxx.xxx.xxx.xxx/api/4.0/config/backups/368728c4
Required header:
--user npadmin:hammerhead
Delete a backup file response
HTTP/1.1 [Response Code] [Response Message] Date: [Date]
Content-Type: [Content Type]
backupID: [Backup ID] filename: [Backup File Name] filepath: [Backup File Path] createTime: [Create Time]
Response fields
Response Code—A standard HTTP response code.
Response Message—A standard HTTP response message.
Date—Standard HTML date format.
Content Type—The response format.
Backup ID—Backup identifier.
Backup File Name—Name of the backup file.
Backup File Path—Location of the backup file.
Create Time—Time when the backup file was created.
Example
HTTP/1.1 200 OK
Date: Wed, 25 Jan 2017 22:35:34 GMT
Content-Type: application/json; charset=utf-8
[
{
"backupID": "1489990230",
"filename": "1489990230.tar.gz",
"filepath": "/data/backup/ROOT1/1489990230.tar.gz", "createTime": "2017-03-20 02:10:30 -0400 EDT"
},
{
"backupID": "1490010808",
"filename": "1490010808.tar.gz",
"filepath": "/data/backup/ROOT1/1490010808.tar.gz", "createTime": "2017-03-20 07:53:28 -0400 EDT"
},
]
cURL code sample: Delete a backup file
The code sample was run with cURL 7.57.0.
curl -k --user npadmin:hammerhead https:///xxx.xxx.xxx.xxx/api/4.0/config/backups/368728c4 -X DELETE
This cURL sample includes the following options:
-k—This option explicitly allows cURL to perform insecure SSL connections and transfers, which allows you to test your SSL connection without installing a CA certificate.
--user npadmin:hammerhead—Replace npadmin with the user name for your Series appliance. Replace hammerhead with the password for your Series appliance.
https://xxx.xxx.xxx.xxx/api/4.0/config/backups/368728c4—The backup and restore request URL. Replace
xxx.xxx.xxx.xxx with the IP address of your Series appliance. Replace 368728c4 with the backup identifier of interest.
-X DELETE—This option specifies using the DELETE method.
Results
This example deletes the specified backup file,. The output is in JSON.
Restore the system configuration request
To restore the system configuration, send the following request:
GET https://<PX_IP_address>/api/4.0/config/backups/<id>/restore
 Note
Note
To use this request, you must belong to the sudo group.
Required header:
--user <username>:<password>
Options
PX_IP_address—IP address of the Series appliance running the Series API.
id—Backup identifier.
username—The user name for your Series appliance.
password—The password for your Series appliance.
Example
GET https://xxx.xxx.xxx.xxx/api/4.0/config/backups/05dba74e/restore
Required header:
--user npadmin:hammerhead
Restore the system configuration response
HTTP/1.1 [Response Code] [Response Message] Date: [Date]
Content-Type: [Content Type]
message: [Message]
Response fields
Response Code—A standard HTTP response code.
Response Message—A standard HTTP response message.
Date—Standard HTML date format.
Content-Type—The response format.
message—The result of the request.
Example
HTTP/1.1 200 OK
Date: Wed, 25 Jan 2017 22:48:17 GMT
Content-Type: application/json; charset=utf-8
{
"message": "Backup applied. You may now restart your PX"
}
cURL code sample: Restore the system configuration
The code sample was run with cURL 7.57.0.
curl -k --user npadmin:hammerhead https://xxx.xxx.xxx.xxx/api/4.0/config/backups/05dba74e/restore
This cURL sample includes the following options:
-k—This option explicitly allows cURL to perform insecure SSL connections and transfers, which allows you to test your SSL connection without installing a CA certificate.
--user npadmin:hammerhead—Replace npadmin with the user name for your Series appliance. Replace hammerhead with the password for your Series appliance.
https://xxx.xxx.xxx.xxx/api/4.0/config/backups/05dba74e/restore—The backup and restore request URL. Replace xxx.xxx.xxx.xxx with the IP address of your Series appliance. Replace 05dba74e with the backup identifier to use to restore the system configuration.
Results
This example restores the system configuration using the specified backup file. The output is in JSON.
Disk encryption
You can encrypt all captured data and metadata on disk to ensure the information is secure if the disk is taken from the appliance.
The following disk encryption endpoints are available:
GET https://<PX_IP_address>/api/4.0/config/disk/encryption
PUT https://<PX_IP_address>/api/4.0/config/disk/encryption/key
GET https://<PX_IP_address>/api/4.0/config/disk/encryption/headers
POST https://<PX_IP_address>/api/4.0/config/disk/encryption/headers
DELETE https://<PX_IP_address>/api/4.0/config/disk/encryption/headers
Encryption status request
To get the status of encryption on your system's disks, send the following request:
GET https://<PX_IP_address>/api/4.0/config/disk/encryption
Required header:
--user <username>:<password>
Options
PX_IP_address—IP address of the Series appliance running the Series API.
username—The user name for your Series appliance.
password—The password for your Series appliance.
Example
GET https://xxx.xxx.xxx.xxx/api/4.0/config/disk/encryption
Required header:
--user npadmin:hammerhead
Encryption status response
HTTP/1.1 [Response Code] [Response Message] Date: [Date]
Content-Type: [Content Type]
{
"enabled": Boolean, "device-status": [
{
"name": "device-name",
"path": "device-path", "encrypted": Boolean
}
]
}
Response fields
Response Code—A standard HTML response code.
Response Message—A standard HTML response message.
Date—Standard HTML date format.
Content Type—The response format.
Example
HTTP/1.1 200 OK
Date: Tue, 04 Sep 2018 00:17:39 GMT
Content-Type: application/json; charset=utf-8
{
"enabled": false, "device-status": [
{
"name": "flow",
"path": "/dev/vgpx/lvflow", "encrypted": false
},
{
"name": "index",
"path": "/dev/vgpx/lvindex", "encrypted": false
},
{
"name": "scratch",
"path": "/dev/vgpx/lvscratch", "encrypted": false
},
{
"name": "search",
"path": "/dev/vgpx/lvsearch", "encrypted": false
},
{
"name": "stats",
"path": "/dev/vgpx/lvstats", "encrypted": false
},
{
"name": "capture",
"path": "/dev/vgpx/lvcapture", "encrypted": false
},
{
"name": "buffer",
"path": "/dev/vgpx/lvbuffer", "encrypted": false
},
{
"name": "event",
"path": "/dev/vgpx/lvevent",
"encrypted": false
}
]
}
cURL code sample: Encryption status
The code sample was run with cURL 7.57.0.
curl --user npadmin:hammerhead https://xxx.xxx.xxx.xxx/api/4.0/config/disk/encryption -k -X GET'
This cURL sample includes the following options:
--user npadmin:hammerhead—Replace npadmin with the user name for your Series appliance. Replace hammerhead with the password for your Series appliance.
https://xxx.xxx.xxx.xxx/api/4.0/config/disk/encryption—The encryption status request URL. Replace
xxx.xxx.xxx.xxx with the IP address of your Series appliance.
-k—This option explicitly allows cURL to perform insecure SSL connections and transfers, which allows you to test your SSL connection without installing a CA certificate.
-X GET—This option specifies using the GET method.
Results
This example gets the encryption status. The output is in JSON format.
Update encryption key request
To change the encryption key phrase, send the following request:
PUT https://<PX_IP_address>/api/4.0/config/disk/encryption/key
 Note
Note
To use this request, you must belong to the sudo group.
Required header:
--user <username>:<password>
Request body:
{
"new" : "new_key", "key" : "current_key"
}
Options
PX_IP_address—IP address of the Series appliance running the Series API.
username—The user name for your Series appliance.
password—The password for your Series appliance.
new_key—The new encryption key.
current_key—Optional. The current key. You do not have to specify the current key if it matches the key already on the Series appliance.
Example
PUT https://xxx.xxx.xxx.xxx/api/4.0/config/disk/encryption/key
Required header:
--user npadmin:hammerhead
Request body:
{
"new" : "fqh280qpjlkwf@jaicp2", "key" : "2fjf012djc9f0209f"
}
Update encryption key response
HTTP/1.1 [Response Code] [Response Message] Date: [Date]
Content-Type: [Content Type]
Response fields
Response Code—A standard HTML response code.
Response Message—A standard HTML response message.
Date—Standard HTML date format.
Content Type—The response format.
Example
HTTP/1.1 200 OK
Date: Fri, 07 Sep 2018 00:17:28 GMT
cURL code sample: Update encryption key
The code sample was run with cURL 7.57.0.
curl --user npadmin:hammerhead https://xxx.xxx.xxx.xxx/api/4.0/config/disk/encryption/key -k -X PUT --data-binary '{ "new" : "ffwqf2q", "key": "o28fchnd29fh" }'
This cURL sample includes the following options:
--user npadmin:hammerhead—Replace npadmin with the user name for your Series appliance. Replace hammerhead with the password for your Series appliance.
https://xxx.xxx.xxx.xxx/api/4.0/config/disk/encryption/key—The encryption key request URL. Replace
xxx.xxx.xxx.xxx with the IP address of your Series appliance.
-k—This option explicitly allows cURL to perform insecure SSL connections and transfers, which allows you to test your SSL connection without installing a CA certificate.
-X PUT—This option specifies using the PUT method.
--data-binary '{ "new" : "ffwqf2q", "key": "o28fchnd29fh" }'—This option specifies the new key.
Results
This example updates the encryption key.
Download encryption headers request
To download a file containing a backup copy of the encryption headers from the Series appliance, send the following request:
GET https://<PX_IP_address>/api/4.0/config/disk/encryption/headers
 Note
Note
To use this request, you must belong to the sudo group.
Required header:
--user <username>:<password>
Options
PX_IP_address—IP address of the Series appliance running the Series API.
username—The user name for your Series appliance.
password—The password for your Series appliance.
Example
GET https://xxx.xxx.xxx.xxx/api/4.0/config/disk/encryption/headers
Required header:
--user npadmin:hammerhead
Download encryption headers response
A file containing a copy of the encryption headers.
cURL code sample: Download encryption headers
The code sample was run with cURL 7.57.0.
curl --user npadmin:hammerhead https://xxx.xxx.xxx.xxx/api/4.0/config/disk/encryption/headers -k -X GET
This cURL sample includes the following options:
--user npadmin:hammerhead—Replace npadmin with the user name for your Series appliance. Replace hammerhead with the password for your Series appliance.
https://xxx.xxx.xxx.xxx/api/4.0/config/disk/encryption/headers—The encryption headers request URL. Replace
xxx.xxx.xxx.xxx with the IP address of your Series appliance.
-k—This option explicitly allows cURL to perform insecure SSL connections and transfers, which allows you to test your SSL
connection without installing a CA certificate.
-X GET—This option specifies using the GET method.
Results
This example downloads a file containing the encryption headers.
Upload encryption headers request
To upload a file containing new encryption headers to the Series appliance, send the following request:
POST https://<PX_IP_address>/api/4.0/config/disk/encryption/headers
 Note
Note
To use this request, you must belong to the sudo group.
Required header:
--user <username>:<password>
Form fields:
backup—The header file in zip format.
key—The key phrase.
Options
PX_IP_address—IP address of the Series appliance running the Series API.
username—The user name for your Series appliance.
password—The password for your Series appliance.
Example
POST https://xxx.xxx.xxx.xxx/api/4.0/config/disk/encryption/headers
Required header:
--user npadmin:hammerhead
Upload encryption headers response
{ "message": "<msg>", "status": "<status>" }
Response fields
message—A standard HTML response code.
status—A standard HTML response message.
Example
Line breaks have been added for readability.
{
"message": "ok",
"status": "Headers successfully restored. PX must be rebooted in order to regain appliance functionality"
}
cURL code sample: Upload encryption headers
The code sample was run with cURL 7.57.0.
curl --user npadmin:hammerhead https://xxx.xxx.xxx.xxx/api/4.0/config/disk/encryption/headers -k -X POST -F 'backup=@header-backup.zip' -F 'key=xyz'
This cURL sample includes the following options:
--user npadmin:hammerhead—Replace npadmin with the user name for your Series appliance. Replace hammerhead with the password for your Series appliance.
https://xxx.xxx.xxx.xxx/api/4.0/config/disk/encryption/headers—The component configuration request URL. Replace xxx.xxx.xxx.xxx with the IP address of your Series appliance.
-k—This option explicitly allows cURL to perform insecure SSL connections and transfers, which allows you to test your SSL connection without installing a CA certificate.
-X POST—Specifies using the POST method.
-F 'backup=@header-backup'—Specifies the zip file named "header-backup.zip".
-F 'key=xyz'—Specifies a key phrase.
Results
This example uploads an encryption header file and specifies a key phrase.
Delete encryption headers request
To delete the encryption headers from the Series appliance, send the following request:
DELETE https://<PX_IP_address>/api/4.0/config/disk/encryption/headers
 Note
Note
To use this request, you must belong to the sudo group.
Required header:
--user <username>:<password>
Options
PX_IP_address—IP address of the Series appliance running the Series API.
username—The user name for your Series appliance.
password—The password for your Series appliance.
Example
DELETE https://xxx.xxx.xxx.xxx/api/4.0/config/disk/encryption/headers
Required header:
--user npadmin:hammerhead
Delete encryption headers response
HTTP/1.1 [Response Code] [Response Message]
Date: [Date]
Response fields
Response Code—A standard HTML response code.
Response Message—A standard HTML response message.
Date—Standard HTML date format.
Example
HTTP/1.1 200 OK
Date: Tue, 04 Sep 2018 00:18:44 GMT
cURL code sample: Delete encryption headers
The code sample was run with cURL 7.57.0.
curl --user npadmin:hammerhead https://xxx.xxx.xxx.xxx/api/4.0/config/disk/encryption/headers -k -X DELETE
This cURL sample includes the following options:
--user npadmin:hammerhead—Replace npadmin with the user name for your Series appliance. Replace hammerhead with the password for your Series appliance.
https://xxx.xxx.xxx.xxx/api/4.0/config/disk/encryption/headers—The encryption headers request URL. Replace
xxx.xxx.xxx.xxx with the IP address of your Series appliance.
-k—This option explicitly allows cURL to perform insecure SSL connections and transfers, which allows you to test your SSL connection without installing a CA certificate.
-X DELETE—This option specifies using the DELETE method.
Results
This example deletes the encryption headers from the Series appliance.
System dump
The system dump endpoints allow you to create and download a system dump as well as list and delete system dumps:
POST https://<PX_IP_address>/api/4.0/config/sysdump
GET https://<PX_IP_address>/api/4.0/config/sysdump
GET https://<PX_IP_address>/api/4.0/config/sysdump/<id>
DELETE https://<PX_IP_address>/api/4.0/config/sysdump/<id>
GET https://<PX_IP_address>/api/4.0/config/sysdump/<id>/download
Create a system dump request
To create a system dump, send the following request:
POST https://<PX_IP_address>/api/4.0/config/sysdump
 Note
Note
To use this request, you must belong to the sudo group.
Required header:
--user <username>:<password>
Options
PX_IP_address—IP address of the Series appliance running the Series API.
username—The user name for your Series appliance.
password—The password for your Series appliance.
Example
POST https://xxx.xxx.xxx.xxx/api/4.0/config/sysdump
Required header:
--user npadmin:hammerhead
Create a system dump response
HTTP/1.1 [Response Code] [Response Message] Date: [Date]
Content-Type: [Content Type]
status: [Status]
sysdumpID: [System Dump ID] filename: [System Dump File Name] createTime: [Create Time]
Response fields
Response Code—A standard HTTP response code.
Response Message—A standard HTTP response message.
Date—Standard HTML date format.
Content Type—The response format.
Status—Status of system dump.
System Dump ID—System dump identifier.
System Dump File Name—System dump file name.
Create Time—Time at which the system dump was requested.
Example
HTTP/1.1 200 OK
Date: Thu, 26 Jan 2017 19:09:53 GMT
Content-Type: application/json; charset=utf-8
{
"status": "queued",
"sysdumpID": "2c047bb62de743ec58a20af854558f99", "filename": "sysdump-1485457793.tar.gz", "createTime": "2017-01-26T14:09:53.968732Z"
}
cURL code sample: Create a system dump
The code sample was run with cURL 7.57.0.
curl -k --user npadmin:hammerhead https://xxx.xxx.xxx.xxx/api/4.0/config/sysdump -X POST
This cURL sample includes the following options:
-k—This option explicitly allows cURL to perform insecure SSL connections and transfers, which allows you to test your SSL connection without installing a CA certificate.
--user npadmin:hammerhead—Replace npadmin with the user name for your Series appliance. Replace hammerhead with the password for your Series appliance.
https://xxx.xxx.xxx.xxx/api/4.0/config/sysdump—The system dump request URL. Replace xxx.xxx.xxx.xxx with the IP address of your Series appliance.
-X POST—This option specifies using the POST method.
Results
This example creates a system dump.
List system dumps request
To list all system dumps, send the following request:
GET https://<PX_IP_address>/api/4.0/config/sysdump
Required header:
--user <username>:<password>
Options
PX_IP_address—IP address of the Series appliance running the Series API.
username—The user name for your Series appliance.
password—The password for your Series appliance.
Example
GET https://xxx.xxx.xxx.xxx/api/4.0/config/sysdump
Required header:
--user cpx:hammerhead
List system dumps response
HTTP/1.1 [Response Code] [Response Message] Date: [Date]
Content-Type: [Content Type]
status: [Status]
sysdumpID: [System Dump ID] filename: [System Dump File Name] createTime: [Create Time]
Response fields
Response Code—A standard HTTP response code.
Response Message—A standard HTTP response message.
Date—Standard HTML date format.
Content Type—The response format.
Status—Status of system dump.
System Dump ID—System dump identifier.
System Dump File Name—System dump file name.
Create Time—Time at which the system dump was requested.
Example
HTTP/1.1 200 OK
Date: Thu, 26 Jan 2017 19:10:40 GMT
Content-Type: application/json; charset=utf-8
[
{
"status": "done",
"sysdumpID": "2c047bb62de743ec58a20af854558f99", "filename": "sysdump-1485457793.tar.gz", "createTime": "2017-01-26T14:09:53.968732Z"
}
]
cURL code sample: List system dumps
The code sample was run with cURL 7.57.0.
curl -k --user cpx:hammerhead https://xxx.xxx.xxx.xxx/api/4.0/config/sysdump
This cURL sample includes the following options:
-k—This option explicitly allows cURL to perform insecure SSL connections and transfers, which allows you to test your SSL connection without installing a CA certificate.
--user cpx:hammerhead—Replace cpx with the user name for your Series appliance. Replace hammerhead with the password for your Series appliance.
https://xxx.xxx.xxx.xxx/api/4.0/config/sysdump—The system dump request URL. Replace xxx.xxx.xxx.xxx with the IP address of your Series appliance.
Results
This example returns a list of all system dumps. The output is in JSON.
System dump details request
To get details about a specific system dump, send the following request: GET https://<PX_IP_address>/api/4.0/config/sysdump/<id> Required header:
--user <username>:<password>
Options
PX_IP_address—IP address of the Series appliance running the Series API.
id—System dump identifier.
username—The user name for your Series appliance.
password—The password for your Series appliance.
Example
GET https://xxx.xxx.xxx.xxx/api/4.0/config/sysdump/2c047bb62de743ec58a20af854558f99
Required header:
--user cpx:hammerhead
System dump details response
HTTP/1.1 [Response Code] [Response Message] Date: [Date]
Content-Type: [Content Type]
status: [Status]
sysdumpID: [System Dump ID] filename: [System Dump File Name] createTime: [Create Time]
Response fields
Response Code—A standard HTTP response code.
Response Message—A standard HTTP response message.
Date—Standard HTML date format.
Content Type—The response format.
Status—Status of system dump.
System Dump ID—System dump identifier.
System Dump File Name—System dump file name.
Create Time—Time at which the system dump was requested.
Example
HTTP/1.1 200 OK
Date: Thu, 26 Jan 2017 19:15:17 GMT
Content-Type: application/json; charset=utf-8
{
"status": "done",
"sysdumpID": "2c047bb62de743ec58a20af854558f99", "filename": "sysdump-1485457793.tar.gz", "createTime": "2017-01-26T14:09:53.968732Z"
}
cURL code sample: System dump details
The code sample was run with cURL 7.57.0.
curl -k --user cpx:hammerhead https://xxx.xxx.xxx.xxx/api/4.0/config/sysdump/2c047bb62de743ec58a20af854558f99
This cURL sample includes the following options:
-k—This option explicitly allows cURL to perform insecure SSL connections and transfers, which allows you to test your SSL connection without installing a CA certificate.
--user cpx:hammerhead—Replace cpx with the user name for your Series appliance. Replace hammerhead with the password for your Series appliance.
https://xxx.xxx.xxx.xxx/api/4.0/config/sysdump/2c047bb62de743ec58a20af854558f99—The system information request URL. Replace xxx.xxx.xxx.xxx with the IP address of your Series appliance. Replace 2c047bb62de743ec58a20af854558f99 with the system dump identifier of interest.
Results
This example returns details about the specified system dump. The output is in JSON.
Delete a system dump request
To delete a specific system dump, send the following request:
DELETE https://<PX_IP_address>/api/4.0/config/sysdump/<id>
 Note
Note
To use this request, you must belong to the sudo group.
Required header:
--user <username>:<password>
Options
PX_IP_address—IP address of the Series appliance running the Series API.
id—System dump identifier.
username—The user name for your PX Series appliance.
password—The password for your PX Series appliance.
Example
DELETE https://xxx.xxx.xxx.xxx/api/4.0/config/sysdump/2c047bb62de743ec58a20af854558f99
Required header:
--user npadmin:hammerhead
Delete a system dump file response
HTTP/1.1 [Response Code] [Response Message] Date: [Date]
Content-Type: [Content Type]
[]
Response fields
Response Code—A standard HTTP response code.
Response Message—A standard HTTP response message.
Date—Standard HTML date format.
Content Type—The response format.
Example
HTTP/1.1 200 OK
Date: Thu, 26 Jan 2017 19:16:26 GMT
Content-Type: application/json; charset=utf-8
[]
cURL code sample: Delete a system dump file
The code sample was run with cURL 7.57.0.
curl -k --user npadmin:hammerhead https://xxx.xxx.xxx.xxx/api/4.0/config/sysdump/ 2c047bb62de743ec58a20af854558f99 -X DELETE
This cURL sample includes the following options:
-k—This option explicitly allows cURL to perform insecure SSL connections and transfers, which allows you to test your SSL connection without installing a CA certificate.
--user npadmin:hammerhead—Replace npadmin with the user name for your Series appliance. Replace hammerhead with the password for your Series appliance.
https://xxx.xxx.xxx.xxx/api/4.0/config/sysdump/2c047bb62de743ec58a20af854558f99—The system information request URL. Replace xxx.xxx.xxx.xxx with the IP address of your Series appliance. Replace 2c047bb62de743ec58a20af854558f99 with the system dump identifier of interest.
-X DELETE—This option specifies using the DELETE method.
Results
This example deletes the specified system dump. The output is in JSON.
Download a system dump request
To download a system dump, send the following request:
GET https://<PX_IP_address>/api/4.0/config/sysdump/<id>/download
Required header:
--user <username>:<password>
Options
PX_IP_address—IP address of the Series appliance running the Series API.
id—System dump identifier.
username—The user name for your Series appliance.
password—The password for your Series appliance.
Example
GET https://xxx.xxx.xxx.xxx/api/4.0/config/sysdump/2c047bb62de743ec58a20af854558f99/download
Required header:
--user cpx:hammerhead
Download a system dump response
% Total: [Total Percentage]
% Received: [Percentage Received]
% Xferd: [Percentage Transferred] Average Dload: [Download Speed] Speed Upload: [Upload Speed]
Time Total: [Total Time] Time Spent: [Time Spent] Time Left: [Time Left]
Current Speed: [Current Speed]
Response fields
Total Percentage—How much of the file was downloaded.
Percentage Received—How much of the file was received.
Percentage Transferred—How much of the file was transferred.
Download Speed—Average download speed.
Upload Speed—Average upload speed.
Total Time—Time required for downloading the file.
Time Spent—How much time has been spent downloading the file.
Time Left—How much time it will take to finish downloading the file.
Current Speed—Current download speed.
Example
% Total % Received % Xferd Average Speed Time Time Time Current
Dload Upload Total Spent Left Speed
100 9854k 100 9854k 0 0 1824k 0 0:00:05 0:00:05 --:--:-- 2006
cURL code sample: Download a system dump
The code sample was run with cURL 7.57.0.
curl -k --user cpx:hammerhead https://xxx.xxx.xxx.xxx/api/4.0/config/sysdump/ 2c047bb62de743ec58a20af854558f99/download -o 2c047bb62de743ec58a20af854558f99.tar.gz
This cURL sample includes the following options:
-k—This option explicitly allows cURL to perform insecure SSL connections and transfers, which allows you to test your SSL connection without installing a CA certificate.
--user cpx:hammerhead—Replace cpx with the user name for your Series appliance. Replace hammerhead with the password for your Series appliance.
https://xxx.xxx.xxx.xxx/api/4.0/config/sysdump/2c047bb62de743ec58a20af854558f99/download—The system dump request URL. Replace xxx.xxx.xxx.xxx with the IP address of your Series appliance. Replace 2c047bb62de743ec58a20af854558f99 with the system dump identifier of interests.
-o 2c047bb62de743ec58a20af854558f99.tar.gz—This option specifies the file name for the downloaded system dump.
Results
This example downloads the specified system dump to your local machine.
Exporter SSH keys
Use the exporter Secure Shell (SSH) keys endpoints to configure SSH keys for exporting data from the PX Series appliance. These exporters are for iatunnel, iarsync, and mdrsync users.
GET https://<PX_IP_address>/api/4.0/config/ssh
GET https://<PX_IP_address>/api/4.0/config/ssh/<exporter>
GET https://<PX_IP_address>/api/4.0/config/ssh/<exporter>/<key_name>
POST https://<PX_IP_address>/api/4.0/config/ssh/<exporter>
PUT https://<PX_IP_address>/api/4.0/config/ssh/<exporter>/<key_name>
DELETE https://<PX_IP_address>/api/4.0/config/ssh/<exporter>/<key_name>
List all exporter SSH keys request
To list all SSH keys, sorted by exporters, end the following request:
GET https://<PX_IP_address>/api/4.0/config/ssh
Required header:
--user <username>:<password>
Options
PX_IP_address—IP address of the Series appliance running the Series API.
username—The user name for your Series appliance.
password—The password for your Series appliance.
Example
GET https://xxx.xxx.xxx.xxx/api/4.0/config/ssh
Required header:
--user cpx:hammerhead
List all exporter SSH keys response
HTTP/1.1 [Response Code] [Response Message] Date: [Date]
Content-Type: [Content Type]
key: [Key] name: [Name]
Response fields
Response Code—A standard HTTP response code.
Response Message—A standard HTTP response message.
Date—Standard HTML date format.
Content Type—The response format.
Key—Value of the SSH key.
Name—Name of the SSH key.
Example
HTTP/1.1 200 OK
Date: Mon, 20 Mar 2017 20:21:28 GMT
Content-Type: application/json; charset=utf-8
{
"iatunnel": [
{
"key":
"ssh-rsa AAAAB3NzaC1yc2EAAAADAQABAAABAQDqGZ9pAO4pIIAYL/uDLDeDss
brt6RhNy934iuD6Xgj9NUUBmZgdXWc4OvwFd7GWnwd03HGQWRVIM6jGq Q2XaHM5IvDsOBqKVZrqVE30XXAHgGCZ6srDwvs6MNsEabIxkAC6efnwjh95XN Uqzw09rm6AgqWVR0nuOpSoQ5z1Avsu6KHY4ZVUazVwLpp7L1Tup1Zcfhrui KWJmuOZZYSd1zyrGTIet/yWmlwK08BrGMpEkknELFptk7C+3sBvcY14Mny/Gkt LezG3DWDYJTgN7ZTl2v33V5wKXu/IW2Qf4ZRXvq3r/tT9tLz++Ovu4LVwvDB g0FztD1wIAayjsl8sn iatunnel@ia131",
"name": "iatunnel@ia131"
}
],
"iarsync": [
{
"key":
"ssh-rsa AAAAB3NzaC1yc2EAAAADAQABAAABAQCv8wWnGQDJ7mhdxtJYhwVja2 QzardqAjcaZjyhD7kPocdvPOLO2VW+DDggjX+IajUD22t7aMJ6fRqV0+QP
s4SORyLYbjsusjv5Ve1eS6y43ksc4twvNvLdX2W7w7XTpekS3TC4ugyFxsyn W8tKh7LiCjAdlfRt7yZovqyLoRQq8AFaBuRK9acrXnSBWAhVCciKMHn4sg pnGrLprv7tTCd2yOgxD6bBdfXg2BZvK57sxg7XnXD3lU5Q/PP94pbESSI NUd5YolxJ3QlPmWdLuK/1xfGvSaFIJlX7evHyeQzOCLj6dm/cvma4eE21 5RwUqoVwG0mXv2eCULCRfFYEqFZ iarsync@ia131",
"name": "iarsync@ia131"
}
],
"mdrsync": []
}
cURL code sample: List all exporter SSH keys files
The code sample was run with cURL 7.57.0.
curl -k --user cpx:hammerhead https://xxx.xxx.xxx.xxx/api/4.0/config/ssh
This cURL sample includes the following options:
-k—This option explicitly allows cURL to perform insecure SSL connections and transfers, which allows you to test your SSL connection without installing a CA certificate.
--user cpx:hammerhead—Replace cpx with the user name for your Series appliance. Replace hammerhead with the password for your Series appliance.
https://xxx.xxx.xxx.xxx/api/4.0/config/ssh—The exporter SSH keys request URL. Replace xxx.xxx.xxx.xxx with the IP address of your Series appliance.
Results
This example returns a list of all SSH keys, sorted by exporters. The output is in JSON.
List SSH keys by exporter request
To list the SSH keys for a specific exporter, send the following request: GET https://<PX_IP_address>/api/4.0/config/ssh/<exporter> Required header:
--user <username>:<password>
Options
PX_IP_address—IP address of the Series appliance running the Series API.
exporter—Type of exporter. Valid values are iatunnel, iarsync, and mdrsync.
username—The user name for your Series appliance.
password—The password for your Series appliance.
Example
GET https://xxx.xxx.xxx.xxx/api/4.0/config/ssh/iatunnel
Required header:
--user cpx:hammerhead
List SSH keys by exporter response
HTTP/1.1 [Response Code] [Response Message] Date: [Date]
Content-Type: [Content Type]
key: [Key] name: [Name]
Response fields
Response Code—A standard HTTP response code.
Response Message—A standard HTTP response message.
Date—Standard HTML date format.
Content Type—The response format.
Key—Value of the SSH key.
Name—Name of the SSH key.
Example
HTTP/1.1 200 OK
Date: Mar 2017 20:28:51 GMT
Content-Type: application/json; charset=utf-8
{
"keys": [
{
"key":
"ssh-rsa AAAAB3NzaC1yc2EAAAADAQABAAABAQDqGZ9pAO4pIIAYL/uDLDeDssbr t6RhNy934iuD6Xgj9NUUBmZgdXWc4OvwFd7GWnwd03HGQWRVIM6jGqQ2 XaHM5IvDsOBqKVZrqVE30XXAHgGCZ6srDwvs6MNsEabIxkAC6efn+w jh95X/NUqzw09rm6AgqWVR0nuOpSoQ5z1Avsu6KHY4ZVUazVwLpp7L1Tup1 ZcfhruiKWJmuOZZYSd1zyrGTIet/yWmlwK08BrGMpEkknELFptk7C+3s BvcY14Mny/GktLezG3DWDYJTgN7ZTl2v33V5wKXu/IW2Qf4ZRXvq3r/tT9 tLz++Ovu4LVwvDBg0FztD1wIAayjsl8sn iatunnel@ia131",
"name": "iatunnel@ia131"
}
]
}
cURL code sample: List SSH keys by exporter
The code sample was run with cURL 7.57.0.
curl -k --user cpx:hammerhead https://xxx.xxx.xxx.xxx/api/4.0/config/ssh/iatunnel
This cURL sample includes the following options:
-k—This option explicitly allows cURL to perform insecure SSL connections and transfers, which allows you to test your SSL connection without installing a CA certificate.
--user cpx:hammerhead—Replace cpx with the user name for your Series appliance. Replace hammerhead with the password for your Series appliance.
https://xxx.xxx.xxx.xxx/api/4.0/config/ssh/iatunnel—The exporter SSH keys request URL. Replace xxx.xxx.xxx.xxx
with the IP address of your Series appliance. Replace iatunnel with the exporter of interest.
Results
This example returns a list of SSH keys for specified exporter. The output is in JSON.
Exporter SSH key by name request
To get the value for a specific SSH key, send the following request:
GET https://<PX_IP_address>/api/4.0/config/ssh/<exporter>/<key_name>
Required header:
--user <username>:<password>
Options
PX_IP_address—IP address of the Series appliance running the Series API.
exporter—Type of exporter. Valid values are iatunnel, iarsync, and mdrsync.
key_name—Name of SSH key.
username—The user name for your Series appliance.
password—The password for your Series appliance.
Example
GET https://xxx.xxx.xxx.xxx/api/4.0/config/ssh/iarsync/iarsync@ia131
Required header:
--user cpx:hammerhead
Exporter SSH key by name response
HTTP/1.1 [Response Code] [Response Message] Date: [Date]
Content-Type: [Content Type]
key: [Key] name: [Name]
Response fields
Response Code—A standard HTTP response code.
Response Message—A standard HTTP response message.
Date—Standard HTML date format.
Content Type—The response format.
Key—Value of the SSH key.
Name—Name of the SSH key.
Example
HTTP/1.1 200 OK
Date: Mon, 20 Mar 2017 20:47:45 GMT
Content-Type: application/json; charset=utf-8
{
"key":
"ssh-rsa AAAAB3NzaC1yc2EAAAADAQABAAABAQCv8wWnGQDJ7mhdxtJYhwVja2Qzard qAjcaZjyhD7kPocdvPOLO2VW+DDggjX+IajUD22t7aMJ6fRqV0+QPs4SORyLYb jsusjv5Ve1eS6y43ksc4twvN/vLdX2W7w7XTpekS3TC4ugyFxsynW8tKh7LiC jAdlfRt7yZovqyLoRQq8AFaBuRK9acrXnSBWAhVCciKMHn4sgpnGrLprv7tTCd 2yOgxD6bBdfXg2BZvK57sxg7XnXD3lU5Q/PP94pbESSINUd5YolxJ3QlPmWdLuK/ 1xfGvSaFIJlX7evHyeQzOCLj6dm/cvma4eE215RwUqoVwG0mXv2eC ULCRfFYEqFZ iarsync@ia131",
"name": "iarsync@ia131"
}
cURL code sample: Exporter SSH key by name
The code sample was run with cURL 7.57.0.
curl -k --user cpx:hammerhead https://xxx.xxx.xxx.xxx/api/4.0/config/ssh/iarsync/iarsync@ia131
This cURL sample includes the following options:
-k—This option explicitly allows cURL to perform insecure SSL connections and transfers, which allows you to test your SSL connection without installing a CA certificate.
--user cpx:hammerhead—Replace cpx with the user name for your Series appliance. Replace hammerhead with the password for your Series appliance.
https://xxx.xxx.xxx.xxx/api/4.0/config/ssh/iarsync/iarsync@ia131—The exporter SSH keys request URL. Replace xxx.xxx.xxx.xxx with the IP address of your Series appliance. Replace iarsync with the exporter of interest. Replace iarsync@ia131 with the name of the SSH key of interest.
Results
This example returns the value for the specified SSH key. The output is in JSON.
Create an exporter SSH key request
To create a new SSH key, send the following request:
POST https://<PX_IP_address>/api/4.0/config/ssh/<exporter>
 Note
Note
To use this request, you must belong to the sudo group.
Required header:
--user <username>:<password>
Request body:
{
"key": "key_value", "name": "key_name"
}
Options
PX_IP_address—IP address of the Series appliance running the Series API.
exporter—Type of exporter. Valid values are iatunnel, iarsync, and mdrsync.
key_value—Value of the SSH key.
key_name—Name of the SSH key.
password—The password for your Series appliance.
username—The user name for your Series appliance.
Example
POST https://xxx.xxx.xxx.xxx/api/4.0/config/ssh/mdrsync
Required header:
--user npadmin:hammerhead
Request body:
{
"key":
"ssh-rsa AAAAB3NzaC1yc2EAAAADAQABAAABAQDRfHFVTRecqmNhTeihOchUj nZvqGDUjLFCUJ2nnF92lEHdlEZXU4F3q4J6LblVNxkha2OfFAT7SJYK0/ lyvmC8+O9b+UugkDv38jmWwxS4ih1TcbfOGxxAieishqr6Suwy/raZ2qV9Af7oT zgMBnBdUO9RYMkjK8Ic9lRG7BDkefPIn2i1Inj7JAOolxNSqRfIaTgQHMsgO pE7rVUf4tnoQKPpLXgxVb1Om7MHSMlak//PrqGBnxqi7hBOsGSCMG9kWd5kRW 5Kp2h+tXmQft+PKdluMdE0NUX865JV/LB9mJhy3XDAXL/MHAuHmD5BlpcKaCpU PaadFmQWfpJJW8aj de@adams",
"name": "de@adams"
}
Create an exporter SSH key response
HTTP/1.1 [Response Code] [Response Message] Date: [Date]
Content-Type: [Content Type]
key: [Key] name: [Name]
Response fields
Response Code—A standard HTTP response code.
Response Message—A standard HTTP response message.
Date—Standard HTML date format.
Content Type—The response format.
Key—Value of the SSH key.
Name—Name of the SSH key.
Example
HTTP/1.1 200 OK
Date: Mon, 20 Mar 2017 21:01:22 GMT
Content-Type: application/json; charset=utf-8
{
"keys": [
{
"key":
"ssh-rsa AAAAB3NzaC1yc2EAAAADAQABAAABAQDRfHFVTRecqmNhTeihOch UjnZvqGDUjLFCUJ2nnF92lEHdlEZXU4F3q4J6LblVNxkha2OfFAT7SJYK0/ly vmC8+O9b+UugkDv38jmWwxS4ih1TcbfOGxxAieishqr6Suwy/raZ2qV9Af7oTz gMBnBdUO9RYMkjK8Ic9lRG7BDkefPIn2i1Inj7JAOolxNSqRfIaTgQHMsgOpE7 rVUf4tnoQKPpLXgxVb1Om7MHSMlak//PrqGBnxqi7hBOsGSCMG9kWd5kRW5Kp2
h+tXmQft+PKdluMdE0NUX865JV/LB9mJhy3XDAXL/MHAuHmD5BlpcKaCpUPaad FmQWfpJJW8aj de@adams",
"name": "de@adams"
}
]
}
cURL code sample: Create an exporter SSH key
The code sample was run with cURL 7.57.0.
curl --user npadmin:hammerhead https://xxx.xxx.xxx.xxx/api/4.0/config/ssh/mdrsync -k -X POST
--data-binary '{"key":"ssh-rsa AAAAB3NzaC1yc2EAAAADAQABAAABAQDRfHFVTRecqmNhTeihOchUjnZvqGDUjLFCUJ2nnF92lEHdlEZXU4F3q4J6LblVNxkha2OfFAT7SJYK0/ lyvmC8+O9bUugkDv38jmWwxS4ih1TcbfOGxxAieishqr6SuwyraZ2qV9Af7oTzgMBnBdUO9RYMkjK8Ic9lRG7BDkefPIn2i1Inj7JAOolxNSqRfIaTgQHM LB9mJhy3XDAXL/MHAuHmD5BlpcKaCpUPaadFmQWfpJJW8aj de@adams", "name":"de@adams"}'
This cURL sample includes the following options:
--user npadmin:hammerhead—Replace npadmin with the user name for your Series appliance. Replace hammerhead with the password for your Series appliance.
https://xxx.xxx.xxx.xxx/api/4.0/config/ssh/mdrsync—The exporter SSH keys request URL. Replace xxx.xxx.xxx.xxx
with the IP address of your Series appliance. Replace iarsync with the exporter of interest.
-k—This option explicitly allows cURL to perform insecure SSL connections and transfers, which allows you to test your SSL connection without installing a CA certificate.
-X POST—This option specifies using the POST method.
--data-binary '{"key":"ssh-rsa AAAAB3NzaC1yc2EAAAADAQABAAABAQDRfHFVTRecqmNhTeihOchUjnZvqGDUjLFCUJ2nnF92lEHdlEZXU4F3q4J6LblVNxkha2OfFAT7SJYK0/ lyvmC8+O9bUugkDv38jmWwxS4ih1TcbfOGxxAieishqr6SuwyraZ2qV9Af7oTzgMBnBdUO9RYMkjK8Ic9lRG7BDkefPIn2i1Inj7JAOolxNSqRfIaTg LB9mJhy3XDAXL/MHAuHmD5BlpcKaCpUPaadFmQWfpJJW8aj de@adams", "name":"de@adams"}'—This option specifies the value
and the name of the new SSH key.
Results
This example creates a new SSH key. The output is in JSON.
Change an exporter SSH key request
To change the value of an existing SSH key, send the following request:
PUT https://<PX_IP_address>/api/4.0/config/ssh/<exporter>/<key_name>
 Note
Note
To use this request, you must belong to the sudo group.
Required header:
--user <username>:<password>
Request body:
{
"key": "key_value", "name": "key_name"
}
Options
PX_IP_address—IP address of the Series appliance running the Series API.
exporter—Type of exporter. Valid values are iatunnel, iarsync, and mdrsync.
key_name—Name of the SSH key.
username—The user name for your Series appliance.
password—The password for your Series appliance.
key_value—Value of the SSH key.
Example
PUT https://xxx.xxx.xxx.xxx/api/4.0/config/ssh/mdrsync/de@adams
Required header:
--user npadmin:hammerhead
Request body:
{
"key":
"ssh-rsa AAAAB3NzaC1yc2EAAAADAQABAAABAQDRfHFVTRecqmNhTeihOchUjn ZvqGDUjLFCUJ2nnF925ug890juig79y7boll98hkobfOGxxAieshqr6Suwy/raZ2qV9Af 7oTzgMBnBdUO9RYMkjK8Ic9lRG7BDkeQHMsgOpE7rVUf4tnoQKPpLXgxVb1O m7MHSMlak//PrqGBnxqi7hBOsGSCMG9kWd5kRW5Kp2h+tXmQft+PKdluMdE0NUX 865JV/LB9mJhy3XDAXL/MHAuHmD5BlpcKaCpUPaadFmQWfpJJW8aj de@adams",
"name": "de@adams"
}
Change an exporter SSH key response
HTTP/1.1 [Response Code] [Response Message] Date: [Date]
Content-Type: [Content Type]
key: [Key] name: [Name]
Response fields
Response Code—A standard HTTP response code.
Response Message—A standard HTTP response message.
Date—Standard HTML date format.
Content Type—The response format.
Key—Value of the SSH key.
Name—Name of the SSH key.
Example
HTTP/1.1 200 OK
Date: Mon, 20 Mar 2017 21:15:07 GMT
Content-Type: application/json; charset=utf-8
{
"keys": [
{
"key":
"ssh-rsa AAAAB3NzaC1yc2EAAAADAQABAAABAQDRfHFVTRecqmNhTeihOch UjnZvqGDUjLFCUJ2nnF925ug890juig79y7boll98hkobfOGxxAieishqr 6Suwy/raZ2qV9Af7oTzgMBnBdUO9RYMkjK8Ic9lRG7BDkeQHMsgOpE7rV Uf4tnoQKPpL XgxVb1Om7MHSMlak//PrqGBnxqi7hBOsGSCMG9kWd5kR W5Kp2h+tXmQ ft+PKdluMdE0NUX865JV/LB9mJhy3XDAXL/MHAuHmD5Bl pcKaCpUPaadFmQWfpJJW8aj de@adams",
"name": "de@adams"
}
]
}
cURL code sample: Change an exporter SSH key
The code sample was run with cURL 7.57.0.
curl --user npadmin:hammerhead https://xxx.xxx.xxx.xxx/api/4.0/config/ssh/mdrsync/de@adams -k -X PUT
--data-binary '{"key": "ssh-rsa AAAAB3NzaC1yc2EAAAADAQABAAABAQDRfHFVTRecqmNhTeihOchUjnZv qGDUjLFCUJ2nnF925ug890juig79y7boll98hkobfOGxxAieishqr6Suwy/ raZ2qV9Af7oTzgMBnBdUO9RYMkjK8Ic9lRG7BDkeQHMsgOpE7rVUf4tnoQKPpLXgxVb1Om7MHSMlak//PrqGBnxqi7hBOsGSCMG9kWd5kRW5Kp2h+tXmQf LB9mJhy3XDAXL/MHAuHmD5BlpcKaCpUPaadFmQWfpJJW8aj de@adams",
"name":"de@adams"}'
This cURL sample includes the following options:
--user npadmin:hammerhead—Replace npadmin with the user name for your Series appliance. Replace hammerhead with the password for your Series appliance.
https://xxx.xxx.xxx.xxx/api/4.0/config/ssh/mdrsync/de@adams—The exporter SSH keys request URL. Replace xxx.xxx.xxx.xxx with the IP address of your Series appliance. Replace iarsync with the exporter of interest. Replace de@adams with the name of the SSH key of interest.
-k—This option explicitly allows cURL to perform insecure SSL connections and transfers, which allows you to test your SSL connection without installing a CA certificate.
-X PUT—This option specifies using the PUT method.
--data-binary '{"key": "ssh-rsa AAAAB3NzaC1yc2EAAAADAQABAAABAQDRfHFVTRecqmNhTeihOchUjnZvqGDUjLFCUJ2nnF925ug890juig79y7boll98hkobfOGxxAieishqr6Suwy/ raZ2qV9Af7oTzgMBnBdUO9RYMkjK8Ic9lRG7BDkeQHMsgOpE7rVUf4tnoQKPpLXgxVb1Om7MHSMlak//PrqGBnxqi7hBOsGSCMG9kWd5kRW5Kp2h+tX LB9mJhy3XDAXL/MHAuHmD5BlpcKaCpUPaadFmQWfpJJW8aj de@adams","name":"de@adams"}'—This option specifies the new
value and the name of the SSH key.
Results
This example changes the value of the specified SSH key. The output is in JSON.
Delete an exporter SSH key request
To delete a specific SSH key, send the following request:
DELETE https://<PX_IP_address>/api/4.0/config/ssh/<exporter>/<key_name>
 Note
Note
To use this request, you must belong to the sudo group.
Required header:
--user <username>:<password>
Options
PX_IP_address—IP address of the Series appliance running the Series API.
exporter—Type of exporter. Valid values are iatunnel, iarsync, and mdrsync.
key_name—Name of SSH key.
username—The user name for your Series appliance.
password—The password for your Series appliance.
Example
DELETE https://xxx.xxx.xxx.xxx/api/4.0/config/ssh/mdrsync/de@adams
Required header:
--user npadmin:hammerhead
Delete an exporter SSH key response
HTTP/1.1 [Response Code] [Response Message] Date: [Date]
Content-Type: [Content Type]
key: [Key] name: [Name]
Response fields
Response Code—A standard HTTP response code.
Response Message—A standard HTTP response message.
Date—Standard HTML date format.
Content Type—The response format.
Key—Value of any remaining SSH keys.
Name—Name of any remaining SSH keys.
Example
HTTP/1.1 200 OK
Date: Mon, 20 Mar 2017 21:16:27 GMT
Content-Type: application/json; charset=utf-8
{
"keys": []
}
cURL code sample: Delete an exporter SSH key
The code sample was run with cURL 7.57.0.
curl --user npadmin:hammerhead https://xxx.xxx.xxx.xxx/api/4.0/config/ssh/mdrsync/de@adams -k -X DELETE
This cURL sample includes the following options:
--user npadmin:hammerhead—Replace npadmin with the user name for your Series appliance. Replace hammerhead with the password for your Series appliance.
https://xxx.xxx.xxx.xxx/api/4.0/config/ssh/mdrsync/de@adams—The exporter SSH keys request URL. Replace xxx.xxx.xxx.xxx with the IP address of your Series appliance. Replace mdrsync with the exporter of interest. Replace de@adams with the name of the SSH key of interest.
-k—This option explicitly allows cURL to perform insecure SSL connections and transfers, which allows you to test your SSL connection without installing a CA certificate.
-X DELETE—This option specifies using the DELETE method.
Results
This example deletes the specified SSH key. The output is in JSON.
Rsync-based export
Remote sync (rsync) is used to make PX data available for other systems. You can use the rsync-based export endpoints to synchronize the metadata between the Series appliance and the IA Series appliance:
GET https://<PX_IP_address>/api/4.0/config/export/rsync
GET https://<PX_IP_address>/api/4.0/config/export/rsync/exporters
POST https://<PX_IP_address>/api/4.0/config/export/rsync/exporters
GET https://<PX_IP_address>/api/4.0/config/export/rsync/exporters/<exporter>
PUT https://<PX_IP_address>/api/4.0/export/rsync/exporters/<exporter>
DELETE https://<PX_IP_address>/api/4.0/config/export/rsync/exporters/<exporter>
GET https://<PX_IP_address>/api/4.0/config/export/rsync/exporters/<exporter>/outputs
POST https://<PX_IP_address>/api/4.0/config/export/rsync/exporters/<exporter>/outputs
GET https://<PX_IP_address>/api/4.0/config/export/rsync/exporters/<exporter>/outputs/<output>
DELETE https://<PX_IP_address>/api/4.0/config/export/rsync/exporters/<exporter>/output/<output>
GET https://<PX_IP_address>/api/4.0/config/export/rsync/exporters/<exporter>/outputs/<output>/filters
POST https://<PX_IP_address>/api/4.0/config/export/rsync/exporters/<exporter>/outputs/<output>/filters
GET https://<PX_IP_address>/api/4.0/config/export/rsync/ exporters/<exporter>/outputs/<output>/filters/<filter>
DELETE https://<PX_IP_address>/api/4.0/config/export/rsync/ exporters/<exporter>/output/<output>/filters/<filter>
List Rsync exporter configuration request
To retrieve the full configuration for rsync export, send the following request:
GET https://<PX_IP_address>/api/4.0/config/export/rsync
Required header:
--user <username>:<password>
Options
PX_IP_address—IP address of the Series appliance running the Series API.
username—The user name for your Series appliance.
password—The password for your Series appliance.
Example
GET https://xxx.xxx.xxx.xxx/api/4.0/config/export/rsync
Required header:
--user cpx:hammerhead
List Rsync exporter configuration response
HTTP/1.1 [Response Code] [Response Message] Date: [Date]
Content-Type: [Content Type]
{
"exporters": [
{<exporter1 config>},
{<exporter2 config>}
]
}
Response fields
Response Code—A standard HTTP response code.
Response Message—A standard HTTP response message.
Date—Standard HTML date format.
Content Type—The response format.
config—The configuration for the rsync-based exporter.
Example
HTTP/1.1 200 OK
Date: Wed, 22 Mar 2017 20:46:23 GMT
Content-Type: application/json; charset=utf-8
{
"exporters": [
{<exporter1 config>},
{<exporter2 config>}
]
}
cURL code sample: List Rsync exporter configuration
The code sample was run with cURL 7.57.0.
curl -k --user cpx:hammerhead https://xxx.xxx.xxx.xxx/api/4.0/config/export/rsync
This cURL sample includes the following options:
-k—This option explicitly allows cURL to perform insecure SSL connections and transfers, which allows you to test your SSL connection without installing a CA certificate.
--user cpx:hammerhead—Replace cpx with the user name for your Series appliance. Replace hammerhead with the password for your Series appliance.
https://xxx.xxx.xxx.xxx/api/4.0/config/export/rsync—The rsync-based export request URL. Replace
xxx.xxx.xxx.xxx with the IP address of your Series appliance.
Results
This example returns the configuration for rsync-based exporters. The output is in JSON.
List Rsync exporters request
To retrieve list of available exporters, send the following request:
GET https://<PX_IP_address>/api/4.0/config/export/rsync/exporters
Required header:
--user <username>:<password>
Options
PX_IP_address—IP address of the Series appliance running the Series API.
username—The user name for your Series appliance.
password—The password for your Series appliance.
Example
GET https://xxx.xxx.xxx.xxx/api/4.0/config/export/rsync/exporters
Required header:
--user cpx:hammerhead
List Rsync exporters response
HTTP/1.1 [Response Code] [Response Message] Date: [Date]
Content-Type: [Content Type]
[
{<exporter1>},
{<exporter2>}
]
Response fields
Response Code—A standard HTTP response code.
Response Message—A standard HTTP response message.
Date—Standard HTML date format.
Content Type—The response format.
config—The configuration for the rsync-based exporter.
Example
HTTP/1.1 200 OK
Date: Wed, 21 Mar 2018 20:49:21 GMT
Content-Type: application/json; charset=utf-8
[
{<exporter1>},
{<exporter2>}
]
cURL code sample: List Rsync exporters
The code sample was run with cURL 7.57.0.
curl -k --user cpx:hammerhead https://xxx.xxx.xxx.xxx/api/4.0/config/export/rsync/exporters
This cURL sample includes the following options:
-k—This option explicitly allows cURL to perform insecure SSL connections and transfers, which allows you to test your SSL connection without installing a CA certificate.
--user cpx:hammerhead—Replace cpx with the user name for your Series appliance. Replace hammerhead with the password for your Series appliance.
https://xxx.xxx.xxx.xxx/api/4.0/config/export/rsync/exporters—The rsync-based export request URL. Replace
xxx.xxx.xxx.xxx with the IP address of your Series appliance.
Results
This example returns available exporters. The output is in JSON.
Add an Rsync exporter request
To create a new rsync exporter, send the following request:
POST https://<PX_IP_address>/api/4.0/config/export/rsync/exporters
 Note
Note
To use this request, you must belong to the sudo group.
Required header:
--user <username>:<password>
Options
PX_IP_address—IP address of the Series appliance running the Series API.
username—The user name for your Series appliance.
password—The password for your Series appliance.
username—The user name of the user associated with the rsync-based exporter.
fullname—The full name of the user associated with the rsync-based exporter.
sshKeys—Value of the SSH key.
outputs—Optional. Output object.
Request body:
{
"username" : "<string>", "fullName" : "<string>", "sshKeys" : [
"<SSH_Key1>", "<SSH_Key2>"
]
"outputs" : [
<Optional Output Object 1>,
<Optional Output Object 2>
]
}
Example
POST https://xxx.xxx.xxx.xxx/api/4.0/config/export/rsync/exporters
Required header:
--user npadmin:hammerhead
Request body:
{
"username" : "john", "fullName" : "john doe", "sshKeys" : [
"PretendIAmAnSSHKey", "PretendIAmAnotherSSHKey"
]
"outputs" : [
<Optional Output Object 1>,
<Optional Output Object 2>
]
}
Add an Rsync exporter response
The response is a JSON object detailing the exporter. In a successful request the object you sent will be returned back to you.
HTTP/1.1 [Response Code] [Response Message] Date: [Date]
Content-Type: [Content Type]
{
"username" : "will", "fullName" : "will taylor", "sshKeys" : [
"PretendIAmAnSSHKey", "PretendIAmAnotherSSHKey"
]
["outputs"] : [
<Optional Output Object 1>,
<Optional Output Object 2>
]
}
Response fields
Response Code—A standard HTML response code.
Response Message—A standard HTML response message.
Date—Standard HTML date format.
Content-type—The response format.
Example
HTTP/1.1 200 OK
Date: Tue, 06 Feb 2018 05:12:09 GMT
Content-Type: application/json; charset=utf-8
{
"username" : "will", "fullName" : "will taylor", "sshKeys" : [
"PretendIAmAnSSHKey", "PretendIAmAnotherSSHKey"
]
"outputs" : [
<Optional Output Object 1>,
<Optional Output Object 2>
]
}
cURL code sample: Add an Rsync exporter
The code sample was run with cURL 7.57.0.
curl --user npadmin:hammerhead https://xxx.xxx.xxx.xxx/api/4.0/config/export/rsync/exporters -k -X POST -d '{"username" : "will", "fullName" : "will taylor", "PretendIAmAnSSHKey", "PretendIAmAnotherSSHKey"] ["outputs"]
: [<Optional Output Object 1>, <Optional Output Object 2>]}'
This cURL sample includes the following options:
--user npadmin:hammerhead—Replace npadmin with the user name for your Series appliance. Replace hammerhead with the password for your Series appliance.
https://xxx.xxx.xxx.xxx/api/4.0/config/export/rsync/exporters—The exporter request URL. Replace
xxx.xxx.xxx.xxx with the IP address of your Series appliance.
-k—This option explicitly allows cURL to perform insecure SSL connections and transfers, which allows you to test your SSL connection without installing a CA certificate.
-X POST—This option specifies using the POST method.
-d '{"username" : "will", "fullName" : "will taylor", "PretendIAmAnSSHKey", "PretendIAmAnotherSSHKey"] ["outputs"] : [<Optional Output Object 1>, <Optional Output Object 2>]}'—Specifies the new exporter.
Results
This example creates an rsync exporter. The output is in JSON.
List Rsync exporter details request
To get details of a specific rsync exporter, send the following request:
GET https://<PX_IP_address>/api/4.0/config/export/rsync/exporters/<exporter>
Required header:
--user <username>:<password>
Options
PX_IP_address—IP address of the Series appliance running the Series API.
username—The user name for your Series appliance.
password—The password for your Series appliance.
exporter—The name of the exporter.
Example
GET https://xxx.xxx.xxx.xxx/api/4.0/config/export/rsync/exporters/<exporter>
Required header:
--user cpx:hammerhead
List Rsync exporter details response
HTTP/1.1 [Response Code] [Response Message] Date: [Date]
Content-Type: [Content Type]
{
"username" : "will", "fullName" : "will taylor", "sshKeys" : [
"PretendIAmAnSSHKey", "PretendIAmAnotherSSHKey"
]
"outputs" : [
<Optional Output Object 1>,
<Optional Output Object 2>
]
}
Response Code—A standard HTTP response code.
Response Message—A standard HTTP response message.
Date—Standard HTML date format.
Content Type—The response format.
Example
HTTP/1.1 200 OK
Date: Wed, 21 Mar 2018 21:46:13 GMT
Content-Type: application/json; charset=utf-8
{
"username" : "will", "fullName" : "will taylor", "sshKeys" : [
"PretendIAmAnSSHKey", "PretendIAmAnotherSSHKey"
]
"outputs" : [
<Optional Output Object 1>,
<Optional Output Object 2>
]
}
cURL code sample: List Rsync exporter details
The code sample was run with cURL 7.57.0.
curl -k --user cpx:hammerhead https://xxx.xxx.xxx.xxx/api/4.0/config/export/rsync/exporters/<exporter>
This cURL sample includes the following options:
-k—This option explicitly allows cURL to perform insecure SSL connections and transfers, which allows you to test your SSL connection without installing a CA certificate.
--user cpx:hammerhead—Replace cpx with the user name for your Series appliance. Replace hammerhead with the password for your Series appliance.
https://xxx.xxx.xxx.xxx/api/4.0/config/export/rsync/exporters/<exporter>—The rsync request URL. Replace
xxx.xxx.xxx.xxx with the IP address of your Series appliance, and <exporter> with the name of the exporter.
Results
This example returns the details of the specified exporter. The output is in JSON.
Update Rsync exporter request
To update a specific rsync exporter, send the following request:
PUT https://<PX_IP_address>/api/4.0/export/rsync/exporters/<exporter>
 Note
Note
To use this request, you must belong to the sudo group.
Required header:
--user <username>:<password>
Request body:
{
"fullName" : "string", "sshKeys" : [
"string"
]
}
Options
PX_IP_address—IP address of the Series appliance running the Series API.
username—The user name for your Series appliance.
password—The password for your Series appliance.
exporter—The name of the exporter.
Example
PUT https://xxx.xxx.xxx.xxx/api/4.0/export/rsync/exporters/my_exporter
Required header:
--user npadmin:hammerhead
Request body:
{
["fullName"] : "will taylor jr", ["sshKeys"] : [
"NowIOnlyHaveOneSSHKey"
]
}
Update Rsync exporter response
HTTP/1.1 [Response Code] [Response Message] Date: [Date]
Content-Type: [Content Type]
{
"username" : "will", "fullName" : "will taylor jr", "sshKeys" : [
"NowIOnlyHaveOneSSHKey"
]
["outputs"] : [
<Optional Output Object 1>,
<Optional Output Object 2>
]
}
Response fields
Response Code—A standard HTML response code.
Response Message—A standard HTML response message.
Date—Standard HTML date format.
Example
HTTP/1.1 200 OK
Date: Mon, 09 Apr 2018 01:21:58 GMT
Content-Type: application/json; charset=utf-8
cURL code sample: Update Rsync exporter
The code sample was run with cURL 7.57.0.
curl --user npadmin:hammerhead https://xxx.xxx.xxx.xxx/api/4.0/export/rsync/exporters/my_exporter -k -X PUT -d '{["fullName"] : "will taylor jr",["sshKeys"] : ["NowIOnlyHaveOneSSHKey"]}'
This cURL sample includes the following options:
--user npadmin:hammerhead—Replace npadmin with the user name for your Series appliance. Replace hammerhead with the password for your Series appliance.
https://xxx.xxx.xxx.xxx/api/4.0/export/rsync/exporters/my_exporter—The exporter request URL. Replace
xxx.xxx.xxx.xxx with the IP address of your Series appliance, and my_exporter with the name of your exporter.
-k—This option explicitly allows cURL to perform insecure SSL connections and transfers, which allows you to test your SSL connection without installing a CA certificate.
-X PUT—This option specifies using the PUT method.
-d '{["fullName"] : "will taylor jr",["sshKeys"] : ["NowIOnlyHaveOneSSHKey"]}'—This option specifies the updated output.
Results
This example updates the SSH key of the specified exporter.
Delete an Rsync exporter request
To delete a specific rsync exporter, send the following request:
DELETE https://<PX_IP_address>/api/4.0/config/export/rsync/exporters/<exporter>
 Note
Note
To use this request, you must belong to the sudo group.
Required header:
--user <username>:<password>
Options
PX_IP_address—IP address of the Series appliance running the Series API.
username—The user name for your Series appliance.
password—The password for your Series appliance.
Parameters
filter-name—The name of the filter to delete.
Example
DELETE https://xxx.xxx.xxx.xxx/api/4.0/config/export/rsync/exporters/my-exporter
Required header:
--user npadmin:hammerhead
Delete an Rsync exporter response
The response is a JSON object detailing the filter. In a successful request the object you sent will be returned back to you.
HTTP/1.1 [Response Code] [Response Message] Date: [Date]
Content-Type: [Content Type]
Response fields
Response Code—A standard HTML response code indicating success or failure
Response Message—A standard HTML response message.
Date—Standard HTML date format.
Content-ype—The response format.
Example
HTTP/1.1 200 OK
Date: Tue, 06 Feb 2018 05:12:09 GMT
Content-Type: application/json; charset=utf-8
cURL code sample: Delete an Rsync exporter
The code sample was run with cURL 7.57.0.
curl --user npadmin:hammerhead https://xxx.xxx.xxx.xxx/api/4.0/config/export/rsync/exporters/my-exporter -k -X DELETE
This cURL sample includes the following options:
--user npadmin:hammerhead—Replace npadmin with the user name for your Series appliance. Replace hammerhead with the password for your Series appliance.
https://xxx.xxx.xxx.xxx/api/4.0/config/exportexport/rsync/exporters/my-exporter—The rsync request URL. Replace xxx.xxx.xxx.xxx with the IP address of your Series appliance, and my-exporter with the name of your exporter.
-k—This option explicitly allows cURL to perform insecure SSL connections and transfers, which allows you to test your SSL connection without installing a CA certificate.
-X DELETE—This option specifies using the DELETE method.
Results
This example deletes the specified exporter.
Rsync exporter outputs request
To retrieve a list of outputs for an exporter, send the following request:
GET https://<PX_IP_address>/api/4.0/config/export/rsync/exporters/<exporter>/outputs
Required header:
--user <username>:<password>
Options
PX_IP_address—IP address of the Series appliance running the Series API.
username—The user name for your Series appliance.
password—The password for your Series appliance.
exporter—The name of the exporter.
Example
GET https://xxx.xxx.xxx.xxx/api/4.0/config/export/rsync/exporters/my-exporter/outputs
Required header:
--user npadmin:hammerhead
Rsync exporter outputs response
HTTP/1.1 [Response Code] [Response Message] Date: [Date]
Content-Type: [Content Type] [
"<output1>", "<output2>", "<outputN>"
]
Response fields
Response Code—A standard HTML response code.
Response Message—A standard HTML response message.
Date—Standard HTML date format.
Content Type—The response format.
outputs—Output configurations.
Example
HTTP/1.1 200 OK
Date: Fri, 10 Mar 2018 01:52:58 GMT
Content-Type: application/json; charset=utf-8 [
"<Directory1>", "<Directory2>", "<DirectoryN>"
]
cURL code sample: Rsync exporter outputs
The code sample was run with cURL 7.57.0.
curl --user npadmin:hammerhead https://xxx.xxx.xxx.xxx/api/4.0/config/export/rsync/exporters/my-exporter/ outputs -k -X GET
This cURL sample includes the following options:
--user npadmin:hammerhead—Replace npadmin with the user name for your Series appliance. Replace hammerhead with the password for your Series appliance.
https://xxx.xxx.xxx.xxx/api/4.0/config/export/rsync/exporters/my-exporter/outputs—The exporter outputs request URL. Replace xxx.xxx.xxx.xxx with the IP address of your Series appliance, and my-exporter with the name of your exporter.
-k—This option explicitly allows cURL to perform insecure SSL connections and transfers, which allows you to test your SSL connection without installing a CA certificate.
-X GET—This option specifies using the GET method.
Results
This example lists rsync exporter outputs. The output is in JSON.
Add an Rsync exporter output request
To create a new rsync exporter output, send the following request:
POST https://<PX_IP_address>/api/4.0/config/export/rsync/exporters/<exporter>/outputs
 Note
Note
To use this request, you must belong to the sudo group.
Required header:
--user <username>:<password>
Options
PX_IP_address—IP address of the Series appliance running the Series API.
username—The user name for your Series appliance.
password—The password for your Series appliance.
exporter—The name of the exporter.
Request body:
{
"directory": "mail",
"eventTypes": ["A"], "filters": [
<Optional Filter Object 1>,
<Optional Filter Object 2>
]
}
Example
POST https://xxx.xxx.xxx.xxx/api/4.0/config/export/rsync/exporters/my-exporter/outputs
Required header:
--user npadmin:hammerhead
Request body:
{
"username" : "will", "fullName" : "will taylor", "sshKeys" : [
"PretendIAmAnSSHKey", "PretendIAmAnotherSSHKey"
]
"outputs" : [
<Optional Output Object 1>,
<Optional Output Object 2>
]
}
Add an Rsync exporter output response
The response is a JSON object detailing the exporter. In a successful request the object you sent will be returned back to you.
HTTP/1.1 [Response Code] [Response Message] Date: [Date]
Content-Type: [Content Type]
{
"username" : "<string>", "fullName" : "<string>", "sshKeys" : [
"<string>", "<string>"
]
"outputs" : [
<Optional Output Object 1>,
<Optional Output Object 2>
]
}
Response fields
Response Code—A standard HTML response code.
Response Message—A standard HTML response message.
Date—Standard HTML date format.
Content-ype—The response format.
eventTypes—The event types that correspond to event-related data.
filter—String detailing the filter.
Example
HTTP/1.1 200 OK
Date: Tue, 06 Feb 2018 05:12:09 GMT
Content-Type: application/json; charset=utf-8
{
"username" : "will", "fullName" : "will taylor", "sshKeys" : [
"PretendIAmAnSSHKey", "PretendIAmAnotherSSHKey"
]
"outputs" : [
<Optional Output Object 1>,
<Optional Output Object 2>
]
}
cURL code sample: Add an Rsync exporter output
The code sample was run with cURL 7.57.0.
curl --user npadmin:hammerhead https://xxx.xxx.xxx.xxx/api/4.0/config/export/rsync/exporters/my-exporter/outputs
-k -X POST -d '{ "username" : "will", "fullName" : "will taylor", "sshKeys" : [ "PretendIAmAnSSHKey", "PretendIAmAnotherSSHKey" ] ["outputs"] : [ <Optional Output Object 1>, <Optional Output Object 2> ] }'
This cURL sample includes the following options:
--user npadmin:hammerhead—Replace npadmin with the user name for your Series appliance. Replace hammerhead with the password for your Series appliance.
https://xxx.xxx.xxx.xxx/api/4.0/config/export/rsync/exporters/my-exporter/outputs—The exporter request URL. Replace xxx.xxx.xxx.xxx with the IP address of your Series appliance, and my-exporter with the name of the exporter.
-k—This option explicitly allows cURL to perform insecure SSL connections and transfers, which allows you to test your SSL connection without installing a CA certificate.
-X POST—This option specifies using the POST method.
-d '{ "username" : "will", "fullName" : "will taylor", "sshKeys" : [ "PretendIAmAnSSHKey", "PretendIAmAnotherSSHKey" ] ["outputs"] : [ <Optional Output Object 1>, <Optional Output Object 2> ]
}'—Specifies the new exporter output.
Results
This example creates an rsync exporter output. The output is in JSON.
Rsync exporter output details request
To retrieve details for a specific exporter output, send the following request:
GET https://<PX_IP_address>/api/4.0/config/export/rsync/exporters/<exporter>/outputs/<output>
Required header:
--user <username>:<password>
Options
PX_IP_address—IP address of the Series appliance running the Series API.
username—The user name for your Series appliance.
password—The password for your Series appliance.
exporter—The name of the exporter.
output—The name of the output.
Example
GET https://xxx.xxx.xxx.xxx/api/4.0/config/export/rsync/exporters/my-exporter/outputs/my-output
Required header:
--user npadmin:hammerhead
Rsync exporter output details response
HTTP/1.1 [Response Code] [Response Message] Date: [Date]
Content-Type: [Content Type]{ "directory": "mail",
"eventTypes": ["A"], "filters": [
<Optional Filter Object 1>,
<Optional Filter Object 2>
]
}
Response fields
Response Code—A standard HTML response code.
Response Message—A standard HTML response message.
Date—Standard HTML date format.
Content Type—The response format.
outputs—Output configurations.
Example
HTTP/1.1 200 OK
Date: Fri, 10 Mar 2018 01:52:58 GMT
Content-Type: application/json; charset=utf-8 [
"<Directory1>", "<Directory2>", "<DirectoryN>"
]
cURL code sample: Rsync exporter output details
The code sample was run with cURL 7.57.0.
curl --user npadmin:hammerhead https://xxx.xxx.xxx.xxx/api/4.0/config/export/rsync/exporters/my-exporter/ outputs/my-output -k -X GET
This cURL sample includes the following options:
--user npadmin:hammerhead—Replace npadmin with the user name for your Series appliance. Replace hammerhead with the
password for your Series appliance.
https://xxx.xxx.xxx.xxx/api/4.0/config/export/rsync/exporters/my-exporter/outputs/my-output—The exporter outputs request URL. Replace xxx.xxx.xxx.xxx with the IP address of your Series appliance, and my-exporter with the name of your exporter.
-k—This option explicitly allows cURL to perform insecure SSL connections and transfers, which allows you to test your SSL connection without installing a CA certificate.
-X GET—This option specifies using the GET method.
Results
This example lists rsync exporter output details. The output is in JSON.
Delete an Rsync exporter output request
To delete a specific rsync exporter output, send the following request:
DELETE https://<PX_IP_address>/api/4.0/config/export/rsync/exporters/<exporter>/output/<output>
 Note
Note
To use this request, you must belong to the sudo group.
Required header:
--user <username>:<password>
Options
PX_IP_address—IP address of the Series appliance running the Series API.
username—The user name for your Series appliance.
password—The password for your Series appliance.
exporter—The name of the exporter.
output—The name of the output.
Example
DELETE https://xxx.xxx.xxx.xxx/api/4.0/config/export/rsync/exporters/my-exporter/output/my-output
Required header:
--user npadmin:hammerhead
Delete an Rsync exporter output response
HTTP/1.1 [Response Code] [Response Message] Date: [Date]
Content-Type: [Content Type]
Response fields
Response Code—A standard HTML response code indicating success or failure
Response Message—A standard HTML response message.
Date—Standard HTML date format.
Content-type—The response format.
Example
HTTP/1.1 200 OK
Date: Tue, 06 Feb 2018 05:12:09 GMT
Content-Type: application/json; charset=utf-8
cURL code sample: Delete an Rsync exporter output
The code sample was run with cURL 7.57.0.
curl --user npadmin:hammerhead https://xxx.xxx.xxx.xxx/api/4.0/config/export/rsync/exporters/my-exporter/output/ my-output -k -X DELETE
This cURL sample includes the following options:
--user npadmin:hammerhead—Replace npadmin with the user name for your Series appliance. Replace hammerhead with the password for your Series appliance.
https://xxx.xxx.xxx.xxx/api/4.0/config/exportexport/rsync/exporters/my-exporter/output/my-output—The rsync request URL. Replace xxx.xxx.xxx.xxx with the IP address of your Series appliance, and my-exporter with the name of your exporter.
-k—This option explicitly allows cURL to perform insecure SSL connections and transfers, which allows you to test your SSL connection without installing a CA certificate.
-X DELETE—This option specifies using the DELETE method.
Results
This example deletes the specified exporter output.
Rsync exporter output filters request
To retrieve a list of output filters for an exporter output, send the following request:
GET https://<PX_IP_address>/api/4.0/config/export/rsync/exporters/<exporter>/outputs/<output>/filters
Required header:
--user <username>:<password>
Options
PX_IP_address—IP address of the Series appliance running the Series API.
username—The user name for your Series appliance.
password—The password for your Series appliance.
exporter—The name of the exporter.
output—The name of the output.
Example
GET https://xxx.xxx.xxx.xxx/api/4.0/config/export/rsync/exporters/my-exporter/outputs/my-output/filters
Required header:
--user npadmin:hammerhead
Rsync exporter output filters response
HTTP/1.1 [Response Code] [Response Message] Date: [Date]
Content-Type: [Content Type] [
"<filter1>", "<filter2>", "<filterN>"
]
Response fields
Response Code—A standard HTML response code.
Response Message—A standard HTML response message.
Date—Standard HTML date format.
Content Type—The response format.
filter—Output filter.
Example
HTTP/1.1 200 OK
Date: Fri, 10 Mar 2018 01:52:58 GMT
Content-Type: application/json; charset=utf-8 [
"<Directory1>", "<Directory2>", "<DirectoryN>"
]
cURL code sample: Rsync exporter output filters
The code sample was run with cURL 7.57.0.
curl --user npadmin:hammerhead https://xxx.xxx.xxx.xxx/api/4.0/config/export/rsync/exporters/my-exporter/ outputs/my-output/filters -k -X GET
This cURL sample includes the following options:
--user npadmin:hammerhead—Replace npadmin with the user name for your Series appliance. Replace hammerhead with the password for your Series appliance.
https://xxx.xxx.xxx.xxx/api/4.0/config/export/rsync/exporters/my-exporter/outputs/my-output/filters—The exporter outputs request URL. Replace xxx.xxx.xxx.xxx with the IP address of your Series appliance, and my-exporter with the name of your exporter.
-k—This option explicitly allows cURL to perform insecure SSL connections and transfers, which allows you to test your SSL connection without installing a CA certificate.
-X GET—This option specifies using the GET method.
Results
This example lists rsync exporter output filters. The output is in JSON.
Add an Rsync exporter output filter request
To create a new rsync exporter output filter, send the following request:
POST https://<PX_IP_address>/api/4.0/config/export/rsync/exporters/<exporter>/outputs/<output>/filters
 Note
Note
To use this request, you must belong to the sudo group.
Required header:
--user <username>:<password>
Options
PX_IP_address—IP address of the Series appliance running the Series API.
username—The user name for your Series appliance.
password—The password for your Series appliance.
exporter—The name of the exporter.
output—The name of the output.
Request body:
{
"name": "string",
"filter": "sourceIPv4Address = \"IP_address\" AND protocolIdentifier = 12", "eventTypes": [
"x",
"A",
"D", "L"
]
}
Example
POST https://xxx.xxx.xxx.xxx/api/4.0/config/export/rsync/exporters/my-exporter/outputs/my-output/filters
Required header:
--user npadmin:hammerhead
Request body:
{
"name": "myfilter",
"filter": "sourceIPv4Address = \"10.10.10.10\" AND protocolIdentifier = 12", "eventTypes": [
"x",
"A",
"D", "L"
]
}
Add an Rsync exporter output filter response
The response is a JSON object detailing the exporter. In a successful request the object you sent will be returned back to you.
HTTP/1.1 [Response Code] [Response Message] Date: [Date]
Content-Type: [Content Type]
{
"name": "string",
"filter": "sourceIPv4Address = \"IP_address\" AND protocolIdentifier = 12", "eventTypes": [
"x",
"A",
"D", "L"
]
}
Response fields
Response Code—A standard HTML response code.
Response Message—A standard HTML response message.
Date—Standard HTML date format.
Content-type—The response format.
eventTypes—The event types that correspond to event-related data.
filter—String detailing the filter.
Example
HTTP/1.1 200 OK
Date: Tue, 06 Feb 2018 05:12:09 GMT
Content-Type: application/json; charset=utf-8
{
"name": "myfilter",
"filter": "sourceIPv4Address = \"10.10.10.10\" AND protocolIdentifier = 12", "eventTypes": [
"x",
"A",
"D", "L"
]
}
cURL code sample: Add an Rsync exporter output filter
The code sample was run with cURL 7.57.0.
curl --user npadmin:hammerhead https://xxx.xxx.xxx.xxx/api/4.0/config/export/rsync/exporters/my-exporter/ outputs/my-output/filters -k -X POST -d '{ "name": "myfilter", "filter": "sourceIPv4Address = \"10.10.10.10\" AND protocolIdentifier = 12", "eventTypes": [ "x", "A", "D", "L" ] }'
This cURL sample includes the following options:
--user npadmin:hammerhead—Replace npadmin with the user name for your Series appliance. Replace hammerhead with the password for your Series appliance.
https://xxx.xxx.xxx.xxx/api/4.0/config/export/rsync/exporters/my-exporter/outputs/my-output/filters—The exporter request URL. Replace xxx.xxx.xxx.xxx with the IP address of your Series appliance, and my-exporter with the name of the exporter.
-k—This option explicitly allows cURL to perform insecure SSL connections and transfers, which allows you to test your SSL connection without installing a CA certificate.
-X POST—This option specifies using the POST method.
-d '{ "name": "myfilter", "filter": "sourceIPv4Address = \"10.10.10.10\" AND protocolIdentifier = 12", "eventTypes": [ "x", "A", "D", "L" ] }'—Specifies the new exporter output filter.
Results
This example creates an rsync exporter output filter. The output is in JSON.
Rsync exporter output filter details request
To return the configuration for a specific exporter output filter, send the following request:
GET https://<PX_IP_address>/api/4.0/config/export/rsync/ exporters/<exporter>/outputs/<output>/filters/<filter>
Required header:
--user <username>:<password>
Options
PX_IP_address—IP address of the Series appliance running the Series API.
username—The user name for your Series appliance.
password—The password for your Series appliance.
exporter—The name of the exporter.
output—The name of the output.
filter—The name of the filter.
Example
Required header:
--user npadmin:hammerhead
Rsync exporter output filter details response
HTTP/1.1 [Response Code] [Response Message] Date: [Date]
Content-Type: [Content Type]
{
"name": "string",
"filter": "sourceIPv4Address = \"IP_address\" AND protocolIdentifier = 12", "eventTypes": [
"x",
"A",
"D", "L"
]
}
Response fields
Response Code—A standard HTML response code.
Response Message—A standard HTML response message.
Date—Standard HTML date format.
Content Type—The response format.
Example
HTTP/1.1 200 OK
Date: Fri, 10 Mar 2018 01:52:58 GMT
Content-Type: application/json; charset=utf-8
{
"name": "my-filter",
"filter": "sourceIPv4Address = \"10.10.10.10\" AND protocolIdentifier = 12", "eventTypes": [
"x",
"A",
"D", "L"
]
}
cURL code sample: Rsync exporter output filter details
The code sample was run with cURL 7.57.0.
curl --user npadmin:hammerhead https://xxx.xxx.xxx.xxx/api/4.0/config/export/rsync/exporters/my-exporter/ outputs/my-output/filters/my-filter -k -X GET
This cURL sample includes the following options:
--user npadmin:hammerhead—Replace npadmin with the user name for your Series appliance. Replace hammerhead with the password for your Series appliance.
https://xxx.xxx.xxx.xxx/api/4.0/config/export/rsync/exporters/my-exporter/outputs/my-output/filters/my-filter—The exporter outputs request URL. Replace xxx.xxx.xxx.xxx with the IP address of your Series appliance, my-exporter with the name of your exporter, and my-output with the name of your output.
-k—This option explicitly allows cURL to perform insecure SSL connections and transfers, which allows you to test your SSL connection without installing a CA certificate.
-X GET—This option specifies using the GET method.
Results
This example lists rsync exporter output filter details. The output is in JSON.
Delete an Rsync exporter output filter request
To delete a specific rsync exporter output filter, send the following request:
DELETE https://<PX_IP_address>/api/4.0/config/export/rsync/ exporters/<exporter>/output/<output>/filters/<filter>
 Note
Note
To use this request, you must belong to the sudo group.
Required header:
--user <username>:<password>
Options
PX_IP_address—IP address of the Series appliance running the Series API.
username—The user name for your Series appliance.
password—The password for your Series appliance.
exporter—The name of the exporter.
output—The name of the output.
filter—The name of the filter to delete.
Example
DELETE https://xxx.xxx.xxx.xxx/api/4.0/config/export/rsync/exporters/my-exporter/output/my-output/filters/my-filter
Required header:
--user npadmin:hammerhead
Delete an Rsync exporter output filter response
HTTP/1.1 [Response Code] [Response Message] Date: [Date]
Content-Type: [Content Type]
Response fields
Response Code—A standard HTML response code indicating success or failure
Response Message—A standard HTML response message.
Date—Standard HTML date format.
Content-ype—The response format.
Example
HTTP/1.1 200 OK
Date: Tue, 06 Feb 2018 05:12:09 GMT
Content-Type: application/json; charset=utf-8
cURL code sample: Delete an Rsync exporter output filter
The code sample was run with cURL 7.57.0.
curl --user npadmin:hammerhead https://xxx.xxx.xxx.xxx/api/4.0/config/export/rsync/exporters/my-exporter/output/ my-output/filter/my-filter -k -X DELETE
This cURL sample includes the following options:
--user npadmin:hammerhead—Replace npadmin with the user name for your Series appliance. Replace hammerhead with the password for your Series appliance.
https://xxx.xxx.xxx.xxx/api/4.0/config/exportexport/rsync/exporters/my-exporter/output/my-output/filters/ my-filter—The rsync request URL. Replace xxx.xxx.xxx.xxx with the IP address of your Series appliance, my-exporter with the name of your exporter, and my-filter with the name of your filter.
-k—This option explicitly allows cURL to perform insecure SSL connections and transfers, which allows you to test your SSL connection without installing a CA certificate.
-X DELETE—This option specifies using the DELETE method.
Results
This example deletes the specified exporter output filter.
ZMQ configuration
ZMQ is a JSON object filter query language added to all forms of metadata export to control what metadata is sent off the box. This chapter details the API to configure this export for ZMQ metadata export.
Export configuration has two levels; one for outputs, and one for output filters. This allows you to split outputs and filters into manageable queries and also assign meaningful names to the filters for management.
Use the ZMQ configuration endpoints to find which components can be configured and then change their values or restore the default values:
GET https://<PX_IP_address>/api/4.0/config/export/zmq
PUT https://<PX_IP_address>/api/4.0/config/export/zmq
GET https://<PX_IP_address>/api/4.0/config/export/zmq/outputs
POST https://<PX_IP_address>/api/4.0/config/export/zmq/outputs
GET https://<PX_IP_address>/api/4.0/config/export/zmq/outputs/<output>
PUT https://<PX_IP_address>/api/4.0/config/export/zmq/outputs/<output>
DELETE https://<PX_IP_address>/api/4.0/config/export/zmq/outputs/<output>
GET https://<PX_IP_address>/api/4.0/config/export/zmq/outputs/<output>/filters
POST https://<PX_IP_address>/api/4.0/config/export/zmq/outputs/<output>/filters
GET https://<PX_IP_address>/api/4.0/config/export/zmq/outputs/<output>/filters/<filter>
DELETE https://<PX_IP_address>/api/4.0/config/export/zmq/outputs/<output>/filters/<filter>
ZMQ export configuration request
To get the current configuration for ZMQ outputs, send the following request:
GET https://<PX_IP_address>/api/4.0/config/export/zmq
Export configuration has two levels. You can first specify a set of event types that you are interested in seeing for a given export. You can then specify a set of event types and a filter query that will remove all metadata records that match the event type specified if the filter query is true. This allows you to split filters up into manageable queries and also assign meaningful names to the filters for management.
Required header:
--user <username>:<password>
Options
PX_IP_address—IP address of the Series appliance running the Series API.
username—The user name for your Series appliance.
password—The password for your Series appliance.
Example
GET https://xxx.xxx.xxx.xxx/api/4.0/config/export/zmq
Required header:
--user npadmin:hammerhead
ZMQ export configuration response
HTTP/1.1 [Response Code] [Response Message] Date: [Date]
Content-Type: [Content Type]
{
"outputs": [
{<output1 config>},
{<output2 config>}
]
}
Response fields
Response Code—A standard HTML response code.
Response Message—A standard HTML response message.
Date—Standard HTML date format.
Content Type—The response format.
Example
HTTP/1.1 200 OK
Date: Tue, 07 Feb 2017 00:17:49 GMT
Content-Type: application/json; charset=utf-8
{
"outputs": [
{ <output1 config>},
{ <output2 config>}
]
}
cURL code sample: ZMQ export configuration
The code sample was run with cURL 7.57.0.
curl --user npadmin:hammerhead https://xxx.xxx.xxx.xxx/api/4.0/config/export/zmq -k -X GET'
This cURL sample includes the following options:
--user npadmin:hammerhead—Replace npadmin with the user name for your Series appliance. Replace hammerhead with the password for your Series appliance.
https://xxx.xxx.xxx.xxx/api/4.0/config/export/zmq—The component configuration request URL. Replace
xxx.xxx.xxx.xxx with the IP address of your Series appliance.
-k—This option explicitly allows cURL to perform insecure SSL connections and transfers, which allows you to test your SSL connection without installing a CA certificate.
-X GET—This option specifies using the GET method.
Results
This example gets the ZMQ export configuration. The output is in JSON.
Update ZMQ export configuration request
To replace the ZMQ export configuration, send the following request:
PUT https://<PX_IP_address>/api/4.0/config/export/zmq
 Note
Note
To use this request, you must belong to the sudo group.
You cannot update ZMQ export while it is being synchronized or if a system upgrade, backup, or restore is in progress.
Required header:
--user <username>:<password>
Request body:
{
"outputs": [
{ <output1 config>},
{ <output2 config>}
]
}
Options
PX_IP_address—IP address of the Series appliance running the Series API.
username—The user name for your Series appliance.
password—The password for your Series appliance.
Example
PUT https://xxx.xxx.xxx.xxx/api/4.0/config/export/zmq
Required header:
--user npadmin:hammerhead
Request body:
{
"outputs": [
{ <output1 config>},
{ <output2 config>}
]
}
Update ZMQ export configuration response
HTTP/1.1 [Response Code] [Response Message] Date: [Date]
Content-Type: [Content Type]
Response fields
Response Code—A standard HTML response code.
Response Message—A standard HTML response message.
Date—Standard HTML date format.
Content Type—The response format.
Example
HTTP/1.1 200 OK
Date: Tue, 07 Feb 2017 00:17:49 GMT
Content-Type: application/json; charset=utf-8
cURL code sample: Update ZMQ export configuration
The code sample was run with cURL 7.57.0.
curl --user npadmin:hammerhead https://xxx.xxx.xxx.xxx/api/4.0/config/export/zmq -k -X PUT --data-binary '{"outputs":[ {<output1 config>}, {<output2 config>}]}'
This cURL sample includes the following options:
--user npadmin:hammerhead—Replace npadmin with the user name for your Series appliance. Replace hammerhead with the password for your Series appliance.
https://xxx.xxx.xxx.xxx/api/4.0/config/export/zmq—The component configuration request URL. Replace
xxx.xxx.xxx.xxx with the IP address of your Series appliance.
-k—This option explicitly allows cURL to perform insecure SSL connections and transfers, which allows you to test your SSL connection without installing a CA certificate.
-X PUT—This option specifies using the PUT method.
--data-binary '{"outputs": [{ <output1 config>},{ <output2 config>}]}'—This option specifies the changes to make to ZMQ export.
Results
This example updates the ZMQ export configuration. The output is in JSON.
ZMQ outputs request
To list ZMQ outputs, send the following request:
GET https://<PX_IP_address>/api/4.0/config/export/zmq/outputs
Required header:
--user <username>:<password>
Options
PX_IP_address—IP address of the Series appliance running the Series API.
username—The user name for your Series appliance.
password—The password for your Series appliance.
Example
GET https://xxx.xxx.xxx.xxx/api/4.0/config/export/zmq/outputs
Required header:
--user npadmin:hammerhead
ZMQ outputs response
HTTP/1.1 [Response Code] [Response Message] Date: [Date]
Content-Type: [Content Type] [
"<output1>", "<output2>", "<outputN>"
]
Response fields
Response Code—A standard HTML response code.
Response Message—A standard HTML response message.
Date—Standard HTML date format.
Content Type—The response format.
Example
HTTP/1.1 200 OK
Date: Tue, 07 Feb 2017 00:17:49 GMT
Content-Type: application/json; charset=utf-8 [
"<output1>", "<output2>", "<outputN>"
]
cURL code sample: ZMQ outputs
The code sample was run with cURL 7.57.0.
curl --user npadmin:hammerhead https://xxx.xxx.xxx.xxx/api/4.0/config/export/zmq/outputs -k -X GET'
This cURL sample includes the following options:
--user npadmin:hammerhead—Replace npadmin with the user name for your Series appliance. Replace hammerhead with the password for your Series appliance.
https://xxx.xxx.xxx.xxx/api/4.0/config/export/zmq/outputs—The component configuration request URL. Replace
xxx.xxx.xxx.xxx with the IP address of your Series appliance.
-k—This option explicitly allows cURL to perform insecure SSL connections and transfers, which allows you to test your SSL connection without installing a CA certificate.
-X GET—This option specifies using the GET method.
Results
This example gets a list of ZMQ outputs. The output is in JSON.
Add ZMQ output request
To add a new ZMQ output, send the following request:
POST https://<PX_IP_address>/api/4.0/config/export/zmq/outputs
 Note
Note
To use this request, you must belong to the sudo group.
Required header:
--user <username>:<password>
Request body:
{
"name": "myoutput",
"address": "ipc:///var/run/flow/test.zmq5", "eventTypes": [
"A"
],
"filters": [
<filter1>,
<filter2>
]
}
Options
PX_IP_address—IP address of the Series appliance running the Series API.
username—The user name for your Series appliance.
password—The password for your Series appliance.
Example
POST https://xxx.xxx.xxx.xxx/api/4.0/config/export/zmq/outputs
Required header:
--user npadmin:hammerhead
Request body:
{
"name": "myoutput",
"address": "ipc:///var/run/flow/test.zmq5", "eventTypes": [
"A"
],
"filters": [
<filter1>,
<filter2>
]
}
Add ZMQ output response
HTTP/1.1 [Response Code] [Response Message] Date: [Date]
Content-Type: [Content Type]
Response fields
Response Code—A standard HTML response code.
Response Message—A standard HTML response message.
Date—Standard HTML date format.
Content Type—The response format.
Example
HTTP/1.1 200 OK
Date: Tue, 06 Feb 2018 00:13:09 GMT
Content-Type: application/json; charset=utf-8
{
"name": "myoutput",
"address": "ipc:///var/run/flow/test.zmq5", "eventTypes": [
"A"
],
"filters": [
<filter1>,
<filter2>
]
}
cURL code sample: Add ZMQ output
The code sample was run with cURL 7.57.0.
curl --user npadmin:hammerhead https://xxx.xxx.xxx.xxx/api/4.0/config/export/zmq/outputs -k -X POST --data-binary '{"name": "myoutput", "address": "ipc:///var/run/flow/test.zmq5", "eventTypes": ["A"], "filters": [<filter1>,<filter2>]}'
This cURL sample includes the following options:
--user npadmin:hammerhead—Replace npadmin with the user name for your Series appliance. Replace hammerhead with the password for your Series appliance.
https://xxx.xxx.xxx.xxx/api/4.0/config/export/zmq/outputs—The component configuration request URL. Replace
xxx.xxx.xxx.xxx with the IP address of your Series appliance.
-k—This option explicitly allows cURL to perform insecure SSL connections and transfers, which allows you to test your SSL connection without installing a CA certificate.
-X POST—This option specifies using the POST method.
--data-binary '{"name": "myoutput", "address": "ipc:///var/run/flow/test.zmq5", "eventTypes": ["A"], "filters": [<filter1>,<filter2>]}'—This option specifies the new output.
Results
This example adds a new ZMQ output. The output is in JSON.
ZMQ output details request
To list the configuration for a ZMQ output, send the following request:
GET https://<PX_IP_address>/api/4.0/config/export/zmq/outputs/<output>
Required header:
--user <username>:<password>
Options
PX_IP_address—IP address of the Series appliance running the Series API.
username—The user name for your Series appliance.
password—The password for your Series appliance.
output—The name of the ZMQ output.
Example
GET https://xxx.xxx.xxx.xxx/api/4.0/config/export/zmq/outputs/<output>
Required header:
--user npadmin:hammerhead
ZMQ output details response
HTTP/1.1 [Response Code] [Response Message] Date: [Date]
Content-Type: [Content Type] [
"<output1>", "<output2>", "<outputN>"
]
Response fields
Response Code—A standard HTML response code.
Response Message—A standard HTML response message.
Date—Standard HTML date format.
Content Type—The response format.
Example
HTTP/1.1 200 OK
Date: Tue, 07 Feb 2017 00:17:49 GMT
Content-Type: application/json; charset=utf-8 [
"<output1>", "<output2>", "<outputN>"
]
cURL code sample: ZMQ output details
The code sample was run with cURL 7.57.0.
curl --user npadmin:hammerhead https://xxx.xxx.xxx.xxx/api/4.0/config/export/zmq/outputs/myoutput -k -X GET'
This cURL sample includes the following options:
--user npadmin:hammerhead—Replace npadmin with the user name for your Series appliance. Replace hammerhead with the password for your Series appliance.
https://xxx.xxx.xxx.xxx/api/4.0/config/export/zmq/outputs/myoutput—The configuration request URL. Replace
xxx.xxx.xxx.xxx with the IP address of your Series appliance, and myoutput with the name of the output.
-k—This option explicitly allows cURL to perform insecure SSL connections and transfers, which allows you to test your SSL connection without installing a CA certificate.
-X GET—This option specifies using the GET method.
Results
This example gets the configuration for a ZMQ output. The output is in JSON.
Update ZMQ output request
To replace the ZMQ export configuration, send the following request:
PUT https://<PX_IP_address>/api/4.0/config/export/zmq/outputs/<output>
 Note
Note
To use this request, you must belong to the sudo group.
You cannot update ZMQ export while it is being synchronized or if a system upgrade, backup, or restore is in progress.
Required header:
--user <username>:<password>
Request body:
{
"address": "ipc:///var/run/flow/test.zmq6", "eventTypes": [
"A"
],
"filters": [
<filter1>,
<filter2>
]
}
Options
PX_IP_address—IP address of the Series appliance running the Series API.
username—The user name for your Series appliance.
password—The password for your Series appliance.
output—The name of the ZMQ output.
Example
PUT https://xxx.xxx.xxx.xxx/api/4.0/config/export/zmq/outputs/<output>
Required header:
--user npadmin:hammerhead
Request body:
{
"address": "ipc:///var/run/flow/test.zmq6", "eventTypes": [
"A"
],
"filters": [
<filter1>,
<filter2>
]
}
Update ZMQ output response
HTTP/1.1 [Response Code] [Response Message] Date: [Date]
Content-Type: [Content Type]
Response fields
Response Code—A standard HTML response code.
Response Message—A standard HTML response message.
Date—Standard HTML date format.
Content Type—The response format.
Example
HTTP/1.1 200 OK
Date: Tue, 06 Feb 2018 00:18:39 GMT
Content-Type: application/json; charset=utf-8
{
"name": "myoutput",
"address": "ipc:///var/run/flow/test.zmq", "eventTypes": [
"A"
],
"filters": [
<filter1>,
<filter2>
]
}
cURL code sample: Update ZMQ output
The code sample was run with cURL 7.57.0.
curl --user npadmin:hammerhead https://xxx.xxx.xxx.xxx/api/4.0/config/export/zmq/outputs/myoutput -k -X PUT --data-binary '{"address": "ipc:///var/run/flow/test.zmq6","eventTypes": ["A"],"filters": [<filter1>, <filter2>]}'
This cURL sample includes the following options:
--user npadmin:hammerhead—Replace npadmin with the user name for your Series appliance. Replace hammerhead with the password for your Series appliance.
https://xxx.xxx.xxx.xxx/api/4.0/config/export/zmq/outputs/myoutput—The ZMQ configuration request URL. Replace
xxx.xxx.xxx.xxx with the IP address of your Series appliance, and myoutput with the name of the output.
-k—This option explicitly allows cURL to perform insecure SSL connections and transfers, which allows you to test your SSL connection without installing a CA certificate.
-X PUT—This option specifies using the PUT method.
--data-binary '{"address": "ipc:///var/run/flow/test.zmq6","eventTypes": ["A"], "filters": [<filter1>,
<filter2>]}'—This option specifies the changes to make to the specified ZMQ output.
Results
This example updates the specified ZMQ output. The output is in JSON.
Delete ZMQ output request
To delete a specific ZMQ output, send the following request:
DELETE https://<PX_IP_address>/api/4.0/config/export/zmq/outputs/<output>
 Note
Note
To use this request, you must belong to the sudo group.
Required header:
--user <username>:<password>
Options
PX_IP_address—IP address of the Series appliance running the Series API.
username—The user name for your Series appliance.
password—The password for your Series appliance.
Parameters
output—The name of the ZMQ output.
Example
DELETE https://xxx.xxx.xxx.xxx/api/4.0/config/export/zmq/outputs/<output>
Required header:
--user npadmin:hammerhead
Delete ZMQ output response
HTTP/1.1 [Response Code] [Response Message] Date: [Date]
Content-Type: [Content Type]
Response fields
Response Code—A standard HTML response code.
Response Message—A standard HTML response message.
Date—Standard HTML date format.
Content Type—The response format.
Example
HTTP/1.1 204 No content
Date: Tue, 06 Feb 2018 00:18:40 GMT
Content-Type: application/json; charset=utf-8
cURL code sample: Delete ZMQ output
The code sample was run with cURL 7.57.0.
curl --user npadmin:hammerhead https://xxx.xxx.xxx.xxx/api/4.0/config/export/zmq/outputs/myoutput -k -X DELETE
This cURL sample includes the following options:
--user npadmin:hammerhead—Replace npadmin with the user name for your Series appliance. Replace hammerhead with the password for your Series appliance.
https://xxx.xxx.xxx.xxx/api/4.0/config/export/zmq/outputs/myoutput—The ZMQ configuration request URL. Replace
xxx.xxx.xxx.xxx with the IP address of your Series appliance, and myoutput with the name of the output to be deleted.
-k—This option explicitly allows cURL to perform insecure SSL connections and transfers, which allows you to test your SSL connection without installing a CA certificate.
-X DELETE—This option specifies using the DELETE method.
Results
This example deletes the specified ZMQ output.
ZMQ output filters request
To list ZMQ output filters for a specific output, send the following request:
GET https://<PX_IP_address>/api/4.0/config/export/zmq/outputs/<output>/filters
Required header:
--user <username>:<password>
Options
PX_IP_address—IP address of the Series appliance running the Series API.
username—The user name for your Series appliance.
password—The password for your Series appliance.
output—The name of the ZMQ output.
Example
GET https://xxx.xxx.xxx.xxx/api/4.0/config/export/zmq/outputs/<output>/filters
Required header:
--user npadmin:hammerhead
ZMQ output filters response
HTTP/1.1 [Response Code] [Response Message] Date: [Date]
Content-Type: [Content Type] [
"<filter1>", "<filter2>"
]
Response fields
Response Code—A standard HTML response code.
Response Message—A standard HTML response message.
Date—Standard HTML date format.
Content Type—The response format.
Example
HTTP/1.1 200 OK
Date: Tue, 06 Feb 2018 00:16:31 GMT
Content-Type: application/json; charset=utf-8 [
"<filter1>", "<filter2>"
]
cURL code sample: ZMQ output filters
The code sample was run with cURL 7.57.0.
curl --user npadmin:hammerhead https://xxx.xxx.xxx.xxx/api/4.0/config/export/zmq/outputs/myoutput/filters -k -X GET'
This cURL sample includes the following options:
--user npadmin:hammerhead—Replace npadmin with the user name for your Series appliance. Replace hammerhead with the password for your Series appliance.
https://xxx.xxx.xxx.xxx/api/4.0/config/export/zmq/outputs/myoutput/filters—The output filter request URL. Replace xxx.xxx.xxx.xxx with the IP address of your Series appliance, and myoutput with the name of your output.
-k—This option explicitly allows cURL to perform insecure SSL connections and transfers, which allows you to test your SSL connection without installing a CA certificate.
-X GET—This option specifies using the GET method.
Results
This example gets a list of ZMQ output filters. The output is in JSON.
Add ZMQ output filter request
To create a ZMQ output filter for a specific output, send the following request:
POST https://<PX_IP_address>/api/4.0/config/export/zmq/outputs/<output>/filters
 Note
Note
To use this request, you must belong to the sudo group.
Required header:
--user <username>:<password>
Request body:
{
"name": "filter_name",
"filter": "sourceIPv4Address = \"xx.xx.xx.xx\" AND protocolIdentifier = int",
"eventTypes": [ "x",
"A",
"D", "L"
]
}
Options
PX_IP_address—IP address of the Series appliance running the Series API.
username—The user name for your Series appliance.
password—The password for your Series appliance.
output—The name of the ZMQ output.
Example
POST https://xxx.xxx.xxx.xxx/api/4.0/config/export/zmq/outputs/<output>/filters
Required header:
--user npadmin:hammerhead
Add ZMQ output filter response
In a successful request you will get the object you sent returned back to you.
HTTP/1.1 [Response Code] [Response Message]
{
"name": "filter_name",
"filter": "sourceIPv4Address = \"xx.xx.xx.xx\" AND protocolIdentifier = int",
"eventTypes": [ "x",
"A",
"D", "L"
]
}
Response fields
Response Code—A standard HTML response code.
Response Message—A standard HTML response message.
Date—Standard HTML date format.
Content Type—The response format.
Example
HTTP/1.1 200 OK
Date: Tue, 06 Feb 2018 00:16:31 GMT
Content-Type: application/json; charset=utf-8
{
"name": "myFilter",
"filter": "sourceIPv4Address = \"10.10.10.10\" AND protocolIdentifier = 12",
"eventTypes": [ "x",
"A",
"D", "L"
]
}
cURL code sample: Add ZMQ output filter
The code sample was run with cURL 7.57.0.
curl --user npadmin:hammerhead https://xxx.xxx.xxx.xxx/api/4.0/config/export/zmq/outputs/myoutput/filters -k -X POST -d '{ "name": "myFilter", "filter": "sourceIPv4Address = \"10.10.10.10\" AND protocolIdentifier = 12", "eventTypes": [ "x", "A", "D", "L" ]}'
This cURL sample includes the following options:
--user npadmin:hammerhead—Replace npadmin with the user name for your Series appliance. Replace hammerhead with the password for your Series appliance.
https://xxx.xxx.xxx.xxx/api/4.0/config/export/zmq/outputs/myoutput/filters—The output filter request URL. Replace xxx.xxx.xxx.xxx with the IP address of your Series appliance, and myoutput with the name of your output.
-k—This option explicitly allows cURL to perform insecure SSL connections and transfers, which allows you to test your SSL connection without installing a CA certificate.
-X POST—This option specifies using the POST method.
-d '{ "name": "myFilter", "filter": "sourceIPv4Address = \"10.10.10.10\" AND protocolIdentifier = 12", "eventTypes": [ "x", "A", "D", "L" ]}'—Specifies the new output filter.
Results
This example gets a list of ZMQ output filters. The output is in JSON.
ZMQ output filter details request
To list the configuration for a ZMQ output filter, send the following request:
GET https://<PX_IP_address>/api/4.0/config/export/zmq/outputs/<output>/filters/<filter>
Required header:
--user <username>:<password>
Options
PX_IP_address—IP address of the Series appliance running the Series API.
username—The user name for your Series appliance.
password—The password for your Series appliance.
output—(string) The name of the ZMQ output.
filter—(string) The name of the output filter.
Example
GET https://xxx.xxx.xxx.xxx/api/4.0/config/export/zmq/outputs/myoutput>/filters/myfilter
Required header:
--user npadmin:hammerhead
ZMQ output filter details response
HTTP/1.1 [Response Code] [Response Message]
Date: [Date]
Content-Type: [Content Type]
{
"name": "myfilter",
"filter": "sourceIPv4Address = \"10.10.10.10\" AND protocolIdentifier = 12", "eventTypes": [
"x",
"A",
"D", "L"
]
}
Response fields
Response Code—A standard HTML response code.
Response Message—A standard HTML response message.
Date—Standard HTML date format.
Content Type—The response format.
Example
HTTP/1.1 200 OK
Date: Tue, 07 Feb 2017 00:17:49 GMT
Content-Type: application/json; charset=utf-8{ "name": "myfilter",
"filter": "sourceIPv4Address = \"10.10.10.10\" AND protocolIdentifier = 12", "eventTypes": [
"x",
"A",
"D", "L"
]
}
cURL code sample: ZMQ output filter details
The code sample was run with cURL 7.57.0.
curl --user npadmin:hammerhead https://xxx.xxx.xxx.xxx/api/4.0/config/export/zmq/outputs/myoutput/filters/ myfilter -k -X GET'
This cURL sample includes the following options:
--user npadmin:hammerhead—Replace npadmin with the user name for your Series appliance. Replace hammerhead with the password for your Series appliance.
https://xxx.xxx.xxx.xxx/api/4.0/config/export/zmq/outputs/myoutput/filters/myfilter—The configuration request URL. Replace xxx.xxx.xxx.xxx with the IP address of your Series appliance, myoutput with the name of the output, and myfilter with the name of your filter.
-k—This option explicitly allows cURL to perform insecure SSL connections and transfers, which allows you to test your SSL connection without installing a CA certificate.
-X GET—This option specifies using the GET method.
Results
This example gets the configuration for a ZMQ output filter. The output is in JSON.
Delete ZMQ output filter request
To delete a ZMQ output filter, send the following request:
DELETE https://<PX_IP_address>/api/4.0/config/export/zmq/outputs/<output>/filters/<filter>
 Note
Note
To use this request, you must belong to the sudo group.
Required header:
--user <username>:<password>
Options
PX_IP_address—IP address of the Series appliance running the Series API.
username—The user name for your Series appliance.
password—The password for your Series appliance.
output—(string) The name of the ZMQ output.
filter—(string) The name of the output filter.
Example
DELETE https://xxx.xxx.xxx.xxx/api/4.0/config/export/zmq/outputs/<output>/filters/<filter>
Required header:
--user npadmin:hammerhead
Delete ZMQ output filter response
HTTP/1.1 [Response Code] [Response Message] Date: [Date]
Content-Type: [Content Type]
Response fields
Response Code—A standard HTML response code.
Response Message—A standard HTML response message.
Date—Standard HTML date format.
Example
HTTP/1.1 204 No content
Date: Tue, 07 Feb 2017 00:17:49 GMT
cURL code sample: Delete ZMQ output filter
The code sample was run with cURL 7.57.0.
curl --user npadmin:hammerhead https://xxx.xxx.xxx.xxx/api/4.0/config/export/zmq/ outputs/<output>/filters/<filter> -k -X DELETE'
This cURL sample includes the following options:
--user npadmin:hammerhead—Replace npadmin with the user name for your Series appliance. Replace hammerhead with the password for your Series appliance.
https://xxx.xxx.xxx.xxx/api/4.0/config/export/zmq/outputs/<output>/filters/<filter>—The component configuration request URL. Replace xxx.xxx.xxx.xxx with the IP address of your Series appliance.
-k—This option explicitly allows cURL to perform insecure SSL connections and transfers, which allows you to test your SSL connection without installing a CA certificate.
-X DELETE—This option specifies using the DELETE method.
Results
This example deletes the specified ZMQ output filter.
Packet filters
Use the following endpoints to filter data throughout the PX pipeline:
GET https://<PX_IP_address>/api/4.0/config/packetfilters
POST https://<PX_IP_address>/api/4.0/config/packetfilters
GET https://<PX_IP_address>/api/4.0/config/packetfilters/<filter>
DELETE https://<PX_IP_address>/api/4.0/config/packetfilters/<filter>
Active packet filters request
To list the names of active packet filters, send the following request:
GET https://<PX_IP_address>/api/4.0/config/packetfilters
Required header:
--user <username>:<password>
Options
PX_IP_address—IP address of the Series appliance running the Series API.
username—The user name for your Series appliance.
password—The password for your Series appliance.
Example
GET https://xxx.xxx.xxx.xxx/api/4.0/config/export/packetfilters
Required header:
--user npadmin:hammerhead
Active packet filters response
HTTP/1.1 [Response Code] [Response Message] Date: [Date]
Content-Type: [Content Type]
{
"filters": [
"<filter1>", "filter2>"
]
}
Response fields
Response Code—A standard HTML response code.
Response Message—A standard HTML response message.
Date—Standard HTML date format.
Content Type—The response format.
filter—The name of the filter.
Example
HTTP/1.1 200 OK
Date: Tue, 06 Feb 2018 00:16:31 GMT
Content-Type: application/json; charset=utf-8
{
"filters": [
"willter", "kylter"
]
}
cURL code sample: Active packet filters
The code sample was run with cURL 7.57.0.
curl --user npadmin:hammerhead https://xxx.xxx.xxx.xxx/api/4.0/config/export/packetfilters -k -X GET
This cURL sample includes the following options:
--user npadmin:hammerhead—Replace npadmin with the user name for your Series appliance. Replace hammerhead with the password for your Series appliance.
https://xxx.xxx.xxx.xxx/api/4.0/config/export/packetfilters—The packet filter request URL. Replace
xxx.xxx.xxx.xxx with the IP address of your Series appliance, and myoutput with the name of your output.
-k—This option explicitly allows cURL to perform insecure SSL connections and transfers, which allows you to test your SSL connection without installing a CA certificate.
-X GET—This option specifies using the GET method.
Results
This example gets a list of packet filters. The output is in JSON.
Add Packet Filter Request
To create a packet filter, send the following request:
POST https://<PX_IP_address>/api/4.0/config/packetfilters
 Note
Note
This endpoint is restricted to sudo users.
Required header:
--user <username>:<password>
Request body:
{
"filter_name": "filter_name",
"filter": { "payload": Boolean, "session": Boolean, "flow": Boolean
},
"expiration": Unix_epoch, "source_mac": "mac_address", "dest_mac": "mac_address", "source_ip": "IP_address", "dest_ip": "IP_address", "source_port": port_num, "dest_port": port_num, "ethertype": "ethertype", "proto": protocol_num
}
Options
PX_IP_address—IP address of the PX Series appliance running the PX Series API.
username—The user name for your PX Series appliance.
password—The password for your PX Series appliance.
filter_name—Name of the packet filter (required).
filter—Various filtering facets. Valid filter facets are:
payload—Do not save this packet's payload to disk
session—Do not perform session analysis for this packet
flow—Do not perform flow analysis for this packet
By enabling all three of these options, the user effectively drops the packet at acquire.
expiration—Unix epoch when the packet should be dropped (excluding this field indicates no expiration)
source_ip—Source IP address (may be IPv4 or IPv6) - may contain CIDR notation (such as 10.10.10/24)
dest_ip—Destination IP address (may be IPv4 or IPv6) - may contain CIDR notation (such as 10.10.10/24)
source_port—Source port
dest_port—Destination port
ethertype—Ethertype (in hex representation)
proto—Protocol
dest_mac—Destination mac address
source_mac—Source mac address
Example
POST https://xxx.xxx.xxx.xxx/api/4.0/config/export/packetfilters
Required header:
--user npadmin:hammerhead
Request body:
{
"filter_name": "sethyll", "filter": {
"payload": true, "session": false, "flow": false
},
"expiration": 1512486907, "source_mac": "00:0a:95:9d:68:16",
"dest_mac": "00:0a:95:9d:68:16",
"source_ip": "10.10.10.10",
"dest_ip": "10.10.10.10",
"source_port": 80,
"dest_port": 80, "ethertype": "0x0800", "proto": 17
}
Add a Packet Filter Response
HTTP/1.1 [Response Code] [Response Message] Date: [Date]
Content-Type: [Content Type]
{
"filter_name": "filter_name", "creator": "username", "filter": {
"payload": Boolean, "session": Boolean, "flow": Boolean
},
"expiration": Unix_epoch, "created": Unix_epoch, "source_mac": "mac_address", "dest_mac": "mac_address", "source_ip": "mIP_address", "dest_ip": "IP_address", "source_port": port_num, "dest_port": port_num, "ethertype": "ethertype", "proto": protocol_num
}
Response Fields
Response Code—A standard HTML response code.
Response Message—A standard HTML response message.
Date—Standard HTML date format.
Content Type—The response format.
creator—The user which created the filter.
created—The Unix epoch when the filter was created.
All fields from request body.
Example
HTTP/1.1 200 OK
Date: Tue, 06 Feb 2018 00:16:35 GMT
Content-Type: application/json; charset=utf-8
{
"filter_name": "sethyll", "creator": "seth", "filter": {
"payload": true, "session": false, "flow": false
},
"expiration": 1512486907,
"created": 1512482932, "source_mac": "00:0a:95:9d:68:16",
"dest_mac": "00:0a:95:9d:68:16",
"source_ip": "10.10.10.10",
"dest_ip": "10.10.10.10",
"source_port": 80,
"dest_port": 80, "ethertype": "0x0800", "proto": 17
}
cURL Code Sample: Add a Packet Filter
The code sample was run with cURL 7.57.0.
curl --user npadmin:hammerhead https://xxx.xxx.xxx.xxx/api/4.0/config/export/packetfilters -k -X POST -d '{
"filter_name": "sethyll", "filter": { "payload": true, "session": false, "flow": false }, "expiration": 1512486907, "source_mac": "00:0a:95:9d:68:16", "dest_mac": "00:0a:95:9d:68:16", "source_ip": "10.10.10.10",
"dest_ip": "10.10.10.10", "source_port": 80, "dest_port": 80, "ethertype": "0x0800", "proto": 17 }'
This cURL sample includes the following options:
--user npadmin:hammerhead—Replace npadmin with the user name for your PX Series appliance. Replace hammerhead with the password for your PX Series appliance.
https://xxx.xxx.xxx.xxx/api/4.0/config/export/packetfilters—The packet filter request URL. Replace
xxx.xxx.xxx.xxx with the IP address of your PX Series appliance, and myoutput with the name of your output.
-k—This option explicitly allows cURL to perform insecure SSL connections and transfers, which allows you to test your SSL connection without installing a CA certificate.
-X POST—This option specifies using the POST method.
-d '{ "filter_name": "sethyll", "filter": { "payload": true, "session": false, "flow": false }, "expiration": 1512486907, "source_mac": "00:0a:95:9d:68:16", "dest_mac": "00:0a:95:9d:68:16", "source_ip": "10.10.10.10", "dest_ip": "10.10.10.10", "source_port": 80, "dest_port": 80, "ethertype": "0x0800", "proto": 17 }'—Data that specifies the new filter.
Results
This example creates a packet filter. The output is in JSON.
Packet Filter Details Request
To return details about an active packet filter, send the following request:
GET https://<PX_IP_address>/api/4.0/config/packetfilters/<filter>
Required header:
--user <username>:<password>
Options
PX_IP_address—IP address of the PX Series appliance running the PX Series API.
username—The user name for your PX Series appliance.
password—The password for your PX Series appliance.
filter—The name of the filter.
Example
GET https://xxx.xxx.xxx.xxx/api/4.0/config/export/packetfilters/sethyll
Required header:
--user npadmin:hammerhead
Packet Filter Details Response
HTTP/1.1 [Response Code] [Response Message] Date: [Date]
Content-Type: [Content Type]
{
"filter_name": "filter_name", "creator": "username", "filter": {
"payload": Boolean, "session": Boolean, "flow": Boolean
},
"expiration": Unix_epoch, "created": Unix_epoch, "source_mac": "mac_address", "dest_mac": "mac_address", "source_ip": "mIP_address", "dest_ip": "IP_address", "source_port": port_num, "dest_port": port_num, "ethertype": "ethertype", "proto": protocol_num
}
Response Fields
Response Code—A standard HTML response code.
Response Message—A standard HTML response message.
Date—Standard HTML date format.
Content Type—The response format.
filter_name—Name of the packet filter (required).
creator—The user which created the filter.
created—The Unix epoch when the filter was created.
filter—Various filtering facets. Valid filter facets are:
payload—Do not save this packet's payload to disk
session—Do not perform session analysis for this packet
flow—Do not perform flow analysis for this packet
By enabling all three of these options, the user effectively drops the packet at acquire.
expiration—Unix epoch when the packet should be dropped (excluding this field indicates no expiration)
source_ip—Source IP address (may be IPv4 or IPv6) - may contain CIDR notation (such as 10.10.10/24)
dest_ip—Destination IP address (may be IPv4 or IPv6) - may contain CIDR notation (such as 10.10.10/24)
source_port—Source port
dest_port—Destination port
ethertype—Ethertype (in hex representation)
proto—Protocol
dest_mac—Destination mac address
source_mac—Source mac address
Example
HTTP/1.1 200 OK
Date: Tue, 06 Feb 2018 00:17:42 GMT
Content-Type: application/json; charset=utf-8
{
"filter_name": "sethyll", "creator":, "seth", "filter": {
"payload": true, "session": false, "flow": false
},
"expiration": 1512486907,
"created": 1512482932, "source_mac": "00:0a:95:9d:68:16",
"dest_mac": "00:0a:95:9d:68:16",
"source_ip": "10.10.10.10",
"dest_ip": "10.10.10.10",
"source_port": 80,
"dest_port": 80, "ethertype": "0x0800", "proto": 17
}
cURL Code Sample: Packet Filter Details
The code sample was run with cURL 7.57.0.
curl --user npadmin:hammerhead https://xxx.xxx.xxx.xxx/api/4.0/config/export/packetfilters/sethyll -k -X GET
This cURL sample includes the following options:
--user npadmin:hammerhead—Replace npadmin with the user name for your PX Series appliance. Replace hammerhead with the password for your PX Series appliance.
https://xxx.xxx.xxx.xxx/api/4.0/config/export/packetfilters/sethyll—The packet filter request URL. Replace
xxx.xxx.xxx.xxx with the IP address of your PX Series appliance, and myoutput with the name of your output.
-k—This option explicitly allows cURL to perform insecure SSL connections and transfers, which allows you to test your SSL connection without installing a CA certificate.
-X GET—This option specifies using the GET method.
Results
This example returns the details about a specific packet filter. The output is in JSON.
Delete packet filter request
To delete a specific packet filter, send the following request:
DELETE https://<PX_IP_address>/api/4.0/config/packetfilters/<filter>
 Note
Note
This endpoint is restricted to sudo users.
Required header:
--user <username>:<password>
Options
PX_IP_address—IP address of the Series appliance running the Series API.
username—The user name for your Series appliance.
password—The password for your Series appliance.
filter—The name of the filter.
Example
DELETE https://xxx.xxx.xxx.xxx/api/4.0/config/export/packetfilters/my_filter
Required header:
--user npadmin:hammerhead
Delete packet filter response
HTTP/1.1 [Response Code] [Response Message] Date: [Date]
Content-Type: [Content Type]
Response fields
Response Code—A standard HTML response code.
Response Message—A standard HTML response message.
Date—Standard HTML date format.
Content Type—The response format.
filter—The name of the filter.
Example
HTTP/1.1 200 OK
Date: Wed, 06 Jun 2018 00:19:11 GMT
Content-Type: application/json; charset=utf-8
cURL code sample: Delete packet filter
The code sample was run with cURL 7.57.0.
curl --user npadmin:hammerhead https://xxx.xxx.xxx.xxx/api/4.0/config/export/packetfilters -k -X DELETE
This cURL sample includes the following options:
--user npadmin:hammerhead—Replace npadmin with the user name for your Series appliance. Replace hammerhead with the password for your Series appliance.
https://xxx.xxx.xxx.xxx/api/4.0/config/export/packetfilters—The packet filter request URL. Replace
xxx.xxx.xxx.xxx with the IP address of your Series appliance, and myoutput with the name of your output.
-k—This option explicitly allows cURL to perform insecure SSL connections and transfers, which allows you to test your SSL connection without installing a CA certificate.
-X DELETE—This option specifies using the DELETE method.
Results
This example deletes the specified packet filter.
HTTP
These endpoints allow you to export alerts and metadata by pushing the data from the Series appliance to the consumer in order to avoid polling for updated information. The following HTTP exporter endpoints are available:
GET https://<PX_IP_address>/api/4.0/config/export/http
GET https://<PX_IP_address>/api/4.0/config/export/http/<exporter>
POST https://<PX_IP_address>/api/4.0/config/export/http
PUT https://<PX_IP_address>/api/4.0/config/export/http/<exporter>
DELETE https://<PX_IP_address>/api/4.0/config/export/http/<exporter>
GET https://<PX_IP_address>/api/4.0/config/export/http/<exporter>/enabled
PUT https://<PX_IP_address>/api/4.0/config/export/http/<exporter>/enabled
GET https://<PX_IP_address>/api/4.0/config/export/http/<exporter>/metadata
PUT https://<PX_IP_address>/api/4.0/config/export/http/<exporter>/metadata
GET https://<PX_IP_address>/api/4.0/config/export/http/<exporter>/outputs
GET https://<PX_IP_address>/api/4.0/config/export/http/<exporter>/outputs/<output>
POST https://<PX_IP_address>/api/4.0/config/export/http/<exporter>/outputs
PUT https://<PX_IP_address>/api/4.0/config/export/http/<exporter>/outputs/<output>
DELETE https://<PX_IP_address>/api/4.0/config/export/http/<exporter>/outputs/<output>
GET https://<PX_IP_address>/api/4.0/config/export/http/<exporter>/outputs/<output>/filters
GET https://<PX_IP_address>/api/4.0/config/export/http/<exporter>/outputs/<output>/filters/<filter>
POST https://<PX_IP_address>/api/4.0/config/export/http/<exporter>/outputs/<output>/filters
PUT https://<PX_IP_address>/api/4.0/config/export/http/<exporter>/outputs/<output>/filters/<filter>
DELETE https://<PX_IP_address>/api/4.0/config/export/http/<exporter>/outputs/<output>/filters/<filter>
GET https://<PX_IP_address>/api/4.0/config/export/http/<exporter>/webhook
PUT https://<PX_IP_address>/api/4.0/config/export/http/<exporter>/webhook
GET https://<PX_IP_address>/api/4.0/config/export/http/<exporter>/status
HTTP export configuration request
To list the HTTP export configuration, send the following request: GET https://<PX_IP_address>/api/4.0/config/export/http Required header:
--user <username>:<password>
Options
PX_IP_address—IP address of the Series appliance running the Series API.
username—The user name for your Series appliance.
password—The password for your Series appliance.
Example
GET https://xxx.xxx.xxx.xxx/api/4.0/config/export/http
Required header:
--user cpx:hammerhead
HTTP export configuration response
HTTP/1.1 [Response Code] [Response Message] Date: [Date]
Content-Type: [Content Type]
[data]
Response fields
Response Code—A standard HTTP response code.
Response Message—A standard HTTP response message.
Date—Standard HTML date format.
Content Type—The response format.
Example
HTTP/1.1 200 OK
Date: Wed, 14 May 2019 09:39:08 GMT
Content-Type: application/json; charset=utf-8 [
{
"name": "athena_export", "enabled": true, "webhook": {
"url": "https://md.fireeye.com/px_metadata", "method": "POST",
"skipTLSVerify": true, "credentials": {
"auth": "TOKEN",
"config": {
"token": "asdfksaldfjsakldjfjsdaf", "header": "px-api-token"
}
},
"headers": {
"key": "value"
}
},
"metadata": {
"outputs": [
{
"directory": "mydir", "eventTypes": ["A", "D"], "filters": [
{
"name": "filter_1",
"filter": "destinationIPv4Address = 1.1.1.1", "eventTypes": ["A"]
}
]
}
],
"filter": "protocolIdentifier = 12", "eventTypes": [
"A", "D"
]
},
"status" : {
"last-upload": "2018-08-28T16:17:38-04:00",
"uploaded-files": 120,
"dropped-files": 0
}
}
]
cURL code sample: HTTP export configuration
The code sample was run with cURL 7.57.0.
curl -k --user cpx:hammerhead https://xxx.xxx.xxx.xxx/api/4.0/config/export/http
This cURL sample includes the following options:
-k—This option explicitly allows cURL to perform insecure SSL connections and transfers, which allows you to test your SSL connection without installing a CA certificate.
--user cpx:hammerhead—Replace cpx with the user name for your Series appliance. Replace hammerhead with the password for your Series appliance.
https://xxx.xxx.xxx.xxx/api/4.0/config/export/http—The HTTP export request URL. Replace xxx.xxx.xxx.xxx with the IP address of your Series appliance.
Results
This example returns the HTTP export configuration. The output is in JSON.
HTTP exporter request
To get the details for a specific HTTP exporter, send the following request: GET https://<PX_IP_address>/api/4.0/config/export/http/<exporter> Required header:
--user <username>:<password>
Options
PX_IP_address—IP address of the Series appliance running the Series API.
username—The user name for your Series appliance.
password—The password for your Series appliance.
exporter—The name of the exporter.
Example
GET https://xxx.xxx.xxx.xxx/api/4.0/config/export/http/athena_export
Required header:
--user cpx:hammerhead
HTTP exporter response
HTTP/1.1 [Response Code] [Response Message] Date: [Date]
Content-Type: [Content Type]
[data]
Response fields
Response Code—A standard HTTP response code.
Response Message—A standard HTTP response message.
Date—Standard HTML date format.
Content Type—The response format.
Example
HTTP/1.1 200 OK
Date: Wed, 14 May 2019 08:09:18 GMT
Content-Type: application/json; charset=utf-8
{
"name": "athena_export", "enabled": true, "webhook": {
"url": "https://md.fireeye.com/px_metadata", "method": "POST",
"skipTLSVerify": true, "credentials": {
"auth": "TOKEN",
"config": {
"token": "asdfksaldfjsakldjfjsdaf", "header": "px-api-token"
}
},
"headers": {
"key": "value"
}
},
"metadata": {
"outputs": [
{
"directory": "mydir", "eventTypes": ["A", "D"], "filters": [
{
"name": "filter_1",
"filter": "destinationIPv4Address = 1.1.1.1", "eventTypes": ["A"]
}
]
}
],
"filter": "protocolIdentifier = 12", "eventTypes": [
"A", "D"
]
},
"status" : {
"last-upload": "2018-08-28T16:17:38-04:00",
"uploaded-files": 120,
"dropped-files": 0
}
}
cURL code sample: HTTP exporter
The code sample was run with cURL 7.57.0.
curl -k --user cpx:hammerhead https://xxx.xxx.xxx.xxx/api/4.0/config/export/http/athena_export
This cURL sample includes the following options:
-k—This option explicitly allows cURL to perform insecure SSL connections and transfers, which allows you to test your SSL connection without installing a CA certificate.
--user cpx:hammerhead—Replace cpx with the user name for your Series appliance. Replace hammerhead with the password for your Series appliance.
https://xxx.xxx.xxx.xxx/api/4.0/config/export/http/athena_export—The HTTP export request URL. Replace
xxx.xxx.xxx.xxx with the IP address of your Series appliance, and athena_export with the name of your exporter.
Results
This example returns details of the specified HTTP exporter. The output is in JSON.
Add HTTP exporter request
To create a new HTTP exporter, send the following request:
POST https://<PX_IP_address>/api/4.0/config/export/http
 Note
Note
To use this request, you must belong to the sudo group.
Required header:
--user <username>:<password>
Options
PX_IP_address—IP address of the Series appliance running the Series API.
username—The user name for your Series appliance.
password—The password for your Series appliance.
Request body:
{
"name": "athena_export", "enabled": true, "webhook": {
"url": "https://md.fireeye.com/px_metadata", "method": "POST",
"skipTLSVerify": true, "credentials": {
"auth": "TOKEN",
"config": {
"token": "asdfksaldfjsakldjfjsdaf", "header": "px-api-token"
}
},
"headers": {
"key": "value"
}
},
"metadata": {
"outputs": [
{
"directory": "mydir", "eventTypes": ["A", "D"], "filters": [
{
"name": "filter_1",
"filter": "destinationIPv4Address = 1.1.1.1", "eventTypes": ["A"]
}
]
}
],
"filter": "protocolIdentifier = 12", "eventTypes": [
"A", "D"
]
},
"status" : {
"last-upload": "2018-08-28T16:17:38-04:00",
"uploaded-files": 120,
"dropped-files": 0
}
}
Example
POST https://xxx.xxx.xxx.xxx/api/4.0/config/export/http
Required header:
--user npadmin:hammerhead
Example request body:
{
"name": "athena_export", "enabled": true, "webhook": {
"url": "https://md.fireeye.com/px_metadata", "method": "POST",
"skipTLSVerify": true, "credentials": {
"auth": "TOKEN",
"config": {
"token": "asdfksaldfjsakldjfjsdaf", "header": "px-api-token"
}
},
"headers": {
"key": "value"
}
},
"metadata": {
"outputs": [
{
"directory": "mydir", "eventTypes": ["A", "D"], "filters": [
{
"name": "filter_1",
"filter": "destinationIPv4Address = 1.1.1.1", "eventTypes": ["A"]
}
]
}
],
"filter": "protocolIdentifier = 12", "eventTypes": [
"A", "D"
]
},
"status" : {
"last-upload": "2018-08-28T16:17:38-04:00",
"uploaded-files": 120,
"dropped-files": 0
}
}
Add an HTTP exporter response
The response is an updated list of HTTP exporters.
HTTP/1.1 [Response Code] [Response Message] Date: [Date]
Content-Type: [Content Type]
[
{
"name": "name", "enabled": Boolean, "webhook": {
"url": "URL",
"method": "POST", "skipTLSVerify": Boolean, "credentials": {
"auth": "TOKEN",
"config": {
"token": "token_string", "header": "px-api-token"
}
},
"headers": {
"key": "key_value"
}
},
"metadata": {
"outputs": [
{
"directory": "my_dir",
"eventTypes": ["event_type1", "event_type2"], "filters": [
{
"name": "string",
"filter": "filter",
"eventTypes": ["A"]
}
]
}
],
"filter": "filter", "eventTypes": [
"type1", "type2"
]
},
"status" : {
"last-upload": "date", "uploaded-files": int, "dropped-files": int
}
}
]
Response fields
Response Code—A standard HTML response code.
Response Message—A standard HTML response message.
Date—Standard HTML date format.
Content-type—The response format.
Example
HTTP/1.1 200 OK
Date: Tue, 06 Feb 2018 05:12:09 GMT
Content-Type: application/json; charset=utf-8 [
{
"name": "athena_export", "enabled": true, "webhook": {
"url": "https://md.fireeye.com/px_metadata", "method": "POST",
"skipTLSVerify": true, "credentials": {
"auth": "TOKEN",
"config": {
"token": "asdfksaldfjsakldjfjsdaf", "header": "px-api-token"
}
},
"headers": {
"key": "value"
}
},
"metadata": {
"outputs": [
{
"directory": "mydir", "eventTypes": ["A", "D"], "filters": [
{
"name": "filter_1",
"filter": "destinationIPv4Address = 1.1.1.1", "eventTypes": ["A"]
}
]
}
],
"filter": "protocolIdentifier = 12", "eventTypes": [
"A", "D"
]
},
"status" : {
"last-upload": "2018-08-28T16:17:38-04:00",
"uploaded-files": 120,
"dropped-files": 0
}
}
]
cURL code sample: Add an HTTP exporter
The code sample was run with cURL 7.57.0.
curl --user npadmin:hammerhead https://xxx.xxx.xxx.xxx/api/4.0/config/export/http -k -X POST -d @example.json
This cURL sample includes the following options:
--user npadmin:hammerhead—Replace npadmin with the user name for your Series appliance. Replace hammerhead with the password for your Series appliance.
https://xxx.xxx.xxx.xxx/api/4.0/config/export/http—The exporter request URL. Replace xxx.xxx.xxx.xxx with the IP address of your Series appliance.
-k—This option explicitly allows cURL to perform insecure SSL connections and transfers, which allows you to test your SSL connection without installing a CA certificate.
-X POST—This option specifies using the POST method.
-d @example.json—Specifies the file containing the parameters of the new exporter.
Results
This example creates an HTTP exporter. The output is in JSON.
Update HTTP exporter request
To update an HTTP exporter, send the following request:
PUT https://<PX_IP_address>/api/4.0/config/export/http/<exporter>
 Note
Note
To use this request, you must belong to the sudo group.
Required header:
--user <username>:<password>
Options
PX_IP_address—IP address of the Series appliance running the Series API.
username—The user name for your Series appliance.
password—The password for your Series appliance.
exporter—The name of the exporter.
Request body:
{
"name": "name", "enabled": Boolean, "webhook": {
"url": "URL",
"method": "POST", "skipTLSVerify": Boolean, "credentials": {
"auth": "TOKEN",
"config": {
"token": "token_string", "header": "px-api-token"
}
},
"headers": {
"key": "key_value"
}
},
"metadata": {
"outputs": [
{
"directory": "my_dir",
"eventTypes": ["event_type1", "event_type2"], "filters": [
{
"name": "string",
"filter": "filter",
"eventTypes": ["A"]
}
]
}
],
"filter": "filter", "eventTypes": [
"type1", "type2"
]
},
"status" : {
"last-upload": "date", "uploaded-files": int, "dropped-files": int
}
}
Example
PUT https://xxx.xxx.xxx.xxx/api/4.0/config/export/http/athena_export
Required header:
--user npadmin:hammerhead
Example request body:
{
"name": "athena_export", "enabled": true, "webhook": {
"url": "https://md.fireeye.com/px_metadata", "method": "POST",
"skipTLSVerify": true, "credentials": {
"auth": "TOKEN",
"config": {
"token": "asdfksaldfjsakldjfjsdaf", "header": "px-api-token"
}
},
"headers": {
"key": "value"
}
},
"metadata": {
"outputs": [
{
"directory": "mydir", "eventTypes": ["A", "D"], "filters": [
{
"name": "filter_1",
"filter": "destinationIPv4Address = 1.1.1.1", "eventTypes": ["A"]
}
]
}
],
"filter": "protocolIdentifier = 12", "eventTypes": [
"A", "D"
]
},
"status" : {
"last-upload": "2018-08-28T16:17:38-04:00",
"uploaded-files": 120,
"dropped-files": 0
}
}
Update an HTTP exporter response
The response is an updated list of HTTP exporters.
HTTP/1.1 [Response Code] [Response Message] Date: [Date]
Content-Type: [Content Type] [data]
Response fields
Response Code—A standard HTML response code.
Response Message—A standard HTML response message.
Date—Standard HTML date format.
Content-type—The response format.
name—Name of the exporter.
enabled—Whether exporter is enabled.
url—Request URL.
method—Method to use with the request URL.
skipTLSVerify—When true, connect even if the SSL connection is not secure. This is useful in cases where the server certificate is invalid or self signed.
auth—Authorization type; can be token or x509.
token—Authorization token.
header—The type of token.
directory— Location where outputs are stored.
eventTypes—The event types included in the outputs.
name—Filter name.
filter—The filter used by the exporter.
last-upload": "2018-08-28T16:17:38-04:00",— Date of last upload (GET only).
uploaded-files—Number of uploaded files (GET only).
dropped-files—Number of dropped files (GET only).
Example
HTTP/1.1 200 OK
Date: Tue, 06 Feb 2018 05:12:09 GMT
Content-Type: application/json; charset=utf-8 [
{
"name": "athena_export_update", "enabled": true,
"webhook": {
"url": "https://md.fireeye.com/px_metadata", "method": "POST",
"skipTLSVerify": true, "credentials": {
"auth": "TOKEN",
"config": {
"token": "asdfksaldfjsakldjfjsdaf", "header": "px-api-token"
}
},
"headers": {
"key": "value"
}
},
"metadata": {
"outputs": [
{
"directory": "mydir", "eventTypes": ["A", "D"], "filters": [
{
"name": "filter_1",
"filter": "destinationIPv4Address = 1.1.1.1", "eventTypes": ["A"]
}
]
}
],
"filter": "protocolIdentifier = 12", "eventTypes": [
"A", "D"
]
},
"status" : {
"last-upload": "2018-08-28T16:17:38-04:00",
"uploaded-files": 120,
"dropped-files": 0
}
}
]
cURL code sample: Update an HTTP exporter
The code sample was run with cURL 7.57.0.
curl --user npadmin:hammerhead https://xxx.xxx.xxx.xxx/api/4.0/config/export/http/athena_exporter -k -X PUT -d @example.json
This cURL sample includes the following options:
--user npadmin:hammerhead—Replace npadmin with the user name for your Series appliance. Replace hammerhead with the password for your Series appliance.
https://xxx.xxx.xxx.xxx/api/4.0/config/export/http/athena_exporter—The exporter request URL. Replace
xxx.xxx.xxx.xxx with the IP address of your Series appliance, and athena_exporter with the name of your exporter.
-k—This option explicitly allows cURL to perform insecure SSL connections and transfers, which allows you to test your SSL connection without installing a CA certificate.
-X PUT—This option specifies using the PUT method.
-d @example.json—Specifies the file containing the parameters of the exporter.
Results
This example updates an HTTP exporter. The output is in JSON.
Delete HTTP exporter request
To delete the HTTP export, send the following request:
DELETE https://<PX_IP_address>/api/4.0/config/export/http/<exporter>
 Note
Note
To use this request, you must belong to the sudo group.
Required header:
--user <username>:<password>
Options
PX_IP_address—IP address of the Series appliance running the Series API.
username—The user name for your Series appliance.
password—The password for your Series appliance.
exporter—The name of the exporter.
Example
DELETE https://xxx.xxx.xxx.xxx/api/4.0/config/export/http/my-exporter
Required header:
--user npadmin:hammerhead
Delete HTTP exporter response
HTTP/1.1 [Response Code] [Response Message] Date: [Date]
Content-Type: [Content Type]
Response fields
Response Code—A standard HTML response code indicating success or failure
Response Message—A standard HTML response message.
Date—Standard HTML date format.
Content-type—The response format.
Example
HTTP/1.1 200 OK
Date: Tue, 14 May 2019 03:12:57 GMT
Content-Type: application/json; charset=utf-8
cURL code sample: Delete HTTP exporter
The code sample was run with cURL 7.57.0.
curl --user npadmin:hammerhead https://xxx.xxx.xxx.xxx/api/4.0/config/export/http/my-exporter -k -X DELETE
This cURL sample includes the following options:
--user npadmin:hammerhead—Replace npadmin with the user name for your Series appliance. Replace hammerhead with the password for your Series appliance.
https://xxx.xxx.xxx.xxx/api/4.0/config/export/http/my-exporter—The HTTP export request URL. Replace
xxx.xxx.xxx.xxx with the IP address of your Series appliance, and my-exporter with the name of your exporter.
-k—This option explicitly allows cURL to perform insecure SSL connections and transfers, which allows you to test your SSL connection without installing a CA certificate.
-X DELETE—This option specifies using the DELETE method.
Results
This example deletes the specified HTTP exporter.
HTTP exporter enabled request
To get the enabled status for a specific HTTP exporter, send the following request:
GET https://<PX_IP_address>/api/4.0/config/export/http/<exporter>/enabled
Required header:
--user <username>:<password>
Options
PX_IP_address—IP address of the Series appliance running the Series API.
username—The user name for your Series appliance.
password—The password for your Series appliance.
exporter—The name of the exporter.
Example
GET https://xxx.xxx.xxx.xxx/api/4.0/config/export/http/athena_export/enabled
Required header:
--user cpx:hammerhead
HTTP exporter response
HTTP/1.1 [Response Code] [Response Message] Date: [Date]
Content-Type: [Content Type]
{
"enabled": Boolean
}
Response fields
Response Code—A standard HTTP response code.
Response Message—A standard HTTP response message.
Date—Standard HTML date format.
Content Type—The response format.
enabled—Enabled status of exporter.
Example
HTTP/1.1 200 OK
Date: Wed, 14 May 2019 09:19:39 GMT
Content-Type: application/json; charset=utf-8
{
"enabled": true
}
cURL code sample: HTTP exporter
The code sample was run with cURL 7.57.0.
curl -k --user cpx:hammerhead https://xxx.xxx.xxx.xxx/api/4.0/config/export/http/athena_export/enabled
This cURL sample includes the following options:
-k—This option explicitly allows cURL to perform insecure SSL connections and transfers, which allows you to test your SSL connection without installing a CA certificate.
--user cpx:hammerhead—Replace cpx with the user name for your Series appliance. Replace hammerhead with the password for your Series appliance.
https://xxx.xxx.xxx.xxx/api/4.0/config/export/http/athena_export/enabled—The HTTP export request URL. Replace
xxx.xxx.xxx.xxx with the IP address of your Series appliance, and athena_export with the name of your exporter.
Results
This example returns the enabled status of the specified HTTP exporter. The output is in JSON.
Change HTTP exporter enabled status request
To change an HTTP exporter's enabled status, send the following request:
PUT https://<PX_IP_address>/api/4.0/config/export/http/<exporter>/enabled
 Note
Note
To use this request, you must belong to the sudo group.
Required header:
--user <username>:<password>
Options
PX_IP_address—IP address of the Series appliance running the Series API.
username—The user name for your Series appliance.
password—The password for your Series appliance.
exporter—The name of the exporter.
Request body:
{
"enabled": Boolean
}
Example
PUT https://xxx.xxx.xxx.xxx/api/4.0/config/export/http/athena_export/enabled
Required header:
--user npadmin:hammerhead
Example request body:
{
"enabled": false
}
Change HTTP exporter enabled status response
HTTP/1.1 [Response Code] [Response Message] Date: [Date]
Content-Type: [Content Type]
{
"enabled": false
}
Response fields
Response Code—A standard HTML response code.
Response Message—A standard HTML response message.
Date—Standard HTML date format.
Content-ype—The response format.
Example
HTTP/1.1 200 OK
Date: Tue, 06 Feb 2018 06:32:41 GMT
Content-Type: application/json; charset=utf-8
{
"enabled": false
}
cURL code sample: Change HTTP exporter enabled status
The code sample was run with cURL 7.57.0.
curl --user npadmin:hammerhead https://xxx.xxx.xxx.xxx/api/4.0/config/export/http/athena_export/enabled -k -X PUT -d @example.json
This cURL sample includes the following options:
--user npadmin:hammerhead—Replace npadmin with the user name for your Series appliance. Replace hammerhead with the password for your Series appliance.
https://xxx.xxx.xxx.xxx/api/4.0/config/export/http/athena_export/enabled—The exporter request URL. Replace
xxx.xxx.xxx.xxx with the IP address of your Series appliance, and athena_export with the name of your exporter.
-k—This option explicitly allows cURL to perform insecure SSL connections and transfers, which allows you to test your SSL connection without installing a CA certificate.
-X PUT—This option specifies using the PUT method.
-d @example.json—Specifies the file containing the updated enabled status.
Results
This example changes an HTTP exporter's enabled status. The output is in JSON.
HTTP exporter metadata request
To get the metadata for a specific HTTP exporter, send the following request:
GET https://<PX_IP_address>/api/4.0/config/export/http/<exporter>/metadata
Required header:
--user <username>:<password>
Options
PX_IP_address—IP address of the Series appliance running the Series API.
username—The user name for your Series appliance.
password—The password for your Series appliance.
exporter—The name of the exporter.
Example
GET https://xxx.xxx.xxx.xxx/api/4.0/config/export/http/athena_export/metadata
Required header:
--user cpx:hammerhead
HTTP exporter metadata response
HTTP/1.1 [Response Code] [Response Message] Date: [Date]
Content-Type: [Content Type]
{
"metadata": {
"outputs": [
{
"directory": "mydir", "eventTypes": ["A", "D"], "filters": [
{
"name": "string",
"filter": "filter1",
"eventTypes": ["A"]
}
]
}
],
"filter": "filter2", "eventTypes": [
"A", "D"
]
}
}
Response fields
Response Code—A standard HTTP response code.
Response Message—A standard HTTP response message.
Date—Standard HTML date format.
Content Type—The response format.
Example
HTTP/1.1 200 OK
Date: Wed, 14 May 2019 09:12:34 GMT
Content-Type: application/json; charset=utf-8
{
"metadata": {
"outputs": [
{
"directory": "mydir", "eventTypes": ["A", "D"], "filters": [
{
"name": "filter_1",
"filter": "destinationIPv4Address = 1.1.1.1", "eventTypes": ["A"]
}
]
}
],
"filter": "protocolIdentifier = 12", "eventTypes": [
"A", "D"
]
}
}
cURL code sample: HTTP exporter metadata
The code sample was run with cURL 7.57.0.
curl -k --user cpx:hammerhead https://xxx.xxx.xxx.xxx/api/4.0/config/export/http/athena_exporter/metadata
This cURL sample includes the following options:
-k—This option explicitly allows cURL to perform insecure SSL connections and transfers, which allows you to test your SSL connection without installing a CA certificate.
--user cpx:hammerhead—Replace cpx with the user name for your Series appliance. Replace hammerhead with the password for your Series appliance.
https://xxx.xxx.xxx.xxx/api/4.0/config/export/http/athena_exporter/metadata—The HTTP metadata request URL. Replace xxx.xxx.xxx.xxx with the IP address of your Series appliance, and athena_exporter with the name of your exporter.
Results
This example returns metadata of the specified HTTP exporter. The output is in JSON.
Update an HTTP exporter metadata request
To update an HTTP exporter, send the following request:
PUT https://<PX_IP_address>/api/4.0/config/export/http/<exporter>/metadata
 Note
Note
To use this request, you must belong to the sudo group.
Required header:
--user <username>:<password>
Options
PX_IP_address—IP address of the Series appliance running the Series API.
username—The user name for your Series appliance.
password—The password for your Series appliance.
exporter—The name of the exporter.
Request body:
{
"metadata": {
"outputs": [
{
"directory": "my_dir",
"eventTypes": ["event_type1", "event_type2"], "filters": [
{
"name": "string",
"filter": "filter",
"eventTypes": ["A"]
}
]
}
],
"filter": "filter", "eventTypes": [
"type1", "type2"
]
}
}
Example
PUT https://xxx.xxx.xxx.xxx/api/4.0/config/export/http/athena_exporter/metadata
Required header:
--user npadmin:hammerhead
Example request body:
{
"metadata": {
"outputs": [
{
"directory": "mydir", "eventTypes": ["A", "D"], "filters": [
{
"name": "filter_1",
"filter": "destinationIPv4Address = 1.1.1.1", "eventTypes": ["A"]
}
]
}
],
"filter": "protocolIdentifier = 12", "eventTypes": [
"A", "D"
]
}
}
Update an HTTP exporter metadata response
The response is an updated list of HTTP exporters.
HTTP/1.1 [Response Code] [Response Message] Date: [Date]
Content-Type: [Content Type]
[data]
Response fields
Response Code—A standard HTML response code.
Response Message—A standard HTML response message.
Date—Standard HTML date format.
Content-type—The response format.
Example
HTTP/1.1 200 OK
Date: Tue, 14 May 2019 15:13:29 GMT
Content-Type: application/json; charset=utf-8
{
"metadata": {
"outputs": [
{
"directory": "mydir", "eventTypes": ["A", "D"], "filters": [
{
"name": "filter_1",
"filter": "destinationIPv4Address = 1.1.1.1", "eventTypes": ["A"]
}
]
}
],
"filter": "protocolIdentifier = 12", "eventTypes": [
"A", "D"
]
}
}
cURL code sample: Update an HTTP exporter metadata
The code sample was run with cURL 7.57.0.
curl --user npadmin:hammerhead https://xxx.xxx.xxx.xxx/api/4.0/config/export/http/athena_exporter/metadata -k -X PUT -d @example.json
This cURL sample includes the following options:
--user npadmin:hammerhead—Replace npadmin with the user name for your Series appliance. Replace hammerhead with the password for your Series appliance.
https://xxx.xxx.xxx.xxx/api/4.0/config/export/http/athena_exporter/metadata—The exporter request URL. Replace
xxx.xxx.xxx.xxx with the IP address of your Series appliance, and athena_exporter with the name of your exporter.
-k—This option explicitly allows cURL to perform insecure SSL connections and transfers, which allows you to test your SSL connection without installing a CA certificate.
-X PUT—This option specifies using the PUT method.
-d @example.json—Specifies the file containing the parameters of the metadata.
Results
This example updates the specified HTTP exporter's metadata. The output is in JSON.
HTTP exporter outputs request
To get the outputs for a specific HTTP exporter, send the following request:
GET https://<PX_IP_address>/api/4.0/config/export/http/<exporter>/outputs
Required header:
--user <username>:<password>
Options
PX_IP_address—IP address of the Series appliance running the Series API.
username—The user name for your Series appliance.
password—The password for your Series appliance.
exporter—The name of the exporter.
Example
GET https://xxx.xxx.xxx.xxx/api/4.0/config/export/http/athena_exporter/outputs
Required header:
--user cpx:hammerhead
HTTP exporter outputs response
HTTP/1.1 [Response Code] [Response Message] Date: [Date]
Content-Type: [Content Type]
{
"outputs": [
{
"directory": "mydir", "eventTypes": ["A", "D"], "filters": [
{
"name": "string",
"filter": "filter",
"eventTypes": ["A"]
}
]
}
]
}
Response fields
Response Code—A standard HTTP response code.
Response Message—A standard HTTP response message.
Date—Standard HTML date format.
Content Type—The response format.
Example
HTTP/1.1 200 OK
Date: Wed, 14 May 2019 08:43:17 GMT
Content-Type: application/json; charset=utf-8
{
"outputs": [
{
"directory": "mydir", "eventTypes": ["A", "D"], "filters": [
{
"name": "filter_1",
"filter": "destinationIPv4Address = 1.1.1.1", "eventTypes": ["A"]
}
]
}
]
}
cURL code sample: HTTP exporter outputs
The code sample was run with cURL 7.57.0.
curl -k --user cpx:hammerhead https://xxx.xxx.xxx.xxx/api/4.0/config/export/http/athena_exporter/outputs
This cURL sample includes the following options:
-k—This option explicitly allows cURL to perform insecure SSL connections and transfers, which allows you to test your SSL connection without installing a CA certificate.
--user cpx:hammerhead—Replace cpx with the user name for your Series appliance. Replace hammerhead with the password for your Series appliance.
https://xxx.xxx.xxx.xxx/api/4.0/config/export/http/athena_exporter/outputs—The HTTP exporter output request URL. Replace xxx.xxx.xxx.xxx with the IP address of your Series appliance, and athena_export with the name of your exporter.
Results
This example returns the outputs of the specified HTTP exporter. The output is in JSON.
HTTP exporter output by name request
To get the details of a specific output for an HTTP exporter, send the following request:
GET https://<PX_IP_address>/api/4.0/config/export/http/<exporter>/outputs/<output>
Required header:
--user <username>:<password>
Options
PX_IP_address—IP address of the Series appliance running the Series API.
username—The user name for your Series appliance.
password—The password for your Series appliance.
exporter—The name of the exporter.
output—The name of the output.
Example
GET https://xxx.xxx.xxx.xxx/api/4.0/config/export/http/athena_exporter/outputs/mydir
Required header:
--user cpx:hammerhead
HTTP exporter output by name response
HTTP/1.1 [Response Code] [Response Message] Date: [Date]
Content-Type: [Content Type]
{
"directory": "mydir", "eventTypes": ["A", "D"], "filters": [
{
"name": "string",
"filter": "filter",
"eventTypes": ["A"]
}
]
}
Response fields
Response Code—A standard HTTP response code.
Response Message—A standard HTTP response message.
Date—Standard HTML date format.
Content Type—The response format.
Example
HTTP/1.1 200 OK
Date: Wed, 14 May 2019 08:43:17 GMT
Content-Type: application/json; charset=utf-8
{
"directory": "mydir", "eventTypes": ["A", "D"], "filters": [
{
"name": "filter_1",
"filter": "destinationIPv4Address = 1.1.1.1", "eventTypes": ["A"]
}
]
}
cURL code sample: HTTP exporter output by name
The code sample was run with cURL 7.57.0.
curl -k --user cpx:hammerhead https://xxx.xxx.xxx.xxx/api/4.0/config/export/http/athena_exporter/outputs/ mydir
This cURL sample includes the following options:
-k—This option explicitly allows cURL to perform insecure SSL connections and transfers, which allows you to test your SSL connection without installing a CA certificate.
--user cpx:hammerhead—Replace cpx with the user name for your Series appliance. Replace hammerhead with the password for your Series appliance.
https://xxx.xxx.xxx.xxx/api/4.0/config/export/http/athena_exporter/outputs/mydir—The HTTP exporter output request URL. Replace xxx.xxx.xxx.xxx with the IP address of your Series appliance, athena_export with the name of your exporter, and mydir with the name of the output.
Results
This example returns the specified HTTP exporter output. The output is in JSON.
Add HTTP exporter outputs request
To add new HTTP exporter outputs, send the following request:
POST https://<PX_IP_address>/api/4.0/config/export/http/<exporter>/outputs
 Note
Note
To use this request, you must belong to the sudo group.
Required header:
--user <username>:<password>
Options
PX_IP_address—IP address of the Series appliance running the Series API.
username—The user name for your Series appliance.
password—The password for your Series appliance.
exporter—The name of the exporter.
Request body:
{
"outputs": [
{
"directory": "mydir", "eventTypes": ["A", "D"], "filters": [
{
"name": "string",
"filter": "filter",
"eventTypes": ["A"]
}
]
}
]
}
Example
POST https://xxx.xxx.xxx.xxx/api/4.0/config/export/http/athena_exporter/outputs
Required header:
--user npadmin:hammerhead
Example request body:
{
"outputs": [
{
"directory": "mydir", "eventTypes": ["A", "D"], "filters": [
{
"name": "filter_1",
"filter": "destinationIPv4Address = 1.1.1.1", "eventTypes": ["A"]
}
]
}
]
}
Add HTTP exporter outputs response
The response is an updated list of HTTP exporter outputs.
HTTP/1.1 [Response Code] [Response Message] Date: [Date]
Content-Type: [Content Type]
{
"outputs": [
{
"directory": "mydir", "eventTypes": ["A", "D"], "filters": [
{
"name": "string",
"filter": "filter",
"eventTypes": ["A"]
}
]
}
]
}
Response fields
Response Code—A standard HTML response code.
Response Message—A standard HTML response message.
Date—Standard HTML date format.
Content-type—The response format.
Example
HTTP/1.1 200 OK
Date: Tue, 06 Feb 2018 05:12:09 GMT
Content-Type: application/json; charset=utf-8
{
"outputs": [
{
"directory": "mydir", "eventTypes": ["A", "D"], "filters": [
{
"name": "filter_1",
"filter": "destinationIPv4Address = 1.1.1.1", "eventTypes": ["A"]
}
]
}
]
}
cURL code sample: Add HTTP exporter outputs
The code sample was run with cURL 7.57.0.
curl --user npadmin:hammerhead https://xxx.xxx.xxx.xxx/api/4.0/config/export/http/athena_exporter/outputs -k -X POST -d @example.json
This cURL sample includes the following options:
--user npadmin:hammerhead—Replace npadmin with the user name for your Series appliance. Replace hammerhead with the password for your Series appliance.
https://xxx.xxx.xxx.xxx/api/4.0/config/export/http/athena_exporter/outputs—The exporter request URL. Replace
xxx.xxx.xxx.xxx with the IP address of your Series appliance, and athena_exporter with the name of your exporter.
-k—This option explicitly allows cURL to perform insecure SSL connections and transfers, which allows you to test your SSL connection without installing a CA certificate.
-X POST—This option specifies using the POST method.
-d @example.json—Specifies the file containing the parameters of the new exporter outputs.
Results
This example returns an updated list of outputs for the specified HTTP exporter. The output is in JSON.
Update HTTP exporter output request
To update an HTTP exporter output, send the following request:
PUT https://<PX_IP_address>/api/4.0/config/export/http/<exporter>/outputs/<output>
 Note
Note
To use this request, you must belong to the sudo group.
Required header:
--user <username>:<password>
Options
PX_IP_address—IP address of the Series appliance running the Series API.
username—The user name for your Series appliance.
password—The password for your Series appliance.
exporter—The name of the exporter.
output—The name of the output.
Request body:
{
"directory": "my_dir",
"eventTypes": ["event_type1", "event_type2"], "filters": [
{
"name": "string",
"filter": "filter",
"eventTypes": ["A"]
}
]
}
Example
PUT https://xxx.xxx.xxx.xxx/api/4.0/config/export/http/athena_exporter/outputs/mydir
Required header:
--user npadmin:hammerhead
Example request body:
{
"directory": "mydir", "eventTypes": ["A", "D"], "filters": [
{
"name": "new_name",
"filter": "destinationIPv4Address = 2.2.2.2", "eventTypes": ["A"]
}
]
}
Update HTTP exporter output response
The response is an updated HTTP exporter output.
{
"directory": "my_dir",
"eventTypes": ["event_type1", "event_type2"], "filters": [
{
"name": "string",
"filter": "filter",
"eventTypes": ["A"]
}
]
}
Response fields
Response Code—A standard HTML response code.
Response Message—A standard HTML response message.
Date—Standard HTML date format.
Content-ype—The response format.
Example
{
"directory": "mydir", "eventTypes": ["A", "D"], "filters": [
{
"name": "new_name",
"filter": "destinationIPv4Address = 2.2.2.2", "eventTypes": ["A"]
}
]
}
cURL code sample: Update HTTP exporter output
The code sample was run with cURL 7.57.0.
curl --user npadmin:hammerhead https://xxx.xxx.xxx.xxx/api/4.0/config/export/http/athena_exporter/outputs/mydir
-k -X PUT -d @example.json
This cURL sample includes the following options:
--user npadmin:hammerhead—Replace npadmin with the user name for your Series appliance. Replace hammerhead with the password for your Series appliance.
https://xxx.xxx.xxx.xxx/api/4.0/config/export/http/athena_exporter/outputs/mydir—The exporter request URL. Replace xxx.xxx.xxx.xxx with the IP address of your Series appliance, athena_exporter with the name of your exporter, and mydir with the name of the output.
-k—This option explicitly allows cURL to perform insecure SSL connections and transfers, which allows you to test your SSL connection without installing a CA certificate.
-X PUT—This option specifies using the PUT method.
-d @example.json—Specifies the file containing the parameters of the metadata.
Results
This example updates the specified HTTP exporter's output. The output is in JSON.
Delete HTTP exporter output request
To delete an HTTP export output, send the following request:
DELETE https://<PX_IP_address>/api/4.0/config/export/http/<exporter>/outputs/<output>
 Note
Note
To use this request, you must belong to the sudo group.
Required header:
--user <username>:<password>
Options
PX_IP_address—IP address of the Series appliance running the Series API.
username—The user name for your Series appliance.
password—The password for your Series appliance.
exporter—The name of the exporter.
output—The name of the output.
Example
DELETE https://xxx.xxx.xxx.xxx/api/4.0/config/export/http/my-exporter/outputs/output-alpha
Required header:
--user npadmin:hammerhead
Delete HTTP exporter output response
HTTP/1.1 [Response Code] [Response Message] Date: [Date]
Response fields
Response Code—A standard HTML response code indicating success or failure
Response Message—A standard HTML response message.
Date—Standard HTML date format.
Example
HTTP/1.1 200 OK
Date: Tue, 14 May 2019 03:18:27 GMT
cURL code sample: Delete HTTP exporter output
The code sample was run with cURL 7.57.0.
curl --user npadmin:hammerhead https://xxx.xxx.xxx.xxx/api/4.0/config/export/http/my-exporter/outputs/output-alpha -k -X DELETE
This cURL sample includes the following options:
--user npadmin:hammerhead—Replace npadmin with the user name for your Series appliance. Replace hammerhead with the password for your Series appliance.
https://xxx.xxx.xxx.xxx/api/4.0/config/export/http/my-exporter—The HTTP export request URL. Replace xxx.xxx.xxx.xxx with the IP address of your Series appliance, my-exporter with the name of your exporter, and output-alpha with the name of the ouptut.
-k—This option explicitly allows cURL to perform insecure SSL connections and transfers, which allows you to test your SSL connection without installing a CA certificate.
-X DELETE—This option specifies using the DELETE method.
Results
This example deletes the specified HTTP exporter output.
HTTP exporter output filters request
To list filters for a specific output, send the following request:
GET https://<PX_IP_address>/api/4.0/config/export/http/<exporter>/outputs/<output>/filters
Required header:
--user <username>:<password>
Options
PX_IP_address—IP address of the Series appliance running the Series API.
username—The user name for your Series appliance.
password—The password for your Series appliance.
exporter—The name of the exporter.
output—The name of the output.
Example
GET https://xxx.xxx.xxx.xxx/api/4.0/config/export/http/athena_exporter/outputs/mydir/filters
Required header:
--user cpx:hammerhead
HTTP exporter output filters response
HTTP/1.1 [Response Code] [Response Message] Date: [Date]
Content-Type: [Content Type]
{
"filters": [
{
"name": "string",
"filter": "filter",
"eventTypes": ["A"]
}
]
}
Response fields
Response Code—A standard HTTP response code.
Response Message—A standard HTTP response message.
Date—Standard HTML date format.
Content Type—The response format.
Example
HTTP/1.1 200 OK
Date: Wed, 14 May 2019 15:13:27 GMT
Content-Type: application/json; charset=utf-8
{
"filters": [
{
"name": "filter_1",
"filter": "destinationIPv4Address = 1.1.1.1", "eventTypes": ["A"]
}
]
}
cURL code sample: HTTP exporter output filters
The code sample was run with cURL 7.57.0.
curl -k --user cpx:hammerhead https://xxx.xxx.xxx.xxx/api/4.0/config/export/http/athena_exporter/outputs/ mydir/filters
This cURL sample includes the following options:
-k—This option explicitly allows cURL to perform insecure SSL connections and transfers, which allows you to test your SSL connection without installing a CA certificate.
--user cpx:hammerhead—Replace cpx with the user name for your Series appliance. Replace hammerhead with the password for your Series appliance.
https://xxx.xxx.xxx.xxx/api/4.0/config/export/http/athena_exporter/outputs/mydir/filters—The filter request URL. Replace xxx.xxx.xxx.xxx with the IP address of your Series appliance, athena_export with the name of your exporter, and mydir with the name of the output.
Results
This example returns the filters for the specified HTTP exporter output. The output is in JSON.
HTTP exporter output filter by name request
To get the details of a specific output filter for an HTTP exporter, send the following request:
GET https://<PX_IP_address>/api/4.0/config/export/http/<exporter>/outputs/<output>/filters/<filter>
Required header:
--user <username>:<password>
Options
PX_IP_address—IP address of the Series appliance running the Series API.
username—The user name for your Series appliance.
password—The password for your Series appliance.
exporter—The name of the exporter.
output—The name of the output.
filter—The name of the filter.
Example
GET https://xxx.xxx.xxx.xxx/api/4.0/config/export/http/athena_exporter/outputs/mydir/filters/myfilter
Required header:
--user cpx:hammerhead
HTTP exporter output filter by name response
HTTP/1.1 [Response Code] [Response Message] Date: [Date]
Content-Type: [Content Type]
{
"name": "string",
"filter": "filter",
"eventTypes": ["A"]
}
Response fields
Response Code—A standard HTTP response code.
Response Message—A standard HTTP response message.
Date—Standard HTML date format.
Content Type—The response format.
Example
HTTP/1.1 200 OK
Date: Wed, 14 May 2019 13:33:15 GMT
Content-Type: application/json; charset=utf-8
{
"name": "filter_1",
"filter": "destinationIPv4Address = 1.1.1.1", "eventTypes": ["A"]
}
cURL code sample: HTTP exporter output filter by name
The code sample was run with cURL 7.57.0.
curl -k --user cpx:hammerhead https://xxx.xxx.xxx.xxx/api/4.0/config/export/http/athena_exporter/outputs/ mydir/filters/myfilter
This cURL sample includes the following options:
-k—This option explicitly allows cURL to perform insecure SSL connections and transfers, which allows you to test your SSL connection without installing a CA certificate.
--user cpx:hammerhead—Replace cpx with the user name for your Series appliance. Replace hammerhead with the password for your Series appliance.
https://xxx.xxx.xxx.xxx/api/4.0/config/export/http/athena_exporter/outputs/mydir/filters/myfilter—The HTTP exporter output request URL. Replace xxx.xxx.xxx.xxx with the IP address of your Series appliance, athena_export with the name of your exporter, mydir with the name of the output, and myfilter with the name of the filter.
Results
This example returns the specified HTTP exporter output filter. The output is in JSON.
Add HTTP exporter output filter request
To add new filters to an HTTP exporter output, send the following request:
POST https://<PX_IP_address>/api/4.0/config/export/http/<exporter>/outputs/<output>/filters
 Note
Note
To use this request, you must belong to the sudo group.
Required header:
--user <username>:<password>
Options
PX_IP_address—IP address of the Series appliance running the Series API.
username—The user name for your Series appliance.
password—The password for your Series appliance.
exporter—The name of the exporter.
output—The name of the output.
Request body:
{
"filters": [
{
"name": "string",
"filter": "filter",
"eventTypes": ["A"]
}
]
}
Example
POST https://xxx.xxx.xxx.xxx/api/4.0/config/export/http/athena_exporter/outputs/outputs/mydir/filters
Required header:
--user npadmin:hammerhead
Example request body:
{
"filters": [
{
"name": "filter_3",
"filter": "destinationIPv4Address = 3.3.3.3", "eventTypes": ["A"]
}
]
}
Add HTTP exporter output filter response
The response is an updated list of HTTP exporter outputs.
HTTP/1.1 [Response Code] [Response Message] Date: [Date]
Content-Type: [Content Type]
{
"filters": [
{
"name": "string",
"filter": "filter",
"eventTypes": ["A"]
}
]
}
Response fields
Response Code—A standard HTML response code.
Response Message—A standard HTML response message.
Date—Standard HTML date format.
Content-type—The response format.
Example
HTTP/1.1 200 OK
Date: Tue, 14 May 2019 05:22:09 GMT
Content-Type: application/json; charset=utf-8
{
"filters": [
{
"name": "filter_3",
"filter": "destinationIPv4Address = 3.3.3.3", "eventTypes": ["A"]
}
]
}
cURL code sample: Add HTTP exporter output filter
The code sample was run with cURL 7.57.0.
curl --user npadmin:hammerhead https://xxx.xxx.xxx.xxx/api/4.0/config/export/http/athena_exporter/outputs/
outputs/mydir/filters -k -X POST -d @example.json
This cURL sample includes the following options:
--user npadmin:hammerhead—Replace npadmin with the user name for your Series appliance. Replace hammerhead with the password for your Series appliance.
https://xxx.xxx.xxx.xxx/api/4.0/config/export/http/athena_exporter/outputs/outputs/mydir/filters—The filter request URL. Replace xxx.xxx.xxx.xxx with the IP address of your Series appliance, athena_exporter with the name of your exporter, and mydir with the name of the output.
-k—This option explicitly allows cURL to perform insecure SSL connections and transfers, which allows you to test your SSL connection without installing a CA certificate.
-X POST—This option specifies using the POST method.
-d @example.json—Specifies the file containing the parameters of the new exporter outputs.
Results
This example returns an updated list of output filters for the specified HTTP exporter. The output is in JSON.
Update HTTP exporter output filter request
To update an HTTP exporter output filter, send the following request:
PUT https://<PX_IP_address>/api/4.0/config/export/http/<exporter>/outputs/<output>/filters/<filter>
 Note
Note
To use this request, you must belong to the sudo group.
Required header:
--user <username>:<password>
Options
PX_IP_address—IP address of the Series appliance running the Series API.
username—The user name for your Series appliance.
password—The password for your Series appliance.
exporter—The name of the exporter.
output—The name of the output.
filter—The name of the filter.
Request body:
{
"name": "string",
"filter": "filter",
"eventTypes": ["A"]
}
Example
PUT https://xxx.xxx.xxx.xxx/api/4.0/config/export/http/athena_exporter/outputs/mydir/filters/myfilter
Required header:
--user npadmin:hammerhead
Example request body:
{
"name": "new_name",
"filter": "destinationIPv4Address = 4.2.4.2", "eventTypes": ["A"]
}
Update HTTP exporter output filter response
{
"name": "string",
"filter": "filter",
"eventTypes": ["A"]
}
Response fields
Response Code—A standard HTML response code.
Response Message—A standard HTML response message.
Date—Standard HTML date format.
Content-ype—The response format.
Example
{
"name": "new_name",
"filter": "destinationIPv4Address = 4.2.4.2", "eventTypes": ["A"]
}
cURL code sample: Update HTTP exporter output filter
The code sample was run with cURL 7.57.0.
curl --user npadmin:hammerhead https://xxx.xxx.xxx.xxx/api/4.0/config/export/http/athena_exporter/outputs/mydir/ filters/myfilter -k -X PUT -d @example.json
This cURL sample includes the following options:
--user npadmin:hammerhead—Replace npadmin with the user name for your Series appliance. Replace hammerhead with the password for your Series appliance.
https://xxx.xxx.xxx.xxx/api/4.0/config/export/http/athena_exporter/outputs/mydir—The filter request URL. Replace xxx.xxx.xxx.xxx with the IP address of your Series appliance, athena_exporter with the name of your exporter, and mydir with the name of the output.
-k—This option explicitly allows cURL to perform insecure SSL connections and transfers, which allows you to test your SSL connection without installing a CA certificate.
-X PUT—This option specifies using the PUT method.
-d @example.json—Specifies the file containing the parameters of the metadata.
Results
This example updates the specified HTTP exporter output filter. The output is in JSON.
Delete HTTP exporter output filter request
To delete an HTTP export output filter, send the following request:
DELETE https://<PX_IP_address>/api/4.0/config/export/http/<exporter>/outputs/<output>/filters/<filter>
 Note
Note
To use this request, you must belong to the sudo group.
Required header:
--user <username>:<password>
Options
PX_IP_address—IP address of the Series appliance running the Series API.
username—The user name for your Series appliance.
password—The password for your Series appliance.
exporter—The name of the exporter.
output—The name of the output.
filter—The name of the filter.
Example
DELETE https://xxx.xxx.xxx.xxx/api/4.0/config/export/http/my-exporter/outputs/output-alpha/filters/myfilter
Required header:
--user npadmin:hammerhead
Delete HTTP exporter output filter response
HTTP/1.1 [Response Code] [Response Message] Date: [Date]
Response fields
Response Code—A standard HTML response code indicating success or failure
Response Message—A standard HTML response message.
Date—Standard HTML date format.
Example
HTTP/1.1 200 OK
Date: Tue, 14 May 2019 05:11:55 GMT
cURL code sample: Delete HTTP exporter output filter
The code sample was run with cURL 7.57.0.
curl --user npadmin:hammerhead https://xxx.xxx.xxx.xxx/api/4.0/config/export/http/my-exporter/outputs/output-alpha/filters/myfilter -k -X DELETE
This cURL sample includes the following options:
--user npadmin:hammerhead—Replace npadmin with the user name for your Series appliance. Replace hammerhead with the password for your Series appliance.
https://xxx.xxx.xxx.xxx/api/4.0/config/export/http/my-exporter/filters/myfilter—The filter request URL. Replace xxx.xxx.xxx.xxx with the IP address of your Series appliance, my-exporter with the name of your exporter, output-alpha with the name of the ouptut, and myfilter with the name of the filter.
-k—This option explicitly allows cURL to perform insecure SSL connections and transfers, which allows you to test your SSL connection without installing a CA certificate.
-X DELETE—This option specifies using the DELETE method.
Results
This example deletes the specified HTTP exporter output filter.
HTTP exporter webhook request
To get the webhook for a specific HTTP exporter, send the following request:
GET https://<PX_IP_address>/api/4.0/config/export/http/<exporter>/webhook
Required header:
--user <username>:<password>
Options
PX_IP_address—IP address of the Series appliance running the Series API.
username—The user name for your Series appliance.
password—The password for your Series appliance.
exporter—The name of the exporter.
Example
GET https://xxx.xxx.xxx.xxx/api/4.0/config/export/http/athena_export/webhook
Required header:
--user cpx:hammerhead
HTTP exporter webhook response
HTTP/1.1 [Response Code] [Response Message] Date: [Date]
Content-Type: [Content Type]
{
"webhook": { "url": "URL",
"method": "POST", "skipTLSVerify": Boolean, "credentials": {
"auth": "TOKEN",
"config": {
"token": "token_string", "header": "px-api-token"
}
},
"headers": {
"key": "value"
}
}
}
Response fields
Response Code—A standard HTTP response code.
Response Message—A standard HTTP response message.
Date—Standard HTML date format.
Content Type—The response format.
Example
HTTP/1.1 200 OK
Date: Wed, 14 May 2019 08:09:18 GMT
Content-Type: application/json; charset=utf-8
{
"webhook": {
"url": "https://md.fireeye.com/px_metadata", "method": "POST",
"skipTLSVerify": true, "credentials": {
"auth": "TOKEN",
"config": {
"token": "asdfksaldfjsakldjfjsdaf", "header": "px-api-token"
}
},
"headers": {
"key": "value"
}
}
}
cURL code sample: HTTP exporter webhook
The code sample was run with cURL 7.57.0.
curl -k --user cpx:hammerhead https://xxx.xxx.xxx.xxx/api/4.0/config/export/http/athena_export/webhook
This cURL sample includes the following options:
-k—This option explicitly allows cURL to perform insecure SSL connections and transfers, which allows you to test your SSL connection without installing a CA certificate.
--user cpx:hammerhead—Replace cpx with the user name for your Series appliance. Replace hammerhead with the password for your Series appliance.
https://xxx.xxx.xxx.xxx/api/4.0/config/export/http/athena_export/webhook—The HTTP export request URL. Replace
xxx.xxx.xxx.xxx with the IP address of your Series appliance, and athena_export with the name of your exporter.
Results
This example returns the webhook of the specified HTTP exporter. The output is in JSON.
Update an HTTP exporter webhook request
To update an HTTP exporter, send the following request:
PUT https://<PX_IP_address>/api/4.0/config/export/http/<exporter>/webhook
 Note
Note
To use this request, you must belong to the sudo group.
Required header:
--user <username>:<password>
Options
PX_IP_address—IP address of the Series appliance running the Series API.
username—The user name for your Series appliance.
password—The password for your Series appliance.
exporter—The name of the exporter.
Request body:
{
"webhook": { "url": "URL",
"method": "POST", "skipTLSVerify": Boolean, "credentials": {
"auth": "TOKEN",
"config": {
"token": "token_string", "header": "px-api-token"
}
},
"headers": {
"key": "key_value"
}
}
}
Example
PUT https://xxx.xxx.xxx.xxx/api/4.0/config/export/http/athena_export/webhook
Required header:
--user npadmin:hammerhead
Example request body:
{
"webhook": {
"url": "https://md.fireeye.com/px_metadata", "method": "POST",
"skipTLSVerify": true, "credentials": {
"auth": "TOKEN",
"config": {
"token": "some_other_token", "header": "px-api-token"
}
},
"headers": {
"key": "value"
}
}
}
Update an HTTP exporter webhook response
The response is an updated list of HTTP exporters.
HTTP/1.1 [Response Code] [Response Message] Date: [Date]
Content-Type: [Content Type]
{
"webhook": { "url": "URL",
"method": "POST", "skipTLSVerify": Boolean, "credentials": {
"auth": "TOKEN",
"config": {
"token": "token_string", "header": "px-api-token"
}
},
"headers": {
"key": "value"
}
}
}
Response fields
Response Code—A standard HTML response code.
Response Message—A standard HTML response message.
Date—Standard HTML date format.
Content-type—The response format.
Example
HTTP/1.1 200 OK
Date: Tue, 06 Feb 2018 05:12:09 GMT
Content-Type: application/json; charset=utf-8
{
"webhook": {
"url": "https://md.fireeye.com/px_metadata", "method": "POST",
"skipTLSVerify": true, "credentials": {
"auth": "TOKEN",
"config": {
"token": "some_other_token", "header": "px-api-token"
}
},
"headers": {
"key": "value"
}
}
}
cURL code sample: Update an HTTP exporter webhook
The code sample was run with cURL 7.57.0.
curl --user npadmin:hammerhead https://xxx.xxx.xxx.xxx/api/4.0/config/export/http/athena_exporter/webhook -k -X PUT -d @example.json
This cURL sample includes the following options:
--user npadmin:hammerhead—Replace npadmin with the user name for your Series appliance. Replace hammerhead with the password for your Series appliance.
https://xxx.xxx.xxx.xxx/api/4.0/config/export/http/athena_exporter/webhook—The exporter request URL. Replace
xxx.xxx.xxx.xxx with the IP address of your Series appliance, and athena_exporter with the name of your exporter.
-k—This option explicitly allows cURL to perform insecure SSL connections and transfers, which allows you to test your SSL connection without installing a CA certificate.
-X PUT—This option specifies using the PUT method.
-d @example.json—Specifies the file containing the parameters of the webhook.
Results
This example updates an HTTP exporter webhook. The output is in JSON.
HTTP exporter status request
To get the status of a specific HTTP exporter, send the following request:
GET https://<PX_IP_address>/api/4.0/config/export/http/<exporter>/status
Required header:
--user <username>:<password>
Options
PX_IP_address—IP address of the Series appliance running the Series API.
username—The user name for your Series appliance.
password—The password for your Series appliance.
exporter—The name of the exporter.
Example
GET https://xxx.xxx.xxx.xxx/api/4.0/config/export/http/athena_export/status
Required header:
--user cpx:hammerhead
HTTP exporter response
HTTP/1.1 [Response Code] [Response Message] Date: [Date]
Content-Type: [Content Type]
{
"status" : {
"last-upload": "date", "uploaded-files": int, "dropped-files": int
}
}
Response fields
Response Code—A standard HTTP response code.
Response Message—A standard HTTP response message.
Date—Standard HTML date format.
Content Type—The response format.
Example
HTTP/1.1 200 OK
Date: Wed, 14 May 2019 08:09:18 GMT
Content-Type: application/json; charset=utf-8
{
"status" : {
"last-upload": "2018-08-28T16:17:38-04:00",
"uploaded-files": 120,
"dropped-files": 0
}
}
cURL code sample: HTTP exporter
The code sample was run with cURL 7.57.0.
curl -k --user cpx:hammerhead https://xxx.xxx.xxx.xxx/api/4.0/config/export/http/athena_export/status
This cURL sample includes the following options:
-k—This option explicitly allows cURL to perform insecure SSL connections and transfers, which allows you to test your SSL connection without installing a CA certificate.
--user cpx:hammerhead—Replace cpx with the user name for your Series appliance. Replace hammerhead with the password for your Series appliance.
https://xxx.xxx.xxx.xxx/api/4.0/config/export/http/athena_export/status—The status request URL. Replace
xxx.xxx.xxx.xxx with the IP address of your Series appliance, and athena_export with the name of your exporter.
Results
This example returns the status of the specified HTTP exporter. The output is in JSON.
Helix
The following endpoints integrate the PX Series appliance with Helix:
GET https://<PX_IP_address>/api/4.0/config/export/helix
PUT https://<PX_IP_address>/api/4.0/config/export/helix
GET https://<PX_IP_address>/api/4.0/config/export/helix/metadata
PUT https://<PX_IP_address>/api/4.0/config/export/helix/metadata
GET https://<PX_IP_address>/api/4.0/config/export/helix/metadata/filters
POST https://<PX_IP_address>/api/4.0/config/export/helix/metadata/filters
DELETE https://<PX_IP_address>/api/4.0/config/export/helix/metadata/filters
GET https://<PX_IP_address>/api/4.0/config/export/helix/metadata/filters/<filter>
PUT https://<PX_IP_address>/api/4.0/config/export/helix/metadata/filters/<filter>
DELETE https://<PX_IP_address>/api/4.0/config/export/helix/metadata/filters/<filter>
GET https://<PX_IP_address>/api/4.0/config/export/helix/logforwarding
PUT https://<PX_IP_address>/api/4.0/config/export/helix/logforwarding
POST https://<PX_IP_address>/api/4.0/config/export/helix/uploadcerts
Helix configuration request
To retrieve the current PX/Helix integration configuration, send the following request:
GET https://<PX_IP_address>/api/4.0/config/export/helix
Required header:
--user <username>:<password>
Options
PX_IP_address—IP address of the Series appliance running the Series API.
username—The user name for your Series appliance.
password—The password for your Series appliance.
Example
GET https://xxx.xxx.xxx.xxx/api/4.0/config/export/helix
Required header:
--user cpx:hammerhead
Helix configuration response
HTTP/1.1 [Response Code] [Response Message] Date: [Date]
Content-Type: [Content Type]
{
"host": "hostname" "metadata": {
"enabled": Boolean "eventTypes": ["x", "H", "A"], "filters": [
{
"name": "filter_name", "eventTypes": ["x"], "filter": "filter_query"
}
],
"interval": int, "batchsize": int,
},
"logforwarding": { "enabled": Boolean }
}
Response fields
Response Code—A standard HTML response code.
Response Message—A standard HTML response message.
Date—Standard HTML date format.
Content Type—The response format.
Example
HTTP/1.1 200 OK
Date: Fri, 8 Jun 2018 00:17:44 GMT
Content-Type: application/json; charset=utf-8
{
"host": "myhelix.eng.fireye.com" "metadata": {
"enabled": true
"eventTypes": ["x", "H", "A"], "filters": [
{
"name": "my-filter",
"eventTypes": ["x"],
"filter": "sourceIPv4Address != 10.10.10.128/25"
}
],
"interval": 60,
"batchsize": 50000,
},
"logforwarding": { "enabled": true
}
}
cURL code sample: Helix configuration
The code sample was run with cURL 7.57.0.
curl -k --user cpx:hammerhead https://xxx.xxx.xxx.xxx/api/4.0/config/export/helix
This cURL sample includes the following options:
-k—This option explicitly allows cURL to perform insecure SSL connections and transfers, which allows you to test your SSL connection without installing a CA certificate.
--user cpx:hammerhead—Replace cpx with the user name for your Series appliance. Replace hammerhead with the password for your Series appliance.
https://xxx.xxx.xxx.xxx/api/4.0/config/export/helix—The Helix request URL. Replace xxx.xxx.xxx.xxx with the IP address of your Series appliance.
Results
This example returns the current PX/Helix integration configuration. The output is in JSON.
Update Helix configuration request
To update the Helix configuration, send the following request:
PUT https://<PX_IP_address>/api/4.0/config/export/helix
 Note
Note
To use this request, you must belong to the sudo group.
Partial updates are allowed. Any fields that do not exist in the actual Helix configuration are ignored. Updates to the enabled field under metadata will start upload of Suricata metadata to Helix.
Updates to the enabled field for logforwarding will start syslog forwarding to Helix.
Required header:
--user <username>:<password>
Request JSON:
{
"metadata": {
"filters": [
{
"name": "filter_name", "eventTypes": ["x", "H"], "filter": "filter_query"
}
]
}
}
Options
PX_IP_address—IP address of the Series appliance running the Series API.
username—The user name for your Series appliance.
password—The password for your Series appliance.
Example
PUT https://xxx.xxx.xxx.xxx/api/4.0/config/export/helix
Required header:
--user cpx:hammerhead
example.json:
{
"metadata": {
"filters": [
{
"name": "my updated filter", "eventTypes": ["x", "H"],
"filter": "destinationIPv4Address != 10.10.10.128/25"
}
]
}
}
Update Helix configuration response
HTTP/1.1 [Response Code] [Response Message] Date: [Date]
Content-Type: [Content Type]
{
"host": "hostname" "metadata": {
"enabled": true
"eventTypes": ["x", "H", "A"], "filters": [
{
"name": "filter_name", "eventTypes": ["x", "H"], "filter": "filter_query"
}
],
"interval": int, "batchsize": int,
},
"logforwarding": { "enabled": Boolean }
}
Response fields
Response Code—A standard HTML response code.
Response Message—A standard HTML response message.
Date—Standard HTML date format.
Content Type—The response format.
host—The host for the Helix instance.
interval—Number of seconds between the posting of events to Helix.
batchsize—The maximum number of events that can be posted at one time.
enabled—Whether the Helix exporter process is enabled.
Example
HTTP/1.1 200 OK
Date: Fri, 03 Mar 2018 00:17:44 GMT
Content-Type: application/json; charset=utf-8
{
"host": "myhelix.eng.fireye.com" "metadata": {
"enabled": true
"eventTypes": ["x", "H", "A"], "filters": [
{
"name": "my-filter", "eventTypes": ["x", "H"],
"filter": "destinationIPv4Address != 10.10.10.128/25"
}
],
"interval": 60,
"batchsize": 50000,
},
"logforwarding": { "enabled": true
}
}
cURL code sample: Update Helix configuration
The code sample was run with cURL 7.57.0.
curl -k --user cpx:hammerhead https://xxx.xxx.xxx.xxx/api/4.0/config/export/helix -X PUT -d @example.json
This cURL sample includes the following options:
-k—This option explicitly allows cURL to perform insecure SSL connections and transfers, which allows you to test your SSL connection without installing a CA certificate.
--user cpx:hammerhead—Replace cpx with the user name for your Series appliance. Replace hammerhead with the password for your Series appliance.
https://xxx.xxx.xxx.xxx/api/4.0/config/export/helix—The Helix request URL. Replace xxx.xxx.xxx.xxx with the IP address of your Series appliance.
-X PUT—Specifies using the PUT method.
-d @example.json—File containing updates to configuration.
Results
This example updates the Helix configuration. The output is in JSON.
Helix metadata upload configuration request
To retrieve the Helix metadata upload configuration, send the following request:
GET https://<PX_IP_address>/api/4.0/config/export/helix/metadata
Required header:
--user <username>:<password>
Options
PX_IP_address—IP address of the Series appliance running the Series API.
username—The user name for your Series appliance.
password—The password for your Series appliance.
Example
GET https://xxx.xxx.xxx.xxx/api/4.0/config/export/helix/metadata
Required header:
--user cpx:hammerhead
Helix metadata upload configuration response
HTTP/1.1 [Response Code] [Response Message] Date: [Date]
Content-Type: [Content Type]
{
"enabled": true
"eventTypes": ["x", "H", "A"], "filters": [
{
"name": "filter_name", "eventTypes": ["x", "H"], "filter": "filter_query"
}
],
"interval": int, "batchsize": int,
}
Response fields
Response Code—A standard HTML response code.
Response Message—A standard HTML response message.
Date—Standard HTML date format.
Content Type—The response format.
interval—Number of seconds between the posting of events to Helix.
batchsize—The maximum number of events that can be posted at one time.
enabled—Whether the Helix exporter process is enabled.
Example
HTTP/1.1 200 OK
Date: Wed, 20 Jun 2018 00:17:49 GMT
Content-Type: application/json; charset=utf-8
{
"enabled": true
"eventTypes": ["x", "H", "A"], "filters": [
{
"name": "my-filter", "eventTypes": ["x", "H"],
"filter": "destinationIPv4Address != 10.10.10.128/25"
}
],
"interval": 60,
"batchsize": 50000,
}
cURL code sample: Helix metadata upload configuration
The code sample was run with cURL 7.57.0.
curl -k --user cpx:hammerhead https://xxx.xxx.xxx.xxx/api/4.0/config/export/helix/metadata -X GET
This cURL sample includes the following options:
-k—This option explicitly allows cURL to perform insecure SSL connections and transfers, which allows you to test your SSL connection without installing a CA certificate.
--user cpx:hammerhead—Replace cpx with the user name for your Series appliance. Replace hammerhead with the password for your Series appliance.
https://xxx.xxx.xxx.xxx/api/4.0/config/export/helix/metadata—The Helix request URL. Replace xxx.xxx.xxx.xxx
with the IP address of your Series appliance.
-X GET—Specifies using the GET method.
Results
This example updates the Helix configuration. The output is in JSON.
Update Helix metadata upload configuration request
To update the Helix metadata upload configuration, send the following request:
PUT https://<PX_IP_address>/api/4.0/config/export/helix/metadata
 Note
Note
To use this request, you must belong to the sudo group.
Partial updates are allowed. Any fields that do not exist in the actual Helix configuration are ignored. Updates to the enabled field under metadata will enable and start upload of Suricata metadata to Helix. Required header:
--user <username>:<password>
Request JSON:
{
"enabled": true
"eventTypes": ["x", "H", "A"], "filters": [
{
"name": "filter_name", "eventTypes": ["x", "H"], "filter": "filter_query"
}
],
"interval": int, "batchsize": int,
}
Options
PX_IP_address—IP address of the Series appliance running the Series API.
username—The user name for your Series appliance.
password—The password for your Series appliance.
Example
PUT https://xxx.xxx.xxx.xxx/api/4.0/config/export/helix/metadata
Required header:
--user cpx:hammerhead
example.json:
{
"enabled": true
"eventTypes": ["x", "H", "A"], "filters": [
{
"name": "my-filter", "eventTypes": ["x", "H"],
"filter": "destinationIPv4Address != 10.10.10.128/25"
}
],
"interval": 50,
"batchsize": 40000,
}
Update Helix metadata upload configuration response
HTTP/1.1 [Response Code] [Response Message] Date: [Date]
Content-Type: [Content Type]
{
"enabled": true
"eventTypes": ["x", "H", "A"], "filters": [
{
"name": "filter_name", "eventTypes": ["x", "H"], "filter": "filter_query"
}
],
"interval": int, "batchsize": int,
}
Response fields
Response Code—A standard HTML response code.
Response Message—A standard HTML response message.
Date—Standard HTML date format.
Content Type—The response format.
host—The host for the Helix instance.
interval—Number of seconds between the posting of events to Helix.
batchsize—The maximum number of events that can be posted at one time.
enabled—Whether the Helix exporter process is enabled.
Example
HTTP/1.1 200 OK
Date: Fri, 03 Mar 2018 00:17:44 GMT
Content-Type: application/json; charset=utf-8
{
"enabled": true
"eventTypes": ["x", "H", "A"], "filters": [
{
"name": "my-filter", "eventTypes": ["x", "H"],
"filter": "destinationIPv4Address != 10.10.10.128/25"
}
],
"interval": 50,
"batchsize": 40000,
}
cURL code sample: Update Helix metadata upload configuration
The code sample was run with cURL 7.57.0.
curl -k --user cpx:hammerhead https://xxx.xxx.xxx.xxx/api/4.0/config/export/helix/metadata -X PUT -d @example.json
This cURL sample includes the following options:
-k—This option explicitly allows cURL to perform insecure SSL connections and transfers, which allows you to test your SSL connection without installing a CA certificate.
--user cpx:hammerhead—Replace cpx with the user name for your Series appliance. Replace hammerhead with the password for your Series appliance.
https://xxx.xxx.xxx.xxx/api/4.0/config/export/helix/metadata—The Helix request URL. Replace xxx.xxx.xxx.xxx
with the IP address of your Series appliance.
-X PUT—Specifies using the PUT method.
-d @example.json—File containing updates to configuration.
Results
This example updates the Helix metadata upload configuration. The output is in JSON.
Helix metadata upload filters request
To list the names of configured Helix metadata upload filters, send the following request:
GET https://<PX_IP_address>/api/4.0/config/export/helix/metadata/filters
Required header:
--user <username>:<password>
Options
PX_IP_address—IP address of the Series appliance running the Series API.
username—The user name for your Series appliance.
password—The password for your Series appliance.
Example
GET https://xxx.xxx.xxx.xxx/api/4.0/config/export/helix/metadata/filters
Required header:
--user cpx:hammerhead
Helix metadata upload filters response
HTTP/1.1 [Response Code] [Response Message] Date: [Date]
Content-Type: [Content Type]
[
"filter"
]
Response fields
Response Code—A standard HTML response code.
Response Message—A standard HTML response message.
Date—Standard HTML date format.
Content Type—The response format.
filter—Name of metadata upload filter.
Example
HTTP/1.1 200 OK
Date: Wed, 20 Jun 2018 00:17:57 GMT
Content-Type: application/json; charset=utf-8
[
"my-filter", "another-filter"
]
cURL code sample: Helix metadata upload filters
The code sample was run with cURL 7.57.0.
curl -k --user cpx:hammerhead https://xxx.xxx.xxx.xxx/api/4.0/config/export/helix/metadata/filters -X GET
This cURL sample includes the following options:
-k—This option explicitly allows cURL to perform insecure SSL connections and transfers, which allows you to test your SSL connection without installing a CA certificate.
--user cpx:hammerhead—Replace cpx with the user name for your Series appliance. Replace hammerhead with the password for your Series appliance.
https://xxx.xxx.xxx.xxx/api/4.0/config/export/helix/metadata/filters—The Helix request URL. Replace
xxx.xxx.xxx.xxx with the IP address of your Series appliance.
-X GET—Specifies using the GET method.
Results
This example returns the Helix metadata upload filter names. The output is in JSON.
Add Helix metadata upload filter request
To create a Helix metadata upload filter, send the following request:
POST https://<PX_IP_address>/api/4.0/config/export/helix/metadata/filters
 Note
Note
To use this request, you must belong to the sudo group.
Required header:
--user <username>:<password>
Request JSON:
{
"name": "my new filter", "eventTypes": [ "X", "A" ], "filter": "sourceTransportPort = 80"
}
Options
PX_IP_address—IP address of the Series appliance running the Series API.
username—The user name for your Series appliance.
password—The password for your Series appliance.
name—Name of new filter.
eventType—Metadata event type.
filter—Filter query.
Example
POST https://xxx.xxx.xxx.xxx/api/4.0/config/export/helix/metadata/filters
Required header:
--user cpx:hammerhead
example.json:
{
"name": "my new filter", "eventTypes": [ "X", "A" ], "filter": "sourceTransportPort = 80"
}
Add Helix metadata upload filter response
HTTP/1.1 [Response Code] [Response Message] Date: [Date]
Content-Type: [Content Type]
[
{
"name": "filter_name", "eventTypes": ["types"], "filter": "filter"
},
{
"name": "filter_name", "eventTypes": [ "types" ], "filter": "filter_name"
}
]
Response fields
Response Code—A standard HTML response code.
Response Message—A standard HTML response message.
Date—Standard HTML date format.
Content Type—The response format.
name—The name of the filter.
eventType—Metadata event type.
filter—Filter query.
Example
HTTP/1.1 200 OK
Date: Mon, 18 Jun 2018 00:17:44 GMT
Content-Type: application/json; charset=utf-8
{
"enabled": true
"eventTypes": ["x", "H", "A"], "filters": [
{
"name": "my-filter", "eventTypes": ["x", "H"],
"filter": "destinationIPv4Address != 10.10.10.128/25"
}
],
"interval": 50,
"batchsize": 40000,
}
cURL code sample: Add Helix metadata upload filter
The code sample was run with cURL 7.57.0.
curl -k --user cpx:hammerhead https://xxx.xxx.xxx.xxx/api/4.0/config/export/helix/metadata/filters -X POST -d @example.json
This cURL sample includes the following options:
-k—This option explicitly allows cURL to perform insecure SSL connections and transfers, which allows you to test your SSL connection without installing a CA certificate.
--user cpx:hammerhead—Replace cpx with the user name for your Series appliance. Replace hammerhead with the password for your Series appliance.
https://xxx.xxx.xxx.xxx/api/4.0/config/export/helix/metadata/filters—The Helix request URL. Replace
xxx.xxx.xxx.xxx with the IP address of your Series appliance.
-X POST—Specifies using the POST method.
-d @example.json—File containing updates to configuration.
Results
This example creates a new Helix metadata upload filter. The output is in JSON.
Delete Helix metadata upload filters request
To delete all Helix metadata upload filters, send the following request:
DELETE https://<PX_IP_address>/api/4.0/config/export/helix/metadata/filters
 Note
Note
To use this request, you must belong to the sudo group.
Required header:
--user <username>:<password>
Options
PX_IP_address—IP address of the Series appliance running the Series API.
username—The user name for your Series appliance.
password—The password for your Series appliance.
Example
DELETE https://xxx.xxx.xxx.xxx/api/4.0/config/export/helix/metadata/filters
Required header:
--user cpx:hammerhead
Delete Helix metadata upload filters response
HTTP/1.1 [Response Code] [Response Message] Date: [Date]
Content-Type: [Content Type]
Response fields
Response Code—A standard HTML response code.
Response Message—A standard HTML response message.
Date—Standard HTML date format.
Content Type—The response format.
Example
HTTP/1.1 200 OK
Date: Wed, 20 Jun 2018 00:17:57 GMT
Content-Type: application/json; charset=utf-8
[
"my-filter", "another-filter"
]
cURL code sample: Delete Helix metadata upload filters
The code sample was run with cURL 7.57.0.
curl -k --user cpx:hammerhead https://xxx.xxx.xxx.xxx/api/4.0/config/export/helix/metadata/filters -X DELETE
This cURL sample includes the following options:
-k—This option explicitly allows cURL to perform insecure SSL connections and transfers, which allows you to test your SSL connection without installing a CA certificate.
--user cpx:hammerhead—Replace cpx with the user name for your Series appliance. Replace hammerhead with the password for your Series appliance.
https://xxx.xxx.xxx.xxx/api/4.0/config/export/helix/metadata/filters—The Helix request URL. Replace
xxx.xxx.xxx.xxx with the IP address of your Series appliance.
-X DELETE—Specifies using the DELETE method.
Results
This example deletes all Helix metadata upload filters.
Helix metadata upload filter details request
To list the details of a specific Helix metadata upload filter, send the following request:
GET https://<PX_IP_address>/api/4.0/config/export/helix/metadata/filters/<filter>
Required header:
--user <username>:<password>
Options
PX_IP_address—IP address of the Series appliance running the Series API.
username—The user name for your Series appliance.
password—The password for your Series appliance.
filter—The name of the filter.
Example
GET https://xxx.xxx.xxx.xxx/api/4.0/config/export/helix/metadata/filters/my-filter
Required header:
--user cpx:hammerhead
Helix metadata upload filter details response
HTTP/1.1 [Response Code] [Response Message] Date: [Date]
Content-Type: [Content Type]
{
"name": "filter_name", "eventTypes": ["eventType"], "filter": "filter_query"
}
Response fields
Response Code—A standard HTML response code.
200—OK.
400—The specified filter does not exist.
Response Message—A standard HTML response message.
Date—Standard HTML date format.
Content Type—The response format.
name—Name of metadata upload filter.
eventTypes—Metadata event type.
filter—Filter query.
Example
HTTP/1.1 200 OK
Date: Wed, 20 Jun 2018 00:18:09 GMT
Content-Type: application/json; charset=utf-8
{
"name": "my-filter",
"eventTypes": ["X"],
"filter": "sourceTransportPort = 22"
}
cURL code sample: Helix metadata upload filter details
The code sample was run with cURL 7.57.0.
curl -k --user cpx:hammerhead https://xxx.xxx.xxx.xxx/api/4.0/config/export/helix/metadata/filters -X GET
This cURL sample includes the following options:
-k—This option explicitly allows cURL to perform insecure SSL connections and transfers, which allows you to test your SSL connection without installing a CA certificate.
--user cpx:hammerhead—Replace cpx with the user name for your Series appliance. Replace hammerhead with the password for your Series appliance.
https://xxx.xxx.xxx.xxx/api/4.0/config/export/helix/metadata/filters—The Helix request URL. Replace
xxx.xxx.xxx.xxx with the IP address of your Series appliance.
-X GET—Specifies using the GET method.
Results
This example returns the details of the specified Helix metadata upload filter. The output is in JSON.
Update Helix metadata upload filter request
To update a specific Helix metadata upload filter, send the following request:
PUT https://<PX_IP_address>/api/4.0/config/export/helix/metadata/filters/<filter>
 Note
Note
To use this request, you must belong to the sudo group.
Required header:
--user <username>:<password>
Request JSON:
{
"eventTypes": ["event_type"], "filter": "filter_query",
}
Options
PX_IP_address—IP address of the Series appliance running the Series API.
username—The user name for your Series appliance.
password—The password for your Series appliance.
filter—The filter name.
Example
PUT https://xxx.xxx.xxx.xxx/api/4.0/config/export/helix/metadata
Required header:
--user cpx:hammerhead
example.json:
{
"eventTypes": ["X", "H"],
"filter": "destinationTransportPort = 80",
}
Update Helix metadata upload filter response
HTTP/1.1 [Response Code] [Response Message] Date: [Date]
Content-Type: [Content Type]
{
"name": "filter_name", "eventTypes": ["eventType"], "filter": "filter_query"
}
Response fields
Response Code—A standard HTML response code.
200—OK.
404—The specified filter does not exist.
Response Message—A standard HTML response message.
Date—Standard HTML date format.
Content Type—The response format.
name—Name of metadata upload filter.
eventTypes—Metadata event type.
filter—Filter query.
Example
HTTP/1.1 200 OK
Date: Mon, 18 Jun 2018 00:17:46 GMT
Content-Type: application/json; charset=utf-8
{
"name": "my-filter", "eventTypes": ["X", "H"],
"filter": "sourceTransportPort = 22"
}
cURL code sample: Update helix metadata upload filter
The code sample was run with cURL 7.57.0.
curl -k --user cpx:hammerhead https://xxx.xxx.xxx.xxx/api/4.0/config/export/helix/metadata/filters/my-filter
-X PUT -d @example.json
This cURL sample includes the following options:
-k—This option explicitly allows cURL to perform insecure SSL connections and transfers, which allows you to test your SSL connection without installing a CA certificate.
--user cpx:hammerhead—Replace cpx with the user name for your Series appliance. Replace hammerhead with the password for your Series appliance.
https://xxx.xxx.xxx.xxx/api/4.0/config/export/helix/metadata/filters/my-filter—The Helix request URL. Replace
xxx.xxx.xxx.xxx with the IP address of your Series appliance.
-X PUT—Specifies using the PUT method.
-d @example.json—File containing updates to configuration.
Results
This example updates the specified Helix metadata upload filter. The output is in JSON.
Delete a Helix metadata upload filter request
To delete a specific Helix metadata upload filter, send the following request:
DELETE https://<PX_IP_address>/api/4.0/config/export/helix/metadata/filters/<filter>
 Note
Note
To use this request, you must belong to the sudo group.
Required header:
--user <username>:<password>
Options
PX_IP_address—IP address of the Series appliance running the Series API.
username—The user name for your Series appliance.
password—The password for your Series appliance.
filter—The name of the filter.
Example
DELETE https://xxx.xxx.xxx.xxx/api/4.0/config/export/helix/metadata/filters/my-filter
Required header:
--user cpx:hammerhead
Delete a Helix metadata upload filter response
HTTP/1.1 [Response Code] [Response Message] Date: [Date]
Content-Type: [Content Type]
Response fields
Response Code—A standard HTML response code.
Response Message—A standard HTML response message.
Date—Standard HTML date format.
Content Type—The response format.
Example
HTTP/1.1 200 OK
Date: Wed, 20 Jun 2018 00:17:57 GMT
Content-Type: application/json; charset=utf-8
cURL code sample: Delete a Helix metadata upload filter
The code sample was run with cURL 7.57.0.
curl -k --user cpx:hammerhead https://xxx.xxx.xxx.xxx/api/4.0/config/export/helix/metadata/filters/my-filter
-X DELETE
This cURL sample includes the following options:
-k—This option explicitly allows cURL to perform insecure SSL connections and transfers, which allows you to test your SSL connection without installing a CA certificate.
--user cpx:hammerhead—Replace cpx with the user name for your Series appliance. Replace hammerhead with the password for your Series appliance.
https://xxx.xxx.xxx.xxx/api/4.0/config/export/helix/metadata/filters/my-filter—The Helix request URL. Replace
xxx.xxx.xxx.xxx with the IP address of your Series appliance.
-X DELETE—Specifies using the DELETE method.
Results
This example deletes the specified filter.
Helix log forwarding configuration request
To retrieve the current log forwarding configuration, send the following request:
GET https://<PX_IP_address>/api/4.0/config/export/helix/logforwarding
Required header:
--user <username>:<password>
Options
PX_IP_address—IP address of the Series appliance running the Series API.
username—The user name for your Series appliance.
password—The password for your Series appliance.
Example
GET https://xxx.xxx.xxx.xxx/api/4.0/config/export/helix/logforwarding
Required header:
--user cpx:hammerhead
Helix log forwarding configuration response
HTTP/1.1 [Response Code] [Response Message] Date: [Date]
Content-Type: [Content Type]
{
"enabled": Boolean
}
Response fields
Response Code—A standard HTML response code.
Response Message—A standard HTML response message.
Date—Standard HTML date format.
Content Type—The response format.
enabled—Specifies if log forwarding is enabled.
Example
HTTP/1.1 200 OK
Date: Fri, 8 Jun 2018 00:17:51 GMT
Content-Type: application/json; charset=utf-8
{
"enabled": false
}
cURL code sample: Helix log forwarding configuration
The code sample was run with cURL 7.57.0.
curl -k --user cpx:hammerhead https://xxx.xxx.xxx.xxx/api/4.0/config/export/helix/logforwarding
This cURL sample includes the following options:
-k—This option explicitly allows cURL to perform insecure SSL connections and transfers, which allows you to test your SSL connection without installing a CA certificate.
--user cpx:hammerhead—Replace cpx with the user name for your Series appliance. Replace hammerhead with the password for your Series appliance.
https://xxx.xxx.xxx.xxx/api/4.0/config/export/helix/logforwarding—The Helix request URL. Replace
xxx.xxx.xxx.xxx with the IP address of your Series appliance.
Results
This example returns the log forwarding configuration. The output is in JSON.
Update Helix log forwarding configuration request
To update the current log forwarding configuration, send the following request:
PUT https://<PX_IP_address>/api/4.0/config/export/helix/logforwarding
 Note
Note
To use this request, you must belong to the sudo group.
Required header:
--user <username>:<password>
Request JSON:
{
"enabled": Boolean
}
Options
PX_IP_address—IP address of the Series appliance running the Series API.
username—The user name for your Series appliance.
password—The password for your Series appliance.
enabled—Setting to true will start syslog forwarding to Helix.
Example
PUT https://xxx.xxx.xxx.xxx/api/4.0/config/export/helix/logforwarding
Required header:
--user cpx:hammerhead
example.json:
{
"enabled": true
}
Update Helix log forwarding configuration response
HTTP/1.1 [Response Code] [Response Message] Date: [Date]
Content-Type: [Content Type]
{
"enabled": Boolean
}
Response fields
Response Code—A standard HTML response code.
Response Message—A standard HTML response message.
Date—Standard HTML date format.
Content Type—The response format.
enabled—Specifies if log forwarding is enabled.
Example
HTTP/1.1 200 OK
Date: Fri, 8 Jun 2018 00:17:51 GMT
Content-Type: application/json; charset=utf-8
{
"enabled": true
}
cURL code sample: Update Helix log forwarding configuration
The code sample was run with cURL 7.57.0.
curl -k --user cpx:hammerhead https://xxx.xxx.xxx.xxx/api/4.0/config/export/helix/logforwarding -X PUT -d @example.json
This cURL sample includes the following options:
-k—This option explicitly allows cURL to perform insecure SSL connections and transfers, which allows you to test your SSL connection without installing a CA certificate.
--user cpx:hammerhead—Replace cpx with the user name for your Series appliance. Replace hammerhead with the password for your Series appliance.
https://xxx.xxx.xxx.xxx/api/4.0/config/export/helix/logforwarding—The Helix request URL. Replace
xxx.xxx.xxx.xxx with the IP address of your Series appliance.
-X PUT—Specifies using the PUT method.
-d @example.json—File containing updates to configuration.
Results
This example updates the log forwarding configuration. The output is in JSON.
Upload Helix bootstrap certificates request
To upload Helix bootstrap certificates, send the following request:
POST https://<PX_IP_address>/api/4.0/config/export/helix/uploadcerts
The Helix host must be configured in order to be able to get client certificates.
This endpoint will trigger the bootstrap to client certificate process. The API will upload the bootstrap certificates to the configured Helix host. The client specific certificates will be stored so that both px-tap-exporter and nx log are able to use them.
 Note
Note
To use this request, you must belong to the sudo group.
Required header:
--user <username>:<password>
Request body:
Zipped helix bootstrap certificate payload retrieved from the Helix UI.
Options
PX_IP_address—IP address of the Series appliance running the Series API.
username—The user name for your Series appliance.
password—The password for your Series appliance.
Example
POST https://xxx.xxx.xxx.xxx/api/4.0/config/export/helix/uploadcerts
Required header:
--user cpx:hammerhead
Upload Helix bootstrap certificates response
HTTP/1.1 [Response Code] [Response Message] Date: [Date]
Content-Type: [Content Type]
Response fields
Response Code—A standard HTML response code.
Response Message—A standard HTML response message.
Date—Standard HTML date format.
Content Type—The response format.
Example
HTTP/1.1 200 OK
Date: Wed, 20 Jun 2018 00:19:47 GMT
Content-Type: application/json; charset=utf-8
cURL code sample: Upload Helix bootstrap certificates
The code sample was run with cURL 7.57.0.
curl -k --user cpx:hammerhead https://xxx.xxx.xxx.xxx/api/4.0/config/export/helix/uploadcerts -X POST --data-binary @helixcerts.zip
This cURL sample includes the following options:
-k—This option explicitly allows cURL to perform insecure SSL connections and transfers, which allows you to test your SSL connection without installing a CA certificate.
--user cpx:hammerhead—Replace cpx with the user name for your Series appliance. Replace hammerhead with the password for your Series appliance.
https://xxx.xxx.xxx.xxx/api/4.0/config/export/helix/uploadcerts—The Helix request URL. Replace xxx.xxx.xxx.xxx
with the IP address of your Series appliance.
-X POST—Specifies using the POST method.
--data-binary @helixcerts.zip—Specifies the certificates file.
Results
This example uploads the bootstrap certificates to the configured Helix host.
Custom rule sets
The custom rule sets endpoints allow you to create your own Suricata rule sets, list them, synchronize them, and delete them:
POST https://<PX_IP_address>/api/4.0/rulesets
GET https://<PX_IP_address>/api/4.0/rulesets
GET https://<PX_IP_address>/api/4.0/rulesets/<setname>
PUT https://<PX_IP_address>/api/4.0/rulesets/<setname>
DELETE https://<PX_IP_address>/api/4.0/rulesets/<setname>
GET https://<PX_IP_address>/api/4.0/rulesets/sync
Upload a custom rule set request
To upload a custom Suricata rule set, send the following request:
POST https://<PX_IP_address>/api/4.0/rulesets
 Note
Note
To use this request, you must belong to the sudo group.
Required header:
--user <username>:<password>
Options
PX_IP_address—The IP address of the Series appliance running the Series API.
username—The user name for your Series appliance.
password—The password for your Series appliance.
Input form fields
file—A compressed file containing a custom Suricata rule set.
The compressed file must not contain any directories.
The compressed file must have a tar.gz, tgz, tar.bz2, tbz2, tar.xz, txz, or tar file name extension.
If the classifications are different than Suricataʼs classification.config, they must be provided in a
classification.config file.
If the references are different than Suricataʼs reference.config, they must be provided in a reference.config file.
If you are using a Lua script to determine whether any captured network traffic matches a programmed condition after the Suricata rule has filtered the traffic stream, you must add lua:<Lua_script_name>; to the Suricata rule. For example:
alert dns any any -> any any (msg:"DNS to lua"; lua:dns.lua; sid:8053001; rev:1;)
setName—Optional. The name of the new rule set. The name cannot be faas or isight. If setName is not provided, the name defaults to the value for file without the extension. The setName is also used as the directory name where the custom rule set is stored. Note: "faas" and "isight" are not valid set names.
enabled—(Boolean) Specifies whether the ruleset is enabled (default: true). Optional.
autoDisable—(Boolean) Indicates if the ruleset should be auto disabled if search or alert HWM thresholds are exceeded (default: true). Optional.
searcherPerSecond—The maximum allowable searches per second on a given ruleset (default: 3). Optional.
alertsPerSecond—The maximum allowable alerts per second on a given ruleset (default: 5). Optional.
setDescription—Additional information about the ruleset (default: empty string). Optional.
Example
POST https://xxx.xxx.xxx.xxx/api/4.0/rulesets
Required header:
--user npadmin:hammerhead
Form:
file: 'http_3000_with_metadata.tar.gz' setName: '2017setname'
Upload a custom rule set response
HTTP/1.1 [Response Code] [Response Message] Date: [Date]
Content-Type: [Content Type] setname: [Set Name] setDescription: [Set Description] uploaddate: [Date]
md5checksum: [md5] sha256checksum: [sha256] rulenames: [Rule Names] luaScripts: [Lua Scripts]
classifications: [Classifications] references: [References]
Response fields
Response Code—A standard HTTP response code.
Response Message—A standard HTTP response message.
Date—Standard HTML date format.
Content Type—The response format.
Set Name—The name of the custom rule set.
Set Description—Text providing additional information about the rule set (default: empty string).
Date—The date the rule was uploaded.
md5—The md5 checksum of the uploaded file.
sha256—The sha256 checksum of the uploaded file.
Rule Names—A list of the rule files in the custom rule set.
Lua Scripts—A list of Lua scripts used by the custom rule set.
Classifications—An array of the classifications used by the custom rule set.
References—An array of the references used by the custom rule set.
Example
HTTP/1.1 200 OK
Date: Mon, 29 Jul 2019 13:27:15 GMT
Content-Type: application/json; charset=utf-8
{
"setname": "2019setname", "rulenames": [
"httpclass.rules"
],
"luaScripts": [], "classifications": [
"tcp-connection"
],
"references": [], "uploadinfo": {
"setDescription": "optional description provided during upload", "uploaddate": "Wed Jul 31 09:39:27 UTC 2019",
"md5checksum": "<md5 checksum of uploaded file>", "sha256checksum": "<sha256 checksum of uploaded file>"
},
"config": { "enabled": true, "autoDisable": true,
"searchesPerSecond": 3,
"alertsPerSecond": 5
}
}
cURL code sample: Upload a custom rule set
The code sample was run with cURL 7.57.0.
curl -k --user npadmin:hammerhead https://xxx.xxx.xxx.xxx/api/4.0/rulesets
-F file=@http_3000_with_metadata.tar.gz -F setName=2019setname -F setDescription="custom rule set for testing"
This cURL sample includes the following options:
-k—This option explicitly allows cURL to perform insecure SSL connections and transfers, which allows you to test your SSL connection without installing a CA certificate.
--user npadmin:hammerhead—Replace npadmin with the user name for your Series appliance. Replace hammerhead with the password for your Series appliance.
https://xxx.xxx.xxx.xxx/api/4.0/rulesets—The custom rule sets request URL. Replace xxx.xxx.xxx.xxx with the IP address of your Series appliance.
-F file=@http_3000_with_metadata.tar.gz—This option specifies the file name of the custom Suricata rule set to upload.
-F setName=2019setname—This option specifies the name of the new rule set.
-F setDescription="custom rule set for testing"—
Results
This example uploads the specified custom rule set.
List custom rule sets request
To list all custom rule sets, send the following request:
GET https://<PX_IP_address>/api/4.0/rulesets
 Note
Note
To use this request, you must belong to the sudo group.
Required header:
--user <username>:<password>
Options
PX_IP_address—The IP address of the Series appliance running the Series API.
username—The user name for your Series appliance.
password—The password for your Series appliance.
Example
GET https://xxx.xxx.xxx.xxx/api/4.0/rulesets
Required header:
--user npadmin:hammerhead
List custom rule sets response
HTTP/1.1 [Response Code] [Response Message] Date: [Date]
Content-Type: [Content Type]
setname: [Set Name] rulenames: [Rule Names] luaScripts: [Lua Scripts]
classifications: [Classifications] references: [References]
Response fields
Response Code—A standard HTTP response code.
Response Message—A standard HTTP response message.
Date—Standard HTML date format.
Content Type—The response format.
Set Name—The name of the custom rule set.
Rule Names—A list of the rule files in the custom rule set.
Lua Scripts—A list of Lua scripts used by the custom rule set.
Classifications—An array of the classifications used by the custom rule set.
References—An array of the references used by the custom rule set.
Example
HTTP/1.1 200 OK
Date: Tue, 14 Mar 2017 23:47:05 GMT
Content-Type: application/json; charset=utf-8
[
{
"setname": "2017setname", "rulenames": [
"httpclass.rules"
],
"luaScripts": [], "classifications": [
"tcp-connection"
],
"references": []
},
{
"setname": "http3001", "rulenames": [
"http_3000_1sthit.rules"
],
"luaScripts": [], "classifications": [], "references": []
}
]
cURL code sample: List custom rule sets
The code sample was run with cURL 7.57.0.
curl -k --user npadmin:hammerhead https://xxx.xxx.xxx.xxx/api/4.0/rulesets
This cURL sample includes the following options:
-k—This option explicitly allows cURL to perform insecure SSL connections and transfers, which allows you to test your SSL connection without installing a CA certificate.
--user npadmin:hammerhead—Replace npadmin with the user name for your Series appliance. Replace hammerhead with the password for your Series appliance.
https://xxx.xxx.xxx.xxx/api/4.0/rulesets—The custom rule sets request URL. Replace xxx.xxx.xxx.xxx with the IP address of your Series appliance.
Results
This example returns a list of all custom rule sets. The output is in JSON.
Custom rule set details request
To get details about a specific custom rule set, send the following request:
GET https://<PX_IP_address>/api/4.0/rulesets/<setname>
 Note
Note
To use this request, you must belong to the sudo group.
Required header:
--user <username>:<password>
Options
PX_IP_address—The IP address of the Series appliance running the Series API.
setname—The name of the custom rule set.
username—The user name for your Series appliance.
password—The password for your Series appliance.
Example
GET https://xxx.xxx.xxx.xxx/api/4.0/rulesets/2019setname
Required header:
--user npadmin:hammerhead
Custom rule set details response
HTTP/1.1 [Response Code] [Response Message] Date: [Date]
Content-Type: [Content Type] setname: [Set Name] setDescription: [Set Description] uploaddate: [Date]
md5checksum: [md5] sha256checksum: [sha256] rulenames: [Rule Names] luaScripts: [Lua Scripts]
classifications: [Classifications] references: [References]
Response fields
Response Code—A standard HTTP response code.
Response Message—A standard HTTP response message.
Date—Standard HTML date format.
Content Type—The response format.
Set Name—The name of the custom rule set.
Set Description—Text providing additional information about the rule set (default: empty string).
Date—The date the rule was uploaded.
md5—The md5 checksum of the uploaded file.
sha256—The sha256 checksum of the uploaded file.
Rule Names—A list of the rule files in the custom rule set.
Lua Scripts—A list of Lua scripts used by the custom rule set.
Classifications—An array of the classifications used by the custom rule set.
References—An array of the references used by the custom rule set.
Example
HTTP/1.1 200 OK
Date: Wed, 31 Jul 2019 10:22:50 GMT
Content-Type: application/json; charset=utf-8
{
"setname": "setname", "rulenames": [
<list of all rule files>
],
"classifications": [
<list of classifications this set uses>
],
"references": [
<list of references this set uses>
],
"uploadinfo": {
"setdescription": "optional description provided during upload", "uploaddate": "Wed Jul 31 09:19:39 UTC 2019",
"md5checksum": "<md5 checksum of uploaded file>", "sha256checksum": "<sha256 checksum of uploaded file>"
},
"config": { "enabled": true,
"autoDisable": true, "searchesPerSecond": 3,
"alertsPerSecond": 5
}
}
cURL code sample: Custom rule set details
The code sample was run with cURL 7.57.0.
curl -k --user npadmin:hammerhead https://xxx.xxx.xxx.xxx/api/4.0/rulesets/2019setname
This cURL sample includes the following options:
-k—This option explicitly allows cURL to perform insecure SSL connections and transfers, which allows you to test your SSL connection without installing a CA certificate.
--user npadmin:hammerhead—Replace npadmin with the user name for your Series appliance. Replace hammerhead with the password for your Series appliance.
https://xxx.xxx.xxx.xxx/api/4.0/rulesets/2019setname—The custom rule sets request URL. Replace xxx.xxx.xxx.xxx
with the IP address of your Series appliance. Replace 2017setname with the name of the custom rule set of interest.
Results
This example returns details about the specified custom rule set. The output is in JSON.
Update custom rule set configuration request
To update a specific custom rule set's configuration, send the following request:
PUT https://<PX_IP_address>/api/4.0/rulesets/<setname>
 Note
Note
To use this request, you must belong to the sudo group.
Required header:
--user <username>:<password>
Options
PX_IP_address—The IP address of the Series appliance running the Series API.
setname—The name of the custom rule set.
username—The user name for your Series appliance.
password—The password for your Series appliance.
Input form fields
All fields are optional.
enabled—(Boolean) Indicates whether the rule set is enabled.
autoDisable—(Boolean) Indicates if the rule set should be auto disabled if search or alert HWM thresholds are exceeded.
searchesPerSecond—Indicates the maximum allowable searches per second on a given rule set.
alertsPerSecond—Indicates the maximum allowable alerts per second on a given rule set.
Example
PUT https://xxx.xxx.xxx.xxx/api/4.0/rulesets/2019setname
Required header:
--user npadmin:hammerhead
Update custom rule set configuration response
HTTP/1.1 [Response Code] [Response Message] Date: [Date]
Content-Type: [Content Type] enabled: [Boolean] autoDisable: [Boolean] searchesPerSecond: [searches alertsPerSecond: [Set Name]
Example
HTTP/1.1 200 OK
Date: Wed, 31 Jul 2019 10:25:40 GMT
Content-Type: application/json; charset=utf-8
{
"enabled": true, "autoDisable": true, "searchesPerSecond": 3,
"alertsPerSecond": 5
}
cURL code sample: Update custom rule set configuration
The code sample was run with cURL 7.57.0.
curl -k --user npadmin:hammerhead -X PUT https://xxx.xxx.xxx.xxx/api/4.0/rulesets/2019setname -F "enabled=true" -F "searchesPerSecond=3"
This cURL sample includes the following options:
-k—This option explicitly allows cURL to perform insecure SSL connections and transfers, which allows you to test your SSL connection without installing a CA certificate.
--user npadmin:hammerhead—Replace npadmin with the user name for your Series appliance. Replace hammerhead with the password for your Series appliance.
https://xxx.xxx.xxx.xxx/api/4.0/rulesets/2019setname—The custom rule sets request URL. Replace xxx.xxx.xxx.xxx
with the IP address of your Series appliance. Replace 2017setname with the name of the custom rule set of interest.
-F "enabled=true"— Enables the rule set.
-F "searchesPerSecond=3"—Changes the number of searches per second.
Results
This example updates the configuration of the specified custom rule set. The output is in JSON.
Delete a custom rule set request
To delete a specific custom rule set, send the following request:
DELETE https://<PX_IP_address>/api/4.0/rulesets/<setname>
 Note
Note
To use this request, you must belong to the sudo group.
Required header:
--user <username>:<password>
Options
PX_IP_address—The IP address of the Series appliance running the Series API.
setname—The name of the custom rule set.
username—The user name for your Series appliance.
password—The password for your Series appliance.
Example
DELETE https://xxx.xxx.xxx.xxx/api/4.0/rulesets/2017setname
Required header:
--user npadmin:hammerhead
Delete a custom rule set response
HTTP/1.1 [Response Code] [Response Message] Date: [Date]
Content-Type: [Content Type]
setname: [Set Name] rulenames: [Rule Names] luaScripts: [Lua Scripts]
classifications: [Classifications] references: [References]
Response fields
Response Code—A standard HTTP response code.
Response Message—A standard HTTP response message.
Date—Standard HTML date format.
Content Type—The response format.
Set Name—The name of an existing custom rule set.
Rule Names—A list of the rule files in the custom rule set.
Lua Scripts—A list of Lua scripts used by the custom rule set.
Classifications—An array of the classifications used by the custom rule set.
References—An array of the references used by the custom rule set.
Example
HTTP/1.1 200 OK
Date: Wed, 15 Mar 2017 00:17:48 GMT
Content-Type: application/json; charset=utf-8
[
{
"setname": "http3001", "rulenames": [
"http_3000_1sthit.rules"
],
"luaScripts": [], "classifications": [],
"references": []
}
]
cURL code sample: Delete a custom rule set
The code sample was run with cURL 7.57.0.
curl -k --user npadmin:hammerhead https://xxx.xxx.xxx.xxx/api/4.0/rulesets/2017setname -X DELETE
This cURL sample includes the following options:
-k—This option explicitly allows cURL to perform insecure SSL connections and transfers, which allows you to test your SSL connection without installing a CA certificate.
--user npadmin:hammerhead—Replace npadmin with the user name for your Series appliance. Replace hammerhead with the password for your Series appliance.
https://xxx.xxx.xxx.xxx/api/4.0/rulesets/2017setname—The custom rule sets request URL. Replace xxx.xxx.xxx.xxx
with the IP address of your Series appliance. Replace 2017setname with the name of the custom rule set to delete.
-X DELETE—This option specifies using the DELETE method.
Results
This example deletes the specified custom rule set. The output is in JSON.
Synchronize custom rule sets request
To synchronize custom rule sets, as a Service (FaaS) rule sets, and iSight rule sets, send the following request:
GET https://<PX_IP_address>/api/4.0/rulesets/sync
 Note
Note
To use this request, you must belong to the sudo group.
Required header:
--user <username>:<password>
Options
PX_IP_address—The IP address of the Series appliance running the Series API.
username—The user name for your Series appliance.
password—The password for your Series appliance.
Example
GET https://xxx.xxx.xxx.xxx/api/4.0/rulesets/sync
Required header:
--user npadmin:hammerhead
Synchronize custom rule sets response
HTTP/1.1 [Response Code] [Response Message] Date: [Date]
Content-Type: [Content Type]
setname: [Set Name] rulenames: [Rule Names] luaScripts: [Lua Scripts]
classifications: [Classifications] references: [References]
Response fields
Response Code—A standard HTTP response code.
Response Message—A standard HTTP response message.
Date—Standard HTML date format.
Content Type—The response format.
Set Name—The name of the custom rule set. FaaS and iSight rule sets are not listed in the response.
Rule Names—A list of the rule files in the custom rule set.
Lua Scripts—A list of Lua scripts used by the custom rule set.
Classifications—An array of the classifications used by the custom rule set.
References—An array of the references used by the custom rule set.
Example
HTTP/1.1 200 OK
Date: Tue, 14 Mar 2017 23:47:05 GMT
Content-Type: application/json; charset=utf-8
[
{
"setname": "2017setname", "rulenames": [
"httpclass.rules"
],
"luaScripts": [], "classifications": [
"tcp-connection"
],
"references": []
},
{
"setname": "http3001", "rulenames": [
"http_3000_1sthit.rules"
],
"luaScripts": [], "classifications": [], "references": []
}
]
cURL code sample: Synchronize custom rule sets
The code sample was run with cURL 7.57.0.
curl -k --user npadmin:hammerhead https://xxx.xxx.xxx.xxx/api/4.0/rulesets/sync
This cURL sample includes the following options:
-k—This option explicitly allows cURL to perform insecure SSL connections and transfers, which allows you to test your SSL connection without installing a CA certificate.
--user npadmin:hammerhead—Replace npadmin with the user name for your Series appliance. Replace hammerhead with the password for your Series appliance.
https://xxx.xxx.xxx.xxx/api/4.0/rulesets/sync—The custom rule sets request URL. Replace xxx.xxx.xxx.xxx with the IP address of your Series appliance.
Results
This example synchronizes all custom rule sets, FaaS rule sets, and iSight rule sets. The output is in JSON.
ACM
The Access Control Manager (ACM) manages HTTP access to back-end services. To configure the ACM, see Configure ACM request.
Use the ACM endpoints to perform the following:
GET https://<PX_IP_address>/login
GET https://<PX_IP_address>/logout
GET https://<PX_IP_address>/session
POST https://<PX_IP_address>/password
GET https://<PX_IP_address>/keys/host
GET https://<PX_IP_address>/keys/trust
GET https://<PX_IP_address>/keys
POST https://<PX_IP_address>/keys
DELETE https://<PX_IP_address>/api/4.0/keys
Log in request
To log in to the ACM and to get a token to authenticate other requests within a 24-hour period, send the following request:
GET https://<PX_IP_address>/login
Required header:
--user <username>:<password>
Options
PX_IP_address—IP address of the Series appliance running the Series API.
username—The user name for your Series appliance.
password—The password for your Series appliance.
Example
GET https://xxx.xxx.xxx.xxx/login
Required header:
--user cpx:hammerhead
Log in response
Set-Cookie: px=[Token]; HttpOnly; Secure
Response fields
Token—This token authenticates a session. By default, the session times out after 24 hours.
Example
HTTP/1.1 200 OK
Date: Thu, 02 Mar 2017 18:20:34 GMT
Content-Type: text/plain; charset=utf-8
Content-Length: 0 Connection: keep-alive Set-Cookie:
px=COOKIEDATACOOKIEDATACOOKIEDATACOOKIEDATACOOKIEDATACOOKIEDATACOOKIEDATACOOKIEDATACOOKIEDATACOOKIEDATACOOKIEDATA;
Path=/; HttpOnly; Secure
X-Content-Type-Options: nosniff Cache-Control: public
X-Frame-Options: SAMEORIGIN
 Note
Note
The ; (semicolon) at the end of the token is not part of the token.
cURL code sample: Log in
The code sample was run with cURL 7.57.0.
curl -k --user cpx:hammerhead https://xxx.xxx.xxx.xxx/login -i
This cURL sample includes the following options:
-k—This option explicitly allows cURL to perform insecure SSL connections and transfers, which allows you to test your SSL connection without installing a CA certificate.
--user cpx:hammerhead—Replace cpx with the user name for your Series appliance. Replace hammerhead with the password for your Series appliance.
https://xxx.xxx.xxx.xxx/login—The ACM request URL. Replace xxx.xxx.xxx.xxx with the IP address of your Series appliance.
-i—This option returns the HTTP header of the response.
Results
This example logs you in to the ACM and provides a token that can be used to authenticate other requests within a 24-hour period.
Log out request
To log out of the ACM, send the following request:
GET https://<PX_IP_address>/logout
Required header:
--user <username>:<password>
Options
PX_IP_address—The IP address of the Series appliance running the Series API.
username—The user name for your Series appliance.
password—The password for your Series appliance.
Example
GET https://xxx.xxx.xxx.xxx/logout
Required header:
--user cpx:hammerhead
Log out response
HTTP/1.1 [Response Code] [Response Message]
Response fields
Response Code—A standard HTTP response code.
Response Message—A standard HTTP response message.
Example
HTTP/1.1 200 OK
cURL code sample: Log out
The code sample was run with cURL 7.57.0.
curl -k --user cpx:hammerhead https://xxx.xxx.xxx.xxx/logout -i
This cURL sample includes the following options:
-k—This option explicitly allows cURL to perform insecure SSL connections and transfers, which allows you to test your SSL connection without installing a CA certificate.
--user cpx:hammerhead—Replace cpx with the user name for your Series appliance. Replace hammerhead with the password for your Series appliance.
https://xxx.xxx.xxx.xxx/logout—The ACM request URL. Replace xxx.xxx.xxx.xxx with the IP address of your Series appliance.
-i—This option returns the HTTP header of the response.
Results
This example logs you out of the ACM.
ACM session request
To find out if your ACM session is active and your roles, send the following request:
GET https://<PX_IP_address>/session
Required headers:
--user <username>:<password> Cookie: px=<token>
Options
PX_IP_address—The IP address of the Series appliance running the Series API.
username—The user name for your Series appliance.
password—The password for your Series appliance.
token—This token authenticates the session. By default, the session times out after 24 hours. To get the token, see Log in request.
Example
GET https://xxx.xxx.xxx.xxx/session
Required headers:
--user cpx:hammerhead
Cookie: px=xxxxxxxxxxxxxxxxxxxxxxxxxxxxxxxxxxxxxxxxxxxxxxxx
ACM session response
Username: [ACM User] Roles: [User Roles]
Response fields
ACM User—User who is logged in to the ACM.
User Roles—Roles for logged-in user.
Example
{
"Username": "cpx", "Roles": [
"cpx", "cpxanalyst", "cpxadmin", "uiapi"
]
}
cURL code sample: ACM session
The code sample was run with cURL 7.57.0.
curl -k --cookie "px=xxxxxxxxxxxxxxxxxxxxxxxxxxxxxxxxxxxxxxxxxxxxxxxx"
--user cpx:hammerhead https://xxx.xxx.xxx.xxx/session
This cURL sample includes the following options:
-k—This option explicitly allows cURL to perform insecure SSL connections and transfers, which allows you to test your SSL connection without installing a CA certificate.
--cookie "px=xxxxxxxxxxxxxxxxxxxxxxxxxxxxxxxxxxxxxxxxxxxxxxxx"—This option specifies the authentication token for this session.
--user cpx:hammerhead—Replace cpx with the user name for your Series appliance. Replace hammerhead with the password
for your Series appliance.
https://xxx.xxx.xxx.xxx/session—The ACM request URL. Replace xxx.xxx.xxx.xxx with the IP address of your Series appliance.
Results
This example returns your user name and roles if your ACM session is active. The output is in JSON.
Change password request
To change your password, send the following request:
POST https://<PX_IP_address>/password
Required headers:
--user <username>:<password>
-H "Content-Type: application/json"
-d '{"old": "<old_password>", "new": "<new_password>", "new2": "<confirm_password>"}'
Options
PX_IP_address—The IP address of the Series appliance running the Series API.
username—The user name for your Series appliance.
password—The password for your Series appliance.
old_password—Your current password.
new_password—A new password.
confirm_password—A new password. The values of new and new2 must match.
Example
POST https://xxx.xxx.xxx.xxx/password
Required headers:
--user cpx:hammerhead
-H "Content-Type: application/json"
-d '{"old": "MYoldandfamiliarPW", "new": "MYnewandimprovedPW", "new2": "MYnewandimprovedPW"}'
Change password response
HTTP/1.1 [Response Code] [Response Message] Date: [Date]
Content-Type: [Content Type] message: [Message]
Response fields
Response Code—A standard HTML response code.
Response Message—A standard HTML response message.
Date—Standard HTML date format.
Content Type—The response format.
Message—Success or failure of request.
Example
HTTP/1.1 200 OK
Date: Fri, 17 Mar 2017 17:17:00 GMT
Content-Type: application/json
{
"message": "Password successfully changed."
}
cURL code sample: Change password
The code sample was run with cURL 7.57.0.
curl https://xxx.xxx.xxx.xxx/password -k -X POST
--user JohnSmith:MYoldandfamiliarPW
-H "Content-Type: application/json"
-d '{"old": "MYoldandfamiliarPW", "new": "MYnewandimprovedPW", "new2": "MYnewandimprovedPW"}'
This cURL sample includes the following options:
https://xxx.xxx.xxx.xxx/password—The ACM request URL. Replace xxx.xxx.xxx.xxx with the IP address of your Series appliance.
-k—This option explicitly allows cURL to perform insecure SSL connections and transfers, which allows you to test your SSL connection without installing a CA certificate.
-X POST—This option specifies using the POST method.
--user JohnSmith:MYoldandfamiliarPW—Replace JohnSmith with the user name for your Series appliance. Replace
MYoldandfamiliarPW with the password for your Series appliance.
-H "Content-Type: application/json"—This header specifies that the request body is in JSON format.
-d '{"old": "MYoldandfamiliarPW", "new": "MYnewandimprovedPW", "new2": "MYnewandimprovedPW"}'—This option specifies the userʼs current and new password.
Results
This example change the userʼs password. The output is in JSON.
List ACM public key request
To list the ACMʼs public key, send the following request:
GET https://<PX_IP_address>/keys/host
Required header:
--user <username>:<password>
Options
PX_IP_address—The IP address of the Series appliance running the Series API.
username—The user name for your Series appliance.
password—The password for your Series appliance.
Example
GET https://xxx.xxx.xxx.xxx/keys/host
Required header:
--user cpx:hammerhead
List ACM public key response
HTTP/1.1 [Response Code] [Response Message] Date: [Date]
Content-Type: [Content Type] hostkey: [Public Key]
Response fields
Response Code—A standard HTML response code.
Response Message—A standard HTML response message.
Date—Standard HTML date format.
Content Type—The response format.
Public Key—The public key of the ACM.
Example
HTTP/1.1 200 OK
Date: Fri, 17 Mar 2017 16:59:46 GMT
Content-Type: application/json
{
"hostkey": "-----BEGIN PUBLIC KEY-----
\nPUBLICKEYPUBLICKEYPUBLICKEYPUBLICKEYPUBLICKEYPUBLICKEYPUBLICKEYPUBLICKEYPUBLICKEYPUBLICKEYPUBLICKEYPUBLICKEYPUBLICKE n-----END PUBLIC KEY \n"
}
cURL code sample: List ACM public key
The code sample was run with cURL 7.57.0.
curl -k --user cpx:hammerhead https://xxx.xxx.xxx.xxx/keys/host
This cURL sample includes the following options:
-k—This option explicitly allows cURL to perform insecure SSL connections and transfers, which allows you to test your SSL connection without installing a CA certificate.
--user cpx:hammerhead—Replace cpx with the user name for your Series appliance. Replace hammerhead with the password for your Series appliance.
https://xxx.xxx.xxx.xxx/keys/host—The ACM request URL. Replace xxx.xxx.xxx.xxx with the IP address of your Series appliance.
Results
This example returns the ACMʼs public key. The output is in JSON.
List ACM trusted keys request
To list the ACMʼs trusted public keys, send the following request:
GET https://<PX_IP_address>/keys/trust
Required header:
--user <username>:<password>
Options
PX_IP_address—The IP address of the Series appliance running the Series API.
username—The user name for your Series appliance.
password—The password for your Series appliance.
Example
GET https://xxx.xxx.xxx.xxx/keys/trust
Required header:
--user cpx:hammerhead
List ACM trusted keys response
HTTP/1.1 [Response Code] [Response Message] Date: [Date]
Content-Type: [Content Type] ip: [IP Address]
key: [Trust Key]
Response fields
Response Code—A standard HTML response code.
Response Message—A standard HTML response message.
Date—Standard HTML date format.
Content Type—The response format.
IP Address—The IP address associated with the trusted public key.
Trust Key—A trusted public key of the ACM.
Example
HTTP/1.1 200 OK
Date: Fri, 17 Mar 2017 16:59:46 GMT
Content-Type: application/json
{
"trustkeys": [
{
"ip": "xxx.xxx.xxx.xxx",
"key": "-----BEGIN PUBLIC KEY-----TRUSTKEYTRUSTKEYTRUSTKEYTRUSTKEYTRUSTKEYTRUSTKEYTRUSTKEYTRUSTKEYTRUSTKEYTRUSTKEYTRUSTKEYTRUSTKEYTRUSTKEYTRUSTKEYTRUSTK END PUBLIC KEY "
},
{
"ip": "xxx.xxx.xxx.xxx",
"key": "-----BEGIN PUBLIC KEY-----TRUSTKEYTRUSTKEYTRUSTKEYTRUSTKEYTRUSTKEYTRUSTKEYTRUSTKEYTRUSTKEYTRUSTKEYTRUSTKEYTRUSTKEYTRUSTKEYTRUSTKEYTRUSTKEYTRUSTK END PUBLIC KEY "
}
]
}
cURL code sample: List ACM trusted keys
The code sample was run with cURL 7.57.0.
curl -k --user cpx:hammerhead https://xxx.xxx.xxx.xxx/keys/trust
This cURL sample includes the following options:
-k—This option explicitly allows cURL to perform insecure SSL connections and transfers, which allows you to test your SSL connection without installing a CA certificate.
--user cpx:hammerhead—Replace cpx with the user name for your Series appliance. Replace hammerhead with the password
for your Series appliance.
https://xxx.xxx.xxx.xxx/keys/trust—The ACM request URL. Replace xxx.xxx.xxx.xxx with the IP address of your Series appliance.
Results
This example returns the ACMʼs trusted public keys. The output is in JSON.
List all ACM keys request
To list all the ACM keys, including the ACMʼs public key and trusted keys, send the following request:
GET https://<PX_IP_address>/keys
Required header:
--user <username>:<password>
Options
PX_IP_address—The IP address of the Series appliance running the Series API.
username—The user name for your Series appliance.
password—The password for your Series appliance.
Example
GET https://xxx.xxx.xxx.xxx/keys
Required header:
--user cpx:hammerhead
List all ACM keys response
HTTP/1.1 [Response Code] [Response Message] Date: [Date]
Content-Type: [Content Type] hostkey: [Public Key]
ip: [IP Address] key: [Trust Key]
Response fields
Response Code—A standard HTML response code.
Response Message—A standard HTML response message.
Date—Standard HTML date format.
Content Type—The response format.
Public Key—The public key of the ACM.
IP Address—The IP address associated with the trusted public key.
Trust Key—A trusted public key of the ACM.
Example
HTTP/1.1 200 OK
Date: Thu, 16 Mar 2017 15:15:54 GMT
Content-Type: application/json
{
"hostkey": "-----BEGIN PUBLIC KEY-----
\nPUBLICKEYPUBLICKEYPUBLICKEYPUBLICKEYPUBLICKEYPUBLICKEYPUBLICKEYPUBLICKEYPUBLICKEYPUBLICKEYPUBLICKEYPUBLICKEYPUBLICKE n-----END PUBLIC KEY \n",
"trustkeys": [
{
"ip": "xxx.xxx.xxx.xxx",
"key": "-----BEGIN PUBLIC KEY-----TRUSTKEYTRUSTKEYTRUSTKEYTRUSTKEYTRUSTKEYTRUSTKEYTRUSTKEYTRUSTKEYTRUSTKEYTRUSTKEYTRUSTKEYTRUSTKEYTRUSTKEYTRUSTKEYTRUSTK END PUBLIC KEY "
},
{
"ip": "xxx.xxx.xxx.xxx",
"key": "dfu4389fjdkfer832054352890jdfffk"
},
{
"ip": "ia141",
"key": "-----BEGIN PUBLIC KEY-----TRUSTKEYTRUSTKEYTRUSTKEYTRUSTKEYTRUSTKEYTRUSTKEYTRUSTKEYTRUSTKEYTRUSTKEYTRUSTKEYTRUSTKEYTRUSTKEYTRUSTKEYTRUSTKEYTRUSTK END PUBLIC KEY "
}
]
}
cURL code sample: List all ACM keys
The code sample was run with cURL 7.57.0.
curl -k --user cpx:hammerhead https://xxx.xxx.xxx.xxx/keys
This cURL sample includes the following options:
-k—This option explicitly allows cURL to perform insecure SSL connections and transfers, which allows you to test your SSL connection without installing a CA certificate.
--user cpx:hammerhead—Replace cpx with the user name for your Series appliance. Replace hammerhead with the password for your Series appliance.
https://xxx.xxx.xxx.xxx/keys—The ACM request URL. Replace xxx.xxx.xxx.xxx with the IP address of your Series appliance.
Results
This example returns a list of all ACM keys. The output is in JSON.
New ACM trusted key request
To add a new trusted key to the ACM, send the following request:
POST https://<PX_IP_address>/keys
Required header:
--user <username>:<password>
Request body:
{
ip: 'ipv4', key: 'TEXT'
}
Options
PX_IP_address—The IP address of the Series appliance running the Series API.
username—The user name for your Series appliance.
password—The password for your Series appliance.
Parameters
ip—The IP address associated with the trusted public key.
key—A trusted public key.
Example
GET https://xxx.xxx.xxx.xxx/keys
Required header:
--user cpx:hammerhead
Request body:
{
ip: 'xxx.xxx.xxx.xxx', key:
'TRUSTKEYTRUSTKEYTRUSTKEYTRUSTKEYTRUSTKEYTRUSTKEYTRUSTKEYTRUSTKEYTRUSTKEYTRUSTKEYTRUSTKEYTRUSTKEYTRUSTKEYTRUSTKEYTRUST
}
New ACM trusted key response
HTTP/1.1 [Response Code] [Response Message] Date: [Date]
Content-Type: [Content Type] ip: [IP Address]
key: [Trust Key]
Response fields
Response Code—A standard HTML response code.
Response Message—A standard HTML response message.
Date—Standard HTML date format.
Content Type—The response format.
IP Address—The IP address associated with the trusted public key.
Trust Key—A trusted public key of the ACM.
Example
HTTP/1.1 200 OK
Date: Fri, 17 Mar 2017 17:17:00 GMT
Content-Type: application/json
{
"ip": "xxx.xxx.xxx.xxx", "key":
"TRUSTKEYTRUSTKEYTRUSTKEYTRUSTKEYTRUSTKEYTRUSTKEYTRUSTKEYTRUSTKEYTRUSTKEYTRUSTKEYTRUSTKEYTRUSTKEYTRUSTKEYTRUSTKEYTRUST
}
cURL code sample: New ACM trusted key
The code sample was run with cURL 7.57.0.
curl --user cpx:hammerhead https://xxx.xxx.xxx.xxx/keys -k -X POST
--data-binary '{"ip":"xxx.xxx.xxx.xxx", "key":"TRUSTKEYTRUSTKEYTRUSTKEYTRUSTKEYTRUSTKEYTRUSTKEYTRUSTKEYTRUSTKEYTRUSTKEYTRUSTKEYTRUSTKEYTRUSTKEY"}'
This cURL sample includes the following options:
--user cpx:hammerhead—Replace cpx with the user name for your Series appliance. Replace hammerhead with the password for your Series appliance.
https://xxx.xxx.xxx.xxx/keys—The ACM request URL. Replace xxx.xxx.xxx.xxx with the IP address of your Series appliance.
-k—This option explicitly allows cURL to perform insecure SSL connections and transfers, which allows you to test your SSL connection without installing a CA certificate.
-X POST—This option specifies using the POST method.
--data-binary '{"ip":"xxx.xxx.xxx.xxx", "key":"TRUSTKEYTRUSTKEYTRUSTKEYTRUSTKEYTRUSTKEYTRUSTKEYTRUSTKEYTRUSTKEYTRUSTKEYTRUSTKEYTRUSTKEYTRUSTKEY"}'—This
option specifies the new trusted key to add.
Results
This example adds a new trusted key to the ACM. The output is in JSON.
Delete ACM trusted keys request
To delete the ACM trusted keys for a specific IP address, send the following request:
DELETE https://<PX_IP_address>/keys
Required header:
--user <username>:<password>
Request body:
{
ip: 'ipv4'
}
Options
PX_IP_address—The IP address of the Series appliance running the Series API.
username—The user name for your Series appliance.
password—The password for your Series appliance.
Example
DELETE https://xxx.xxx.xxx.xxx/keys
Required header:
--user cpx:hammerhead
Delete ACM trusted keys response
HTTP/1.1 [Response Code] [Response Message] Date: [Date]
Content-Type: [Content Type] ip: [IP Address]
key: [Trust Key]
Response fields
Response Code—A standard HTML response code.
Response Message—A standard HTML response message.
Date—Standard HTML date format.
Content Type—The response format.
IP Address—The IP address associated with the trusted public key.
Trust Key—A trusted public key of the ACM.
Example
HTTP/1.1 200 OK
Date: Fri, 17 Mar 2017 20:32:45 GMT
Content-Type: application/json
{
"trustkeys": [
{
"ip": "xxx.xxx.xxx.xxx",A
"key": "-----BEGIN PUBLIC KEY-----TRUSTKEYTRUSTKEYTRUSTKEYTRUSTKEYTRUSTKEYTRUSTKEYTRUSTKEYTRUSTKEYTRUSTKEYTRUSTKEYTRUSTKEYTRUSTKEYTRUSTKEYTRUSTKEYTRUSTK END PUBLIC KEY "
}
]
}
cURL code sample: Delete ACM trusted keys
The code sample was run with cURL 7.57.0.
curl -k –-user cpx:hammerhead https://xxx.xxx.xxx.xxx/keys -X DELETE
--data-binary '{"ip":"xxx.xxx.xxx.xxx"}'
This cURL sample includes the following options:
-k—This option explicitly allows cURL to perform insecure SSL connections and transfers, which allows you to test your SSL connection without installing a CA certificate.
--user cpx:hammerhead—Replace cpx with the user name for your Series appliance. Replace hammerhead with the password for your Series appliance.
https://xxx.xxx.xxx.xxx/keys—The ACM request URL. Replace xxx.xxx.xxx.xxx with the IP address of your Series
appliance.
--data-binary '{"ip":"xxx.xxx.xxx.xxx"}'—This option specifies the IP address for the trusted keys to delete.
Results
This example deletes the ACM trusted keys for a specified IP address. The output is in JSON.
FaaS
The following FaaS endpoints are available:
GET https://<PX_IP_address>/api/4.0/faas
POST https://<PX_IP_address>/api/4.0/faas
DELETE https://<PX_IP_address>/api/4.0/faas
GET https://<PX_IP_address>/api/4.0/faas/connection
POST https://<PX_IP_address>/api/4.0/faas/connection
DELETE https://<PX_IP_address>/api/4.0/faas/connection
GET https://<PX_IP_address>/api/4.0/faas/connection/config
PUT https://<PX_IP_address>/api/4.0/faas/connection/config
DELETE https://<PX_IP_address>/api/4.0/faas/connection/config
GET https://<PX_IP_address>/api/4.0/faas/connection/config/production
PUT https://<PX_IP_address>/api/4.0/faas/connection/config/production
DELETE https://<PX_IP_address>/api/4.0/faas/connection/config/production
GET https://<PX_IP_address>/api/4.0/faas/connection/config/provisioning
PUT https://<PX_IP_address>/api/4.0/faas/connection/config/provisioning
DELETE https://<PX_IP_address>/api/4.0/faas/connection/config/provisioning
GET https://<PX_IP_address>/api/4.0/faas/connection/config/proxy
PUT https://<PX_IP_address>/api/4.0/faas/connection/config/proxy
DELETE https://<PX_IP_address>/api/4.0/faas/connection/config/proxy
POST https://<PX_IP_address>/api/4.0/faas/test-alert
GET https://<PX_IP_address>/api/4.0/faas/metadata
GET https://<PX_IP_address>/api/4.0/faas/metadata/outputs
GET https://<PX_IP_address>/api/4.0/faas/metadata/outputs/<output>
GET https://<PX_IP_address>/api/4.0/faas/metadata/outputs/<output>/files
DELETE https://<PX_IP_address>/api/4.0/faas/metadata/outputs/<output>/files
GET https://<PX_IP_address>/api/4.0/faas/metadata/outputs/<output>/files/<filename>
DELETE https://<PX_IP_address>/api/4.0/faas/metadata/outputs/<output>/files/<filename>
FaaS connectivity status request
To get FaaS connectivity status, send the following request:
GET https://<PX_IP_address>/api/4.0/faas
 Note
Note
This request can be used by all authenticated users, but the production configuration will not be returned to non-FaaS users.
Required header:
--user <username>:<password>
Options
PX_IP_address—IP address of the Series appliance running the Series API.
username—The user name for your Series appliance.
password—The password for your Series appliance.
Example
GET https://xxx.xxx.xxx.xxx/api/4.0/faas
Required header:
--user npadmin:hammerhead
FaaS connectivity status response
Faas User:
HTTP/1.1 [Response Code] [Response Message] Date: [Date]
Content-Type: [Content Type]
{
"installed": Boolean, "licensed": Boolean, "connection": {
"connected": Boolean, "status": "status", "config": {
"production": {
"production_ip": "xx.xx.xx.xx", "production_port": port_number
},
"provisioning": { "provisioning_ip": "xx.xx.xx.xx", "provisioning_port": port_number
},
"proxy": {
"proxy_enabled": Boolean, "proxy_ip": "xx.xx.xx.xx", "proxy_port": port_number, "proxy_username": "proxy_user", "proxy_password": "string", "proxy_auth": "basic"
}
}
}
}
Sudo user:
HTTP/1.1 [Response Code] [Response Message] Date: [Date]
Content-Type: [Content Type]
{
"installed": Boolean, "licensed": Boolean, "connection": {
"connected": Boolean, "status": "status", "config": {
"provisioning": { "provisioning_ip": "xx.xx.xx.xx", "provisioning_port": port_number
},
"proxy": {
"proxy_enabled": Boolean, "proxy_ip": "xx.xx.xx.xx", "proxy_port": port_number, "proxy_username": "proxy_user", "proxy_password": "string",
"proxy_auth": "basic"
}
}
}
}
Response fields
Response Code—A standard HTML response code.
Response Message—A standard HTML response message.
Date—Standard HTML date format.
Content Type—The response format.
Example
FaaS user:
HTTP/1.1 200 OK
Date: Wed, 07 Jun 2018 00:13:39 GMT
Content-Type: application/json; charset=utf-8
{
"installed": Boolean, "licensed": false, "connection": {
"connected": true, "status": "ok", "config": {
"production": {
"production_ip": "12.12.12.12",
"production_port": 80
},
"provisioning": { "provisioning_ip": "10.10.10.10",
"provisioning_port": 80
},
"proxy": { "proxy_enabled": true,
"proxy_ip": "12.12.12.12",
"proxy_port": 81, "proxy_username": "p_user", "proxy_password": "mypassword", "proxy_auth": "basic"
}
}
}
}
Sudo user:
HTTP/1.1 200 OK
Date: Wed, 07 Jun 2018 00:13:39 GMT
Content-Type: application/json; charset=utf-8
{
"installed": false, "licensed": false, "connection": {
"connected": true, "status": "ok", "config": {
"provisioning": { "provisioning_ip": "10.10.10.10",
"provisioning_port": 80
},
"proxy": { "proxy_enabled": true,
"proxy_ip": "12.12.12.12",
"proxy_port": 81, "proxy_username": "p_user", "proxy_password": "mypassword", "proxy_auth": "basic"
}
}
}
}
cURL code sample: FaaS connectivity status
The code sample was run with cURL 7.57.0.
curl --user npadmin:hammerhead https://xxx.xxx.xxx.xxx/api/4.0/faas -k -X GET
This cURL sample includes the following options:
--user npadmin:hammerhead—Replace npadmin with the user name for your Series appliance. Replace hammerhead with the password for your Series appliance.
https://xxx.xxx.xxx.xxx/api/4.0/faas—The FaaS request URL. Replace xxx.xxx.xxx.xxx with the IP address of your Series appliance.
-k—This option explicitly allows cURL to perform insecure SSL connections and transfers, which allows you to test your SSL connection without installing a CA certificate.
-X GET—This option specifies using the GET method.
Results
This example gets the connectivity status of FaaS. The output is in JSON.
Install FaaS package request
To install FaaS, send the following request:
POST https://<PX_IP_address>/api/4.0/faas
 Note
Note
You must have sudo access to use this request. Prerequisite: the package is not installed.
Required header:
--user <username>:<password>
Options
PX_IP_address—IP address of the Series appliance running the Series API.
username—The user name for your Series appliance.
password—The password for your Series appliance.
Example
POST https://xxx.xxx.xxx.xxx/api/4.0/faas
Required header:
--user npadmin:hammerhead
Install FaaS package response
HTTP/1.1 [Response Code] [Response Message] Date: [Date]
Content-Type: [Content Type]
Response fields
Response Code—A standard HTML response code.
Response Message—A standard HTML response message.
Date—Standard HTML date format.
Content Type—The response format.
Example
HTTP/1.1 200 OK
Date: Wed, 07 Jun 2018 00:13:39 GMT
Content-Type: application/json; charset=utf-8
cURL code sample: Install FaaS package
The code sample was run with cURL 7.57.0.
curl --user npadmin:hammerhead https://xxx.xxx.xxx.xxx/api/4.0/faas -k -X POST
This cURL sample includes the following options:
--user npadmin:hammerhead—Replace npadmin with the user name for your Series appliance. Replace hammerhead with the password for your Series appliance.
https://xxx.xxx.xxx.xxx/api/4.0/faas—The FaaS request URL. Replace xxx.xxx.xxx.xxx with the IP address of your Series appliance.
-k—This option explicitly allows cURL to perform insecure SSL connections and transfers, which allows you to test your SSL connection without installing a CA certificate.
-X POST—This option specifies using the POST method.
Results
This example installs FaaS.
Uninstall FaaS package request
To uninstall FaaS, send the following request:
DELETE https://<PX_IP_address>/api/4.0/faas
 Note
Note
You must have sudo access to use this request. Uninstalling Faas will also sever any FaaS connections.
Required header:
--user <username>:<password>
Options
PX_IP_address—IP address of the Series appliance running the Series API.
username—The user name for your Series appliance.
password—The password for your Series appliance.
Example
DELETE https://xxx.xxx.xxx.xxx/api/4.0/faas
Required header:
--user npadmin:hammerhead
Uninstall FaaS package response
HTTP/1.1 [Response Code] [Response Message] Date: [Date]
Content-Type: [Content Type]
Response fields
Response Code—A standard HTML response code.
Response Message—A standard HTML response message.
Date—Standard HTML date format.
Content Type—The response format.
Example
HTTP/1.1 200 OK
Date: Wed, 07 Jun 2018 00:13:39 GMT
Content-Type: application/json; charset=utf-8
cURL code sample: Uninstall FaaS package
The code sample was run with cURL 7.57.0.
curl --user npadmin:hammerhead https://xxx.xxx.xxx.xxx/api/4.0/faas -k -X DELETE
This cURL sample includes the following options:
--user npadmin:hammerhead—Replace npadmin with the user name for your Series appliance. Replace hammerhead with the password for your Series appliance.
https://xxx.xxx.xxx.xxx/api/4.0/faas—The FaaS request URL. Replace xxx.xxx.xxx.xxx with the IP address of your Series appliance.
-k—This option explicitly allows cURL to perform insecure SSL connections and transfers, which allows you to test your SSL connection without installing a CA certificate.
-X DELETE—This option specifies using the DELETE method.
Results
This example uninstalls FaaS.
FaaS connection details request
To get FaaS connection details, send the following request:
GET https://<PX_IP_address>/api/4.0/faas/connection
 Note
Note
This request can be used by all authenticated users, but the production configuration will not be returned to non-FaaS users. The FaaS package must be installed.
Required header:
--user <username>:<password>
Options
PX_IP_address—IP address of the Series appliance running the Series API.
username—The user name for your Series appliance.
password—The password for your Series appliance.
Example
GET https://xxx.xxx.xxx.xxx/api/4.0/faas/connection
Required header:
--user npadmin:hammerhead
FaaS connection details response
Faas User:
HTTP/1.1 [Response Code] [Response Message] Date: [Date]
Content-Type: [Content Type]
{
"connected": Boolean, "status": "status", "config": {
"production": {
"production_ip": "xx.xx.xx.xx", "production_port": port_number
},
"provisioning": { "provisioning_ip": "xx.xx.xx.xx", "provisioning_port": port_number
},
"proxy": {
"proxy_enabled": Boolean, "proxy_ip": "xx.xx.xx.xx", "proxy_port": port_number, "proxy_username": "p_user", "proxy_password": "password", "proxy_auth": "authentication_type"
}
}
}
Sudo user:
HTTP/1.1 [Response Code] [Response Message] Date: [Date]
Content-Type: [Content Type]
{
"connected": Boolean, "status": "status", "config": {
"provisioning": { "provisioning_ip": "xx.xx.xx.xx", "provisioning_port": port_number
},
"proxy": {
"proxy_enabled": Boolean, "proxy_ip": "xx.xx.xx.xx", "proxy_port": port_number, "proxy_username": "p_user", "proxy_password": "password", "proxy_auth": "authentication_type"
}
}
}
Response fields
Response Code—A standard HTML response code.
Response Message—A standard HTML response message.
Date—Standard HTML date format.
Content Type—The response format.
Example
FaaS user:
HTTP/1.1 200 OK
Date: Wed, 07 Jun 2018 00:13:39 GMT
Content-Type: application/json; charset=utf-8
{
"connected": true, "status": "ok", "config": {
"production": {
"production_ip": "12.12.12.12",
"production_port": 80
},
"provisioning": { "provisioning_ip": "10.10.10.10",
"provisioning_port": 80
},
"proxy": { "proxy_enabled": true,
"proxy_ip": "12.12.12.12",
"proxy_port": 81, "proxy_username": "p_user", "proxy_password": "mypassword", "proxy_auth": "basic"
}
}
}
Sudo user:
HTTP/1.1 200 OK
Date: Wed, 07 Jun 2018 00:13:39 GMT
Content-Type: application/json; charset=utf-8
{
"connected": true, "status": "ok", "config": {
"provisioning": { "provisioning_ip": "10.10.10.10",
"provisioning_port": 80
},
"proxy": { "proxy_enabled": true,
"proxy_ip": "12.12.12.12",
"proxy_port": 81, "proxy_username": "p_user", "proxy_password": "mypassword", "proxy_auth": "basic"
}
}
}
cURL code sample: FaaS connection details
The code sample was run with cURL 7.57.0.
curl --user npadmin:hammerhead https://xxx.xxx.xxx.xxx/api/4.0/faas/connection -k -X GET
This cURL sample includes the following options:
--user npadmin:hammerhead—Replace npadmin with the user name for your Series appliance. Replace hammerhead with the password for your Series appliance.
https://xxx.xxx.xxx.xxx/api/4.0/faas/connection—The FaaS request URL. Replace xxx.xxx.xxx.xxx with the IP address of your Series appliance.
-k—This option explicitly allows cURL to perform insecure SSL connections and transfers, which allows you to test your SSL connection without installing a CA certificate.
-X GET—This option specifies using the GET method.
Results
This example gets FaaS connection details. The output is in JSON.
Initialize FaaS connection request
To initialize the FaaS VPN connection, send the following request:
POST https://<PX_IP_address>/api/4.0/faas/connection
If the FaaS package is not installed, POSTing to this endpoint will install it for you. This allows you to go from an unconfigured system to connected to the FaaS VPN in one step. No configuration is needed if the configuration has already been provided (in the case of a /faas/connection POST and subsequent /faas/connection DELETE).
 Note
Note
You must have sudo access to use this request.
Required header:
--user <username>:<password>
Request JSON:
{
"provisioning": { "provisioning_ip": "xx.xx.xx.xx", "provisioning_port": port_number
},
"proxy": {
"proxy_enabled": Boolean, "proxy_ip": "xx.xx.xx.xx", "proxy_port": port_number, "proxy_username": "p_user", "proxy_password": "password", "proxy_auth": "authentication_type"
},
"fe_password": "password"
}
fe_password sets the password for the fe_services user.
Options
PX_IP_address—IP address of the Series appliance running the Series API.
username—The user name for your Series appliance.
password—The password for your Series appliance.
Example
POST https://xxx.xxx.xxx.xxx/api/4.0/faas/connection
Required header:
--user npadmin:hammerhead
example.json:
{
"provisioning": { "provisioning_ip": "10.10.10.10",
"provisioning_port": 80
},
"proxy": { "proxy_enabled": true,
"proxy_ip": "12.12.12.12",
"proxy_port": 81, "proxy_username": "p_user", "proxy_password": "mypassword", "proxy_auth": "basic"
},
"fe_password": "AVjTaDtrVXZk7V9t"
}
Initialize FaaS connection response
HTTP/1.1 [Response Code] [Response Message] Date: [Date]
Content-Type: [Content Type]
{
"connected": Boolean, "status": "status"
}
Response fields
Response Code—A standard HTML response code.
Response Message—A standard HTML response message.
Date—Standard HTML date format.
Content Type—The response format.
Example
HTTP/1.1 200 OK
Date: Wed, 07 Jun 2018 00:13:52 GMT
Content-Type: application/json; charset=utf-8
{
"connected": true, "status": "connecting"
}
cURL code sample: Initialize FaaS connection
The code sample was run with cURL 7.57.0.
curl --user npadmin:hammerhead https://xxx.xxx.xxx.xxx/api/4.0/faas/connection -k -X POST -d @example.json
This cURL sample includes the following options:
--user npadmin:hammerhead—Replace npadmin with the user name for your Series appliance. Replace hammerhead with the password for your Series appliance.
https://xxx.xxx.xxx.xxx/api/4.0/faas/connection—The FaaS request URL. Replace xxx.xxx.xxx.xxx with the IP address of your Series appliance.
-k—This option explicitly allows cURL to perform insecure SSL connections and transfers, which allows you to test your SSL connection without installing a CA certificate.
-X POST—This option specifies using the POST method.
-d example.json—Specifies the JSON file containing the configuration details.
Results
This example initializes the FaaS VPN connection. The response is in JSON.
Disconnect FaaS request
To uninstall FaaS, send the following request:
DELETE https://<PX_IP_address>/api/4.0/faas/connection
 Note
Note
You must have sudo access to use this request.
This endpoint will retain the production and provisioning configuration. This only stops the connection to FaaS. A subsequent call to GET /faas/connection will return:
{"status":"provisioned", "connected": false}
Required header:
--user <username>:<password>
Options
PX_IP_address—IP address of the Series appliance running the Series API.
username—The user name for your Series appliance.
password—The password for your Series appliance.
Example
DELETE https://xxx.xxx.xxx.xxx/api/4.0/faas/connection
Required header:
--user npadmin:hammerhead
Disconnect FaaS response
HTTP/1.1 [Response Code] [Response Message] Date: [Date]
Content-Type: [Content Type]
Response fields
Response Code—A standard HTML response code.
Response Message—A standard HTML response message.
Date—Standard HTML date format.
Content Type—The response format.
Example
HTTP/1.1 200 OK
Date: Wed, 07 Jun 2018 00:13:39 GMT
Content-Type: application/json; charset=utf-8
cURL code sample: Disconnect FaaS
The code sample was run with cURL 7.57.0.
curl --user npadmin:hammerhead https://xxx.xxx.xxx.xxx/api/4.0/faas/connection -k -X DELETE
This cURL sample includes the following options:
--user npadmin:hammerhead—Replace npadmin with the user name for your Series appliance. Replace hammerhead with the password for your Series appliance.
https://xxx.xxx.xxx.xxx/api/4.0/faas/connection—The FaaS request URL. Replace xxx.xxx.xxx.xxx with the IP address of your Series appliance.
-k—This option explicitly allows cURL to perform insecure SSL connections and transfers, which allows you to test your SSL connection without installing a CA certificate.
-X DELETE—This option specifies using the DELETE method.
Results
This example terminates the FaaS VPN connection.
FaaS connection configuration request
To get FaaS connection configuration details, send the following request:
GET https://<PX_IP_address>/api/4.0/faas/connection/config
 Note
Note
This request can be used by all authenticated users, but the production configuration will not be returned to non-FaaS users. The FaaS package must be installed.
Required header:
--user <username>:<password>
Options
PX_IP_address—IP address of the Series appliance running the Series API.
username—The user name for your Series appliance.
password—The password for your Series appliance.
Example
GET https://xxx.xxx.xxx.xxx/api/4.0/faas/connection/config
Required header:
--user npadmin:hammerhead
FaaS connection configuration response
FaaS User:
HTTP/1.1 [Response Code] [Response Message] Date: [Date]
Content-Type: [Content Type]
{
"production": {
"production_ip": "xx.xx.xx.xx", "production_port": port_number
},
"provisioning": { "provisioning_ip": "xx.xx.xx.xx", "provisioning_port": port_number
},
"proxy": {
"proxy_enabled": Boolean, "proxy_ip": "xx.xx.xx.xx", "proxy_port": port_number, "proxy_username": "p_user", "proxy_password": "password", "proxy_auth": "authentication_type"
}
}
Sudo user:
HTTP/1.1 [Response Code] [Response Message] Date: [Date]
Content-Type: [Content Type]
{
"provisioning": { "provisioning_ip": "xx.xx.xx.xx", "provisioning_port": port_number
},
"proxy": {
"proxy_enabled": Boolean, "proxy_ip": "xx.xx.xx.xx", "proxy_port": port_number, "proxy_username": "p_user", "proxy_password": "password", "proxy_auth": "authentication_type"
}
}
Response fields
Response Code—A standard HTML response code.
Response Message—A standard HTML response message.
Date—Standard HTML date format.
Content Type—The response format.
Example
FaaS user:
HTTP/1.1 200 OK
Date: Wed, 07 Jun 2018 00:13:39 GMT
Content-Type: application/json; charset=utf-8
{
"production": {
"production_ip": "12.12.12.12",
"production_port": 80
},
"provisioning": { "provisioning_ip": "10.10.10.10",
"provisioning_port": 80
},
"proxy": { "proxy_enabled": true,
"proxy_ip": "12.12.12.12",
"proxy_port": 81, "proxy_username": "p_user", "proxy_password": "mypassword", "proxy_auth": "basic"
}
}
Sudo user:
HTTP/1.1 200 OK
Date: Wed, 07 Jun 2018 00:13:39 GMT
Content-Type: application/json; charset=utf-8
{
"provisioning": { "provisioning_ip": "10.10.10.10",
"provisioning_port": 80
},
"proxy": { "proxy_enabled": true,
"proxy_ip": "12.12.12.12",
"proxy_port": 81, "proxy_username": "p_user", "proxy_password": "mypassword", "proxy_auth": "basic"
}
}
cURL code sample: FaaS connection configuration
The code sample was run with cURL 7.57.0.
curl --user npadmin:hammerhead https://xxx.xxx.xxx.xxx/api/4.0/faas/connection/config -k -X GET
This cURL sample includes the following options:
--user npadmin:hammerhead—Replace npadmin with the user name for your Series appliance. Replace hammerhead with the password for your Series appliance.
https://xxx.xxx.xxx.xxx/api/4.0/faas/connection/config—The FaaS request URL. Replace xxx.xxx.xxx.xxx with the IP address of your Series appliance.
-k—This option explicitly allows cURL to perform insecure SSL connections and transfers, which allows you to test your SSL connection without installing a CA certificate.
-X GET—This option specifies using the GET method.
Results
This example gets FaaS connection configuration details. The output is in JSON.
Update FaaS connection configuration request
To update the FaaS connection configuration, send the following request:
PUT https://<PX_IP_address>/api/4.0/faas/connection/config
 Note
Note
The FaaS package must be installed.
Updates to the configuration will restart the connection.
Required header:
--user <username>:<password>
Options
PX_IP_address—IP address of the Series appliance running the Series API.
username—The user name for your Series appliance.
password—The password for your Series appliance.
Parameters
Configuration for the provisioning or production VPN should be provided as a form. Any fields not provided will use the value
already configured on the system. Form parameters for non-FaaS users:
provisioning_ip—IP address of provisioning VPN.
provisioning_port—Port number of provisioning VPN.
proxy_enabled—(Boolean) Enable proxy.
proxy_ip—IP address of proxy.
proxy_port—Port number of proxy.
proxy_username—Proxy username.
proxy_password—Proxy user's password.
proxy_auth—Proxy authentication.
Form parameters for FaaS users:
production_ip—IP address of production VPN.
production_port—Port number of production VPN.
certs—A gzipped tarball containing the certs to be installed.
Example
PUT https://xxx.xxx.xxx.xxx/api/4.0/faas/connection/config
Required header:
--user npadmin:hammerhead
Update FaaS connection configuration response
FaaS User:
HTTP/1.1 [Response Code] [Response Message] Date: [Date]
Content-Type: [Content Type]
{
"production": {
"production_ip": "xx.xx.xx.xx", "production_port": port_number
},
"provisioning": { "provisioning_ip": "xx.xx.xx.xx", "provisioning_port": port_number
},
"proxy": {
"proxy_enabled": Boolean, "proxy_ip": "xx.xx.xx.xx", "proxy_port": port_number, "proxy_username": "proxy_user", "proxy_password": "password", "proxy_auth": "authentication_type"
}
}
Sudo user:
HTTP/1.1 [Response Code] [Response Message] Date: [Date]
Content-Type: [Content Type]
{
"provisioning": { "provisioning_ip": "xx.xx.xx.xx", "provisioning_port": port_number
},
"proxy": {
"proxy_enabled": Boolean, "proxy_ip": "xx.xx.xx.xx", "proxy_port": port_number, "proxy_username": "proxy_user", "proxy_password": "password", "proxy_auth": "authentication_type"
}
}
Response fields
Response Code—A standard HTML response code.
Response Message—A standard HTML response message.
Date—Standard HTML date format.
Content Type—The response format.
Example
FaaS user:
HTTP/1.1 200 OK
Date: Wed, 07 Jun 2018 00:14:21 GMT
Content-Type: application/json; charset=utf-8
{
"production": {
"production_ip": "12.12.12.12",
"production_port": 80
},
"provisioning": { "provisioning_ip": "10.10.10.10",
"provisioning_port": 80
},
"proxy": { "proxy_enabled": true,
"proxy_ip": "12.12.12.12",
"proxy_port": 81, "proxy_username": "p_user", "proxy_password": "mypassword", "proxy_auth": "basic"
}
}
Sudo user:
HTTP/1.1 200 OK
Date: Wed, 07 Jun 2018 00:13:39 GMT
Content-Type: application/json; charset=utf-8
{
"provisioning": { "provisioning_ip": "10.10.10.10",
"provisioning_port": 80
},
"proxy": { "proxy_enabled": true,
"proxy_ip": "12.12.12.12",
"proxy_port": 81, "proxy_username": "p_user", "proxy_password": "mypassword", "proxy_auth": "basic"
}
}
cURL code sample: Update FaaS connection configuration
The code sample was run with cURL 7.57.0.
curl --user npadmin:hammerhead https://xxx.xxx.xxx.xxx/api/4.0/faas/connection/config -k -X PUT -F provisioning_ip="10.10.10.10" -F provisioning_port=80”
This cURL sample includes the following options:
--user npadmin:hammerhead—Replace npadmin with the user name for your Series appliance. Replace hammerhead with the password for your Series appliance.
https://xxx.xxx.xxx.xxx/api/4.0/faas/connection/config—The FaaS request URL. Replace xxx.xxx.xxx.xxx with the IP address of your Series appliance.
-k—This option explicitly allows cURL to perform insecure SSL connections and transfers, which allows you to test your SSL connection without installing a CA certificate.
-X PUT—This option specifies using the PUT method.
-F provisioning_ip="10.10.10.10" -F provisioning_port=80—Specifies the new connection configuration values.
Results
This example updates the FaaS connection configuration. The output is in JSON.
Delete FaaS connection configuration request
To remove the FaaS connection configuration, send the following request:
DELETE https://<PX_IP_address>/api/4.0/faas/connection/config
 Note
Note
If there is an active connection to FaaS, it will be disconnected. A subsequent call to GET /faas/connection will return:
{"status":"disconnected", "connected": false}
Required header:
--user <username>:<password>
Options
PX_IP_address—IP address of the Series appliance running the Series API.
username—The user name for your Series appliance.
password—The password for your Series appliance.
Example
DELETE https://xxx.xxx.xxx.xxx/api/4.0/faas/connection/config
Required header:
--user npadmin:hammerhead
Delete FaaS connection configuration response
HTTP/1.1 [Response Code] [Response Message] Date: [Date]
Content-Type: [Content Type]
Response fields
Response Code—A standard HTML response code.
Response Message—A standard HTML response message.
Date—Standard HTML date format.
Content Type—The response format.
Example
HTTP/1.1 200 OK
Date: Wed, 07 Jun 2018 00:14:02 GMT
Content-Type: application/json; charset=utf-8
cURL code sample: Delete FaaS connection configuration
The code sample was run with cURL 7.57.0.
curl --user npadmin:hammerhead https://xxx.xxx.xxx.xxx/api/4.0/faas/connection/config -k -X DELETE
This cURL sample includes the following options:
--user npadmin:hammerhead—Replace npadmin with the user name for your Series appliance. Replace hammerhead with the password for your Series appliance.
https://xxx.xxx.xxx.xxx/api/4.0/faas/connection/config—The FaaS request URL. Replace xxx.xxx.xxx.xxx with the IP address of your Series appliance.
-k—This option explicitly allows cURL to perform insecure SSL connections and transfers, which allows you to test your SSL connection without installing a CA certificate.
-X DELETE—This option specifies using the DELETE method.
Results
This example deletes the FaaS connection configuration.
FaaS production configuration request
To get FaaS production configuration details, send the following request:
GET https://<PX_IP_address>/api/4.0/faas/connection/config/production
 Note
Note
This request can be only be used by FaaS users. The FaaS package must be installed.
Required header:
--user <username>:<password>
Options
PX_IP_address—IP address of the Series appliance running the Series API.
username—The user name for your Series appliance.
password—The password for your Series appliance.
Example
GET https://xxx.xxx.xxx.xxx/api/4.0/faas/connection/config/production
Required header:
--user npadmin:hammerhead
FaaS production configuration response
HTTP/1.1 [Response Code] [Response Message] Date: [Date]
Content-Type: [Content Type]
{
"production_ip": "xx.xx.xx.xx", "production_port": port_number
}
Response fields
Response Code—A standard HTML response code.
Response Message—A standard HTML response message.
Date—Standard HTML date format.
Content Type—The response format.
Example
HTTP/1.1 200 OK
Date: Wed, 07 Jun 2018 00:14:25 GMT
Content-Type: application/json; charset=utf-8
{
"production_ip": "12.12.12.12",
"production_port": 80
}
cURL code sample: FaaS production configuration
The code sample was run with cURL 7.57.0.
curl --user npadmin:hammerhead https://xxx.xxx.xxx.xxx/api/4.0/faas/connection/config/production -k -X GET
This cURL sample includes the following options:
--user npadmin:hammerhead—Replace npadmin with the user name for your Series appliance. Replace hammerhead with the password for your Series appliance.
https://xxx.xxx.xxx.xxx/api/4.0/faas/connection/config/production—The FaaS request URL. Replace
xxx.xxx.xxx.xxx with the IP address of your Series appliance.
-k—This option explicitly allows cURL to perform insecure SSL connections and transfers, which allows you to test your SSL connection without installing a CA certificate.
-X GET—This option specifies using the GET method.
Results
This example gets FaaS production configuration details. The output is in JSON.
Update FaaS production configuration request
To update the FaaS production configuration, send the following request:
PUT https://<PX_IP_address>/api/4.0/faas/connection/config/production
 Note
Note
The FaaS package must be installed.
Updates to the configuration will restart the connection. Restricted to users in the faas group.
Required header:
--user <username>:<password>
Options
PX_IP_address—IP address of the Series appliance running the Series API.
username—The user name for your Series appliance.
password—The password for your Series appliance.
Parameters
Configuration for the provisioning or production VPN should be provided as a form. Any fields not provided will use the value already configured on the system.
Form parameters:
production_ip—IP address of production VPN.
production_port—Port number of production VPN.
Gzipped tarball containing the information described below:
ca.crt—certificate authority/root certificate in .pem format.
client.crt—client certificate in .pem format, signed by ca.cert.
client.key—private key in .pem format, generated when building client.crt.
tls.key—allows initiating a TLS handshake with the VPN server for integrity validation. In OpenVPN static key format.
client.conf—contains standard configuration items as well as the IP/Port values for VPN access.
client.down—shell script to update resolv.conf when the VPN goes down.
client.up—shell script to update resolv.conf when the VPN comes up.
Example
PUT https://xxx.xxx.xxx.xxx/api/4.0/faas/connection/config/production
Required header:
--user npadmin:hammerhead
Update FaaS production configuration response
HTTP/1.1 [Response Code] [Response Message] Date: [Date]
Content-Type: [Content Type]
{
"production_ip": "xx.xx.xx.xx", "production_port": port_number
}
Response fields
Response Code—A standard HTML response code.
Response Message—A standard HTML response message.
Date—Standard HTML date format.
Content Type—The response format.
Example
HTTP/1.1 200 OK
Date: Wed, 07 Jun 2018 00:14:53 GMT
Content-Type: application/json; charset=utf-8
{
"production_ip": "12.12.12.12",
"production_port": 80
}
cURL code sample: Update FaaS production configuration
The code sample was run with cURL 7.57.0.
curl --user npadmin:hammerhead https://xxx.xxx.xxx.xxx/api/4.0/faas/connection/config/production -k -X PUT -F “options={\"production\": {\"production_ip\": \"10.10.10.11\",\"production_port\": 80}}”
This cURL sample includes the following options:
--user npadmin:hammerhead—Replace npadmin with the user name for your Series appliance. Replace hammerhead with the password for your Series appliance.
https://xxx.xxx.xxx.xxx/api/4.0/faas/connection/config/production—The FaaS request URL. Replace
xxx.xxx.xxx.xxx with the IP address of your Series appliance.
-k—This option explicitly allows cURL to perform insecure SSL connections and transfers, which allows you to test your SSL connection without installing a CA certificate.
-X PUT—This option specifies using the PUT method.
-F “options={\"production\": {\"production_ip\": \"10.10.10.11\",\"production_port\": 80}, "example.tar.gz"}”—Specifies the new production configuration values.
Results
This example updates FaaS production configuration. The output is in JSON.
Delete FaaS production configuration request
To remove the FaaS production configuration, send the following request:
DELETE https://<PX_IP_address>/api/4.0/faas/connection/config/production
 Note
Note
Restricted to users in the faas group. The FaaS package must be installed.
If there is an active connection to FaaS, it will be disconnected. A subsequent call to GET /faas/connection will return:
{"status":"provisioned", "connected": false}
Required header:
--user <username>:<password>
Options
PX_IP_address—IP address of the Series appliance running the Series API.
username—The user name for your Series appliance.
password—The password for your Series appliance.
Example
DELETE https://xxx.xxx.xxx.xxx/api/4.0/faas/connection/config/production
Required header:
--user npadmin:hammerhead
Delete FaaS production configuration response
HTTP/1.1 [Response Code] [Response Message] Date: [Date]
Content-Type: [Content Type]
Response fields
Response Code—A standard HTML response code.
Response Message—A standard HTML response message.
Date—Standard HTML date format.
Content Type—The response format.
Example
HTTP/1.1 200 OK
Date: Wed, 07 Jun 2018 00:14:02 GMT
Content-Type: application/json; charset=utf-8
cURL code sample: Delete FaaS production configuration
The code sample was run with cURL 7.57.0.
curl --user npadmin:hammerhead https://xxx.xxx.xxx.xxx/api/4.0/faas/connection/config/production -k -X DELETE
This cURL sample includes the following options:
--user npadmin:hammerhead—Replace npadmin with the user name for your Series appliance. Replace hammerhead with the password for your Series appliance.
https://xxx.xxx.xxx.xxx/api/4.0/faas/connection/config/production—The FaaS request URL. Replace
xxx.xxx.xxx.xxx with the IP address of your Series appliance.
-k—This option explicitly allows cURL to perform insecure SSL connections and transfers, which allows you to test your SSL connection without installing a CA certificate.
-X DELETE—This option specifies using the DELETE method.
Results
This example deletes the FaaS production configuration.
FaaS provisioning configuration request
To get FaaS provisioning configuration details, send the following request:
GET https://<PX_IP_address>/api/4.0/faas/connection/config/provisioning
 Note
Note
Restricted to users in the wheel or faas group. The FaaS package must be installed.
Required header:
--user <username>:<password>
Options
PX_IP_address—IP address of the Series appliance running the Series API.
username—The user name for your Series appliance.
password—The password for your Series appliance.
Example
GET https://xxx.xxx.xxx.xxx/api/4.0/faas/connection/config/provisioning
Required header:
--user npadmin:hammerhead
FaaS provisioning configuration response
HTTP/1.1 [Response Code] [Response Message] Date: [Date]
Content-Type: [Content Type]
{
"provisioning_ip": "xx.xx.xx.xx", "provisioning_port": port_number
}
Response fields
Response Code—A standard HTML response code.
Response Message—A standard HTML response message.
Date—Standard HTML date format.
Content Type—The response format.
Example
HTTP/1.1 200 OK
Date: Wed, 07 Jun 2018 00:14:58 GMT
Content-Type: application/json; charset=utf-8
{
"provisioning_ip": "10.10.10.10",
"provisioning_port": 80
}
cURL code sample: FaaS production configuration
The code sample was run with cURL 7.57.0.
curl --user npadmin:hammerhead https://xxx.xxx.xxx.xxx/api/4.0/faas/connection/config/provisioning -k -X GET
This cURL sample includes the following options:
--user npadmin:hammerhead—Replace npadmin with the user name for your Series appliance. Replace hammerhead with the password for your Series appliance.
https://xxx.xxx.xxx.xxx/api/4.0/faas/connection/config/provisioning—The FaaS request URL. Replace
xxx.xxx.xxx.xxx with the IP address of your Series appliance.
-k—This option explicitly allows cURL to perform insecure SSL connections and transfers, which allows you to test your SSL connection without installing a CA certificate.
-X GET—This option specifies using the GET method.
Results
This example gets FaaS provisioning configuration details. The output is in JSON.
Update FaaS provisioning configuration request
To update the FaaS provisioning configuration, send the following request:
PUT https://<PX_IP_address>/api/4.0/faas/connection/config/provisioning
Any fields not provided will use the values already configured.
 Note
Note
Restricted to users in the wheel or faas group. The FaaS package must be installed.
Required header:
--user <username>:<password>
Request JSON:
{
"provisioning_ip": "xx.xx.xx.xx", "provisioning_port": port_number
}
Options
PX_IP_address—IP address of the Series appliance running the Series API.
username—The user name for your Series appliance.
password—The password for your Series appliance.
Example
PUT https://xxx.xxx.xxx.xxx/api/4.0/faas/connection/config/provisioning
Required header:
--user npadmin:hammerhead
example.json:
{
"provisioning_ip": "12.12.12.12",
"provisioning_port": 20
}
Update FaaS provisioning configuration response
HTTP/1.1 [Response Code] [Response Message] Date: [Date]
Content-Type: [Content Type]
{
"provisioning_ip": "xx.xx.xx.xx", "provisioning_port": port_number
}
Response fields
Response Code—A standard HTML response code.
Response Message—A standard HTML response message.
Date—Standard HTML date format.
Content Type—The response format.
Example
HTTP/1.1 200 OK
Date: Wed, 07 Jun 2018 00:15:31 GMT
Content-Type: application/json; charset=utf-8
{
"provisioning_ip": "12.12.12.12",
"provisioning_port": 20
}
cURL code sample: Update FaaS provisioning configuration
The code sample was run with cURL 7.57.0.
curl --user npadmin:hammerhead https://xxx.xxx.xxx.xxx/api/4.0/faas/connection/config/provisioning -k -X PUT -d @example.json
This cURL sample includes the following options:
--user npadmin:hammerhead—Replace npadmin with the user name for your Series appliance. Replace hammerhead with the password for your Series appliance.
https://xxx.xxx.xxx.xxx/api/4.0/faas/connection/config/provisioning—The FaaS request URL. Replace
xxx.xxx.xxx.xxx with the IP address of your Series appliance.
-k—This option explicitly allows cURL to perform insecure SSL connections and transfers, which allows you to test your SSL connection without installing a CA certificate.
-X PUT—This option specifies using the PUT method.
-d @example.json—Specifies the JSON file containing the configuration details.
Results
This example updates the FaaS provisioning configuration. The response is in JSON.
Delete FaaS provisioning configuration request
To remove the FaaS provisioning configuration, send the following request:
DELETE https://<PX_IP_address>/api/4.0/faas/connection/config/provisioning
 Note
Note
Restricted to users in the faas or wheel group. The FaaS package must be installed.
This does not sever any existing connections to FaaS, but does remove the provisioning configuration.
Required header:
--user <username>:<password>
Options
PX_IP_address—IP address of the Series appliance running the Series API.
username—The user name for your Series appliance.
password—The password for your Series appliance.
Example
DELETE https://xxx.xxx.xxx.xxx/api/4.0/faas/connection/config/provisioning
Required header:
--user npadmin:hammerhead
Delete FaaS provisioning configuration response
HTTP/1.1 [Response Code] [Response Message]
Date: [Date]
Content-Type: [Content Type]
Response fields
Response Code—A standard HTML response code.
Response Message—A standard HTML response message.
Date—Standard HTML date format.
Content Type—The response format.
Example
HTTP/1.1 200 OK
Date: Wed, 07 Jun 2018 00:14:42 GMT
Content-Type: application/json; charset=utf-8
cURL code sample: Delete FaaS provisioning configuration
The code sample was run with cURL 7.57.0.
curl --user npadmin:hammerhead https://xxx.xxx.xxx.xxx/api/4.0/faas/connection/config/provisioning -k -X DELETE
This cURL sample includes the following options:
--user npadmin:hammerhead—Replace npadmin with the user name for your Series appliance. Replace hammerhead with the password for your Series appliance.
https://xxx.xxx.xxx.xxx/api/4.0/faas/connection/config/provisioning—The FaaS request URL. Replace
xxx.xxx.xxx.xxx with the IP address of your Series appliance.
-k—This option explicitly allows cURL to perform insecure SSL connections and transfers, which allows you to test your SSL connection without installing a CA certificate.
-X DELETE—This option specifies using the DELETE method.
Results
This example deletes the FaaS provisioning configuration.
FaaS proxy configuration request
To get FaaS proxy configuration details, send the following request:
GET https://<PX_IP_address>/api/4.0/faas/connection/config/proxy
 Note
Note
This request is restricted to users in the wheel or faas group. The FaaS package must be installed.
Required header:
--user <username>:<password>
Options
PX_IP_address—IP address of the Series appliance running the Series API.
username—The user name for your Series appliance.
password—The password for your Series appliance.
Example
GET https://xxx.xxx.xxx.xxx/api/4.0/faas/connection/config/proxy
Required header:
--user npadmin:hammerhead
FaaS proxy configuration response
FaaS User:
HTTP/1.1 [Response Code] [Response Message] Date: [Date]
Content-Type: [Content Type]
{
"proxy_enabled": Boolean, "proxy_ip": "xx.xx.xx.xx", "proxy_port": port_number,
"proxy_username": "p_user", "proxy_password": "password", "proxy_auth": "authentication_type"
}
Response fields
Response Code—A standard HTML response code.
Response Message—A standard HTML response message.
Date—Standard HTML date format.
Content Type—The response format.
Example
HTTP/1.1 200 OK
Date: Wed, 07 Jun 2018 00:13:09 GMT
Content-Type: application/json; charset=utf-8
{
"proxy_enabled": true, "proxy_ip": "12.12.12.12",
"proxy_port": 81, "proxy_username": "p_user", "proxy_password": "mypassword", "proxy_auth": "basic"
}
cURL code sample: FaaS proxy configuration
The code sample was run with cURL 7.57.0.
curl --user npadmin:hammerhead https://xxx.xxx.xxx.xxx/api/4.0/faas/connection/config/proxy -k -X GET
This cURL sample includes the following options:
--user npadmin:hammerhead—Replace npadmin with the user name for your Series appliance. Replace hammerhead with the password for your Series appliance.
https://xxx.xxx.xxx.xxx/api/4.0/faas/connection/config/proxy—The FaaS request URL. Replace xxx.xxx.xxx.xxx
with the IP address of your Series appliance.
-k—This option explicitly allows cURL to perform insecure SSL connections and transfers, which allows you to test your SSL connection without installing a CA certificate.
-X GET—This option specifies using the GET method.
Results
This example gets FaaS proxy configuration details. The output is in JSON.
Update FaaS proxy configuration request
To update the FaaS proxy configuration, send the following request:
PUT https://<PX_IP_address>/api/4.0/faas/connection/config/proxy
Any fields not provided will use the values already configured. Updates to the configuration will restart the connection.
 Note
Note
Restricted to users in the wheel or faas group. The FaaS package must be installed.
Required header:
--user <username>:<password>
Request JSON:
{
"provisioning_ip": "xx.xx.xx.xx", "provisioning_port": port_number
}
Options
PX_IP_address—IP address of the Series appliance running the Series API.
username—The user name for your Series appliance.
password—The password for your Series appliance.
Example
PUT https://xxx.xxx.xxx.xxx/api/4.0/faas/connection/config/proxy
Required header:
--user npadmin:hammerhead
example.json:
{
"proxy_enabled": true, "proxy_ip": "12.12.12.12",
"proxy_port": 81, "proxy_username": "p_user", "proxy_password": "mypassword", "proxy_auth": "basic"
}
Update FaaS proxy configuration response
HTTP/1.1 [Response Code] [Response Message] Date: [Date]
Content-Type: [Content Type]
{
"proxy_enabled": Boolean, "proxy_ip": "xx.xx.xx.xx", "proxy_port": port_number, "proxy_username": "p_user", "proxy_password": "password", "proxy_auth": "authentication_type"
}
Response fields
Response Code—A standard HTML response code.
Response Message—A standard HTML response message.
Date—Standard HTML date format.
Content Type—The response format.
Example
HTTP/1.1 200 OK
Date: Wed, 07 Jun 2018 00:15:31 GMT
Content-Type: application/json; charset=utf-8
{
"proxy_enabled": true, "proxy_ip": "12.12.12.12",
"proxy_port": 81, "proxy_username": "p_user", "proxy_password": "mypassword", "proxy_auth": "basic"
}
cURL code sample: Update FaaS proxy configuration
The code sample was run with cURL 7.57.0.
curl --user npadmin:hammerhead https://xxx.xxx.xxx.xxx/api/4.0/faas/connection/config/proxy -k -X PUT -d @example.json
This cURL sample includes the following options:
--user npadmin:hammerhead—Replace npadmin with the user name for your Series appliance. Replace hammerhead with the password for your Series appliance.
https://xxx.xxx.xxx.xxx/api/4.0/faas/connection/config/proxy—The FaaS request URL. Replace xxx.xxx.xxx.xxx
with the IP address of your Series appliance.
-k—This option explicitly allows cURL to perform insecure SSL connections and transfers, which allows you to test your SSL connection without installing a CA certificate.
-X PUT—This option specifies using the PUT method.
-d @example.json—Specifies the JSON file containing the configuration details.
Results
This example updates the FaaS proxy configuration. The response is in JSON.
Delete FaaS proxy configuration request
To remove the FaaS proxy configuration, send the following request:
DELETE https://<PX_IP_address>/api/4.0/faas/connection/config/proxy
If there is an active connection to FaaS, it will be disconnected. A subsequent call to GET /faas/connection will return:
{"status":"disconnected", "connected": false}
 Note
Note
Restricted to users in the faas or wheel group. The FaaS package must be installed.
Required header:
--user <username>:<password>
Options
PX_IP_address—IP address of the Series appliance running the Series API.
username—The user name for your Series appliance.
password—The password for your Series appliance.
Example
DELETE https://xxx.xxx.xxx.xxx/api/4.0/faas/connection/config/proxy
Required header:
--user npadmin:hammerhead
Delete FaaS proxy configuration response
HTTP/1.1 [Response Code] [Response Message] Date: [Date]
Content-Type: [Content Type]
Response fields
Response Code—A standard HTML response code.
Response Message—A standard HTML response message.
Date—Standard HTML date format.
Content Type—The response format.
Example
HTTP/1.1 200 OK
Date: Wed, 07 Jun 2018 00:14:42 GMT
Content-Type: application/json; charset=utf-8
cURL code sample: Delete FaaS proxy configuration
The code sample was run with cURL 7.57.0.
curl --user npadmin:hammerhead https://xxx.xxx.xxx.xxx/api/4.0/faas/connection/config/proxy -k -X DELETE
This cURL sample includes the following options:
--user npadmin:hammerhead—Replace npadmin with the user name for your Series appliance. Replace hammerhead with the password for your Series appliance.
https://xxx.xxx.xxx.xxx/api/4.0/faas/connection/config/proxy—The FaaS request URL. Replace xxx.xxx.xxx.xxx
with the IP address of your Series appliance.
-k—This option explicitly allows cURL to perform insecure SSL connections and transfers, which allows you to test your SSL connection without installing a CA certificate.
-X DELETE—This option specifies using the DELETE method.
Results
This example deletes the FaaS proxy configuration.
Initialize FaaS alert injection request
To initialize FaaS alert injection, send the following request:
POST https://<PX_IP_address>/api/4.0/faas/test-alert
 Note
Note
This endpoint is restricted to FaaS users.
Required header:
--user <username>:<password>
Options
PX_IP_address—IP address of the Series appliance running the Series API.
username—The user name for your Series appliance.
password—The password for your Series appliance.
Example
POST https://xxx.xxx.xxx.xxx/api/4.0/faas/test-alert
Required header:
--user npadmin:hammerhead
Initialize FaaS alert injection response
HTTP/1.1 [Response Code] [Response Message] Date: [Date]
Content-Type: [Content Type]
Response fields
Response Code—A standard HTML response code.
Response Message—A standard HTML response message.
Date—Standard HTML date format.
Content Type—The response format.
Example
HTTP/1.1 200 OK
Date: Wed, 07 Jun 2018 00:13:55 GMT
Content-Type: application/json; charset=utf-8
cURL code sample: Initialize FaaS alert injection
The code sample was run with cURL 7.57.0.
curl --user npadmin:hammerhead https://xxx.xxx.xxx.xxx/api/4.0/faas/test-alert -k -X POST
This cURL sample includes the following options:
--user npadmin:hammerhead—Replace npadmin with the user name for your Series appliance. Replace hammerhead with the password for your Series appliance.
https://xxx.xxx.xxx.xxx/api/4.0/faas/test-alert—The FaaS request URL. Replace xxx.xxx.xxx.xxx with the IP address of your Series appliance.
-k—This option explicitly allows cURL to perform insecure SSL connections and transfers, which allows you to test your SSL connection without installing a CA certificate.
-X POST—This option specifies using the POST method.
-d example.json—Specifies the JSON file containing the configuration details.
Results
This example initializes FaaS alert injection.
FaaS metadata request
To get the available outputs for FaaS, send the following request:
GET https://<PX_IP_address>/api/4.0/faas/metadata
 Note
Note
This endpoint is restricted to FaaS users.
Required header:
--user <username>:<password>
Options
PX_IP_address—IP address of the Series appliance running the Series API.
username—The user name for your Series appliance.
password—The password for your Series appliance.
Example
GET https://xxx.xxx.xxx.xxx/api/4.0/faas/metadata
Required header:
--user npadmin:hammerhead
FaaS metadata response
HTTP/1.1 [Response Code] [Response Message] Date: [Date]
Content-Type: [Content Type]
{
"outputs": [
"output",
"output",
...
]
}
Response fields
Response Code—A standard HTML response code.
Response Message—A standard HTML response message.
Date—Standard HTML date format.
Content Type—The response format.
Example
HTTP/1.1 200 OK
Date: Wed, 07 Jun 2018 00:14:26 GMT
Content-Type: application/json; charset=utf-8
{
"outputs": [
"alert",
"dhcp",
"dns",
"event",
"file",
"flow",
"ftp",
"http",
"irc",
"krb5",
"mail",
"rdp",
"rtsp",
"scada",
"sip",
"smb",
"ssh", "tacplus", "tls"
]
}
cURL code sample: FaaS metadata
The code sample was run with cURL 7.57.0.
curl --user npadmin:hammerhead https://xxx.xxx.xxx.xxx/api/4.0/faas/metadata -k -X GET
This cURL sample includes the following options:
--user npadmin:hammerhead—Replace npadmin with the user name for your Series appliance. Replace hammerhead with the password for your Series appliance.
https://xxx.xxx.xxx.xxx/api/4.0/faas/metadata—The FaaS request URL. Replace xxx.xxx.xxx.xxx with the IP address of your Series appliance.
-k—This option explicitly allows cURL to perform insecure SSL connections and transfers, which allows you to test your SSL connection without installing a CA certificate.
-X GET—This option specifies using the GET method.
Results
This example returns the available outputs for FaaS. The output is in JSON.
FaaS outputs request
To get all available outputs for FaaS, send the following request:
GET https://<PX_IP_address>/api/4.0/faas/metadata/outputs
 Note
Note
This endpoint is restricted to FaaS users.
Required header:
--user <username>:<password>
Options
PX_IP_address—IP address of the Series appliance running the Series API.
username—The user name for your Series appliance.
password—The password for your Series appliance.
Example
GET https://xxx.xxx.xxx.xxx/api/4.0/faas/metadata/outputs
Required header:
--user npadmin:hammerhead
FaaS outputs response
HTTP/1.1 [Response Code] [Response Message] Date: [Date]
Content-Type: [Content Type] [
"output",
"output",
...
]
Response fields
Response Code—A standard HTML response code.
Response Message—A standard HTML response message.
Date—Standard HTML date format.
Content Type—The response format.
Example
HTTP/1.1 200 OK
Date: Wed, 07 Jun 2018 00:14:34 GMT
Content-Type: application/json; charset=utf-8
[
"alert",
"dhcp",
"dns",
"event",
"file",
"flow",
"ftp",
"http",
"irc",
"krb5",
"mail",
"rdp",
"rtsp",
"scada",
"sip",
"smb",
"ssh", "tacplus", "tls"
]
cURL code sample: FaaS outputs
The code sample was run with cURL 7.57.0.
curl --user npadmin:hammerhead https://xxx.xxx.xxx.xxx/api/4.0/faas/metadata/outputs -k -X GET
This cURL sample includes the following options:
--user npadmin:hammerhead—Replace npadmin with the user name for your Series appliance. Replace hammerhead with the password for your Series appliance.
https://xxx.xxx.xxx.xxx/api/4.0/faas/metadata/outputs—The FaaS request URL. Replace xxx.xxx.xxx.xxx with the IP address of your Series appliance.
-k—This option explicitly allows cURL to perform insecure SSL connections and transfers, which allows you to test your SSL connection without installing a CA certificate.
-X GET—This option specifies using the GET method.
Results
This example returns all available outputs for FaaS. The output is in JSON.
FaaS output overview request
To get all files available for a specific FaaS output, send the following request:
GET https://<PX_IP_address>/api/4.0/faas/metadata/outputs/<output>
 Note
Note
This endpoint is restricted to FaaS users.
Required header:
--user <username>:<password>
Options
PX_IP_address—IP address of the Series appliance running the Series API.
username—The user name for your Series appliance.
password—The password for your Series appliance.
output—The output type.
Example
GET https://xxx.xxx.xxx.xxx/api/4.0/faas/metadata/outputs/tls
Required header:
--user npadmin:hammerhead
FaaS output overview response
HTTP/1.1 [Response Code] [Response Message] Date: [Date]
Content-Type: [Content Type]
{
"files": [ "filename", "filename,
...
]
}
Response fields
Response Code—A standard HTML response code.
Response Message—A standard HTML response message.
Date—Standard HTML date format.
Content Type—The response format.
Example
HTTP/1.1 200 OK
Date: Wed, 07 Jun 2018 00:14:34 GMT
Content-Type: application/json; charset=utf-8
{
"files": [
"20180610-1246.json.gz", "20180610-1247.json.gz", "20180610-1248.json.gz", "20180610-1249.json.gz", "20180610-1250.json.gz"
]
}
cURL code sample: FaaS output overview
The code sample was run with cURL 7.57.0.
curl --user npadmin:hammerhead https://xxx.xxx.xxx.xxx/api/4.0/faas/metadata/outputs/tls -k -X GET
This cURL sample includes the following options:
--user npadmin:hammerhead—Replace npadmin with the user name for your Series appliance. Replace hammerhead with the password for your Series appliance.
https://xxx.xxx.xxx.xxx/api/4.0/faas/metadata/outputs/tls—The FaaS request URL. Replace xxx.xxx.xxx.xxx with the IP address of your Series appliance, and tls with the output name.
-k—This option explicitly allows cURL to perform insecure SSL connections and transfers, which allows you to test your SSL connection without installing a CA certificate.
-X GET—This option specifies using the GET method.
Results
This example returns the names of files available for the specified FaaS output. The output is in JSON.
FaaS output files request
To get all files available for a specific FaaS output, send the following request:
GET https://<PX_IP_address>/api/4.0/faas/metadata/outputs/<output>/files
 Note
Note
This endpoint is restricted to FaaS users.
Required header:
--user <username>:<password>
Options
PX_IP_address—IP address of the Series appliance running the Series API.
username—The user name for your Series appliance.
password—The password for your Series appliance.
output—The output type.
Example
GET https://xxx.xxx.xxx.xxx/api/4.0/faas/metadata/outputs/tls/files
Required header:
--user npadmin:hammerhead
FaaS output files response
HTTP/1.1 [Response Code] [Response Message] Date: [Date]
Content-Type: [Content Type]
[
"filename", "filename,
...
]
Response fields
Response Code—A standard HTML response code.
Response Message—A standard HTML response message.
Date—Standard HTML date format.
Content Type—The response format.
Example
HTTP/1.1 200 OK
Date: Wed, 07 Jun 2018 00:14:52 GMT
Content-Type: application/json; charset=utf-8
[
"20180610-1246.json.gz", "20180610-1247.json.gz", "20180610-1248.json.gz", "20180610-1249.json.gz", "20180610-1250.json.gz"
]
cURL code sample: FaaS output files
The code sample was run with cURL 7.57.0.
curl --user npadmin:hammerhead https://xxx.xxx.xxx.xxx/api/4.0/faas/metadata/outputs/tls/files -k -X GET
This cURL sample includes the following options:
--user npadmin:hammerhead—Replace npadmin with the user name for your Series appliance. Replace hammerhead with the password for your Series appliance.
https://xxx.xxx.xxx.xxx/api/4.0/faas/metadata/outputs/tls/files—The FaaS request URL. Replace xxx.xxx.xxx.xxx
with the IP address of your Series appliance, and tls with the output name.
-k—This option explicitly allows cURL to perform insecure SSL connections and transfers, which allows you to test your SSL
connection without installing a CA certificate.
-X GET—This option specifies using the GET method.
Results
This example returns the names of files available for the specified FaaS output. The output is in JSON.
Delete FaaS output files request
To remove all files from a given FaaS output, send the following request:
DELETE https://<PX_IP_address>/api/4.0/faas/metadata/outputs/<output>/files
 Note
Note
This endpoint is restricted to FaaS users.
Required header:
--user <username>:<password>
Options
PX_IP_address—IP address of the Series appliance running the Series API.
username—The user name for your Series appliance.
password—The password for your Series appliance.
output—The output type.
Example
DELETE https://xxx.xxx.xxx.xxx/api/4.0/faas/metadata/outputs/tls/files
Required header:
--user npadmin:hammerhead
Delete FaaS output files response
HTTP/1.1 [Response Code] [Response Message] Date: [Date]
Content-Type: [Content Type]
Response fields
Response Code—A standard HTML response code.
Response Message—A standard HTML response message.
Date—Standard HTML date format.
Content Type—The response format.
Example
HTTP/1.1 200 OK
Date: Wed, 07 Jun 2018 00:14:34 GMT
Content-Type: application/json; charset=utf-8
cURL code sample: Delete FaaS output files
The code sample was run with cURL 7.57.0.
curl --user npadmin:hammerhead https://xxx.xxx.xxx.xxx/api/4.0/faas/metadata/outputs/tls/files -k -X DELETE
This cURL sample includes the following options:
--user npadmin:hammerhead—Replace npadmin with the user name for your Series appliance. Replace hammerhead with the password for your Series appliance.
https://xxx.xxx.xxx.xxx/api/4.0/faas/metadata/outputs/tls/files—The FaaS request URL. Replace xxx.xxx.xxx.xxx
with the IP address of your Series appliance, and tls with the output name.
-k—This option explicitly allows cURL to perform insecure SSL connections and transfers, which allows you to test your SSL connection without installing a CA certificate.
-X DELETE—This option specifies using the DELETE method.
Results
This example removes all files from the specified FaaS output.
Download FaaS output file request
To download a specific FaaS output file, send the following request:
GET https://<PX_IP_address>/api/4.0/faas/metadata/outputs/<output>/files/<filename>
 Note
Note
This endpoint is restricted to FaaS users.
Required header:
--user <username>:<password>
Options
PX_IP_address—IP address of the Series appliance running the Series API.
username—The user name for your Series appliance.
password—The password for your Series appliance.
output—The output type.
filename—The name of the file to download.
Example
GET https://xxx.xxx.xxx.xxx/api/4.0/faas/metadata/outputs/tls/files/20180610-1250.json.gz
Required header:
--user npadmin:hammerhead
Download FaaS output file response
HTTP/1.1 [Response Code] [Response Message] Date: [Date]
Content-Type: [Content Type]
Response fields
Response Code—A standard HTML response code.
Response Message—A standard HTML response message.
Date—Standard HTML date format.
Content Type—The response format.
Example
HTTP/1.1 200 OK
Date: Wed, 07 Jun 2018 00:14:59 GMT
Content-Type: application/json; charset=utf-8
cURL code sample: Download FaaS output file
The code sample was run with cURL 7.57.0.
curl --user npadmin:hammerhead https://xxx.xxx.xxx.xxx/api/4.0/faas/metadata/outputs/tls/files/ 20180610-1250.json.gz -k -X GET
This cURL sample includes the following options:
--user npadmin:hammerhead—Replace npadmin with the user name for your Series appliance. Replace hammerhead with the password for your Series appliance.
https://xxx.xxx.xxx.xxx/api/4.0/faas/metadata/outputs/tls/files/20180610-1250.json.gz—The FaaS request URL. Replace xxx.xxx.xxx.xxx with the IP address of your Series appliance, tls with the output name, and
20180610-1250.json.gz with the file name.
-k—This option explicitly allows cURL to perform insecure SSL connections and transfers, which allows you to test your SSL connection without installing a CA certificate.
-X GET—This option specifies using the GET method.
Results
This example downloads the specified FaaS output file. The output is in JSON.
Delete FaaS output file request
To remove a specific FaaS output file, send the following request:
DELETE https://<PX_IP_address>/api/4.0/faas/metadata/outputs/<output>/files/<filename>
 Note
Note
This endpoint is restricted to FaaS users.
Required header:
--user <username>:<password>
Options
PX_IP_address—IP address of the Series appliance running the Series API.
username—The user name for your Series appliance.
password—The password for your Series appliance.
output—The output type.
filename—The name of the file to download.
Example
DELETE https://xxx.xxx.xxx.xxx/api/4.0/faas/metadata/outputs/tls/files/20180610-1250.json.gz
Required header:
--user npadmin:hammerhead
Delete FaaS output file response
HTTP/1.1 [Response Code] [Response Message] Date: [Date]
Content-Type: [Content Type]
Response fields
Response Code—A standard HTML response code.
Response Message—A standard HTML response message.
Date—Standard HTML date format.
Content Type—The response format.
Example
HTTP/1.1 200 OK
Date: Wed, 07 Jun 2018 00:14:59 GMT
Content-Type: application/json; charset=utf-8
cURL code sample: Delete FaaS output file
The code sample was run with cURL 7.57.0.
curl --user npadmin:hammerhead https://xxx.xxx.xxx.xxx/api/4.0/faas/metadata/outputs/tls/files/ 20180610-1250.json.gz -k -X DELETE
This cURL sample includes the following options:
--user npadmin:hammerhead—Replace npadmin with the user name for your Series appliance. Replace hammerhead with the password for your Series appliance.
https://xxx.xxx.xxx.xxx/api/4.0/faas/metadata/outputs/tls/files/20180610-1250.json.gz—The FaaS request URL. Replace xxx.xxx.xxx.xxx with the IP address of your Series appliance, tls with the output name, and
20180610-1250.json.gz with the file name.
-k—This option explicitly allows cURL to perform insecure SSL connections and transfers, which allows you to test your SSL connection without installing a CA certificate.
-X DELETE—This option specifies using the DELETE method.
Results
This example deletes the specified FaaS output file.
Aggregator
The following px-aggregator endpoints are available:
GET https://<PX_IP_address>/api/4.0/config/px-aggregator
PUT https://<PX_IP_address>/api/4.0/config/px-aggregator
GET https://<PX_IP_address>/api/4.0/config/px-aggregator/frequency
PUT https://<PX_IP_address>/api/4.0/config/px-aggregator/frequency
GET https://<PX_IP_address>/api/4.0/config/px-aggregator/protocols
PUT https://<PX_IP_address>/api/4.0/config/px-aggregator/protocols
DELETE https://<PX_IP_address>/api/4.0/config/px-aggregator/protocols
GET https://<PX_IP_address>/api/4.0/config/px-aggregator/subnets
PUT https://<PX_IP_address>/api/4.0/config/px-aggregator/subnets
POST https://<PX_IP_address>/api/4.0/config/px-aggregator/subnets
DELETE https://<PX_IP_address>/api/4.0/config/px-aggregator/subnets
Aggregator configuration request
To list the full px-aggregator configuration, send the following request:
GET https://<PX_IP_address>/api/4.0/config/px-aggregator
 Note
Note
This endpoint is available to all authenticated users.
Required header:
--user <username>:<password>
Options
PX_IP_address—IP address of the Series appliance running the Series API.
username—The user name for your Series appliance.
password—The password for your Series appliance.
Example
GET https://xxx.xxx.xxx.xxx/api/4.0/config/px-aggregator
Required header:
--user npadmin:hammerhead
Aggregator configuration response
HTTP/1.1 [Response Code] [Response Message] Date: [Date]
Content-Type: [Content Type]
{
"frequency": minutes,
"protocols": [protocols], "subnets": [
{
"address": "IP_address", "cidr": bits
},
. . .
]
}
Response fields
Response Code—A standard HTML response code.
Response Message—A standard HTML response message.
Date—Standard HTML date format.
Content Type—The response format.
frequency—Number of minutes to aggregate before dumping the data to the output JSON file. The default is 1.
protocols—– List of protocol IDs that px-aggregator will collect. The default is 1 (ICMP), 6 (TCP), 17 (UDP).
subnets—– List of subnets (defined by address and cidr).
address—IPv4 address of the subnet.
cidr—Number of significant bits in the subnet.
Example
HTTP/1.1 200 OK
Date: Tue, 07 Jun 2018 00:17:39 GMT
Content-Type: application/json; charset=utf-8
{
"frequency": 1,
"protocols": [1, 6, 17], "subnets": [
{
"address": "10.0.0.0",
"cidr": 8
},
{
"address": "172.16.0.0",
"cidr": 12
},
{
"address": "192.168.0.0",
"cidr": 16
}
]
}
cURL code sample: Aggregator configuration
The code sample was run with cURL 7.57.0.
curl --user npadmin:hammerhead https://xxx.xxx.xxx.xxx/api/4.0/config/px-aggregator -k -X GET
This cURL sample includes the following options:
--user npadmin:hammerhead—Replace npadmin with the user name for your Series appliance. Replace hammerhead with the password for your Series appliance.
https://xxx.xxx.xxx.xxx/api/4.0/config/px-aggregator—The aggregator configuration request URL. Replace
xxx.xxx.xxx.xxx with the IP address of your Series appliance.
-k—This option explicitly allows cURL to perform insecure SSL connections and transfers, which allows you to test your SSL connection without installing a CA certificate.
-X GET—This option specifies using the GET method.
Results
This example lists the px-aggregator configuration. The output is in JSON.
Update aggregator configuration request
To update the px-aggregator configuration, send the following request:
PUT https://<PX_IP_address>/api/4.0/config/px-aggregator
 Note
Note
This endpoint is restricted to sudo users.
Required header:
--user <username>:<password>
Request JSON:
{
"frequency": minutes, "protocols": [protocols], "subnets": [
{
"address": "IP_address", "cidr": bits
},
. . .
]
}
Options
PX_IP_address—IP address of the Series appliance running the Series API.
username—The user name for your Series appliance.
password—The password for your Series appliance.
frequency—Number of minutes to aggregate before dumping the data to the output JSON file. The default is 1.
protocols—– List of protocol IDs that px-aggregator will collect. The default is 1 (ICMP), 6 (TCP), 17 (UDP).
subnets—– List of subnets (defined by address and cidr).
address—IPv4 address of the subnet.
cidr—Number of significant bits in the subnet.
Example
PUT https://xxx.xxx.xxx.xxx/api/4.0/config/px-aggregator
Required header:
--user npadmin:hammerhead
example.json:
{
"frequency": 1,
"protocols": [1, 6, 17], "subnets": [
{
"address": "10.0.0.0",
"cidr": 8
},
{
"address": "172.16.0.0",
"cidr": 12
},
{
"address": "192.168.0.0",
"cidr": 16
}
]
}
Update aggregator configuration response
HTTP/1.1 [Response Code] [Response Message] Date: [Date]
Content-Type: [Content Type]
{
"frequency": minutes, "protocols": [
],
"subnets": [
{
"address": "IP_address", "cidr": bits
},
. . .
]
}
protocols
Response fields
Response Code—A standard HTML response code.
Response Message—A standard HTML response message.
Date—Standard HTML date format.
Content Type—The response format.
frequency—Number of minutes to aggregate before dumping the data to the output JSON file. The default is 1.
protocols—– List of protocol IDs that px-aggregator will collect. The default is 1 (ICMP), 6 (TCP), 17 (UDP).
subnets—– List of subnets (defined by address and cidr).
address—IPv4 address of the subnet.
cidr—Number of significant bits in the subnet.
Example
HTTP/1.1 200 OK
Date: Tue, 07 Jun 2018 00:17:39 GMT
Content-Type: application/json; charset=utf-8
{
"frequency": 1,
"protocols": [1, 6, 17], "subnets": [
{
"address": "10.0.0.0",
"cidr": 8
},
{
"address": "172.16.0.0",
"cidr": 12
},
{
"address": "192.168.0.0",
"cidr": 16
}
]
}
cURL code sample: Update aggregator configuration
The code sample was run with cURL 7.57.0.
curl --user npadmin:hammerhead https://xxx.xxx.xxx.xxx/api/4.0/config/px-aggregator -k -X PUT -d @example.json
This cURL sample includes the following options:
--user npadmin:hammerhead—Replace npadmin with the user name for your Series appliance. Replace hammerhead with the password for your Series appliance.
https://xxx.xxx.xxx.xxx/api/4.0/config/px-aggregator—The aggregator configuration request URL. Replace
xxx.xxx.xxx.xxx with the IP address of your Series appliance.
-k—This option explicitly allows cURL to perform insecure SSL connections and transfers, which allows you to test your SSL connection without installing a CA certificate.
-X PUT—This option specifies using the PUT method.
-d @example.json—File containing the request JSON.
Results
This example updates the px-aggregator configuration. The output is in JSON.
Aggregator frequency request
To get the configured px-aggregator frequency, send the following request:
GET https://<PX_IP_address>/api/4.0/config/px-aggregator/frequency
 Note
Note
This endpoint is available to all authenticated users.
Required header:
--user <username>:<password>
Options
PX_IP_address—IP address of the Series appliance running the Series API.
username—The user name for your Series appliance.
password—The password for your Series appliance.
Example
GET https://xxx.xxx.xxx.xxx/api/4.0/config/px-aggregator/frequency
Required header:
--user npadmin:hammerhead
Aggregator frequency response
HTTP/1.1 [Response Code] [Response Message] Date: [Date]
Content-Type: [Content Type]
{
"frequency": minutes,
}
Response fields
Response Code—A standard HTML response code.
Response Message—A standard HTML response message.
Date—Standard HTML date format.
Content Type—The response format.
frequency—Number of minutes to aggregate before dumping the data to the output JSON file. The default is 1.
Example
HTTP/1.1 200 OK
Date: Tue, 05 Jun 2018 00:17:49 GMT
Content-Type: application/json; charset=utf-8
{
"frequency": 1
}
cURL code sample: Aggregator frequency
The code sample was run with cURL 7.57.0.
curl --user npadmin:hammerhead https://xxx.xxx.xxx.xxx/api/4.0/config/px-aggregator/frequency -k -X GET
This cURL sample includes the following options:
--user npadmin:hammerhead—Replace npadmin with the user name for your Series appliance. Replace hammerhead with the password for your Series appliance.
https://xxx.xxx.xxx.xxx/api/4.0/config/px-aggregator/frequency—The aggregator configuration request URL. Replace xxx.xxx.xxx.xxx with the IP address of your Series appliance.
-k—This option explicitly allows cURL to perform insecure SSL connections and transfers, which allows you to test your SSL connection without installing a CA certificate.
-X GET—This option specifies using the GET method.
Results
This example returns the configured value for px-aggregator frequency. The output is in JSON.
Update aggregator frequency request
To update the px-aggregator frequency, send the following request:
PUT https://<PX_IP_address>/api/4.0/config/px-aggregator/frequency
 Note
Note
This endpoint is restricted to sudo users.
Required header:
--user <username>:<password>
Request JSON:
{
"frequency": minutes
}
Options
PX_IP_address—IP address of the Series appliance running the Series API.
username—The user name for your Series appliance.
password—The password for your Series appliance.
frequency—Number of minutes to aggregate before dumping the data to the output JSON file. The default is 1.
Example
PUT https://xxx.xxx.xxx.xxx/api/4.0/config/px-aggregator/frequency
Required header:
--user npadmin:hammerhead
example.json:
{
"frequency": 2
}
Update aggregator configuration response
HTTP/1.1 [Response Code] [Response Message] Date: [Date]
Content-Type: [Content Type]
{
"frequency": minutes
}
Response fields
Response Code—A standard HTML response code.
Response Message—A standard HTML response message.
Date—Standard HTML date format.
Content Type—The response format.
frequency—Number of minutes to aggregate before dumping the data to the output JSON file. The default is 1.
Example
HTTP/1.1 200 OK
Date: Tue, 05 Jun 2018 00:17:39 GMT
Content-Type: application/json; charset=utf-8
{
"frequency": 2
}
cURL code sample: Update aggregator frequency
The code sample was run with cURL 7.57.0.
curl --user npadmin:hammerhead https://xxx.xxx.xxx.xxx/api/4.0/config/px-aggregator -k -X PUT -d @example.json
This cURL sample includes the following options:
--user npadmin:hammerhead—Replace npadmin with the user name for your Series appliance. Replace hammerhead with the password for your Series appliance.
https://xxx.xxx.xxx.xxx/api/4.0/config/px-aggregator—The aggregator configuration request URL. Replace
xxx.xxx.xxx.xxx with the IP address of your Series appliance.
-k—This option explicitly allows cURL to perform insecure SSL connections and transfers, which allows you to test your SSL connection without installing a CA certificate.
-X PUT—This option specifies using the PUT method.
-d @example.json—File containing the request JSON.
Results
This example updates the px-aggregator frequency. The output is in JSON.
Aggregator protocols request
To list the protocol IDs that px-aggregator will collect, send the following request:
GET https://<PX_IP_address>/api/4.0/config/px-aggregator/protocols
 Note
Note
This endpoint is available to all authenticated users.
Required header:
--user <username>:<password>
Options
PX_IP_address—IP address of the Series appliance running the Series API.
username—The user name for your Series appliance.
password—The password for your Series appliance.
Example
GET https://xxx.xxx.xxx.xxx/api/4.0/config/px-aggregator/protocols
Required header:
--user npadmin:hammerhead
Aggregator protocols response
HTTP/1.1 [Response Code] [Response Message] Date: [Date]
Content-Type: [Content Type]
{
"protocols": [protocols]
}
Response fields
Response Code—A standard HTML response code.
Response Message—A standard HTML response message.
Date—Standard HTML date format.
Content Type—The response format.
protocols—– List of protocol IDs that px-aggregator will collect. The default is 1 (ICMP), 6 (TCP), 17 (UDP).
Example
HTTP/1.1 200 OK
Date: Tue, 05 Jun 2018 00:17:39 GMT
Content-Type: application/json; charset=utf-8
{
"protocols": [1, 6, 17]
}
cURL code sample: Aggregator protocols
The code sample was run with cURL 7.57.0.
curl --user npadmin:hammerhead https://xxx.xxx.xxx.xxx/api/4.0/config/px-aggregator/protocols -k -X GET
This cURL sample includes the following options:
--user npadmin:hammerhead—Replace npadmin with the user name for your Series appliance. Replace hammerhead with the password for your Series appliance.
https://xxx.xxx.xxx.xxx/api/4.0/config/px-aggregator/protocols—The aggregator configuration request URL. Replace xxx.xxx.xxx.xxx with the IP address of your Series appliance.
-k—This option explicitly allows cURL to perform insecure SSL connections and transfers, which allows you to test your SSL connection without installing a CA certificate.
-X GET—This option specifies using the GET method.
Results
This example lists the protocols configured for px-aggregator. The output is in JSON.
Update aggregator protocols request
To update the protocols configured for px-aggregator, send the following request:
PUT https://<PX_IP_address>/api/4.0/config/px-aggregator/protocols
 Note
Note
This endpoint is restricted to sudo users.
Required header:
--user <username>:<password>
Request JSON:
{
"protocols": [protocols]
}
Options
PX_IP_address—IP address of the Series appliance running the Series API.
username—The user name for your Series appliance.
password—The password for your Series appliance.
protocols—– List of protocol IDs that px-aggregator will collect. The default is 1 (ICMP), 6 (TCP), 17 (UDP).
Example
PUT https://xxx.xxx.xxx.xxx/api/4.0/config/px-aggregator/protocols
Required header:
--user npadmin:hammerhead
example.json:
This example configures ICMP and HMP:
{
"frequency": 1,
"protocols": [1, 20]
}
Update aggregator protocols response
HTTP/1.1 [Response Code] [Response Message] Date: [Date]
Content-Type: [Content Type]
{
"protocols": [
]
}
protocols
Response fields
Response Code—A standard HTML response code.
Response Message—A standard HTML response message.
Date—Standard HTML date format.
Content Type—The response format.
protocols—– List of protocol IDs that px-aggregator will collect. The default is 1 (ICMP), 6 (TCP), 17 (UDP).
Example
HTTP/1.1 200 OK
Date: Tue, 07 Jun 2018 00:17:39 GMT
Content-Type: application/json; charset=utf-8
{
"protocols": [1, 20]
}
cURL code sample: Update aggregator protocols
The code sample was run with cURL 7.57.0.
curl --user npadmin:hammerhead https://xxx.xxx.xxx.xxx/api/4.0/config/px-aggregator/protocols -k -X PUT -d @example.json
This cURL sample includes the following options:
--user npadmin:hammerhead—Replace npadmin with the user name for your Series appliance. Replace hammerhead with the password for your Series appliance.
https://xxx.xxx.xxx.xxx/api/4.0/config/px-aggregator/protocols—The aggregator configuration request URL. Replace xxx.xxx.xxx.xxx with the IP address of your Series appliance.
-k—This option explicitly allows cURL to perform insecure SSL connections and transfers, which allows you to test your SSL connection without installing a CA certificate.
-X PUT—This option specifies using the PUT method.
-d @example.json—File containing the request JSON.
Results
This example updates the px-aggregator to use ICMP and HMP. The output is in JSON.
Delete aggregator protocols request
To clear the list of protocol IDs that px-aggregator will collect, send the following request:
DELETE https://<PX_IP_address>/api/4.0/config/px-aggregator/protocols
 Note
Note
This endpoint is restricted to sudo users.
Required header:
--user <username>:<password>
Options
PX_IP_address—IP address of the Series appliance running the Series API.
username—The user name for your Series appliance.
password—The password for your Series appliance.
Example
DELETE https://xxx.xxx.xxx.xxx/api/4.0/config/px-aggregator/protocols
Required header:
--user npadmin:hammerhead
Delete aggregator protocols response
HTTP/1.1 [Response Code] [Response Message] Date: [Date]
Content-Type: [Content Type]
Response fields
Response Code—A standard HTML response code.
Response Message—A standard HTML response message.
Date—Standard HTML date format.
Content Type—The response format.
Example
HTTP/1.1 200 OK
Date: Tue, 05 Jun 2018 00:17:39 GMT
Content-Type: application/json; charset=utf-8
cURL code sample: Delete aggregator protocols
The code sample was run with cURL 7.57.0.
curl --user npadmin:hammerhead https://xxx.xxx.xxx.xxx/api/4.0/config/px-aggregator/protocols -k -X DELETE
This cURL sample includes the following options:
--user npadmin:hammerhead—Replace npadmin with the user name for your Series appliance. Replace hammerhead with the password for your Series appliance.
https://xxx.xxx.xxx.xxx/api/4.0/config/px-aggregator/protocols—The aggregator configuration request URL. Replace xxx.xxx.xxx.xxx with the IP address of your Series appliance.
-k—This option explicitly allows cURL to perform insecure SSL connections and transfers, which allows you to test your SSL connection without installing a CA certificate.
-X DELETE—This option specifies using the DELETE method.
Results
This example clears the list of protocols configured for px-aggregator.
Aggregator subnets request
To get the configuration for px-aggregator subnets, send the following request:
GET https://<PX_IP_address>/api/4.0/config/px-aggregator/subnets
 Note
Note
This endpoint is available to all authenticated users.
Required header:
--user <username>:<password>
Options
PX_IP_address—IP address of the Series appliance running the Series API.
username—The user name for your Series appliance.
password—The password for your Series appliance.
Example
GET https://xxx.xxx.xxx.xxx/api/4.0/config/px-aggregator/subnets
Required header:
--user npadmin:hammerhead
Aggregator subnets response
HTTP/1.1 [Response Code] [Response Message] Date: [Date]
Content-Type: [Content Type]
{
"subnets": [
{
"address": "IP_address", "cidr": bits
},
. . .
]
}
Response fields
Response Code—A standard HTML response code.
Response Message—A standard HTML response message.
Date—Standard HTML date format.
Content Type—The response format.
subnets—– List of subnets (defined by address and cidr).
address—IPv4 address of the subnet.
cidr—Number of significant bits in the subnet.
Example
HTTP/1.1 200 OK
Date: Tue, 05 Jun 2018 00:17:42 GMT
Content-Type: application/json; charset=utf-8
{
"subnets": [
{
"address": "10.0.0.0",
"cidr": 8
},
{
"address": "172.16.0.0",
"cidr": 12
},
{
"address": "192.168.0.0",
"cidr": 16
}
]
}
cURL code sample: Aggregator subnets
The code sample was run with cURL 7.57.0.
curl --user npadmin:hammerhead https://xxx.xxx.xxx.xxx/api/4.0/config/px-aggregator/subnets -k -X GET
This cURL sample includes the following options:
--user npadmin:hammerhead—Replace npadmin with the user name for your Series appliance. Replace hammerhead with the password for your Series appliance.
https://xxx.xxx.xxx.xxx/api/4.0/config/px-aggregator/subnets—The aggregator configuration request URL. Replace
xxx.xxx.xxx.xxx with the IP address of your Series appliance.
-k—This option explicitly allows cURL to perform insecure SSL connections and transfers, which allows you to test your SSL connection without installing a CA certificate.
-X GET—This option specifies using the GET method.
Results
This example lists the px-aggregator subnet configuration. The output is in JSON.
Update aggregator subnets request
To update the list of px-aggregator subnets, send the following request:
PUT https://<PX_IP_address>/api/4.0/config/px-aggregator/subnets
 Note
Note
This endpoint is restricted to sudo users.
Required header:
--user <username>:<password>
Request JSON:
{
"subnets": [
{
"address": "IP_address", "cidr": bits
},
. . .
]
}
Options
PX_IP_address—IP address of the Series appliance running the Series API.
username—The user name for your Series appliance.
password—The password for your Series appliance.
subnets—– List of subnets (defined by address and cidr).
address—IPv4 address of the subnet.
cidr—Number of significant bits in the subnet.
Example
PUT https://xxx.xxx.xxx.xxx/api/4.0/config/px-aggregator
Required header:
--user npadmin:hammerhead
example.json:
{
"frequency": 1,
"protocols": [1, 6, 17], "subnets": [
{
"address": "10.0.0.0",
"cidr": 8
},
{
"address": "172.16.0.0",
"cidr": 12
},
{
"address": "192.168.0.0",
"cidr": 16
}
]
}
Update aggregator subnets response
HTTP/1.1 [Response Code] [Response Message] Date: [Date]
Content-Type: [Content Type]
{
"subnets": [
{
"address": "IP_address", "cidr": bits
},
. . .
]
}
Response fields
Response Code—A standard HTML response code.
Response Message—A standard HTML response message.
Date—Standard HTML date format.
Content Type—The response format.
subnets—– List of subnets (defined by address and cidr).
address—IPv4 address of the subnet.
cidr—Number of significant bits in the subnet.
Example
HTTP/1.1 200 OK
Date: Tue, 07 Jun 2018 00:17:39 GMT
Content-Type: application/json; charset=utf-8
{
"subnets": [
{
"address": "10.0.0.0",
"cidr": 8
},
{
"address": "172.16.0.0",
"cidr": 12
},
{
"address": "192.168.0.0",
"cidr": 16
}
]
}
cURL code sample: Update aggregator subnets
The code sample was run with cURL 7.57.0.
curl --user npadmin:hammerhead https://xxx.xxx.xxx.xxx/api/4.0/config/px-aggregator/subnets -k -X PUT -d @example.json
This cURL sample includes the following options:
--user npadmin:hammerhead—Replace npadmin with the user name for your Series appliance. Replace hammerhead with the password for your Series appliance.
https://xxx.xxx.xxx.xxx/api/4.0/config/px-aggregator/subnets—The aggregator configuration request URL. Replace
xxx.xxx.xxx.xxx with the IP address of your Series appliance.
-k—This option explicitly allows cURL to perform insecure SSL connections and transfers, which allows you to test your SSL connection without installing a CA certificate.
-X PUT—This option specifies using the PUT method.
-d @example.json—File containing the request JSON.
Results
This example updates the list of px-aggregator subnets. The output is in JSON.
Add aggregator subnet request
To add a new px-aggregator subnet, send the following request:
POST https://<PX_IP_address>/api/4.0/config/px-aggregator/subnets
 Note
Note
This endpoint is restricted to sudo users.
Required header:
--user <username>:<password>
Request JSON:
{
"address": "IP_address", "cidr": bits
}
Options
PX_IP_address—IP address of the Series appliance running the Series API.
username—The user name for your Series appliance.
password—The password for your Series appliance.
address—IPv4 address of the subnet.
cidr—Number of significant bits in the subnet.
Example
POST https://xxx.xxx.xxx.xxx/api/4.0/config/px-aggregator/subnets
Required header:
--user npadmin:hammerhead
example.json:
{
"address": "192.168.0.0",
"cidr": 16
}
Add aggregator subnet response
HTTP/1.1 [Response Code] [Response Message] Date: [Date]
Content-Type: [Content Type]
{
"address": "IP_address", "cidr": bits
}
Response fields
Response Code—A standard HTML response code.
Response Message—A standard HTML response message.
Date—Standard HTML date format.
Content Type—The response format.
address—IPv4 address of the subnet.
cidr—Number of significant bits in the subnet.
Example
HTTP/1.1 200 OK
Date: Tue, 06 Jun 2018 00:18:09 GMT
Content-Type: application/json; charset=utf-8
{
"subnets": [
{
"address": "10.0.0.0",
"cidr": 8
},
{
"address": "172.16.0.0",
"cidr": 12
},
{
"address": "192.168.0.0",
"cidr": 16
}
]
}
cURL code sample: Add aggregator subnet
The code sample was run with cURL 7.57.0.
curl --user npadmin:hammerhead https://xxx.xxx.xxx.xxx/api/4.0/config/px-aggregator/subnets -k -X POST -d @example.json
This cURL sample includes the following options:
--user npadmin:hammerhead—Replace npadmin with the user name for your Series appliance. Replace hammerhead with the password for your Series appliance.
https://xxx.xxx.xxx.xxx/api/4.0/config/px-aggregator/subnets—The aggregator configuration request URL. Replace
xxx.xxx.xxx.xxx with the IP address of your Series appliance.
-k—This option explicitly allows cURL to perform insecure SSL connections and transfers, which allows you to test your SSL connection without installing a CA certificate.
-X POST—This option specifies using the POST method.
-d @example.json—File containing the request JSON.
Results
This example adds a new subnet to the list of px-aggregator subnets. The output is in JSON.
Delete aggregator subnets request
To clear the list of subnets, send the following request:
DELETE https://<PX_IP_address>/api/4.0/config/px-aggregator/subnets
 Note
Note
This endpoint is restricted to sudo users.
Required header:
--user <username>:<password>
Options
PX_IP_address—IP address of the Series appliance running the Series API.
username—The user name for your Series appliance.
password—The password for your Series appliance.
Example
DELETE https://xxx.xxx.xxx.xxx/api/4.0/config/px-aggregator/subnets
Required header:
--user npadmin:hammerhead
Delete aggregator subnets response
HTTP/1.1 [Response Code] [Response Message] Date: [Date]
Content-Type: [Content Type]
Response fields
Response Code—A standard HTML response code.
Response Message—A standard HTML response message.
Date—Standard HTML date format.
Content Type—The response format.
Example
HTTP/1.1 200 OK
Date: Tue, 05 Jun 2018 00:17:39 GMT
Content-Type: application/json; charset=utf-8
cURL code sample: Delete aggregator subnets
The code sample was run with cURL 7.57.0.
curl --user npadmin:hammerhead https://xxx.xxx.xxx.xxx/api/4.0/config/px-aggregator/subnets -k -X DELETE
This cURL sample includes the following options:
--user npadmin:hammerhead—Replace npadmin with the user name for your Series appliance. Replace hammerhead with the password for your Series appliance.
https://xxx.xxx.xxx.xxx/api/4.0/config/px-aggregator/subnets—The aggregator configuration request URL. Replace
xxx.xxx.xxx.xxx with the IP address of your Series appliance.
-k—This option explicitly allows cURL to perform insecure SSL connections and transfers, which allows you to test your SSL connection without installing a CA certificate.
-X DELETE—This option specifies using the DELETE method.
Results
This example clears the list of subnets configured for px-aggregator.
Processes
The following process endpoints are available:
GET https://<PX_IP_address>/api/4.0/processes
GET https://<PX_IP_address>/api/4.0/processes/<process>
GET https://<PX_IP_address>/api/4.0/processes/<process>/status
POST https://<PX_IP_address>/api/4.0/processes/<process>/restart
Managed processes request
To list all managed processes, send the following request:
GET https://<PX_IP_address>/api/4.0/processes
Required header:
--user <username>:<password>
Options
PX_IP_address—IP address of the Series appliance running the Series API.
username—The user name for your Series appliance.
password—The password for your Series appliance.
Example
GET https://xxx.xxx.xxx.xxx/api/4.0/processes
Required header:
--user npadmin:hammerhead
Managed processes response
HTTP/1.1 [Response Code] [Response Message] Date: [Date]
Content-Type: [Content Type]
[
{
"restartable": Boolean, "name": "process-name",
"status": "status",
"group": []
},
. . .
]
Response fields
Response Code—A standard HTML response code.
Response Message—A standard HTML response message.
Date—Standard HTML date format.
Content Type—The response format.
restartable— indicates whether the process can be restarted
name— name of the process
status— indicates the status of the process. Values can be:
running (the process is alive)
stopped (the process is stopped)
disabled (the process is stopped and not enabled)
partial (in the case of a group, some processes are running and others are not)
group— indicates if the process is actually a collection of processes. Restarting a process that has a members in its group restarts all the processes within the group
Example
HTTP/1.1 200 OK
Date: Fri, 8 Jun 2018 01:52:58 GMT
Content-Type: application/json; charset=utf-8
[
{
"restartable": false, "name": "acm",
"status": "running",
"group": []
},
{
"restartable": false, "name": "acquired",
"status": "running",
"group": []
},
{
"restartable": false, "name": "asap",
"status": "running",
"group": []
},
{
"restartable": false, "name": "influxd",
"status": "running",
"group": []
},
{
"restartable": false, "name": "postgres",
"status": "running",
"group": []
},
{
"restartable": false, "name": "px-alert-monitor",
"status": "running",
"group": []
},
{
"restartable": false, "name": "px-api",
"status": "running",
"group": []
},
{
"restartable": false, "name": "px-capture",
"status": "running",
"group": []
},
{
"restartable": false, "name": "px-collect",
"status": "running",
"group": []
},
{
"restartable": true, "name": "px-eve-route",
"status": "running",
"group": []
},
{
"restartable": false, "name": "px-aggregator",
"status": "running",
"group": []
},
{
"restartable": false, "name": "px-event-filter",
"status": "running",
"group": []
},
{
"restartable": false, "name": "px-flow2eve",
"status": "running",
"group": []
},
{
"restartable": false, "name": "px-mom",
"status": "running",
"group": []
},
{
"restartable": true, "name": "px-purge",
"status": "running",
"group": []
},
{
"restartable": false, "name": "px-search",
"status": "running",
"group": []
},
{
"restartable": false, "name": "px-stat-collect",
"status": "running",
"group": []
},
{
"restartable": false, "name": "px-sys-stats",
"status": "running",
"group": []
},
{
"restartable": false, "name": "px-packet-filter",
"status": "running",
"group": []
},
{
"restartable": false, "name": "px-tap-exporter",
"status": "running",
"group": []
},
{
"restartable": false, "name": "redis-server",
"status": "running",
"group": []
},
{
"restartable": false, "name": "snmpd",
"status": "running",
"group": []
},
{
"restartable": true, "name": "suricata",
"status": "running",
"group": []
},
{
"restartable": false, "name": "npmonitor",
"status": "running",
"group": []
},
{
"restartable": false,
"name": "npsnmp",
"status": "running",
"group": []
},
{
"restartable": false, "name": "nrpe",
"status": "running",
"group": []
},
{
"restartable": false, "name": "px",
"status": "running",
"group": ["acm", "asap", "px-capture", "px-purge", "px-collect", "px-search", "suricata", "px-api", "px-eve-route", "px-flow2eve", "px-sys-stats", "px-alert-monitor", "px-stat-collect", "acquired", "npsnmp"]
},
{
"restartable": false, "name": "databases",
"status": "running",
"group": ["redis-server", "postgres", "influxd"]
}
]
cURL code sample: Managed processes
The code sample was run with cURL 7.57.0.
curl --user npadmin:hammerhead https://xxx.xxx.xxx.xxx/api/4.0/processes -k -X GET
This cURL sample includes the following options:
--user npadmin:hammerhead—Replace npadmin with the user name for your Series appliance. Replace hammerhead with the password for your Series appliance.
https://xxx.xxx.xxx.xxx/api/4.0/processes—The process request URL. Replace xxx.xxx.xxx.xxx with the IP address of your Series appliance.
-k—This option explicitly allows cURL to perform insecure SSL connections and transfers, which allows you to test your SSL connection without installing a CA certificate.
-X GET—This option specifies using the GET method.
Results
This example lists all managed processes. The output is in JSON.
Managed process details request
To get details of a specific process, send the following request:
GET https://<PX_IP_address>/api/4.0/processes/<process>
Required header:
--user <username>:<password>
Options
PX_IP_address—IP address of the Series appliance running the Series API.
username—The user name for your Series appliance.
password—The password for your Series appliance.
process—Name of process. You can find process names by using GET /processes.
Example
GET https://xxx.xxx.xxx.xxx/api/4.0/processes/px-alert-monitor
Required header:
--user npadmin:hammerhead
Managed process details response
HTTP/1.1 [Response Code] [Response Message] Date: [Date]
Content-Type: [Content Type]
{
"restartable": Boolean, "name": "process-name",
"status": "status",
"group": []
}
Response fields
Response Code—A standard HTML response code.
Response Message—A standard HTML response message.
Date—Standard HTML date format.
Content Type—The response format.
restartable— Indicates whether the process can be restarted.
name— Name of the process.
status— Indicates the status of the process. Values can be:
running (the process is alive)
stopped (the process is stopped)
disabled (the process is stopped and not enabled)
partial (in the case of a group, some processes are running and others are not)
group— indicates if the process is actually a collection of processes. Restarting a process that has a members in its group restarts all the processes within the group.
Example
HTTP/1.1 200 OK
Date: Fri, 8 Jun 2018 01:54:02 GMT
Content-Type: application/json; charset=utf-8
{
"restartable": false, "name": "px-alert-monitor",
"status": "running",
"group": []
}
cURL code sample: Managed process details
The code sample was run with cURL 7.57.0.
curl --user npadmin:hammerhead https://xxx.xxx.xxx.xxx/api/4.0/processes/px-alert-monitor -k -X GET
This cURL sample includes the following options:
--user npadmin:hammerhead—Replace npadmin with the user name for your Series appliance. Replace hammerhead with the password for your Series appliance.
https://xxx.xxx.xxx.xxx/api/4.0/processes/px-alert-monitor—The process request URL. Replace xxx.xxx.xxx.xxx
with the IP address of your Series appliance.
-k—This option explicitly allows cURL to perform insecure SSL connections and transfers, which allows you to test your SSL connection without installing a CA certificate.
-X GET—This option specifies using the GET method.
Results
This example lists details of the px-alert-monitor process. The output is in JSON.
Managed process status request
To get the status of a specific process, send the following request:
GET https://<PX_IP_address>/api/4.0/processes/<process>/status
Required header:
--user <username>:<password>
Options
PX_IP_address—IP address of the Series appliance running the Series API.
username—The user name for your Series appliance.
password—The password for your Series appliance.
process—Name of process. You can find process names by using GET /processes.
Example
GET https://xxx.xxx.xxx.xxx/api/4.0/processes/px-eve-route/status
Required header:
--user npadmin:hammerhead
Managed process status response
HTTP/1.1 [Response Code] [Response Message] Date: [Date]
Content-Type: [Content Type]
{
"status": "status"
}
Response fields
Response Code—A standard HTML response code.
Response Message—A standard HTML response message.
Date—Standard HTML date format.
Content Type—The response format.
status— Indicates the status of the process. Values can be:
running (the process is alive)
stopped (the process is stopped)
disabled (the process is stopped and not enabled)
partial (in the case of a group, some processes are running and others are not)
Example
HTTP/1.1 200 OK
Date: Fri, 8 Jun 2018 01:54:02 GMT
Content-Type: application/json; charset=utf-8
{
"status": "running"
}
cURL code sample: Managed process status
The code sample was run with cURL 7.57.0.
curl --user npadmin:hammerhead https://xxx.xxx.xxx.xxx/api/4.0/processes/px-eve-route/status -k -X GET
This cURL sample includes the following options:
--user npadmin:hammerhead—Replace npadmin with the user name for your Series appliance. Replace hammerhead with the password for your Series appliance.
https://xxx.xxx.xxx.xxx/api/4.0/processes/px-eve-route/status—The process request URL. Replace
xxx.xxx.xxx.xxx with the IP address of your Series appliance.
-k—This option explicitly allows cURL to perform insecure SSL connections and transfers, which allows you to test your SSL connection without installing a CA certificate.
-X GET—This option specifies using the GET method.
Results
This example returns the status of the px-eve-route process. The output is in JSON.
Managed process restart request
To restart a specific process, send the following request:
POST https://<PX_IP_address>/api/4.0/processes/<process>/restart
This action can only be taken on processes with a status of restartable.
 Note
Note
This endpoint is restricted to sudo users.
Required header:
--user <username>:<password>
Options
PX_IP_address—IP address of the Series appliance running the Series API.
username—The user name for your Series appliance.
password—The password for your Series appliance.
process—Name of process. You can find process names by using GET /processes.
Example
POST https://xxx.xxx.xxx.xxx/api/4.0/processes/px-eve-route/restart
Required header:
--user npadmin:hammerhead
Managed process restart response
HTTP/1.1 [Response Code] [Response Message] Date: [Date]
Content-Type: [Content Type]
Response fields
Response Code—A standard HTML response code.
Response Message—A standard HTML response message.
Date—Standard HTML date format.
Content Type—The response format.
status— Indicates the status of the process. Values can be:
running (the process is alive)
stopped (the process is stopped)
disabled (the process is stopped and not enabled)
partial (in the case of a group, some processes are running and others are not)
Example
HTTP/1.1 200 OK
Date: Fri, 8 Jun 2018 01:54:02 GMT
Content-Type: application/json; charset=utf-8
cURL code sample: Managed process restart
The code sample was run with cURL 7.57.0.
curl --user npadmin:hammerhead https://xxx.xxx.xxx.xxx/api/4.0/processes/px-eve-route/restart-k -X POST
This cURL sample includes the following options:
--user npadmin:hammerhead—Replace npadmin with the user name for your Series appliance. Replace hammerhead with the password for your Series appliance.
https://xxx.xxx.xxx.xxx/api/4.0/processes/px-eve-route/restart—The process request URL. Replace
xxx.xxx.xxx.xxx with the IP address of your Series appliance.
-k—This option explicitly allows cURL to perform insecure SSL connections and transfers, which allows you to test your SSL connection without installing a CA certificate.
-X POST—This option specifies using the POST method.
Results
This example restarts the px-eve-route process.
Logging
The following logging endpoints are available:
GET https://<PX_IP_address>/api/4.0/eventlogs
GET https://<PX_IP_address>/api/4.0/logs
GET https://<PX_IP_address>/api/4.0/logs/<log_name>
POST https://<PX_IP_address>/api/4.0/config/syslog
GET https://<PX_IP_address>/api/4.0/purgelogs
GET https://<PX_IP_address>/api/4.0/logs/<log_name>/download
Local event logging request
To retrieve Suricata local event logs containing layer-7 event information, send the following request:
GET https://<PX_IP_address>/api/4.0/eventlogs
Required header:
--user <username>:<password>
 Note
Note
Depending on the amount of data on the system, this endpoint could return a lot of information. recommends querying more frequently for smaller time ranges rather than less frequently with larger time ranges.
Options
PX_IP_address—The IP address of the Series appliance running the Series API.
username—The user name for your Series appliance.
password—The password for your Series appliance.
Query parameters
stime—Date and time from which the search should start. See Conventions for the format.
etime—Date and time at which the search should end. See Conventions for the format.
Example
GET https://xxx.xxx.xxx.xxx/api/4.0/eventlogs?stime=20150304.000000&etime=20150304.000001
Required header:
--user cpx:hammerhead
Local event logging response
The response varies depending on the type of event.
Response fields
The response fields vary depending on the type of event.
Example
The response varies depending on the type of event.
cURL code sample: Local event logging
The code sample was run with cURL 7.57.0.
curl -k --user cpx:hammerhead "stime=20150304.000000&etime=20150304.000001" https://xxx.xxx.xxx.xxx/api/4.0/ eventlogs
This cURL sample includes the following options:
-k—This option explicitly allows cURL to perform insecure SSL connections and transfers, which allows you to test your SSL connection without installing a CA certificate.
--user cpx:hammerhead—Replace cpx with the user name for your PX Series appliance. Replace hammerhead with the password for your Series appliance.
"stime=20150304.000000&etime=20150304.000001"—This option specifies the range of time.
https://xxx.xxx.xxx.xxx/api/4.0/eventlogs—The local event logging request URL. Replace xxx.xxx.xxx.xxx with the IP address of your Series appliance.
Results
This example returns the Suricata local event logs for the specified time range. The output is a stream of JSON objects.
List log files request
To list which log files are available to you, send the following request:
GET https://<PX_IP_address>/api/4.0/logs
Required header:
--user <username>:<password>
 Note
Note
This endpoint is restricted to users in the wheel or faas groups.
Options
PX_IP_address—IP address of the Series appliance running the Series API.
username—The user name for your Series appliance.
password—The password for your Series appliance.
Example
GET https://xxx.xxx.xxx.xxx/api/4.0/logs
Required header:
--user cpx:hammerhead
List log files response
[
"logfile"
]
Example
[
"acm",
"asap",
"npulse",
"px-alert-monitor", "px-api",
"px-capture",
"px-collect",
"px-eve-route", "px-flow2eve", "px-mom",
"px-purge",
"px-search", "suricata"
]
cURL code sample: List log files
The code sample was run with cURL 7.57.0.
curl -k --user cpx:hammerhead https://xxx.xxx.xxx.xxx/api/4.0/logs
This cURL sample includes the following options:
-k—This option explicitly allows cURL to perform insecure SSL connections and transfers, which allows you to test your SSL connection without installing a CA certificate.
--user cpx:hammerhead—Replace cpx with the user name for your Series appliance. Replace hammerhead with the password for you Series appliance.
https://xxx.xxx.xxx.xxx/api/4.0/logs—The local event logging request URL. Replace xxx.xxx.xxx.xxx with the IP address of your Series appliance.
Results
This example returns a list of available log files. The output is in JSON.
Query log file request
To get the contents of a specific log file in plaintext, send the following request:
GET https://<PX_IP_address>/api/4.0/logs/<log_name>
A "whitelist" indicates what log files are accessible at the given time. The whitelist is generated based upon the MDA license status; there are some logs which cannot be accessed by a non-FaaS user while MDA is licensed. These logs become part of the whitelist once MDA is no longer active.
Non-whitelisted files can also be queried, but these are only available to sudo users while MDA is not active, or to FaaS users
while MDA is active. A non-whitelisted file can be specified by providing the path to the file relative to the /var/log directory. Note that attempting to query logs outside of /var/log (by use of ../ or otherwise) will not function.
 Note
Note
This endpoint is restricted to users in the wheel or faas groups.
Required header:
--user <username>:<password>
Options
PX_IP_address—IP address of the Series appliance running the Series API.
username—The user name for your Series appliance.
password—The password for your Series appliance.
log_name—The log file to retrieve.
Parameters
keywords—Returns only lines matching at least one keyword. Multiple comma-separated keywords are supported.
limit—Limits the number of lines returned to the N most recent results.
Example
GET https://xxx.xxx.xxx.xxx/api/4.0/logs/acm?keywords=foo,bar,baz&limit=50
Required header:
--user cpx:hammerhead
Query log file response
matching log file lines
cURL code sample: Query log file
The code sample was run with cURL 7.57.0.
curl -k --user cpx:hammerhead https://xxx.xxx.xxx.xxx/api/4.0/logs/acm?keywords=foo,bar,baz&limit=50
This cURL sample includes the following options:
-k—This option explicitly allows cURL to perform insecure SSL connections and transfers, which allows you to test your SSL connection without installing a CA certificate.
--user cpx:hammerhead—Replace cpx with the user name for your Series appliance. Replace hammerhead with the password for your Series appliance.
https://xxx.xxx.xxx.xxx/api/4.0/logs/acm?keywords=foo,bar,baz&limit=50—The local event logging request URL. Replace xxx.xxx.xxx.xxx with the IP address of your Series appliance, acm with the log you want, foo,bar,baz with the keywords you want to find, and 50 with the line limit.
Results
This example returns the specified log file. The output is in JSON.
Configure system logging request
To configure system logging, send one of the following requests:
POST https://<PX_IP_address>/api/4.0/config/syslog
PUT https://<PX_IP_address>/api/4.0/config/syslog
 Note
Note
To use this request, you must belong to the sudo group.
You cannot configure system logging while it is being synchronized or if a system upgrade, backup, or restore is in progress.
Required header:
--user <username>:<password>
Request body:
{
acm: 'TEXT',
asap: 'TEXT',
px-api: 'TEXT',
px-capture: 'TEXT', px-collect: 'TEXT', px-eve-route: 'TEXT', px-flow2eve: 'TEXT', px-mom: 'TEXT',
px-purge: 'TEXT', px-search: 'TEXT',
px-sys-stats: 'TEXT', enable: BOOLEAN, level: 'TEXT', protocol: 'TEXT', address: 'IP address', port: INT
}
Options
PX_IP_address—The IP address of the Series appliance running the Series API.
username—The user name for your Series appliance.
password—The password for your Series appliance.
Parameters
acm—The level of logging for the Access Control Manager (ACM). Valid values are "EMERGENCY", "ALERT", "CRITICAL", "ERROR", "WARNING", "NOTICE", "INFO", and "DEBUG".
asap—The level of logging for asap. Valid values are "EMERGENCY", "ALERT", "CRITICAL", "ERROR", "WARNING", "NOTICE", "INFO", and "DEBUG".
px-api—The level of logging for the Series API. Valid values are "EMERGENCY", "ALERT", "CRITICAL", "ERROR", "WARNING", "NOTICE", "INFO", and "DEBUG".
px-capture—The level of logging for capture. Valid values are "EMERGENCY", "ALERT", "CRITICAL", "ERROR", "WARNING", "NOTICE", "INFO", and "DEBUG".
px-collect—The level of logging for px-collect. Valid values are "EMERGENCY", "ALERT", "CRITICAL", "ERROR", "WARNING", "NOTICE", "INFO", and "DEBUG".
px-eve-route—The level of logging for PX-Eve-Route. Valid values are "EMERGENCY", "ALERT", "CRITICAL", "ERROR", "WARNING", "NOTICE", "INFO", and "DEBUG".
px-flow2eve—The level of logging for px-flow2eve. Valid values are "EMERGENCY", "ALERT", "CRITICAL", "ERROR", "WARNING", "NOTICE", "INFO", and "DEBUG".
px-mom—The level of logging for px-mom. Valid values are "EMERGENCY", "ALERT", "CRITICAL", "ERROR", "WARNING",
"NOTICE", "INFO", and "DEBUG".
px-purge—The level of logging for purge. Valid values are "EMERGENCY", "ALERT", "CRITICAL", "ERROR", "WARNING", "NOTICE", "INFO", and "DEBUG".
px-search—The level of logging for px-search. Valid values are "EMERGENCY", "ALERT", "CRITICAL", "ERROR", "WARNING", "NOTICE", "INFO", and "DEBUG".
px-sys-stats—The level of logging for sys-stats. Valid values are "EMERGENCY", "ALERT", "CRITICAL", "ERROR", "WARNING", "NOTICE", "INFO", and "DEBUG".
enable—Whether remote targets are enabled. Valid values are true and false.
level—The general level of logging. Valid values are "emerg", "alert", "crit", "err", "warning", "notice", "info", "debug", and "*".
protocol—The protocol for sending data to remote targets. Valid values are "udp" and "tcp".
address—An IP address for a remote target. There can be multiple addresses.
port—Optional. The port number for the corresponding address.
Example
POST https://xxx.xxx.xxx.xxx/api/4.0/config/syslog
Required header:
--user npadmin:hammerhead
Request body:
{
"values": { "components": [
{
"acm": [ "INFO"
],
"asap": [ "NOTICE"
],
"px-api": [ "DEBUG"
],
"px-capture": [ "INFO"
],
"px-collect": [ "ALERT"
],
"px-eve-route": [ "DEBUG"
],
"px-flow2eve": [ "INFO"
],
"px-mom": [ "INFO"
],
"px-purge": [ "DEBUG"
],
"px-search": [ "INFO"
],
"px-sys-stats": [ "NOTICE"
]
}
],
"enable": [ true
],
"level": [ "debug"
],
"protocol": [ "udp"
],
"targets": [
{
"address": [ "xxx.xxx.xxx.xxx"
],
"port": [ 1220
]
},
{
"address": [ "xxx.xxx.xxx.xxx"
],
"port": [ 1644
]
}
]
}
}
Configure system logging response
HTTP/1.1 [Response Code] [Response Message] Date: [Date]
Content-Type: [Content Type] description: [Description} fields: [Fields]
label: [Label] acm: [ACM] asap: [ASAP]
px-api: [PX API]
px-capture: [PX Capture] px-collect: [PX Collect]
px-eve-route: [PX-Eve-Route] px-flow2eve: [PX Flow]
px-mom: [PX MOM]
px-purge: [PX Purge] px-search: [PX Search]
px-sys-stats: [PX System Statistics] enable: [Enable]
level: [Level] protocol: [Protocol] address: [Address] port: [Port]
Response fields
Response Code—A standard HTML response code.
Response Message—A standard HTML response message.
Date—Standard HTML date format.
Content Type—The response format.
Description—A description of the component.
Fields—Fields list different options for each component.
Label—The name of the component.
ACM—The level of logging for the ACM.
ASAP—The level of logging for asap.
API—The level of logging for the Series API.
PX Capture—The level of logging for PX capture.
PX Collect—The level of logging for px-collect.
PX-Eve-Route—The level of logging for PX-Eve-Route.
PX Flow—The level of logging for px-flow2eve.
PX MOM—The level of logging for px-mom
PX Purge—The level of logging for purge.
PX Search—The level of logging for px-search.
PX System Statistics—The level of logging for sys-stats.
Enable—Whether remote targets are enabled.
Level—The general level of logging.
Protocol—The protocol for sending data to remote targets.
Address—An IP address for a remote target.
Port—Optional. The port number for the corresponding address.
Example
HTTP/1.1 200 OK
Date: Fri, 10 Feb 2017 17:51:51 GMT
Content-Type: application/json; charset=utf-8
{
"description": "Syslog configuration", "fields": {
"components": {
"description": "Component configured for custom syslog level", "fields": {
"acm": {
"default": [ "INFO"
],
"description": "Syslog logging level for acm", "enums": [
"EMERGENCY", "ALERT", "CRITICAL", "ERROR", "WARNING", "NOTICE",
"INFO", "DEBUG"
],
"label": "acm", "maxCount": 1,
"minCount": 1,
"type": "enum"
},
"asap": {
"default": [ "INFO"
]
"description": "Syslog logging level for asap", "enums": [
"EMERGENCY", "ALERT", "CRITICAL", "ERROR", "WARNING", "NOTICE",
"INFO", "DEBUG"
],
"label": "asap",
"maxCount": 1,
"minCount": 1,
"type": "enum"
},
"px-api": {
"default": [ "INFO"
],
"description": "Syslog logging level for px-api", "enums": [
"EMERGENCY", "ALERT", "CRITICAL", "ERROR", "WARNING", "NOTICE",
"INFO", "DEBUG"
],
"label": "px-api", "maxCount": 1,
"minCount": 1,
"type": "enum"
},
"px-capture": {
"default": [ "INFO"
],
"description": "Syslog logging level for px-capture", "enums": [
"EMERGENCY", "ALERT", "CRITICAL", "ERROR", "WARNING", "NOTICE",
"INFO", "DEBUG"
],
"label": "px-capture", "maxCount": 1,
"minCount": 1,
"type": "enum"
},
"px-collect": {
"default": [ "INFO"
],
"description": "Syslog logging level for px-collect", "enums": [
"EMERGENCY", "ALERT", "CRITICAL", "ERROR", "WARNING", "NOTICE",
"INFO", "DEBUG"
],
"label": "px-collect", "maxCount": 1,
"minCount": 1,
"type": "enum"
},
"px-eve-route": { "default": [
"INFO"
],
"description": "Syslog logging level for px-eve-route", "enums": [
"EMERGENCY", "ALERT", "CRITICAL", "ERROR", "WARNING", "NOTICE",
"INFO", "DEBUG"
],
"label": "px-eve-route", "maxCount": 1,
"minCount": 1,
"type": "enum"
},
"px-flow2eve": {
"default": [ "INFO"
],
"description": "Syslog logging level for px-flow2eve", "enums": [
"EMERGENCY", "ALERT", "CRITICAL", "ERROR", "WARNING", "NOTICE",
"INFO", "DEBUG"
],
"label": "px-flow2eve", "maxCount": 1,
"minCount": 1,
"type": "enum"
},
"px-mom": {
"default": [ "INFO"
],
"description": "Syslog logging level for px-mom", "enums": [
"EMERGENCY", "ALERT", "CRITICAL", "ERROR", "WARNING", "NOTICE",
"INFO", "DEBUG"
],
"label": "px-mom", "maxCount": 1,
"minCount": 1,
"type": "enum"
},
"px-purge": {
"default": [ "DEBUG"
],
"description": "Syslog logging level for px-purge", "enums": [
"EMERGENCY", "ALERT", "CRITICAL", "ERROR", "WARNING", "NOTICE",
"INFO", "DEBUG"
],
"label": "px-purge", "maxCount": 1,
"minCount": 1,
"type": "enum"
},
"px-search": {
"default": [ "INFO"
],
"description": "Syslog logging level for px-search", "enums": [
"EMERGENCY", "ALERT", "CRITICAL", "ERROR", "WARNING", "NOTICE",
"INFO", "DEBUG"
],
"label": "px-search", "maxCount": 1,
"minCount": 1,
"type": "enum"
},
"px-sys-stats": { "default": [
"INFO"
],
"description": "Syslog logging level for px-sys-stats", "enums": [
"EMERGENCY", "ALERT", "CRITICAL", "ERROR", "WARNING", "NOTICE",
"INFO", "DEBUG"
],
"label": "px-sys-stats", "maxCount": 1,
"minCount": 1,
"type": "enum"
}
},
"label": "Component syslog definition", "maxCount": 1,
"minCount": 1,
"type": "object"
},
"enable": {
"default": [
false
],
"description": "Enable/disable Remote targets", "falseLabel": "Disabled",
"label": "Remote Targets", "maxCount": 1,
"minCount": 1, "trueLabel": "Enabled", "type": "bool"
},
"level": {
"default": [ "info"
],
"description": "Syslog reporting level", "enums": [
"emerg",
"alert",
"crit",
"err", "warning", "notice",
"info", "debug"
],
"label": "Level", "maxCount": 1,
"minCount": 1,
"type": "enum"
},
"protocol": {
"default": [ "udp"
],
"description": "Syslog protocol", "enums": [
"tcp", "udp"
],
"label": "Protocol", "maxCount": 1,
"minCount": 1,
"type": "enum"
},
"targets": {
"description": "Remote Syslog targets", "fields": {
"address": {
"description": "Address of target server", "label": "Address",
"maxCount": 1,
"minCount": 1,
"type": "address"
},
"port": {
"description": "Port of target server (optional)", "label": "Port",
"maxCount": 1,
"maxValue": 65535,
"minCount": 0,
"minValue": 0,
"type": "int"
}
},
"label": "Targets", "minCount": 0,
"type": "object"
} },
"label": "Syslog", "values": {
"components": [
{
"acm": [ "INFO"
],
"asap": [ "NOTICE"
],
"px-api": [ "DEBUG"
],
"px-capture": [ "INFO"
],
"px-collect": [ "ALERT"
],
"px-eve-route": [ "DEBUG"
],
"px-flow2eve": [ "INFO"
],
"px-mom": [ "INFO"
],
"px-purge": [ "DEBUG"
],
"px-search": [ "INFO"
],
"px-sys-stats": [ "NOTICE"
]
}
],
"enable": [ true
],
"level": [ "debug"
],
"protocol": [ "udp"
],
"targets": [
{
"address": [ "xxx.xxx.xxx.xxx"
],
"port": [ 1220
]
},
{
"address": [ "xxx.xxx.xxx.xxx"
],
"port": [ 1644
]
}
]
}
}
cURL code sample: Configure system logging
The code sample was run with cURL 7.57.0.
curl --user npadmin:hammerhead https://xxx.xxx.xxx.xxx/api/4.0/config/syslog -k -X POST --data-binary '{"values": {"components": [{"acm": ["INFO"],"asap": ["NOTICE"],"px-api": ["DEBUG"],"px-capture":
["INFO"],"px-collect": ["ALERT"],"px-eve-route": ["DEBUG"],"px-flow2eve": ["INFO"],"px-mom": ["INFO"],"px-
purge": ["DEBUG"],"px-search": ["INFO"],"px-sys-stats": ["NOTICE"]}],"enable": [true],"level":
["debug"],"protocol": ["udp"],"targets": [{"address": ["xxx.xxx.xxx.xxx"],"port": [1220]},{"address": ["xxx.xxx.xxx.xxx"],"port": [1644]}]}}'
This cURL sample includes the following options:
--user npadmin:hammerhead—Replace npadmin with the user name for your Series appliance. Replace hammerhead with the password for your Series appliance.
https://xxx.xxx.xxx.xxx/api/4.0/config/syslog—The component configuration request URL. Replace xxx.xxx.xxx.xxx
with the IP address of your Series appliance.
-k—This option explicitly allows cURL to perform insecure SSL connections and transfers, which allows you to test your SSL connection without installing a CA certificate.
-X POST—This option specifies using the POST method.
--data-binary '{"values": {"components": [{"acm": ["INFO"],"asap": ["NOTICE"],"px-api": ["DEBUG"],"px-
capture": ["INFO"],"px-collect": ["ALERT"],"px-eve-route": ["DEBUG"],"px-flow2eve": ["INFO"],"px-mom":
["INFO"],"px-purge": ["DEBUG"],"px-search": ["INFO"],"px-sys-stats": ["NOTICE"]}],"enable": [true],"level":
["debug"],"protocol": ["udp"],"targets": [{"address": ["xxx.xxx.xxx.xxx"],"port": [1220]},{"address": ["xxx.xxx.xxx.xxx"],"port": [1644]}]}}'—This option specifies the changes to make to system logging.
Results
This example updates the values for system logging. The output is in JSON.
Purge logs request
To retrieve a log of purged files, send the following request:
GET https://<PX_IP_address>/api/4.0/purgelogs
Required header:
--user <username>:<password>
Options
PX_IP_address—IP address of the Series appliance running the Series API.
username—The user name for your Series appliance.
password—The password for your Series appliance.
Example
GET https://xxx.xxx.xxx.xxx/api/4.0/purgelogs
Required header:
--user cpx:hammerhead
Purge logs response
HTTP/1.1 [Response Code] [Response Message] Date: [Date]
Content-Type: [Content Type]
path: [Path] datetime: [Date Time] reason: [Reason]
Response fields
Response Code—A standard HTTP response code.
Response Message—A standard HTTP response message.
Date—Standard HTML date format.
Content Type—The response format.
Path—Path of the file that was purged.
Date Time—Time when the file was purged, in epoch time.
Reason—Reason why the file was purged.
Example
[
{ "path": "/data/px/search/47c4b9a2637449537a1a518443a68e20", "datetime": 1486720705, "reason": "Max count reached" } ,
{ "path": "/data/px/capture/0/20170206/13/52", "datetime": 1486720705, "reason": "Filesystem too full" } ,
{ "path": "/data/px/search/967fb54656714a134ed550e8179dcd9d", "datetime": 1486720705, "reason": "Max count reached" } ,
{ "path": "/data/px/search/22d1aff3f24246f874b7612dd0acd224", "datetime": 1486720705, "reason": "Max count reached" }
]
cURL code sample: Purge logs
The code sample was run with cURL 7.57.0.
curl -k --user cpx:hammerhead https://xxx.xxx.xxx.xxx/api/4.0/purgelogs
This cURL sample includes the following options:
-k—This option explicitly allows cURL to perform insecure SSL connections and transfers, which allows you to test your SSL connection without installing a CA certificate.
--user cpx:hammerhead—Replace cpx with the user name for your Series appliance. Replace hammerhead with the password for your Series appliance.
https://xxx.xxx.xxx.xxx/api/4.0/purgelogs—The local event logging request URL. Replace xxx.xxx.xxx.xxx with the IP address of your Series appliance.
Results
This example returns a log of purged files. The output is a stream of JSON objects.
Download log file request
To download a specific log file, send the following request:
GET https://<PX_IP_address>/api/4.0/logs/<log_name>/download
A "whitelist" indicates what log files are accessible at the given time. The whitelist is generated based upon the MDA license
status; there are some logs which cannot be accessed by a non-FaaS user while MDA is licensed. These logs become part of the whitelist once MDA is no longer active.
Non-whitelisted files can also be queried, but these are only available to sudo users while MDA is not active, or to FaaS users while MDA is active. A non-whitelisted file can be specified by providing the path to the file relative to the /var/log directory. Note that attempting to query logs outside of /var/log (by use of ../ or otherwise) will not function.
 Note
Note
This endpoint is restricted to users in the wheel or faas groups.
Required header:
--user <username>:<password>
Options
PX_IP_address—IP address of the Series appliance running the Series API.
username—The user name for your Series appliance.
password—The password for your Series appliance.
log_name—The log to retrieve.
Example
GET https://xxx.xxx.xxx.xxx/api/4.0/logs/suricata/download
Required header:
--user cpx:hammerhead
Download log file response
requested log file
cURL code sample: Download log file
The code sample was run with cURL 7.57.0.
curl -k --user cpx:hammerhead https://xxx.xxx.xxx.xxx/api/4.0/logs/suricata/download
This cURL sample includes the following options:
-k—This option explicitly allows cURL to perform insecure SSL connections and transfers, which allows you to test your SSL connection without installing a CA certificate.
--user cpx:hammerhead—Replace cpx with the user name for your Series appliance. Replace hammerhead with the password for your Series appliance.
https://xxx.xxx.xxx.xxx/api/4.0/logs/suricata/download—The local event logging request URL. Replace
xxx.xxx.xxx.xxx with the IP address of your Series appliance, and suricata with the log file you want.
Results
This example downloads the suricata log file. The output is in JSON.
PII Redaction
PII Redaction endpoints are used to safeguard sensitive data within the PX network. These endpoints facilitate the automated identification and removal of confidential information, including credit card details, from captured network traffic
GET http://<PX_IP_address>/api/4.0/config/pii-redaction
PUT http://<PX_IP_address>/api/4.0/config/pii-redaction-custom rules -F file=@custom.txt
GET http://<PX_IP_address>/api/4.0/config/pii-redaction-customrules
Check status and counters
Checks the status and counters for PII redaction.
Path
GET http://<PX_IP_address>/api/4.0/config/pii-redaction
Required header:
--user <username>:<password>
Request
GET http://<PX_IP_address>/api/4.0/config/pii-redaction
where:
PX_IP_address—IP address of the Series appliance running the Series API.
username—The user name for your Series appliance.
password—The password for your Series appliance.
pii-redaction—The pii redaction.
Request example
curl -H "X-Username: npadmin" -XGET http://<PX_IP_address>/api/4.0/config/pii-redaction
Response
"PII Redaction Status": "true", "CreditCardsRedacted": 37837
Response parameters
Parameter | Data type/Values | Description |
PII Redaction Status | True | The status of the PII redaction. |
CreditCardsRedacted | 37837 | Redacting the credit card information. |
Response example
curl -H "X-Username: npadmin" -XGET http://<PX_IP_address>/api/4.0/config/pii-redaction
Response codes
Status | Response | Description |
200 | True | Returns values for PII redaction and credit card redaction |
Results
This example returns values for PII redaction and credit card redaction.
Upload custom rules
The Credit Card Data Redaction feature allows for customization of detection rules through the custom.txt file. This file contains user-defined Perl Compatible Regular Expressions (PCREs). Modifications to the custom.txt file result in the replacement of all existing custom rules. There is no requirement for system restarts, as the API manages the update process automatically.
Path
PUT http://<PX_IP_address>/api/4.0/config/pii-redaction-customrules -F "file=@custom.txt"
Required header:
--user <username>:<password>
Request
PUT http://<PX_IP_address>/api/4.0/config/pii-redaction-customrules -F "file=@custom.txt"
where:
PX_IP_address—IP address of the PX series appliance running the Series API.
username—The user name for your PX series appliance.
password—The password for your PX series appliance.
pii-redaction-customrules—The pii redaction custom rules.
Request parameters
Parameters | Data types/Values | Description |
file | custom.txt | Specifies the name of the data being uploaded |
Request example
curl -H "X-Username: npadmin" -H -XGET http://<PX_IP_address>/api/4.0/config/pii-redaction-customrules -F "file=@custom.txt"
<ID>:/<regex>/i
ID can range from 90001 to 90200
Total custom rules is max 200 Some examples are provided below:
90001:/\b(6011|5[1-5]\d{2}|4\d{3}|3\d{3})[- ]\d{4}[- ]\d{4}[- ]\d{4}\b/i
90002:/\b3[47]\d{2} \d{6} \d{5}\b/i
90003:/\b3[47]\d{2}-\d{6}-\d{5}\b/i
Response
{"status":"failed","message":"Unable to upload custom rules rule:[sdfds] error:[invalid rule]"}
Response parameters
Parameter | Data type/Values | Description |
Status | Failure / Empty | Denotes the status of the upload. |
Message | Valid rule/Invalid rule | Denotes if the rule is valid or invalid. |
Response example
curl -H "X-Username: npadmin" -H -XGET http://<PX_IP_address>/api/4.0/config/pii-redaction-customrules -F "file=@custom.txt"
Results
This example provides all the custom rules.
Verify uploaded custom rules
Verifies the uploaded custom rules.
Path
GET http://<PX_IP_address>/api/4.0/config/pii-redaction-customrules
Required header:
--user <username>:<password>
Use the PII redaction config to check the status and counters. The response must have "done":true before you start to use them.
Request
XGET http://<PX_IP_address>/api/4.0/config/pii-redaction-customrules
Request parameters
PX_IP_address—IP address of the Series appliance running the Series API.
username—The user name for your Series appliance.
password—The password for your Series appliance.
pii-redaction - customrules—The pii redaction custom rules.
Request example
curl -H "X-Username: npadmin" -XGET http://<PX_IP_address>/api/4.0/config/pii-redaction-customrules
Results
This example returns uploaded custom rules.
Appendix
The appendix covers the following topic:
Connection metadata properties
This appendix provides definitions of -specific connection attributes.
Connection Metadata Property | Definition |
connectionReason | The reason for connection termination. The range of values are:
terminated for reporting purposes while it was still active.
connection was terminated because the metering process detected a signal indicating the end of the connection (such as the TCP FIN flag).
terminated because of some external event (such as a shutdown of the metering process).
was terminated because of lack of resources available to the metering process. |
layer3FlagsIn | Combination of all IPv4 flags seen for packets from IP_address_1 to IP_address_2 for the connection. |
layer3FlagsOut | Combination of all IPv4 flags seen for the packets from IP_address_2 to IP_address_1 for the connection. |
Connection Metadata Property | Definition |
layer4FlagsIn | Combination of all TCP flags seen for the packets from IP_address_1 to IP3 for the connection. |
layer4FlagsOut | Combination of all TCP flags seen for the packets from IP_address_2 to IP_address_1 for the connection. |
sortedHashValue | A hash of the 5-tuple information (source and destination IP address, source and destination port, and protocol). |
roundTripTime | Amount of time in milliseconds that it took for one packet to be sent from IP_address_1 to IP_address_2 and then for IP_address_2 to send a packet back to IP_address_1. |
connectionEndSeconds | Portion of the time stamp of the end of the connection. Units are seconds since Jan. 1, 1970. This field, combined with Connection End Nanoseconds, gives you the full nanoseconds time stamp of the end of the connection. |
connectionEndNanoseconds | Fractional portion of the time stamp of the end of the packet. Units are in nanoseconds. This field, combined with Connection End Seconds, gives you the full nanosecond time stamp at the end of the connection. |
octetDeltaCountIn | Number of octets sent from IP_address_1 to IP_address_2 for this connection. |
octetDeltaCountOut | Number of octets sent from IP_address_2 to IP_address_1 for this connection. |
packetDeltaCountIn | Number of packets sent from IP_address_1 to IP_address_2 for this connection. |
Connection Metadata Property | Definition |
packetDeltaCountOut | Number of octets sent from IP_address_2 to IP_address_1 for this connection. |
droppedOctetDeltaCountIn | Number of octets dropped from IP_address_1 to IP_address_2 for this connection. |
droppedOctetDeltaCountOut | Number of octets dropped from IP_address_2 to IP_address_1 for this connection. |
droppedPacketDeltaCountIn | Number of packets dropped from IP_address_1 to IP_address_2 for this connection. |
droppedPacketDeltaCountOut | Number of packets dropped from IP_address_2 to IP_address_1 for this connection. |