
SECURITY ORCHESTRATOR / 2022
FireEye and the FireEye logo are registered trademarks of FireEye, Inc. in the United States and other countries. All other trademarks are the property of their respective owners.
FireEye assumes no responsibility for any inaccuracies in this document. FireEye reserves the right to change, modify, transfer, or otherwise revise this publication without notice.
Copyright © 2022 FireEye, Inc. All rights reserved.
Security Orchestrator System Administration Guide
Software Release 6.6.0
Revision 2
FireEye Contact Information:
Website: www.fireeye.com
Technical Support: https://csportal.fireeye.com
Phone (US):
1.408.321.6300
1.877.FIREEYE
Contents
Contents
PART I: Get Started ........................................................................ 7
About Security Orchestrator ............................................................. 9
Virtual Appliance ........................................................................10
Architecture ..............................................................................10
Command-Line Interface (CLI) .......................................................11
SO Web UI ..............................................................................11
Web Browser Support .................................................................... 11
System Requirements ...................................................................13
Virtual Appliance Requirements .......................................................13
Network Requirements .............................................................13
PART II: Deployment ..............................................................15
Deployment Checklist ..............................................................17
Virtual Appliance Installation ....................................................19
Obtain SO Deployment Files .........................................................19
Install the SO Virtual Appliance ...................................................20
Configure the SO Virtual Appliance at Initial Startup .............................21
Before You Begin ..................................................................21
Initial Configuration of the SO Virtual Appliance ...............................21
Set SO Virtual Appliance Date and Time ............................................27
Access SO Web UI ..................................................................28
Troubleshoot SO Web UI Access Issues .............................................29
Server Unreachable ..............................................................29
Hostname Not Resolving ........................................................29
Plug-In Management ..............................................................31
Self Reliant Plug-in Installation ..................................................31
Single-click Installation .........................................................31
© 2022 FireEye
3
Contents
Upgrade Plug-ins ........................................................31
Manual Installation / Upgrade ......................................32
Legacy Plug-in Installation ........................................32
Installing Plug-in Dependencies ...................................33
Installing Plug-ins Using the Web UI ..............................33
Configuration ..........................................................35
Manual Configuration ................................................35
Network Configuration ............................................35
Hostname Configuration ...........................................36
Web Configuration ................................................40
Firewall Configuration ............................................43
SSL Configuration ................................................44
Remote Access with Secure Shell (SSH) ........................45
Configure Remote Access Authentication .........................46
Generate RSA Keys for SSH Authentication ........................46
Connect using PuTTY and Authorized Keys ........................47
SNMP ...................................................................50
SNMP Installation ..................................................51
SNMP Configure and Monitor ......................................52
PART III: User Management ...............................................63
About User Management ..............................................65
Manage Groups ........................................................67
Access Permissions by Component .................................67
Playbooks ............................................................68
Devices ..............................................................68
Adapters .............................................................69
Users ................................................................69
Current User ........................................................69
User Groups ..........................................................70
Scripts ...............................................................70
Parameter Types .....................................................70
4
© 2022 FireEye
Contents
Packages ........................................................................71
Content Packages ................................................................71
Tables .........................................................................71
Forms ..........................................................................72
Tags ...........................................................................72
Table Rows ....................................................................72
Cases and Processes ..........................................................72
System Configuration .......................................................73
External API ................................................................73
View Groups .................................................................73
Create a Group ............................................................74
Modify a Group ............................................................74
Delete a Group ............................................................75
Manage Users .............................................................77
View Users ................................................................77
Create a User .............................................................78
Change User Details .......................................................78
Change User Passwords ....................................................79
Reset Passwords for Locked-Out Users ....................................79
Reset Passwords Using the CLI ..........................................80
Change User Group Assignments ..........................................80
Enable or Disable a User ................................................80
Delete a User ...........................................................81
PART IV: Administration ..................................................83
Upgrading Software .......................................................83
Prerequisites ................................................................84
Configuring Microsoft Active Directory Authentication ....................85
Obtain Active Directory Information ....................................85
Add the AD IP Address and Domain to /etc/hosts ........................86
Update Settings in the web.conf Configuration File ......................86
Restart Security Orchestrator ...........................................87
© 2022 FireEye5
Contents
Verify the Connection ....................................................................87
Add Users to Groups .................................................................88
Enable Inline Help and Tutorials ..............................................88
Database Configuration .........................................................89
Generate Log Bundles for Customer Support ..............................91
Manage Logs .....................................................................93
Configure Logging Levels .......................................................93
RabbitMQ Service Logs .........................................................94
Manage Services .................................................................95
Status of SO and Dependent Services ...................................95
Stop SO and Dependent Services ........................................95
Start SO and Dependent Services .......................................96
Using Snapshots to Save System Configuration ........................97
Creating a Snapshot of Your SO Configuration ........................98
Importing a Snapshot to Your SO Virtual Machine ....................99
Migrating Data Into a New Version of Security Orchestrator .........101
Migrating Data Using a Snapshot Import ................................101
Back Up and Restore SO Files ................................................105
Create a Backup File ............................................................105
Restore Files ..................................................................106
Optimizing Performance ......................................................107
Technical Support ............................................................109
Documentation ..................................................................109
6 © 2022 FireEye
Security Orchestrator System Administration Guide
PART I: Get Started
About Security Orchestrator on page 9
System Requirements on page 13
© 2022 FireEye | 7 |
Security Orchestrator System Administration Guide
PART I: Get Started
8
© 2022 FireEye
Security Orchestrator System Administration Guide
About Security Orchestrator
About Security Orchestrator
Security Orchestrator (SO) is an open playbook platform that integrates Security Orchestrator and third-party products and services to provide effective threat detection and event response for your system. Security Orchestrator provides a playbook builder interface that allows you to model procedures, and a plug-in API architecture to integrate external systems into your playbooks.
Security Orchestrator initiates automated workflows called playbooks. These automated workflows can complete automated tasks and request human intervention to complete manual tasks. Playbooks can create cases and escalate important alerts or events. You can create playbooks and customize Security Orchestrator pre-configured playbooks to meet the needs of your organization using the Playbook Builder.
With the variety of Security Orchestrator plug-ins provided by FireEye, you can perform a diverse set of tasks using Playbooks and develop plug-ins to extend your Security Orchestrator capabilities. Existing plug-ins can integrate created playbooks with many kinds of products and services, including:
FireEye appliances and tools
Threat intelligence services
Malware analysis tools
Security information and event management (SIEM) tools
Cloud-based storage
Ticketing and issue tracking systems
Endpoints
Firewalls
Switches
Sandbox tools
Email servers
Chat tools
Mobile devices
© 2022 FireEye
9
Security Orchestrator System Administration Guide
This guide explains how to install, configure, and maintain the Security Orchestrator virtual appliance. To get started, read the following sections:
Virtual Appliance below
Architecture below
Command-Line Interface (CLI) on the facing page
SO Web UI on the facing page
For information on creating, customizing, and managing playbooks, see the Security Orchestrator User Guide.
Virtual Appliance
Security Orchestrator (SO) is a virtual appliance distributed in the Open Virtualization Format (OVF).
The SO 6.6 virtual appliance is a CentOS Linux 7.9 virtual machine.
Architecture
The following services, systems, and components are installed on the Security Orchestrator virtual appliance:
Name | Description |
|---|---|
Security Orchestrator service | The main Security Orchestrator service (fso) that manages all Web and engine services. |
Apache HTTP Server 2.4 | Web server that provides access to the Security Orchestrator Web UI. |
Python Virtual Environment | SO uses a Python virtual environment for running plug-in commands. This environment is different from the Python environment included in the CentOS Linux 7.9 operating system. |
Python Interpreter | Used by the SO engine. One process runs for each worker thread (by default, 10 processes total), as well as one process per running adapter. |
Database Platform | Postgresql is the database in SO 6.6: Postgresql manages data, including application configurations, playbooks, cases, and events. |
Release 6.6About Security Orchestrator
Name | Description |
|---|---|
RabbitMQ server | Message queuing framework used to store events that need to be processed by SO, such as results received by adapters and playbook tasks. |
Mnesia database | The RabbitMQ server uses the Mnesia database to store data that SO needs to access quickly, such as in-progress executions and their status. |
Erlang | Redirects Erlang input and output streams on Unix systems. Erlang runs the SO Web application. |
Erlang Runtime | Used by RabbitMQ and SO Web servers. |
Node.js | Used to run Javascript code and custom scripts entered in the SO Web UI. One process is used for each script task worker (5 script task workers available), one for each mustache worker (5 mustache workers available), and one more for playbook validation, for a total of 11. |
Cron Scheduler | Daemon to execute scheduled commands, such as logrotate. |
Command-Line Interface (CLI)
The Security Orchestrator (SO) virtual appliance has a command-line interface (CLI) that can be used to configure the system, monitor and manage system services and logs, install and upgrade software, and create and restore snapshots.
SO Web UI
The Security Orchestrator (SO) virtual appliance has a Web UI that can be used to build playbooks, manage cases generated by playbooks, view metrics, manage users, and monitor system status.
For information on how to manage user access from the Web UI, see About User Management on page 65. For more information about the Web UI, see the Security Orchestrator User Guide.
Web Browser Support
The latest versions of the following browsers are tested and approved for use with Security Orchestrator:
Security Orchestrator System Administration Guide
Google Chrome
Mozilla Firefox
12
© 2022 FireEye
Security Orchestrator System Administration GuideSystem Requirements
System Requirements
Before deployment of a Security Orchestrator virtual appliance, make sure the following requirements are met.
Virtual Appliance Requirements
Check and verify resource requirements are met.
A successful deployment requires the following:
Resource | Minimum Requirement |
|---|---|
Processor | 64-bit quad-core processor |
Memory (RAM) | 32 GB |
Disk space | 220 GB |
Network Requirements
The following communications are required to allow the virtual machine to communicate.
Description | Source | Destination | Protocol | Port |
|---|---|---|---|---|
DNS resolution | SO virtual appliance (eth0) | Internal DNS servers | TCP/UDP | 53 |
NTP | SO virtual appliance (eth0) | Trusted NTP servers | UDP | 123 |
CLI using SSH | Admin workstation | SO virtual appliance (eth0) | TCP | 22 |
Access to the SO Web UI | Admin and analyst workstation | SO virtual appliance (eth0) | TCP | 443 |
© 2022 FireEye
13
Security Orchestrator System Administration Guide
The following communications are optional. You can install and configure SNMP as part of your Security Orchestrator deployment; it is not installed by default. For more information, see SNMP on page 50.
Description | Source | Destination | Protocol | Port |
|---|---|---|---|---|
SNMP polling for SO Web UI | SNMP Manager | SO virtual appliance (eth0) | UDP | 161 |
SNMP traps for SO Web UI | SO virtual appliance (eth0) | SNMP Manager | UDP | 162 |
Security Orchestrator System Administration Guide
PART II: Deployment
Deployment Checklist on page 17
Virtual Appliance Installation on page 19
Plug-In Management on page 31
Configuration on page 35
© 2022 FireEye
15
Security Orchestrator System Administration GuidePART II: Deployment
16
© 2022 FireEye
Security Orchestrator System Administration Guide
Deployment Checklist
Deployment Checklist
Follow these steps to install and configure Security Orchestrator. For information about migrating to a new version of Security Orchestrator, see Migrating Data Into a New Version of Security Orchestrator on page 101.
WARNING: You cannot install Security Orchestrator 6.6 directly onto a version of SO earlier than 6.0. If you attempt to install release 6.6 on an older SO machine, the upgrade will fail. You must deploy a brand new virtual machine, install SO 6.6, then import or restore settings.

Task | Details |
|---|---|
Step 1: | See System Requirements on page 13. |
Step 2: |
|
Step 3: | See Access SO Web UI on page 28. |
Step 4: | See About User Management on page 65. |
© 2022 FireEye
Security Orchestrator System Administration Guide
Task | Details |
|---|---|
Step 5: Install SO plug-ins. | See the following sections:
|
Optional Configuration Steps: | |
Configure secure shell (SSH) authentication. | See Remote Access with Secure Shell (SSH) on page 45. |
Configure firewall settings for the SO virtual appliance, as needed. | See Firewall Configuration on page 43. |
Configure a custom SSL certificate. | See SSL Configuration on page 44. |
Install and configure SNMP. | See SNMP on page 50. |
Security Orchestrator System Administration GuideVirtual Appliance Installation
Virtual Appliance Installation
This section describes how to install and initially configure your Security Orchestrator virtual appliance.
WARNING: You cannot install Security Orchestrator 6.6 directly onto a version of SO earlier than 6.0. If you attempt to install release 6.6 on an older SO machine, the upgrade will fail. You must deploy a brand new virtual machine, install SO 6.6, then import or restore settings.

This section includes the following topics:
Install the SO Virtual Appliance on the next page
Configure the SO Virtual Appliance at Initial Startup on page 21
Set SO Virtual Appliance Date and Time on page 27
Access SO Web UI on page 28
Troubleshoot SO Web UI Access Issues on page 29
For information on how to upgrade the virtual appliance, see Upgrading Software on page 83.
Obtain SO Deployment Files
To obtain the SO deployment files:
Download the following files from the FireEye Customer Support Portal:
SO Release Readme file, which contains the SHA-256 checksums for the SO deployment files
SO virtual appliance, fso-system-6.6.x-<rev>.el7.ova
© 2022 FireEye 19
Security Orchestrator System Administration Guide
SO login credentials for the virtual appliance, fso-system-6.6.x-ova-credentials.zip, which contains the FSO_Access_Credentials_Readme file
2. Verify SHA-256 checksums for the SO virtual appliance and login credentials files.
Install the SO Virtual Appliance
A Security Orchestrator (SO) virtual appliance is a virtual instance of the SO system image. You deploy an SO virtual appliance using a hypervisor product. The following instructions use the VMware ESXi hypervisor as an installation example.
NOTE: This document assumes familiarity with deploying virtual machines and administering ESXi hosts. This document provides the basic steps for creating and deploying an SO virtual appliance. For comprehensive information about deploying virtual machines, see documentation provided by VMware, Inc.

Prerequisites
Root user account on an ESXi server
Familiarity with deploying virtual machines and administering ESXi hosts
Virtual appliance deployment files. See Obtain SO Deployment Files on the previous page.
This section describes how to install a virtual appliance.
NOTE: This procedure covers the required settings for a FireEye virtual appliance. You can accept the default values for the other settings, or specify values that are appropriate for your setup.
To install a virtual appliance:
Log in to vSphere Client.
From the File menu, select Deploy OVF Template to start the wizard.
On the Source screen, click Browse and navigate to the OVA file containing the Security Orchestrator system image. Then click Next.
On the OVF Template Details screen, review the information. If the information is correct, click Next. Otherwise, click Back and enter the correct URL or path.
On the Name and Location screen, enter a unique name that describes the virtual appliance.
On the Disk Format screen, click Next.
20
© 2022 FireEye
On the Network Mapping screen, click Next to accept the default settings.
On the Ready to Complete screen:
Verify the information.
(Optional) Select the Power on after deployment checkbox.
Click Finish.
Configure the SO Virtual Appliance at Initial Startup
Follow these steps when you boot the Security Orchestrator (SO) virtual appliance for the first time.
Before You Begin
Collect the following information:
Hostname for the SO virtual appliance.
Static IP address (IPv4) for the SO virtual appliance, if not using DHCP.
Netmask (subnet mask), if not using DHCP.
Default gateway IP address, if not using DHCP.
IP addresses for primary, secondary, and tertiary DNS servers.
IP address and fully qualified domain name (FQDN) that will be used to access the SO Web UI.
Initial Configuration of the SO Virtual Appliance
Power on the SO virtual appliance, if it is not already on.
Log in as the ixoperator user with the default password provided in the FSO_Access_Credentials_Readme file (in
fso-system-6.6.x-ova-credentials.zip).The system immediately prompts you to change the ixoperator password.
Change the password for the ixoperator user.
Run the following command to configure the appliance network interface, DNS servers, and hostname:
sudo fso-host-configThe system prompts you for the ixoperator password. Enter the password to continue.
A prompt will ask you if you want to run Network Manager TUI. Enter Y to open the Network Manager.
© 2022 FireEye
Security Orchestrator System Administration Guide
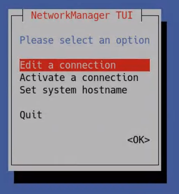
The Network Manager TUI appears:
[IMAGE PLACEHOLDER: A terminal-style dialog titled "NetworkManager TUI" showing the prompt "Please select an option" and list items "Edit a connection", "Activate a connection", "Set system hostname", with "Quit" highlighted in red and an "<OK>" indicator at the bottom-right; dialog has a light-gray box with a blue outer background.]
22
© 2022 FireEye
Release 6.6
Virtual Appliance Installation
6. Select Edit a Connection in the list, and then press Enter.
An available connection options will appear.
Select an option (this example shows eth0 as available).
[IMAGE PLACEHOLDER: A tall vertical configuration dialog. On the left is a boxed list titled "Ethernet" with the entry "eth0" highlighted in blue. To the right of the list are action labels including "<Add>" near the top, a red highlighted "<Edit...>" button, an "<Delete>" label, and a "<Back>" label near the bottom. The dialog has a gray background and a blue outer border.]
7. Select Edit to manage a device connection.
© 2022 FireEye
23
Security Orchestrator System Administration Guide
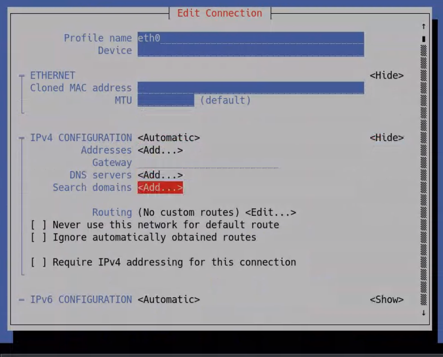
[IMAGE PLACEHOLDER: Screenshot of a network connection editor dialog titled "Edit Connection" showing fields and options including Profile name (eth0), Device, ETHERNET section with Cloned MAC address and MTU, IPv4 CONFIGURATION set to <Automatic> with Addresses <Add...>, Gateway, DNS servers <Add...>, Search domains <Add...>, routing options (No custom routes) <Edit...>, checkboxes for default route and obtained routes, and an IPv6 CONFIGURATION section. The dialog is framed in a blue window border.]
24
© 2022 FireEye
Release 6.6
Virtual Appliance Installation
In the eth0 Edit connection window; define the device name and connection: The configuration can be manual or set
Addresses
Gateway DNS Servers
Search domains
Routing.
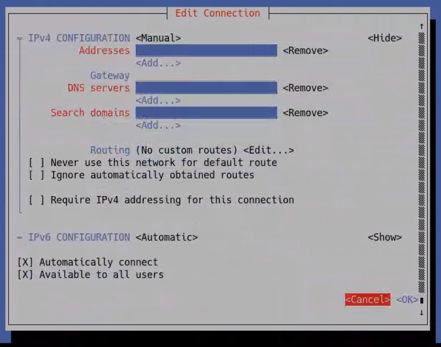
To configure 'Search the domain' option; Select Add to view and edit IPv4 or IPv6 connections.
Complete this configuration when DNS resolutions fails. Domains listed here will be appended to hostnames, one at a time.
Once configured, reattempt DNS.
© 2022 FireEye
25
Security Orchestrator System Administration Guide
10. Configure the following network settings:
Setting | Description |
|---|---|
Name | Default: eth0. Default value is recommended. |
Device | Default: eth0. Default value is recommended. |
Use DHCP | IPv4/IPv6 Configuration type (Automatic, Manual) = Automatic is DHCP |
Static IP | This is the IP version 4 address that will be used. If there is already an IP configured, or if one was received via DHCP, then it will show as the default value. |
Netmask | Use / CIDR (Classless Inter-Domain Routing) notation,(an IP address, a slash ('/') character, and a decimal number), e.g 'a.b.c.d/XY'. |
Default gateway IP | This is the default gateway to use for IP communication. |
Automatically Connect | Will automatically connect. |
Search Domain | The domain of the host (ie, foo.example.local, where 'example.local' is the domain part) |
11. Save changes.

IMPORTANT: Reboot may be required. The system will reboot automatically in 10 seconds.
Configuring the SO virtual appliance as a Network Manager:
The following DNS configuration settings are managed by the Network Manager TUI:
Hostname
Primary DNS
Secondary DNS
Tertiary DNS
DNS search path
The FSO virtual machine restarts after saving DNS configuration settings managed by the Network Manager TUI. After the virtual machine restarts, enter sudo fso-host-config.
Select N when asked whether to run the Network Manager TUI, then select Y to approve the installation of FSO.
Release 6.6Virtual Appliance Installation

Make sure to verify the Hostname for the node and the Hostname for the Web UI are the same.
The hostnames must be the same for the Web UI to run.
When prompted for Hostname for the node, enter the fully qualified domain name or the IP address for the SO virtual appliance. This value must match the Hostname for the Web UI (entered in the next step) exactly.
When prompted for Hostname for the Web UI, enter the same value used for the Hostname for the node.
The initial configuration completes and then starts all system services.
Change the password for the root user:
Log out of the system with the following command:
$ exitLog in as the root user with the default password provided in the
FSO_Access_Credentials_Readmefile.The system immediately prompts you to change the root password.
To change the root password, re-enter the current password and then enter the new password.
All Security Orchestrator services and components should now be running and accessible. Next, verify that the SO Web UI can be accessed. See Access SO Web UI on the next page.
If any of the initial configuration information changes, such as the IP address, domain name, hostname, or DNS information, see Manual Configuration on page 35 for instructions on how to change these configuration settings manually.
Set SO Virtual Appliance Date and Time
By default, SO uses NTP protocol to synchronize time with trusted time servers available online. You can adjust this to point to internal time servers.
The configuration is in the /etc/chrony.conf file.
By default, the following NTP servers are specified in the /etc/chrony.conf file:
server 0.fireeye.pool.ntp.org iburst
server 1.fireeye.pool.ntp.org iburst
server 2.fireeye.pool.ntp.org iburst
server 3.fireeye.pool.ntp.org iburst
Security Orchestrator System Administration Guide
To check and correct date and time settings:
Log in to the SO virtual appliance as root.
To display the date and time, run the following command:
# dateIf the date and time are not accurate, update the NTP servers in the
/etc/chrony.conffile. To open the file for editing, run the following command:# vi /etc/chrony.confAfter making changes to the
/etc/chrony.conffile, restart the NTP service by running the following command:# service chronyd restart
You can also force an immediate time synchronization at any time by restarting the ntpd service with the command above.
Access SO Web UI
The Security Orchestrator (SO) Web UI uses HTTPS to provide a secure connection with the SO virtual appliance. The IP address and hostname are set during the initial configuration of the SO virtual appliance.
Prerequisites
The IP address or hostname for the SO Web UI.
A supported Web browser. See Web Browser Support on page 11.
To access the SO Web UI for the first time:
Open a Web browser and enter
https://<virtualappliance>in the address line, where<virtualappliance>is the hostname configured during initial setup of the SO virtual appliance.If you cannot access the SO login page or receive an error message, see Troubleshoot SO Web UI Access Issues on the facing page.
Enter the following user name and password the first time you log in to the Web UI:
User name: fso_admin
Password: changeme
IMPORTANT: After you log in to the Web UI the first time, change the password.
© 2022 FireEye
Release 6.6
Virtual Appliance Installation
To change the password:
In the lower left corner, point to FA (or the user's name) and then select Change Password.
In the Previous Password box, enter the current password.
In the New Password and Confirm Password boxes, enter a new password.
Click Apply.
Troubleshoot SO Web UI Access Issues
If you have issues when trying to access or use the SO Web UI, review the following sections that describe common problems and solutions.
Server Unreachable
If you see a "Server Unreachable" error when you try to log in to Security Orchestrator, this may be due to stricter certificate requirements in recent versions of Google Chrome. To resolve this error, you must install a valid certificate. For example, on a Mac, install the certificate as follows:
On the Security Orchestrator login page, click the padlock icon at the left of the URL in the Web browser.
Click Certificate to open the certificate.
Drag the certificate icon to a folder to copy the Security Orchestrator
.cerfile. The certificate is typically namedfso.local.gui.cer.Open the
.cerfile. When prompted, allow Keychain Access to add or modify the keychain.In Keychain, select System and Certificates and select the
.cerfile.Expand the Trust section and for When using this certificate, select Always trust.
Quit and reopen Chrome.
Hostname Not Resolving
The most common reason for this problem is that a hostname was used for the AppHost in the /etc/httpd/conf.d/zzz-fso-system.conf file and the server is unable to resolve that hostname to an IP address. The solution is to add the appropriate entry in the /etc/hosts file to ensure that SO can resolve the IP address of that hostname without relying on external DNS. See the steps for updating the /etc/hosts file in Hostname Configuration on page 36.
© 2022 FireEye29
Security Orchestrator System Administration Guide
Unresponsive Web UI
If the Web UI is unresponsive, first try reloading the browser page by clicking the browser Reload button (or select the F5 button). This may resolve issues such as difficulty logging in or changes not being saved. For further troubleshooting, you can open the browser developer console (F12in Chrome, Ctrl-Shift-K or Cmd-Opt-K for Firefox). This console displays any HTTP or HTML errors encountered while loading the current page, which may help you identify the underlying issue.
30
© 2022 FireEye
Security Orchestrator System Administration GuidePlug-In Management
Plug-In Management
This section describes how to install plug-ins in to your Security Orchestrator deployment.
Legacy Plug-in Installation on the next page
Self Reliant Plug-in Installation
In Security Orchestrator release 6.6.0, you can install and upgrade the FireEye Market plug-ins using the Web UI.
Single-click Installation
Use this installation only when your Security Orchestrator server has access to FireEye Market.
The Market tab displays all the available plug-ins listed in the FireEye Market. You can click Install to initiate a direct installation of plug-ins, without the need for a download.
To install a Market plug-ins:
From the left pane, expand Manage Content and then click Plugins.
Click the Market tab. The list of plug-ins available for installation is displayed.
Select the plug-in that you want to install and then click Install. A message asks you to confirm the installation.
Click Yes to proceed. A success message is displayed after the plug-in is installed. The plug-in is now available in the Installed tab.
Upgrade Plug-ins
Use this installation only when your Security Orchestrator server has access to FireEye Market.
All installed plug-ins can be upgraded if a new version is available. An icon is displayed on the top-right corner of the plug-in tile when an upgrade is available for that plug-in. Click this icon to upgrade the plug-in to its newer version.
© 2022 FireEye31
Security Orchestrator System Administration Guide
To upgrade the plug-ins:
From the left pane, expand Manage Content and then click Plugins.
Click the Installed tab. All plug-ins for which upgrades are available displays the upgrade icon on the top-right corner in the plug-in tile.
Select the icon to upgrade or click the More Options menu and then select Upgrade.
Manual Installation / Upgrade
Use this installation when your Security Orchestrator server does not have access to FireEye Market.
The Market tab does not display the available plug-ins listed in the FireEye Market because there is no access.
Prerequisites
The plug-in tar distributed by FireEye on the FireEye Market
A valid SO hostname or IP address.
A supported Web browser.
Administrator access permissions to the Security Orchestrator Web UI.
To install a plug-in:
In the SO Web UI, select Library in the navigation menu.
Click Install in the top-right corner.
Click Choose file.
In your file explorer, select the plug-in .tar file.
Click Install.
Click Done.
 WARNING: Changing a device plug-in version in the SO Web UI may invalidate playbooks and adapters. For information about managing plug-ins and entities affected by plug-ins, see the Security Orchestrator User Guide.
Legacy Plug-in Installation
Use this installation when you want to install legacy plug-ins from the SO Content Bundle.
Release 6.6
Plug-In Management
Installing Plug-in Dependencies
Plug-in dependencies are included in the SO Content Bundle on the FireEye Market. Follow these steps to install third-party modules (dependencies) required by plug-ins.
To install third-party modules:
Log in to the SO virtual appliance as ixoperator.
Enter the following:
su -l ixoperatorChange to the plug-in development environment:
source /opt/fireeye/fso/config/iso_package_dev_envInstall any third-party Python modules that are required by a plug-in:
pip install <directory name>Restart Security Orchestrator services.
systemctl restart fso.service
Installing Plug-ins Using the Web UI
In Security Orchestrator release 6.6.0, you can only install and upgrade plug-ins using the Web UI. Plug-ins available in the FireEye Market are not compatible with SO6.6.0. Individual plug-ins are formatted in a .tar file and must be installed individually.
Prerequisites
The SO Content Bundle distributed by FireEye on the FireEye Market
A valid SO hostname or IP address.
A supported Web browser.
Administrator access permissions to the Security Orchestrator Web UI.
To install a plug-in:
In the SO Web UI, select Library in the navigation menu.
Click Install in the top-right corner.
Click Choose file.
In your file explorer, select the plug-in .tar file.
Click Install.
Click Done.
Security Orchestrator System Administration Guide
WARNING: Changing a device plug-in version in the SO Web UI may invalidate playbooks and adapters. For information about managing plug-ins and entities affected by plug-ins, see the Security Orchestrator User Guide.

The support to download and install SO Content Bundle is available in Security Orchestrator release 6.6.0.
34
© 2022 FireEye
Configuration
The steps in this section are not required. They are provided for reference and troubleshooting purposes.
This section covers the following topics:
Manual Configuration below
Remote Access with Secure Shell (SSH) on page 45
SNMP on page 50
Manual Configuration
This section covers the following topics:
Network Configuration below
Hostname Configuration on the next page
Web Configuration on page 40
Firewall Configuration on page 43
SSL Configuration on page 44
Network Configuration
You can update network configuration settings in the ifcfg-eth0 file. The configuration file contents will be similar to the following:
DEVICE=eth0
BOOTPROTO=none
DHCP_HOSTNAME="myfsoserver"
HOSTNAME="myfsoserver"
IPV6INIT=yes
MTU=1500
NM_CONTROLLED=yes
ONBOOT=yes
TYPE=Ethernet© 2022 FireEye
35
Security Orchestrator System Administration Guide
UUID="ab222222-1cde-2200-12c1-1c1abc987456"
IPADDR=192.168.111.111
HWADDR=00:0a:11:22:d1:33
NETMASK=255.255.255.0
GATEWAY=192.168.111.1
DNS1=8.8.8.3
DNS2=8.8.8.4
USERCTL=no
PEERDNS=yesTo update network configuration settings:
Log in to the SO virtual appliance as root.
To open and edit the
ifcfg-eth0file for editing:# vi /etc/sysconfig/network-scripts/ifcfg-eth0Update the IP address, hostname, netmask, gateway, and DNS as needed.
Restart network services using the following commands:
# systemctl stop network # systemctl start network
Hostname Configuration
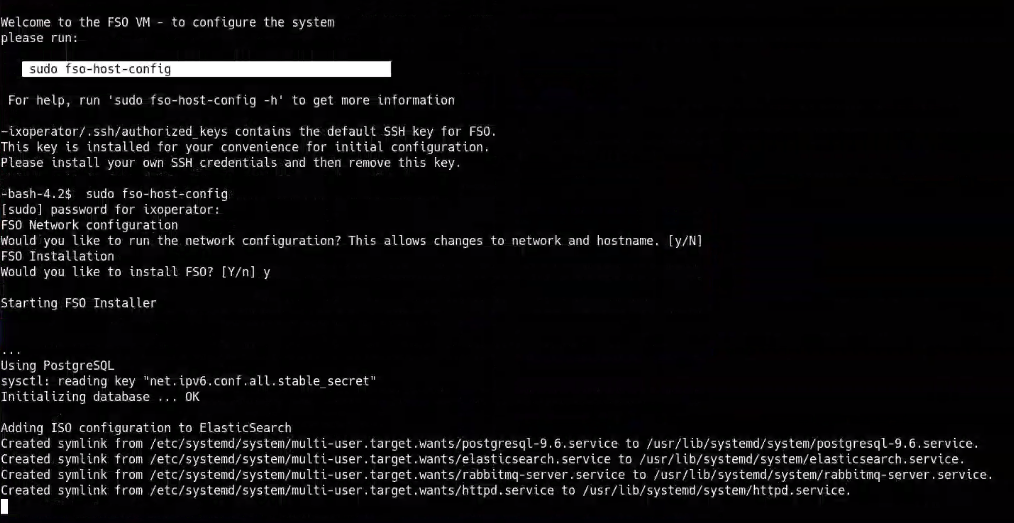
Security Orchestrator (SO) 6.6 includes a command syntax not previously used, especially to configure the host. This SO has particular steps that make sure of the installation file (the OVA), as well as various of parts of steps and command-line options that transform the management of the network. For example the graphical setup of network information within the OVA is now call the Network Manager Text-based User Interface or NMTUI. The SO 6.6 shares the following as to how to enter hostnames and custom IP addresses/subnets within the network manager: Meet the requirements and complete the installation to manually configure the hostname and IP information.
NOTE: You should set the hostname from the NMTUI. Also if you run it for the first time and do not have a DNS, you will need to set the IP.
Prerequisite: An initial configuration of the virtual appliance should be complete before configuring the hostname.
IMPORTANT: The system will reboot automatically after you change the hostname.
Complete the following steps to change the Security Orchestrator hostname or check the current configuration:
Release 6.6
Configuration
To manually reconfigure the SO 6.6 hostname:
Log in to the SO virtual appliance as the root user.
© 2022 FireEye
37
Security Orchestrator System Administration Guide
Run Network Manager program to change IP and or hostname info:
nmtui
NOTE: When changing your hostname, set the `search domain` name, in the `nmtui` command. Select: 'Edit a connection' (this example shows 'eth0').

Select the connection you want to configure (this example follows `IPv4 CONFIGURATION`), then Select the 'Search domains' field.
NOTE: When you edit the interface (eth0) you can set the search domain OR you can edit
/etc/resolv.confand change it directly. This means that the NMTUI will make the domain equal to what is entered, in/etc/sysconfig/network-scripts/ifcfg-eth0.
Release 6.6Configuration
On the local virtual appliance:
Stop RabbitMQ and fso services using these system control commands:
systemctl stop fso systemctl stop rabbitmq-serverOn the nmtui: Select the 'Set system hostname' option and follow prompts to change /etc/hosts IP and or hostname and fully qualified hostname.
Reboot the virtual machine (VM).
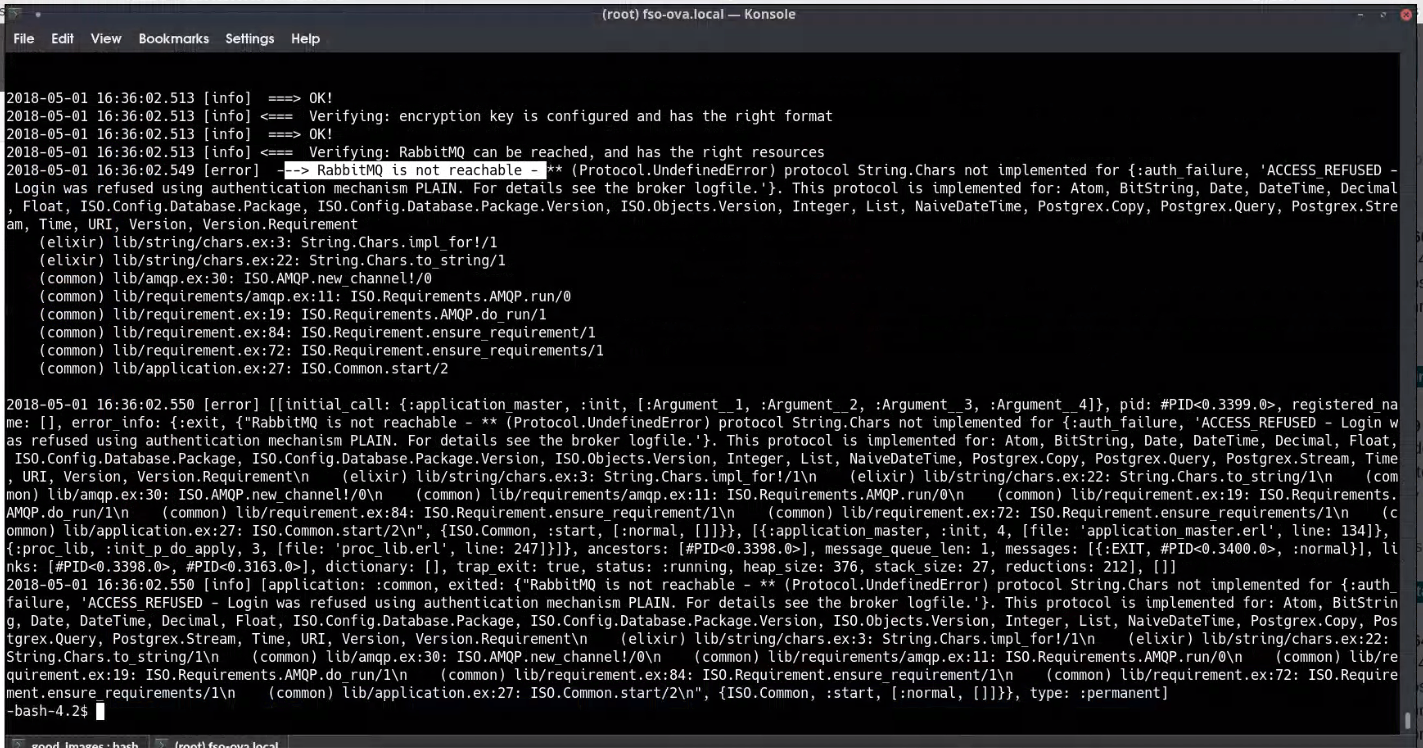
NOTE: FSO will fail to start being unable to reach RabbitMQ.
© 2022 FireEye
39
Security Orchestrator System Administration Guide
Remove entries from
/etc/fireeye/fso/web.conffor rabbitmq.admin_password, rabbitmq.password.Modify entries in
/etc/fireeye/fso/web.confto point to the new hostnamecore.hostname,common.web_url,common.contact_nodes.Run
fso_rabbitmq_lockdown.Edit
/etc/fireeye/fso/httpd-conf.d/zzz-fso-system.conf:Change or update the 'Use AppHost' hostname to the new hostname.
The following step is optional:
Do not complete step #10 if you want to keep your current data information, including playbooks, devices, adapters, tasks, and so on. Completing step 10 will REMOVE ALL currently available DATA in the SO 6.6 application, /opt/fireeye/fso/setup/configure.
When using HTTPS/TLS, check and verify certificate and keys used for the new hostname/domain:
/opt/fireeye/fso/config:systemctl restart httpd systemctl start fsoFor more information on SSL/TLS certificates, see SSL Configuration on page 44.
Verify that SO 6.6 is active and running as expected.
Web Configuration
You can locate Web configuration files at: /etc/fireeye/fso/web.conf
40
© 2022 FireEye
Release 6.6
Configuration
Setting | Description | Default Value |
|---|---|---|
core.hostname | Can be a name, fully qualified domain name (FQDN), or IPv4 address. If a name or FQDN is used, it must be resolvable to an IP address on the SO server. | IP or Hostname of the SO server |
config.temporary_files_rootdir | Location on the SO server where all files generated by a plug-in for consumption internally to SO are stored. | /var/tmp/fso |
common.web_url | Configuration used internally by SO Cases when resolving the "Case URL" value. In most cases should match the IP/hostname used in the core.hostname field above. | https://<IP/HostName> |
© 2022 FireEye
41
Security Orchestrator System Administration Guide
Setting | Description | Default Value |
|---|---|---|
common.encryption_key | Unique base 64 encoded key used in all encrypted values stored internally to SO. If this key is changed or lost, SO will not be able to decode encrypted values. Backup this key and have it available when migrating or restoring an SO system. For more information, see Managing Snapshots.
| Unique per install |
engine.adapter_command_timeout | Max time an adapter will allow a plug-in command to run, will supersede any configured value on the UI. | 60 seconds |

42
© 2022 FireEye
Release 6.6Configuration
Setting | Description | Default Value |
|---|---|---|
engine.task_command_timeout | Max time a playbook device task will allow a plug-in command to run. If a plug-in has a long running command, like submit file for analysis. This setting must be lengthened to the max time that command could take to complete. | 60 seconds |
engine.msg_send_mbs | Max message size supported while communicating with SO plug-in to SO engine. | 1 MB |
config.host_count | The number of command workers is directly proportional to plugin command processing. | 10 |
config.worker_count_mustache | The number of mustache workers is directly proportional to mustache script processing. | 10 |
config.worker_count_js | The number of js workers is directly proportional to javascript processing. | 10 |
Firewall Configuration
The SO virtual machine firewall is managed by the 'firewalld' application. This tool introduces simple command line firewall management to SO. The firewalld daemon tool replaces the use of iptables and the management of rules associated with the control of data traffic for SO. The version of firewalld installed and enabled by SO 6.6 is the firewalld 0.6.3 release.
© 2022 FireEye43
Security Orchestrator System Administration Guide
Primary Command Line Tool
When SO 6.6 is installed, the firewalld application is enabled by default and set with FireEye SO 6.6 design standards. You can check the enabled 'firewalld' application rules with the following command:
sudo firewall-cmdUsing the 'firewalld' primary command line tool, you can apply these options as described in the following reference table, when in the ssh terminal as the root user. Go to: firewalld.org and research 'firewall-cmd' for current information on the following and other command line options:
firewalld Primary Command Line Tool Reference
Command Line Option | Option Description | What the Command Line Option will produce |
|---|---|---|
| To get the firewalld version | Version Number, e.g. 0.4.4.4 |
| To get the firewall-cmd help output | Help output will appear |
| To get the firewalld status | Status will appear, e.g. Running |
| To get the active zones with binding | Zones are sets of rules that direct data traffic |
| To get the zone of the interface eth0 | (Zone information for the specified interface) |
Stopping and Starting firewalld
On CentOS 7.9, you can stop or start the 'firewalld' application with the following commands:
sudo systemctl stop firewalld
sudo systemctl start firewalldSSL Configuration
To configure the Security Orchestrator virtual appliance to use a custom certificate for HTTPS:
Create a new certificate and key file pair in PEM format following instructions from your Certificate Authority administrator.
Release 6.6
Configuration
The "subject" of the certificate is typically the hostname or fully qualified domain name of the server. Ensure that the hostname resolves to the IP address of the SO virtual appliance, from both the client system accessing the Web UI as well as from the SO server itself.
Once you receive the files, name the certificate file ssl.crt and name the key file ssl.key. This will save having to change the Apache configuration file, since we are using the same file names.
Before copying the new certificate and key files over, back up the existing self-signed certificate and key:
# mv /etc/fireeye/fso/httpd-conf.d/ssl.crt /etc/fireeye/fso/httpd-conf.d/ssl.crt.orig # mv /etc/fireeye/fso/httpd-conf.d/ssl.key /etc/fireeye/fso/httpd-conf.d/ssl.key.origStop Apache and SO services:
# systemctl stop httpd # systemctl stop fsoCopy the new ssl.crt and ssl.key files to /etc/fireeye/fso/httpd-conf.d/
Update the following configuration files to point to the subject hostname from the certificate, Enter:
# vi /etc/fireeye/fso/web.conf...
common.web_url = <https://your-ssl-cert-subject-hostname-here>
...
# etc/fireeye/fso/httpd-conf.d/zzz-fso-system.conf...
Use AppHost <your-ssl-cert-subject-hostname-here>
/opt/fireeye/fso/config /opt/fireeye/fso/apps/web/priv/static localhost 4000...
Start Apache and SO services, Enter:
# systemctl start httpd # systemctl start fso
Remote Access with Secure Shell (SSH)
This section contains:
Configure Remote Access Authentication on the next page
Generate RSA Keys for SSH Authentication on the next page
Connect using PuTTY and Authorized Keys on page 47
© 2022 FireEye
45
Security Orchestrator System Administration Guide
Configure Remote Access Authentication
By default, password-based authentication is enabled for remote SSH sessions to allow users to log in remotely with a user name and password. For improved security, you can turn off password-based authentication and allow users to connect with authorized key authentication only. The setting is controlled in the /etc/ssh/sshd_config file. See the example snippet below:
...
# To disable tunneled clear text passwords, change to no here!
#PasswordAuthentication yes
#PermitEmptyPasswords no
PasswordAuthentication yes
...Logging in through the console as root and changing PasswordAuthentication from yes to no will prevent users from logging in remotely with a user name and password.
Generate RSA Keys for SSH Authentication
Use PuTTYgen to generate RSA keys for secure SSH authentication with OpenSSH. You can use a pair of public and private keys to secure SSH access to the SO virtual appliance. To create keys: Select options in the Actions section of the PuTTY Key Generator UI.
[IMAGE PLACEHOLDER: Blue circular icon representing a key or security]
The private key provides 2048-bit encryption.
46
© 2022 FireEye
Release 6.6Configuration
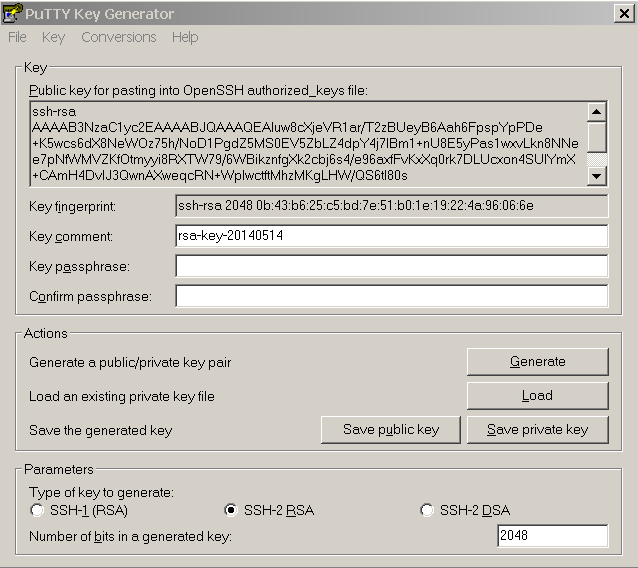
To generate RSA keys:
Download PuTTYgen from the PuTTY download page.
Open PuTTYgen on your desktop.
Click Generate to generate the public and private keys.
Enter a unique key passphrase and then confirm the passphrase in the Key passphrase and Confirm passphrase fields.
Click Save public key to save the public key.
Click Save private key to save the private key.
Copy all the characters in the Public key for pasting into OpenSSH authorized_keys file area. You need this key to allow the ixoperator user to log in to the SO virtual appliance.
Connect using PuTTy and Authorized Keys
The following steps can be used to configure PuTTy to use key-based authentication.
© 2022 FireEye47
Security Orchestrator System Administration Guide
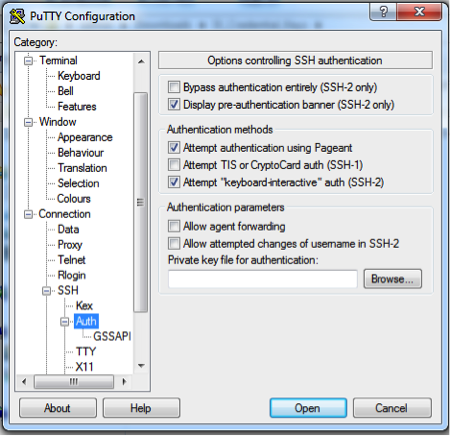
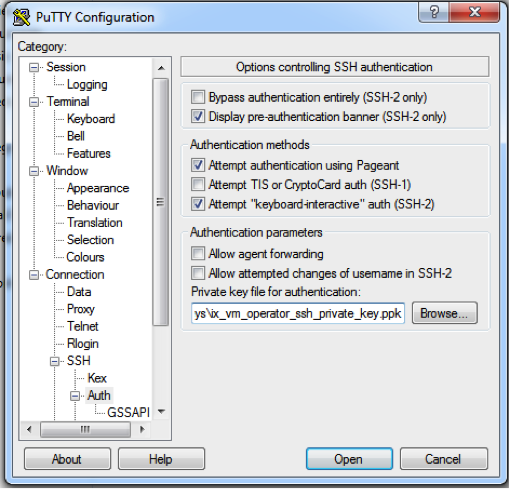
Launch PuTTy and navigate to Connection->SSH->Auth and click on the Browse button.
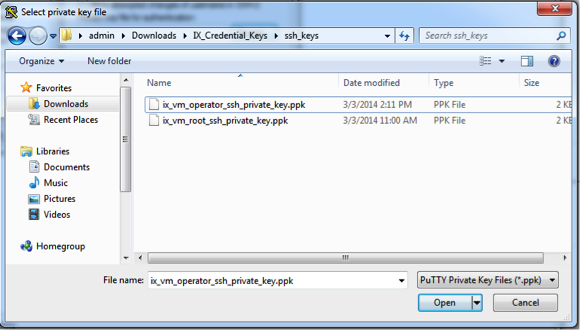
Navigate to the desired PuTTY Private Key File (*.ppk), select the file, and then select Open.
48
© 2022 FireEye
Release 6.6
Configuration
The full path to the chosen ppk file is now shown in the Private key file for authentication: field. Select the Session from the Category list at the top left.
Enter the hostname or IP address in the required field and type in a name for the session in the Saved Sessions field, then select Save.
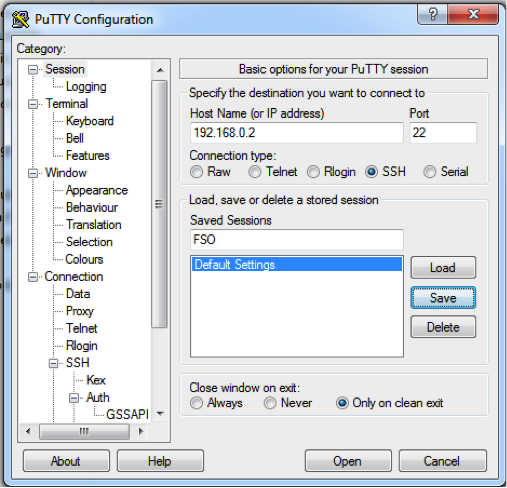
Click on Open to start the session.
© 2022 FireEye
49
Security Orchestrator System Administration Guide
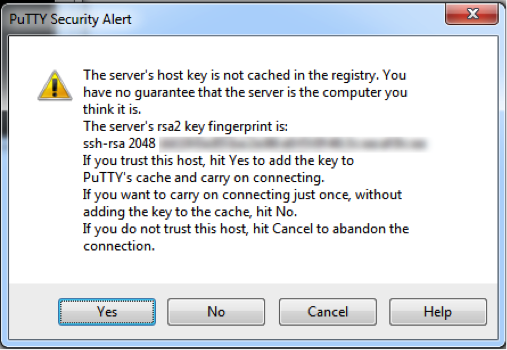
6. If this is the first connection to the SO device, you will be prompted to accept the target hosts key. Select Yes.
7. You will be presented with a login prompt. Enter the user name associated with the key file, and the key file passphrase provided in the credentials ZIP file.
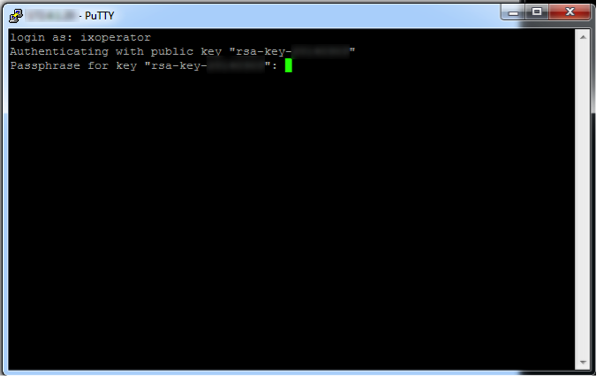
You should now have access to the SO command line.
SNMP
Simple Network Management Protocol (SNMP) is an Internet-standard protocol for collecting and organizing information about managed devices on IP networks and for modifying that information to change device behavior. SNMP is widely used in network management for network monitoring.
SNMP exposes management data in the form of variables on the managed systems organized in a management information base (MIB) which describe the system status and configuration. These variables can then be remotely queried (in some circumstances, manipulated) by managing applications.
This section covers the following information:
50
© 2022 FireEye
Release 6.6Configuration
SNMP Installation below
SNMP Configure and Monitor on the next page
SNMP Installation
SNMP is not installed in an out-of-the-box installation of Security Orchestrator. This is to ensure that only appropriate deployments have SNMP installed and enabled. Complete the following process to use an SNMP:
Install SNMP and related utilities on your device, then use
firewall-cmdto add/enablesnmp.
To locate the updated files needed to complete an SNMP installation without the internet, go to rpmfind.net. On that site, search for "lm_sensors" on the current operating system (for SO 6.6, the operating system is 'centOS 7.9').
Collect and save the appropriate files.
Install SNMP
To install SNMP on an appliance with Internet access:
Log in to the SO virtual appliance as root.
Install SNMP and SNMP utilities by running the following command:
# yum -y install net-snmp net-snmp-utilsEnable
snmpd, the SNMP daemon, by running the following command:# systemctl enable snmpdStart the
snmpdservice by running the following command:# systemctl start snmpd
To install SNMP on an appliance without Internet:
NOTE: To locate a package file, search online locations using identifiers like package name, distribution, or the file name.
Download and save a package file, that match the following criteria:
lm-sensor
centOS 7.9 or possible centOS 7.x.
© 2022 FireEye
Security Orchestrator System Administration Guide
c. Similar to the following examples:
http://mirror.centos.org/centos/7/os/x86_64/Packages/net-snmp-5.7.2-33.el7.x86_64.rpm
http://mirror.centos.org/centos/7/os/x86_64/Packages/net-snmp-libs-5.7.2-33.el7.x86_64.rpm
http://mirror.centos.org/centos/7/os/x86_64/Packages/net-snmp-utils-5.7.2-33.el7.x86_64.rpm
http://mirror.centos.org/centos/7/os/x86_64/Packages/net-snmp-agent-libs-5.7.2-33.el7.x86_64.rpm
http://mirror.centos.org/centos/7/os/x86_64/Packages/perl-Data-Dumper-2.145-3.el7.x86_64.rpm
Copy the downloaded files to the SO virtual appliance using the secure copy command:
scpLog in as the root user on the SO virtual appliance.
Navigate to the directory where the downloaded SNMP RPM files are located.
Install SNMP and SNMP utilities by running the following command:
# yum install *.rpm --disablerepo=*Enable snmpd, the SNMP daemon, by running the following command:
# systemctl enable snmpdStart the snmpd service by running the following command:
# systemctl start snmpd
SNMP Configure and Monitor
Update Host Firewall Rules
Use firewall-cmd to enable SNMP then firewall-cmd --reload to apply the new rules to the system.
52
© 2022 FireEye
Release 6.6
Configuration
Update SNMP Configuration
The ixoperator user is given the ability to perform privileged tasks (listed below) necessary for management of the SNMP agent installed on the Security Orchestrator virtual appliance.
To start and stop SNMP related services, use the following:
snmpdTo edit SNMP related configuration settings, use the following:
/etc/snmp/snmpd.confTo run SNMP utilities, use the following:
/usr/bin/net-snmp-create-v3-user
SNMP Read Configuration for SNMP v2
SNMP v2 and v3 connections are available on the Security Orchestrator virtual appliance. SNMP v2 connection is used in the following examples to pool SNMP data.
The following settings must be configured in the snmpd.conf file to pool data from Security Orchestrator virtual appliance. testCommunityString was chosen for the v2 community string, so the same string is required in the Monitor Application settings to establish SNMP connection:
# ssh ixoperator@<SO-SERVER>
# sudoedit /etc/snmp/snmpd.conf..........
####
# First, map the community name "public" into a "security name"
# sec.name source community
com2sec notConfigUser default testCommunityString
####
# Second, map the security name into a group name:
# groupName securityModel securityName
#group notConfigGroup v1 notConfigUser
group notConfigGroup v2c notConfigUser
####
# Third, create a view for us to let the group have rights to:
# Make at least snmpwalk -v 1 localhost -c public system fast again.
# name incl/excl subtree mask(optional)
view systemview included .1.3.6.1.2.1.1
view systemview included .1.3.6.1.2.1.25.1.1
view systemview included .1.3.6© 2022 FireEye
53
Security Orchestrator System Administration Guide
SNMP Process Monitoring Configuration
The SNMP process monitoring feature is enabled on the Security Orchestrator virtual appliance, but the settings need to be modified to specify process names, to perform correct monitoring at the Monitoring Application. Process details are listed under the configuration changes, as shown in the following example:
# ssh ixoperator@<SO-SERVER>
# sudoedit /etc/snmp/snmpd.conf
..........
##############################################################
# Process checks.
#
# The following are examples of how to use the agent to check for
# processes running on the host. The syntax looks something like:
#
# proc NAME [MAX=0] [MIN=0]
#
# NAME: the name of the process to check for. It must match
# exactly (ie, http will not find httpd processes).
# MAX: the maximum number allowed to be running. Defaults to 0.
# MIN: the minimum number to be running. Defaults to 0.
#
# Examples (commented out by default):
#
# Make sure mountd is running
#proc mountd
# Make sure there are no more than 4 ntalkds running, but 0 is ok.
#proc ntalkd 4
#
proc run_erl 1 1 # fso-web
proc beam.smp 2 2 # fso-web, rabbitmq
proc node 12 2 # fso-web
proc rabbitmq-server 2 2 # rabbitmq; queue manager
proc epmd 1 1 # rabbitmq; queue manager
proc httpd 255 7 # httpd; http server
# A snmpwalk of the process mib tree would look something like this:
#
# % snmpwalk -v 1 localhost -c public .1.3.6.1.4.1.2021.2Release 6.6
Configuration
Process Names | Process Counts While Running | Related SO Module |
|---|---|---|
run_erl | MAX=1 MIN=1 | fso-web |
beam.smp | MAX=2 MIN=2 | fso-web, rabbitmq |
java | MAX=2 MIN=1 | postgresql |
node | MAX=12 MIN=2 | fso-web |
rabbitmq-server | MAX=2 MIN=2 | rabbitmq; queue manager |
epmd | MAX=1 MIN=1 | rabbitmq, queue manager |
httpd | MAX=255 MIN=7 | httpd, http server |
Setting SNMPD Restart Rights
By default, the ixoperator account does not have the right to restart the snmpd service using sudo. An additional sudoers file can be added for snmpd to allow ixoperator to restart the service. It is not recommended to modify the fso default sudoers file.
# ssh ixoperator@<SO-SERVER>
# su
# vi /etc/sudoers.d/snmpd
## SNMPD service commands
Cmnd_Alias SNMPD_SERVICE = /sbin/systemctl start snmpd, /sbin/service snmpd stop, /sbin/service snmpd restart, /sbin/service snmpd status
## Allow ixoperator to run SNMPD service options
ixoperator ALL= SNMPD_SERVICE
Restarting SNMPD
The ixoperator user has been provisioned such that the user can perform privileged tasks necessary for management of the SNMP agent installed on the Security Orchestrator virtual appliance. A restart is required after making the above configuration changes:
# ssh ixoperator@<SO-SERVER>
# sudo systemctl restart snmpd
The SNMP Monitoring Application
SNMP Monitoring Application provides complete monitoring of SNMP. SNMP is an “agentless” method of monitoring network devices and servers, and is often preferable to installing dedicated agents on target machines. Thousands of different network devices and operating systems from different vendors support SNMP for delivering critical information on health and usage metrics, service state, and more.
© 2022 FireEye
55
Security Orchestrator System Administration Guide
OID/MIB Entries of Process Monitoring
The following OID Numbers are required for the Monitoring application to continuously monitor SO internal processes. The monitoring team can send email alerts as an alert mechanism.
Example monitoring of ‘run_erl’ process with OID numbers:
Process Name :
# snmpwalk -v2c -On -c testCommunityString 10.11.222.333
.1.3.6.1.4.1.2021.2.1.2.1
.1.3.6.1.4.1.2021.2.1.2.1 = STRING: "run_erl"Error Flag :
# snmpwalk -v2c -On -c testCommunityString 10.11.222.333
.1.3.6.1.4.1.2021.2.1.100.1
.1.3.6.1.4.1.2021.2.1.100.1 = INTEGER: 0Min Run:
# snmpwalk -v2c -On -c testCommunityString 10.11.222.333
.1.3.6.1.4.1.2021.2.1.3.1
.1.3.6.1.4.1.2021.2.1.3.1 = INTEGER: 2Max Run:
# snmpwalk -v2c -On -c testCommunityString 10.11.222.333
.1.3.6.1.4.1.2021.2.1.4.1
.1.3.6.1.4.1.2021.2.1.4.1 = INTEGER: 2Current Run:
# snmpwalk -v2c -On -c testCommunityString 10.11.222.333
.1.3.6.1.4.1.2021.2.1.5.1
.1.3.6.1.4.1.2021.2.1.5.1 = INTEGER: 2Last Error Message:
# snmpwalk -v2c -On -c public 10.11.222.333 .1.3.6.1.4.1.2021.2.1.101.1
.1.3.6.1.4.1.2021.2.1.101.1 = ""The complete list of OIDs of monitored processes is shown below. You can monitor them by using the OID numbers directly, or you can use the MIB file named UCD-SNMP-MIB. This MIB file is generally added to SNMP libraries by default, and you can choose the variables from it directly.
.1.3.6.1.4.1.2021.2.1.1.1 = INTEGER: 1
.1.3.6.1.4.1.2021.2.1.1.2 = INTEGER: 2
.1.3.6.1.4.1.2021.2.1.1.3 = INTEGER: 3
.1.3.6.1.4.1.2021.2.1.1.4 = INTEGER: 4
.1.3.6.1.4.1.2021.2.1.1.5 = INTEGER: 5
.1.3.6.1.4.1.2021.2.1.1.6 = INTEGER: 6
.1.3.6.1.4.1.2021.2.1.1.7 = INTEGER: 7
.1.3.6.1.4.1.2021.2.1.2.1 = STRING: run_erl56
© 2022 FireEye
Release 6.6
Configuration
.1.3.6.1.4.1.2021.2.1.2.2 = STRING: beam.smp
.1.3.6.1.4.1.2021.2.1.2.3 = STRING: java
.1.3.6.1.4.1.2021.2.1.2.4 = STRING: node
.1.3.6.1.4.1.2021.2.1.2.5 = STRING: rabbitmq-server
.1.3.6.1.4.1.2021.2.1.2.6 = STRING: epmd
.1.3.6.1.4.1.2021.2.1.2.7 = STRING: httpd
.1.3.6.1.4.1.2021.2.1.3.1 = INTEGER: 2
.1.3.6.1.4.1.2021.2.1.3.2 = INTEGER: 3
.1.3.6.1.4.1.2021.2.1.3.3 = INTEGER: 4
.1.3.6.1.4.1.2021.2.1.3.4 = INTEGER: 2
.1.3.6.1.4.1.2021.2.1.3.5 = INTEGER: 2
.1.3.6.1.4.1.2021.2.1.3.6 = INTEGER: 1
.1.3.6.1.4.1.2021.2.1.3.7 = INTEGER: 2
.1.3.6.1.4.1.2021.2.1.4.1 = INTEGER: 2
.1.3.6.1.4.1.2021.2.1.4.2 = INTEGER: 3
.1.3.6.1.4.1.2021.2.1.4.3 = INTEGER: 4
.1.3.6.1.4.1.2021.2.1.4.4 = INTEGER: 12
.1.3.6.1.4.1.2021.2.1.4.5 = INTEGER: 2
.1.3.6.1.4.1.2021.2.1.4.6 = INTEGER: 1
.1.3.6.1.4.1.2021.2.1.4.7 = INTEGER: 6
.1.3.6.1.4.1.2021.2.1.5.1 = INTEGER: 2
.1.3.6.1.4.1.2021.2.1.5.2 = INTEGER: 3
.1.3.6.1.4.1.2021.2.1.5.3 = INTEGER: 4
.1.3.6.1.4.1.2021.2.1.5.4 = INTEGER: 12
.1.3.6.1.4.1.2021.2.1.5.5 = INTEGER: 2
.1.3.6.1.4.1.2021.2.1.5.6 = INTEGER: 1
.1.3.6.1.4.1.2021.2.1.5.7 = INTEGER: 6
.1.3.6.1.4.1.2021.2.1.100.1 = INTEGER: noError(0)
.1.3.6.1.4.1.2021.2.1.100.2 = INTEGER: noError(0)
.1.3.6.1.4.1.2021.2.1.100.3 = INTEGER: noError(0)
.1.3.6.1.4.1.2021.2.1.100.4 = INTEGER: noError(0)
.1.3.6.1.4.1.2021.2.1.100.5 = INTEGER: noError(0)
.1.3.6.1.4.1.2021.2.1.100.6 = INTEGER: noError(0)
.1.3.6.1.4.1.2021.2.1.100.7 = INTEGER: noError(0)
.1.3.6.1.4.1.2021.2.1.101.1 = STRING:
.1.3.6.1.4.1.2021.2.1.101.2 = STRING:
.1.3.6.1.4.1.2021.2.1.101.3 = STRING:
.1.3.6.1.4.1.2021.2.1.101.4 = STRING:
© 2022 FireEye
57
Security Orchestrator System Administration Guide
.1.3.6.1.4.1.2021.2.1.101.5 = STRING:
.1.3.6.1.4.1.2021.2.1.101.6 = STRING:
.1.3.6.1.4.1.2021.2.1.101.7 = STRING:Example monitoring of ‘run_erl’ process with MIB variables:
Process Name :
# snmpwalk -v2c -On -c testCommunityString 10.11.222.333 UCD-SNMP-MIB::prNames.1
UCD-SNMP-MIB::prNames.1 = STRING: "run_erl"Error Flag :
# snmpwalk -v2c -On -c testCommunityString 10.11.222.333 UCD-SNMP-MIB::prErrorFlag.1
UCD-SNMP-MIB::prErrorFlag.1 = INTEGER: 0Min Run:
# snmpwalk -v2c -On -c testCommunityString 10.11.222.333 UCD-SNMP-MIB::prMin.1
UCD-SNMP-MIB::prMin.1 = INTEGER: 2Max Run:
# snmpwalk -v2c -On -c testCommunityString 10.11.222.333 UCD-SNMP-MIB::prMax.1
UCD-SNMP-MIB::prMax.1 = INTEGER: 2Current Run:
# snmpwalk -v2c -On -c testCommunityString 10.11.222.333 UCD-SNMP-MIB::prCount.1
UCD-SNMP-MIB::prCount.1 = INTEGER: 2Last Error Message:
# snmpwalk -v2c -On -c testCommunityString 10.11.222.333 UCD-SNMP-MIB::prErrMessage.1
UCD-SNMP-MIB::prErrMessage.1 = ""MIB File
The MIB file can be downloaded at http://www.net-snmp.org/docs/mibs/UCD-SNMP-MIB.txt. The MIB file has some related information about MIB variables and their definitions. Detailed documentation can be downloaded at http://www.net-snmp.org/docs/mibs/ucdavis.html.
The complete list of MIBs for monitored processes is shown below. You can monitor them by using the following MIB variables:
UCD-SNMP-MIB::prIndex.1 = INTEGER: 1
UCD-SNMP-MIB::prIndex.2 = INTEGER: 2
UCD-SNMP-MIB::prIndex.3 = INTEGER: 3
UCD-SNMP-MIB::prIndex.4 = INTEGER: 4
UCD-SNMP-MIB::prIndex.5 = INTEGER: 558 © 2022 FireEye
Release 6.6
Configuration
UCD-SNMP-MIB::prIndex.6 = INTEGER: 6
UCD-SNMP-MIB::prIndex.7 = INTEGER: 7
UCD-SNMP-MIB::prNames.1 = STRING: run_erl
UCD-SNMP-MIB::prNames.2 = STRING: beam.smp
UCD-SNMP-MIB::prNames.3 = STRING: java
UCD-SNMP-MIB::prNames.4 = STRING: node
UCD-SNMP-MIB::prNames.5 = STRING: rabbitmq-server
UCD-SNMP-MIB::prNames.6 = STRING: epmd
UCD-SNMP-MIB::prNames.7 = STRING: httpd
UCD-SNMP-MIB::prMin.1 = INTEGER: 2
UCD-SNMP-MIB::prMin.2 = INTEGER: 3
UCD-SNMP-MIB::prMin.3 = INTEGER: 4
UCD-SNMP-MIB::prMin.4 = INTEGER: 2
UCD-SNMP-MIB::prMin.5 = INTEGER: 2
UCD-SNMP-MIB::prMin.6 = INTEGER: 1
UCD-SNMP-MIB::prMin.7 = INTEGER: 2
UCD-SNMP-MIB::prMax.1 = INTEGER: 2
UCD-SNMP-MIB::prMax.2 = INTEGER: 3
UCD-SNMP-MIB::prMax.3 = INTEGER: 4
UCD-SNMP-MIB::prMax.4 = INTEGER: 12
UCD-SNMP-MIB::prMax.5 = INTEGER: 2
UCD-SNMP-MIB::prMax.6 = INTEGER: 1
UCD-SNMP-MIB::prMax.7 = INTEGER: 6
UCD-SNMP-MIB::prCount.1 = INTEGER: 2
UCD-SNMP-MIB::prCount.2 = INTEGER: 3
UCD-SNMP-MIB::prCount.3 = INTEGER: 4
UCD-SNMP-MIB::prCount.4 = INTEGER: 12
UCD-SNMP-MIB::prCount.5 = INTEGER: 2
UCD-SNMP-MIB::prCount.6 = INTEGER: 1
UCD-SNMP-MIB::prCount.7 = INTEGER: 6
UCD-SNMP-MIB::prErrorFlag.1 = INTEGER: noError(0)
UCD-SNMP-MIB::prErrorFlag.2 = INTEGER: noError(0)
UCD-SNMP-MIB::prErrorFlag.3 = INTEGER: noError(0)
UCD-SNMP-MIB::prErrorFlag.4 = INTEGER: noError(0)
UCD-SNMP-MIB::prErrorFlag.5 = INTEGER: noError(0)
UCD-SNMP-MIB::prErrorFlag.6 = INTEGER: noError(0)
UCD-SNMP-MIB::prErrorFlag.7 = INTEGER: noError(0)
UCD-SNMP-MIB::prErrMessage.1 = STRING:© 2022 FireEye
59
Security Orchestrator System Administration Guide
UCD-SNMP-MIB::prErrMessage.2 = STRING:
UCD-SNMP-MIB::prErrMessage.3 = STRING:
UCD-SNMP-MIB::prErrMessage.4 = STRING:
UCD-SNMP-MIB::prErrMessage.5 = STRING:
UCD-SNMP-MIB::prErrMessage.6 = STRING:
UCD-SNMP-MIB::prErrMessage.7 = STRING:Example Usage with PRTG Network Monitor
PRTG Network Monitor is a server up-time and utilization, network monitoring, and bandwidth usage software package for server infrastructure. It can monitor and classify bandwidth usage in a network using SNMP, packet sniffing, and net flow. It services Microsoft Windows and Linux. It was derived from the open-source Multi-Router Traffic Grapher (MRTG) project. A version with a limited number of sensors is available free of charge.
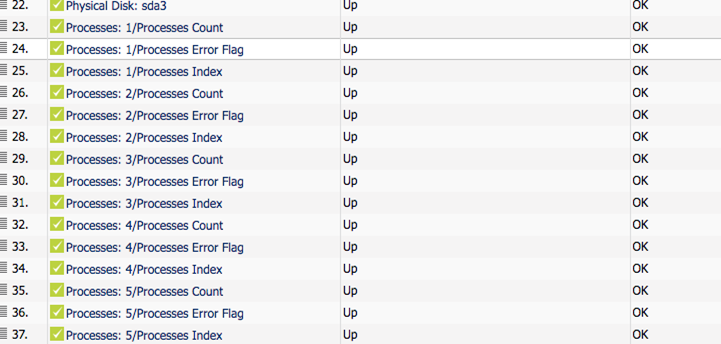
It is a simple example for testing SNMP Monitoring on the application side. Add the MIBs above to check that they are valid for monitoring and alerting. Usage examples are available at: https://kb.paessler.com/en/topic/29403-monitoring-processes-in-linux. Add the Security Orchestrator virtual appliance to PRTG as a device. Then, add the required MIBs to the PRTG system as a sensor. All related sensors are SNMP sensors and CPU, Memory, Network Interface, Disk Status, Storage Spaces, and Processes can be monitored with them. Features in the UCD-SNMP-MIB are already added to Sensor database.
Example status of monitored sensors for Security Orchestrator:
You can stop the fso service to test the SNMP monitoring by running the following command:
# ssh ixoperator@<SO-SERVER>
# sudo systemctl stop fso© 2022 FireEye
Release 6.6
Configuration
After stopping the fso service, you can set error flags to 1 so the monitoring application can detect the crashing or closing processes:
Example status of monitored sensors after stopping the fso service:
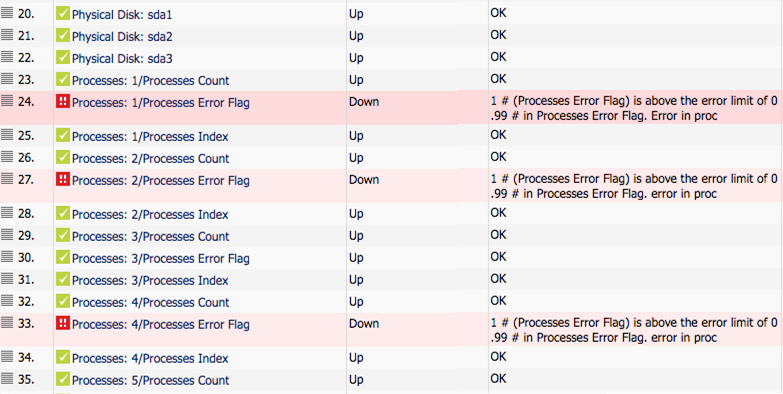
After you see that the error flags are set, SNMP monitoring configuration can be marked as completed and you can start the fso service again:
# ssh ixoperator@<SO-SERVER>
# sudo systemctl start fsoMonitoring Other Security Orchestrator Features
CPU, Memory, Disks, and Network Status can also be monitored using SNMP OIDs/MIBs. The monitoring application can periodically fetch this data from Security Orchestrator and display it for further monitoring.
The Security Orchestrator 6.6 virtual appliance uses CentOS 7.9 and Net-SNMP is the module used for the SNMPD service, so the standard SNMP sensors will work with Security Orchestrator. CPU, Memory, Disks, and Network Status can be polled using the default Linux SNMP readers in the monitoring application.
© 2022 FireEye
61
Security Orchestrator System Administration Guide
62
© 2022 FireEye
Security Orchestrator System Administration Guide
PART III: User Management
About User Management on page 65
Manage Groups on page 67
Manage Users on page 77
© 2022 FireEye 63
Security Orchestrator System Administration Guide
PART III: User Management
64 © 2022 FireEye
Security Orchestrator System Administration GuideAbout User Management
About User Management
Security Orchestrator (SO) provides role-based access control for the Web UI. You control who can access the Web UI by creating users, and you control which features and components a user can access by configuring groups and assigning users to groups.
By default, all users have access to the Dashboard and System Status pages. By assigning a user to a group, you can also grant add, read, write, delete, and execute access to SO components, such as playbooks, devices, adapters, and cases.
You create and manage users and groups using the SO Web UI. For information on accessing the Web UI, see Access SO Web UI on page 28.
You can also apply role-based permissions to specific playbooks, allowing user groups to access some playbooks but not others. For information on granting access to specific playbooks, see the Security Orchestrator Playbook Management Guide.
For information on managing groups and users, see the following sections:
Manage Groups on page 67
Manage Users on page 77
© 2022 FireEye
65
Security Orchestrator System Administration Guide
66
© 2022 FireEye
Manage Groups
A group defines the types of access a user has to Security Orchestrator components, such as playbooks, adapters, and devices. When configuring a group, you can grant add, read, write, delete, and execute permissions for individual components.

Security Orchestrator has a default admin user, assigned to a default Administrators group. The Administrators group has full access to all components.
Do not delete or modify the Administrators group or the admin user.
For instructions on managing groups, read the following sections:
View Groups on page 73
Create a Group on page 74
Modify a Group on page 74
Delete a Group on page 75
Access Permissions by Component
You can set access permissions for the following Security Orchestrator components:
Playbooks on the next page
Devices on the next page
Adapters on page 69
Users on page 69
Current User on page 69
User Groups on page 70
Scripts on page 70
Parameter Types on page 70
Content Packages on page 71
© 2022 FireEye
67
Security Orchestrator System Administration Guide
Tables on page 71
Forms on page 72
Tags on page 72
Table Rows on page 72
Cases and Processes on page 72
System Configuration on page 73
External API on page 73
Playbooks
Playbooks permissions control user access to playbooks and the cases and processes generated by playbooks. You can set the following permissions for playbooks:
Permission | Access Granted |
|---|---|
View | View the Playbook page. View configuration details and workflows for all playbooks. View the Cases page and All Activity page. View cases and processes generated by all playbooks. |
Edit | Modify configuration details and workflows for all playbooks. |
Add | Create new playbooks. Publish playbooks. |
Delete | Delete playbooks. |
Execute | Run recommended playbooks and pivot actions from a case or process. |
You can also grant a user group access to only specific playbooks (on the Playbook page), instead of granting the group access to all playbooks. For information on granting access to specific playbooks, see the Security Orchestrator Playbook Management Guide.
Devices
You can set the following permissions for devices:
Permission | Access Granted |
|---|---|
View | View the Devices page. View configurations of all devices. |
68
Release 6.6
Manage Groups
Permission | Access Granted |
|---|---|
Edit | Modify configurations of all devices. |
Add | Create new devices. |
Delete | Delete devices. |
Adapters
You can set the following permissions for adapters:
Permission | Access Granted |
|---|---|
View | View the Adapters page. View configurations of all adapters. |
Edit | Modify configurations of all adapters. |
Add | Create new adapters. |
Delete | Delete adapters. |
Users
You can set the following permissions for users:
Permission | Access Granted |
|---|---|
View | View the Users page. View user configurations. |
Edit | Modify all users, including profiles, passwords, and group assignments. |
Add | Create new users. |
Delete | Delete users. |
Current User
You can set the following permissions for the currently logged-in user:
Permission | Access Granted |
|---|---|
View | Does not affect user access. |
Edit | Change the password of the currently logged-in user. |
© 2022 FireEye
69
Security Orchestrator System Administration Guide
User Groups
You can set the following permissions for user groups:
Permission | Access Granted |
|---|---|
View | View the Groups page. View group configurations. |
Edit | Modify all groups on the Groups page. Modify playbook-specific group permissions on the Playbook page. |
Add | Create new groups. |
Delete | Delete groups. |
Scripts
You can set the following permissions for scripts:
Permission | Access Granted |
|---|---|
View | View the Scripts page. View JavaScript and Mustache scripts. |
Edit | Modify scripts. |
Add | Create new scripts. Publish scripts. |
Delete | Delete scripts. |
Parameter Types
You can set the following permissions for parameter types:
Permission | Access Granted |
|---|---|
View | View the Parameter Types page. View all custom and system parameters types. |
Edit | Modify custom parameter types. |
Add | Create new custom parameter types. |
Delete | Delete custom parameter types. |
Release 6.6
Manage Groups
Packages
You can set the following permissions for plug-ins:
Permission | Access Granted |
|---|---|
Add | Does not affect user access. |
Delete | Does not affect user access. |
View | View the Plug-Ins page. View details about all installed plug-ins. |
Edit | Modify plug-in descriptions and default parameter values. |
Content Packages
You can set the following permissions for content packages:
Permission | Access Granted |
|---|---|
Read | View the Content Packages page. |
Write | Modify content packages. |
Add | Create new content packages. Publish content packages. |
Delete | Delete content packages. |
Tables
You can set the following permissions for tables:
Permission | Access Granted |
|---|---|
View | View the Tables page. View table configurations and table data. |
Edit | Modify table configurations and table data. |
Add | Create new tables. Publish tables. |
Delete | Delete tables. |
© 2022 FireEye
71
Security Orchestrator System Administration Guide
Forms
You can set the following permissions for forms:
Permission | Access Granted |
|---|---|
View | View the Forms page. |
Edit | Modify form configurations. |
Add | Create new forms. Publish forms. |
Delete | Delete forms. |
Tags
You can set the following permissions for tags:
Permission | Access Granted |
|---|---|
View | All users have read access to tags. |
Edit | Modify tag names and assignments. |
Add | Create new tags. |
Delete | Delete tags. |
Table Rows
You can set the following permissions for table rows:
Permission | Access Granted |
|---|---|
View | View the Table Rows page. |
Edit | Modify table rows. |
Add | Create new table rows. |
Delete | Delete table rows. |
Cases and Processes
You can set the following permissions for cases and processes:
Release 6.6
Manage Groups
Permission | Access Granted |
|---|---|
View | View the Cases and Processes page. |
Edit | Modify cases and processes. |
Add | Create new cases and processes by running the playbook manually. |
Delete | Delete cases and processes. |
System Configuration
You can set the following permissions for system settings:
Permission | Access Granted |
|---|---|
Read | View the License page. |
Write | Upload a new license on the License page. |
External API
You can set the following permissions for the external API:
Permission | Access Granted |
|---|---|
Read | Read access for all Security Orchestrator entities (playbooks, adapters, devices, etc.) |
Write | Modify configuration details for all playbooks. |
Execute | Run all playbooks. |
View Groups
The Groups page displays the following information for each user group:
Group name and description
Users assigned to the group (in the Members column).
Date and time the group was last updated
To view groups:
In the Web UI, select Users & Groups.
Select the Groups tab.
To view group access permissions, select the group in the list.
© 2022 FireEye | 73 |
Security Orchestrator System Administration Guide
Create a Group
Create a group to define access permissions for a group of users.
To create a new group:
In the Web UI, click Users & Groups.
Click the Groups tab.
Click New Group.
In the Name box, enter a unique name for the user group that clearly identifies its purpose. This will help you find and assign the correct user groups when configuring users.

The name of a group cannot be modified after the group is created.
In the Description box, enter an optional description of the user group.
Click Create.
In the panel on the right, click Manage.
Select permissions for each component:
View—Allows a user group to view entities for the component.
Edit—Allows a user group to modify entities for the component.
Add—Allows a user group to create entities for the component. Also allows a user group to publish entities, such as playbooks, summary forms, and tables.
Delete—Allows a user group to delete entities for a component.
Execute—Allows a user group to run recommended playbooks and pivot actions.
Click Save.
Modify a Group
You can change group access permissions and descriptions, but you cannot change the group name. If you change a group access permissions, the changes take effect immediately for users assigned to the group.

Do not modify access permissions for the Administrators group.
Release 6.6Manage Groups
To modify group access permissions:
In the Web UI, click Users & Groups.
Click the Groups tab.
In the list, select the group you want to modify.
In the panel on the right, click Manage.
Modify access permissions for components as needed:
View—Allows a user group to view entities for the component.
Edit—Allows a user group to modify entities for the component.
Add—Allows a user group to create entities for the component. Also allows a user group to publish entities, such as playbooks, summary forms, and tables.
Delete—Allows a user group to delete entities for a component.
Execute—Allows a user group to run recommended playbooks and pivot actions.
Click Save.
To modify group descriptions:
In the Web UI, click Users & Groups.
Click the Groups tab.
In the list, select the group you want to modify.
In the panel on the right, enter a description in the Description box.
Delete a Group
Deleting a group will remove the group assignment from all users, and may cause users to lose access to components. Before deleting a group, review the list of users assigned to the group. See View Groups on page 73.

Do not delete the Administrators group.
To delete a group:
In the Web UI, click Users & Groups.
Click the Groups tab.
In the list, select the group you want to modify.
In the panel on the right, click …, then click Delete.
Click Confirm.
© 2022 FireEye
75
Security Orchestrator System Administration Guide
76
© 2022 FireEye
Release 6.6 Manage Users
Manage Users
A user is a user account, including a user name and password, for accessing the Security Orchestrator Web UI. You control who can access the Web UI by creating users. You control which features and components a user can access by creating groups and assigning users to groups.
All users have access to the Dashboard and System Status pages. By assigning users to groups, you can also grant add, read, write, delete, and execute access to additional Security Orchestrator components.

Security Orchestrator has a default admin user, assigned to a default Administrators group. The Administrators group has full access to all components.
Do not delete or modify the Administrators group or the admin user.
For instructions on managing users, see the following sections:
Create a User on the next page
View Users below
Change User Details on the next page
Change User Passwords on page 79
Reset Passwords for Locked-Out Users on page 79
Change User Group Assignments on page 80
Delete a User on page 81
Enable or Disable a User on page 80
View Users
The Users page displays the following information for each user:
User name
The user's full name and email addresses
Group assignments
Enabled status (on or off)
Date and time the user configuration was last updated
© 2022 FireEye
77
Security Orchestrator System Administration Guide
To view all users:
In the Web UI, click Users & Groups.
To view user details, select the user in the list.
Create a User
Create a user to give someone access to the Security Orchestrator Web UI.

User access to specific components, is granted by creating groups and then assigning users to groups. Specific components that require user access creation or modification include playbooks, adapters, and cases. See Create a Group on page 74 or Modify a Group on page 74
To create a new user:
In the Web UI, click Users & Groups.
Click New User.
In the Username box, enter a unique user name for the user.

The user name cannot be modified after the user is created.
(Optional) In the Name boxes, enter the user's first, middle, and last names.
(Optional) Click +Add Email Address to enter an email address for the user.
If you enter multiple email addresses, click Main next to the email address you want to appear in the summary list on the Users page.
In the Password and Confirm Password boxes, enter a temporary password for the user.
In the Groups box, select group assignments for the user:
To assign the user to a group, click in the Groups box and then select a group name from the list. Select multiple groups if needed. The user is granted all access permissions defined in the selected groups.
To remove the user from a group, click x next to the group name.
Click Create.
The user can log in to the Security Orchestrator Web UI with the user name and temporary password.
Change User Details
You can change a user's full name and email addresses after the user is created.
78
© 2022 FireEye
Release 6.6Manage Users

You cannot change the user name after a user is created.
To change a user's full name and email addresses:
In the Web UI, click Users & Groups.
In the list, select the user you want to modify.
The user details appear in the panel on the right.
In the Name boxes, edit the user's first, middle, and last names.
Edit or delete the listed email addresses as needed.
To enter a new email address, click +Add Email.
If you enter multiple email addresses, click Main next to the email address you want to appear in the summary list on the Users page.
Click Save.
Change User Passwords
The admin user can change any user's password. Users can change their own passwords if they are assigned to a group with write permission for the Current User component. For more information, see Current User on page 69.
To change a user's password:
In the Web UI, click Users & Groups.
In the list, select the user you want to modify.
In the panel on the right, click Change.
The Reset Password window opens.
In the New Password and Confirm Password boxes, enter the new password for the user.
Click Apply.
Reset Passwords for Locked-Out Users
You must reset the password for a user who has been locked out of the SO Web UI after reaching the limit of failed login attempts. The account will lock out after five (5) failed login attempts.
You can reset the password using the CLI. See Reset Passwords Using the CLI on the next page.
You can also reset the password using the Web UI, while logged in as a user with write permission for the Users component. See Change User Passwords above.
© 2022 FireEye79
Security Orchestrator System Administration Guide
Reset Passwords Using the CLI
To reset a user's password using the CLI:
Log in to the SO virtual appliance as the ixoperator user.
Run the following command:
fso reset password username <username>where <username> is the user name of a Security Orchestrator user.
Enter the new password.
Change User Group Assignments
You can add or remove groups in a user's configuration to change the user's access permissions.
NOTE: User access to specific components, such as playbooks, adapters, and cases, is granted by creating groups and then assigning users to groups. See Create a Group on page 74 or Modify a Group on page 74.

IMPORTANT: By default, Security Orchestrator has an fso_admin user who is assigned to the Administrators group, granting the admin user full access to all components. Do not remove the admin user from the Administrators group.

To modify a user's group assignments:
In the Web UI, click Users & Groups.
In the list, select the user you want to modify.
Group assignments appear in the panel on the right.
Next to Groups, add and remove groups as needed:
To assign the user to a group, click Add to group and then select a group name from the list. Select multiple groups if needed. The user is granted all access permissions defined in the selected groups.
To remove the user from a group, click x next to the group name.
Click Save.
Enable or Disable a User
After a user is created, the user is automatically enabled and can log in to the Web UI. Disabling a user prevents the user from logging in to the Web UI.
© 2022 FireEye
Release 6.6Manage Users
To enable or disable a user:
In the Web UI, click Users & Groups.
In the list, select the user you want to enable or disable.
Next to Enabled, slide the button to the right to enable the user, or slide the button to the left to disable the user.
If you disabled a user, the user's access to the Web UI is denied the next time the user attempts to log in.
Delete a User
Deleting a user removes the user's login credentials and prevents the user from accessing the Web UI. To deny a user access temporarily, consider disabling the user. See Enable or Disable a User on the previous page.
To delete a user:
In the Web UI, click Users & Groups.
In the list, select the user you want to delete.
In the panel on the right, click Delete.
Click Confirm.
© 2022 FireEye81
Security Orchestrator System Administration Guide
82
© 2022 FireEye
Security Orchestrator System Administration Guide
Upgrading Software
PART IV: Administration
Upgrading Software below
Configuring Microsoft Active Directory Authentication on page 85
Enable Inline Help and Tutorials on page 88
Database Configuration on page 89
Generate Log Bundles for Customer Support on page 91
Manage Services on page 95
Manage Logs on page 93
Using Snapshots to Save System Configuration on page 97
Migrating Data Into a New Version of Security Orchestrator on page 101
Back Up and Restore SO Files on page 105
Optimizing Performance on page 107
Upgrading Software
This section explains how to upgrade the FireEye Security Orchestrator virtual appliance OVA from version 6.0 onwards to version 6.6.0.
You can only upgrade from the 6.0 OVA to 6.6.0. To upgrade from earlier releases, you must use snapshots to migrate data from the older version of Security Orchestrator to a new 6.6.0 virtual machine. See Migrating Data Into a New Version of Security Orchestrator on page 101 for information.
FireEye recommends that you take a snapshot backup of your existing Security Orchestrator VM before you upgrade.

© 2022 FireEye
83
Security Orchestrator System Administration Guide
PART IV: Administration
Prerequisites
Offline tar bundle of 6.6.0 release. This tar bundle can be used to upgrade from 6.0 OVA only.
To upgrade Security Orchestrator from release 6.0 to release 6.6:
Log in to the Security Orchestrator host as ixoperator.
Copy the tar bundle to this machine.
Untar the bundle and go to the v6.5.0 directory.
Execute fso_install:
To upgrade without changing the Web UI hostname:
./fso_installTo upgrade and change the Web UI hostname, include the -webhostname parameter and the Web host name in small capital letters:
./fso_install -webhostname <NEW-WEBHOST>
When prompted, enter Y to upgrade the rpms on the host system:
Would you like to update FSO [Y/N]: YWhen prompted to reconfigure the system, enter Y. This option updates the web.conf configuration file with new keys. The existing SSL certificate is retained.
Would you like to re-configure/configure the system? [Y/n]: Y
84
© 2022 FireEye
Release 6.6
Configuring Microsoft Active Directory Authentication
Configuring Microsoft Active Directory Authentication
As an administrator, you can uses third-party authentication servers such as Microsoft Active Directory to authenticate users. Security Orchestrator maintains access rights management information locally. Configure all the parameters described below in the web.conf configuration file and then restart Security Orchestrator. Users can then log in using their Active Directory/ LDAP credentials, but they will not belong to any groups until you add them.
NOTE: The fso_admin user is never disabled, even when Microsoft Active Directory authentication is configured.

Summary of steps:
Obtain Active Directory Information below
Add the AD IP Address and Domain to /etc/hosts on the next page
Update Settings in the web.conf Configuration File on the next page
Restart Security Orchestrator on page 87
Verify the Connection on page 87
Add Users to Groups on page 88
Obtain Active Directory Information
You need the following details for Active Directory:
The Base DN (Distinguished Name)
Administrator DN username and password
DNs for all groups.
IMPORTANT: Always use the DN (Distinguished Name) to refer to user groups, administrators, organization unit (OU), and so on.

© 2022 FireEye
85
Security Orchestrator System Administration Guide
Add the AD IP Address and Domain to /etc/hosts
Add the IP address of your AD server and the AD domain name to the domain entry in your SO /etc/hosts file in the format <IP-address> <AD domain name>. For example:
11.22.33.44 mydomain.comUpdate Settings in the web.conf Configuration File
Change the following setting from false to true:
# engine.auth_ldap.enabled
Replace the following settings with the information for your organization:
# engine.auth_ldap.server = fsosoreset.local
# engine.auth_ldap.bind_dn = "CN=Administrator,CN=Users,DC=fsoforest,DC=local"
# engine.auth_ldap.password = changeme
# engine.auth_ldap.search_base = "DC=fsoforest,DC=local"
Update the port and SSL settings as necessary to match the settings of your server. The default settings for SSL are:
# engine.auth_ldap.port = 636
# engine.auth_ldap.ssl = true
The default settings not using SSL are:
# engine.auth_ldap.port = 389
# engine.auth_ldap.ssl = false
Comment out the following line:
### engine.auth_ldap.ssl_cacert_file =
Provide the LDAP group or groups that have access to Security Orchestrator, as in the following example:
# engine.auth_ldap.groups = "CN=pune,CN=Users,DC=fsoforest,DC=local", "CN=mumbai,CN=Users,DC=fsoforest,DC=local"
Map the following attributes:
# engine.auth_ldap.map_email = userPrincipalName
# engine.auth_ldap.map_username = sAMAccountName
# engine.auth_ldap.map_first_name = givenName
# engine.auth_ldap.map_middle_name = initials
# engine.auth_ldap.map_last_name = sn
Comment out any other setting you do not need to use.
Release 6.6
Configuring Microsoft Active Directory Authentication
The following example shows the updated SO configuration settings in the web.conf file:
#Uncomment and enable to use AD/LDAP for authentication
# engine.auth_ldap.enabled = true
# engine.auth_ldap.server = fsoforest.local
# engine.auth_ldap.port = 636
# engine.auth_ldap.ssl = true
# engine.auth_ldap.ssl_cacert_file = /path/to/file - enables cert validation
# engine.auth_ldap.bind_dn =
"CN=Administrator,CN=Users,DC=fsoforest,DC=local"
# engine.auth_ldap.password = abc123
# engine.auth_ldap.connect_timeout_ms = 10000
# engine.auth_ldap.search_timeout_ms = 10000
# engine.auth_ldap.sync_initial_delay_secs = 300
# engine.auth_ldap.sync_delay_secs = 3600
# engine.auth_ldap.search_base = "DC=fsoforest,DC=local"
# ## User records will be matched on having ALL the classes and # ##
categories,and being member of at least ONE of the groups
# engine.auth_ldap.classes = user, organizationalPerson
# engine.auth_ldap.categories =
# engine.auth_ldap.groups = "CN=pune,CN=Users,DC=fsoforest,DC=local",
"CN=mumbai,CN=Users,DC=fsoforest,DC=local"
# ## follow membership chain - only on MS AD
# engine.auth_ldap.ad_membership_chain = false
# ## Attribute mapping
# ## - username _must_ be unique
# ## - first,middle,last name fields will automatically
# ## "parse" displayName if set to displayName.
# engine.auth_ldap.map_email = mail
# engine.auth_ldap.map_username = sAMAccountName # 'cn' for OpenLDAP
# engine.auth_ldap.map_first_name = displayName
# engine.auth_ldap.map_middle_name = displayName
# engine.auth_ldap.map_last_name = displayNameRestart Security Orchestrator
Save your changes to web.conf. Then restart Security Orchestrator using the systemctl restart fso command.
Verify the Connection
Verify that your Active Directory host can be reached from Security Orchestrator with the following commands, substituting the values your organization uses.
#ldapsearch with ldaps
ldapsearch -d 1 -H ldaps://fsoforest.local:636 -D "CN=Administrator,CN=Users,DC=fsoforest,DC=local" -x -w xxxxxx -b "CN=kameshfso1,CN=Users,DC=fsoforest,DC=local"#ldapsearch with ldap
ldapsearch -h fsoforest.local -p 389 -D "CN=Administrator,CN=Users,DC=fsoforest,DC=local" -x -w xxxxxx -b "CN=punegpr,OU=fsoou,DC=fsoforest,DC=local"© 2022 FireEye
Security Orchestrator System Administration Guide
NOTE: You may need to install ldapsearch which is part of the open-ldap client, to use these commands.
Add Users to Groups
By default, users are not associated with any groups. To provision users and add users to groups, follow the steps in Manage Users on page 77
Enable Inline Help and Tutorials
Guided tutorials and inline help are provided dynamically by a Knowledge Bot in the Security Orchestrator Web UI. To use the help and learning content, allow HTTPS communication between the Knowledge Bot servers and the browser used to access the Web UI.
Open port: 443
Allow traffic for Web application SDK (https://web-sdk.aptrinsic.com) and Tracking (https://px-esp.fireeye.com/).
88
© 2022 FireEye
Release 6.6
Database Configuration
Database Configuration
The standard database for this release, PostgreSQL, is installed by default.
© 2022 FireEye
89
Security Orchestrator System Administration Guide
90
© 2022 FireEye
Security Orchestrator System Administration Guide
Generate Log Bundles for Customer Support
Generate Log Bundles for Customer Support
Security Orchestrator allows you to generate a bundle of logs that can be sent to FireEye Support for diagnostics and troubleshooting. This bundle can also be used by an administrator to collect system logs for review.
Run the following command (as root user) to generate a support bundle:
cd /var/lib/fireeye/fso/web;tar jcf fso_log_$(date '+%Y-%m-%d').tar.bz2 --warning=no-file-changed logThe resulting file will have the following name format: fso_log_<timestamp>.tar.bz2
The file is a tar archive compressed with bzip2. To extract the logs from the file, use the following command:
tar jxf fso_<MAC>_log.<timespstamp>.tar.bz2The files are extracted to a directory named log in the current working directory. This includes log files for Security Orchestrator and Apache.
© 2022 FireEye
91
Security Orchestrator System Administration Guide
92
© 2022 FireEye
Security Orchestrator System Administration Guide
Manage Logs
Manage Logs
The web.log file is the main source for logs regarding errors with the Security Orchestrator application, plug-ins, adapters, and Web UI.
To follow the log in real time, use the following command:
tail -f /var/log/fireeye/fso/web/web.log
To follow only Web requests (useful for troubleshooting the Web UI), use the following command:
tail -f /var/log/fireeye/fso/web/web.log | grep request_id=
To follow everything except Web requests (useful for troubleshooting plug-ins and adapters), use the following command:
tail -f /var/log/fireeye/fso/web/web.log | grep -v request_id=
Configure Logging Levels
To enable debug level logging for all plug-in loading and command execution, set the following in /etc/fireeye/fso/web.conf:
engine.python.debug = trueTo disable, set the option to false.
To change the SO application logging level, set the following in /etc/fireeye/fso/web.conf:
logger.level = <Level><Level> can be debug, info, warn, error, or fatal. The default setting is info.

FireEye does not recommend setting logging levels to debug for extended periods of time. Debug mode requires file I/O and consumes disk space each time a command is executed. After you troubleshoot an issue with debug mode enabled, reset logging levels to their defaults.
© 2022 FireEye
93
Security Orchestrator System Administration Guide
RabbitMQ Service Logs
Logs generated by the RabbitMQ service can be used to troubleshoot issues with the event queue.
The following example shows the tail command that can be used to monitor the main log for RabbitMQ:
tail -f \@<server_name>.log
RabbitMQ also writes specific logs at startup and shutdown and tracks errors in separate logs. The following logs are included:
/var/log/rabbitmq/startup_err/var/log/rabbitmq/startup_log/var/log/rabbitmq/shutdown_err/var/log/rabbitmq/shutdown_log
The RabbitMQ service may trigger an error message about log rotation. You can ignore this. Log rotation succeeds and the RabbitMQ service continues to work correctly.
The error is:
/etc/cron.daily/logrotate:
Password: su: incorrect password
error: error running shared postrotate script for '/var/log/rabbitmq/*.log 'Security Orchestrator System Administration Guide
Manage Services
Manage Services
While logged in as the ixoperator user, use the following commands to manage the Security Orchestrator service:
sudo systemctl stop|restart|start|status fsoThe proper way to start and stop Security Orchestrator is by using the fso service. The status of Security Orchestrator should also be checked using the fso service.
Depending on your Security Orchestrator configuration, the system can take a considerable amount of time to start up or restart. Wait at least 90 seconds in environments with a full configuration and large operational datasets. When the Web UI is responsive, the system is fully operational.

Status of SO and Dependent Services
To check the status of fso and all dependent services:
While logged in as root user, run the following commands:
# systemctl status httpd
# systemctl status fsoDefault database is PostgreSQL:
# systemctl status postgresql-9.6Else
# systemctl status rabbitmq-server
# systemctl status crondStop SO and Dependent Services
Use the commands below to stop SO and dependent services. This is only recommended during SO troubleshooting.
© 2022 FireEye
95
Security Orchestrator System Administration Guide

Depending on your Security Orchestrator configuration, the system can take a considerable amount of time to start up or restart. Wait at least 90 seconds in environments with a full configuration and large operational datasets. When the Web UI is responsive, the system is fully operational.
Service configuration is set to stop all services in the correct order during system shutdown. If any services do not run as expected, it is recommended that you stop and restart them in the order listed below.
To stop fso and all dependent services:
While logged in as root user, run the following commands in the order shown:
# systemctl stop crond
# systemctl stop httpd
# systemctl stop fsoDefault database is PostgreSQL:
# systemctl stop postgresql-9.6Else
# systemctl stop rabbitmq-serverStart SO and Dependent Services
To start FSO and all dependent services:
While logged in as root user, run the following commands in the order shown:
# systemctl start httpd
# systemctl start rabbitmq-serverDefault database is PostgreSQL:
# systemctl start postgresql-9.6Else
# systemctl start cassandra
# systemctl start fso
# systemctl start crond96
© 2022 FireEye
Security Orchestrator System Administration Guide
Using Snapshots to Save System Configuration
Using Snapshots to Save System Configuration
A snapshot is a compressed JSON file that contains a copy of your Security Orchestrator configuration settings. You can use snapshots to preserve the latest version of the following Security Orchestrator components:
Users
Groups
Plug-ins
Devices
Adapters
Playbooks
Packages
Forms
Tables

WARNING: Data from All Activity and Cases is not saved by a snapshot.
The Security Orchestrator configuration file web.conf is not saved by a snapshot. If you made changes to this file, you must re-enter them manually after loading the snapshot.
If the time to live configuration (engine.table_content.min_time_to_live value) was changed in web.conf before the snapshot was made, you must re-enter the new value manually after reloading the snapshot. If this value is not updated, Security Orchestrator may not function properly.

TIP: You can also use a snapshot to migrate configuration data to a newer version of Security Orchestrator.
Snapshots also preserve the following:
© 2022 FireEye
97
Security Orchestrator System Administration Guide
User credentials. To ensure the security of user data, all passwords are hashed and salted when a snapshot is created.
The latest versions of custom scripts and templates configured within the playbook workflow builder.
Table definition and configuration. However, table contents are not saved.
Published and unpublished versions of SO components.
Optionally, encrypted data. The encrypted data requires a separate secret key, which is contained in the /etc/fireeye/fso/web.conf file as common.encryption_key.
This section includes the following:
Importing a Snapshot to Your SO Virtual Machine on the facing page
Creating a Snapshot of Your SO Configuration
You can create a snapshot without affecting the operational state of Security Orchestrator.

NOTE: FireEye recommends creating snapshots with encrypted data.
Prerequisites:
Start the fso service.
Confirm that Security Orchestrator is not processing any events.
Confirm that no users are logged into Security Orchestrator.
To create a snapshot with encrypted data:
Log in to the SO CLI as ixoperator.
Create the snapshot:
fso snapshot save --include-encrypted <snapshot file name>
NOTE: If no encrypted data is contained in the SO machine, the --include-encrypted option is ignored.

IMPORTANT: A secret key is required to access encrypted data in the snapshot. The key is stored in the /etc/fireeye/fso/web.conf file as common.encryption_key. Save a copy of the web.conf file to ensure that the secret key is available to restore encrypted data in the snapshot.
To create a snapshot without encrypted data:
98
© 2022 FireEye
Importing a Snapshot to Your SO Virtual Machine
You can import a snapshot into your virtual machine to restore the configuration settings saved in the JSON file. You can specify whether to include encrypted data when you restore a snapshot. By default, encrypted data is not imported. To include encrypted data, use the --include-encrypted option.

IMPORTANT: The only way to import encrypted data to your Security Orchestrator virtual machine is through a snapshot.
Security Orchestrator shuts down when a snapshot is being imported. All configuration and operational SO data is cleared and replaced with the contents of the JSON file. After the snapshot is completely imported, SO restarts.
Prerequisites:
Start the
fsoservice.Confirm that Security Orchestrator is not processing any events.
Confirm that no users are logged into Security Orchestrator.
If you are importing a snapshot with encrypted data to a different SO system, edit the
/etc/fireeye/fso/web.conffile to include thecommon.encryption_keyfrom the system on which the snapshot was generated.
To import a snapshot with encrypted data:
Log in to the SO CLI as ixoperator.
Import the snapshot:
fso snapshot load --include-encrypted <snapshot file name>
NOTE:
If no encrypted data is contained in the snapshot, the
--include-encryptedoption is ignored.Security Orchestrator snapshot load command may ask you to enter ixoperator password.

Security Orchestrator System Administration Guide
To import a snapshot without encrypted data:
Log in to the SO CLI as ixoperator.
Import the snapshot:
fso snapshot load <snapshot file name>
100 | © 2022 FireEye |
Security Orchestrator System Administration Guide Migrating Data Into a New Version of Security Orchestrator
Migrating Data Into a New Version of Security Orchestrator
You can migrate data to Security Orchestrator release 6.6.0 using snapshots of your saved system configuration.
Snapshots preserve the configuration settings of several main SO components. You can import snapshots from Security Orchestrator 6.0 into SO 6.6. PostgreSQL is selected as the default database when you import a snapshot into a 6.6.0 machine.
WARNING: You cannot install Security Orchestrator 6.6 directly onto a version of SO earlier than 6.0. If you attempt to install release 6.6 on an older SO machine, the upgrade will fail. You must deploy a brand new virtual machine, install SO 6.6, then import or restore settings.

This section contains the following:
Prerequisites
Review Using Snapshots to Save System Configuration on page 97.
Deploy a new Security Orchestrator virtual machine specifically for 6.6.0. See Virtual Appliance Installation on page 19 for more information.
Disable all adapters on your current Security Orchestrator server.
Migrating Data Using a Snapshot Import
Follow the instructions detailed in the table below to migrate your configuration data to Security Orchestrator 6.6.
© 2022 FireEye
101
Security Orchestrator System Administration Guide
Task | Details |
|---|---|
Step 1: |
NOTE: FireEye recommends including encrypted data in your snapshot or backup file to preserve passwords and other encrypted data. See Using Snapshots to Save System Configuration on page 97 for more information. |
Step 2: |
NOTE: You can also use an SFTP or WinSCP client to copy files into Security Orchestrator. |
Step 3: | Only a single snapshot is required. The last item restored will overwrite all previous data.
|
Step 4: | If you imported a snapshot from a version of SO older than 6.6.0, you must upgrade plug-ins and required dependencies to the latest versions available. See Plug-In Management on page 31 and the latest Security Orchestrator Release Notes for more information. |

Release 6.6
Migrating Data Into a New Version of Security Orchestrator
Task | Details |
|---|---|
Step 5: Log in to the SO 6.6.0 server and verify imported data. |
See the Security Orchestrator Release Notes for details on known importing issues and information on updated entities. |
Step 6: Establish access permissions to brand-new entities. | Security Orchestrator preserves existing user and group access permissions, but does not automatically grant permissions in areas of new functionality.
See User Management on page 63 for more information. |
Step 7: Disable input adapters in the old SO Web UI. |
|
© 2022 FireEye
103
Security Orchestrator System Administration Guide
Task | Details |
|---|---|
Step 8: |
|
Release 6.6Back Up and Restore SO Files
Back Up and Restore SO Files
As a good practice and as part of system design, you can create a backup file that may be restored to the system when needed. Restoration of these files will affect all components of the system, including all Configure menu items:
Plugins
Devices
Adapters
Playbooks
If you plan to restore a Security Orchestrator 6.0 backup onto a 6.6.0 machine, you must create the backup with certain options and restore certain files manually, as described in the following sections.
Create a Backup File
To create a backup file a file, from the system ssh terminal, - as sudo:
Enter the following command:
sudo fso data backup --helpTo re-dispatch, use the command under sudo with additional SO backup options as follows;
Enter:
fso data backup --force backup-nameThe options are described in the following table for reference:
SO Backup Usage Options | |
Optional Argument (italicized) | Description |
|---|---|
| Instructs the system to not prompt for action |
| Name of backup file |
© 2022 FireEye
105
Security Orchestrator System Administration Guide
CAUTION: Special Requirements for 6.0 to 6.1 Backups
If you need to create a 6.0 backup to restore onto a 6.1 machine, follow these special requirements:
You must create the 6.0 backup using the -withkey and --with-secrets parameters with the fso data backup command.
Note:
If the 6.0 backups are taken without options -withkey and -with-secrets, the value of the parameter postgresql.password in web.conf has to be updated before restore. It must be updated with the back up machine's postgresql.password.
6.1 backups are by default with -withkey and -with-secrets.
The web.conf configuration file is not saved by the fso data backup command. If you made changes to this file, you must re-enter them manually after restoring the backup.
If the time to live configuration (engine.table_content.min_time_to_live value) was changed in web.conf before the 6.0 backup was made, you must re-enter the new value manually after restoring the backup to the 6.1 machine. If this value is not updated, Security Orchestrator may not function properly.
The plugin-db.conf configuration file is not saved by the fso data backup command. After restoring the backup to the 6.1 machine, you must manually update the value of plugin.postgresql.password in plugin-db.conf. If this value is not updated, plugins that use postgresql may not function properly.

Security Orchestrator data restore command may ask you to enter ixoperator password.
Restore Files
To restore a file for SO 6.6; from the system ssh terminal, - as sudo:
Enter the following command:
sudo fso data restore --helpRelease 6.6Optimizing Performance
To re-dispatch, use the command under sudo with additional SO backup options as follows;
Enter:
sudo fso data restore <backupfilename.tar.gz>The options are described in the following table for reference:
SO Restore Usage Options | |
|---|---|
Optional Argument (italicized) | Description |
| Displays more information |
| Instructs the system to restore the backup file to the system. |

IMPORTANT: If you made changes to the web.conf configuration file, you must re-enter them manually after restoring the backup.
You must manually update the value of plugin.postgresql.password in plugin-db.conf after restoring the backup.
Optimizing Performance
You can optimize performance in Security Orchestrator by doing both of the following:
Update performance keys in the web.conf configuration file.
Increase processor (CPU) cores.
Both steps must be taken. If you update the web.conf file without increasing processor cores, or vice versa, performance will not change.
The amount of improvement will vary, depending on your environment.
In the web.conf file, increase the values of the following keys from the default value of 10:
config.host_count—This value is directly proportional to plugin command processing.
config.worker_count_mustache—This value is directly proportional to mustache script processing.
config.worker_count_js—This value is directly proportional to Javascript processing.
© 2022 FireEye107
Security Orchestrator System Administration Guide
108
© 2022 FireEye
Technical Support
For technical support, contact FireEye through the Support portal:
Documentation
Documentation for all FireEye products is available on the FireEye Documentation Portal (login required):
FireEye, Inc. | 601 McCarthy Blvd. | Milpitas, CA | 1.408.321.6300 | 1.877.FIREEYE | www.fireeye.com
© 2022 FireEye, Inc. All rights reserved. FireEye is a registered trademark of FireEye, Inc. All other brands, products, or service names are or may be trademarks or service marks of their respective owners.