Product overview
Trellix Endpoint Forensics Bridge connects the Trellix Endpoint Detection and Response and Trellix ePO ecosystem with Trellix Endpoint Security (HX) to provide a more unified solution for endpoint security. You can choose to view alerts or threats from multiple Trellix sources on Trellix EDR and Trellix ePO.
Trellix Endpoint Forensics Bridge consists of the following components:
Trellix Endpoint Forensics Bridge ePO extension — the supported version is 36.0.0.95
Trellix Endpoint Security Agent (HX) package for Windows, Linux, and macOS endpoints. The supported versions are:
Windows — 35.31.25
Linux — 36.21.0
Mac — 36.20.0
Corresponding Trellix Endpoint Security (HX) module named Forensics Bridge — the supported version is 1.0.2
The Forensic Bridge module utilizes the Trellix Endpoint Security Agent (HX) , also known as Agent (HX) to provide the additional alerting.
Trellix Endpoint Forensics Bridge enables the following capabilities:
Single phase deployment—You can deploy Agent (HX), along with Trellix ENS and Trellix EDR clients, either individually or as combined deployment tasks using Trellix ePO - On-prem or Trellix ePO - SaaS. Previously, Agent (HX) deployment was done only through HX. However, you can now choose either of the methods. With Trellix ePO, you will continue to have the capability to manage both the existing products such as Trellix ENS and Trellix EDR, while HX remains the platform for configuring Agent (HX) settings. Use the Product Deployment page from the Trellix ePO console to deploy packages on your endpoints.
iImportant
Trellix Endpoint Forensics Bridge requires you to install and configure HX and several modules such as AMSI, Logon Tracker, and Forensics Bridge.
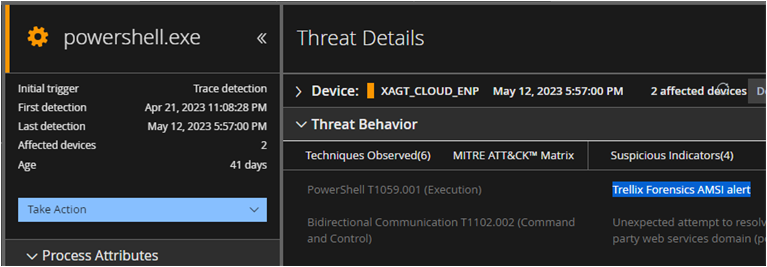
Unified view to alerts—You can get a consolidated perspective on alerts from various Trellix endpoint sources, enhancing the alerting experience on both Trellix EDR and Trellix ePO platforms. Once the products are deployed, the solution thoroughly assesses both new and past events on your endpoints, incorporating Trellix Endpoint Security (HX) data like Logon Tracker, AMSI, and IOC alerts. These additional alerts or potential threats are presented on Trellix ePO and Trellix EDR consoles, providing you with relevant information.
Note
The alerts displayed on HX are shown as Trellix Forensics (AMSI, IOC, or LT) Alert on the TEDR console. In APIs, alerts are displayed as LT (Logon Tracker), AMSI, and IOC.
Integrated detection and response— Use the native capabilities of Trellix EDR to investigate Agent (HX)-originated threats on your endpoints.
Trellix EDR— Trellix EDR enables you to visualize the additional context for threats and endpoints associated with them. You can drill into the additional data and telemetry such as threat behavior, process activity, sequence of events leading to the compromise, and so on. Also, If you want to do in-depth investigation of a Logon Tracker, AMSI, or IOC related alert, you can do so in the Trellix Endpoint Security (HX) UI by navigating to the Hosts page to view the triage acquisition for the host.
The observed threat behaviors are aligned with the MITRE ATT&CK™ framework. Trellix EDR identifies adversary Tactics, Techniques, and Procedures (TTPs) as defined by MITRE.
Trellix ePO— You can optionally direct the Endpoint Forensics Bridge to send the Agent (HX) alerts to Trellix ePO. Within Trellix ePO, you can view alerts as well as create dashboards and actions based on the new alerts.
How Trellix Endpoint Forensics Bridge works
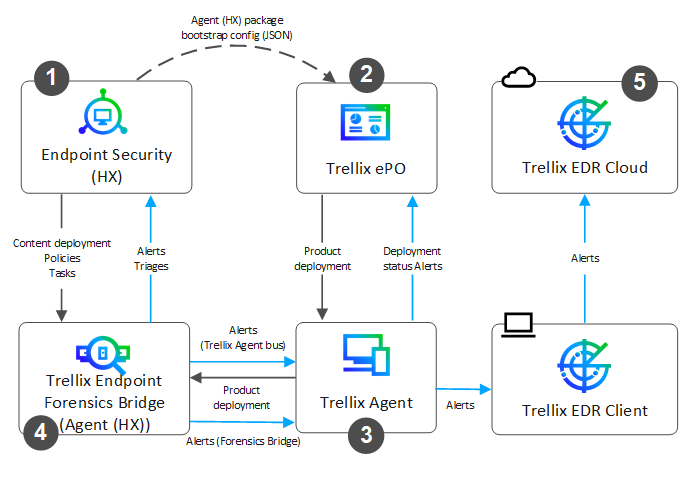
Endpoint Security (HX) sends descriptive alert information to Trellix Endpoint Security Agent (HX). It also provides you with other functionalities such as content deployment, policy configuration, and task scheduling. The HX server is also used to install the corresponding Trellix Forensic Bridge Module that manages the policy for transmission of selected alerts to Trellix EDR and Trellix ePO. Lastly, HX receives alert triage packages.
Within Trellix ePO, install the Trellix ePO extension. If Trellix ePO is used to deploy Agent (HX), then Trellix ePO leverages Trellix Agent to deploy the Agent (HX). You need to pre-configure Agent (HX) on the Trellix ePO platform to connect to the Trellix Endpoint Security (HX) server using
agent_config.json. When the configuration is completed, Trellix ePO also receives the Agent (HX) alerts.Trellix Agent initiates the installation of Agent (HX) if installed using Trellix ePO. Upon completion, the Agent (HX) is registered with both Trellix Endpoint Security (HX) server and Trellix ePO. Trellix Agent also passes the Agent (HX) alerts on to Trellix ePO.
The deployed Agent (HX) on the endpoint actively collects and sends alerts to Trellix EDR and Trellix ePO using the Forensics Bridge Module plugin based on policy configuration.
The built-in rules in Trellix EDR Cloud identify the Agent (HX) alerts and present them as threats on the console for visibility and action.
Install and configure Trellix Endpoint Forensics Bridge
Installation of Trellix Endpoint Forensics Bridge requires specific steps in Trellix ePO and Trellix Endpoint Security (HX). The steps in this guide are in addition to the general setup of these products. This guide assumes general setup is complete.
As part of Trellix rebranding, the certificates used to sign our software have been updated. If your enterprise automatically updates root certificates, the software update or installation does not require any additional effort. However, if your enterprise manages root certificate updates manually, you need to install the new intermediate and root certificates. For information on downloading and installing the certificates, see KB91697.
Make sure to set up Trellix Endpoint Security (HX) before installing Trellix Endpoint Forensics Bridge.
Set up Trellix ePO:
Install Trellix Endpoint Forensics Bridge or Agent (HX) client and extension.
You can use HX to update your Agent (HX) to the most recent version in case the version deployed through Trellix ePO is less recent.
Configure the Agent (HX) extension with HX information (agent_config.json)
For details about the configuration, see step 2 from Install Trellix Endpoint Forensics Bridge or Agent (HX) client and extension. This step is applicable if you have used Trellix ePO to install Agent (HX).
Set up Trellix Endpoint Security (HX):
Configure Trellix EDR and Trellix ePO consoles.
Configure any desired dashboards and actions if consuming Agent (HX) alerts in Trellix ePO
No additional Trellix EDR configurations needed if consuming Agent (HX) alerts in Trellix EDR
Notes
You can also choose to use HX to upgrade Agent (HX) installed using Trellix ePO to the latest version.
The IOC alerting is not optionally installed on HX and does not require a module management. However, you need to configure the IOC-related policies.
For the Forensics Bridge module, make sure that you have enabled each alert type that you want to send to either Trellix ePO or Trellix EDR.
Make sure to configure and enable HX modules such as IOC, AMSI, and Logon Tracker to send Agent (HX) alerts to Trellix EDR and Trellix ePO.
Install and deploy Agent (HX) on endpoints
You can install Trellix Endpoint Security Agent (HX) on endpoints to collect the alerts generated by modules such as Logon Tracker, AMSI, IOC, etc., and send them to Trellix ePO and Trellix EDR using the Forensics Bridge module.
You can install Agent (HX) using Trellix ePO - On-prem or Trellix ePO - SaaS:
Before deploying the Agent (HX) package on endpoints, make sure to configure a policy on Agent (HX). For details, see step 2 in Install and deploy Agent (HX) using Trellix ePO - On-prem.
Once the Agent (HX) installation is completed, make sure to verify the installation. For details, see Verify the Agent (HX) installation.
Install and deploy Agent (HX) using Trellix ePO - On‑prem
You can install and deploy Agent (HX) using Trellix ePO - On‑prem.
Check in the Agent (HX) package.
On Trellix ePO - On‑prem, navigate to Menu → Software → Software Catalog.
On Software Catalog, navigate to Threat Analysis and select the Trellix Endpoint Forensics Bridge product. Then under Actions, click Check‑in.
Note
You can also choose to select the appropriate Trellix Endpoint Security Agent (HX) package for Windows, Linux, or macOS endpoints.
After you check in the Agent (HX) package, the extension is listed on the Extensions page and the installation packages are listed on the Main Repository page.
Configure a policy on Trellix Endpoint Forensics Bridge.
This policy configures the HX IP address details so that Trellix Agent can communicate with HX to pull configurations and security content.
Note
As an administrator, you can assign Trellix Forensics: View and change policies or Trellix Forensics: View policies permission to an user to view and change policies on Trellix ePolicy Orchestrator.
On Trellix ePO, select Menu → Policy → Policy Catalog.
From the Product drop‑down list, select Trellix Forensics.
Select Trellix Default and choose to duplicate the policy.
In Agent config, add the Agent (HX) configuration certificate‑related details consisting of the HX server IP:
On the HX UI, navigate to Admin → Agent Versions to download and extract the Agent (HX) installer package.
Open the agent_config.json agent_config.json file, from the extracted installer package, copy and paste the content into Agent config.
Click Save.
After you create a policy, assign it to managed endpoints to configure Agent (HX) on those endpoints.
For details about assigning a policy to managed endpoints, see Assign a policy to a System Tree group or Assign a policy to a managed system.
Deploy Agent (HX) to endpoints.
On Trellix ePO - On‑prem, select Menu → Software → Product Deployment, then click New Deployment.
Enter a name and description for the deployment task.
Select the appropriate Trellix Endpoint Security Agent (HX) package for Windows, Linux, or macOS endpoints as the software package.
Select Individual Systems or by Tag or Group to open the System Selection window.
From System Tree, on the System Selection page, select the endpoints where you want to deploy the Agent (HX), then click OK.
Click Run Immediately to start the deployment task immediately.
Click Save.
Deploy Agent (HX) using Trellix ePO - SaaS
You can deploy Agent (HX) using Trellix ePO - SaaS.
Log on to Trellix ePO - SaaS as an administrator.
Select Menu → Software → Product Deployment.
Select Advanced Options → Advanced Product Deployment, then click New Deployment.
Enter a name and description for the deployment task.
Select the appropriate Trellix Endpoint Security Agent (HX) package for Windows, Linux, or macOS endpoints as the software package.
Select Individual Systems or by Tag or Group to open the System Selection window.
From System Tree, on the System Selection page, select the endpoints where you want to deploy the client software, then click OK.
Choose Run immediately to start the deployment task immediately.
Click Save.
Verify the Agent (HX) installation
Once Agent (HX) is installed, you can follow either of the below methods to verify the installation:
On Trellix ePO – Navigate to Systems Tree and select the endpoint. On the Products tab, the Trellix Endpoint Forensics Bridge product is listed.
On endpoint – The xAgt service runs on the endpoint.
You can find the Agent (HX) installation, logs, and data paths in the following locations for different endpoints:
Installation path
Windows – C:\Program Files (x86)\Trellix\Trellix Forensics\
Linux – /opt/fireeye and /var/lib/fireeye/
Mac – /Library/FireEye/ and /Library/Extensions/FireEye.kext/
Logs path
Windows – C:\ProgramData\Trellix\Trellix Forensics\logs
Data path
Windows – C:\ProgramData\Trellix\Trellix Forensics\
Configure Trellix EDR and Trellix ENS for compatibility
If you are using Endpoint Forensics Bridge together with Trellix EDR, you need to make sure there are no conflicts between the two. To make sure Trellix EDR is configured properly to co-exist with Agent (HX), configure a Trellix EDR policy to exclude processes from Trellix EDR traces to avoid detecting them as threats when any alert triggers.
Note
You can Configure Trellix Endpoint Security products such as Trellix ENS and Endpoint Security (HX) to coexist on endpoints. For details, see KB96791.
On Trellix ePO, select Menu → Policy → Policy Catalog.
From the Product drop-down list, select Trellix EDR.
Create a new policy. On the policy page, navigate to the Trace tab and click Show Advanced.
In the Exclude process(es) by full path on Windows option, add the following processes full path to exclude their binaries from traces.
C:\Program Files (x86)\FireEye\xagt\xagt.exe
C:\WINDOWS\FireEye\FeAmsiProvider32.dll5. Click Save.
After you create a policy, assign it to managed endpoints to configure Agent (HX) on those endpoints.
Upgrade Agent (HX)
If you are not using Trellix ePO to deploy Agent (HX), you need to update to a version of Agent (HX) compatible with Trellix Endpoint Forensics Bridge through HX. The Endpoint Forensics Bridge requires Agent (HX) version 35.x.y or higher.
Even if you are using Trellix ePO to install Agent (HX), you can use HX to upgrade your Agent (HX) to the latest version in case the version deployed through Trellix ePO is less recent.
Install HX modules
Modules are additional capabilities that you can add to your HX server and deliver directly to an assigned endpoint. When you install a module, new policies are added to HX. If a module provides detection capabilities, the results appear in your existing alert workflow.
You can install additional modules from the Available Modules page. These modules are called Installable modules. After you install and enable a module, the module name appears in the Modules menu on the Web UI.
You can install the following HX modules:
AMSI
Logon Tracker
Forensics Bridge
You can install modules either using the Install Modules or Available Modules options.
Install Modules — Download the module .cms file from the Marketplace and upload it manually. Then go to Actions → Install.
Available Modules — Select the module and go to Actions → Install.
To manually install the modules, follow the below steps.
Log on to the HX UI with your administrator credentials.
From the Modules menu, select Endpoint Module Administration to access the Modules page.
On the Modules page, click Install Modules to upload the module .cms file to the HX Web UI.
In the Upload Module dialog box, click Select File.
Navigate to the downloaded module .cms file, select the .cms file, and click Open.
The selected .cms file appears in the Upload Module dialog box.
In the Upload Module dialog box, click Upload.
Once the file is uploaded, a message at the top of the page shows that the installation is initiated.
After the module is installed, it is listed on the Installed Modules page.
Configure HX modules and policies
You must configure modules in the HX UI after you install them. Modules that have a server component and an agent component. Use the Endpoint Module Administration page of the Modules menu to enable the server component. Use the Policies page of the Admin menu to enable the agent component on the default agent policy.
Note
The IOC alerting is not optionally installed on HX and does not require the module management. However, you need to configure IOC-related policies.
Configure modules on the Endpoint Module Administration page:
Log on to the HX UI with your administrator credentials.
From the Modules menu, select Endpoint Module Administration to access the Modules page.
From the Action list on the Modules page for the module that you want to configure, select Configure.
Change the configuration settings as needed.
Click Save Settings to save your changes.
Configure modules on the Agent policy page:
Log on to the HX UI with your administrator credentials.
From the Admin menu, select Policies to access the Policies page.
On the Policies page, you can edit the default agent policy or create a custom policy to configure modules.
Note
For the Forensics Bridge module, make sure that you have enabled each alert type that you want to send to Trellix ePO and Trellix EDR.
d. Click Save. After the agent policy is customized, you can assign it to an endpoint (host set).
Note
Based on the Poll for Agent config settings on the Edit Policies page, Agent (HX) will poll and pull policies from HX. The default value set to poll and pull policies is 15 mins.
Enable HX modules
You can use the HX UI to enable the modules you have installed.
Enable modules on the Endpoint Module Administration page:
Log on to the HX UI with your administrator credentials.
From the Modules menu, select Endpoint Module Administration to access the Modules page.
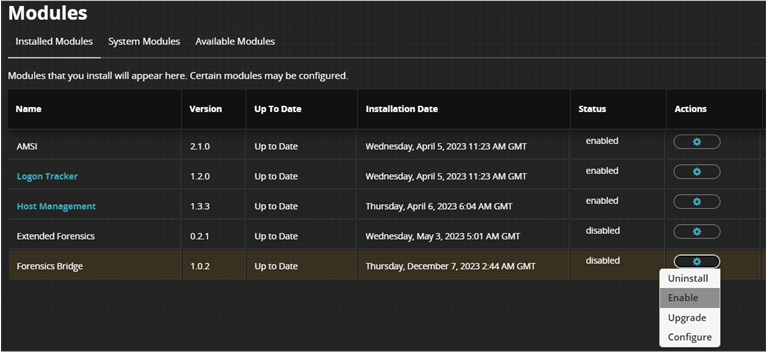
From the action list on the Installed Modules page, select Enable to enable the module.
d. On the Edit Policy page, click Categories to expand the list of categories, select the agent component of the module or modules you have installed, and click Apply.
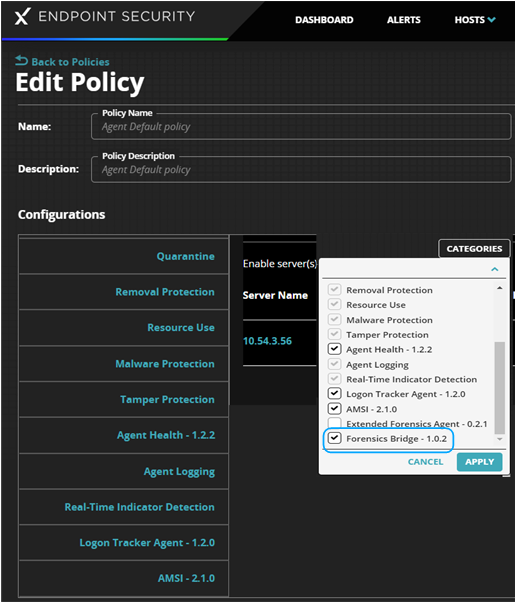
The selected categories appear on the agent policy.
e. From the list of configurations on the Edit Policy page, click the agent component of the module you have installed and use the toggle to enable the module in the Web UI.
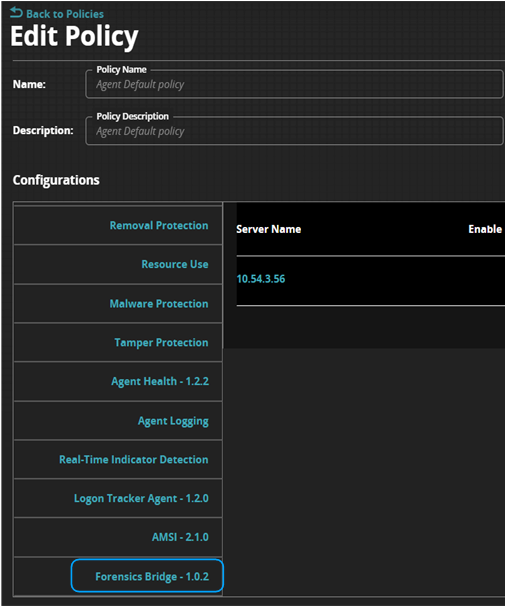
f. Enable modules to send alerts to Trellix ePO and Trellix EDR.
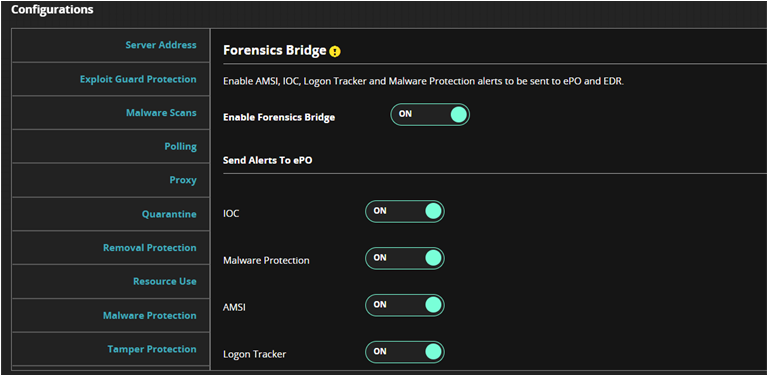
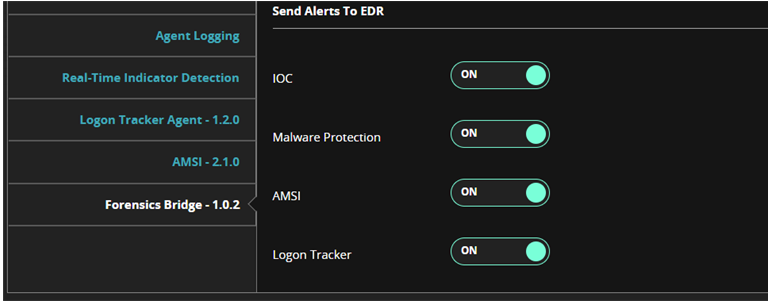
g. Click Save to save your changes to the default agent policy.
Configure Trellix EDR and Trellix ePO consoles
Configure Trellix EDR and Trellix ePO consoles for use of the Agent (HX) alerts. This is the final step in Trellix Endpoint Forensics Bridge setup to fine tune your consoles.
Trellix EDR
Trellix EDR consumes Agent (HX) alerts like any other alerts. The Agent (HX) alerts appear on the Trellix EDR Monitoring and Alerting pages. You can investigate and perform the same set of actions that you take for the alerts generated by Trellix EDR.
Note
There are no additional Trellix EDR configuration options needed to use of the Trellix Endpoint Forensics Bridge or Agent (HX) data. However, make sure to configure the HX modules to send the Agent (HX) alerts to Trellix EDR and Trellix ePO.
Trellix ePO
You can configure Trellix ePO to further take advantage of the Trellix Endpoint Forensics Bridge or Agent (HX) data. You can create customized dashboards, tags, and actions.
Analyze the Trellix Endpoint Forensics Bridge or Agent (HX) data
You can analyze and investigate the Agent (HX) data consists of IOC, Logon Tracker, and AMSI alerts in Trellix EDR and Trellix ePO consoles to contain and remediate threats.
Trellix EDR
Trellix EDR consumes Agent (HX) alerts like any other alerts. The Agent (HX) alerts appear on the Monitoring and Alerting pages. You can investigate and perform the same set of actions that you take for the alerts generated by Trellix EDR.
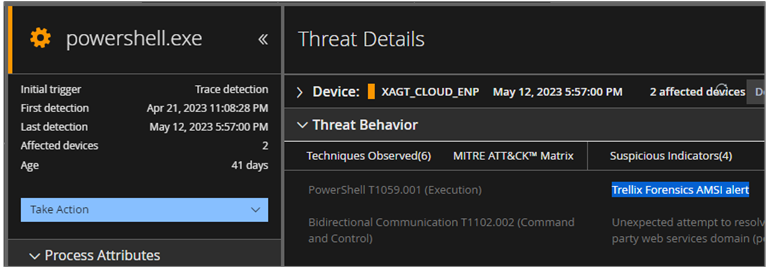
If you want to do in-depth investigation of an alert, you can transition to the HX controller to check the corresponding triage package of the alert. To do so, navigate to the Hosts page to check the triage acquisition for the host. Using HX, you can perform any additional actions on the host offered by HX.
Trellix ePO
Trellix ePO consumes Agent (HX) alerts like any other alerts. The Agent (HX) alerts appear on the Threat Events log page. You can perform the same set of actions that you take for the alerts and threats generated by Trellix ePO.
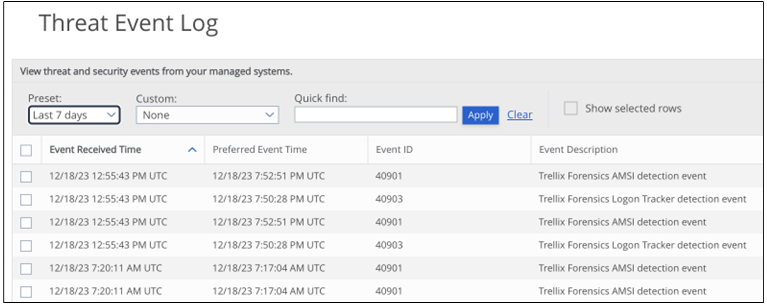
If you want to do in-depth investigation of an alert, you can transition to the HX controller to check the corresponding triage package of the alert. To do so, navigate to the Hosts page to check the triage acquisition for the host. Using HX, you can perform any additional actions on the host offered by HX.
Trellix Endpoint Forensics Bridge or Agent (HX) alert data reference
Abbreviation | Name | Event ID | What it does |
|---|---|---|---|
AMSI | Anti-Malware Scan Interface | 40901 | Monitors, detects, and blocks suspicious scripts, and generates alerts when malicious scripts are detected. AMSI compares scripts to preconfigured YARA rules. If any script matches a rule, the event and detection metadata is collected, and AMSI generates an alert. |
IOC | Indicators of Compromise | 40900 | Rules you can manage in HX that detect many types of suspicious activities, such as:
|
LT | Logon Tracker | 40903 | Helps you detect and investigate lateral movement within your enterprise environment. Logon Tracker aggregates historical activity, monitors new activity, and presents this data in an interface designed for analyzing investigative leads such as compromised accounts and for hunting suspicious activity such as RDP activity by privileged accounts. When lateral movement on your environment meets the criteria of any of the custom rules you create, Logon Tracker generates an alert. |