Using the Outlook add-in, users and administrators can report mail as junk or phishing. Email reported as junk is moved to the Junk Email folder and email reported as phishing is moved to the Deleted Items folder. Configured recipients receive notifications from Email Cloud when email is reported using the add-in.
Downloading the Outlook add-in in Email Cloud
From the Outlook add-in page, you can download the manifest needed to install the add-in and manage reported mail notification recipients.
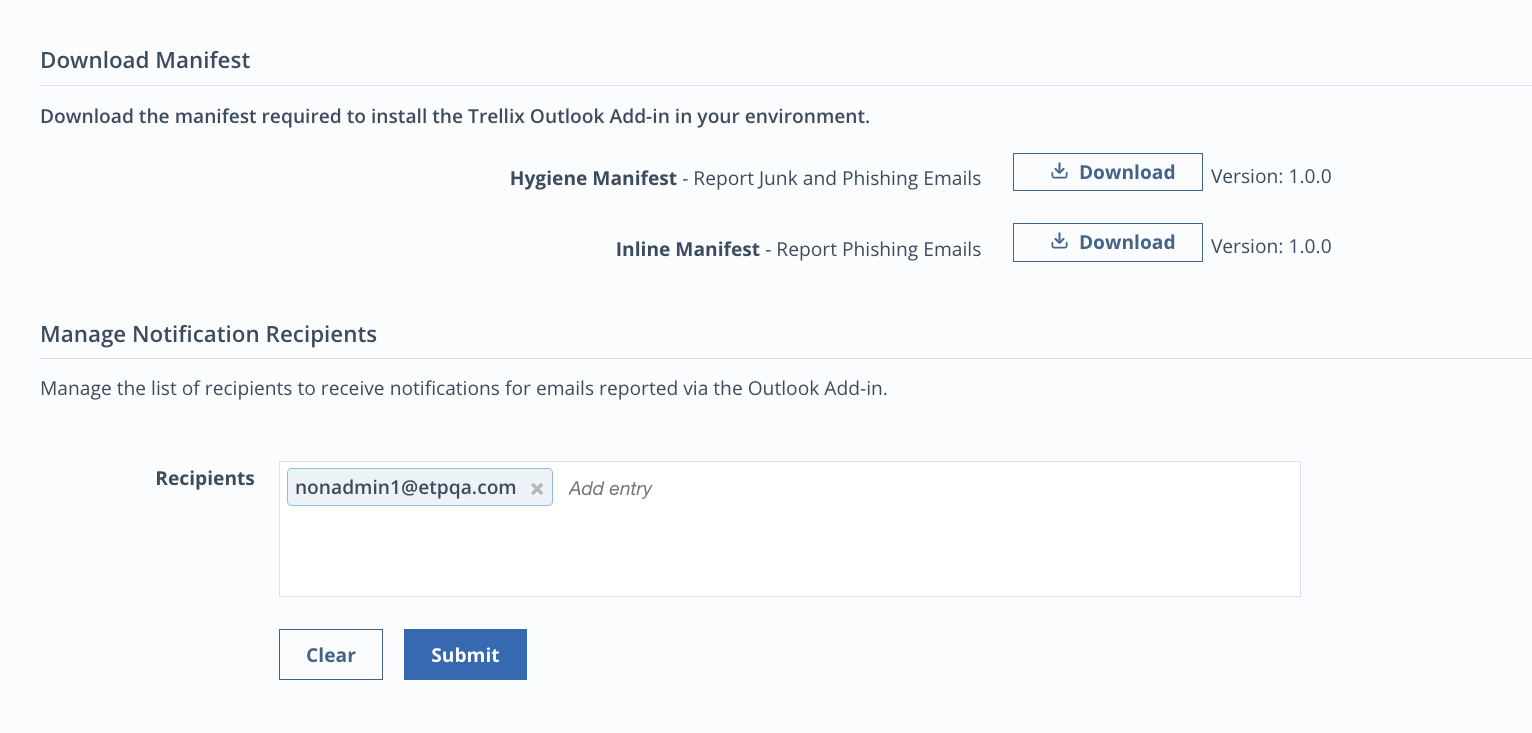
To download the manifest.xml required to install the add-in, click Download Manifest next to the corresponding manifest. If you select the inline manifest, end users will only be able to see the Report as Phishing option in the add-in. Inline administrators can only download the inline manifest (Report as Phishing). Hygiene administrators can download the Inline Manifest (Report as Phishing) and the Hygiene Manifest (Report as Junk, Report as Phishing).
After you download the manifest, you must install the add-in in Outlook. See Installing the add-in in Outlook.
To add notification recipients, manually enter a comma-separated list of recipient addresses in the Add entry box. Click Submit.
Installing the add-in in Outlook
To install the add-in:
Note
For more information on deploying add-ins in Microsoft, see the Microsoft documentation.
Download the manifest in Email Security — Cloud portal. See Managing the Outlook add-in in Email Cloud.
Log in to the Microsoft 365 admin center.
Click Settings > Integrated apps.
Click Upload Custom Apps.
Next to Upload manifest file, click Choose File.
Select the manifest downloaded in Step 1.
Click Open > Next.
Select who it will be deployed for: Just me, Entire organization, or Specific users/groups.
If you selected Specific users/groups, search for and add them.
Click Next.
Click Accept Permission.
Select your account.
Click Accept > Next.
Click Finish Deployment. Deployment is confirmed. It may take up to 6 hours to appear in Outlook.
Supported versions
The Outlook add-in is supported in the Outlook Web App (OWA) and by the following versions of Outlook apps on Windows and Mac:
Office on Windows (connected to a Microsoft 365 subscription) - Version 2008 (build 13127.20000) or later
Office on Mac (both subscription and one-time purchase Office on Mac 2019 and later) - 16.40 or later
Using the Outlook add-in
Important
You can only report emails received within the last 7 days.
Submissions are ignored for emails that were not scanned by Trellix, such as internal messages.
Submissions via the add-in do not result in any feedback regarding the analysis outcome. For more information, see the community article.
If you are using Outlook:
In Outlook, select the mail you wish to report.
From the top menu, select Report Message
Select Report as Junk or Report as Phishing.
Report as Junk is available for Inline with Hygiene users only.
Click Report.
If you are using the Outlook web app (OWA):
In OWA, select the mail you wish to report.
Click the more actions menu (three horizontal dots).
Select Trellix Email Security.
Select Report as Junk or Report as Phishing.
Report as Junk is available for Inline with Hygiene users only.
Click Report.
In both Outlook and OWA, click Report Message > Help to see the Trellix help dialog.
Updating the add-in
When a new version of the Trellix Outlook add-in manifest needs to be installed in the Email Security — Cloud portal, you must update the add-in in the Microsoft 365 admin center.
Note
If the Trellix Email Security — Cloud license mode is changed, the Trellix Outlook add-in must be uninstalled and re-installed using the corresponding manifest (either inline or hygiene). Do not use the following procedure for license mode changes.
To update the add-in:
Download the new version of the Trellix Outlook add-in manifest in the Trellix portal. See Managing the Outlook add-in in Email Cloud.
In the Microsoft 365 admin center, click Settings > Integrated apps.
Select the Trellix Email Security add-in app. The Trellix Outlook add-in dialog opens.
Under Actions, select Update add-in.
Click Choose file and select the manifest downloaded in Step 1. Click Next.
The update will be confirmed. Click Done. It may take up to 24 hours for the update to be reflect in the add-in.