Introduction
Trellix Drive Encryption - SaaS protects data from unauthorized access, loss, and exposure. With data breaches on the rise, it is important to protect information assets and comply with privacy regulations
The following Trellix system recovery tools can be used in conjunction with
DETech (WinPE V3, V4, V5, and V6)
DEOpalTech (WinPE V3, V4, V5, and V6)
DETech (Standalone)
DEOpalTech (Standalone)
DETech (Standalone) and DEOpalTech (Standalone) are smaller, ready-made system recovery tools that allow the administrator to perform normal recovery functions. DETech WinPE and DEOpalTech WinPE require the end user to download the relevant Microsoft ADK or AIK to build an image of WinPE.
DETech Standalone's recovery features are specific to Trellix Drive Encryption - SaaS, while WinPE recovery can be used for both Trellix Drive Encryption - SaaS and Windows recovery.
Audience
This guide is intended for experienced system administrators, security managers, and corporate security administrators. Knowledge of PC boot process (UEFI/GPT), full-disk encryption, and a general understanding of the aims of centrally managed security are required.
Using this guide
This guide helps corporate security administrators to understand the system rescue tools, DETech and DEOpalTech (Standalone) and DETech and DEOpalTech (WinPE). This document includes procedures to recover data from systems that are unrecoverable using features like self-recovery and administrative recovery.
What DETech does
DETech is the name given to a family of tools that are used for rescue and disaster-recovery of systems which have an error that makes self or administrative recovery of the system impossible.
These are examples of reasons why rescue might be necessary:
The Pre-Boot File System (PBFS) has become corrupted, preventing authentication in the normal fashion
One or more sectors of the disk have failed, causing the OS to be unable to boot or the filesystem to be corrupted.
An unexpected external event resulted in the OS being unable to boot.
Several different functions are provided by the DETech family, with a number of tools that provide a mixture of functions for different applications. We recommend that the expert tools listed below are used only by experienced administrators. For emergency boot purposes, a rudimentary tool that provides only an emergency boot capability is provided to allow inexperienced users to perform the rescue.
These expert tools are provided for comprehensive rescue with WinPE environments, and can be used on UEFI booting systems.
DETech (WinPE 3.x, 4.x, 5.x, and 6.x)
DEOpalTech (WinPE 3.x, 4.x, 5.x, and 6.x)
DETech UEFI Standalone
These expert tools are provided for comprehensive rescue when booting from a USB memory stick:
DETech (UEFI) for software and Opal encryption on UEFI-based systems
Note
On UEFI systems, SecureBoot needs to be disabled in order to use DETech (Standalone) from a USB memory stick.
DETech and DEOpalTech have similar functionality. However, Opal versions of DETech do not include certain features related to encrypting and decrypting data, such as Crypt Sectors and Force Crypt Sectors because Opal disks are self-encrypting disks.
Note
For , Opal disks are supported only using Advanced Host Controller Interface (AHCI) mode.
Feature | Function | DETech WinPE | DETech Standalone | DEOpalTech WinPE | DEOpalTech Standalone |
|---|---|---|---|---|---|
Emergency boot | Allows you to boot through to Windows by authenticating through DETech instead of the normal PBA. Once successfully booted into Windows, the PBFS is rebuilt and all user data is synchronized again from the server. This should be considered as the first-line rescue capability, resolving the majority of issues. | √ | √ | ||
Retrieve | Allows you to authenticate (and therefore unlock) the disk within a PE environment and copy data off or onto the disk. Useful for pulling data off an encrypted drive without requiring to boot from the drive. | √ | √ | ||
Remove | Allows you to remove , from the disk after decrypting the disk. This feature should not be used instead of server-initiated removal via policy. Useful if policy enforcement fails. We recommend that you make a sector level copy of the disk before attempting this operation. | √ | √ | √ | √ |
Crypt | Allows you to manually encrypt or decrypt areas of the disk, ensuring that only areas that are currently not encrypted can be encrypted, and only areas that are currently encrypted can be decrypted. This option should be considered only if other rescue options have failed, and only once a sector level copy has been made. | √ | √ | ||
Force | Allows you to manually encrypt or decrypt areas of the disk, but does not prevent encrypted areas of the disk from being encrypted (leading to multiple-encryption), or decrypted areas of the disk from being decrypted (leading to multiple-decryption). This option allows multiple encryption or decryption to be performed. Therefore it should be considered only as a last resort, and only once a sector level copy has been made. | √ | √ | √ | |
Repair disk information | Allows you to repair various pieces of metadata in case of corruption; for example, repairing the Disk Information metadata. Useful in case of unknown corruption. We recommend making a sector level copy of the disk before attempting this operation. | √ | |||
View disk information | Allows you to read metadata; for example, view the Disk Keycheck value, which can be used to locate a system key in the database. Useful when a system has been deleted from , making export of the recovery file impossible without knowing the Keycheck value. | √ | √ | √ |
Preparing for DETech rescue
DETech contains some powerful rescue tools, and should not be used without proper understanding of how the tools work. Some of the tools can damage the data on disks if used without due care and attention.
We recommend that you take time to create and try out the various DETech rescue tools in a test environment to gain familiarity with the tools before a real-life rescue situation occurs.
If in doubt, contact Support for assistance.
We also strongly recommend that, prior to performing any DETech rescue, a sector-level copy of the disk be made as a backup. Should you perform a step that inadvertently damages some of the data on the disk, the backup will allow you to try the rescue again.
Understanding the daily authorization code
To prevent unskilled personnel from using the powerful features in DETech, some recovery operations in DETech require authorization. You authorize these features by typing a four-digit code into the authorization screen. This daily authorization code is also known as Code of the Day (COD).
Customers can download the COD tool from the website.
Note
All DETech operations require authentication. However, only the administrative operations require authorization with the four-digit daily authorization code.
The following operations do not require the daily authorization code:
Viewing and retrieving data from the disk (DETech WinPE)
Using the workspace utility to view sectors on the disk
Using the disk information utility to identify encrypted regions on the disk
Setting the encryption algorithm used by DETech
Setting the boot disk where DETech performs its operations
The following operations do require the daily authorization code:
Removing (decrypting the disk and restoring the Windows boot manager)
Repairing disk information
Using the crypt sectors and force crypt sectors utilities to manually encrypt or decrypt specific sectors
1 | Introduction
Editing the disk crypt state
Performing an emergency boot (feature available in DETech Standalone and DEOpalTech Standalone)
Using DETech
In general, the use of DETech is made up of these basic steps:
Start DETech.
Authenticate by using user credentials or a recovery XML file.
Set the boot disk (if required) to make sure that DETech authenticates the correct disk.
Authorize DETech, if the function you are about to perform requires it.
Perform the rescue operation.
Note
The DETech version must be the same or later than the software that activated the system. Recovery of older 7.x Legacy BIOS clients will require the use of 7.x Legacy BIOS DETech. Drive Encryption 8.0 does not supports Legacy BIOS.
Export the recovery information file from ePolicy Orchestrator - SaaS
Exporting the recovery information is an optional step. In most recoveries, the administrator can authenticate by simply entering their credentials (or other token data). However, if the PBFS has become corrupted, it might be impossible to authenticate a user throu password or other token in DETech because the data files containing the user's token data are corrupted.
In this case, makes it possible to export the system's recovery data to a plain-text file, allowing it to be taken to the affected system, and then used to authenticate the system without DETech needing to access the PBFS.
The recovery file contains secret data that allows access to the encrypted system; it must be handled securely and shredded from the file system where it is placed once the recovery operation has been completed.
Perform this task to export the recovery information file for the system from ePolicy Orchestrator - SaaS. There is a recovery information file in for all clients where encryption is active. This file can be used to authenticate the system in DETech. For more information, see the system recovery section in the Product Guide.
Task
Insert a removable media, such as a USB memory stick, to the system where is installed.
1 | Introduction
From the console, click Menu → Systems → System Tree to open the Systems page, then select the group from the System Tree pane.
Select the system, then click Actions → Drive Encryption → Export Recovery Information to open the Export Recovery Information confirmation page.
Click Yes to export the recovery information file. The Export Recovery Information page lists the Export information (.xml) file.
Right-click the .xml file and save it to the inserted removable media.
Note
The recovery information file has the general format of the client system name (.xml). Handle the file securely and shred (not just delete) it when recovery is completed.
DETech PE
DETech can be run in Standalone mode or as a Windows application. The DETech Windows application can be run from PE environments. This provides an environment that is similar to Windows and allows the administrator to recover data without having to fully decrypt the disk.
Licensing requirements dictate that you must build these tools yourself from your licensed copy of Windows, because license restrictions prevent from distributing the necessary Windows components.
It is entirely the responsibility of the qualified system administrators and security managers to take appropriate precautions while using the DETech recovery tool. DETech provides very low level control of the disk, and administrative error when using this tool can result in a loss of data. We recommend that only experienced administrators work with DETech.
 Caution
Make sure that you do not restart the client system when DETech is decrypting the disk while running from a PE environment. For more information, see KB74056.
 Note
Note
A tool is available to allow automated creation of Win PE 3.x and higher. This tool enables injection of files and addition of registry items into the WinPE image. For more information, see KB79853.
Add DETech or DEOpalTech to a WinPE 32-bit CD/DVD
You can add DETech or DEOpalTech to a WinPE 32-bit CD/DVD.
Add DETech to a Microsoft WinPE 32-bit CD/DVD
Use this task to create a bootable WinPE recovery CD/DVD from the operating system. To do this, you must configure WinPE to include the plug-in for , which supports the x86 (32-bit) architecture.
The following information is intended for System Administrators when modifying the registry details:
Registry modifications are irreversible and if done incorrectly can cause system failure.
We recommend that you back up your registry and understand the restore process before you proceed with the registry modification. For more information, see http:// support.microsoft.com/kb/256986.
Do not run a .REG file, which is not considered to be a genuine registry import file.
11
2 | Introduction
Do not combine the 32-bit and 64-bit architectures.
Download the Windows Assessment and Deployment Kit (ADK) for the operating system from the Microsoft website.
Install the ADK on the Windows operating system by burning it to a CD/DVD or by extracting it using WinRAR.
Click Windows | All programs | Windows Kits | Windows ADK, then run the tool as Administrator to display the command prompt.
Go to <Windows ADK install path>\Deployment Tools, then run the copype.cmd command using this syntax:
copype.cmd <architecture> <destination>Where
<architecture> can be x86 or amd64
<destination> is a path to the local directory
For example, copype.cmd x86 c:\winpe_x86
This command creates the required directory structure and copies all the necessary files for that architecture.
To mount the Windows PE image (Winpe.wim) base to the Mount directory to access the WinPE image, open the command prompt, then enter this command:
Dism.exe /Mount-Wim /WimFile:C:\winpe_x86\media\sources\boot.wim /index:1 /MountDir:C:\winpe_x86\mountEdit the WinPE environment as follows:
Open regedit, then load the system hive under [HKEY_LOCAL_MACHINE].
Click HKEY_LOCAL_MACHINE, File, then click Load Hive.
From the mounted WinPE image, navigate to this system file C:\winpe_x86\mount\Windows\System32\Config\SYSTEM.
Name the WinPE hive, for example, pe.
Access the [HKEY_LOCAL_MACHINE\pe\ControlSet001\Control\Class\{4D36E967-E325-11CE-BFC1-08002BE10318}] registry entry.
Edit the multi-string upper filters with values in the specified order:
MfeEpePC
PartMgr
Right-click HKEY_LOCAL_MACHINE\pe\ControlSet001\services, then create the MfeEpePC and MfeCcde keys.
2 | Introduction
h. Modify the values of the [HKEY_LOCAL_MACHINE\pe\ControlSet001\services\MfeEpePC] key as follows:
"Type"=dword:00000001"Start"=dword:00000000"ErrorControl"=dword:00000003
Note
The keys are still 32-bit dword even though you are using a 64-bit system.
i. Modify the values of the [HKEY_LOCAL_MACHINE\pe\ControlSet001\services\MfeCcde] key as follows:
"Type"=dword:00000001"Start"=dword:00000000"ErrorControl"=dword:00000003"Group"=string:Primary Disk
Note
The keys are still 32-bit dword even though you are using a 64-bit system.
j. Click pe, then click File → Unload hive to unload the WinPE hive.
k. Close the Registry Editor.
7. Create the necessary folders in the mounted WinPE image, then copy the files to the appropriate folders. For details, see Folders and files for WinPE 32-bit CD/DVDs.
8. Commit the changes by performing these steps:
To commit changes to WIM, enter this command:
Dism.exe /Unmount-Wim /MountDir:C:\winpe_x86\mount\ /CommitTo create a bootable ISO image, enter this command for the appropriate WinPE version:
WinPE Version | Command |
|---|---|
Version 3 |
|
Version 4 | oscdimg -n -bc:\winpe_x86\etfsboot.com C:\winpe_x86\ISO C:\winpe_x86\ winpe_x86.iso |
Version 5 | oscdimg.exe -m -o -u2 -udfver102 -bootdata:2#p0,e,b"C:\Winpe_x86\ fwfiles\etfsboot.com"#pEF,e,b"C:\Winpe_x86\fwfiles\efisys.bin" "C:\Winpe_x86\media""C:\Winpe_x86\winpe_x86.iso" |
Version 6 | MakeWinPEMedia /iso c:\winpe_x86 winpe_x86.iso |
The ISO image for WinPE 32-bit for DETech can be found at C:\winpe_x86\winpe_x86.iso
Burn this image to a CD/DVD and boot the system from the CD/DVD.
At the command prompt, enter these commands:
cd\
cd Program Files\Drive Encryption
EETech.exe
The DETech screen appears.
Add DEOpalTech to a Microsoft WinPE 32-bit CD/DVD
Use this task to create a bootable DEOpalTech WinPE recovery CD/DVD from the Windows operating system. To do this, you must configure WinPE to include the plug-in for , which supports the x86 (32-bit) architecture.
Note: Do not boot the system from WinPE CD/DVD while decryption is in progress.
The following information is intended for System Administrators when modifying the registry details:
Registry modifications are irreversible and if done incorrectly can cause system failure
We recommend that you back up your registry and understand the restore process before you proceed with the registry modification. For more information, see https://learn.microsoft.com/en-us/troubleshoot/windows-server/performance/windows-registry-advanced-users.
Do not run a .REG file, which is not considered to be a genuine registry import file.
Download the Windows Assessment and Deployment Kit (ADK) for Windows from the Microsoft website.
Install the ADK on the Windows operating system by downloading and double-clicking the ADKsetup.exe file.
Select Search and type Deployment to display the Deployment and Imaging Tools Environment icon, then run the tool as Administrator to display the command prompt.
Go to <Windows ADK install path>\Deployment Tools, then run the copype.cmd command using this syntax:
copype.cmd <architecture> <destination>Where
<architecture> can be x86 or amd64
<destination> is a path to the local directory
For example,
copype.cmd x86 c:\winpe_x86This command creates the required directory structure and copies all the necessary files for that architecture.
To mount the Windows PE image (Winpe.wim) base to the Mount directory to access the WinPE image, open the command prompt, then enter this command:
Dism.exe /Mount-Wim /WimFile:C:\winpe_x86\media\sources\boot.wim /index:1 /MountDir:C:\winpe_x86\mountEdit the WinPE environment as follows:
Open regedit, then load the system hive under [HKEY_LOCAL_MACHINE].
Click HKEY_LOCAL_MACHINE, File, then click Load Hive.
From the mounted WinPE image, navigate to this system file
C:\winpe_x86\mount\Windows\System32\Config\SYSTEM.Name the WinPE hive, for example,
pe.Access the
[HKEY_LOCAL_MACHINE\pe\ControlSet001\Control\Class\{4D36E967-E325-11CE-BFC1-08002BE10318}]registry entry.Edit the multi-string upper filters with values:
MfeEpeOpal
MfeEpePC
PartMgr
Right-click HKEY_LOCAL_MACHINE\pe\ControlSet001\services, then create the MfeEpeOpal, MfeEpePC and MfeCcde keys.
Modify the values of the [HKEY_LOCAL_MACHINE\pe\ControlSet001\services\MfeEpeOpal] key as follows:
"Type"=dword:00000001
"Start"=dword:00000000
"ErrorControl"=dword:00000003
Modify the values of the [HKEY_LOCAL_MACHINE\pe\ControlSet001\services\MfeEpePC] key as follows:
"Type"=dword:00000001
"Start"=dword:00000000
"ErrorControl"=dword:00000003
Note: The keys are still 32-bit dword even though you are using a 64-bit system.
Modify the values of the [HKEY_LOCAL_MACHINE\pe\ControlSet001\services\MfeCcde] key as follows:
"Type"=dword:00000001
"Start"=dword:00000000
"ErrorControl"=dword:00000003
"Group"=string:Primary Disk
Click pe, then click File → Unload hive to unload the WinPE hive.
Close the Registry Editor.
Note: The keys are still 32-bit dword even though you are using a 64-bit system.
Create the necessary folders in the mounted WinPE image, then copy the files to the appropriate folders. For details, see Folders and files for WinPE 32-bit CD/DVDs.
Commit the changes by performing these steps:
To commit changes to WIM, enter this command:
Dism.exe /Unmount-Wim /MountDir:C:\winpe_x86\mount\ /CommitTo create a bootable ISO image, enter this command for the appropriate WinPE version:
WinPE
VersionCommand
Version 3
oscdimg -n -bc:\winpe_x86\etfsboot.com C:\winpe_x86\ISO C:\winpe_x86\winpe_x86.isoVersion 4
oscdimg -n -bc:\winpe_x86\fwfiles\etfsboot.com C:\winpe_x86\Media C:\winpe_x86\winpe_x86.isoVersion 5
oscdimg.exe -m -o -u2 -udfver102 -bootdata:2#p0,e,b"C:\Winpe_x86\fwfiles\etfsboot.com"#pEF,e,b"C:\Winpe_x86\fwfiles\efisys.bin" "C:\Winpe_x86\media" "C:\Winpe_x86\winpe_x86.iso"Version 6
MakeWinPEMedia /iso c:\winpe_x86 winpe_x86.iso
The ISO image for WinPE 32-bit for DETech can be found at C:\winpe_x86\winpe_x86.iso
9. Burn this image to a CD/DVD and boot the system from the CD/DVD.
Note
Do not boot the system from WinPE CD/DVD while decryption is in progress.
10. At the command prompt, enter these commands:
cd\
cd Program Files\Drive Encryption
EETech.exe
The Trellix DETech (Opal) screen appears.
Folders and files for WinPE 32-bit CD/DVDs
Add the files to the appropriate locations in the mounted WinPE image as indicated in these tables.
Folders
Location | Folder to be created |
|---|---|
C:\Winpe_x86\mount\Program Files\ | Drive Encryption |
C:\Winpe_x86\mount\Program Files\Drive Encryption\ | EpeReaders |
C:\Winpe_x86\mount\Program Files\Drive Encryption\ | EpeTokens |
C:\Winpe_x86\mount\Program Files\Drive Encryption\ | Locale |
C:\Winpe_x86\mount\Program Files\Drive Encryption\ | Theme |
Files
Location | Files to be copied |
|---|---|
C:\Winpe_X86\mount\Windows\System32\Drivers\ | MfeCcde.sys |
C:\Winpe_x86\mount\Program Files\Drive Encryption\ | EETech.exe |
C:\Winpe_x86\mount\Program Files\Drive Encryption\EpeReaders | EpeReaderPcsc.dll |
C:\Winpe_x86\mount\Program Files\Drive Encryption\EpeTokens | EpeTokenPassword.dll |
C:\Winpe_x86\mount\Program Files \Drive Encryption\Locale | Locale.xml |
C:\Winpe_x86\mount\Program Files\Drive Encryption\Locale\English-US | Use the language of your choice, for example, English-US Core-0409.xml Tech-0409.xml |
C:\Winpe_x86\mount\Program Files\Drive Encryption\Theme | Background.png BootManager.xml CJK_Tahoma8.pbf EpeTechAuthorize.xml EpeTechCryptSectors.xml EpeTechDiskInfo.xml EpeTechEditCryptList.xml EpeTechEditRegion.xml EpeTechFilePicker.xml EpeTechMainWnd.xml EpeTechRemoveEpe.xml EpeTechSectorPicker.xml EpeTechSelectAlg.xml EpeTechSetBootDisk.xml EpeTechWorkspace.xml ErrorMessageBox.xml Language.xml LatinASCII_Tahoma8.pbf Logon.xml LogonBanner.png MessageBox.xml Modules.xml NewPassword.xml OsLogon.xml OsNewPassword.xml PasswordToken.xml Progress.xml QAEnrolWizard.xml QaEnrolWizardBanner.png RecoverLocal.xml RecoverLocalBanner.png RecoverRemote.xml RecoverRemoteBanner.png RecoveryType.xml RecoveryTypeBanner.png SelectUser.xml SelectUserBanner.png Tech-0409.xml Theme.xml TimeoutDialog.xml TokenInit.xml TokenSelect.xml |
Add DETech or DEOpalTech to a WinPE 64-bit CD/DVD
You can add DETech or DEOpalTech to a WinPE 64-bit CD/DVD.
Add DETech to a Microsoft WinPE 64-bit CD/DVD
Use this task to create a bootable WinPE recovery CD/DVD from the Windows (64-bit) operating system. To do this, you must configure WinPE to include the plug-in for
The following information is intended for System Administrators when modifying the registry details:
Registry modifications are irreversible and if done incorrectly can cause system failure.
We recommend that you back up your registry and understand the restore process before you proceed with the registry modification. For more information, see https://learn.microsoft.com/en-us/troubleshoot/windows-server/performance/windows-registry-advanced-users.
Do not run a .REG file, which is not considered to be a genuine registry import file.
Do not combine the 32-bit and 64-bit architectures.
You must rename the EETech64.exe file (found in the Win64 folder within the build) to EETech.exe.
WinPE 64-bit is limited to file and password authentication; token support is not available.
Download the Windows Assessment and Deployment Kit (ADK) for Windows from the Microsoft website.
Install the ADK on the Windows operating system by downloading and double-clicking the
ADKsetup.exefile.Select Search and type Deployment to display the Deployment and Imaging Tools Environment icon, then run the tool as Administrator to display the command prompt.
Go to <Windows ADK install path>\Deployment Tools, then run the copype.cmd command using this syntax:
copype.cmd <architecture> <destination>Where
<architecture> can be x86 or amd64
<destination> is a path to the local directory
For example,
copype.cmd amd64 c:\winpe_amd64This command creates the required directory structure and copies all the necessary files for that architecture.
To mount the Windows PE image (Winpe.wim) base to the Mount directory to access the WinPE image, open the command prompt, then enter this command:
Dism.exe /Mount-Wim /WimFile:C:\winpe_amd64\media\sources\boot.wim /index:1 /MountDir:C:\winpe_amd64\mountEdit the WinPE environment as follows:
Open regedit, then load the system hive under
[HKEY_LOCAL_MACHINE].Click
HKEY_LOCAL_MACHINE, File menu, then click Load Hive.From the mounted WinPE image, navigate to this system file
C:\winpe_amd64\mount\Windows\System32\Config\SYSTEM.Name the WinPE hive, for example,
pe.Access the
[HKEY_LOCAL_MACHINE\pe\ControlSet001\Control\Class\{4D36E967-E325-11CE-BFC1-08002BE10318}]registry entry.Edit the multi-string upper filters with values in the specified order:
MfeEpePCPartMgrRight‑click the services folder under
HKEY_LOCAL_MACHINE\pe\ControlSet001\services, then create theMfeEpePCandMfeCcdekeys.Modify the values of the
[HKEY_LOCAL_MACHINE\pe\ControlSet001\services\MfeEpePC]key as follows:"Type"=dword:00000001"Start"=dword:00000000
"ErrorControl"=dword:00000003
Note
The keys are still 32-bit dword even though you are using a 64-bit system.
i. Modify the values of the [HKEY_LOCAL_MACHINE\pe\ControlSet001\services\MfeCcde] key as follows:
"Type"=dword:00000001
"Start"=dword:00000000
"ErrorControl"=dword:00000003
"Group"=string:Primary Disk
The keys are still 32-bit dword even though you are using a 64-bit system.
j. Click pe, then click File menu and Unload hive to unload the WinPE hive.
k. Close the Registry Editor.
7. Create the necessary folders in the mounted WinPE image, then copy the files to the appropriate folders. For details, see the section on Folders and files for WinPE 64-bit CD/DVDs detailed below.
8. Commit the changes by performing these steps:
a. To commit changes to WIM, enter this command:
Dism.exe /Unmount-Wim /MountDir:C:\winpe_amd64\mount\ /Commitb. To create a bootable ISO image, enter this command for the appropriate WinPE version:
WinPE Version | Command |
|---|---|
Version 3 |
|
Version 4 |
|
Version 5 | oscdimg.exe -m -o -u2 -udfver102 -bootdata:2#p0,e,b"C:\Winpe_amd64\fwfiles\etfsboot.com"#pEF,e,b"C:\Winpe_amd64\fwfiles\efisys.bin" "C:\Winpe_amd64\media""C:\Winpe_amd64\winpe_amd64.iso" |
Version 6 | MakeWinPEMedia /iso c:\winpe_amd64 winpe_amd64.iso |
The ISO image for WinPE 64-bit for DETech can be found at c:\winpe_amd64\winpe_amd64.iso
9. Burn this image to a CD/DVD and boot the system from the CD/DVD.
Note
Do not boot the system from WinPE CD/DVD while decryption is in progress.
10. At the command prompt, enter these commands:
cd\
cd Program Files\Drive Encryption
EETech.exe
The DETech screen appears.
Add DEOpalTech to a Microsoft WinPE 64-bit CD/DVD
Use this task to create a bootable DEOpalTech WinPE recovery CD/DVD from the Windows operating system. To do this, you must configure WinPE to include the plug-in for , which supports the x64 (64-bit) architecture (MBR and UEFI).
The following information is intended for System Administrators when modifying the registry details:
Registry modifications are irreversible and if done incorrectly can cause system failure.
We recommend that you back up your registry and understand the restore process before you proceed with the registry modification. For more information, see http://support.microsoft.com/kb/256986.
Do not run a .REG file, which is not considered to be a genuine registry import file.
You must rename the EEOpalTech64.exe file (found in the Opal64 folder within the build) to EEOpalTech.exe.
Download the Windows Assessment and Deployment Kit (ADK) for Windows from the Microsoft website.
Install the ADK on the Windows operating system by downloading and double-clicking the ADKsetup.exe file.
Select Search and type Deployment to display the Deployment and Imaging Tools Environment icon, then run the tool as Administrator to display the command prompt.
Go to <Windows ADK install path>\Deployment Tools, then run the copype.cmd command using this syntax:
copype.cmd <architecture> <destination>Where
<architecture> can be x86 or amd64
<destination> is a path to the local directory
For example, copype.cmd amd64 c:\winpe_amd64
This command creates the required directory structure and copies all the necessary files for that architecture.
To mount the Windows PE image (Winpe.wim) base to the Mount directory to access the WinPE image, open the command prompt, then enter this command:
Dism.exe /Mount-Wim /WimFile:C:\winpe_amd64\media\sources\boot.wim /index:1 /MountDir:C:\winpe_amd64\mountEdit the WinPE environment as follows:
Open regedit, then load the system hive under [HKEY_LOCAL_MACHINE].
Click HKEY_LOCAL_MACHINE, File, then click Load Hive.
From the mounted WinPE image, navigate to this system file:
C:\winpe_amd64\mount\Windows\System32\Config\SYSTEM.Name the WinPE hive, for example, pe.
Access the [HKEY_LOCAL_MACHINE\pe\ControlSet001\Control\Class\{4D36E967-E325-11CE-BFC1-08002BE10318}] registry entry.
Edit the multi-string upper filters with values:
MfeEpeOpal
MfeEpePC
PartMgr
Right-click HKEY_LOCAL_MACHINE\pe\ControlSet001\services, then create the MfeEpeOpal, MfeEpePC and MfeCcde keys.
Modify the values of the [HKEY_LOCAL_MACHINE\pe\ControlSet001\services\MfeEpeOpal] key as follows:
"Type"=dword:00000001"Start"=dword:00000000"ErrorControl"=dword:00000003
Modify the values of the [HKEY_LOCAL_MACHINE\pe\ControlSet001\services\MfeEpePC] key as follows:
"Type"=dword:00000001"Start"=dword:00000000"ErrorControl"=dword:00000003
Note: The keys are still 32-bit dword even though you are using a 64-bit system.
Modify the values of the [HKEY_LOCAL_MACHINE\pe\ControlSet001\services\MfeCcde] key as follows:
"Type"=dword:00000001"Start"=dword:00000000"ErrorControl"=dword:00000003"Group"=string:Primary Disk
Note: The keys are still 32-bit dword even though you are using a 64-bit system.
Click pe, then click File → Unload hive to unload the WinPE hive.
Close the Registry Editor.
Create the necessary folders in the mounted WinPE image, then copy the files to the appropriate folders. For more information, see Folders and files for WinPE 64-bit CD/DVDs.
Commit the changes by performing these steps:
a. Add the files, created in Step 7, to the appropriate locations in the mounted WinPE image as indicated in the Folders and files for WinPE 64-bit CD/DVDs section.
b. To commit changes to WIM, enter this command: Dism.exe /Unmount-Wim /MountDir:C:\winpe_amd64\mount\ /Commit
c. To create a bootable ISO image, enter this command for the appropriate WinPE version:
WinPE | Command |
|---|---|
Version 3 | |
Version 4 | |
Version 5 | |
Version 6 | |
The ISO image for WinPE 64-bit for DEOpalTech can be found at C:\winpe_amd64\winpe_amd64.iso
Burn this image to a CD/DVD and boot the system from the CD/DVD.
Note
Do not boot the system from WinPE CD/DVD while decryption is in progress.
At the command prompt, enter these commands:
cd\ cd Program Files\Drive Encryption EEOpalTech.exe
The Trellix DETech (Opal) screen appears.
Folders and files for WinPE 64-bit CD/DVDs
Add these files to the appropriate locations in the mounted WinPE image as indicated in these tables.
Folders
Location | Folder to be created |
|---|---|
C:\Winpe_amd64\mount\Program Files\ | Drive Encryption |
C:\Winpe_amd64\mount\Program Files\Drive Encryption\ | EpeReaders |
C:\Winpe_amd64\mount\Program Files\Drive Encryption\ | EpeTokens |
C:\Winpe_amd64\mount\Program Files\Drive Encryption\ | Locale |
C:\Winpe_amd64\mount\Program Files\Drive Encryption\ | Theme |
Files
Location | Files to be copied |
|---|---|
C:\Winpe_amd64\mount\Windows\System32\Drivers\ | MfeCcde.sys MfeEpePC.sys MfeEpeOpal.sys (for Opal client recovery only) |
C:\Winpe_amd64\mount\Program Files\Drive Encryption\ | EETech.exe EEOpalTech.exe (for Opal client recovery only) EpeOpalATASec4SATA64.dll (for Opal client recovery only) |
C:\Winpe_amd64\mount\Program Files\Drive Encryption\EpeTokens | EpeTokenPassword.dll |
C:\Winpe_amd64\mount\Program Files\Drive Encryption\Encryption\Locale | Locale.xml |
C:\Winpe_amd64\mount\Program Files\Drive Encryption\Locale\English-US | Use the language of your choice, e.g., English-US |
C:\Winpe_amd64\mount\Program Files\Drive Encryption\Theme | Background.png EpeTechAuthorize.xml EpeTechCryptSectors.xml RecoverRemoteBanner.png RecoveryType.xml RecoveryTypeBanner.png SelectUser.xml SelectUserBanner.png Tech-0409.xml Theme.xml TimeoutDialog.xml TokenInit.xml TokenSelect.xml RecoverRemoteBanner.png RecoveryType.xml RecoveryTypeBanner.png SelectUser.xml SelectUserBanner.png Tech-0409.xml Theme.xml TimeoutDialog.xml TokenInit.xml TokenSelect.xml |
Authenticate with token
Use this task to authenticate with a token to enable recovery tasks. The DETech tool requires either token authentication (password) from an assigned user or a recovery file (.XML) exported from the console.
Make sure that you have the DETech WinPE recovery boot disk.
Make sure that the system’s main power supply is plugged in. Do not attempt to perform this task on battery power only.
Boot the system with the DETech WinPE boot disc. This loads the Drive Encryption interface.
At the command prompt, enter these commands to open the DETech window:
cd\ cd Program Files\Drive Encryption EETech.exe OR EEOpalTech.exeUnder Authentication, click Token.
A logon page prompts you to enter the credentials for the system.
Enter the username and password for the client system, then click Logon.
When the correct credentials are provided, the Authentication status changes to Authenticated with Token.
Authenticate with a recovery file
Use this task to authenticate the recovery procedures using the Recovery Information File (.xml). The administrator needs to ...export the Recovery Information File for the system from the server.
Make sure that you have:
The DETech WinPE boot disk
The USB memory stick containing the Recovery Information File (.xml)
Note: Authenticating with a recovery file is an optional procedure. We recommend that you use token authentication.
Make sure that the system’s main power supply is plugged in. Do not attempt to perform this task on battery power only.
Boot the system with the DETech WinPE Recovery CD/DVD to load the interface.
At the command prompt, enter these commands to open the DETech window:
cd\ cd Program Files\Drive Encryption EETech.exe or EEOpalTech.exe(Optional) Click Set Boot Disk, then select the required boot disk.
Under Authentication, click File. Browse and select the Recovery Information File (.xml) from the USB memory stick, then click OK. When the correct file is selected, the Authentication status changes to Authenticated with File.
After the recovery is complete, use a secure file deletion tool make sure the recovery file is shredded.
Authorize with daily authorization code
Use this task to gain administrative access to DETech with the daily authorization code. This code is only required for certain tasks in DETech, so retrieve the code when the recovery procedure in this document states that it is required.
Make sure that you have:
The DETech WinPE boot disk
The daily authorization code
Note: You can download the Code of the Day tool from the website.
Make sure that the system’s main power supply is plugged in. Do not attempt to perform this task on battery power only.
Boot the system with the DETech WinPE Recovery CD/DVD to load the Drive Encryption interface.
At the command prompt, enter these commands to open the DETech window:
cd\ cd Program Files\Drive Encryption EETech.exe or EEOpalTech.exeUnder Authorization, click Authorize.
Enter the daily authorization code, then click OK. When the correct authorization code is entered, the Authorization status changes to Authorized.
Remove with token and file authentication
Use this task to remove with token authentication when Windows becomes corrupt, you cannot access the data of an encrypted system, or encryption or decryption fails.
Make sure that you have:
The DETech WinPE boot disk
The daily authorization code
Note: You can download the Code of the Day tool from the website.
Removing with token authentication fully decrypts the disk and restores the Windows Boot Manager.
Back up the system by taking an image of the disk that includes every sector of the hard disk (including sector zero).
Make sure that the system’s main power supply is plugged in for this task. Do not attempt to perform this task on battery power only.
Boot the system with DETech WinPE boot disk.
At the command prompt, enter these commands to open the DETech window:
cd\ cd Program Files\Drive Encryption EETech.exe OR EEOpalTech.exe
Enter the daily authorization code, then confirm the authorization status.
If necessary, click Set Boot Disk, then select the required boot disk.
Authenticate with a token or a Recovery Information File (.xml), then confirm the authentication status.
Bring the disk offline.
Note
This step might or might not be required. If required, continue with step 8. If not, skip to step 9.
Click Remove DE under Actions.
Note
Clicking the Remove DE button might not work because the Windows 7 PE environment brings the disk online. To resolve this issue, you must bring the disk offline before attempting to remove . To bring the disk offline, you must use DiskPart, which is available in Windows 7 PE. Launch the Windows command prompt, and enter these commands.
diskpart select disk 0 offline disk
10. Click Remove to begin the decryption process.
Once completed, is removed by installing the Windows boot sector. This process might take several hours to complete.
Removing using DETech does not uninstall the DEAgent or components from the operating system. When you restart the system, the operating system loads and these components synchronize with the server and apply the current policy. To prevent from activating and encrypting, disconnect the system from the network or change its policy in before restarting the system. When configuring the policy, uncheck the Enable Policy option in the General tab. Ensure that you do this only for the selected system and not for all systems in the System Tree.
For instructions on configuring policies, see Product Guide.
Encrypt or decrypt sectors
The Crypt Sector feature allows you to safely manipulate which sectors are encrypted on the disk. Note that there is no check to ensure that you are using the correct key for the machine; use of the wrong key could corrupt data.
Make sure that you have:
The DETech WinPE Recovery CD/DVD boot disk
The daily authorization code
Note: You can download the Code of the Day tool from the website.
Recovery information file (.xml) or authentication token
The disk maintains a list of regions of the disk which are encrypted, and regions of the disk which are not; this list is called the crypt list.
This option uses the crypt list to validate the ranges you submit to make sure that you cannot inadvertently encrypt sectors that are already encrypted, or decrypt sectors that are currently not encrypted. This option also supports power fail protection.
The Crypt Sector option cannot be used if has become corrupt on the disk, or the crypt state has been corrupted. The Force Crypt Sectors option can be used in such cases, but this provides no protection and must therefore be used with extreme caution.
Changing the encryption state of areas of the disk with this feature modifies the disk crypt list, which persists until the next policy enforcement. For example, if you use this feature to decrypt a specific partition, the next time you boot the machine to windows and the policy is enforced, re-encrypts the partition according to the policy applied.
Note: DETech now displays the Disk Crypt List and Edit Disk Crypt State information in decimal instead of hexadecimal format.
Caution:
It is entirely the responsibility of the qualified system administrators and security managers to take appropriate precautions before performing this task. DETech provides very low level control of the disk and administrative error when using this tool can result in the loss of data. We recommend that only experienced administrators work with DETech.
Make a sector level backup of the drive being processed.
Boot the system with the DETech WinPE Recovery CD/DVD to load the Drive Encryption interface.
At the command prompt, enter these commands to open the DETech window:
cd\
cd Program Files\Drive Encryption
EETech.exe OR EEOpalTech.exe
If necessary, click Set Boot Disk, then select the required boot disk.
Enter the daily authorization code, then confirm the authorization status.
Authenticate with Token or Recovery Information File (.xml), then confirm the authentication status.
Click Set Algorithm, then select the required algorithm from the Select Algorithm page.
Click Crypt Sectors, select the disk from the Select Disk list, then type the Start Sector and the Number of Sectors.
Click Encrypt/Decrypt to encrypt or decrypt a range of sectors.
DETech embedded within the boot menu
As of , DETech is now installed into the EFI system partition (UEFI systems only), along with a boot menu entry. After a successful challenge code and response code administrator recovery procedure, you can then perform a subset of recovery tasks such as emergency boot."
Use DETech tool to recover systems
Use DETech tool within the boot menu to recover systems instead of creating DETech standalone boot disk.
Make sure is installed on the client system.
Task
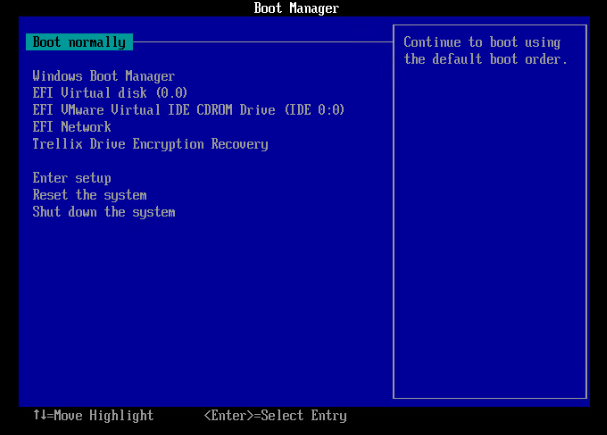
Restart the client system.
On the Boot Manager page, click Trellix Drive Encryption Recovery.
By default, DETech tool opens with the challenge code.
Click Cancel to see Recovery option.
Generate the challenge code on DETech tool using Recovery option.
The Challenge code is generated from DETech tool within the boot menu.
Generate the response code for the administrator recovery
The administrator types the challenge code, which is provided by the user, on the console and generates the response code required for the administrator (system and user) recovery.
Make sure that administrator performs this task in .
Task
Click Menu → Data Protection → Encryption Recovery. The Recovery wizard displays the Challenge Code field.
Ask the client user to read the Challenge Code and get the Response Code from the administrator who manages .
Note
It is the administrator's responsibility to authenticate that the client user's identify.
Type the Challenge Code, then click Next to open the Recovery Type page.
Select the required recovery type from the Recovery Type list, then click Next to open the Response Code page with the response codes.
Note
The generated response code depends on the recovery key size set in the policy and the selected recovery type, system recovery or user recovery.
Read out the response code to the user.
DETech Standalone
This chapter describes some of the common tasks that can be undertaken using Trellix’s system recovery tool, the standalone version of DETech. Make sure that you exercise caution in performing all DETech procedures.
Refer to Authenticate with token and Authorize with daily authorization code procedures.
Note
DETech Standalone does not support file recovery and can't be run in FIPS mode.
Boot from DETech and DEOpalTech standalone boot disks
DETech and DEOpalTech are accessed through DETech and DEOpalTech USB memory sticks. When a user boots the unrecoverable system with DETech and DEOpalTech Standalone boot disks, the first screen displayed is the DETech or DEOpalTech interface, respectively.
Note
The DEOpalTech interface is a minimized version of DETech interface and does not support viewing the workspace, encrypting or decrypting sectors, and restoring the MBR functionalities.
Boot the unrecoverable system in one of these ways:
Boot the system with the EETech (Standalone) boot/USB. The Trellix DETech interface appears.
Boot the system with the DEOpalTech (Standalone) boot/USB. The Trellix DEOpalTech interface appears.
Note
Some Opal drives lock if authentication fails more than several times. If this happens, power-cycle the system to allow authentication to occur.
Create DETech for UEFI (Standalone) bootable USB
Trellix DETech for UEFI (Standalone) is a disaster recovery tool that allows the administrator to perform normal recovery functions. It enhances the user experience with a simplified process of creating the DETech boot disk. You can create the boot disk by running a simple command from the command prompt.
Make sure that you have a Universal Serial Bus (USB) drive/port in your computer and a USB memory stick.
Extract EETech.zip and place the Standalone folder in the desired location.
Insert the USB memory stick and format it using this command:
C:\>format 'volume': /FS:FAT32 /V:EETechMake sure to replace 'volume' with the drive letter of the USB drive/port. For example, consider the USB drive/port as 'G'.
Note
The right-click format (FAT 32) and quick format (FAT32) do not work on all USB memory sticks or hardware combinations.
Create the directory structure "\EFI\Boot" on the USB memory stick.
For 32-bit systems, extract EpeTechEfi32.efi and copy it to the USB memory stick, renaming it to "\EFI\Boot\BootIA32.efi".
For 64-bit systems, extract EpeTechEfi.efi and copy it to the USB memory stick, renaming it to "\EFI\Boot\BootX64.efi" (they can both be present on the same USB memory stick).
Note
On the console, the system property Firmware Type indicates whether a particular system is MBR, UEFI 32-bit, or UEFI 64-bit.
The bootable USB memory stick is created. The combination of directory and filename must be recognized by the UEFI system allowing it to boot from the USB memory disk.
Boot from DETech UEFI standalone boot disks
DETech for UEFI is accessed through DETech for UEFI (Standalone) bootable USB memory stick. When the user boots the unrecoverable system with DETech for UEFI (Standalone) boot USB memory stick, the first page that appears is the DETech interface.
Boot the unrecoverable system with the DETech for UEFI (Standalone) boot USB. The Trellix DETech interface appears.
The system boots automatically from the USB drive.
Note:
Only certain systems automatically boot from the USB drive/port.
To manually boot systems from the USB drive/port:
Insert the DETech for UEFI (Standalone) bootable USB memory stick.
Power on the system.
Load the boot option menu during the system boot-up.
Select the bootable USB memory stick.
The system is booted manually from the USB drive/port.
Perform emergency boot
You can perform the emergency boot when a installed system fails to boot or when the logon page is corrupt.
Make sure that you have:
The DETech (Standalone) boot disk
The USB memory stick containing the recovery information file (.xml)
The daily authorization code
Note
Users with a valid support contract with can obtain the daily authorization code from Support.
In Windows, an emergency boot does not affect data on the drive until the next policy enforcement occurs. For this reason, it is not necessary to create a sector level backup of the disk during emergency booting.
Restart the unrecoverable system using the DETech (Standalone) boot disk to load the Trellix DETech interface.
Enter the daily authorization code, then confirm the authorization status.
Click Enable USB under Actions. The Trellix DETech dialog box displays the USB enabled message.
Click OK to close the dialog box.
Click File under Authentication, then browse and select the Recovery Information File (.xml) from the USB memory stick, then click OK. The Authentication status changes to Authenticated with File.
Or
Authenticate with the Token, then confirm that the authentication status changes to Authenticated with Token.
3
Under Actions, click Emergency Boot.
When prompted for confirmation, click OK.
Note
When the system boots into Windows, if there is a network connection to the server, the system synchronizes with and fully repairs itself by rebuilding the PBFS and re-synchronizing all data from the server. To confirm this right-click Trellix Agent Tray, then click Quick Settings | Drive Encryption status
If the is unable to establish a connection with the server, continue to use the DETech Emergency Boot option to boot the system until a connection to the server is made.
When prompted to confirm your operating system type,
If you are booting Windows XP, click Yes.
If you are booting to Windows Vista or a later version of Window, click No.
Remove with token authentication
Use this task to remove with token authentication.
Make sure that you have:
The DETech (Standalone) boot disk
The daily authorization code
Note
Users can download the COD tool from the website.
Use this task when:
Windows becomes corrupt
You cannot access the data of an encrypted system
Encryption or decryption fails
Note
Standalone DETech can't be used to remove from UEFI systems activated with Opal drives. DEOpalTech for WinPE4 should be used instead.
Make a sector level backup before performing this operation.
Make sure that the system’s main power supply is plugged in. Do not attempt to perform this task on battery power only.
Restart the unrecoverable system using the DETech (Standalone) boot disk. This loads the Trellix DETech interface.
Enter the daily authorization code, then confirm the authorization status.
Authenticate with Token, then confirm the authentication status changes to Authenticated.
Click Remove DE under Actions.
Click Remove. This removes the encryption and boot sector from the client system, however, this does not remove client files. It might take a few hours to perform the decryption and complete the operation depending on the system performance and the storage capacity of the drive or partition.
This removes the encryption and boot sector from the client system, however, this does not remove client files. It might take a few hours to perform the decryption and complete the operation depending on the system performance and the storage capacity of the drive or partition.
Removing through DETech does not uninstall the DEAgent or components from the operating system. When you restart the system, the OS loads and these components synchronize with the server and apply the current policy. If you wish to prevent from activating and encrypting, disconnect the system from the network or change its policy in before restarting the system. When configuring the policy, uncheck the Enable Policy option in the General tab. Ensure that you do this only for the selected system and not for all systems in the System Tree.
For instructions on configuring policies, refer to Product Guide.
View the workspace
The Workspace allows you to view the ranges of sectors read from the disk. This option opens the Workspace window that allows users to read sector ranges.
Make sure that you have:
The DETech (Standalone) boot disk
The daily authorization code
Note
Users with a valid support contract with can obtain the daily authorization code from Support.
Recovery Information File (.xml) or Authentication Token
By default, nothing is loaded into the workspace. The workspace is not a view of the disk, it displays only what the user loads into it. The user can choose to load the ranges of sectors.
Caution
It is entirely the responsibility of the qualified system administrators and security managers to take appropriate precautions before performing this task. Maximum care must be taken in performing this task, otherwise, it might cause the system to become corrupt or result in a loss of data. Contact Support for assistance on how to use the DETech workspace.
Boot the system with the DETech (Standalone) boot disk. This loads the Trellix DETech interface.
Enter the daily authorization code, then confirm the authorization status.
Authenticate with Token or Recovery Information File (.xml), then confirm the authentication status.
Click Workspace under Actions. The Workspace page lists these options:
Load From File — Loads the file and displays the bytes that comprise it.
Save To File — Saves the current data in the workspace to the file.
Load From Disk — Loads bytes from a continuous range of sectors on the disk.
Save To Disk — Saves the current data in the workspace to a continuous range of sectors on the disk.
Zero Workspace — Fills the workspace with zeros.
Set workspace Alg — Enables you to select and set the desired algorithm to use in the workspace for encryption or decryption.
Encrypt Workspace — Encrypts the entire contents of the workspace.
Decrypt Workspace — Decrypts the entire contents of the workspace.
Click First Sector to view the first sector from the disk.
Click Previous Sector to view the previous sector of the current sector from the disk.
Click Next Sector to view the next sector of the current sector from the disk.
Click Last Sector to view the last sector from the disk.
Encrypt or decrypt sectors
The Crypt Sector feature allows you to safely manipulate which sectors are encrypted on the disk. Note that there is no check to ensure that you are using the correct key for the machine; use of the wrong key could corrupt data.
Make sure that you have:
The DETech (Standalone) boot disk
The daily authorization code
Recovery information file (.xml) or authentication token
Note
You can download the Code of the Day tool from the website.
The disk maintains a list of regions of the disk that are encrypted, and regions of the disk which are not; this list is called the crypt list.
This option uses the crypt list to validate the ranges you submit to make sure that you cannot inadvertently encrypt sectors that are already encrypted, or decrypt sectors that are currently not encrypted. This option also supports power fail protection.
The Crypt Sector option cannot be used if has become corrupt on the disk, or the crypt state has been corrupted. The Force Crypt Sectors option can be used in such cases, but this provides no protection and must therefore be used with extreme caution.
Changing the encryption state of areas of the disk with this feature modifies the disk crypt list, which persists until the next policy enforcement. For example, if you use this feature to decrypt a specific partition, the next time you boot the machine to windows and the policy is enforced, re-encrypts the partition according to the policy applied.
can be manually removed by decrypting the entire disk using this feature, and then performing a Restore MBR operation that replaces the MBR with the Windows MBR, thus deactivating .
It is entirely the responsibility of the qualified system administrators and security managers to take appropriate precautions before performing this task. DETech provides very low level control of the disk and administrative error when using this tool can result in a loss of data. We recommend that only experienced administrators work with DETech.
Make a sector level backup of the drive being processed.
Boot the system with the DETech (Standalone) boot disk to load the Trellix DETech interface.
Enter the daily authorization code, then confirm the authorization status.
Click Set Boot Disk, then select the required boot disk on the Set Boot Disk page.
Authenticate with Token or Recovery Information File (.xml), and confirm the authentication status.
Select the disk from the Select Disk list, then type the Start Sector and the Number of Sectors.
Click Set Algorithm, then select the required algorithm from the Select Algorithm page.
Click Crypt Sectors, select the disk from the Select Disk list, then type the Start Sector and the Number of Sectors.
Click Encrypt/Decrypt to encrypt or decrypt a range of sectors.
Additional options
There are a number of options that are common to both DETech (WinPE) and DETech (Standalone). These options have similar functions in both recovery methods.
Options | Description |
|---|---|
Disk Information |
|
Repair Disk Information | The Repair Disk Information option fixes problems with any disk that is set as the boot disk. For this to work the crypt list portion must still be valid and the power fail state must be inactive. The disk information is stored in a chain of sectors. If the chain of sectors breaks, then it is not possible for to figure out what parts of the disk are encrypted. As a result, the user gets errors. The Repair Disk Information option attempts to repair the broken chain sectors. |
Force Crypt Sectors | Unlike the Crypt Sectors | Encrypt/Decrypt option, the Force Crypt Sectors option does not consider the disk crypt state. It simply performs the operation blindly according to user input. Force Crypt does not support power fail, nor does it apply any logic or parameter validation on the input. You should use the Force Crypt Sectors option only when everything else fails. For example, when the on-disk structures are completely corrupted.
|
Edit Disk Crypt State | The disk crypt state contains information about the range of sectors that are encrypted. This option allows you to change the ranges. Caution
|
Set Algorithm | This option is present under Disk Operations on the DETech page for setting the correct algorithm on a system. |
Set Boot Disk | This option displays a list of disks from which the user can select a disk to use as the boot disk. |
Code of the Day (COD) | Code of the Day is also known as the daily authorization code. Certain recovery operations in DETech require administrative access. The user can get this access by typing this four-digit code (COD) into the authorization screen. |
