Last Updated: July 7, 2025
Overview
Trellix allows Trellix Native Drive Encryption to manage FileVault and BitLocker enabled endpoints through ePolicy OrchestratorTM - On-prem. You can manage Trellix Native Drive Encryption with ePO - On-prem, or you can use ePO - On-prem only to report on the encryption status of endpoints that have FileVault and BitLocker enabled.
To install Trellix Native Drive Encryption on Mac or Windows client systems and manage it using ePO - On-prem, you need to install a client package and three extensions.
MNE-OSX-5.2.x.x.zip — The client package for Mac systems.
MNE-WIN-5.2.x.x.zip — The client package for Windows systems.
MNEADMIN-5.2.x.x.zip — The extension that allows you to manage and report on FileVault and BitLocker on client systems.
dpssp.zip — The extension that allows users to perform self-recovery.
EEGO.zip — The extension assesses the readiness of systems for full disk encryption. It is for Mac OS X systems only.
Which type of installation do you need?
You can install Trellix Native Drive Encryption as a first-time installation, upgrade your current version to a new version, or install the software on a self-managed system.
Determine which steps apply to the type of installation you need.
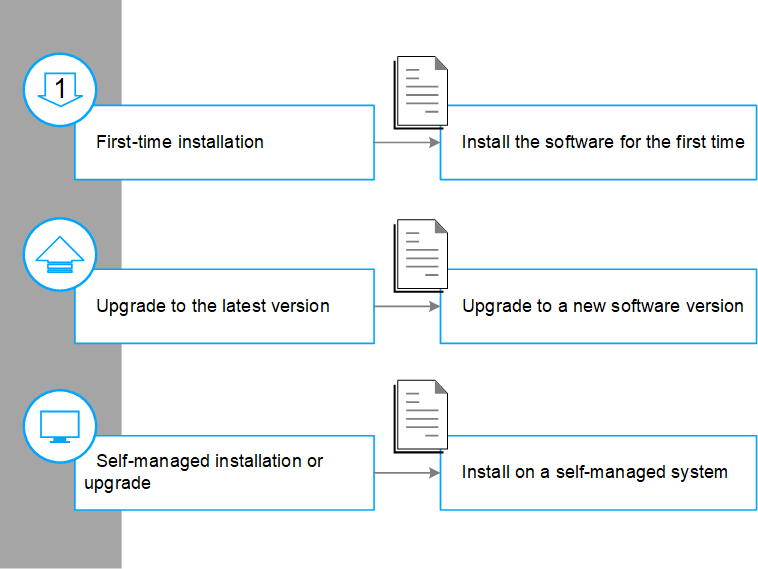
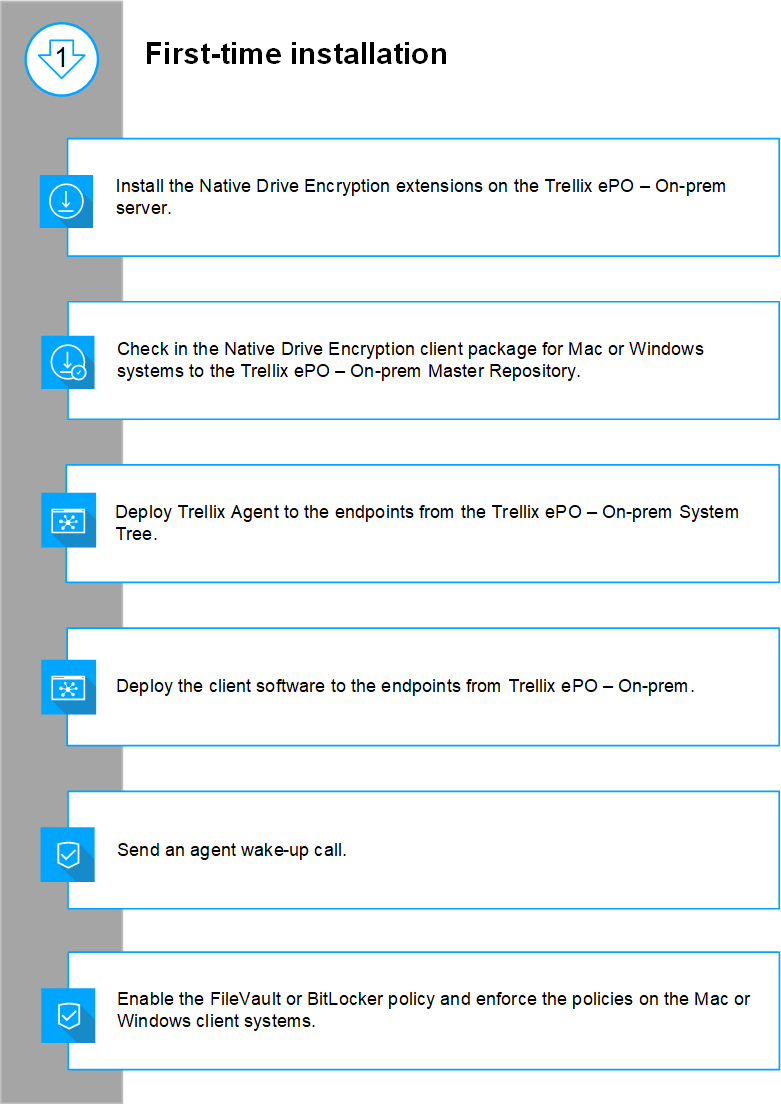
First-time installation workflow
Use ePO - On-prem to install Trellix Native Drive Encryption on managed endpoints.
You must install ePO - On-prem on the server system before you can install Trellix Native Drive Encryption. For information about installing ePO - On-prem, see the product documentation for your version of ePO - On-prem.
 Note: The client system might prompt for a restart. The behavior of the client system depends on the underlying encryption product (FileVault or BitLocker), and policy settings defined.
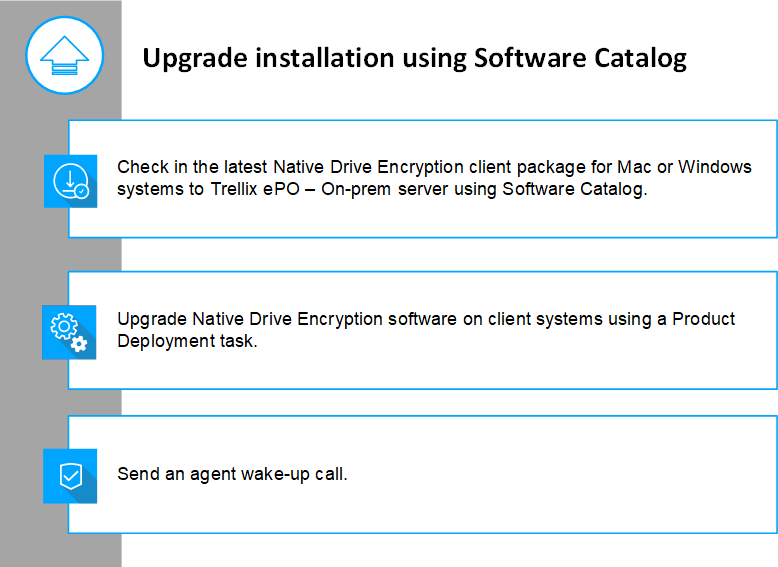
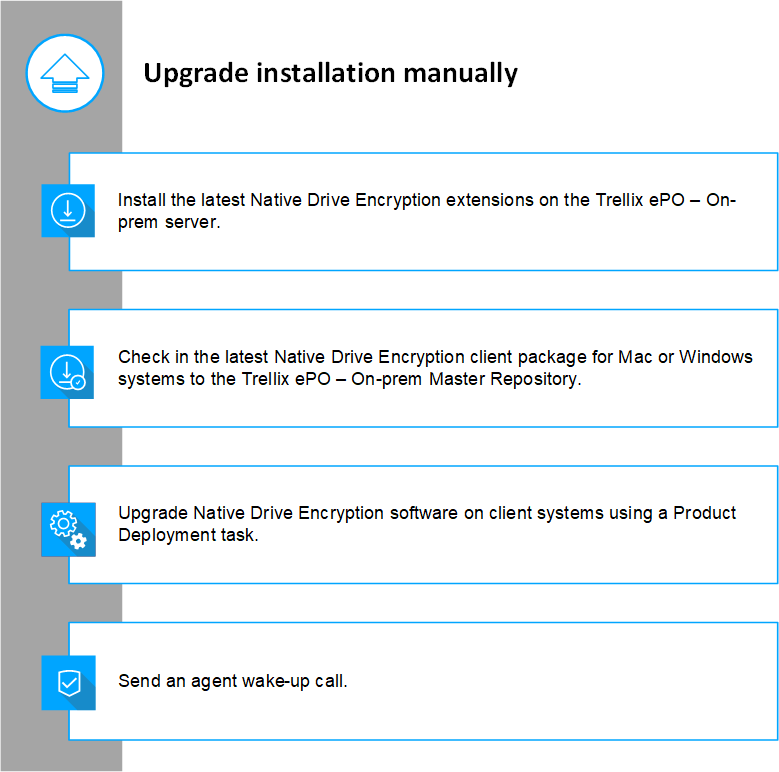
Upgrade installation workflow
Upgrade Trellix Native Drive Encryption to the latest software version.
Planning to install Trellix Native Drive Encryption
Before you start the Trellix Native Drive Encryption installation, make sure that you have the information you need to install the software.
Installation instructions for all clients
Make sure the target client systems meet the system requirements as detailed in KB79375.
Make sure the target client systems are running supported versions of Windows or Mac OS X. For details, see KB79375.
Before you can deploy Trellix Native Drive Encryption to a client system, you must have a supported version of Trellix Agent and ePO - On-prem installed. For details, see KB79375.
Trellix Preboot supports US keyboards only. Active Directory user passwords that include a £ symbol do not work.
Trellix Preboot is supported only on 64-bit UEFI systems.
Installation instructions for Windows clients
Windows clients — If you want to use Trusted Platform Module (TPM) protection, Trellix Native Drive Encryption supports TPM and TPM and PIN authentication. Password authentication is only available with Windows 8 and later.
Warning: Windows 7 BitLocker does not support password authentication. If a password authentication policy is applied to a BitLocker system that does not have TPM, or where the TPM has not been activated, the system is not encrypted because there is no suitable authentication mechanism available.
BitLocker systems need a system partition. You might need to create the system partition before BitLocker can encrypt the drive. For details, see https://technet.microsoft.com/en-us/library/hh831507.aspx#BKMK_HSRequirements.
For slates or tablets, for example the Microsoft Surface Pro 4, enable the advanced GPO option in the Trellix Native Drive Encryption BitLocker policy to allow encryption on clients that report having no preboot input support.
If you enable the Use enhanced PIN if supported policy option, all new TPM and PIN protectors use enhanced PINs. Some systems might not support enhanced PINs in the preboot environment, resulting in a BitLocker encryption failure. Check your systems before enabling this feature.
Trellix® Data Exchange Layer is needed if you want to use Trellix Preboot to allow new users to be provisioned from Active
Directory. If you want new users to be provisioned from Active Directory, make sure that DXL components are installed and set up in your IT infrastructure. See the documentation on https://docs.trellix.com for information about how to install DXL. The DXL Windows client is installed by default with Trellix Agent 5.6.
Installation instructions for Mac clients
Mac OS X client systems need to have a recovery partition available before they can be successfully encrypted. For details, see KB83473.
Make sure that Mac OS X client systems are not using Institutional Keys because it is not currently supported. For details, see KB82774.
Install the software for the first time
Install the Trellix Native Drive Encryption extensions and check in the software packages into the Master Repository on the ePO - On-prem server. A client deployment task deploys the software package to client systems from the ePO - On-prem server, allowing these client systems to be managed by ePO - On-prem.
Once the packages are deployed, the Windows client system might require a restart to complete the installation. After the restart, the client communicates with the ePO - On-prem server and manages BitLocker according to the policies configured. For the Mac client system, restart is not required after deployment and you can manage FileVault according to the policies configured.
Install Trellix Native Drive Encryption using Software Catalog
You can use the Software Catalog to install, upgrade, and remove the software. If you use Software Catalog to install the software, you don't need to access the Trellix Product Download website to retrieve new Trellix Native Drive Encryption software and software updates.
Task
In ePO - On-prem, select Menu → Software → Software Catalog.
Select the checkbox next to Trellix Native Drive Encryption.
Click Check In All.
The Trellix Native Drive Encryption extensions and Windows and macOS packages are installed on the ePO - On-prem server.
Install the Trellix Native Drive Encryption extensions
The Trellix Native Drive Encryption extensions contain the policy settings and management features that are used to manage client system encryption products.
You must install the extensions in this order:
MNEADMIN-5.2.x.x.zip — Allows you to manage and report on FileVault and BitLocker on client systems.
help_MNE_520.zip — Allows you to access Trellix Native Drive Encryption documentation when using ePO - On-prem 5.9 or later.
dpssp.zip — Provides self-recovery capabilities.
EEGO.zip — (Mac OS X only) Assesses the readiness of systems for full disk encryption.
Log on to the ePO - On-prem server as an administrator.
Select Menu → Software → Extensions, then click Install Extension to open the Install Extension dialog box.
For each extension file, click Browse, select it, then click OK.
The Install Extension page displays the extension name and version.
Click OK.
Check in the Trellix Native Drive Encryption software packages
The software package must be checked in to the Master Repository so that you can use ePO - On-prem to deploy the software to your client systems.
Task
Log on to the ePO - On-prem server as an administrator.
Select Menu → Software → Master Repository, then click Actions → Check In Package.
From the Package type list, select Product or Update (.zip), then browse and select the software package for your platform:
Mac — MNE-OSX-5.2.x.x.zip
Windows — MNE-WIN-5.2.x.x.zip
Click Next to open the Package Options page and select Current, Previous or Evaluation under Branch.
Click Save.
The new package appears in the Packages in Master Repository page under its respective branch in the repository.
Deploy Trellix Agent for Mac through SSH
You can deploy Trellix Agent for Mac to client systems through Secure Shell (SSH).
To deploy Trellix Agent for Mac to your system, you must enable SSH (remote login). Enable the Remote Login option under System Preferences | Sharing | Remote Login.
Before you begin
To deploy Trellix Agent for Mac to your system, you must enable SSH (remote login). Enable the Remote Login option under System Preferences | Sharing | Remote Login.
Task
Log on to the ePO - On-prem server as an administrator.
Select Menu → Systems → System Tree → New Systems.
Select Push agents and add systems to the current group (My Organization) from How to add systems.
Next to Target Systems, type the NetBIOS name for each system, separated by commas, spaces, or line breaks. Alternatively, click Browse to select the systems.
In the Agent version field, select Non-Windows, then select Trellix Agent for Mac from the drop-down list.
In the Credentials for agent installation field, enter the Mac administrator credentials.
Next to Installation path, select the path from the drop-down list.
Specify additional options as needed.
Click OK to trigger the Trellix Agent deployment on the Mac system.
To view the deployment status, select Menu → Automation → Server Task Log.
Deploy Trellix Native Drive Encryption to client systems
Trellix Native Drive Encryption can be deployed to client systems that run a supported Windows Server operating system. There are a few cases where policy options, user messages, and log messages include the operating system version in the text.
To avoid complexity, no explicit reference is made in such strings to the Windows Server operating system; rather, the equivalent client operating system is shown.
Assume Windows Server 2016 is identified as Windows 10 when mapping between a stated client operating system in the text and an installed Windows Server version.
For more information about the deployment task, see the product documentation for your version of ePO - On-prem. If you want to deploy Trellix Native Drive Encryption without using ePO - On-prem, see the Install on a self-managed system topic.
Task
Log on to the ePO - On-prem server as an administrator.
Select Menu → Client Tasks → Client Task Catalog, select Trellix Agent → Product Deployment as Client Task Types, then click New Task.
Make sure that Product Deployment is selected, then click OK.
Type a name for the task and add any notes.
Next to Target platforms, select Mac or Windows for FileVault or BitLocker systems respectively.
Next to Products and components set the following:
Select Trellix Native Drive Encryption - FileVault 5.2.x or Trellix Native Drive Encryption - BitLocker 5.2.x for
FileVault or BitLocker systems respectively.
Set the Action to Install, then select the package Language, and the Branch.
Next to the Command line, type ARPNOREMOVE=1 to allow administrators to prevent Trellix Native Drive Encryption uninstallation from Programs and Features under the Control Panel.
Note: The Uninstall option in the Control Panel is grayed out. You can still uninstall the Trellix Native Drive Encryption product using the command-line or third-party tools, if permitted in ePO - On-prem policy.
Specify other options as needed and click Save.
Select Menu → Systems → System Tree → Systems, select the system where you want to deploy the product, then select Actions → Agent → Edit Tasks on a single system.
Select Actions → New Client Task Assignment to open the Client Task Assignment Builder wizard.
On the Select Task page, select Trellix Agent as the Product and Product Deployment as Task Type, then select Native Drive Encryption - FileVault for Mac systems or Native Drive Encryption - BitLocker for Windows systems.
Next to Tags, select the required platforms where you are deploying the packages:
Send this task to all computers
Send this task to only computers that have the following criteria — Use one of the edit links to configure the criteria.
On the Schedule section, select whether the schedule is enabled and specify the schedule details.
Specify other options as needed and click Save.
Send an agent wake-up call
The client system gets the policy update when it connects to the ePO - On-prem server during the agent‑server communication. However, you can force an immediate update with a wake-up call.
Task
Log on to the ePO - On-prem server as an administrator.
Select Menu → Systems → System Tree, then select a system or a group of systems from the left pane.
Select the System Name(s) of that group.
Click Actions → Agent → Wake Up Agents.
Select a wake-up call type and a randomization period (0–60 minutes) to define the length of time when all systems must respond to the wake-up call.
Under Options, select Get full product properties.
Under Force policy update, select Force complete policy and task update.
Click OK.
To view the status of the agent wake-up call, navigate to Menu → Automation → Server Task Log.
Turn on FileVault on a Mac client system
You can turn on FileVault by enforcing the Turn On (Enable) FileVault policy on a Mac client system.
Note: The default Trellix Native Drive Encryption policy for FileVault enforces the Turn On (Enable) FileVault policy that enables FileVault on the Mac client system.
For Mac systems, once the Trellix Native Drive Encryption software package is deployed to the client system, the Trellix Native Drive Encryption client integrates with the Endpoint Security for Mac, version 10.5.5 and later, user interface . If the product is not available, Trellix Native Drive Encryption installs the Endpoint Security for Mac 10.7.9 framework and Trellix Native Drive Encryption integrates into its user interface.
The user can see the status FileVault: Disabled on the user interface. Task
Log on to the ePO - On-prem server as an administrator.
Select Menu → Policy → Policy Catalog, select Native Drive Encryption from the Product drop-down list, then select FileVault Product Settings from the Category drop-down list.
Check if FileVault is enabled. If it's not enabled, select Turn On (Enable) FileVault to enable it.
You can also enable other policy options, as needed. For more information, see the Trellix Native Drive Encryption Product Guide.
Select Apply password content rules to apply the password settings on to the client systems.
In the Display the following message, instead of the default, when enabling FileVault option, provides a message for the user to view on the client system when FileVault is enabled.
If you do not provide a message, the user receives a predefined message on the client system.
Select Display the following login banner, and provide a login banner for the user to view after authenticating into FileVault.
In the Display the following message when FileVault has been disabled by 3rd party application or user option, provide a message for the user to view on the client system when FileVault is disabled by anything other than Trellix Native Drive Encryption. If you do not provide a message, the user receives a predefined message on the client system.
Click Save.
Select Menu → Systems → System Tree → Systems tab, then select the group in the System Tree where the system belongs. The list of systems belonging to this group appears in the details pane.
Select a system, then click Actions → Agent → Modify Policies on a Single System.
Select Trellix Native Drive Encryption, then click Enforcing next to Enforcement status.
Select Break inheritance and assign the policy and settings below to change the enforcement status.
Next to Enforcement status, select Enforcing, then click Save.
Send a wake-up call.
The client system prompts for Restart now and Remind me later options. If the user clicks Remind me later, the notification is dismissed for the duration specified in the ePO - On-prem policy and reappears when the user restarts the system and enables FileVault by entering the password.
Note: An Active Directory user cannot authenticate through the FileVault preboot authentication screen if the password is changed. For more information, see KB81289.
FileVault is turned on, and the user can now see the status FileVault: Enabled on the user interface.
Turn on BitLocker on a Windows client system
You can turn on BitLocker by enforcing the Turn On (Enable) BitLocker policy on a Windows client system. Use the BitLocker option in the Control Panel to display the BitLocker: Disabled status.
Task
Log on to the ePO - On-prem server as an administrator.
Select Menu → Policy → Policy Catalog, select Native Drive Encryption 5.2.x from the Products tab, then click BitLocker Product Settings.
From the My Default settings, click Edit under Actions.
Select Manage BitLocker → Turn On (Enable) BitLocker and click Save.
Select Menu → Systems → System Tree → Systems tab, then select the group in the System Tree where the system belongs. The list of systems belonging to this group appears in the details pane.
Select a system, then click Actions → Agent → Edit Policies on a Single System.
Select Trellix Native Drive Encryption 5.2.x, then click Enforcing next to Enforcement status.
Select Break inheritance and assign the policy and settings below. Next to Enforcement status, select Enforcing, then click Save. The client system prompts for restart and remind later options. The user must restart the system and enter the password to authenticate.
Send a wake-up call.
BitLocker is turned on, and might request a password or PIN from the user depending on the policy selected.
Install Trellix Native Drive Encryption on a client system
Windows client users can install the .msi directly on the client system. Mac client users can install Trellix Native Drive Encryption on the client systems using the MNE-5.2.x.xxx.dmg package. The administrator provides the package and user credentials to client users.
Important: You must have administrator rights on the client system to perform this task.
Users can configure client systems on the ePO - On-prem server remotely using the Trellix ePO Remote Provisioning Tool. The Trellix ePO Remote Provisioning Tool works with Trellix Agent 5.7.9.
Task
On the client system, open the MNE-5.2.x.xxx.dmg package provided by the administrator.
Double-click the MNE-5.2.x.xxx.pkg file to open the Install Trellix Native Drive Encryption page.
Click Continue, then click Agree to accept.
Click Install, type the user's system password, and click Install Software. After the installation is complete, the Trellix ePO Remote Provisioning Tool app opens. The app is installed under the Applications → Utilities directory.
Type the ePO address, User name, and Password details provided by the administrator, then click Configure.
Type the user's system password at the prompt and click OK. The client system is successfully configured on the ePO - On-prem server.
Click Close.
Trellix Native Drive Encryption installation with case-sensitive installation path
You can't install Trellix Native Drive Encryption if any folder in the installation path is configured to be case sensitive. To resolve this, make sure that all folders in the installation path are configured to be case insensitive.
Note: During upgrades, the case sensitivity of the installation path is ignored.
Upgrade to a new software version
Upgrade to the latest Trellix Native Drive Encryption version on Mac systems
Upgrade the Mac client systems to the latest Trellix Native Drive Encryption version using ePO - On-prem. Task
Log on to the ePO - On-prem server as an administrator.
Upgrade the required Trellix Native Drive Encryption extensions on the ePO - On-prem server.
Check in the Trellix Native Drive Encryption FileVault package on the ePO - On-prem server.
Create the Trellix Native Drive Encryption - FileVault product deployment task and apply it to the client system that you want to upgrade.
Send an agent wake-up call to send the client's product properties to the ePO - On-prem server.
Upgrade to the latest Trellix Native Drive Encryption version on Windows systems
Upgrade the Windows client systems from Trellix Native Drive Encryption 4.0.x or 4.1.x to the latest version using ePO - On-prem. Task
Log on to the ePO - On-prem server as an administrator.
Upgrade the required Trellix Native Drive Encryption extensions on the ePO - On-prem server.
Check in the Trellix Native Drive Encryption BitLocker package to the ePO - On-prem server.
Create the Native Drive Encryption - BitLocker product deployment task and apply it to the required client system that you want to upgrade.
Send a wake-up call to send the client's product properties to the ePO - On-prem server.
Transfer of encryption management from Trellix Drive Encryption
Both Trellix Native Drive Encryption and Trellix Drive Encryption provide disk encryption and are incompatible when active.
If Trellix Native Drive Encryption and Trellix Drive Encryption are both installed in the ePO - On-prem managed environment, select the appropriate product and apply encryption accordingly.
Trellix Drive Encryption version 7.2.9 or later is installed on the endpoint
Note: If Trellix Drive Encryption 7.2.9 or later is already installed, Trellix Native Drive Encryption waits until Trellix Drive Encryption is deactivated before it activates BitLocker.
Deploy Trellix Native Drive Encryption to an endpoint that has Trellix Drive Encryption installed and activated.
Deactivate Trellix Drive Encryption and decrypt the endpoint.
Configure Trellix Native Drive Encryption policies for endpoint authentication and encryption methods.
Transfer to Trellix Native Drive Encryption is initiated on the first policy enforcement after Trellix Drive Encryption deactivates on the endpoint.
Trellix Drive Encryption version 7.2.8 or earlier is installed on the endpoint
Note: If Trellix Drive Encryption 7.2.8 or earlier is already installed, Trellix Native Drive Encryption waits until Trellix Drive Encryption is uninstalled before it activates BitLocker.
Deactivate Trellix Drive Encryption and decrypt the endpoint.
Uninstall Trellix Drive Encryption on the endpoint.
Deploy Trellix Native Drive Encryption to an endpoint.
Configure Trellix Native Drive Encryption policies for endpoint authentication and encryption methods.
Transfer to Trellix Native Drive Encryption is initiated on the first policy enforcement after Trellix Drive Encryption deactivates on the endpoint.
FIPS mode
Reporting FIPS status to client systems
The 140 series of Federal Information Processing Standards (FIPS) is a U.S. government computer security standard that specifies requirements for cryptography modules.
Trellix Native Drive Encryption checks the client systems for FIPS certification and reports whether the client systems are running in FIPS mode. For this to happen, the user must perform these tasks.
Note: For Mac systems running Mountain Lion 10.8.4 or later, the FIPS status is reported automatically to ePO - On-prem by Trellix Native Drive Encryption, and the user does not have to install the FIPS Administration tools.
Make sure that the operating system is running in FIPS mode.
Mac — Install the FIPS Administration tools (http://support.apple.com/kb/HT5396).
Windows — See the relevant Microsoft documentation.
Send an agent wake-up call.
Trellix Native Drive Encryption automatically reports the FIPS status back to ePO - On-prem.
Running the software in FIPS mode
To run the client systems in FIPS mode, see the FileVault or BitLocker FIPS Security Policy for Mac and Windows client systems respectively.
BitLocker systems
For FIPS mode to be reported as active on a BitLocker-managed system, the client must be encrypted and managed by Trellix Native Drive Encryption with FIPS GPO (Group Policy Objects) set. If the client is already encrypted when Trellix Native Drive Encryption is installed, even if it is encrypted with FIPS mode, Trellix Native Drive Encryption reports that the client system does not meet the FIPS requirements. This is because BitLocker FIPS Security policy states that:
BitLocker can only be initialized by a Cryptographic Officer.
BitLocker only allows a Cryptographic Officer to perform key management operations.
In this case, the client has to be disabled, decrypted, and re-enabled using Trellix Native Drive Encryption under the control of the Cryptographic Officer for the system to be reported as FIPS compliant.
This Security Policy places restrictions on the use of BitLocker in FIPS mode. In particular, when running in FIPS mode, make sure
that:
Only Cryptographic Officers are permitted to perform administrative BitLocker functions (such as recovery).
On Windows 7 systems, only 256-bit binary recovery keys are permitted; 48-digit numeric recovery keys are not permitted.
We recommend that only Cryptographic Officers are given permission to perform Trellix Native Drive Encryption recoveries in ePO - On-prem using the relevant Trellix Native Drive Encryption permission sets. When the Cryptographic Officer performs the recovery, a .bek file that contains the binary key must be requested from the Trellix Native Drive Encryption recovery page. This file must be securely transported to the required client system on a USB drive, before the Cryptographic Officer performs the recovery, according to BitLocker FIPS Security Policy. The self-service portal does not serve up the 256-bit binary recovery keys used in FIPS mode.
Remove Trellix Native Drive Encryption software
Here are some important steps involved in removing the Trellix Native Drive Encryption software.
Turn off FileVault
On the ePO - On-prem console, you must change the product setting policy to turn off FileVault. You can turn off FileVault only if ePO - On-prem manages the client system through Trellix Native Drive Encryption.
Task
Log on to the ePO - On-prem server as an administrator.
Select Menu → Systems → System Tree → Systems, then select a group under System Tree. All systems within this group (but not its subgroups) appear in the details pane.
Select a system, then click Actions → Agent → Modify Policies on a Single System to open the Policy Assignment page for that system.
From the Product drop-down list, select Trellix Native Drive Encryption. The policy Categories under Trellix Native Drive Encryption are listed with the system’s assigned policy.
Click Edit Assignment in the FileVault Product Settings category.
If the policy is inherited, select Break inheritance and assign the policy and settings below next to Inherit from.
From the Assigned policy drop-down list, select a policy. From this location, you can edit the selected policy, or create a policy.
Select whether to lock policy inheritance. Any system that inherits this policy can't have another one assigned in its place.
Enable Manage FileVault → Turn Off (Disable) FileVault for FileVault users.
Click Save on the Policy Settings page, then click Save on the Product Settings page.
Send a wake-up call.
When you turn off the FileVault policy, all encrypted drives are decrypted, and the status becomes FileVault: Disabled. This can take a few hours, depending on the number and size of the encrypted drives.
Turn off BitLocker
On the ePO - On-prem console, you must change the product setting policy to turn off BitLocker. You can turn off BitLocker only if ePO - On-prem manages the client system through Trellix Native Drive Encryption.
Task
Log on to the ePO - On-prem server as an administrator.
Select Menu → Systems → System Tree → Systems, then select a group under System Tree. All systems within this group (but not its subgroups) appear in the details pane.
Select a system, then click Actions → Agent → Edit Policies on a Single System to open the Policy Assignment page for that system.
From the Product drop-down list, select Trellix Native Drive Encryption. The policy Categories under Trellix Native Drive Encryption are listed with the system’s assigned policy.
Click Edit Assignment in the BitLocker Product Settings category.
If the policy is inherited, select Break inheritance and assign the policy and settings below next to Inherit from.
From the Assigned policy drop-down list, select a policy. From this location, you can edit the selected policy, or create a policy.
Select whether to lock policy inheritance. Any system that inherits this policy can't have another one assigned in its place.
Enable Manage BitLocker → Turn Off (Disable) BitLocker for BitLocker users.
Click Save on the Policy Settings page, then click Save on the Product Settings page.
Send an agent wake-up call.
When you turn off the BitLocker policy, all encrypted drives are decrypted, and the status becomes BitLocker: Disabled. This can take a few hours, depending on the number and size of the encrypted drives.
Remove from the client using a ePO - On-prem deployment task
Use a product deployment client task to remove the software package from the client system.
Disable the Trellix Preboot and Network Unlock system authentication options before you remove Trellix Native Drive Encryption.
Task
Log on to the ePO - On-prem server as an administrator.
Select Menu → Policy → Client Task Catalog, select Trellix Agent → Product Deployment as Client Task Types, then click Actions → New Task.
Make sure that Product Deployment is selected, then click OK.
Type a name for the task and add any notes.
Next to Target platforms, select Mac or Windows as appropriate.
Next to Products and components, set the following:
Select Native Drive Encryption 5.2.x to specify the version of the Trellix Native Drive Encryption package to be removed.
Set the action to Remove.
Deactivate Trellix Native Drive Encryption on client systems.
Select Menu → Policy → Policy Catalog.
Select Trellix Native Drive Encryption from the Products drop-down list.
Select My Default and click Edit under Actions.
Click the Turn off (Disable) FileVault Enable policy checkbox and click Save.
Select Menu → Systems → System Tree → Systems tab, select the system where you want to remove the product, then click Actions → Agent → Modify Tasks on a single system.
Select Actions → New Client Task Assignment.
On the Select Task page, select Trellix Agent as the product and Product Deployment as the task type, then select the task you created.
Next to Tags, select the platforms where you are removing the packages, then click Next:
Send this task to all computers
Send this task to only computers that have the following criteria — Use one of the edit links to configure the criteria.
On the Schedule page, select whether the schedule is enabled, specify the schedule details, then click Next.
On the Summary page, review the summary, then click Save.
Remove the Trellix Native Drive Encryption extensions
You must remove the Trellix Native Drive Encryption extensions, MNEADMIN_5.2.x.x.zip, help_MNE_520.zip, dpssp.zip, and
EEGO.zip from the ePO - On-prem server to uninstall it from ePO - On-prem.
Note: Recovery keys are not deleted when the Trellix Native Drive Encryption extension is removed.
Task
Log on to the ePO - On-prem server as an administrator.
Select Menu → Software → Extensions, then select Trellix Native Drive Encryption 5.2.x. The Extension page appears with the extension name and version details.
Click Remove on the required extension.
Click OK to remove the extension.
Note: The Trellix Native Drive Encryption tables are not dropped from the database when MNEAdmin is uninstalled. This prevents recovery keys from being accidentally deleted.
Remove the Trellix Native Drive Encryption software package
Remove the Trellix Native Drive Encryption software package from the Master Repository. Before you begin
For Mac systems, turn off FileVault.
For Windows systems, turn off BitLocker before removing the Trellix Native Drive Encryption software package on the Windows system from ePO - On-prem.
Remove the MNE-OSX-5.2.x.x.zip or MNE-WIN-5.2.x.x.zip software package. Task
Log on to the ePO - On-prem server as an administrator.
Select Menu → Software → Master Repository. The Packages in Master Repository page appears with the list of software packages and their details.
Click Delete next to the Trellix Native Drive Encryption software package.
Click OK to confirm.
The Trellix Native Drive Encryption software package is removed from client systems.
Manually uninstall Trellix Native Drive Encryption from the client system
You can manually uninstall Trellix Native Drive Encryption from the client system, although ePO - On-prem has all required features for removing the product from the client system. This allows you to remove Trellix Native Drive Encryption directly from the client system.
Important: You must have administrator rights to perform this task.
Before you begin
For Mac systems, make sure that you turn off the FileVault policy in ePO - On-prem.
For Windows systems, make sure that you turn off the BitLocker policy in ePO - On-prem.
Task
Remove the Trellix Native Drive Encryption software package from the client system.
Mac — Type this command: sudo /usr/local/McAfee/uninstall MNE.
Windows — Click Windows → Control Panel → Uninstall a product.
Uninstallation scenarios
It is not always possible to remove Trellix Native Drive Encryption from client systems because of the way Trellix Native Drive Encryption manages security through system authentication on client systems.
The table below lists Trellix Native Drive Encryption system authentication methods and the different states Trellix Native Drive Encryption might be in when you want to remove the software. It indicates whether Trellix Native Drive Encryption can be uninstalled with Yes or No.
For example, if you configure your BitLocker Settings policy with Network Unlock at the top of the system authentication list, and you set BitLocker management to Turn on (Enable) BitLocker, then you cannot uninstall Trellix Native Drive Encryption.
Turn on (Enable) BitLocker | Turn off (Disable) Bitlocker | 1 - Turn on (Enable) Bitlocker then Do not manage BitLocker | 2 - Turn on (Enable) BitLocker, manually decrypt, then Do not manage BitLocker | 3 - BitLocker enabled by the user, then Do not manage BitLocker | |
Domain User Trellix Preboot [Deprecated] | No | Yes | No | No | 5 - N/A |
Network Unlock | No | 4 - Yes | No | No | 5 - N/A |
TPM | Yes | Yes | Yes | Yes | Yes |
TPM and PIN | Yes | Yes | Yes | Yes | Yes |
TPM and enhanced PIN | Yes | Yes | Yes | Yes | Yes |
Password | Yes | Yes | Yes | Yes | Yes |
A system is encrypted by selecting Manage BitLocker → Turn on (Enable) BitLocker, and then the Do not manage BitLocker policy is enforced on the client.
A system that is encrypted by selecting Manage BitLocker → Turn on (Enable) BitLocker in ePO - On-prem policies, and manually decrypted on the client by selecting Turn BitLocker off. The decryption completes and subsequently the Do not manage BitLocker policy is enforced on the client.
A system that is manually encrypted with BitLocker on the client system and subsequently the Do not manage BitLocker policy is enforced on the client.
A system protected by Network Unlock prevents uninstallation while locked drives are present.
This is not an applicable state as both Domain User and Network Unlock are proprietary authentication methods and cannot be used to manually encrypt a system.
Make sure the policy enforcement finishes once the system is successfully decrypted to allow uninstallation.