Malware scan settings allow administrators to control how users interact with on-demand malware scans on the host endpoints. You can give users in your organization the ability to pause or cancel an on-demand malware scan running on their host endpoint.
.png)
The Pause setting allows you to set the maximum duration users are allowed to delay the start of an on-demand malware scan on their host endpoint. Valid values for the pause setting range from 1 to 48 hours (3600 to 172,800 seconds). Users can resume a paused scan before the full duration.
You can also configure the maximum number of pauses the user is allowed to enable on their endpoint. Valid values for the maximum number of pauses range from 1 to 100 times.
The Cancel settings allows users to terminate an on-demand malware scan actively running on their host endpoint. The malware scan settings are configurable through the Web UI or the API.
Note
You must enable malware detection (Signature and Heuristic Detections) and scheduled scans before configuring the on-demand malware scan settings. If malware detection and scheduled scans are disabled, the on-demand scan settings are ignored. See Enabling and Disabling Malware Detection and MalwareGuard and Managing On-Demand Malware Scans for more information.
This section covers the following topics:
Enabling and Disabling the Pause Setting for On-Demand Scans
The Pause setting for on-demand malware scans allows you to control the endpoint user's ability to delay and resume on-demand malware scans running on their endpoint for a defined period of time. You can use the Web UI or the API to enable or disable the pause setting for on-demand malware scans for all of your host endpoints or for select host sets in your environment.
Ensure that malware detection (Signature and Heuristic Detections) and scheduled scans are turned on before you enable the pause setting. See Enabling and Disabling Malware Detection and MalwareGuard and Configuring On-Demand Malware Scans for more information.
.png)
This section covers how to use the Web UI to enable and disable the pause setting for on-demand malware scans. See the Endpoint Security (HX) REST API Guide for information on using the API to enable and disable the pause setting for on-demand malware scans.
Enabling the Pause Setting for On-Demand Scans
Important
You must enable malware detection (Signature and Heuristic Detection) and Scheduled Scans before you enable the cancel setting for on-demand malware scans.
To enable the pause malware scan setting for all host endpoints:
Log in to the Web UI as an administrator.
From the Admin menu, select Policies to access the Policies page.
In the Policies table, click the Agent Default Policy link to access the Edit Policy page.
Select the Malware Scans tab.
In the Malware Scans section, verify that the Scheduled Scans ON/OFF switch is turned ON.
.png)
In the Scan Settings section, complete the following actions:
Toggle the User Paused Scans ON/OFF switch and set it to ON.
In the Pause duration field, enter the time interval for the pause duration you want to allow on your host endpoints in the Pause duration field. Valid values for the pause duration range from 1 to 48 hours.
In the Pause limit (per scan) field, define the maximum number of consecutive pauses the user is allowed on their host endpoint for a scheduled malware scan. Valid values for the maximum number of pauses range from 1 to 100 times. There is no default value.
Click Save.
To enable the pause malware scan setting for selected host sets:
Note
See Creating a Custom Policy for more information about using the Web UI to create a custom policy.
Log in to the Web UI as an administrator.
From the Admin menu, select Policies to access the Policies page.
In the Policies table, click the link for the custom policy you want to modify.
Select the Malware Scans tab.
In the Malware Scans section, verify that the Scheduled Scans ON/OFF switch is turned ON.
In the Scan Settings section, complete the following actions:
Toggle the User Paused Scans ON/OFF switch and set it to ON.
In the Pause duration field, enter the time interval for the pause duration you want to allow on your host endpoints in the Pause duration field. Valid values for the pause duration range from 1 to 48 hours.
In the Pause limit (per scan) field, define the maximum number of consecutive pauses the user is allowed on their host endpoint for a scheduled malware scan. Valid values for the maximum number of pauses range from 1 to 100 times. There is no default value.
Click Save.
Now you can assign host sets to the custom policy and set the policy priority level. See Assigning Host Sets to Agent Policies and Configuring Policy Priority Using the Web UI for more information.
Disabling the Pause Setting for On-Demand Scans
Note
If the pause setting is disabled, the endpoint user will not be able to delay or resume an active on-demand scan.
To disable the malware scan pause setting for all host endpoints:
Log in to the Web UI as an administrator.
From the Admin menu, select Policies to access the Policies page.
In the Policies table, click the link to access the Edit Policy page.
Select the Malware Scans tab.
In the Scan Settings section, Toggle the User Paused Scans ON/OFF switch and set it to OFF.
.png)
Click Save.
To disable the malware scan pause setting for selected host sets:
Note
When you disable a setting in a custom policy, the setting is disabled for all host sets assigned to the policy. If you want to select host sets to keep the original setting, you must create a new custom policy with the setting enabled and assign it to the selected host sets. See Creating a Custom Policy for more information about using the Web UI to create a custom policy.
Log in to the Web UI as an administrator.
From the Admin menu, select Policies to access the Policies page.
In the Policies table, click the link for the custom policy you want to modify.
Select the Malware Scans tab.
In the Scan Settings section, Toggle the User Paused Scans ON/OFF switch and set it to OFF.
Click Save.
Pausing a Scheduled Scan on the Endpoint
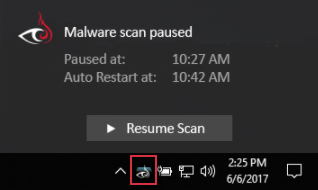
When the pause setting is enabled for on-demand malware scans, the malware scan window appear on host endpoints during an active on-demand malware scan. This window informs the user that a scheduled malware scan is in progress and allows the user to delay the scheduled malware scan for a defined time interval and resume the scan later.
To pause an on-demand malware scan on the host endpoint:
Log in to a host endpoint currently running Trellix Endpoint Security (HX) xAgent version 26 or later.
Click on the malware scan pop-up window when an on-demand malware scan is in progress.
Click Pause Scan to pause the active scan.
Click Resume to restart the active scan.
Enabling and Disabling the Cancel Setting for On-Demand Scans
When the malware scan cancel setting is enabled, users in your enterprise can terminate on-demand malware scans running on their endpoint. You can use the Web UI or the API to enable or disable the cancel setting for on-demand malware scans for all of your host endpoints or for select host sets in your environment.
Ensure that malware detection (Signature and Heuristic Detections) and scheduled scans are turned on before you enable the pause setting. See Enabling and Disabling Malware Detection and MalwareGuard and Configuring On-Demand Malware Scans for more information.
This section covers how to use the Web UI to enable and disable the cancel setting for on-demand malware scans. See the Endpoint Security (HX) REST API Guide for information on using the API to enable and disable the cancel setting for on-demand malware scans.
Enabling the Cancel Setting for On-Demand Scans
Important
You must enable malware detection (Signature and Heuristic Detection) and Scheduled Scans before you enable the cancel setting for on-demand malware scans.
To enable the cancel malware scan setting for all host endpoints:
Log in to the Web UI as an administrator.
From the Admin menu, select Policies to access the Policies page.
In the Policies table, click the Agent Default Policy link to access the Edit Policy page.
Select the Malware Scans tab.
In the Malware Scans section, verify that the Scheduled Scans ON/OFF switch is turned ON.
In the Scan Settings section, toggle the User Canceled Scans ON/OFF switch and set it to ON.
.png)
Click Save.
To enable the cancel malware scan setting for selected host sets:
Note
See Creating a Custom Policy for more information about using the Web UI to create a custom policy.
Log in to the Web UI as an administrator.
From the Admin menu, select Policies to access the Policies page.
In the Policies table, click the link for the custom policy you want to modify.
Select the Malware Scans tab.
In the Malware Scans section, verify that the Scheduled Scans ON/OFF switch is turned ON.
In the Scan Settings section, toggle the User Canceled Scans ON/OFF switch and set it to ON.
Click Save.
Now you can assign host sets to the custom policy and set the policy priority level. See Assigning Host Sets to Agent Policies and Configuring Policy Priority Using the Web UI for more information.
Disabling the Cancel Setting for On-Demand Scans
Note
If the cancel setting is disabled, the endpoint user will not be able to delay or resume an active on-demand scan.
To disable the malware scan cancel setting for all host endpoints:
Log in to the Web UI as an administrator.
From the Admin menu, select Policies to access the Policies page.
In the Policies table, click the link to access the Edit Policy page.
Select the Malware Scans tab.
In the Scan Settings section, Toggle the User Canceled Scans ON/OFF switch and set it to OFF.
Click Save.
To disable the malware scan cancel setting for selected host sets:
Note
When you disable a setting in a custom policy, the setting is disabled for all host sets assigned to the policy. If you want to select host sets to keep the original setting, you must create a new custom policy with the setting enabled and assign it to the selected host sets. See Creating a Custom Policy for more information about using the Web UI to create a custom policy.
Log in to the Web UI as an administrator.
From the Admin menu, select Policies to access the Policies page.
In the Policies table, click the link for the custom policy you want to modify.
Select the Malware Scans tab.
In the Scan Settings section, Toggle the User Canceled Scans ON/OFF switch and set it to OFF.
Click Save.
Canceling a scheduled scan on the Endpoint
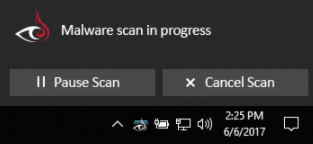
When the Cancel setting is enabled for on-demand malware scans, the malware scan window appears on host endpoints during an active on-demand malware scan. This window informs the user that a scheduled malware scan is in progress and allows the user to terminate the scheduled malware scan.
To cancel an on-demand malware scan on the host endpoint:
Log in to a host endpoint currently running Trellix Endpoint Security (HX) xAgent version 26 or later.
Click on the malware scan pop-up window when an on-demand malware scan is in progress.
Click Cancel Scan to terminate the active scan.
Important
You cannot resume an on-demand scan after clicking Cancel Scan.