Last Updated: November 27, 2025
Overview
Trellix Endpoint enhances Microsoft Windows Defender Antivirus and Microsoft Windows Defender Firewall allowing you to monitor potential threats on Windows endpoints. It provides monitoring support for Microsoft Windows 10 (version 1709 and later) and Microsoft Windows Server 2016 (and later).
Trellix Endpoint provides a range of threat detection and policy management capabilities including:
Centralized management for Windows Defender Antivirus and Windows Defender Firewall.
Policies defined inTrellix ePolicy Orchestrator - On-premises or Trellix ePolicy Orchestrator - SaaS are applied to Trellix Endpoint, and Windows Defender Antivirus and Windows Defender Firewall.
Threat alerts and the security compliance status of your endpoints are intuitively displayed, with filtering options available to provide information on specific threats and devices.
Protection Workspace, a centralized dashboard which monitors unresolved detections, escalated devices, and resolved threats on your managed endpoints.
Story Graph, a graphical tracing of endpoint threat detections which displays the process and file behavior that led to the detection.
Key features
Trellix Endpoint enhances protection on your Microsoft Windows 10 and Microsoft Windows Server 2016 (and later) endpoints.
Enhanced detection for Windows Defender Antivirus
Trellix Endpoint:
Provides enhanced analysis of the file when Windows Defender Antivirus allows a file to execute.
Uses local and cloud technologies to detect and provide protection against the threats that bypass Windows Defender Antivirus
Includes protection against credential harvesting. It provides static and behavioral protection.
Uses machine-learning research to analyze the latest zero-day threats.
IOAV protection scans files being downloaded and zipped files being extracted for threats.
Windows Defender Antivirus management
Trellix ePolicy Orchestrator - SaaS and Trellix ePolicy Orchestrator - On-premises:
Manage Trellix Endpoint.
Manage several Windows Defender Antivirus features when Trellix Endpoint is installed on your endpoints.
Provides reporting on all endpoints that have Windows Defender Antivirus active.
Windows Defender Firewall rule management
Trellix Endpoint:
Enables centralized management of Windows Defender Firewall and rule management from Trellix ePolicy Orchestrator - SaaS and Trellix ePolicy Orchestrator - On-premises.
Reports the number of blocked events from WIndows Defender Firewall in the past 24 hours.
Reports firewall compliance data from each managed endpoint and sends this information to Trellix ePolicy Orchestrator - SaaS and Trellix ePolicy Orchestrator - On-premises.
Note
Windows Defender Firewall and firewall rule management are switched off by default. Manage your Windows Defender Firewall rules by navigating to Policy Catalog > Firewall Rules.
Windows Defender Exploit Guard management
Trellix ePolicy Orchestrator - SaaS and Trellix ePolicy Orchestrator - On-premises:
Manage several Windows Defender Exploit Guard features.
Provide reporting on all endpoints that have Windows Defender Exploit Guard active.
Support for Windows 10 and Windows Server operating systems
Trellix Endpoint provides support and management of Windows Defender Antivirus, Windows Defender Firewall, and Windows Defender Exploit Guard on Windows 10 and Windows Server 2016 and later systems.
Protection Workspace
The Protection Workspace dashboard allows you to monitor threats in your network, view compliance information about Trellix products, and manage your devices. You can view information about:
The total number of devices managed by Trellix Endpoint
Devices tagged as Escalated
Resolved and unresolved threats
Quarantined threats
Endpoint compliance status
Graphical information about file behavior that led to its detection.
Unified policy model
Define policies for Windows Defender Antivirus, Windows Defender Firewall and Trellix Endpoint simultaneously, simplifying the management and protection of your endpoints.
How it works
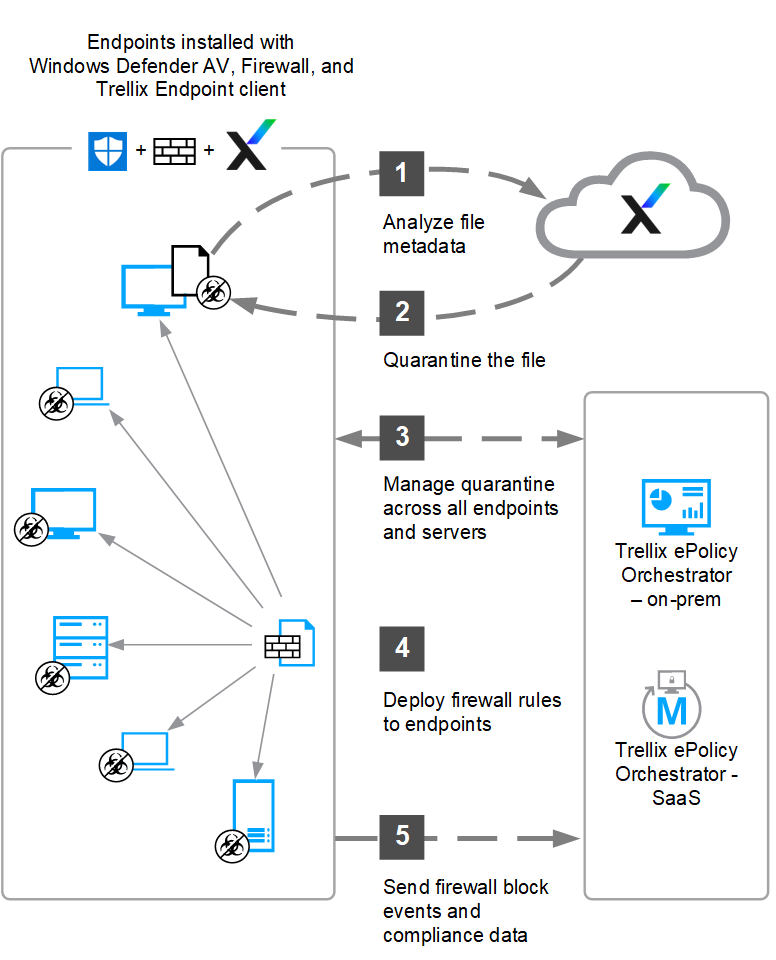
Trellix Endpoint uses cloud content and local content to analyze data. It then presents the information in the Protection Workspace dashboard in ePO - On-prem.
Managing the Trellix Endpoint client component
The Trellix Endpoint client component is installed on each protected endpoint and communicates directly with your ePO - On-prem server.
ePO - On-prem server (on-premises, in a hosted service, or Trellix ePolicy Orchestrator - SaaS).
Trellix Endpoint sends file metadata to the cloud infrastructure for analysis.
When files are quarantined, they are stored in the Quarantine database on the relevant endpoint. The server then reads from these endpoint quarantine locations to enable centralized quarantine management across all your protected endpoints and servers.
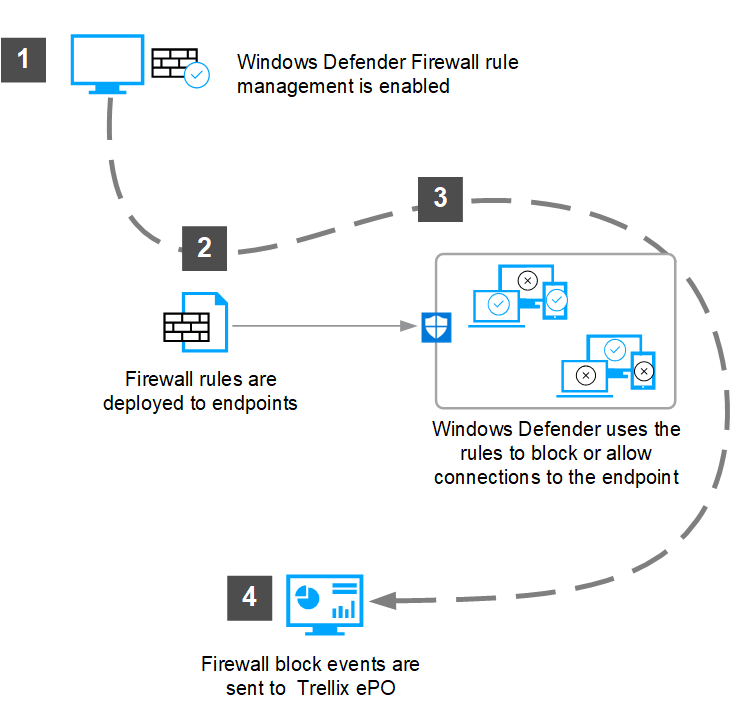
When enabled, firewall rules are pushed to Windows Defender Firewall on the managed endpoints and servers.
Summaries are sent to ePO - On-prem. These summaries include Windows Defender Firewall blocked events and firewall compliance data.
Note
When using Trellix Endpoint to manage Windows Defender Antivirus or Windows Defender Firewall, do not also use Domain Controller Group Policy or System Center Configuration Manager (SCCM) Policy. Domain Controller and SCCM policies have higher precedence and result in the Trellix Endpoint policies being overwritten.
How Trellix Endpoint works
Managing Windows Defender Antivirus
Trellix Endpoint works with Windows Defender Antivirus
Windows Defender Antivirus protects your endpoints and servers from known viruses and malware.
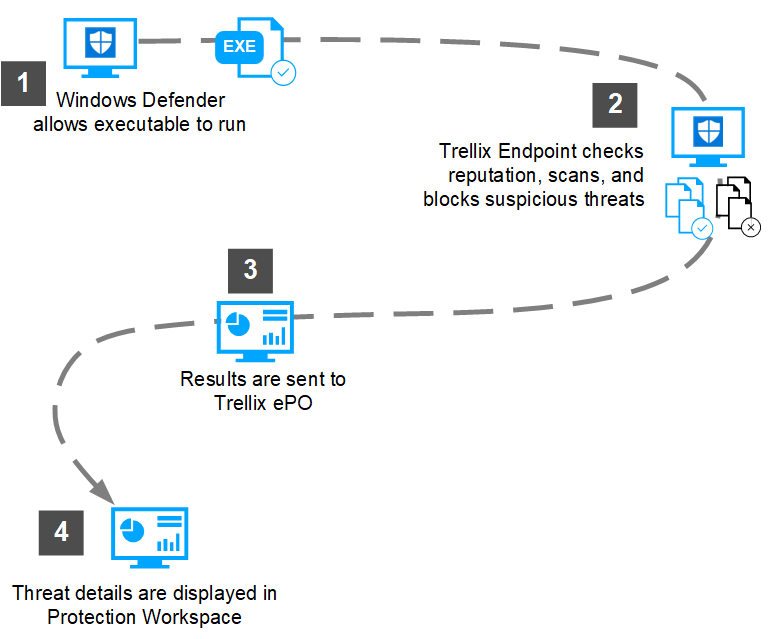
Windows Defender Antivirus passes an executable to Trellix Endpoint for further analysis if it deems the executable to be safe. Trellix Endpoint then uses the Trellix local and cloud-based detection infrastructure for this more detailed analysis.
Threat detections from Windows Defender Antivirus and Trellix Endpoint appear in the Protection Workspace where you can resolve threats and change your policies to refine your protection levels.
Note
Trellix Endpoint applies the Microsoft Defender policy when Tamper Protection is enabled. When enabled, Tamper Protection prevents Group Policy disabling some settings on Microsoft Defender. Because of this, Trellix Endpoint does not manage the following settings when Tamper Protection is enabled:
Real Time Monitoring
Behavior Monitoring
IOAV Protection
Trellix Endpoint applies Microsoft Defender policies on a best effort basis, and will try to apply all policies even if protected.
Windows Defender Antivirus and Trellix Endpoint can both quarantine files. You can manage quarantined files in the Quarantine Management area in ePO - On‑prem.
How Trellix Endpoint interacts with Windows Defender Antivirus
Managing Windows Defender Firewall rules
Trellix Endpoint lets you manage Windows Defender Firewall rules. These rules are used across your protected endpoints and servers.
With a default set of firewall rules available out-of-the-box, you can quickly implement these rules and push them to all your protected endpoints and servers.
You can create rules, or change the existing ones, to meet your corporate requirements.
When creating rules, consider re-creating any previous firewall rules to maintain your current level of protection.
As an administrator, you can allow local firewall rules to be run on the endpoints and servers.
How Trellix Endpoint interacts with Windows Defender Firewall
View Trellix Endpoint features in the interface
ePO - On-prem extensions and components are used to access Trellix Endpoint features.
Security administrators define policies in ePO - On-prem which are pushed to Trellix Endpoint installed on your endpoint devices. As a result, Trellix Endpoint is used to manage your Microsoft Windows Defender Antivirus settings.
Protection Workspace
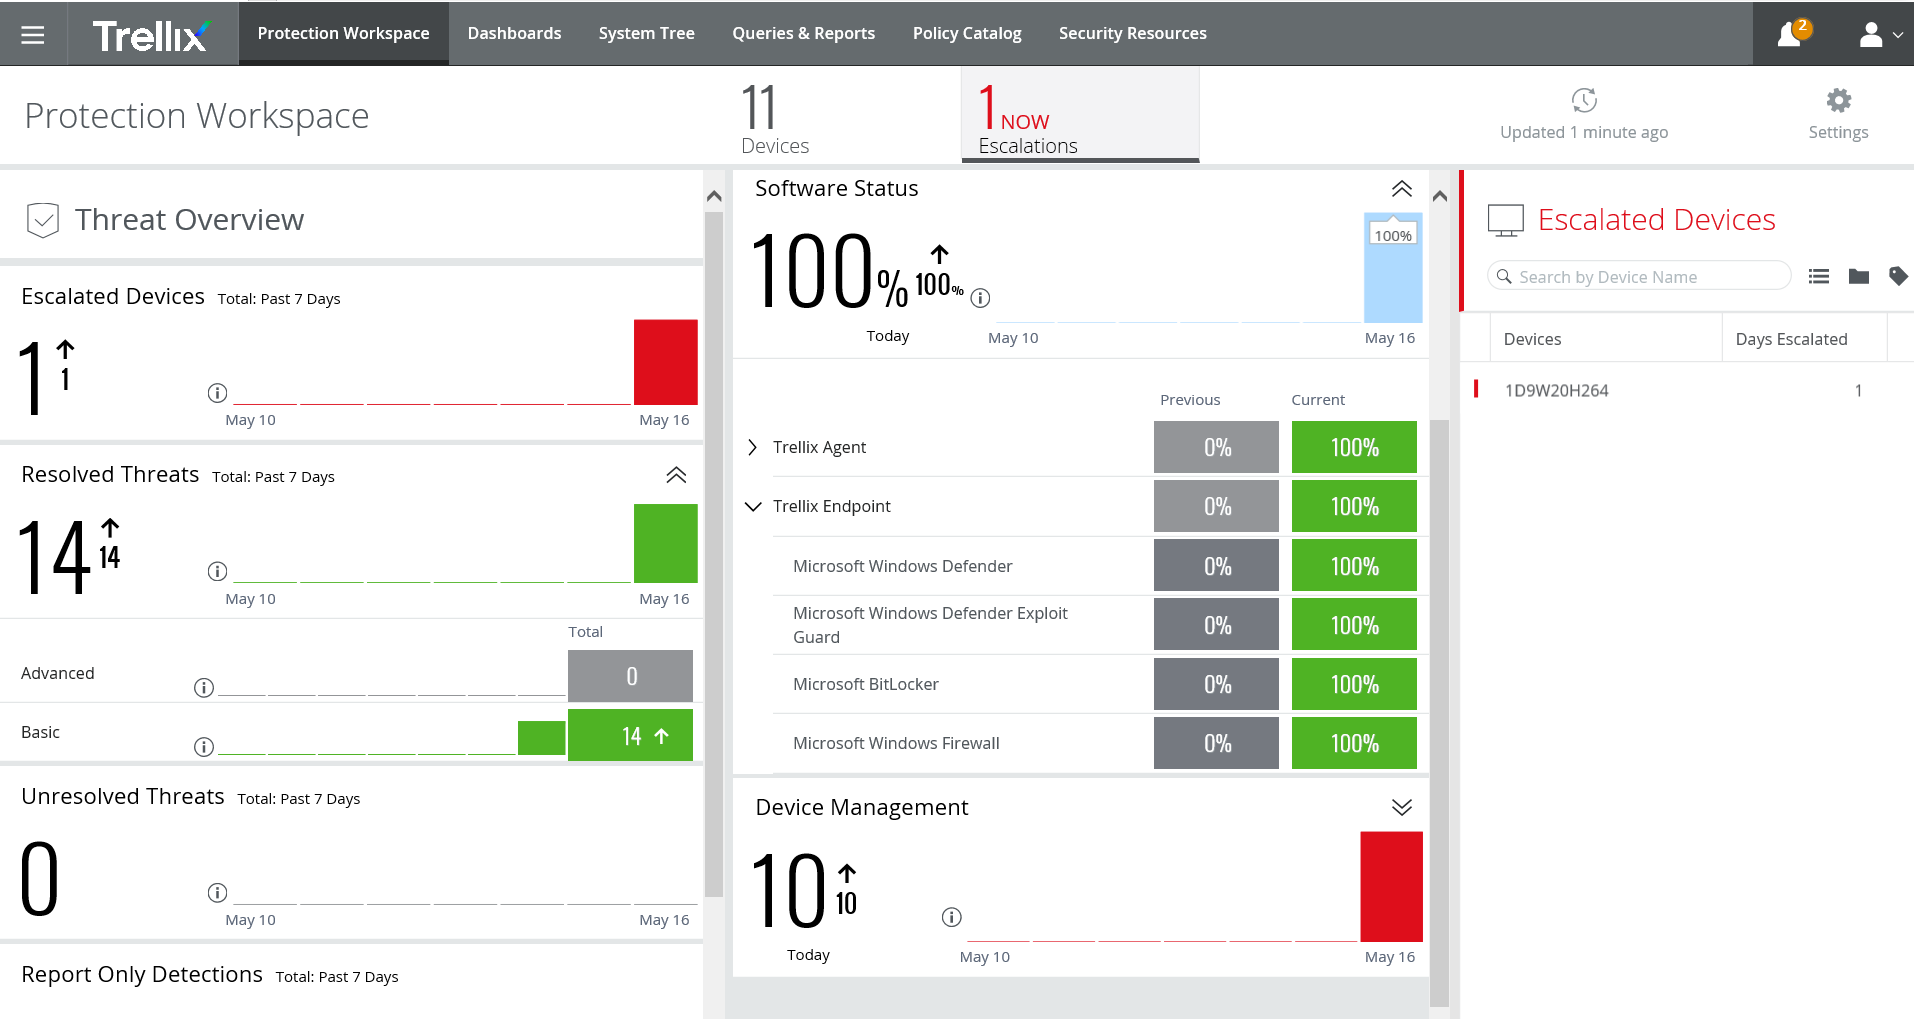
The Protection Workspace is the interface for Trellix Endpoint where you can view threat incidents and device compliance. It is included by default in ePO - SaaS, and is available as an extension for earlier versions of ePO - On-prem.
Protection Workspace interface showing Trellix Endpoint data
Quarantine Management
The Quarantine Management extension allows you to manage quarantined files from any of your protected endpoints protected by Trellix Endpoint.
The Quarantine Management interface is located under System Tree. A Quarantine Content tab is found under the device information.
Automatic updating of client components
The Trellix Endpoint Updater extension allows you to automatically update your endpoints with the latest version of Trellix Endpoint. The Trellix Endpoint Update task runs daily by default, and updates your endpoints with the latest software from the ePO - On-prem Software Catalog.
Manage Trellix Endpoint with policies
Trellix Endpoint ships with default policies found in the ePO - On-prem Policy Catalog. These provide templates for you to create policies that match your organizational priorities.
Trellix Endpoint uses the following policy types: General, Firewall Rules,Exclusions, and Exploit Protection Program Settings. Follow the standard ePO - On-prem workflow to duplicate and change these policies as needed.
Note
As new features are added to Trellix Endpoint, new default policies are added to include updated settings. We recommend you use the latest versions as the basis for the policies pushed to your endpoints and servers.
Group Policy Enforcement status
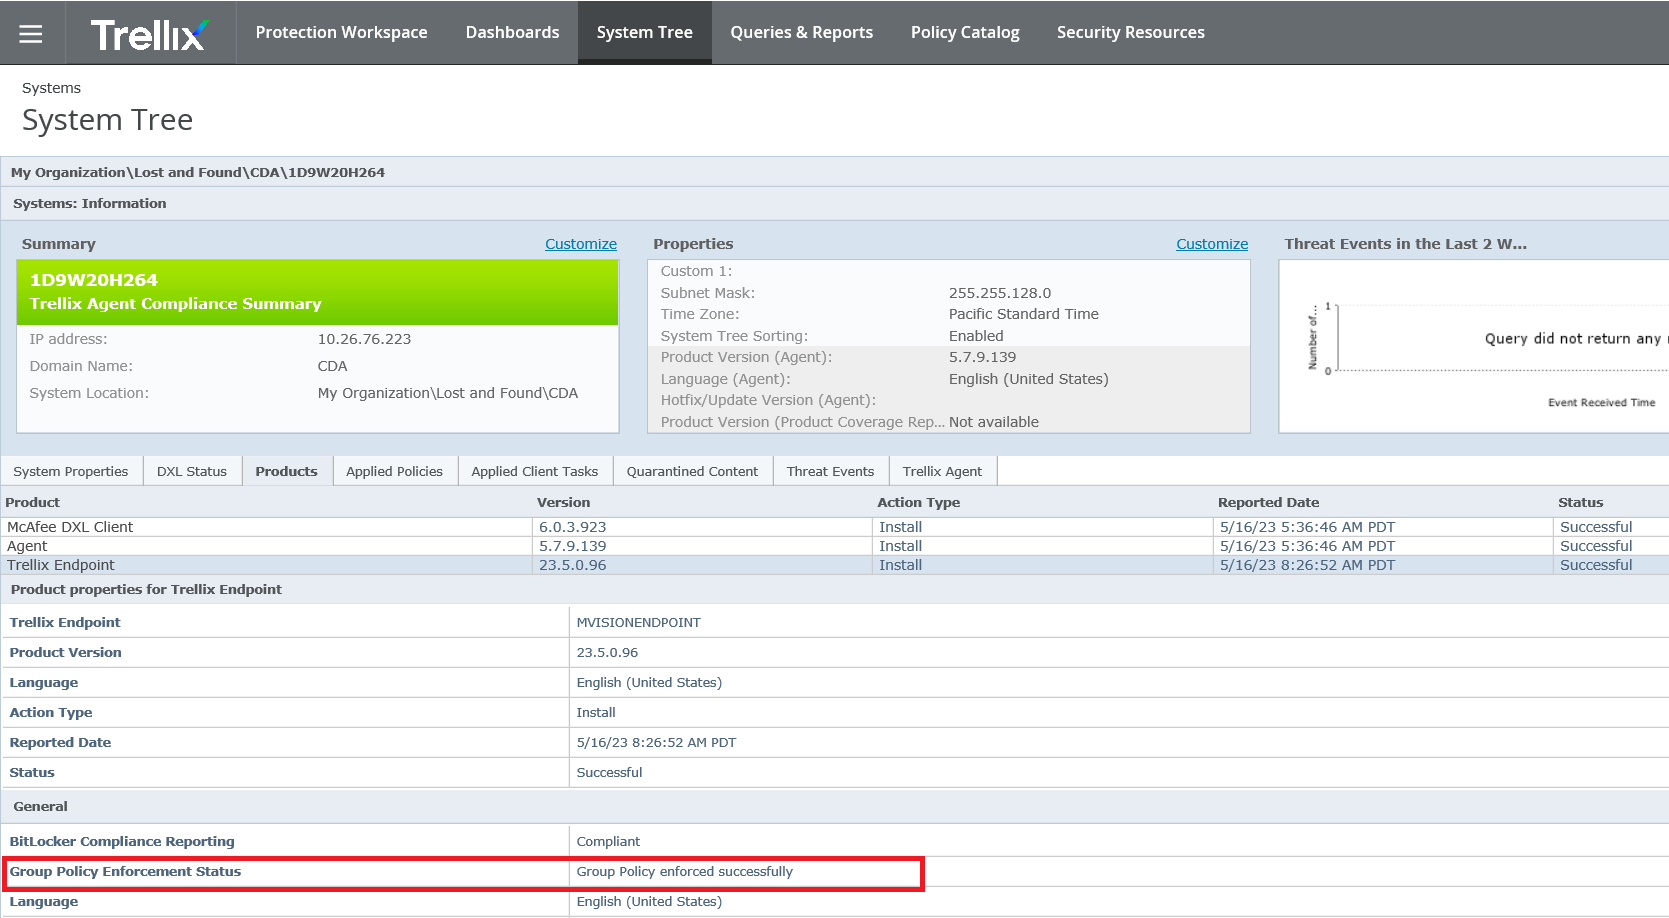
Group Policy must be enforced for management of your endpoints using policies. The Group Policy Enforcement status can be viewed on your endpoints by navigating to System Tree and selecting an endpoint. Click Products > Trellix Endpoint and under General see Group Policy Enforcement Status.
If the status displays "Group Policy enforcement failed", restart the endpoint.
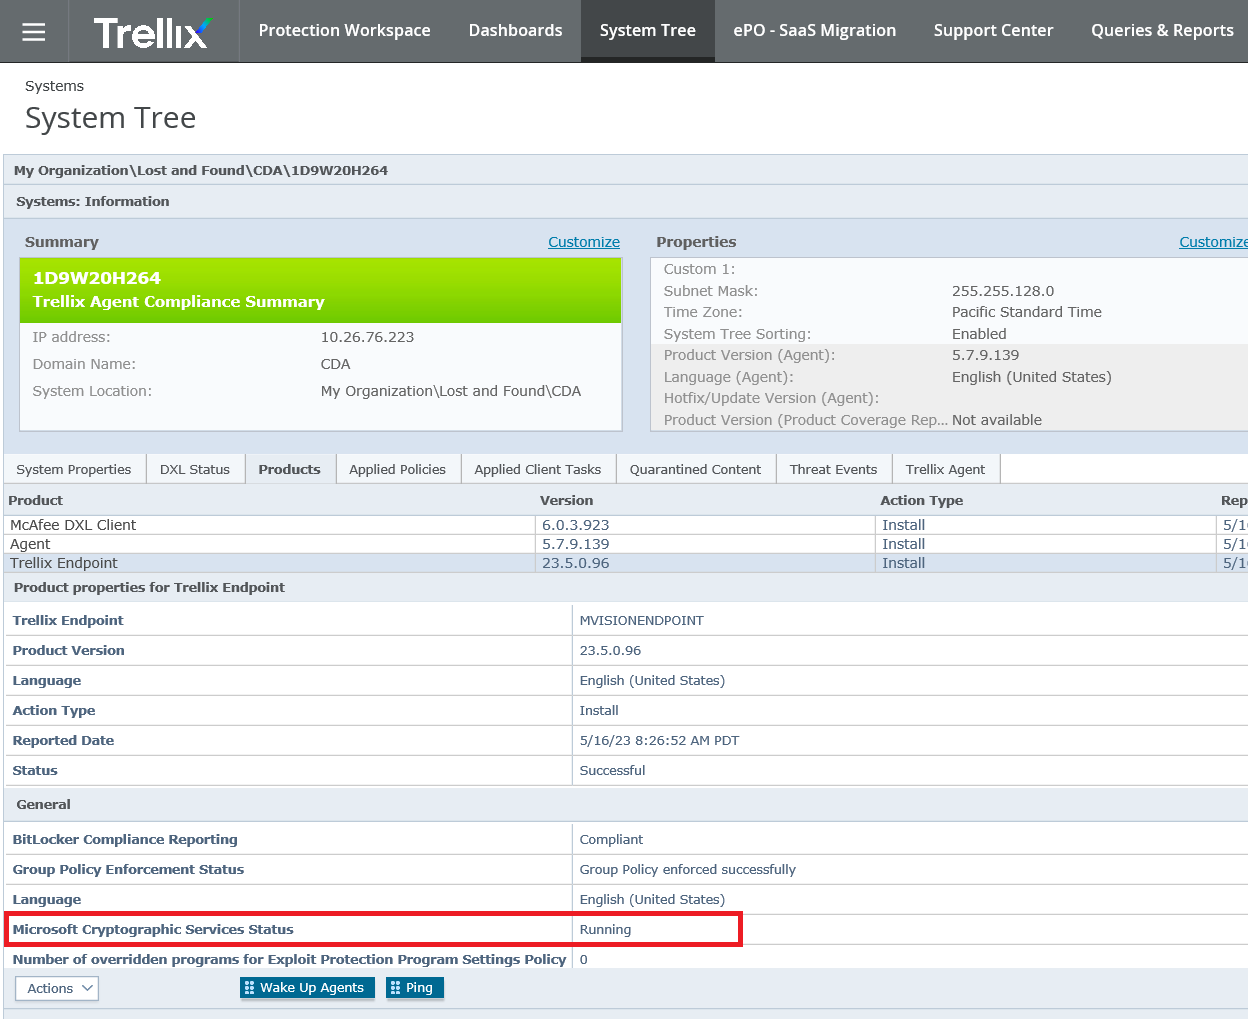
Microsoft Cryptographic Services status
Microsoft Cryptographic Services, or CryptSvc, is used to verify file signatures. Trellix Endpoint reports the status of this service to ePolicy Orchestrator - On-premises to provide improved visibility into the overall health of an endpoint.
Security posture
When you open the General Policy, you see the Security Posture slider bar. It abstracts the security settings from users who do not want to see the full list, and instead provides a high-level view of the General Policy configuration. Users can choose Balanced, High Protection, and Custom settings to decide the level of detail they want to view for a more personalized user experience.
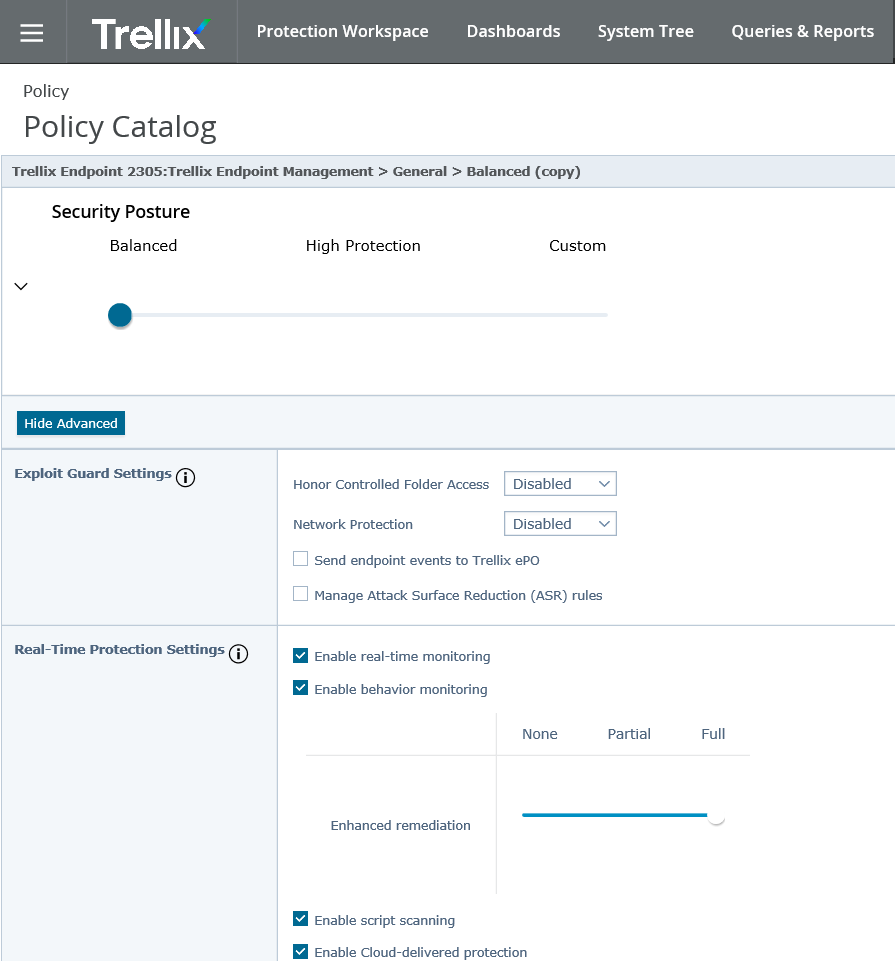
If the slider is moved to one of the predefined states (Balanced or High Protection), the following configuration information remains unchanged:
Antivirus management
Firewall management
Automatic updates delay
Uninstall password
Signature update sources
Enabling Threat Protection and Firewall management
By default, Threat Protection is enabled when you install Trellix Endpoint. We recommend that you do not disable this feature as advanced malware detection is not operational.
To manage Microsoft Windows Defender Firewall rules, navigate to the ePO - On-prem Policy Catalog and select Trellix Endpoint Management > General. Select a policy and click Firewall.
Note
When Firewall is disabled in the policy, Protection Workspace reports the firewall status as being compliant.
Sending Exploit Guard events to ePO - On-prem - On-prem and ePO - SaaS
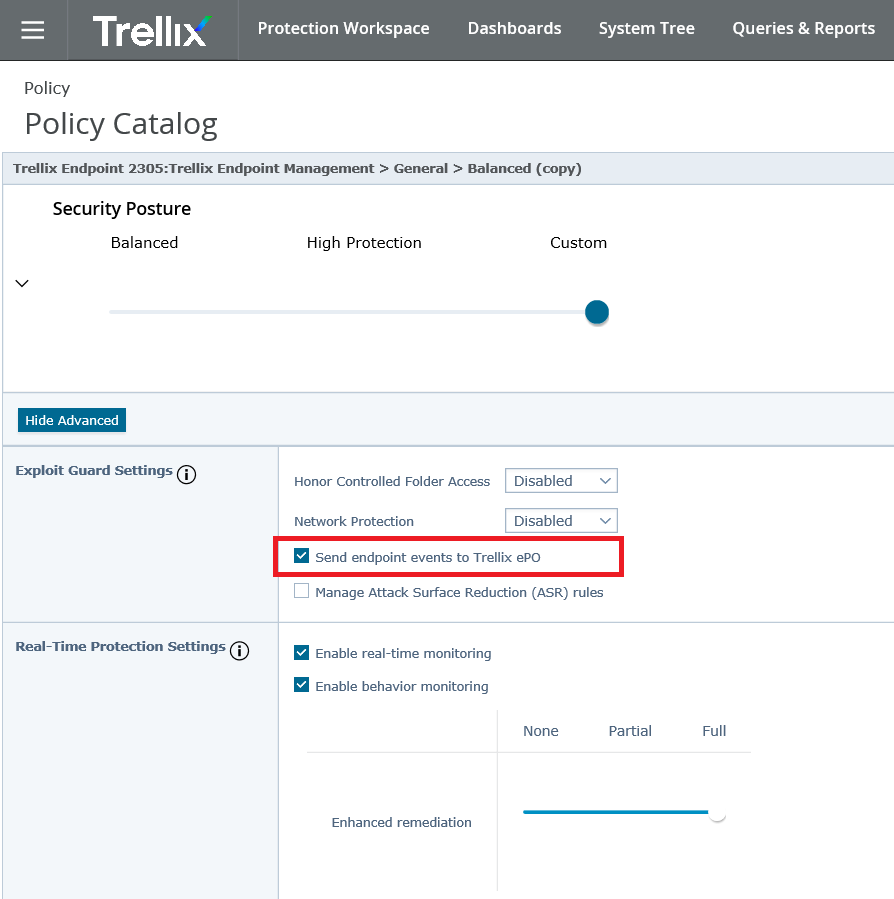
Exploit Guard events for Controlled Folder Access and Attack Surface Reduction rules can be reported to Trellix ePolicy Orchestrator - On-premises and Trellix ePolicy Orchestrator - SaaS. Enable this feature by navigating to Policy Catalog and selecting the Send endpoint events to Trellix ePO checkbox under Exploit Guard settings. Event information is viewable in the Threat Event Log. Also, predefined queries templates can be used to report the exploit information. The templates can be found under Queries and Reports > Trellix Groups > Trellix Endpoint.
General policies
The default policies allow you to configure the general settings for Trellix Endpoint. These include Threat Protection, Firewall, Log Settings, and Compliance Reporting.
There are two templates for the General policy. The first is for general use, and the second is for configurations that require a higher security level. The options are the same for both, but more restrictive settings are used for higher security.
For ePO - On-prem policies, you can duplicate and customize the settings in these default policies, using the standard ePO - On-prem policies workflow. See the documentation for your version of ePO - On-prem on https://docs.trellix.com.
Threat Protection
Threat Protection — Standard options
Option | Definition |
|---|---|
Protection level | Use the sliders to set the confidence level when Trellix takes the Block or Report actions for potential malware.
|
Scan Settings | Define the scan type, scanning schedule, and required actions for threats of differing severity for Windows Defender Antivirus. Enable Credential Theft Protection to prevent processes from reading lsass.exe memory (lsass.exe stores user credentials). |
Update Scheduler | Set the Update Scheduler options.
|
Notifications | As administrator, you can decide if your users see notifications when Trellix Endpoint or Windows Defender Antivirus detects threats on the endpoint devices. |
Threat Protection — Advanced options
Option | Definition |
|---|---|
Signature update sources distributed from | Windows Defender Antivirus can use several methods to check for and download signature updates. Select the methods to use, and drag and drop them in your preferred order. When using Configuration Manager (SCCM) as the update source, set a time period after which, if SCCM finds no new signature updates, the system falls back to using other update sources. To check for signature updates from UNC file shares, enter the relevant UNC paths. |
Exploit Guard Settings | Manage access to selected folders. Choose Disabled, Block, or Audit from the drop-down list. The lists of controlled folders are defined in the Exclusions policy. Select the Send endpoint events to Trellix ePO checkbox to report Exploit Guard event information for Controlled Folder Access, Attack Surface Reduction Rules, and Network Protection to ePO - On-prem On-prem and ePO - SaaS.
|
Real-Time Protection Settings | Select the real-time protection configuration to be applied to Windows Defender Antivirus and Trellix Endpoint. This area includes the ability to enable scanning for potentially unwanted applications (PUA), and to set the action — Block, or Audit Only — when these types of applications are detected. |
What to Scan | Select the items that Windows Defender Antivirus and Trellix Endpoint scan. |
Additional Scan Settings | Select the settings appropriate for your requirements. |
Proxy Server Settings | Configure the proxy server for Trellix Endpoint and Windows Defender to allow you to route threat intelligence from your network to Trellix Endpoint. |
Firewall
Firewall — Standard options
Option | Definition |
|---|---|
Basic | Choose the profiles that you enable the Firewall management for Decide if the users of each profile see notifications about firewall events.. |
Firewall — Advanced options
Option | Definition |
|---|---|
Advanced | To use existing local firewall rules, select the profiles to which these rules apply. |
Note
If you use the Trellix Endpoint Firewall management, and later disable it, the local firewall rules on your managed endpoints are automatically reactivated.
Log Settings
Option | Definition |
|---|---|
Log Settings across Trellix Endpoint | Select the information to be included in the log files. (Advanced option) Set the Log Size Limit, and the Log Level. The default settings are suitable for most customers. You can change them if you have specific requirements. For example, if you are troubleshooting an issue, select a more detailed Log Level and increase the Log Size Limit. These log settings provide more detailed information to help diagnose the issue. |
Compliance Reporting Settings
Option | Definition |
|---|---|
BitLocker Settings | Check the box to enable BitLocker compliance reporting (if enabled, Bitlocker must be installed and running). |
Manage automatic updates
Use group policies to automatically update your systems with the latest software. The update scheduler allows you to schedule automatic updates on a timed delay so that you can control when different parts of your organization receive each update.
Make a plan to organize your systems into groups and determine a schedule for rolling out automatic updates to different parts of your organization.
Select Systems → Systems Tree.
Categorize the systems in your organization into groups and assign separate policies to each group.
Under System Tree, select a group.
Select the Assigned Policies tab, highlight the General category, and click Edit Assignment.
The Policy Assignment window opens.
Under Assigned policy, select Balanced and click New Policy.
The Create a new policy window opens.
Complete the options for a new policy.
Category: General
Create a policy based on this existing policy: select Balanced
Policy Name: Enter a policy name. For example, Sales.
Click OK.
The Trellix Endpoint 22xx: Trellix Endpoint Management → General → Sales window opens.
Under Threat Protection, complete the options for the Update Scheduler.
Select the Check for updates every 8 hour(s) option. You can modify the number hours if needed.
Select the Delay products updates by (days) checkbox.
Enter the number of days.
Click Save.
The system returns you to the Policy Assignment window.
7. Click Save to save the policy changes.
The policy is now scheduled to automatically update your systems in your group based on your selections. Create policies for the remaining groups as before.
To make sure that you have scheduled the updates, you can:
Use the Trellix Agent Monitor to see whether the service is running.
Use the Policy → Policy Comparison page to view and compare the scheduling for different policies.
Prevent users from changing exclusions in Windows Defender
Use policy settings to disable antivirus scan exclusions and improve security on your managed systems.
A user can exclude files, folders, and processes from antivirus scans in Windows Defender using the Exclusions page under Virus and Threat Protection settings. In some instances, you might want to disable this ability. This can be done by enforcing a new policy setting in the Policy Catalog page for the policy.
From your ePO - On-prem interface, browse to Policy Catalog → Trellix Endpoint 22xx → General.
Select a policy and click Edit.
Click Show Advanced. The Additional Scan Settings section is displayed.
Select Disable users from creating scan exclusions.
Click Save.
Make sure you assign the rule to your chosen endpoints. Use Wake Up Agents to push the policies to them.
With the new policy enforced, managed endpoints can no longer add exclusions in Windows Defender. You can verify the change by opening Windows Defender on an endpoint and viewing the exclusions. Note that the Add an exclusion button is disabled and new text reads: Changing exclusions has been disabled by your administrator.
Configure a proxy server for cloud access
Use policy settings to configure a proxy server for Trellix GTI and apply it to your managed systems.
make sure you know the HTTP address and port number of your proxy server.
From your ePO - On-prem interface, browse to Policy Catalog → Trellix Endpoint 22xx → General.
Click Edit.
Click Show Advanced.
Select Configure proxy server. The HTTP address and Port fields appear.
Enter the HTTP address using DNS, IPv4, or IPv6.
Enter the port number.
Click Save.
Note
Click Wake Up Agents to push the policies to your protected endpoints and servers.
Firewall Rules
Trellix Endpoint includes the ability to manage Microsoft Windows Defender Firewall rules on your Microsoft Windows 10 or Microsoft Windows Server 2016 (or later) endpoints and servers.
As with all ePO - On-prem policies, you can duplicate and customize the settings in these default policies, using the standard ePO - On-prem policies workflow. See the documentation for your version of ePO - On-prem on https://docs.trellix.com.
Microsoft Windows Defender Firewall, by default, contains two 'top level' rules; one that blocks all inbound connections, and the other, which allows all outbound connections.
To have a working system, you must set up rules to allow the inbound connections needed for your normal network connectivity.
By default, Trellix Endpoint includes several firewall rules to allow the most commonly used inbound connections.
Create further rules to meet your specific needs for inbound connections to your endpoints and servers, and to also create the outbound rules — of both Allow and Block types — to meet your required security objectives.
You can sort the default rules by clicking the column heading of any column.
Note
Options in bold contain groups of similar rules.
Option definitions — out-of-the-box inbound allow rules
Rule | Definition |
|---|---|
Allow Network Time Protocol traffic | Rule for Network Time Protocol communications. |
Allow inbound Remote Desktop Connections (RDP) connections | Inbound RDP connections rule. |
App Installer | Rule for the Microsoft App installer, allowing installation and maintenance of Apps. |
Connect | Rule for Microsoft PPI Projection. |
Core Networking | Rules concerned with allowing networking functions. |
Cortana | Rule for Microsoft Cortana communications. |
Delivery Optimization | Includes rules for TCP-In and UDP-In. |
Mail and Calendar | Rule for Microsoft Windows Communication Apps. |
Microsoft Edge | Rule for Microsoft Edge |
My Office | Communications with the Microsoft Office hub. |
NetBIOS | Includes rules for RCP and NetBIOS sessions. |
Network Discovery | Includes multiple rules for network discovery purposes. |
OneNote | Rule for Microsoft OneNote communications. |
Remote Assistance | Rules for Remote Assistance channels. |
Skype | Skype communications rule. |
VPN | Rules used to enable VPN communications. |
Win32WebViewHost | Rule for Microsoft Windows 32-bit Webview host applications. |
Windows AD authentication | Active Directory rules. |
Wireless Display | Rules that apply to connections with wireless displays. |
Work or school account | Rule for the plug-in to allow work or home account integration. |
Your account | Rule for communications with Microsoft Windows cloud account logon. |
Add a firewall rule
When defining your firewall policy for your protected endpoints and servers, you can add new firewall rules.
You can create firewall rules that allow communications, or that block communications. These communications can be inbound or outbound, and can apply to programs, services, IP addresses, or to specific protocols or ports. Use the available options to create a rule that meets your specific needs.
Note
This example creates a rule that blocks access from the endpoint to Skype.
From the ePO - On-prem interface, browse to Policy Catalog → Trellix Endpoint 22xx → Firewall Rules.
Click Edit.
Select the group header, or the individual rule in the group for which you want to add a firewall rule.
From the Take action drop-down list, select New Rule. The Details pane is displayed.
Type Block Skype in the rule name text box.
Select the options for the rule:
Action: As this example rule is a block rule, select Block.
Direction: For this example, select Outbound.
Profile: For this example, select the Private and Public profiles.
Program: Select Specified path and enter the path to the program, for example C:\Program files (x86)\Microsoft\Skype for Desktop\Skype.exe.
Local IP/Remote IP: Set the IP addresses to Any IP address.
Protocol and Ports: Set to Any.
Advanced: Choose from the following optional settings:
Edge Traversal - Choose Block Edge Traversal, Allow Edge Traversal, Defer to User, Defer to Application.
Authorized Users Select Any User, Specified User (enter the authorized users or computers)
Click Add.
The new rule to block outgoing connections from the endpoint to Skype is added to the rules in the selected policy.
Note
Make sure you assign the new rule to your selected endpoints, then use Wake Up Agents to push the policies to them.
Edit a firewall rule
When defining your firewall policy for your protected endpoints and servers, you can change existing firewall rules.
From your ePO - On-prem interface, browse to Policy Catalog → Trellix Endpoint 22xx → Firewall Rules.
Click Edit.
Select the rule to change. The Details pane is displayed.
Edit the rule and click Update.
Click Save.
RESULT_CFD01CA6C6B04103B2364E7B829916E2
" alt="Note icon" style="vertical-align:middle;margin-right:8px;">Note
Make sure you assign the rule to your chosen endpoints, then click Wake Up Agents to push the policies to them.
Delete a firewall rule
When defining your firewall policy for your protected endpoints, remove any rules that you do not want in your policy.
You can't delete rules from the default (read-only) policies.
From your ePO - On-prem interface, browse to Policy Catalog → Trellix Endpoint 22xx → Firewall Rules.
Click Edit.
Select the rule to delete. Use the checkboxes to select multiple rules.
The Details pane shows the current settings for a rule.
From the Take action drop-down list, select Delete.
When selecting multiple rules, only the rules with checkboxes are affected.
Confirm that you want to delete the selected rules.
Click Save. The selected rule is removed from the policy.
Note
Use Wake Up Agents to push the policies to your protected endpoints.
Copy a firewall rule
When defining your firewall policy for your protected endpoints and servers, you can make copies of existing firewall rules.
From your ePO - On-prem interface, browse to Policy Catalog → Trellix Endpoint 22xx → Firewall Rules.
Click Edit.
The policy opens, showing the existing rules.
Select the rule to copy. Use the checkboxes to select multiple rules.
The Details pane shows the current settings for a rule.
From the Take action drop-down, select Copy. When selecting multiple rules, only the rules with checkboxes are affected.
Confirm that you want to add the copy of the selected rules. When creating multiple copies, you are not prompted until you save.
Click Save. When creating multiple copies, you are warned about the new copies. Click Yes to discard the copies, or No to keep them.
Note
Use Wake Up Agents to push the policies to your protected endpoints.
Exclusions policy
The Exclusions policy contains a single policy template. Duplicate this policy to configure files, folders, and processes to be excluded from the Trellix Endpoint and Windows Defender Antivirus scans.
Option | Excluded by | Definition | Maximum number of characters per field |
|---|---|---|---|
File and Folder Exclusions | Trellix Endpoint and Windows Defender Antivirus | Enter the folder paths to exclude folders and the files they contain from scheduled and real-time scans. | 250 |
Process Exclusions | Trellix Endpoint and Windows Defender Antivirus | To exclude files opened by processes from being scanned, specify the paths to those processes. All files opened by the specified process are excluded from scans. | 100 |
File Type Exclusions | Windows Defender Antivirus | To prevent scanning of specific file types by scheduled, custom, or real-time scans, add the files types to the File Type Exclusions list. | 100 |
Controlled Folders | Windows Defender Antivirus | Define folders where untrusted applications can't change or delete files or folders. For example, prevent untrusted applications from changing files in the Documents folder. | 260 |
Permitted Applications | Windows Defender Antivirus | Specify the applications to be considered as trusted, and that can change or delete files or folders in the Controlled Folders list. | 100 |
Attack Surface Reduction | Windows Defender Antivirus | Specify the folders or files and resources that should be excluded from Attack Surface Reduction rules. | 100 |
Script Hashes | Trellix Endpoint | Specify SHA256 hashes of scripts to exclude them from real-time scanning. | The number of characters must be 64. Character strings lesser or greater than 64 are not valid. |
Note
The exclusions for Controlled Folders and Permitted Applications are applied only if the Honor Protected Folder policy is set to Block or Audit.
Note
There is no limit to the number of exclusion entries you can apply for each policy setting. However, a high number of exclusion entries impacts the length of time it will take to push a policy enforcement down to an endpoint. It is recommended that you add exclusion paths containing multiple executables or applications to reduce the number of individual exclusions to be applied to an individual endpoint.
Wildcards
You can use a single asterisk (*) and question mark (?) as wildcards when defining items in the file name or folder path exclusion list.
Asterisk (*) wildcard | Function |
|---|---|
File name and file extension exclusions | Replaces any number of characters. Only applies to files in the last folder defined in a query. |
Folder exclusions | Replaces a single folder. Use multiple * with folder slashes \ to indicate multiple, nested folders. |
Process exclusions | The asterisk (*) wildcard can only be used at the end of a complete path. For example: C:\MyWork\*. |
File name and file extension exclusions | Replaces a single character. Only applies to files in the last folder defined in a query. |
Folder exclusions | Replaces a single character in a folder name. |
Process exclusions | The question mark (?) wildcard is not supported in process exclusions. |
Wildcard examples
Wildcard | Expression | Result |
|---|---|---|
Asterisk (*) | C:\MyWork\*.txt | C:\MyWork\notes.txt |
C:\someworkpath\*\Data | Any file in:
| |
C:\Work\*\*\Backup | Any file in:
| |
C:\Work\*\*\Backup (example) | Any matching backup folders under Work paths | |
Question mark (?) | C:\MyData\my?.zip | C:\MyData\my1.zip |
C:\somepath\?\Data | Any file in C:\somepath\P\Data and its subfolders | |
C:\somepath\test0?\Data | Any file in C:\somepath\test01\Data and its subfolders | |
C:\somepath\test0?\Data (example) | Any matching files for test0? patterns |
Note
Double asterisk (
**) is not supported by Trellix Endpoint.
Note
System environmental variables such as
%SystemRoot%can be used in exclusions. User environmental variables such as%UserProfile%are not supported by Trellix Endpoint.
Exploit Protection Program Settings policies
Oversee how Trellix Endpoint manages Windows exploit protection. You can export the exploit protection settings from one endpoint, edit your settings, and then push them to all your Trellix Endpoint-managed endpoints and servers.
Option | Definition |
|---|---|
Import endpoint exported Settings.xml | Import information about the exploit protection program settings that have previously been exported from a Microsoft Windows system. |
Take Action button | Enables you to create a rule, or you can delete or copy a selected rule. |
Table grid | Shows all rules from the imported |
Export Windows exploit protection rules
Export the rules from an existing Windows computer, so that they can then be imported into ePO - On-prem, edited, and then deployed to your endpoints.
From your selected Windows computer, open Windows Defender Security Center.
Open the App & browser control tab.
Locate the Exploit protection area. Click Exploit protection settings.
Click Export settings and choose where to save the settings file.
The Windows Exploit protection settings are saved to a file with the default file name settings.xml.
Import Windows exploit protection settings into ePO - On-prem
Import the exploit protection program settings from Microsoft Windows into ePO - On-prem, so that you can edit the settings and push them to all your Trellix Endpoint-managed systems.
Make sure that you have exported the Windows exploit protection settings from Windows Defender Security Center on a suitable Microsoft Windows computer. Also, make sure you can access the resultant Settings.xml file from where you manage your ePO - On-prem server.
From ePO - On-prem, navigate to Policy Catalog → Trellix Endpoint 22xx → Exploit Protection Program Settings.
Open the selected policy for editing.
Click Choose File, and navigate to your previously saved
Settings.xmlfile. Click Open.
The exploit protection program settings are imported into your selected policy. You can edit the program settings and push the policy to your endpoints.
Verify policy compliance
From the ePO - On-prem interface, navigate to System Tree.
Select the group to which the new policy will be applied.
For each endpoint open system information.
Select the Product tab, and click Trellix Endpoint.
Review the sections compliance information.
If noncompliant devices are present, a Message Center alert is displayed in the top-right corner of the screen.
The Message Center alert provides a link to run a noncompliant device query. This query can also be run by navigating to Reporting > Queries and Reports > Trellix Groups > Trellix Endpoint. The query checks for noncompliant devices and displays device and noncompliant details.
Using Protection Workspace to identify and remediate threats
You can see all potential threats on managed devices and respond to them using Protection Workspace. You can identify threats and navigate seamlessly to any impacted device for remediation.
Protection Workspace helps you answer these questions:
What threats are discovered by advanced threat protection technologies from products like Trellix Endpoint and Trellix Endpoint Security (ENS) Adaptive Threat Protection?
Why is a device escalated?
Where did the threat come from?
When was the threat discovered?
Identifying threats and the security status of your devices
The security status of your device is color coded to efficiently prioritize threats and take action.
Red — A threat was discovered, or your software or device is running outdated versions and must be updated to be compliant.
Yellow — There are threats to investigate or some devices are not up to date.
Green — The current state of your environment is healthy, threats have been mitigated, and devices are compliant.
Light blue — Information only. No action needed.
Gray — No data available.
Using Protection Workspace with Trellix Endpoint
Protection Workspace is a ePO - On-prem component used by several Trellix products.
Protection Workspace is installed by default when using the cloud-based, multi-tenant, ePO - SaaS product. For the on-premises versions of ePO - On-prem (versions 5.3, 5.9, and 5.10), you need to manually install Protection Workspace extensions on your ePO - On-prem server before you can use it.
Because the Protection Workspace is a shared component used by several Trellix products, some of the options and data may vary by product and deployment.
Included might not apply to Trellix Endpoint. As an example, Trellix Endpoint does not use daily DAT updates, it relies instead on Windows Defender Antivirus for the basic definition-based virus detections. So, in the context of Trellix Endpoint, the Protection Workspace → Compliance Overview → Security Content shows the status of your Windows Defender Antivirus installations, but does not list Trellix Endpoint, because this product does not use its own DAT files.
Navigating Protection Workspace console
The Protection Workspace provides a visual representation of threat incidents in your environment and device compliance data, all from a single dashboard using several panes. You can quickly identify threats detected in the environment and seamlessly navigate to any impacted device to remediate the threat.
Protection Workspace bar
The Protection Workspace bar displays these details.
Item | Description |
|---|---|
Devices | Total number of devices tracked by the ePO - On‑prem server. Systems that have never communicated with ePO - On‑prem are not included in the count. |
Escalations | Total number of devices that are tagged as escalated. Select a device to view Escalated Devices. System is escalated if more than 5 threats are detected in 24 hours. |
Update | Data on the back-end is automatically refreshed every 60 seconds, and the interface is automatically refreshed every 5 minutes. Click the refresh button to manually redisplay the Protection Workspace with the latest updates. |
Settings | Use to adjust the Security Content Color Thresholds and Check‑In Failure Color Thresholds to customize the security levels for your environment. |
Threat Overview pane
The Threat Overview pane displays these details.
Item | Description |
|---|---|
Escalated Devices | Total number of devices that received a threat over the past 7 days. System is escalated if 5 or more threats are detected in 24 hours. |
Resolved Threats | Total number of threats that were resolved in the past 7 days. Basic — Detected by products like Trellix VirusScan Enterprise, Trellix Endpoint Security (ENS) Threat Prevention, and Microsoft Windows Defender. Advanced — Detected by products with advanced detection techniques like Trellix Endpoint and Trellix Endpoint Security (ENS) Adaptive Threat Protection. |
Unresolved Threats | Total daily count of unresolved threats. Arrow indicates the trend over the past 7 days. |
Report Only Detections | Total and daily counts of report-only detections over the past 7 days. Arrow indicates the trend. Select the value to open the details for total or daily threat events. |
Encryption Events | Total number of encryption events with critical and major severity over the past 7 days. Arrow indicates the trend. Select the value to open the details for total or daily threat events. |
Activity Filters
From the Threat Overview pane, you can drill down to view the device details and the top 5 threats. Select a threat to open the Threat Details pane, and view details about the threat.
Threat Details
The Threat Details pane displays the details of the selected threat.
Item | Description |
|---|---|
Threat Details | Displays these basic information about the selected threat event.
|
Advanced Details | Displays the in-depth information about the selected threat event.
|
Affected Devices | Displays the list of devices affected by the selected event. |
Story Graph (Trace Summary) | Displays the trace summary for the selected event. |
Compliance Overview
The Compliance Overview pane displays these details.
Item | Description |
|---|---|
Security Content | Status of the security content in the environment. Here's how the compliance status is calculated for these items: Trellix Endpoint Security (ENS) AMCore — Number of systems with AMCore content compliant or noncompliant.
Trellix Endpoint Security (ENS) Exploit Prevention — Number of systems with Exploit Prevention content compliant or noncompliant.
Trellix DAT — An endpoint is considered compliant if the DAT Date is within 7 days from today. For example, if today is July 19, endpoints with a DAT date of July 13 or later are compliant. Microsoft Windows Defender — An endpoint is considered compliant if the Anti-Virus Signature Last Updated date is within 7 days from today. For example, if today is July 19, endpoints with a DAT date of July 13 or later are compliant. For Trellix DAT and Microsoft Windows Defender, the endpoint reports the date, which can be viewed on the Products tab of the System Information page. |
Software Status | Status of the individual products deployed in the environment. For example, Trellix Endpoint Security (ENS), Trellix Agent, and Trellix Endpoint. The devices are color-coded to indicate the health of the security status (health) of the device. |
Device Management | Check-in Failure indicates the number of devices that haven't checked in to the ePO - On-prem server for more than 15 days. Managed Devices without Protection indicates the number of devices that don't have these antimalware products installed: Threat Prevention, Trellix Endpoint, or VirusScan Enterprise. Managed Devices indicates the total number of managed devices over the past 7 days. View the number of devices that have communicated with ePO - On-prem at least once. Systems that have never communicated with ePO - On-prem are not included in the count.
|
Devices
The information that appears in the Devices pane changes depending on the category you select:
Devices
Escalations (default view)
You can view your devices by tags, by System Tree view, or as a list. Use the search feature to quickly find a device.
Important
The systems that never communicated with ePO - On-prem appear in the System Tree and not in Protection Workspace.
Device Details
From the Devices pane, you can drill down to view the device details and the top 5 threats. Select a threat under Recent Threat Events to open the Threat Details pane, and view details about a specific threat.
Threat Event workflow
Protection Workspace provides a snapshot of your network's security status, allowing you to view key threats so you can investigate and determine a response.
Protection Workspace displays key threat events and device compliance across Trellix products.
The security administrator quickly urgent events and escalated devices.
The security team investigates the escalated devices to determine a response.
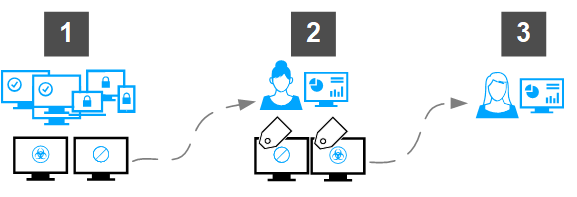
View threat events using the Story Graph
The Story Graph allows you to trace the history of threat events using a graphical interface. You can view the story graph in both the Threat Event Log and in Protection Workspace.
Make sure to install the required extensions.
Select Reporting > Threat Event Log.
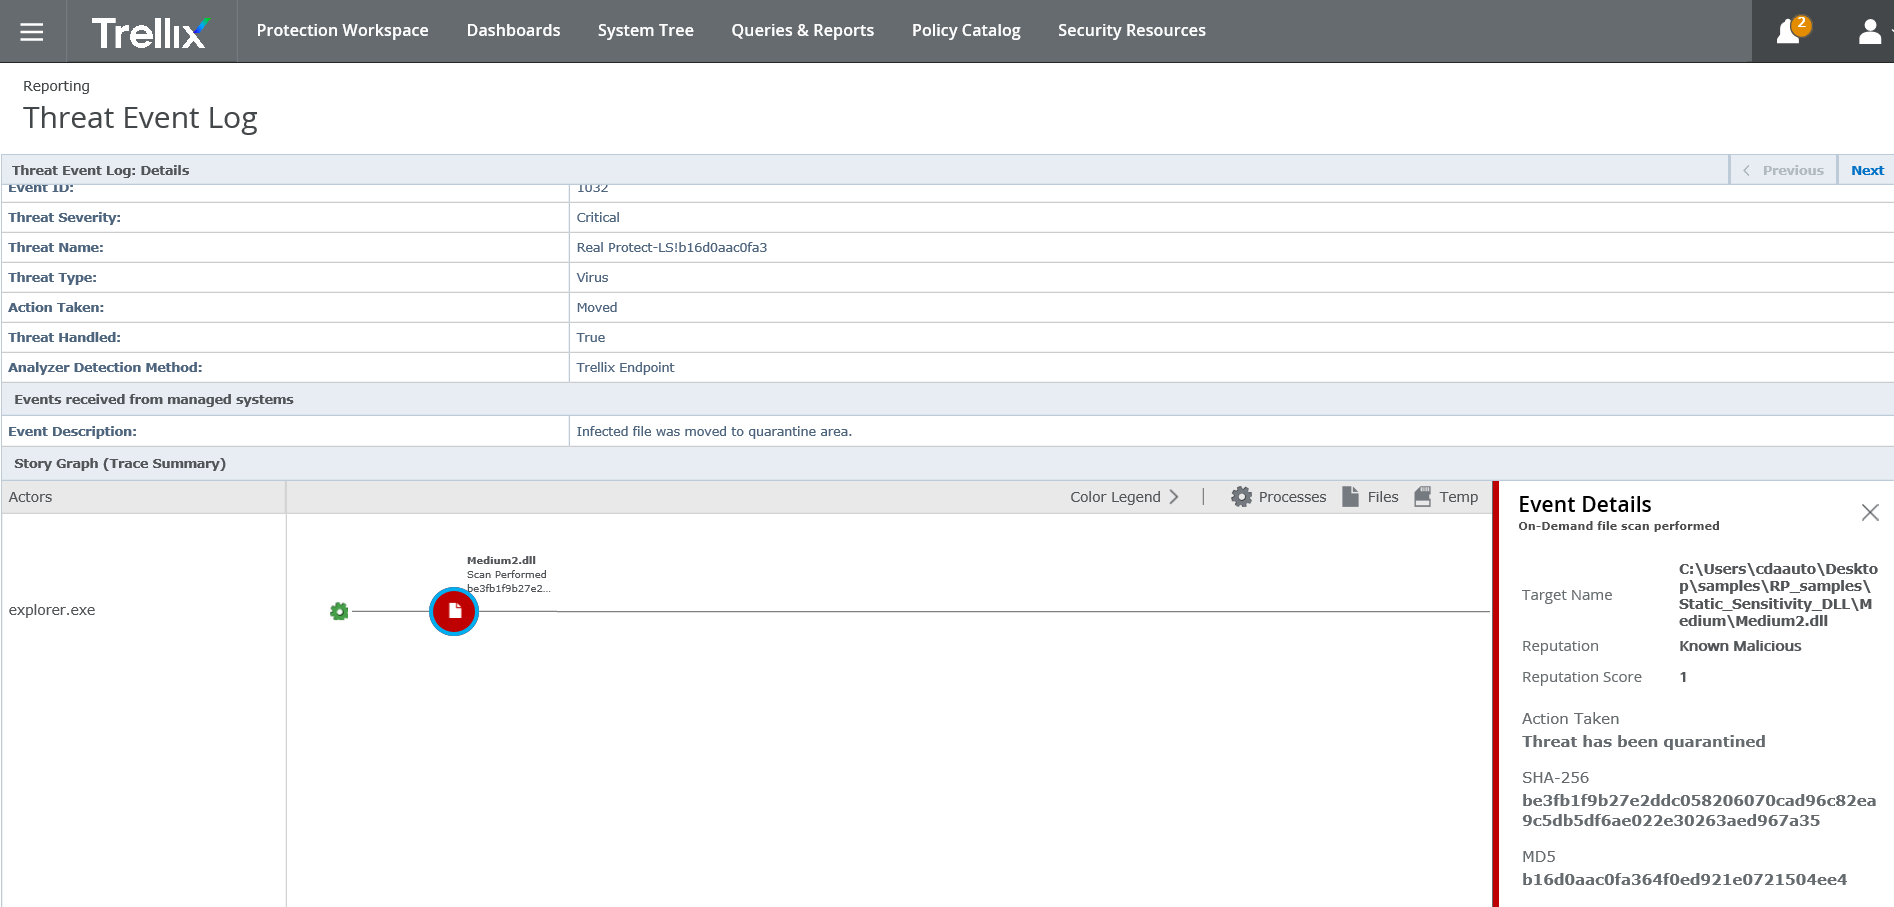
Story Graph is integrated into the Threat Event Log.
Click a threat event.
View the process trace for the threat event.
Apply Protection Workspace tags to systems
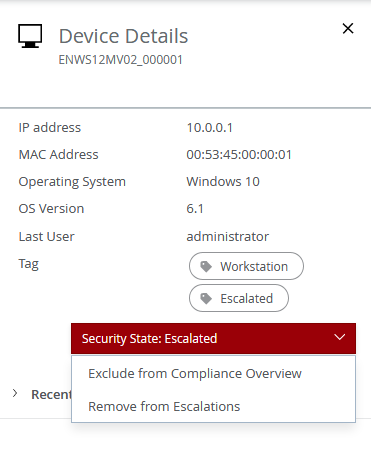
Tag devices (systems) to escalate or exclude them from a compliance check.
In the Protection Workspace, select a device from the tag, tree, or list view.
The Device Details pane opens.
From the Security State drop-down list, select a tag.
Click Confirm.
Use predefined queries to create reports
Predefined configurable query templates can be used to provide information about exploit events and device compliance. For more information, see Introduction to queries.
From the ePO - On-prem interface, navigate to Reporting > Queries and Reports > Trellix Groups > Trellix Endpoint.
Select the query you want to use from the list and click Run. Reports can be created for information about compliance and exploit events.
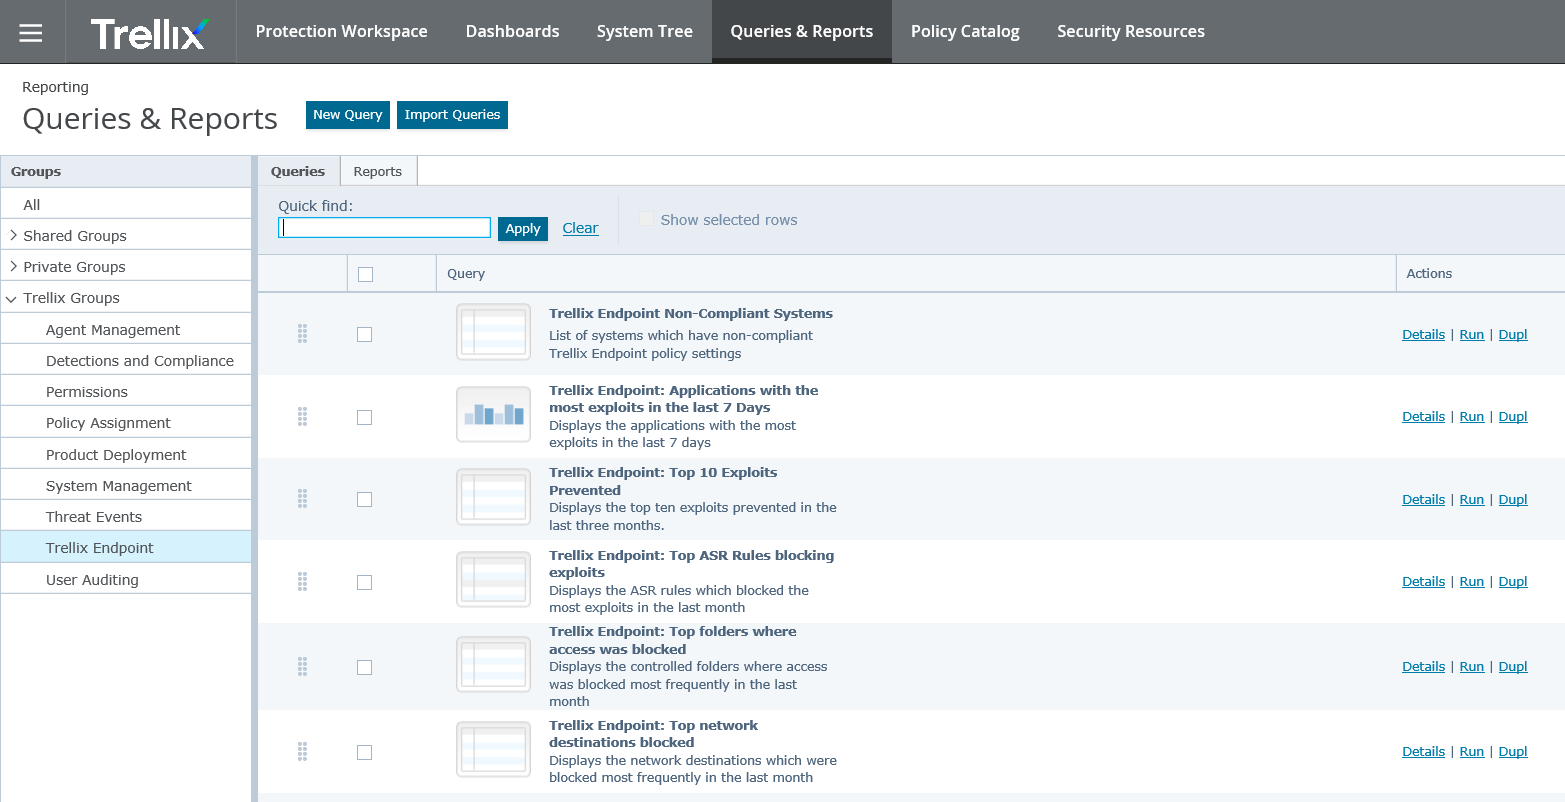
To configure a query, select Duplicate to edit and configure as needed.
View Microsoft Windows Defender status
Verify that Microsoft Windows Defender is installed and enabled on your endpoints.
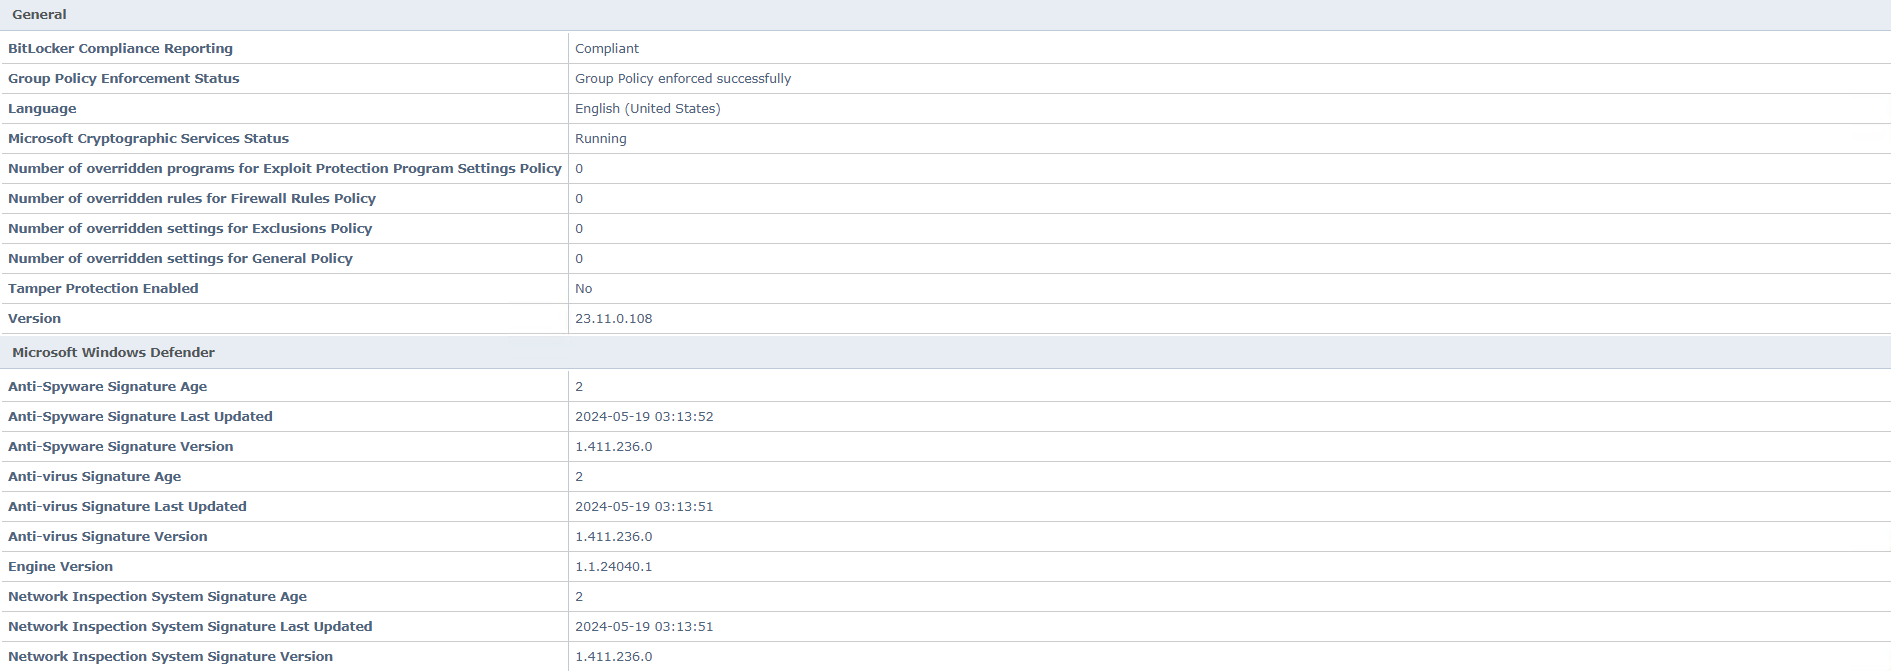
The status of Microsoft Windows Defender on your endpoints is reported during new installations and version upgrades of Trellix Endpoint. Users are notified if Microsoft Windows Defender is either not installed, or installed but not enabled on an endpoint.
Go to System Tree and under Products tab, select Trellix Endpoint.
The Microsoft Windows Defender status on your endpoints is displayed as follows:
Manage quarantined content
You can manage quarantined content from the ePO - On-prem System Tree. The Quarantined Content tab, found in the System Tree for each of your configured systems, provides information about content that has been quarantined by compatible products.
Use the Quarantined Content tab to view information about the files that have been quarantined. You can also release files from quarantine, restoring them, and any related registry entries, to their previous locations on the system where they were quarantined.
⚠️ Caution
Quarantined files have the potential to be malicious. Only restore quarantined content that you know to be safe.
Using the quarantined content area
The Quarantined Content area for each managed system displays information about the quarantined items from that system.
Name | Description |
|---|---|
Detection Name | The name Trellix has given to the item that has been detected and quarantined by Windows Defender Antivirus or Trellix Endpoint. Use Search the Threat Library (https://www.trellix.com/en-us/threat-center.html) to learn more about the detected item. |
Type | The type of item quarantined. Options include:
|
Quarantined Item | Path and name for the item that has been quarantined. |
Hash | If available, the hash value for the quarantined content. Click the hash value to look up the description of the threat on the VirusTotal information page. |
Detection Method | How the quarantined item was detected. Options depend on the software using the Quarantine management:
|
Event | Possible Event options are:
|
Quarantined Time | The time and data stamp for the quarantine event. |
Action (displayed above the table) | Select the quarantined items to be handled, and select the required Action.
|
Viewing and handling quarantined content
Use the ePO - On-prem System Tree to view information about quarantined content and to take the appropriate actions on that content.
Note
You can configure your policy to automatically delete quarantined content after a specified number of days.
Identify the endpoint with quarantined content. From Protection Workspace, expand Resolved Threats, and look for endpoints and servers that have the Action Taken set to moved.
Log on to ePO - On-prem.
In the System Tree, select the endpoint with the quarantined content.
Click the Quarantined Content tab.
Information about the quarantined content for the selected endpoints or servers is displayed.

Select the quarantined items to be handled, and select the required Action.
Delete — Remove the selected content from quarantine.
Restore — Restore the selected content to the endpoint and location where it was quarantined.