Trellix Endpoint Security Storage Protection overview
Trellix Endpoint Security Storage Protection (TENSSP) detects and removes viruses, malware, and other potentially unwanted software programs from your network-attached storage (NAS) devices.
Trellix Endpoint Security Storage Protection is added to Trellix Endpoint Security (ENS) and expands its capability. The software performs remote scanning on NAS devices such as NetApp filers and Internet Content Adaptation Protocol (ICAP) storage appliances.
For a list of supported filer vendors, see KB94811.
You can use Trellix Endpoint Security Storage Protection in two ways:
As a managed product, using Trellix ePolicy Orchestrator - On-premises or Trellix ePolicy Orchestrator - SaaS to install, manage, and enforce policies. Use queries and dashboards for tracking activity and detections.
As a module added to a standalone installation of Trellix Endpoint Security (ENS) Threat Prevention.
2 | Trellix Endpoint Security Storage Protection overview
How Trellix Endpoint Security Storage Protection works
You can deploy this high-performance scanning solution on one or more Windows servers with multi-filer and multi-scanner configuration.
Trellix Endpoint Security Storage Protection supports two types of filers.
NetApp filers — Filers that work on RPC-based protocols.
ICAP — Filers that work on ICAP-based protocols.
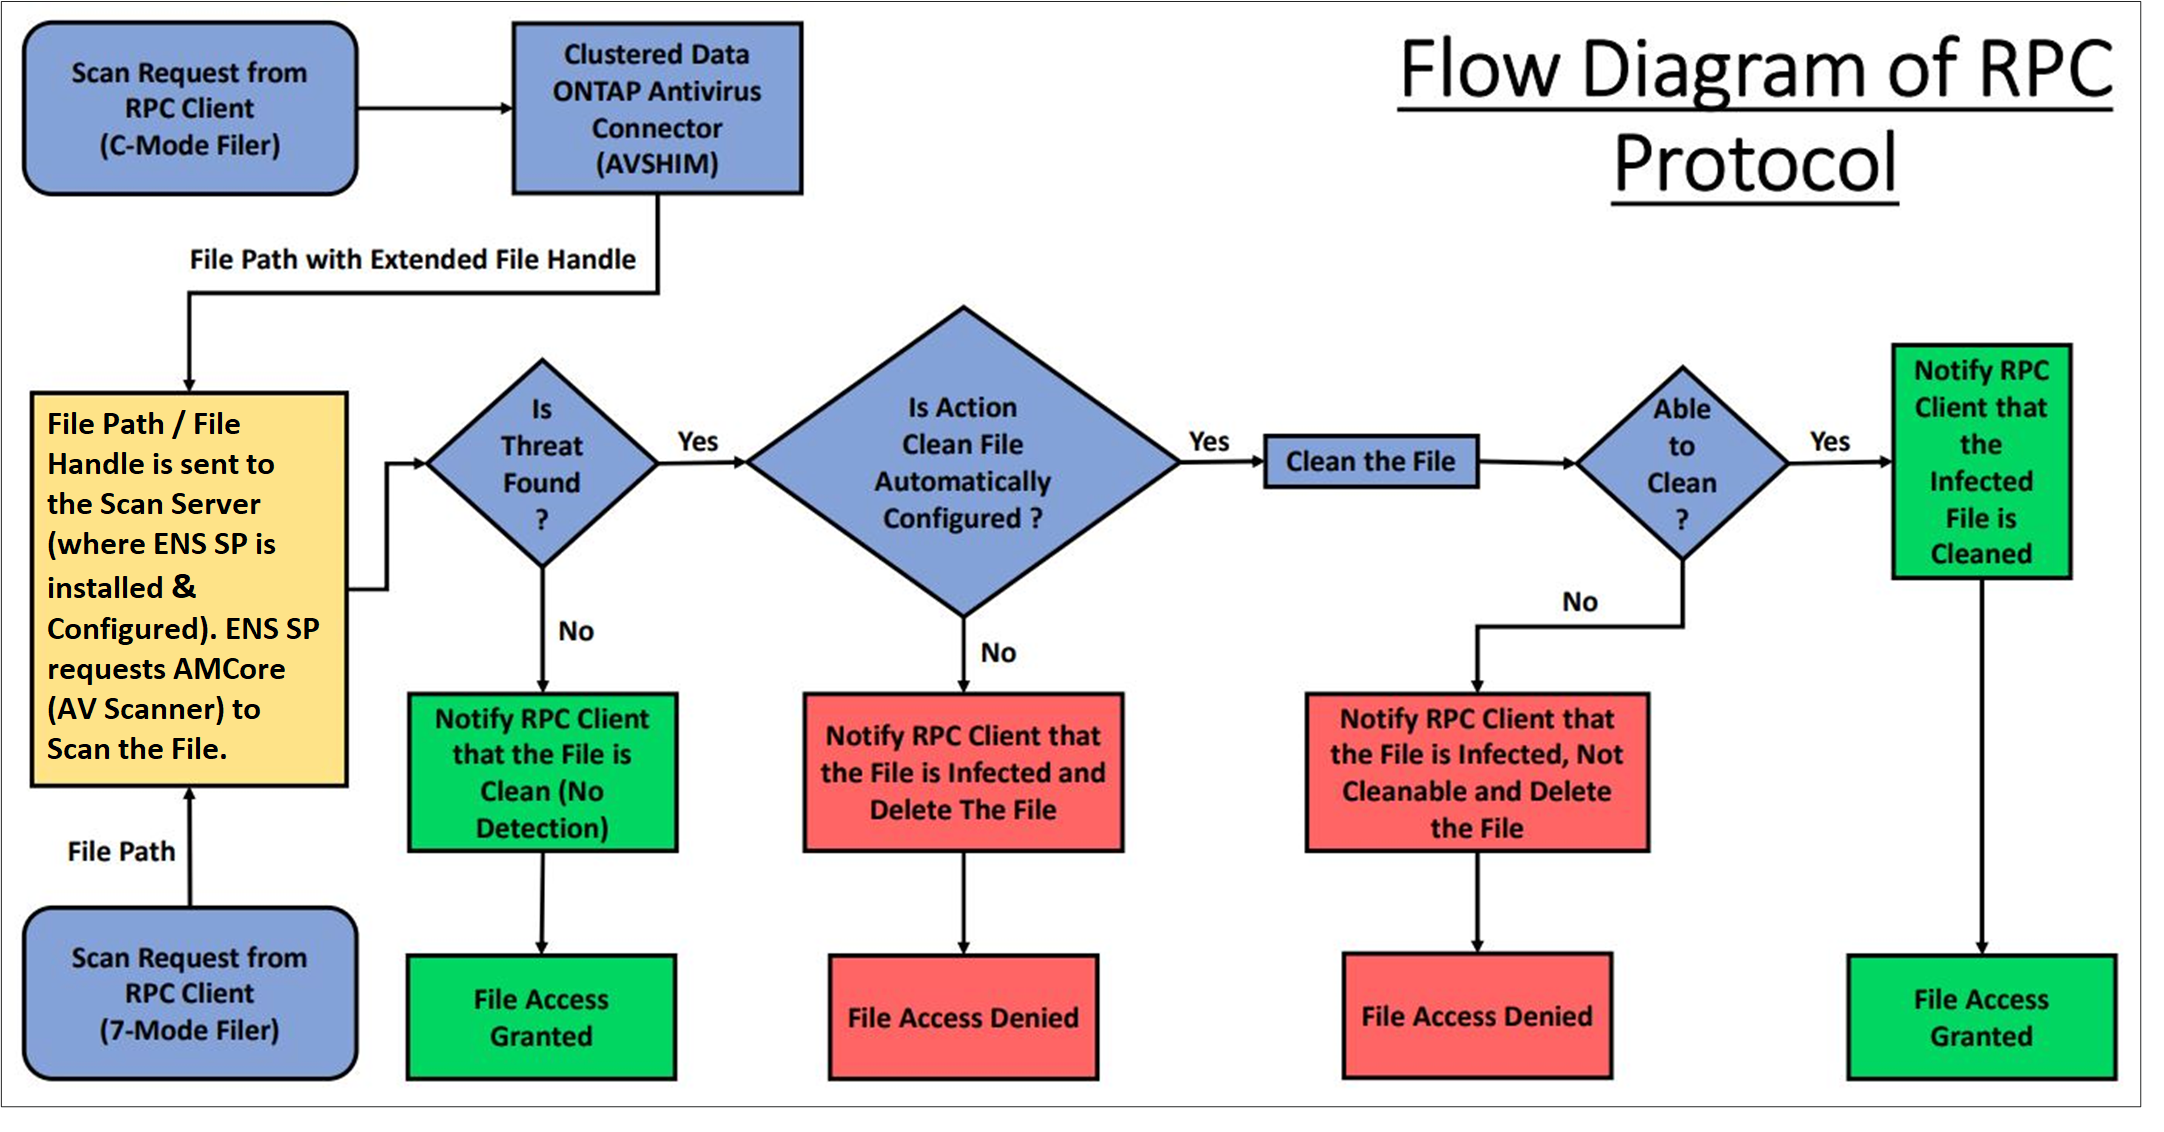
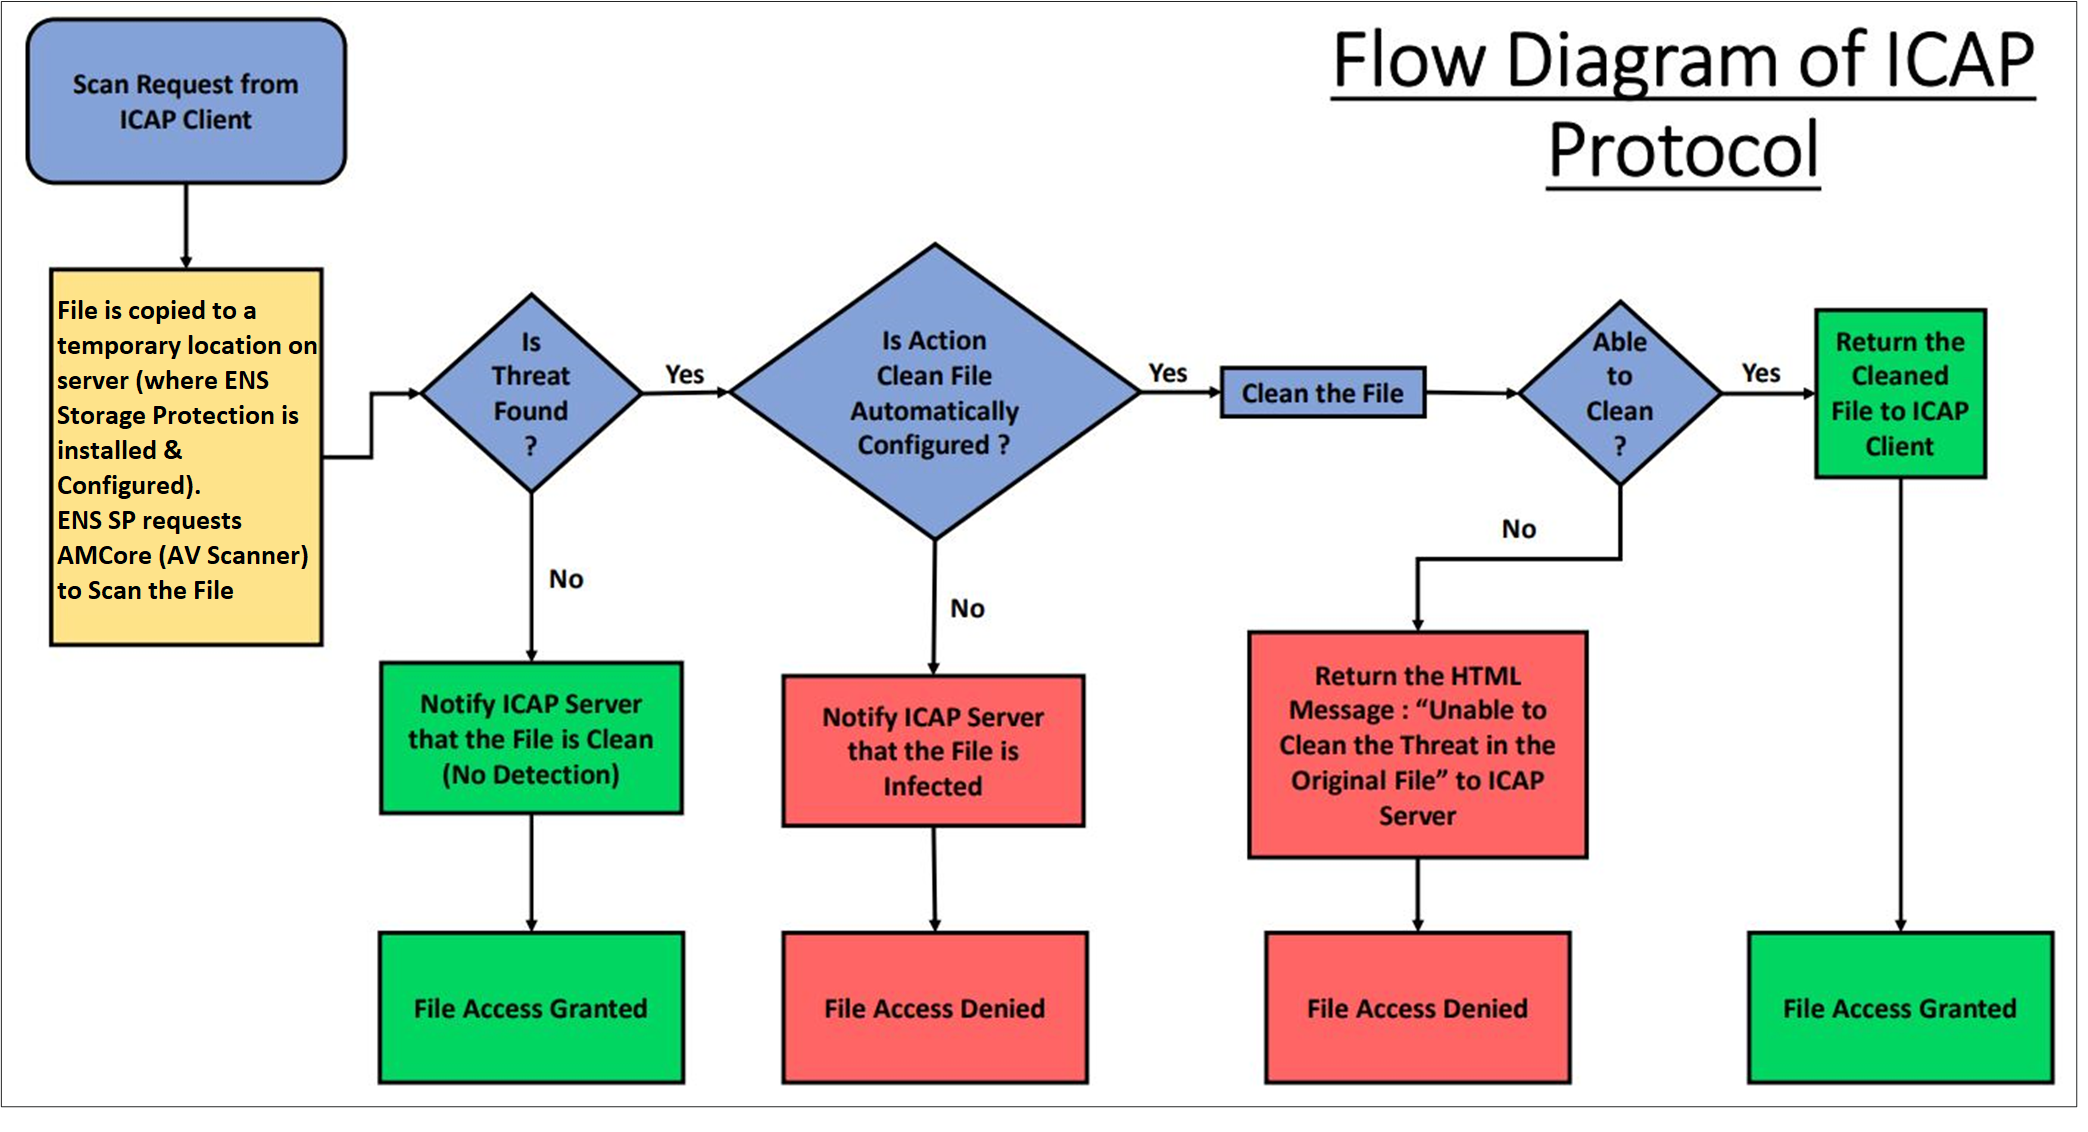
Trellix Endpoint Security Storage Protection scans files in real time when they are accessed, stored, or modified on storage devices. For the ICAP protocol, the filer decides the appropriate action for infected files. For filers such as NetApp that work on RPC-based protocols, the Trellix Anti-Malware Engine takes appropriate actions.
For a list of supported filer vendors, see KB94811.
How scanning of NetApp filer works
Trellix Endpoint Security Storage Protection performs scanning operation when a scan request is received from registered filers.
For Cluster-Mode scanning, Trellix Endpoint Security Storage Protection requires Clustered Data ONTAP Antivirus Connector software. The software must run on the same scanner server where Trellix Endpoint Security Storage Protection is running. When the loop-back IP address (127.0.0.1) is added to the scanner server, the scanner establishes connection with the software.
Note
Trellix Endpoint Security Storage Protection requires Data ONTAP Antivirus Connector software from NetApp only if Data ONTAP 8.2.1 and later version filers configured in Cluster-Mode are connected.
For more information about downloading Clustered Data ONTAP Antivirus Connector software and technical assistance, contact NetApp support.
This diagram presents an overview of the scanning process when reading, writing, and copying a file from or to the NetApp filer.
How scanning of ICAP servers works
Trellix Endpoint Security Storage Protection scans Internet Content Adaptation Protocol servers. The ICAP client is a Network Attached Storage (NAS) device.
Note
Trellix Endpoint Security Storage Protection adheres to RFC-3507 for ICAP scanning. As part of the ICAP use, Trellix ENSSP supports only Response Modification (RESPMOD). RESPMOD commands must also be in specific formatting as well. For more information on determining if an ICAP client meets the pre-requisites for communication with Trellix ENSSP, refer to KB75543 (Storage compatibility testing with ICAP-based NAS appliances).

Product features
The Trellix Endpoint Security Storage Protection features help you to configure, protect, and manage your network-connected storage devices.
On-Access Scan protection — Protects your NAS devices from malware threats while files are being accessed, copied, or written to the server, including files hidden in compressed files. It protects data from malware before signatures are developed.
Quarantine — Quarantines malware items (or suspected malware-related behavior) so that they can't be opened or executed.
Protection from spyware — Detects hidden spyware programs that can track your Internet use, and can access business-critical data.
Central management of software — Manages and controls systems centrally from a single management console using ePO - On-prem.
Optimization of security and performance — Deploys multi-scanner to multi-filer configurations that increase the load-balancing capacity and failover security.
Standard solution for multiple vendors — Protects multiple storage systems and devices, and works on different storage environments and configurations.
Support for Clustered Data ONTAP Cluster-Mode scanning — Supports scanning of Clustered Data ONTAP <Version> using Clustered Data ONTAP Antivirus Connector, a NetApp product. This version supports Cluster-Mode and 7-Mode scanning that provide greater scalability than a single scanning instance.
NetApp configuration
Configure the NetApp scanner options such as, add filers, define types to scan or exclude, and define actions for threat items. These configurations are applied to the NetApp filers that are connected to Trellix Endpoint Security Storage Protection.
Based on the environment, you can configure the NetApp scanner option:
Using ePO - On‑prem | Using ePO - SaaS | Using Installer (on self‑managed endpoints) | Use this method |
|---|---|---|---|
Yes | |||
Yes | |||
Yes |
NetApp configuration on ePO - On‑prem managed endpoints
Configure Trellix Endpoint Security Storage Protection with NetApp filers and scan the filers using the NetApp server.
Make sure Trellix Endpoint Security Storage Protection (Threat Prevention and Storage Protection modules) is installed on your managed systems.
When using C‑Mode filer, make sure that Clustered Data ONTAP Antivirus Connector software is installed and running on the systems where Trellix Endpoint Security Storage Protection is installed.
Create NetApp policies on ePO - On‑prem.
Assign the NetApp policies to the managed endpoints.
Configure the NetApp scanner server with NetApp filers.
Create a NetApp filer policy on ePO - On‑prem
Create NetApp filer policies to define parameters for scanning file types, and to manage the list of NetApp filers connected to
Log on to the ePO - On-prem server as an administrator.
Click Menu → Policy → Policy Catalog.
Select Endpoint Security Storage Protection as the product, then select NetApp Policies as the category.
Under NetApp Policies, edit My Default.
or
Click New Policy, type a name for the policy, then click OK.
On the Filers tab of the policy page, configure the filers list that the scan server protects, and create a user account with proper permissions such as, read, write, and backup for all filers:
In...
Define...
Filers list
Overwrite client filer list — Processes scan requests only for filers defined in the policy.
Filers — Use the plus and minus signs to add and remove filers.
These settings apply to all filers
Enable 'keep-alive' probes — To make sure that the filer and scanner-server are in communication.
Reset filer's clean file cache after each DAT or Engine update — Clears the cache of files already scanned after the scanner-server sends a DAT or engine update. This makes all files available for scanning with the latest DAT and engine files.
Tip
Trellix recommends that you enable these two options for all filers.
Administrator account common to all filers
Use the following account on all filers — If this option is not selected, you must set up an individual account for each locally installed Trellix Endpoint Security Storage Protection connection.
To specify a user account with proper permissions (read, write, and backup) to all filers, enter the User name, Password, and Confirm Password.
Domain — Domain name of the NetApp filer.
Note:
The account specified must be set as an interactive account, not a service account. For more details, see KB84418.
6. On the Scan Items tab, define the type of files to scan for malware threats and to detect unwanted programs:
In... | Define... |
|---|---|
Scanning |
|
File types to scan |
|
Options |
|
Heuristics |
|
7. On the Exclusions tab, configure the files and folders to exclude from scanning:
In... | Define... |
|---|---|
What not to scan |
You can edit, remove, or clear the exclusions. |
How to handle client exclusions |
|
8. On the Performance tab, configure the scanning duration options to improve the performance.
In... | Define... |
|---|---|
Maximum scan time (seconds) | Specifies the maximum scan time for files in seconds. The default scan time is 60 seconds. If a scan exceeds the time limit, the scan stops and logs a message. Allowed scan time is from 10–9999 seconds. |
Number of anti-virus scan threads | Specifies the number of anti-virus scan threads. The default scan thread is 100 threads. Allowed scan thread is 1–800 threads. |
9. On the Actions tab, define the primary and secondary actions to perform when a threat is detected:
In... | Define... |
|---|---|
When a threat is found | Perform this action first — Select the first action that you want the scanner to take when a threat is detected.
If the first action fails, then perform this action — Select the next action you want the scanner to take if the first action fails.
|
When an unwanted program is found | Perform this action first — Select the first action that you want the scanner to take when an unwanted program is detected.
|
10. On the Reports tab, configure these log activities preferences:
In... | Define... |
|---|---|
Activity log |
|
Log file size | Limit the size of log file — Enable to provide the maximum log file size.
|
Log file format | Defines the log file format such as ANSI, Unicode UTF8, or Unicode UTF16. |
What to log in addition to scanning activity |
|
11. Click Save.
Tip
For best practices about how to configure Trellix Endpoint Security Storage Protection settings to support NetApp filers in 7-Mode and Cluster-Mode, see KB81982 (7-Mode) and KB84086 (Cluster-Mode).
Assign NetApp policies to ePO - On-prem managed systems
After you create or modify the NetApp policies, assign them to the ePO - On-prem managed systems.
Log on to the ePO - On-prem server as an administrator.
Click Menu → Systems → System Tree.
Click Systems tab, then select a group under System Tree.
In the Assigned Policies tab, select Trellix Endpoint Security Storage Protection from the Product list, select the NetApp policy, then click Edit Assignment.
Select appropriate inheritance options, select the policy to assign, then click Save.
In the System Tree tab, select a group or systems, then click the Wake Up Agents.
In the Force policy update, select Force complete policy and task update and click OK.
The policy is now assigned to the endpoints. To check the policy is assigned to the endpoints, open the Trellix Endpoint Security Storage Protection settings and confirm.
Configure NetApp scanner server with the NetApp filers (ePO - On-prem managed)
You can scan the files on filers for viruses, malware, and other security threats by integrating Trellix Endpoint Security Storage Protection with NetApp filer through the Remote Procedure Protocol (RPC).
Before sending files to be scanned on the NetApp scanner server, configure the scanner server details (server where the Trellix ENSSP is installed) in your Clustered Data ONTAP Antivirus Connector software. For more information about how to configure the NetApp scanner server details with Data ONTAP, refer the respective NetApp filer guide.
After the NetApp scanner server scans the file, it informs the NetApp filer whether the file is a threat and then repairs the malicious file. All generated events are sent to ePO - On-prem and it can be reviewed under Threat Event Log.
NetApp configuration on ePO - SaaS managed endpoints
Configure Trellix Endpoint Security Storage Protection with NetApp filers and scan the filers using the NetApp server.
Make sure Trellix Endpoint Security Storage Protection (Threat Prevention and Storage Protection modules) is installed on your ePO - SaaS.
When using C-Mode filer, make sure that Clustered Data ONTAP Antivirus Connector software is installed and running on the systems where Trellix Endpoint Security Storage Protection is installed.
Create NetApp policies on ePO - SaaS.
Assign the NetApp policies to the managed endpoints.
Configure the NetApp scanner server with NetApp filers.
Create a NetApp filer policy on ePO - SaaS
Create NetApp filer policies to define parameters for scanning file types, and to manage the list of NetApp filers connected to Trellix Endpoint Security Storage Protection.
Log on to the ePO - SaaS.
Click Menu → Policy → Policy Catalog.
Select Endpoint Security Storage Protection as the product, then select NetApp Policies as the category.
Under NetApp Policies, edit My Default.
or
Click New Policy, type a name for the policy, then click OK.
5. On the Filers tab of the policy page, configure the filers list that the scan server protects, and create a user account with proper permissions such as, read, write, and backup for all filers:
In... | Define... |
|---|---|
Filers list |
|
These settings apply to all filers |
|
Administrator account common to all filers | Use the following account on all filers — If this option is not selected, you must set up an individual account for each locally installed Trellix Endpoint Security Storage Protection connection.
|
6. On the Scan Items tab, define the type of files to scan for malware threats and to detect unwanted programs:
In... | Define... |
|---|---|
Scanning |
|
File types to scan |
Tip You can add more file types by typing the file extensions separated by spaces.
|
Options |
|
Heuristics |
|
7. On the Exclusions tab, configure the files and folders to exclude from scanning:
In... | Define... |
|---|---|
What not to scan |
2. Click Ok. You can edit, remove, or clear the exclusions. |
How to handle client exclusions | • Overwrite client exclusions (only exclude items specified in this policy) — Exclude the items specified in this policy. If this option is not selected, the exclusion items defined in the local system are used. |
8. On the Performance tab, configure the scanning duration options to improve the performance.
In... | Define... |
|---|---|
Maximum scan time (seconds) | Specifies the maximum scan time for files in seconds. The default scan time is 60 seconds. If a scan exceeds the time limit, the scan stops and logs a message. Allowed scan time is from 10–9999 seconds. |
Number of anti-virus scan threads | Specifies the number of anti-virus scan threads. The default scan thread is 100 threads. Allowed scan thread is 1–800 threads. |
9. On the Actions tab, define the primary and secondary actions to perform when a threat is detected:
In... | Define... |
|---|---|
When a threat is found | Perform this action first — Select the first action that you want the scanner to take when a threat is detected.
If the first action fails, then perform this action — Select the next action you want the scanner to take if the first action fails.
|
When an unwanted program is found | Perform this action first — Select the first action that you want the scanner to take when an unwanted program is detected.
If the first action fails, then perform this action — Select the next action you want the scanner to take if the first action fails.
|
10. On the Reports tab, configure these log activities preferences:
In... | Define... |
|---|---|
Activity log |
|
Log file size |
|
Log file format | Defines the log file format such as ANSI, Unicode UTF8, or Unicode UTF16. |
What to log in addition to scanning activity |
|
11. Click Save.
 Tip
Tip
For best practices about how to configure Trellix Endpoint Security Storage Protection settings to support NetApp filers in 7-Mode and Cluster-Mode, see KB81982 (7-Mode) and KB84086 (Cluster-Mode).
Assign NetApp policies to ePO - SaaS managed system
After you create or modify the NetApp policies, assign them to the ePO - SaaS managed systems.
Log on to the ePO - SaaS.
Click Menu → Systems → System Tree.
Click Systems tab, then select a group under System Tree.
In the Policies tab, select Trellix Endpoint Security Storage Protection from the Product list, select the NetApp policy, then click Edit Assignment.
Select appropriate inheritance options, select the policy to assign, then click Save.
In the Systems tab, select a group or systems, then click the Wake Up Agents.
In the Force policy update, select Force complete policy and task update and click OK.
The policy is now assigned to the endpoints. To check the policy is assigned to the endpoints, open the Trellix Endpoint Security Storage Protection settings and confirm.
Configure NetApp scanner server with the NetApp filers (ePO - SaaS managed)
You can scan the files on filers for viruses, malware, and other security threats by integrating Trellix Endpoint Security Storage Protection with NetApp filer through the Remote Procedure Protocol (RPC).
Before sending files to be scanned on the NetApp scanner server, configure the scanner server details (server where the Trellix ENSSP is installed) in your Clustered Data ONTAP Antivirus Connector software. For more information about how to configure the NetApp scanner server details with Data ONTAP, refer the respective NetApp filer guide.
After the NetApp scanner server scans the file, it informs the NetApp filer whether the file is a threat and then repairs the malicious file. All generated events are sent to ePO - SaaS and it can be reviewed under Threat Event Log.
NetApp configuration on self-managed endpoints
Configure Trellix Endpoint Security Storage Protection with NetApp filers and scan the filers using the NetApp scanner server.
Make sure Trellix Endpoint Security Storage Protection (Threat Prevention and Storage Protection modules) is installed on your systems.
Make sure that Clustered Data ONTAP Antivirus Connector software is installed and running on the systems where Trellix Endpoint Security Storage Protection is installed.
Configure NetApp scanner server settings.
Configure NetApp scanner server with NetApp filers.
Configure NetApp scanner server settings on self-managed endpoints
Configure the NetApp filer AV scanner options such as, add filers, define file types to scan or exclude, and define actions for threat items. These configurations are applied to the NetApp filers that are connected to Trellix Endpoint Security Storage Protection.
Make sure that Clustered Data ONTAP Antivirus Connector software is installed and running on the endpoint to connect the scanner server to the Cluster‑Mode filer.
To verify this, on the Windows taskbar, click Start → Control Panel → Administrative Tools → Services, then double-click ONTAP AV Connector. The status of the service appears as Running.
Open the Trellix Endpoint Security (ENS) Client.
On the top-right corner, click ▾ and then select Settings .
On the left pane, click Storage Protection.
On the top-right corner, click Show Advanced.
Under NETAPP Filer, select Enable NetApp Filler to enable the NetApp scanner.
In the Connections section, configure the filers list that the scan server protects, and create a user account with proper permissions such as, read, write, and backup for all filers:
In... | Define... |
|---|---|
IP Address | Add the IP address of the NetApp filers.
Test Connection – Click to check the filer connection by providing the credentials.
|
In the Scan Items section, define the type of files to scan for malware threats and to detect unwanted programs:
In... | Define... |
|---|---|
File Types to Scan |
|
Options |
|
Heuristics |
|
8. In the Exclusions section, click Add to configure the files and folders to exclude from scanning:
In... | Define... |
|---|---|
What to exclude |
|
When to exclude | When writing to disk or reading from disk — When performing file write operation, it excludes the files given in What to exclude. When reading from disk — When performing file read operation, it excludes the files given in What to exclude. When writing to disk or reading from disk — When performing file read or write operation, it excludes the files given in What to exclude. |
9. In the Performance section, configure the scanning duration options to improve the performance:
In... | Define... |
|---|---|
Maximum Scan Time (seconds) | Specify the maximum scan time for files in seconds. The default scan time is 60 seconds. If a scan exceeds the time limit, the scan stops and logs a message. Allowed scan time is from 10–9999 seconds. |
Number of Scan Threads | Specify the number of antivirus scan threads. The default scan thread is 100 threads. Allowed scan thread is 1–800 threads. |
10. In the Actions section, define the primary and secondary actions to perform when a threat is detected:
In... | Define... |
|---|---|
Threat Detection First Response | Select the first action that you want the scanner to take when a threat is detected.
|
If the first response fails | Select the next action if the first action fails.
|
Unwanted Programs first response | Select the first action that you want the scanner to take when an unwanted program is detected.
|
If the first response fails | Select the next action you want the scanner to take if the first action fails.
|
11. In the Reports section, configure these log activities preferences:
In... | Define... |
|---|---|
Log Files |
|
Log File Format | Select the log file format such as ANSI, Unicode UTF8, or Unicode UTF16. |
What to log, in addition to scanning activity |
|
12. Click Apply to save the configuration.
Tip
You can view the filer connection status from the scan statistics page. For more information, see View filers scan statistics.
For best practices about how to configure Trellix Endpoint Security Storage Protection settings to support NetApp filers in 7-Mode and Cluster-Mode, see KB81982 (7-Mode) and KB84086 (Cluster-Mode).
Configure NetApp scanner server with NetApp filers (self-managed environment)
You can scan the files on filers for viruses, malware, and other security threats by integrating Trellix Endpoint Security Storage Protection with NetApp filer through the Remote Procedure Protocol (RPC).
Before sending files to be scanned on the NetApp scan server, configure the scan server details (server where the Trellix ENSSP is installed) in your Clustered Data ONTAP Antivirus Connector software. For more information about how to configure the NetApp scanner server details with Data ONTAP, refer the respective NetApp filer guide.
After the NetApp scanner server scans the file, it informs the NetApp filer whether the file is a threat and it repairs the malicious file. All generated events are sent to Event Log.
ICAP configuration
Configure the server connection for scan requests, file types to scan or exclude, action for threat items, and log settings.
Based on the environment, configure Trellix Endpoint Security Storage Protection with ICAP storage appliances:
Using ePO - On-prem | Using ePO - SaaS | Using Installer (on self-managed endpoints) | Use this method |
|---|---|---|---|
Yes | ICAP configuration on ePO - On-prem managed endpoints | ||
Yes | ICAP configuration on ePO - SaaS managed endpoints | ||
Yes | ICAP configuration on self-managed endpoints |
ICAP configuration on ePO - On-prem managed endpoints
Configure Trellix Endpoint Security Storage Protection with ICAP storage appliances and scan the storage appliances using the ICAP scan server (server where Trellix ENSSP is installed).
Make sure Trellix Endpoint Security Storage Protection (Threat Prevention and Storage Protection modules) is installed on your managed systems.
Create ICAP policies.
Assign the ICAP policies to the managed systems.
Configure ICAP scanner server with ICAP storage appliances.
5 | Trellix Endpoint Security Storage Protection overview
Note
Trellix Endpoint Security Storage Protection adheres to RFC-3507 for ICAP scanning. As part of the ICAP use, Trellix ENSSP supports only Response Modification (RESPMOD). RESPMOD commands must also be in specific formatting as well. For more information on determining if an ICAP client meets the pre-requisites for communication with Trellix ENSSP, refer to KB75543 (Storage compatibility testing with ICAP-based NAS appliances).
Create an ICAP policy on
Create ICAP server scan policies to define the file types to be scanned, and to manage the list of ICAP appliances connected to Trellix Endpoint Security Storage Protection.
Log on to the server as an administrator.
Click Menu → Policy → Policy Catalog.
Select Endpoint Security Storage Protection as the product, then select ICAP Policies as the category.
Under ICAP Policies, edit My Default.
or
Click New Policy, type a name for the policy, then click OK.
On the Connections and Server tab, configure IP addresses of the storage that can accept ICAP scan requests, the bind address (the IP address of the computer where Trellix Endpoint Security Storage Protection is installed), and the port number:
In... | Define... |
|---|---|
Connection list | Specify the ICAP server configuration and the list of IP addresses to accept connections from:
|
ICAP Server Configuration |
|
6. On the Scan Items tab, configure the file types to scan, detect for unwanted programs:
In... | Define... |
Scanning | Enable Scanning — Enable or disable the ICAP scanner. |
File types to scan |
💡 Tip You can add more file types by typing the file extensions separated by spaces.
|
Options |
|
Heuristics |
|

7. On the Performance tab, configure the scanning duration options to improve performance.
In... | Define... |
|---|---|
Maximum scan time (seconds) | Specifies the maximum scan time for files in seconds. The default scan time is 60 seconds. If a scan exceeds the time limit, the scan stops and logs a message. Allowed scan time is from 10–9999 seconds. |
Number of anti-virus scan threads | Specifies the number of antivirus scan threads. The default scan thread is 100 threads. Allowed scan thread is 1–800 threads. |
8. On the Actions tab, define the primary and secondary action to perform when a threat is detected:
In... | Define... |
|---|---|
When a threat is found |
|
When an unwanted program is found |
|
9. On the Reports tab, configure these log activities preferences:
In... | Define... |
|---|---|
Activity log |
|
Log file size |
|
Log file format | Defines the log file format such as ANSI, Unicode UTF8, or Unicode UTF16. |
What to log in addition to scanning activity |
|
Click Save.
💡
Tip
For best practices about how to configure ICAP settings for Trellix Endpoint Security Storage Protection, see KB81933.
Assign ICAP policies to managed systems
After you create or modify the ICAP policies, assign them to the managed systems.
Log on to the server as an administrator.
Click Menu → Systems → System Tree.
Click Systems tab, then select a group under System Tree.
In the Assigned Policies tab, select Trellix Endpoint Security Storage Protection from the Product list, select the NetApp policy, then click Edit Assignment.
Select appropriate inheritance options, select the policy to assign, then click Save.
In the System Tree tab, select a group or systems, then click the Wake Up Agents.
In the Force policy update, select Force complete policy and task update and click OK.
The policy is now assigned to the endpoints. To check the policy is assigned to the endpoints, open the Trellix Endpoint Security Storage Protection settings and confirm.
Configure the ICAP scanner server in the environment with ICAP
You can scan the files on ICAP storage appliances for viruses, malware, and other security threats by integrating with Trellix Endpoint Security Storage Protection through the Internet Content Adaptation Protocol (ICAP).
Before you send files to be scanned on an ICAP scanner server, configure the scanner server details (server where the Trellix ENSSP is installed) in your ICAP storage appliances. For more information about how to configure the ICAP scanner server, refer to the respective ICAP storage appliance guide.

Note
Trellix Endpoint Security Storage Protection adheres to RFC-3507 for ICAP scanning. As part of the ICAP use, Trellix ENSSP supports only Response Modification (RESPMOD). RESPMOD commands must also be in specific formatting as well. For more information on determining if an ICAP client meets the pre-requisites for communication with Trellix ENSSP, refer to KB75543 (Storage compatibility testing with ICAP-based NAS appliances).
After an ICAP scanner server scans the file, it informs the ICAP storage appliance whether the file is a threat according to ICAP 1.0 standards. The ICAP scanner server repairs the malicious file based on the ICAP storage appliance's configuration. All generated events are sent to and it can be reviewed under Threat Event Log.
ICAP configuration on ePO - SaaS managed endpoints
Configure Trellix Endpoint Security Storage Protection with ICAP storage appliances and scan the storage appliances using the ICAP scan server (server where Trellix ENSSP is installed).
Make sure Trellix Endpoint Security Storage Protection (Threat Prevention and Storage Protection modules) is installed on your ePO - SaaS.
Create ICAP policies in ePO - SaaS.
Assign the ICAP policies to the managed systems.
Configure ICAP scanner server with ICAP storage appliances.
Note
Trellix Endpoint Security Storage Protection adheres to RFC-3507 for ICAP scanning. As part of the ICAP use, Trellix ENSSP supports only Response Modification (RESPMOD). RESPMOD commands must also be in specific formatting as well. For more information on determining if an ICAP client meets the prerequisites for communication with Trellix ENSSP, see KB75543 (Storage compatibility testing with ICAP-based NAS appliances).
Create an ICAP policy on ePO - On-prem
Create ICAP server scan policies to define the file types to be scanned, and to manage the list of ICAP appliances connected to Trellix Endpoint Security Storage Protection.
Log on to the ePO - On-prem server as an administrator.
Click Menu → Policy → Policy Catalog.
Select Endpoint Security Storage Protection as the product, then select ICAP Policies as the category.
Under ICAP Policies, edit My Default.
or
Click New Policy, type a name for the policy, then click OK.
On the Connections and Server tab, configure IP addresses of the storage that can accept ICAP scan requests, the bind address (the IP address of the computer where Trellix Endpoint Security Storage Protection is installed), and the port number:
In...
Define...
Connection list
Specify the ICAP server configuration and the list of IP addresses to accept connections from:
Overwrite client's connection list — Overrides the client list of IP addresses and accept ICAP requests only from the listed IP address.
Accept connections and scan requests from these IP addresses only — Defines the list of IP addresses for which connections and scan requests can be accepted.
IP Address — Provide the IP address of the storage appliance. Use the plus and minus signs to add and remove IP address.
ICAP Server Configuration
Overwrite ICAP server configuration on each client — Overrides the server configuration on each client.
Bind address — Provide the IP address of the scan server where Trellix Endpoint Security Storage Protection is installed.
Port number - Provide the port number or use the default (1344).
6. On the Scan Items tab, configure the file types to scan, detect for unwanted programs:
In... | Define... |
|---|---|
Scanning | Enable Scanning — Enable or disable the ICAP scanner. |
File types to scan |
|
Options |
|
Heuristics |
|
7. On the Performance tab, configure the scanning duration options to improve performance.
In... | Define... |
|---|---|
Maximum scan time (seconds) | Specifies the maximum scan time for files in seconds. The default scan time is 60 seconds. If a scan exceeds the time limit, the scan stops and logs a message. Allowed scan time is from 10–9999 seconds. |
Number of antivirus scan threads | Specifies the number of antivirus scan threads. The default scan thread is 100 threads. Allowed scan thread is 1–800 threads. |
8. On the Actions tab, define the primary and secondary action to perform when a threat is detected:
In... | Define... |
|---|---|
When a threat is found | Perform this action first — Select the firstaction that you want the scanner to take when a threat is detected.
|
When an unwanted program is found |
|
9. On the Reports tab, configure these log activities preferences:
In... | Define... |
|---|---|
Activity log |
|
Log file size |
|
Log file format | Defines the log file format such as ANSI, Unicode UTF8, or Unicode UTF16. |
What to log in addition to scanning activity |
|
10. Click Save.
Tip
For best practices about how to configure ICAP settings for Trellix Endpoint Security Storage Protection, see KB81933.

Assign ICAP policies to ePO - On-prem managed systems
After you create or modify the ICAP policies, assign them to the ePO - On‑prem managed systems.
Log on to the ePO - SaaS server as an administrator.
Click Menu → Systems → System Tree.
Click Systems tab, then select a group under System Tree.
In the Policies tab, select Trellix Endpoint Security Storage Protection from the Product list, select the NetApp policy, then click Edit Assignment.
Select appropriate inheritance options, select the policy to assign, then click Save.
In the Systems tab, select a group or systems, then click the Wake Up Agents.
In the Force policy update, select Force complete policy and task update and click OK.
The policy is now assigned to the endpoints. To check the policy is assigned to the endpoints, open the Trellix Endpoint Security Storage Protection settings and confirm.
Configure the ICAP scanner server in the ePO - On-prem environment with ICAP
You can scan the files on ICAP storage appliances for viruses, malware, and other security threats by integrating with Trellix Endpoint Security Storage Protection through the Internet Content Adaptation Protocol (ICAP).
Before you send files to be scanned on an ICAP scanner server, configure the scanner server details (server where the Trellix ENSSP is installed) in your ICAP storage appliances. For more information about how to configure the ICAP scanner server, see the respective ICAP storage appliance guide.
Note
Trellix Endpoint Security Storage Protection adheres to RFC-3507 for ICAP scanning. As part of the ICAP use, Trellix ENSSP supports only Response Modification (RESPMOD) and Request Modification (REQMOD) commands. RESPMOD commands must also be in specific formatting as well. For more information about determining if an ICAP client meets the prerequisites for communication with Trellix ENSSP, see KB75543 (Storage compatibility testing with ICAP-based NAS appliances).
After an ICAP scanner server scans the file, it informs the ICAP storage appliance whether the file is a threat according to ICAP 1.0 standards. The ICAP scanner server repairs the malicious file based on the ICAP storage appliance's configuration. All generated events are sent to ePO - On‑prem and it can be reviewed under Threat Event Log.
ICAP configuration on self-managed endpoints
Configure Trellix Endpoint Security Storage Protection with ICAP storage appliances and scan the storage appliances using the ICAP scanner server (server where Trellix ENSSP is installed).
Make sure Trellix Endpoint Security Storage Protection (Threat Prevention and Storage Protection modules) is installed on your systems.
Configure ICAP scanner server settings.
Configure ICAP scanner server with ICAP storage appliances.
 Note
Note
Trellix Endpoint Security Storage Protection adheres to RFC-3507 for ICAP scanning. As part of the ICAP use, Trellix ENSSP supports only Response Modification (RESPMOD) and Request Modification (REQMOD) commands. RESPMOD commands must also be in specific formatting as well. For more information on determining if an ICAP client meets the pre-requisites for communication with Trellix ENSSP, refer to KB75543 (Storage compatibility testing with ICAP-based NAS appliances).
Configure the ICAP server scan settings on self-managed endpoints
Configure the server connection for scan requests, file types to scan or exclude, action for threat items, and log settings.
Open the Trellix Endpoint Security (ENS) Client.
On the top-right corner, click ▾ and then select Settings .
On the left pane, click Storage Protection.
On the top-right corner, click Show Advanced.
Under ICAP Scanner, select Enable ICAP Scanner to enable the ICAP scanner.
In the Connections section, configure IP addresses of the storage that can accept ICAP scan requests, the bind address (the IP address of the endpoint where Trellix Endpoint Security Storage Protection is installed), and the port number:
In... | Define... |
|---|---|
Accept scan request from these ICAP Clients only | Enable to configure the list of ICAP storage appliances that the scan server protects. IP Address — Add the IP address of the ICAP storage appliances. |
ICAP Server Configuration | Bind address — Provide the IP address of the scan server where Trellix Endpoint Security Storage Protection is installed. Port — Provide the port number or use the default (1344). |
7. In the Scan Items section, configure the file types to scan, detect for unwanted programs:
In... | Define... |
|---|---|
File Types to Scan |
|
Options |
|
Heuristics |
|
8. On the Performance section, configure the scanning duration options to improve performance.
In... | Define... |
|---|---|
Maximum Scan Time | Specify the maximum scan time for files in seconds. The default scan time is 60 seconds. If a scan exceeds the time limit, the scan stops and logs a message. Allowed scan time is from 10–9999 seconds. |
Number of Scan Threads | Sets the maximum number of scan threads. The default scan thread is 100 threads. Allowed scan thread is 1–800 threads. |
9. In the Actions section, define the primary and secondary action to perform when a threat is detected:
In... | Define... |
|---|---|
Threat Detection First Response |
|
If the first response fails | Select the next action you want the scanner to take if the first action fails. Continue Scanning — Continue scanning when a threatened file is detected. |
Unwanted Programs first response | Clean — Cleans the item that contains threat then Continue Scanning as secondary action. |
If the first response fails | Continue Scanning — Continues scanning without taking any action when a threat is found. |
10. In the Reports section, configure these log activities preferences:
In... | Define... |
|---|---|
Log Files |
|
Log File Format | Defines the log file format such as ANSI, Unicode UTF8, or Unicode UTF16. |
What to log, in addition to scanning activity |
|
Click Apply to save the configuration.
Tip
You can view the ICAP connection status from the scan statistics page. For more information, see View filers scan statistics.
Tip
For best practices about how to configure ICAP settings for Trellix Endpoint Security Storage Protection, see KB81933.
Configure ICAP scanner server in self-managed environment with ICAP storage appliances
You can scan the files on ICAP storage appliances for viruses, malware, and other security threats by integrating with Trellix Endpoint Security Storage Protection through the Internet Content Adaptation Protocol (ICAP).
Before you send files to be scanned on an ICAP scan server, configure the scan server details (server where the Trellix ENSSP is installed) in your ICAP storage appliances. For more information about how to configure the ICAP scanner server with ICAP storage appliances, refer your ICAP storage appliance guide.
Note
Trellix Endpoint Security Storage Protection adheres to RFC-3507 for ICAP scanning. As part of the ICAP use, Trellix ENSSP supports only Response Modification (RESPMOD). RESPMOD commands must also be in specific formatting as well. For more information on determining if an ICAP client meets the pre-requisites for communication with Trellix ENSSP, refer to KB75543 (Storage compatibility testing with ICAP-based NAS appliances).

After an ICAP server scans the file, it informs the ICAP storage appliance whether the file is a threat according to ICAP 1.0 standards. The ICAP scan server repairs the malicious file based on the ICAP storage appliance's configuration. All generated events are sent to Events Log.
Monitoring Trellix Endpoint Security Storage Protection activity in your environment
You can monitor activity on your managed systems and self-managed system to determine what to do when issues occur.
Dashboards are collections of monitors that track activity in your ePO - On-prem environment.
Trellix Endpoint Security Storage Protection predefined dashboards and monitors. Depending on your permissions, you can use them as is, modify them to add or remove monitors, or create custom dashboards.
Based on the environment, you can monitor the activity:
Using ePO - On-prem | Using ePO - SaaS | Using Installer (on self-managed endpoints) | Use this method |
|---|---|---|---|
Yes | |||
Yes | |||
Yes |
View the Threat Event Log on ePO - On-prem
You can view threat events for all ePO - On-prem managed systems from the Reporting menu.
The Threat Event Log is a log file of all threat events that ePO - On-prem receives from managed systems. To view the log files, click Menu → Reporting → Threat Event Log.
In ePO - On-prem, you can define which events are forwarded to the server. To display the complete list of events in , select Menu → Configuration → Server Setting, select Event Filtering, then click Edit.
Set up a Purge Threat Event Log, server task to purge the Threat Event Log periodically.
For information about Automatic Responses and working with the Threat Event Log, see the ePO - On-prem Product Guide.
Trellix Endpoint Security Storage Protection dashboard and monitors on ePO - On‑prem
You can watch the status of your managed systems and any threats in your environment using your dashboard.
Dashboards are collections of monitors that track activity in your ePO - On‑prem environment.
Trellix Endpoint Security Storage Protection provides default dashboard and monitors for both ICAP server and NetApp filers. Depending on your permissions, you can use them as is, modify them to add or remove monitors, or create custom dashboards using ePO - On‑prem.
Default dashboards and monitors of NetApp filers
The predefined dashboards and monitors of NetApp filers:
Dashboard | Monitor | Description |
|---|---|---|
Endpoint Security Storage Protection NetApp: Currect Detections | Endpoint Security Storage Protection NetApp: Filers with Threats Detected per Week Endpoint Security Storage Protection NetApp: Top 10 Detected Threats Endpoint Security Storage Protection NetApp: Summary of Threats Detected in the Last 24 Hours Endpoint Security Storage Protection NetApp: Threat Names Detected per Week Endpoint Security Storage Protection NetApp: Threats Detected per Week Protection NetApp: Summary of Threats Detected in the Last 7 Days | Run queries or reports to get current malware or threat trend on configured NetApp filers. |
Endpoint Security Storage Protection NetApp: Filer Performance | Endpoint Security Storage Protection NetApp: Scan Requests Accepted | Run queries or reports to get summary of NetApp scanner server statistics. |
Endpoint Security Storage Protection NetApp: File Access Denied | ||
Endpoint Security Storage Protection NetApp: Scan Requests Denied | ||
Endpoint Security Storage Protection NetApp: Scans Timed Out | ||
Endpoint Security Storage Protection NetApp: Filer Performance per Scan Server | Endpoint Security Storage Protection NetApp: Scan Requests Accepted Per Server | Run queries or reports to get scan statistics per NetApp scanner server. |
Endpoint Security Storage Protection NetApp: File Access Denied Per Server | ||
Endpoint Security Storage Protection NetApp: Scan Requests Denied Per Server | ||
Endpoint Security Storage Protection NetApp: Scans Timed Out Per Server | ||
Default dashboards and monitors of ICAP scanner
The predefined dashboards and monitors of ICAP scan server.
Dashboard | Monitor | Description |
|---|---|---|
Endpoint Security Storage Protection ICAP: Currect Detections | Endpoint Security Storage Protection ICAP: Filers with Threats Detected per Week | Run queries or reports to get current malware or thread trend on configured ICAP server. |
Endpoint Security Storage Protection ICAP: Top 10 Detected Threats | ||
Endpoint Security Storage Protection ICAP: Summary of Threats Detected in the Last 24 Hours | ||
Endpoint Security Storage Protection ICAP: Threat Names Detected per Week | ||
Endpoint Security Storage Protection ICAP: Threats Detected per Week | ||
Endpoint Security Storage Protection ICAP: Summary of Threats Detected in the last 7 Days | ||
Endpoint Security Storage Protection ICAP: Server Performance | Endpoint Security Storage Protection ICAP: Scan Requests Accepted | Run queries or reports to get summary of ICAP scanner server statistics. |
Endpoint Security Storage Protection ICAP: File Access Denied |
Dashboard | Monitor | Description |
|---|---|---|
Endpoint Security Storage Protection ICAP: Scan Requests Denied Endpoint Security Storage Protection ICAP: Scans Timed Out | ||
Endpoint Security Storage Protection ICAP: Server Performance per Scan Server | Endpoint Security Storage Protection ICAP: Scan Requests Accepted Per Server Endpoint Security Storage Protection ICAP: File Access Denied Per Server Endpoint Security Storage Protection ICAP: Scan Requests Denied Per Server Endpoint Security Storage Protection ICAP: Scans Timed Out Per Server | Run queries or reports to get scan statistics per ICAP scanner server. |
Custom dashboards
Depending on your permissions, you can create custom dashboards and add monitors using default Trellix Endpoint Security Storage Protection queries.
Queries and reports on ePO - On-prem
Use queries to retrieve detailed information about the status of your managed systems and any threats in your environment. You can export, download, or combine queries into reports, and use queries as dashboard monitors.
Queries are questions that you ask ePO - On-prem, which returns answers as charts and tables. Reports enable you to package one or more queries into a single PDF document to access outside of ePO - On-prem.
Similar information is available by accessing activity logs from the Trellix Endpoint Security (ENS) Client on individual systems.
You can view query data only for resources where you have permissions. For example, if your permissions grant access to a specific System Tree location, your queries return data only for that location.
To view and run queries or reports:
Click Menu → Reporting → Queries & Reports
Select Queries tab.
or
Select Reports tab.
On the left pane, click Trellix Groups → Endpoint Security
Review the queries in the Queries tab.
or
Review the reports in the Reports tab.
Navigate to the required query or reports and click Run.
Default NetApp queries
The storage protection module adds default NetApp queries to Trellix Groups. Depending on your permissions, you can use them as is, modify them, or create custom queries from events and properties in the ePO - On-prem database.
Endpoint Security Storage Protection NetApp: Detection Response Summary
Endpoint Security Storage Protection NetApp: File Access Denied
Endpoint Security Storage Protection NetApp: File Access Denied Per Server
Endpoint Security Storage Protection NetApp: Filers with Threats Detected Per Week
Endpoint Security Storage Protection NetApp: Scan Requests Accepted
Endpoint Security Storage Protection NetApp: Scan Requests Accepted Per Server
Endpoint Security Storage Protection NetApp: Scan Requests Denied
Endpoint Security Storage Protection NetApp: Scan Requests Denied Per Server
Endpoint Security Storage Protection NetApp: Scans Timed Out
Endpoint Security Storage Protection NetApp: Scans Timed Out Per Server
Endpoint Security Storage Protection NetApp: Spyware Detected in the Last 24 Hours
Endpoint Security Storage Protection NetApp: Spyware Detected in the Last 7 Days
Endpoint Security Storage Protection NetApp: Summary of Threats Detected in the Last 24 Hours
Endpoint Security Storage Protection NetApp: Summary of Threats Detected in the Last 7 Days
Endpoint Security Storage Protection NetApp: Threat Count by Severity
Endpoint Security Storage Protection NetApp: Threat Names Detected per Week
Endpoint Security Storage Protection NetApp: Threats Detected in the Last 24 Hours
Endpoint Security Storage Protection NetApp: Threats Detected in the Last 7 Days
Endpoint Security Storage Protection NetApp: Threats Detected Over the Previous 2 Quarters
Endpoint Security Storage Protection NetApp: Threats Detected per Week
Endpoint Security Storage Protection NetApp: Top 10 Detected Threats
Endpoint Security Storage Protection NetApp: Top 10 Threats Per Threat Category
Endpoint Security Storage Protection NetApp: Unwanted Programs Detected in the Last 24 Hours
Default ICAP queries
The storage protection module adds default ICAP queries to Trellix Groups. Depending on your permissions, you can use them as is, modify them, or create custom queries from events and properties in the ePO - On‑prem database.
Endpoint Security Storage Protection ICAP: Detection Response Summary
Endpoint Security Storage Protection ICAP: File Access Denied
Endpoint Security Storage Protection ICAP: File Access Denied Per Server
Endpoint Security Storage Protection ICAP: Filers with Threats Detected Per Week
Endpoint Security Storage Protection ICAP: Scan Requests Accepted
Endpoint Security Storage Protection ICAP: Scan Requests Accepted Per Server
Endpoint Security Storage Protection ICAP: Scan Requests Denied
Endpoint Security Storage Protection ICAP: Scan Requests Denied Per Server
Endpoint Security Storage Protection ICAP: Scans Timed Out
Endpoint Security Storage Protection ICAP: Scans Timed Out Per Server
Endpoint Security Storage Protection ICAP: Spyware Detected in the Last 24 Hours
Endpoint Security Storage Protection ICAP: Spyware Detected in the Last 7 Days
Endpoint Security Storage Protection ICAP: Summary of Threats Detected in the Last 24 Hours
Endpoint Security Storage Protection ICAP: Summary of Threats Detected in the Last 7 Days
Endpoint Security Storage Protection ICAP: Threat Count by Severity
Endpoint Security Storage Protection ICAP: Threat Names Detected per Week
Endpoint Security Storage Protection ICAP: Threats Detected in the Last 24 Hours
Endpoint Security Storage Protection ICAP: Threats Detected in the Last 7 Days
Endpoint Security Storage Protection ICAP: Threats Detected Over the Previous 2 Quarters
Endpoint Security Storage Protection ICAP: Threats Detected per Week
Endpoint Security Storage Protection ICAP: Top 10 Detected Threats
Endpoint Security Storage Protection ICAP: Top 10 Threats Per Threat Category
Endpoint Security Storage Protection ICAP: Unwanted Programs Detected in the Last 24 Hours
Endpoint Security Storage Protection ICAP: Unwanted Programs Detected in the Last 7 Days
View the Threat Event Log on ePO - SaaS
You can view threat events for all ePO - SaaS managed systems from the Reporting menu.
The Threat Event Log is a log file of all threat events that ePO - SaaS receives from managed systems. To view the log files, click Menu → Reporting → Threat Event Log.
In ePO - SaaS, you can define which events are forwarded to the ePO - SaaS server. To display the complete list of events in ePO - SaaS, select Menu → Configuration → Server Setting, select Event Filtering, then click Edit.
Set up a Purge Threat Event Log, server task to purge the Threat Event Log periodically.
Trellix Endpoint Security Storage Protection dashboard and monitors on ePO - SaaS
You can watch the status of your managed systems and any threats in your environment using your dashboard.
Dashboards are collections of monitors that track activity in your ePO - SaaS environment.
Trellix Endpoint Security Storage Protection provides default dashboard and monitors for both ICAP server and NetApp filers. Depending on your permissions, you can use them as is, modify them to add or remove monitors, or create custom dashboards using ePO - SaaS.
Default dashboards and monitors of NetApp filers
The predefined dashboards and monitors of NetApp filers:
Dashboard | Monitor | Description |
|---|---|---|
Endpoint Security Storage Protection NetApp: Currect Detections | Endpoint Security Storage Protection NetApp: Filers with Threats Detected per Week | Run queries or reports to get current malware or threat trend on configured NetApp filers. |
Endpoint Security Storage Protection NetApp: Top 10 Detected Threats | ||
Endpoint Security Storage Protection NetApp: Summary of Threats Detected in the Last 24 Hours | ||
Endpoint Security Storage Protection NetApp: Threat Names Detected per Week | ||
Endpoint Security Storage Protection NetApp: Threats Detected per Week | ||
Endpoint Security Storage Protection NetApp: Threats Detected per Week |
Dashboard | Monitor | Description |
|---|---|---|
| Protection NetApp: Summary of Threats Detected in the Last 7 Days |
|
Endpoint Security Storage Protection NetApp: Filer Performance | Endpoint Security Storage Protection NetApp: Scan Requests Accepted Endpoint Security Storage Protection NetApp: File Access Denied Endpoint Security Storage Protection NetApp: Scan Requests Denied Endpoint Security Storage Protection NetApp: Scans Timed Out | Run queries or reports to get summary of NetApp scanner server statistics. |
Endpoint Security Storage Protection NetApp: Filer Performance per Scan Server | Endpoint Security Storage Protection NetApp: Scan Requests Accepted Per Server Endpoint Security Storage Protection NetApp: File Access Denied Per Server Endpoint Security Storage Protection NetApp: Scan Requests Denied Per Server Endpoint Security Storage Protection NetApp: Scans Timed Out Per Server | Run queries or reports to get scan statistics per NetApp scanner server. |
Default dashboards and monitors of ICAP scanner
The predefined dashboards and monitors of ICAP scan server:
Dashboard | Monitor | Description |
|---|---|---|
Endpoint Security Storage Protection ICAP: Currect Detections | Endpoint Security Storage Protection ICAP: Filers with Threats Detected per Week | Run queries or reports to get current malware or thread trend on configured ICAP server. |
Endpoint Security Storage Protection ICAP: Top 10 Detected Threats | ||
Endpoint Security Storage Protection ICAP: Summary of Threats Detected in the Last 24 Hours | ||
Endpoint Security Storage Protection ICAP: Threat Names Detected per Week | ||
Endpoint Security Storage Protection ICAP: Threats Detected per Week | ||
Endpoint Security Storage Protection ICAP: Summary of Threats Detected in the Last 7 Days | ||
Endpoint Security Storage Protection ICAP: Summary of Threats Detected in the Last 7 Days | ||
Endpoint Security Storage Protection ICAP: Server Performance | Endpoint Security Storage Protection ICAP: Scan Requests Accepted | Run queries or reports to get summary of ICAP scanner server statistics. |
Endpoint Security Storage Protection ICAP: Server Performance | Endpoint Security Storage Protection ICAP: File Access Denied | Run queries or reports to get summary of ICAP scanner server statistics. |
Dashboard | Monitor | Description |
|---|---|---|
Endpoint Security Storage Protection ICAP: Scan Requests Denied Endpoint Security Storage Protection ICAP: Scans Timed Out | ||
Endpoint Security Storage Protection ICAP: Server Performance per Scan Server | Endpoint Security Storage Protection ICAP: Scan Requests Accepted Per Server Endpoint Security Storage Protection ICAP: File Access Denied Per Server Endpoint Security Storage Protection ICAP: Scan Requests Denied Per Server Endpoint Security Storage Protection ICAP: Scans Timed Out Per Server | Run queries or reports to get scan statistics per ICAP scanner server. |
Custom dashboards
Depending on your permissions, you can create custom dashboards and add monitors using default Trellix Endpoint Security Storage Protection queries.
Queries and reports on ePO - SaaS
Use queries to retrieve detailed information about the status of your managed systems and any threats in your environment. You can export, download, or combine queries into reports, and use queries as dashboard monitors.
Queries are questions that you ask ePO - SaaS, which returns answers as charts and tables. Reports enable you to package one or more queries into a single PDF document to access outside of ePO - SaaS.
Similar information is available by accessing activity logs from the Trellix ENS Client on individual systems.
You can view query data only for resources where you have permissions. For example, if your permissions grant access to a specific System Tree location, your queries return data only for that location.
To view and run queries or reports:
Click Menu → Reporting → Queries & Reports
Select Queries tab.
Or
Select Reports tab.
On the left pane, click Trellix Groups → Endpoint Security
Review the queries in the Queries tab.
Or
Review the reports in the Reports tab.
Navigate to the needed query or reports and click Run.
Default NetApp queries
The storage protection module adds default NetApp queries to Trellix Groups. Depending on your permissions, you can use them as is, modify them, or create custom queries from events and properties in the ePO - SaaS database.
Endpoint Security Storage Protection NetApp: Detection Response Summary
Endpoint Security Storage Protection NetApp: File Access Denied
Endpoint Security Storage Protection NetApp: File Access Denied Per Server
Endpoint Security Storage Protection NetApp: Filers with Threats Detected Per Week
Endpoint Security Storage Protection NetApp: Scan Requests Accepted
Endpoint Security Storage Protection NetApp: Scan Requests Accepted Per Server
Endpoint Security Storage Protection NetApp: Scan Requests Denied
Endpoint Security Storage Protection NetApp: Scan Requests Denied Per Server
Endpoint Security Storage Protection NetApp: Scans Timed Out
Endpoint Security Storage Protection NetApp: Scans Timed Out Per Server
Endpoint Security Storage Protection NetApp: Summary of Threats Detected in the Last 24 Hours
Endpoint Security Storage Protection NetApp: Summary of Threats Detected in the Last 7 Days
Endpoint Security Storage Protection NetApp: Threat Names Detected per Week
Endpoint Security Storage Protection NetApp: Threats Detected in the Last 24 Hours
Endpoint Security Storage Protection NetApp: Threats Detected in the Last 7 Days
Endpoint Security Storage Protection NetApp: Threats Detected per Week
Endpoint Security Storage Protection NetApp: Top 10 Detected Threats
Endpoint Security Storage Protection NetApp: Top 10 Threats Per Threat Category
Default ICAP queries
The storage protection module adds default ICAP queries to Trellix Groups. Depending on your permissions, you can use them as is, modify them, or create custom queries from events and properties in the ePO - SaaS database.
Endpoint Security Storage Protection ICAP: Detection Response Summary
Endpoint Security Storage Protection ICAP: File Access Denied
Endpoint Security Storage Protection ICAP: File Access Denied Per Server
Endpoint Security Storage Protection ICAP: Filers with Threats Detected Per Week
Endpoint Security Storage Protection ICAP: Scan Requests Accepted
Endpoint Security Storage Protection ICAP: Scan Requests Accepted Per Server
Endpoint Security Storage Protection ICAP: Scan Requests Denied
Endpoint Security Storage Protection ICAP: Scan Requests Denied Per Server
Endpoint Security Storage Protection ICAP: Scans Timed Out
Endpoint Security Storage Protection ICAP: Scans Timed Out Per Server
Endpoint Security Storage Protection ICAP: Summary of Threats Detected in the Last 24 Hours
Endpoint Security Storage Protection ICAP: Summary of Threats Detected in the Last 7 Days
Endpoint Security Storage Protection ICAP: Threat Names Detected per Week
Endpoint Security Storage Protection ICAP: Threats Detected in the Last 24 Hours
Endpoint Security Storage Protection ICAP: Threats Detected in the Last 7 Days
Endpoint Security Storage Protection ICAP: Threats Detected per Week
Endpoint Security Storage Protection ICAP: Top 10 Detected Threats
Endpoint Security Storage Protection ICAP: Top 10 Threats Per Threat Category
Check the Event Log for recent activity
The Event Log in the Trellix Endpoint Security (ENS) Client displays a record of events that occur on the -protected system.
Open the Trellix Endpoint Security (ENS) Client.
Click Event Log on the left side of the page.
The page shows any events that Trellix ENS has logged on the system in the last 30 days.
If the Trellix Endpoint Security (ENS) Client can't reach the Event Manager, it displays a communication error message. In this case, reboot the system to view the Event Log.
Select an event from the top pane to display the details in the bottom pane.
To change the relative sizes of the panes, click and drag the sash widget between the panes.
On the Event Log page, sort, search, filter, or reload events.
Navigate in the Event Log.
By default, the Event Log displays 20 events per page. To display more events per page, select an option from the Events per page drop-down list.
Event Log page
The Event Log page is where you view the activity and debug events in the Event Log.
Option | Definition | ||||||||
|---|---|---|---|---|---|---|---|---|---|
Number of events | Indicates the number of events that Trellix ENS logged on the system in the last 30 days. | ||||||||
| Refreshes the Event Log display with any new event data. | ||||||||
View Logs Folder | Opens the folder that contains the log files in Windows Explorer. The folder contains log files for:
| ||||||||
Show all events | Removes any filter. | ||||||||
Filter by Severity | Filters events by a severity level:
| ||||||||
Filter by Module | Filters events by module. The features that appear in the drop-down list depend on the features installed on the system at the time you opened the Event Log. | ||||||||
Search | Searches the Event Log for a string. | ||||||||
Events per page | Selects the number of events to display on a page. (By default, 20 events per page) | ||||||||
Previous page | Displays the previous page in the Event Log. | ||||||||
Next page | Displays the next page in the Event Log. | ||||||||
Page x of x | Selects a page in the Event Log to navigate to. Enter a number in the Page field and press Enter or click Go to navigate to the page. |

Column heading | Sorts the event list by... | ||||||||||
|---|---|---|---|---|---|---|---|---|---|---|---|
Date | Date the event occurred. | ||||||||||
Feature | Feature that logged the event. | ||||||||||
Action taken | Action that Trellix ENS took, if any, in response to the event.
| ||||||||||
Severity | Severity level of the event.
|
Trellix Endpoint Security Storage Protection log file names and locations
The activity, error, and debug log files record events that occur on systems with Trellix ENS enabled.
All activity and debug log files are stored in the following default location.
%ProgramData%\McAfee\Endpoint Security\Logs
Each module, feature, or technology places activity or debug logging in a separate file. All modules place error logging in one file EndpointSecurityPlatform_Errors.log.
Feature or technology | File name |
|---|---|
Platform | EndpointSecurityPlatform_Activity.log EndpointSecurityPlatform_Debug.log |
Self Protection | SelfProtection_Activity.log SelfProtection_Debug.log |
Errors | EndpointSecurityPlatform_Errors.log Contains error logs for all modules. |
Endpoint Security Client | MFEConsole_Debug.log |
Scan | OnAccessScan_Activity.log OnAccessScan_Debug.log OnDemandScan_Activity.log OnAccessScan_Debug.log |
Threat Prevention | ThreatPrevention_Activity.log ThreatPrevention_Debug.log |
Storage Protection | NetAppStats_Activity |
Exploit Prevention | ExploitPrevention_Activity.log |
View the scan statistics
You can view the statistics of NetApp or ICAP scan servers in Trellix Endpoint Security (ENS) Client. The statistic page provides the details like scanner threads, scanning statistics, and performance statistics.
Open the Trellix Endpoint Security (ENS) Client.
Click Storage Scan Statistics on the left pane.
To view the NetApp statistics:
Click the NetApp Statistics tab.
Under NetApp Connections, click View All Server Scan Statistics to view the scan statistics summary of all configured NetApp filers.
To view the scan statistics of a specific filer, click the required server name.
To view the ICAP statistics:
Click the ICAP Statistics tab.
Under ICAP Connections, click View All Server Scan Statistics to view the scan statistics summary of all configured ICAP scanner servers.
To view the scan statistics of a specific ICAP scanner server, click the required server name.
You can specify the time limit in the Statistics update interval (seconds) to determine the refresh frequency of the Endpoint Storage Protection Statistics page. The minimum interval value is 10 seconds. You can set the interval value ranging from 10 to 9999 seconds.
Controlling users and roles assignments on ePO - SaaS
Trellix Endpoint Security Storage Protection uses ePO - SaaS Users & Roles to assign different parts of the Trellix ENSSP administration to different users or groups.
Assigning Trellix Endpoint Security Storage Protection permissions on ePO - SaaS
(This topic applies only to Trellix Endpoint Security Storage Protection on ePO - SaaS) Administrators can add users and assign specific roles to them.
Deploying Trellix ENSSP adds the ePO - SaaS permissions for Storage Protection.
Administrators can invite users to create accounts, and manage and configure accounts. Administrators control what users see and what they can access by adding and assigning roles to users. All roles have specific permission sets.
The permission sets in Storage Protection includes:
Endpoint Security Storage Protection: View and change policies
Endpoint Security Storage Protection: View policies
To assign or remove permission for a user, select or deselect the permission checkboxes displayed for role.
Invite users to manage
(This topic applies to Trellix Endpoint Security Storage Protection on ePO - SaaS) As an administrator, you can add users and assign specific roles to them for using Trellix Endpoint Security Storage Protection on ePO - SaaS.
Make sure that you have administrator permissions to use ePO - SaaS.
Log on to ePO - SaaS.
Select Menu → Configuration → Users & Roles.
On the Users & Roles page, click Invite User.
On the Invite new user page, type the first name, last name, and the email address of the user you want to invite.
Click Invite.
An invitation email is sent to the user with activation instructions. This email is valid for 7 days. Once you add the user, their names appear on the Users panel.
Create a role
(This topic applies to Trellix Endpoint Security Storage Protection on ePO - SaaS) You can use the default permissions for Storage Protection and ePO - SaaS to create a customized role for your user.
Make sure that you have administrator permissions to use ePO - SaaS.
Log on to ePO - SaaS.
Select Menu → Configuration → Users & Roles.
On the Users & Roles page, click Add Role.
Enter a name for the role.
From the MVISION ePolicy Orchestrator drop-down lists, select the required permissions.
The selected permissions appear in Assigned Permissions.
The created role appears in the Roles panel. You can now assign this role to selected users.
Duplicate a role
(This topic applies to Trellix Endpoint Security Storage Protection on ePO - SaaS) You can create a copy of an existing role and customize as needed.
Make sure that you have administrator permissions to use ePO - SaaS.
Log on to ePO - SaaS.
Select Menu → Configuration → Users & Roles.
On the Users & Roles page, select the role that you want to copy.
Click Duplicate.
A copy of the existing role is created. You can edit the role name, assign or unassign permissions, and save the role.
Assign roles to users
(This topic applies to Trellix Endpoint Security Storage Protection on ePO - SaaS) You can limit or extend users' access to Trellix Endpoint Security Storage Protection in ePO - SaaS by assigning or unassigning roles. All roles have specific permission sets assigned to them.
Make sure that you have administrator permissions to use ePO - SaaS.
Log on to ePO - SaaS.
Select Menu → Configuration → Users & Roles.
On the Users & Roles page, select a user from the Users panel.
The user details, assigned roles, and unassigned roles for the selected user appears on the right pane.
Select the required roles from the Unassigned Roles list. The Roles panel lists the created roles.
Click Save Changes.
Delete users and roles
(This topic applies to Trellix Endpoint Security Storage Protection on ePO - SaaS) You can remove all roles and users when they are no longer in use. The default roles can't be deleted.
Make sure that you have administrator permissions to use ePO - SaaS.
Log on to ePO - SaaS.
Select Menu → Configuration → Users & Roles.
On the Users & Roles page, select the user or role that you want to delete.
Click Delete, then click Confirm.
The user role is removed from the Users or Roles list.
Frequently asked questions
Here are answers to frequently asked questions.
What are the file types that I should exclude from on-access scanning?
Exclude these common file types from on-access scanning. Add other files in the exclusion list according to your environment.
Database files
.ldb
.mdb
.pst
.pst.tmp
.nsf
Archives or large files
.7z
.cab
.iso
.jar
.rar
.tar
.tgz
.vhd
.vmdk
.zip
Why is Trellix Endpoint Security Storage Protection not designed to perform on-access scan for database, large, or archived files?
When a system sends a scan file request to the filer, the filer has only 45 seconds of Common Internet File System (CIFS) or Server Message Block (SMB) protocol timeout. This scanning operation must be completed before this duration, otherwise the user is denied access to the file.
There are three performance parameters for an on-access scan solution. Do not use the time-sensitive on-access scanning solution, for:
Files that are already scanned by another product— Email local databases (Example: .pst, .nsf) and email server or SQL Server databases (Example: .mdb, .mdf) use large database files. These files should be scanned by email or database scanning software.
Trellix recommends that you configure specialized scanners to scan the database contents upon creation.
Archived files— Scanning archived files such as .zip, .rar, or .7z requires the scan engine to expand the archive folder and its contents before initiating the scanning.
Trellix recommends that you configure on-access scanning to scan the archive content when it is expanded by the user, or schedule an on-demand scan to scan these files.
Large-size files — Files that are larger in size should be scanned using on-demand scanning because it requires more system resources. This is evident in an ICAP on-access scanning solution, where the entire file must be copied to the scanner before the scan is initiated.
Trellix recommends that you schedule an on-demand scan to scan these files.
Scanning these files with the on-access scanning solution increases the frequency of scan timeout. If the filer is set to deny access to files that were not scanned, sometimes users are denied access to files.
Is NetApp scanning configuration complicated?
The NetApp ONTAP design involves these protocols with their dependencies:
Active Directory
CIFS/SMB
Named Pipes
NetBIOS over TCP/IP
RPC
These designs choices:
Confer certain benefits over other designs such as ICAP.
Require comprehensive prerequisites that must be met by the operating system and Trellix Endpoint Security Storage
8 | Trellix Endpoint Security Storage Protection overview
Protection product.
Require that the vendor scanner server meets the mandatory prerequisites for Trellix Endpoint Security Storage Protection and all NetApp mandatory prerequisites.
What is the importance of the scan thread configuration and how does it affect the scanner count?
Consider a scenario where you have Y number of physical filers and Z number of discrete filer IP addresses that send scan requests.
To deploy ICAP as 2 X Y scanners, you must configure each scanner's ICAP scan thread count as 20 X Z threads. **
Note
** The value must be provided by the filer vendor based on how many outstanding scan requests the filer's operating system issues from the discrete filer IP address.
To deploy NetApp 2 X Y scanners, you must configure the NetApp scan thread count for each scanner as (50 X (Z) threads. **
Note
** The value must be provided by the filer vendor based on how many outstanding scan requests the filer's operating system issues from the discrete filer IP address.
Trellix Endpoint Security Storage Protection can be configured with a maximum of 800 threads. One scanner can handle scan requests from a maximum of 16 filers.
In the production environment, if 40 or more threads are used consistently, it represents stress.
If the Stats_ICAP.log threads used + Stats_NetApp.log threads used is >= 40 threads consistently, you can add scanners until relief is observed and the thread count remains below 40.
For more information about configuring the number of scanners, see KB81962.
Note
If only ICAP or NetApp filers are scanned by the scanner, you need to consider only the
Stats_ICAP.logorStats_NetApp.logrespectively.
For more Frequently Asked Questions, see KB78672.