2020 / Software Release 9.0.0 / Revision 1.0
Event-Driven File Scanning
File Protect software release 8.2.0 and later supports an integrated NetApp and file content security solution. This enables the File Protect appliance to protect documents managed by NetApp clustered Data ONTAP.
About NetApp Clustered Data ONTAP
NetApp clustered Data ONTAP is a storage operating system that allows all storage resources within the cluster to be managed as a single system. Storage resources typically consist of NetApp fabric-attached storage (FAS) controllers that run the clustered Data ONTAP operating system and manage NetApp FAS storage arrays. You can mix models and generations of hardware to create pools of heterogeneous storage. Client applications access data on aggregated storage pools through logical constructs called Virtualized Servers (Vservers), which are also called Storage Virtual Machines (SVMs).
Data ONTAP allows integrated partner applications to monitor file access and set file access permissions based on the configuration of FPolicy. FPolicy is the file policy component of Data ONTAP that enables external servers to register with the NetApp storage system for certain file system events, such as file open, create, remove, rename, directory create, and others. When these file-access events occur as a result of client access, the storage system notifies the external server.
About FireEye File Protect Appliances
FireEye File Protect appliances help prevent, detect, and respond to cyber attacks on files on network file shares and enterprise content management stores. The appliance analyzes files and directories to detect and quarantine malware that bypasses next-generation firewalls and traditional antivirus (AV) software engines.
The appliance detects new, previously unknown content threats in real time by executing suspicious apps within the FireEye Multi-Vector Virtual Execution (MVX) engine and categorizing analyzed files as “malicious,” “good,” “whitelisted,” and “unknown.” Malicious files can be automatically removed to a quarantine folder that is remote to the source file share and the File Protect appliance. You can view malicious files and examine the malware in them.
Event-Driven Scans of NetApp File Shares
The integrated NetApp and FireEye solution optimizes the protection of files in CIFS and NFS shares on NetApp Vservers. The NetApp and FireEye systems communicate over TCP or SSL through a NetApp API. As file events occur on FireEye-protected file shares, the NetApp FPolicy component of Data ONTAP sends notifications that contain the names of the affected files. The file event notifications trigger the File Protect appliance to scan and analyze the files specified in the notifications.
NetApp FPolicy is the Data ONTAP file access notification framework responsible for transmitting notifications from a Vserver in the cluster to partner applications connected to the storage systems. To specify the file events that are to be reported to the File Protect appliance, you can use NetApp Filer CLI commands to configure FPolicy.
With a software release older than 8.2.0, the File Protect appliance protects file content in CIFS and NFS shares on NetApp Vservers by continuously scanning file timestamps to discover any changes. However, polling-based scans—called continuous scans—can consume a large amount of storage network bandwidth, which in turn adds latency to the file system's disk operations.
With software release 8.2.0 or newer, the File Protect appliance uses notification-based scans—called listen scans—to discover file changes. Listen scans are much faster and consume less bandwidth in the storage network than continuous scans. A listen scan provides continuous content security for a file share but without the delay or overhead of polling.
Feature Requirements
For the File Protect appliance, the following are required:
The File Protect appliance is running software release 8.2.0 or newer. The latest security content and latest guest images are installed.
Admin or Operator access to the appliance CLI and Web UI.
For the NetApp storage system, the following are required:
The NetApp FAS controllers are running Data ONTAP software release v 9.0 or newer in clustered mode with FlexVol volumes and not Infinite Volumes.
Clients access protected storage using the CIFS, NFSv3, or NFSv4 file access protocols.
You have Vserver administrator access to the Data ONTAP cluster CLI at the admin privilege level.
(CIFS shares only) You have credentials to access the NetApp API.
You have the following information:
The name of the virtual server that hosts the file share you want protected
The name of the volume and the file share you want to protect
The volume that contains the file share is mounted.
The time is in sync on NetApp and the File Protect appliance. FireEye recommends that both point to the same NTP server.
(Recommended) Shares for scan results (malicious files, non-malicious files, whitelisted files, and files of unknown file types) are configured and mounted. For more information, see the FireEye File Protect User Guide.
Configuring Communication
This section covers the following information:
Task List for Configuring Communication
Perform the following tasks to enable communication between the File Protect appliance and the NetApp DataONTAP Vserver:.
Configure NetApp API mode for non-secure (TCP) or secure (SSL) communication.
If you configured secure NetApp API mode, configure SSL for NetApp.
Configuring NetApp API Mode
To enable the File Protect appliance to receive connection requests and file event notification messages from NetApp FPolicy, configure NetApp API mode on the appliance:
Enable API mode.
Specify whether communication is over a non-secure (TCP) channel or a secure (SSL) channel.
If you specify a secure connection to the NetApp API, you must also install a FireEye self-signed server certificate in the NetApp truststore.
You can configure NetApp API mode using the appliance Web UI or CLI:
Configuring NetApp API Mode Using the CLI on the facing page
Configuring NetApp API Mode Using the Web UI
Follow these steps to enable the File Protect appliance to receive NetApp file event notifications over a non-secure (TCP) channel or a secure (SSL) channel.
IMPORTANT! If you specify a secure connection to the NetApp API, you must also install a FireEye self-signed server certificate in the Data ONTAP Vserver trust store.
To configure NetApp API mode from the File Protect Web UI, use the Storage settings page.
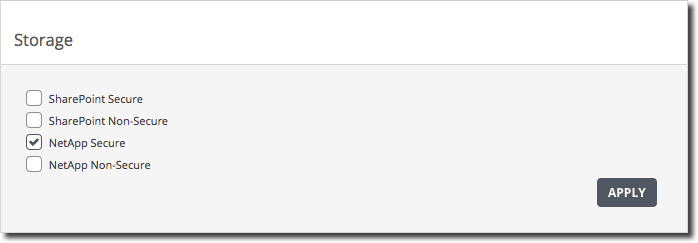
Prerequisites:
Admin or Operator access to the File Protect appliance
To configure NetApp API mode:
Log in to the File Protect appliance Web UI.
Select Settings > Storage.
Enable NetApp API mode.
To receive NetApp file event notifications over a TCP channel, select NetApp Non-Secure and clear NetApp Secure.
To receive NetApp file event notifications over an SSL channel, select NetApp Secure and clear NetApp Non-Secure.
Click Apply.
The next step depends on whether you selected secure or non-secure API mode:
If you specified a TCP connection to the NetApp API:
You must add a FireEye self-signed server authentication certificate to the NetApp storage system certificate store. This is done using NetApp tools as described in Configuring SSL for NetApp (for Secure API Mode).
If you specified an SSL connection to the NetApp API:
You do not need a FireEye certificate in the NetApp storage system certificate store. See, Configuring Storage Access.
Configuring NetApp API Mode Using the CLI
Follow these steps to enable the File Protect appliance to receive NetApp file event notifications over a non-secure (TCP) channel or a secure (SSL) channel.
NOTE: If you specify a secure connection to the NetApp API, you must also install a FireEye self-signed server certificate in the NetApp storage system certificate store.
To configure NetApp API mode from the File Protect CLI, use the following command:
fmps api netapp {non-secure | secure} enablePrerequisites:
Admin or Operator access to the File Protect appliance.
To enable a TCP or SSL connection to the NetApp API:
Log in to the File Protect appliance CLI.
Go to configuration mode.
hostname > enable hostname # configure terminal
Enable NetApp API mode.
To receive NetApp file event notifications over a TCP channel, specify non-secure API mode:
hostname (config) # fmps api netapp non-secure enableTo receive NetApp file event notifications over an SSL channel, specify secure API mode:
hostname (config) # fmps api netapp secure enable
If you need to disable NetApp API mode, use the no form of the command.
Verify the NetApp API mode configuration.
In the following example, NetApp API mode is enabled on the appliance for secure connection to the NetApp API.
hostname (config) # show fmps api SharePoint Secure : Disabled SharePoint Non-Secure : Disabled NetApp Secure : Enabled NetApp Non-Secure : DisabledVerify the NetApp API mode configuration.
hostname (config) # show fmps apiSave your changes.
hostname (config) # write memoryThe next step depends on whether you selected secure or non-secure API mode:
If you specified a TCP connection to the NetApp API:
You must add a FireEye self-signed server authentication certificate to the NetApp storage system certificate store. This is done using NetApp tools as described in Configuring SSL for NetApp (for Secure API Mode) on the facing page.
If you specified an SSL connection to the NetApp API:
You do not need a FireEye certificate in the NetApp storage system certificate store. see, Configuring Storage Access.
Configuring SSL for NetApp (for Secure API Mode)
A Data ONTAP Vserver requires a FireEye self-signed server authentication certificate if NetApp file event notifications are sent to an File Protect appliance over a secure SSL channel. Certificate-based authentication ensures that the API communications are transmitted in encrypted form. Information is sent privately and unaltered from the authenticated client (a Data ONTAP Vserver) to the specified server (the File Protect appliance).

NOTE: Install the certificate only if you configured the File Protect appliance to receive NetApp file event notifications over a secure (SSL) channel.
Configuring SSL for NetApp entails the following tasks:
Download the certificate bundle from the File Protect appliance to your local system.
Import the certificate to the NetApp storage system certificate store.
Add the certificate to the NetApp storage system truststore.
You can configure SSL for NetApp by using the Web UI or the CLI to obtain the self-signed server certificate from the File Protect appliance.
Configuring SSL for NetApp Using the Web UI
Sending NetApp file event notifications to an File Protect appliance over a secure SSL channel requires the use of digital certificates. Certificate-based authentication ensures that API communications are transmitted in encrypted form. Information is sent privately and unaltered from the authenticated client (the Data ONTAP Vserver) to the specified server (the File Protect appliance).
NOTE: Install the certificate only if you configured the File Protect appliance to receive NetApp file event notifications over a secure (SSL) channel.
Follow these steps to download a self-signed server certificate and its matching key (also called a public key certificate) from the File Protect appliance, import the certificate to the NetApp storage system certificate store, and add the certificate to the NetApp storage system truststore.
Download the self-signed certificate from the Certificate Management page.
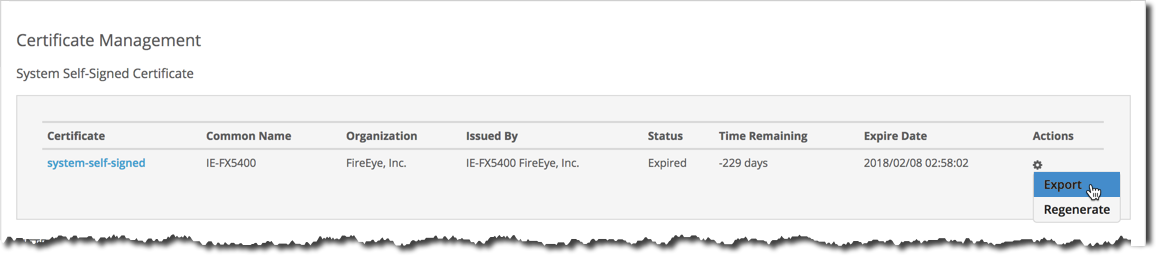
Use the following Data ONTAP cluster CLI command to import the certificate and add it to NetApp storage system certificate store:
security certificate install -type server -vserver <vserverName>Prerequisites
NetApp API mode is enabled with TCP connectivity on the File Protect appliance.
Admin or Operator access to the File Protect appliance Web UI or CLI.
Vserver administrator access to the Data ONTAP cluster CLI at the admin privilege level.
To configure SSL for the NetApp storage system:
Log in to the File Protect appliance Web UI.
Download the certificate from the File Protect appliance Web UI to your local system.
Select Settings > Certificates/Keys.
In the System Self-Signed Certificate section, click the Action icon and select Export.
Save the text file named
system-self-signed.crton your local system.
For details, see the FireEye File Protect System Administration Guide.
Log in to the Data ONTAP cluster CLI as a Vserver administrator at the admin privilege level.
Import the File Protect certificate to the NetApp storage system certificate store. Use the following command, where
<vserverName>is the name of the virtual server that hosts the share you want protected.security certificate install -type server -vserver <vserverName>The following example installs the FireEye self-signed server certificate for the Vserver named vserverone.
clus9::> security certificate install -type server -vserver VserverOneAt the CLI prompt to enter the certificate, copy and paste the contents of the certificate file, and press Enter.
At the CLI prompt to enter the File Protect appliance private key, copy and paste the contents of the key file, and press Enter.
At the CLI prompt to install the CA root and intermediate certificates that form the certificate chain of the server certificate, enter Y.
Go to Configuring Storage Access .
Configuring SSL for NetApp Using the CLI
Follow these steps to download the self-signed server certificate and its matching key (also called a public key certificate) from the File Protect appliance to your local system, then import the certificate to the NetApp storage system certificate store.

NOTE: Install the certificate only if you configured the File Protect appliance to receive NetApp file event notifications over a secure (SSL) channel.
Use the following File Protect appliance CLI command to download the certificate.
show crypto certificate default-cert public-pemUse the Data ONTAP cluster CLI to import the certificate and add it to NetApp storage system certificate store.
Prerequisites
NetApp API mode is enabled with TCP connectivity on the File Protect appliance.
Admin or Operator access to the File Protect appliance CLI.
Vserver administrator access to the Data ONTAP cluster CLI at the admin privilege level.
To configure SSL for the NetApp storage system:
Download the File Protect self-signed certificate to your local system using the File Protect appliance CLI.
Log in to the File Protect appliance CLI.
Go to configuration mode.
hostname > enable hostname # configure terminalView the PEM-encoded default certificate and key information:
hostname (config) # show crypto certificate default-cert public-pemCopy the PEM-encoded default certificate and key information from the command output and save it in a text file named system-self-signed.crt on your local system.
Log in to the Data ONTAP cluster CLI as a Vserver administrator at the admin privilege level.
NOTE: Copy and paste all of the command output, including the first line (----BEGIN NEW CERTIFICATE REQUEST----) and the last line (----END CERTIFICATE REQUEST----).
Import the File Protect certificate to the NetApp storage system certificate store. Use the following command, where <vserverName> is the name of the virtual server that hosts the share you want protected.
security certificate install -type server -vserver <vserverName>The following example installs the FireEye self-signed server certificate for the Vserver named vserverone.
clus9::> security certificate install -type server -vserver VserverOneAt the CLI prompt to enter the certificate, copy and paste the contents of the certificate file, and press Enter.
At the CLI prompt to enter the File Protect appliance private key, copy and paste the contents of the key file, and press Enter.
At the CLI prompt to install the CA root and intermediate certificates that form the certificate chain of the server certificate, enter Y.
Go to Configuring Storage Access .
Configuring Storage Access
This section covers the tasks you perform to configure storage for event-driven scanning of NetApp shares:
Task List for Configuring Storage Access
The following list summarizes the tasks you perform to configure storage for event-driven scanning of NetApp shares:
Understanding storage shares for scanning NetApp shares.
About NetApp Listen Scans on the next page
Share Types Used for NetApp Listen Scans on the next page
Mount a Files share for the remote storage on a NetApp share.
FireEye recommends that you configure storage for whitelisted files, non-malicious files, files of unknown type, and quarantined malicious files.
About NetApp Listen Scans
The File Protect appliance supports the following scan types:
Pre-scan—Gathers initial statistics about a share.
Scheduled scan—Automatically runs daily or weekly.
Continuous scan—Checks for new files at 1-second to 3-minute intervals.
Scan now—An "instant scan" that runs as soon as you start it.
Listen scan—A notification-based scan of the files specified in a file event notification from an integrated storage system.
Listen scans are supported for the integrated NetApp and FireEye solution. Supported appliances and storage systems are described in Feature Requirements.
As file events occur on protected CIFS and NFS shares on NetApp Vservers, the FPolicy component of Data ONTAP sends file event notifications to the File Protect appliance. The file event types that trigger notifications are specified by configuring FPolicy using the NetApp Filer CLI. The notifications contain the names of files that need to be scanned and analyzed. The active listen scan on the appliance analyzes the files specified in the notification.
Share Types Used for NetApp Listen Scans
This topic describes the three share types referenced from a NetApp listen scan configuration:
Files Share
When you configure a scan of a NetApp share, you specify the File Protect appliance share that contains the files or subdirectory of files that the appliance is to protect against malware. This File Protect storage is called a Files share. You configure the share by specifying the name of the Vserver that hosts the NetApp share to be protected, the path from the volume root to the share, and the file access protocol.
Quarantine Share
FireEye recommends that any malicious files found by a listen scan be moved to a Quarantine share. The quarantine repository can be a mounted CIFS or NFS share that resides on any storage device, provided that the appliance has read-write access to the share.
When you configure a scan, you can select a Quarantine share you added, or you can select local_QF. If you select local_QF, the File Protect appliance creates a local_QF folder in the source file share the first time the scan encounters a malicious file. All malicious files discovered by the scan will be moved to that folder.
IMPORTANT! FireEye recommends against using the
local_QFfolder, because malicious files will not be isolated from the source files.

When a listen scan operation moves a malicious NetApp-managed file to quarantine, it also replaces the malicious file with a placeholder file. The existence of a placeholder file indicates that the original file was quarantined. By default, quarantine placeholder files are empty files with a filename of the following format, where <originalFileName> is the name of the quarantined file:
<originalFileName>.fe-quarantined
Good/Whitelisted/Unknown Files Share
You can specify that a scan operation moves non-malicious files, whitelisted files, and files with disabled or unknown file types to repositories called Good/Whitelist/Unknown Files shares. If you will be using this option, you will need to add storage for these files. Like a Quarantine share, these shares can reside on CIFS or NFS shares located on any storage device, provided that the appliance has read-write access to the shares.
A single Good/Whitelist/Unknown Files share can serve as the repository for multiple types of scan result moves (non-malicious files, whitelisted files, or files of an unknown type). However, you must specify the mappings separately when you configure the scan.
For more information, see the FireEye File Protect User Guide.
Determining the Location of a NetApp Share Using Data ONTAP
As a prerequisite for the next two configuration tasks, you must obtain certain attributes of the NetApp file share. The following table describes the attributes needed:
NetApp | Description and Value | Information You Use |
|---|---|---|
| ID of the virtual server that hosts the share |
|
| ID of the volume that contains the share |
|
| Path from the root of the volume to the share (if it is present) |
|
In the next configuration task, Mounting Storage for a NetApp Share, you will create, configure, and mount a Files share for the NetApp share you need to protect. The Files share definition set up the share name and authentication at the File Protect appliance. The definition also specifies the Vserver name, the path from the volume root to the share (<volSharePath>, if it is present), and the file access protocol.
In the configuration task after that, Mapping Storage to a NetApp Share Using the CLI, you will use an File Protect appliance CLI command to map File Protect appliance Files share to the NetApp source share. In the command, you specify the NetApp share location by combining two or all three of NetApp storage attributes. You will specify the share location by concatenating two or three of the text strings, separated by forward slash characters ( / ), and enclosed in double quote marks ( " ).
If the share path includes a subdirectory (if <volSharePath> is present), specify the share location within double quote marks as follows:
"<vserverID>/<volumeID>/<volsharePath>"If the share path does not include a subdirectory (if no <volSharePath> is present), specify the share path within double quote marks as follows:
"<vserverID>/<volumeID>"

NOTE: In addition to determining the location of the protected NetApp share, FireEye recommends that you locate a share for quarantined files and one to three shares for scan results. For more information, see the FireEye File Protect User Guide.
Prerequisites
Vserver administrator access to the Data ONTAP cluster CLI at the admin privilege level.
The name of the virtual server that hosts the NetApp file share you want to scan.
In the example, the name of virtual server (<vserverName>) is VserverOne. With this information, you can find the ID of the volume (<vserverID>).
The name of the NetApp file share you want to scan.
In the example, the name of file share you want to scan (<shareName>) is VserverOne. With this information, you can find the name of the volume that hosts the share and, by extension, the value for <volumeID>.
To determine the location of the NetApp share:
Log in to the Data ONTAP cluster CLI as a Vserver administrator at the admin privilege level.
Obtain <vserverID>, which is the ID of the NetApp virtual server that hosts the share to be protected by the File Protect appliance. Use the following command, where <vserverName> is the name of the virtual server. In the command output, the "vserver UUID" line will display the virtual server ID.
vserver show -vserver <vserverName>
In the following example, the NetApp file share to be scanned resides on the virtual server named VserverOne.
clus9::> vserver show -vserver VserverOne
Vserver: VserverOne
Vserver Type: data
Vserver UUID: c8d8d6e9-5ba6-11e4-87ab-123478563412
Root Volume: NetAppAPITest_root
Aggregate: aggr1In the command output, the "Vserver UUID:" line shows that the virtual server ID (<vserverID>) is c8d8d6e9-5ba6-11e4-87ab-123478563412.

TIP: Record the <vserverID> value in a text file. You will record additional values in the file and then concatenate the text strings to form the share location specifier.
3. Obtain <volSharePath>, which is the path from the volume root to the share and <volumeName>, name of the volume that contains the share. Use the following command:
share show -vserver <VserverName> -share-name <NTAPshareName>In the command output, the "Path:" line displays the share path and the "Volume Name:" line displays the name of the volume that contains the share. The path from the volume root to the share appears between the volume name and the share name.
The following example shows that the share named shareOne is in the volume named volumeOne and has path /volumeOne/dir1/dir2/shareOne:
clus9s::> share show -vserver vserverOne -share-name shareOne
Vserver: vserverOne
Share: shareOne
CIFS Server NetBIOS Name: serverOne
Path: /volumeOne/dir1/dir2/shareOne
Share Properties: oplocks
browsable
changenotify
Symlink Properties: enable
File Mode Creation Mask: -
Directory Mode Creation Mask: -
Share Comment: -
Share ACL: Everyone / Full Control
File Attribute Cache Lifetime: -
Volume Name: volumeOne
Offline Files: manual
Vscan File-Operations Profile: standard
Maximum Tree Connections on Share: 4294967295
UNIX Group for File Create: -In this example, the share path includes a subdirectory of dir1/dir2, and it will be included in the share location parameter when you map the File Protect appliance share to the NetApp share.

TIP: Record the <volsharePath> value in the same file in which you recorded the <vserverID> value.
4. Obtain <volumeID>, which is the ID of the volume on which the share is located.
use the following command, where <volumeName> is the name of the volume that contains the share:
volume show -vserver <VserverName> -volume <volumeName>In the command output, the "Volume Master Data Set ID" line will display the ID of the volume that contains the share.
The following example shows that the volume ID is 2147484692.
clus9::> volume show -vserver VserverName -volume volumeOne
Vserver Name: VserverOne
Volume Name: volumeOne
Aggregate Name: aggr1
Volume Size: 1TB
Volume Data Set ID: 1044
Volume Master Data Set ID: 2147484692
 TIP: Record the <volumeID> value in the same file in which you recorded the <vserverID> and <volsharePath> values
In this example, the following text would be saved to a text file:
c8d8d6e9-5ba6-11e4-87ab-123478563412/21474846925. Save the text file in which you recorded the three storage system attributes.
Mounting Storage for a NetApp Share
You can use the File Protect appliance Web UI or CLI to mount a Files share for the remote storage on a NetApp share:
Mounting Storage for a NetApp Share Using the Web UI below
Editing Storage for a NetApp Share Using the Web UI
Deleting Storage for a NetApp Share Using the Web UI
Mounting Storage for a NetApp Share Using the CLI
Mounting Storage for a NetApp Share Using the Web UI
Follow these steps to create, configure, and mount a Files share on the File Protect appliance.
Use the network Network Storage panel.
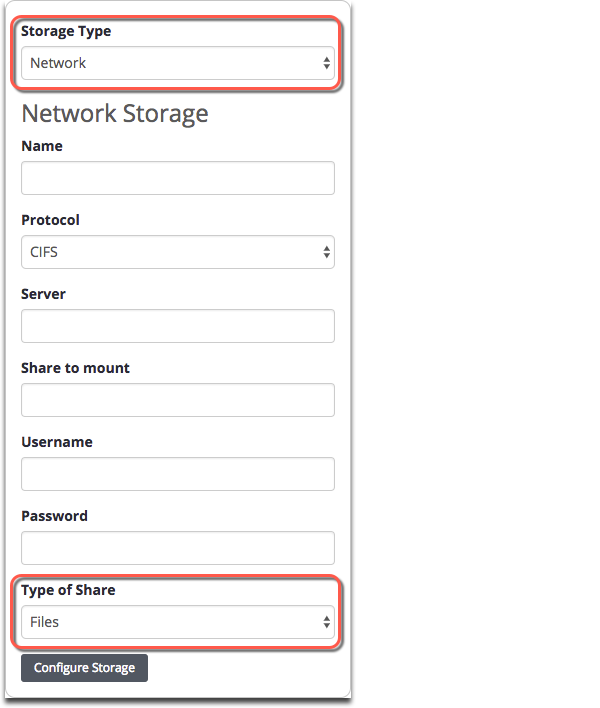
In the example used in this task, you create, configure, and mount a Files share named NTAPshareOne for a CIFS share that resides on the NetApp Vshare at IP address 192.168.1.1. The path from the volume root to the file share is dir1/dir2.
NOTE: In addition to defining a Files share, FireEye recommends that you define a Quarantine share and one to three Good/Whitelisted/Unknown Files shares for scan results. For more information, see the FireEye File Protect User Guide.

NOTE: Listen scans require additional configuration. For more information, see Configuring Listen Scans.
Prerequisites
The name or IP address of the NetApp Vserver.
The path from the volume root to the share to be protected.
The file access protocol (CIFS or NFS) used to mount the share.
(CIFS file share only) You have credentials needed to access the NetApp API.
Admin or Operator access to the File Protect appliance CLI.
To create, configure, and mount a network Files share for NetApp share:
Log in to the File Protect appliance Web UI.
Click the Storage tab.
Complete the fields in the Add Storage panel:
Name
A unique name to identify the storage. The name can contain letters, numbers, hyphens ( - ), underscores ( _ ), and periods ( . ).
Example: NTAPshareOne
Protocol
Source share protocol.
Example: cifs
Server
URL or name of the Vserver that hosts the source share.
Example: 192.168.1.1
Share to mount
Network share name or full export path.
Example: shareOne
Username
(CIFS shares only) A user with access to the NetApp API.
Example: Domain/cifsUser
Password
(CIFS shares only) The password used to authenticate the NetApp API user.
Type of Share
Files
4. Click Configure Storage.
Locate the new storage in the Currently Configured Storage section. The icon in the Status column is yellow while the storage is being added, and turns green after it is added successfully.
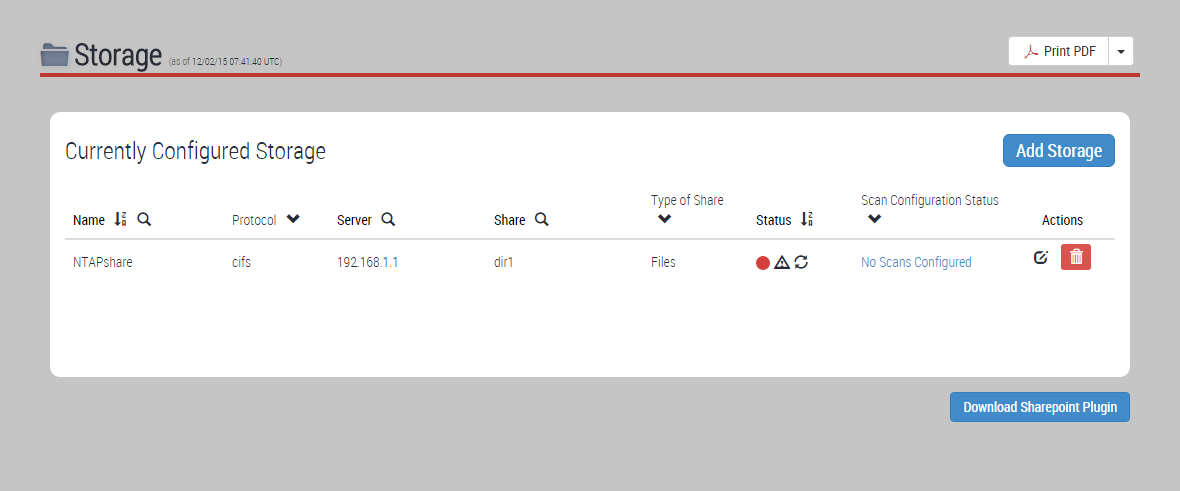
(Recommended) To configure the scan to automatically move malicious files to a designated share, follow step 3 through step 5 to add storage on the appliance. For the Type of Share, specify Quarantine. For more information, see the FireEye File Protect User Guide.
IMPORTANT! FireEye recommends against configuring scans that specify local_QF as the quarantine share, because malicious files will not be isolated from the source files.
Example repository name:
qshr(Recommended) To configure the scan to automatically move non-malicious, whitelisted, and skipped files to designated shares, add storage for those purposes. For the Type of Share, specify Good/Whitelist/Unknown Files.
A single Good/Whitelist/Unknown Files share can serve as the repository for multiple types of scan result moves (non-malicious files, whitelisted files, or files of an unknown type). However, you must specify the mappings separately when you configure the scan. For more information, see the FireEye File Protect User Guide.
Example repository names:
Good_repo_2,White_repo_3, andUnknown_repo_4.
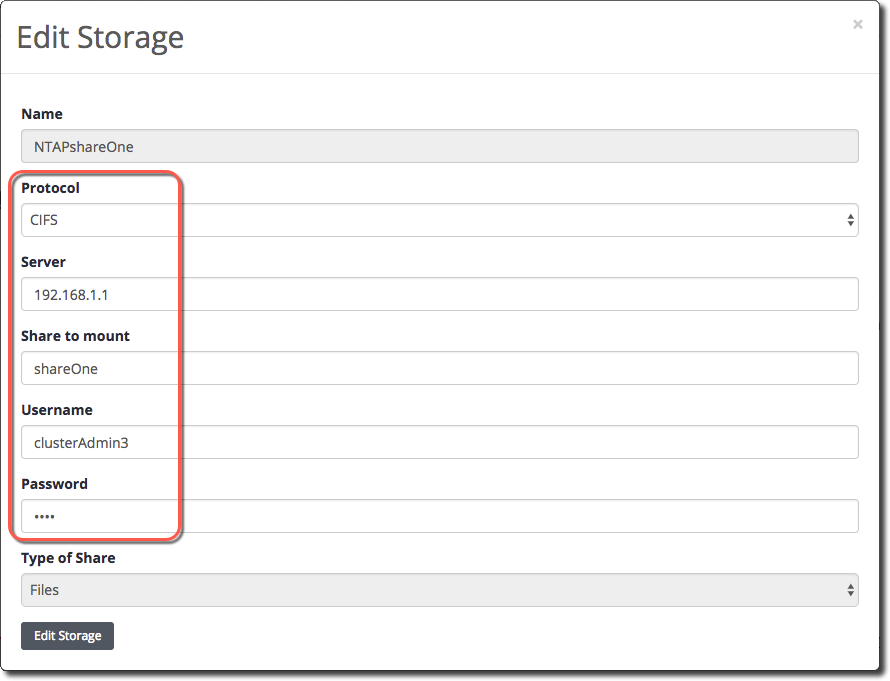
Editing Storage for a NetApp Share Using the Web UI
Follow these steps to edit storage for a NetApp share.
You can edit the following attributes of the share:
The protocol use to access the NetApp share (CIFS or NFS).
The name or IP address of the NetApp Vserver
A network share name or full export path
A username to access the NetApp API (required for CIFS shares only)
A password to access the NetApp API (required for CIFS shares only)
You cannot edit the share type or the user-friendly name for the storage.
Use the network Network Storage panel to edit the attributes:
Prerequisites
Admin or Operator access to the File Protect appliance CLI.
To edit a network Files share for a NetApp share:
Log in to the File Protect appliance Web UI.
Select Storage > Network.
Locate the mount point you want to edit.
Click the pencil and paper icon (
 ) in the Action column.
Release 9.0
Mounting Storage for a NetApp Share
5. Edit the attributes that need to be changed:
Protocol
Source share protocol.
Example: nfs
Server
URL or name of the Vserver that hosts the source share.
Example: 192.168.7.7
Share to mount
Network share name or full export path.
Example: shareSeven
Username
(CIFS shares only) A user with access to the NetApp API.
Example: Domain/cifsUser
Password
(CIFS shares only) The password used to authenticate the NetApp API user.
6. Click Configure Storage.
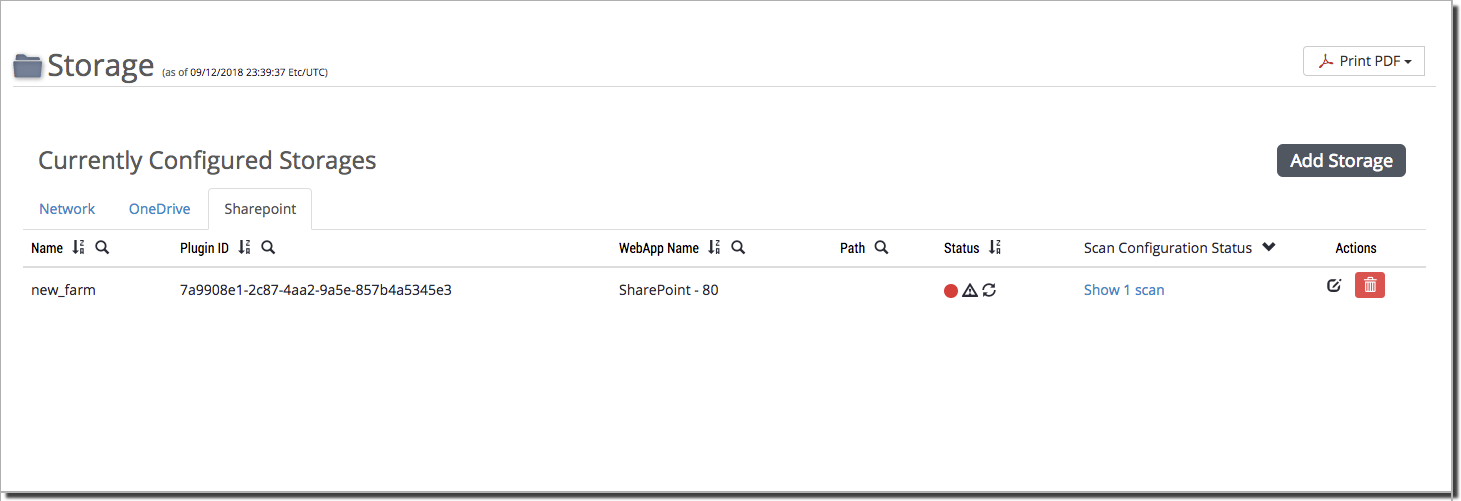
Deleting Storage for a NetApp Share Using the Web UI
Follow these steps to delete storage for a NetApp share.
Use the network Network Storage panel to delete storage:
Prerequisites
Admin or Operator access to the File Protect appliance CLI.
To delete a network Files share for a NetApp share:
Log in to the File Protect appliance Web UI.
Click the pencil and paper icon (
 ) in the Action column.
Select Storage > Network.
Locate the mount point you want to edit.
Click the red trash can icon (
 ) in the Action column, then click OK.
Mounting Storage for a NetApp Share Using the CLI
This procedures describes how to create, configure, and mount a Files share on the sasa
In the example used in this task, you create, configure, and mount a Files share named NTAPshareOne for a CIFS share that resides on the NetApp Vshare at IP address 192.168.1.1. The path from the volume root to the file share is dir1/dir2.
NOTE: In addition to defining a Files share, FireEye recommends that you define a Quarantine share and one to three Good/Whitelisted/Unknown Files shares for scan results. For more information, see the FireEye File Protect User Guide.
Prerequisites
The name or IP address of the NetApp Vserver.
The path from the volume root to the share to be protected.
The file access protocol (CIFS, NFSv4, or NFSv3) used to mount the share.
(CIFS file share only) Credentials needed to access the NetApp API.
Admin or Operator access to the File Protect appliance CLI.
Log in to the File Protect appliance CLI.
Go to configuration mode.
hostname > enable
hostname # configure terminalFor a CIFS share, use the following commands:
fmps share create source <FXshareName>
fmps share configure <FXshareName> server <server> [path <volsharePath>]
fmps share configure <FXshareName> protocol cifs
fmps share configure <FXshareName> auth user <username>
fmps share configure <FXshareName> auth password <password>
fmps share mount <FXshareName>For an NFS share, use the following commands:
fmps share create source <FXshareName>
fmps share configure <FXshareName> server <server> [path <volsharePath>]
fmps share configure <FXshareName> protocol nfs
fmps share mount <FXshareName>For command sequences, the variables are as follows:
<FXshareName>—The unique name you specify to identify the Files share you create. The name can contain letters, numbers, hyphens ( - ), underscores ( _ ), and periods ( . ).<server>—The host name or IP address of the Vserver that hosts the NetApp share. If the share path includes a subdirectory, include the path<volSharePath>option.
The following example creates, configures, and mounts the CIFS share NTAPshareOne. The file share you want to scan resides on the NetApp storage device at IP address 192.168.1.1, and the complete path to the file share is dir1/dir2.
hostname (config) # fmps share create source NTAPshareOne
hostname (config) # fmps share configure NTAPshareOne server 192.168.1.1 path dir1/dir2
hostname (config) # fmps share configure NTAPshareOne protocol cifs
hostname (config) # fmps share configure NTAPshareOne auth user cifsUser
hostname (config) # fmps share configure NTAPshareOne auth password ••••••••
hostname (config) # fmps share mount NTAPshareOneshow fmps share <FXshareName>The following example shows the configuration and status of NTAPshareOne, the Files share created and mounted on the File Protect appliance for the protected NetApp share:
hostname (config) # show fmps share NTAPshareOne
Share Name: NTAPshareOne
Share Type: Source
Status: Share is mounted
Share URL: //192.168.1.1/dir1/dir2
Protocol: cifs
Share user: Domain\cifsUser
Mount command prefix: --no-mtab -t cifs -o sec=ntlmsspi
CA file: -
Server name: -To determine whether the Files share on the File Protect appliance is mounted on the File Protect appliance, note the value displayed in the
"Status:"line.Share is mounted
The
"Status:"line should display"Share is mounted,"meaning that the share is mounted on the File Protect appliance, but the NetApp Vserver is not connected. Go to step 6, Save your changes. on the facing page.Share is not mounted
If the
"Status:"line displays"Share is not mounted,"the share is not mounted on the File Protect appliance. Before you continue, go back to step 3, Mount a share for the NetApp share you want to scan. on the previous page. Make sure that thefmps share configure <FXshareName>commands configure the proper values for these attributes:Name or IP address of the Vserver that hosts the protected NetApp share.
(If present) Directory in the path from the root of the volume to the share.
File access protocol.
(If CIFS) NetApp API credentials.
(Recommended) To configure the scan to automatically move malicious files to a designated share, add storage for that purpose. Use the following CLI configuration command, where <targetShareType> is quarantine:
fmps scan configure <scanID> target-shares <targetShareType> <quarantineName>The
<quarantineName>parameter is the name of a target share already configured.For more information, see the FireEye File Protect User Guide.

IMPORTANT! FireEye recommends against configuring scans that specify local_QF as the quarantine share, because malicious files will not be isolated from the source files.
Example repository name: qshr
Release 9.0Mounting Storage for a NetApp Share
(Recommended) To configure the scan to automatically move non-malicious, whitelisted, and skipped files to designated shares, add storage for those purposes. Use the following CLI configuration command, where <targetShareType> is good, whitelisted, or unknown:
fmps scan configure scanID target-shares <targetShareType> <repositoryName>The <repositoryName> parameter is the name of a target share already configured.
A single Good/Whitelist/Unknown Files share can serve as the repository for multiple types of scan result moves (non-malicious files, whitelisted files, or files of an unknown type). However, you must specify the mappings separately when you configure the scan. For more information, see the FireEye File Protect User Guide.
Example repository names: Good_repo_2, white_repo_3, and Unknown_repo_4.
Save your changes.
hostname (config) # write memoryGo to Mapping Storage to a NetApp Share Using the CLI on the next page.
Mapping Storage to a NetApp Share Using the CLI
This procedure describes how to associate a Files share you already mounted on the File Protect appliance with the NetApp share that is to be protected by the appliance. This operation can be performed at the File Protect appliance CLI only.
Prerequisites
You have the text string that describes the location of the protected NetApp share. Obtain the string as described in Determining the Location of a NetApp Share Using Data ONTAP.
You have the name of the File Protect appliance Files share defined for the protected NetApp share, as described in Mounting Storage for a NetApp Share.
Admin or Operator access to the File Protect appliance CLI.
To map an File Protect appliance Files share to the protected NetApp share:
Log in to the File Protect appliance CLI.
Go to configuration mode.
hostname > enable hostname # configure terminalMap the Files share on the File Protect appliance to the corresponding NetApp share to be protected by the appliance. Use the following command, specifying the share location values derived in Determining the Location of a NetApp Share Using Data ONTAP.
fmps share configure <FXshareName> server-name "<vserverID>/<volumeID>"
The command parameters are as follows:
<FXshareName>— Name of the Files share you defined on the File Protect appliance, as described in Mounting Storage for a NetApp Share.For the
<vserverID>/<volumeID>parameter in double quotes, use the NetApp share location you derived in Determining the Location of a NetApp Share Using Data ONTAP.
The following example maps the Files share name NTAPshareOne to the NetApp share shareOne.
hostname (config) # fmps share configure NTAPshareOne server-name "c8d8d6e9-5ba6-11e4-87ab-123478563412/2147484692"4. Verify the mapping of the Files share definition <FXshareName> to the protected NetApp share. Use the following command:
fmps share configure <shareName> server-name <vserveruuid>/<volumeid>The following example verifies the mapping of the File Protect appliance Files share NTAPshareOne:
hostname (config) # show fmps share NTAPshareOne
Share Name: NTAPshareOne
Share Type: Source
Status: Share is mounted
Share URL: //192.168.1.1/dir1/dir2
Protocol: cifs
Share user: Domain/cifsUser
Mount command prefix: --no-mtab -t cifs -o sec=ntlm
CA file: -
Server name: c8d8d6e9-5ba6-11e4-87ab-123478563412/21474846925. To determine whether the Files share on the File Protect appliance is mapped to the protected NetApp share, note the values displayed in the "Share user:" and "Server name:" lines.
If the mapping succeeded, you will see the following changes in the command output:
The "Share user:" line now displays the Vserver name (in addition to the NetApp API login name).
The "Server name:" line now displays the NetApp file share location in the following form: <vserverID>/<volumeID>.
If the "Server Name" line still displays a dash (–), the mapping does not exist.
To resolve the share-mapping issue, go back to step 3. Make sure that the fmps share configure <FXshareName> server-name command specifies the proper share location values derived in Determining the Location of a NetApp Share Using Data ONTAP.
6. Save your changes.
hostname (config) # write memoryThe File Protect appliance can now access the protected NetApp share through the Files share definition.
7. Go to Configuring File Event Notifications.
Configuring File Event Notifications
This section covers the following information:
Task List for Configuring File Event Notifications
Perform the following tasks to configure storage access for NetApp listen scans:
Configure NetApp FPolicy, which Data ONTAP uses to transmit file event notifications from a Vserver in the cluster.
Verify that an File Protect appliance Files share is mounted and is connected to the Vserver that hosts the protected NetApp share.
IMPORTANT! Here is some general text for a note. Replace this with your own content. This icon is for important information.

Configuring NetApp FPolicy Using the NetApp Filer CLI
This procedure describes how to use NetApp Filer CLI commands to configure NetApp FPolicy to transmit notifications (names of files that need to be scanned) from a Vserver in the cluster to the File Protect appliance.
The example configuration in this procedure is based on the example values shown in Attributes of the Example NetApp FPolicy
The following FPolicy components are configured:
FPolicy external engine—A process that runs on the File Protect appliance and processes and acts upon notifications sent by Data ONTAP FPolicy over a TCP or SSL control channel.
FPolicy event—A configuration element that specifies a Vserver be monitored for a file access protocol, a list of file types, and a list of file operations that can trigger notifications.
FPolicy policy—A logical structure that contains one or more FPolicy events and associates the events with a scope.
FPolicy policy scope—Specifies a volume or share in the Vserver. Events contained in the policy are applied within that scope.
When an FPolicy policy is enabled, the FPolicy external engine monitors file operations on the Vserver and processes notifications.
Prerequisites
A Files share has been created and mounted on the File Protect appliance and mapped to the source share. See Configuring Storage Access.
Vserver administrator access to the clustered Data ONTAP cluster CLI at the admin privilege level.
Restrictions
CIFS shares
File Protect appliances support write operations for which the client requested close with modifications. Use the following event configuration command:
fpolicy policy event create -vserver <VserverName> -event-name <eventName>
-volume-operation {true | false} -protocol cifs -file-operations write
-filters close-with-modificationNFSv3 and NFSv4 shares
File Protect appliances support write operations. Use the following event configuration command:
fpolicy policy event create -vserver <VserverName> -event-name <eventName>
-volume-operation {true | false} -protocol {nfsv3 | nfsv4}
-file-operations writeList of NetApp Filer CLI Commands
The example Fpolicy configuration in this topic uses the following NetApp Filer CLI commands for Data ONTAP 9.0 or newer:
Creates FPolicy external engine FXextEngine_1 on VserverOne
fpolicy policy external-engine create -vserver VserverOne
-engine-name FXextEngine_1 -primary-servers 192.168.1.1 -port 5563
-extern-engine-type asynchronous -ssl-option server-sideCreates FPolicy event FXwriteOnCloseEvent on VserverOne
fpolicy policy event create -vserver VserverOne
-event-name FXwriteOnCloseEvent -volume-operation false -protocol cifs
-file-operations close -filters close-with-modificationDisplays information about all FPolicy events belonging to VserverOne
fpolicy policy event show -vserver VserverOne
-event-name FXwriteOnCloseEventCreates FPolicy FXwrtClosePolicyFXwrtClosePolicy on VserverOne
fpolicy policy create -vserver VserverOne -policy-name FXwrtClosePolicy
-events FXwriteOnCloseEvent -engine FXextEngine_1 -is-mandatory true
-allow-privileged-access noCreates an FPolicy scope for FPolicy policy FXwrtClosePolicy
fpolicy policy scope create -vserver VserverOne
-policy-name FXwrtClosePolicy -volumes-to-include volumeOneEnables FPolicy policies for vserverOne and sets their sequence (priority)
fpolicy enable -vserver vserverone -policy-name FXwrtClosePolicy
-sequence-number 1Displays status information for the FPolicy external engine attached to node clus9-01
fpolicy show-engine -node clus9-01 -vserver vserverone
-policy-name FXpolicyCloseStep-by-Step Procedure
The following procedure provides only general guidelines for configuring FPolicy. For more information, see the NetApp documentation for FPolicy.
To configure FPolicy to notify the File Protect appliance of specific file operations:
Log in to the clustered Data ONTAP cluster CLI as a Vserver administrator at the admin privilege level.
Mount the share on the File Protect appliance.
List the IP addresses on the NetApp storage system.
clus9::> network interface showList the shares and their access protocols on the NetApp storage system.
clus9::> share showVerify that the storage system can reach the File Protect appliance.
clus9::> network ping -node <nodeName> -destination 192.168.1.1
Configure an FPolicy external engine on the File Protect appliance.
The engine runs on the File Protect appliance, where it processes and acts upon notifications sent by Data ONTAP FPolicy running on a Vserver. Use the following command, where <extEngPort> is 5562 for TCP or 5563 for SSL. If the Vserver communicates with the FPolicy external server over SSL, specify that only the FPolicy server is authenticated (--ssl-option server-auth).
fpolicy policy external-engine create -vserver <vserverName> -engine-name <extEngName> -primary-servers <extEngIPaddr> -port <extEngPort> -extern-engine-type asynchronous -ssl-option {no-auth | server-auth | mutual-auth}
The following example defines the FPolicy external engine FXextEngine_1 for the Vserver vserverOne. The external engine is reached at 192.168.1.1 (the FX appliance IP), port 5563.
clus9::> fpolicy policy external-engine create -vserver vserverone
-engine-name FXextEngine_1 -primary-servers 192.168.1.1 -port 5563
-extern-engine-type asynchronous -ssl-option server-auth4. Configure an FPolicy event.
An event specifies that a Vserver be monitored for specified client access operations on files of a specified type and file access protocol. Use the following forms of the event configuration and event show commands:
fpolicy policy event create -vserver <VserverName>
-event-name <eventName> -protocol {cifs | nfs3 | nfs4}
-file-operations <eventOpsCSV> -filters <eventFiltersCSV>
fpolicy policy event show -vserver <vserverName>
-event-name <eventName>The following example configures and verify the FPolicy event FXwriteOnCloseEvent. The policy specifies Vserver VserverOne and file protocol CIFS. The policy monitors file close operations performed where the file was modified.
clus9::> fpolicy policy event create -vserver VserverOne
-event-name FXwriteOnCloseEvent -volume-operation false -protocol cifs
-file-operations close -filters close-with-modification
clus9::> fpolicy policy event show -vserver VserverOne
-event-name FXwriteOnCloseEvent Vserver: VserverOne
Event: FXwriteOnCloseEvent
Protocol: cifs
File Operations: close
Filters: close-with-modification
Volume operation: false5. Configure an FPolicy policy.
A policy contains a list of events. Use the following command, where <eventNameList> is a list of FPolicy events:
fpolicy policy create -vserver VserverOne -policy-name <policyName>
-events <eventNameList> -engine <extEngName> -is-mandatory true
-allow-privileged-access noThe following example configures the FPolicy policy FXwrtClosePolicy that contains the event FXwriteOnCloseEvent for external engine FXextEngine_1.
clus9::> fpolicy policy create -vserver VserverOne
-policy-name FXwrtClosePolicy -events FXwriteOnCloseEvent
-engine FXextEngine_1 -is-mandatory true -allow-privileged-access no6. (Recommended) Configure a scope for the events in the policy.
A scope specifies the storage objects (volumes, CIFS shares, or NFS exports) on which the events in the policy will be active. To associate a scope with storage objects, use the following command:
fpolicy policy scope create -vserver <vserverName>
-policy-name <policyName>
{-volumes-to-include <volList>| -shares-to-include <shareList>}To specify a list of volumes, use this parameter: -volumes-to-include <volList>
To specify a list of shares, use this parameter: -shares-to-include <shareList>
The following example specifies that the events contained in policy VXwrtClosePolicy act on the volume volumeOne:
clus9::> fpolicy policy scope create -vserver VserverOne
-policy-name FXwrtClosePolicy -volumes-to-include volumeOne7. Enable the policy by using the following command:
fpolicy enable -vserver <vserverName> -policy-name <policyName>
-sequence-number <seqNumber>The following example enables the FPolicy policy FXwrtClosePolicy.
clus9::> fpolicy enable -vserver VserverOne
-policy-name FXwrtClosePolicy -sequence-number 18. Verify that the NetApp Vserver <vserverName> is connected to the external engine <FXengineName>. Use the following command to display status information about the FPolicy external engine attached to the node <nodeName>:
fpolicy show-engine -node <nodeName> -vserver <VserverName>
-policy-name <FXpolicyName>The following example displays information about the FPolicy FXpolicyClose for Vserver VserverOne. The command output verifies that the policy runs on the FPolicy external engine at 192.168.1.1 and that the external engine is connected and is the primary external engine.
clus9::> fpolicy show-engine -node clus9-01 -vserver vserverOne -policy-
name FXpolicyCloseVserver | Policy Name | Node | FPolicy Server | Server Status | Server Type |
|---|---|---|---|---|---|
VserverOne | FXpolicyClose | clus9-01 | 192.168.1.1 | connected | primary |
9. Go to Verifying the API Connection Using the CLI.
Verifying the API Connection Using the CLI
This procedure describes how to verify that an File Protect appliance Files share is mounted and is connected to the Vserver that hosts the protected NetApp share.
In the example used in this procedure, the File Protect appliance is to protect a CIFS share that resides on the NetApp file server IP address 192.168.1.1. The NetApp share is in the dir1/dir2 directory under the root of the volume. On the File Protect appliance, the Files share named NTAPshareOne is mounted.
Prerequisites
The Vserver volume that contains the NetApp share is mounted using CIFS or NFS.
You have the IP address of the NetApp file server.
You have the path from the volume root to the share.
(CIFS file share only) You have credentials needed to access the NetApp API.
Admin or Operator access to the File Protect appliance CLI.
To verify that the Files share is mounted and the protected NetApp share is connected:
Log in to the File Protect appliance CLI.
Go to enable mode.
hostname > enable
© 2020 FireEye 47
3. View the configuration and status of the Files share. Use the following command, where <FXshareName> is the name of the Files share:
show fmps share <FXshareName>The following example shows the configuration and status of NTAPshareOne, the Files share created and mounted on the File Protect appliance for the protected NetApp share:
hostname (config) # show fmps share NTAPshareOne
Share Name: NTAPshareOne
Share Type: Source
Status: Share is mounted and connected
Share URL: //192.168.1.1/dir1/dir2
Protocol: cifs
Share user: Domain/cifsUser
Mount command prefix: --no-mtab -t cifs -o sec=ntlm
CA file: -
Server name: c8d8d6e9-5ba6-11e4-87ab-123478563412/2147484692
The status is shown as "Share is mounted and connected" only when the
fpolicy show engine connectionis established in the NetApp server.

4. To determine whether the Files share on the File Protect appliance is connected to the protected NetApp share, note the value displayed in the "Status:" line.
Share is mounted and connected
The "Status:" line should display "Share is mounted and connected," meaning that the share is connected to vserverone, the NetApp Vserver that hosts the protected NetApp share.
Go to Configuring Listen Scans .
Share is mounted
If the "Status:" line displays "Share is mounted," the share is not connected to the NetApp Vserver that hosts the protected NetApp share.
To resolve the NetApp API connectivity issue:
Make sure the File Protect appliance is enabled for NetApp API mode.
If the appliance is configured to receive NetApp file event notifications over SSL, make sure that the appliance server certificate is uploaded to the NetApp VServer (vserverone) that hosts the protected share. See Configuring SSL for NetApp Using the CLI.
Make sure the Files share named NTAPshareOne is configured with the correct Vserver name or IP address, name of the NetApp share, and NetApp API credentials.
File Protect NetApp API Integration Guide
Task List for Creating a NetApp Listen Scan Configuration
Configuring Listen Scans
This section describes how to configure the File Protect appliance to initiate a scan and analysis cycle on a NetApp file share when it receives a file event notification from the NetApp storage system.
Task List for Creating a NetApp Listen Scan Configuration
The following steps summarize the tasks you perform to create a NetApp listen scan.
(Recommended) Configure a quarantine repository that can be specified in a NetApp listen scan configuration. The repository can be a network share mounted on the File Protect appliance, or it can be a
local_QFfolder that the appliance creates in the source file share the first time the scan encounters a malicious file.NOTE: FireEye recommends against using
local_QFas a quarantine repository, because malicious files will not be isolated from the source files.Create a listen scan configuration for a NetApp share. You must use the CLI to configure a NetApp listen scan:
About NetApp Listen Scan Configurations
The following topics describe the information specified in a NetApp listen scan configuration:
File Types That Can be Specified in a Listen Scan on the facing page
NetApp Listen Scan Configuration Settings
The minimum configuration for a NetApp listen scan specifies an File Protect Files share that contains NetApp-managed files or subdirectories you want to protect from malware. The share specifies the Vserver that hosts the NetApp share to be protected, the path from the volume root to the share, and the file access protocol.

A listen scan will only scan files that NetApp sends fpolicy notifications for.
The following table lists required and optional NetApp listen scan settings:
NetApp Listen Scan Settings | Details |
|---|---|
Required | |
File Protect Files share that FPolicy associates with an access protocol and a NetApp share | |
CLI | Default: None |
Optional | |
User-friendly name for the scan configuration | |
CLI | Default: None |
A single folder to scan | |
CLI | Default: None |
NetApp Listen Scan Settings | Details |
|---|---|
File types to scan | |
CLI | Default: None All file types are scanned. |
File types to whitelist | |
CLI | Default: None No file types are skipped. |
Recommended | |
Scan results folders | |
CLI | Default: None Malicious, unknown, good, and whitelisted files are not moved. |
File Types That Can be Specified in a Listen Scan
A listen scan can be configured to scan files of specified types and to skip (whitelist) files of specified types.
The following filename extensions are supported:
3gp chm gif jtd pdf tnef 7zip cmd gz lnk pkg txt ace com hlp lzh png vbs apk csv hml mach-o ppt vcf app dll hta mht pptx vcs arj dmg htm midi qt wav asf doc hwp mov rar wsf avi docx hwt mp3 rm xls bat elf ico mp4 rmi xlsx bz2 eml jar mpg rtf xml cab exe jpg mpkg swf xps cdf flv js msi tiff zip
Configuring a Quarantine Repository
Changed files are scanned and analyzed in the MVX analysis engine, where they are categorized as good or malicious. Malicious files are moved to a quarantine repository, if one is specified in the listen scan configuration.
Mounting a Quarantine Network Share Using the Web UI on the facing page
About Quarantine Repositories
FireEye recommends that any malicious files found by a listen scan be moved to a quarantine repository.
A CIFS or NFS Network Share
When you configure a NetApp listen scan, you can select a CIFS or NFS network share you previously added and mounted on the File Protect appliance. The repository can reside on any storage device, provided that the appliance has read-write access to the document library. Create and mount network shares using the File Protect appliance Web UI or CLI.
A local_QF Folder on a SharePoint Document Library
When you configure a NetApp listen scan, you can select select local_QF. The first time the scan encounters a malicious file, the appliance creates a named local_QF in the source file share. All malicious files discovered by the scan will be moved to that folder.
IMPORTANT! FireEye recommends against using local_QF as a quarantine repository, because malicious files will not be isolated from the source files.

Placeholder Files
When a listen scan operation moves a malicious NetApp-managed file to quarantine, it also replaces the malicious file with a placeholder file. The existence of a placeholder file indicates that the original file was quarantined. By default, quarantine placeholder files are empty files with a filename of the following format, where <originalFileName> is the name of the quarantined file:
<originalFileName>.fe-quarantinedMounting a Quarantine Network Share Using the Web UI
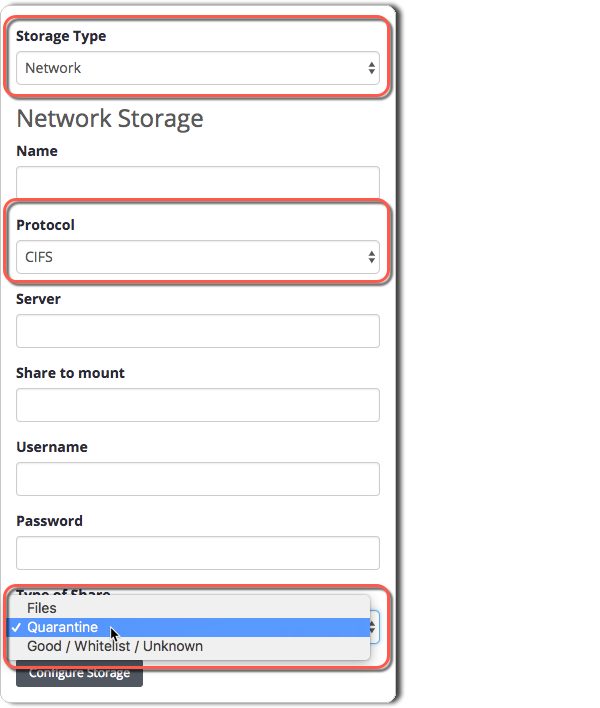
Follow these steps to create and mount a CIFS or NFS network share to be used to store quarantine malicious files found by NetApp listen scans.
To create and mount the share, use the Network Storage panel.
Prerequisites
The File Protect appliance is configured to communicate with the NetApp share, as described in Configuring Communication.
Admin or Operator access to the File Protect appliance.
To create and mount a CIFS or NFS network share as a quarantine repository:
Log in to the File Protect appliance Web UI.
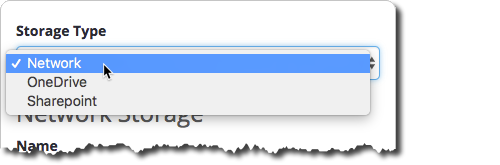
Select Storage > Network.
Select Network in the Storage Type field.
© 2020 FireEye
4. Complete the other required fields in the panel:
Name
Enter a unique name to identify the network quarantine. The name can contain letters, numbers, hyphens (-), underscores (_), and periods (.).
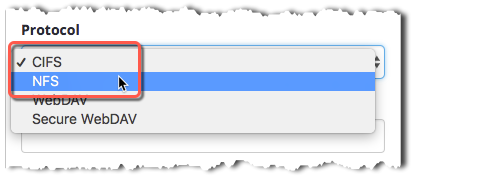
Protocol
Select CIFS or NFS.
Server
Enter the URL or name of the file server that hosts the network share.
Share to Mount
Enter the network share name or full export path.
Username
(If CIFS protocol) Enter a username with access to the remote file system.
Password
(If CIFS protocol) Enter the password used to authenticate the user.
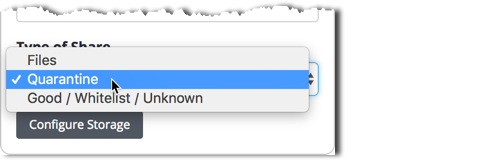
Type of Share
Select Quarantine.
5. Click Configure Storage.
Creating and Managing Listen Scan Configurations Using the CLI
You can create and manage NetApp listen scan configurations using the CLI:
Creating a Listen Scan Configuration Using the CLI
Follow these steps to create a NetApp listen scan using the File Protect CLI.
The example configuration in this procedure is based on the example values shown in Attributes of the Example NetApp Share.
The procedure uses the following CLI commands:
show fmps share <FXshareName>
fmps scan create from share <FXshareName>
show fmps scan-ID <scanID>
fmps scan configure <scanID> scan-name <scanName>
fmps scan configure <scanID> target-share quarantine {<qShare>|local_QF}
fmps scan configure <scanID> target-share unknown <repUnknown>
fmps scan configure <scanID> target-share good <repGood>
fmps scan configure <scanID> target-share whitelisted <repWhitelisted>
fmps scan configure <scanID> subdirectories <subDirName>
fmps scan configure <scanID> filetypes select <extensionList>
fmps scan configure <scanID> filetypes whitelist <extensionList>The show fmps scan-ID <scanID> command output includes the state of the listen scan:
configured
running
paused
aborting
aborted
The five fmps scan configure <scanID> commands can be applied to NetApp listen scans that are in the configured state only.
Prerequisites
NetApp FPolicy is configured to send file event notifications to the File Protect appliance, as described in Configuring NetApp FPolicy Using the NetApp Filer CLI.
Admin or Operator access to the File Protect appliance.
To create a listen scan configuration for a NetApp file share:
Log in to the File Protect appliance CLI.
Go to configuration mode.
hostname > enable hostname # configure terminalView the configuration and status of the Files share. Use the following command:
show fmps share <FXshareName>The following example shows the configuration and status of NTAPshareOne, the Files share created and mounted on the File Protect appliance for the protected NetApp share:
hostname (config) # show fmps share NTAPshareOne Share Name: NTAPshareOne Share Type: Source Status: Share is mounted Share URL: //192.168.1.1/dir1/dir2 Protocol: cifs Share user: Domain/cifsUser Mount command prefix: --no-mtab -t cifs -o sec=ntlmsspi CA file: - Server name: -Create a new scan for the NetApp file share and obtain the scan ID. Use the following command, where <FXshareName> is the Files share you created for the NetApp share you want to scan:
fmps scan create from share <FXshareName>For the <FXshareName> value, use the name you specified for the Files share you created, configured, and mounted in Mounting Storage for a NetApp Share.
The following example command creates a scan for the file share named NTAPshareOne and assigns the scan a system-internal scan ID of 85:
hostname (config) # fmps scan create from share NTAPshareOne Scan 85 configured
5. View the minimum configuration of the new listen scan.
Use the following command, where <scanID> is the scan identifier assigned by the fmps scan create from share command:
show fmps scan-ID <scanID>The following example shows details about scan 85:
hostname (config) # show fmps scan-id 85
Scan ID: 85 (State: Configured Description: Scan configured)
Scan type: -
Scan name: -
Share name: NTAPshareOne
Share URL: -
Filetype whitelist: -
Selected filetypes: -
Quarantine repository name: -
Good repository name: -
Unknown repository name: -
Whitelisted repository name: -
Only files modified: -
Advanced:
Timestamp type: change
Rescan: false6. (Optional) Assign a user-friendly name to the scan. Use the following command, where <scanID> is the scan identifier returned in the previous step, and <scanName> is the name an easily identifiable name for the scan in the Scans tab. The name does not have to be unique.
fmps scan configure <scanID> scan-name <scanName>The following example applies the descriptive name NTAP_test_scan.
hostname (config) # fmps scan configure 85 scan-name NTAP_test_scan7. (Recommended) Specify a quarantine repository.
Use the following command, where <scanID> is the scan identifier assigned by the fmps scan create from sharepoint command:
fmps scan configure <scanID> target-share quarantine {<qShare>|local_QF}The quarantine repository can be a CIFS or NFS network share designated as a quarantine repository, or it can be a directory local to the NetApp source file share:
<qShare>
Specifies the name of the CIFS or NFS network share you designated as a quarantine share. See Mounting a Quarantine Network Share Using the Web UI.
local_QF
Specifies a quarantine repository local to the NetApp client.

NOTE: FireEye recommends against using local_QF as a quarantine repository, because malicious files will not be isolated from the source files.
The following example specifies that malicious files found by a listen scan be moved to the Quarantine share qshr:
hostname (config) # fmps scan configure 85 target-share quarantine qshr8. (Optional) Configure the listen scan to include files of specified types.
Use the following command, where <scanID> is the scan identifier assigned by the fmps scan create from sharepoint command:
fmps scan configure <scanID> filetypes select <extensionList>The <extensionList> parameter specifies the filename extensions of files to be scanned. If you specify multiple filename extensions, separate them with a space character. For a list of supported filename extensions, see File Types That Can be Specified in a Listen Scan.
The following example configures the scan files with the filename extension com, dll, exe, and pdf.
hostname (config) # fmps scan configure 85 filetypes select com dll exe pdf9. (Optional) Configure the listen scan to skip files of specified file types and move those "whitelisted" files to a repository you have already configured.
Use the following command, where <scanID> is the scan identifier assigned by the fmps scan create from sharepoint command:
fmps scan configure <scanID> filetypes whitelist <extensionList>The <extensionList> parameter specifies the filename extensions of files to be whitelisted. If you specify multiple filename extensions, separate them with a space character. For a list of supported filename extensions, see File Types That Can be Specified in a Listen Scan.
The following example configures the scan to skip files with the filename extension hlp.
hostname (config) # fmps scan configure 85 filetypes whitelist hlp10. (Optional) Limit the listen scan to the files in a specified directory.
Use the following command, where <scanID> is the scan identifier assigned by the fmps scan create from share command:
fmps scan configure <scanID> subdirectories <subDirName>The <subDirName> parameter specifies subdirectory on the storage.
The following example limits the listen scan to files in the /bin folder.
hostname config # fmps scan configure 85 subdirectories /bin11. Verify the newly created scan. Use the following command, where <scanID> is the ID of the scan you created for the NetApp file share:
show fmps scan-id <scanID>The following example shows details about the scan on share 85:
hostname (config) # show fmps scan-id 85
Scan ID: 85 (State: Configured Description: Scan configured)
Scan type: -
Scan name: NTAP_test_scan
Share name: NTAPshareOne
Share URL: //192.168.1.1/dir1/dir2
Filetype whitelist: - hlp
Selected filetypes: - com dll exe pdf
Quarantine repository name: qshr
Good repository name: Good_repo_2
Unknown repository name: Unknown_repo_4
Whitelisted repository name: White_repo_3
Only files modified: -
Advanced:
Timestamp type: change
Rescan: falseNOTE: If you create a NetApp listen scan using the appliance CLI, the scan type field in the show fmps scan-id <scanID> command output does not display the value “Listen” until the scan is started.
12. Save your changes.
hostname (config) # write memoryEditing a Listen Scan Configuration Using the CLI
Follow these steps to edit a NetApp listen scan using the File Protect CLI.
The example configuration in this procedure is based on the example values shown in Attributes of the Example NetApp Share.
The procedure uses the following CLI commands:
show fmps share <FXshareName>
show fmps scan-ID <scanID>
fmps scan configure <scanID> scan-name <scanName>
fmps scan configure <scanID> target-share quarantine {<qShare>|local_QF}
fmps scan configure <scanID> target-share unknown <repUnknown>
fmps scan configure <scanID> target-share good <repGood>
fmps scan configure <scanID> target-share whitelisted <repWhitelisted>
fmps scan configure <scanID> subdirectories <subDirName>
fmps scan configure <scanID> filetypes select <extensionList>
fmps scan configure <scanID> filetypes whitelist <extensionList>Prerequisites
NetApp FPolicy is configured to send file event notifications to the File Protect appliance, as described in Configuring NetApp FPolicy Using the NetApp Filer CLI.
Admin or Operator access to the File Protect appliance.
To edit a listen scan configuration for a NetApp file share:
Log in to the File Protect appliance CLI.
Go to configuration mode.
hostname > enable hostname # configure terminalView the configuration of the SharePoint listen scan you want to edit.
Use the following command, where <scanID> is the scan identifier assigned by the fmps scan create from share command:
show fmps scan-ID <scanID>The following example shows that scan 85 specifies a minimum configuration:
hostname (config) # show fmps scan-id 85 Scan ID: 85 (State: Configured Description: Scan configured) Scan type: Listen Scan name: - Share name: NTAPshareOne Share URL: - Filetype whitelist: - Selected filetypes: - Quarantine repository name: - Good repository name: - Unknown repository name: - Whitelisted repository name: - Only files modified: - Advanced: Timestamp type: change Rescan: false

NOTE: If you create a NetApp listen scan using the appliance CLI, the Scan type field in the
show fmps scan-id <scanID>command output does not display the value “Listen” until the scan is started.
(Optional) Add or change a user-friendly name to the scan. Use the following command, where <scanID> is the scan identifier returned in the previous step, and <scanName> is the name an easily identifiable name for the scan in the Scans tab. The name does not have to be unique.
fmps scan configure <scanID> scan-name <scanName>The following example applies the descriptive name NTAP_test_scan:
hostname (config) # fmps scan configure 85 scan-name NTAP_test_scan
© 2020 FireEye
5. (Recommended) Specify a quarantine repository.
Use the following command, where <scanID> is the scan identifier assigned by the fmps scan create from sharepoint command:
fmps scan configure <scanID> target-share quarantine {<qShare>|local_QF}The quarantine repository can be a CIFS or NFS network share designated as a quarantine repository, or it can be a directory local to the NetApp source file share:
<qShare>
Specifies the name of the CIFS or NFS network share you designated as a quarantine share.See Mounting a Quarantine Network Share Using the Web UI.
local_QF
Specifies a quarantine repository local to the NetApp client.
NOTE: FireEye recommends against using local_QF as a quarantine repository, because malicious files will not be isolated from the source files.

The following example specifies that malicious files found by a listen scan be moved to the Quarantine share qshr:
hostname (config) # fmps scan configure 85 target-share quarantine qshrfmps scan configure <scanID> target-shares quarantine (<QrepName> | local_QF)
fmps scan configure <scanID> target-shares unknown <UrepName>
fmps scan configure <scanID> target-shares good <GrepName>
fmps scan configure <scanID> target-shares whitelisted <WrepName>The following example configures scan results folder, where qshr is a Quarantine share that was already configured as described in Mapping Storage to a NetApp Share Using the CLI. Three Good/Whitelisted/Unknown Files shares are also already configured: Good_repo_2, White_repo_3, and Unknown_repo_4.
hostname (config) # fmps scan configure 85 target-shares quarantine qshr
hostname (config) # fmps scan configure 85 target-shares good Good_repo_2
hostname (config) # fmps scan configure 85 target-shares whitelisted White_repo_3
hostname (config) # fmps scan configure 85 target-shares unknown Unknown_repo_4In the example, non-malicious files, whitelisted files, and files of unknown file types are moved to separate repositories.
Release 9.0
Creating and Managing Listen Scan Configurations Using the CLI
7. Verify the newly created scan. Use the following command, where <scanID> is the ID of the scan you created for the NetApp file share:
show fmps scan-id <scanID>The following example shows details about the scan on share 85:
hostname (config) # show fmps scan-id 85
Scan ID: 85 (State: Configured Description: Scan configured)
Scan type: Listen
Scan name: NTAP-test-scan
Share name: NTAPshareOne
Share URL: //192.168.1.1/dir1/dir2
Filetype whitelist: - hlp
Selected filetypes: - com dll exe pdf
Quarantine repository name: qshr
Good repository name: Good_repo_2
Unknown repository name: Unknown_repo_4
Whitelisted repository name: White_repo_3
Only files modified: -
Advanced:
Timestamp type: change
Rescan: false8. Save your changes.
hostname (config) # write memoryDeleting a Listen Scan Configuration Using the CLI
Use the following File Protect appliance CLI commands to delete the definition of a listen scan.
If you enter an fmps scan command for a deleted scan, the CLI displays a message that the scan is not found.
Prerequisites
The listen scan you want to delete is currently configured or aborted. You cannot delete a scan that is running, paused, or aborting.
Admin or Operator access to the File Protect appliance.
To delete a listen scan configuration for a NetApp file share:
Log in to the File Protect appliance CLI.
Go to configuration mode.
hostname > enable
hostname # configure terminal3. View the system-assigned identifiers of all scans configured on the appliance:
hostname (config) # fmps scan delete ?
<scan-id>
1
2
3
4
5
6
74. Display information about a scan definition by using the following command:
show fmps scan-ID <scanID>The following example shows details about scan 6:
hostname (config) # show fmps scan-id 6
Scan ID: 85 (State: Configured Description: Scan configured)
Scan type: Listen
Scan name: NTAP_scan
Share name: NTAPshareOne
Share URL: //192.168.1.1/dir1/dir2
Filetype whitelist: - hlp
Selected filetypes: - com dll exe pdf
Quarantine repository name: qshr
Good repository name: Good_repo_2
Unknown repository name: Unknown_repo_4
Whitelisted repository name: White_repo_3
Only files modified: -
Advanced:
Timestamp type: change
Rescan: false5. Delete the scan:
hostname (config) # fmps scan delete 66. Verify that the scan definition has been removed:
hostname (config) # show fmps scan-id 6
Scan ID 6 not found7. Save your changes.
hostname (config) # write memoryStarting a NetApp Listen Scan
After you start a NetApp listen scan, the scan runs until it is aborted or paused. While the scan is running, the File Protect appliance can receive file event notifications from the NetApp storage system. The notifications list the changed files that need to be scanned.
You can start a NetApp listen scan using the Web UI or CLI:
Starting a NetApp Listen Scan Using the Web UI
Follow these steps to start a NetApp listen scan from the Scans page in the File Protect appliance Web UI.
The following example shows the following information about scan 26:
The scan is a listen scan.
It is applied to the files in the NetApp share shareOne. To view information about FMPS-1759, select Storage > NetWork.
It is configured to move malicious files to a CIFS or NFS network share named qShr. To view information about qShr, select Storage > Network.
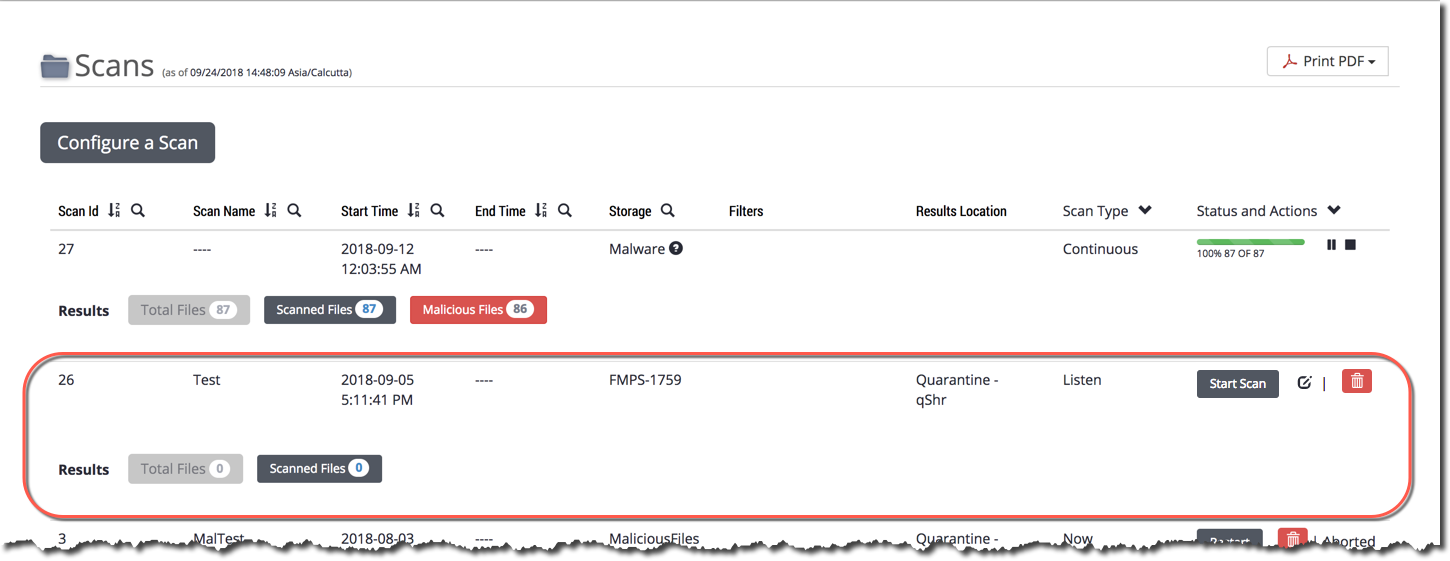
NOTE: Only one scan can be active on a share. If you attempt to start a second scan of any type on a share that has an active scan, the second scan aborts with an error message.

Prerequisites
No other scan is running on the storage protected by the scan you want to run.
Admin or Operator access to the File Protect appliance.
To start a NetApp listen scan:
Log in to the File Protect appliance Web UI.
Select Storage > Network.
Make sure no other scan is running on the same storage. Filter the Scans list for all scans applied to the same mount point as the listen scan you want to run.
Suppose you want to start the example listen scan nicknamed Test (scan ID 26 shown in the example Scans list). You would search the list for scans that contain the text string “FMPS-1759” in the Storage field:

NOTE: If the Status and Actions column shows any scans that are running, paused, aborted, or aborting, wait until no other scans in the filtered list are running.
Select Scans > Configured & Recent Scans.
Click Start Scan to start a configured listen scan.

Click OK.
If you want to pause the scan, click the pause icon (⏸). The scan status changes to Paused, and you can resume the scan later.
If you want to abort the scan, click the stop icon (■). The scan status changes to Aborted, and you can restart the scan later.
Starting a NetApp Listen Scan Using the CLI
Follow these steps to start a listen scan from the File Protect appliance CLI.
Prerequisites
You know the system-assigned ID of the listen scan you want to start. The <scanID> value appears in the output of the following command, where <FXshareName> is the Files share you created for the NetApp share you want to scan.
fmps scan create from share <FXshareName>The listen scan you want to start is in the configured state.
No other scan is active on the NetApp file share that you want scanned.

NOTE: Only one scan can be active for a share. If you attempt to start a second scan of any type on a share that has an active scan, the system aborts the new scan with an error message.
Admin or Operator access to the File Protect appliance CLI.
Perform the following steps to start the listen scan:
Log in to the File Protect appliance CLI.
Go to configuration mode.
hostname > enable hostname # configure terminalMake sure the scan is configured but not active. Run the following command, where <scanID> is the ID of the scan you created for the NetApp file share.
show fmps scan-id <scanID>
The following example shows that scan 85 is a listen scan on NTAPshareOne Files share, and the scan is configured but not active.
hostname (config) # show fmps scan-id 85
Scan ID: 85 (State: Configured Description: Scan configured)
Scan type: Listen
Scan name: NTAP-test-scan
Share name: NTAPshareOne
Share URL: //192.168.1.1/dir1/dir2
Filetype whitelist: hlp
Selected filetypes: com dll exe pdf
Quarantine repository name: qshr
Good repository name: Good_repo_2
Unknown repository name: Unknown_repo_4
Whitelisted repository name: White_repo_3
Only files modified: -
Advanced:
Timestamp type: change
Rescan: falseStart the scan. Use the following command:
fmps scan start <scanID> listenThe following example starts a listen scan on the file share NTAPshareOne.
hostname (config) #fmps scan start 85 listenSave your changes.
hostname (config) # write memoryTo check the status of the scan, run the following command, where <scanID> is the ID of the scan you started:
show fmps scan-id <scanID>
Now that the listen scan has been started, it appears in the Scans > Configured & Recent Scans page of the File Protect Web UI.
NOTE: You can also verify the newly created scan by going to the Scans > Configured & Recent Scans page in the File Protect Web UI.
The following example displays details and results for the scan on share 85:
hostname (config) # show fmps scan-id 85
Scan ID: 85 (State: Completed Description: Scan completed)
Scan type: Listen
Scan name: NTAP-test-scan
Share name: NTAPshareOne
Share URL: //192.168.1.1/dir1/dir2
Filetype whitelist: hlp
Selected filetypes: com dll exe pdf
Quarantine repository name: qShr
Good repository name: Good_repo_2
Unknown repository name: Unknown_repo_4
Whitelisted repository name: White_repo_3
Only files modified: -
Advanced:
Timestamp type: change
Rescan: false
Started at: 2016-01-03 00:40:42
Ended at: 2016-01-03 00:40:42
Duration: 00:00:00
Total number of files in the share: 533 (Scannable 533)
Scanned: 533 (2.0 files/sec => ~173778 files/day)
Analyzed: 2 (~0.4% of the share)
Good: 0 (~0.0% of the share)
Unknown: 526 (~98.7% of the share)
Whitelisted: 5 (~0.9% of the share)
Duplicates: 0 (~0.0% of the share)
Malicious: 2 (~0.4% of the share)
No files analyzed
----------------------------------------------------------------------
Filetypes Statistics
----------------------------------------------------------------------
File
Type Analyzed Malicious Good Seconds per
Analysis Dups Dup
Percent White- White-
listed Listed
Percent
exe 2 2 0 163 1 33.3 0 0.0
zip 0 0 0 0 0 0.0 4 100.0
Viewing Configured and Recent Scans Using the Web UI
Configured and recently run scans are listed in the Scans page. This example list is filtered to show listen scans only, and the first listen scan in the list is aborting.
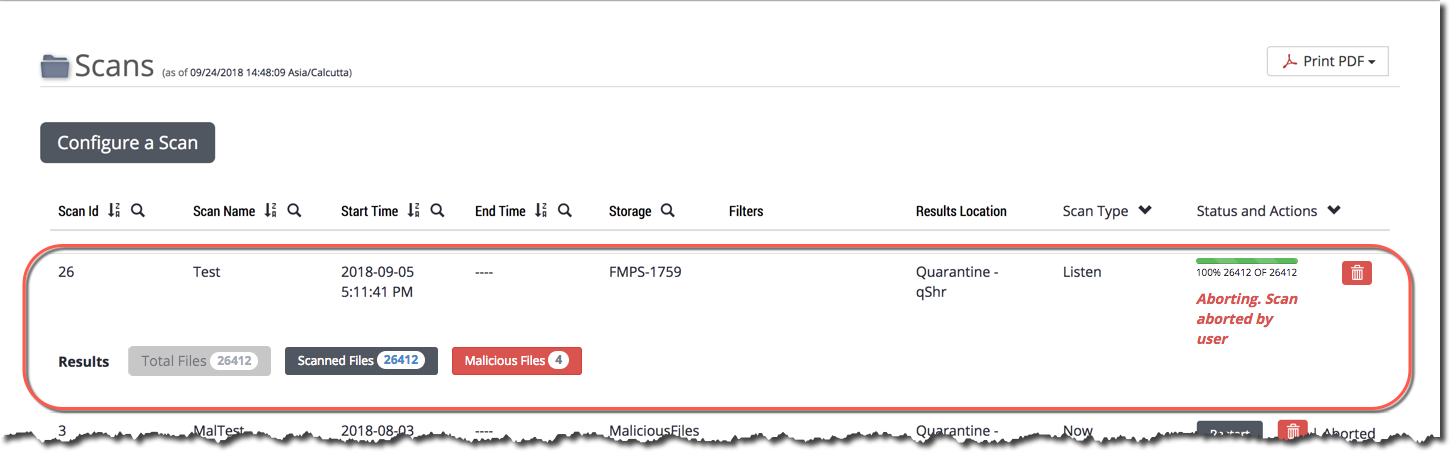
After the first scan stops, the Scan and Status field displays the following:
The Results area below the list shows the following information:

The total number of files scanned since the listen scan started.

The number of files scanned.
Click to view more information about the files scanned by this listen scan. The Scanned File Summary sections provides statistics for scanned files, grouped by file types. The Scanned File Log Details section provides statistics for scanned files, grouped by the following categories: analyzed, unkon, and whitelisted..

The number of malicious files scanned.
Click to pivot to the quarantine list, filtered to show the files this listen scan moved to the quarantine repository (if one was specified when the scan started).
Prerequisites
Admin or Operator access to the File Protect appliance.
To view the list of listen scans:
Log in to the File Protect appliance.
Select Scans > Configured & Recent Scans.
In the Scan Type column, select Listen.
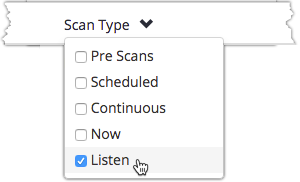
(Optional) To view more detailed infrnatuim click Scanned Files and Malicious Files in the Results section .
Managing Listen Scans Using the Web UI
You can use the Scans page in the File Protect appliance Web UI to manage listen scans:
Aborting a Running Listen Scan Using the Web UI
From the File Protect appliance Web UI, you can abort a running scan by using the abort icon in the Scans tab.
Prerequisites
The listen scan you want to abort is in the running or paused state.
Admin or Operator access to the File Protect appliance.
To abort a running listen scan:
Log in to the File Protect appliance Web UI.
Select Scans > Configured & Recent Scans.
Click the stop icon (■) in the Status and Actions field of the scan you want to abort.
Click OK.
The scan stops running, and the Status column shows that the scan is aborted.
Restarting an Aborted Listen Scan Using the Web UI
From the File Protect appliance Web UI, you can restart an aborted scan by using the restart icon in the Scans tab.
Prerequisites
The listen scan you want to restart is in the aborted state.
Admin or Operator access to the File Protect appliance.
To restart an aborted listen scan:
Log in to the File Protect appliance Web UI.
Select Scans > Configured & Recent Scans.
Click Restart in the Status and Actions field of the listen scan you want to restart.
Click OK.
The scan starts again at the beginning, and the scan status changes to running.
Pausing a Running Listen Scan Using the Web UI
From the File Protect appliance Web UI, you can pause a running scan by using the pause icon in the Scans tab.
Prerequisites
The listen scan you want to pause is in the running state.
Admin or Operator access to the File Protect appliance.
To pause a running listen scan:
Log in to the File Protect appliance Web UI.
Select Scans > Configured & Recent Scans.
Click the pause icon ( || ) in the Status and Actions field of the scan you want to pause.
Click OK to confirm that you want the scan paused.
The scan stops running, and the Status column shows that the scan is paused.
Resuming a Paused Listen Scan Using the Web UI
To use the File Protect appliance Web UI to resume a paused scan, use the resume icon in the Scans > Configured & Recent Scans page.
From the File Protect appliance Web UI, you can resume a paused scan by using the pause icon in the Scans tab.
Prerequisites
The listen scan you want to resume is in the paused state.
Admin or Operator access to the File Protect appliance.
To resume a paused listen scan:
Log in to the File Protect appliance Web UI.
Select Scans > Configured & Recent Scans.
Click Restart in the Status and Actions field of the aborted scan that you want to restart.
Click OK.
The scan resumes running at the point where it was paused, and the scan status changes to running.
Managing Listen Scans Using the CLI
You can use File Protect appliance CLI commands to manage listen scans:
Aborting a Running Listen Scan Using the CLI
Use the following File Protect appliance CLI commands to abort a running listen scan.
Prerequisites
The scan you want to abort is currently running.
Admin or Operator access to the File Protect appliance.
To abort a running listen scan:
Log in to the File Protect appliance CLI.
Go to configuration mode.
hostname > enable hostname # configure terminalView the IDs of the running scans:
hostname (config) # fmps scan abort ? <scan-id> 1 2 3 4Abort the scan. The following example aborts scan 3:
hostname (config) # fmps scan abort 3The specified scan stops running.
Check the scan status. Use the following command:
hostname (config) # show fmps scan-id 3
In the command output, the scan ID: line shows the ID and the status of the scan.
Restarting an Aborted Listen Scan Using the CLI
Use the following File Protect appliance CLI commands to restart an aborted listen scan.
Prerequisites
The scan you want to restart is in the aborted state.
Admin or Operator access to the File Protect appliance.
To restart an aborted listen scan:
Log in to the File Protect appliance CLI.
Go to configuration mode.
hostname > enable hostname # configure terminalView the IDs of the paused scans:
hostname (config) # fmps scan restart ? <scan-id> 1 2 3 4Restart the scan again at the beginning of the scan target. The following example restarts scan 4:
hostname (config) # fmps scan restart 4The scan restarts again at the beginning, and the scan status changes to running.
Check the scan status. Use the following command:
hostname (config) # show fmps scan-id 4In the command output, the scan ID: line shows the ID and the status of the scan.
Pausing a Running Listen Scan Using the CLI
Use the following File Protect appliance CLI commands to pause a running listen scan.
Prerequisites
The scan you want to restart is in the running state.
Admin or Operator access to the File Protect appliance.
To pause a running listen scan:
Log in to the File Protect appliance CLI.
Go to configuration mode.
hostname > enable hostname # configure terminalView the IDs of the running scans:
hostname (config) # fmps scan pause ? <scan-id> 1 2 3 4Pause the scan. The following example pauses scan 2:
hostname (config) # fmps scan pause 2The scan stops running, and the scan status changes to paused.
Check the scan status. Use the following command:
hostname (config) # show fmps scan-id 2In the command output, the scan ID: line shows the ID and the status of the scan. The scan status should be paused.
Resuming a Paused Listen Scan Using the CLI
Use the following File Protect appliance CLI commands to resume a paused listen scan at the point where it was paused.
Prerequisites
The scan you want to resume is in the paused state.
Admin or Operator access to the File Protect appliance.
To resume a paused listen scan:
Log in to the File Protect appliance CLI.
Go to configuration mode.
hostname > enable hostname # configure terminal
View the IDs of the paused scans:
hostname (config) # fmps scan resume ? <scan-id> 1 2 3 4Resume the scan. The following example resumes scan 1:
hostname (config) # fmps scan resume 1The scan resumes running at the point where it was paused, and the scan status changes to running.
Check the scan status. Use the following command:
hostname (config) # show fmps scan-id 1In the command output, the "scan ID: line shows the ID and the status of the scan. The scan status should be running.
Attributes of the Example NetApp Share
The example NetApp share in this guide is a CIFS share named shareOne. The share is located on the dir1/dir2 path on the volume named volumeOne, and the volume is hosted on the Vserver named VserverOne. To configure storage on the File Protect appliance for the NetApp share, you create a Files share named NTAPshareOne.
NetApp Share Attribute | Attribute Variable in the CLI Command Syntax and Attribute Value Used in the Procedure Examples |
|---|---|
Share to Be Protected by the File Protect Appliance | |
Access protocol | Variable in the syntax: {cifs | nfsv3 | nfsv4} |
Share name | Variable in the syntax: <NTAPshareName> |
File Protect | Variable in the syntax: <FXshareName> |
FlexVol Volume That Contains the Share | |
Volume name | Variable in the syntax: <volumeName> |
Volume ID2 | Variable in the syntax: <volumeID> |
Share path from volume root | Variable in the syntax: <volsharePath> |
Virtualized Share Storage That Hosts the Share | |
Virtual server name | Variable in the syntax: <vserverName> |
Virtual server ID2 | Variable in the syntax: <vserverID> |
Virtual server IP address | Variable in the syntax: <vserverIPaddr> |
1 The variable <FXshareName> represents the Files share name (NTAPshareOne in the examples) that corresponds to the protected NetApp share. For details, see Configuring NetApp FPolicy Using the NetApp Filer CLI.
2 The variables <volumeID> and <vserverID> represent the NetApp system identifiers for the FlexVol volume name and Vserver name (volumeOne and VserverOne in the examples) that contain the protected share. For details, see Determining the Location of a NetApp Share Using Data ONTAP.
Attributes of the Example NetApp FPolicy
The following table lists the values of the example FPolicy configuration.
NetApp FPolicy Attribute | Attribute Variable in the Data ONTAP Command Syntax and Attribute Value Used in the Procedure Examples |
|---|---|
FPolicy External Engine on the File Protect Appliance | |
FPolicy external engine name | Variable in the syntax: <extEngName> |
FPolicy external engine IP address | Variable in the syntax: <extEngIPaddr> |
FPolicy external engine port number | Variable in the syntax: <extEngPortNumber> |
FPolicy event specifies the file access protocol and file operations to monitor | |
FPolicy event name | Variable in the syntax: <eventName> |
File access protocol3 to monitor | Variable in the syntax: <eventProtocol> |
List of file operations3 to monitor | Variable in the syntax: <eventOpsList> |
List of filters3 on the operations | Variable in the syntax: <eventFiltersList> |
FPolicy policy to contain the event | |
FPolicy policy name | Variable in the syntax: <policyName> |
Deny monitored events if FPolicy server is down? | Variable in the syntax: -is-mandatory {true|false} |
FPolicy server: Require privileged access to files? | Variable in the syntax: -allow-privileged-access {yes|no} |
3 The file operations supported by the File Protect appliance are based on the file protocol monitored. For details, see Configuring NetApp FPolicy Using the NetApp Filer CLI.