Trellix Intelligent Sandbox 5.0.x Hardware Guide
Last Updated: September 17, 2023

Contents
Setting up the Intelligent Sandbox Appliance ......................................................... 3
Intelligent Sandbox Appliances ............................................................... 3
Functions of a Intelligent Sandbox Appliance ......................................... 3
Before you install the Intelligent Sandbox Appliance ................................ 4
Warnings and cautions ..................................................................... 4
Usage restrictions ......................................................................... 5
Unpack the shipment .................................................................... 5
Check your shipment .................................................................... 6
Hardware specifications .............................................................. 15
Default ports used in Intelligent Sandbox communication ................. 18
Set up the hardware ...................................................................... 20
Install or remove rack handles ..................................................... 20
Rack mount the appliance .......................................................... 21
Turn on the Intelligent Sandbox Appliance ..................................... 23
Handling the front bezel ............................................................. 24
Enable RMM ................................................................................. 25
Connect the management port ..................................................... 25
Configure the Intelligent Sandbox Appliance network information ...... 26
1 | Setting up the Intelligent Sandbox Appliance
Setting up the Intelligent Sandbox Appliance
Prepare the Intelligent Sandbox Appliance for installation and integration in the network.
Intelligent Sandbox Appliances
Depending on the model, the Intelligent Sandbox Appliance is a 1-U or 2-U rack dense chassis with Intel® Xeon® E5-2600, E5-4600 or Xeon Scalable family processor.
The Intelligent Sandbox Appliance runs on a pre-installed, hardened Linux kernel 3.6.0 and comes preloaded with the Intelligent Sandbox software.
The Intelligent Sandbox Appliance is available in the following models:
- ATD-3000 — Standard model is a 1U chassis
- ATD-6000 — High-end model is a 2U chassis
- ATD-3100 — Standard model is a 1U chassis
- ATD-6100 — High-end model is a 1U chassis
- ATD-3200 — Standard model is a 1U chassis
- ATD-6200 — High-end model is a 1U chassis
The Intelligent Sandbox Appliances are purpose-built, scalable, and flexible high-performance servers designed to analyze suspicious files for malware.
The following are the primary functions of the Intelligent Sandbox Appliance:
- Host the Intelligent Sandbox software that analyzes files for malware.
- Host the Intelligent Sandbox web interface.
- Host the virtual machines used for dynamic analysis of suspicious files.
Note
For the performance values related to the appliances, contact Support.

1 | Setting up the Intelligent Sandbox Appliance
-
Host the virtual machines used for dynamic analysis of suspicious files.
Note
For the performance values related to Intelligent Sandbox Appliances, contact Trellix support.
Before you install the Intelligent Sandbox Appliance
This section describes the tasks that you must complete before you begin to install a Intelligent Sandbox.
-
Read all the provided documentation before installation.
-
Make sure that you have selected a suitable location for installing the Intelligent Sandbox Appliance.
-
Check that you have all the necessary equipment and components outlined in this document.
-
Familiarize yourself with the Trellix Intelligent Sandbox Appliance network access card ports and connectors as described in this document.
-
Make sure you have the following information available when you configure the Intelligent Sandbox Appliance:
IPv4 address that you want to assign to the Appliance.
Network mask.
Default gateway address.
Warnings and cautions
Read and follow these safety warnings when you install the Intelligent Sandbox Appliance.
⚠️ Caution
Failure to observe these safety warnings could result in serious physical injury.
Power Supply
-
The push-button on/off power switch on the front panel of the Intelligent Sandbox Appliance does not turn off the AC power. To remove AC power from the Intelligent Sandbox Appliance, you must unplug the AC power cord from either the power supply or wall outlet for both the power supplies.
-
If you press the push-button on/off power switch on the front panel of the Intelligent Sandbox Appliance while the appliance is running, it shuts down. If you want to power off the appliance, use CLI command — shutdown, then after the system halts—press the power button until the appliance turns off.
-
The power supplies in your system might produce high voltages and energy hazards, which can cause bodily harm. Only trained service technicians are authorized to remove the covers and access any of the components inside the system.
-
Hazardous electrical conditions might be present on power, telephone, and communication cables. Turn off the Intelligent Sandbox Appliance and disconnect telecommunications systems, networks, modems, and both the power cords attached to the Intelligent Sandbox Appliance before opening it. Otherwise, personal injury or equipment damage can result.
4 Trellix Intelligent Sandbox 5.0.x Hardware Guide
1 | Setting up the Intelligent Sandbox Appliance
- This equipment is intended to be grounded. Ensure that the host is connected to earth ground during normal use.
- To avoid electric shock, do not connect safety extra-low voltage (SELV) circuits to telephone-network voltage (TNV) circuits. LAN ports contain SELV circuits, and WAN ports contain TNV circuits. Some LAN and WAN ports both use RJ-45 connectors. Use caution when connecting cables.
Avoid Injuries
Lifting the Intelligent Sandbox Appliance and attaching it to the rack is a two-person job.
Appliance outer shell
- Do not remove the outer shell of the Intelligent Sandbox Appliance. Doing so invalidates your warranty.
- Do not operate the system unless all cards, faceplates, front covers, and rear covers are in place. The faceplates and cover panels prevent exposure to hazardous voltages and currents inside the chassis. The components might produce high electromagnetic interference (EMI) that might disrupt other nearby equipment.
- Ensure that the appliance is placed in such a manner that flow of cooling air through the chassis is not blocked.
Usage restrictions
The following restrictions apply to the use and operation of Intelligent Sandbox Appliance:
- You should not remove the outer shell of the Intelligent Sandbox Appliance. Doing so invalidates your warranty.
- The Intelligent Sandbox Appliance is not a general-purpose server.
- Trellix prohibits the use of Intelligent Sandbox Appliance for anything other than operating the Intelligent Sandbox solution.
- Trellix prohibits the modification or installation of any hardware or software on the Intelligent Sandbox Appliance that is not part of the normal operation of Intelligent Sandbox.
Unpack the shipment
- Place the packaging box as close to the installation site as possible.
- Position the box with the text upright and then open the top flaps of the box.
- Remove the content of the box, including the Intelligent Sandbox Appliance.
- Locate the accessory kit bag.
Verify that you have received all the parts as listed in Content Sheet.
- Pull out the packing material surrounding the Intelligent Sandbox Appliance.
- Remove the Intelligent Sandbox Appliance from the anti-static bag.
- Save the box and packing materials for later use in case you need to move or ship the Intelligent Sandbox Appliance.
Trellix Intelligent Sandbox 5.0.x Hardware Guide
1 | Setting up the Intelligent Sandbox Appliance
Check your shipment
Each product ships with all the items needed to install the appliance on a network.
To verify that you received all the necessary items, verify that you have received the following:
- Intelligent Sandbox Appliance
- Accessories itemized on the Content Sheet
- Set of tool-less slide rails
- Front bezel with key
- Country or region specific power cords
Trellix Intelligent Sandbox Appliance front and back panels
ATD-3000 and ATD-6000 front panel
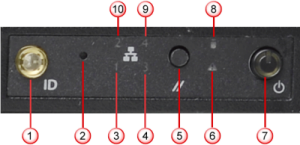
Label | Description |
1 | System ID button with integrated indicator light |
2 | NMI button (recessed, tool required for use) |
3 | NIC 1 activity indicator light |
4 |
|
5 | System cold reset button |
6 | System status indicator light |
1 | Setting up the Intelligent Sandbox Appliance
| Label | Description |
|---|---|
| 7 | Power button with integrated indicator light |
| 8 | Hard drive activity indicator light |
| 9 |
|
| 10 | NIC 2 activity indicator light |
ATD-3000 Appliance back panel

| Label | Description |
|---|---|
| 1 | Power supply module 1 |
| 2 | Power supply module 2 |
| 3 |
Management port (NIC 1). This is the eth-0 interface. The |
| 4 |
NIC 2. This is the eth-1 interface. This interface is disabled by default.
|
Trellix Intelligent Sandbox 5.0.x Hardware Guide7
1 | Setting up the Intelligent Sandbox Appliance
|
Label |
Description |
|---|---|
|
For example,
For example, | |
|
5 |
NIC 3. This is the eth-2 interface. The note described for NIC 2 applies to this interface as well. |
|
6 |
NIC 4. This is the eth-3 interface. The note described for NIC 2 applies to this interface as well. |
|
7 |
Video connector |
|
8 |
RJ45 serial-A port |
|
9 |
USB ports |
|
10 |
RMM4 NIC port |
|
11 |
I/O module ports/connectors (not used) |
|
12 |
Add-in adapter slots from riser card 1 and riser card 2 |
Setting up the Intelligent Sandbox Appliance
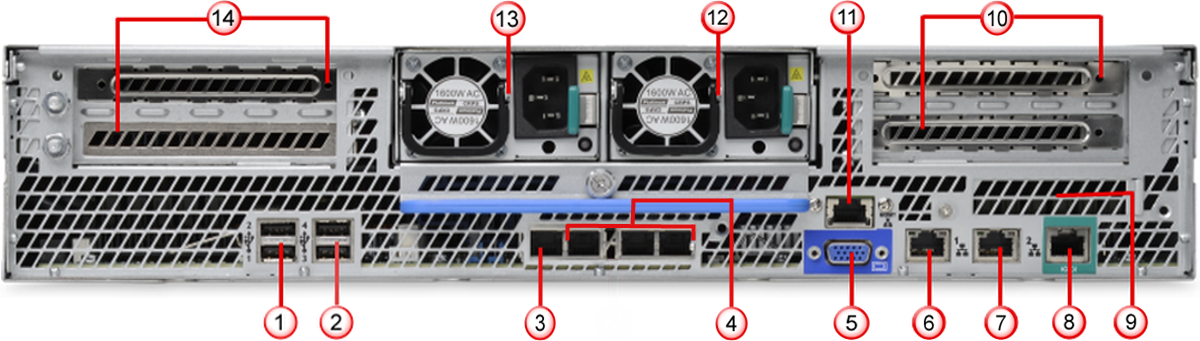
ATD-6000 Appliance back panel
|
Label |
Description |
|---|---|
|
1 |
USB ports |
|
2 |
USB ports |
|
3 |
Management port. This is the eth-0 interface. The |
|
4 |
Additional I/O module ports/connectors. These are the eth-1, eth-2, and eth-3 interfaces respectively. These interfaces are disabled by default.
|
Trellix Intelligent Sandbox 5.0.x Hardware Guide
1 | Setting up the Intelligent Sandbox Appliance
|
Label |
Description |
|---|---|
|
For example, route add network 10.10.10.0 netmask 255.255.255.0 gateway 10.10.10.1 intfport 1. This command routes all traffic from the 10.10.10.0 command to 10.10.10.1 through eth-1. | |
| 5 | Video connector |
| 6 | NIC 1 (currently not used) |
| 7 | NIC 2 (currently not used) |
| 8 | RJ45 serial-A port |
| 9 | I/O module ports/connectors (not used) |
| 10 | Add-in adapter slots from riser card |
| 11 | RMM4 NIC port |
| 12 | Power supply module 2 |
| 13 | Power supply module 1 |
| 14 | Add-in adapter slots from riser card |
1 | Setting up the Intelligent Sandbox Appliance
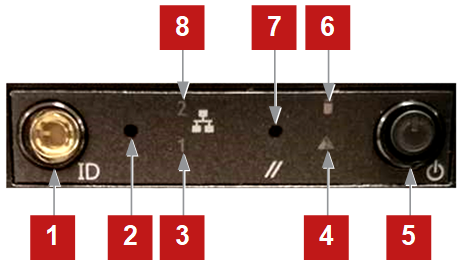
ATD-3100, and ATD-6100 Appliance Front panel
| Label | Description |
|---|---|
| 1 | System ID button with integrated indicator light |
| 2 | NMI button (recessed, tool required for use) |
| 3 | INTF2 activity indicator light |
| 4 | System status indicator light |
| 5 | Power button with integrated indicator light |
| 6 | Hard drive activity indicator light |
| 7 | System cold reset button |
| 8 | INTF3 activity indicator light |
Trellix Intelligent Sandbox 5.0.x Hardware Guide 11
1 | Setting up the Intelligent Sandbox Appliance
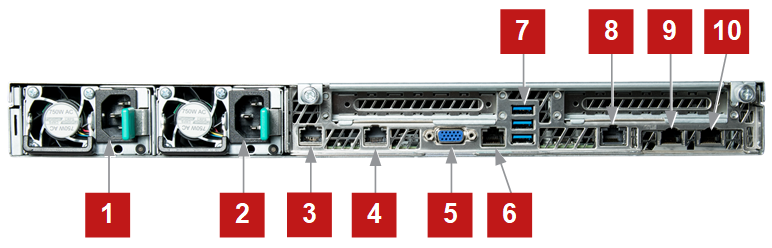
ATD-3100, and ATD-6100 Appliance back panel
Label | Interface port |
|---|---|
1 | Power supply module 1 |
2 | Power supply module 2 |
3 | Ethernet interface 2 (intf2) |
4 | Ethernet interface 3 (intf3) |
5 | VGA connector |
6 | Serial console interface |
7 | USB 3.0 ports |
8 | BMC port (RMM) |
9 | Ethernet interface 0 (ATD Management Interface) |
10 | Ethernet interface 1 (intf1) |
1 | Setting up the Intelligent Sandbox Appliance
ATD- 3200, ATD-6200 Appliance Front panel
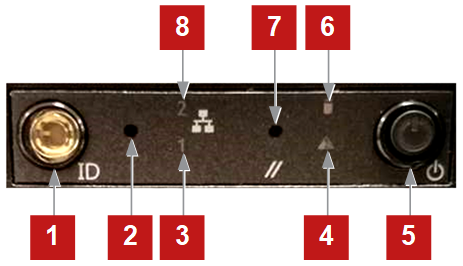
Label | Description |
|---|---|
1 | System ID button with integrated indicator light |
2 | NMI button (recessed, tool required for use) |
3 | NIC 1 activity indicator light |
4 | System status indicator light |
5 | Power button with integrated indicator light |
6 | Hard drive activity indicator light |
7 | System cold reset button |
8 | NIC 2 activity indicator light |
Trellix Intelligent Sandbox 5.0.x Hardware Guide 13
1 | Setting up the Intelligent Sandbox Appliance
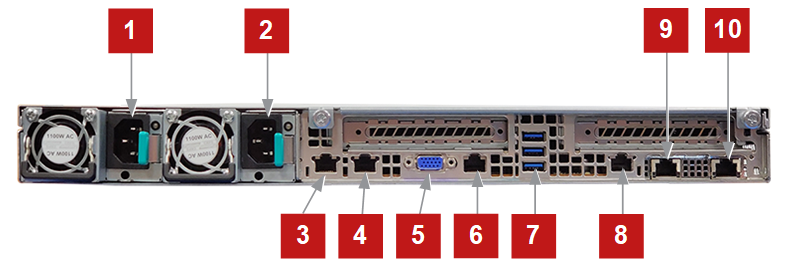
ATD- 3200, ATD-6200 Appliance Back panel - Configuration A
ATD- 3200, ATD-6200 Appliance Back panel - Configuration B
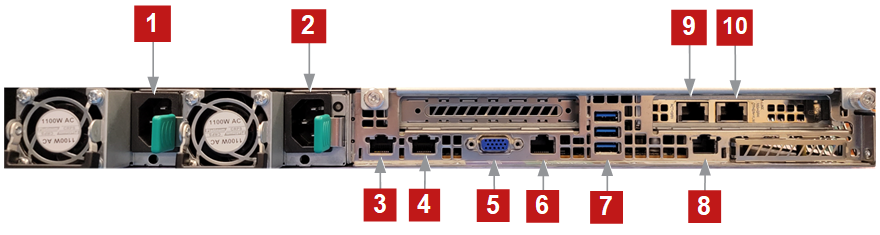
|
Label |
Interface port |
|---|---|
|
1 |
Power supply module 1 |
|
2 |
Power supply module 2 |
|
3 |
Ethernet interface 0 (ATD Management Interface) |
|
4 |
Ethernet interface 1 (intf1) |
|
5 |
VGA connector |
|
6 |
Serial console interface |
|
7 |
USB 3.0 ports (3) |
1 | Setting up the Intelligent Sandbox Appliance
|
Label |
Interface port |
|---|---|
|
8 |
BMC port (RMM) |
|
9 |
Ethernet interface 3 (intf3) |
|
10 |
Ethernet interface 2 (intf2) |
If an item is missing or damaged, contact your supplier.
Hardware specifications
Before you set up the Intelligent Sandbox Appliance, review the hardware specifications.
|
Specification |
ATD-3200 |
ATD-6200 |
|---|---|---|
|
Packaging Dimension |
Length = 38", Width = 24", Height = 8" |
Length = 38", Width = 24", Height = 8" |
|
Chassis |
Intel R1208WFTYSR (Wolf Pass) |
Intel R1208WFTYSR (Wolf Pass) |
|
Chassis Dimension |
Length = 28", Width = 17.3", Height = 1.8" |
Length = 28", Width = 17.3", Height = 1.8" |
|
Packaged Weight |
21 Kg (46.5 lbs) |
22 Kg (48.5 lbs) |
|
Form Factor |
1U rack mountable; fits 19-inch rack |
1U rack mountable; fits 19-inch rack |
|
Motherboard |
S2600WFTR |
S2600WFTR |
|
CPU |
2 x Xeon Scalable Silver 4210, 2.20 GHz Base, 13.75MB cache, 10 Cores |
2 x Xeon Scalable Gold 6230, 2.10 GHz Base, 27.5MB cache, 20 Cores |
|
Storage |
|
|
1 | Setting up the Intelligent Sandbox Appliance
| Specification | ATD-3200 | ATD-6200 |
|---|---|---|
| 960 GB, SATA, 2.5", Raid-0 | ||
| Memory | 16 x 16 GB DDR4 2933 MHz ECC | 16 x 32 GB DDR4 2933 MHz ECC |
| Remote Management | RMM4LITE2 | RMM4LITE2 |
| Power Supply | 1100 W or 1300 W redundant | 1100 W or 1300 W redundant |
| Network Interfaces (Copper) - Configuration A | Dual Integrated 10 GB/1 GB/100 MB and Dual 10 GB/1 GB/100 MB Module | Dual Integrated 10 GB/1 GB/100 MB and Dual 10 GB/1 GB/100 MB Module |
| Network Interfaces (Copper) - Configuration B | Dual Integrated 10 GB/1 GB (onboard) and Dual 10 GB/1 GB/100 MB (PCIe I/O) Module | Dual Integrated 10 GB/1 GB (onboard) and Dual 10 GB/1 GB/100 MB (PCIe I/O) Module |
| Specification | ATD-3100 | ATD-6100 |
|---|---|---|
| Packaging Dimension | Length = 38", Width = 24", Height = 7" | Length = 38", Width = 24", Height = 7" |
| Chassis | Intel R1208WTTGSR (Wildcat Pass) | Intel R1208WTTGSR (Wildcat Pass) |
| Chassis Dimension | Length = 28", Width = 17.3", Height = 1.7" | Length = 28", Width = 17.3", Height = 1.7" |
| Packaged Weight | 22.7 Kg (50 lbs) | 22.7 Kg (50 lbs) |
| Form Factor | 1U rack mountable; fits 19-inch rack | 1U rack mountable; fits 19-inch rack |
| Motherboard | S2600WTT | S2600WTT |
| CPU | 2 x E5-2609v4, 1.7 GHz, 20M cache, 8 Cores | 2 x E5-2695v4, 2.1 GHz, 45M cache, 18 Cores |
1 | Setting up the Intelligent Sandbox Appliance
| Specification | ATD-3100 | ATD-6100 |
|---|---|---|
| Storage |
|
|
| Memory | 16 x 16 GB DDR4 2400 MHz ECC | 16 x 32 GB DDR4 2400 MHz ECC |
| Remote Management | RMM4LITE2 | RMM4LITE2 |
| Power Supply | 750 W redundant | 750 W redundant |
| Network Interfaces (Copper) | Dual Integrated 10 GB/1 GB/100 MB and Dual 10 GB/1 GB/100 MB Module | Dual Integrated 10 GB/1 GB/100 MB and Dual 10 GB/1 GB/100 MB Module |
| Specification | ATD-3000 | ATD-6000 |
|---|---|---|
| Packaging Dimension | Length = 38", Width = 24", Height = 7" | Length = 36", Width = 24", Height = 7" |
| Chassis | R1304GZ4GC | R2304LH2HKC |
| Chassis Dimension | Length = 29", Width = 17.25", Height = 1.7" | Length = 29", Width = 17.25", Height = 3.43" |
| Packaged Weight | 15 Kg (33 lbs) | 22.7 Kg (50 lbs.) |
| Form Factor | 1U rack mountable; fits 19-inch rack | 2U rack mountable; fits 19-inch rack |
| Motherboard | S2600GZ4 | S4600LH2 |
| CPU | 2 x E5-2658, 2.10 GHz, 20M Cache, 8 Cores | 4 x E5-4640, 2.40 GHz, 20M Cache, 8 Cores |
1 | Setting up the Intelligent Sandbox Appliance
| Specification | ATD-3000 | ATD-6000 |
|---|---|---|
| Storage |
|
|
| Memory | 192 GB | 256 GB |
| Remote Management | RMM4R | RMM4 |
| Power Supply | 2x 750 W, AC redundant, hot swappable | 2x 1600 W, AC redundant, hot swappable |
| Network Interfaces (Copper) | Dual Integrated 10 GB/1 GB/100 MB and Dual 10 GB/1 GB/100 MB Module | Dual Integrated 10 GB/1 GB/100 MB and Dual 10 GB/1 GB/100 MB Module |
Default ports used in Intelligent Sandbox communication
Intelligent Sandbox Appliance uses many ports for network communications.
| Client | Server | Default port | Configurable | Description |
|---|---|---|---|---|
| Any (desktop and REST API client) | Intelligent Sandbox | TCP 443 (HTTPS) | No | Access the Intelligent Sandbox web interface and REST API client. |
| Any (desktop) | Intelligent Sandbox | TCP 6080 (HTTPS) | No | For VM activation process and X-mode. |
| Any (FTP client) | Intelligent Sandbox | TCP 21 (FTP) | No | Access the FTP servers on Intelligent Sandbox. |
| Any (SFTP client) | Intelligent Sandbox | TCP 22 (SFTP) | No | Access the SFTP servers on Intelligent Sandbox. |
| Sensor | Intelligent Sandbox | TCP 8505 | No | Communication channel between a Sensor and |
|
Client |
Server |
Default |
Configurable |
Description |
|---|---|---|---|---|
|
Intelligent Sandbox. | ||||
|
Manager |
Intelligent Sandbox |
TCP 443 |
No |
Communication between the Manager and Intelligent Sandbox through the RESTful APIs. |
|
Intelligent Sandbox |
McAfee ePO |
TCP 8443 |
Yes |
Host information queries. |
|
Intelligent Sandbox |
atd.repl.gti.trellix.com |
TCP 443 |
No |
File Reputation queries. |
|
Intelligent Sandbox |
List.smartfilter.com |
TCP 80 |
No |
URL updates. |
|
Intelligent Sandbox |
All DXL Brokers in your environment |
TCP 8883 |
No |
DXL connection from TIS to DXL broker |
|
Intelligent Sandbox |
All McAfee ePO in your environment |
TCP 443 |
No |
McAfee Agent on TIS gets DXL certificates from McAfee ePO |
|
Intelligent Sandbox (DAT updates) |
wpm.webwasher.com |
Updates for Trellix Gateway Anti-Malware Engine and Trellix Anti-Malware Engine. |
1 | Setting up the Intelligent Sandbox Appliance
| Client | Server | Default port | Configurable | Description |
|---|---|---|---|---|
| tau-manual.skyhigh.cloud | ||||
|
Intelligent Sandbox | atdupdate.trellix.com | TCP 443 (HTTPS) | No |
Updates for the Intelligent Sandbox software. The update includes new detection and application package. |
|
Intelligent Sandbox | atd.rest.gti.trellix.com | TCP 443 (HTTPS) | No |
Sends telemetry data to Trellix. For information on what data is sent, see Configure telemetry in Trellix Intelligent Sandbox Installation Guide. |
|
Any (SSH client) |
Intelligent Sandbox | TCP 2222 (SSH) | No | CLI access. |
Set up the hardware
Install and integrate the hardware in your network.
Install or remove rack handles
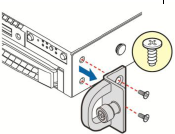
- To install a rack handle, align it with the two holes on the side of the Intelligent Sandbox Appliance and attach the rack handle to the Appliance with two screws as shown.
Note
ATD-3100, ATD-6100, ATD-3200, and ATD-6200 comes with the handles attached out of the box.
1 | Setting up the Intelligent Sandbox Appliance
Installing the rack handle
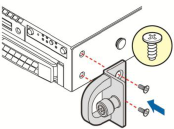
- To remove a rack handle, remove the two screws holding the rack handle in place, and remove the rack handle from the server system as shown.
Removing the rack handle
Rack mount the appliance
To install the Intelligent Sandbox Appliance on the four-post 19-inch rack, use the rack-mounting kit. You can use the kit with most industry-standard rack cabinets.
Task
-
For each mounting rail, use the following steps.
- At the front of the rack, position the right or left mounting rail on the corresponding side so that the mounting bracket aligns with the rack holes.
⚠️ Caution
Always load the rack from the bottom up. If you are installing multiple appliances, start with the lowest available position.
1 | Setting up the Intelligent Sandbox Appliance
Slide rail installation
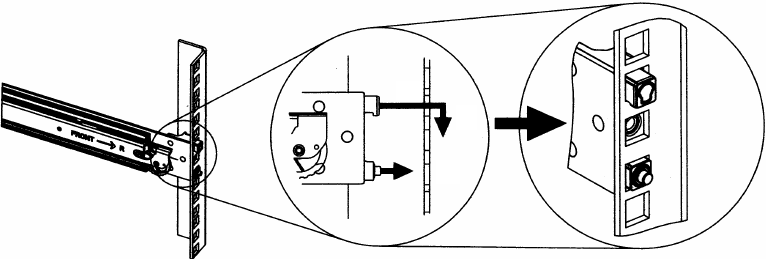
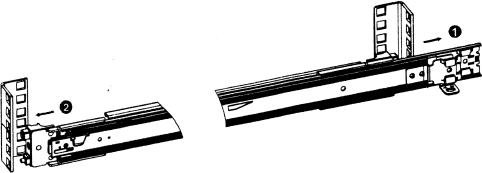
b. At the back of the rack, pull the back mounting-bracket (extending the mounting rail) so that it aligns with the rack holes.
On each side of the rack, ensure that the mounting rails are the same level.
Install rail to rack
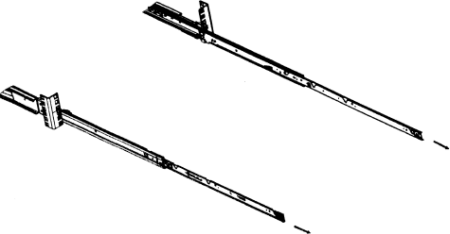
c. Clip the rail to the rack and secure it with the tie wraps.
2. Slide both rails so they are fully extended.
Full extend slide
[IMAGE PLACEHOLDER: Black-and-white technical illustration of the full-extend slide rail pulled fully out, showing the inner sliding rail nested within the outer channel and an arrow indicating full extension direction.]
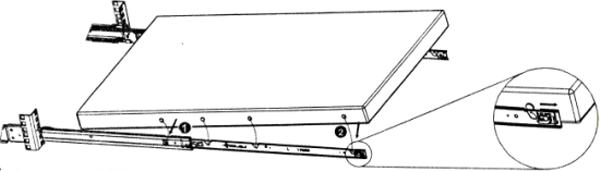
3. With help from another person, lift the Intelligent Sandbox Appliance and install the chassis to the rail on both the sides.
Drop in the rear spool first, then the middle, then the front.
1 | Setting up the Intelligent Sandbox Appliance
⚠️ Caution
At least two people are required to lift and attach the Intelligent Sandbox Appliance to the rack.
If required, attach the lockable bezel to protect the front panel.
-
Lift the release tab and push the Intelligent Sandbox Appliance into the rack.
Lift release tab and push Appliance into rack
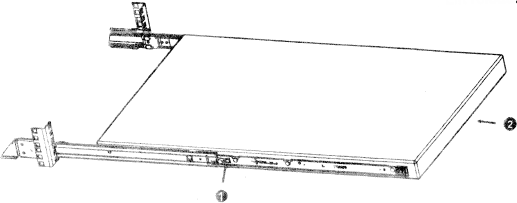
To remove the Intelligent Sandbox Appliance from the rack, lift the release tab next to the chassis front spool, then lift it out of the rails.
Turn on the Intelligent Sandbox Appliance
The Intelligent Sandbox Appliance has redundant power supplies pre-installed.
The Intelligent Sandbox Appliance ships with two AC power cords specific to your country or region.
-
Plug one end of the AC power cord into the first power supply module in the back panel, then plug the other end into the power source.
-
Plug one end of the other AC power cord into the second power supply module in the back panel, then plug the other end into the power source.
Trellix Intelligent Sandbox 5.0.x Hardware Guide 23
1 | Setting up the Intelligent Sandbox Appliance
end into the power source.
Intelligent Sandbox powers up without pressing the on/off button on the front panel.
To turn off the Intelligent Sandbox Appliance AC power, you must unplug both AC power cords from the back panel or power source.
Note
The on/off button on the front panel does not turn on/off the AC power.
To restart the Intelligent Sandbox Appliance, you must press the on/off power switch on the front panel while the appliance is turned on.
To turn off the Intelligent Sandbox Appliance, use the shutdown CLI command, then press the on/off power switch.
Note
When you plug power cord to both PSUs on ATD 3200/ATD 6200 model and provide power to both PSUs, you will see one PSU LED is blinking in 1 Hz frequency in green. This is an expected behavior. The power supply with the blinking LED is in cold redundant state, meaning it is powered down to standby mode until the other power supply fails, or until the power supplies switch roles between primary and standby.
Handling the front bezel
You can remove the front bezel if required, and then re-install it. However, before you install the bezel, you must install the rack handles.
-
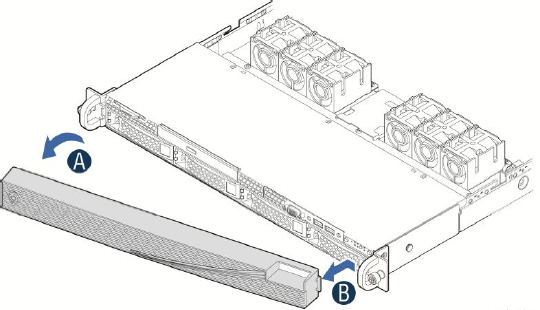
Remove the front bezel.
-
Unlock the bezel if it is locked.
-
Remove the left end of front bezel from rack handle.
-
Rotate the front bezel anticlockwise to release the latches on the right end from the rack handle.
-
1 | Setting up the Intelligent Sandbox Appliance
-
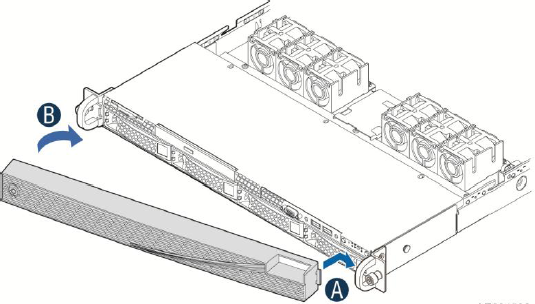
Install the front bezel.
Lock the right end of the front bezel to the rack handle
Rotate the front bezel clockwise until the left end clicks into place
Lock the bezel if needed.
Enable RMM
Enable Intel RMM on your Intelligent Sandbox Appliance.
Restart the Intelligent Sandbox Appliance.
During the reboot process, press F2.
On the BIOS Setup Utility page, select the Server Management tab.
Select BMC LAN Configuration.
-
Locate Intel (R) RMM4 LAN configuration and configure the settings.
Highlight IP Source, press Enter, then select Static.
Highlight IP Address, then enter the IP address.
Highlight Subnet Mask, then enter the subnet mask address.
Highlight Gateway IP, then enter the gateway IP address.
-
Locate User configuration and configure the settings.
Highlight User status, press Enter, then select Enabled.
Highlight User password, press Enter, then enter the root account password.
Press Enter, confirm the password, then press Enter again.
Press F10, then press Enter.
Log on to the RMM interface.
Connect the management port
When you connect your network device to the Intelligent Sandbox Appliance, you can configure the appliance IP address and other parameters for integration in your network.
Trellix Intelligent Sandbox 5.0.x Hardware Guide
25
1 | Setting up the Intelligent Sandbox Appliance
Task
- On the rear panel, plug the Category 5e or 6 Ethernet cable in the Ethernet port 1.
The Ethernet port 1 is the ATD Management port.
- Plug the other end of the cable into the network device.
Configure the Intelligent Sandbox Appliance network information
Manage the Intelligent Sandbox Appliance from a remote computer or terminal server.
Task
- On the Intelligent Sandbox Appliance, connect a monitor to the VGA port.
- Connect a keyboard to one of the USB ports.
- To log on to the Intelligent Sandbox Appliance, use the following credentials.
- User name —
cliadmin - Password —
atdadmin
To access all the built-in command syntax instructions, enter
helpor?. For a list of all commands, enterlist. - User name —
- Open the command prompt and configure the Intelligent Sandbox Appliance.
- Enter the Intelligent Sandbox Appliance name.
For example,
set appliance name matd_appliance_1. - Enter the Intelligent Sandbox Appliance management port IP address and subnet mask.
For example,
set appliance ip 10.34.2.8 255.255.255.0. - Enter the default gateway IP address.
For example,
set appliance gateway 12.34.2.1. - Restart the Intelligent Sandbox Appliance.
- Enter the management port speed and duplex settings using one of the following commands:
set mgmtport auto— Sets the management port in auto mode for speed and duplex.set mgmtport speed (10|100) duplex (full|half)— Sets the speed to 10 or 100 Mbps at full or half duplex.
 Tip
TipBest Practice: Use an alphanumeric character string up to 25 characters. The string must begin with a letter and can include hyphens, underscores, and periods, but not spaces.
 Note
NoteDo not assign this class C network IP address:
192.168.55.0/24. - Enter the Intelligent Sandbox Appliance name.
1 | Setting up the Intelligent Sandbox Appliance
f. To change the Intelligent Sandbox Appliance password, enter passwd.
Passwords are case sensitive, must not include spaces, and must contain the following:
- Between 8 and 25 characters
- At least one uppercase letter
- At least one lowercase letter
- At least one digit
- At least one alphanumeric character or symbol
Tip
Best Practice: Enter a password with a combination of characters that is easy for you to remember, but difficult for someone else to guess.
g. Verify the configuration.
- To view the configuration details, enter
show. - To check the network connectivity, enter
ping <IP address>.
The success message host <ip address> is alive appears. If the host is not reachable, failed to talk to <ip address> appears.
COPYRIGHT
Copyright © 2026 Musarubra US LLC.
Trellix and FireEye are the trademarks or registered trademarks of Musarubra US LLC, FireEye Security Holdings US LLC, and their affiliates in the US and /or other countries. Other names and brands are the property of these companies or may be claimed as the property of others.