Trellix Intelligent Sandbox 5.0.x
Installation Guide
Last Updated: September 17, 2023

Contents
Installation overview 7
-
Which type of installation do you need? ⋅⋅⋅⋅⋅⋅⋅⋅⋅⋅⋅⋅⋅⋅⋅⋅⋅⋅⋅⋅⋅⋅⋅⋅⋅ 7
-
Plan your deployment ⋅⋅⋅⋅⋅⋅⋅⋅⋅⋅⋅⋅⋅⋅⋅⋅⋅⋅⋅⋅⋅⋅⋅⋅⋅ 7
System requirements 9
-
Virtual system requirements ⋅⋅⋅⋅⋅⋅⋅⋅⋅⋅⋅⋅⋅⋅⋅⋅⋅⋅⋅⋅⋅⋅ 9
-
Physical server requirements ⋅⋅⋅⋅⋅⋅⋅⋅⋅⋅⋅⋅⋅⋅⋅⋅⋅⋅⋅⋅⋅⋅ 10
-
Web interface client requirements ⋅⋅⋅⋅⋅⋅⋅⋅⋅⋅⋅⋅ 11
-
Cluster requirements ⋅⋅⋅⋅⋅⋅⋅⋅⋅⋅⋅⋅⋅⋅⋅⋅⋅ 12
-
Intelligent Sandbox cluster network connections ⋅⋅⋅⋅⋅⋅ 13
-
Analyzer VM requirements ⋅⋅⋅⋅⋅⋅⋅⋅⋅⋅ 14
-
Plan your deployment ⋅⋅⋅⋅⋅⋅⋅⋅⋅⋅⋅⋅⋅⋅⋅⋅⋅ 21
-
Hardware specifications ⋅⋅⋅⋅⋅⋅⋅⋅⋅⋅⋅⋅⋅⋅⋅⋅⋅ 21
-
System environmental limits ⋅⋅⋅⋅⋅⋅⋅⋅⋅⋅ 24
-
Default ports used in Intelligent Sandbox communication ⋅ 30
-
Warnings and cautions ⋅⋅⋅⋅⋅⋅⋅⋅⋅⋅⋅⋅⋅⋅⋅ 32
-
Deployment checklist ⋅⋅⋅⋅⋅⋅⋅⋅⋅⋅⋅⋅⋅⋅⋅ 33
Pre-installation tasks 35
-
Installing the OS, software, and Email Connector ⋅⋅⋅⋅⋅⋅⋅⋅⋅ 35
-
Download the product files ⋅⋅⋅⋅⋅⋅⋅⋅⋅⋅⋅⋅ 36
-
Installer package details ⋅⋅⋅⋅⋅⋅⋅⋅⋅⋅⋅⋅ 36
Upgrade the software 38
-
Upgrade your Intelligent Sandbox software ⋅⋅⋅⋅⋅⋅⋅⋅⋅ 38
-
Upgrade the software incrementally ⋅⋅⋅⋅⋅⋅⋅⋅ 39
-
Automatically download the latest application software package ⋅⋅ 40
Manually upload the latest application software package ............................................................ 40
Upgrade the Android analyzer VM ........................................................................ 41
View the Upgrade log ...................................................................................... 41
Install the software ................................................................. 43
Fresh installation of Trellix Intelligent Sandbox ............................................. 43
Install the Operating system and ATD software to your appliance .......................... 43
Setting up Intelligent Sandbox IP ........................................................... 45
Install the operating system to your appliance remotely using RMM ...................... 45
Installing Virtual Intelligent Sandbox ......................................................... 46
Install a Virtual Intelligent Sandbox instance .............................................. 46
Install Virtual Intelligent Sandbox on Hyper-V using the automated script ............ 48
Install Virtual Intelligent Sandbox on Hyper-V manually ................................ 50
Prepare your sandbox virtual machine ...................................................... 51
Activate the product ............................................................................... 52
Activate the product using the temporary key ............................................. 53
Activate the product using the permanent key ............................................ 53
Install Email Connector ........................................................................... 54
Post-installation tasks .......................................................... 56
Creating analyzer VMs ........................................................................... 56
Create a VM using the VM Builder ......................................................... 56
Create a virtual machine on VMware Workstation ......................................... 58
Create a virtual machine on VMWare ESXi ................................................. 61
Create a virtual machine on Hyper-V Manager ............................................ 63
Create a virtual disk file ....................................................................... 64
Create a virtual disk file for Windows XP .................................................. 64
Create a virtual disk file for Windows Server 2003 ...................................... 65
Create a virtual disk file for Windows 7 .................................................. 66
Create a virtual disk file for Windows 8 .................................................. 67
Create a virtual disk file for Windows Server 2008 ...................................... 68
Create a virtual disk file for Windows 8.1 ................................................. 69
Create a virtual disk file for Windows 10 .......................................................... 69
Create a virtual disk file for Windows 11 .......................................................... 71
Create a virtual disk file for Windows 2012 ....................................................... 73
Create a virtual disk file for Windows 2012 R2 .................................................... 73
Create a virtual disk file for Windows Server 2016/2019 Standard .............................. 74
Install Microsoft Office on the virtual machine ................................................. 74
Enable PDF file analysis ............................................................................... 75
Enable JAR file analysis ............................................................................... 75
Analyze OneNote file .................................................................................. 75
Enable Flash file analysis ............................................................................ 76
Complete the VMDK and VHDX file creation process ............................................ 76
Prepare the virtual disk image for analysis .................................................... 76
Run the VM Provisioner Tool ....................................................................... 77
Prepare your VMDK or VHDX image for analysis manually .................................... 77
Prepare a Windows XP image for analysis ...................................................... 78
Prepare a Windows Server 2003 image for analysis ......................................... 80
Prepare a Windows 7 image for analysis ....................................................... 83
Prepare a Windows Server 2008 image .......................................................... 85
Prepare a Windows 8 image for analysis ...................................................... 87
Prepare a Windows 8.1 image for analysis .................................................... 90
Prepare a Windows 10 image for analysis ..................................................... 93
Prepare Windows 11 image for analysis ....................................................... 97
Prepare a Windows 2012 R2 image for analysis ............................................. 100
Prepare a Windows Server 2016/2019 Standard image for analysis .......................... 103
Import the virtual disk file ...................................................................... 106
Convert the VMDK and VHDX file to an image file ............................................ 106
Accessing the Intelligent Sandbox web interface ........................................... 108
Trellix Intelligent Sandbox web UI requirements and preparation .......................... 108
Log on to the Intelligent Sandbox web interface ........................................... 110
Copy existing image files from one Intelligent Sandbox Appliance to others on the same network ........ 110
Managing VM profiles ............................................................................... 111
Create VM profiles .......................................................... 112
Configuring Intelligent Sandbox for malware analysis .................................. 114
High-level steps to configure malware analysis ..................................... 114
Configure the Trellix Virtual Intelligent Sandbox network information .................. 115
Configure the security and performance options .................................... 116
Configure proxy servers for Internet connectivity .................................. 117
Configure Intelligent Sandbox to communicate with McAfee GTI ........................ 117
Enable the malware site proxy .................................................... 118
Configure DNS setting .......................................................... 118
Configure the syslog settings .................................................. 119
Configuring the TAXII settings .................................................. 121
Enable and configure TAXII settings ............................................. 121
Configuring date and time settings .............................................. 122
Configure a Network Time Protocol server ....................................... 123
Configure the date and time manually ............................................ 124
Add the Intelligent Sandbox logon banner ....................................... 125
Configure telemetry ........................................................... 125
Enable telemetry .............................................................. 127
Configure Common Settings .................................................... 128
Configure maximum threshold wait time ........................................ 128
Enable Common Criteria (CC) mode .............................................. 128
Use SSL encryption while communicating with Network Security Platform ............... 129
Enable account lock out ....................................................... 130
Configuring Email Connector .................................................. 130
Enable and configure Email Connector ......................................... 131
Configuring your Secure Email Gateway for Email Connector ........................ 134
Configure Email Connector filtering rules ...................................... 134
Recommended concurrent SMTP sessions for Email Connector ........................ 135
Understanding Email Headers with analysis status ................................ 135
Uploading certificates ........................................................ 137
Upload trusted CA certificates ................................................ 138
Upload web certificates ........................................................................ 139
Manage users and performance ............................................................ 140
Manage users .................................................................................. 140
Add users ..................................................................................... 140
Types of users ............................................................................. 140
Command-line Interface user .............................................................. 140
Super Administrator ...................................................................... 141
Network Security Platform user ........................................................ 141
Upload Administrator .................................................................. 141
Web Gateway user ...................................................................... 141
Email Gateway user .................................................................... 142
TIE user .................................................................................... 142
Virtual Network Security Platform user ............................................... 142
Email connector user .................................................................. 142
Bro Network Sensor user ............................................................... 142
Administrator permissions .............................................................. 143
Admin User ................................................................................ 143
Web Access ................................................................................ 143
Restful Access ............................................................................ 144
FTP Access permission ................................................................. 144
Managing user roles in Intelligent Sandbox .......................................... 144
Create a role in Intelligent Sandbox ................................................ 144
Review user analysis reports and status in Intelligent Sandbox ........................ 145
Assign roles to users in Intelligent Sandbox .......................................... 145
1 | Installation overview
Which type of installation do you need?
Trellix Intelligent Sandbox is available in two form factors—On-premises physical appliance and Virtual.
Both on-premises and virtual Trellix Intelligent Sandbox come pre-installed. While on-premise come pre-installed on your new physical appliance, for virtual form factor, you are provided with an OVA file which you can deploy in your environment.
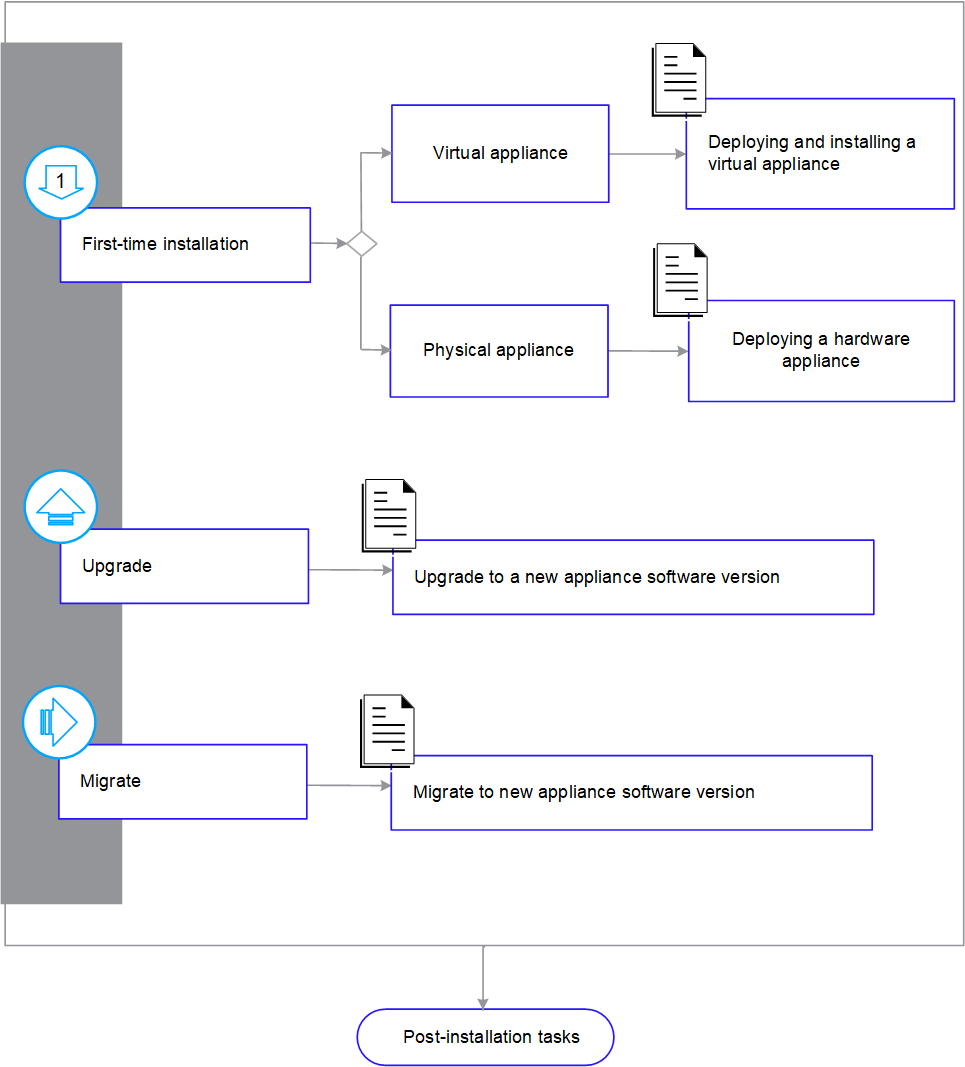
For more details about Installer package, see Installer package details.
Plan your deployment
You can deploy Trellix Intelligent Sandbox as standalone or integrated with other products.
- Standalone deployment — This is a simple way of deploying Trellix Intelligent Sandbox. In this case, it is not integrated with other externally installed McAfee products. When deployed as a standalone Appliance, you can manually submit the suspicious files using the Trellix Intelligent Sandbox web application. Or, you can submit the samples using an FTP client. This deployment option is used, for example, during the testing and evaluation phase, to fine-tune configuration, and to analyze suspicious files in an isolated network segment. Also, research engineers might use the standalone deployment option for detailed analysis of malware.
- Integration with Network Security Platform — This deployment involves integrating Trellix Intelligent Sandbox with Network Security Platform Sensor and Manager.
Based on how you have configured the corresponding Advanced Malware policy, an inline Sensor detects a file download and sends a copy of the file to Trellix Intelligent Sandbox for analysis. If Trellix Intelligent Sandbox detects a malware within a few seconds, the Sensor can block the download. The Manager displays the results of the analysis from Trellix Intelligent Sandbox.
Trellix Intelligent Sandbox 5.0.x Installation Guide7
1 | Installation overview
If Trellix Intelligent Sandbox requires more time for analysis, the Sensor allows the file to be downloaded. If Trellix Intelligent Sandbox detects a malware after the file has been downloaded, it informs Network Security Platform, and you can use the Sensor to quarantine the host until it is cleaned and remediated. You can configure the Manager to update all Sensors about this malicious file. So, if that file is downloaded again anywhere in your network, your Sensors might block it.
For information about how to integrate Network Security Platform and Trellix Intelligent Sandbox, see the latest Network Security Platform Integration Guide.
-
Integration with McAfee® Web Gateway — You can configure Trellix Intelligent Sandbox as another engine for antimalware protection. When your network user downloads a file, the native McAfee Gateway antimalware Engine on McAfee® Web Gateway scans the file and determines a malware score. Based on this score and the file type, McAfee® Web Gateway sends a copy of the file to Trellix Intelligent Sandbox for deeper inspection and dynamic analysis. A progress page informs your users that the requested file is being analyzed for malware. Based on the malware severity level reported by Trellix Intelligent Sandbox, McAfee® Web Gateway determines if the file is allowed or blocked. If it is blocked, the reasons are displayed for your users. You can view the details of the malware that was detected in the log file.
This design makes sure that only those files that require an in-depth analysis are sent to Trellix Intelligent Sandbox. This balances your users' experience in terms of download speed and security. McAfee® Web Gateway hosted over IPv6 device can integrate with Trellix Intelligent Sandbox IPv6 address. For information about how to integrate Trellix Intelligent Sandbox and McAfee® Web Gateway, see the McAfee® Web Gateway Product Guide, version 7.4.
-
Integration with McAfee® ePolicy Orchestrator (McAfee ePO) — This integration enables Trellix Intelligent Sandbox to retrieve information regarding the target host. Knowing the operating system on the target host, enables it to select a similar virtual environment for dynamic analysis.
-
Dynamic analysis requires the suspicious file to be executed for a specific time period. During this time, the malware is likely to have reached the intended target. You can then take the needed remedial steps to clean the affected host.
-
This integration also enables you to identify the other hosts detected by the same malware and take the appropriate remedial steps.
-
How the deployment options address the four major aspects of antimalware process cycle:
-
Detection of file download: When a user accesses a file, the inline Network Security Platform Sensor or McAfee® Web Gateway detects this and sends a copy of the file to Trellix Intelligent Sandbox for analysis.
-
Analysis of the file for malware: Even before the user fully downloads the file, Trellix Intelligent Sandbox can detect a known malware using sources that are local to it or on the cloud.
-
Block future downloads of the same file: Every time Trellix Intelligent Sandbox detects a medium, high, or high severity malware, it updates its local black list.
-
Identify and remediate affected hosts: Integration with Network Security Platform enables you to quarantine the host until it is cleaned up and remediated.
2 | Installation overview
Virtual system requirements
To ensure that your deployment is successful, your virtual systems must meet the minimum requirements.
Total number of virtual CPU and memory requirement depends on the number of deployments on the ESXi or Hyper-V servers.
Note
These are minimum resource requirements. Make sure that there is enough resource available when multiple virtual machines are running at the same time.
|
Requirement |
Details |
|---|---|
|
Hypervisor support |
|
|
VM file format |
|
|
Virtual CPUs |
per vATD — 16 |
|
Virtual Memory |
Default 48 GB RAM |
|
Virtual Disk |
per vATD — 750 GB (VMware ESXi), 400 GB (Hyper-V) |
|
Physical Network Interface |
1 (E1000); You can configure 2 interfaces for a separate malware interface. |
|
Virtual Network Interfaces |
1 Management interface. You need to add a second virtual network interface manually, if a separate |
Trellix Intelligent Sandbox 5.0.x Installation Guide
2 | Installation overview
| Requirement | Details |
|---|---|
| malware interface is required. | |
| Physical system setting | Enable Virtualization Technology option in BIOS. |
Note
To change the RAM allocated for existing vATD deployments from 32 GB to 48 GB, see KB94639. For new 4.12.0 OVA deployments, the memory allocated is 32 GB. To allocate additional memory, see KB94639.
Physical server requirements
To deploy Trellix Virtual Intelligent Sandbox (vATD) on explicit servers, make sure that your server meets these requirements.
Important
When CPU Hyper-threading is available, for each physical processor core, the operating system addresses two virtual (logical) cores and shares the workload between them. For example, the minimum core requirement for vATD is 16, with Hyper-threading, the 8 physical cores of the CPU is treated as 16 by the operating system.
This is the minimum requirement for one vATD on VMware ESXi.
| Number of vATD deployment | Number of physical CPU cores | RAM | Disc space | Network interfaces |
|---|---|---|---|---|
| 1 | 8 | 48 GB | 1 TB | 2 |
Examples:
| Number of vATD deployments | Number of physical CPU cores | RAM | Disc space | Network interfaces |
|---|---|---|---|---|
| 2 | 16 | 96 GB | 2 TB | 2 |
2 | Installation overview
| Number of vATD deployments | Number of physical CPU cores | RAM | Disc space | Network interfaces |
|---|---|---|---|---|
| 4 | 32 | 192 GB | 3.5 TB | 2 |
| 8 | 64 | 384 GB | 6.5 TB | 2 |
On Hyper-V
This is the minimum requirement for one vATD on Microsoft Hyper-V.
| Number of vATD deployment | Number of physical CPU cores | RAM | Disc space | Network interfaces |
|---|---|---|---|---|
| 1 | 8 | 48 GB | 1 TB | 2 |
Examples:
| Number of vATD deployments | Number of physical CPU cores | RAM | Disc space | Network interfaces |
|---|---|---|---|---|
| 2 | 16 | 96 GB | 2 TB | 2 |
| 4 | 32 | 192 GB | 3.5 TB | 2 |
| 8 | 64 | 384 GB | 6.5 TB | 2 |
Web interface client requirements
To log on to the Intelligent Sandbox web interface, make sure that your client meets the requirements.
2 | Installation overview
Supported operating systems
| Operating system | Version |
|---|---|
| Microsoft Windows |
|
| Microsoft Windows Server |
|
Supported browsers
| Browser | Version |
|---|---|
| Internet Explorer | version 6 to 11. |
| Google Chrome | version 81. |
| Mozilla Firefox | version 54.0 to 76. |
Cluster requirements
To create clusters of one or more Intelligent Sandbox Appliances, make sure your environment meets the requirements.
- Use the Intelligent Sandbox Appliance eth-0 interfaces, or management ports.
- For optimal performance, node eth-0 interfaces must be in the same layer-2 network of the OSI reference model.
2 | Installation overview
Note
When you set up a Virtual Intelligent Sandbox cluster, the Primary and Backup nodes must reside on same VMware EXSi server. The Secondary nodes can be on same or a different VMware EXSi server.
-
All nodes must have the same:
-
Intelligent Sandbox software version
-
Analyzer VMs
-
Trellix Anti-Malware Engine DAT and engine versions
-
Trellix Gateway Anti-Malware Engine DAT and engine versions
-
Intelligent Sandbox cluster network connections
Eth-0 interface of the primary acts as the management interface of the cluster whereas the eth-0 of the secondary and backup node are used to exchange information with the primary.
The Backup node acts as a secondary node till the time the Primary node goes down for some reason and the Backup node takes the role of the primary node. The primary node load balances the files received on the eth-0 interface among the secondary nodes based on the number of files submitted to a node. A highly burdened node receives lesser number of samples for processing as opposed to a less burdened node. The primary node transfers files to be analyzed by the secondary node through the eth-0 interface and uses the same to retrieve results. When cluster configuration changes are made using the primary node, they are synchronized across the secondary nodes and the backup node through the eth-0 interface.
An example Intelligent Sandbox cluster deployment
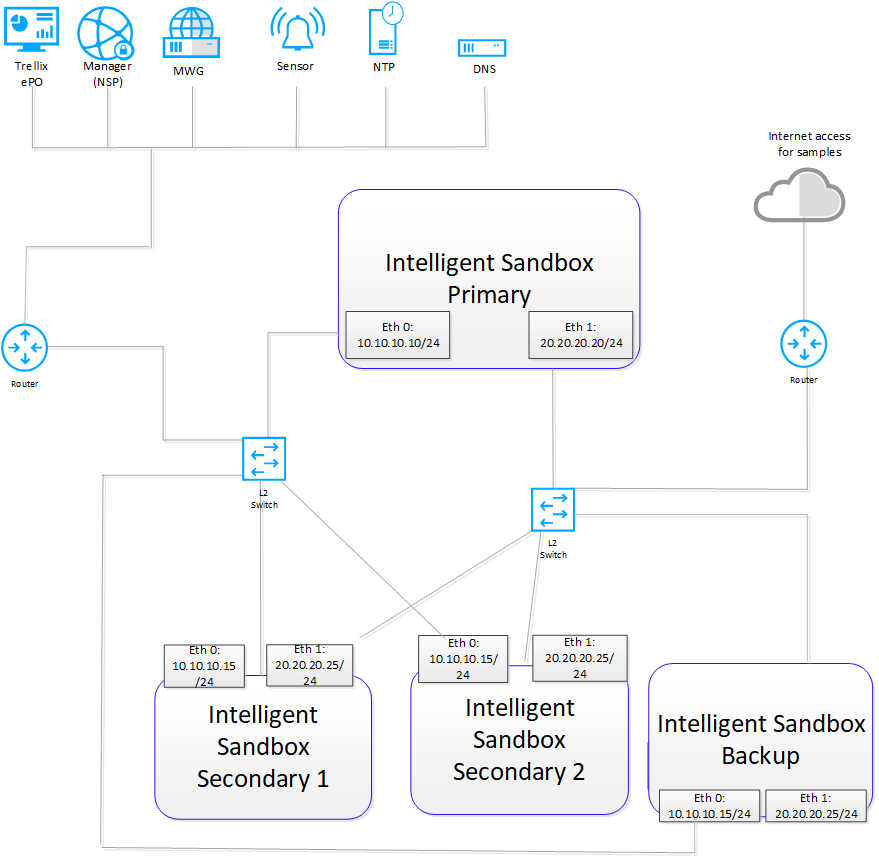
In this example, eth-1 is used to provide network access to malware running on the analyzer VMs. This isolates the network traffic generated by malware from the production network to which eth-0 interfaces are connected.
A local database is maintained at the Primary node which lists the MD5 hash value along with corresponding node-id of the
Trellix Intelligent Sandbox 5.0.x Installation Guide
13
2 | Installation overview
samples blacklisted by Intelligent Sandbox cluster node. Node-id is the primary identifier of a node that processes a particular sample. Whenever a sample is submitted to Intelligent Sandbox, the Primary node looks for an existing entry of this sample in its newly created database. If the MD5 hash value of a sample matches with an existing one in the database, this previously blacklisted sample is sent to the node based on the corresponding node-id of the sample. This approach ensures that every previously submitted, blacklisted sample reaches the node that analyzed it earlier, hence avoiding re-analysis of the blacklisted samples by any other node in the cluster.
Intelligent Sandbox determines the wait time for a submitted sample before it gets picked for analysis. The wait time is calculated based on the current sample analysis rate of the nodes. For samples submitted through MEG, a default threshold wait time of 780 seconds is allotted. Intelligent Sandbox rejects all the incoming samples from MEG until the wait time drops below this threshold value.
Analyzer VM requirements
Trellix Intelligent Sandbox uses secure virtual machines, or analyzer VMs, for dynamic analysis. During dynamic analysis, Trellix Intelligent Sandbox executes suspicious files in the analyzer VM, then monitors the file behavior for malicious activities.
To create the analyzer VM and VM profile, review the recommended requirements.
Note
- If you already have a VMDK or VHDX file, it must be a single file that contains all files required to create the VM.
- The platforms and other specifications listed here are based on Trellix test results.

Recommended RAM size
| Operating system | RAM size (MB) |
|---|---|
| Microsoft Windows XP 32-bit (Service Pack 2 and 3) | 512 |
| Microsoft Windows 7 32-bit (Service Pack 1) | 1024 |
| Microsoft Windows 7 64-bit (Service Pack 1) | 2048 |
| Microsoft Windows 8 Professional 32-bit | 2048 |
| Microsoft Windows 8 Professional 64-bit | 2048 |
| Microsoft Windows 8.1 64-bit Enterprise (Update 1 version 6.3 build) | 2048 |
2 | Installation overview
|
Operating system |
RAM size (MB) |
|---|---|
|
9600) | |
|
Microsoft Windows 8.1 64-bit Professional (Update 1 version 6.3 build 9600) |
2048 |
|
Microsoft Windows 10 Enterprise 64-bit version 1511,1607,1703, 1909.18363.418 to 1909.18363.778, 20h2(19042.508 - 19042.746), 21h1 (19043.1052 - 19043.1165), and 21h2 (19044.1526 - 19044.1586) |
3072 |
|
Microsoft Windows 10 Professional version 1607, 1803, 1809, 1903, 1909.18363.418 to 1909.18363.778 and 20h2(19042.508 - 19042.746), 21h1 (19043.928 - 19043.1165), and 21h2(19044.1526 - 19044.1586) |
3072 |
|
Microsoft Windows 11 Professional & Enterprise 64 bit (22000.318 to 22000.739) |
3072 |
|
Microsoft Windows Server 2003 32-bit (Service Pack 1 and 2) |
2048 |
|
Microsoft Windows Server 2008 R2 (Service Pack 1) Datacenter |
2048 |
|
Microsoft Windows Server 2012 Datacenter |
2048 |
|
Microsoft Windows Server 2012 R2 Standard |
2048 |
|
Microsoft Windows Server 2012 R2 Datacenter |
2048 |
|
Microsoft Windows Server 2016 Standard |
2048 |
|
Microsoft Windows Server 2019 Standard |
3072 |
Supported operating systems
To create an ISO image, Intelligent Sandbox supports the following operating systems.
2 | Installation overview
|
Operating |
Version |
|---|---|
|
Microsoft Windows |
|
|
Microsoft Windows Server |
|
|
Android |
|
2 | Installation overview
| Operating system | Version |
|---|---|
|
If you are using a Microsoft Windows operating system, you must have the license key, and it must come in one of these languages:
- English
- Chinese Simplified
- Japanese
- German
- Italian
- Spanish
- French
Supported applications
Required applications
| Application | Supported version | Supported languages |
|---|---|---|
| Internet Explorer |
6, 7, 8, 9, 10, and 11
| English, Chinese-Simplified, Japanese, German, and Italian. |
| Mozilla Firefox | all versions until 63.0 | English, Chinese-Simplified, Japanese, German, and Italian. |
| Google Chrome | all versions until 70.0 | All languages |
| Microsoft Office | 2003, 2007, 2010, 2013, 2016, and 2019 | English, Japanese |
Trellix Intelligent Sandbox 5.0.x Installation Guide
|
Application |
Supported version |
Supported languages |
|---|---|---|
|
Microsoft Outlook |
2010 |
English |
|
Microsoft Edge |
79 - 93
|
English |
|
JustSystems Ichitaro |
Government 8 and Pro 3 Recommended operating system: Microsoft Windows 7 |
Japanese |
|
Adobe Flash Player |
13 |
English |
|
Adobe Flash Player |
32.0.0.238 |
English |
|
Adobe Reader |
|
English |
|
jdk-7u25 |
|
English |
|
jre-7u25 |
|
English |
|
jdk-8u101 |
|
English |
|
jre-8u101 |
|
English |
2 | Installation overview
Disk space
The minimum available disk space must be 200 MB. The maximum used total disk space must not exceed 30 GB.
The disk space affects the maximum number of VMs you create.
Maximum VMs
The following table specifies the maximum number of VMs that you can create for each Microsoft Windows operating system. The number of VMs listed in the table is based on the assumption that the disk space occupied by Windows is not more than 22 GB.
Operating system | Minimum disk space occupied | ATD-3000 (Number of VMs) | ATD-6000 (Number of VMs) | ATD-3100 (Number of VMs) | ATD-6100 (Number of VMs) | ATD-3200 (Number of VMs) | ATD-6200 (Number of VMs) |
|---|---|---|---|---|---|---|---|
| Microsoft Windows 7 32-bit | 12 GB | 29 | 59 | 29 | 59 | 29 | 59 |
| Microsoft Windows 7 64-bit | 14 GB | 29 | 59 | 29 | 59 | 29 | 59 |
| Microsoft Windows 8 Professional 32-bit | 25–30 GB | 29 | 59 | 29 | 59 | 29 | 59 |
| Microsoft Windows 8 Professional 64-bit | 25–30 GB | 29 | 59 | 29 | 59 | 29 | 59 |
| Microsoft Windows 8.1 Enterprise and Professional (Update 1 version 6.3 build 9600) | 25–30 GB | 29 | 59 | 29 | 59 | 29 | 59 |
| Microsoft Windows 10 Enterprise 64-bit (version 1507, 1511, 1607, 1703, 1909.18363.418 to 1909.18363.778, 20h2(19042.508 - 19042.746), 21h1(19043.1052 - | 25–30 GB | 29 | 59 | 29 | 59 | 29 | 59 |
Trellix Intelligent Sandbox 5.0.x Installation Guide
19
2 | Installation overview
| Operating system | Minimum disk space occupied | ATD-3000 (Number of VMs) | ATD-6000 (Number of VMs) | ATD-3100 (Number of VMs) | ATD-6100 (Number of VMs) | ATD-3200 (Number of VMs) | ATD-6200 (Number of VMs) |
|---|---|---|---|---|---|---|---|
| Microsoft Windows 10 Professional 64-bit (version 1607, 1803, 1809, 1903, 1909.18363.418 to 1909.18363.778, 20h2(19042.508 - 19042.746), 21h1(19043.928 - 19043.1165), and 21h2(19044.1526 - 19044.1586)) | 25–30 GB | 29 | 59 | 29 | 59 | 29 | 59 |
| Microsoft Windows 11 Professional & Enterprise 64 bit (22000.318 to 22000.739) | 25–30 GB | 29 | 59 | 29 | 59 | 29 | 59 |
| Microsoft Windows Server 2008 64-bit Service Pack 1 Datacenter | 14 GB | 29 | 59 | 29 | 59 | 29 | 59 |
| Microsoft Windows 2012 R2 Datacenter and Standard 64-bit | 25–30 GB | 29 | 59 | 29 | 59 | 29 | 59 |
| Microsoft Windows 2016 Standard | 25–30 GB | 29 | 59 | 29 | 59 | 29 | 59 |
| Microsoft Windows 2019 Standard | 25–30 GB | 29 | 59 | 29 | 59 | 29 | 59 |
2 | Installation overview
Note
For better detection during bulk submission, we recommend not exceeding the number of VM licenses beyond 20 (for ATD-3000) and 15 (for ATD-3100) for Windows 10 20h2 (19042.xxx) and Windows 10 21h1 OS, and not exceeding the number of VM licenses beyond 10 (for ATD-3000) and 5 (for ATD-3100) for Windows 10 21h2 OS.
Supported VM Provisioner Tool operating systems
To use the VM Provisioner Tool, you must use a supported operating system.
- Microsoft Windows 7 32-bit and 64-bit (Service Pack 1)
- Microsoft Windows 8 Professional 32-bit and 64-bit
- Microsoft Windows 8.1 64-bit Enterprise (Update 1 version 6.3 build 9600)
- Microsoft Windows 8.1 64-bit Professional (Update 1 version 6.3 build 9600)
- Microsoft Windows 10 Enterprise 64-bit version 1511, 1607, 1703 and 1909.18363.418 to 1909.18363.778, 20h2(19042.508 - 19042.746), 21h1(19043.1052 - 19043.1165), and 21h2(19044.1526 - 19044.1586).
- Microsoft Windows 10 Professional 64-bit version 1607, 1803, 1809, 1903 and 1909.18363.418 to 1909.18363.778, 20h2(19042.508 - 19042.746), 21h1(19043.928 - 19043.1165), and 21h2(19044.1526 - 19044.1586)
- Microsoft Windows 11 Professional & Enterprise 64 bit (22000.318 to 22000.739)
- Microsoft Windows Server 2008 R2 (Service Pack 1) Datacenter
- Microsoft Windows Server 2012 Datacenter
- Microsoft Windows Server 2012 R2 Datacenter
- Microsoft Windows Server 2012 R2 Standard
- Microsoft Windows Server 2016 Standard
- Microsoft Windows Server 2019 Standard
Plan your deployment
Before you set up the Intelligent Sandbox Appliance, verify that you have everything you need, and that your environment meets the minimum system requirements.
Hardware specifications
Before you set up the Intelligent Sandbox Appliance, review the hardware specifications.
| Specification | ATD-3200 | ATD-6200 |
|---|---|---|
| Packaging Dimension | Length = 38", Width = 24", Height = 8" | Length = 38", Width = 24", Height = 8" |
| Chassis | Intel R1208WFTYSR (Wolf Pass) | Intel R1208WFTYSR (Wolf Pass) |
2 | Installation overview
|
Specification |
ATD-3200 |
ATD-6200 |
|---|---|---|
|
Chassis Dimension |
Length = 28", Width = 17.3", Height = 1.8" |
Length = 28", Width = 17.3", Height = 1.8" |
|
Packaged Weight |
21 Kg (46.5 lbs) |
22 Kg (48.5 lbs) |
|
Form Factor |
1U rack mountable; fits 19-inch rack |
1U rack mountable; fits 19-inch rack |
|
Motherboard |
S2600WFTR |
S2600WFTR |
|
CPU |
2 x Xeon Scalable Silver 4210, 2.20 GHz Base, 13.75MB cache, 10 Cores |
2 x Xeon Scalable Gold 6230, 2.10 GHz Base, 27.5MB cache, 20 Cores |
|
Storage |
|
|
|
Memory |
16 x 16 GB DDR4 2933 MHz ECC |
16 x 32 GB DDR4 2933 MHz ECC |
|
Remote Management |
RMM4LITE2 |
RMM4LITE2 |
|
Power Supply |
1100 W redundant |
1100 W redundant |
|
Network Interfaces (Copper) |
Dual Integrated 10 GB/1 GB/100 MB and Dual 10 GB/1 GB/100 MB Module |
Dual Integrated 10 GB/1 GB/100 MB and Dual 10 GB/1 GB/100 MB Module |
|
Specification |
ATD-3100 |
ATD-6100 |
|---|---|---|
|
Packaging Dimension |
Length = 38", Width = 24", Height = 7" |
Length = 38", Width = 24", Height = 7" |
|
Chassis |
Intel R1208WTTGSR (Wildcat Pass) |
Intel R1208WTTGSR (Wildcat Pass) |
2 | Installation overview
| Specification | ATD-3100 | ATD-6100 |
|---|---|---|
| Chassis Dimension | Length = 28", Width = 17.3", Height = 1.7" | Length = 28", Width = 17.3", Height = 1.7" |
| Packaged Weight | 22.7 Kg (50 lbs) | 22.7 Kg (50 lbs) |
| Form Factor | 1U rack mountable; fits 19-inch rack | 1U rack mountable; fits 19-inch rack |
| Motherboard | S2600WTT | S2600WTT |
| CPU | 2 x E5-2609v4, 1.7 GHz, 20M cache, 8 Cores | 2 x E5-2695v4, 2.1 GHz, 45M cache, 18 Cores |
| Storage |
|
|
| Memory | 16 x 16 GB DDR4 2400 MHz ECC | 16 x 32 GB DDR4 2400 MHz ECC |
| Remote Management | RMM4LITE2 | RMM4LITE2 |
| Power Supply | 750 W redundant | 750 W redundant |
| Network Interfaces (Copper) | Dual Integrated 10 GB/1 GB/100 MB and Dual 10 GB/1 GB/100 MB Module | Dual Integrated 10 GB/1 GB/100 MB and Dual 10 GB/1 GB/100 MB Module |
| Specification | ATD-3000 | ATD-6000 |
|---|---|---|
| Packaging Dimension | Length = 38", Width = 24", Height = 7" | Length = 36", Width = 24", Height = 7" |
| Chassis | R1304GZ4GC | R2304LH2HKC |
Trellix Intelligent Sandbox 5.0.x Installation Guide
23
2 | Installation overview
|
Specification |
ATD-3000 |
ATD-6000 |
|---|---|---|
|
Chassis Dimension |
Length = 29", Width = 17.25", Height = 1.7" |
Length = 29", Width = 17.25", Height = 3.43" |
|
Packaged Weight |
15 Kg (33 lbs) |
22.7 Kg (50 lbs.) |
|
Form Factor |
1U rack mountable; fits 19-inch rack |
2U rack mountable; fits 19-inch rack |
|
Motherboard |
S2600GZ4 |
S4600LH2 |
|
CPU |
2 x E5-2658, 2.10 GHz, 20M Cache, 8 Cores |
4 x E5-4640, 2.40 GHz, 20M Cache, 8 Cores |
|
Storage |
|
|
|
Memory |
192 GB |
256 GB |
|
Remote Management |
RMM4R |
RMM4 |
|
Power Supply |
2x 750 W, AC redundant, hot swappable |
2x 1600 W, AC redundant, hot swappable |
|
Network Interfaces (Copper) |
Dual Integrated 10 GB/1 GB/100 MB and Dual 10 GB/1 GB/100 MB Module |
Dual Integrated 10 GB/1 GB/100 MB and Dual 10 GB/1 GB/100 MB Module |
System environmental limits
These are the system environmental limits for the Intelligent Sandbox Appliance.
Parameter | State or category | ATD-3200 and ATD 6200 | ATD-3100 and ATD 6100 | ATD-3000 | ATD-6000 |
|---|---|---|---|---|---|
Temperature | Operating |
|
|
+10° C to +35° C (+50°F to +95°F) with the |
+10° C to +35° C (+50°F to +95°F) with the |
2 | Installation overview
Parameter | State or category | ATD-3200 and ATD 6200 | ATD-3100 and ATD 6100 | ATD-3000 | ATD-6000 |
|---|---|---|---|---|---|
|
— Continuous Operation, 10° C to 35° C (50° F to 95° F) with the maximum rate of change not to exceed 10° C per hour
|
Class A2 — Continuous Operation, 10° C to 35° C (50° F to 95° F) with the maximum rate of change not to exceed 10° C per hour
|
maximum rate of change not to exceed 10° C per hour
|
maximum rate of change not to exceed 10° C per hour |
2 | Installation overview
| Parameter | State or category | ATD-3200 and ATD 6200 | ATD-3100 and ATD 6100 | ATD-3000 | ATD-6000 |
|---|---|---|---|---|---|
| |||||
| Shipping | -40° C to 70° C (-40° F to 158° F) | -40° C to 70° C (-40° F to 158° F) | -40° C to +70° C (-40° F to +158° F) | -40° C to +70° C (-40° F to +158° F) | |
| Altitude | Operating | Support operation up to 3050 meters (10,000 feet) with ASHRAE class deratings | Support operation up to 3050 meters (10,000 feet) with ASHRAE class deratings | Support operation up to 3050 meters (10,000 feet) | Support operation up to 3050 meters (10,000 feet) |
| Humidity | Shipping | 50% to 90%, non-condensing with a maximum wet bulb of 28°C (at temperatures from 25°C to 35°C) | 50% to 90%, non-condensing with a maximum wet bulb of 28°C (at temperatures from 25°C to 35°C) |
|
|
2 | Installation overview
| Parameter | State or category | ATD-3200 and ATD 6200 | ATD-3100 and ATD 6100 | ATD-3000 | ATD-6000 |
|---|---|---|---|---|---|
| from 25°C to 35°C) | with a maximum wet bulb of 28°C (at temperatures from 25°C to 35°C) | ||||
| Shock | Operating | Half sine, 2 g peak, 11 milliseconds | Half sine, 2 g peak, 11 milliseconds | Half sine, 2 g peak, 11 milliseconds | Half sine, 2 g peak, 11 milliseconds |
| Unpackaged | Trapezoidal, 25 g, velocity change is based on packaged weight | Trapezoidal, 25 g, velocity change is based on packaged weight | Trapezoidal, 25 g, velocity change 136 inches/second (≥40 lbs to < 80 lbs) | Trapezoidal, 25 g, velocity change is based on packaged weight | |
| Packaged | International Safe Transit Association (ISTA) Test Procedure 3A 2008 | International Safe Transit Association (ISTA) Test Procedure 3A 2008 | Non-palletized free fall in height 24 inches (≥40 lbs to < 80 lbs) |
| |
| Vibration | Unpackaged | 5 Hz to 500 Hz, | 5 Hz to 500 | 5 Hz to 500 Hz, | 5 Hz to 500 Hz, |
Trellix Intelligent Sandbox 5.0.x Installation Guide 27
2 | Installation overview
|
Parameter |
State or category |
ATD-3200 and ATD 6200 |
ATD-3100 and ATD 6100 |
ATD-3000 |
ATD-6000 |
|---|---|---|---|---|---|
|
ged |
2.20 g RMS random |
Hz, 2.20 g RMS random |
2.20 g RMS random |
2.20 g RMS random | |
|
Package d |
International Safe Transit Association (ISTA) Test Procedure 3A 2008 |
International Safe Transit Association (ISTA) Test Procedure 3A 2008 |
5 Hz to 500 Hz, 1.09 g RMS random | ||
|
AC-DC |
Voltage |
ATD-3200
ATD-6200
|
ATD-3100
ATD-6100
|
100 - 240 V at 5.8 Amps |
100 - 240 V. 8.5 Amps |
|
Frequen |
47 Hz to 63 Hz |
47 Hz to 63 Hz |
50 - 60 Hz |
50 - 60 Hz | |
|
Source Interrupt |
No Loss of data for power line drop-out of 12 milliseconds |
No Loss of data for power line drop-out of 12 milliseconds | |||
|
Surge |
Unidirectional |
Unidirectional |
2 | Installation overview
| Parameter | State or category | ATD-3200 and ATD 6200 | ATD-3100 and ATD 6100 | ATD-3000 | ATD-6000 |
|---|---|---|---|---|---|
| (Operating and non-operating) | I | ||||
| Line to earth Only |
|
| |||
| ESD | Air Discharged | 12.0 kV | 12.0 kV | +/-12 KV except I/O port +/- 8 KV per Intel® Environmental test specification | 12.0 kV |
| Contact Discharge | 8.0 kV | 8.0 kV | 8.0 kV | ||
| Acoustic noise | Power level <300 W | 7.0 BA | 7.0 BA | Sound power: 7.0 BA in operating conditions at typical office ambient temperature (23 +/- 2 degrees C) | Sound power: 7.0 BA in operating conditions at typical office ambient temperature (23 +/- 2 degrees C) |
| Power level >300 W |
2 | Installation overview
| Parameter | State or category | ATD-3200 and ATD 6200 | ATD-3100 and ATD 6100 | ATD-3000 | ATD-6000 |
|---|---|---|---|---|---|
|
Power level | |||||
|
Power level | |||||
|
Certificat |
Safety certificat |
UL 1950, CSA-C22.2 No. 950, EN-60950, IEC 950, EN 60825, 21CFR1040 CB license and report covering all national country deviations |
UL 1950, CSA-C22.2 No. 950, EN-60950, IEC 950, EN 60825, 21CFR1040 CB license and report covering all national country deviations | ||
|
EMI certificat |
FCC Part 15, Class A (CFR 47) (USA), ICES-003 Class A (Canada), EN55022 Class A (Europe), CISPR22 Class A (Int'l) |
FCC Part 15, Class A (CFR 47) (USA), ICES-003 Class A (Canada), EN55022 Class A (Europe), CISPR22 Class A (Int'l) | |||
Default ports used in Intelligent Sandbox communication
Intelligent Sandbox Appliance uses many ports for network communications.
| Client | Server | Default port | Configurable | Description |
|---|---|---|---|---|
| Any (desktop and REST API) | Intelligent Sandbox | TCP 443 (HTTPS) | No | Access the Intelligent Sandbox web interface |
2 | Installation overview
| Client | Server | Default port | Configurable | Description |
|---|---|---|---|---|
client) | and REST API client. | |||
Any (desktop) | Intelligent Sandbox | TCP | No | For VM activation process and X-mode. |
Any (FTP client) | Intelligent Sandbox | TCP 21 | No | Access the FTP servers on Intelligent Sandbox. |
Any (SFTP client) | Intelligent Sandbox | TCP 22 | No | Access the SFTP servers on Intelligent Sandbox. |
Sensor | Intelligent Sandbox | TCP | No | Communication channel between a Sensor and Intelligent Sandbox. |
Manager | Intelligent Sandbox | TCP 443 | No | Communication between the Manager and Intelligent Sandbox through the RESTful APIs. |
Intelligent Sandbox | McAfee ePO | TCP 8443 | Yes | Host information queries. |
Intelligent Sandbox | atd.repl.gti.trellix.com | TCP 443 | No | File Reputation queries. |
Intelligent Sandbox | List.smartfilter.com | TCP 80 | No | URL updates. |
Intelligent Sandbox | All DXL Brokers in your environment | TCP 8883 | No | DXL connection from TIS to DXL broker |
Intelligent Sandbox | All McAfee ePO in your environment | TCP 443 | No | McAfee Agent on TIS gets DXL certificates from McAfee ePO |
2 | Installation overview
|
Client |
Server |
Default port |
Configurable |
Description |
|---|---|---|---|---|
|
Intelligent Sandbox (DAT updates) |
wpm.webwasher.com wpm1-2.webwasher.com wpm1-3.webwasher.com wpm1-4.webwasher.com tau.skyhigh.cloud tau1-2.skyhigh.cloud tau1-3.skyhigh.cloud tau1-4.skyhigh.cloud tau-usa.skyhigh.cloud tau-europe.skyhigh.cloud tau-asia.skyhigh.cloud rpns.skyhigh.cloud mwg-update.skyhigh.cloud (Akamai CDN) tau-manual.skyhigh.cloud |
TCP 443 (HTTPS) |
No |
Updates for Trellix Gateway Anti-Malware Engine and Trellix Anti-Malware Engine. |
|
Intelligent Sandbox (Software updates) |
atdupdate.trellix.com |
TCP 443 (HTTPS) |
No |
Updates for the Intelligent Sandbox software. The update includes new detection and application package. |
|
Intelligent Sandbox (Telemetry) |
atd.rest.gti.trellix.com |
TCP 443 (HTTPS) |
No |
Sends telemetry data to Trellix. For information on what data is sent, see Configure telemetry in Trellix Intelligent Sandbox Installation Guide. |
|
Any (SSH client) |
Intelligent Sandbox |
TCP 2222 (SSH) |
No |
CLI access. |
Warnings and cautions
Read and follow these safety warnings when you install the Intelligent Sandbox Appliance.
2 | Installation overview
 Caution
Failure to observe these safety warnings could result in serious physical injury.
Power Supply
- The push-button on/off power switch on the front panel of the Intelligent Sandbox Appliance does not turn off the AC power. To remove AC power from the Intelligent Sandbox Appliance, you must unplug the AC power cord from either the power supply or wall outlet for both the power supplies.
- If you press the push-button on/off power switch on the front panel of the Intelligent Sandbox Appliance while the appliance is running, it shuts down. If you want to power off the appliance, use CLI command — shutdown, then after the system halts—press the power button until the appliance turns off.
- The power supplies in your system might produce high voltages and energy hazards, which can cause bodily harm. Only trained service technicians are authorized to remove the covers and access any of the components inside the system.
- Hazardous electrical conditions might be present on power, telephone, and communication cables. Turn off the Intelligent Sandbox Appliance and disconnect telecommunications systems, networks, modems, and both the power cords attached to the Intelligent Sandbox Appliance before opening it. Otherwise, personal injury or equipment damage can result.
- This equipment is intended to be grounded. Ensure that the host is connected to earth ground during normal use.
- To avoid electric shock, do not connect safety extra-low voltage (SELV) circuits to telephone-network voltage (TNV) circuits. LAN ports contain SELV circuits, and WAN ports contain TNV circuits. Some LAN and WAN ports both use RJ-45 connectors. Use caution when connecting cables.
Avoid Injuries
Lifting the Intelligent Sandbox Appliance and attaching it to the rack is a two-person job.
Appliance outer shell
- Do not remove the outer shell of the Intelligent Sandbox Appliance. Doing so invalidates your warranty.
- Do not operate the system unless all cards, faceplates, front covers, and rear covers are in place. The faceplates and cover panels prevent exposure to hazardous voltages and currents inside the chassis. The components might produce high electromagnetic interference (EMI) that might disrupt other nearby equipment.
- Ensure that the appliance is placed in such a manner that flow of cooling air through the chassis is not blocked.
Deployment checklist
To make sure that your network is ready to set up Intelligent Sandbox, review the deployment checklist.
2 | Installation overview
|
Determine... |
Verified |
|---|---|
|
If you environment meets all of the minimum requirements | |
|
The location that you want to install the Intelligent Sandbox Appliance and familiarized yourself with the network access card ports and connectors | |
|
That you have the following information to configure the Intelligent Sandbox Appliance:
| |
|
The type of installation that is best for your network:
| |
|
Which users you want to assign administrator permissions | |
|
If you plan to use Intelligent Sandbox with any compatible Trellix product |
3 | Installation overview
Installing the OS, software, and Email Connector
Your Intelligent Sandbox Appliance comes pre-installed with an operating system and Intelligent Sandbox software. Email Connector is not pre-installed and you need to install it separately.
Operating system and Intelligent Sandbox software for your appliance
You can install Intelligent Sandbox or Virtual Intelligent Sandbox 5.0 through:
- A clean install — Installs Operating system and Intelligent Sandbox 5.0 software. You'd use
ATD_installer.5.0.xxxxx.x86_64.iso.
 Note
Note
- For Virtual Intelligent Sandbox, you can download the appliance installation files for your respective hypervisor from the download site.
- If you are using an Intelligent Sandbox version 4.10.x or older, you need to upgrade to 4.14.x and then upgrade to 5.0 using system
5.0.x.x.xxxxxx.msu.
These are the possible upgrade paths from your current version of the Trellix Intelligent Sandbox software to the latest version.
Starting Trellix Intelligent Sandbox version | Upgrade Path |
|---|---|
4.8.x | 4.8.x » 4.12.0 » 5.0 |
4.10.x | 4.10.x » 4.14.0 » 5.0 |
4.12.x | 4.12.x » 5.0 |
4.14.x | 4.14.x » 5.0 |
Email Connector
Email Connector protects you from email borne threats by analyzing email attachments through Intelligent Sandbox.
3 | Installation overview
Important
Email Connector is not installed by-default when you install Intelligent Sandbox.
To install Email connector:
- Download the Email connector installer from the download site.
- SFTP the installer to your appliance.
- Install Email connector.
Download the product files
Download the Intelligent Sandbox product files from Trellix Downloads page.
Task
- Go to Trellix Product Downloads.
- Enter the grant number and email address associated with the product, then click Submit. The My Products page displays information about your licensed products.
- Click Network Security Reseller Support > Intelligent Sandbox Software.
- Click and download the installation files to your client computer.
Installer package details
Review and identify the packages you would use while installing the Operating system, Intelligent Sandbox software, and Email Connector.
| Installer package name | Description |
|---|---|
| system- 5.0.x.xx.xxxxx.msu |
Intelligent Sandbox software package. This package installs the Intelligent Sandbox software on your appliance. This package does not install Email Connector by-default.
For more information, see the following topics:
|
36 Trellix Intelligent Sandbox 5.0.x Installation Guide
3 | Installation overview
|
Installer package name |
Description |
|---|---|
|
ATD_installer. 5.0.x.xxxxx.x86_64.iso |
Operating System installation package. This package does a clean install of the Operating System for your appliance followed by System.msu upgrade to bring Intelligent Sandbox in 5.0.0. For more information, see:
|
|
vATD-MIO- 5.0_x_xx-xxxxx-xxxxx.ova |
Virtual Intelligent Sandbox installation package for VMWare ESXi. Use this package to deploy a new Virtual Intelligent Sandbox 5.0 on your VMWare ESXi server. This package does not install Email Connector by-default. |
|
hvATD-MIH- 5.0_x_xx-xxxxx-xxxxx.zip |
Virtual Intelligent Sandbox installation package for HyperV. Use this package to deploy a new Virtual Intelligent Sandbox 5.0 on your HyperV server. This package does not install Email Connector by-default. |
|
systemex- 5.0.x.xx.xxxxx.msu |
Email Connector installation package. This package installs email connector on Intelligent Sandbox 5.0 appliance and Virtual Intelligent Sandbox appliance.
For more information, see Install Email Connector. |
4 | Installation overview
Upgrade the software
Upgrade the Intelligent Sandbox software and Android analyzer VM to the latest versions.
When you upgrade the Intelligent Sandbox software:
- You are unable to use the system.msu files to downgrade the Intelligent Sandbox software.
- OpenSSL automatically upgrades.
Upgrade your Intelligent Sandbox software
With every new release, Intelligent Sandbox is optimized for improved performance. Upgrade your Intelligent Sandbox software to the latest version.
Note
Intelligent Sandbox 5.0 is not available for Microsoft Azure.
For more information, refer the migration guide.
Upgrade your Intelligent Sandbox using Web-Interface or Command Line Interface.
Web-Interface
Task
-
Use an SFTP client, such as Filezilla, to log on to the Intelligent Sandbox Appliance.
Log on as the atdadmin user.
-
Upload system-5.0.x.x.xxxxxx.msu to the Intelligent Sandbox root directory:
Make sure that the transfer mode is binary.
-
Use the following to upgrade the Intelligent Sandbox software, then repeat these steps to upgrade the Android analyzer VM.
- Log on to the Intelligent Sandbox web interface as the administrator.
- Click Manage → Image & Software → Software.
- From the System Software drop-down list, select the file.
- Make sure that Reset Database is deselected, then click Install.
- On the installation Status message, click OK.
If you are unable to view the installation Status message, delete the browser cache.
The installation takes a minimum of 20 minutes. It can take more than 20 minutes depending upon the number of sample analysis records present in Intelligent Sandbox and it should not be interrupted.
When the installation completes, the Intelligent Sandbox Appliance restarts.
4 | Installation overview
f. On the reboot Status message, click OK.
If you are unable to view the reboot Status message, delete the browser cache.
-
When the Intelligent Sandbox Appliance starts, log on to the CLI and verify the software version.
-
Log on to the Intelligent Sandbox web interface and verify the following.
-
Software version
-
All data and configuration settings are transferred from the previous Intelligent Sandbox installation
-
-
Click Dashboard, then verify that the VM Creation status is Successful on the VM Status monitor.
Intelligent Sandbox automatically re-creates all analyzer VMs. The amount of time it takes to re-create the analyzer VMs depends on the number of analyzer VMs configured in Intelligent Sandbox.
Command Line Interface
You can upgrade Intelligent Sandbox from CLI using the below command as well:
install msu <system-5.0.x.x.msu> <dbreset>
DBreset=1 : Database will be reset.
DBreset=0 : Database will be preserved.
Note
You may use this command to observe the progress of installation until it is completed and device goes for reboot.
Upgrade the software incrementally
Upgrade the Intelligent Sandbox software to an available patch version.
This application software upgrade option provides an incremental upgrade of the software to an available patch version. For a complete upgrade of the software, you need to download the software from the Trellix Product Downloads page. See the respective sections for detailed instructions on the tasks.
Note
Upgrading the application software also upgrades the detection packages. You would not see any previously installed detection packages after this upgrade. Also, the system services and system might restart during the application software upgrade process.
When updates are available for the application software and detection software package, notification messages appear in the toolbar of the Intelligent Sandbox interface.
4 | Installation overview
Automatically download the latest application software package
Automatically download and install the latest content updates in Intelligent Sandbox Appliance.
Task
-
Log on to the Intelligent Sandbox web interface, then do one of these to access the Content Updates page.
-
Click Click to Update Software from the header.
-
Note
When multiple notifications are available, select Click to Update Software from the list of notifications.
-
Click Manage → Image & Software → Content Update.
-
-
Under Automatic Update, select Application Software, then click Apply.
-
Select the Application Software tab, then click Install against the available software version.
A confirmation message appears before the installation starts. All Intelligent Sandbox services are restarted. Once the process is complete, a status message appears that provides information about a successful upgrade and a suggestion to log on again to the Intelligent Sandbox interface.
-
Log on to the Intelligent Sandbox interface again, then validate whether the upgrade was successful.
-
From the header on Intelligent Sandbox interface, .
-
Verify that the version is listed as Current: Click Manage → Image & Software → Content updates, then click the Application Software tab.
-
In case of any issues with the upgrade, click Revert to reverse the software to the previous backed-up version. You won't see the Revert option if Intelligent Sandbox software has been upgraded using system.msu.
Manually upload the latest application software package
Manually upload and install the latest content updates in Intelligent Sandbox.
Intelligent Sandbox allows you to import a maximum of two versions of the application software. The latest uploaded version is the Current upload by default, and renders the previous upload as Backup.
Task
-
Log on to the Intelligent Sandbox web interface.
-
Click Manage → Image & Software → Content Update.
-
To download the application software package, contact Support.
-
On the Content Updates page, click Browse, then select the application software package.
-
Click Upload.
4 | Installation overview
To reinstate the Backup file as the Current file, click Revert.
Upgrade the Android analyzer VM
Using the Intelligent Sandbox web application, you can upgrade the Android analyzer VM.
Task
-
Log on to the Intelligent Sandbox Appliance using an SFTP client such as FileZilla.
Log on as the atdadmin user.
-
Using SFTP, upload the Android MSU file to the root directory of Intelligent Sandbox.
Tip
Make sure that the transfer mode is binary.
-
After the file is uploaded, log on to the Intelligent Sandbox web application as the admin user and select Manage → Software Management.
-
Under System Software, select the Android MSU file, then click Install.
Note
Ensure that Reset Database is not selected.
-
Click OK on the confirmation message.
The Intelligent Sandbox web application closes, logs out automatically and the status of the installation is displayed in the browser.
- It takes a minimum of 20 minutes for the system software installation to complete.
- If you are not able to view these messages, clear the browser cache.
- When you upgrade Android, the default Android analyzer VM is automatically re-created. This process might take a few minutes to complete.
-
Log on to the web application, and select Manage → System Log.
-
In the System Log page, verify that the
vmcreatortask is successfully completed for the Android analyzer VM.
View the Upgrade log
To upgrade the Trellix Intelligent Sandbox software version, view the upgrade path and version history logs.
4 | Installation overview
Sample upgrade log
The upgrade log displays details such as the current software version, the previous software version, and system details.
Application package [5.0.0.7] installed on [2022-05-25T12:49:56+0530]
Detection package [5.0.0.220525] installed on [2022-05-25T12:50:43+0530]
------------------------------------------------------
Wed May 25 12:51:33 IST 2022 Following version of software are installed
amas build version: 5.0.0.7.c0dfb7
systemex build version: 4.12.4.10.c7e722 [Valid]
email connector version: 7.6-4.12.2.6
buildscript version: 5.0.0.7.c0dfb7-5.0.0
avlabS-xp-v3-5.0.0.7.c0dfb7.msi
avlabS-64-v3-5.0.0.7.c0dfb7.msi
------------------------------------------------------To view the Upgrade logs, log on to the Trellix Intelligent Sandbox and go to Manage → Logs → Upgrade.
5 | Installation overview
Install the Operating system and ATD software to your appliance
You can do a clean install of Intelligent Sandbox on your appliance. The clean install begins with installing the operating system.
Before you begin
Ensure that all previous ISOs and MSUs are removed from the SFTP directory of your Intelligent Sandbox. Use an FTP client to log on to your Intelligent Sandbox to remove these legacy files.
Task
-
Download the operating system installer and transfer it to a USB storage device. To download the installer, follow these steps:
-
Go to Trellix Product Downloads.
-
Enter your grant number and the captcha, then click Submit.
-
Download the Installer which will do both Operating system and Intelligent Sandbox software installation.
ATD Installer: ATD_installer.5.0.x.xxxxx.x86_64.iso
-
-
Make the USB storage device bootable and connect it the Intelligent Sandbox Appliance. To make your USB storage device bootable, follow these steps:
-
Connect your USB storage device to your Linux system.
-
Identify your USB storage device. Use the
dmesgcommand to identify your USB storage device.dmesg | grep sdThe command returns a list of all connected devices on your system.
-
Format your USB storage device. Use the
ddcommand to format your USB storage device.dd if=/dev/zero of=/dev/sdX count=1234 -
Copy the operating system ISO image to your Linux system.
-
Tip
- Minimum required capacity of the USB Storage Device is 4 GB.
- Recommended Linux distributions are CentOS Linux 6.5 or Red Hat Enterprise Linux 7.

Note
Replace
/dev/sdXwith the device name as reported by thedmesgcommand earlier.

Trellix Intelligent Sandbox 5.0.x Installation Guide — page 43
5 | Installation overview
e. Write the operating system ISO image to your USB storage device. Use the dd command to write the image to your USB storage device.
dd if=<OS Installer Location> of=/dev/sdX bs=4M && syncReplace <OS Installer Location> with the full path to the ISO image file you downloaded, sdX with the device name as reported by the dmesg command earlier.
-
Connect the USB Storage Device to your Intelligent Sandbox appliance. Connect your RMM terminal or Intelligent Sandbox Monitor Console and keyboard to your Intelligent Sandbox appliance, then reboot your appliance using the
rebootcommand. -
At the time of reboot, press F6 on the keyboard to enter the boot menu.
-
From the boot device selection prompt, use the up or down arrow keys on the keyboard to select your USB storage device, then press Enter.
The operating system installation begins from the USB storage device.
Important
Installer prompts you to take backup of your data or to proceed with a clean install. Since this is a clean install, any inputs to back up your data will fail. If you want to back up your data, we recommend you follow the migration procedure. For more information, see Trellix Intelligent Sandbox Migration Guide.
-
Click Cancel to cancel the backup prompt, then click Yes to confirm to proceed with a clean install.
Note
The backup prompt screen times out in 120 seconds. If you do not provide any inputs with in the given time, the backup is initiated by default.
Results
The operating system installation now begins. Your appliance will reboot during the course of installation.
Once the operating system installation is complete, system.msu installation will begin automatically. Once the installation is complete, user will see Log on screen in the appliance.
You should refrain from interacting with Console until you see the logon prompt. This is applicable for both USB and RMM methods.
5 | Installation overview
Setting up Intelligent Sandbox IP
Once the operating system and system.msu installations are complete, you can assign the IP to your appliance.
Task
-
Log on to the Intelligent Sandbox Command-line Interface using the default username:
cliadminand password:atdadmin. -
If you have not configured your IP address and Gateway, set them for you appliance with these commands:
-
To set the IP Address
set appliance ip <xxx.xxx.xxx.xxx> <xxx.xxx.xxx.xxx.>
-
To set the gateway
set appliance gateway <xxx.xxx.xxx.xxx>
For more information on these commands, see Trellix Intelligent Sandbox Product Guide.
-
-
Post IP assignment, log on to your Intelligent Sandbox web interface to verify the software version.
Install the operating system to your appliance remotely using RMM
You can choose to install the operating system remotely to your appliance using RMM.
Before you begin
Ensure that all previous ISOs and MSUs are removed from the SFTP directory of your Intelligent Sandbox. Use an FTP client to log on to your Intelligent Sandbox to remove these legacy files.
Task
-
Download the operating system installer. To download the installer, follow these steps:
-
Go to Trellix Product Downloads.
-
Enter your grant number and the captcha, then click Submit.
-
Download the installer which will do both Operating system and Intelligent Sandbox software installation.
ATD Installer:
ATD_installer. 5.0.x.xxxxx.x86_64.iso
-
-
On your web browser, log on to the Intelligent Sandbox RMM IP address (
http://<ATD RMM IP>orhttps://<ATD RMM IP>) and open the Intelligent Sandbox RMM console. If security setting of browser is blocking the page, do the following:-
Disable pop-up blocker for this webpage.
-
Trellix Intelligent Sandbox 5.0.x Installation Guide 45
5 | Installation overview
-
Add the ATD RMM URL to Local Windows Machine. Goto Control panel → Java → Security, then add your ATD RMM URL (for example: http://<ATD RMM IP> or https://<ATD RMM IP>) to the Exception Site List.
-
From the Remote Control tab, then click Launch Console.
Accept the JViewer Launcher security warning and the RMM console for your Intelligent Sandbox appliance is open.
-
On the RMM Console screen click the Device tab, then select Redirect ISO.
-
Browse and select to the operating system installer file on your local windows system.
-
Log on to your Intelligent Sandbox console as
cliadmin. -
Reboot the appliance using the
rebootcommand. -
During start, press F6 to enter the boot menu.
-
From the boot device selection prompt, use the up or down arrow keys on the keyboard to select Virtual CDROM 1.00, then press Enter.
-
The operating system installation begins from the ISO image file.
Important
During the installation, the installer prompts you to take backup of your data or to continue with a clean install. Since this is a clean install, any input to back up your data fails. If you want to back up your data, we recommend you follow the migration procedure. For more information, see Trellix Intelligent Sandbox Migration Guide.
-
Click Cancel on backup notification, then click Yes to continue for clean install.
Results
The operating system installation now begins. Your appliance reboots during installation. Once the operating system installation is complete, system.msu installation will begin automatically.Once the system.msu installation is complete, you will see the Log-on screen to your appliance. You can configure IP to your appliance now.
Installing Virtual Intelligent Sandbox
Trellix Virtual Intelligent Sandbox appliance can be installed and deployed on VMWare ESXi and Microsoft Hyper-V virtual machine environment.
Important
After a successful installation, take a snapshot of the Trellix Virtual Intelligent Sandbox instance in power off state. You might need that later to recover an erroneous installation. There is no USB recovery stick or Remote Management Module available with Trellix Virtual Intelligent Sandbox.
Install a Virtual Intelligent Sandbox instance
Place an order, download the software, then deploy it on the ESXi server.
5 | Installation overview
Before you begin
- Enable the nested virtualization on the VMware ESXi server. In an SSH session of ESXi server, add this property to the configuration file at /etc/vmware/config.
vhv.enable = "TRUE"
Note
Updating
vhv.enable = "TRUE"in /etc/vmware/config is a global change on ESXi host. This change can be done at VM level from vSphere 5.5 and above version. For vATD, edit VM settings and enable the CPU flag for Hardware Virtualization as Expose hardware assisted virtualization to the guest OS. From ESXi host, it then addsvhv.enable = "TRUE"in VM's vmx file.
- Disable EVC mode before creating VMs on VMware ESXi.
- Deploy vATD always on Sandy Bridge or on updated processor architecture.
Note
vATD is not supported on Haswell, Nehalem, and older version processors. For example, VM creation fails if vATD is deployed on a processor architecture which is of an older version than Nehalem.
- From the ESX Web GUI or VCenter VM settings, enable Expose hardware assisted virtualization to the guest OS.
Note
Power off your VM before you change the VM settings.
Attention
Virtual Intelligent Sandbox does not support Dynamic MAC address. Make sure that you set a static MAC address for your Virtual Intelligent Sandbox.
To upgrade from an existing version of Trellix Virtual Intelligent Sandbox, see the Upgrade the software and Android analyzer VM topic in the Trellix Intelligent Sandbox product guide. If you upgrade from a trial version of the software, obtain the license key and grant number from the Trellix order fulfillment team at licensing@trellix.com again and activate it.
Task
- Place a Purchase Order (PO) for Trellix Virtual Intelligent Sandbox, and receive an email with your grant number and license key.
- Go to Trellix Product Downloads with grant number and download the software.
5 | Installation overview
Package name format: vATD-MIO-5_x_x_xx-xxxxx-xxxxx.ova
-
Deploy the software on an ESXi server.
-
From a vSphere client, select File → Deploy OVF Template.
-
Click Browse, locate and select the Trellix Virtual Intelligent Sandbox software, click Open, then click Next.
-
Type a name the OVF template, then click Next.
-
On Disk Format, select Thin Provision, then click Next.
-
On Network Mapping, select a network, then click Next.
-
Review the deployment settings, select Power on after deployment, then click Finish.
-
What to do next
For multiple Trellix Virtual Intelligent Sandbox instances, deploy the OVA again.
Install Virtual Intelligent Sandbox on Hyper-V using the automated script
Place an order, download the software, then use the downloaded script to easily deploy Virtual Intelligent Sandbox on the Hyper-V server.
Before you begin
-
Enable Hyper-V (including Hyper-V Management Tools and Hyper-V Platform) from Control Panel → Programs and Features → Turn Windows features on or off → Hyper-V.
-
Disable Hyper-V compatibility mode on your Hyper-V server.
Virtual Intelligent Sandbox for Hyper-V is supported on the following platforms:
-
Windows Server 2016 Standard (Server with GUI)
-
Windows Server 2016 Datacenter (Server with GUI)
Requirements:
Disk size: 400 GB
RAM size: 48 GB
Virtual CPU Cores: 16
Note
The Hyper-V host and guest must both be on the supported platforms.
For nested virtualization, ensure that you have Hyper-V 2016.
5 | Installation overview
Your downloaded package consists of two scripts. This gives you three methods to install Virtual Intelligent Sandbox on Hyper-V.
- Using setup.exe – Run this file as an administrator to create an instance of Virtual Intelligent Sandbox on Hyper-V.
Note
This VM creation method requires Visual C++ runtime package.
- Using deploy_hvatd.ps1 – Run this PowerShell script to create an instance of Virtual Intelligent Sandbox on Hyper-V.
- Using your own changed deploy_hvatd.ps1 – You can change this PowerShell script according to your needs, then run it to create an instance of Virtual Intelligent Sandbox on Hyper-V.
Note
deploy_hvatd.ps1 is signed by McAfee. If you change the script, it loses the McAfee signature.
Task
- Place a Purchase Order (PO) for Trellix Virtual Intelligent Sandbox, and receive an email with your grant number and license key.
- Log on to Trellix Product Downloads with the grant number and download the software package. Package name format:
hvATD_MIH_5_x_x_xx_xxxxx_xxxxx.zip - Unzip the .zip file to any location on your system.
- Do one of the following:
- Run setup.exe as an Administrator.
The setup automatically creates one instance of Virtual Intelligent Sandbox. The first instance is named hvatd1. You can run setup.exe multiple times depending on the number of Virtual Intelligent Sandbox instances that you require.
- Run deploy_hvatd.ps1 to create an instance of Virtual Intelligent Sandbox on Hyper-V.
Note
You might have to set the execution policy using
Set-ExecutionPolicy RemoteSigned.
5 | Installation overview
 Note
Note
- deploy_hvatd.ps1 is signed by Mcafee. If you change the script, it loses the McAfee signature.
- If you are running the changed script, you need to enabled nested virtualization. Run the following cmdlet to enable nested virtualization:
Set-VMProcessor -VMName <VMName> -ExposeVirtualizationExtensions $true
Replace <VMName> with the name of your Hyper-V virtual machine.
-
Add a network interface for the VMs.
Open Hyper-V Manager, then select a Virtual Intelligent Sandbox instance.
Right-click on the VM, then click Settings.
In the navigation pane, click Add Hardware, then choose a network adapter.
Click Add, then under Network, select the virtual network you want to connect to.
Click OK.
Install Virtual Intelligent Sandbox on Hyper-V manually
Place an order, download the software, then deploy it on Hyper-V server.
Before you begin
- Ensure that you have enabled Hyper-V (including Hyper-V Management Tools and Hyper-V Platform) from Control Panel → Programs and Features → Turn Windows features on or off → Hyper-V.
- Unzip the Virtual Intelligent Sandbox package that you purchased from McAfee. The package includes hvATD.vhdx. This is the disk image of Virtual Intelligent Sandbox.
- Disable Hyper-V compatibility mode on your Hyper-V server.
 Attention
- Virtual Intelligent Sandbox does not support Dynamic MAC address. Make sure that you set a static MAC address for your Virtual Intelligent Sandbox.
Task
Open Hyper-V Manager, then from the Actions pane, select New → Virtual Machine....
-
Type a name for your virtual machine, then click Next.
You can also choose to store your virtual machine at an alternate location.
In the Specify Generation section, choose Generation 1.
In the Assign Memory section, set 48 GB.
In the Configure Networking section, choose a virtual switch.
50
Trellix Intelligent Sandbox 5.0.x Installation Guide
5 | Installation overview
-
In the Connect Virtual Hard Disk section, select Use an existing virtual hard disk.
-
Click Browse, then select hvATD.vhdx, and then click Finish.
Note
If you plan to deploy multiple instances of Virtual Intelligent Sandbox, make a copy of hvATD.vhdx.

-
Right click on the VM, then select Settings → Memory → Processor, then set the processor core to 16.
-
Open PowerShell. Enable nested virtualization using the following command:
Set-VMProcessor -VMName <Target VM’s name > -ExposeVirtualizationExtensions $true
In <Target VM's name>, enter the name of the VM that you created.
-
Set Static IP address and Gateway to the VM using Intelligent Sandbox console.
Prepare your sandbox virtual machine
Prepare your Windows environment to capture malware behaviors in the sandbox.
- Connect to your VM using Remote Desktop Connection and log on to your VM.
- Open Local Users and Groups from the Control Panel.
- In the left page, click Users.
- In the right page, select a user and rename it to Administrator.
- Set the Administrator password to cr@cker42.
- Restart your VM.
- Log on to your VM, then open Control Panel → System → Advanced system settings.
- In the Advanced Tab of the System Properties window, under Performance, select Settings....
- In the Performance Options windows, select Advanced → Change....
- In the Virtual Memory windows, select Automatically manage paging file size for all drives, then click OK.
- Install and configure Adobe Reader.
- To analyze PDF files, download Adobe Reader to the native host and install it to the VM.
- In Adobe reader, if Adobe Reader Protected Mode message appears, click Open with Protected Mode disabled, then click OK.
- If Accessibility Setup Assistance message appears, click Cancel.
- Select Edit → Preferences → Updater, select Do not download or install updated automatically, select OK, then select Yes to confirm the changes.
- Install and configure Java.
- Open Registry Editor.
- Navigate to HKEY_LOCAL_MACHINE\SOFTWARE\Wow6432Node\JavaSoft\Java Update\Policy\EnableJavaUpdate.
- Set its value to 0.
Trellix Intelligent Sandbox 5.0.x Installation Guide
51
5 | Installation overview
-
Install and configure Adobe Flash Player.
-
Run the command prompt as an Administrator.
-
Execute the following command:
dism.exe /online /add-package /packagepath:"<Adobe-Flash-For-Windows-Package>.mum"
-
-
Run the VM Provisioner Tool.
-
Shrink the volume to about between 20 GB and 30 GB and leave the rest unallocated.
-
Download Disk2vhd and extract it on your VM.
You can download Disk2vhd from:
https://docs.microsoft.com/en-%20us/sysinternals/downloads/disk2vhd
-
Run the extracted disk2vhd.exe file.
-
Select your primary drive, then click Create.
-
After, the VHDX file is created reduce its virtual size.
-
Open PowerShell.
-
Run the following command:
Resize-VHD -Path <path to your vhdx file> -ToMinimumSize
-
-
Convert your VHDX file to an image file.
For details about how to convert your VHDX file to an image file, see Trellix Intelligent Sandbox Product Guide.
 Note
Note
Replace <Adobe-Flash-For-Windows-Package> with the name and path of the Adobe Flash for Windows package MUM file.
Note
Resize-VHD command is available only on systems with the Hyper-V module.
Activate the product
Activate your Trellix Virtual Intelligent Sandbox software using a temporary or permanent license key.
Obtain the license key and grant number from the Trellix order fulfillment team at licensing@trellix.com.
Trellix Virtual Intelligent Sandbox supports these license key types:
- 30-days trial key — A temporary license valid for 30 days is obtained on the initial purchase of the product. This license is
52 Trellix Intelligent Sandbox 5.0.x Installation Guide
5 | Installation overview
based on the version of the Trellix Virtual Intelligent Sandbox software that you install.
- Permanent license key — A permanent license is purchased for a certain period. At the time of purchase, you can provide the end date of the permanent license. This license is based on the system ID of the Trellix Virtual Intelligent Sandbox instance.
You also need the grant number to activate your product.
Activate the product using the temporary key
Activate your Trellix Virtual Intelligent Sandbox software using the temporary license key.
Task
- Save temporary license key file to desktop and make a note of grant number from the grant email.
- Log on to the Trellix Virtual Intelligent Sandbox interface.
When you log on for the first time, you would see a message box requesting to activate Intelligent Sandbox instance with a license. Click OK to close the box or click Help for further assistance.
- Select Manage → ATD Configuration → Licensing.
- Click Browse, locate and select the temporary license file, then click Open.
- Type the grant number, then click Activate.
Once the process is complete, the license details appear in the License Information section.
- Check whether:
- The license status is Activated.
- The validity date is correct.
Note
ATD-3200/ ATD-6200 does not require license after upgrade to Intelligent Sandbox version 4.12.
Activate the product using the permanent key
Obtain a permanent license key and activate your Trellix Virtual Intelligent Sandbox software.
Task
- Obtain the system ID from the command line interface or web-interface of the Trellix Virtual Intelligent Sandbox software instance.
Command line interface
- Log on to the command line interface with a valid user name.
Trellix Intelligent Sandbox 5.0.x Installation Guide
53
5 | Installation overview
The default user name is cliadmin and password is atdadmin.
-
Run
show system id. -
From the result, make a note of the System ID from the result.
Web-interface
-
Log on to the Trellix Virtual Intelligent Sandbox interface.
-
Select Manage → TIS Configuration → Licensing → Licensing
-
From the License Information section, make a note of the Device System ID.
-
Send an email with the System ID to the Trellix order fulfillment team at licensing@trellix.com.
You can send System IDs of all Trellix Virtual Intelligent Sandbox instances.
-
After you receive an email with the grant number and license key, register your product on the Manage → TIS Configuration → Licensing page.
-
Click Browse, locate and select the permanent license file, then click Open.
-
Type the grant number, then click Activate.
Once the process is complete, the license details appear in the License Information section.
-
Check whether:
The license status is Activated.
The validity date is correct.
The system ID is correct.
Install Email Connector
Email connector is not installed with the Intelligent Sandbox software. You need to install this feature separately, then configure your email gateway to send emails to Intelligent Sandbox for analysis.
Ensure that your appliance does not have an existing
atdecuser account. This user account is dedicated for Email Connector to communicate with Intelligent Sandbox.Configure
eth0as the management interface. Email traffic on any other interface will not be redirected to the Email Connector.
Task
Download
systemex-5.x.x.xx.xxxxx.msufrom Trellix Product Downloads.Upload the package to the appliance using SFTP with the
atdadminaccount.Log on to the Intelligent Sandbox web interface.
On the right pane, select Image & Software → Software.
In the Manage tab, under System Software section, from the drop-down select
systemex-5.x.x.xx.xxxxx.msu.Click Install, then follow the on-screen instructions to complete the installation.
5 | Installation overview
Results

Note
- If you have configured a cluster, ensure that you install Email connector in your primary as well as the back up nodes.
- The Intelligent Sandbox dashboard shows the systemex version number under the System information monitor. To configure email connector, see Intelligent Sandbox Product Guide.
Creating analyzer VMs
Intelligent Sandbox uses secure virtual machines, or analyzer VMs, for dynamic analysis. During dynamic analysis, Intelligent Sandbox executes suspicious files in the analyzer VM, then monitors the file behavior for malicious activities.
Note
The number of analyzer VMs you can create is limited by the following conditions:
- The available Intelligent Sandbox Appliance disk space.
- The disk space occupied by the operating system.
Intelligent Sandbox limits the maximum number of analyzer VMs you can use for analysis.
- ATD-3000 — 29 analyzer VMs
- ATD-6000 — 59 analyzer VMs
- ATD-3100 — 29 analyzer VMs
- ATD-6100 — 59 analyzer VMs
- ATD 3200 — 29 analyzer VMs
- ATD-6200 — 59 analyzer VMs
The number of concurrent licenses that you specify affects the number of concurrent active analyzer VMs.
Any security software or low-level utility tool on an analyzer VM can interfere with the dynamic analysis of the sample file. The sample-file execution can be closed during dynamic analysis. As a result, the reports might not capture the full behavior of the sample file. If you need to find out the complete behavior of the sample file, do not update the operating system of the analyzer VM or install any security software on it.
Important
- Make sure that you upload the VMDK to your Intelligent Sandbox before activating your Microsoft Windows and Office. Use the Activation feature available in the Intelligent Sandbox Web interface. For more information, see Create VM profiles.
- If you activate your Microsoft Windows and Microsoft Office on VMware Workstation, VMware ESXi Server, or Microsoft Hyper-V, your licenses are lost due to change in hardware.
Create a VM using the VM Builder
The VM Builder tool makes it easier for you to create VMs for VMware ESXi. The tool allows you to include all needed installers and OS ISO, then seamlessly create VMs for you. The tool supports operating systems configured only for the English language.
6 | Installation overview
Before you begin
- Enable SSH on ESXi 6.0 Server.
- Add the following USB Pass-through and reboot ESXi:
- C600/X79 series chipset USB2 Enhanced Host Controller #1
- C600/X79 series chipset USB2 Enhanced Host Controller #2
- Copy the following installers to a USB drive. Ensure that the USB driver is formatted with NTFS file system.
- Adobe Reader
- Adobe Flash Player
- Java
- Microsoft Office
- Microsoft Visual C++ Redistributable
- Web browser - Internet Explorer, Chrome, Firefox, and Microsoft Edge (we support Microsoft Edge only on Windows 10 OS)
- Upload the Windows ISO to the ESXi Datastore.
- Download and install Visual C++ 2012 Redistributable (x86) on your local system.
Task
-
Download the VM Builder tool:
- Log on to Intelligent Sandbox.
- Click Manage → Image & Software → Image, then click Download VM Builder Tool.
- Run the VM Builder Tool as an Administrator.
- Type the IP address, user name, password, and port of your ESXi, then select the checkbox.
-
Click Test SSH Connection, and then click Next.
If you are prompted to store the RSA2 key fingerprints, type 'y' and press enter.
-
From the drop-down, select the Datastore from the list, then click Fetch ISO.
The tool fetches all datastore from $/vmfs/volumes/ on ESXi.
- From the list of Windows ISO, select an ISO for your Windows VM.
- From the drop-down, select the OS corresponding to the ISO that you have selected, then click Select OS.
- Change the VM name if needed, then click Check Availability, click Next.
- Use the browse icon to select the USB drive where you have copied the installer files.
- Choose the installer for the corresponding software.
Note
- Visual C++ 2012 Redistributable (x86) must be installed.
- All installers must be offline installers.
- All installers must be compatible with the respective operating systems.
6 | Installation overview
If you do not want to install any of the other software except VC++, you can leave the respective field blank.
Click Next to continue.
Type the License key for Microsoft Windows and Office, then click Next.
Note
- License key for Windows 10 and Windows Server Edition is mandatory.
- Office is activated automatically only if you enter the license key. An Internet connection is required for activation.
Review the Summary, click Create VM.
Important
Ensure that you connect your USB to the VM in 10 seconds of the VM creation.
Open vSphere Client, and select the VM that you create using VM Builder.
From the toolbar, click the USB icon, and select your USB drive.
Once the USB is connected, your Windows OS automatically begins installation.
If you could not connect the USB drive to the VM in 10 Sec, the VM Builder prompts you to reset the VM. Click Yes and the VM gets reset. Now connect the USB in 10 secs.
Results
- Once the virtual machine is created, the VM Provisioner tool executes automatically. After the VM Provisioner tool completes the checks, review the VM Provisioner log on the C drive of the virtual machine. If you see any issues, correct them and run VM Provisioner tool again.
- If the network is disconnected while the USB is connected to VM, the USB might crash.
Solution: Restart your local system. You might lose some settings on your VM.
- vSphere Client takes a long time to connect the USB drive.
Solution: Log on again to vSphere Client, then connect the USB, and reset the VM.
Create a virtual machine on VMware Workstation
To create the virtual machine, you must complete the New Virtual Machine Wizard.
Task
Make sure you have your operating system ISO image and license key.
6 | Installation overview
- Download and install VMware Workstation 9.0 or later.
- Start the VMware Workstation.
- On the VMware Workstation page, select File → New Virtual Machine.
- To complete the New Virtual Machine Wizard, configure the following options, then click Next on each page.
Note
These steps are documented based on VMware Workstation 12 Pro.
|
Window name |
Configuration options |
|---|---|
|
Welcome to the New Virtual Machine Wizard |
Select Custom (Advanced). |
|
Choose the Virtual Machine Hardware Compatibility |
From the Hardware drop-down list, choose the Workstation version based on the following criteria:
For all other fields, use the default values. |
|
Guest Operating System Installation |
Select one of these options:
|
|
Select a guest Operating System Installation |
|
6
Installation overview
| Window name | Configuration options |
|---|---|
| |
Easy Install Information
|
Enter the following:
If the VMware Workstation message displays, click Yes. |
Name the Virtual Machine |
Enter the following:
|
|
Firmware type |
Select BIOS. |
|
Processor Configuration |
Use default values or processor: 2, core: 1. |
|
Memory for the Virtual Machine |
Enter the amount of RAM for your operating system. See Analyzer VM requirements to know the RAM size required for your operating system. |
|
Network Type |
Use the default value. |
|
Select I/O Controller Types |
Use the default value or LSI Logic SAS. |
|
Select a Disk Type |
Select IDE. |
| Window name | Configuration options |
|---|---|
|
| |
| Select a Disk | Select Create a new virtual disk. |
| Specify Disk Capacity |
Enter the Maximum disk size (30 GB), then select these options:
|
| Specify Disk file | Make sure that the <virtual machine image name.vmdk> appears in the field. |
| Click Customize Hardware (only for Windows 11) |
Follow the below steps:
|
| Ready to Create Virtual Machine |
Click Finish. This step can take up to 30 minutes to complete. |
Note
The sandbox VMs will be updated to multi processors during VM profile creation process on ATD.
Create a virtual machine on VMWare ESXi
To create the virtual machine, you must complete the New Virtual Machine Wizard.
Task
- Make sure you have your operating system ISO image and license key.
- Download and install VMware ESXi.
- Start the VMware ESXi.
- On the VMware ESXi page, select File → New → New Virtual Machine.
Trellix Intelligent Sandbox 5.0.x Installation Guide
61
6 | Installation overview
5. Configure the following options, then click Next on each page.
|
Section name |
Configuration options |
|---|---|
|
Configuration |
Select Custom. |
|
Name and Location |
Type a name for your virtual machine. |
|
Resource Pool |
Select a resource pool within which you wish to run your virtual machine. |
|
Storage |
Select a location where you'd want to store your virtual machine. |
|
Virtual Machine Version |
Select a virtual machine version to use.
|
|
Guest Operating System |
Select the operating system and its version that you plan to install on this virtual machine. |
|
CPUs |
Select the number of CPUs for your virtual machine. We recommend you use the default values. |
|
Memory |
Select an appropriate RAM size for your virtual machine. |
|
Network |
Select the number of network cards for the virtual machine and choose what network it can connect to. We recommend you choose E1000 virtual NIC. |
|
SCSI Controller |
Select LSI Logic SAS. |
|
Select a Disk |
Select Create a new virtual disk. |
|
Create a disk |
Set an appropriate disk space, then select Thin Provision. |
|
Advanced Options |
In Virtual Device Node, select IDE (0:0). |
|
Ready to Complete |
Review the settings you of your new virtual machine. |
6 | Installation overview
|
Section name |
Configuration options |
|---|---|
|
Select Edit the virtual machine settings before, then click Continue. |
-
Select your new virtual machine, then click Edit virtual machine settings.
-
In the Virtual Machine Properties page, do the following:
-
Select CD/DVD Drive1.
-
In Device Status, enable Connect at power on.
-
In Datastore ISO File, use Browse to provide the location of the operating system you plan to install in your virtual machine.
-
In Virtual Machine Node, select IDE (1:0).
-
-
Click Finish.
Note
The sandbox VMs will be updated to multi processors during VM profile creation process on ATD.
Create a virtual machine on Hyper-V Manager
This topic explains how to create a virtual machine in Microsoft Hyper-V Manager.
Ensure that you have enabled Hyper-V (including Hyper-V Management Tools and Hyper-V Platform) from Control Panel → Programs and Features → Turn Windows features on or off → Hyper-V.
Note
Intelligent Sandbox does not support the following operating systems on Hyper-V:
Microsoft Windows XP
Microsoft Windows Server 2003
Microsoft Windows 8 32-bit
Task
-
Open Hyper-V Manager, then from the Actions pane, select New → Virtual Machine....
Trellix Intelligent Sandbox 5.0.x Installation Guide
63
6 | Installation overview
-
Type a name for your virtual machine, then click Next.
You can also choose to store your virtual machine at an alternate location.
-
In the Specify Generation section, choose Generation 1.
-
In the Assign Memory section, type the appropriate RAM size.
-
In the Configure Networking section, choose a virtual switch.
-
In the Connect Virtual Hard Disk section, select Create a virtual hard disk.
-
Type a name for the hard disk.
-
Specify the location where you want to save the VHDX file.
-
Type an appropriate size for the hard disk, then click Next.
-
-
In the Installation Options section, select Install an operating system from a bootable CD/DVD-ROM.
-
Select Image file (.iso), then browse and select the image file, then click Next.
-
In the Summary page, review the settings, then click Finish.
Note
The sandbox VMs will be updated to multi processors during VM profile creation process on ATD.
Create a virtual disk file
Create a virtual disk file of the ISO image on VMWare or Hyper-V.
Create a virtual disk file for Windows XP
If you are using Windows XP, use the following steps to create the virtual disk file.
Task
-
Complete the Windows XP setup.
-
On the Setup cannot continue until you enter your name. Administrator and Guest are not allowable names to use message, click OK.
-
In the Windows XP Professional Setup window, enter the following, then click Next.
-
Name — root
-
Organization — Leave blank.
-
-
If prompted, log on to virtual machine image with the following credentials.
-
User — administrator
-
Password — cr@cker42
-
-
-
In the Virtual Machine Settings window, select CD/DVD (IDE).
-
Next to the Use ISO image file field, click Browse, locate the ISO file, then click OK.
-
Download and install the following Redistributable Packages and .NET Framework.
-
Microsoft Visual C++ 2005 Redistributable Package (x86)
-
6 | Installation overview
- Microsoft Visual C++ 2008 Redistributable Package (x86)
- Microsoft Visual C++ 2010 Redistributable Package (x86)
- Microsoft .NET Framework 3.5 Service Pack 1 (x86)
5. Run the VM Provisioner tool as an administrator or prepare the image for analysis manually.
Note
The VM administrator password cr@cker42 is required for VM profile creation. ATD system updates it to a random string as a part of VM creation. The running sandbox VM will have a random password.
Create a virtual disk file for Windows Server 2003
If you are using Windows Server 2003, use the following steps to create the virtual disk file.
-
In the VMware ESXi, turn on the virtual machine, then install Windows Server 2003.
- This step can take up to 30 minutes.
- To format the partition during installation, you can use the NTFS file system.
-
For each Windows setup window, configure the options, then click Next.
Window name | Configuration options |
Regional and Language Options | Configure the settings for your environment. |
Windows Setup |
Enter the following credentials:
|
Your Product Key | Enter the product key. |
Licensing Modes | Select Per Server, then enter the number of concurrent connections. |
Computer Name and Administrator Password |
Configure the following options:
|
6 | Installation overview
|
Window name |
Configuration options |
|---|---|
|
Date and Time Settings |
Use the default values. |
|
Network Settings |
Use the default values. |
|
Workgroup or Computer Domain |
Use the default values. |
-
To log on to the virtual machine, use these credentials:
-
User —
administrator -
Password —
cr@cker42
-
-
In the Windows Server Post-Setup Security Updates window, click Finish.
-
If you are using Windows Server 2003 SP1, complete the following.
-
Install the hotfix for Microsoft Windows Server 2003.
-
Restart your computer.
-
On the command prompt, enter
tlntsvr /service, then press Enter.
-
-
Download and install the following Redistributable Packages and .NET Framework.
Microsoft Visual C++ 2005 Redistributable Package (x86)
Microsoft Visual C++ 2008 Redistributable Package (x86)
Microsoft Visual C++ 2010 Redistributable Package (x86)
Microsoft .NET Framework 3.5 Service Pack 1 (x86)
-
Run the VM Provisioner tool as an administrator or prepare the image for analysis manually.
Note
The VM administrator password
cr@cker42is required for VM profile creation. ATD system updates it to a random string as a part of VM creation. The running sandbox VM will have a random password.
Create a virtual disk file for Windows 7
If you are using Windows 7, use the following steps to create the virtual disk file.
-
From the installation wizard, select the language, time and currency format, keyboard or input method, then click Next.
-
Click Install Now, then click Next.
-
Accept the license terms, then click Next.
-
On the Windows Setup page, select Custom: Install Windows only (advanced), leave the default disk space settings,
6 | Installation overview
then click Next.
- Use the following credentials to create an account:
- User name — administrator
- Password — cr@cker42
- In the Removable Devices window, select Do not show this hint again, then click OK.
The Windows installation can take up to 15 minutes.
- In the Set Network Location window, select Public Network, then close the window.
- Download and install Microsoft .NET Framework 4.6.1.
- Run the VM Provisioner tool as an administrator or prepare the image for analysis manually.
Note
The VM administrator password cr@cker42 is required for VM profile creation. ATD system updates it to a random string as a part of VM creation. The running sandbox VM will have a random password.

Create a virtual disk file for Windows 8
If you are using Windows 8, use these steps to create the virtual disk file.
- From the installation wizard, select the language, time and currency format, keyboard or input method, then click Next.
- Click Install Now, then click Next.
- Accept the license terms, then click Next.
- On the Windows Setup page, select Custom: Install Windows only (advanced), leave the default disk space settings, then click Next.
- In the Settings window, select Use Express settings.
- In sign in to your PC, select Sign in without a Microsoft Account, then select Local Account.
- Use the following credentials to create an account:
- User name — administrator
- Password — cr@cker42
- Configure Adobe Reader as the default application to open PDF files.
- Open the Control Panel, then select Programs → Default Programs → Associate a file type or protocol with a program.
- Double-click .pdf, then select Adobe Reader.
- Click Close.
- In the Removable Devices window, select Do not show this hint again, then click OK.
The Windows installation can take up to 15 minutes.
- To log on to the virtual machine Image, use these credentials:
6 | Installation overview
- Administrator
- cr@cker42
- To switch to desktop mode, click the desktop tile.
- Download and install Microsoft .NET Framework 4.6.1 and above.
- Run the VM Provisioner tool as an administrator or prepare the image for analysis manually.
Note
The VM administrator password cr@cker42 is required for VM profile creation. ATD system updates it to a random string as a part of VM creation. The running sandbox VM will have a random password.
Create a virtual disk file for Windows Server 2008
If you are using Windows Server 2008, use the following steps to create the virtual disk file.
Task
- From the installation wizard, select the language, time and currency format, keyboard or input method, then click Next.
- Click Install Now, then click Next.
- Accept the license terms, then click Next.
- On the Windows Setup page, select Custom (advanced), leave the default disk space settings, then click Next.
- Set password for administrator account.
- In the Removable Devices window, select Do not show this hint again, then click OK.
The Windows installation can take up to 15 minutes.
- In the Initial Configuration Tasks window, select Do not show this window at logon, then click Close.
- Log on to the computer, then download the following packages:
- Microsoft Visual C++ 2005 Redistributable Package (x86)
- Microsoft Visual C++ 2008 Redistributable Package (x86)
- Microsoft Visual C++ 2010 Redistributable Package (x86)
- Microsoft .NET Framework 4.6.1
- Run the VM Provisioner tool as an administrator or prepare the image for analysis manually.
The VM administrator password cr@cker42 is required for VM profile creation. ATD system updates it to a random string as a part of VM creation. The running sandbox VM will have a random password.
6 | Installation overview
Create a virtual disk file for Windows 8.1
If you are using Windows 8.1, use these steps to create the virtual disk file.
Task
-
From the installation wizard, select the language, time and currency format, keyboard or input method, then click Next.
-
Click Install Now, then click Next.
Installation process is completed in various stages. The setup is first initialized.
-
On the Activate Windows page, enter your Windows product key, or select I don't have a product key to activate it later, then click Next.
-
Accept the license terms, then click Next.
-
On the Windows Setup page, select Custom: Install Windows only (advanced), use the default disk space settings, then click Next.
The step is completed in five stages. Wait for all stages to complete.
-
In the Settings window, select Use Express settings.
-
For the type of owner, select I own it, then click Next.
-
Asked to enter your Microsoft Account Details, select Skip this step.
-
Asked to create an account, use these credentials, then click Next.
User name —
administratorPassword —
cr@cker42
-
Asked about Cortana, select Not now.
-
Wait until the installation is complete, then install the required software.
-
Check that these redistributable packages are installed.
Microsoft Visual C++ 2005 Redistributable Package (x86)
Microsoft Visual C++ 2008 Redistributable Package (x86)
Microsoft Visual C++ 2010 Redistributable Package (x86)
Microsoft .NET Framework 4.6.1 and above
-
Run the VM Provisioner tool as an administrator or prepare the image for analysis manually.
Note
The VM administrator password
cr@cker42is required for VM profile creation. ATD system updates it to a random string as a part of VM creation. The running sandbox VM will have a random password.
Create a virtual disk file for Windows 10
If you are using Windows 10, use these steps to create the virtual disk file.
6 | Installation overview
Task
-
From the installation wizard, select the language, time and currency format, keyboard or input method, then click Next.
-
Click Install Now, then click Next.
Installation process is completed in various stages. The setup is first initialized.
-
On the Activate Windows page, enter your Windows product key, or select I don't have a product key to activate it later, then click Next.
-
Accept the license terms, then click Next.
-
On the Windows Setup page, select Custom: Install Windows only (advanced), use the default disk space settings, then click Next.
The step is completed in five stages. Wait for all stages to complete.
-
Choose United States in region, and in primary keyboard, select English (United States).
-
In the Settings window, select Use Express settings.
-
For the type of owner, select I do, then click Next.
-
In the Make it yours window, select Skip this step.
-
In the Meet Cortana windows, select Not now.
-
In the Choose how you'll connect' window, select Join a local Active Directory domain.
-
In the Create an account for this PC window, use these credentials, then click Next.
User name —
adminPassword —
cr@cker42
-
In the Choose Privacy settings window, keep the default settings, then click Next.
-
Wait until the installation is complete, then install the required software.
-
Run the VM Provisioner tool as an administrator or prepare the image for analysis. On Windows 10, Administrator account is disabled by default. To enable, do the following:
Run VM Provisioner Tool as a non-administrator user.
Restart the virtual machine.
The Administrator account is enabled once the virtual machine is started.
Log on to Windows as the Administrator user.
Run VM Provisioner Tool again.
-
Check that these redistributable packages are installed.
Microsoft Visual C++ 2005 Redistributable Package (x86)
Microsoft Visual C++ 2008 Redistributable Package (x86)
Microsoft Visual C++ 2010 Redistributable Package (x86)
Microsoft Visual C++ 2012 Redistributable Package (x86)
Microsoft .NET Framework 4.7 and above
Note
adminand Administrator user accounts are not the same.
6 | Installation overview
Note
The VM administrator password cr@cker42 is required for VM profile creation. ATD system updates it to a random string as a part of VM creation. The running sandbox VM will have a random password.
Note
If you are using any later build/version of win 10 1909.18363.418, it's required to switch off tamper protection manually inside win 10 VMs for better detection.
Following are the steps to turn off Tamper Settings:
- Click on the Start button.
- Click on Settings.
- Go to Updates and Security
- Select Windows Security
- Switch to Virus and Threat Protection
- Select Manage Settings
- Scroll a bit to find Tamper Protection
- Toggle Off
.
Create a virtual disk file for Windows 11
If you are using Windows 11, use these steps to create the virtual disk file. We recommend that you disable the Internet when creating Windows 11 virtual disks in order to prevent Microsoft from updating Windows Defender.
Task
- From the installation wizard, select the language, time and currency format, keyboard or input method, then click Next. Install Now page is displayed.
- Open command prompt and run the following commands:
reg add HKLM\System\Setup\LabConfig /v BypassTPMCheck /t reg_dword /d 0x00000001 /f > NULreg add HKLM\System\Setup\LabConfig /v BypassSecureBootCheck /t reg_dword /d 0x00000001 /f > NULreg add HKLM\System\Setup\LabConfig /v BypassRAMCheck /t reg_dword /d 0x00000001 /f > NULreg add HKLM\System\Setup\LabConfig /v BypassStorageCheck /t reg_dword /d 0x00000001 /f > NULreg add HKLM\System\Setup\LabConfig /v BypassCPUCheck /t reg_dword /d 0x00000001 /f > NUL
- Close the command prompt and click Install Now, then click Next. Installation process is completed in various stages. The setup is first initialized.
- On the Activate Windows page, enter your Windows product key, or select I don't have a product key to activate it later, then click Next.
- Accept the license terms, then click Next.
- On the Windows Setup page, select Custom: Install Windows only (advanced), use the default disk space settings, then ...
Trellix Intelligent Sandbox 5.0.x Installation Guide
6 | Installation overview
click Next.
The step is completed in five stages. Wait for all stages to complete.
- Choose United States in region, and in primary keyboard, select English (United States).
- In the Settings window, select Use Express settings.
- For the type of owner, select I do, then click Next.
- In the Make it yours window, select Skip this step.
- In the Meet Cortana windows, select Not now.
- In the Choose how you'll connect' window, select Join a local Active Directory domain.
- In the Create an account for this PC window, use these credentials, then click Next.
- User name —
admin - Password —
cr@cker42
- User name —
- In the Choose Privacy settings window, keep the default settings, then click Next.
- Wait until the installation is complete, then install the required software.
- Run the VM Provisioner tool as an administrator or prepare the image for analysis. On Windows 11, Administrator account is disabled by default. To enable, do the following:
- Run VM Provisioner Tool as a non-administrator user.
- Restart the virtual machine.
The Administrator account is enabled once the virtual machine is started.
- Log on to Windows as the Administrator user.
- Run VM Provisioner Tool again.
Note
adminand Administrator user accounts are not the same.
- Check that these redistributable packages are installed.
- Microsoft Visual C++ 2005 Redistributable Package (32-bit and 64-bit)
- Microsoft Visual C++ 2008 Redistributable Package (32-bit and 64-bit)
- Microsoft Visual C++ 2010 Redistributable Package (32-bit and 64-bit)
- Microsoft Visual C++ 2012 Redistributable Package (32-bit and 64-bit)
- Microsoft Visual C++ 2015 Redistributable Package (32-bit and 64-bit)
- Microsoft Visual C++ 2017 Redistributable Package (32-bit and 64-bit)
- Microsoft Visual C++ 2019 Redistributable Package (32-bit and 64-bit)
- Microsoft .NET Framework 3.5 and above which must be enabled manually or via an offline executable.
Note
- The VM administrator password
cr@cker42is required for VM profile creation. ATD system updates it to a random string as a part of VM creation. The running sandbox VM will have a random password.- If you are using any later build/version of Windows 11, its required to switch off tamper protection manually inside Windows 11 VMs for better detection.
6 | Installation overview
Following are the steps to turn off Tamper Settings:
-
Click on the Start button.
-
Search for Windows Security and select the top result to open the application.
-
Click Virus and Threat Protection
-
Under the Virus and Threat Protection section, select the Manage Settings option.
-
Disable Tamper Protection.
.
Create a virtual disk file for Windows 2012
If you are using Windows 2012, use these steps to create the virtual disk file.
Task
-
From the installation wizard, select the language, time and currency format, keyboard or input method, then click Next.
-
Click Install Now, accept the license terms, then click Next.
-
Select Custom Install Windows, Windows Server 2012 Datacenter, use the default disk space settings, then click Next.
Installation process is completed in various stages. -
Set password for administrator account.
-
Log on to the computer, then download and install the following redistributable packages and .NET framework.
- Microsoft Visual C++ 2005 Redistributable Package (x86)
- Microsoft Visual C++ 2008 Redistributable Package (x86)
- Microsoft Visual C++ 2010 Redistributable Package (x86)
- Microsoft .NET Framework 4.6.1
-
Run the VM Provisioner tool as an administrator or prepare the image for analysis manually.
Create a virtual disk file for Windows 2012 R2
If you are using Windows 2012 R2, use these steps to create the virtual disk file.
Task
-
From the installation wizard, select the language, time and currency format, keyboard or input method, then click Next.
-
Click Install Now, accept the license terms, then click Next.
-
Select Custom Install Windows, Windows Server R2 2012 Datacenter, use the default disk space settings, then click Next.
Installation process is completed in various stages. -
Set password for administrator account.
Trellix Intelligent Sandbox 5.0.x Installation Guide
73
6 | Installation overview
-
Log on to the computer, then download and install the following redistributable packages and .NET framework.
Microsoft Visual C++ 2005 Redistributable Package (x86)
Microsoft Visual C++ 2008 Redistributable Package (x86)
Microsoft Visual C++ 2010 Redistributable Package (x86)
Microsoft .NET Framework 4.6.1
-
Run the VM Provisioner tool as an administrator or prepare the image for analysis manually.
Create a virtual disk file for Windows Server 2016/2019 Standard
If you are using Windows Server 2016/2019 Standard, use these steps to create the virtual disk file.
Task
-
From the installation wizard, select the language, time and currency format, keyboard or input method, then click Next.
-
Click Install Now, accept the license terms, then click Next.
-
Select Custom Install Windows, Windows Server 2016 Standard (or Windows Server 2019 Standard), use the default disk space settings, then click Next.
Installation process is completed in various stages.
-
Set password for administrator account.
-
Log on to the computer, then download and install the following redistributable packages and .NET framework.
Microsoft Visual C++ 2005 Redistributable Package (32-bit and 64-bit)
Microsoft Visual C++ 2008 Redistributable Package (32-bit and 64-bit)
Microsoft Visual C++ 2010 Redistributable Package (32-bit and 64-bit)
Microsoft Visual C++ 2012 Redistributable Package (32-bit and 64-bit)
Microsoft Visual C++ 2013 Redistributable Package (32-bit and 64-bit)
Microsoft Visual C++ 2019 Redistributable Package (32-bit and 64-bit)
Microsoft .NET Framework 4.6.2
-
Run the VM Provisioner tool as an administrator or prepare the image for analysis manually.
Install Microsoft Office on the virtual machine
To install Microsoft Office on the virtual machine, you must download the compatibility pack from Microsoft.
Task
-
In the Microsoft Office Setup window, select the following options, then click Next.
Microsoft Word
Microsoft Excel
Microsoft PowerPoint
74
Trellix Intelligent Sandbox 5.0.x Installation Guide
6 | Installation overview
-
To open Microsoft Office files created in a newer version of Microsoft Office, install the compatibility pack.
Download the required Microsoft Office compatibility pack for Word, Excel, and PowerPoint file formats.
Install the compatibility pack on the virtual machine.
-
In the Compatibility Pack for the 2007 Office system window, select Click here to accept the Microsoft Software License Terms, then click OK.
Enable PDF file analysis
To analyze PDF files, download Adobe Reader to the native host and copy it to the VM.
Install Adobe Reader on the virtual machine.
Open Adobe Reader, then click Accept on the License Agreement window.
Enable JAR file analysis
To analyze JAR files, download and install Java Runtime Environment (JRE).
By default, Intelligent Sandbox supports JRE version 7.
Download and install the Java SE Development Kit for your computer.
On your computer, click Start → Java → Configure Java.
On the Java Control Panel, click the Security tab.
Change the Security Level to Medium, then click OK.
Note
If you are using Java 8 or above, change the security level to High.
Analyze OneNote file
OneNote (formerly OneNote 2016) with the extension .one is part of the Microsoft Office suite.
Supported versions: Office 2010, 2013, 2016, 2019.
Trellix Intelligent Sandbox 5.0.x Installation Guide 75
6 | Installation overview

Note
Trellix Intelligent Sandbox does not support OneNote which is pre-installed with Windows 10 called as OneNote for Windows 10.
To analyze OneNote file:
Task
-
Install Microsoft Office on the virtual machine.
If you have installed Microsoft Office but OneNote is not included, you can download OneNote from the website (www.onenote.com) or use the Add or Remove feature in the Control Panel to install it.
-
Open OneNote and sign-in (if required).
-
Click Accept on the License Agreement window.
Enable Flash file analysis
To dynamically analyze Flash files, install Adobe Flash Player or the Flash plug-in.
Task
-
Make sure that Internet Explorer is your default browser.
-
Install Adobe Flash Player or the Flash plug-in on your computer.
Download and install Adobe Flash Player, then verify that it is the default flash extension.
Download and install Adobe Flash plug-in, then verify that Shockwave Flash Object is enabled.
Complete the VMDK and VHDX file creation process
Task
Restart the virtual machine.
To shut down virtualMachineImage, select Start → Shut down.
-
Make sure there are not any stale lock files (.lck) associated with the virtual machine.
The .lck files are located in the same folder as the .vmdk or .vhdx file.
Locate the virtualMachineImage-flat.vmdk or virtualMachineImage.vhdx file.
Prepare the virtual disk image for analysis
Prepare your VMDK or VHDX images to capture malware behaviors in the sandbox environment.
We recommend that you run the VM Provisioner Tool that's available in the Intelligent Sandbox interface. However, if the tool
76Trellix Intelligent Sandbox 5.0.x Installation Guide
6 | Installation overview
doesn't work in your environment, you could also prepare your sandbox environment manually.
Run the VM Provisioner Tool
Download the VM Provisioner Tool from the Intelligent Sandbox interface, then run the tool to prepare your virtual disk images to capture malware behaviors in the sandbox environment.
Run the VM Provisioner Tool after installing all required software on all Windows VM images that you create. The VM Provisioner Tool supports operating systems configured for the supported languages: English, Spanish, Japanese, Chinese (Simplified), German, French, Italian.
Task
-
Log on to the Intelligent Sandbox interface.
-
Click Manage → Image & Software → Image.
-
Click Download VM Provisioner Tool.
-
Save the VM Provisioner Tool .exe file on your virtual machine.
-
Make sure that the Visual Studio 2012 C++ Redistributable is installed on the VM.
Download the x86 version of the Visual Studio 2012 C++ Redistributable for your corresponding operating system language from https://www.microsoft.com/EN-US/DOWNLOAD/DETAILS.ASPX?ID=30679.
-
Open and run the VM Provisioner Tool .exe file as Administrator.
-
Run VM Provisioner Tool as a non-administrator user.
-
Restart the virtual machine.
The Administrator account is enabled once the virtual machine is started.
-
Log on to Windows as the Administrator user.
-
Run VM Provisioner Tool again.
-
Note
adminand Administrator user accounts are not the same.
Results
-
To view the log file that contains all executed commands and changed registries, go to C:\VM_Provi.log.
-
Before you shut down the virtual machine, copy the log file to another system (outside of the VM) for later reference, then remove the log file.
Prepare your VMDK or VHDX image for analysis manually
Prepare your environment manually to capture malware behaviors in the sandbox environment.
Trellix Intelligent Sandbox 5.0.x Installation Guide77
6 | Installation overview
Prepare a Windows XP image for analysis
Configure your Windows XP virtual system for analysis.
Task
-
Configure the virtual machine in VMware ESXi or Microsoft Hyper-V:
Right-click on the Windows XP image, then select Settings.
In the Virtual Machine Settings window, select CD/DVD (IDE).
In Use ISO image file, browse to the ISO file that you used and click OK.
In the Welcome to Microsoft Windows XP page, click Exit.
Log on to the virtual machine as administrator.
Turn off the firewall in the virtual image: Select Start → Control Panel → Security Center → Windows Firewall → OFF.
-
Start the telnet service in the virtual image:
Click Start and right-click My Computer.
Select Manage → Services and Applications → Services, then double-click Telnet.
In the Telnet Properties (Local Computer) page, select Automatic for the Startup type, then select Apply → Start → OK.
-
Enable FTP in the virtual image:
Select Start → Control Panel → Add or remove Programs → Add or remove Windows components.
In the Windows Components wizard, double-click Internet Information Services(IIS).
In the Internet Information Services(IIS) pop-up window, select these entries:
File Transfer Protocol (FTP) Service
Common Files
Internet Information Services Snap-In
Click OK, then click Next.
In the Windows Components wizard, click Finish to finish installing FTP.
In the Insert Disk message, click Cancel.
In the Windows XP Setup message, select OK.
-
Configure FTP settings in the virtual image:
Select Start → Control Panel → Switch to Classic View → Administrative Tools, then double-click Internet Information Services.
In the Internet Information Services page, expand the entry under Internet Information Services, then expand FTP Sites.
Right-click on Default FTP Site, select Properties → Home Directory.
Browse to the C:\ drive, select Read, Write, and Log visits.
Click Apply, then OK.
-
Set automatic logon:
Select Start → Run, type rundll32 netplwiz.dll,UsersRunDLL, then press Enter.
In the User Accounts window, deselect Users must enter a user name and password to use this computer and click Apply.
78
Trellix Intelligent Sandbox 5.0.x Installation Guide
6 | Installation overview
c. In the Automatically log on page, provide these credentials.
- User name — Administrator
- Password — cr@cker42
- Confirm Password — cr@cker42
- Run the MergeIDE batch file on the virtual machine:
- Download MergeIDE.zip from the following URL on the native computer and then copy it to the virtual machine.
https://www.virtualbox.org/raw-attachment/wiki/Migrate_Windows/MergeIDE.zip - Extract MergeIDE.zip and run the MergeIDE batch file in the VM.
- Download MergeIDE.zip from the following URL on the native computer and then copy it to the virtual machine.
- Disable Windows updates:
- Select Start → Settings → Control Panel.
- Open System.
- In the Automatic Updates tab, deselect Keep my computer up to date.
- Click Apply and then OK.
- Configure Microsoft Office:
- To analyze Microsoft Word, Excel, and PowerPoint files, install Microsoft Office 2003 on the virtual machine.
- Lower the security to run macros for the Office applications. In Microsoft Word 2003 and select Tools → Macro → Security, select Low, then click OK. Do the same for other applications such as Microsoft Excel and PowerPoint.
- Go to http://www.microsoft.com/en-us/download/details.aspx?id=3 and download the required Microsoft Office compatibility pack for Word, Excel, and PowerPoint File Formats, then install them on the virtual machine.
You need the compatibility pack to open Microsoft Office files that were created in a newer version of Microsoft Office. For example, to open a .docx file using Office 2003, you need the corresponding compatibility pack installed. - In the Compatibility Pack for the 2007 Office system dialog, select Click here to accept the Microsoft Software License Terms, then click OK.
- Configure Adobe Reader:
- To analyze PDF files, download Adobe Reader to the native host and copy it to the VM.
- Open Adobe Reader and click Accept.
- In Adobe Reader, select Edit → Preferences → General, then remove Check for updates.
- In Adobe Reader, select Help → Check for updates → Preferences, then deselect Adobe Updates.
- Configure Java:
- Open Java in the Control Panel.
- In the Update tab, deselect Check for Updates Automatically.
- In the Java Update Warning message, select Do Not Check and then click OK.
- Configure system startup:
- Run the
msconfigcommand. - From the Startup tab, deselect
reader_slandjusched, then click OK.
- Run the
" /> Note
reader_sl is available only when Adobe Reader is installed.
Trellix Intelligent Sandbox 5.0.x Installation Guide
79
- In the System Configuration message, select
Restart. - In the System Configuration Utility message, select Don't show this message or launch the System Configuration Utility when Windows start, then click OK.
14. Configure the default browser:
- In Internet Explorer, select Tools → Internet Options.
- In Home page select Use Blank or Use new tab based on the version of Internet Explorer.
- From the Privacy tab, uncheck Turn on Pop-up Blocker.
- Go to the Advanced tab of the Internet Options and locate Security, then select Allow active content to run in files on My Computer.
Note
The VM administrator password
cr@cker42is required for VM profile creation. ATD system updates it to a random string as a part of VM creation. The running sandbox VM will have a random password.

Prepare a Windows Server 2003 image for analysis
Configure your Windows Server 2003 virtual system for analysis.
Task
- Log on to the virtual machine as administrator.
- If the Windows Server Post-Setup Security Updates page appears, select Finish.
- If the Manage Your Server window page appears, select Don't Display the page at logon and close the page.
- Disable the shutdown event tracker:
- Select Start → Run, type
gpedit.msc, then click OK. - In the Group policy object editor page, select Computer Configuration → Administrative Templates → System, then double-click Display Shutdown Event Tracker.
- Select Disabled, then click OK.
- Close the Group policy object editor page.
- Select Start → Run, type
- Install the hotfix for Windows Server 2003 Service Pack 1 (if applicable).
Note
Skip this step if you have Windows Server 2003 Service Pack 2.
- Go to http://support.microsoft.com/hotfix/KBHotfix.aspx?kbnum=899260&kbln=en-us and install the hotfix corresponding to your version of Windows Server 2003.
- Restart the virtual machine.
- In the Windows command prompt, run the
tlntsvr /servicecommand.
- Turn off the firewall in the virtual image: Select Start → Control Panel → Windows Firewall → OFF.
- Start the telnet service in the virtual image:
6 | Installation overview
- Click Start and right-click My Computer.
- Select Manage → Services and Applications → Services, then double-click Telnet.
- In the Telnet Properties (Local Computer) page, select Automatic for the Startup type, then select Apply → Start → OK.
-
Run the MergeIDE batch file on the virtual machine:
- Download MergeIDE.zip from the following URL on the native computer and then copy it to the virtual machine.
https://www.virtualbox.org/raw-attachment/wiki/Migrate_Windows/MergeIDE.zip - Extract MergeIDE.zip and run the MergeIDE batch file in the VM.
- Download MergeIDE.zip from the following URL on the native computer and then copy it to the virtual machine.
-
Enable FTP in the virtual image:
- Select Start → Control Panel → Add or remove Programs → Add or remove Windows components.
- In the Windows Components wizard, double-click Application Server, then double-click Internet Information Services(IIS).
- In the Internet Information Services(IIS) pop-up window, select these entries:
- File Transfer Protocol (FTP) Service
- Common Files
- Internet Information Services Manager
- Click OK, then click Next.
- In the Windows Components wizard, click Finish when the FTP installation is complete.
- In the Insert Disk message, click Cancel.
- In the Windows XP Setup message, select OK.
-
Configure FTP settings in the virtual image:
- Select Start → Control Panel → Switch to Classic View → Administrative Tools, then double-click Internet Information Services.
- In the Internet Information Services page, expand the entry under Internet Information Services, then expand FTP Sites.
- Right-click on Default FTP Site, select Properties → Home Directory.
- Browse to the C:\ drive, select Read, Write, and Log visits.
- Click Apply, then click OK.
-
Set automatic logon:
- Select Start → Run, type rundll32 netplwiz.dll,UsersRunDll, then press Enter.
- In the User Accounts window, deselect Users must enter a user name and password to use this computer and click Apply.
- In the Automatically log on page, provide these credentials:
- User name — Administrator
- Password — cr@cker42
- Confirm Password — cr@cker42
-
Disable Windows updates:
- Select Start → Control Panel → System → Automatic Updates.
- Select Turn off Automatic Updates.
- Click Apply and then click OK.
-
Configure Microsoft Office:
Trellix Intelligent Sandbox 5.0.x Installation Guide
81
6 | Installation overview
-
To analyze Microsoft Word, Excel, and PowerPoint files, install Microsoft Office 2003 on the virtual machine.
-
Lower the security to run macros for the Office applications. In Microsoft Word 2003 and select Tools → Macro → Security, select Low, then click OK. Do the same for other applications such as Microsoft Excel and PowerPoint.
-
Go to http://www.microsoft.com/en-us/download/details.aspx?id=3 and download the required Microsoft Office compatibility pack for Word, Excel, and PowerPoint File Formats, then install them on the virtual machine.
You need the compatibility pack to open Microsoft Office files that were created in a newer version of Microsoft Office. For example, to open a .docx file using Office 2003, you need the corresponding compatibility pack installed.
-
In the Compatibility Pack for the 2007 Office system dialog, select Click here to accept the Microsoft Software License Terms, then click OK.
-
Configure Adobe Reader:
To analyze PDF files, download Adobe Reader to the native host and copy it to the VM.
Open Adobe Reader and click Accept.
In Adobe Reader, select Edit → Preferences → General, then remove Check for updates.
In Adobe Reader, select Help → Check for updates → Preferences, then deselect Adobe Updates.
-
Configure Java:
Open Java in the Control Panel.
In the Update tab, deselect Check for Updates Automatically.
In the Java Update Warning message, select Do Not Check and then click OK.
-
Configure system startup:
Run the
msconfigcommand.From the Startup tab, deselect reader_sl and jusched, then click OK.
Note
reader_sl is available only when Adobe Reader is installed.
In the System Configuration message, select Restart.
In the System Configuration Utility message, select Don't show this message or launch the System Configuration Utility when Windows start, then click OK.
-
Configure the default browser:
In Internet Explorer, select Tools → Internet Options.
In Home page select Use Blank or Use new tab based on the version of Internet Explorer.
From the Privacy tab, uncheck Turn on Pop‑up Blocker.
Go to the Advanced tab of the Internet Options and locate Security, then select Allow active content to run in files on My Computer.
Note
The VM administrator password
cr@cker42is required for VM profile creation. ATD system updates it to a random string as a part of VM creation. The running sandbox VM will have a random password.
6 | Installation overview
Prepare a Windows 7 image for analysis
Configure your Windows 7 virtual system for analysis.
Task
-
Log on to the virtual machine as administrator.
-
Turn off the firewall in the virtual image:
-
Select Start → Control Panel → System and Security → Turn on Windows Firewall On or Off.
-
Select Turn off Windows Firewall (not recommended) for both Home or work(private) network location settings and Public network location settings, then click OK.
-
-
Enable required Windows features.
-
Select Start → Control Panel → Programs → Programs and Features → Turn Windows feature on or off.
-
Select Internet Information Services → FTP server → FTP Extensibility.
-
Select Internet Information Services → Web Management Tools → IIS Management Service.
-
Select Telnet Server, then click OK.
This operation might take around 5 minutes to complete.
-
-
Start the telnet service in the virtual image:
-
Click Start and right-click My Computer.
-
Select Manage → Services and Applications → Services, then double-click Telnet.
-
In the Telnet Properties (Local Computer) page, select Automatic for the Startup type, then select Apply → Start → OK.
-
-
Configure FTP settings in the virtual image:
-
Select Start → Control Panel → System and Security → Administrative Tools, then double-click Internet Information Services.
-
In the Internet Information Services page, expand the entry under Internet Information Services (IIS) Manager, then expand the tree under host name.
-
Select Sites, right-click on Default FTP Site, select Remove, then click Yes to confirm.
-
Right-click Sites, select Add FTP Site, then do the following.
Provide the FTP site name as root and Physical path as C:\, then click Next.
For Bindings and SSL Settings, select No SSL, then click Next.
For Authentication and Authorization Information, select Basic under Authentication, select All Users under Allow access to, select both Read and Write under Permissions.
Click Finish.
-
Close the Internet Information Services (IIS) Manager page.
-
-
Set automatic logon:
-
Select Start → Run, type
netplwiz, then press Enter. -
In the User Accounts window, deselect Users must enter a user name and password to use this computer, then click Apply.
-
In the Automatically log on page, provide these credentials.
User name — Administrator
-
Trellix Intelligent Sandbox 5.0.x Installation Guide 83
6 | Installation overview
- Password —
cr@cker42 - Confirm Password —
cr@cker42
-
Disable Windows updates:
- Select Start → Control Panel → Windows Update → Change settings.
- Under Important updates, select Never check for updates (not recommended).
- Deselect all options under Recommended updates, Who can install updates, Microsoft update, Software notifications.
- Click OK.
-
Configure Microsoft Office:
- To analyze Microsoft Word, Excel, and PowerPoint files, install Microsoft Office 2003 on the virtual machine.
- Lower the security to run macros for the Office applications. In Microsoft Word 2003 and select Tools → Macro → Security, select Low, then click OK. Do the same for other applications such as Microsoft Excel and PowerPoint.
- Go to http://www.microsoft.com/en-us/download/details.aspx?id=3 and download the required Microsoft Office compatibility pack for Word, Excel, and PowerPoint File Formats, then install them on the virtual machine.
You need the compatibility pack to open Microsoft Office files that were created in a newer version of Microsoft Office. For example, to open a .docx file using Office 2003, you need the corresponding compatibility pack installed.
- In the Compatibility Pack for the 2007 Office system dialog, select Click here to accept the Microsoft Software License Terms, then click OK.
-
Configure JustSystems Ichitaro word processing software:
- To analyze JTD and JTDC files, install Ichitaro word processing software.
Recommended versions Govt8 or Pro3.
- Disable automatic updates.
- If you want analyze Microsoft Office files using Ichitaro, manually change the file association.
- To analyze JTD and JTDC files, install Ichitaro word processing software.
-
Configure Adobe Reader:
- To analyze PDF files, download Adobe Reader to the native host and copy it to the VM.
- Open Adobe Reader and click Accept.
- In Adobe Reader, select Edit → Preferences → General, then remove Check for updates.
- In Adobe Reader, select Help → Check for updates → Preferences, then deselect Adobe Updates.
-
Configure Java:
- Open Java in the Control Panel.
- In the Update tab, deselect Check for Updates Automatically.
- In the Java Update Warning message, select Do Not Check and then click OK.
-
Configure system startup:
- Run the
msconfigcommand. - From the Startup tab, deselect
reader_slandjusched, then click OK.
- Run the
Note
reader_slis available only when Adobe Reader is installed.
6 | Installation overview
-
In the System Configuration message, select Restart.
-
In the System Configuration Utility message, select Don't show this message or launch the System Configuration Utility when Windows start, then click OK.
-
Configure the default browser:
-
In Internet Explorer, select Tools → Internet Options.
-
In Home page select Use Blank or Use new tab based on the version of Internet Explorer.
-
From the Privacy tab, uncheck Turn on Pop-up Blocker.
-
Go to the Advanced tab of the Internet Options and locate Security, then select Allow active content to run in files on My Computer.
-
-
Disable the HTTP auto proxy server: Open command prompt with administrator privilege, then run these commands.
Net stop WinHttpAutoProxySvcSc config WinHttpAutoProxySvc start= disabled
Note
The VM administrator password
cr@cker42is required for VM profile creation. ATD system updates it to a random string as a part of VM creation. The running sandbox VM will have a random password.
Prepare a Windows Server 2008 image
Configure your Windows Server 2008 virtual system for analysis.
Task
Log on to the virtual machine as administrator.
If the Manage Your Server window page appears, select Don't Display the page at logon and close the page.
-
Disable the shutdown event tracker:
Select Start → Run, type
gpedit.msc, then click OK.In the Local Group Policy Editor page, select Computer Configuration → Administrative Templates → System, then double-click Display Shutdown Event Tracker.
Select Disabled, then click OK.
Close the Local Group Policy Editor page.
-
Turn off the firewall in the virtual image:
Select Start → Control Panel → Windows Firewall → Turn on Windows Firewall On or Off.
Select Off, then click OK.
-
Install telnet in the virtual image:
Select Start → Administrative Tools → Server Manager.
In the Server Manager window, right-click Features and select Add Features.
In the Add Features Wizard, select Telnet Server.
Click Next, then Install.
Click Close after the installation succeeds.
6 | Installation overview
-
Start the telnet service in the virtual image:
-
Select Start → Administrative Tools → Services, then double-click Telnet.
-
In the Telnet Properties (Local Computer) page, select Automatic for the Startup type, then select Apply → Start → OK.
-
-
Configure FTP settings in the virtual image:
-
Select Start → Administrative Tools → Internet Information Services(IIS) Manager.
-
In the Internet Information Services Manager page, select Sites, select Add FTP Site
-
In the Add FTP Site wizard, do the following.
-
Provide the FTP site name as root and Physical path as C:\, then click Next.
-
For Bindings and SSL Settings, select No SSL, then click Next.
-
For Authentication and Authorization Information, select Basic under Authentication, select All Users under Allow access to, select both Read and Write under Permissions.
-
Click Finish.
-
-
-
Set automatic logon:
-
Select Start → Run, type netplwiz, then press Enter.
-
In the User Accounts window, deselect Users must enter a user name and password to use this computer, then click Apply.
-
In the Automatically log on page, provide these credentials.
-
User name — Administrator
-
Password — cr@cker42
-
Confirm Password — cr@cker42
-
-
-
Disable Windows updates:
-
Select Start → Control Panel → Windows Update → Change settings.
-
Under Important updates, select Never check for updates (not recommended).
-
Deselect Recommended updates when downloading, installing, or notifying me about updates.
-
Click OK.
-
-
Configure Microsoft Office:
-
To analyze Microsoft Word, Excel, and PowerPoint files, install Microsoft Office 2003 on the virtual machine.
-
Lower the security to run macros for the Office applications. In Microsoft Word 2003 and select Tools → Macro → Security, select Low, then click OK. Do the same for other applications such as Microsoft Excel and PowerPoint.
-
Go to http://www.microsoft.com/en-us/download/details.aspx?id=3 and download the required Microsoft Office compatibility pack for Word, Excel, and PowerPoint File Formats, then install them on the virtual machine.
You need the compatibility pack to open Microsoft Office files that were created in a newer version of Microsoft Office. For example, to open a .docx file using Office 2003, you need the corresponding compatibility pack installed.
-
In the Compatibility Pack for the 2007 Office system dialog, select Click here to accept the Microsoft Software License Terms, then click OK.
-
-
Configure Adobe Reader:
-
To analyze PDF files, download Adobe Reader to the native host and copy it to the VM.
-
Open Adobe Reader and click Accept.
-
In Adobe Reader, select Edit → Preferences → General, then remove Check for updates.
-
6 | Installation overview
d. In Adobe Reader, select Help → Check for updates → Preferences, then deselect Adobe Updates.
-
Configure Java:
Open Java in the Control Panel.
In the Update tab, deselect Check for Updates Automatically.
In the Java Update Warning message, select Do Not Check and then click OK.
-
Configure system startup:
Run the
msconfigcommand.From the Startup tab, deselect
reader_slandjusched, then click OK.
Note
reader_slis available only when Adobe Reader is installed.In the System Configuration message, select
Restart.In the System Configuration Utility message, select Don't show this message or launch the System Configuration Utility when Windows start, then click OK.
-
Configure the default browser:
In Internet Explorer, select Tools → Internet Options.
In Home page select Use Blank or Use new tab based on the version of Internet Explorer.
From the Privacy tab, uncheck Turn on Pop-up Blocker.
Go to the Advanced tab of the Internet Options and locate Security, then select Allow active content to run in files on My Computer.
Note
The VM administrator password
cr@cker42is required for VM profile creation. ATD system updates it to a random string as a part of VM creation. The running sandbox VM will have a random password.
Prepare a Windows 8 image for analysis
Configure your Windows 8 virtual system for analysis.
Task
-
From the native system, set up Windows 8 to display in the Desktop mode instead of the default Metro UI mode when it starts.
Press the
WindowsandRkeys simultaneously, which is the shortcut to open the Run dialog box.In the Run dialog box, type
regedit, then pressEnter.In Registry Editor, select HKEY_LOCAL_MACHINE → SOFTWARE → Microsoft → Windows NT → CurrentVersion → Winlogon, then double-click on
Shell.Change Value data to
explorer.exe, explorer.exe(instead of the default value ofexplorer.exe), then click OK.
Log on to the virtual machine as administrator.
Trellix Intelligent Sandbox 5.0.x Installation Guide87
6 | Installation overview
-
Turn off the firewall in the virtual image:
-
Press the Windows and X keys simultaneously, then select Control Panel → System and Security → Turn on Windows Firewall On or Off.
-
Select Turn off Windows Firewall (not recommended) for both Home or work(private) network location settings and Public network location settings, then click OK.
-
-
Disable Windows Defender:
-
Press the Windows and X keys simultaneously, select Control Panel, then select Small Icons under View by.
-
Select Windows Defender → Settings → Administrators, deselect Turn on Windows Defender, then click Save changes.
-
Close the Windows Defender message box.
-
-
Disable first log on animation:
-
Press the Windows and X keys simultaneously.
-
In the Run dialog box, type gpedit.msc, then press Enter.
-
In the Local Group Policy Editor page, select Computer Configuration → Administrative Templates → System → Logon.
-
Double-click Show first sign-in animation, select Disabled, then click OK.
-
-
Enable required Windows features.
-
Press the Windows and X keys simultaneously, select Control Panel, then select Small Icons under View by.
-
Select Programs → Programs and Features → Turn Windows feature on or off.
-
Select Internet Information Services → FTP server → FTP Extensibility.
-
Select Internet Information Services → Web Management Tools → IIS Management Service.
-
Select Telnet Server.
-
Select .NET Framework 3.5 (includes .NET 2.0 and 3.0) and then select Windows Communication Foundation HTTP Activation and Windows Communication Foundation Non-HTTP Activation options, then press OK.
-
If the Windows needs files from Windows Update to finish installing some features message appears, select Download files from Windows Update.
This operation might take around 5 minutes to complete. A confirmation message is displayed when the operation completes.
-
-
Edit the power options:
-
Press the Windows and X keys simultaneously, select Control Panel, then select Small Icons under View by.
-
Select Power Options → Choose when to turn off the display, select Never for both Turn off the display and Put the computer to sleep options, then click Save changes.
-
Select Power Options → Choose what the power buttons do, select Change Settings that are currently unavailable for both Turn off the display and Put the computer to sleep options, then click Save changes.
-
For shutdown settings, deselect Turn on fast startup and Hibernate options, then click Save changes.
-
-
Start the telnet service in the virtual image:
-
Press the Windows and X keys simultaneously, select Computer Management → Services and Applications → Services, then double-click Telnet.
-
In the Telnet Properties (Local Computer) page, select Automatic for the Startup type, then select Apply → Start → OK.
-
-
Configure FTP settings in the virtual image:
-
Press the Windows and X keys simultaneously, select Control Panel, then select Small Icons under View by.
-
Select Administrative Tools, then double-click Internet Information Services.
-
88
Trellix Intelligent Sandbox 5.0.x Installation Guide
6 | Installation overview
-
In the Internet Information Services page, expand the entry under Internet Information Services(IIS) Manager, then expand the tree under host name.
-
If you see the Do you want to get started with Microsoft Web Platform to stay connected with latest Web Platform Components? message, select Do not show this message, then click Cancel.
-
Select Sites, right-click on Default Web Site, select Remove, then click Yes to confirm.
-
Right-click Sites, select Add FTP Site, then do the following.
-
Provide the FTP site name as root and Physical path as
C:\, then click Next. -
For Bindings and SSL Settings, select No SSL, then click Next.
-
For Authentication and Authorization Information, select Basic under Authentication, select All Users under Allow access to, select both Read and Write under Permissions.
-
Click Finish.
-
-
Close the Internet Information Services (IIS) Manager page.
-
Turn off automatic updating for Windows:
-
Press the Windows and X keys simultaneously, select Control Panel, then select Small Icons under View by.
-
Select Windows Update → Change.
-
Select Never check for updates (not recommended), then click OK.
-
-
Configure Telnet clients
-
Press the Windows and X keys simultaneously, select Control Panel, then select Small Icons under View by.
-
Select Administrator Tools → Computer Management.
-
Select Computer Management (Local) → System Tools → Local Users and Groups → Groups.
-
Double-click TelnetClients.
-
Click Add, type Administrator, click Check Names, then click OK.
-
-
Set automatic logon:
-
Press the Windows and R keys simultaneously, type
netplwiz, then press Enter. -
In the User Accounts window, deselect Users must enter a user name and password to use this computer, then click Apply.
-
In the Automatically log on page, provide these credentials.
-
User name — Administrator
-
Password — cr@cker42
-
Confirm Password — cr@cker42
-
-
-
Configure Microsoft Office:
-
To analyze Microsoft Word, Excel, and PowerPoint files, install Microsoft Office 2003 on the virtual machine.
-
Lower the security to run macros for the Office applications. In Microsoft Word 2003 select Tools → Macro → Security, select Low, then click OK. Do the same for other applications such as Microsoft Excel and PowerPoint.
-
Go to http://www.microsoft.com/en-us/download/details.aspx?id=3 and download the required Microsoft Office compatibility pack for Word, Excel, and PowerPoint File Formats, then install them on the virtual machine.
-
In the Compatibility Pack for the 2007 Office system dialog, select Click here to accept the Microsoft Software License Terms, then click OK.
-
Trellix Intelligent Sandbox 5.0.x Installation Guide 89
6 | Installation overview
-
Configure Adobe Reader:
To analyze PDF files, download Adobe Reader to the native host and copy it to the VM.
Open Adobe Reader and click Accept.
In Adobe Reader, select Edit → Preferences → General, then remove Check for updates.
In Adobe Reader, select Help → Check for updates → Preferences, then deselect Adobe Updates.
-
Configure Java:
Open Java in the Control Panel.
In the Update tab, deselect Check for Updates Automatically.
In the Java Update Warning message, select Do Not Check and then click OK.
-
Configure system startup:
Run the msconfig command.
From the Startup tab, then click Open Task Manager.
Select Java(TM) Update Scheduler (jusched) (if listed), then click Disable.
Select Adobe Acrobat SpeedLauncher (reader_sl) (if listed), then click Disable.
In the System Configuration message, select Restart.
In the System Configuration Utility message, select Don't show this message or launch the System Configuration Utility when Windows start, then click OK.
-
Configure the default browser:
In Internet Explorer, select Tools → Internet Options.
In Home page select Use Blank or Use new tab based on the version of Internet Explorer.
From the Privacy tab, uncheck Turn on Pop-up Blocker.
Go to the Advanced tab of the Internet Options and locate Security, then select Allow active content to run in files on My Computer.
-
Disable the HTTP auto proxy server: Open command prompt with administrator privilege, then run these commands.
Net stop WinHttpAutoProxySvcSc config WinHttpAutoProxySvc start= disabled
Note
The VM administrator password
cr@cker42is required for VM profile creation. ATD system updates it to a random string as a part of VM creation. The running sandbox VM will have a random password.
Prepare a Windows 8.1 image for analysis
Configure your Windows 8.1 virtual system for analysis.
Task
-
From the native system, set up Windows 8.1 to display in the Desktop mode instead of the default Metro UI mode when it starts.
Press the Windows and R keys simultaneously, which is the shortcut to open the Run dialog box.
In the Run dialog box, type regedit, then press Enter.
90Trellix Intelligent Sandbox 5.0.x Installation Guide
6 | Installation overview
c. In Registry Editor, select HKEY_LOCAL_MACHINE → SOFTWARE → Microsoft → Windows NT → CurrentVersion → Winlogon, then double-click on Shell.
d. Change Value data to explorer.exe, explorer.exe (instead of the default value of explorer.exe), then click OK.
-
Log on to the virtual machine as administrator.
-
Turn off the firewall in the virtual image:
-
Press the Windows and X keys simultaneously, then select Control Panel → System and Security → Turn on Windows Firewall On or Off.
-
Select Turn off Windows Firewall (not recommended) for both Home or work(private) network location settings and Public network location settings, then click OK.
-
-
Disable Windows Defender:
-
Press the Windows and X keys simultaneously, select Control Panel, then select Small Icons under View by.
-
Select Windows Defender → Settings → Administrators, deselect Turn on this app, then click Save changes.
-
If a Windows Defender message appears, close the message screen.
-
-
Disable first log on animation:
-
Press the Windows and R keys simultaneously, type gpedit.msc, then press Enter.
-
In the Local Group Policy Editor page, select Computer Configuration → Administrative Templates → System → Logon.
-
Double-click Show first sign-in animation, select Disabled, then click OK.
-
-
Enable required Windows features.
-
Press the Windows and X keys simultaneously, then select Control Panel → Programs → Programs and Features → Turn Windows feature on or off.
-
Select Internet Information Services → FTP server → FTP Extensibility.
-
Select Internet Information Services → Web Management Tools → IIS Management Service.
-
Select Telnet Server.
-
Select .NET Framework 3.5(includes .NET 2.0 and 3.0) and then select Windows Communication Foundation HTTP Activation and Windows Communication Foundation Non-HTTP Activation options, then press OK.
-
If the Windows needs files from Windows Update to finish installing some features message appears, select Download files from Windows Update.
This operation might take around 5 minutes to complete. A confirmation message is displayed when the operation completes.
-
-
Download and install the .NET Framework 4.6 on the VM image.
If a Blocking Issues message appears, install the suggested components, then select Continue.
-
Edit the power options:
-
Press the Windows and X keys simultaneously, select Control Panel, then select Small Icons under View by.
-
Select Power Options → Choose when to turn off the display, select Never for both Turn off the display, and Put the computer to sleep options, then click Save changes.
-
For shutdown settings, deselect Turn on fast startup and Hibernate options, then click Save changes.
-
-
Start the telnet service in the virtual image:
-
Press the Windows and X keys simultaneously, select Computer Management → Services and Applications → Services, then double-click Telnet.
-
In the Telnet Properties (Local Computer) page, select Automatic for the Startup type, then select Apply → Start → OK.
-
-
Configure FTP settings in the virtual image:
Trellix Intelligent Sandbox 5.0.x Installation Guide 91
6 | Installation overview
- Press the
WindowsandXkeys simultaneously, select Control Panel → System and Security → Administrative Tools, then double-click Internet Information Services. - In the Internet Information Services page, expand the entry under Internet Information Services(IIS) Manager, then expand the tree under host name.
- If you see the "Do you want to get started with Microsoft Web Platform to stay connected with latest Web Platform Components?" message, select Do not show this message, then click Cancel.
- Select Sites, right-click on Default Web Site, select Remove, then click Yes to confirm.
- Right-click Sites, select Add FTP Site, then do the following.
- Provide the FTP site name as root and Physical path as
C:\, then click Next. - For Bindings and SSL Settings, select No SSL, then click Next.
- For Authentication and Authorization Information, select Basic under Authentication, select All Users under Allow access to, select both Read and Write under Permissions.
- Click Finish.
- Provide the FTP site name as root and Physical path as
- Close the Internet Information Services (IIS) Manager page.
- Turn off automatic updating for Windows:
- Press the
WindowsandXkeys simultaneously, then select Control Panel → Windows Update → Change. - Select Never check for updates (not recommended), then click OK.
- Press the
- Configure Telnet clients.
- Press the
WindowsandXkeys simultaneously, select Control Panel, then select Small Icons under View by. - Select Administrative tools → Computer Management.
- Select Computer Management (Local) → System Tools → Local Users and Groups → Groups.
- Double-click TelnetClients.
- Click Add, type Administrator, click Check Names, then click OK.
- Press the
- Set automatic logon:
- Press the
WindowsandRkeys simultaneously, typenetplwiz, then pressEnter. - In the User Accounts window, deselect Users must enter a user name and password to use this computer, then click Apply.
- In the Automatically log on page, provide these credentials.
- User name — Administrator
- Password —
cr@cker42 - Confirm Password —
cr@cker42
- Press the
- Configure Microsoft Office:
- To analyze Microsoft Word, Excel, and PowerPoint files, install Microsoft Office 2007 on the virtual machine.
- Lower the security to run macros for the Office applications. In Microsoft Word 2007, select the Microsoft Office option on the top left corner, then select Word options → Trust Center → Trust Center Settings → Macro Settings, then select Enable all macros (not recommended potentially dangerous code can run). Do the same for other applications such as Microsoft Excel and PowerPoint.
- On the Welcome to Microsoft Office 2007 page, click Next button.
- On the Sign-up for Microsoft Update page, select I don't want to use Microsoft Update, then click Finish.
- Configure Adobe Reader:
- To analyze PDF files, download Adobe Reader to the native host and install it to the VM.
- In Adobe reader, if Adobe Reader Protected Mode message appears, select Open with Protected Mode ...
6 | Installation overview
-
Configure Java:
Open Java in the Control Panel.
In the Update tab, deselect Check for Updates Automatically.
In the Java Update Warning message, select Do Not Check and then click OK.
-
Configure system startup:
Run the
msconfigcommand.From the Startup tab, then click Open Task Manager.
Select Java(TM) Update Scheduler (jusched) (if listed), then click Disable.
Select Adobe Acrobat SpeedLauncher (reader_sl) (if listed), then click Disable.
In the System Configuration dialog, select Don't show this message again, then select Restart.
-
Configure the default browser:
In Internet Explorer, select Tools → Internet Options.
In Home page select Use Blank or Use new tab based on the version of Internet Explorer.
From the Privacy tab, uncheck Turn on Pop-up Blocker.
Go to the Advanced tab of the Internet Options and locate Security, then select Allow active content to run in files on My Computer.
-
Disable the HTTP auto proxy server: Open command prompt with administrator privilege, then run these commands.
Net stop WinHttpAutoProxySvcSc config WinHttpAutoProxySvc start= disabled
The VM administrator password
cr@cker42is required for VM profile creation. ATD system updates it to a random string as a part of VM creation. The running sandbox VM will have a random password.

Prepare a Windows 10 image for analysis
Configure your Windows 10 virtual system for analysis.
Task
-
Log on to the virtual machine, then run the VM Provisioner Tool.
VM Provisioner Tool enables the Administrator account, which is disabled by default on Windows 10.
Trellix Intelligent Sandbox 5.0.x Installation Guide
93
6 | Installation overview
Note
The VM administrator password cr@cker42 is required for VM profile creation. ATD system updates it to a random string as a part of VM creation. The running sandbox VM will have a random password.
-
Restart the virtual machine.
-
Turn off the firewall in the virtual image:
-
Press the Windows and X keys simultaneously, then select Control Panel → System and Security → Turn on Windows Firewall On or Off.
-
Select Turn off Windows Firewall (not recommended) for both Home or work(private) network location settings and Public network location settings, then click OK.
-
-
Disable Windows Defender:
-
Press the Windows and X keys simultaneously, select Control Panel, then select Small Icons under View by.
-
Select Windows Defender, then turn off all features on the Windows Defender Settings page.
-
If a Windows Defender message appears, close the message screen.
-
-
Disable first log on animation:
-
Press the Windows and R keys simultaneously.
-
In the Run dialog box, type gpedit.msc, then press Enter.
-
In the Local Group Policy Editor page, select Computer Configuration → Administrative Templates → System → Logon.
-
Double-click Show first sign-in animation, select Disabled, then click OK.
-
-
Enable required Windows features.
-
Press the Windows and X keys simultaneously, select Control Panel, then select Small Icons under View by.
-
Select Programs → Programs and Features → Turn Windows feature on or off.
-
Select Internet Information Services → FTP server → FTP Extensibility.
-
Select Internet Information Services → Web Management Tools → IIS Management Service.
-
Select .NET Framework 4.6 Advanced Services, and ensure that ASP.NET 4.6 is enabled.
-
Select WCF Service Library, ensure that TCP Port Sharing is enabled, then select OK.
-
If the Windows needs files from Windows Update to finish installing some features message appears, select Download files from Windows Update.
This operation might take around 5 minutes to complete. A confirmation message is displayed when the operation completes.
-
-
Edit the power options:
-
Press the Windows and X keys simultaneously, select Control Panel, then select Small Icons under View by.
-
Select Power Options → Choose when to turn off the display, select Never for Turn off the display, then click Save changes.
-
-
Configure FTP settings in the virtual image:
-
Press the Windows and X keys simultaneously, select Control Panel, then select Small Icons under View by.
-
Select Administrative Tools, then double-click Internet Information Services.
-
In the Internet Information Services page, expand the entry under Internet Information Services(IIS) Manager, then expand the tree under host name.
-
If you see the Do you want to get started with Microsoft Web Platform to stay connected with latest Web Platform Components? message, select Do not show this message, then click Cancel.
-
Select Sites, right-click on Default Web Site, select Remove, then click Yes to confirm.
-
6 | Installation overview
-
Right-click Sites, select Add FTP Site, then do the following.
-
Provide the FTP site name as root and Physical path as C:\, then click Next.
-
For Bindings and SSL Settings, select No SSL, then click Next.
-
For Authentication and Authorization Information, select Basic under Authentication, select All Users under Allow access to, select both Read, and Write under Permissions.
-
Click Finish.
-
-
Close the Internet Information Services (IIS) Manager page.
-
Turn off automatic updating for Windows:
-
Press the Windows and X keys simultaneously, select Control Panel, then select Small Icons under View by.
-
Select Administrative Tools → Services, then double-click Windows Update.
-
Select Startup type as Disabled.
-
Stop the service if the service is running.
-
Press the Windows and R keys simultaneously, type gpedit.msc, then click OK.
-
In Local Group Policy Editor, select Computer Configuration → Administrative Templates → Windows Components → Windows Update.
-
On the right-pane, double-click Configure Automatic Updates.
-
Select Disabled, then click OK.
-
-
Set automatic logon:
-
Press the Windows and R keys simultaneously, type netplwiz, then press Enter.
-
In the User Accounts window, deselect Users must enter a user name and password to use this computer, then click Apply.
-
In the Automatically log on page, provide these credentials.
User name — admin
Password — cr@cker42
Confirm Password — cr@cker42
-
-
Configure Microsoft Office:
-
To analyze Microsoft Word, Excel, and PowerPoint files, install Microsoft Office 2007 on the virtual machine.
-
From any Microsoft Office software, select File → Options → Advanced, then under the Display section, enable the following options:
Disable hardware graphics acceleration
Disable Slide Show hardware graphics acceleration
-
Lower the security to run macros for the Office applications. In Microsoft Word 2007, select the Microsoft Office option on the top left corner, then select Word options → Trust Center → Trust Center Settings → Macro Settings, then select Enable all macros (not recommended potentially dangerous code can run). Do the same for other applications such as Microsoft Excel and PowerPoint.
-
Lower the security to run ActiveX for the Office applications. In Microsoft Word 2007, select the Microsoft Office option on the top left corner, then select Word options → Trust Center → Trust Center Settings → ActiveX Settings, then select Enable all controls without restrictions and without prompting (not recommended potentially dangerous code can run). Do the same for other applications such as Microsoft Excel and PowerPoint.
-
Select Word options → Trust Center → Trusted Locations, then use the Add new...
-
6 | Installation overview
-
location... button to add C:\ under User Locations. Once added, double-click on the entry for C:\, then in the pop-up, select Subfolders of this location are also trusted, then click OK.
-
On the Welcome to Microsoft Office 2007 page, click Next button.
-
On the Sign-up for Microsoft Update page, select I don't want to use Microsoft Update, then click Finish.
-
When you open any of the Microsoft Office 2007 software, you would see the Help Protect and Improve Microsoft Office pop-up. From the pop-up select Don't make changes, then click OK.
-
-
Configure Adobe Reader:
-
To analyze PDF files, download Adobe Reader to the native host and install it to the VM.
-
In Adobe reader, if Adobe Reader Protected Mode message appears, select Open with Protected Mode disabled, then select OK.
-
If Accessibility Setup Assistance message appears, select Cancel.
-
Select Edit → Preferences → Updater, select Do not download or install updated automatically, select OK, then select Yes to confirm the changes.
-
-
Configure Java:
-
Open Java in the Control Panel.
-
In the Update tab, deselect Check for Updates Automatically.
-
In the Java Update Warning message, select Do Not Check and then click OK.
-
-
Configure system startup:
-
Run the
msconfigcommand. -
From the Startup tab, then click Open Task Manager.
-
Select Java(TM) Update Scheduler (jusched) (if listed), then click Disable.
-
Select Adobe Acrobat SpeedLauncher (reader_sl) (if listed), then click Disable.
-
In the System Configuration dialog, select Don't show this message again, then select Restart.
-
-
Configure the default browser:
-
In Internet Explorer, select Tools → Internet Options.
-
In Home page, select Use Blank or Use new tab based on the version of Internet Explorer.
-
From the Privacy tab, deselect Turn on Pop-up Blocker.
-
Go to the Advanced tab of the Internet Options and locate Security, then select Allow active content to run in files on My Computer.
-
-
Disable the HTTP auto proxy server: Open command prompt with administrator privilege, then run these commands.
Net stop WinHttpAutoProxySvcSc config WinHttpAutoProxySvc start= disabled
-
Enable .NET framework: Open command prompt with administrator privilege, then run one of these commands.
-
Using DISM with Internet connectivity
DISM /Online /Enable-Feature /FeatureName:NetFx3 /All
-
Using DISM with no Internet connectivity
DISM /Image:<driveletter>:\test\offline /Enable-Feature /FeatureName:NetFx3 /All /Source:<driveletter>:\sources\sxs
Replace
<driveletter>:\sources\sxswith the path of the installation media.Replace
<driveletter>:\test\offlinewith the path where the image is mounted. -
96
Trellix Intelligent Sandbox 5.0.x Installation Guide
6 | Installation overview
18. Disable the Windows Defender Application Guard.
Note
This step is applicable only on Windows 10 Creators Update (Build v1703) and above.
-
Go to Run, then type
gpedit.msc, and then click OK. This opens the Local Group Policy Editor. -
Navigate to Computer Configuration → Administrative Templates → Windows Components → Windows Defender Application Guard.
-
In the right-pane, edit Turn on Windows Defender Application Guard in Enterprise Mode.
-
Select Disabled, then click OK.
Prepare Windows 11 image for analysis
Configure your Windows 11 virtual system for analysis.
Task
-
Log on to the virtual machine, then run the VM Provisioner Tool.

Note
VM Provisioner Tool enables the Administrator account, which is disabled by default on Windows 11.
Note
The VM administrator password
cr@cker42is required for VM profile creation. ATD system updates it to a random string as a part of VM creation. The running sandbox VM will have a random password. -
Restart the virtual machine.
-
Turn off the firewall in the virtual image:
-
Press the Windows and X keys simultaneously, then select Control Panel → System and Security → Turn on Windows Firewall On or Off.
-
Select Turn off Windows Firewall (not recommended) for both Home or work(private) network location settings and Public network location settings, then click OK.
-
-
Disable Windows Defender:
-
Press the Windows and X keys simultaneously, select Control Panel, then select Small Icons under View by.
-
Select Windows Defender, then turn off all features on the Windows Defender Settings page.
-
If a Windows Defender message appears, close the message screen.
-
-
Disable first log on animation:
-
Press the Windows and R keys simultaneously.
-
6 | Installation overview
-
In the Run dialog box, type
gpedit.msc, then press Enter. -
In the Local Group Policy Editor page, select Computer Configuration → Administrative Templates → System → Logon.
-
Double-click Show first sign-in animation, select Disabled, then click OK.
-
Enable required Windows features.
-
Press the Windows and X keys simultaneously, select Control Panel, then select Small Icons under View by.
-
Select Programs → Programs and Features → Turn Windows feature on or off.
-
Select Internet Information Services → FTP server → FTP Extensibility.
-
Select Internet Information Services → Web Management Tools → IIS Management Service.
-
Select .NET Framework 4.6 Advanced Services, and ensure that ASP.NET 4.6 is enabled.
-
Select WCF Service Library, ensure that TCP Port Sharing is enabled, then select OK.
-
If the Windows needs files from Windows Update to finish installing some features message appears, select Download files from Windows Update.
This operation might take around 5 minutes to complete. A confirmation message is displayed when the operation completes.
-
-
Edit the power options:
-
Press the Windows and X keys simultaneously, select Control Panel, then select Small Icons under View by.
-
Select Power Options → Choose when to turn off the display, select Never for Turn off the display, then click Save changes.
-
-
Configure FTP settings in the virtual image:
-
Press the Windows and X keys simultaneously, select Control Panel, then select Small Icons under View by.
-
Select Administrative Tools, then double-click Internet Information Services.
-
In the Internet Information Services page, expand the entry under Internet Information Services(IIS) Manager, then expand the tree under host name.
-
If you see the Do you want to get started with Microsoft Web Platform to stay connected with latest Web Platform Components? message, select Do not show this message, then click Cancel.
-
Select Sites, right-click on Default Web Site, select Remove, then click Yes to confirm.
-
Right-click Sites, select Add FTP Site, then do the following.
-
Provide the FTP site name as root and Physical path as C:\, then click Next.
-
For Bindings and SSL Settings, select No SSL, then click Next.
-
For Authentication and Authorization Information, select Basic under Authentication, select All Users under Allow access to, select both Read, and Write under Permissions.
-
Click Finish.
-
-
Close the Internet Information Services (IIS) Manager page.
-
-
Turn off automatic updating for Windows:
-
Press the Windows and X keys simultaneously, select Control Panel, then select Small Icons under View by.
-
Select Administrative Tools → Services, then double-click Windows Update.
-
Select Startup type as Disabled.
-
Stop the service if the service is running.
-
Press the Windows and R keys simultaneously, type
gpedit.msc, then click OK. -
In Local Group Policy Editor, select Computer Configuration → Administrative Templates → Windows Components → Windows Update.
-
6 | Installation overview
-
Set automatic logon:
-
Press the Windows and R keys simultaneously, type netplwiz, then press Enter.
-
In the User Accounts window, deselect Users must enter a user name and password to use this computer, then click Apply.
-
In the Automatically log on page, provide these credentials.
-
User name — admin
-
Password — cr@cker42
-
Confirm Password — cr@cker42
-
-
-
Configure Microsoft Office:
-
To analyze Microsoft Word, Excel, and PowerPoint files, install Microsoft Office 2007 on the virtual machine.
-
From any Microsoft Office software, select File → Options → Advanced, then under the Display section, enable the following options:
Disable hardware graphics acceleration
Disable Slide Show hardware graphics acceleration
-
Lower the security to run macros for the Office applications. In Microsoft Word 2007, select the Microsoft Office option on the top left corner, then select Word options → Trust Center → Trust Center Settings → Macro Settings, then select Enable all macros (not recommended potentially dangerous code can run). Do the same for other applications such as Microsoft Excel and PowerPoint.
-
Lower the security to run ActiveX for the Office applications. In Microsoft Word 2007, select the Microsoft Office option on the top left corner, then select Word options → Trust Center → Trust Center Settings → ActiveX Settings, then select Enable all controls without restrictions and without prompting (not recommended potentially dangerous code can run). Do the same for other applications such as Microsoft Excel and PowerPoint.
-
Select Word options → Trust Center → Trusted Center Settings → Trusted Locations, then use the Add new location... button to add C:\ under User Locations. Once added, double-click on the entry for C:\, then in the pop-up, select Subfolders of this location are also trusted, then click OK.
On the Welcome to Microsoft Office 2007 page, click Next button.
On the Sign-up for Microsoft Update page, select I don't want to use Microsoft Update, then click Finish.
When you open any of the Microsoft Office 2007 software, you would see the Help Protect and Improve Microsoft Office pop-up. From the pop-up select Don't make changes, then click OK.
-
-
Configure Adobe Reader:
To analyze PDF files, download Adobe Reader to the native host and install it to the VM.
In Adobe reader, if Adobe Reader Protected Mode message appears, select Open with Protected Mode disabled, then select OK.
If Accessibility Setup Assistance message appears, select Cancel.
Select Edit → Preferences → Updater, select Do not download or install updated automatically, select OK, then select Yes to confirm the changes.
-
Configure Java:
Open Java in the Control Panel.
In the Update tab, deselect Check for Updates Automatically.
6 | Installation overview
c. In the Java Update Warning message, select Do Not Check and then click OK.
-
Configure system startup:
-
Run the msconfig command.
-
From the Startup tab, then click Open Task Manager.
-
Select Java(TM) Update Scheduler (jusched) (if listed), then click Disable.
-
Select Adobe Acrobat SpeedLauncher (reader_sl) (if listed), then click Disable.
-
In the System Configuration dialog, select Don't show this message again, then select Restart.
-
-
Configure the default browser:
-
In Internet Explorer, select Tools → Internet Options.
-
In Home page, select Use Blank or Use new tab based on the version of Internet Explorer.
-
From the Privacy tab, deselect Turn on Pop-up Blocker.
-
Go to the Advanced tab of the Internet Options and locate Security, then select Allow active content to run in files on My Computer.
-
-
Disable the HTTP auto proxy server: Open command prompt with administrator privilege, then run these commands.
-
Net stop WinHttpAutoProxySvc
-
Sc config WinHttpAutoProxySvc start= disabled
-
-
Enable .NET framework: Open command prompt with administrator privilege, then run one of these commands.
-
Using DISM with Internet connectivity
DISM /Online /Enable-Feature /FeatureName:NetFx3 /All
-
Using DISM with no Internet connectivity
DISM /Image:<driveletter>:\test\offline /Enable-Feature /FeatureName:NetFx3 /All /Source:<driveletter>:\sources\sxs
Replace <driveletter>:\sources\sxs with the path of the installation media.
Replace <driveletter>:\test\offline with the path where the image is mounted.
-
Prepare a Windows 2012 R2 image for analysis
Configure your Windows Server 2012 R2 virtual system for analysis.
Task
-
Log on to the virtual machine as administrator.
Note
The VM administrator password
cr@cker42is required for VM profile creation. ATD system updates it to a random string as a part of VM creation. The running sandbox VM will have a random password.
2. If the Manage Your Server window page appears, select Don't Display the page at logon and close the page.
6 | Installation overview
-
If the Server Manager windows is displayed, select Manage → Server Manager Properties, select Do not start Server Manager automatically at logon, then select OK.
-
Disable the shutdown event tracker:
-
Select Start → Run, type
gpedit.msc, then click OK. -
In the Local Group Policy Editor page, select Computer Configuration → Administrative Templates → System, then double-click Display Shutdown Event Tracker.
-
Select Disabled, then click OK.
-
Close the Local Group Policy Editor page.
-
-
Turn off the firewall in the virtual image:
-
Select Start → Control Panel → Windows Firewall → Turn on Windows Firewall On or Off.
-
Select Off, then click OK.
-
-
Install telnet in the virtual image:
-
Select Start → Administrative Tools → Server Manager.
-
In the Server Manager window, select Add Roles and Features.
-
In Add Roles and Features Wizard, select Telnet Server.
-
Click Next, then Install.
-
Click Close after the installation succeeds.
-
-
Start the telnet service in the virtual image:
-
Select Start → Administrative Tools → Services, then double-click Telnet.
-
In the Telnet Properties (Local Computer) page, select Automatic for the Startup type, then select Apply → Start → OK.
-
-
Configure FTP settings in the virtual image:
-
Install IIS Manager if not already present and make sure you check the FTP Server checkbox when installing IIS Manager.
- From Server Manager page, select Add Roles and Features, then click Next.
- In the Installation type page, select Role-based or feature-based installation, then click Next.
- In the Server selection page, select Select a server from the server pool, then click Next.
- In the Server Roles page, expand the Web Server (IIS) node, expand the FTP Server node, select FTP Server, select FTP Service, then click Next.
- In the Select features page, click Next, then click Install.
-
Select Start → Administrative Tools → Internet Information Services(IIS) Manager.
-
In the Internet Information Services Manager page, select Sites, select Add FTP Site
-
In the Add FTP Site wizard, do the following.
- Provide the FTP site name as
rootand Physical path asC:\, then click Next. - For Bindings and SSL Settings, select No SSL, then click Next.
- For Authentication and Authorization Information, select Basic under Authentication, select All Users under Allow access to, select both Read and Write under Permissions.
- Click Finish.
- Provide the FTP site name as
-
-
Download and install the .NET Framework 4.6 on the VM image.
If a Blocking Issues message appears, install the suggested components, then select Continue.
-
Set automatic logon:
-
Select Start → Run, type
netplwiz, then press Enter.
-
Trellix Intelligent Sandbox 5.0.x Installation Guide
6 | Installation overview
-
Disable Windows updates:
-
Select Start → Control Panel → Windows Update → Change settings.
-
Under Important updates, select Never check for updates (not recommended).
-
Deselect Recommended updates when downloading, installing, or notifying me about updates.
-
Click OK.
-
-
Configure Microsoft Office:
-
To analyze Microsoft Word, Excel, and PowerPoint files, install Microsoft Office 2007 on the virtual machine.
-
Lower the security to run macros for the Office applications. In Microsoft Word 2007, select the Microsoft Office option on the top left corner, then select Word options → Trust Center → Trust Center Settings → Macro Settings, then select Enable all macros (not recommended potentially dangerous code can run). Do the same for other applications such as Microsoft Excel and PowerPoint.
-
Lower the security to run ActiveX for the Office applications. In Microsoft Word 2007, select the Microsoft Office option on the top left corner, then select Word options → Trust Center → Trust Center Settings → ActiveX Settings, then select Enable all controls without restrictions and without prompting (not recommended potentially dangerous code can run). Do the same for other applications such as Microsoft Excel and PowerPoint.
-
On the Welcome to Microsoft Office 2007 page, click Next button.
-
On the Sign-up for Microsoft Update page, select I don't want to use Microsoft Update, then click Finish.
-
-
Configure Adobe Reader:
-
To analyze PDF files, download Adobe Reader to the native host and install it to the VM.
-
In Adobe reader, if Adobe Reader Protected Mode message appears, select Open with Protected Mode disabled, then select OK.
-
If Accessibility Setup Assistance message appears, select Cancel.
-
Select Edit → Preferences → Updater, select Do not download or install updated automatically, select OK, then select Yes to confirm the changes.
-
-
Configure Java:
-
Open Java in the Control Panel.
-
In the Update tab, deselect Check for Updates Automatically.
-
In the Java Update Warning message, select Do Not Check and then click OK.
-
-
Configure system startup:
-
Run the
msconfigcommand. -
From the Startup tab, deselect reader_sl and jusched, then click OK.
-
Note
reader_sl is available only when Adobe Reader is installed.
c. In the System Configuration dialog, select Don't show this message again, then select Restart.
-
Configure the default browser:
In Internet Explorer, select Tools → Internet Options.
In Home page select Use Blank or Use new tab based on the version of Internet Explorer.
From the Privacy tab, uncheck Turn on Pop-up Blocker.
Go to the Advanced tab of the Internet Options and locate Security, then select Allow active content to run in files on My Computer.
Prepare a Windows Server 2016/2019 Standard image for analysis
Configure your Windows Server 2016/2019 Standard virtual system for analysis.
Task
-
Log on to the virtual machine as administrator.
 Note
NoteThe VM administrator password cr@cker42 is required for VM profile creation. ATD system updates it to a random string as a part of VM creation. The running sandbox VM will have a random password.
-
If the Manage Your Server window page appears, select Don't Display the page at logon and close the page.
-
If the Server Manager windows is displayed, select Manage → Server Manager Properties, select Do not start Server Manager automatically at logon, then select OK.
-
Disable the shutdown event tracker:
Select Start → Run, type gpedit.msc, then click OK.
In the Local Group Policy Editor page, select Computer Configuration → Administrative Templates → System, then double-click Display Shutdown Event Tracker.
Select Disabled, then click OK.
Close the Local Group Policy Editor page.
-
Turn off the firewall in the virtual image:
Select Start → Control Panel → Windows Firewall → Turn on Windows Firewall On or Off.
-
Select Turn off Windows Firewall (not recommended), for the following, then click OK.
Home or work (private) networks
Public networks
-
Configure FTP settings in the virtual image:
-
Install IIS Manager if not already present and make sure you check the FTP Server checkbox when installing IIS Manager.
From Server Manager page, select Add Roles and Features, then click Next.
In the Installation type page, select Role-based or feature-based installation, then click Next.
In the Server selection page, select Select a server from the server pool, then click Next.
-
Trellix Intelligent Sandbox 5.0.x Installation Guide
103
6 | Installation overview
- In the Server Roles page, expand the Web Server (IIS) node, expand the FTP Server node, select FTP Server, select FTP Service, then click Next.
- In the Select features page, select the Telnet Client checkbox, then click Install. You can skip this step if you do not require a Telnet client.
- In the confirmation page, click Install.
b. Select Start → Administrative Tools → Internet Information Services(IIS) Manager.
c. In the Internet Information Services Manager page, select ADMINISTRATOR → Sites, then right-click on Sites and select Add FTP Site.
d. In the Add FTP Site wizard, do the following.
- Provide the FTP site name as root and Physical path as C:\, then click Next.
- For Bindings and SSL Settings, select No SSL, then click Next.
- For Authentication and Authorization Information, select Basic under Authentication, select All Users under Allow access to, select both Read and Write under Permissions.
- Click Finish.
- Ensure that .NET Framework 4.6.2 is installed.
- Set automatic logon:
- Select Start → Run, type netplwiz, then press Enter.
- In the User Accounts window, deselect Users must enter a user name and password to use this computer, then click Apply.
- In the Automatically log on page, provide these credentials.
- User name — Administrator
- Password — cr@cker42
- Confirm Password — cr@cker42
- Disable Windows updates and Windows Defender:
- Select Start → Run, type gpedit.msc, then press Enter.
- Select Computer Configuration → Administrative Templates → Windows Components → Windows update.
- On the right pane, double click Configure Automatic Updates, then select Disable.
- Click OK.
- Select Computer Configuration → Administrative Templates → Windows Components → Windows Defender.
- On the right pane, double click Turn off Windows Defender, then select Enable.
- Click OK.
- Configure Microsoft Office 2019:
- To analyze Microsoft Word, Excel, and PowerPoint files, install Microsoft Office 2019 on the virtual machine.
- Lower the security to run macros for the Office applications. In Microsoft Word , select the Microsoft Office 2019 option on the top left corner, then select Word options → Trust Center → Trust Center Settings → Macro Settings, then select Enable all macros (not recommended potentially dangerous code can run). Do the same for other applications such as Microsoft Excel and PowerPoint.
- Lower the security to run ActiveX for the Office applications. In Microsoft Word 2007, select the Microsoft Office option on the top left corner, then select Word options → Trust Center → Trust Center Settings → ActiveX Settings, then select Enable all controls without restrictions and without prompting (not recommended potentially dangerous code can run). Do the same for other applications such as Microsoft Excel and PowerPoint.
104 Trellix Intelligent Sandbox 5.0.x Installation Guide
6 | Installation overview
d. On the Welcome to Microsoft Office 2019 page, click Next button.
e. On the Sign-up for Microsoft Update page, select I don't want to use Microsoft Update, then click Finish.
-
Configure Adobe Reader:
-
To analyze PDF files, download Adobe Reader to the native host and install it to the VM.
-
In Adobe reader, if Adobe Reader Protected Mode message appears, select Open with Protected Mode disabled, then select OK.
-
If Accessibility Setup Assistance message appears, select Cancel.
-
Select Edit → Preferences → Updater, select Do not download or install updated automatically, select OK, then select Yes to confirm the changes.
-
-
Configure Java:
-
Open Registry Editor
-
Navigate to HKEY_LOCAL_MACHINE\SOFTWARE\Wow6432Node\JavaSoft\Java Update\Policy\EnableJavaUpdate.
-
Set its value to 0.
-
Close the Registry Editor.
-
-
Configure Adobe flash player:
-
Run the command prompt as an Administrator.
-
Execute the following command:
dism.exe /online /add-package /packagepath:"<Adobe-Flash-For-Windows-Package>.mum" -
Restart the VM.
-
-
Configure system startup:
-
Select Start → Run, type
msconfig, then click OK. -
From the Startup tab, deselect reader_sl and jusched, then click OK.
-
-
Configure the default browser:
-
In Internet Explorer, select Tools → Internet Options.
-
In Home page select Use Blank or Use new tab based on the version of Internet Explorer.
-
From the Privacy tab, uncheck Turn on Pop-up Blocker.
-
Go to the Advanced tab of the Internet Options and locate Security, then select Allow active content to run in files on My Computer.
-
Open Registry Editor.
-
Navigate to HKEY_LOCAL_MACHINE\SOFTWARE\Microsoft\Active Setup\Installed
-
Note
Replace <Adobe-Flash-For-Windows-Package> with the name and path of the Adobe Flash for Windows MUM file.
Note
reader_slis available only when Adobe Reader is installed.
Trellix Intelligent Sandbox 5.0.x Installation Guide
105
6 | Installation overview
Components\{A509B1A7-37EF-4b3f-8CFC-4F3A74704073}.
g. Set its value to 0.
h. Close the Registry Editor.
Import the virtual disk file
To create an analyzer VM, you must import the corresponding virtual disk file into Intelligent Sandbox.
Task
-
Click Start → Shut down.
-
Make sure there are no stale lock files (.lck) associated with the virtual machine.
The .lck files are located in the same folder as the .vmdk or .vhdx file.
-
Locate the virtual disk file.
Make sure the virtual disk file name does not contain any spaces or unsupported characters. If it contains any spaces or unsupported characters, the image file conversion fails.
-
To enable FTP, use the
set ftp enableCLI command.FTP transfer is faster than SFTP, but less secure. If your Intelligent Sandbox Appliance is in an unsecured network, such as an external network, use SFTP.
-
Open the FTP client.
For example, you can use WinSCP or FileZilla.
-
To connect to the FTP server on Intelligent Sandbox, use the following credentials.
- Host — IP address of Intelligent Sandbox
- Username — atdadmin
- Password — atdadmin
- Port — The corresponding port number based on the protocol you want to use.
-
Upload the virtual disk file from the local machine to Intelligent Sandbox.
Convert the VMDK and VHDX file to an image file
To create an analyzer VM, you must convert the VMDK and VHDX file to an image file.
For malware analysis, you can create multiple VMs that run on the same operating system, but with different applications. For example, you can create a Windows 7 SP1 analyzer VM for Internet Explorer 10 and another Windows 7 SP1 analyzer VM for Internet Explorer 9.
Users without administrator permissions are able to convert VMDK and VHDX files to image files.
Task
-
Log on to the Intelligent Sandbox web interface.
- Click Manage → Image & Software → Image.
- From the VMDK and VHDX Image drop-down list, select the imported VMDK or VHDX file.
- In the Image Name field, enter the image name that corresponds to your operating system.
Note
Image Name must not contain a space or any special characters. Accepted special characters are hyphens (-) or underscores (_).
Image names
Operating system | Image name |
|---|---|
| Microsoft Windows 7 32-bit Service Pack 1 | win7sp1.img |
| Microsoft Windows 7 64-bit Service Pack 1 | win7x64sp1.img |
| Microsoft Windows 8 Professional 32-bit | win8p0x32.img |
| Microsoft Windows 8 Professional 64-bit | win8p0x64.img |
| Windows 8.1 Enterprise Update 1 version 6.3 build 9600 64-bit | win8p1x64.img |
| Windows 10 Enterprise (Redstone 1 and 2, Threshold 2) 64-bit | win10p0x64.img |
| Microsoft Windows Server 2008 R2 Service Pack 1 | win2k8sp1.img |
| Windows 2012 Datacenter 64-bit | win2k12.img |
| Windows 2012 R2 Datacenter 64-bit | win2k12r2.img |
Note
Ensure that you specify whether the OS is a 32-bit or a 64-bit in the Image Name field, else the samples will fail submission.
McAfee ePO and OS profiling work only when you use the default name.
- Select the Operating System.
6 | Installation overview
Intelligent Sandbox attaches the name that you provide to the default name.
Example: You select Microsoft Windows 7 32-bit Service Pack 1, then enter with_PDF in the Image Name field.
The image file name is win7sp1_with_PDF.
Note
The image file name must be an alphabet, number, or underscore (_).
Click Convert.
On the Info window, click OK.
-
View the image conversion logs.
From the Select Log drop-down list, select the image name.
Click View.
Accessing the Intelligent Sandbox web interface
The Intelligent Sandbox web interface is hosted on the Intelligent Sandbox Appliance. You can access the Intelligent Sandbox web interface from a remote machine using a supported browser.
Trellix Intelligent Sandbox web UI requirements and preparation
Before you access the web UI, ensure that you make changes to your browser settings. Also, make sure that your system meets the necessary requirements. For a complete list of system requirements for client systems, see KB87121.
Browser settings for HTML5 support
User-interactive mode (XMode) is used for activation of VM images and manual submission of files. This mode works with any browser that support HTML5 Canvas. You do not need to install Java to use the XMode feature.
Chrome version 44.0.2403 and higher and Mozilla Firefox version 40.0.3 and higher are supported. Microsoft Internet Explorer is not supported.
You need to modify Firefox settings to use the HTML5 feature.
From the Firefox homepage, click Options → Advanced → Certificates → View Certificates.
From the Certificate Manager window, click Servers.
Click Add Exception... and type
https://<Host ATD IP address>:6080and click Get Certificate.Click Confirm Security Exception and then OK.
Click Activation or XMode.
6 | Installation overview
Security settings for Internet Explorer
When you try to access the web application, you might see the ActiveX control unsafe pop-up dialog box. Perform these steps to resolve this issue.
On your system, search for Edit Group Policy. The Local Group Policy Editor window is displayed.
From the Local Computer Policy tree, go to Computer Configuration → Administrative Templates → Windows Components and click Internet Explorer.
In the right window options, double-click Turn off the Security Settings Check feature and select Enabled.
Click Apply and then OK.
Security settings for Microsoft Edge
Before installing Microsoft Edge, you must make these changes on the Windows Registry.
On your system, open the Registry Editor.
Go to
HKEY_LOCAL_MACHINE\SOFTWARE\Policies\Microsoft\EdgeUpdatekey.Enter this information:
- DWORD name: Allowsxs
- DWORD value: 1
Note
You must create this key if it is not available.

Group Policy change for Microsoft Edge
You can modify a group policy to configure Microsoft Edge.
Open the Group Policy Editor.
Go to Computer Configuration → Administrative Templates → Microsoft Edge Update → Applications and select Allow Microsoft Edge Side by Side browser experience.
Click Edit Policy Setting and select Enabled.
Click OK.
Accessing Web UI using a URL
You can access the Trellix Intelligent Sandbox Web UI using a URL. For this, you need to set the appliance name and add it to your DNS server.
Trellix Intelligent Sandbox 5.0.x Installation Guide 109
6 | Installation overview
Set the appliance name using the set appliance name command. Then add this newly created appliance name to your DNS server. This allows you to access Trellix Intelligent Sandbox using a URL within your domain.
For example:
Set your appliance name to myatd. Add myatd to your DNS server.
If the domain name of your organization is www.example.com. You can access Trellix Intelligent Sandbox Web UI using myatd.example.com.
For more information about set appliance name, see Trellix Intelligent Sandbox CLI Reference Guide.
Log on to the Intelligent Sandbox web interface
To log on to the Intelligent Sandbox web interface for the first time, use the default credentials.
Set the appliance name using the set appliance name command. Then add the appliance name to your DNS server. This allows you to access Trellix Intelligent Sandbox using a URL within your domain.
Task
-
Open your Internet browser, then use the following to log on to the Intelligent Sandbox web interface:
URL — https://<Intelligent Sandbox Appliance host name or IP address>
Login ID — admin
Password — admin
Click Log In.
Change the default password.
Copy existing image files from one Intelligent Sandbox Appliance to others on the same network
Any image file available can be concurrently copied to multiple Intelligent Sandbox Appliance on the same network. This helps reduce the additional effort of preparing image files for each individual standalone appliance.
When copying the IMG file to an Intelligent Sandbox cluster, make sure that you copy it to the primary node and follow up with VM Sync to propagate the image to all nodes.
110 Trellix Intelligent Sandbox 5.0.x Installation Guide
6 | Installation overview
Note
We do not recommend copying images to backup or secondary nodes in a cluster directly.
-
Avoid copying into more than five destination Intelligent Sandbox Appliance concurrently.
Task
-
Log on to the Intelligent Sandboxweb interface.
-
Click Manage → Image & Software → Software.
-
In Destination IP, enter the IP addresses of all devices where the IMG file needs to be copied, separated by semicolons (;).
Note
Invalid or unavailable IP addresses are ignored.
-
In VM Image, select the image to be copied.
-
Click Copy VM.
Note
This button is disabled if previous instances of Image copy are running.
What to do next
Verify that the image copied at the destination is same as the source. To do this, compare their hashes available under VM Profiles page.
Note
If Image Copy is in progress and either the source or destination Intelligent Sandbox goes offline, a partial image might appear in the destination Intelligent Sandbox which would be unusable.
Restart the Image Copy instance when both devices are online to fix the issue.
Managing VM profiles
After you convert the imported VMDK or VHDX file to an image file, you create a VM profile for that image file.
Trellix Intelligent Sandbox 5.0.x Installation Guide111
6 | Installation overview
Note
You cannot associate this VM profile with any other image file. Similarly, once associated, you cannot change the VM profile for an image file.
VM profiles contain the operating system and applications in an image file. This enables you to identify the images that you uploaded to Intelligent Sandbox and then use the appropriate image for dynamically analyzing a file. You can also specify the number of licenses that you possess for the operating system and the applications. Intelligent Sandbox factors this in when creating concurrent analyzer VMs from the corresponding image file.
You use the Intelligent Sandbox web application to manage VM profiles.
Configurations in a VM profile
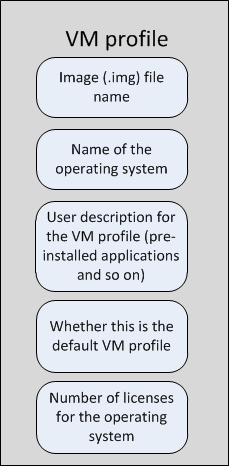
Create VM profiles
You must configure each image file that you convert with a single, unused VM profile. You can convert the same virtual disk file image files multiple times. This enables you to create multiple image files from one virtual disk file.
VM profiles contain the operating system and applications in an image file. This enables you to identify the images that you uploaded to Intelligent Sandbox and then use the appropriate image to dynamically analyze files. You can also specify the number of licenses that you possess for the operating system and the applications. Intelligent Sandbox factors this in when creating concurrent analyzer VMs from the corresponding image file.
- Log on to the Intelligent Sandbox web interface, then select Policy → VM Profile → New.
- From the Image drop-down list, select the image, then click Activate.
Based on your browser settings, the activation window opens in a new tab or window.
112 Trellix Intelligent Sandbox 5.0.x Installation Guide
6 | Installation overview
Note
- Ensure the pop-up blocker for your browser is not blocking the pop-up window. Add the ATD appliance IP under your pop-up blocker exceptions.
- Ensure that ports 6000 and higher (port 6000–6000 + number of VMs existing on ATD appliance) are open between the ATD Client and ATD Appliance. Check that the client's firewall allows connections on these ports. All firewalls between ATD and the client must allow connections through these ports.
- When in activation mode, the DNS does not function in the analyzer VM. To enable internet access, the customer must configure static DNS and reset DNS to DHCP prior to shutting down the VM.
- Activate Windows on the VM.
- Click Start → Control Panel → Windows Activation → Activate Windows now.
- Open Microsoft Word, then click Activate.
- On the Microsoft Office Activation Wizard, follow the on-screen prompts.
- Shut down the VM, then click Disconnect.
- On the Intelligent Sandbox web interface, click Validate.
- Close the 5n. flash not exist OK message.
- Download Flash Player.
- To run the original virtual disk image, use VMware ESXi or Microsoft Hyper-V.
- On the running VM, download Flash Player.
- Unzip the file.
- From the command line, run the following commands, then press Enter.
- flashplayerX_X_X_win.exe
- flashplayerX_X_X_win_debug.exe
- flashplayerX_X_X_win_sa_debug.exe
- Close the Flash Player window.
- Stop the VM, then copy the virtual disk image to the Intelligent Sandbox Appliance.
If the validation fails, create a new virtual disk file with the correct settings, then create the analyzer VM.
- Click Check Status, then verify that the following validation tests are successful on the Image Validation Log window.
- FTP connect to <VM IP address> OK
- FTP login OK
- FTP file upload OK
- Telnet login successful
- OS winxp
- Multiprocessing OK
- FTP OK
- TELNET OK
- AUTOLOGON OK
- ADMINISTRATOR OK
- FIREWALL OK
- Sigcheck OK
- Scan Complete
If the validation tests fail, create a new virtual disk file, then create the analyzer VM.
6 | Installation overview
-
Create the VM profile.
-
Enter a name and short description for the VM profile.
-
Select Default Profile, to set this as your default VM profile.
-
In VM Login, enter the log on credential for the VM image.
If you want to log on as an Administrator, leave this field blank.
-
In Maximum Licenses, enter the number of licenses you have for the operating system that you are using for this VM profile.
-
Click Save.
-
-
On the Information window, click OK.
-
To monitor the VM creation progress, click Dashboard. The VM creation progress appears on the VM Status monitor.
-
To view the VM creation logs, click Manage → System.
-
Configuring Intelligent Sandbox for malware analysis
To configure Intelligent Sandbox or Virtual Intelligent Sandbox for malware analysis, log on to the Intelligent Sandbox web interface.
Important
Ensure that you change the password for
cliadminfrom the Command-line interface andatdadminfrom the web interface for the configurations to be successful. Some of the configurations might fail if you continue using the default password.
High-level steps to configure malware analysis
This section provides the high-level steps on how to configure Intelligent Sandbox for malware analysis and reporting
Summarized steps for configuring malware analysis
-
Set up the Intelligent Sandbox Appliance and ensure that it is up and running.
-
Based on your deployment option, make sure the Intelligent Sandbox Appliance has the required network connections. For example, if you integrate it with Network Security Platform, make sure the Sensor, Manager, and the Intelligent Sandbox Appliance are able to communicate with each other.
-
Make sure the required static analysis modules, such as the Gateway Anti-Malware Engine are up-to-date.
-
-
Create the analyzer VMs and the VM profiles.
-
Create the analyzer profiles that you need.
-
If you want Intelligent Sandbox to upload the results to an FTP server, configure it and have the details with you before you create the profiles for the corresponding users.
-
Create the required user profiles.
-
Log on to Intelligent Sandbox web application using the credentials of a user you created and upload a sample file for analysis. This is to check if you have configured Intelligent Sandbox as required.
6 | Installation overview
-
In the Analysis Status page, monitor the status of the analysis.
-
After the analysis is complete, view the report in the Analysis Results page.
Configure the Trellix Virtual Intelligent Sandbox network information
Manage the Trellix Virtual Intelligent Sandbox from virtual machine manager.
Task
-
From your client virtual machine, access the virtual machine console with these credentials.
User name —
cliadminPassword —
atdadmin
-
Change your password: Provide the old password as
atdadmin, followed by the new password, then re-enter the new password to confirm. -
In the command prompt, configure the Trellix Virtual Intelligent Sandbox:
-
Set a name for Trellix Virtual Intelligent Sandbox.
For example,
set appliance name matd_appliance_1.The password must be an alphanumeric character string up to 25 characters. The string must begin with a letter, and can include hyphens, underscores, and periods, but not spaces.
-
Set the Trellix Virtual Intelligent Sandbox management port IP address and subnet mask.
For example,
set appliance IP xx.xx.x.x 255.255.255.0.Do not assign this class C network IP addresses: 192.168.55.0/24
-
Set the default gateway IP address.
For example,
set appliance gateway xx.xx.x.x. -
Set the management port speed and duplex settings using one of the following commands:
set mgmtport auto— Sets the management port in auto mode for speed and duplex.set mgmtport speed (10|100) duplex (full|half)— Sets the speed to 10 Mbps or 100 Mbps in full or half-duplex mode.
-
Verify the configuration.
To view the configuration details, run the
showcommand.To check the network connectivity, run the
ping <IP address>command.
One of these messages appears:
host <ip address> is alive— When the server is reachable.failed to talk to <ip address>— When the host server is not reachable.
-
-
Restart the Trellix Virtual Intelligent Sandbox.
6 | Installation overview
Configure the security and performance options
To ensure that Intelligent Sandbox runs securely and efficiently, configure the Global Settings.
Task
- Log on to the Intelligent Sandbox web interface.
- Click Manage → ATD Configuration → Global Settings.
- Configure the following settings.
| Option | Definition |
|---|---|
| Prevent unsupported file types | When selected, prevents Sensors from sending unsupported file types to Intelligent Sandbox for analysis. |
| Accept files based on extensions | When selected, allows Intelligent Sandbox to accept the file based on the file extension, instead of only the file header, before it is sent for dynamic analysis. |
| GTI lookup for links embedded inside PDF files | When selected, allows Intelligent Sandbox to complete the McAfee GTI lookup of links that are embedded in PDF files during dynamic analysis. |
| Generate STIX report | When selected, allows Intelligent Sandbox to generate the STIX report, which displays the activities that malware has performed on the sandbox environment. |
| MEG Wait-Time Threshold in Seconds | Specifies the maximum wait time that Intelligent Sandbox uses to analyze samples from your configured secure gateway. |
| X-Mode Maximum Time | Specifies the maximum time that users can access the sandbox environment. |
| Apply Custom Behavioral Rules | When selected, allows you to use your own YARA rules to identify and classify malware. |
6 | Installation overview
| Option | Definition |
|---|---|
| File Sizes | Allows you to set the minimum and maximum file size of the supported file type. Click the minimum or maximum size of the respective file type to edit. |
4. Click Save.
Note
To return the settings to the default configuration, click Reset Settings to Default.
Configure proxy servers for Internet connectivity
Intelligent Sandbox connects to different proxy servers for Internet connectivity. Based on the source of the traffic, Intelligent Sandbox determines the proxy server on which the Internet access requests from the traffic have to be routed.
These proxy servers can be configured on Intelligent Sandbox to handle Internet access requests:
- GTI HTTP Proxy — This setting is relevant for those analyzer profiles which have GTI Reputation enabled in their Analyzing Options. Intelligent Sandbox sends a query to a McAfee GTI server to fetch McAfee GTI score for the suspicious file being analyzed. If the customer network is protected under proxy, specify the proxy server details here so that the McAfee GTI queries can be sent out.
- Malware Site Proxy — This setting is applicable when samples being analyzed at analyzer VMs request Internet access. The proxy server specified under Malware Site Proxy handles the request. Because the traffic from an analyzer VM might be malicious, you might want to segregate this traffic from your production network.
Configure Intelligent Sandbox to communicate with McAfee GTI
To use McAfee GTI with Intelligent Sandbox, configure the options.
- Log on the Intelligent Sandbox web interface.
- Verify that the GTI File Reputation option is enabled.
- Click Policy → Analyzer Profile.
- Select the analyzer profile, then click Edit.
- Select GTI File Reputation.
- Click Manage → ATD Configuration → Proxy.
- Configure the GTI HTTP Proxy options, then click Test.
6 | Installation overview
Click Submit.
Enable the malware site proxy
Allow analyzer VMs to connect to the internet for sample analysis.
Task
Log on the Intelligent Sandbox web interface.
Click Manage → ATD Configuration → Proxy.
Configure the Malware Site Proxy options, then click Test.
Click Submit.
Configure DNS setting
When you execute files, the files can send DNS queries to resolve names. DNS queries are an attempt by malware to determine if they are being run in a sandbox environment. If the DNS query fails, the file might take an alternate path. When Intelligent Sandbox dynamically analyzes such a file, you might want to provide a proxy DNS service in order to bring out the actual behavior of the file.
Before you begin
- The DNS server is required to have access to a public domain or the internet.
- Ensure that the IP configured for DNS should be resolved by the DNS server using reverse lookup.
📝 Note
Malware DNS is used during VM activation, and also for any name resolution requests originating from the analyzer VM.
Task
Log on to the Intelligent Sandbox web interface.
Click Manage → ATD Configuration → DNS.
-
In DNS Setting, complete these settings, then click Apply.
- Domain — Type your domain name.
- Preferred DNS Server — Type IP address of the primary DNS server.
- Alternate DNS Server — Type IP address of the secondary DNS server.
In Malware DNS Setting, type IP address of the DNS server to resolve name resolution queries originated from the sandbox environment, then click Apply.
6 | Installation overview
Configure the syslog settings
The syslog mechanism transfers the Intelligent Sandbox events over the syslog channel to Security Information and Event Management (SIEM) or a logging server.
You can configure up to two external syslog server to which the following information are sent based on your configuration:
- Analysis Results (Malicious only or All)
- CPU Utilization (above a threshold percentage)
- Memory Utilization (above a threshold percentage)
- HDD Utilization (above a threshold percentage)
- Interface Status
- User Login/Logout
- Audit Log
- HTTPS Session Log
Once the user-defined threshold limit exceeds for CPU Utilization, Memory Utilization and HDD Utilization, syslog events are generated and sent to SIEM receiver. Minimum threshold level supported is 30%. Maximum threshold level supported is 90%. By default, the threshold percentage displayed under Syslog Setting page is 75%.
Whenever the interface link goes down or comes up, syslog events are generated and sent to SIEM receiver.
Analysis results and logon/logoff events are sent to the SIEM receiver.
Note
After syslog events are generated and sent to SIEM receiver, the information are parsed and sent to ESM. The summary is then displayed on the ESM user interface.
Note
The SIEM receiver and ESM can be on separate appliances or can be together in a virtual environment.
Task
- Log on to the Intelligent Sandbox web interface.
- Click Manage → ATD Configuration → Syslog, then select Enable Logging.
- In the Statistic to Log section, make these selections and entries as per requirement.
- Select Analysis Results, then select a level from the Severity Level drop-down list.
- Select CPU Utilization and specify the threshold level in the respective Threshold drop-down.
- Select Memory Utilization and specify the threshold level in the respective Threshold drop-down.
- Select HDD Utilization and specify the threshold level in the respective Threshold drop-down.
- Select Interface Status to receive information regarding interface link status.
Trellix Intelligent Sandbox 5.0.x Installation Guide
119
6 | Installation overview
-
If you want to store the logon/logoff information with a time stamp, select User Login/Logout.
-
Select Audit Log to view logs for administrative actions performed on Intelligent Sandbox. Audit Log is selected by default.
-
Select HTTPS Session Log to view logs for every session established or terminated.
This option is only available when Common Criteria Mode is enabled in Advanced Security Settings.
Note
When HTTPS Session Log is enabled, Intelligent Sandbox web performance is impacted.
-
From the drop-down, select the communication protocol between your Syslog server and Intelligent Sandbox.
Note
If you select TCP/TLS Encryption, then ensure that you upload a valid root CA certificate. You can upload the certificate from Manage → Security → Manage Certificates → Trusted CA certificate. For more information see the Upload certificates topic.
5. You can configure up to two syslog servers on Intelligent Sandbox. To configure the System Log Server options, do the following:
-
Enable Syslog.
-
Type the IP address or hostname of the logging server.
Note
In CC mode, hostname validation is done based on the logging server certificates. The communication will fail if there is a discrepancy between the hostname of the logging server and the certificate.
-
Type the port number on which the logging server is listening.
-
Enable Validate Syslog Server Certificate, to perform security checks on the syslog server certificates.
Note
This checkbox is available only if you chose TCP/TLS Encryption in the communication protocol.
This option must be enabled to run Intelligent Sandbox in CC mode. Intelligent Sandbox validates your syslog server certificate before it starts communicating with your syslog server. Intelligent Sandbox will notify you if there was a validation failure.
-
Click Test Connection. When the "Test connection successful" message appears, click OK.
6 | Installation overview
Note
When you select UDP as the Protocol from the drop-down list then Test Connection tab is disabled as UDP uses a simple connectionless transmission model rendering the connection status, unverifiable.
7. Click Submit.
Configuring the TAXII settings
Trusted Automated eXchange of Indicator Information (TAXII™) is a transport mechanism which allows you to automate the exchange of threat information. The information is shared in the form of a STIX report to the TAXII server.
Intelligent Sandbox generates STIX report when malicious files are detected and then the report sent to your TAXII server. For Intelligent Sandbox to do so, you need to configure your TAXII server information on Intelligent Sandbox.
Supported versions
STIX - version 1.2
TAXII - version 1.x
Intelligent Sandbox only supports HTTPS while communicating with the TAXII server.
Enable and configure TAXII settings
Intelligent Sandbox generates the STIX report which is then sent to the TAXII server.
Before you begin
Ensure that you have configured an inbox service and set a data collection name on the TAXII server.
Task
- Log on to the Intelligent Sandbox interface, then click Manage → ATD Configuration → Global Settings and select Generate STIX report.
- Click Manage → ATD Configuration → TAXII, then select Enable TAXII Communication.
- In URL, type the address of your TAXII server.
- Choose None or Basic based on the authentication requirement set for your server.
If you choose Basic, type the user name and password for authentication. - If your TAXII server requires TAXII client authentication, select Certificate Authentication Required.
- Use Browse to select a certificate, then click Upload.
6 | Installation overview
Note
- The certificate must be in PEM format.
- Merge the private key with your certificate.
- Ensure that the certificate key-length is 2048 bytes or above.

-
Select Enable Discovery and do the following:
-
In Discover Service URL, type the URL for the discover service.
This allows Intelligent Sandbox to check for available TAXII services on the TAXII server.
-
In Collection URL, type the URL for the data collection service.
This allows Intelligent Sandbox to request information about available Data Collections on the TAXII server.
-
-
In Inbox Path, type the path of the managed inbox of your TAXII server.
Inbox Path can be read from response obtained from Discover Services.
-
In Collection Name, type the name of the collection where the STIX reports are delivered.
Collection Name can be read from response obtained from Discover Collection.
-
Click Test Connection to check the status of the connection between Intelligent Sandbox and the TAXII server.
The check returns the status of the following:
- Inbox service on collection name.
- Discovery service (if enabled)
- Collection Service (if enabled)
-
Click Apply to save your configuration.
Results
Once Intelligent Sandbox starts communicating with the TAXII server, the TAXII Status changes to the following:
- UP – Last attempt to send STIX report to the TAXII server was successful.
- DOWN – Last attempt to send STIX report to the TAXII server was unsuccessful. This status can also appear if the TAXII settings are not configured or incorrect.
- UNKNOWN – Connection status is not yet verified by Intelligent Sandbox.
Configuring date and time settings
Intelligent Sandbox uses the date and time that you configure for all its functional and display purposes. The date and time displays on the Intelligent Sandbox web interface, reports, log files, and CLI.
You have two ways to configure the date and time:
- Manually specify the date and time
- Configure Network Time Protocol (NTP) servers
If you configure Network Time Protocol (NTP) servers as the time source, Intelligent Sandbox acts as an NTP client and synchronizes with the highest priority NTP server that is available. You can configure up to 3 Network Time Protocol (NTP) servers. In this case,
6 | Installation overview
-
By default, synchronization with NTP servers is enabled in Intelligent Sandbox. Also, pool.ntp.org is configured as the default NTP server. The default time zone is Pacific Standard Time (UTC-8).
-
When you upgrade from a previous version without selecting the Reset Database option, the date and time settings from the previously installed version are preserved. If you upgrade with the Reset Database option selected, the default date and time settings as described above are set.
-
At any point in time, there must be at least one valid NTP server specified in the Date and Time Settings page of Intelligent Sandbox. You can add, edit, or delete the list of NTP servers specified in Intelligent Sandbox.
-
Based on the access available to Intelligent Sandbox, you can specify public NTP servers or the ones locally on your network.
-
You can specify the domain name or the IPv4 address of NTP servers. If you specify the domain names, then you must have configured DNS settings in Intelligent Sandbox.
Note
If you specify public NTP servers, then using the domain names instead of IP addresses is recommended. The domain of a public NTP server might resolve to different IP addresses based on various factors.
-
Whether you enable NTP server synchronization or manually set the date and time, you must select the required time zone in the Date and Time Settings page. If you configure an NTP server, Intelligent Sandbox considers only the date and time from the NTP server. But for the time zone, it relies on what is specified in the Date and Time Settings page.
-
The date and time on a Intelligent Sandbox client has no impact on the timestamps that are displayed. Consider that the current time on the Intelligent Sandbox Appliance is 10 am PST (UTC-8). Regardless of the time zone from which you access this Intelligent Sandbox Appliance, all the timestamps are displayed in PST only. That is, the timestamps are not converted based on a client's date and time.
-
When the current date and time settings are changed, the timestamp for all the older records are also changed accordingly. Consider that the current time zone is PST (UTC-8) and you change it to Japan Standard Time (UTC+9). Then the timestamp for the older records are all converted as per Japan Standard Time (JST). For example, if the timestamp displayed for a record in the Analysis Status page was 0100 hours (1 am) PST before you changed the time zone. After you change the time zone to IST, the timestamp for the same record is 1800 hours IST.
-
The date and time settings of all the analyzer VMs are immediately synchronized to the date and time on the Intelligent Sandbox Appliance.
To use the Network Security Protocol server domain names, make sure you have configured the DNS servers.
Configure a Network Time Protocol server
Configure Network Time Protocol (NTP) servers as the time source. After you configure, Intelligent Sandbox acts as an NTP client and synchronizes with the highest priority NTP server that is available. You can configure up to 3 Network Time Protocol (NTP) servers.
6 | Installation overview
To use the Network Security Protocol server domain names, make sure you have configured the DNS servers.
You can choose between NTP and Secure NTP while configuring the NTP servers. If you choose Secure NTP, ensure that you configure with a symmetric key authentication.
Task
-
Log on to the Intelligent Sandbox web interface.
-
Click Manage → ATD Configuration → Date & Time.
-
In the Network Time Protocol section, select Enable Network Time Protocol.
-
Enter the NTP Server Name. If you choose to enable Secure NTP, select the checkbox in the Secure column, then do the following:
-
Set the polling interval.
Polling interval can be from 3 to 17.
Polling interval is calculated in the powers of 2 (2n). For example, if you set the polling interval value as 3, the client connect to the server every 23 i.e., 8 seconds.
-
In Authentication ID, enter the Secure NTP server key.
Authentication ID can be from 1 to 65534.
-
Select one of the following authentication key type as configured in your Secure NTP server.
SHA-1
MD5
-
In authentication key, enter your Secure NTP password.
-
-
Click Submit.
Note
Ensure that Authentication ID of two NTP servers are not the same.
Configure the date and time manually
You can configure the date and time by manually entering them in the settings.
Task
-
Log on to the Intelligent Sandbox web interface.
-
Click Manage → ATD Configuration → Date & Time.
-
In the Date and Time Settings section, enter the date and time, then click Submit.
6 | Installation overview
Add the Intelligent Sandbox logon banner
Upload custom text to the Intelligent Sandbox logon page.
Task
- Log on to the Intelligent Sandbox web interface.
- Click Manage → Security → Advanced Security Settings.
- Select Display Login Banner.
- In the Banner Message field, enter the logon message.
Note
You can only use the ASCII character set. The maximum number of characters you can use is 2048.
Click Save.
Configure telemetry
Telemetry allows Intelligent Sandbox to collect data about malware and the Intelligent Sandbox Appliance.
The data contains useful information about threat trends and product feature usage. The data is retained for 6 months, then deleted. Metadata, such as summary of the threat trends and feature usage, are maintained indefinitely. Trellix Intelligent Sandbox Telemetry data is collected and aggregated in the USA, then stored with our research team in India.
The data collected do not include personally identifiable information (PII) of the customer or end user.
Intelligent Sandbox captures these two categories of data.
Category | Definition |
|---|---|
|
Telemetry data that Intelligent Sandbox uses for the Intelligent Sandbox Appliance. |
Intelligent Sandbox collects Intelligent Sandbox Appliance telemetry data to:
The system data that Intelligent Sandbox collects |
Trellix Intelligent Sandbox 5.0.x Installation Guide125
6 | Installation overview
| Category | Definition |
|---|---|
|
includes:
|
6 | Installation overview
| Category | Definition |
|---|---|
|
Telemetry data for:
|
Trellix Labs require the analysis results from Intelligent Sandbox telemetry data to:
Telemetry data contains information about the analyzed samples, and includes:
|
Enable telemetry
Intelligent Sandbox sends system telemetry data only when you allow automatic updates.
Task
- Log on to the Intelligent Sandbox interface.
- Click Manage → Image & Software → Content Update.
- Under Allow Automatic Update, click Apply, then click OK.
- Click Manage → ATD Configuration → Telemetry.
Trellix Intelligent Sandbox 5.0.x Installation Guide127
6 | Installation overview
-
Ensure that the following options are selected, then click Submit.
- Send feedback to McAfee about system information in order to improve the product.
- Send feedback to McAfee about potential malicious files and urls.
Note
These options are enabled by default.
Configure Common Settings
Configure the Max Wait-Time Threshold for analyzing samples received from Email Gateway.
Configure maximum threshold wait time
Intelligent Sandbox allows you to configure the maximum wait time for analyzing samples received from McAfee Email Gateway. If the average analysis time of samples in Intelligent Sandbox is more than the threshold set, the samples submitted by McAfee Email Gateway are rejected.
Note
In a load-balancing scenario, the threshold wait time is 3 hours.
Follow the steps below to configure the maximum wait time for analyzing samples received from McAfee Email.
- Go to Manage → TIS Configuration → Global Settings.
- In the Performance Tuning area, set the threshold wait time.
Enable Common Criteria (CC) mode
You can enable Common Criteria (CC) mode in Intelligent Sandbox. On enabling the CC mode, you might see various security warnings which you can either accept or fix the security warning by reviewing the Security Logs.
Before you begin
From the Syslog settings page:
- Enable logging.
- Choose TCP/TLS in communication protocol
- Enable Validate Syslog Server Certificate.
128
6 | Installation overview
Note
In Common Criteria (CC) mode:
- The minimum TLS version is set to 1.2.
- FTP Access, HTTP, and SSH access are disabled.
Due to the SSH being disabled, Intelligent Sandbox cluster is not available in CC mode.
- Intelligent Sandbox uses only SSL connections with NSP.
- Web server and Syslog server certificates are strictly validated. Ensure the following:
- Root CA certificate for Web server and syslog server is uploaded in Trusted CA certificate. The root CA should be trusted by Intelligent Sandbox for any communication with syslog server and web server, else the communication fails.
- Certificate validation checks for valid certificate validity, key length, signature algorithm, chain validation, extended purpose, and revocation.
- Syslog server, Web server, and all intermediate certificates must have either OCSP or CRL (only HTTP URL is supported) information included, else the chain validation fails.
- Syslog server, Web server, and all intermediate certificate have Authority Information Access extension information of issuer CA (only HTTP URL is supported).
- Log on to the Intelligent Sandbox web interface.
- Click Manage → ATD Configuration → Syslog, then select Enable Logging.
- Configure the System Log Server options, then click Test connection to test the connection.
- In the Statistics to Log area, make sure Audit Log is checked. By default Audit Log is enabled.
- Click Submit.
- Go to Manage → Security → Advanced Security Settings, select Common Criteria Mode.
Audit function starts as Intelligent Sandbox boots up and stops with Intelligent Sandbox shutdown. The function restarts in the following two scenarios.
- Change in Syslog certificate
- Manual change in Date and Time information
Use SSL encryption while communicating with Network Security Platform
Setting up a secure communication with Network Security Platform is done from the Advanced Settings page of the Intelligent Sandbox web UI. This allows you to establish a secure SSL channel while communicating with Network Security Platform. Disabling this sets the channel to use TCP connection.
Note
In Intelligent Sandbox 4.12.x, all connections to Network Security Platform are set to use SSL by default.
Trellix Intelligent Sandbox 5.0.x Installation Guide129
6 | Installation overview
Task
-
Log on to your Intelligent Sandbox web UI.
-
Navigate to Manage → Security → Advanced Security Settings.
-
In the Advanced Security Settings section, select Use SSL for NSP.
Enable account lock out
You can configure Intelligent Sandbox to lock accounts after a defined number of invalid logon attempts. You can also define the time period the account remains locked. During this time, the user cannot log on to Intelligent Sandbox until the lock out period is elapsed.
Task
-
Log on to the Intelligent Sandbox web interface.
-
Click Manage → Security → Advanced Security Settings.
-
Select Enabled Account Lock Out, then set the lock out duration and the number of allowed incorrect logon attempts.
-
Duration of Lock Out in Minutes – Set the duration of the lock out period in minutes.
-
Maximum Login Retries – Set the number of allowed incorrect logon attempts, after which the account is locked.
-
Configuring Email Connector
Email Connector protects you from email borne threats by analyzing email attachments and URLs starting with http, https and ftp in the body of the email, through Intelligent Sandbox.
6 | Installation overview
Note
- Email Connector is not installed with Intelligent Sandbox. You need to install Email connector separately using systemex-5.x.x.xx.xxxxx.msu. For more information on installing Email Connector, see Install Email Connector.
- If you have configured a cluster, ensure that you install Email connector in your primary as well as the backup nodes.
- Ensure that you have reset your
cliadminpassword. If you continue using the default password, the configurations will fail.- In order to utilize the URL scanning option, as a prerequisite,
- Install the latest systemex provided for 5.0 release.
- Enable the Enable Malware Internet Access checkbox in the analyzer profile associated with atdec user.
- Intelligent Sandbox accepts up to 100 URLs per email for analysis.
- Email Connector URL scanning is configurable from 4.12.2 release. Refer the below procedure to enable/disable this in Intelligent Sandbox:
- In 4.12.0, URL scanning is enabled by default.
- Install the latest systemex provided for 5.0 release.
- Post upgrade, URL scanning gets disabled.
- From ATD UI Page, Go to Manage | Email Connector | under Scanning Email | Configuration.
- Check the URL Analysis checkbox.
- Click Apply to enable it again.
Intelligent Sandbox receives emails from a secure email gateway, performs an analysis on the email attachments and URLs in the body of the email, adds a verdict in the email header and sends it back to the email server.
You need to configure your email gateway to send emails to the Intelligent Sandbox for analysis. You can add filters such as send the ones with attachment only and so on. We recommend you configure your SEG to send emails for analysis to Intelligent Sandbox only when your SEG's AV analysis have returned an inconclusive result.
Troubleshooting email connector
You can also view the conversation log for each email report when you click  under the Log column. The HTML or PDF reports for a sample now displays the Received Time in UTC time zone. Previously, the HTML or PDF reports displayed the time stamp in the local time-zone.
- While you view the reports, the maximum number of reports you can navigate to are one million. If you want to view the reports beyond one million, use the search filter to reduce the result of the number of reports.
- The updated time might take few minutes to reflect in the reports page post migration. This is dependent on the size of the reports database.
Enable and configure Email Connector
6 | Installation overview
analysis settings, and destination SEG or relay hosts to which the emails with analysis headers are forwarded.
Task
-
Log on to the Intelligent Sandbox interface, then click Manage → Email Connector → Configuration.
-
In Email Connector Configuration, select Enable Email Connector, and then choose:
-
Inline Mode (hold email until decision made) – Emails are delivered to an onward SEG or MTA after Intelligent Sandbox scan.
-
Offline Mode (send copy of email to ATD for analysis) – Emails are discarded from Intelligent Sandbox after a scan. The email and analysis reports are maintained on Intelligent Sandbox.
-
-
In Receiving Email, complete these settings.
-
Listen Port — Type the port number to use for receiving emails. The default port number is 25.
-
Use TLS Connection — Select the level of security in TLS communication between ATD and the SEG that sends the emails. Choose from the three options to use TLS-secured communication, for receiving emails.
-
Permitted Hosts — From the drop-down, select the Host type as IP address, Hostname, or Network, then enter the IP addresses, host name, or network address of the source SEG for Intelligent Sandbox to receive emails. Click Add to add a Permitted host.
-
-
In Sending Email, complete these settings.
You can configure multiple relay hosts—where with multiple domains, you can configure a specific relay host for each domain.
-
In Use TLS Connection, select when to use TLS-secured communication for all outbound emails.
-
In Relay Host Value, type the IP address or hostname of the destination email server.
-
In Port, type the port number of the destination email server.
-
In Domain, type the domain name of the domain that you want this host to handle.
-
Click Add, to add the relay host.
The relay host would now appear in the list. Repeat Steps b, c, and d to add more relay hosts.
-
" style="vertical-align:middle;"> Note
If you want to configure a default relay host, enter * for the domain name.
Ensure that the default relay host is the last relay host you add. This keeps it as the last item of the list. If the default relay host is on the top of the list, all emails are sent to this relay host, and the remaining relay hosts in the list are ignored.
Ensure that you have configured a DNS server that can resolve this domain name and the hostname (if set) that is set in Relay Host Value..
132
Trellix Intelligent Sandbox 5.0.x Installation Guide
6 | Installation overview
5. In Scanning Email, complete these settings.
-
Maximum time per email to wait for all scans to complete — The maximum time (in seconds) within which the analysis must complete. The analysis times-out when the time exceeds the time specified and the email is queued in the SEG. Default is 600.
-
Scan these file types — Select the file types of the email attachments to scan.
-
Skip Protected Files — Ignores protected files during the scan.
-
Action when system is overloaded — Choose whether to deliver emails without scanning or drop SMTP connections when the system is overloaded.
Note
If you have selected Deliver emails unscanned, then the emails are delivered with the X-ATD-VERDICT as -8.
-
URL Analysis — By default, this setting is disabled. When enabled, the URLs in the email are detected and sent to ATD for analysis. The URL's severity plays an important role in determining the overall severity of the email.
-
Sandbox all URLs — This checkbox is available for configuration only if the URL Analysis setting is enabled. URLs that are classified as clean by GTI URL are sent to sandbox for analysis only when this check box is enabled. For the URLs detected in the email, the value of this check box takes precedence over the Continue to run all engines even after file is found malicious check box in the analyzer profile associated with 'atdec' user. When the Continue to run all engines even after file is found malicious check box is enabled and the Sandbox all URLs check box is disabled, the URL, if clean, is not sent to sandbox for analysis.
6. In Attachment Profiling, complete these settings.
-
Enable Profiling Mode (Attachments and URLs will not be scanned in this mode) – Enables email profiling. This option disables scanning the email attachments and URLs. Only email count is incremented and sent to the transporting email server.
Note
If you enable this option, the header X-ATD-VERDICT -7 is added to the emails.
-
Document Format – Select the format in which you want your profiling report to get generated.
-
Reporting Period – Select the period for which you want the emails to be profiled.
-
Granularity – Select the period in a granular level.
-
Download Report – Downloads the email profiling report. This option is available only if you have enabled email profiling mode.
7. Click Apply.
Results
You can view the total number of emails and attachments/URLs analyzed in the Email Counter monitor from the Dashboard.
6 | Installation overview
Configuring your Secure Email Gateway for Email Connector
For optimal performance, it is important that you configure your Secure Email Gateway.
Setting up SEG timeout
When attachments/URLs need to run through a full sandbox scan, emails sent to Intelligent Sandbox could take several minutes for analysis.
Setting the right timeout on your SEG is important, so that it waits until the Intelligent Sandbox scan is complete. A suitable value for timeout depends on the settings for the analyzer profile configured for your Email Connector.
Setting Intelligent Sandbox as a permitted host in your SEG
Depending on your SEG and its configuration, you might be required to include the IP address of the Intelligent Sandbox appliance to your SEG. This allows Intelligent Sandbox to deliver the scanned messages to your SEG.
Setting up SEG functions
Your SEG is expected to perform all anti-spam, anti-virus, or other blocking and filtering functions. Intelligent Sandbox does not perform any of these SEG functions. Messages to Intelligent Sandbox must be redirected only when the SEG:
- is not sure about the content of the email
- requires an Intelligent Sandbox verdict to enforce a policy accordingly.
Configure Email Connector filtering rules
Create rules to exclude email attachments from analysis.
Task
- Log on to the Intelligent Sandbox interface, then click Manage → Email Connector → Filtering Rules.
- Type a name for the rule, then select one or a combination of these filtering options:
- Name Filtering — Enter file names separated by semi-colons (;). You can use asterisk (*) and question mark (?) as wildcard characters.
- Size Filtering — Select less than or greater than criteria, type the file size, then select the unit.
- Catagory Filtering — Select the file types to exclude.
- Click Add Rule.
The rule is added in the Filtering Rules table.
6 | Installation overview
Recommended concurrent SMTP sessions for Email Connector
Review the number of concurrent sessions supported by Intelligent Sandbox and configure your email connector accordingly.
Appliance type | Standalone | Cluster |
|---|---|---|
Virtual Intelligent Sandbox | 50 | 300 |
Intelligent Sandbox appliance | 200 | 500 |

Note
The Standalone and Cluster number shows up by submitting 1 mail per session.
The recommended number of VM licenses to be created are:
Appliance model | For Windows 10 or later OS | For other OS |
|---|---|---|
Virtual Intelligent Sandbox | 6 | 7 |
ATD-3000/ATD-3100/ATD-3200 | 18 | 25 |
ATD-6000/ATD-6100/ATD-6200 | 55 | 55 |
Note
The number of licenses supported by Windows 10 OS are less compared to other windows OS because of higher resource consumption.
Understanding Email Headers with analysis status
After analyzing the email attachment/URL for threats, Intelligent Sandbox updates adds these headers of the respective emails with the observations, and sends the emails to the configured relay host.
Trellix Intelligent Sandbox 5.0.x Installation Guide
135
6 | Installation overview
|
Header |
Values |
|---|---|
|
X-ATD-FILENAMES |
Lists the names of all attachments/URLs of the email separated by comma(,). |
|
X-ATD-ALTFILENAMES |
Lists the alternate names of scanned attachments that have the same hash value as determined during the earlier scans. For example, if after scanning a file (file1), another attachment with the same hash but a different file name (file2) is detected, the X-ATD-ALTFILENAMES header is added with the value file1, file 2. |
|
X-ATD-FILEHASHES |
Adds the hashes of all email attachments/URLs. For example, MD5 , SHA-256. |
|
X-ATD-FILEVERDICTS |
Adds the verdict for each email attachment/URL that was submitted for analysis.
|
|
X-ATD-VERDICT |
Adds the overall verdict for an email.
|
6 | Installation overview
Header | Values |
|---|---|
| |
X-ATD-SILENTMODE |
Adds the value of 1 if an email was scanned in silent mode. Otherwise this header is not added. |
X-ATD-TOOBUSY |
Adds this header to all messages that pass through Intelligent Sandbox while it is:
|
Uploading certificates
For authentication, Intelligent Sandbox requires you to upload trusted CA and web certificates.
Ensure that you remember these guidelines before generating and uploading any certificate to Intelligent Sandbox:
- First, add root CA certificate to trusted CA bundle of Intelligent Sandbox. The Intermediate CA certificates are optional.
- CA flag must be set for CA certificates.
- Uploading chain certificates is not supported. Upload certificates one by one.
- Intelligent Sandbox validates expiry dates of certificates.
- Intelligent Sandbox checks for certificate revocation using OCSP or CRL. Certificate must have either OCSP or CRL URL. Ensure that the URLs are HTTP.
- Intelligent Sandbox checks for certificate chain validation. For the validation, Intelligent Sandbox uses Authority Information Access (AIA) issuer URL for creating full chain. Certificate chain validation fails if this field is not present.
Trellix Intelligent Sandbox 5.0.x Installation Guide 137
6 | Installation overview
-
Intelligent Sandbox checks for host name validation. Then, it compares presented identifier with SAN or CN field of certificate. In case SAN field is present then CN is not checked as part of host name validation. Wildcard certificates are accepted and are validated as part of host name check.
-
Minimum key size accepted by Intelligent Sandbox is 2048 for end certificate.
-
Minimum signature algorithm should be SHA256 with RSA encryption for end certificate.
When you upload a certificate for the web server, Intelligent Sandbox checks for the certificate and key in the same PEM file (certificate and private key concatenation), then validates the metadata. Post validation, you might see security warnings as a result of the validation which you can accept or fix.
Trusted CA Certificates
Upload all trusted root and intermediate CA (optional) certificates in the Trusted CA Certificates section. Certificate chain validation passes only if the root CA is in the trusted CA certificates.
⚠️ Caution
Ensure that you first upload the root CA certificate first, before you upload any intermediate CA certificates.
Web Certificates
Upload all web server certificates in the Web Certificates section. Certificate is validated for basic checks in non-CC mode and strict checks in CC mode.
⚠️ Caution
Ensure that you have uploaded all root CA certificates before you upload the web server certificates.
Upload trusted CA certificates
Upload trusted root and intermediate CA certificates.
Task
-
Log on to the Intelligent Sandbox web interface.
-
Click Manage → Security → Manage Certificate.
-
In the Trusted CA Certificate Upload section, click Browse.
6 | Installation overview
Note
You can only upload one certificate at a time.
-
Locate and select the certificate, then click Open, and then click Upload.
Upload web certificates
For web server authentication, Intelligent Sandbox requires you to upload web server certificates in PEM format.
Before you begin
-
Ensure that you have uploaded the root CA certificate before uploading the web server certificate.
-
If you haven't generated a CSR using Intelligent Sandbox, then ensure that you append the private key to web server certificate, in PEM format, before uploading to Intelligent Sandbox.
Task
-
Log on to the Intelligent Sandbox web interface.
-
Click Manage → Security → Manage Certificate.
-
Under Web Certificate Upload, click Browse.
-
Locate and select the certificate, then click Open.
-
Click Upload.
In non-CC mode, the certificates are validated for basic check. In CC mode, the certificates are validated strictly.
Trellix Intelligent Sandbox 5.0.x Installation Guide 139
7 | Installation overview
Manage users
Create Trellix Intelligent Sandbox users accounts that assign specific permissions and configuration settings to users in your network.
Add users
Create accounts for users on your network, then assign them permissions.
- Log on to the Intelligent Sandbox web interface.
- Click Manage → ATD Configuration → ATD Users, then click New.
- Configure the user options, then click Save.
Note
- You can create upto 512 users from Intelligent Sandbox 4.14.2.x and above.
- By default, you can create upto 128 users. To increase the limit, use
set maxuserscommand on CLI.- We have tested with limited active sessions for the users. We recommend users to have the limited active sessions and close the session once done.
Types of users
To manage Intelligent Sandbox and its integrated products, Intelligent Sandbox uses different user accounts . These user accounts have different sets of administrator responsibilities. For example, the Super administrator user is responsible to configure the Intelligent Sandbox web interface, manage user accounts, and perform software upgrades. The Network Security Platform user is responsible to integrate Network Security Platform with Intelligent Sandbox.
Note
You cannot change the username for these accounts.
Command-line Interface user
To use the Command-line Interface (CLI), you need to log on to CLI using the user cliadmin credentials.
Command-line Interface administrator uses the following credentials:
7 | Installation overview
- username — cliadmin
- default password — atdadmin
Super Administrator
You create the Super Administrator account when you install Intelligent Sandbox and log on to the web interface.
The Super Administrator manages the following:
- Initially configure the Intelligent Sandbox web interface
- View and edit all Intelligent Sandbox user accounts
- Schedule database backups
- Software upgrades
Super Administrator uses the following credentials:
- username — admin
- default password — admin
Network Security Platform user
The Network Security Platform user has access to integrate Network Security Platform with Intelligent Sandbox.
Network Security Platform user uses these credentials:
- User name — nsp
- Password — admin
Upload Administrator
The Upload Administrator accesses the Intelligent Sandbox FTP server.
Upload Administrator uses the following credentials:
- User name — atdadmin
- Password — atdadmin
Web Gateway user
Web Gateway users integrate Web Gateway with Intelligent Sandbox.
Web Gateway user uses the following credentials:
- username — mwg
7 | Installation overview
- default password — admin
Email Gateway user
Email Gateway users integrate McAfee Email Gateway with Intelligent Sandbox.
As the McAfee Email Gateway user, you can view and edit the user account.
To edit other accounts, contact your administrator.
Email Gateway user uses the following credentials:
- username — meg
- default password — admin
TIE user
TIE users integrate TIE with Intelligent Sandbox.
TIE user uses the following credentials:
- username — tie
- default password — admin
Virtual Network Security Platform user
Virtual Network Security Platform user integrates Virtual Network Security Platform user with Intelligent Sandbox.
Network Security Platform user uses the following credentials:
- username — vnsp
- password — admin
Email connector user
The Email Connector user atdec is used by the Trellix Intelligent Sandbox software to communication with Email Connector and analyze email attachments. As an Trellix Intelligent Sandbox user, you do not have to use atdec for any configuration or access.
Bro Network Sensor user
Bro user integrates Intelligent Sandbox with one or more Bro Network Sensors. The users are also responsible for submitting files for analysis.
142
Trellix Intelligent Sandbox 5.0.x Installation Guide
7 | Installation overview
Note
- While you create a Bro user, ensure that you select BRO is user type.
- In a scenario where your Intelligent Sandbox is communicating with multiple Bro Network Sensors, we recommend you create separate Bro users for each Bro Network Sensor.
Bro users can use the following default user credentials or create new users with the BRO user type.
- username—bro
- password–admin
Administrator permissions
You can give permissions to administrators that enable them to access different settings.
Admin User
Administrators with Admin User permissions have access to all of the settings on the Intelligent Sandbox web interface.
- Create and manage users
- Grant users access to the FTP server
- Access the Intelligent Sandbox web interface RESTful APIs
- Upgrade the Intelligent Sandbox software
- Upgrade the Android analyzer VM
- Convert VMDK or VHDX files to images files
- Manage image files
- View all of the analyzer profiles in the database
- Enable Internet access to samples
- LDAP authentication
- Configure date and time settings
- View the status of all submitted files
Web Access
Administrators with the Web Access permission have access to the malware analysis capabilities.
- Submit files for analysis only for the analyzer profiles that the Web Access role administrators create
- View the analysis results
- Edit the Web Access Administrator accounts
- Create analyzer profiles
Trellix Intelligent Sandbox 5.0.x Installation Guide
143
7 | Installation overview
Restful Access
Administrators with Restful Access permissions have access to the RESTful APIs.
- Upload files using the RESTful APIs
- Edit the Restful Access account
For more information, see the Trellix Intelligent Sandbox RESTful APIs Reference Guide.
FTP Access permission
Administrators with FTP Access permissions upload the files to the FTP server hosted on the Intelligent Sandbox Appliance.
For FTP Access, logon to your Intelligent Sandbox Appliance as atdadmin.
Managing user roles in Intelligent Sandbox
As an administrator, you can assign role-based permissions to other users and define their access levels in Intelligent Sandbox. Role Based Access Control (RBAC) lets you manage access to Intelligent Sandbox based on the role assigned to users. You can assign any one of the six default roles or a customized role to any number of users with suitable permissions.
- Before you begin, review the following default roles, and determine if you need to create new roles:
- System Administrator — Manages the Intelligent Sandbox environment which also includes LDAP authentication and reset CLI password. Custom user roles with LDAP edit permissions can only configure LDAP settings and enable and disable LDAP, but cannot configure LDAP authentication.
- Standard User — Monitor the analysis reports and manual submission of files.
- Report Auditor — Audit reports and logs.
- Config Auditor — View all configurations.
- Integration Administrator — Manage integrated point products.
- Analyst — Monitor the analysis report, dashboard, and manual submission of files. Analyst can also view policies and content updates.
- Create custom roles on your Intelligent Sandbox web interface.
- Assign a role to the Intelligent Sandbox users
Create a role in Intelligent Sandbox
You can create roles by granting the appropriate permissions and assign it to other users.
Task
- Log on to the Intelligent Sandbox web interface.
- Select Manage → TIS Configuration → TIS Roles and click New.
144
Trellix Intelligent Sandbox 5.0.x Installation Guide
7 | Installation overview
On the Role Management page, enter a role name and description.
-
Under Permissions, you can do the following:
Dashboard — Enable or disable access to view the dashboard.
Click Select All to allow access to all permissions or select the specific permission(s) for Analysis, Policy, and Manage options.
Allow to modify selected permissions — Select this checkbox to allow the user to modify the Manage permission selected in this role.
Click Remove All to remove all permissions.
Click Save.
Review user analysis reports and status in Intelligent Sandbox
With Trellix Intelligent Sandbox, you can create custom roles by granting permissions to review Analysis Status and Reports of other users as well as download original samples. Reviewing the analysis status and reports of a specific user provides insight into potential threats and suspicious behavior, which allows you to take proactive measures to address these threats.
Task
Log on to Intelligent Sandbox.
Select Manage → TIS Configuration → TIS Roles and click New.
On the Role Management page, enter a role name and description.
On the Analysis tab, select Analysis Status (All) and Analysis Reports (All) permissions.
Click Save.
Assign roles to users in Intelligent Sandbox
Each role corresponds to a specific permission set and can be assigned to multiple users.
Before you begin
After upgrading to Intelligent Sandbox 5.0, existing users are granted new roles.
Admin users (including super user) are granted the System Administrator role.
The default point product users are granted the Integration Administrator role.
Non-admin and upload admin users are granted the Standard User role.
Task
Log on to the Intelligent Sandbox web interface.
Select Manage → TIS Configuration → TIS Users .
7 | Installation overview
-
Enter user credentials such as username and password.
-
Select a role from the Role Type dropdown list.
-
Select the required permissions to access different settings on the Intelligent Sandbox web interface.
-
Allow Multiple Logins — User can manage one or more account at the same time.
-
Sample Download Access — Download originally submitted files for analysis.
-
Web Access — User can access the malware analysis capabilities.
-
Restful Access — User can access REST APIs.
-
FTP Access — User can upload files to the FTP server hosted on the Intelligent Sandbox appliance.
-
Enable FTP Result Output — User can upload the analysis report of the sample file to other servers.
-
-
Enter user information such as name, company, email, phone, and more.
-
Select the default Analyzer Profile.
-
Click Save.
COPYRIGHT
Copyright © 2026 Musarubra US LLC.
Trellix and FireEye are the trademarks or registered trademarks of Musarubra US LLC, FireEye Security Holdings US LLC, and their affiliates in the US and /or other countries. Other names and brands are the property of these companies or may be claimed as the property of others.