After the EDR Telemetry Store virtual appliance is powered on, you must perform the initial configuration from the Command Line Interface (CLI).
Important
Configure the static IP address before you configure the EDR Telemetry Store cluster using the OpenSearch Cluster setup wizard. If you modify the IP address after the cluster configuration, you must reconfigure the appliance and regenerate the security certificates.
For more information, see Configure the EDR Telemetry Store cluster.
Log in to the CLI with the default credentials:
Username:
adminPassword:
admin
Change the password: You need to change your default password immediately. Re-enter your current password (
admin) and then create a new password.Note
The new password must be at least 14 characters long and should contain four or more character classes (uppercase, lowercase, numbers, and special characters like
!, @, #, $, %). The password cannot be a palindrome.Accept the End User License Agreement: After you change your password, the End User License Agreement (EULA) is displayed.
Press the space bar to read through the agreement.
At the prompt, you must type
yto accept the EULA and continue the installation. If you typen, the session ends.
View the appliance status: By default, the EDR Telemetry Store virtual appliance uses DHCP. We recommend using a DHCP reservation to assign a static IP address to the appliance.
To view the appliance status, network configuration, and resource usage, run the following command:
show status
Note
Record the IP address in the Network Configuration section of the
show statuscommand output. Use this IP address to set up the EDR Telemetry Store cluster.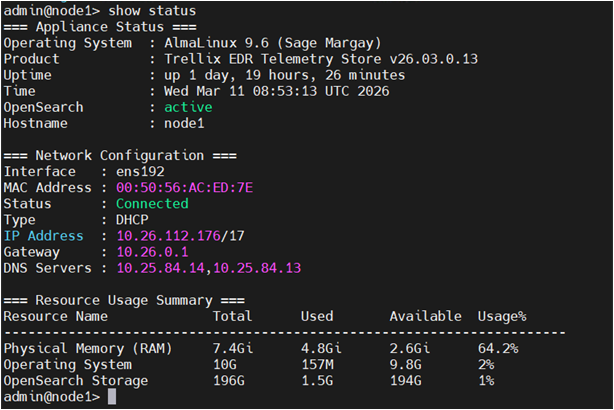
Configure a static IP address: To configure a static IP address, perform the following steps:
Before you configure the static IP, identify the network interface name.
Note
For EDR Telemetry Store version 26.03 or later, the interface name is available in the Network Configuration section of the
show statuscommand output.For version 25.11, run the commands in step b to view the interface name.
To view the network interface name, run these commands. The system prompts you for your password after the
enablecommand.enable [sudo] password for admin: shell ip address exit
Enter configuration mode and run the following commands:
configure configure system network
Follow the prompts to set the static IP address, subnet mask, and gateway:
Do you want to configure a static IP address for this node?: Type
yes.Enter Network Interface: Enter the network interface name.
Default value:
ens192.Enter Static IP and Subnet: Enter the IP address and subnet in CIDR format.
For example,
192.168.10.10/24.Enter Default Gateway: Enter the gateway IP address.
Enter DNS Servers: Enter the DNS server IP addresses.
To configure multiple DNS servers, separate the IP addresses with commas.
Review the configuration summary, then type
yesto complete the setup.To verify the configuration, use SSH to connect to the appliance using the new IP address:
ssh admin@<new_static_ip>
Run the
show statuscommand to verify the IP address.