Before you configure an existing inbound domain with outbound policies, you must create a message analysis policy and an email routing configuration policy specifically for outbound use. After you create a message analysis and email routing configuration policy, you link them to an existing inbound domain.
Follow the steps below to set up your outbound email functionality:
Important
Outbound support is available only for licensed Inline with Hygiene mode users. All Email Security — Cloud service regions can enable outbound email scanning.
Caution
Email Security - Cloud is not designed to be used for handling mass outbound email. If you send emails in bulk, such as newsletters, marketing emails, or system generated emails, you must not use Email Security — Cloud to scan them. Email Security — Cloud is able to identify senders with anomalous outbound email traffic and will rate limit outbound email if the defined rate limits are exceeded.
To handle mass emails, you can use a 3rd party email provider, set up custom transport/outbound rules in a mail server that bypasses the Email Security — Cloud outbound email filter, or send outbound emails in batches that do not exceed the defined rate limits.
Caution
Email Security - Cloud is designed to scan messages sent from your organization's domains to external entities. Messages between domains in your organization must not be forwarded to Email Security — Cloud.
Configuring a message analysis policy and email routing configuration policy
Important
The following message appears in the Create Policy page before you create an outbound message analysis or email routing configuration policy: Creation of outbound scanning policies, and associating those to domains will enable outbound scanning of emails. You acknowledge that such scans may from time to time result in quarantining or blocking of outbound emails. Completing the following steps indicates you acknowledge this statement.
Configuring a message analysis policy
To configure a message analysis policy:
In the Email Security — Cloud Web UI, click Configuration, then select Policies from the drop-down menu.
Click Create Policy.
Select Outbound for Traffic Type.
Select Message Analysis for Rule Type.
Enter a policy name and description (optional) and click Create.
The policy configuration page appears. Several configuration fields, including Hygiene Settings and Rate Limit Settings, are auto-populated based on the size of your organization. To adjust these settings, select Manage next to Configuration. See Message analysis policies for more information.
Important
Hygiene mode is the default mode for outbound policies.
Configuring an email routing configuration policy
To configure an email routing configuration policy:
In the Email Security — Cloud Web UI, click Configuration, then select Policies from the drop-down menu.
Click Create Policy.
Select Outbound for Traffic Type.
Select Email Routing Configuration for Rule Type.
Enter a policy name and description (optional) and click Create.
The policy configuration page appears. Select Manage next to Email Routing Configuration.
Under Incoming Server Addresses, select Add.
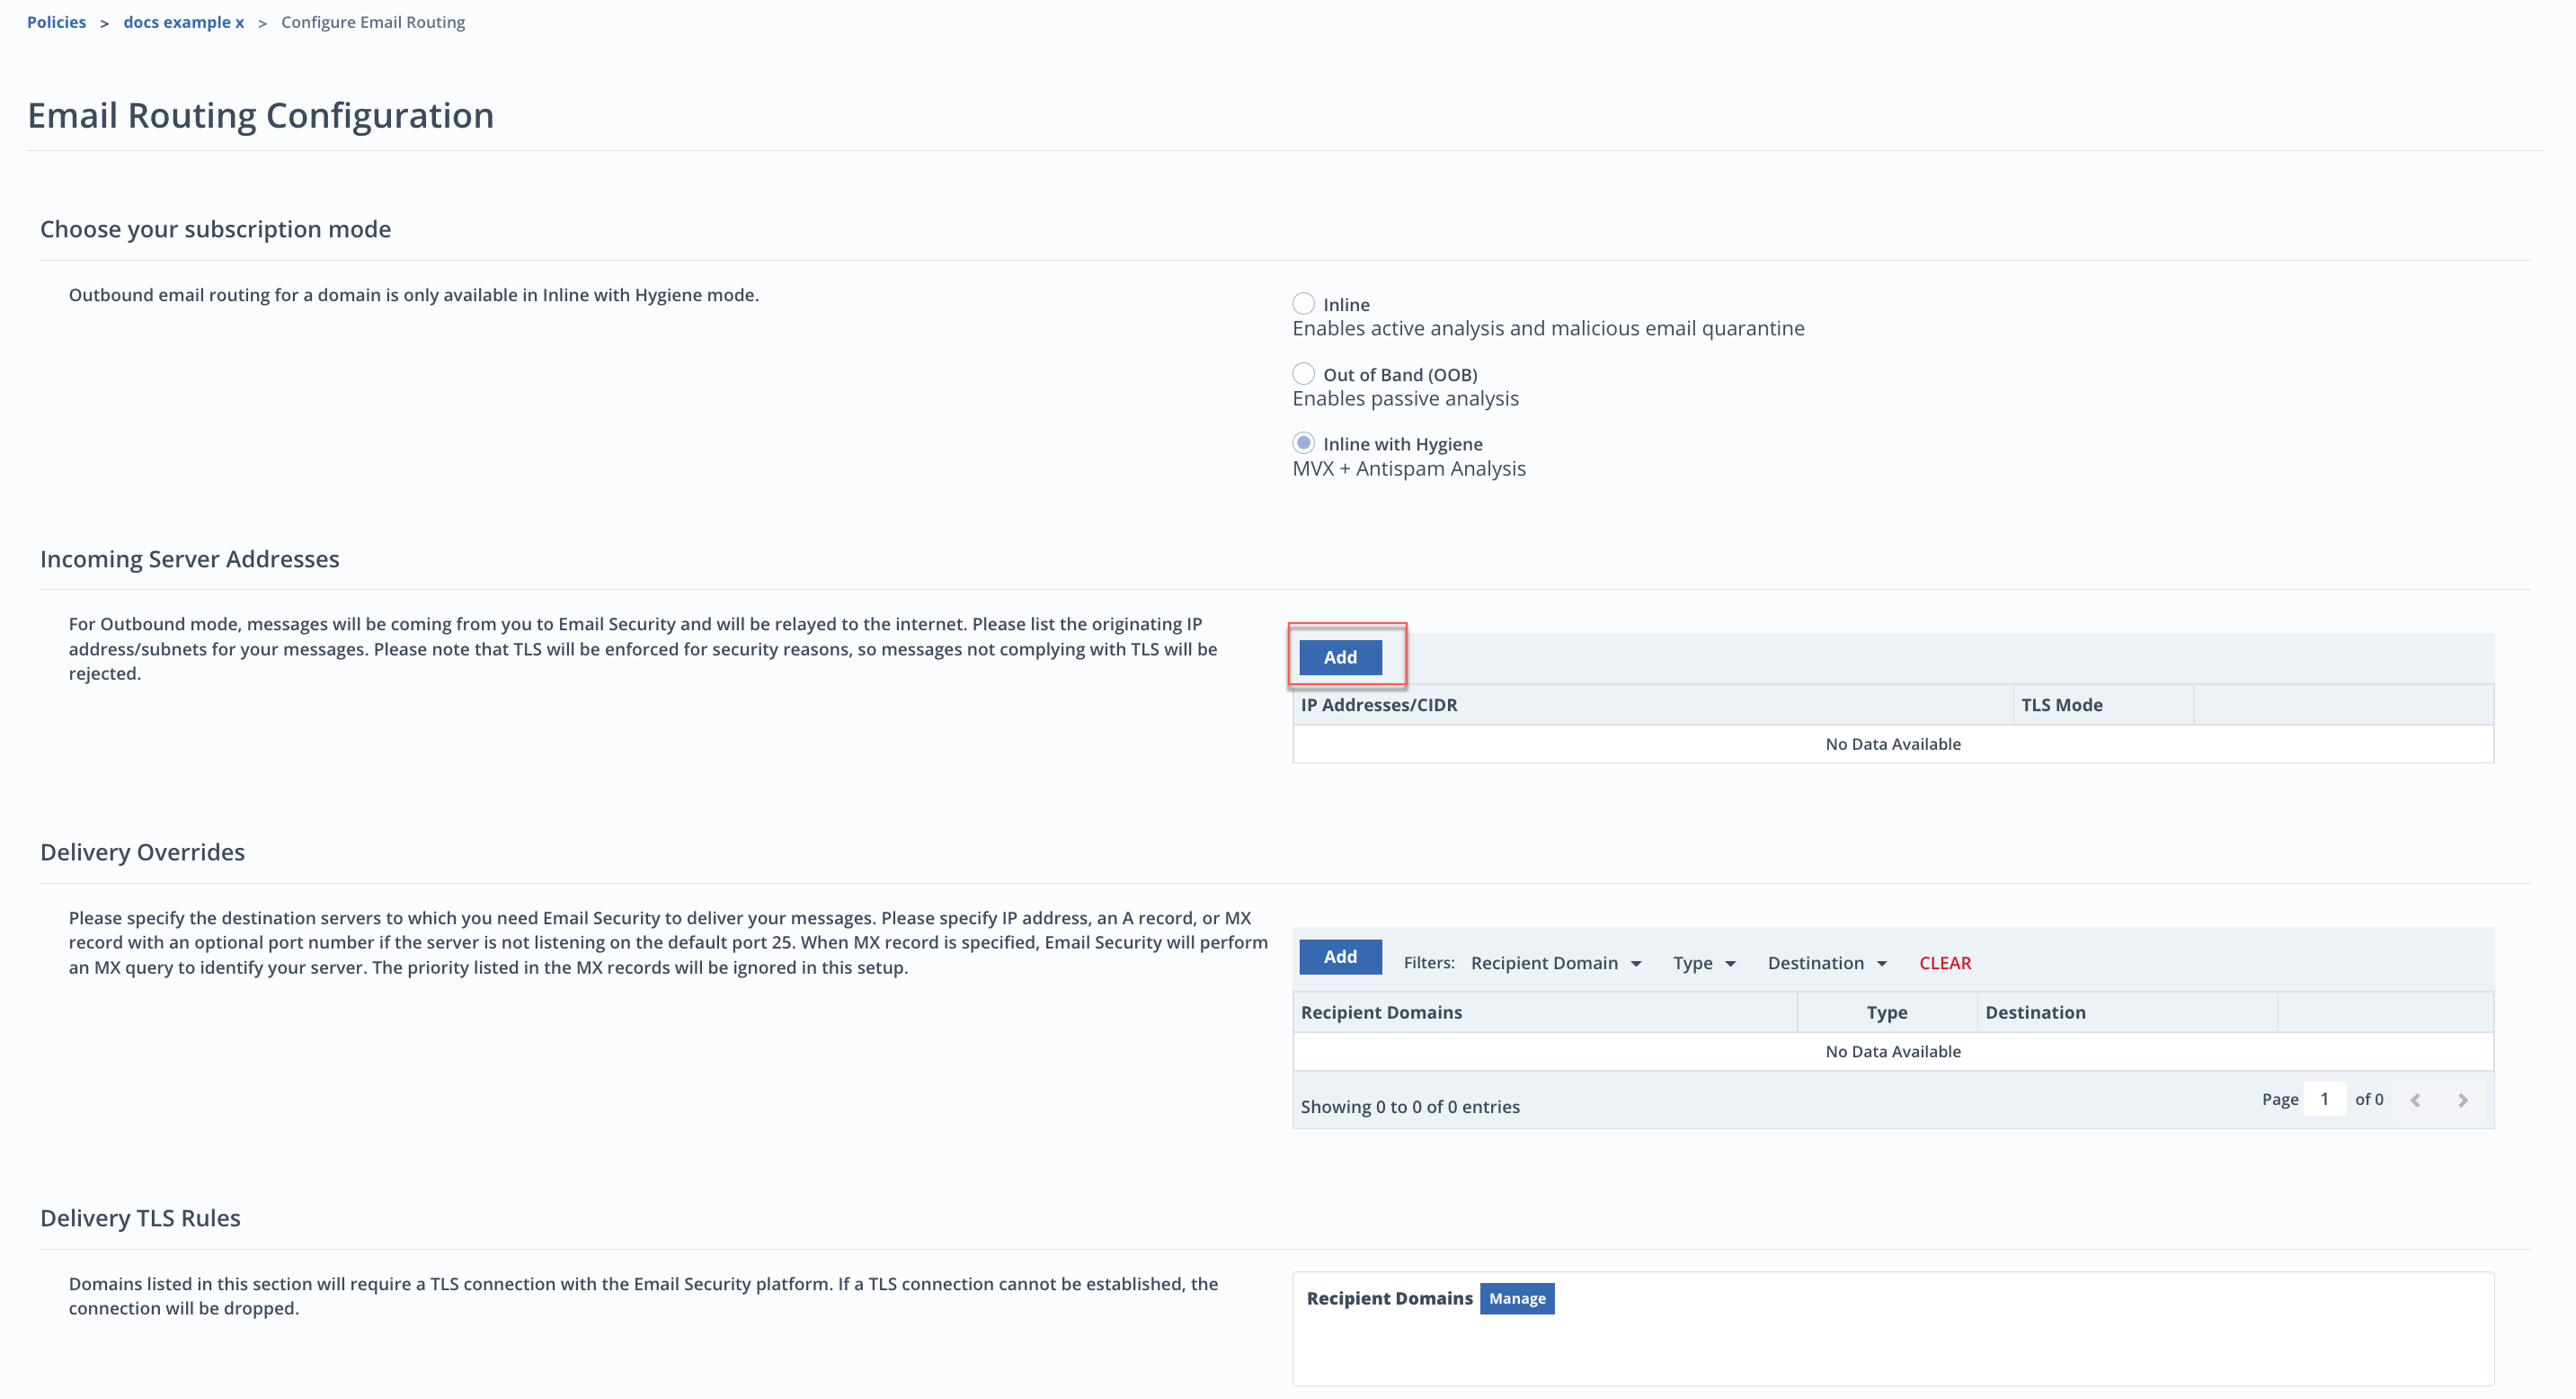
(Optional) Under Delivery Overrides, add next-hop destination servers where messages are delivered after the Email Security — Cloud hop. You can leverage third-party scanning solutions while also benefiting from Email Security — Cloud defenses. You can add A records, IP addresses, and MX records. Wildcard syntax is supported for each destination type. You can add multiple destinations for message delivery and determine the priority order under Delivery Overrides.
Caution
Email Security - Cloud cannot perform anti-spam/anti-virus scanning on emails after they are delivered to third-party tools.
Click Add. The Add Delivery Override Rule menu appears.
Enter recipient domains for mail delivery. To signify delivery to all domains in a destination (wildcard), enter an asterisk.
In the drop-down menu select what type of destination the recipient domains are associated with.
Enter destinations. Click OK.
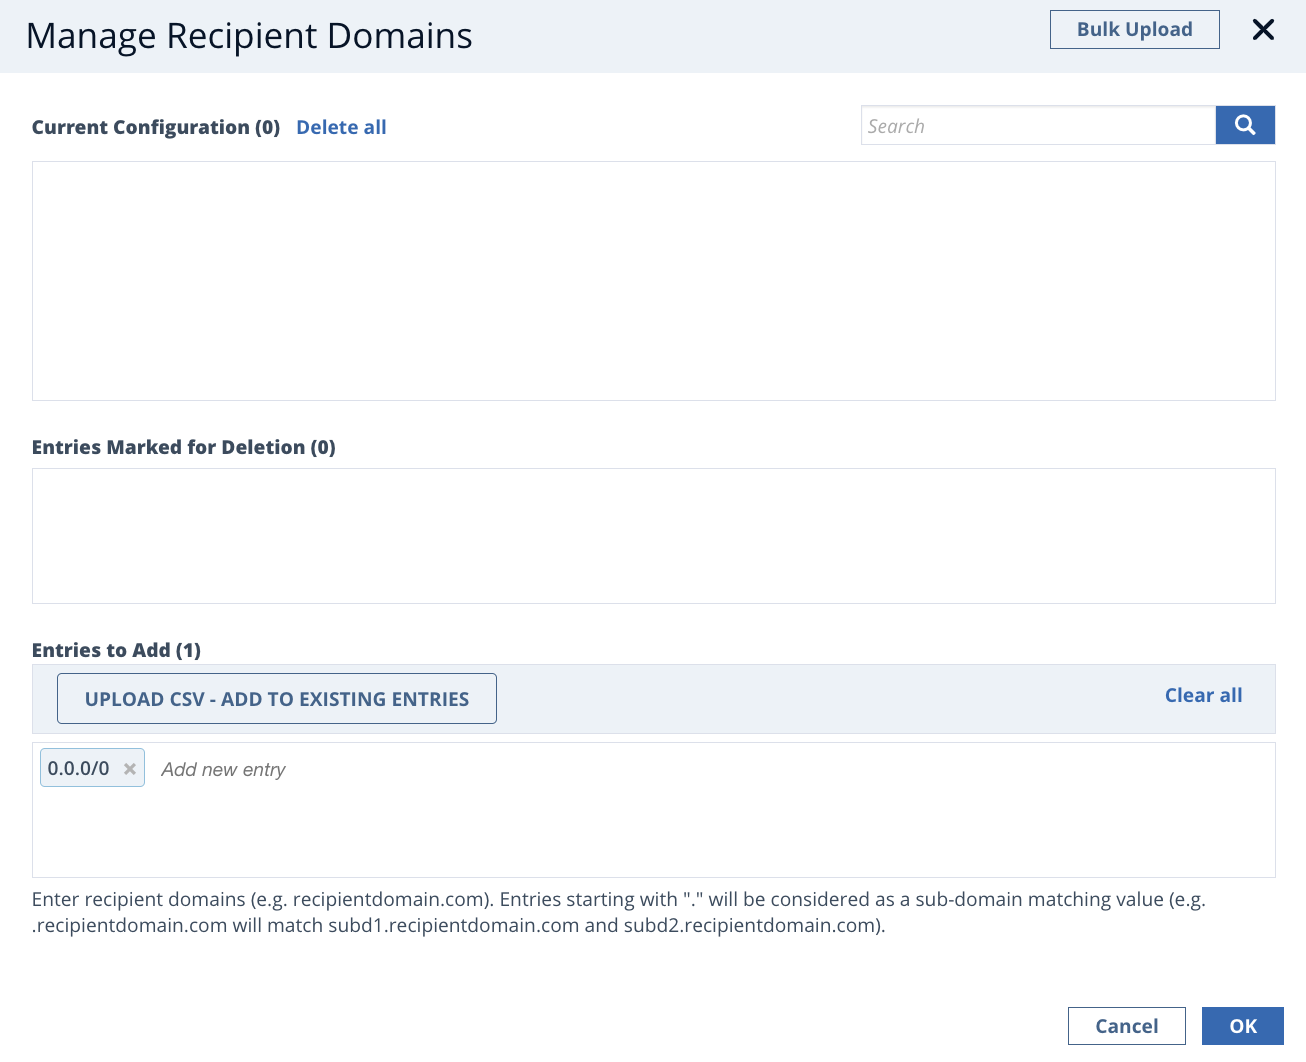
Under Deliver TLS Rules, enter the domains that will have TLS rules enforced.
Click Manage next to Recipient Domains. The Manage Recipient Domains window appears.
Under Entries to Add, enter the domains that will have TLS rules enforced. (Optional) Use an asterisk to signify delivery to all domains is TLS enforced.
(Optional) Click Bulk Upload to upload a CSV file from your local machine. CSV files uploaded overwrite existing TLS settings.
Click OK.
Caution
If an email is sent by your organization from an IP address that is not listed in an outbound email routing configuration policy, the message will be rejected.
In the policy configuration page, click Save. Allow up to 5 minutes for your changes to appear.
Configuring an inbound domain for outbound use
Important
You must provision a domain through inbound mode before enabling it for outbound use. However, you are not required to have inbound mail flow configured and enabled to provision a domain and set up outbound functionality.
To configure an inbound domain for outbound use:
In the Email Cloud Web UI, click Configuration, then select Domains from the drop-down menu.
In the list of domains and domain groups, select the domain you want to use for outbound mail.
The domain configuration page appears. Under Policies - Outbound, click Manage next to Message Analysis Policy.
In the configuration page, click Change to select open the list of available message analysis policies.
Select the message analysis policy you configured using the previous steps and click OK.
Click Save.
Under Policies - Outbound, click Manage next to Email Routing Configuration.
Repeat Steps 4 - 6 to add the outbound email routing configuration policy to your domain.
Configuring your MTA
Your upstream MTA must be set up to relay your outbound messages from Email Security — Cloud.
Important
Email Security — Cloud supports secure connections to the MTA using TLS 1.3, 1.2, (no support for SSLv3).
All Email Security — Cloud outbound domains use port 25 only.
In your MTA, add the Trellix Email Security — Cloud outbound domain:
US:
mx.us.email-out.fireeyecloud.comEMEA:
mx.emea.email-out.fireeyecloud.comAPJ:
mx.ap.email-out.fireeyecloud.comUS GOV:
mx.us.email-out.etp.fireeyegov.comCA:
mx.ca.email-out.fireeyecloud.com
Depending on the region of your account, allowlist the traffic from the following IP addresses in your MTA:
US IP addresses: |
|
EMEA IP addresses: |
|
APJ IP address: | 3.112.100.0/24 |
US GOV IP address: | 15.200.33.0/24 |
CA IP address: | 3.97.208.0/24 |
Update the SPF record
To maintain the high reputation score for messages sent through the Email Security — Cloud outbound infrastructure, you must update the SPF record of your outbound domain. Updating the SPF record reduces the risk of outbound mail being rejected by the receiving email server. Email Security — Cloud SPF records must be added to any existing SPF records. The SPF record you add depends on the geographical service region of your Email Security — Cloud account.
Non-US GOV accounts:
_spf.fireeyecloud.com
US GOV accounts:
_spf.fireeyegov.com
The following are examples of an SPF record:
v=spf1 include:_spf.fireeyecloud.com -all
v=spf1 include:_spf.fireeyegov.com -all
Generating and using a domain identification key
Unique domain identification keys are used to verify and secure your sender identity when sending outbound messages.
Note
Domain identification keys are used in conjunction with Envelope From Domain to associate polices with emails sent through Email Security - Cloud.
Policies associated with Envelope From Domain will be applied to a message if the message includes a valid domain identification key, Envelope From Domain is part of Email Security — Cloud's registered domain, and you have assigned an Outbound Message Analysis Policy to the registered domain. Otherwise, policies associated with the domain identification key will be applied.
A single domain identification key can be used for multiple domains.
To generate a domain identification token:
Open the configuration page of the domain you selected for outbound use.
Under Policies - Outbound, click Generate Token. A unique, randomized identification key is generated.
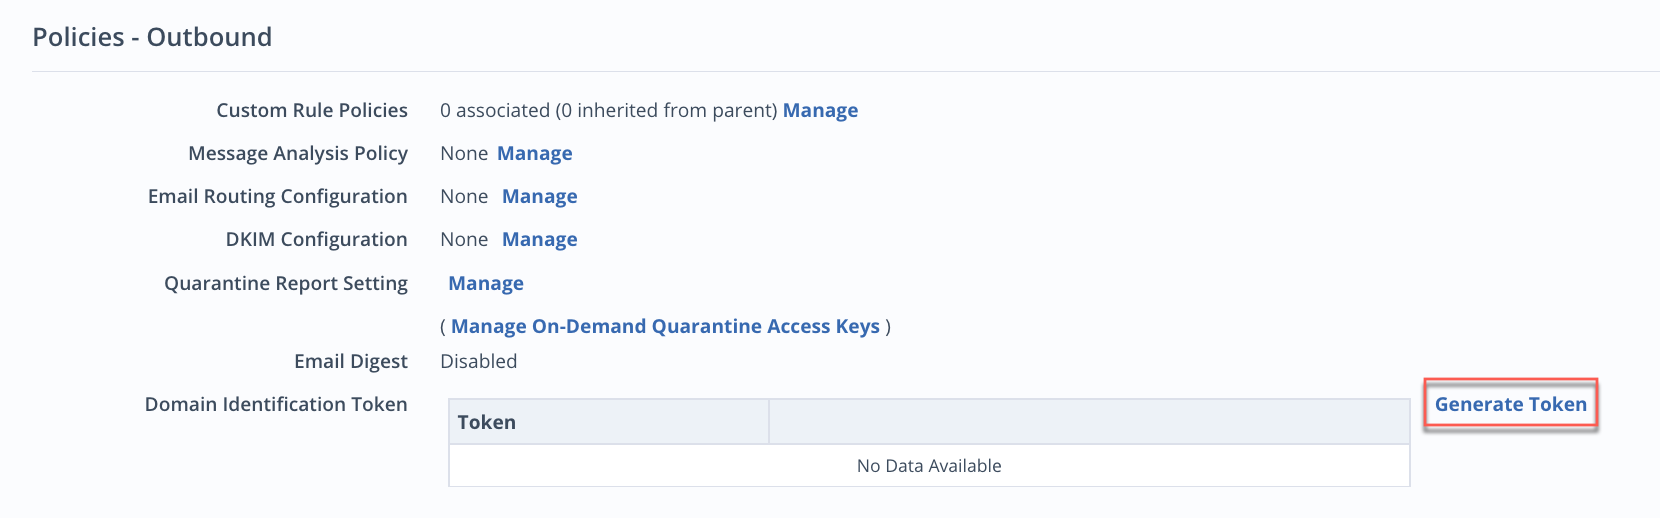
Click Copy to copy the full identification key to your clipboard.
You can begin sending outbound email traffic through Email Security — Cloud.
To use a domain identification token:
In the header of the email you want to send, include the domain identification key using the following format:
X-ETP-DOMAIN-AUTH-TOKEN: <identification-key>
Outbound messages that do not include a domain identification key within the header are rejected by Email Security — Cloud.