Trellix Drive Encryption - SaaS overview
Trellix Drive Encryption - SaaS provides protection for individual computers and roaming laptops with Unified Extensible Firmware Interface (UEFI). The Trellix Drive Encryption - SaaS software includes the encryption software that is installed on client systems, and the managing component in Cloud. It is deployed and managed through ePO - SaaS.
The Trellix Drive Encryption - SaaS suite provides multiple layers of defense against data loss with integrated modules that address specific areas of risk.
Trellix DE - SaaS allows you to:
Enforce access control with Pre-boot Authentication
Use certified encryption algorithms (FIPS)
Support mixed device environments, including solid-state drives
Support Trusted Computing Group (TCG) Opal self-encrypting drives
Planning to install Trellix Drive Encryption - SaaS
The Trellix Drive Encryption - SaaS client software is deployed from the ePO - SaaS server and installed on the client system.
The client system requires a restart to complete the installation. After the restart, the client communicates with the ePO - SaaS server, pulls down the assigned Drive Encryption policies and the assigned users, and activates the system according to the defined policies. Drive Encryption creates the Pre-Boot File System (PBFS) on the client system at the time of activation, then proceeds to encrypt the disks according to specified policies. The assigned users can be initialized through the pre-boot screen after the restart.
Important
Before installing Drive Encryption 8.1.1 client package, you must ensure that the Secure Boot database is updated with the Microsoft UEFI CA 2023 and Microsoft Option ROM UEFI CA 2023 on all Windows 10 and later systems. If the UEFI secure boot database is not updated with CA 2023 signature, auto upgrade to Drive Encryption 8.1.1 can cause client deployment to fail. For more information, see article 000015304.
The installation and deployment process is the same for both Drive Encryption software and Opal encrypted drives.
The overall Trellix DE - SaaS installation and deployment process is made up of the following stages.
Configure the registered server (Microsoft Active Directory Connector).
Deploy the Trellix Drive Encryption - SaaS software package to the client systems. For more information, see Install Trellix Drive Encryption - SaaS.
(Optional) Make sure the Trellix Drive Encryption - SaaS system status window appears on the client system, and the System State is Inactive.
(Optional) If you don't use ALDU, add users to the system or a group of systems in the DE group Assignment page on ePO - SaaS.
Create a custom Product Settings policy or duplicate the Trellix default policy, then assign it to the system or a group of systems by using the standard ePO - SaaS policy assignment capabilities.
(Optional) Make sure Trellix Drive Encryption - SaaS System Status is Active on the client system.
Choosing an encryption provider for Trellix Drive Encryption - SaaS
Opal drives are self-contained, standalone hard disk drives (HDDs) that conform to the TCG Opal standard. Drive Encryption provides a management tool for Opal drives.
By default, we recommended that you use the PC Software encryption. OPAL encryption relies on the firmware implementation of the disk, and therefore “outsources” an important part of the overall security of the encryption solution to a 3rd-party vendor.
The overall experience for administrators and users in installing and using Trellix DE - SaaS is the same, whether the target system has an Opal drive or a non-Opal HDD. You can apply the same policy to Opal and non-Opal systems, and the client system will choose the appropriate encryption provider for the system, giving Trellix DE - SaaS a powerful, seamless, and transparent approach to managing Opal and non-Opal systems in the same environment.
Note
Make sure that you select the correct encryption provider and set the priority. For systems with Opal drives, only the All disks and Boot disk only encryption options are supported. Also, for systems with Opal TCG complaint drives, set the highest priority to use Opal in the organization. For more information, see the Trellix Drive Encryption - SaaS Product Guide.
Drive Encryption provides support for Opal Compatibility tool that tests the Opal drive on your systems to verify if it is compatible to use the Opal features. For more information about this tool, see KB76182.
Trellix Drive Encryption - SaaS system requirements
Make sure that the client systems meet these requirements before installing Trellix DE - SaaS.
System requirements
Systems | Requirements |
|---|---|
Client systems | Processor: 1 gigahertz (GHz) or faster processor or System on a Chip (SoC) (AMD and Intel) BIOS Mode: Unified Extensible Firmware Interface (UEFI) RAM: 1 gigabyte (GB) for 32-bit or 2 GB for 64-bit Hard Disk: 16 GB for 32-bit OS or 32 GB for 64-bit OS ESP Size: 50 Megabyte (MB) |
Trellix DE - SaaS provides protection for individual computers and roaming laptops with Unified Extensible Firmware Interface (UEFI). The software supports UEFI-based tablets and uses a ePO - SaaS Tablet Test tool to verify if the pre-boot environment responds to the tablet's touch interface. For more information about this tool, see KB78050.
Install Trellix Drive Encryption - SaaS for the first time
The ePO - SaaS repository infrastructure allows you to deploy the Drive Encryption product to your managed systems from a central location.
Hardware compatibility
Drive Encryption provides user-centric access control to encrypted disks. When a system is encrypted with Drive Encryption, a “pre-boot” application is installed that loads before Microsoft Windows. This pre-boot application handles the authentication and authorization of users and the subsequent unlocking of the encrypted drive in order for the operating system to boot. For this pre-boot application to function correctly, there are a number of integration points with hardware that must also function correctly. When hardware compatibility issues arise, business operations might be interrupted due to systems being unable to boot.
The following diagram illustrates the variety of hardware that plays a role during Pre-boot Authentication:
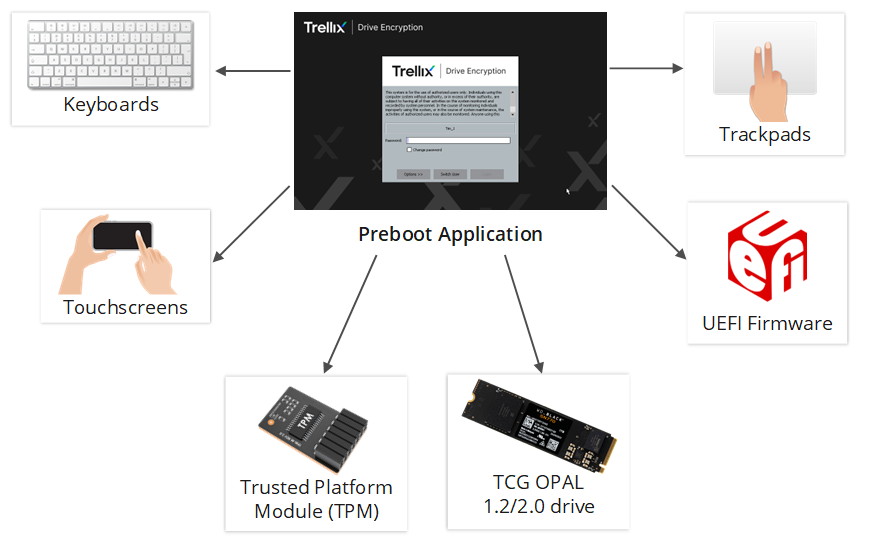
The following sections provide a detailed overview of the hardware involved in the PBA process, and what issues may arise.
Keyboards
Drive Encryption provides an internationalized pre-boot application, supporting over 20 different languages. The pre-boot user can select a keyboard layout that matches their keyboard. Due to variances between OEM manufacturers, Drive Encryption must use different techniques to intercept keystrokes from keyboards within UEFI in order to map keystrokes to a character. When testing Drive Encryption on new hardware, the following issues might arise with keyboards with the Drive Encryption pre-boot application:
Keystrokes may be ignored, intermittent, or repeated.
Keystrokes may be intermittent or repeated.
Key modifiers (e.g., SHIFT, CTRL, Alt-Gr) might not apply correctly.
Despite changing keyboard layouts, the keystrokes remain detected as English‑US.
Keyboards connected via docking stations might not work.
If keyboard issues are experienced following deployment or upgrade, we recommend that you check if any knowledge base articles exist for the hardware in question or contact Support for assistance. In almost all cases, Trellix Support can help identify a configuration for the device that results in a better user experience.
Trackpads and Touchscreens
Pointing devices within the Drive Encryption pre-boot application are used for navigating the user interface (UI). When a keyboard is available and functioning, all UI navigation can be performed through ‘TAB’ key presses. A pointing device is only ever necessary when a keyboard is not available, and the On-Screen Keyboard (OSK) feature has been enabled through the Drive Encryption policy. The following issues might be experienced with Trackpads or Touchscreens:
Clicks are not registered correctly.
The cursor is jittery or unresponsive.
Touch has no effect.
If pointing device issues are experienced following deployment or upgrade, we recommend that you check if any knowledge base articles exist for the hardware in question or contact Support for assistance. In almost all cases, Trellix Support can help identify a configuration for the device that results in a better user experience.
UEFI firmware
UEFI is a type of firmware interface that's responsible for booting up the operating system on a computer. Because Drive Encryption integrates very closely with the firmware of the device, updating the firmware does come with the risk of introducing compatibility issues, and might result in the system becoming unbootable. Therefore, it is strongly recommended to deploy BIOS updates in stages, starting with a single test system. If any issues are found, it is recommended to contact Trellix support for assistance.
Use the Canary Deployment Model to BIOS updates due to their inherent risk. The following issues might be experienced:
The system is unable to boot.
Any other hardware element suddenly stops working.
Trusted Platform Module (TPM)
A Trusted Platform Module is a secure cryptoprocessor that Drive Encryption can use to provide platform authentication. Drive Encryption supports 1.20 and TPM 2.0 on Windows 10 and later. For more information, see KB79784.
Encryption pre-boot application appearing, when the user is not expecting to see it. This in turn can result in helpdesk calls for forgotten credentials. It is recommended to enable the feature “Synchronize passwords for matching usernames, when autoboot is enabled” if password authentication is used for Windows, as this will maximize the chances of the user being able to log in at pre-boot without further assistance.
Drive Encryption can be configured to “use TPM if available” and revert to standard autoboot if it's not available.
OPAL drives
Drive Encryption can manage self-encrypting drives that adhere to the TCG OPAL 1.2/2.0 specifications. OPAL drives have their own firmware, and KB81136 lists all drives (including the firmware) that are known to work with Drive Encryption. The interoperability between Drive Encryption and the underlying OPAL drives of the device is sensitive to drive firmware updates, and also to UEFI/BIOS updates. It is recommended to treat OPAL firmware upgrades with the same level of caution as UEFI firmware upgrades. For more information, see the FAQs and troubleshooting guidance in KB89333 and KB93593.
Drive Encryption deployment options
Canary deployment
We recommend a Canary deployment model to protect the integration points that are susceptible to interruption. Canary deployment reduces the risk of business outages by testing a small subset of systems first. The following steps are recommended.
Designate a group of “canary” systems.
The users of these systems need to be aware that they will receive potentially disruptive updates, and be educated on how best to seek assistance should an issue arise.
The canary group should ideally cover all hardware combinations that are deployed in the environment. For example, if there are five different models of laptop in the environment, then one of each model should be included in the canary group.
ePO tagging can be leveraged to tag and track canary systems.
Deploy new Drive Encryption or BIOS updates to the Canary group first.
Use system and patch management software such as SCCM to apply BIOS, TPM or OPAL firmware updates.
Leverage ePO queries for tracking Drive Encryption upgrades.
Leave ample time for updates to be applied, and for users to report any issues.
Handle any reported issues on a case-by-case basis. Leverage Trellix Support if hardware integration issues are reported.
Once deployment to the canary group is considered a success, expand the deployment to more systems as necessary.
Phased deployment
For an efficient deployment, perform phased deployment in order to scale the deployment process. Create deployment tasks and deploy Drive Encryption to systems arranged in groups or batches in the System Tree. Monitor the deployment for any problems, ensuring that the next phase of deployment only begins once the previous phase has completed successfully.
Install Trellix Drive Encryption - SaaS
You can install the Trellix Drive Encryption - SaaS software on Windows systems and manage it using ePO - SaaS.
Task
Log on to the ePO - SaaS server as an administrator.
Select Menu → Software → Product Deployment.
Enter the Group Name, then select Trellix Drive Encryption from the Endpoint Protection Software list.
Click Save.
The page displays the deployment URL.
Copy the URL.
Run the downloaded Trellixsmartinstaller.exe file to install software in a client machine.
Trellix Drive Encryption software for windows is installed on the client machine.
Register Microsoft Active Directory Connector with Trellix ePolicy Orchestrator - SaaS
If you are sourcing Drive Encryption users from Active Directory, you must register Microsoft Active Directory with ePO - SaaS before you can create Drive Encryption users.
Before you begin
You must have administrator rights to modify the server settings, permission sets, users, and registered servers.
Task
Click Menu → Configuration → Directory Service, then click New Server to open the Registered Server Builder wizard.
From the Server type drop-down list on the Description page, select Directory Services, specify a unique user-friendly name and any details, then click Next.
On the Details page:
Select Active Directory from Directory Services type, then enter the Domain name or the Server name.
Click Select Systems from Active Directory Connector (ADC) that connects to your organization’s Active Directory.
Enter the username for Active Directory accounts in this format:
domain\Username.Enter the password and confirm it.
Click Test Connection to check that the connection is successful, then click Save.
Assign Trellix Drive Encryption - SaaS user to a system
Use the ePolicy Orchestrator - SaaS server to add the Trellix Drive Encryption - SaaS users to the client system. The Drive Encryption software can be activated on a client system only after adding a user and enforcing the required encryption policies correctly.
Before you begin
You must have administrator rights to perform this task.
Task
Click Menu → System Tree to open the My organization page.
From the System Tree pane, click on a system to open the system properties.
Click Drive Encryption → Users tab.
Click Users Actions → Add Users.
Click Users from Browse directory → Select the user to assign from the list.
Click OK.

Note
The maximum number of users that you can now accommodate is 5000 to the previous 250. However, Trellix recommends minimizing the number of users assigned for better performance.
You can assign users to a System Tree group. For more information see Assign user to a System Tree group in the Trellix DE - SaaS Product Guide.
Trellix Trellix Drive Encryption - SaaS activation sequence
When the Trellix DE - SaaS package is successfully deployed, the system gets restarted.
Note
The restart is essential for activation of Trellix DE - SaaS on the client to proceed. The restart can be canceled, however, Drive Encryption - SaaS will not become active on the client until the restart has occurred. In addition, hibernation and the use of new USB devices will be impaired until a restart is issued.
Trellix Drive Encryption - SaaS synchronization with the Trellix ePO - SaaS server
The status in the Show Drive Encryption Status window is Inactive until Drive Encryption package synchronizes with the Trellix ePO – SaaS server and gets all the users assigned to it. This is referred to as an ASCI event. It can be manually triggered on the client by opening the Drive Encryption Status Monitor, then clicking Collect and Send Props.
It can also be triggered from the ePO - SaaS server by an agent wake‑up call. Otherwise, you need to wait for the scheduled agent‑server communication interval to occur (the default is 60 minutes). After two agent‑server communication intervals, Drive Encryption activation begins. The activation process requires a number of ePO - SaaS events to be sent, and this can take some minutes to occur. Once the client‑server communication has completed, the Drive Encryption Status switches to Active and encryption starts based on the policy defined. When Drive Encryption activation is complete, it should be restarted once before hibernation takes place. For this reason, we recommend that hibernation be disabled from the Control Panel on Microsoft Window clients.
Activate Trellix Drive Encryption - SaaS using Add local domain users (ALDU)
Using the Add local domain users option, you can activate Drive Encryption on the client systems without manually adding users in ePO - SaaS. This option provides automatic user assignment, eliminating the need for administrators to manually assign users to client systems in the ePO - SaaS console. We recommend that you manually assign at least one user to all systems to ensure successful Drive Encryption activation even if the Add local domain user option fails to function as configured.
However, if this option is configured correctly, it will not fail. We recommend that you manually add a group of support users to all systems, then activate Drive Encryption using the Add local domain users option. You can remove these users at a later stage after completing the deployment.
Task
Configure the Product Settings Policy with the Add local domain users option enabled.
Log on to the client system. After the agent to server communication interval, the Add local domain users feature adds the previously or currently logged on domain users to the client system.
Trellix Drive Encryption - SaaS is activated in the client system during the next ASCI. You can now restart the client to log on using the PBA page.
Change the default password in Pre-boot Authentication (PBA) page
When the client system is restarted and Trellix DE - SaaS is first activated, the user must log on with the username that matches the user attribute set in the AD Sync: Sync across users from AD task and the default password of 1234567 (this is the Trellix default password which can be changed in the User Based Policy) in the PBA page. The user is prompted to change this password and enroll for self-recovery based on the policy set. If you want the system to automatically capture the user's credentials without making them use a default password on PBA, enable the Do not prompt for default password option under User Based Policies | Password.
Single Sign On (SSO)
The Trellix DE - SaaS client system then boots to Windows. This first boot establishes SSO (if it has been enabled). On future restarts, the user needs to log in to PBA only. Once authenticated, SSO automatically logs on to Windows. In short, the SSO option facilitates the user with the single authentication to the Operating System even when PBA is enabled. Though it requires an extra step, disabling SSO is the more secure configuration. When the Must match username option is enabled, both the Drive Encryption user name and the Windows user name should match for SSO to work, regardless of which domain the user is part of. This user can even be a local user.
When the Synchronize Trellix DE - SaaS password with Windows option is enabled, the Drive Encryption password is reset to the Windows password. However, be aware that if the Password history option is enabled or Password content rules are set, and the Drive Encryption password is the same as the Windows password, then synchronization does not occur.
Activate Trellix Drive Encryption - SaaS offline
The Trellix DE - SaaS offline Activation feature allows you to activate Trellix Drive Encryption - SaaS on a client system without connecting to the ePO - SaaS server. The activation process enables the client system to receive the required policies and user assignments from the ePO - SaaS server for the first time.
Before activating the Trellix DE - SaaS offline, you must install the offline activation package. For more information, see How Trellix Drive Encryption - SaaS works offline.
Send an agent wake-up call
The client computer gets the policy update whenever it connects to the ePO - SaaS server during the next agent-server communication interval (ASCI). The policy update can be scheduled or forced. The agent wake-up call option forces the policy update to the client system. For information on adding a new system, see Trellix ePO – SaaS Product Guide.
Before you begin
You must have administrator rights to perform this task.
Task
Click Menu → Systems → System Tree, then select a system or a group of systems from the System Tree.
Select the System Names of that group.
Click Actions → Agents → Wake Up Agents.
Select a Wake-up call type and a Randomization period (0–60 minutes) within which the systems respond to the wake-up call sent by ePO - SaaS.
Select Get full product properties for the agents to send complete properties instead of sending only the properties that have changed since the last agent-to-server communication.
Select Force complete policy and task update for the agent to send the complete policy and task update.
Click OK.
Note
To view the status of the agent wake-up call, navigate to Menu → Automation → Server Task Log.
Preparations for configuring Trellix Drive Encryption - SaaS
Follow these recommendations to make sure that your data is protected during and after the encryption process.
Re-provisioning a Trellix Drive Encryption - SaaS encrypted disk
To repurpose a disk encrypted with Trellix DE - SaaS, the system has to go through the Drive Encryption de-activation process so that no remnants of Drive Encryption remain before going through the reimaging process. Alternatively, if the encrypted disk was reimaged, the process of re-provisioning should include the deletion of the EPE partition.
Back up the system before you encrypt it, and perform regular backups
As with any deployment, it is good practice to back up the system before installing Drive Encryption to ensure data is not lost in the unlikely event that a problem occurs. The DETech recovery tools can also be used to decrypt and recover any unbootable disks. Refer to the DETech User Guide for more information. When upgrading Drive Encryption, the Mfeeephost service must not be stopped manually or by third-party software because this can cause problems. In addition, during an upgrade, the system must be kept powered on until the software (both Host and Encryption Provider portions) completes installation.
CHKDSK/r Clean up the disk before you encrypt it
Hard disks that are damaged, or have a high number of undiscovered bad sectors, might fail during the full disk encryption process. Run a CHKDSK /r command prior to installing Drive Encryption to make sure the disk is healthy. Optionally, run the OEM diagnostic tools to make sure that all other hardware components are working correctly.
Maintain separate test and production clients
Enterprise administrators are advised to maintain separate test and production environments. Modification to the production server should be limited. Use the test system to test software updates, driver updates, and Windows Service Packs prior to updating the production systems.
Build and test recovery tools
The administrator needs to be aware that there will be changes to the normal client boot process due to installing Drive Encryption. Administrators are advised to create and test the customized DETech WinPE V3 or V4 (for UEFI systems) Disk with Drive Encryption drivers installed.
Enable self-recovery from a smartphone
We recommend that you download and install the Trellix Endpoint Assistant app on your Android or IOS smartphone so that you can scan the QR code and initiate self-recovery without the need to contact your administrator for assistance.
On the client system, the first time you log on, a QR code is displayed. Scanning the QR code with your mobile device saves it to the device and establishes trust between the client system and the device. Later, you can initiate recovery by clicking Smart Phone Recovery and using the QR code at Pre-boot Authentication. We recommend that you scan the QR code using a mobile device with a high-level processing capacity. The Trellix Endpoint Assistant app can be used on mobile devices. For supported platforms, see Supported mobile operating systems section in KB85893.
You can download the Trellix Endpoint Assistant app from the Google Play Store and Apple Play Store. For more details, see Smartphone recovery in the Trellix Drive Encryption - SaaS Product Guide.
Perform disk recovery on decrypted disks
If you need to perform any disk recovery activities on a disk protected with Drive Encryption, we recommend that you first decrypt the disk. For more information about decrypting the Drive Encryption installed system, see Trellix Trellix Drive Encryption - SaaS Product Guide and the Trellix Drive Encryption - SaaS DETech Product Guide.
Automatic Repair should be disabled for Windows 10 and above systems
Automatic Repair of an encrypted disk for Windows 10 and above systems might destroy the encrypted operating system files without any notification and cause permanent boot problems. However, previous versions of Windows display a confirmation message before starting the repair. Windows 8 launches into Automatic Repair immediately if a problem is detected, leaving little scope to prevent destruction of encrypted data.
To disable Automatic Repair, run this command from an administrative command prompt:
bcdedit /set {current} recoveryenabled No
Other ways to install Trellix Drive Encryption - SaaS
Install using Advanced Product Deployment option
You can install Drive Encryption using Advanced Product Deployment in ePO - SaaS.
Before you begin
You must have administrator rights to perform this task.
Task
Click Menu → Software → Product Deployment.
Click Advanced Product Deployment under Advanced Options.
Select New Deployment to start a new project.
Type a name and description for this deployment. This name appears on the Product Deployment page after you save the deployment.
To automatically update your products, make sure that the Auto Update checkbox is selected.
If the checkbox is deselected, products are still updated with the latest patches, hotfixes, and content package, but major and minor releases are ignored.
To specify which software to deploy, select the Trellix Drive Encryption product from the Package list.
From the Actions list, select Install.
Under Select the systems, click Select Systems.
Under Select a start time, select a schedule for your deployment:
Run Immediately — Starts the deployment task during the next ASCI.
Once or Daily — Opens the scheduler so you can configure the start date, time, and randomization.
Click Save at the top of the page. The Product Deployment page opens with your new project added to the list of deployments.
After you create a deployment project, a client task is automatically created with the deployment settings.
The Trellix Drive Encryption software for Windows is installed on the client machine.
Deploy Trellix Drive Encryption - SaaS client package in FIPS mode
The 140 series of Federal Information Processing Standards (FIPS) is a set of U.S. government computer security standards that specify requirements for cryptography modules.
Trellix Drive Encryption - SaaS currently does not offer full support for FIPS 140-2.
The Drive Encryption client package can be installed on the client in FIPS mode.
The Trellix DE - SaaS backend services operate using FIPS-certified cryptography.
For more information about FIPS certification for Trellix DE - SaaS, see KB83483.
Installing the Trellix Drive Encryption - SaaS client package in FIPS Mode
For the Drive Encryption client to operate in FIPS mode, install the Drive Encryption client package in FIPS mode before activating Drive Encryption on the client.
If Drive Encryption is already installed on systems without enabling the FIPS mode, perform these tasks to make it operate in the FIPS mode.
Decrypt the client systems.
Deactivate Drive Encryption on the client systems.
Remove the Drive Encryption product from the client systems.
Reinstall Drive Encryption in the FIPS mode.
Deploying Drive Encryption through a ePO - SaaS deployment task
When installing Drive Encryption client package in FIPS mode using a ePO - SaaS deployment task, make sure to add the keyword FIPS on the command line of the Drive Encryption deployment task in ePO - SaaS. For more information on installation steps, see Install using Advanced Product Deployment.
Deploying Trellix Drive Encryption - SaaS through a third-party deployment software
When installing Trellix DE - SaaS client package in FIPS mode using third-party deployment software, add the parameter FIPS_MODE=1 when you install the Drive Encryption client package, as in the following command:
32-bit system — msiexec.exe /q/i MfeEEPc32.msi FIPS_MODE=1
64-bit system — msiexec.exe /q/i MfeEEPc64.msi FIPS_MODE=1
Impact of FIPS mode
In FIPS mode, certain self-tests are performed in Windows and pre-boot environments. These self-tests might impact the performance of the pre-boot.
If self-tests of FIPS fail, the failed components of the system stop completely, in one of these ways.
If the Windows Drive Encryption FIPS component fails self-test, the system doesn't activate or enforce policies.
If the Windows Drive Encryption driver fails self-test, the driver performs a bug-check (BSOD).
If the pre-boot Drive Encryption FIPS component fails self-test, pre-boot stops functioning.
Move your mouse in pre-boot
Additionally, FIPS 140-2 defines minimum requirements for entropy during key generation. This might lead to key generation errors in pre-boot where insufficient entropy (randomness) is available at the point of key generation. To avoid this, you can supply entropy (randomness) into pre-boot by moving the mouse randomly before you perform the action that produced the error.
Disable Self-Protection feature in Trellix Drive Encryption - SaaS
By default, the Self-Protection option is enabled to ensure the security of the system and prevent unauthorized modifications to Trellix DE - SaaS files, folders and registry. The Self-Protection feature leverages the Trellix SysCore component, which includes several kernel drivers. We recommend that Self-Protection be tested in isolation before being deployed to production, especially if non-Trellix security software is present on the endpoint.
To disable the Self-Protection on ePO - SaaS, you need to perform the following steps:
On ePO - SaaS console, click Menu → Policy Catalog.
Select Edit from the product settings.
On the General tab, select the Disable Self-protection checkbox in the Self-Protection option.
Click Save.

Note
Reinstallation of the Self-Protection requires manual steps.
Deploying Trellix Drive Encryption - SaaS through Trellix ePolicy Orchestrator - SaaS without Self-Protection feature
You can deploy Trellix DE - SaaS without Self-Protection feature. Before deploying, you need to ensure that the 'Disable Self-Protection' and 'Uninstall Self-Protection' checkbox is selected in the Product settings page.
To install Trellix DE - SaaS without the Self-Protection feature enabled, you need to ensure that the keyword NOSELFPROTECTION is included in the command line parameters for the Trellix DE - SaaS deployment task in Trellix ePolicy Orchestrator - SaaS. This step disables the Self-Protection feature until the first policy enforcement, and ensures that the self-protection component is not installed on the system.
For more information on installation steps, see Install using Advanced Product Deployment.
Deploying Trellix Drive Encryption - SaaS through third-party deployment task without self-protection feature
Before deploying Trellix DE - SaaS without Self-Protection, the user needs to ensure that the 'Disable Self-Protection' and 'Uninstall Self-Protection' checkbox is selected in the Product settings page.
When installing Drive Encryption client package in self-protection mode using third-party deployment software, make sure to add the keyword DISABLE_SELF_PROTECTION=1 on the command line.
How Trellix Drive Encryption - SaaS works offline
Activating Trellix DE - SaaS on the client system is the most important phase in the Drive Encryption installation process. The activation process enables the client system to receive the required policies and user assignments from the ePO - SaaS server for the first time. The Offline Activation feature allows you to activate Drive Encryption a client system without connecting to the ePO - SaaS server.
Offline activation package recommendations
Extracting the MSI package
The DriveEncryption.msi file is required to install Drive Encryption on the client systems. You can download file from Trellix download center and extract this file from the Drive Encryption product build.
This file is available in \TDE-8.x\DE Software Packages\Drive Encryption for PC\DriveEncryption-8.x.zip in the product builds.
Download and extract the EpeOaGenXML.exe file
Use the EpeOaGenXML.exe file as an input to create the offline activation package. Extract this file from the Drive Encryption build that you downloaded from the download site.
Before you begin
Make sure that you have access to the latest Drive Encryption build.
Task
Download the latest Drive Encryption build to a temporary location on the target system.
Extract the EpeOaGenXML.exe file from the product build to the temporary folder on the target system. The EpeOaGenXML.exe file is available at McAfeeDE8.x\Drive Encryption Misc\Drive Encryption Admin tools.
Extract and download the Key Server Public Key
The Key Server Public Key is required for generating the offline activation package. It is used to encrypt the disk encryption key on the client system during activation.
Before you begin
You must have administrator rights to perform this task.
Task
Click Menu → Configuration → Settings to open the settings categories page.
Click Drive Encryption → Copy to clipboard from the Key server public key.
The Key server public key copied successfully.
Add at least one user to work Drive Encryption offline
You must have at least one user account within the offline activation package to activate Drive Encryption offline on a client system that is not connected to ePO - SaaS. You must add these users to a user configuration file, then use that file when creating the offline package.
Before you begin
Make sure that you have the list of user names to be added to the user configuration file.
Make sure that you have the required token details.
When using the Offline Activation process, the offline user can be set up as a password user or token user. For a token user, only SI tokens are supported, as standard PKI tokens need to sync back with ePO - SaaS to be authenticated.
Task
Open a text file and add the Drive Encryption users that you need to add to the client system. Name the file, as appropriate (for example: UserList.txt).
Save the text file to a temporary location on the target system. The format of each user being added is name: token, where:
Name — The Drive Encryption user name that you need to add to the client system and that will be used for Drive Encryption logon. Make sure that you add a colon (:) after the user name.
Token — The token type you need to assign to that user.
examples to update names and token types in a .txt file:
imaging_user1: Password
imaging_user2: Password
imaging_user3: PasswordCreating the offline activation package
The offline activation package is used for activating Drive Encryption on a client system that is not connected to the ePO - SaaS server. The following are required to create the offline activation package:
EpeOaGenXML.exe
Key Server Public Key
User configuration file (Example: Userlist.txt)
You must extract and export the Key Server Public Key from the ePO - SaaS server, then manually create the user configuration file.
When you activate a system with an offline activation, a recovery file is created by default in the root of the (C:) drive. For example, C:\EERecovery.xml.
After activation but before rebooting the client system, recovery file must be backed up to another secure location that isn't on the system's drives.
If a recovery situation arises, and the file resides only on an encrypted volume, the file is not available for use in recovery.
Once the system is managed by ePO - SaaS, the recovery information will automatically be escrowed, enabling administrator recovery workflows (challenge/response, recovery key export).
Offline activation options
For information about Drive Encryption offline activation configuration options, see KB92634.
Generate the offline activation package
Using EpeOaGenXML.exe and the user configuration file, you can create the offline activation package with default policy settings that you export from the ePO - SaaS server.
Before you begin
Make sure that you have copied the required input files (EpeOaGenXML.exe, Userlist.txt) to the ePO - SaaS.
You must have administrator rights to perform this task.
Task
Open the command prompt, then navigate to the folder that contains the EpeOaGenXML.exe and Userlist.txt files.
Type
EpeOaGenXML.exe --helpto display the list of policy configuration options available with Drive Encryption.Generate the offline activation package using the command:
EpeOaGenXML.exe --option argWhere : --option arg specifies the required setting for any of the policy configurations. For example, --PbfsSize 60 --BackupMachineKey false --Sso true
Note
If you don't specify any input for arg on the command line, the default policy configuration is used to generate the offline activation package. However, you can also modify the default policy configuration options by specifying the required settings on the command line.
To generate the offline activation package using the default policy settings and the Userlist.txt file, run the command:
EpeOaGenXML.exe --user-file UserList.txt.
To generate the offline activation package with non-default policy settings and the Userlist.txt file, run the command:
EpeOaGenXML.exe --user-file UserList.txt --PbfsSize 60 --BackupMachineKey false --Sso true --SkipUnused true --Disable PF true.
Note
If the user configuration file is in a different location than EpeOaGenXML.exe, specify its full path. If there are blank spaces in the path, make sure that you type the path within the double quotes. For example, EpeOaGenXML.exe –userfile "c:\documents and settings\user\my documents\UserList.txt".
If the package is generated successfully, no feedback or error message appears. The offline activation package (ESOfflineActivateCmd.XML and OfflineActivation.exe) is created in the folder where the EpeOaGenXML.exe file is located.
ESOfflineActivateCmd.XML — Lists all users you added, the policy settings, and all policy configuration options. If you modified any of the policy configuration options while running the EpeOaGenXML.exe file, that change also appears in the XML file.
OfflineActivation.exe — This is the actual offline activation package to be used to activate Drive Encryption on the client system that is not connected to a network or ePO - SaaS.
Note
If you enabled the SkipUnused option, enter Yes in response to the message: By using this feature you accept the risk associated with not encrypting unused sectors with respect to (deleted) sensitive data leakage.
Performing Trellix Drive Encryption - SaaS offline
The purpose of creating the offline activation package is to install and activate Drive Encryption offline on a client system that is not connected to a network or to the ePO - SaaS server.
After creating and downloading all required packages and MSIs, you must run them one at a time to install and activate the Drive Encryption software on the system.
Before you perform offline activation on the client system:
Make sure that your client system is not connected to the network and not managed by the ePO - SaaS.
Make sure that your client system has an administrator account with sufficient rights for installing and activating the Drive Encryption software.
Make sure that you have copied these files to a temporary location on the client system:
OfflineActivation.exe
DriveEncryption.zip package
Install the offline activation package and activate Trellix Drive Encryption - SaaS
To activate Trellix Drive Encryption - SaaS offline, you must install the offline package that has the users list, policy settings, and policy configuration options. Copy and run the OfflineActivation.exe package on the client system to activate Trellix DE - SaaS offline.
Before you begin
Make sure that your client system has an administrator account with sufficient rights for installing and activating the Drive Encryption software.
Task
Run the OfflineActivation.exe file from the temporary location. A command prompt window displays this message:
Activating Drive Encryption, please wait... message. The command prompt window disappears after adding the users and activating Drive Encryption.
Make sure Trellix Drive Encryption System Status is Active on the client system.
Note
The Drive Encryption System State should be Active, and after a short while the Volume Status should change to Decrypted. The message Activation has completed successfully also appears on the Drive Encryption System Status window.

Log on to the Trellix Drive Encryption - SaaS client system
When the client system is restarted and Drive Encryption is first activated, the user needs to log on with the user name that matches the user account defined in the user configuration file.
Restart the client system after installing and activating Drive Encryption. The Pre-boot Authentication page appears, prompting for a user name.
In the user name field, type the user name that was defined in the user configuration file.
Note
The user account can be a password user or a user associated with a supported token type. When you are logging on for the first time, initialize the user with the default password of 12345 on the Pre-boot Authentication page. The user is then prompted to change this password and enroll for self-recovery.
After initializing your token, the self-recovery enrollment dialog box appears. The default self-recovery setting for Offline Activation is configured to prompt for these recovery questions:
What is your favorite color?
What is your pet's name?
What is your favorite musician?
Once recovery enrollment is complete, the client system boots to Windows.
Trellix DE - SaaS troubleshooting scenarios
Trellix Drive Encryption - SaaS activation failures
Make sure at least one Encryption user name is created and assigned to a client system to activate Drive Encryption. Also, disable the BitLocker when you activate Trellix DE - SaaS.
Troubleshooting Trellix DE - SaaS activation failures start with the evaluation of Driveencryption.log (programdata/Trellix/Drive Encryption) and Trellix DE - SaaS activation failure event IDs. For details about event IDs, see KB84622.
Below are the troubleshooting scenarios for Trellix DE - SaaS activation failures.
System state is In-active due to | Troubleshooting Knowledge Base article |
|---|---|
Duplicate users exist in ePO - SaaS |
Uninstall Trellix Drive Encryption - SaaS software
To uninstall Drive Encryption from the client, the encryption policy must be disabled in order to decrypt the client system, and then the software package can be removed.
Here are some important steps involved in removing the software.
Disable the Drive Encryption product setting policy
Make sure that the Drive Encryption System Status is Inactive.
Uninstall Drive Encryption from the client system.
Disable the Trellix Drive Encryption - SaaS client
Modify the Drive Encryption product setting policy on the ePO - SaaS console to deactivate the Drive Encryption client.
Before you begin
You must have administrator rights to perform this task.
Task
Log on to ePO - SaaS as an administrator.
Click Menu → System Tree → Systems, then select a group from the System Tree.
Select a system, then click Actions → Agent → Modify Policies on a Single System.
From the Product drop-down list, select Drive Encryption. The policy categories under Drive Encryption are listed with the system’s assigned policy.
Select the Product Setting policy category, then click Edit Assignments.
If the policy is inherited, select Break inheritance and assign the policy and settings below next to Inherit from. Select whether to lock policy inheritance. Any systems that inherit this policy can't have another one assigned in its place.
From the Assigned policy drop-down list, select a product setting policy. And, click Edit Policy.
On the General tab, deselect Enable policy.
On Opal systems, make sure that you select the correct encryption provider and set the priority, as appropriate, so that the policy enforcement occurs correctly.
Click Save on the Policy Settings page, then click Save on the Product Settings page.
Send an agent wake-up call.
Note
On disabling the product setting policy, all the encrypted drives are decrypted, and the Drive Encryption status becomes Inactive. This can take a few hours depending on the number and size of the encrypted drives. However, client systems with Opal drives become Inactive quickly.
Remove Trellix Drive Encryption - SaaS the client system
The ePO - SaaS repository infrastructure allows you to remove the Drive Encryption product from your managed systems from a central location. To remove the software package from the client system, use this Product Deployment client task.
Before you begin
You must have administrator rights to perform this task
Task
Click Menu → Systems → System Tree.
Select one or more systems on which to run the task.
Click Actions → Agent, then Run Client Task Now.
Select the Product as Trellix Agent and the Task Type as Product Deployment, then click Create New Task.
On the Run Client Task Now page:
Next to Target platforms, select the types of platform to use the deployment.
Select Products and components from the drop-down list.
Set the Action to Remove, then select the Language and Branch of the package.
Click Run Task Now.
You can click + or − to add or remove products and components from the list displayed.
The Running Client Task Status page appears, and displays the state of all running tasks. When the tasks are complete, the results can be viewed in the Audit Log and Server Task Log.
Remove the Trellix Drive Encryption - SaaS software package
When you deactivate and remove the Drive Encryption software from the client system, you need to remove the Drive Encryption software package (DriveEncryption.zip) from the ePO - SaaS server.
Before you begin
You must have administrator rights to perform this task.
Make sure that you deactivate the Drive Encryption client before removing the Drive Encryption software package from ePO - SaaS.
Task
Menu Menu → Software → Main Repository. The Package in Main Repository page lists the software package and their details.
Select the Drive Encryption package from the list, click Action and select Delete Package.
Click OK.
Manually uninstall Trellix Drive Encryption - SaaS from the client system
Before you begin
You must have administrator rights to perform this task.
Task
Log on to the ePO - SaaS server as an administrator.
Select Menu → Software → Product Deployment.
Enter the Group name, then deselect the Drive Encryption checkbox.
Click Save.
Drive Encryption for Windows is successfully uninstalled on the client system.