Trellix Drive Encryption - SaaS overview
Trellix Drive Encryption - SaaS features deliver encryption that protects data from unauthorized access, loss, and exposure using Pre-boot Authentication and a powerful encryption engine. Trellix Drive Encryption - SaaS provides a feature-rich solution for organizations that administer multiple users on a single device, as well as enterprises that are required to meet industry regulations and compliance standards.
Control which users devices and users access the network through authentication.
Protect data on devices from brute force attacks.
Manage policies, users and groups through a single platform integrated with Active Directory.
Meets standards for National Institute of Standards and Technology (NIST) SP 800-111 compliance and is FIPS 140-2 validated.
Generate reports needed for audits and compliance, including if a device is lost or stolen.
The Trellix DE - SaaS software includes the encryption software that is installed on client systems. It is deployed and managed through Trellix ePolicy Orchestrator - SaaS.
Key features
The Trellix Drive Encryption - SaaS features provide full disk encryption for Microsoft Windows laptops and desktop PCs and prevent the loss of sensitive data, especially from lost or stolen equipment.
Centralized management — Trellix DE - SaaS integrates fully into ePO - SaaS, leveraging the ePO - SaaS infrastructure for automated security reporting, monitoring, deployment, and policy administration.
Encryption — Control and monitor the encryption of system drives, selecting which volumes should be encrypted and which encryption technology should be used (software, or TCG Opal 1.2/2.0).
User-centric Access Control — Defines precisely who has access to specific systems or groups of systems, using seamless integration with Active Directory.
Recovery — Multiple self-service and helpdesk-driven recovery options exist to ensure business continuity.
Trusted Platform Module (TPM) — Trellix DE - SaaS supports TPM on Windows 10 and later UEFI systems to provide platform authentication without the need for Pre-boot Authentication (PBA).
Accessibility in the pre-boot environment — Pre-boot interface navigation can be complemented by a series of system audio beeps to ensure that visually impaired users can successfully authenticate.
Self-Protection — This feature prevent unauthorized modifications to Trellix Drive Encryption - SaaS files and folders and registry.
How Trellix Drive Encryption - SaaS works
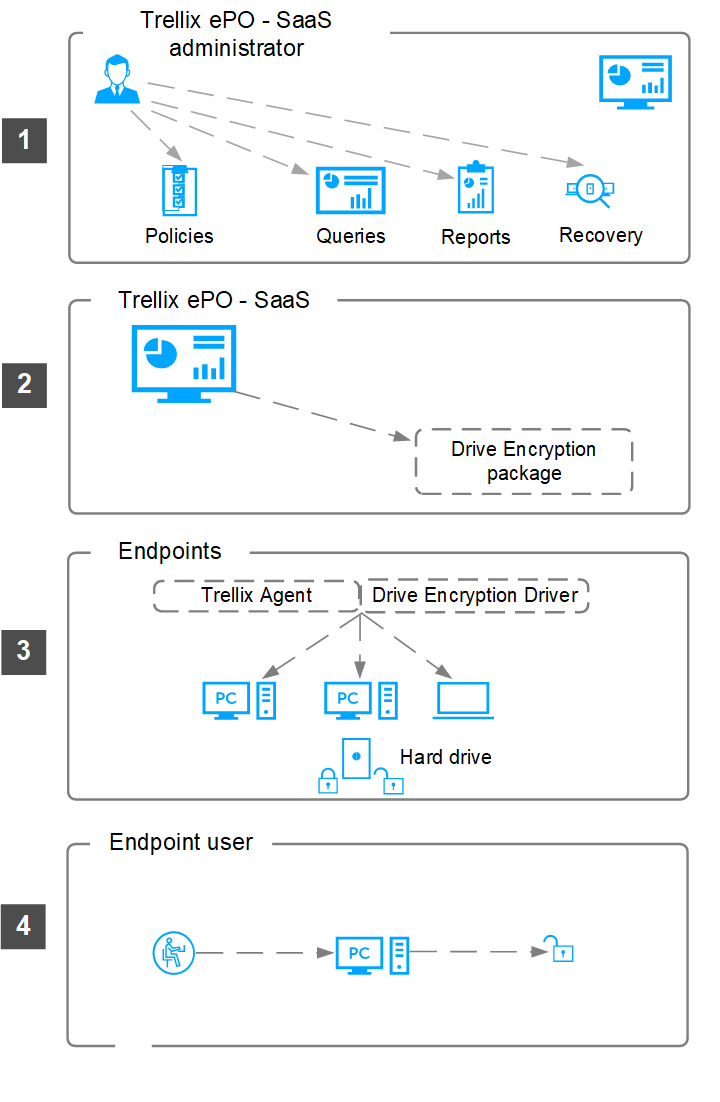
Trellix Drive Encryption - SaaS protects the data on a system by taking control of the hard disk or self-encrypting drive (Opal) from the operating system.
The ePO - SaaS administrator configures Drive Encryption policies and access control, runs Drive Encryption queries and reports, and performs Drive Encryption system recovery if required.
The Drive Encryption package is deployed to the client system. When Drive Encryption is installed and activated, it takes control of the hard disk or self-encrypting drive (Opal), and policies are assigned to the client system.
Policies determine how Trellix DE - SaaS software functions on the user's computer. The disk encryption process is transparent to the user and has little impact on the computer's performance.
Note
During the activation process, the system synchronizes with ePO - SaaS and acquires user data. You can also use the Offline Activation feature to activate Drive Encryption on a client system without connecting to the ePO - SaaS server. For more information, see How Drive Encryption - SaaS works offline section of the Installation Guide.
The Trellix Drive Encryption encrypts all data that is written to the disk and decrypts the data that is read on the disk. The package is deployed to the client systems.
After successful activation and system restart, the user is authenticated and logs on through the pre-boot environment, which then loads the operating system.
Configuring Drive Encryption – SaaS policies
Managing Trellix DE - SaaS from a single location is achieved by integrating the Drive Encryption software into ePO - SaaS. This management is accomplished through the combination of product policies.
When configuring policies for the first time:
Plan product policies for the segments of your System Tree.
Create and assign policies to system groups or individual system.
Policy settings for Trellix DE - SaaS are grouped by category. Each policy category refers to a specific subset of policy settings. On the Policy Catalog page, policies appear under Drive Encryption and the individual policies appear under a specific category.
Product settings
User-based Policies
Add local domain user settings
When you open or edit an existing policy or create a new policy under Drive Encryption, the policy settings are organized in a series of tabs. For details, see Interface reference.
Creating and Assigning policies
You can add a custom policy to the Policy Catalog before or after the Drive Encryption software is deployed. Modify and assign the Drive Encryption policies to systems, as appropriate, to meet your corporate requirements.
For more information about creating and assigning policies, see the topics in the Configuring policies section of the ePO - SaaS Product Guide.
Enforce Trellix Drive Encryption - SaaS polices
You can enable or disable policy enforcement for Drive Encryption on a system or System Tree group. Policy enforcement is enabled by default and is inherited in the System Tree.
For more information, see Enforcing product polices of the ePO - SaaS Product Guide.
Managing Trellix Drive Encryption - SaaS users
The user's authentication credentials, token type, and the user information fields are managed from the ePO - SaaS server. Trellix DE - SaaS gives the administrator the freedom of adding and removing the users to and from systems or system groups at any time.
The ePO - SaaS server allows administrators to assign users from Microsoft Active Directory to Trellix DE - SaaS managed systems.
View the Trellix Drive Encryption - SaaS users assigned to a system
You can use the ePO - SaaS server to view the Trellix Drive Encryption - SaaS users assigned to the client system. The Trellix DE - SaaS software can be activated on a client system only after adding one or more users and enforcing the required encryption policies correctly.
Before you begin
You must have administrator rights to perform this task.
Make sure that you have assigned the user at the system level or branch level. If a user is assigned at the branch level, the user is assigned to other client systems even after removing one system. You can also remove users from a client system.
Task
Click Menu → System Tree to open the My Organization page.
From the System Tree pane, click on a system to open the system properties.
Click Drive Encryption → Users to display the users assigned to a system.
Assign user to a System Tree group
Assign multiple users to systems from a centralized location without having to work on the individual systems. You can group users at different organizational levels and edit the inheritance as required.
Before you begin
You must have administrator rights to perform this task.
Task
Click Menu → System Tree → DE Group Assignments to open the DE Group Assignments page.
Click Actions → Drive Encryption → Add Users to open the Add Drive Encryption Users page.
Click users from Browse directory → Select the users to assign from the list.
Click OK.
Windows Hello authentication with Drive Encryption - SaaS
Windows Hello provides end users with simple authentication (PIN, fingerprint, face, security key, picture password). It helps to strengthen your protections against credential theft. Because an attacker must have both the device and the biometric information or PIN, it's much more difficult to gain access without the user's knowledge. For more details on Microsoft Windows Hello, see Windows Hello overview.
Drive Encryption now uses passwords and smartcards for its Windows credential provider features like Single Sign-On, password synchronization, and logon-managed autoboot. Since Windows Hello authentication mechanisms like fingerprint and PIN are not integrated into Trellix Drive Encryption, its credential provider features will not function when Windows Hello is enabled for Windows logon authentication.
By default, Windows Hello authentication is allowed by the Drive Encryption credential provider. But Drive Encryption credential provider features like Single Sign-On, Password synchronization, or Logon-managed autoboot will not function when Windows Hello credential providers are used.
Note
The user's pre-boot credentials will not remain synchronized with their domain credentials, and you must depend on the User-Based Policy settings to enforce password policies.
Enable Single-Sign-On (SSO) to log on with a single authentication
Enabling Single-Sign-On (SSO) on a system reduces the number of times a user needs to authenticate before they reach the Windows desktop. It allows automatic logon to the operating system once the user authenticates through the Pre-boot Authentication page.
SSO functions only when the user logs in to PBA. It will not work when automatic booting is enabled.
Task
The SSO is enabled through the Product Setting Policy. For more information on Policy Management, see Configuring policies section of the ePO - SaaS Product Guide.
On the Log On tab, select Enable SSO under Windows.
If required, select these options:
Must match user name — This option makes sure that the SSO details are captured only when the user's Drive Encryption and Windows user name match. This should be used, where possible, to make sure that the Drive Encryption user who authenticated through pre-boot does not inadvertently capture SSO for a different user.
Synchronize Drive Encryption password with Windows — When the user changes on the client, this option synchronizes the new password to the Drive Encryption user.
Allow user to cancel SSO — Allows the user to cancel the SSO to Windows in the pre-boot stage only. When this option is enabled, an additional checkbox appears at the bottom of the pre-boot logon dialog box. This setting lasts for a single boot only.
Click Save on the Policy Settings page.
Send an agent wake-up call.
For the interface reference to enable SSO, see Product setting policy - Log on tab.
Synchronize the Trellix Drive Encryption - SaaS password with the Windows password
This synchronizes the Windows password to the Drive Encryption password, so the user needs to authenticate on the Pre-boot Authentication page with Windows password.
Task
Synchronize Drive Encryption password with Windows is enabled via the Product Setting Policy. For more information on Policy Management, see Configuring policies section of the ePO - SaaS Product Guide.
On the Log On tab, click Enable SSO, then select Synchronize Drive Encryption password with Windows under Windows pane.
Click Save on the Policy Settings page.
Send an agent wake-up call.
Note: Make sure that the Windows password adheres to the Trellix DE - SaaS password restriction policy. Otherwise, the password synchronization does not run.
For the interface reference to enable Synchronize Drive Encryption password with Windows, see the Product setting policy - Log on tab.
Password synchronization with autoboot enabled
Drive Encryption previously required a user to authenticate through pre-boot before password synchronization could be performed. This caused two major pain points.
After a period of autoboot use, it was difficult to re-enable pre-boot because user credentials were no longer in sync.
When using TPM autoboot, users do not routinely use pre-boot. When a TPM measurement changes and pre-boot shows, users were unable to log in with their Windows password.
Password synchronization can now be performed even when autoboot is enabled. This is configurable via policy. When a password is synchronized to a user who has not logged in through pre-boot, the user is re-initialized (Q&A self-recovery, SSO, and password history are all reset), and the password is updated to match their Windows password.
Task
The Password synchronization with autoboot enabled is enabled via the Product Setting Policy. For more information on Policy Management, see Configuring policies section of the ePO - SaaS Product Guide.
On the Log On tab, enable Password synchronization, then select Synchronize password for matching usernames, when autoboot is enabled .
Click Save on the Policy Settings page.
Send an agent wake-up call.
For the interface reference to enable Password synchronization with autoboot enabled, see Product Setting Policy - Log On tab.
Configure Trellix Drive Encryption - SaaS password content rules
This policy setting determines whether the Trellix Drive Encryption - SaaS passwords must meet complexity requirements. Complexity requirements are enforced when the updated policy is assigned to the required user on a system.
Before you begin
You must have administrator rights to perform this task.
Task
Configure the Trellix Drive Encryption - SaaS password content rules via the User Based Policy. For more information on Policy Management, see Configuring policies section of the ePO - SaaS Product Guide.
On the Password Content Rules tab, enable the Display list of password rules option to display the password requirements to users.
Enter the Password Length in the Minimum and Maximum fields.
Under Enforce password content, type the number of Alpha, Numeric, Alphanumeric, and Symbols characters required to form a password.
Under Password content restrictions, select or deselect the options to define the password content restriction rules.
Click Save in the Policy Settings page, then click Save in the User Based Policies settings page.
Send an agent wake-up call.
Note: When changing the Windows password and synchronizing to Trellix Drive Encryption - SaaS password, Windows does not provide the old password.
For the interface reference to configure the Trellix Drive Encryption - SaaS password content rules, see User Based Policy - Password Content Rules tab.
Exclude users from the Add Local Domain User (ALDU) function
With the Add Local Domain User (ALDU) function, domain users who have previously and are currently logged on to the client system can authenticate through pre-boot, even if the administrator has not explicitly assigned the user to the client system.
While this captures the regular users of the system, in some cases, an administrator who has previously configured the system is also granted access. This might be applicable to some, but not all, users.
To address this situation, you can add a blocklist of users to the Add Local Domain User Settings policy. Users added to the blocklist are excluded from the list of users assigned by the ALDU function.
Note
Prioritization of policy assignment rules is not applicable to the ALDU blocklist policy.
Task
Exclude users from the ALDU function via the Add Local Domain User Settings. For more information on Policy Management, see Configuring policies section of the ePO - SaaS Product Guide.
Click Add from Regular expression and type the regular expressions that help to exclude the local domain users from being assigned to the client system.
\\\\domainname\\username— The specified user from the given domain is added to the blocklist.\\\\.*\\username— The specified user name from all available domains is added to the blocklist.\\\\.*\\a.*— All user names that start with the letter "a" from all available domains are added to the blocklist.\\\\.*\\[a-n][a-z]*— All user names that start with the letter "a" to "n", from all available domains are added to the blocklist.
Click Test to verify the regular expression.
You can add multiple regular expressions under a single policy. All comparisons are case-insensitive.
3 | Trellix Drive Encryption - SaaS overview
Enter the user name in the Value field and validate the specified regular expression.
On the Policy Settings page, click Save.
Send an agent wake-up call.
During the next ASCI, this rule is applied to the new local domain users assigned to the client system where the policy is enforced.
Note
Users assigned before the blocklist is assigned are not removed from the system.
For the interface reference to exclude users from the ALDU function, see Add Local Domain User settings - Regular expressions.
Manage logon hours on the Trellix Drive Encryption - SaaS client system
You can control and limit the timeline when a user can log on to the Drive Encryption client system.
This option does not force users to log off from the current session. However, once the user logs out from the system, the user will not be able to log on to the client system until the next allowed logon hour.
Note
Logon hours policy is applied only when the user is not logged on.
Task
Manage logon hours via the User Based Policy. For more information on Policy Management, see Configuring policies section of the ePO - SaaS Product Guide.
On the Authentication tab, select Apply restrictions in Logon Hours, then schedule the logon timing by blocking or allowing specific logon hours.
Click Save in the Policy Settings page.
Send an agent wake-up call.
For the interface reference to manage logon hours, see User Based Policies - Authentication tab.
Managing Trellix Drive Encryption - SaaS client computers
The administrator can manage the client computers after installing the Trellix Drive Encryption - SaaS. System management helps administrators import system information from the Active Directory server into ePO - SaaS. This is useful in the process of installing Trellix Drive Encryption - SaaS and assigning the users to the systems.
Manage users and roles in Trellix Drive Encryption - SaaS
ePO - SaaS administrator rights management determines what administrators can do while managing the Trellix Drive Encryption - SaaS software.
The administrator can set up Trellix DE - SaaS-specific permission sets for different users in ePO - SaaS. The permission sets can be created for a variety of roles including but not restricted to Executive Reviewer, Global Reviewer, Group Admin, and Group Reviewer.
The ePO - SaaS administrator for Trellix Drive Encryption - SaaS can:
Manage Trellix DE - SaaS users, policies and server settings
Run queries to view the encryption status of the client systems
View client system audits
View Trellix user audits
Manage Trellix Drive Encryption - SaaS providers
Administrative roles can be configured and implemented using the Configuration → Users & Roles option in ePO - SaaS. It is possible to configure a number of admin roles using this option. For example, you can create admin roles such as:
Drive Encryption Administrator: User accounts in this level have full control of Trellix Drive Encryption - SaaS, but cannot manage any other software in ePO - SaaS.
Drive Encryption Helpdesk: User accounts in this level can do Trellix Drive Encryption - SaaS password resets only.
Drive Encryption Engineer: User accounts in this level can do password resets as well as export recovery files to be used with DETech tool.
Drive Encryption Auditor: User accounts in this level can view Trellix Drive Encryption - SaaS reports only.
The tenant user/administrator needs to be assigned the Cloud Directory Services role in order to assign a user in the Drive Encryption.
Before you begin configure the AD server using Configuration | Directory Service.
AD server is configured and registered in ePO - SaaS.
Schedule and run the AD Synchronization: Sync across users from AD task.
For more information on configuring roles, see Trellix ePO - SaaS Product Guide.
Note
Use the correct format of the user name when logging on to ePO - SaaS.
Select client system disks for encryption
To encrypt the target disk on your client system, you need to select the required encryption type and set the encryption priority from the Product Setting policy available with the Drive Encryption product.
Before you begin
You must have administrator rights to perform this task.
Task
Select the disks for encryption via the Product Setting Policy. For more information on Policy Management, see Configuring policies section of the ePO - SaaS Product Guide.
On the Encryption tab, select the disks to be encrypted. For the Self-Encrypting (Opal) drives, select PC Opal with All disks or Boot only.
The Encryption type options such as None, All disks except boot disk, and Selected partitions are not applicable to Self-Encrypting (Opal) drives.
To initiate the encryption on the client, the user must select any one of the options other than None. The default option, None, does not initiate the encryption.
On the Policy Settings page, click Save.
Send an agent wake-up call.
For the interface reference to select disks for encryption, see Product Settings Policy - Encryption tab.
Enable automatic booting to remove the Pre‑boot Authentication
The Trellix Drive Encryption - SaaS pre-boot logon environment allows you to select a logon method and to require authentication credentials such as user name and password.
If the user provides the correct authentication details, the Trellix DE - SaaS boot code starts the crypt driver in memory and boots the original operating system of the protected system.
Enabling automatic booting removes the Pre-boot Authentication from the client system.
Note
Trellix does not recommend the use of autoboot, as it completely disables the protection of the underlying encrypted data. It is strongly recommended to always require Pre-boot Authentication.
Task
The automatic booting is enabled via the Product Setting Policy. For more information on Policy Management, see Configuring policies section of the ePO - SaaS Product Guide.
From the Log On tab, select Enable automatic booting under the Drive Encryption pane to enable the pre-boot environment.
A security warning This will remove the pre-boot authentication. Are you sure? appears.
Click Yes to enable the automatic booting.
Set the expiration date and time for the automatic booting, if required.
Click Save on the Policy Settings page.
Send an agent wake-up call.
Note
If password synchronization is in use, enabling autoboot for any period of time can cause DE user credentials to go out of sync with Windows user credentials. Therefore, it is recommended to enable "Password synchronization with autoboot enabled". For more details, see Password synchronization with autoboot enabled in this Product Guide.
For the interface reference to enable automatic booting, see Product Settings policy - Log On tab.
Enable or disable temporary automatic booting
Drive Encryption allows you to turn on the Pre-boot Authentication screen with a client-side utility. This feature eliminates the need to modify the policy in ePO - SaaS, and helps to implement automated patching and other client management scenarios.
In the Drive Encryption administrator Tools directory, extract EEAdminTools.zip, and locate the EpeTemporaryAutoboot.exe file. Distribute this file to your client systems.
Log on to ePO - SaaS and navigate to Menu → Policy → Policy Catalog, select Drive Encryption from the Product drop-down list, then select Product Settings from the Category drop-down list.
Click the policy that you want to change.
On the Log on tab, select Allow temporary automatic booting.
Note
If this option is not selected, you can't use EpeTemporaryAutoboot.exe on the client system.
Send an agent wake-up call, so that the client systems receive this new policy. You can now use this feature on the client systems.
Write a script or use a client management application to run EpeTemporaryAutoboot.exe.
There are four basic options available that must be run with administrator rights on the client system.
Temporarily reboot for X number of reboots. Example syntax: EpeTemporaryAutoboot.exe -- number-of-reboots 3.
Temporarily reboot for X number of minutes. Example syntax: EpeTemporaryAutoboot.exe -- timeout-in-minutes 15.
To clear the temporary autoboot. Example syntax: EpeTemporaryAutoboot.exe --clear.
For help. Example syntax: EpeTemporaryAutoboot.exe --help.
When autoboot is enabled, windows password is synchronized to the PBA password. For more details, see, Password synchronization with autoboot enabled in this Product Guide.
Enable prevent automatic booting when the disk moves system
Prevent automatic booting when the disk is moved between (UEFI) systems feature hardens the automatic boot process of Trellix DE - SaaS by disallowing systems from automatically booting when the disk is moved between systems. Instead, it displays the Pre-boot Authentication screen. This prevents autoboot from functioning when a disk is moved between the systems, and also ensures that the system's encryption key is never stored to disk in plaintext form.
Task
Prevent automatic booting when the disk moves system is enabled through the Product Setting Policy. For more information on Policy Management, see Configuring policies section of the ePO - SaaS Product Guide.
On the Log On tab, enable Prevent automatic booting when the disk moves systems.
Click Save on the Policy Settings page.
Send an agent wake-up call.
Set the encryption provider priority
The priority of the encryption providers (PC software and Opal) can be set using the Trellix Drive Encryption - SaaS Product Setting policy.
The secondary provider is only chosen if the first provider is not supported. E.g., if OPAL is first and PC second, then PC will only be used if there are no OPAL drives in the system.
If activation with the first provider fails unexpectedly, there is no fallback mechanism; the second provider will not be attempted. Instead, consult the Activation Failures report to determine why activation failed.
Trellix does not recommend using Opal drives as a first choice, because it outsources a fundamental part of the security (Drive Encryption) to a third party (the drive manufacturer), and there have been real instances where drive Opal implementations have had vulnerabilities.
Before you begin
You must have administrator rights to perform this task.
Task
Set the encryption provider priority via the Product Setting Policy. For more information on Policy Management, see Configuring policies section of the ePO - SaaS Product Guide.
On the Encryption tab, set the Encryption Provider priority by moving the encryption provider rows up and down, as appropriate. The encryption priority determines the order of encryption on the client systems.
Click Save in the Policy Settings page.
Send an agent wake-up call.
For the interface reference to set the encryption provider priority, see Product Settings Policy - Encryption tab.
Enable accessibility in the pre-boot environment
Pre-boot interface navigation can be complemented by a series of system audio beeps to ensure that visually-impaired users can successfully authenticate.
Note
Drive Encryption adds 508 compliance system beeps to UEFI. For details, see KB69853.
Task
Enable accessibility in the pre-boot environment via the Product Setting Policy. For more information on Policy Management, see Configuring policies section of the ePO - SaaS Product Guide.
Make sure that you enable the Enable Accessibility option under Log On | Drive Encryption.
Click Save on the Policy Settings page.
Send an agent wake-up call.
When the user tries to authenticate on the client system after enforcing this policy, the user can listen to the beep audio guidance in the pre-boot environment.
For the interface reference to enable accessibility, see Product Settings policy - Log On tab.
Allow Trellix Drive Encryption - SaaS users to reset self-recovery answers
The client user's self-recovery details can be reset using the Allow users to re-enroll self-recovery information at PBA option available with the Product Settings policy.
Before you begin
Make sure that the Enable Self-recovery option is enabled under User Based Policy → Self-recovery.
Task
Reset self-recovery answers via the Product Setting Policy. For more information on Policy Management, see Configuring policies section of the ePO - SaaS Product Guide.
Note
Only initialized users can reset their self-recovery details.
On the Recovery tab, select Allow users to re-enroll self-recovery information at PBA to enable the option.
Click Save on the Policy Settings page.
Send an agent wake-up call.
When this policy is saved and enforced to the client system, the Pre-boot Authentication (Username) screen includes the Reset Self Recovery option. The user selects this option and is prompted for a password, and then the self-recovery enrollment. The user should then enroll the self-recovery details with new self-recovery answers.
Trusted Platform Module (TPM) support
Trusted Platform Module (TPM) allows encryption to occur using keys sealed within the TPM, a dedicated hardware security chip. TPM is also implemented in firmware for modern tablets and devices. Trellix DE - SaaS supports TPM 1.2 and later for its TPM autoboot features.
Trellix DE - SaaS uses TPM on Windows 10 and later UEFI systems to provide platform authentication without the need for Pre-boot Authentication (PBA). The system can boot directly to the Windows login screen, where user authentication occurs.
Note
Any software update that changes the boot path, like a Microsoft update to the UEFI bootloader will result in pre-boot being displayed since the boot path has changed, and therefore the disk encryption key cannot be unsealed.
How TPM autoboot works
TPM autoboot enhances boot security by replacing static on-disk credential storage with hardware-based cryptographic verification. This process ensures that encryption keys are available only after the system's security chip verifies the integrity of the boot path.
The file containing the encryption key can only be decrypted on the system that encrypted it, and only if the boot path is unmodified from when the key was sealed. This provides two key benefits:
Theft protection — It prevents unauthorized access if the drive is stolen and moved to another machine.
Malware protection — It protects against boot-level malware, as any modification to the boot path will fail the integrity check.
If the integrity check fails, Drive Encryption automatically detects this and enforces PBA to ensure the system remains secure.
Frictionless enrollment
A significant improvement in Drive Encryption is the frictionless enrollment experience.
The end-user interaction is no longer required. Drive Encryption now manages this initialization seamlessly in the background. The system uses a form of temporary autoboot while it gathers and finalizes the Platform Configuration Registers (PCR) measurements. For the end-user, the rollout is transparent, with no extra PBA prompts.
Platform Configuration Registers (PCRs)
The automatic boot feature relies on the TPM "unsealing" data that is bound to specific Platform Configuration Registers (PCRs).
Trellix DE - SaaS allows administrators to select specific PCRs (0–7) to seal encryption keys. You can configure the TPM autoboot policy for precise control, ensuring a balance between security requirements and minimizing unnecessary PBA prompts due to routine system changes.
Changing PCR configuration policy
A key administrative benefit is that changing the PCR configuration in the policy does not trigger a PBA prompt. This allows for a phased rollout. For example, an administrator can initially enable TPM autoboot using a minimal set of PCRs. Later, they can add and test more restrictive PCRs (for example, PCR 7) across the environment, assessing the balance between security and TPM measurement sensitivity.
Here are descriptions of the individual registers:
Platform Configuration Registers (PCRs) | Description |
|---|---|
PCR 0 | This is the foundational measurement. It records the Core Root of Trust for Measurement (CRTM) - the very first code that executes on power-on. It also includes the system's UEFI/BIOS firmware and other essential platform code. Any firmware update from the PC's manufacturer will change this value. |
PCR 1 | This register measures the static configuration of the computer's hardware. This includes data from the SMBIOS tables (describing components like the motherboard and RAM) and UEFI settings that define system behavior during startup. Essentially, it's a snapshot of the platform that the Windows operating system is running on. |
PCR 2 | This PCR measures any additional UEFI drivers that load before the main Windows boot loader. This typically includes drivers for add-on hardware like graphics cards, network adapters, or storage controllers that must initialize early in the boot process. |
PCR 3 | This register complements PCR 2 by measuring the configuration data and options used by the third-party UEFI drivers. This helps ensure that not only is the driver code correct, but its settings have not been maliciously altered. |
PCR 4 | This is a critical register for Windows systems. It measures the main Windows Boot Manager file (bootmgfw.efi). If this file is modified by a legitimate Windows OS update or by a malicious attack, the measurement in PCR 4 will change triggering Pre-Boot Authentication (PBA) with Drive Encryption. |
PCR 5 | This PCR records the configuration for the Windows Boot Manager, specifically the Boot Configuration Data (BCD) store. The BCD contains the settings that tell the boot manager how and where to find the Windows installation. It also measures the GUID Partition Table (GPT) of the boot drive, which defines the layout of the primary partition and others. |
PCR 6 | This register is reserved for use by the PC manufacturer (for example, Dell or HP) for specific integrity checks that are independent of the Windows operating system. |
PCR 7 | This PCR is vital for systems using UEFI Secure Boot, a key Windows security feature. It measures the state of the Secure Boot policy, including the authorized cryptographic keys and the databases of allowed (db) and revoked (dbx) signatures. A change in this value indicates that the core security policy governing which software is allowed to run before Windows has been modified. See article 000015304 before you enable PCR 7. |
Best practices for TPM autoboot
When using TPM autoboot, follow these best practices:
Update the User-Based Policy default password to a very long, random and complex value that cannot be easily guessed.
Ensure the option Do not prompt for default password is unchecked.
Set a short expiration time for uninitialized users. Navigate to Product Settings policy under General tab, set "Expire users who don't log on" to 1 hour.
Enable the policy "Prevent automatic booting when the disk moves systems." This is an important safeguard that ensures the encryption key is never written to disk in cleartext, which is important during the initial TPM sealing phase and when temporary autoboot is used for patching.
Enable password synchronization, which automatically syncs the preboot password with the Windows login password. This helps to reduce uninitialized users. It also ensures that if PBA is ever triggered, users can log in with their familiar Windows password. For more details, see Password synchronization with autoboot enabled.
Using temporary autoboot for system patching
Temporary autoboot is a maintenance feature that can be enabled regardless of your primary policy configuration, including environments already using TPM autoboot.
This feature temporarily bypasses TPM PCR validation and switches to a less secure, static on-disk key for authentication. Its primary purpose is to prevent PBA from being triggered during system maintenance, such as when rolling out a firmware or OS patch that you know will change TPM measurements.
This allows administrators to perform major updates without causing user disruption. For details on enabling and using this feature, see Enable or disable temporary automatic booting.
Generating queries and reports
Drive Encryption queries are configurable objects that retrieve and display data from the database. These queries can be displayed in charts and tables.
Query results can be exported to a variety of formats, any of which can be downloaded or sent as an attachment to an email message. Most queries can be used as a dashboard monitor.
Queries as dashboard monitors
Most queries can be used as a dashboard monitor, except those using a table to display the initial results. Dashboard monitors are refreshed automatically on a user-configured interval (five minutes by default).
Exported results
Drive Encryption query results can be exported to four different formats. Exported results are historical data and are not refreshed like other monitors when used as dashboard monitors. Like query results and query-based monitors displayed in the console, you can drill down into the HTML exports for more detailed information.
Reports are available in these formats:
CSV — Use the data in a spreadsheet application (for example, Microsoft Excel).
XML — Transform the data for other purposes.
HTML — View the exported results as a webpage.
PDF — Print the results.
View the standard Trellix Drive Encryption - SaaS reports
You can run and view the standard Drive Encryption reports from the Queries page.
Before you begin
You must have administrator rights to perform this task.
Task
Click Menu → Reporting → Queries & Reports.
In the Groups pane, select Drive Encryption from the Trellix Groups drop-down list to open the Standard DE query list.
Query | Definition |
|---|---|
DE: Activation Failures | Displays the list of systems that have failed activation and allows you to identify the reason for failure for each system. |
DE: Encryption Provider | Displays which encryption provider is active on each system. |
DE: Installed version | Displays the version of the Drive Encryption installed in systems. |
DE: Product Client Events | Displays Drive Encryption client events. |
DE: Users | Lists all Drive Encryption users. From here, the user can use these options to manage the users in the selected system:
|
DE: Volume Status | Displays the encryption status of the disk volumes. For self-encrypted (Opal) drives, the DE: Volume Status appears blank without any details because it does not allow volume level encryption. |
Select a query from the Queries list.
Drill down into the report and take actions on items as necessary. Available actions depend on the permissions of the user.

Note
The user can edit the query and view the query details.
5. Click Close when finished.
Drive Encryption client events
While implementing and enforcing the Drive Encryption policies that control how sensitive data is encrypted, the administrators can monitor real-time client events and generate reports using the DE: Product client events query.
For details about Drive Encryption client events, see KB84622.
Create the Trellix Drive Encryption - SaaS dashboard
Dashboards are collections of user-selected and configured monitors that provide current data about your environment. You can create your own dashboards from query results or use default ePO - SaaS dashboards.
Before you begin
You must have administrator rights to perform this task.
Task
Click Menu → Reporting → Dashboards, then click Dashboard Actions.
Click New Dashboard, then enter a new name.
For each monitor, click New Monitor, select the monitor from the Trellix groups - Drive Encryption to display in the dashboard, then click OK.
Click Save.
Tip
You can make this dashboard public by editing the dashboard and selecting PUBLIC.
All new dashboards are saved to the private My Dashboards category.
Report which client systems are encrypted and decrypted systems
The disk and volume status reflects the encryption and decryption status of the managed client system, for example, Encrypted or Decrypted .
Task
Click Menu → Reporting → Queries & Reports to open the Query page.
In the Groups pane, click Trellix Groups → Drive Encryption.
Note
Edit the DE: Volume Status queries to display the system details in table format. This gives you a simplified view of the system and the encryption status. Make sure to include the State (Volume) columns in the table.
Click Run in the DE: Volume Status from the Queries list.
The DE: Volume Status page appear accordingly with the list of client systems and their details configured in the query. The State (Volume) columns indicate the system's status as Encrypted or Decrypted.
Recovering Trellix Drive Encryption - SaaS users and systems
Resetting a remote user's password or replacing the user's lost logon token requires a challenge and response procedure. Use Trellix ePO - SaaS to enable these functionalities in the client computer.
Configure the self-recovery functionality
The Self-recovery option allows the user to reset a forgotten password by answering a set of security questions. A list of security questions is set by the administrator using ePO - SaaS . If the answers from the user match what has been stored with their self-recovery information, they can proceed through the recovery process.
A list of security questions is set by the administrator using ePO - SaaS. If the answers from the user match what is stored with their self-recovery information, they can proceed through the recovery process.
Use ePO - SaaS to enable or disable the self-recovery functionality in the client computer.
Task
Configure the self-recovery functionality via the User Based Policy. For more information on Policy Management, see Configuring policies section of the ePO - SaaS Product Guide.
On the Self-recovery tab, enable or disable the self-recovery functionality for the specified user or user group.
Select Invalidate self-recovery after no. of attempts and type the number of attempts.
Note
The self-recovery token is invalidated if the user types invalid answers for more than the number of attempts specified in the policy.
Type the number of Questions to be answered to perform the self-recovery. The client user is prompted with these questions when trying to recover the user account at the client system.
Type the number of Logons before forcing user to set answers to determine how many times a user can log on without setting their self-recovery questions and answers.
Click + to create a new question, then select the question Language and type the Min answer length for the answer to this question.
Note
Answers to these questions are typed by the user on the client system during the recovery process. The user is prompted for recovery enrollment during every logon. The user can cancel the enrollment until the user exceeds the specified number of logon attempts. After exceeding the defined number of logon attempts, the Cancel button is disabled and the user is forced to enroll for self-recovery.

Click Save.
Send an agent wake-up call.
For the interface reference to configure the self-recovery functionality, see User Based Policies - Self-recovery tab.
Perform self-recovery on the client computer
Use this option to recover the user on the client computer, if the user's password or the logon token has been lost.
Before you begin
Make sure that you have successfully enrolled for self-recovery on the client system. This task should be performed by the client user on the client computer.
Task
Click Options → Recovery.
Select Self-recovery for the recovery type.
Enter the user name, then click OK. The Recovery dialog box lists the questions that the user answered while enrolling for the self-recovery.
Enter the answers for the prompted questions, then click Finish to open the Change Password dialog box.
Enter and confirm the new password, then click OK.
Enable or disable the administrator recovery functionality
The client system prompts for authentication on the pre-boot logon page to access the system. When a user forgets the password, is disabled in the Active Directory, or loses the token, the user can't log on to the system.
Resetting the user's password, unlocking the disabled user, replacing a lost logon token, and performing machine recovery require a challenge and response procedure. The users must start their system and click Recovery on the Drive Encryption pre-boot logon page. This option needs to be enabled on the ePO - SaaS server before performing this task on the client systems.
Use ePO - SaaS to enable or disable the administrator (system and user) recovery functionality on the client computer.
Task
Configure the administrator recovery via the Product Setting Policy. For more information on Policy Management, see Configuring policies section of the ePO - SaaS Product Guide.
On the Recovery tab, enable or disable the system recovery functionality.
From the Key size drop-down list, select the required recovery key size, then enter the message to appear on the recovery page.
Click Save on the Product Settings page.
Send an agent wake-up call.
For the interface reference to configure the administrator recovery, see Product Settings Policy - Recovery tab.
Perform administrator recovery on the client system
If the user's password or the logon token has been lost, perform this task on the client computer to recover the user or the system.
Important
Make sure that the client user performs this task on the client system.

Task
Restart the client system.
Click Options → Recovery.
Select the Administrator / Smartphone Recovery for the recovery type, then click OK to open the Recovery dialog box with the challenge code.
Read the Challenge Code and get the Response Code from the administrator who manages ePO - SaaS.
Enter the response code in the Line field, then click Enter.
Note
It is the administrator's responsibility to authenticate that the client user's identity.

Note
Each line of the code is checked when it is entered.
6. Click Finish.
Note
The generated response code depends on the recovery key size set in the policy and the selected recovery type, that is, machine recovery or user recovery.
Use DETech tool to recover systems
Use DETech tool within the boot menu to recover systems instead of creating DETech standalone boot disk.
Make sure Trellix Drive Encryption - SaaS is installed on the client system.
Task
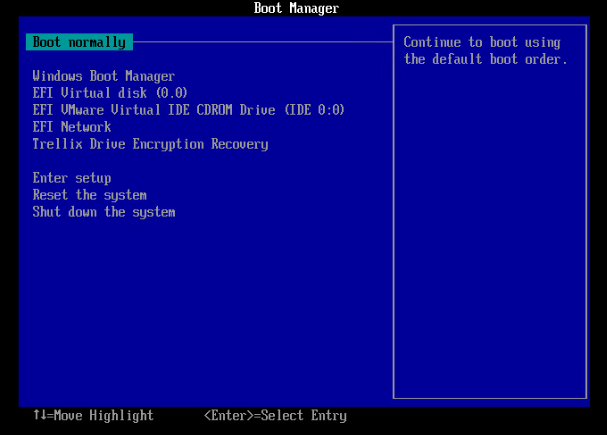
Restart the client system.
On the Boot Manager page, click Trellix Drive Encryption Recovery.
By default, DETech tool opens with the challenge code.
Click Cancel to see Recovery option.
Generate the challenge code on DETech tool using Recovery option.
The Challenge code is generated from DETech tool within the boot menu.
Generate the response code for the administrator recovery
The administrator types the challenge code, which is provided by the user, on the ePO - SaaS console and generates the response code required for the administrator (system and user) recovery.
Make sure that ePO - SaaS administrator performs this task in ePO - SaaS.
Task
Click Menu → Data Protection → Encryption Recovery. The Drive Encryption Recovery wizard displays the Challenge Code field.
Ask the client user to read the Challenge Code and get the Response Code from the administrator who manages ePO - SaaS.
Note
It is the administrator's responsibility to authenticate that the client user's identify.
Type the Challenge Code, then click Next to open the Recovery Type page.
Select the required recovery type from the Recovery Type list, then click Next to open the Response Code page with the response codes.
Note
The generated response code depends on the recovery key size set in the policy and the selected recovery type, system recovery or user recovery.
Read out the response code to the user.
Smartphone recovery
When a Drive Encryption user forgets the PBA password or loses the logon token, the user must perform the smartphone recovery on the client system to reset the password or replace the logon token.
To perform the smartphone recovery, the user must first download and install the Trellix Endpoint Assistant application onto the smartphone or tablet. The user can download the Trellix Endpoint Assistant free application from Google Play for Android supported smartphones or Apple Appstore for iOS supported smartphones.
Note
Trellix recommends the Drive Encryption users to perform smartphone recovery over administrator recovery and self recovery for a quicker and better experience.
Enable or disable the smartphone recovery functionality
You must enable the smartphone recovery functionality in ePO - SaaS if a user forgets the PBA password and requires to reset it.
The client system prompts for authentication on the pre-boot logon page to access the system. When a user forgets the password, is disabled in the Active Directory, or loses the token, the user can't log on to the system.
Resetting the user’s password, unlocking the disabled user, replacing a lost logon token, and performing system recovery require a challenge and response procedure. The users must start their system and click Recovery on the Drive Encryption pre-boot logon page. This option needs to be enabled on the ePO - SaaS server before performing this task on the client systems.
Use ePO - SaaS to enable or disable the administrator (system and user) recovery functionality on the client computer.
Task
Configure the smartphone recovery via the Product Setting Policy. For more information on Policy Management, see Configuring policies section of the ePO - SaaS Product Guide.
On the Companion Devices tab, enable or disable the Enable Companion Device Support option to perform system recovery through smartphone.
Click Save.
Select the User Based Policies policy category, then click Edit Assignments to open the User Based Policies page.
If the policy is inherited, select Break inheritance and assign the policy and settings below next to Inherit from.
From the Assigned policy drop-down list, select a user based policy, then click Edit Policy to open the User Based Policies page.
On the Companion Devices tab, enable or disable the Recovery option to perform system recovery through smartphone.
Select the required Password Definition option to create a password according to the option selected.
If the user has once set a higher password definition to the system, the user cannot change the password to a lower password definition (that is less secure) even if that policy is set in ePO - SaaS.
Click Save on the User Based Policies page.
Send an agent wake-up call.
Perform smartphone recovery on the client system
To perform smartphone recovery on the client system, the user must first register the client system with the smartphone or tablet, and then perform the recovery process on the client system.
Smartphone registration
During Pre-boot Authentication (PBA), in the User Selection screen, select the Register Smartphone option.
The Smartphone Registration page may also appear automatically the first time a user logs on to a system, or the first time that the user logs on after the policy was enabled in ePO - SaaS (policy option to support smartphone recovery has been set for the user in ePO - SaaS).
Enter your credentials and authenticate.
When the password is accepted, the QR Code Recovery Registration window is shown on PBA.
Open the Endpoint Assistant application on your smartphone or tablet and click Scan to scan the image that appears on the QR Code Recovery Registration dialog box.
After the image is scanned properly, you will receive a successful notification on your smartphone or tablet specifying that you have registered the system with your smartphone or tablet.
On the QR Code Recovery Registration window, click Finish to proceed to Windows.
Note
The first time a user logs on to initialize or the first time the policy option to support smartphone recovery is switched on, the system displays the registration screen automatically. However, if the user clicks Finish, the screen does not appear again. If the user clicks Skip, it appears again at the next logon attempt.
Smartphone recovery process
Click Options → Recovery.
Select the Administrator / Smartphone Recovery recovery type, then click OK to open the Recovery dialog box that appears with the challenge code.
On your smartphone or tablet, select Tap to Scan to scan the image that appears on the Recovery dialog box.
Once the image is scanned properly, you will receive the response code on your smartphone or tablet.
Click Next.
Enter the Response Code in the Line field, then click Enter.
Each line of the code is checked when it is entered.
Click Finish.
Note
You can also manage your keys by selecting the Manage option on your smartphone or tablet.
Trellix Drive Encryption - SaaS system recovery
The purpose of encrypting the client's data is to control access to the data by controlling access to the encryption keys. It is important that keys are not accessible to users.
The key that encrypts the hard disk sectors needs to be protected. These keys are referred to as Machine Keys. Each system has its own unique Machine Key. The Machine Key is stored in the ePO - SaaS database to be used for client recovery, when required. There are four different system recovery options available in Drive Encryption that can be reached through: Menu → Systems → System Tree → System → Actions → Drive Encryption.
Trellix Drive Encryption - SaaS system recovery
Option | Definition |
|---|---|
Decrypt offline recovery file | The encrypted machine key is stored in a recovery information file (xml) on the client system. To enable the recovery procedures on the client systems, the user can use ePO - SaaS to decrypt the offline recovery file that is retrieved from the client system. |
Destroy all recovery information | When you want to secure-erase the drives in your Drive Encryption installed system, remove all users from the system (including those inherited from parent branches in the System Tree). This makes the disks inaccessible through normal authentication as there are no longer any users assigned to the system. You need to then destroy the recovery information for the system using the option Menu → Systems → System Tree → Systems → Actions → Drive Encryption → Destroy All Recovery Information in the ePO - SaaS console. This means that the system can never be recovered. |
Export recovery information | This option is used to export the recovery information file (.xml) for the desired client system from ePO - SaaS. Every client system that is encrypted using Drive Encryption has a recovery information file in ePO - SaaS. Any user trying to enable the recovery procedures on the client systems should get the file from the ePO - SaaS administrator for Drive Encryption. For more information, see Drive Encryption - SaaS DETech Product Guide.
|
Export recovery information based on Disk Keycheck | This option is used to export the recovery information file (.xml) for a disk of a client system from ePO - SaaS. Every disk of a client system has a disk keycheck value. For instance, if a client system has a disk called 'Disk1', you can recover that client system (when on unrecoverable state) using the keycheck value of 'Disk1'. However, if a new disk 'Disk2' is installed and activated in that same client system, you must use the keycheck value of 'Disk2' and the keycheck value of 'Disk1' loses priority. To perform this task, you need to access the client system using DETech and obtain the disk keycheck value using the Disk Information option from the DETech user interface.
|
Use the Machine Key for client recovery
The purpose of encrypting the client's data is to control access to the data by controlling access to the encryption keys. It is important that keys are not accessible to users.
The key that encrypts the hard disk sectors needs to be protected. These keys are referred to as Machine Keys. Each system has its own unique Machine Key. The Machine Key is stored in the ePO - SaaS database to be used for client recovery when required.
What happens to the Machine Key when you delete a Trellix Drive Encryption - SaaS active system from ePO - SaaS?
The Machine Key remains in the ePO - SaaS database; however, the key association with the client system is lost when the client system is deleted from ePO - SaaS. When the client system reports back to ePO - SaaS during the next ASCI, it appears as a new node. A new node does not have any users assigned to the client system. The administrator must therefore assign users to allow logon, or enable the Add local domain user option in the Product Setting Policy. The administrator must also configure the required policies in ePO - SaaS.
The next data channel communication after adding the users and configuring the policies makes sure that:
The Machine Key is re-associated with the client system and the recovery key is available.
When the associated Machine Key is not present with the new node, ePO - SaaS sends a Machine Key request. If the user is logged on to the client system, an agent-server communication between the client and the ePO - SaaS server ensures the Machine Key is updated in ePO - SaaS and the users are updated on the client. Thereafter, the Machine Key is available and administrator recovery and policy enforcement work.
The users are assigned to the client system. Therefore, these users can straightaway log on to the client system.
Note
Although Trellix Drive Encryption - SaaS increases the number of users that pre-boot can support to 1000s rather than 100s, we recommend minimizing the number of users assigned per node. Firstly, best security practice aims to limit the number of users that can access a system to the smallest group of users. Secondly, assigning large numbers of users to each node might affect the overall scalability of the entire system and reduce the maximum number of nodes that can be supported by Drive Encryption.
What happens to Machine Keys when moving systems from one branch to another in ePO - SaaS?
The LeafNode is not deleted from ePO - SaaS database when a system is moved from one branch to another in ePO - SaaS, hence the Machine Key is available for the particular client system.
Destroy the recovery information for a Trellix Drive Encryption - SaaS installed system
When you want to secure-erase the drives in your Trellix Drive Encryption - SaaS installed system, remove all users from the system (including those inherited from parent branches in the system tree). This makes the disks inaccessible through normal authentication as there are no longer any users assigned to the system. You must then destroy the recovery information for the system using the option Menu | Systems | System Tree | Systems tab | Actions | Drive Encryption | Destroy All Recovery Information in the ePO - SaaS console. You must also disable the Add local domain user option in the Product Setting Policy. This means that the system can never be recovered.
Use Drive Encryption Recovery API to recover systems
Drive Encryption Recovery API enables administrators to build custom recovery workflows related to Trellix Data Encryption when it is managed by ePO - SaaS. Using Drive Encryption Recovery API, administrators can securely perform challenge/response recovery for end users.
If the user's password or logon tokens have been lost, you need to perform administrator recovery on the client computer to recover the user or system. By using this API from the Trellix Developers Portal, administrators can perform challenge/response recoveries for specific endpoints without using the ePO - SaaS.
Follow these steps in the Trellix Developers Portal to generate a Challenge Response Code:
Generating client credentials for Drive Encryption Recovery API
Generating a token for Drive Encryption Recovery API requests
Generating an API call
Generating client credentials for Drive Encryption Recovery API
Client credentials, such as client ID and client secret, are used to request API tokens and communicate with the Drive Encryption Recovery API.
Task
Log in to the Trellix IAM (https://uam.ui.trellix.com/clientcreds.html) with your user credentials.
On the Trellix IAM dashboard, select the menu in the top-right corner, then click Client Credentials.
Click Add.
(Optional) Add a description for the new client credentials.
(Optional) To associate a user with API activity, select an email address from the Email Claim drop-down menu.
Select Encryption: de.admin.rec scope.
Click Create.
Click the client ID to view existing client credential information, such as client ID, client secret, and the assigned scopes, and edit or delete the client credentials. To delete a client credentials, click Delete in the Actions column.
Generating a token for Drive Encryption Recovery API requests
After generating your client credentials, use them to obtain an access token for Drive Encryption Recovery API requests.
Before you begin
You must have the following details from your IAM dashboard.
client_id - The client ID from the client credentials you created.
client_secret - The client secret from the client credentials you created.
grant_type - The type of grant. Use client_credentials.
scope - The scope from the client credentials you selected, Encryption: de.admin.rec.
Task
Create base64-encoded client credentials using a base64 encoder of your choice. You can use one of various command line tools or Base64 online tool. The input should be in the format of
client_id:client_secret.Make a POST request to the token generation endpoint (https://iam.cloud.trellix.com/iam/v1.0/token) with the required parameters in the request body.
The POST request can be made using various tools or programming languages. In the Curl example below, replace <BASE64_CLIENTCRED> with base64 encoded client credentials from step 1, and replace <SCOPE> with
de.admin.rec.curl --location --request POST 'https://iam.cloud.trellix.com/iam/v1.0/token' --header 'Content-Type: application/x-www-form-urlencoded' --header 'Authorization: Basic <Base64 Encoded CLIENT_ID:CLIENT_SECRET>' --data-urlencode 'grant_type=client_credentials' --data-urlencode 'scope=de.admin.rec'Send the POST request.
The response is in JSON format and includes the access token, token type, expiration time, and other details. Extract the access token and use it for subsequent API requests.
Note
Use proper security measures, such as securely storing the client secret and transmitting the requests over a secure connection, such as HTTPS.
Generating an API call
After you generate client credentials and the token, you can call a server API and keep track of its validity.
Task
Extract the token from your token generation request.
Make the API request to the server endpoint with the access token included in the request header. In the Curl example below, add Recovery Type as 1, provide the Challenge Code value to get the response code and Replace <ACCESS_TOKEN> with the token you generated in Generating a token for Drive Encryption Recovery API requests.
curl --location --request GET 'https://api.manage.trellix.com/encryption/v2/tde/adminRecovery?recoveryType=1&challengeCode=<Provide ChallengeCode>' \
--header 'Content-Type: application/vnd.api+json' \
--header 'x-api-key: <TRELLIX_API_KEY>' \
--header 'Authorization: Bearer <ACCESS_TOKEN>'Check the server API response and track the token’s validity period. Compare the current time with the token’s expiration time, which is typically found in the response from the token generation endpoint. If the token has expired, generate a new one. For more information, see Generating a token for Drive Encryption Recovery API requests.
Interface reference
Product Settings Policy — General tab
The General tab under the Product Settings Policy provides you the settings required for activating the product, to collect the log messages from the client system, and to manage the users who are not logged on.
Option | Definition |
|---|---|
Enable policy | Activates the encryption on the client computers with assigned or local domain users. |
Logging level | Allows the administrator to set a different logging level for each client computer that has the specific policy setting assigned.
|
Expire users who do not login | Allows the administrator to control and manage the users who have not logged on to the client system. This option forces the user account, which is not initialized, to expire after a number of hours as set in the policy. |
Allow users to create endpoint info file | Allows the user to collect client system details such as the list of assigned users, policy settings, recovery, and Drive Encryption status. After enabling this option, the Save Machine info button appears in:
You can click this button and save the text file for later reference. |
Enable logging for Credential provider | Select this option to enable or disable credential provider logging. |
Self Protection | Provides protection against modification of files, folders, and registries related to Trellix Drive Encryption. Disable Self-Protection (Not recommended): Removes existing protection that stops modification of files, folders, and registries pertaining to Trellix Drive Encryption. Uninstall Self-Protection: Allowed only after disabling Self-Protection. Removes/Uninstalls Self-Protection software from the client system, as viewed from Trellix Drive Encryption's perspective. |
Duplicate | Duplicates or copies the policy settings with a different name and this can be assigned to a different user. |
Save | Saves the product settings policy of Drive Encryption. |
Cancel | Exits the current page. |
Product Settings Policy — Encryption tab
The Encryption tab under the Product Settings Policy allows you to select the required encryption type and set the encryption priority.
Option | Definition |
|---|---|
Encrypt | Allows you to select the required encryption type and to set the encryption priority. |
Encryption type | The type of encryption:
This table also lists the available encryption providers (PC Software and PC Opal) available. You can change and set the encryption priority by moving the encryption provider rows up and down, as appropriate. By default, software encryption is used on both Opal and non-Opal systems in this version of Drive Encryption. To ensure that Opal technology is chosen in preference to software encryption, we recommend that you always set Opal as the default encryption provider, by moving it to the top of the list on the Encryption Providers page. This ensures that Opal locking will be used on Opal drives.
The Encryption type options None, All disks except boot disk, and Selected partitions are not applicable to self-encrypting drives in Opal mode. |
Move To Top | Allows the topmost encryption provider to take priority. |
Duplicate | Duplicates or copies the policy with a different name and this can be assigned to a different user. |
Save | Saves the product settings policy of Drive Encryption. |
Cancel | Exits the current page. |

Product Settings policy — Log On tab
The Log On tab under the Product Settings policy allows you to define the logon settings for the Product Settings policy of Drive Encryption.
Log On (Drive Encryption)
Option | Definition |
|---|---|
Enable automatic booting | When enabled, the client system boots automatically without prompting for a Pre-boot Authentication. The expiration date for auto-booting can also be set. If required, the user can select the UTC time standard option.
On the Windows authentication screen, if the user fails to authenticate the defined number of times, a message appears indicating that the maximum number of failed operating system logons was reached, and that Pre-boot Authentication is enabled on the machine. Upon clicking OK, the client system restarts and PBA screen appears. Once the user authenticates through PBA and Windows successfully, autoboot is enabled.
|
Allow temporary automatic booting | Allows you to turn (on or off) the PBA screen, with a client-side utility. This eliminates the need to modify the policy in ePO - SaaS, and fully automates patching and other client management scenarios. |
Use of TPM for automatic booting | Select one of these options:
|
Prevent automatic booting when the disk moves system | This prevents autoboot from functioning when a disk is moved between the systems. |
Log on message | Type a message that appears to the client user in the pre-boot login page. |
Pre-boot power management | Automatically shutdown pre-boot after a period of inactivity. |
Do not display previous user name at log on | Prevents the client system from automatically displaying the user name of the last logged on user on all Drive Encryption logon dialog boxes. |
Enable on screen keyboard | Enables the pre-boot On-Screen Keyboard (OSK) and the associated Wacom serial pen driver. When this option is enabled, the pen driver finds supported pen hardware (Panasonic CF-H1 and Samsung Slate 7) and displays the OSK.
|
Add local domain users |
Note: If you select this option, at least one user should be added to the client system for a successful Drive Encryption activation on the client. The activation doesn't happen until a user logs on to Windows. |
Enable accessibility | Select this option to sound a beep as a signal when the user moves the focus from one field to the next using mouse or keyboard in the pre-boot environment. This option is helpful to visually challenged users. For more details, see Enable Accessibility in the Pre-boot environment. |
Disable pre-boot authentication when not synchronized | Blocks a user from logging on to PBA in the client system, if the client system is not synchronized with the ePO - SaaS server for the set number of days. The user is blocked from logging on to PBA, and can then request the administrator to perform Administrator Recovery to unlock the client system. This allows the client system to boot and communicate with the ePO - SaaS server. The client system continues to block the user from logging on to the system until synchronization with ePO - SaaS. This allows the client system to boot and communicate with the ePO - SaaS server. Note: This allows the client system to boot and communicate with the ePO - SaaS server. |

Log On (Windows)
Windows Hello authentication | Windows Hello allows users to sign in to their Windows devices using biometric data, or a PIN, instead of a traditional password. |
Third-party credential providers | Allow integrated third‑party credential providers to override the Drive Encryption credential provider — Enable this option to make sure that the Drive Encryption credential provider does not load and allow a compatible third‑party credential provider to override the existing credential provider. |
Single sign-on (SSO) | Provide a single sign-on experience for Drive Encryption users (SSO) — Enable this option to allow the user to log on to the system with a single authentication process. It allows automatic logon to the operating system once the user authenticates through the Pre‑boot Authentication page. |
Password synchronization |
Warning: This will result in an increased load on the domain server that manages the endpoint.
|
Pre-boot user options | Allow user to cancel SSO and password synchronization — Enable this option to allow the user to cancel SSO and password synchronization. |
Windows username matching | The Windows username must match the username of the Drive Encryption user before capturing SSO or synchronizing passwords — Ensures the SSO details are captured only when the user’s Drive Encryption and Windows user names match. This ensures that the SSO data captured is replayed for the user for which it was captured. |
Credential provider bitmap | Do not display Trellix shield on Windows logon tiles — Enabling this option allows you to hide the Trellix shield on Windows logon titles. |
Duplicate | Duplicates or copies the policy with a different name and this can be assigned to a different user. |
Save | Saves the Product Settings Policy of Drive Encryption. |
Cancel | Exits the current page. |
Product Settings Policy — Recovery tab
The Recovery tab under the Product Settings Policy allows you to define the recovery settings for the Product Settings Policy of Drive Encryption.
Option | Definition |
|---|---|
Enabled | The Recovery option is enabled by default. This activates the Administrator Recovery option in the client system. |
Administrator recovery |
|
Self-recovery | Allow users to re-enroll self-recovery information at PBA — Allows the client user's self-recovery details can be reset. The user must then re-enroll their self-recovery details with new self-recovery answers. Note: Before resetting the self-recovery questions on the client system, make sure that you have enabled the Enable Self Recovery option under User Based Policy | Self-recovery. When this option is enabled, the Pre-boot Authentication (user name) screen includes the Reset self-recovery option. On selecting Reset self-recovery, the user is prompted for a password, then self-recovery enrollment.
|
Duplicate | Duplicates or copies the policy with a different name and this can be assigned to a different user. |
Save | Saves the product settings policy of Drive Encryption. |
Cancel | Exits the current page. |
Policy Settings — Companion Devices tab
The Companion Devices tab under the Product Settings Policy allows you to enable the Drive Encryption companion devices support feature through policies.
Option | Definition |
|---|---|
Enable Companion Device Support | Enable this option to allow the user to perform system recovery through smartphone. Note: The Companion Device application is now known as Trellix Endpoint Assistant. |
Duplicate | Duplicates or copies the policy with a different name and this can be assigned to a different user. |
Save | Saves the product settings policy of Drive Encryption. |
Cancel | Exits the current page. |
Add local domain user settings — Regular expressions
You can add regular expressions to blocklist the user accounts. Any users, who match the configured regular expression are excluded from the ALDU list. Regular Expression ECMA 262 standard is supported with the ALDU blocklist policy.
Option | Definition |
|---|---|
Regular expressions |
|
Duplicate | Duplicates or copies the settings with a different name and this can be assigned to a different user. |
Save | Saves the settings of Drive Encryption. |
Cancel | Exits the current page. |

User Based Policies — Authentication tab
The Authentication tab under the User Based Policies allows you to define the authentication for the user in the client system and to limit the user's logon hours.
Option | Definition |
|---|---|
Token type | The authentication token type: Only password. |
Logon Hours | This defines the day and the timeline when the user can log on to the client system. The restrictions are applied using the Apply restrictions option. |
Duplicate | Duplicates or copies the policy with a different name and this can be assigned to a different user. |
Save | Saves the User Based Policy of Drive Encryption. |
Cancel | Exits the current page. |
User Based Policies — Password tab
The Password tab under the User Based Policies allows you to change and manage the user's password in the client system.
Option | Definition |
|---|---|
Default password | Change default password — The default password is 1234567, if the administrator changes the default password, then the newly set password will be the new default password for this policy under the User Based Policy category.
|
Password change |
|
Incorrect passwords |
|
Allow showing of password | Enable this option to display the password of the user during authentication. |
Duplicate | Duplicates or copies the policy with a different name and this can be assigned to a different user. |
Save | Saves the user based policy of Drive Encryption. |
Cancel | Exits the current page. |
User Based Policies — Password Content Rules tab
The Password Content Rules tab under the User Based Policies allows you to define the length and limit the content of a user's password.
Option | Definition |
|---|---|
Display list of password rules | Enable this option to display the password rules to users. |
Password length | This specifies the number of characters in a user password.
|
Enforce password content | This specifies the number of different characters like alpha, numeric, alphanumeric, and symbols that a user password can have.
|
Password content restrictions | This specifies the password content restrictions for the user password.
No Simple Words — These are the set of words defined as simple words that cannot be used as passwords. Simple Word Group — This contains the list of simple words. |
Duplicate | Duplicates or copies the policy with a different name and this can be assigned to a different user. |
Save | Saves the user based policy of Drive Encryption. |
Cancel | Exits the current page. |
User Based Policies — Self-recovery tab
The Self-recovery tab under the User Based Policies allows you to enable and configure the self (local) recovery process. This allows the user to reset a forgotten password by answering a set of security questions. A list of security questions is set by the administrator using ePO - SaaS. If the answers from the user match what has been stored in the server, they can proceed through the recovery process.
Option | Definition |
|---|---|
Enable self-recovery | Enables self-recovery for users assigned to the system. |
Invalidate self-recovery after no. of invalid attempts | This specifies the number of attempts after which the self recovery is disabled. |
Questions to be answered | The number of questions to be answered by the user to perform the self-recovery. This lists the default questions for the selected language, also provides an option to add more questions.
|
Logons before forcing user to set answers | The number of logons before forcing the user to set answers. |
Questions | Allows you to select a language, set the question, and set the minimum answer length. This lists the default questions for the selected language, and provides an option to add more questions.
|
Duplicate | Duplicates or copies the policy with a different name and this can be assigned to a different user. |
Save | Saves the user based policy of Drive Encryption. |
Cancel | Exits the current page. |

User Based Policies — Companion Devices tab
The companion devices tab under the User Based Policies allows you to enable recovery for the companion devices and to configure the password definition.
Option | Definition |
|---|---|
Recovery | Enabled — Enables recovery for the companion devices. |
Password Definition |
|
Challenge Code (Drive Encryption Recovery)
The Challenge Code pane under Menu | Data Protection | Encryption Recovery allows you to perform the system recovery by typing the challenge code generated in the client system.
Option definitions
Option | Definition |
|---|---|
Challenge Code | Specifies the challenge code generated in the client system. |
Back | Navigates to the previous page. |
Next | Navigates to the next page. |
Close | Exits the current page. |
Recovery Type (Drive Encryption Recovery)
The Recovery Type pane under Menu | Data Protection | Encryption Recovery allows you to perform the system recovery by verifying the user details and by selecting the recovery type.
Option | Definition |
|---|---|
Machine Name | Displays the name of the system that you are trying to recover. |
Recovery Type | Specifies the recovery type.
|
Back | Navigates to the previous page. |
Next | Navigates to the next page. |
Close | Exits the current page. |
Select User (Drive Encryption Recovery)
The Select User pane under Menu | Data Protection | Encryption Recovery allows you to select the user to be recovered.
Option | Definition |
|---|---|
Name | Displays the name list of the users. |
Actions | Drive Encryption
|
Quick Find | Allows the administrator to find the desired user quickly. |
Apply | Finds and displays the desired user. |
Show selected rows | Displays the user information of the selected users only. |
Back | Navigates to the previous page. |
Next | Navigates to the next page. |
Close | Exits the current page. |
Response Code (Drive Encryption Recovery)
The Response Code pane under Menu | Data Protection | Encryption Recovery allows you to view the response code, then read it to the user.
Option | Definition |
|---|---|
Line 1 Line 2 | Displays the response code and the codes are phonetically arranged in the table.
|
Back | Navigates to the previous page. |
Close | Exits the current page. |