Last Updated: September 17, 2023
Overview
Trellix Cloud Workload Security (Trellix CWS) helps you discover, import, manage, and secure your public and private cloud infrastructure using Trellix® ePolicy Orchestrator - On-prem . It also discovers, assesses, and remediates container-based applications managed through Kubernetes cluster using Trellix ePO - On-prem.
Cloud Workload Security offers improved visibility and control to address the unique requirements of cloud server security. It detects and imports virtual infrastructure details, security groups, and virtual networks to the Trellix ePO - On-prem server. It provides control over cloud infrastructure and insight into the threat information across clouds. It also offers infrastructure visibility and security alerts so that you can quickly assess security issues and take immediate actions.
Key features
Trellix CWS integrates the management feature of Trellix ePO - On-prem with the configured cloud, which hosts and manages virtual machines (VM) and containers, and synchronizes periodically with the cloud accounts, and imports the virtual infrastructure details to Trellix ePO - On-prem.
Trellix CWS has an innovative dashboard to view and monitor security compliance of your cloud assets. You can flag systems at risk and take corrective actions. You can deploy Trellix® Agent and install other Trellix products on the discovered instances.
Visualization of your cloud workloads
The user interface gives you a complete view into your cloud accounts and their assets with security status.
You can view these details:
Your virtual workload group list, security risk, and threat details
Status of other security product installation
Firewall (security group), and other system information of your VMs
The total number of pods and their network assessment policy details
Compliance and security posture assessment
You can view potential threats and unsafe settings so that you can take appropriate actions. You can define compliance policies for security assessment and view all high and low compliance events in the Trellix CWS dashboard.
You can view these details in your network configuration.
Security settings that include unsafe firewall settings for AWS and Microsoft Azure accounts.
Security settings that check the network policies for pods.
Systems without Trellix security products installed.
Security group management
You can view security group information of your virtual instances across your cloud accounts. You can see how many instances are associated with any firewall (security group) or network security. You can also manage these firewall (security groups) by adding, editing, or deleting rules, and detaching firewall (security group) from an instance.
Network visualization and anomaly detection
Trellix CWS assesses your cloud configuration and flags systems, which are at risk. You can immediately take appropriate actions and secure your assets.
Easy activation of missing protection with a few clicks
After visualizing your cloud account structure, and seeing which systems are at risk, you can secure your instances with a few clicks.
Manage your instances by installing Trellix Agent.
After installing Trellix Agent, you can install these Trellix products on your instances.
Trellix Endpoint Security (ENS)
Trellix Endpoint Security (ENS) for Linux
Host Intrusion Prevention
Trellix Application Control
Trellix Policy Auditor
Trellix Change Control
Trellix Endpoint Security (ENS) Adaptive Threat Protection
Cloud usage metering
You can track the usage of AWS and Microsoft Azure running cloud VMs with the metering feature. The usage of VMs is tracked in the sum of CPU hours that an account uses monthly.
Note: The Smart Scheduler for Trellix Endpoint Security for Servers gets the CPU utilization value of AWS and Microsoft Azure accounts using the metering feature. Based on the CPU utilization value, the Smart Scheduler instructs Trellix Agent to trigger on-demand scans.
How it works
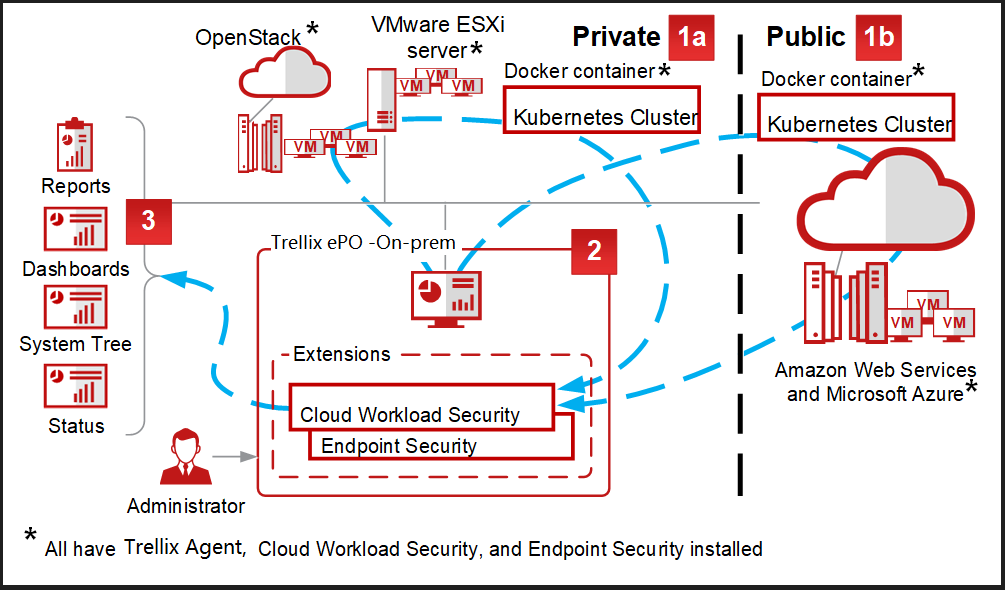
Trellix CWS provides the real-time view of all running workloads, and manages these workloads using Trellix ePO - On-prem.
You can configure and register your public and private cloud infrastructure with Trellix ePO - On-prem using Trellix CWS.
Amazon Web Services (AWS) — Collection of web services that make up the cloud computing solution offered by Amazon.
Citrix Hypervisor — A server virtualization platform to handle different workload types, operating systems, and network configurations.
Kubernetes — Open-source platform for automating deployment, scaling, and management of container applications.
Microsoft Azure — Cloud computing platform and infrastructure for building, deploying, and managing applications and services through a global network of Microsoft-managed data centers.
Microsoft Hyper-V — A hardware virtualization product that runs each virtual machine in its own isolated space.
OpenStack — Open-source platform for cloud computing and infrastructure for deploying virtual servers and other resources.
Virtual Machines (VMs) — An isolated guest operating system installation in a normal host operating system that supports both virtual desktops and virtual servers.
Azure Virtual Network — A logically isolated section of Azure cloud dedicated to your subscription.
AWS Virtual Private Cloud — A logically isolated section of Amazon Web Services cloud to start your AWS resources in a virtual network.
Hypervisor (ESXi) — A virtual operating platform that manages the execution of the guest operating systems. They allow multiple operating systems to run concurrently on a hosted system. ESXi are embedded hypervisors for servers that run directly on server hardware, without requiring another underlying operating system.
VMware vCenter — Console that manages the ESXi servers, which host the guest VMs that require protection.
Trellix CWS discovers workloads and pods, and manages them using Trellix ePO - On-prem policies. Security audit policies are managed in the Trellix ePO - On-prem Policy Catalog. The policy definitions in the Policy Catalog determine the severity of the threat.
The Trellix ePO - On-prem policies applied across your public and private cloud infrastructure provide simplified management audit and reporting. You can view your cloud account information, security issues, risks, and other details in the card-based user interface. Events and workloads are classified as high and medium risks based on the security policies, whereas pods are classified as high risks based on the network assessment policies. All account properties are color-coded to reflect their security status.
Reports
Dashboards
System Tree
Status
3
Trellix ePO -On-prem
2
- Extensions
Cloud Workload Security
Endpoint Security
Administrator
OpenStack *
VMware ESXi server *
VM
Private 1a
Docker container *
Kubernetes Cluster
Public 1b
Docker container *
Kubernetes Cluster
Amazon Web Services and Microsoft Azure *
VM
* All have Trellix Agent, Cloud Workload Security, and Endpoint Security installed
Managing policies with Trellix ePO - On-prem
You can integrate and manage assessment policies using Trellix ePO - On-prem.
Trellix ePO - On-prem provides centralized policy management and enforcement of your Trellix security products and the systems where they are installed. It also provides comprehensive reporting and product deployment capabilities through a single point of control.
Trellix CWS policies on Trellix ePO - On-prem
The default policies fit the broadest set of customer environments. You can tune these policies to fit your environment.
Trellix CWS adds these categories in the Policy Catalog.
Category | Description |
|---|---|
Assessment Rules — Firewall | This policy defines the firewall settings for the systems. You can set inbound rules for the systems. It also defines how the systems are flagged if they violate the specified rules. |
Assessment Rules — General | This policy defines how the systems are flagged if the products aren't installed. |
Assessment Rules — Container | This policy defines how the pods are flagged if they don't have any network policies associated with them. |
Auto-Remediation Settings | This policy allows you to enable or disable automatic remediation for your instances. |
Assessment Rules — General has Core Protection, Full Compliance, McAfee Default, and My Default policies.
Assessment Rules — Firewall, Assessment Rules — Container, and Auto-Remediation Settings have McAfee Default and My Default policies.
You can use these policies as is or you can edit My Default policies.
Policy | Description |
|---|---|
McAfee Default | Defines the out-of-the-box policy that takes effect if no other policy is applied. You can duplicate this policy, but you can't delete or change it. |
My Default | Defines the customizable default policy for your environment.
|
Core Protection | Defines the core or important protection that you can have in your environment. |
Full Compliance | Defines the strongest protection that you can have in your environment. |
Set Trellix CWS policies
You can set up Trellix CWS policies in Trellix ePO - On‑prem. These policies define the permission levels to access Trellix CWS policies and tasks.
Task
Log on to Trellix ePO - On‑prem as administrator.
Select Menu → User Management → Permission Sets.
Click Edit against Cloud Workload Security : Policies: in the Permission Sets page.
Select:
No permissions — to deny access to Trellix CWS policies and tasks.
View policy and task settings — to set view permissions for Trellix CWS policies and tasks.
View and change policy and task settings — to set view and edit permissions for Trellix CWS policies and tasks.
Click Save.
Finding policies
View and manage your firewall policies from three locations in the Trellix ePO - On‑prem console.
You can assign policies to your cloud accounts using the Assigned Policies tab (Systems | System Tree | Assigned Policies for a selected group in the System Tree), and the Policy Catalog tab (Systems | Policy Catalog). You can also assign policies from Cloud Workload Security user interface when you register your cloud accounts.
Use the Policy Catalog to:
Create policies.
View and edit policy information.
View where a policy is assigned.
View the settings and owner of a policy.
View assignments where policy enforcement is disabled.
Import and export policies.
Duplicate policies.
Share policies.
Use the Assigned Policies tab to:
View the available policies of a particular feature of the product.
View details of the policy.
View inheritance information.
Edit policy assignment.
Edit custom policies.
Create an assessment policy
Create a custom assessment policy to suit your environment.
Log on to Trellix ePO - On-prem as an administrator.
Select Menu → Policy → Policy Catalog, then from the Product list, select Cloud Workload Security.
From the Category list, select Assessment Rules - General.
Click the name of an editable policy.
Set the product flags to Must Have, Good to Have, or Optional.
If Must Have products are missing, critical alerts (red) are flagged.
If Good to Have products are missing, warnings (yellow) are flagged.
If Optional products are missing, no alerts are flagged.
You can set these flags for Strong Security Groups, Volume Encryption, Intrusion Prevention, Threat Prevention, Application Control, Policy Auditor, Change Control (FIM), and Adaptive Threat Prevention. Strong Security Groups are always set as Must Have for your AWS and Microsoft Azure accounts. You cannot change this setting for AWS and Microsoft Azure accounts.
Click Save.
✎Note
You can edit the My Default policies, or any policies that you create. McAfee Default policies aren't editable.
Results
The new policy appears in the Policy Catalog.
Create a firewall policy
Create a custom firewall policy to suit your environment.
Log on to the Trellix ePO - On-prem server as an administrator.
Select Menu → Policy → Policy Catalog, then from the Product list, select Cloud Workload Security.
From the Category list, select Assessment Rules - Firewall.
Select New Policy, type a name for the policy, then click OK.
Click the name of an editable policy.
NoteYou can edit the My Default policies, or any policies that you create. McAfee Default policies aren't editable.
Specify which inbound firewall rules can come from which IP addresses and their severities.
Option | Severity |
|---|---|
If inbound firewall rule to port | Select the inbound port from the list. |
Then flag as | Select the flag value from Safe or Critical. |
Note: You can set If inbound firewall rule to port option to Any to allow all ports, then flag them as Safe or Critical.
If you don't specify a rule for a port, it is flagged as Warning. Critical alerts are flagged for unrestricted IP addresses (with suffix /0) only.
For example, a firewall policy is set in Cloud Workload Security.
3389 (RDP) | Critical |
|---|---|
80 | SAFE |
These are the assessment results.
3389 | Anywhere | RED |
3389 | <Custom IP> | SAFE |
80 | Anywhere | SAFE |
80 | <Custom IP> | SAFE |
8082 | Anywhere | YELLOW |
8082 | <Custom IP> | YELLOW |
7. Click Save.
Results
The new policy appears in the Policy Catalog.
Create a container policy
Create a custom container policy to suit your environment.
Task
Log on to the Trellix ePO - On-prem server as an administrator.
Select Menu → Policy → Policy Catalog, then from the Product list, select Cloud Workload Security.
From the Category list, select Assessment Rules - Container.
Select New Policy, type a name for the policy, then click OK.
Click the name of an editable policy.
Note
You can edit the My Default policies, or any policies that you create. McAfee Default policies aren't editable.
6. Select a container network policy.
Must Have — Flags critical alerts if the container network policy is not applied on your pods. We recommend that you select this option for your container network polices.
Optional — Doesn't alert any flag if the container network policy is not applied on your pods.
7. Click Save.
Results
The new policy appears in the Policy Catalog.
Create an auto-remediation policy
Create a custom auto-remediation policy to suit your environment.
Log on to Trellix ePO - On-prem server as an administrator.
Select Menu → Policy → Policy Catalog, then from the product list, select Cloud Workload Security.
From the Category list, select Auto-Remediation Settings.
Select New Policy, type a name for the policy, then click OK.
Click an editable policy.
You can edit the My Default policies, or any policies that you create. You cannot edit McAfee Default policies.
From the Auto-Remediation option, select Enable or Disable to enable or disable auto-remediation respectively.
From the Auto-remediation Settings, select:
Quarantine instance when Security Group assessment is critical
Note
This action might affect the communication with the instances within your organization. To quarantine a specific Security Group/Network Security Group or an instance, create a duplicate auto-remediation policy.
Run DAT Update if DAT is non-compliant
Run On-Demand Scan when On-Access Scan threat count per instance is > [threat count] in the last 24 hours, then type the threat count above which you want to run on-demand scan.
Note
Auto-Remediation Settings option is disabled if you have disabled auto-remediation.
Assign custom policies to systems in your network
When you assign custom policies to a set of systems, they are effective after the next synchronization. If you want them to be effective immediately, schedule a manual sync.
Log on to Trellix ePO - On-prem as an administrator.
Select Menu → Systems → System Tree, then select your group of systems from the hierarchy.
You can go to the Policy Catalog page from the Register Cloud Account pane of Cloud Workload Security user interface.
From the Assigned Policies, you can see policies assigned to these systems. Click Edit Assignment.
Select Break inheritance and assign the policy and settings below for Inherit from.
Select your custom policy from the Assigned Policy list, then specify the values for other fields.
Click Save.
Create policy management permission sets for Trellix CWS
The Trellix CWS Permission Sets allow you to view the Trellix CWS console and edit security groups, accounts, and policies based on the user type.
Before you begin
Ensure that these conditions are met.
You have installed Trellix ePO - On-prem 5.10.
You have administrator rights to change Permission Sets.
As an administrator, you can create permission sets for different user levels. For example, Trellix CWS offers different permissions for these user levels.
User type | View Trellix CWS | Install Trellix managed products and Trellix Agent | Change Trellix CWS policies | Remediate security groups | Quarantine workloads | Shut down workloads | Add/ Delete accounts |
|---|---|---|---|---|---|---|---|
Read-only user | Yes | No | No | No | No | No | No |
Security user | Yes | No | Yes | No | No | No | No |
Network user | Yes | No | No | Yes | Yes | No | No |
SOC/ Security admin | Yes | Yes | Yes | Yes | Yes | Yes | Yes |
Account admin | Yes | No | No | No | No | No | Yes |
Restricted user | No | No | No | No | No | No | No |
Tip: Make sure that the Trellix CWS permission sets assigned to a user doesn't conflict with the Trellix ePO - On-prem permission sets. By default, a new Trellix CWS user has no permissions to view the Trellix CWS console. The Trellix ePO - On-prem admin user must change the user permissions by changing the Cloud Workload Security(Controls) permissions under Trellix ePO - On-prem Permission Sets.
Task
Select Menu → User Management → Permission Sets.
Click New Permission Sets to create the policy administrator permission set , type the name, then click Save.
Select your permission set, then scroll down to Cloud Workload Security (Controls), and click Edit.
This allows the policy administrator user to set visualization permissions to the Trellix CWS users.
Select the appropriate option against Control Permissions based on your user level, then click Save.
Option | Description |
|---|---|
No Permissions | Select to restrict the user from viewing Trellix CWS console. |
View Cloud Workload Security Console | Select to allow the user to view Trellix CWS console. |
View and Edit Cloud Workload Security | Select these options.
|
Administrator Permissions | Select to set administrator permissions to the user. This user can view and edit security groups, cloud accounts, and policies in the Trellix CWS console. |
To duplicate the policy administrator permission set and create the policy user permission set, click Actions → Duplicate.
Type the policy user permission set name and click OK.
A duplicate policy administrator permission set is created.
Policy approval on Trellix ePO - On-prem
You can assign different permission sets to different policy users, so they can create and modify specific product policies. Some users can approve or deny changes from the policies submitted by other users.
Note
Policy approval is supported in Trellix ePO - On-prem 5.10 only.
Policies can be managed by users with different permissions. Trellix ePO - On-prem creates two types of user levels and permissions.
Policy administrator — Approves policies created and modified by other users.
Policy user — Duplicates and creates policies that they submit to the policy administrator for approval before they are used.
For more information about policy management users, see Trellix ePolicy Orchestrator - On-prem Product Guide.
Configure approval settings for policy changes
You can choose whether policy users and administrators need approval to make policy changes. This prevents users from making inadvertent changes to any product policies.
Ensure that you have administrator rights.
Select Menu → Configuration → Server Settings.
Click Approvals on the Setting Categories pane.
Click Edit.
Select Users need approval for policy changes if policy users have to seek approval to make changes.
Select Administrators and Approvers need approval for policy changes if the administrators and approvers also need to seek approval to make changes.
Note
If you change these settings when a policy or task is submitted for review, it is rejected automatically.
Submit policy changes for review
All users, including administrators and policy approvers, can create and change policies; but they might need to submit the policy for review by the administrator, or users with approval permissions, or a policy administrator.
Before you begin
Server Settings and user permission sets must be configured to allow users to submit policies for approval.Task
Create and maintain policies.
Note: Policy users only have access to policies and settings configured by the administrator in their assigned permission set.
To save the policy and send it to the administrator, click Submit for Review.
Check the policy approval status using one of these methods:
Select Menu → Policy → Policy History, and select the policy.
Select Menu → Policy → Policy Catalog, and select the policy.
You can view the policy approval status in the Policy Details pane.
Use the Product, Category, and Name filters to select Policy History entries to check.
Results
The Status column displays one of these entries:
Review in progress — Has not been reviewed
Rejected — Has been rejected and not saved
Approved — Has been approved and saved
Note
The notification icon notifies if an action has been taken on the policy submitted for review.
Cancel policy review
If you are the user making changes and submitting a policy for review, you can withdraw the policy from review.
Before you begin
You must be the user who submitted the policy changes for review.
Task
Select Menu → Policy → Policy Catalog.
Select Pending Approvals from the Products pane.
Select the policy for which you want to cancel review.
Click Cancel Review on the Policy Details pane.
Click Cancel on the pop-up dialog box that appears to confirm cancellation of review.
Results
The policy changes that were submitted for review are cancelled. The policy is removed from the Pending Approvals list.
Review policy changes
As a policy administrator, you need to periodically approve or reject policies submitted by non-admin users. You receive notifications when a non-admin user submits a policy for approval.
Before you begin
The Server Settings and user permission sets must be configured to allow users to submit policies for approval.
Task
To change the status of the policy submitted for review, select Menu → Policy → Policy Catalog.
Select Pending Approvals from the Products pane and select the policy you want to review.
View all proposed changes on the Policy Details pane.
Click Approve or Reject.
A pop-up dialog box appears to confirm your decision. You can enter comments (optional) in the Comments text box.
Results
If you approve the changes, the policy is saved; otherwise the policy changes are not saved.
Product Improvement Program
Trellix Agent 5.5.2 or later introduces a Product Improvement Program (PIP) with a new, more efficient, and more secure product telemetry framework. To simplify the management experience, the new framework is integrated with Trellix Agent management extension and client.
Purpose
Trellix uses the data collected by Trellix Agent to:
Improve product features and customers' experience with the product.
Used by Technical Support for troubleshooting.
For more information about PIP, see the Product Guide for Trellix Agent.
Privacy protection
The data collected by Trellix Agent will be used only for product improvement and Technical Support. The system-specific data will be filtered or used in aggregate form, unless it is required for Technical Support. For details about Trellix Privacy Notice, see https://www.trellix.com/en-us/about/legal/privacy.html.
Visualization of your cloud accounts
Cloud Workload Security enables you to see your cloud infrastructure assets and their hierarchy.
Configure and register the cloud accounts with Trellix ePO - On-prem using Menu → Systems → Cloud Workload Security. You can view your cloud account information, security issues, risks, and other threat details.
Viewing Trellix CWS console
The Trellix CWS console displays the details your cloud accounts and pods using card-based panes.
The Trellix CWS console has summary card, Systems pane, and Accounts pane.
The summary card displays these information.
Total Workloads
Compliance Events
Threat Events
Total Pods
Compliance Events
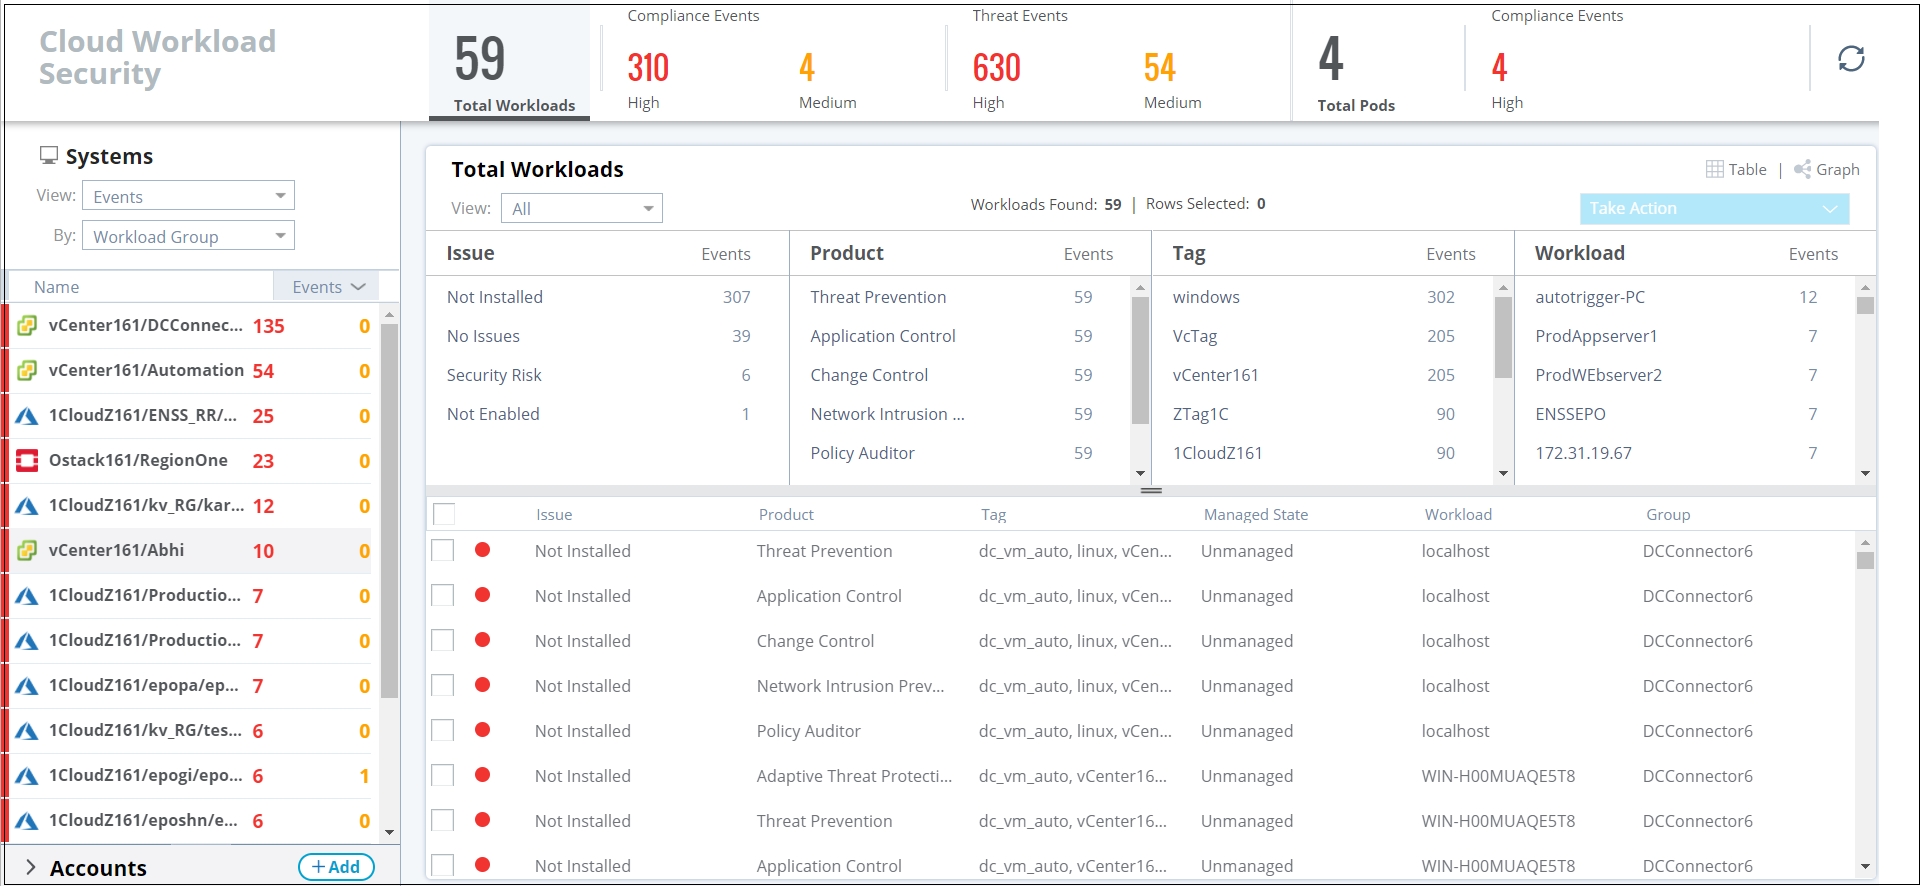
You can view the details of your instances using the filters in the Trellix CWS user-interface. All account properties are color-coded to reflect their security status. Events and workloads are classified as critical or warning if they violate the security policies. The policy definitions in the Trellix ePO - On-prem Policy Catalog determine the severity of the threat.
Red — Critical
Yellow — Warning
The Systems pane lists the number of events and workloads in each cloud account. The View and By filters in the Systems pane filter the workloads and events based on the registered cloud vendors.
The Accounts pane lists the cloud vendor accounts and Kubernetes cluster registered in Trellix ePO - On-prem. When you select your account, you can view the list of virtual networks in your account. For a VMware vCenter account, you can view the list of data centers or clusters in the account. For Kubernetes cluster, you can view the number of pods in the cluster.
Select a virtual network to view the workloads under that virtual network.
Select a data center or cluster to view the list of hypervisors in it. Select a hypervisor to view the list of workloads in the hypervisor.
If you select the VM, you can view the security status, management status, and system properties for that VM.
If you have any VMs which aren't grouped under any VPC, they are placed under Ungrouped VMs for AWS instances.
You can check if the VM is managed, and install Trellix Agent on your unmanaged VMs.
You can check if the network assessment policies are assigned to the pods. You can view issues, product, labels, name, status, and namespace associate with a pod using the filters.
The Network Security pane lists the Trellix Intrusion Prevention System Manager accounts registered in Trellix ePO - On-prem.
Note: You must install Trellix License extension to register the Manager account.
Viewing information about Compliance Events
You can view if any anti-malware policies assigned to your instances. Several Trellix managed products are deployed in Trellix CWS to detect compliance events.
Viewing information about Threat Prevention
To protect your instances from attacks, make sure that you install and configure the appropriate Trellix anti-malware software like Trellix Endpoint Security (ENS).
Your instance is color-coded and classified according to the anti-malware policy that you set in the Trellix ePO - On-prem Policy Catalog.
When checking for the presence of anti-malware software, the results depend on the cloud environment and operating system. Install Trellix Endpoint Security (ENS) on your Windows instances and Trellix Endpoint Security (ENS) for Linux on your Linux instances.
Depending on the Threat Prevention products installed, you can view these product properties.
Product | Properties |
|---|---|
Trellix Endpoint Security (ENS) for Windows | On-Access General Access Protection Exploit Prevention DAT |
Trellix Endpoint Security (ENS) for Linux | On-Access General On-Access ScriptScan DAT |
You can:
See if any properties are enabled or disabled. For details, see the product guides for the anti-malware products.
Install Trellix Endpoint Security (ENS) on your instances.
Tag this system with the Trellix ePO - On-prem tags related to product deployment tasks. See the product guide for your version of Trellix ePO - On-prem.
Note: All Threat Prevention properties should be enabled, and DAT should not be older than 7 days. If the DAT for any workload is older than 7 days, then the Threat Prevention status is noncompliant.
Viewing information about Application Control software
Install Application Control to protect your system from unauthorized applications.
Your instance is color-coded and classified according to the policy that you set in the Trellix ePO - On-prem Policy Catalog. You can see if Application Control is installed and enabled on the instance. For details, see the product guide for Application Control.
Viewing information about Policy Auditor
Trellix® Policy Auditor software automates security audit processes and helps you report consistently and accurately against internal and external policies.
With Policy Auditor, Trellix CWS assesses workloads based on the policies settings and provide compliance alerts. Policy Auditor has three benchmarks:
Baseline configuration
Patches
Regular benchmark
Trellix CWS performs a series of checks to determine the Policy Auditor compliance of the workloads. An audit is run on workloads to check the benchmarks. For a workload to be Policy Auditor compliant, it must have Policy Auditor Agent installed on it, and it must not have any benchmark failures.
We recommend that you use the Policy Auditor workflow to create an audit, assign it to the VMs, and perform the audit.
A workload is tagged as compliant if it passes all benchmarks in the audit. Any workload which fails to meet the benchmark is tagged as noncompliant.
Note
Policy Auditor performs audit on standard benchmark levels only. To know more about the issue and failed rules, you must look into the Policy Auditor Agent audit results.
Viewing information about Change Control software
Install Change Control file integrity monitoring solution to prevent any changes made in your environment that may lead to a security breach. You can see if your instance has Change Control software installed.
Your instance is color-coded and classified according to the policy that you set in the Trellix ePO - On-prem Policy Catalog.
You can see if Change Control is installed and enabled on the instance. For details, see the product guide for Change Control.
Viewing information about volume encryption
You can view if your AWS volumes encrypted or not. You can view the number of root and data volumes for your instances.
Though both root and data volumes are shown, only data volumes are assessed for your AWS instances.
Your instances are color-coded and classified according to the policy that you set in the Trellix ePO - On-prem Policy Catalog for volume encryption.
You can view these details for your volumes.
Property | Definition |
|---|---|
Status | The encryption status of the volumes. |
Type | The type of the volume (root or data volume). |
ID | The volume ID. |
Assign assessment policy for your workload
Select or create an assessment policy from the Workload Details pane to assign policy to the selected workload.
Log on to Trellix ePO - On-prem as an administrator.
Select Menu → Systems → Cloud Workload Security.
Select Workload Group or Account from the Systems pane, then select any category from the Event list.
Select the workload for which you have to assign the assessment policy.
Select a policy from the Assessment Policy drop-down list.
You can create your own policy or select an existing policy from the Workload Details pane. Click
 next to Policy Catalog to go to the Policy Catalog page to create or select a policy.
Click Save.
Viewing information about Threat Events
You can view threat details of all powered-on instances under the Threat Events pane. Several products are deployed in Trellix CWS to detect threat events.
You can view various blocked internal connections, and the accepted suspicious and malicious external connections to and from your AWS and Azure instances. The internal and external traffic is captured as East-West and North-South traffic respectively. The traffic displayed is the data accumulated for a maximum of seven days.
Note: You must install Trellix License extension to view the traffic details of your cloud accounts. You also need this extension to view Amazon GuardDuty events.
Threat Source | Issues |
|---|---|
Traffic Anomalies Detection |
|
Threat Protection |
|
Adaptive Threat Protection |
|
Network Intrusion Prevention | Network Prevention Alerts |
Amazon Web Services | GuardDuty events |
Application Control | Application Control Events |
Change Control | Change Control Events |
Traffic discovery
After you register your cloud accounts, you can discover traffic details for your instances. You must set the required permission and rules for your AWS account and Microsoft Azure account to enable network traffic flow logs at VPC levels and to discover Network Security Group traffic discovery respectively. These policies and rules allow Trellix CWS to discover network traffic logs.
Traffic assessment
Trellix GTI — Detects malicious and suspicious North-South connections. Trellix CWS performs IP/connection reputation to determine the severity of the risk. The malicious and suspicious connections are categorized to high and medium risks, and color-coded in red and yellow respectively.
Risk port assessment — Identifies the ports with security risks based on the firewall policies. Your connections are classified into malicious and suspicious connections based on risk port assessment.
For example, the port 3389 is identified as a risk port based on firewall (security group) policies. A North-South inbound traffic trying to approach your workload through port 3389 is assessed as a malicious connection.
You can set the safe and critical ports in your firewall (security group) policy for to remediate workloads. The corrective actions such as firewall (security group) remediation or Trellix CWS firewall policy update removes the corresponding threat events.
Network prevention alerts — You can view the network prevention alerts for your instances from your registered Trellix IPS Manager account.
Note
When you enable traffic discovery for your Azure account, Trellix CWS creates storage accounts for each geographical location. You can only create 200 storage accounts for one subscription. Azure traffic sync fails if the storage account number exceeds 200 per subscription. You are charged when a storage account is created. For more information about the pricing, see Azure pricing for storage accounts.
Note
For every traffic synchronization, Trellix CWS discovers only 8000 records per region with a maximum of 50 traffic records for one Network Interface.
Amazon GuardDuty
Amazon GuardDuty is a threat detection service that continuously monitors for malicious or unauthorized behavior. You can view GuardDuty events which include network connections, port probes, and DNS requests for EC2 instances on the Trellix CWS console. IAM related events are not captured. The GuardDuty events which are categorized as low and medium events in the AWS console, are both categorized as medium severity events in Trellix CWS console. Network Connection GuardDuty events are mapped in the traffic graph if the corresponding traffic is discovered.
To handle the GuardDuty events from Trellix CWS console:
Make sure your instances have Threat Prevention installed, enabled and that they have latest DAT updates.
Shut down the compromised instances using event details card.
Change your security groups so that they have least permissive rules.
For information about how to act on GuardDuty events, see AWS documentation.
Note
You must enable GuardDuty on your Amazon Web Services management console to view GuardDuty events in the Trellix CWS console.
Note
GuardDuty is not supported for AWS China region.
Application Control Events
Application Control protects your system from unauthorized applications. You can view Application Control events on the Trellix CWS console.
Change Control Events
Change Control File Integrity Monitoring (FIM) prevents any change made in your environment that might lead to a security breach. You can view Change Control events on the Trellix CWS console.
Viewing traffic flow logs
Click the Graph button to view the graphical representation of traffic for your instances. You can view the East-West and North-South traffic on your workload using the filters present in the Traffic pane.
The Trellix CWS traffic card has filters to view the flow logs based on time intervals. The traffic card has filters to display inbound traffic, outbound traffic, and blocked connections. Inbound connections are traffic flowing towards the workload whereas, outbound connections are traffic flowing from the workload. Blocked connections are blocked inbound and outbound connections.
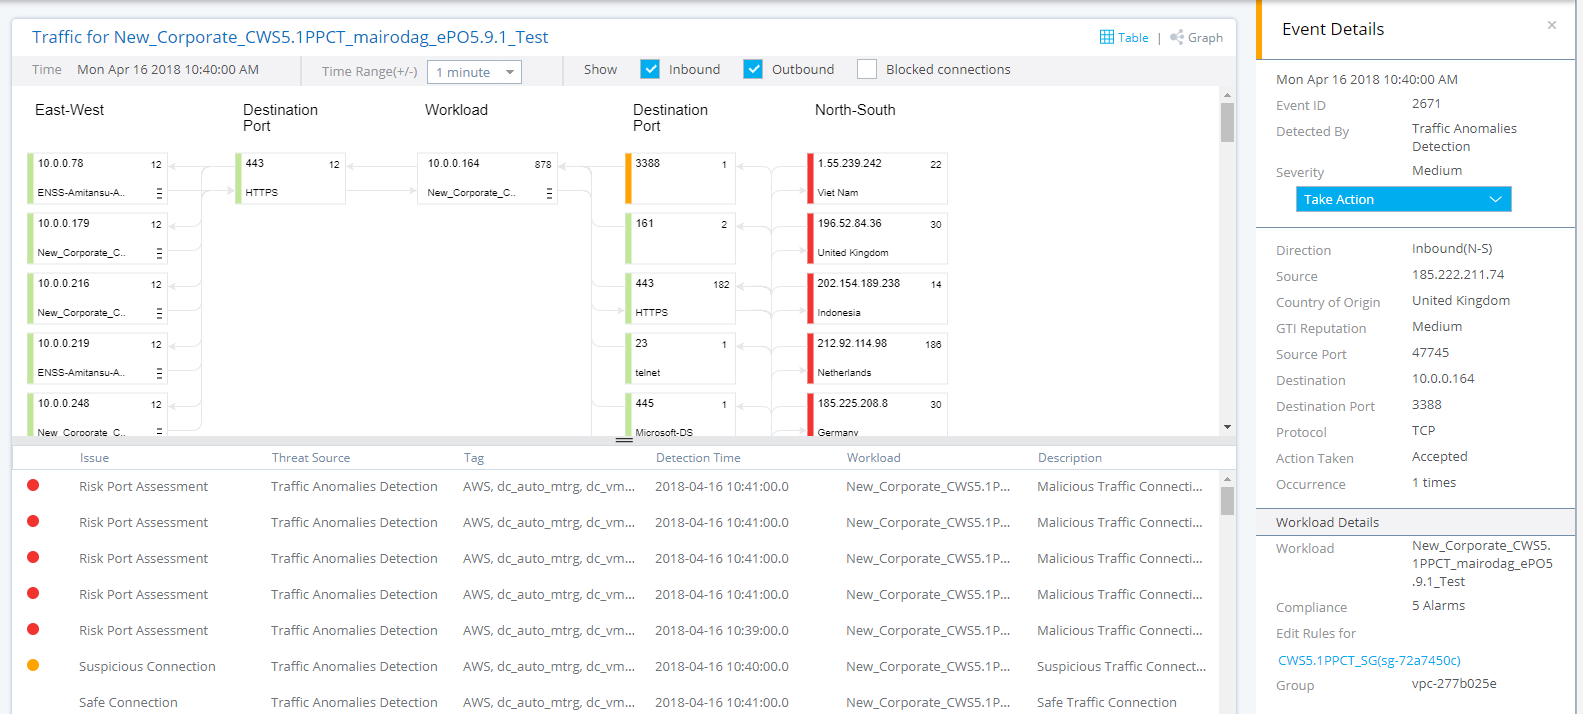
Time — Displays the date and time of occurrence of the selected event.
Time Range(+/-) — Filters the issues based on time intervals.
1 minute — Filter issues occurred a minute before and after the time of occurrence of the selected event.
5 minutes — Filter issues occurred 5 minutes before and after the time of occurrence of the selected event.
15 minutes — Filter issues occurred 15 minutes before and after the time of occurrence of the selected event.
30 minutes — Filter issues occurred 20 minutes before and after the time of occurrence of the selected event.
Show — Filter inbound, outbound, and blocked connections based on traffic flow.
Note
By default, the inbound and outbound connections are selected.
In addition to the filters, you can view the direction of traffic flow by selecting any issue under the Traffic pane. The direction of flow is highlighted for the selected issue.
You can view information about the security groups associated with your instance by selecting the Show Security Groups option from the menu in the Workload block. You can shut down your workload as a remediation measure by selecting the Shut Down Workload option from the menu in the Workload block.
The Table button will take you back to the instance details.
Viewing information about pods
You can view if the network assessment policies are assigned to your pods. Container Firewall is deployed in Trellix CWS to discover issues.
You can view information about the issues associated with your pods using these filters. You can also narrow down the search results by searching specific labels in the search bar.
Issue — The number of issues.
Product — The name of the product that discovers the issues. Container Firewall detects the pods which doesn't have network assessment policies associated with them.
Labels — The name of the label associated with the pod.
Pod Name — The name of the pod.
Pod Status — Displays whether the pod is turned on or not.
Namespace — Displays the namespace details of the pod.
View information about Security Groups
You can view all security groups associated with your instances. Based on the enterprise rules set, the security group status is either red or yellow.
Select an instance from the Compliance Events or Threat Events pane to view more information about the security groups under Workload Details or Event Details respectively.
Log on to Trellix ePO - On-prem as an administrator.
Select Menu → Systems → Cloud Workload Security.
Select your workload from Systems.
Select an instance from the instance list under Compliance Events.
Select an instance from the instance list under Threat Events.
To view more information of your security groups.
For instances under Compliance Events, select Show Security Groups from the Take Action combo box.
For instances under Threat Events:
Click Graph.
Click the menu icon in the Workload block.
Select Show Security Groups.
Security Groups
Property | Definition |
|---|---|
Security Groups | Displays the name of the security or network security group. |
ID | Displays the ID of the security or network security group. |
Association | Displays the number of instances associated with this security group or the network security group. |
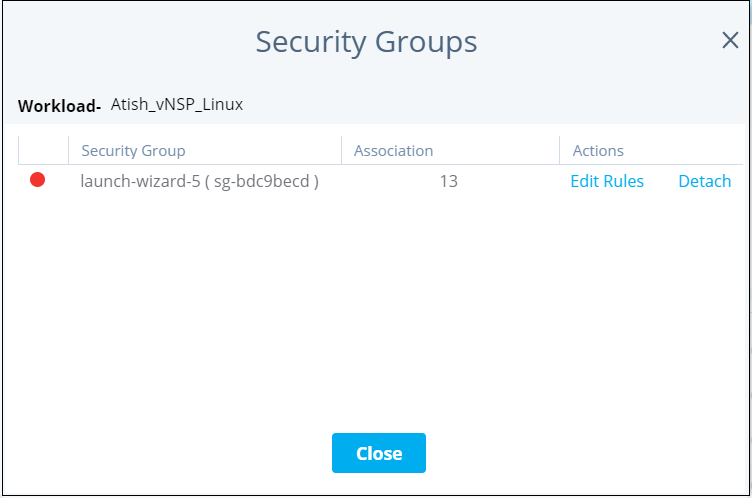
Note
Some VMs in Microsoft Azure accounts might not be associated with any security groups.
Click Edit Rules or double-click the security group to view the rules in each security group.
For threat events, you can edit the security group rules by clicking the workload name under Edit Inbound Rules for under the Event Details.
Automatic responses
Configure your Trellix ePO - On-prem server to trigger an action in response to critical or warning issues.
Set automatic responses from Menu → Automation → Automatic Responses if you want a notification sent to you.
The standard templates for Cloud Workload Security are:
Noncompliant critical workloads for AWS and Azure
Noncompliant warning workloads for AWS and Azure
Noncompliant critical workloads for vSphere
Noncompliant warning workloads for vSphere
You can set up responses for other events also as needed.
Set up automatic responses
Configure Trellix ePO - On-prem server to receive automatic responses through email.
Specify the SMTP server name and the SMTP server port in Email Server from Menu → Configuration → Server Settings.
For details about automatic responses and specifying the email server, see the product guide for your version of Trellix ePO - On-prem.
Click Menu → Automation → Automatic Responses.
Select Preset as Cloud Workload Security.
Click New Response or click Edit next to an existing template.
On the Description page, type a unique name and any notes for the rule, if you are creating a template.
In the Event field, select:
Event Group — Cloud Workload Security
Event Type — Critical Issues or Warning Issues
Click Next.
On the Filter page, select:
Account Name — Filter the cloud account name.
Datacenter — Filter the datacenter name. This is applicable for vSphere.
ePO Tags — Filter Trellix ePO - On-prem tags assigned to instances.
Instance ID — Filter AWS or Azure workload ID.
Issue Subtype — Select any option from the drop-down list.
Issue Type — Select any option from the drop-down list.
Platform — Filter the operating system running on the instance.
Region — Filter the region. Type the name of the region or the location of the instance. For example, if you want instances in the ap-southeast-1 location, type ap-southeast-1/Asia Pacific (Singapore).
UUID — Filter UUID of the vSphere workload.
Vendor Type — Filter the cloud service provider. Type AWS, Azure, or vSphere.
Click Next.
Define when the event triggers the rule on the Aggregation page. For details, see Set thresholds for the rule in the Trellix ePolicy Orchestrator - On-prem Product Guide.
Click Next.
On the Actions page, compose the email and select the recipients. For details, see Configure the action for Automatic Response rules in the Trellix ePolicy Orchestrator - On-prem Product Guide.
On the Summary page, verify the information, then click Save.
Results
The new response template for Cloud Workload Security appears in the Automatic Responses list.
Manage responses to trigger actions for threat events
You can set up an automatic response in Trellix ePO - On-prem that is triggered for every ENS/ENSL event. This response updates the threat count in the Cloud Workload Security console. The threat count displays the number of threat instances discovered in the last 7 days. The threat instances are categorized based on the virtual private cloud on the Workload Group List. The threat instance details of the selected workload group appears in the Workload Groups Overview pane.
Before you begin
You installed the Cloud Workload Security extension on Trellix ePO - On-prem. You downloaded the Rule_ThreatEventTriggerforENS_ENSL file.
By default, the threat event response for ENS/ENSL is configured. The administrator can configure the automatic responses, if it is configured incorrectly.
Task
Select Menu → Automation → Automatic Responses.
Click Import Response.
Click Choose File on the Automatic Responses page.
Select Rule_ThreatEventTriggerforENS_ENSL and click OK.
Click Enable Response in the Import Response Details dialog box, then click OK.
The new response template for ePO Notification Events appears in the Automatic Responses list.
Note: The previous threat event response also appear in the Automatic Responses list. You must disable or delete the duplicate response.
6. To disable or delete a response:
Select the response
Click Actions drop-down list
Select Disable Responses to disable the response
Select Delete Responses to delete the response
Remediation
After viewing the details of your cloud accounts, and seeing which systems are at risk, activate missing protection by installing Trellix products and correcting firewall settings.
You can manage your instances by installing Trellix Agent. You can install other Trellix products after installing Trellix Agent.
Install Trellix Agent on your instances
To manage your unmanaged instances with Trellix ePO - On-prem, install Trellix Agent.
Log on to Trellix ePO - On-prem as an administrator.
Select Menu → Systems → Cloud Workload Security.
Select your workload from Systems pane, then select an instance from the instance list under Compliance Events.
Select Install Trellix Agent from the Take Action combo box.
See KB85233 for details to install Trellix Agent on your instances using deployment URL.
Do one of the following:
Enter the logon credentials, then click Install.
Run the deployment Script.
You can see the installation status on the Systems page. If your Trellix ePO - On-prem server doesn't receive installation status, it times out after 60 minutes.
Installing Threat Prevention
Protect your instance by installing appropriate Trellix anti-malware software based on your operating system and cloud environment.
You can install Endpoint Security on your Windows instances and Endpoint Security for Linux on your Linux instances.
Install Trellix Endpoint Security (ENS)
Protect your instance by installing Trellix ENS or Trellix ENS for Linux.
Before you begin
Install Trellix Agent on your unmanaged instances to manage them with Trellix ePO - On-prem.
Important
You cannot install Trellix ENS from Cloud Workload Security if Host Intrusion Prevention or Trellix MOVE AntiVirus is installed on your instances. If Host Intrusion Prevention and Trellix ENS are installed, Cloud Workload Security checks for the presence of Trellix ENS and its properties.
Note
Trellix CWS supports Trellix ENS for Linux 5.5.1 only.
Task
Log on to Trellix ePO - On-prem as an administrator.
Select Menu → Systems → Cloud Workload Security.
Select your workload from the Systems pane, then select an instance from the systems list under Compliance Events.
Select Install Threat Prevention from the Take Action combo box, then click Install.
Results
Trellix ENS is installed on Windows Workloads, and Trellix ENS for Linux is installed on Linux workloads.
You can see the installation status on the Systems page. If your Trellix ePO - On-prem server doesn't receive installation status, it is timed out after 60 minutes.
Install Application Control on your instances
Protect your instance by installing Trellix Application Control.
Before you begin
Install Trellix Agent on your unmanaged instances to manage them with Trellix ePO - On-prem.
Make sure you have the appropriate license before installing this product.
See the product guide for Application Control before installing this product.
Task
Log on to Trellix ePO - On-prem as an administrator.
Select Menu → Systems → Cloud Workload Security.
Select your workload from the Systems pane, then select an instance from the systems list under Compliance Events.
Select Install Application Control from the Take Action combo box, then click Install.
Results
You can see the installation status on the Systems page. If your Trellix ePO - On-prem server doesn't receive installation status, it times out after 60 minutes.
What to do next
Application Control is activated in Observe Mode for your windows workloads.
The Windows workloads aren't restarted and all features except Memory Protection are available. Memory protection is available after restarting your instance.
Install Policy Auditor on your instances
Policy Auditor automates security audit processes and helps you report consistently and accurately against internal and external policies.
Before you begin
Ensure that these conditions are met:
Trellix CWS General assessment policy for Policy Auditor is set as Optional.
You installed Trellix Agent on your unmanaged instances to manage them with Trellix ePO - On-prem.
You have the appropriate license before installing this product.
You have a compatible Policy Auditor version.
Trellix CWS supports Policy Auditor 6.3 version. See the product guide for Policy Auditor before installing this product.
Task
Log on to Trellix ePO - On-prem as an administrator.
Select Menu → Systems → Cloud Workload Security.
Select your workload from the Systems pane, then select an instance from the systems list under Compliance Events.
Click Install Policy Auditor from the Take Action combo box, then click Install.
You can see the installation status on the Systems page. If your Trellix ePO - On-prem server doesn't receive installation status, it times out after 60 minutes.
Install Change Control
Protect your instance by installing Trellix Change Control.
Before you begin
Install Trellix Agent on your unmanaged instances to manage them with Trellix ePO - On-prem.
Make sure that you have appropriate license before installing this product.
See the product guide for Trellix Change Control before installing this product.
Task
Log on to Trellix ePolicy Orchestrator - On-prem as an administrator.
Select Menu → Systems → Cloud Workload Security.
Select your workload from the Systems pane, then select an instance from the systems list under Compliance Events.
Select Install Change Control (FIM) from the Take Action combo box, then click Install.
Results
You can see the installation status on the Systems page. If your Trellix ePO - On-prem server doesn't receive installation status, it times out after 60 minutes.
Install Network Intrusion Prevention System on your instances
Protect your instances from sophisticated threats by installing Network Intrusion Prevention.
Before you begin
Install Trellix Agent on your unmanaged instances to manage them with Trellix ePO - On-prem.
Make sure you have the appropriate license before installing this product.
Make sure that the Trellix IPS Manager server details are registered under Accounts → Network security.
Make sure that the vNSP prerequisites like controller and cluster are deployed for the VPC and subnet of the selected instance.
See the product guide for Trellix Intrusion Prevention System before installing this product.
Task
Log on to Trellix ePO - On-prem as an administrator.
Select Menu → Systems → Cloud Workload Security.
Select your workload from the Systems pane, then select an instance from the systems list under Compliance Events.
Select Install Network IPS from the Take Action combo box, then click Install.
Results
You can see the installation status on the Systems page. If your Trellix ePO - On-prem server doesn't receive installation status, it times out after 60 minutes.
Install Adaptive Threat Protection on your instances
Adaptive Threat Protection analyzes content from your enterprise and decides what to do based on file reputation, rules, and reputation thresholds.
Before you begin
Install Adaptive Threat Protection policies to configure queries, reports, and dashboards to monitor threat activity within your environment.
Install Trellix Agent on your unmanaged instances to manage them with Trellix ePO - On-prem.
Make sure you have the appropriate license before installing this product.
See the product guide for Adaptive Threat Protection before installing this product.
Task
Log on to Trellix ePO - On-prem as an administrator.
Select Menu → Systems → Cloud Workload Security.
Select your workload from the Systems pane, then select an instance from the instance list under Compliance Events.
Select Install Adaptive Threat Protection from the Take Action combo box, then click Install.
Note: The Adaptive Threat Protection module is supported on Windows systems only.
You can see the installation status on the Systems page. If your Trellix ePO - On-prem server doesn't receive installation status, it times out after 60 minutes.
Quarantine workload
You can stop the infected workload from spreading malware to other workloads by quarantining the affected workload.
You can quarantine only AWS and Azure workloads.
Log on to Trellix ePO - On-prem as an administrator.
Select Menu → Systems → Cloud Workload Security.
Select your workload from the Systems pane, then select an instance.
Quarantine the malicious workload using these three methods.
Select an instance under Compliance Events, then select Quarantine Workload from the Take Action combo box.
Select an instance under Threat Events, then select Quarantine Workload from the Take Action combo box in the Event Details pane.
Click Graph, then select Quarantine Workload from the menu in the Workload block.
Click OK.
Note
You can release the quarantined workload by changing the security group rules manually. When you quarantine a workload, a new security group, Trellix_CWS_Quarantine is created. Trellix_CWS_Quarantine replaces the existing security group, and allows only RDP on windows and SSH on Linux. The source IP address is set to 1.1.1.1/32 by default. You must replace this IP address with your IP address manually. In the AWS console, you must change the security group from Trellix_CWS_Quarantine to your security group to access the workload.
Remediate firewall rules
To protect and secure your cloud instances that are classified as red, correct the firewall rules.
You can correct the firewall settings from Policy Catalog: See Where to find policies.
Task
Select Menu → Systems → Cloud Workload Security.
Select your workload from Systems.
Select an instance from the instance list under Compliance Events.
Select an instance from the instance list under Threat Events.
To view more information of your security groups.
For instances under Compliance Events, select Show Security Groups from the Take Action combo box.
For instances under Threat Events:
Click Graph.
Click the menu icon in the Workload block.
Select Show Security Groups.
Click Edit Rules or double-click the security group to view and correct the firewall rules in each security group.
Edit or add new rules and click Apply Changes.
Edit the security group rules
Change the rules in your security group policy and secure your critical instances.
Log on to Trellix ePO - On-prem as an administrator.
Select the critical system and its security group policy from:
Select Menu → Systems → Cloud Workload Security.
Select your workload from the Systems pane.
Select an instance from the instance list under Compliance Events.
Select an instance from the instance list under Threat Events.
To view more information of your security groups:
For instances under Compliance Events, select Show Security Groups from the Take Action combo box.
For instances under Threat Events:
Click Graph.
Click the menu icon in the Workload block.
Select Show Security Groups.
A red dot highlights the noncompliant rules.
Click Edit Rules or double-click the security group to view the rules in each security group.
For threat events, you can edit the security group rules by clicking on the workload name under Edit Inbound Rules for under the Event Details.
Changes made to the security group will be applied to all other instances that are associated with the security group. Make sure that you review other server instances that are associated with the security group.
Edit the security group rules by changing Type, Protocol, Port range, or Source. For Microsoft Azure instances, you cannot edit rules that have Access as Deny.
While editing Source, you can choose Anywhere to allow connections from all traffic or Custom IP to provide an IP address that you want to allow. For AWS instances, you can also provide the security group for which you want to allow traffic.
To add a rule, select Add New Rule and type in the values.
To delete a non-compliant rule, click the delete icon.
Click Apply Changes.
You can see the action details for edit, delete, update, or add in Menu → User Management → Audit Log.
Detach the security group from an instance
To secure your critical systems, remove the association of the security group to your AWS instance.
If your workload has only one security group associated with it, you can't detach it.
A security group which is associated with this workload can also be associated with many NICs.
You can't detach a security group if it is the only security group associated with a NIC.
You can detach a security group only from your AWS instances.
Task
Log on to Trellix ePO - On-prem as an administrator.
Select the critical system and its security group policy from:
Select Menu → Systems → Cloud Workload Security.
Select your workload from the Systems pane.
Select an instance from the instance list under Compliance Events
Select an instance from the instance list under Threat Events.
To view security groups:
For instances under Compliance Events, select Show Security Groups from the Take Action combo box.
For instances under Threat Events:
Click Graph.
Click the menu icon in the Workload block.
Select Show Security Groups.
Select one of them and click Detach to detach the security group policy from this instance.
A red dot highlights the noncompliant rules.
Results
You can see the detach failure or success details in the Detached Status window.
Shut down workload
The malicious East-West traffic trying to approach your workload creates security risk. As a remediation measure, you can shut down the affected workload.
You can shut down AWS and Microsoft Azure instances only.
Task
Log on to Trellix ePO - On-prem as an administrator.
Select Menu → Systems → Cloud Workload Security.
Select your workload from the Systems pane, then select an instance.
Shut down the workload using these three methods.
Select an instance under Compliance Events, then select Shut Down Workload from the Take Action combo box.
Select an instance under Threat Events, then click the Shut Down Workload button in the Event Details pane.
Click Graph, then select Shut Down Workload from the menu in the Workload block.
You can shut down only one workload at a time.
Click OK.
The shut down workloads and the corresponding events will not be displayed in the Trellix CWS console.
Tag workloads
Tag your instances with Trellix ePO - On-prem tags related to product deployment tasks. You can create auto tags for your instances based on account name and platform. You can also bulk tag selected instances.
Log on to Trellix ePO - On-prem as an administrator.
Select Menu → Systems → Cloud Workload Security.
Select your workload from the Systems pane, then select an instance or multiple instances from the instance list under Compliance Events.
Select Tag from the Take Action combo box.
Enter a tag name and click Add.
Click Save.
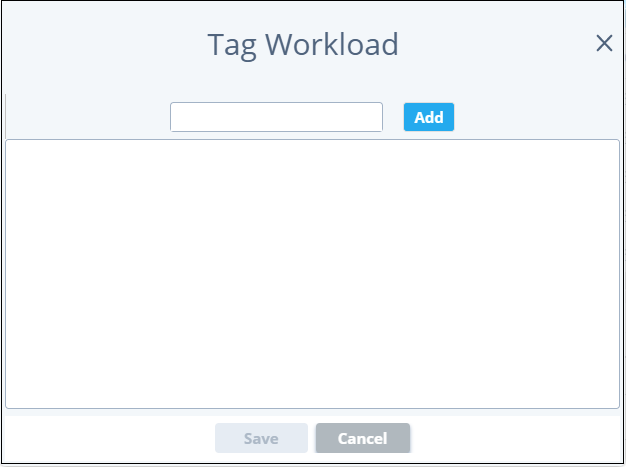
You can see the tag details of your instances on the Workload Details pane.
Update DAT
The DAT non-compliant instances can be remediated by updating DAT. You can view the status of DAT update in the Workload
Details pane.
Log on to Trellix ePO - On-prem as an administrator.
Select Menu → Systems → Cloud Workload Security.
Select your workload from the Systems pane, then select an instance.
Select Update DAT from the Take Action combo box.
Click OK.
Run on-demand scan
On-demand scan is a manual scan that actively scans your workloads when prompted.
Log on to Trellix ePO - On-prem as an administrator.
Select Menu → Systems → Cloud Workload Security.
Select your workload from the Systems pane.
Select an instance under Threat Events, then select Take Action → Run On-Demand Scan in the Event Details pane.
Click OK.
Assign network policies for pods
Network policies define how pods are allowed to communicate with each other, and other network endpoints. Network policy resources use labels to define rules to allow or deny traffic to the selected pod.
Before you begin
Ensure that these conditions are met:
Make sure that you have appropriate license extensions.
You have deployed Trellix pod.
You have registered your Kubernetes cluster on the Trellix CWS console.
Set Trellix CWS Container assessment policy for Kubernetes to Must Have.
For information about Kubernetes network policy, see https://kubernetes.io/docs/concepts/services-networking/network-policies/.
Task
Log on to Trellix ePO - On-prem as an administrator.
Select Menu → Systems → Cloud Workload Security.
Click Compliance events in the summary card pod section.
Select an issue from the issue browser.
Click Take Action and select Assign Network Policy.
Select a pod label for which you want to assign the policy.
Click Add Rule to apply rules for the selected pod.
You can allow or deny any IP address, namespace selector, or pod selector to communicate with the selected pod.
Click Apply.
Quarantine pods
You can isolate a pod from other pods by quarantining the pod.
Log on to Trellix ePO - On-prem as an administrator.
Select Menu → Systems → Cloud Workload Security.
Click Compliance events in summary card pod section.
Select an issue from the issue browser.
Click Take Action and select Quarantine Pod.
Click Ok.
Assign Network Policy and Quarantine Pod options are disabled for quarantined pods.
To restore a quarantined pod, click Take Action → Restore.
Sync public cloud tags with Trellix ePO - On-prem
You can import the user-defined AWS and Microsoft Azure tags assigned to the cloud instances with Trellix ePO - On-prem during cloud account registration.
Before you begin
Ensure that these conditions are met:
You have AWS or Microsoft Azure accounts and their details ready.
You have permissions to use Trellix CWS.
You have the list of tags assigned to your instance in AWS or Microsoft Azure cloud.
You have installed the Trellix CWS extension on Trellix ePO - On-prem.
Your Trellix ePO - On-prem system date and time are synchronized with the current date and time.
Task
Log on to the Trellix ePO - On-prem server as an administrator.
Select Menu → Systems → Cloud Workload Security to open the Trellix CWS console.
From the Accounts pane, click Add Account to open the Registered Cloud Account pane.
Select Amazon Web Services or Microsoft Azure from the drop-down list, and type the required details.
Click Validate to validate the cloud account.
Click the Add button under Import Cloud Tags to add the public cloud tags to your workload.
Note
The Add button is enabled after cloud account validation.
In the Import Cloud Tags window, type the tag names assigned to your instances in the AWS or Microsoft Azure cloud consoles and click Add.
Click Save.
The imported tags appear against Cloud Tags under the Account Details section after successful sync.
Queries and reports
With Cloud Workload Security, you can quickly generate a summary view of all registered datacenters.
The predefined queries and dashboards provide out of the box functionality, because they are added to your Trellix ePO - On-prem server when the software is installed. You can configure these queries to display results in charts or tables, which you can use as dashboard monitors. Query results can be exported to several formats, which you can download or send as an attachment to an email message.
You can view the list of predefined queries for the datacenters from Queries and reports → Trellix Groups → Data Center.
You can view the list of predefined queries for the public cloud accounts from Queries and reports → Trellix Groups → Public Cloud.
Predefined queries
You can use predefined queries as is, edit them, or create queries from events and properties stored in the Trellix ePO - On-prem database.
To create custom queries, your assigned permission set must include the ability to create and edit private queries.
Data center provides these predefined queries.
Query | Definition |
|---|---|
Anti-Malware Status | Specifies whether the system is in one of these states:
|
Application Reputation | Categorizes the applications based on Trellix GTI file reputation:
For details about file reputation, see the product documentation for Application Control. |
AV Protection by Product | Displays the anti-virus protection status of Trellix products. |
Security Incidents (last 14 days) | Displays the events reported for these components on the VMs in the last 14 days.
|
Data Centers | Displays all registered data centers. |
File Integrity Monitoring Status | Displays the number of VMs with FIM installed and enabled. For details about FIM, see the product documentation for Change Control. |
Host Firewall Status | Specifies whether the system is in one of these states:
|
OS Distribution | The OS Type shows the template value selected while creating the VMs. But, it might not be the actual operating system installed on the VM. |
Usage Metering Report | Displays the usage of cloud accounts in number of hours per month.
|
Endpoint Scan Report | Displays the details of the last scan of the endpoints.
|
Endpoint Security Report | Displays the protection status of the endpoints.
|
Instance Assessment Status | The number of instances that are classified as critical and the number of instances that are classified as warning. |
Data Protection per Cloud VM | The number of VMs that are encrypted and not encrypted. |
View default queries
To generate reports based on datacenter components, run the predefined queries .
Log on to the Trellix ePO - On-prem server as an administrator.
Select Menu → Reporting → Queries & Reports.
From the Groups pane, select Data Center to display the queries for the selected group. Reports are grouped under Trellix Groups.
From the Queries list, select a query, then click Run.
In the query results page, click any item in the results to drill down.
Click Close when finished.
Create custom queries
You can create custom queries that retrieve and display the details related to the Usage Metering Report and network traffic reports. With this wizard, you can configure which data is retrieved and displayed, and how it is displayed.
Make sure that you have administrator rights to perform this task.
Log on to the Trellix ePO - On-prem server as an administrator.
Select Menu → Reporting → Queries & Reports, then click Actions → New to open the Query Builder wizard.
To view Usage Metering records, select Public Cloud on the Feature Group list and on the Result Type page, select Usage Metering records, then click Next.
To view network traffic reports for your AWS instances, select Data Center on the Feature Group list, and on the Result Type page, select Amazon Network Traffic Logs, then click Next.
Select the type of chart or table to display the primary results of the query, then click Next to open the Columns page. If you select Boolean Pie Chart, you must configure the criteria to include in the query.
Select the columns to include in the query, then click Next to open the Filter page.
If you had selected Table on the Chart page, the columns you select here are the columns of that table. Otherwise, these are the columns that make up the query details table.
Select properties to narrow the search results, then click Run.
The Unsaved Query page displays the results of the query, which is actionable. You can take any available actions on items in any tables or drill-down tables. Selected properties appear in the content pane with operators that can specify criteria to narrow the data that is returned for that property.
If the query doesn't return the expected results, click Edit Query to go back to the Query Builder and edit the details of this query.
If you don't want to save the query, click Close.
If this is a query you want to use again, click Save and continue to the next step.
On the Save Query page, type a name for the query, add any notes, and select one of these options:
New Group — Type the new group name and select whether the group is private or public.
Existing Group — Select the group from the list of Shared Groups.
Click Save.
Dashboards and monitors
Dashboards, which are made up of monitors, help you track key metrics from all data center products.
Reports are grouped under Trellix Dashboards at Menu → Queries and reports → Groups.
The Data Center dashboard displays a collection of monitors based on the results of the default datacenter queries.
The Public Cloud dashboard displays the collection of monitors for default public cloud account queries.
The data in these monitors on the dashboard is refreshed every 15 minutes.
The default monitors that appear under these dashboards are:
Data Centers — Displays all registered datacenters.
OS Distribution — Displays the operating system type. It shows the template value selected while creating the VMs. But, it might not be the actual operating system installed on the VM.
Security Incidents (last 14 days) — Specifies events reported for these components on the VMs in the last 14 days.
Application Control
Antivirus
Firewall
Memory Protection
Anti-Malware Status — Displays the state of the VM.
Application Control Enabled — These VMs have Trellix Application Control installed and enabled.
Only Anti-Virus Enabled — These VMs have a Trellix anti-virus product installed and enabled.
Unprotected — These VMs don't have any Trellix anti-malware product enabled.
Host Firewall Status — Displays the state of the system.
Firewall Enabled — These VMs have Host Intrusion Prevention installed.
Not in use — These VMs don't have Host Intrusion Prevention installed.
File Integrity Monitoring Status — Displays the number of VMs with File Integrity Monitoring (FIM) installed and enabled.
Enabled — File Integrity Monitoring is enabled on these VMs.
Not enabled — File Integrity Monitoring is disabled on these VMs.
Not installed — File Integrity Monitoring isn't installed on these VMs.
Instance Assessment status — Displays the number of instances that are classified as critical and the number that are classified as warning.
Data protection per Cloud VM — Displays the number of VMs that are encrypted versus the number of VMs that aren't encrypted.
Encrypted — These VMs are encrypted.
Not Encrypted — These VMs aren't encrypted.
Usage Metering Report — Displays the usage of running AWS and Microsoft Azure cloud instances, in number of hours per month.
You can see how many hours are used by your single core, dual core, and your quad-core instances for every month.
Application Reputation — Categorizes the applications based on Trellix Global Threat Intelligence file reputation.
Good
Bad
Unclassified
Note
This dashboard retrieves data from the Trellix Application Control extension.
For details about file reputation, see the product documentation for Trellix Application Control.
Endpoint Scan Report — Displays the last scan details of the endpoints. This report is run every eight hours.
Endpoint — The name of the endpoint.
IP Address — The IP address of the endpoint.
Category — The group/resource pool/host of the endpoint.
Operating System — Displays operating system details.
Last Scan — Displays the last on-demand scan time for an endpoint with different anti-virus software.
Endpoint Security Report — Displays the protection status of the endpoints. This report is run every eight hours.
Endpoint — The name of the endpoint.
IP Address — The IP address of the endpoint.
Virtual — Specifies whether the endpoint is a virtual system.
VM Classification — Specifies if the VM is a part of public (Cloud Machine) or private (Virtual Machine) cloud.
Vendor — The name of the cloud service provider of the endpoint.
Power Status — Specifies the power status of the endpoint.
Category — The group/resource pool/host of the endpoint.
Operating System — The operating system details.
AntiVirus/Antimalware — The name of the Trellix anti-virus and anti-malware software that is installed on the endpoint.
Firewall — The name of the Trellix software with the firewall protection active on the endpoint.
Whitelisting — Specifies whether the whitelisting feature is enabled.
Access Protection — The name of the Trellix software that provides access protection.
Memory Protection — The name of the Trellix software that provides memory protection.
Last Communication — The time details of the last server-client communication.
Best Practice: To get accurate data in this report, first run the Data Center: Compute Endpoint Reports server task from Menu → Automation → Server Tasks.
How Trellix ePO - On-prem server and clients communicate
Trellix ePO - On-prem is deployed on-premise or in the cloud.
Trellix ePO - On-prem communicates with client systems across networks in these ways:
Client-initiated communication — Trellix Agent is installed on each client system. It periodically connects to the Trellix ePO - On-prem server to check for updates such as new policy information, assigned tasks, and product updates. For client systems to connect to Trellix ePO - On-prem:
Client systems must have outbound access to Trellix ePO - On-prem.
Trellix ePO - On-prem server must have inbound access on TCP ports 80 and 443.
Note: TCP ports 80 and 443 are the default ports used for communication between Trellix ePO - On-prem and the Trellix Agent. You can change the ports while installing Trellix ePO - On-prem.
Trellix ePO - On-prem server-initiated communication — Trellix ePO - On-prem can wake up and force client systems to pull down the latest security content. For Trellix ePO - On-prem to connect to the client systems:
Trellix ePO - On-prem must have outbound access to client systems.
Client instances must have inbound access on port 8081.
Note
The AWS Security Group must allow this communication. For details about port requirements, see KB66797.
Managing and remediating workloads using Chef
The cookbook allows installation and management of Trellix Agent, Trellix ENS for Windows and Linux, and Adaptive Threat Protection. It creates and assigns tags to systems after product installation. To manage workload/node on Trellix ePO - On-prem using Chef, you must configure Chef server and node, and define the attributes.
Prerequisites
Configure chef server and workstation, and bootstrap the node to the server where Trellix products are to be installed. For more information, see https://docs.chef.io/.
Check-in Cloud Workload Security 5.2.0 in Trellix ePO - On-prem, and register AWS or Azure cloud accounts.
Check-in Trellix Agent 5.0.5 or later.
Check-in Trellix ENS package.
Chef workstation settings
Download the cookbook from the external repository, and configure the chef attributes in the attributes/default.rb attributes file.
The recipe cook book requires a connection to Trellix ePO - On-prem to install the security products. Hence, the Trellix ePO - On-prem credentials needs to be encrypted in the recipe cook book. To encrypt the Trellix ePO - On-prem credentials, run the ruby EncryptPassword.rb USERNAME PASSWORD command.
You need to have Ruby installed in your chef workstation to run this command.
Attributes for cookbook
Attribute | Description |
|---|---|
default[:epo][:address] | The Trellix ePO - On-prem IP address and port number. |
default[:epo][:username] | The Trellix ePO - On-prem user name. Cookbook retrieves the user name from the encrypted file if this field is blank. |
default[:epo][:password] | The Trellix ePO - On-prem password. Cookbook retrieves the password from the encrypted file if this field is blank. |
default[:cloud][:accountname] | The name of the registered cloud account. |
default[:tag] | The name of the tag to be assigned to the node. The default tag name is CWS_DEVOPS. |
default[:products] | The name of the products to be installed.
|
default[:policy][:ENS] (optional field) | The name of the ENS/ENSL On-Access Scan policy to be assigned to node/client. |
default[:policy][:ATP] (optional field) | The name of the ATP policy to be assigned to node/client. |
After defining the attributes, upload the modified cookbook in the Chef server.
Note:: The default.rb recipe is mcafeeagent. To ensure that Trellix Agent is installed, include mcafeeagent in your node's
run_list.{ "name":"my_node", "run_list":[ "recipe[mcafeeagent]" ] }
To trigger the installation of Trellix products on the client, run chef-client on the client node. You can also add recipe to the node run list when bootstrapping it from the workstation.
Managing and remediating workloads using Puppet
The module allows installation and management of Trellix Agent, Trellix ENS for Windows and Linux, and Adaptive Threat Protection to a node. It creates a tag-based policy assignment rule for on-access scan. On the next agent-to-server communication, this policy is enforced to the client system. To manage a node with Trellix ePO - On-prem using Puppet, you must configure Puppet server and define the attributes.
Prerequisites
Configure puppet server and workstation, and bootstrap the node to the server where Trellix products are to be installed. For more information, see https://docs.puppet.com/puppet.
Check-in Cloud Workload Security 5.2.0 in Trellix ePO - On-prem, and register AWS or Azure cloud accounts.
Check-in Trellix Agent 5.0 or later.
Check-in Trellix ENS package.
Register AWS or Azure cloud accounts.
Puppet server settings
Download the module from the external repository and configure puppet attributes in the modules/facts/lib/facter/config.yaml attribute file. Copy modules and manifests to the /etc/puppetslab/code/environments/production folder in the puppet-server system.
The module connects to Trellix ePO - On-prem to install the security products. Hence, the Trellix ePO - On-prem credentials needs to be encrypted in the module. To encrypt the Trellix ePO - On-prem credentials, run the ruby EncryptPassword.rb USERNAME PASSWORD command.
You need to have Ruby installed in your puppet server to run this command.
For immediate execution on a particular agent node, check for a particular agent node manually by running the /opt/puppetlabs/bin/puppet agent -test command for Linux and puppet agent -test command for Windows.
Attribute | Description |
|---|---|
[epo_address] | The Trellix ePO - On-prem IP address and port number. |
[epo_username] | The Trellix ePO - On-prem user name. Module retrieves the user name from the encrypted file if this field is blank. |
[epo_password] | The Trellix ePO - On-prem password. Module retrieves the password from the encrypted file if this field is blank. |
[cloud_account_name] | The name of the registered cloud account. |
[tag_name] | The name of the tag to be assigned to the node. The default tag name is CWS_DEVOPS. |
[install_products] | The name of the product to be installed.
|
[policy_ENS] (optional field) | Name of the ENS/ENSL On-Access Scan policy to be assigned to node/client. |
[policy_ATP] (optional field) | Name of the ATP policy to be assigned to node/client. |
Managing AWS clients using Trellix ePO - On-prem installed on AWS
To manage client systems outside your organization's network, install Trellix ePO - On-prem on an AWS instance with a compatible operating system.
For information about compatible operating systems, see KB51569.
To manage client instances in AWS cloud, Trellix ePO - On-prem can be deployed:
In one geographic region
In one geographic region with one Amazon Virtual Private Cloud (VPC)
In one geographic region with multiple Amazon VPCs
In multiple geographic regions
Managing instances in one geographic region
Trellix ePO - On-prem can be installed to manage instances in one geographic region with multiple availability zones.
This type of deployment supports client-initiated and Trellix ePO - On-prem server-initiated communication. You must create a separate AWS security group for Trellix ePO - On-prem that allows outbound connections to client instances (server-initiated communication) and inbound connections (agent-initiated communication). Once you deploy Trellix ePO - On-prem, you can view the available systems in the System Tree under AWS.
Managing instances in one geographic region with one VPC
A virtual private cloud (VPC) is a virtual network dedicated to your AWS account. It is logically isolated from other virtual networks in the AWS Cloud. You can launch your AWS resources, such as Amazon EC2 instances, into your VPC.
In one geographic region with a single VPC, each instance that you launch in a non-default subnet has a private IP address. When you install Trellix ePO - On-prem in the VPC, client instances in the same VPC communicate with the Trellix ePO - On-prem server or with other instances across the private network. For information about VPCs and subnets, see AWS documentation.
[IMAGE PLACEHOLDER: Diagram of a VPC inside a red-bordered box within a cloud labeled “Region on AWS cloud”. The VPC contains multiple dashed red boxes labeled “Availability zone” with icons representing servers and client machines, and a Trellix ePO - On-prem server; arrows indicate communication between instances and the server.]
One geographic region deployment with multiple VPCs
When multiple VPCs are present in one geographic region, you can use VPC peering to connect the VPCs.
For information about VPC peering and setting one VPC as private and another VPC as public, see AWS documentation.
When you configure VPC peering, Trellix ePO - On-prem server and client instances communicate via the private network. VPC peering supports client-initiated and Trellix ePO - On-prem server-initiated communication.
Configure a virtual Agent Handler on your Trellix ePO - On-prem server to enable communication through public and private IP addresses. For more information about configuring a virtual Agent Handler, see Set up Trellix ePO - On-prem and Client Communication.
You can configure VPC routes to restrict communication between VPCs only to Trellix ePO - On-prem and client instances if other applications do not require VPC peering on the same infrastructure. For more information, see the product documentation for your version of Trellix ePO - On-prem.
Tip
Set up VPC peering for Trellix ePO - On-prem server and client communication wherever possible.
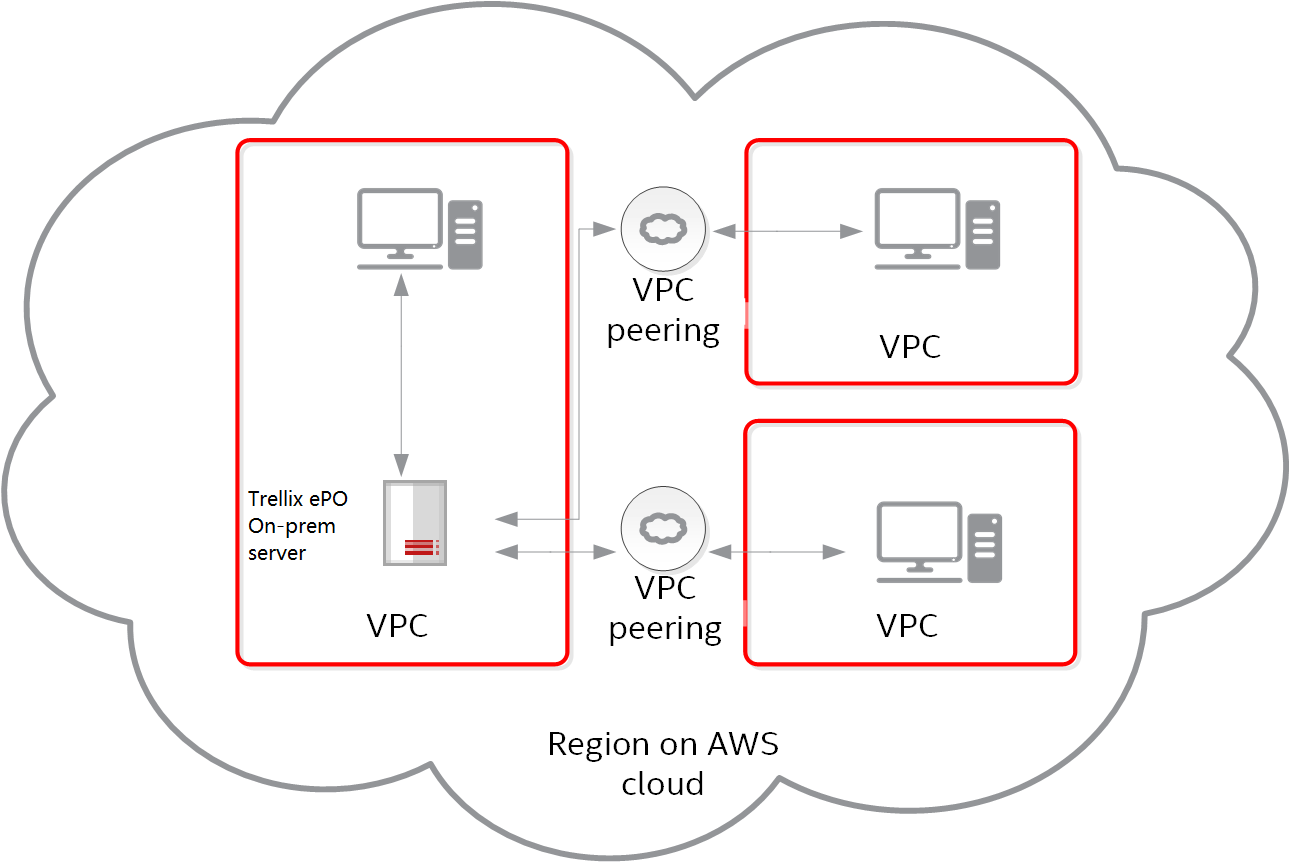
Multiple geographic region deployment
In multiple geographic region deployment, you can use an architecture where client instances connect to Trellix ePO - On-prem using a public IP address using the internet.
Use this architecture if:
Your organization uses multiple regions with multiple VPCs.
You can't use VPC peering to connect multiple VPCs in a region.
This architecture supports only client-initiated communication. To use this architecture:
All client instances must have outbound access to Trellix ePO - On-prem. Configure the AWS security groups accordingly.
The AWS security group of the Trellix ePO - On-prem server must be configured to accept communication from the client instances.
For more information, see the product documentation for your version of Trellix ePO - On-prem.
💡
Tip
Set the agent-server communication interval to 60 minutes so that client instances can get product, policy, and task updates frequently without affecting performance.
Configure a virtual Agent Handler on your Trellix ePO - On-prem server to enable communication with client instances through public IP address. For more information about configuring a virtual Agent Handler, see Set up Trellix ePO - On-prem and Client Communication.
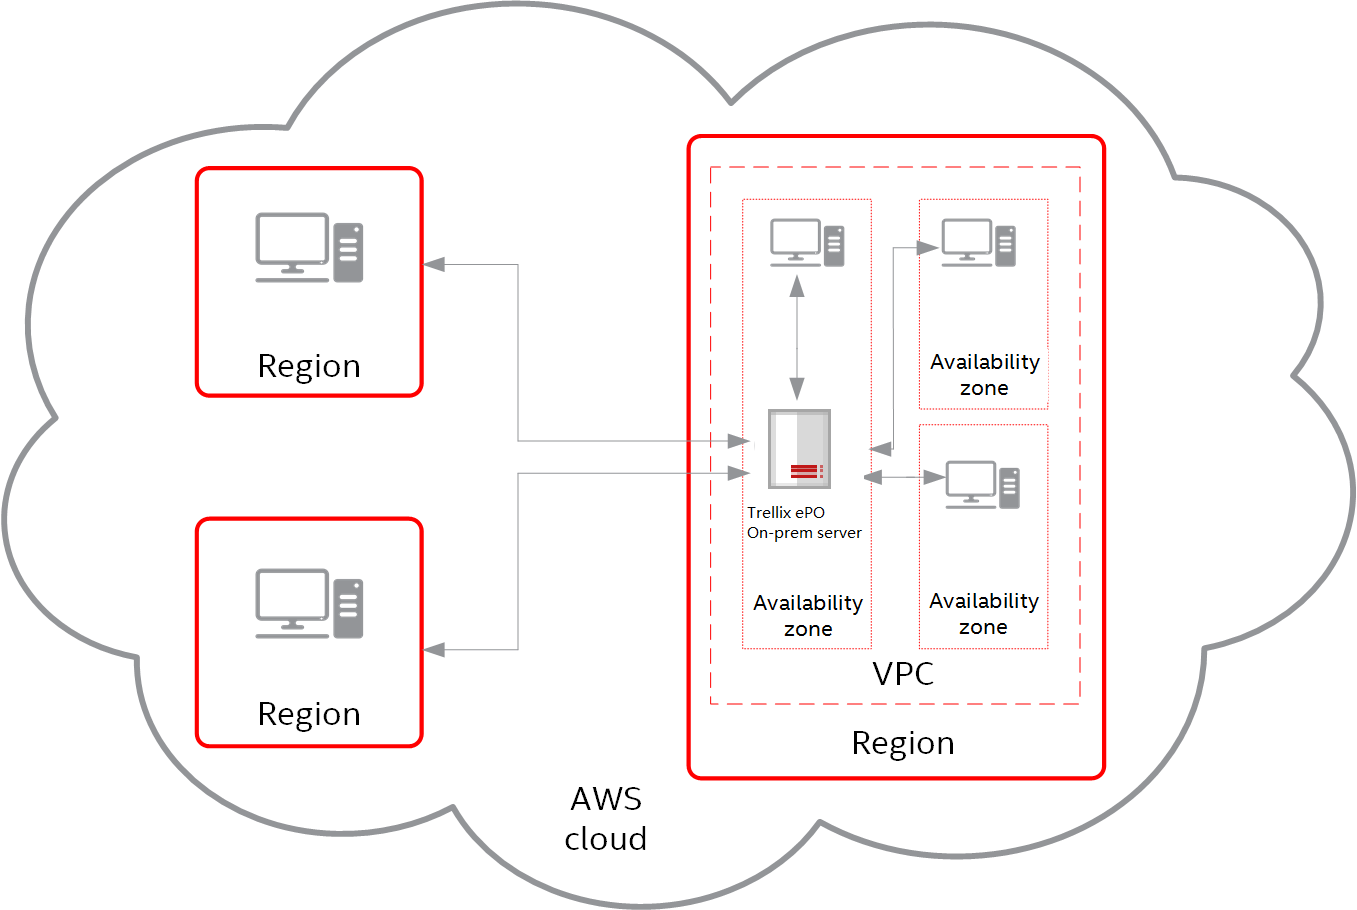
Set up Trellix ePO - On-prem and client communication
Configure Trellix ePO - On-prem and Agent Handler to set up communication for Trellix ePO - On-prem and the client on AWS.
Install Trellix ePO - On-prem in the region with the highest number of instances.
This ensures optimized communication between Trellix ePO - On-prem and client instances.
Assign an elastic IP address to the Trellix ePO - On-prem instance.
This ensures that the public IP address of the Trellix ePO - On-prem instance does not change.
For details about assigning an elastic IP address, see AWS documentation.
Configure a virtual Agent Handler on the Trellix ePO - On-prem server for your managed client instances to connect to the Trellix ePO - On-prem server.
Open the Agent Handlers page: Menu → Configuration → Agent Handlers, then in Handler Groups, click New Group to open the Add/Edit Group.
Specify a virtual Agent Handler group name.
In the Included Handlers section, select Use load balancer and specify the details.
Virtual DNS Name — Type the DNS name assigned to the static public IP address associated with this AWS server.
Virtual IP Address — Type the static public IP address associated with this AWS server.
Enable the new virtual Agent Handler.
Select Menu → Configuration → Agent Handlers, then click the Handler Groups monitor.
Find the new virtual Agent Handler, then click Actions → Enable.
Assign the virtual Agent Handler group.
Select Menu → Configuration → Agent Handlers, then click New Assignment.
Specify a unique name for this assignment.
In the Agent Criteria section, browse to and select My Organization from the System Tree location.
In the Handler Priority section, click Use custom handler list and select the new virtual Agent Handler.
Note
Use + to add additional Agent Handlers to the list.
Results
The created virtual Agent Handler publishes Trellix ePO - On-prem on its public IP address and all client instances communicate using this address.
Managing AWS clients using Trellix ePO - On-prem installed on-premise
Install Trellix ePO - On-prem on an on-premise server and the Agent Handler in the DMZ with a public IP address for easy connectivity and scalability.
This architecture is best if:
You use Trellix ePO - On-prem in a hybrid cloud environment.
Your organization requires Trellix ePO - On-prem to be installed on-premise rather than in the cloud.
To use this architecture:
Install Trellix ePO - On-prem on an on-premise server to manage systems on-premise. Assign an internal private IP address to Trellix ePO - On-prem.
Install Agent Handler on an on-premise server in the DMZ to manage instances on AWS. You must assign a public IP address to the Agent Handler.
You must connect Trellix ePO - On-prem server and the Agent Handler through a low latency and high-bandwidth network.
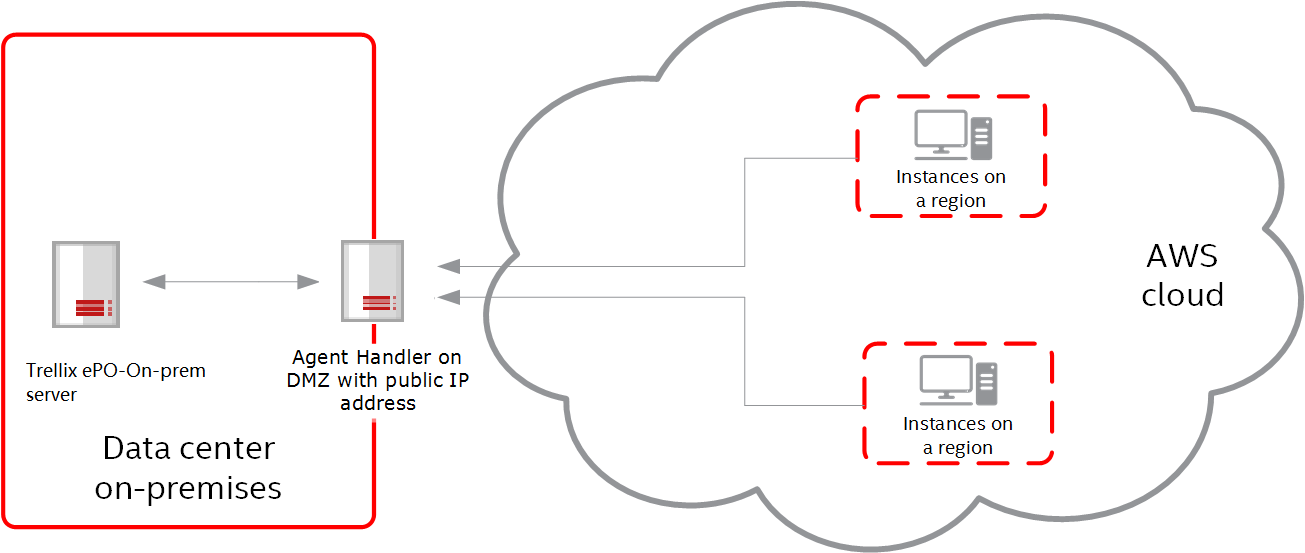
This architecture supports client-initiated communication, but Trellix ePO - On-prem can't wake up the Trellix Agent on a managed AWS instance. To use Trellix ePO - On-prem initiated communication (wake up agent) feature, AWS instances must use a VPN to connect to the on-premise network.
For information about the ports required for Trellix ePO - On-prem and client instance communication, see KB66797. For information about port guidelines, see the Trellix ePO - On-prem Product Guide.
Using Trellix Agent deployment URL feature
The Trellix Agent deployment URL contains a link to an installer. The installer downloads and installs Trellix Agent and deploys Trellix products to AWS instances.
For instructions about deploying Trellix Agent on AWS instances, see KB85233.
Set up Trellix ePO - On-prem and client communication
Configure Trellix ePO - On-prem and the Agent Handler to set up communication between Trellix ePO - On-prem and the client.
Install Trellix ePO - On-prem on an on-premise server.
Install the Agent Handler on another on-premise server in the DMZ.
Configure the Agent Handler.
Open the Agent Handlers page: Menu → Configuration → Agent Handlers, then in Handler Status, click Agent Handler.
From the Handler List, click the Agent Handler that is installed in the DMZ.
Specify the public IP address of the Agent Handler to connect to AWS EC2 instances in the Published IP Address field.
Using Cloud Workload Security
Consider these best practices to set up Cloud Workload Security to monitor and manage AWS EC2 resources.
Install Trellix ePO - On-prem based on your infrastructure requirements.
Install the Cloud Workload Security extension on the Trellix ePO - On-prem server.
Make sure that you set up a user on AWS with read-write privileges on EC2 and traffic flow logs for all regions that requires management.
Register your AWS cloud account with Trellix ePO - On-prem, so that Trellix ePO - On-prem discovers, imports, assesses and displays your cloud account information.
Specify the sync interval for Trellix ePO - On-prem to AWS synchronization. Sync interval determines how often new instances are discovered.
While deploying Trellix Agent, select Auto deploy Trellix Agent on VMs when all your EC2 instances and traffic flow logs are in the same region and support Active Directory based deployment.
Deploying Trellix security products on AWS cloud
To deploy Trellix security products on AWS instances, deploy a Trellix Agent on each of the AWS instances.
Once you deploy Trellix Agent, you can use Trellix ePO - On-prem to manage product installation and network security of the AWS instances.
Note: You must have credentials for each of the AWS instances. Currently, only password-based authentication is supported on Windows and Linux.
To deploy Trellix security products easily and efficiently:
Use Active Directory-based authentication.
Create secure client Amazon Machine Image (AMIs) with the Trellix Agent and products installed.
Deploy Trellix security products on AWS instances using AMIs
To ensure security of the AWS instances as they start, create secure client Amazon Machine Images (AMIs) using standard AMIs. The AMI contains Trellix Agent and Trellix Endpoint Security (ENS).
Before you begin
If you are using Amazon Elastic Compute Cloud (Amazon EC2), start a Windows or Linux instance.
Install the Trellix Agent and Trellix ENS extensions in the Trellix ePO - On-prem server. Trellix ENS protects instances from malware.
Check in the client packages.
Make sure that you don't have duplicate Trellix Agent GUIDs, which can affect product installation, policy enforcement, and prevent properties from being recorded correctly.
We recommend that you access your AWS instances from Trellix ePO - On-prem until the AWS instances are compliant with the organization's IT security standards.
Using Trellix Agent deployment URL feature
The Trellix Agent deployment URL contains a link to an installer. The installer downloads and installs Trellix Agent and deploys Trellix products to AWS instances.
For instructions about deploying Trellix Agent on AWS instances, see KB85233.
Create secure client AMIs
Start a secure client AMI on a Windows EC2 or Linux instance.
Depending on the operating system that you use, start a Windows EC2 or a Linux instance on the AWS console.
Log on to the instance.
Deploy Trellix Agent on the instance using Cloud Workload Security.
Download the deployment script under Trellix ePO Management on the Cloud Workload Security user interface.
Select Install Trellix Agent from the Take Action combo box on the Cloud Workload Security user interface.
Install Trellix ENS on the instance using the Take Action combo box on the Cloud Workload Security interface.
Delete Agent GUID details to avoid duplicate GUID's. For more information, see KB84356.
Delete AMcore GUID details. For more information, see KB89849.
On the AWS console:
Use EC2Config or windows tools to sysprep the server with shutdown option.
Select the AMI and click Launch.
This starts a new secure client AMI with Trellix Agent and Trellix ENS installed on it.
Deploying Trellix security products on AWS using Trellix Cloud Workload Security
You can deploy Trellix security products on the AWS instances from the Cloud Workload Security user interface using the Take Action combo box.
Consider these best practices when you deploy Trellix security products using Cloud Workload Security on the AWS instances.
By default, the secure AMIs ensure protection of your instances. It is recommended that you create your server instances from the secured AMIs.
You can install Threat Prevention on the AWS instances in batches. The number of systems per batch is 25. You can increase the number of systems per batch if you have distributed repositories.
You can set threat alert notifications for Cloud Workload Security in the Automatic Responses page. The default value of Threat Event Trigger for ENS/ENSL for Cloud Workload Security is 1 minute. It is recommended that you set the notification time to a higher value if the number of events per aggregation time is more.
Note: Selecting the Trigger this response for every event option is not recommended as it causes significant performance issues in Trellix ePO - On‑prem.
Quarantine workloads
You can stop the infected workload from spreading malware to other workloads by quarantining the affected workload.
When you quarantine an instance, a new security group, Trellix_CWS_Quarantine is created for the corresponding instance. You can release the quarantined instance by changing the security group for the instance manually in the AWS Management Console.
It's not advisable to edit Trellix_CWS_Quarantine security group rules. It's advised that you create a security group and set required permissions, and assign it to your instance if you want to open any specific port for the quarantined instance.
Configure OpenStack (Generic) instances
You can register an OpenStack account with Trellix ePO - On-prem so that the Trellix ePO - On-prem can communicate with the OpenStack cloud.
You must configure your OpenStack instances if the operating system detail of the instance is not available in the Trellix CWS console. For more information about OpenStack images, see https://docs.openstack.org/python-glanceclient/latest/cli/property-keys.html.
Open the OpenStack dashboard.
Select Images.
Select an image, then click Launch → Update Metadata.
Click XenAPI Driver → OS Type and select the image's operating system.
Managing auto-remediation policy to quarantine instances
You can quarantine an instance if the security group assessment for that instance is critical.
The quarantine action might affect the communication with the instances within the organization.
We recommend that you follow these instructions when you enable the quarantine instance settings.
Create a custom auto-remediation policy and enable quarantine settings.
Apply the quarantine policy to the instance that you want to quarantine.
Select the appropriate cloud vendor from the System Tree, then select the instance that you want to quarantine from a particular geographical region.
Click Actions, then select Agent → Edit Policies on a Single System.
Click Edit Assignment against Auto- Remediation Settings to edit quarantine settings.
Select Break inheritance and assign the policy and settings below against the Inherit from option, then select your custom policy from the Assigned policy menu.
Click Save.
Note
The Inherit from option changes to This Node, and the policy is updated after saving the settings.
After a successful Trellix CWS sync, the quarantine action is automatically applied to the selected instance based on the policy change. With these settings, you can avoid triggering quarantine action for the instances that you don't want to quarantine.
Auto-remediation actions such as quarantine, DAT update, and on-demand scan are listed under Reporting → Audit Log.
For example, you can view the quarantined instances in the Audit Log page
Action | Auto-Remediation Quarantine Workload |
|---|---|
Details | Details — Auto-remediation Quarantine task assigned to [workloadName] workloads successfully |
You can view the assigned quarantine tasks under Client Tasks → Client Task Catalog → Trellix Agent → Client Task Types.
For example, DAT_update_Windows_CWS.
Frequently asked questions
Here are answers to frequently asked questions.
See KB90063 for more questions and answers.
Installation
Can I install Trellix Agent on AWS instances using the Agent Deployment URL feature and Amazon User Data?
Yes. For details, see KB85233.
Can I use scripts for Puppet, Chef, or Amazon OpsWorks to install and configure security solutions offered by Trellix?
Yes.
For Puppet sample scripts, see KB82585.
For Chef sample scripts, see KB82584.
For Amazon OpsWorks scripts, see KB82586.
What happens to my policies when I upgrade from Trellix CWS 5.2.0 to 5.3.0?
When upgrading from 5.2.0 to 5.3.0, since the policy structure has changed in the latest version, your previous policies, policy settings, and policy assignments are lost.
Configuration
How do I troubleshoot AWS instance connectivity issues?
See AWS documentation.
How many cloud accounts can I register under one Trellix ePO - On-prem server?
There is no limit to the number of cloud accounts that can be registered under one Trellix ePO - On-prem server.
How do I get the subscription ID, tenant ID, and client ID?
You can get your client ID, tenant ID, and subscription ID after creating an application. You need to configure your client key. You can create application by following steps listed in Create an application in the Microsoft Azure console. You can also run PowerShell scripts, which automate this process. For details, see KB87316.
What ports are included when I select port as Any when configuring inbound firewall rule?
All ports (0–65535) are included.
Functionality
When AWS instances are switched off, are they reported "powered off" in Trellix ePO - On-prem?
Yes. If the computers are managed, they aren't deleted, even on termination. Unmanaged systems, when terminated, are no longer seen in the Trellix ePO - On-prem System Tree.
How long does it take for Trellix CWS to discover a new instance?
After the synchronization occurs, the new instance is discovered. Synchronization depends on the Sync Interval that you specified. If you specify the sync interval as 5 minutes, the next sync is scheduled 5 minutes after the completion of the current sync. You can also schedule a manual sync and the synchronization starts immediately.
What happens when an instance is terminated in EC2?
After the instance is terminated (and a synchronization occurs), the instance is no longer displayed in the Trellix ePO - On-prem System Tree. But, any events from this instance are still present.
What are the reasons for my cloud account synchronization to fail?
Check your cloud account details. Your access key and secret key pair might have been disabled.
Check if your network is connected.
Check if your Trellix ePO - On-prem system date and time are synchronized with the Internet date and time.
Check if you are registering the same AWS account again in Trellix ePO - On-prem.
What are things to be considered when creating a user type with Trellix CWS Permissions Set?
The user permissions are based on the roles selected for the Trellix CWS user. Make sure that the Trellix CWS permission sets assigned to the user doesn't conflict with the Trellix ePO - On-prem permission sets. The Trellix ePO - On-prem admin user must give appropriate user permissions to the Trellix CWS user by changing the Cloud Workload Security(Controls) permissions under Trellix ePO - On-prem Permission Sets accordingly.
Why does tagging a workload fail?
Check if the Trellix ePO - On-prem admin user has assigned the appropriate permission for the Trellix CWS user to tag workloads under Permission Sets → Systems → Tagging. You can check if these permissions are assigned to the Trellix CWS user in the Trellix ePO - On-prem Orion logs.
Why do the server tasks fail when triggered from the Trellix CWS console?
Check if the Trellix ePO - On-prem admin user has assigned the permission to the Trellix CWS user to trigger server tasks. You can check if these permissions are assigned to the Trellix CWS user in the Trellix ePO - On-prem Orion logs.
Why does the workload/account policy assignment fail?
Check if the Trellix ePO - On-prem admin user has assigned the permission to the Trellix CWS user to assign policies to workloads/accounts under Permission Sets → Cloud Workload Security(Controls) → Edit and select the appropriate Control Permission option. You can check if these permissions are assigned to the Trellix CWS user in the Trellix ePO - On-prem Orion logs.
Why can't a newly created Trellix CWS user view the Trellix CWS console?
By default, a new Trellix CWS user has no permissions to view the Trellix CWS console. The Trellix ePO - On-prem admin user must change the user permissions by changing the Cloud Workload Security(Controls) permissions under Trellix ePO - On-prem Permission Sets.
Visualization of your cloud accounts
Can I view the registered cloud account details in the Trellix CWS console immediately after an upgrade?
After a successful upgrade, initiate a sync on all registered cloud accounts to view the updated Trellix CWS console.
immediately. You can also wait for the next scheduled sync to complete successfully.
VirusScan Enterprise is installed on my instance, but the instance is still color-coded as red.
If your instance is not managed with this Trellix ePO - On-prem, then the status is shown as red. For assessment to show correct result, the instance must be managed by the same Trellix ePO - On-prem.
Detaching the security group from an AWS instance fails.
If there is one NIC associated with an instance, and you are trying to detach a security group.
If your instance is associated with multiple NICs and you are trying to detach a security group, which is associated with another NIC.
I can't see the virtual networks when I click Accounts.
If you installed the Trellix CWS extension and completed registering your accounts, you can see your virtual networks in your accounts when synchronization and assessment is complete.
I can't see all virtual networks in my account.
By default, you can see all virtual networks that have at least one running workload. If your virtual network has no running workloads, it isn't shown. Select Show All on the Accounts panel to see all virtual networks.
I can see some names and some IDs under Virtual Networks and Workloads.
By default, you can see the names of your virtual networks and workloads. If they don't have a name, you can see their IDs.
Which vendor cloud accounts are supported in the Cloud Workload Security dashboard.
Currently, we support AWS and Microsoft Azure cloud accounts. Microsoft Azure classic accounts aren't shown here.
I can't see network traffic for some workloads on the Cloud Workload Security dashboard.
Network traffic records are available only for AWS workloads.
If you can't view traffic for your AWS workloads, make sure that you selected Enable Traffic Discovery for your AWS account.
When creating the IAM role for flow logs for your AWS account, make sure that the name of your role is McAfeeFlowLogger.
My traffic discovery is disabled, but I can still see traffic details for AWS instances.
Data retention period for AWS traffic data is seven days. So you might still see some traffic details until the retention period.
How long is the AWS traffic data stored in Trellix ePO - On-prem?
Data retention period for AWS traffic data is seven days.
Sometimes the Trellix CWS screen remains collapsed.
Do a browser refresh using F5.
Can I get a detailed server log file if Trellix Agent deployment fails?
Yes.
From Menu → Automation → Server Task Log, look for Data Center: Auto Deploy Trellix Agent.
Select the task with the start date of your deployment task.
Select a subtask with your system IP address.
Can I get a detailed server log file if any product installation fails?
Yes.
From Menu → Automation → Server Task Log, search for "wake up" task that has details about the feature.
Select the task with the start date of your deployment task.
Select a subtask with your system IP address.
Does the installation of Trellix Agent or any of the products times out?
If your Trellix ePO - On-prem server doesn't receive the installation status of Trellix Agent or any of the products, it times out after 60 minutes.
What number is displayed in the tooltip of data center, cluster, hypervisor, or workloads?
The corresponding ID of the data center, cluster, hypervisor, or the workload is displayed in the tooltip.