Endpoint Security Deny List
Module User Guide Release 1.1.0
Last Updated: September 17, 2023

Contents
Module Overview..........................................................3
Supported Platforms..........................................................3
Installing the Deny List Module..........................................................4
Installing the Deny List Module on the Server....................................4
Verifying the Installation..........................................................5
Uninstalling the Deny List Module..........................................................6
Configuring the Deny List Module..........................................................7
Enabling the Deny List Server Module........................................7
Disabling the Deny List Server Module.....................................7
Configuring the Deny List Server Settings..................................7
Configuring the Deny List Policy..........................................................8
Using the Deny List Module..........................................................10
Creating a CSV File..........................................................10
Uploading a CSV file..........................................................11
Importing File Hashes From Third-Party Feed..........................12
Configuration API..........................................................15
1 | Module Overview
Module Overview
The Deny List module enables FireEye Endpoint administrators to alert, block or quarantine files based on hash or a file path list.
With this module, FireEye Endpoint administrators can:
- Upload file hashes or file paths.
- Import file hash intel from a third-party Intel feed.
- Select the action required to be taken on the files if they are detected on an endpoint.
Deny List alerts appear on the FireEye Endpoint Security Alert view, like other module alerts.
Supported Platforms
The release of Deny List Module is supported on Endpoint Security 5.0.4 and Agent version 32.x and later on Windows operating systems. Mac OSX and Linux platforms are not supported at this time.
Note
- Installing the Deny List on Endpoint Security 5.0.3 or lower is not a supported scenario.
- The usage of the Deny List module is independent of Malware Protection, Malware Guard or quarantine being enabled on the endpoint.
- For certain Windows protected folders, quarantine might require a reboot.
- Ensure that you add adequate exclusion to Antivirus settings if you are using any other Antivirus products.
2 | Module Overview
Installing the Deny List Module
Deny List is an optional (non-core) module available for Endpoint Security 5.0.4 and Agent version 32.x. The module installer package .cms file is downloaded from the FireEye Market and then installed on your Endpoint Security Web UI. Initially, the module is disabled by default.
For more information on how to enable the server module, see Enabling the Deny List Server Module.
After the module is installed successfully, it is displayed on the Modules menu.
Installing the Deny List Module on the Server
Note
If you use a third-party antivirus software, add exclusions to it before installing the module.
To install the Deny List Module using the Endpoint Security Web UI:
- Log in to the Endpoint Security Web UI as an administrator.
- From the Modules menu, select Endpoint Module Administration.
- Click the Available Modules tab and locate Deny List in the Module list.
- In the Actions column, click the gear icon, and click Install.
- Click Install on the dialog box.
To download the module installer CMS package, go to the FireEye Market, then upload the module CMS file in your Endpoint Security Web UI.
Note
Note down the navigation path to the directory where you have downloaded the .cms file.
Perform the following steps to upload the CMS file in your Endpoint Security Web UI:
- On the Endpoint Security Web UI, click Install Modules to upload the module .cms file from your local drive to the Endpoint Security Console. The .cms file includes a server module and an agent module of the Deny List Module.
- In the Upload Module dialog box, navigate to the downloaded module .cms file, select the .cms file, and click Open. The selected .cms file appears in the Upload Module dialog box.
- Click Upload.
2 | Module Overview
The module is disabled by default. When the module is installed successfully, it is displayed on the Modules menu.
Verifying the Installation
To verify that the Deny List module is installed and running:
-
Go to Modules > Endpoint Module Administration > Installed Modules and check if the Deny List module is displayed in the list.
-
Additionally, the working status of the module can also be verified on the Endpoint Server through API to review the system information received from Endpoint Agent.
Endpoint Security Deny List Module User Guide Release 1.1.0
5
3 | Module Overview
Uninstalling the Deny List Module
Uninstalling the Deny List Module removes the server module from the management server. You do not need to disable the Deny List before you uninstall it.
-
On the Endpoint Security Web UI, locate for the Deny List module on the Modules page.
-
Click the Actions icon, select Uninstall. and in the confirmation window, click Uninstall to start the uninstallation of the module.
A success message appears at the top of the page when the module is removed.
4 | Module Overview
Configuring the Deny List Module
The Deny List Module consists of a server module and an agent module. The agent module is installed and enabled on agents using the Deny List policy. If you disable the server module, this will automatically disable the agent module for all policies.
Enabling the Deny List Server Module
Log in to the Endpoint Security Web UI.
From the Modules menu, select Endpoint Module Administration.
On the Modules page, click Installed Modules.
Locate the Deny List module in the list.
In the Actions column, click the gear icon, and select Enable.
To configure Deny List Server settings, see Configuring the Deny List Server Settings
Disabling the Deny List Server Module
Note
Always ensure to disable the module from the Edit Policy page before disabling it from the Modules page. The module uses Protection Platform to compute hash and monitor the file changes. If the module is disabled directly from the Modules page, "stop" command is not sent to Protection Platform thus allowing the module to remain in the Enabled state. This might cause the module to calculate file reputations for all the existing files and cause file I/O on the system. To disable the module from the Edit Policy page, move the Enable Deny List toggle to Off.
To disable the module from the Modules page, perform the following steps:
Log in to the Endpoint Security Web UI as an administrator.
From the Modules tab, select Endpoint Module Administration.
On the Modules page, click Installed Modules.
Locate the Deny List module in the list.
In the Actions column, click the gear icon, and select Disable.
A message There are no policies containing Deny List.. is displayed.
Endpoint Security Deny List Module User Guide Release 1.1.0
7
4 | Module Overview
Configuring the Deny List Server Settings
-
Log in to the Endpoint Security Web UI as an administrator.
-
From the Modules menu, select Endpoint Module Administration to access the Modules page.
-
On the Installed Modules page, locate the Deny List Module.
-
In the Actions column, click the gear icon, and select Configure.
-
The Deny List Settings page opens.
Configuring the Deny List Policy
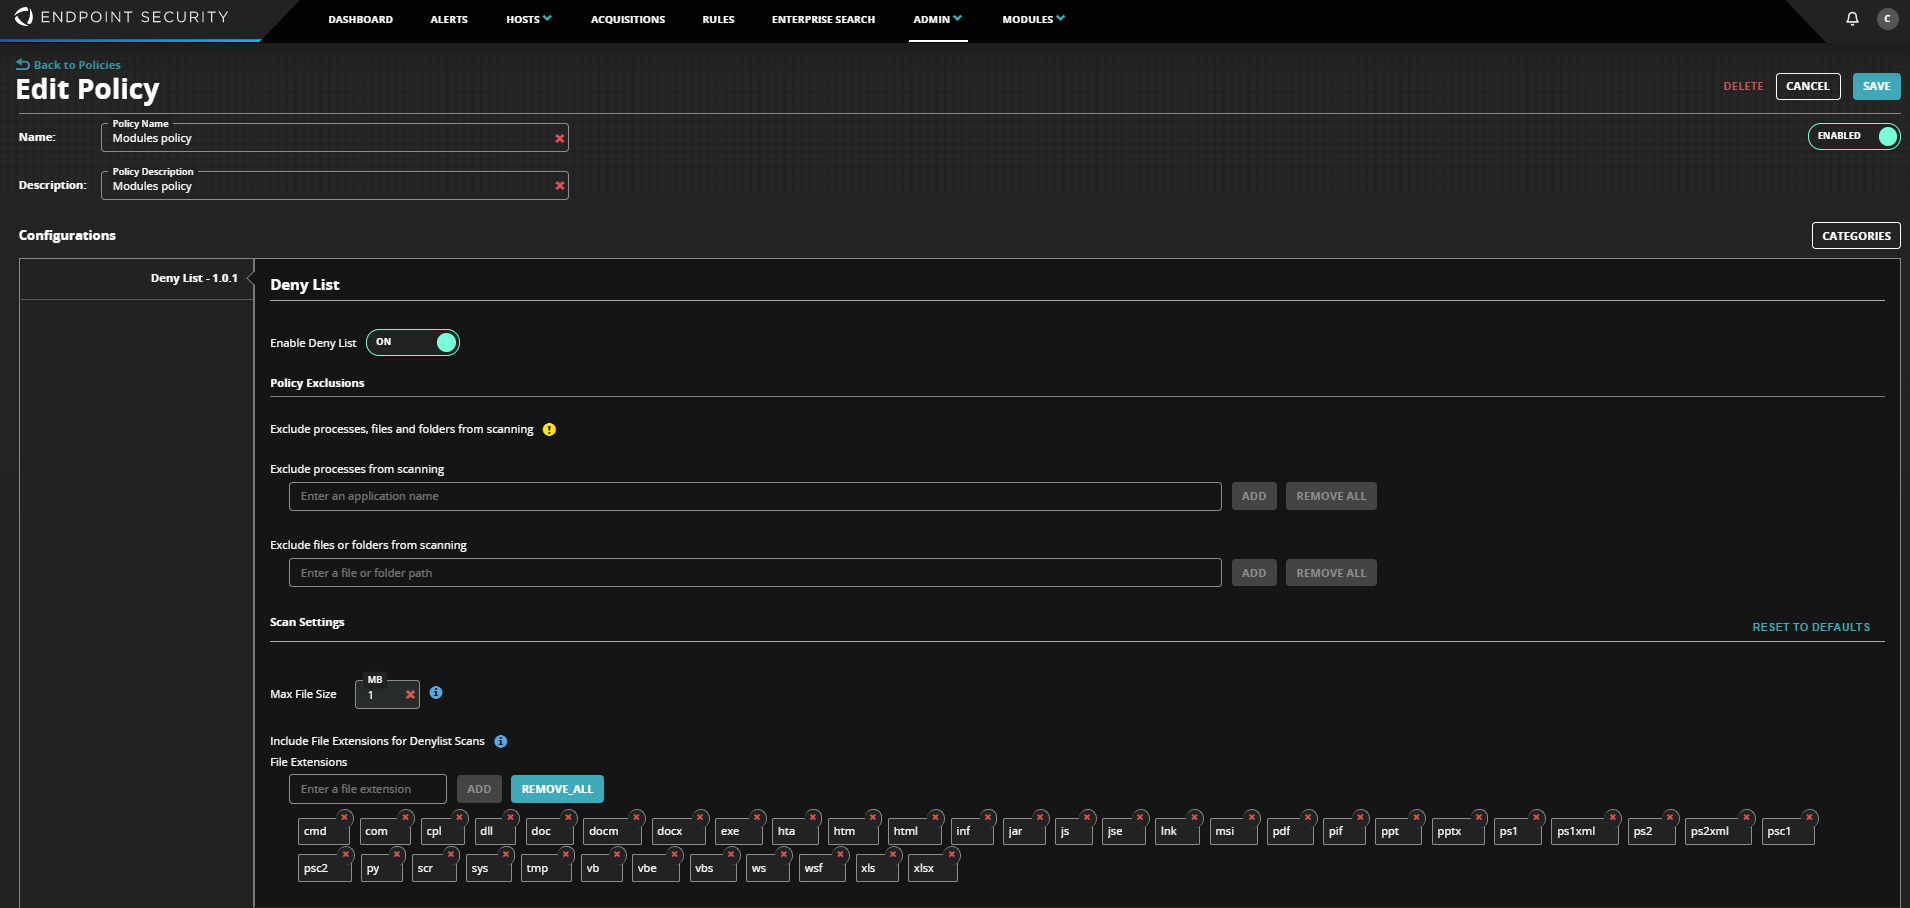
The Deny List policy is configured using the Module Policy page.
-
Log in to the Endpoint Security Web UI as an administrator.
-
From the Admin menu, select Policies.
-
Locate to the policy that you want to edit.
-
In the Actions column, click the gear icon, and click Edit Policy.
-
Navigate to the Deny List section and move the Enable Deny List toggle to On.
-
Optionally, add file paths or process for overall exclusion.
-
Process Exclusion: Excludes the configured processes. Currently, wildcards are not supported.
-
Files/Folder Exclusion: Excludes configured files and folders. Wildcards are also supported.
-
-
Configure Max File Size and file extensions for hash based scans.
Note
Deny List will only consider file which is 0 to configured file size.
-
Click Save to save the module settings.
8 Endpoint Security Deny List Module User Guide Release 1.1.0
4 | Module Overview
Endpoint Security Deny List Module User Guide Release 1.1.0 9
5 | Module Overview
Using the Deny List Module
Note
- Using the Deny List module is restricted to FireEye Endpoint Security Administrators and Investigator roles.
- Usage of the Deny List module is independent of Malware Protection, Malware Guard or quarantine being enabled on the endpoint.
The Deny List module enables FireEye Endpoint administrators and investigators to alert, block or quarantine files based on a hash or file path list. They can upload files separated by a comma. Files containing MD5 hashes, SHA-256 file hashes, or file paths are uploaded from the UI.
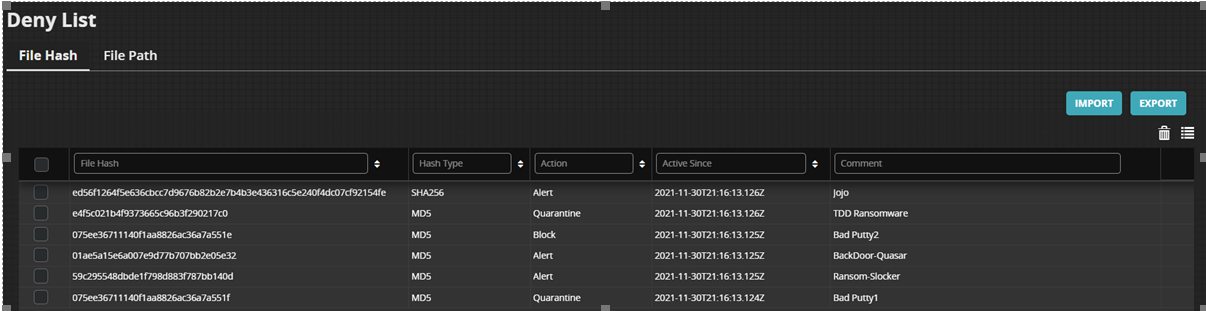
For more information on how to create and install the .csv file, see Creating a CSV File and Uploading a CSV file
Creating a CSV File
A CSV file is used for importing file hashes into the Deny List module. The file hashes supported are MD5 and SHA-256. There are 39 default file extensions to be scanned which can also be increased. For performance reasons, Deny List does not scan files which are more than 100MB in size for the configured file paths.
The CSV file used for importing hashes has four primary fields.
All the headers of the columns are required.
| File_hash | Type | Action | Comments | |
|---|---|---|---|---|
| 1 | 01ae5a15e6a007e9d77b707bb2e05e32 | MD5 | Alert | BackDoor-Quasar |
| 2 | 59c295548dbde1f798d883f787bb140d | MD5 | Alert | Ransom-Slocker |
| 3 | ed56f1264f5e636cbcc7d9676b82b2e7b4b3e436316c5e240f4dc07cf92154fe | SHA256 | Alert | Jojo |
| 4 | e4f5c021b4f9373665c96b3f290217c0 | MD5 | Quarantine | TDD Ransomware |
5 | Module Overview
file_hash value (required) - File hash of a file
type value (required) - Type of the file hash.
Supported file hash types: MD5 and SHA256
-
action value (optional) – The action to be taken on detected file
Alert - An alert is generated when the file is attempted to be accessed.
Block - A block action is performed when the file is attempted to be accessed.
Quarantine - A quarantine action is performed when the file is attempted to be accessed.
comments value (optional) - The comment description is used in the alert name
The CSV file used for importing file paths to in the Deny List module has three primary fields.

file_path value (required) - File path of a file
-
action value (optional) – The action on detected file
Alert - An alert is generated when the file is attempted to be accessed.
Block - A block action is performed when the file is attempted to be accessed.
Quarantine - A quarantine action is performed when the file is attempted to be accessed.
comments value (optional) - The comment description is used in the alert name
Note
If an entry for a file exists in both the hash and file path list, the action associated with the file path will always take precedence over the hash list.
Uploading a CSV file
After installing and enabling the Deny List module, click the Deny List option.
On the Deny List page, click Import and select the .csv file containing file hashes or file paths (case insensitive).
5 | Module Overview
Select whether to append or replace the hash list and then click Upload. A success or failure message appears on the page.
After successfully uploading a Deny List .csv file, it appears on the Modules page. Here, you can delete the hashes or file paths by selecting a specific hash or file path and sort the list by the different column fields.
Note
The default deny list hash is set at 1000 file hashes. A maximum of 50,000 file hashes or file paths can be added. If you try to upload more than maximum file hashes or paths through the Web UI, the following error message will be displayed:

On the API front, the following error response is displayed:
{"error": { "errCode":"ERR_DENYLIST_RECORD_LIMIT_REACHED","message":" The list contains more than the allowed number of records, only 800 can be added" } }
Also note that multiple alerts are seen during a copy operation.
Importing File Hashes From Third-Party Feed
Instead of manually collecting and configuring intel, you can use a third-party feed to automate the import of file hash Intel to the Deny List module. The VirusTotal API is supported.
To configure a third-party API in the Endpoint Security Web UI:
Configuring API key
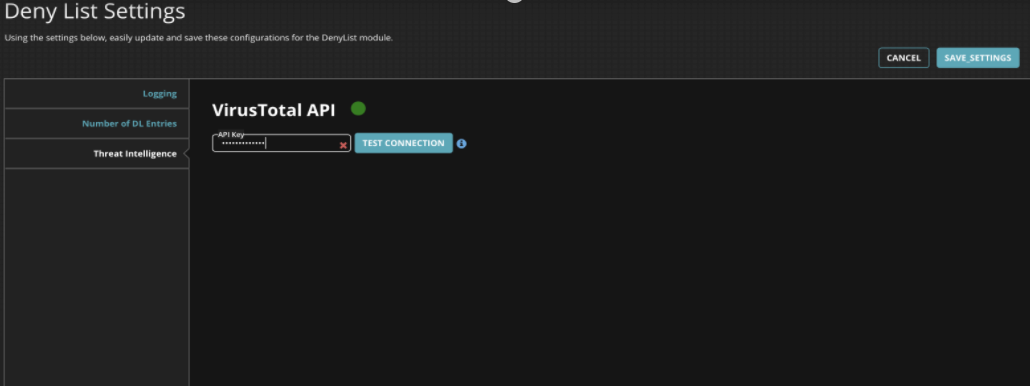
- Go to Modules > Endpoint Modules Administration > Deny List > Configure.
- On the Threat Intelligence tab, enter the VirusTotal API key and then click Test Connection.
The green dot indicates connection is established with the third-party API. When the key is invalid, the dot is indicated in red.
5 | Module Overview
Adding Queries to Threat Intelligence
After establishing the connection with Virus Total API, you add VirusTotal queries. The polling interval for the Threat Intelligence is set as 1, 2, 4 or 8 hours.
-
On the Threat Intelligence tab, set the Polling Interval as 1,2,4, or 8 hours.
-
Click the ADD QUERY button and then provide the values for the following fields.
- Feed Source: Set to Virus Total
- Action : Alert, Block or Quarantine
- Max no of Results: 0 to 300 results for each query
- Hash Type: Md5 or Sha256
- Query: Virus Total API
- Comment: Enter to identify the received third-party Intel from the file hash intel.
Endpoint Security Deny List Module User Guide Release 1.1.0
13
5 | Module Overview
[IMAGE PLACEHOLDER: "Add Query" dialog UI showing a dark-themed form with a green success banner at the top, fields for Feed Source, Action, Max no of Results, Hash Type, Query, Comments, a "TEST QUERY" button, and "CANCEL" and "SAVE QUERY" buttons in the footer]
3. Click Test Query. The Save Query button is enabled when all the parameters are correct.
4. Click Save Query to save the query. This button is now visible in the Threat Intelligence tab.
5. Verify that the received intel is available in the File Hash tab.
[IMAGE PLACEHOLDER: "Deny List" UI screenshot showing a dark table listing file hashes, file path, threat intelligence, hash type, action, timestamps, and comments, with table controls and pagination at the bottom]
14
Endpoint Security Deny List Module User Guide Release 1.1.0
6 | Module Overview
Configuration API
The configuration API is made available via the configuration endpoint of the Endpoint Security Server REST API. For complete details on how to interact with Endpoint Security Server API, please refer to FireEye document Endpoint Security REST API Guide Release 5.0.
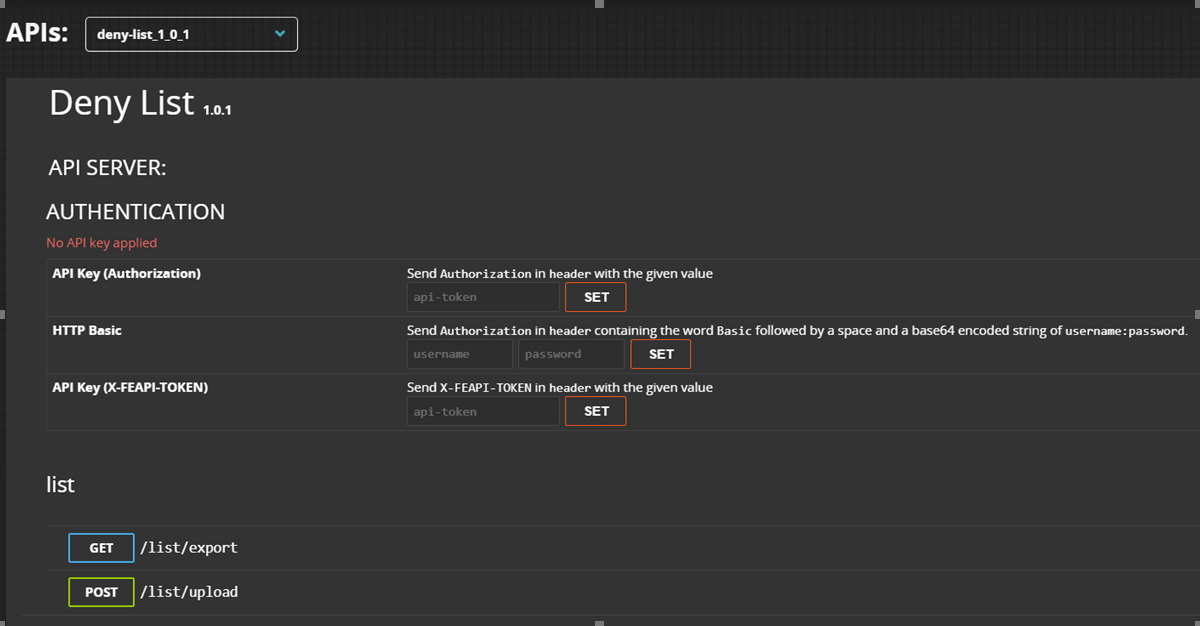
UPLOAD API For Deny List
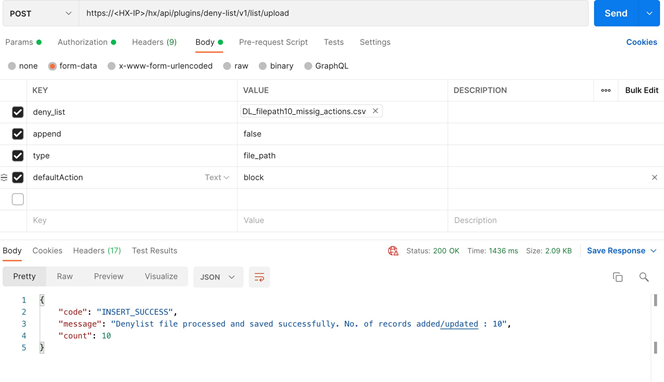
A FireEye Endpoint Security administrator can upload a list of hashes or list of filepaths to the Endpoint Server using the following API method.
Request
| HTTP Verb | Path | Parameters |
|---|---|---|
| POST | hx/api/plugins/deny-list/v1/list/upload | - |
Response
Endpoint Security Deny List Module User Guide Release 1.1.0 15
6 | Module Overview
| Type | Key | Notes |
|---|---|---|
|
BODY (form data) |
deny_list(mandatory) |
value: file (denylist.csv: file to upload) Text parameters in form data:
|
Note
Use lower case values as they are case-sensitive.
EXPORT API for Deny List
6 | Module Overview
| HTTP Verb | Path | Parameters |
|---|---|---|
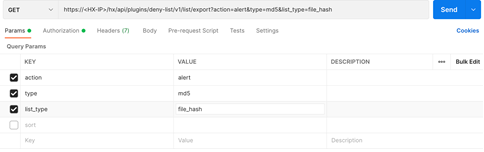
| GET | hx/api/plugins/deny-list/v1/list/export |
Type: Query params
|
Note
Use lowercase values as they are case-sensitive.
Adding VirusTotal Queries
| HTTP Verb | Path | Parameters |
|---|---|---|
| POST | hx/api/plugins/deny-list/v1/list/thirdparty/configuration | - |
Endpoint Security Deny List Module User Guide Release 1.1.0 17
6 | Module Overview
[IMAGE PLACEHOLDER: Postman screenshot showing a POST request to https://<HX-IP>/hx/api/plugins/deny-list/v1/list/thirdparty/configuration with a JSON body (configuration: { "vt": { "poll_interval": 120, "queries": [ { "query": "positives:1 fireeye:infected", "enable": true, "limit": 50, "action": "alert", "comment": "VT", "hash_type": "md5" } ] } } ) and the response JSON: { "code": "QUERY_INSERT_SUCCESS", "message": "Configuration settings saved successfully" } with status 200 OK.]
18
Endpoint Security Deny List Module User Guide Release 1.1.0
COPYRIGHT
Copyright © 2026 Musarubra US LLC.
Trellix and FireEye are the trademarks or registered trademarks of Musarubra US LLC, FireEye Security Holdings US LLC, and their affiliates in the US and /or other countries. Other names and brands are the property of these companies or may be claimed as the property of others.