Endpoint Security Endpoint Agent
Console Module User Guide
Release 1.1.3
Last Updated: September 17, 2023

Contents
Module Overview .................................................... 4
Supported Platforms .................................................... 4
Installing the Module .................................................... 5
Installing the Server Module .................................................... 5
Installing the Agent Module .................................................... 5
Processes Created After Installation .................................................... 6
Verifying the Installation .................................................... 6
Uninstalling the Module .................................................... 7
Uninstalling the Agent Module .................................................... 7
Configuring the Module .................................................... 8
Enabling the Module .................................................... 8
Enabling the Server Module .................................................... 8
Enabling the Agent Module .................................................... 8
Disabling the Module .................................................... 9
Disabling the Server Module .................................................... 9
Disabling the Agent Module .................................................... 9
Configuring the Server Module .................................................... 9
Logging .................................................... 10
Data Aging .................................................... 10
Configuring the Agent Policy .................................................... 10
Event Log .................................................... 11
Quarantine .................................................... 11
The Endpoint Agent Console Module Home Page .................................................... 12
The Endpoint Agent Console Dashboard.............................................................. 12
Quarantine...................................................................................... 13
Restored Files................................................................................ 14
Event Log...................................................................................... 14
About........................................................................................ 17
Using the Module ........................................................................... 18
Locating the Log File Location on the HX appliance................................................ 18
Generating Log Files ...................................................................... 18
Creating Log Files During Installation.......................................................... 19
Supported Languages...................................................................... 19
Agent Console REST API............................................................... 20
Get Endpoint Agent Console Configuration............................................. 20
Update Endpoint Agent Console Configuration.......................................... 21
Get Local Quarantine Actions........................................................ 22
Get Local Quarantine Actions, CSV Formatted........................................... 23
Troubleshooting................................................................. 25
How to Identify if the Module is running on all the deployed systems............................ 25
Error Messages Displayed when the Module is in the foreground................................. 25
Displaying Two FireEye icons Error........................................................ 25
Displaying Error Message when the module is launched from Start Menu............................ 25
Malware Protection Service is Restarting when the Module is Uninstalled from the Agent................ 25
1 | Module Overview
Module Overview
The Endpoint Agent Console Module is a Trellix HX Innovation Architecture (IA) module that enables the end user to access Endpoint Agent features using a local graphical user interface. This module provides insights into the quarantined items, detected malware, server scheduled scan summary events, and agent version information.
The data displayed in the Endpoint Agent Console module is collected from the endpoint agent locally and displayed. There is no server communication involved in displaying the data.
Supported Platforms
This release of Endpoint Agent Console 1.1.3 is supported on Endpoint Security 5.0.0 or later with xAgent 32 or later running on Windows 7 and above only. Mac OS and Linux platforms are not supported as of this release. The Endpoint Agent Console module requires Microsoft .NET 4.0 and above on the endpoint to function.
- Installing the Endpoint Agent Console module on Endpoint Security 4.9.x with xAgent 31 or lower is not a supported scenario.
- Features such as quarantine and restore require Malware Protection feature to be enabled on the endpoint.
- You may see two FireEye system tray icons at times. This is normal and does not cause any system performance overhead.
- Malware Protection service is restarted when Endpoint Agent Console is uninstalled. This is necessary to ensure clean uninstallation of the module.
- Endpoint Agent Console requires Microsoft .NET 4.0 and above to run and display the user interface. Without this version of .NET, installation will succeed, but the Endpoint Agent Console system tray icon won’t appear.
Refer to Endpoint Agent Console Release Notes for more details on known issues.
4 Endpoint Security Endpoint Agent Console Module User Guide Release 1.1.3
2 | Module Overview
Installing the Module
Endpoint Agent Console is an optional module available for Endpoint Security 5.0.0 with xAgent 32. The module installer package .cms file is downloaded from the FireEye Market and then installed on your Endpoint Security Web UI. Initially, the module is disabled by default and must be enabled before using it. For more information on how to enable the module, see the Enabling the Endpoint Agent Console Module section.
After the module is installed successfully, it is displayed on the Modules menu. The configuration properties for the module appear on the Endpoint Module Administration Module Configuration page.
Installing the Server Module
The module consists of a server module and an agent module.
To install the Endpoint Agent Console Module using the EndpointSecurity Web UI:
- Log in to the EndpointSecurity Web UI as an administrator.
- From the Modules menu, select Endpoint Module Administration.
- Click the Available Modules tab and locate Endpoint Agent Console in the Module list.
- In the Actions column, click the gear icon, and click Install.
- Click Install on the dialog box.
To download the module installer CMS package, go to the FireEye Market, then upload the module CMS file to your Endpoint Security Web UI.
To enable the Server Module, see Enabling the Server Module.
Installing the Agent Module
- Log in to the Endpoint Security Web UI as an administrator.
- From the Admin menu, select Policies to access the Policies page.
- On the Policies page, in the Actions column, click the gear icon for the appropriate policy assigned to the host that you want to deploy Endpoint Agent Console to, and select Edit Policy.
- On the Edit Policy page, click Categories, and select Endpoint Agent Console. Click Apply.
- Click Save.
Endpoint Security Endpoint Agent Console Module User Guide Release 1.1.3
5
2 | Module Overview
The above procedure inform the endpoints (local systems) to download the agent module and install it during configuration update. For more information about various configuration settings provided in the Endpoint Agent Console server configuration, see Configuring the Server Module.
Processes Created After Installation
After successful installation, the following processes are created:
-
An instance of xagt.exe with its command line. This is a container application to interact with agent services. This process runs under system account like any other agent instances.
-
xagtui.exe, a GUI application, runs under each logged in user account.
If an endpoint supports multiple user sessions, it is normal to see multiple instances of xagtui.exe. An instance of this application is launched for each user session.
Verifying the Installation
To verify that the Endpoint Agent Console module is installed and running:
-
Go to Modules > Endpoint Module Administration > Installed Modules and check if the Endpoint Agent Console module is displayed in the list.
-
Verify the status of the module using the Endpoint Server through API.
3 | Module Overview
Uninstalling the Module
Uninstalling the Endpoint Agent Console Module removes Endpoint Agent Console policy settings from all policies, removes the server module from the management server, and removes the agent modules from endpoints on host systems. You do not need to disable Endpoint Agent Console before you uninstall it. You can also remove the agent module from a host set without removing the module from the server.
To uninstall the Endpoint Agent Console Module using the Endpoint Security Web UI, complete the following steps:
- Log in to the EndpointSecurity Web UI as an administrator.
- From the Modules menu, select Endpoint Module Administration.
- Click the Installed Modules tab and locate Endpoint Agent Console in the Module list.
- On the Modules page, locate the Endpoint Agent Console module and click the Actions icon.
- Select Uninstall and click Uninstall in the confirmation window.
A message at the top of the page tells you that module uninstallation succeeded.
Uninstalling the Agent Module
- Log in to the Endpoint Security Web UI as an administrator.
- From the Admin menu, select Policies to access the Policies page.
- On the Policies page, in the Action column, click the gear icon for the policy that you want to remove the Endpoint Agent Console from, and select Edit Policy.
- On the Edit Policy page, click Categories.
- Clear the Endpoint Agent Console checkbox and click Apply.
- Click Save.
4 | Module Overview
Configuring the Module
The Endpoint Agent Console module consists of a server module and an agent module. The module must also be installed and enabled on agents using the agent policy. It is important to understand the following relationships between the server and agent modules:
- The agent module is installed and enabled on agents using the Endpoint Agent Console policy.
- After the server module is enabled, disabling the server module will disable the agent module in all the policies.
- Uninstalling the Endpoint Agent Console module removes Endpoint Agent Console policy settings from all policies and ensures that both the server module and the agent module are removed from endpoints (local systems).
Enabling the Module
You can enable the module from the Modules and Policies pages in the Endpoint Security Web UI.
Enabling the Server Module
- Log in to the EndpointSecurity Web UI.
- From the Modules menu, select Endpoint Module Administration.
- On the Modules page, click Installed Modules.
- Locate the Endpoint Agent Console module in the list.
- In the Actions column, click the gear icon, and select Enable.
Enabling the Agent Module
To enable Endpoint Agent Console on a host set, complete the following steps:
- Log in to the Endpoint Security Web UI as an administrator.
- From the Admin tab, select Policies.
- On the Policies page, click the appropriate policy.
- Select Endpoint Agent Console in the Configurations list.
- In the Endpoint Agent Console details panel, move the Endpoint Agent Console toggle to On, and click Save.
8
Endpoint Security Endpoint Agent Console Module User Guide Release 1.1.3
4 | Module Overview
The Endpoint Agent Console Module will be enabled the next time the configuration is updated on the agent.
Disabling the Module
Disabling the Endpoint Agent Console server module (once enabled) will disable the agent module in all the policies.
Disabling the Server Module
Log in to the Endpoint Security Web UI as an administrator.
From the Modules tab, select Endpoint Module Administration.
On the Modules page, click Installed Modules.
Locate the Endpoint Agent Console module in the list.
In the Actions column, click the gear icon, and select Disable.
Disabling the Agent Module
Log in to the Endpoint Security Web UI as an administrator.
From the Admin menu, select Policies.
On the Policies page, locate the appropriate policy for the agent on which you want to disable Endpoint Agent Console.
In the Actions column, click the gear icon and click Edit Policy.
In the Edit Policy page, in the Configurations panel, click Endpoint Agent Console.
In the details panel, move the Enable Endpoint Agent Console on the host toggle to Off.
On the Edit Policy page, click Save.
Configuring the Server Module
Log in to the Endpoint Security Web UI as an administrator.
From the Modules menu, select Endpoint Module Administration to access the Modules page.
On the Installed Modules page, locate the Endpoint Agent Console Module.
4 | Module Overview
-
In the Actions column, click the gear icon, and select Configure.
-
The Endpoint Agent Console Settings page opens.
Logging
Logging settings allow you to configure log levels for the Endpoint Agent Console server module.
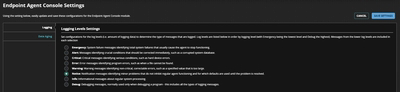
Note
To know if the module generates its own log files, see Generating Log Files
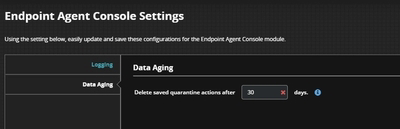
Data Aging
Data Aging settings allow you to configure the number of days that quarantine actions records are saved on the server. These records serve as audit records for the administrators to keep track of user actions.
Configuring the Agent Policy
This section describes the various configuration settings provided in the Endpoint Agent Consoleagent policy.
-
Log in to the Endpoint Security Web UI as an administrator.
-
From the Admin menu, select Policies.
-
Locate the policy you want to edit.
-
In the Actions column, click the gear icon, and click Edit Policy.
10
Endpoint Security Endpoint Agent Console Module User Guide Release 1.1.3
4 | Module Overview
-
In the Edit Policy page, in Configurations, select Endpoint Agent Console.
-
In the details panel, see the following sections for feature functionality.
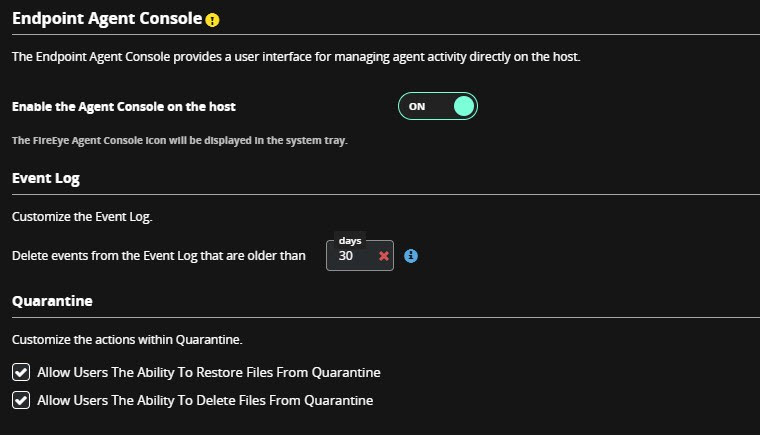
To enable Endpoint Agent Console on a given host, the toggle Enable the Agent Console on the host is set to ON. When the agent configuration is updated, a Trellix system tray icon is displayed on the endpoint. You can click or right-click the icon and select the Endpoint Agent Console to open the graphical user interface.
Event Log
Event Log settings allows you to view and manage events on the endpoint (local system). Default event retention value is displayed and is customized based on your needs (1 to 30 days). Events older than the given number of days are purged from the local data base on the agent and they will no longer be visible.
For more information on Event Log functionality, see The Endpoint Agent Console Module Home Page.
Note
An event deleted from the Endpoint Agent Console GUI does not impact the events on the HX server.
Quarantine
Quarantine policy settings are provided to allow the endpoint user/admin (local host) to restore and delete quarantined files locally. These settings are intended for advanced users of the endpoint who understand the implications of restoring possible malware. Further details on Quarantine functionality is provided in The Endpoint Agent Console Module Home Page.
Endpoint Security Endpoint Agent Console Module User Guide Release 1.1.311
5 | Module Overview
The Endpoint Agent Console Module Home Page
The Endpoint Agent Console Module home page enables the administrators to use the Endpoint Agent Console interface on the endpoint.
To access the Endpoint Agent Console interface using the system tray icon:
- Log in to the endpoint (workstation) using your credentials.
- Locate the Trellix logo icon in the system tray notification area.
- Right-click the Trellix logo icon and then select Show Main Console. This displays the Main Console of the application.
Note
If you exit from the module using the system tray exit menu, you can launch it again from the Windows Start menu shortcut. If the Endpoint Agent Console module is already running (and hidden in system tray), you can relaunch it from the Windows Start menu and bring it to foreground.

To access the Endpoint Agent Console home page:
- Log in to the Endpoint Agent Console Web UI.
- From the Modules menu, select Endpoint Agent Console.
The Endpoint Agent Console Dashboard
The Endpoint Agent Console Dashboard displays user actions on the quarantined items.
5 | Module Overview
[IMAGE PLACEHOLDER: Endpoint Agent Console Dashboard screenshot showing a dark-themed console window with a list of local quarantine actions and a top navigation bar labeled "ENDPOINT SECURITY".]
Quarantine
After you launch the Main Console from the system tray, the following screen is displayed.
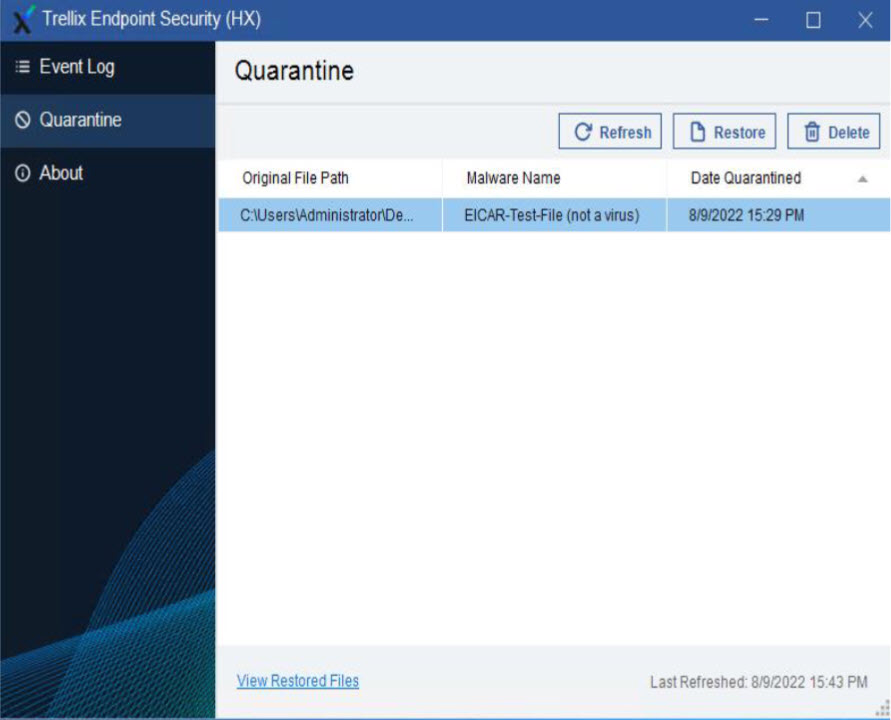
The Quarantine tab displays a list of quarantined files on the local system. The Restore and Delete buttons are displayed or hidden based on the Quarantine policy configuration options.
The Refresh action refreshes the quarantined items.
The Delete action deletes a stored quarantined file from the local system permanently. After the quarantined items are deleted, the HX Server cannot acquire these files from the agent. An event is sent to the HX server for auditing purposes when a
Endpoint Security Endpoint Agent Console Module User Guide Release 1.1.3
13
5 | Module Overview
quarantined item is deleted.
The Restore action restores a quarantined file to its original location and allows the file to be accessed by the end user. Be careful not to restore a file that is malware. After a quarantined file is restored, an event is sent to the HX server for auditing purposes. The file is restored only on endpoint (local system) and does not affect other endpoints managed by the HX server. After a quarantined file is restored, it is added to a restored files list, so that it is not detected again.
You can view restored files by clicking the View Restored Files link.
Restored Files
Restored Files displays all the files restored from a quarantine by endpoint (local system) users.
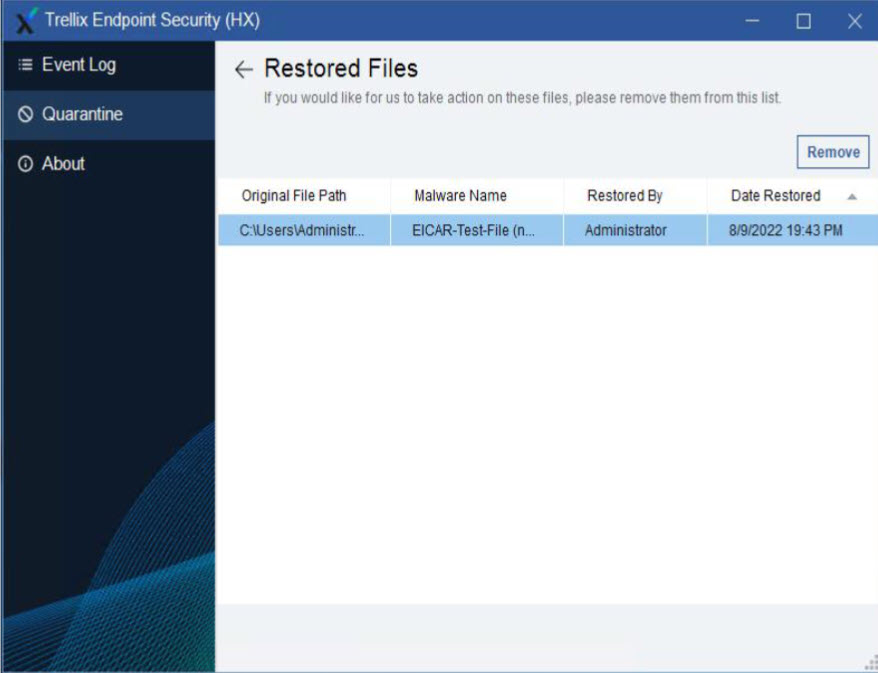
When a quarantined file is restored, the file details, such as original file path and file hashes are maintained in the restored files list for these files to be no longer detected as malware. To remove the entries from the Restored Files list, click Remove, thereby enabling the agent to again detect the files as malicious.
When a restored file is removed from the list, it does not cause the restored file to be detected immediately. It is detected when the file is accessed or modified subsequently either through real time scanning or on-demand scan.
The file is restored only on endpoint (local system) and does not affect other endpoints managed by the HX server. Files in the Restored Files list can only be deleted using the Endpoint Agent Console and cannot be overridden by the HX server. So, be careful when enabling users to restore files on the endpoint.
5 | Module Overview
Event Log
Event Log provides a list of events triggered on the endpoint (local system). The list of events are locally maintained on the endpoint and does not interfere with the events sent to the HX server.
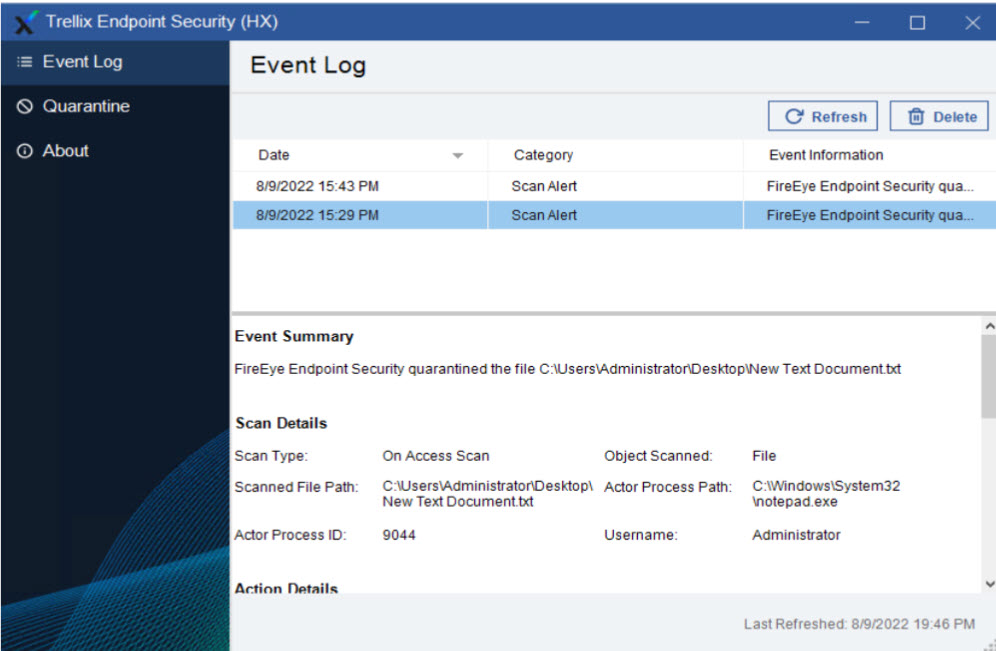
Click the Refresh button to refresh the content by new events, if any.
Click Delete to delete a single event or multiple events. Deleting the events deletes events only from the endpoint (local system) and does not impact events sent to the HX server.
The current release of the Endpoint Agent Console module supports the following categories of events.
| Category | Description |
|---|---|
| Scan Alert | Detection events from Malware Protection and Malware Guard |
| Scan Summary | Scan summary events of scheduled on demand scan. |
When an event is selected, a detailed meta data associated with the selected event is displayed at the bottom of the event log .
The meta data varies based on the category of the event as explained below.
| Scan Alert Meta Data | Description |
|---|---|
| Scan Details |
Endpoint Security Endpoint Agent Console Module User Guide Release 1.1.3 15
5 | Module Overview
Scan Type | Type of scan – On Access Scan, On Demand Scan |
Object Scanned | Typically, a file object, but additional enhancements in scanners may result in the definition of new types |
Scanned File Path | Path of scanned file |
Actor Process Path | Path of the process that caused the file to be detected |
Actor Process ID | Process identifier (PID) |
Username | Username under which the event was detected |
Action Details | |
Actioned Object Type | Typically, a file object, but additional enhancements in scanners may result in the definition of new types |
Actioned File Path | Path of file that was acted upon |
System File | Indicates if the file was treated as a system file |
File Size | File size |
File Created | File creation time |
File Modified | File modified time |
File Last Accessed | Last accessed time |
MD5/SHA1/SHA256 Hash | Different types of hashes |
Requested Action | Action requested by policy |
Applied Action | Action performed by scan engine |
Result | Result of applied action |
5 | Module Overview
|
Engine Details | |
|
Engine |
Engine responsible for detection. It can be Antivirus or Malware Guard |
|
Engine version |
Engine version |
|
Content Version |
Content version at the time of detection |
|
Malware Details | |
|
Malware Type |
Malware type as determined by engine |
|
Malware Name |
Malware name as determined by engine |
|
Scan Summary Meta Data | |
|
Scan Name |
Scan name configured in HX server |
|
Scan Type |
Type of scan. Supported types are Quick scan, Full Scan, and Memory Scan |
|
Number of Scanned Object(s) |
Total number of scanned objects |
|
Number of Infected Object(s) |
Number of infected objects detected |
|
Number of Actioned Object(s) |
Number of objects acted upon by scanner |
|
Start Time |
Scan start time |
|
End Time |
Scan end time |
|
Reboot Required |
If any infected objects require reboot of the system to clean, this value will be set to True. |
Endpoint Security Endpoint Agent Console Module User Guide Release 1.1.317
5 | Module Overview
About
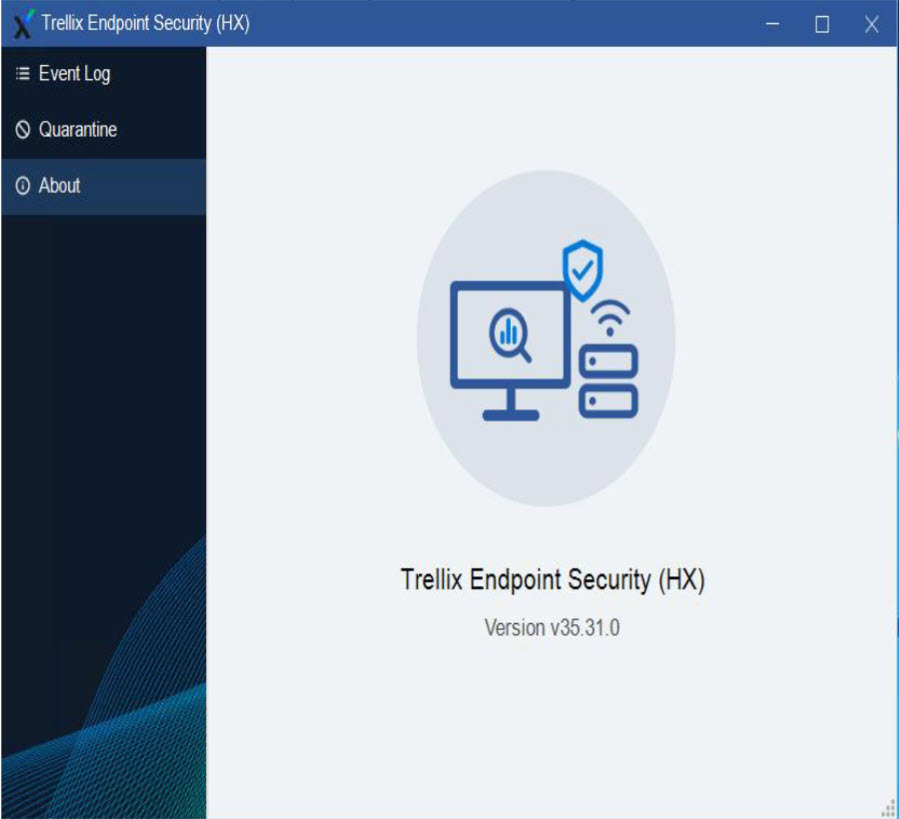
The About tab provides version details of the installed Trellix Endpoint Agent.
Using the Module
This section provides more details on log files and supported languages.
Locating the Log File Location on the HX appliance
You can find the log file for the server module?under /var/log/supervisor/agent-console-server_<version>_<unique_id>.log
Generating Log Files
To launch the Endpoint Agent Console module with logging enabled, the module must run with either -l or -log as a command line parameter and hence must be followed by log level. If no log level is passed in, the log level is set to the lowest level (error) by default. The module generates its own log file called xagtui.log and is located under %TEMP% (Usually this is C:\Users\<username>\AppData\Local\Temp)
The following are the log levels available to the Endpoint Agent Console module:
- Error: Used for program errors. If this log level is specified at the command line, only Error level messages are logged.
- Info: Used for informational messages. If this log level is specified at the command line, only Error and Info level messages are logged.
18
Endpoint Security Endpoint Agent Console Module User Guide Release 1.1.3
5 | Module Overview
-
Debug: Messages that contain information normally when debugging a program. If this log level is specified at the command line, then all messages (Error, Info, and Debug) are logged.
Creating Log Files During Installation
The Endpoint Agent Console agent module creates log files under %TEMP% (Usually this is C:\Users\
-
endpoint_ui_install.log
-
endpoint_ui_uninstall.log
-
endpoint_ui_preupgrade.log
-
endpoint_ui_upgrade.log
You can also refer to agent logs to know if there are any installer messages related to plug-in installation.
Supported Languages
6 | Module Overview
Agent Console REST API
The following API endpoints are provided by the Endpoint Agent Console module. These API endpoints center around the retrieval of events specific to the Endpoint Agent Console. To access other aspects of Endpoint Security Server artifacts such as policies, see Endpoint Security REST API Guide Release 5.0 for more details.
Endpoint | Purpose |
|---|---|
/quarantine/actions | GET the record of quarantine actions performed via the Endpoint Agent Console |
/quarantine/actions/export | GET the record of quarantine actions performed via the Endpoint Agent Console as CSV formatted data |
Get Endpoint Agent Console Configuration
The configuration API is made available using the configuration endpoint of the Endpoint Security Server REST API
Returns the current configuration for the Endpoint Agent Console module as a JSON result.
HTTP Verb | Route | Parameters |
|---|---|---|
GET | hx/api/services/config/tree | ?node_name=/config/agent-console |
Response
Key | Notes |
|---|---|
data | List of configuration properties. Each property has the following attributes:
|
6 | Module Overview
| Key | Notes |
|---|---|
|
configuration property
|
The following is a list of configuration properties for the Endpoint Agent Console Module.
| Property | Path | Type {Values} |
|---|---|---|
| Aging Interval | /config/agent-console/aging/database/monitor_interval | Int32 (number of seconds) Default = 1 hour |
| Aging Period | /config/agent-console/aging/database/period | Int32 (number of seconds) Default = 30 days |
| Logging Level | /config/agent-console/logging/level | String {'debug' | 'info' | 'warning' | 'notice' | 'error' | 'critical' | 'alert' | 'emergency'} |
Update Endpoint Agent Console Configuration
Updates a configuration property for the Endpoint Agent Console Module.
| HTTP Verb | Route | Parameters |
|---|---|---|
| PUT | hx/api/services/config/tree | ?node_name={config path} |
Query Headers
| Content-Type | Application/json |
|---|
Endpoint Security Endpoint Agent Console Module User Guide Release 1.1.3 21
6 | Module Overview
Query Body
List of configuration properties to be set, formatted as JSON. For example, the following request body will specify that the logging level be updated to a value of Error.
{"data":[{"default_value":"notice","name":"/config/agent-console/logging/level","type":"string","value":"error"}]}Get Local Quarantine Actions
Returns record of quarantine actions from the Endpoint Agent Console database as a JSON result.
| HTTP Verb | Route |
|---|---|
| GET | /hx/api/plugins/agent-console/v1/quarantine/actions |
Query Parameters
| Parameter | Notes |
|---|---|
| limit=<unsigned 32> | Limits the number of records returned. The default is 50. |
| offset=<unsigned 32> | Used for pagination. Returns the records starting at this offset. The default is 0. |
| sort=<text> |
Sorts the results by the specified field and direction. Default is id:ascending. Valid Fields: object, threat, hostname, user, time Valid Directions: ascending, descending |
| filters=<filter list> |
Specifies how to filter the records. The default is no filter. A filter is declared with the following keys and values: { "operator":"eq", "field":"object_type", "arg":"file" } Where field may be any field belonging to a record, and arg is the value(s) to filter against. |
6 | Module Overview
|
A complex filter can contain more than one filter as follows: Filter=[{filter spec 1}, {filter spec 2}, ...] Where the implied operation between filter specs is AND |
Response
|
Key |
Notes |
|---|---|
|
total |
Number of data rows available |
|
data |
List of rows, each as a key-value pair |
|
offset |
The offset requested |
|
limit |
The limit requested |
|
filter |
The filter requested |
|
sort |
The sort requested |
Get Local Quarantine Actions, CSV Formatted
Returns record of quarantine actions from the Endpoint Agent Console database as a JSON result.
|
HTTP Verb |
Route |
|---|---|
|
GET |
/hx/api/plugins/agent-console/v1/quarantine/actions/export |
|
Parameter |
Notes |
|---|---|
|
limit=<unsigned> |
Limits the number of records returned. The default |
Endpoint Security Endpoint Agent Console Module User Guide Release 1.1.3
23
6 | Module Overview
| Parameter | Notes |
|---|---|
| is 50. | |
| Used for pagination. Returns the records starting at this offset. The default is 0. | |
| sort=<text> |
Sorts the results by the specified field and direction. Default is id:ascending. Valid Fields: object, threat, hostname, user, timeValid Directions: ascending, descending
|
| filters=<filter list> | Specifies how to filter the records. The default is no filter. See section above for remaining details. |
| columns=<text> | A comma-separated list of record fields to include in the export. Default is all fields. |
Response
The information that is returned is CSV formatted data. Each row of the CSV data is terminated by a newline. The first row is the column header row. Note that the column headers are representative of the text that is shown in the data grid. For example, field agent_id is returned as Agent ID because that is how it is represented in the Grid Area of the Web Interface.
24 Endpoint Security Endpoint Agent Console Module User Guide Release 1.1.3
7 | Module Overview
Troubleshooting
This section provides helpful solutions/steps for problems occurred in the module.
How to Identify if the Module is running on all the deployed systems
Since there is a dependency on .NET 4.0 on Windows platform, there a way to know if the module is running on all the deployed systems.
The Endpoint Agent Console plug-in reports the availability of .NET dependency in the agentinfo report. This can be verified using HX API for the given host.
Error Messages Displayed when the Module is in the foreground
Error messages are displayed when a dependent service, such as Malware Protection or Remediation Service is temporarily unavailable (content updates, and so on). During this time the Endpoint Agent Console module cannot fetch data and therefore displays error messages.
Retry the operation after some time (few seconds) to work as expected.
Displaying Two FireEye icons Error
You will see two icons:
- When there is a detection notification message.
- When a scheduled scan is in progress and the administrator has enabled Pause/Cancel options.
This is normal and does not lead to any functional issues.
Displaying Error Message when the module is launched from Start Menu
Administrators can disable the Endpoint Agent Console module on host/hostsets. When disabled, Endpoint Agent Console does not automatically launch during user logon sessions. When you attempt to launch it using the Windows Start menu shortcut, it displays an error message.
Endpoint Security Endpoint Agent Console Module User Guide Release 1.1.3
7 | Module Overview
Malware Protection Service is Restarting when the Module is Uninstalled from the Agent
The Malware Protection component uses Endpoint Agent Console components when it is available for sharing detection events and scan summary details. To properly unload and delete all the Endpoint Agent Console components, Malware Protection service gets restarted.
COPYRIGHT
Copyright © 2026 Musarubra US LLC.
Trellix and FireEye are the trademarks or registered trademarks of Musarubra US LLC, FireEye Security Holdings US LLC, and their affiliates in the US and /or other countries. Other names and brands are the property of these companies or may be claimed as the property of others.