After you create a configuration source, you must deploy the EDR Telemetry Store cluster.
You can deploy the EDR Telemetry Store cluster using one of the following methods:
Deployment quick guide
In multi-node cluster environments with multiple cluster manager nodes, perform all setup or modification tasks on the single cluster manager node where you set up the cluster. The artifact generated on this node must be replicated across all other nodes to ensure the cluster is synchronized.
Note
Update the default
configuser password on the cluster manager node where you perform the setup. Use this updated password when prompted for credentials on other nodes.
Deployment scenario | Action |
|---|---|
The cluster manager node where you perform the setup or modification |
|
For remaining nodes (other cluster manager, data, or ingest nodes) |
|
Deployment workflow
Log on to the EDR Telemetry Store appliance using SSH.
ssh admin@<IP_address>
After you create the configuration file, you need to deploy the EDR Telemetry Store cluster.
opensearch cluster deploy
To proceed with the deployment, type
yand press Enter.From the Available Configuration Sources, type the corresponding number (1–6) and press Enter.
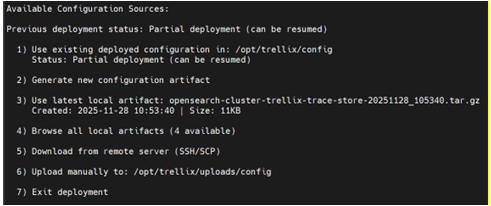
Once the deployment is done, verify the status.
Option 1: Use existing deployed configuration
Use this method to redeploy the EDR Telemetry Store cluster using the metadata and configuration details (such as index templates and ISM policies) already present on the system.
This method is recommended if the EDR Telemetry Store unexpectedly stops or crashes, or if you need to resume a partial deployment without creating a new artifact file.
Perform steps 1-4.
Type
1and press Enter.This pulls the configuration currently located in
/opt/trellix/config.To confirm and begin the deployment, type
yand press Enter.
Option 2: Generate new configuration artifact
Use this option if a configuration artifact does not exist or if you need to create a new one from scratch.
Perform steps 1-4.
Type
2and press Enter.The system exits the deployment menu and displays the command to start the setup wizard.
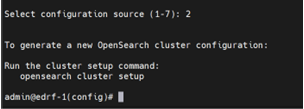
Run the setup wizard to create a new artifact:
opensearch cluster setup
For more information, see Configure the EDR Telemetry Store cluster.
Note
Once the configuration is complete, run the
opensearch cluster deploycommand again and type3to use the artifact you just created.
Option 3: Use latest local artifact
Use this option to deploy the cluster using the most recently created configuration artifact stored on the appliance. This is the standard method to use immediately after you run the setup wizard.
Perform steps 1-4.
Type
3and press Enter.The system displays the filename, creation date, and size of the artifact being used.
For example,
opensearch-cluster-trellix-trace-store-YYYYMMDD_HHMMSS.tar.gzTo confirm and begin the deployment, type
yand press Enter.
Option 4: Browse all local artifacts
Use this option to view a list of all configuration artifacts currently stored in the /opt/trellix/uploads/config directory. This allows you to select a specific configuration file.
Perform steps 1-4.
Type
4and press Enter.The system displays a list of available artifacts.
At the Enter selection prompt, type the artifact number or the artifact filename, and press Enter.
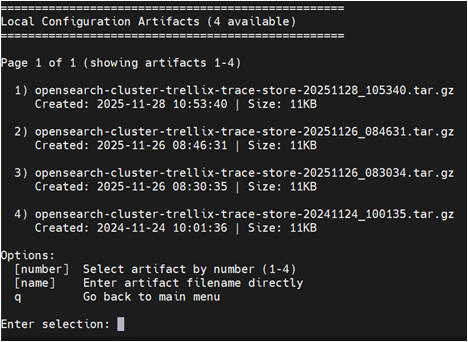
To confirm and begin the deployment, type
yand press Enter.
Option 5: Download from remote server (SSH/SCP)
Use this method to download a configuration artifact from another machine (such as the primary node in a multi-node deployment) and deploy it on the current appliance.
Prerequisite:
Before you download artifacts from a remote server, you must change the default password for the config user on the machine where the artifact was created.
Log on to the EDR Telemetry Store using SSH.
ssh config@<IP_address>
Enter the default password (
config) and follow the prompts to set a new password.
Perform steps 1-4.
Type
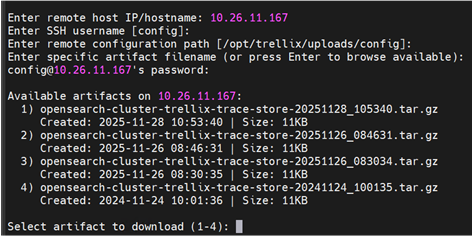
5and press Enter.Enter the IP address of the remote machine where the artifact is located.
Enter the SSH username.
Default name:
configEnter the remote configuration path.
Default path:
/opt/trellix/uploads/configEnter a specific artifact filename, or press Enter to browse available artifacts.
Enter the password for the
configuser.The system displays a list of artifacts available on the remote server.
At the Select artifact to download prompt, type the number corresponding to the artifact and press Enter.
The deployment process automatically begins.
Option 6: Upload manually
Use this option to view the directory structure and permission requirements to create and manually upload a custom artifact.
Perform steps 1-4.
Type
6and press Enter.The system displays the required folder structure, file location, and permission requirements for a valid artifact.
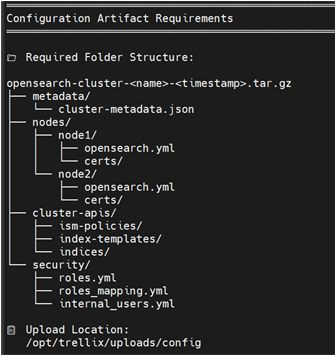
Ensure your
tar.gzfile matches the folder structure containingmetadata/,nodes/,cluster-apis/,security/directories.Ensure that all files within the subdirectories are owned by the
configuser, and that the.tar.gzarchive is owned by theconfiguser and thesshusersgroup.Use a secure transfer tool (like SCP or WinSCP) to upload your artifact to the
/opt/trellix/uploads/configdirectory on the appliance.Once the correct file is uploaded, run the
opensearch cluster deploycommand as theadminuser.Type
4to deploy using Browse all local artifacts, then select your manually uploaded file from the list to begin deployment.
Verify the deployment
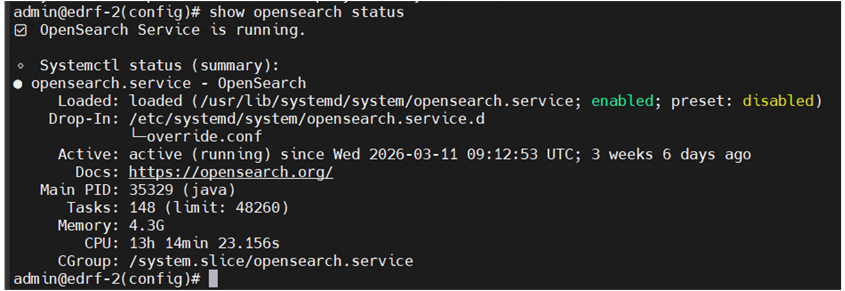
The deployment process can take a few minutes. A success message appears after the deployment is completed.
To verify the status of the cluster, run the following command:
show opensearch status
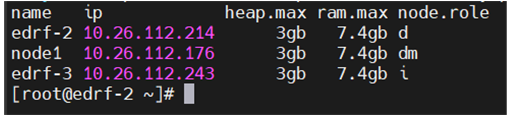
To verify the JVM heap size and node roles, run the following commands:
enable [sudo] password for admin: shell curl -k -X GET "https://localhost:9200/_cat/nodes?v&h=name,ip,heap.max,ram.max,node.role" --cert /etc/opensearch/certs/opensearch-admin.pem --key /etc/opensearch/certs/opensearch-admin-key.pem